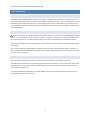
1
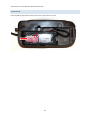
CameraSecura Transmitter User Manual Release 493
CONTENTS
Warning .................................................................................................................................................................. 5
Basic Operation ...................................................................................................................................................... 6
Powering On the Transmitter ............................................................................................................................. 6
Powering Off the Transmitter ............................................................................................................................. 6
Connecting the Camera ...................................................................................................................................... 6
The Main Screen ..................................................................................................................................................... 7
Battery Gauge ................................................................................................................................................. 7
Internal Temperature ..................................................................................................................................... 7
CPU Usage....................................................................................................................................................... 7
CPU Speed ...................................................................................................................................................... 7
The Options Screen ................................................................................................................................................. 8
Status Line ...................................................................................................................................................... 8
Wi-Fi........................................................................................................................................................................ 9
Configuring Wi-Fi ................................................................................................................................................ 9
Wi-Fi Mode ..................................................................................................................................................... 9
Select Network ............................................................................................................................................... 9
SSID ................................................................................................................................................................. 9
Encryption....................................................................................................................................................... 9
Password......................................................................................................................................................... 9
DHCP ............................................................................................................................................................... 9
Advanced Wi-Fi Settings ..................................................................................................................................... 9
IP Address ....................................................................................................................................................... 9
NetMask ......................................................................................................................................................... 9
Gateway ........................................................................................................................................................ 10
DNS ............................................................................................................................................................... 10
Wi-Fi Troubleshooting ...................................................................................................................................... 10
Maximizing Wi-Fi Speed ................................................................................................................................... 10
1
CameraSecura Transmitter User Manual Release 493
Recommended Wi-Fi Routers ........................................................................................................................... 10
3G/4G Settings ...................................................................................................................................................... 10
Transmit Settings .................................................................................................................................................. 11
Transmit Which Files.. ...................................................................................................................................... 11
Transmission Protocol ...................................................................................................................................... 11
None ................................................................................................................................................................. 11
Email ................................................................................................................................................................. 11
To .................................................................................................................................................................. 11
From.............................................................................................................................................................. 11
Reply-to ........................................................................................................................................................ 11
Subject .......................................................................................................................................................... 11
Server ............................................................................................................................................................ 12
Password....................................................................................................................................................... 12
FTP .................................................................................................................................................................... 12
FTP Server ..................................................................................................................................................... 12
FTP Port Number .......................................................................................................................................... 12
UserName ..................................................................................................................................................... 12
Password....................................................................................................................................................... 12
FTPS .................................................................................................................................................................. 12
IRES ................................................................................................................................................................... 12
SCP .................................................................................................................................................................... 12
Secure FTP ........................................................................................................................................................ 12
SmugMug .......................................................................................................................................................... 13
UserName ..................................................................................................................................................... 13
Password....................................................................................................................................................... 13
Select Album ................................................................................................................................................. 13
Image Settings .................................................................................................................................................. 14
Process Images ............................................................................................................................................. 14
Resize Images................................................................................................................................................ 14
2
CameraSecura Transmitter User Manual Release 493
Image Width ................................................................................................................................................. 14
Quality (40-100) ............................................................................................................................................ 14
Remote Editing ..................................................................................................................................................... 15
Remote Editing Options .................................................................................................................................... 15
Server ............................................................................................................................................................ 15
Encryption..................................................................................................................................................... 15
UserName ..................................................................................................................................................... 15
Email ............................................................................................................................................................. 15
Password....................................................................................................................................................... 15
Preview Width .............................................................................................................................................. 15
Image Settings .............................................................................................................................................. 16
Resize Images................................................................................................................................................ 16
Image Width ................................................................................................................................................. 16
Quality (40-100) ............................................................................................................................................ 16
More Options........................................................................................................................................................ 17
Web User Name............................................................................................................................................ 17
Web Password .............................................................................................................................................. 17
Screen Timeout ............................................................................................................................................. 17
Power off USB ports when idle ..................................................................................................................... 17
Display Notifications ..................................................................................................................................... 17
Enable Power LED ......................................................................................................................................... 17
Calibrate Screen ............................................................................................................................................ 17
Diagnostics ............................................................................................................................................................ 18
Ifconfig .............................................................................................................................................................. 18
Iwconfig ............................................................................................................................................................ 18
Lsusb ................................................................................................................................................................. 18
Df ...................................................................................................................................................................... 18
Log .................................................................................................................................................................... 18
Dmesg ............................................................................................................................................................... 18
3
CameraSecura Transmitter User Manual Release 493
IRES SpeedTest ................................................................................................................................................. 18
Recovery Mode ................................................................................................................................................. 18
Installing the SIM Card for 3G/4G Support ........................................................................................................... 19
3G SIM .............................................................................................................................................................. 19
MicroSD Card Installation ................................................................................................................................. 19
Verizon 4G ........................................................................................................................................................ 20
Configuring the 3G/4G Card ................................................................................................................................. 21
Enable WWAN1 ............................................................................................................................................ 21
WWAN1 Configuration ................................................................................................................................. 21
Modem ......................................................................................................................................................... 22
Init5 ............................................................................................................................................................... 22
Phone ............................................................................................................................................................ 22
Stupid Mode ................................................................................................................................................. 22
Connecting to the Transmitter from your phone or laptop ................................................................................. 23
Ethernet Support .................................................................................................................................................. 24
Nikon D3/D3s/D3X/D4/D300/D700 Setup ........................................................................................................... 25
On your PC ........................................................................................................................................................ 25
On the camera .................................................................................................................................................. 25
DC Power Jack ....................................................................................................................................................... 26
Specifications .................................................................................................................................................... 26
Recovery Mode ..................................................................................................................................................... 27
Select a Version to Install ............................................................................................................................. 27
Options ......................................................................................................................................................... 27
Configuring a Bluetooth Barcode Scanner ............................................................................................................ 28
Pairing the Scanner ........................................................................................................................................... 28
4
CameraSecura Transmitter User Manual Release 493
WARNING
This product uses 18650 Li-Ion batteries, which like any Li-Ion battery, must be treated with respect.
Use only high quality 18650 batteries that have protection circuitry.
Avoid very cheap batteries as they are typically counterfeit.
Do not drop or mistreat the batteries as this can break the protection circuit.
Any batteries that show signs of damage or corrosion must be promptly disposed of according to local
recycling guidelines.
Never mix batteries that have different capacities, have different amounts of charge, or mix old
batteries with new ones.
5
CameraSecura Transmitter User Manual Release 493
BASIC OPERATION
POWERING ON THE TRANSMITTER
Insert two protected 18650 batteries into the Transmitter. The button top of the battery needs to touch the +
sign on the battery door interior, and flat end of the bottom needs to touch the – sign. The LED will turn red if
the batteries are charged. Use your nail or a pen to apply pressure to the on/off switch for 1 second to turn on
the Transmitter. The LED will start blinking green. After 30 seconds the LED will turn solid green and the initial
screen will appear.
POWERING OFF THE TRANSMITTER
NB: The Transmitter must be powered down before the batteries are removed to avoid damaging the OLED
screen, or corrupting the file system. If the Transmitter is on (green or blue LED), hold down the on/off switch
for 1 second to turn it off. The LED will blink orange, once it turns red the batteries can be safely removed.
Tip: Remove the batteries if the Transmitter will not be used for more than a day to prevent the batteries from
discharging.
Tip: The Transmitter has a super capacitor that take several seconds to discharge when power is removed. If
the Transmitter does not appear to work properly after quickly changing batteries, leave the battery door open
for 10 seconds and try again.
CONNECTING THE CAMERA
The Transmitter screws into the camera’s tripod mount via the thumb screw included in the box.
The USB cable on the left of the Transmitter plugs into the camera’s USB port. There is some extra cable inside
the transmitter, so if you need a bit more length, loosen the 3 screws on the top of the transmitter closest to
the usb cable, and gently pull.
Tip: A regular USB cable plugged into one of the USB ports of the grip can also be used if you wish to mount
the transmitter away from the camera.
6
CameraSecura Transmitter User Manual Release 493
THE MAIN SCREEN
The main screen provides an overview of what the Transmitter is doing.
The top line shows if the camera is connected, and what files are being downloaded.
The second line displays transmission status, such as what file is being sent, and at what speed.
The third and fourth lines change depending on what features are enabled. If Remote Editing is enabled, you`ll
see a line showing the connection status, otherwise you`ll see the Wi-Fi status.
The right hand side of the screen has several icons and numbers, which in order are:
BATTERY GAUGE
How much battery life is left.
INTERNAL TEMPERATURE
How toasty the circuit board is. Ideally this should be below 75C. At 80C, the CPU will be limited to 600Mhz,
and at 85C the CPU will be limited to 300Mhz in an attempt to reduce the temperature. Temperatures above
85C will cause components such as memory cards to fail. The Transmitter will turn itself off if the temperature
goes above 90C.
CPU USAGE
This shows how busy the CPU is from 0-100%.
CPU SPEED
This shows the CPU speed, which can range from 300-800Mhz.
7
CameraSecura Transmitter User Manual Release 493
THE OPTIONS SCREEN
To reach the options screen, tap on the right hand side of the main screen, where the battery gauge is.
STATUS LINE
This line shows the release number of the software installed, and which version of Linux is running. You`ll
need this when contacting support.
8
CameraSecura Transmitter User Manual Release 493
WI-FI
From the Options Screen, tapping the Wi-Fi button takes you to the Wi-Fi Status.
The first line shows the SSID (name) of the hotspot you are connected to, the signal strength, and connection
speed.
The second line shows your current IP address.
Tap Configure to change the Wi-Fi settings.
CONFIGURING WI-FI
WI-FI MODE
Create Access Point – Create a Wi-Fi network that other devices can connect to.
Connect to Access Point – Connect to an existing Wi-Fi network such as a Wi-Fi router or phone.
SELECT NETWORK
This page lists all the networks the Wi-Fi card can see. Some networks do not broadcast their name, select
Manual Setup to connect to hidden networks. Manual Setup can also be used to enter settings of a network
that is not in range.
SSID
If Manual Setup was selected, you can enter the name of the network here. Note that SSIDs are case sensitive!
ENCRYPTION
If Manual Setup was selected, you can select if the network uses no encryption, WEP, or WPA1/WPA2.
PASSWORD
This is the password required to connect to the network.
DHCP
Normally Enable DHCP should be turned on so that the Wi-Fi network assigns you an IP address automatically.
ADVANCED WI-FI SETTINGS
IP ADDRESS
If Enable DHCP was not turned on, the next screen lets you enter an IP address, for example 192.168.1.100
NETMASK
9
CameraSecura Transmitter User Manual Release 493
This screen lets you enter the netmask, usually 255.255.255.0
GATEWAY
This screen lets you enter the gateway. If your IP address is for example 192.168.1.100, usually your gateway
is 192.168.1.1
DNS
This screen lets you enter the DNS server. If you aren’t sure, try 8.8.8.8 to use Google’s free DNS server.
WI-FI TROUBLESHOOTING
If it does not connect to the Wi-Fi network within a minute after changing settings, try turning the transmitter
off and on again.
MAXIMIZING WI-FI SPEED
The Wi-Fi status screen displays the current speed you are connected at. 54Mbps is the maximum for 802.11g
networks. 72Mbps is typical for 802.11n networks. To reach 150Mbps, your Wi-Fi router must be configured
for 40Mhz mode, check your router’s instruction manual for how to do this. However, this only provides a
benefit if there are not many other Wi-Fi networks in the area, otherwise it causes more interference and ends
up making things slower. Also, 40Mhz mode works best for short range connections. If you move further than
100ft from the router, then you will find that 20Mhz mode is faster.
RECOMMENDED WI-FI ROUTERS
http://www.smallnetbuilder.com/ has the best router tests we have found. We use the Asus RT-N66U based
on their recommendation, and it works extremely well with the Transmitter.
3G/4G SETTINGS
This option enables or disables the 3G/4G card if present. For configuring 3G settings, see Configuring the
3G/4G Card.
10
CameraSecura Transmitter User Manual Release 493
TRANSMIT SETTINGS
The transmit settings tell the Transmitter which files to transmit, how to transmit them, and what if anything it
should do the images being transmitted, such as resizing them.
TRANSMIT WHICH FILES..
All Files – Everything you shoot will be transmitted without you needing to do anything.
Only Protected Files – This options lets you tell the transmitter which files to shoot. With this option enabled,
simply protect an image on your camera to transmit it.
JPEG Files Only – This option tells the transmitter to ignore RAW and video files.
TRANSMISSION PROTOCOL
This screen lets you choose how the files will be sent. The list of options can be scrolled with your finger or a
stylus.
NONE
No files will be transmitted. Useful when using Remote Editing.
EMAIL
Sends files via email. If Remote Editing is connected, the files will be sent to the Remote Editing server at high
speed, and then the server will send the email. If you are using a 3G or 4G connection this provides a big
speed boost.
TO
The Email address of who you want the files sent to.
FROM
Your email address.
REPLY-TO
Usually left blank, but can be used so that emails come from one address, but replies to the emails go to a
different address.
SUBJECT
The subject line for the email messages.
11
CameraSecura Transmitter User Manual Release 493
SERVER
The SMTP server to use. If using gmail, this would be smtp.gmail.com
PASSWORD
The password to your email account.
FTP
Sends files via File Transfer Protocol. FTP is very common, but not secure, passwords and files are sent
unencrypted.
FTP SERVER
The server to send the files to. This can be an ip address, such as 192.168.1.10, or a domain such as
ftp.ftpserver.com
FTP PORT NUMBER
There is no specific page for this setting, but if your server runs on a non-standard port (ShutterSnitch for
example), add a colon and the port number to the end of the FTP server, for example: ftp.ftpserver.com:8021
USERNAME
The username for the FTP server.
PASSWORD
The password for the FTP server.
FTPS
FTPS is similar to FTP but uses secure connections to eliminate the security problems of FTP. It supports AES
encryption. For a description of the settings, see the FTP settings above.
IRES
This sends the file to the Remote Editing server if connected. Normally when using remote editing you would
not use this option, as the remote editor chooses which files to download, but if you don’t have an editor,
sending the files via IRES basically turns remote editing into a very fast, optionally very secure, FTP server.
SCP
Sends files via the Secure Copy Protocol. This uses ssh, so passwords and files can be encrypted using AES. For
a description of the settings, see the FTP settings above.
SECURE FTP
12
CameraSecura Transmitter User Manual Release 493
Sends files via the secure version of FTP. Passwords and files are encrypted, and AES is supported. For a
description of the settings, see the FTP settings above.
SMUGMUG
This sends files to a SmugMug gallery. Where Remote Editing is ideal for showing your photos to a photo
editor as you shoot, SmugMug is ideal for showing your photos to commercial clients as you shoot, or for
event photography, as photos can be viewed and purchased right away.
USERNAME
This is your SmugMug username, usually your email address.
PASSWORD
Your SmugMug password.
SELECT ALBUM
Choose the album to upload photos to. If you enter your username or password incorrectly, or there is no
internet connection available, you will see an error message on this page instead.
13
CameraSecura Transmitter User Manual Release 493
IMAGE SETTINGS
PROCESS IMAGES
This has to be turned on for the transmitter to do anything to the images, otherwise they will be sent as-is.
RESIZE IMAGES
If this option is turned on, the images will be resized to the size entered on the next screen.
IMAGE WIDTH
This selects the width used for resizing images. For example, if your camera takes photos that are 4000x3000,
and you enter 2000 as the image width, landscape photos will be resized to 2000x1500, and portrait photos
will be resized to 1500x2000.
QUALITY (40-100)
This selects the JPEG quality level the files will be saved as. 100 is the highest quality, 40 is the lowest. Usually
you wouldn’t set it to 100, as 90 will give much smaller files and barely any visible loss of quality. A level of 75
is a good compromise, giving you small files, with not many compression artifacts. 60 will give you even
smaller files, but some scenes will show blocking. Going lower than 60 is not really recommended, try reducing
the image width if you need smaller files.
14
CameraSecura Transmitter User Manual Release 493
REMOTE EDITING
Remote Editing allows a photo editor to view your photos in real time, as you shoot. It is an optional upgrade,
please contact us for details.
Tip: The power LED can be used to tell at a glance if Remote Editing is connected, as it turns blue.
REMOTE EDITING OPTIONS
Enable Remote Editing – Turn Remote Editing on or off.
Share Tagged Files Only – Share only files that are protected on the camera. This lets you choose the photos
the editor sees rather than showing everything.
SERVER
The Remote Editing server to connect to. Our server is usa1.remoteedit.net, you can also run the server
software on your own server for an additional fee.
ENCRYPTION
None – Select this option if using our server, usa1.remoteedit.net
128bit AES – Select this option if you are running your own server, and have configured it for 128bit AES
256bit AES – Select this option if you are running your own server, and have configured it for 128bit AES
USERNAME
Your user name. This is the name that must be entered to view the photos on the server. You can choose
your own user name.
EMAIL
Your email address. This is the email address that is licensed to use Remote Editing. Note that each device
connecting to the server must have a unique email address, so if you use the Windows version of Remote
Editing, you have to enter a different email address or you will not be allowed to connect.
PASSWORD
This is the group password that the editor will need to enter in order to view the photos. This is something
you make up, and can change any time. If multiple transmitters are set to use the same group password, they
will show up as a group, and the editor will be able to view the photos from all the photographers on the same
screen.
PREVIEW WIDTH
This lets you choose how big you want to preview size images to be. 640 is about the minimum for it to be
useful, 1024 is good for 3G, 1600 is good for 4G.
15
CameraSecura Transmitter User Manual Release 493
IMAGE SETTINGS
Remote Editing allows the editor to either download processed images, which are smaller than the original
image, but have a caption, or the original unprocessed image.
Process Images – Turning this option on configures the transmitter to resize, recompress, and add a caption to
the full size images.
RESIZE IMAGES
If this option is turned on, the images will be resized to the size entered in the next screen.
IMAGE WIDTH
This selects the width used for resizing images. For example, if your camera takes photos that are 4000x3000,
and you enter 2000 as the image width, landscape photos will be resized to 2000x1500, and portrait photos
will be resized to 1500x2000.
QUALITY (40-100)
This selects the JPEG quality level the files will be saved as. 100 is the highest quality, 40 is the lowest. Usually
you wouldn’t set it to 100, as 90 will give much smaller files and barely any visible loss of quality. A level of 75
is a good compromise, giving you small files, with not many compression artifacts. 60 will give you even
smaller files, but some scenes will show blocking. Going lower than 60 is not really recommended, try reducing
the image width if you need smaller files.
16
CameraSecura Transmitter User Manual Release 493
MORE OPTIONS
WEB USER NAME
The Transmitter has a web server that can be used to browse photos and change settings. To secure this page,
enter a user name, and a password on the next page.
WEB PASSWORD
The password for accessing the built-in web server.
SCREEN TIMEOUT
Set how many seconds the screen will wait before turning off.
POWER OFF USB PORTS WHEN IDLE
This is currently experimental, do not change.
DISPLAY NOTIFICATIONS
This is currently experimental, do not change.
ENABLE POWER LED
This option lets you turns off the power LED for use in the dark.
CALIBRATE SCREEN
If when using the on-screen keyboard, it seems the wrong key is always being pressed, the screen may need
calibrating. Tap on the calibrate screen button, then tap on the 4 corners of the screen as directed. NB: You
MUST use a stylus to calibrate the screen, using your fingers may result in the screen becoming unusable.
17
CameraSecura Transmitter User Manual Release 493
DIAGNOSTICS
The diagnostics page displays technical information about the Transmitter, which we use during development.
Usually you won’t need to use this page.
IFCONFIG
Lists detailed information on all the network adapters.
IWCONFIG
Lists detailed information on all the wireless network adapters.
LSUSB
Lists all the USB devices connected.
DF
Lists the free space on all devices.
LOG
Shows the last few lines of the debug log.
DMESG
Shows the last few lines of the kernel debug log.
IRES SPEEDTEST
This sends a large amount of data to the Remote Editing server to see how fast your connection is. The next
page specifies the amount of data in megabytes.
RECOVERY MODE
Reboot into Recovery Mode for performing updates or reverting the transmitter to a clean state. We prefer
that you touch the screen then turn the transmitter on to enter Recovery Mode though.
18
CameraSecura Transmitter User Manual Release 493
INSTALLING THE SIM CARD FOR 3G/4G SUPPORT
To access the 3G/4G card, remove the 7 screws from the bottom of the transmitter. Pry the lid up slowly and
carefully to avoid cracking it. Pry up from the left as show, then pry up the middle. Gently work it back and
forth if it gets stuck on the latch.
3G SIM
Insert the SIM as shown below, taking care to line up the notch as circled.
MICROSD CARD INSTALLATION
The 3G card has a MicroSD slot, to access it, gently pull the 3G card up. The MicroSD card goes upside down,
as shown below:
19
CameraSecura Transmitter User Manual Release 493
VERIZON 4G
Insert the SIM as shown below, taking care to line up the notch as circled.
20
CameraSecura Transmitter User Manual Release 493
CONFIGURING THE 3G/4G CARD
If you are lucky your transmitter will be pre-configured for the network you wish to use, but if you are the first
to use a particular network, put some relaxing music on. The settings for 3G cards are quite lengthy, so in
order to allow for them to be cut and pasted, you must change them via your web browser. See “Connecting
to the Transmitter from your phone or laptop” for how to do this. Once connected via your browser, press the
Settings button, then Configure 3G/4G.
ENABLE WWAN1
This tells the transmitter to connect using the 3G/4G card.
WWAN1 CONFIGURATION
For the Verizon 4G card, this should be left blank as it uses special commands to connect.
For 3G, the settings look like this:
[Dialer Defaults]
Modem = /dev/ttyUSB4
ISDN = off
Modem Type = Analog Modem
Baud = 921600
Init = ATZ
Init2 = AT+CFUN=1
Init3 = AT
Init4 = AT+CGREG=1
Init5 = ATZ+CGDCONT=1,"IP","3internet"
Init6 =
Init7 =
Init8 =
Init9 =
Phone = *99***1#
Phone1 =
Phone2 =
Phone3 =
Phone4 =
Dial Prefix =
Dial Attempts = 1
Dial Command = ATDT
#Ask Password = on
Password =;
Username =;
Abort on Busy = off
Carrier Check = no
Check Def Route = on
Abort on No Dialtone = no
Stupid Mode = on
Idle Seconds = 0
Auto DNS = on
21
CameraSecura Transmitter User Manual Release 493
Luckily there are usually only one or two settings that need changing.
MODEM
This tells the script which port to connect to, and varies depending on the model of 3G card installed. The
Option 431 is the standard modem we use, but if you aren’t sure, ask us, or go the Diagnostics page, and tap
lsusb
For the Option Icon 431 (0af0:7501) it should be /dev/ttyUSB9
For the Option Icon 452 (0af0:7901) it should be /dev/ttyUSB4
INIT5
This line tells the card what apn to connect to. In this case the apn is “3internet”, for the 3 network in the UK.
PHONE
This is the phone number to dial, usually *99***1#
STUPID MODE
Don’t ask.
22
CameraSecura Transmitter User Manual Release 493
CONNECTING TO THE TRANSMITTER FROM YOUR PHONE OR LAPTOP
Configure the transmitter to connect to a WiFi network. Run Safari or Chrome on your computer or phone, and
enter the transmitter’s IP address. This is displayed on the WiFi status page. If you are asked for a username
and password, see the More Options section. You should see “Connecting…“ displayed, and then the main
page.
23
CameraSecura Transmitter User Manual Release 493
ETHERNET SUPPORT
The Transmitter supports Gigabit Ethernet via the “Plugable USB 2.0 to 10/100/1000 Gigabit USB Dongle”
which can be plugged into one of the USB ports.
Available from Amazon:
http://www.amazon.com/Plugable-Gigabit-Ethernet-Chromebook-Specific/dp/B003VSTDFG/
NB: 4G must be turned off for Ethernet to work.
24
CameraSecura Transmitter User Manual Release 493
NIKON D3/D3S/D3X/D4/D300/D700 SETUP
Nikon cameras require a small amount of setup before they can be used with the Transmitter. However, you
will be rewarded with a screen that stays on while connected, so you can review images, and select images to
transmit using the protect button.
ON YOUR PC
1.
Install the WT-4 Setup Utility from:
http://support.nikonusa.com/app/answers/detail/a_id/61#Anchor-11
2. Run it
3. Select Add/Edit Profiles
4. Plug in the camera
5. Select <Add new profile>
6. Enter a name for the profile (e.g. Dummy)
7. Profile Type: Computer
8. Interface Type: Wireless and Ethernet
9. Automatic setup
10. Step through the rest of the wizard until finished. None of the values you enter matter as they will
not actually be used.
ON THE CAMERA
1.
2.
3.
Select Settings->Wireless Transmitter (or Setting->Network->WT-4 on the D4)
Select Mode->PC Mode
Then select the profile created with the Nikon software.
25
CameraSecura Transmitter User Manual Release 493
DC POWER JACK
On the bottom of the Transmitter is a DC jack. It is usually covered with a thin layer of plastic for protection,
but if the Transmitter will primarily be used indoors the port can be opened with a scalpel or Stanley knife.
SPECIFICATIONS
Input Voltage: 7-16V DC, 1A or higher
Inside Contact Diameter: 1.3 mm
Outside Contact Diameter: 4.5 mm
Required Tip Length: 8-10mm
Note: The DC jack will not charge the batteries.
26
CameraSecura Transmitter User Manual Release 493
RECOVERY MODE
The Transmitter has a recovery partition that allows the operating system and software to be updated, or
completely wiped and replaced with a fresh installation if needed. To enter recovery mode, tap the screen for
5 seconds immediately after pressing the on/off switch.
SELECT A VERSION TO INSTALL
This page lets you choose which version you wish to install. The transmitter will scan internal storage, and any
USB drives that are plugged in for upgrade files. If your Transmitter has a recovery file present it will be listed
here, otherwise we can provide links to upgrade files if needed.
Tip: Recovery files are password protected zip files. They are signed to ensure that the files have not been
corrupted or tampered with. If you see a message “Verification Failed”, try downloading the file again.
OPTIONS
Preserve settings and passwords? – Normally when the operating system is reinstalled on the transmitter, all
of your settings such as FTP and email servers are wiped. Selecting this option backs them up, then restores
them once everything has been installed. If you wish to wipe the transmitter back to a clean state, turn this
option off.
To perform the update, press the Finish button. The update procedure can take from a few seconds to a few
minutes depending on if the recovery file updates the operating system or not.
27
CameraSecura Transmitter User Manual Release 493
CONFIGURING A BLUETOOTH BARCODE SCANNER
The Transmitter supports the Socket Mobile CHS 7C Bluetooth Barcode Scanner
The scanner must be switched to SPP mode in order to work. Use the scanner to scan the barcode below to
put it in SPP mode.
To reset the scanner back to factory default settings, scan the code below.
PAIRING THE SCANNER
To pair the scanner with the Transmitter, log on to the Transmitter’s web server. See “Connecting to the
Transmitter from your phone or laptop” for how to do this. Once connected via your browser, press the
Settings button, then Advanced Settings. Type in the scanner’s MAC address into the field labeled “Socket
Scanner MAC”. The MAC address can be found by removing the battery cover on the scanner, it should look
something like: 00:01:02:03:04:05
28