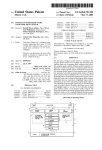
1
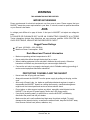
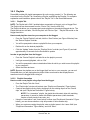
NUGGET PLAYER
U s e r
M a n u a l
Version 3.1
This Nugget user manual complies with the following products:
Firmware Version 2.x; Firmware Version 5.x (Nugget Post); and NUG-SDI Version 94
NUG.OM.000105.DRM
Page 1
Doremi Labs, Inc.
Version 3.1
Table of Contents
1 Introduction........................................................................................................................... 10
1.1Contact.............................................................................................................................. 11
2 Nugget Models...................................................................................................................... 12
2.1 Nugget Front Panel........................................................................................................... 12
2.2 Nugget Rear Panel........................................................................................................... 12
2.3 Nugget Pro Rear Panel.....................................................................................................13
3 Controlling the Nugget......................................................................................................... 14
3.1 Doremi Asset Manager ....................................................................................................14
3.2 DoremiAM Installation.......................................................................................................14
3.2.1 Description.................................................................................................................15
3.2.2 Running DoremiAM for the First Time........................................................................15
3.3 Adding Nugget Units to DoremiAM...................................................................................16
3.4 Nugget IP Address............................................................................................................ 17
3.5 Nugget Configuration and Parameters .............................................................................18
3.5.1 Device Settings Window.............................................................................................18
3.6 Transferring Files to Nugget Units....................................................................................20
Using DoremiAM Database to Transfer a Clip to the Device ..............................................21
3.6.1 Using the Drop-In Folders .........................................................................................22
3.6.2 Drag and Drop ...........................................................................................................22
3.6.3 Transferring files from Nugget to DoremiAM Database..............................................22
3.6.4 Transferring Video Files to the Nugget.......................................................................25
3.6.5 Playlists...................................................................................................................... 26
3.6.5.1 Playlist Tab........................................................................................................... 26
3.6.5.2 Playlist Generation...............................................................................................26
3.6.5.3 Editing the Playlist................................................................................................27
3.6.5.4 Playlist Limitation..................................................................................................27
3.6.5.5 Missing clips......................................................................................................... 27
3.6.6 Auto Start...................................................................................................................28
3.7 Timecode Offset............................................................................................................... 28
4 Features ................................................................................................................................ 29
4.1 Generating 3D Side/Side and Top/Bottom Clips...............................................................29
4.1.1 How does it work?......................................................................................................29
4.1.2 Audio Dubbing............................................................................................................ 30
4.1.2.1 Duplicating a clip:.................................................................................................30
4.1.2.2 Audio Dubbing......................................................................................................31
4.2 Supported Formats........................................................................................................... 34
4.2.1 Supported Containers................................................................................................34
4.2.2 Supported Video Formats..........................................................................................34
4.2.3 Supported Image Sequences.....................................................................................34
4.2.4 Supported Audio Formats..........................................................................................34
4.3 Nugget Supported Resolutions.........................................................................................35
5 Synchronizing Multiple Nugget Units..................................................................................37
5.1 Synchronized Playback....................................................................................................37
5.1.1 Locking to External Sync Source................................................................................37
5.1.2 Locking to LTC IN......................................................................................................37
NUG.OM.000105.DRM
Page 2
Doremi Labs, Inc.
Version 3.1
5.1.3 Chase......................................................................................................................... 37
5.2 Synchronizing Nugget Units using Chase.........................................................................38
5.3 Synchronizing 2 Nugget Units Automatically.....................................................................38
5.4 Synchronizing more than 2 Nugget Units..........................................................................39
5.5 LTC IN Latency................................................................................................................. 39
6 Video Outputs....................................................................................................................... 40
6.1 DVI-I Connector................................................................................................................ 40
6.2 HD-SDI Connector............................................................................................................ 40
6.3 SD-SDI Connector............................................................................................................ 40
6.4 Composite Connector.......................................................................................................40
6.5 Color Space Setting.......................................................................................................... 40
7 Nugget Video Settings.......................................................................................................... 41
7.1 Best Setup for 1080i, 720p and SD Formats.....................................................................41
7.2 Best Setup for 1080p Formats..........................................................................................41
7.3 Video Out Auto Mode.......................................................................................................41
7.4 Recommended Settings....................................................................................................41
8 Video Outputs Genlock........................................................................................................ 42
9 NTSC Closed Caption........................................................................................................... 43
10 Logo Overlay and Burn In Window (BIW)........................................................................44
10.1 Logo Overlay................................................................................................................. 44
10.2 Logo Design.................................................................................................................. 44
10.3 Logo File Transfer.......................................................................................................... 45
10.4 Burn In Window............................................................................................................. 45
10.4.1 HD-SDI Options are: ...............................................................................................45
10.4.2 SD-SDI Options are:.................................................................................................45
11 Firmware Upgrade Instructions........................................................................................46
11.1 Nugget Specific.............................................................................................................. 46
12 Nugget MPEG2 File Structure...........................................................................................49
12.1 Nugget........................................................................................................................... 49
12.2 Nugget + Dimension-3D................................................................................................49
13 Video Duration Limitations...............................................................................................50
14 Control Protocol................................................................................................................. 51
14.1 Controlling the Nugget using the Serial Port..................................................................51
14.1.1 Wiring of the Standard RS422 Cable.......................................................................52
14.1.2 Wiring of the NUGGET RS422-PC Cable.................................................................53
14.1.3 Wiring of the Nugget RS422-Mac Cable...................................................................54
14.1.4 Wiring of the DB-25 Audio Connector.......................................................................55
15 Specifications..................................................................................................................... 56
15.1
15.2
15.3
15.4
Interface......................................................................................................................... 56
Audio............................................................................................................................. 56
Video............................................................................................................................. 56
TimeCode...................................................................................................................... 56
NUG.OM.000105.DRM
Page 3
Doremi Labs, Inc.
Version 3.1
16 Emulation........................................................................................................................... 57
17 Document Revision History ..............................................................................................58
NUG.OM.000105.DRM
Page 4
Doremi Labs, Inc.
Version 3.1
Software License Agreement
The software license agreement can be found at the following location:
http://www.doremilabs.com/support/proav-support/proav-warranties/
Hardware Warranty
The hardware warranty can be found at the following location:
http://www.doremilabs.com/support/proav-support/proav-warranties/
NUG.OM.000105.DRM
Page 5
Doremi Labs, Inc.
Version 3.1
WARNING
THIS APPARATUS MUST BE EARTHED
IMPORTANT WARNING
Power requirements for electrical equipment vary from area to area. Please ensure that your
NUGGET meets the power requirements in your area. If in doubt, consult a qualified electrician
or your Doremi Labs dealer.
AVIS
Le voltage peut différer d’un pays à l’autre. Il faut que le NUGGET soit ajuste au voltage du
pays.
LA SOURCE DE PUISSANCE DOIT AVOIR UN CONDUCTEUR CONNECTE A LA TERRE.
Toutes réparations doivent être effectuées par une personne qualifiée. AFIN D’EVITER UN
CHOC ELECTRIQUE, VEUILLEZ NE PAS ENLEVER LE CAPOT.
Nugget Power Ratings
•
•
AC Input: 100-240V~, 4-2A, 60-50Hz
Maximum Power Consumption: 180W
Rack Mount and Thermal Information
•
Maximum operating ambient temperature is 40°C.
•
Never restrict the airflow through the device's fan or vents.
•
When installing equipment into a rack/shelf, distribute the units evenly. Otherwise
hazardous conditions may be created by an uneven weight distribution.
•
Connect the unit only to a properly rated supply circuit. Reliable earthing (grounding) of
rack-mounted equipment should be maintained
PROTECTING YOURSELF AND THE NUGGET
•
Never touch the AC plug with wet hands.
•
Always disconnect the NUGGET from the power supply by pulling on the plug, not the
cord.
•
Allow only a Doremi Labs, Inc. dealer or qualified professional engineer to repair or
reassemble the NUGGET. Apart from voiding the warranty, unauthorized engineers
might touch live internal parts and receive a serious electric shock.
•
Do not place, or allow anyone to place any object, especially metal objects into the
NUGGET. Use only an AC power supply. Never use a DC power supply.
•
If any liquid (including water), is spilled into or onto the NUGGET, immediately
disconnect the power and call your dealer.
•
Make sure the unit is well ventilated and kept away from direct sunlight. To avoid
damage to the internal circuitry, as well as the external finish, keep the NUGGET away
from sources of direct heat (stoves, radiators, etc.).
NUG.OM.000105.DRM
Page 6
Doremi Labs, Inc.
Version 3.1
•
Avoid using aerosol, insecticides, etc. near the NUGGET. These products may damage
the surface and cause the Nugget to ignite. Do not use denatured alcohol, thinner or
similar chemicals to clean the NUGGET. They will damage the finish.
•
Modification of this equipment is dangerous, and can result in the functions of the
NUGGET being impaired. Never attempt to modify the equipment in any way.
In order to ensure optimum performance of your NUGGET, select the setup location carefully,
and make sure the equipment is used properly. Avoid setting up the NUGGET in the following
locations:
•
In a humid or dusty environment;
•
In a room with poor ventilation;
•
On a surface which is not horizontal;
•
Inside a vehicle such as a car, where it will be subject to vibration; or
•
In an extremely hot or cold environment.
NUG.OM.000105.DRM
Page 7
Doremi Labs, Inc.
Version 3.1
WARNING!!
To prevent fire or shock hazard, do not expose this
Appliance to rain or moisture!
Caution
Risk of Electric Shock
TO PREVENT THE RISK OF ELECTRIC SHOCK,
DO NOT REMOVE THE COVER (OR BACK).
NO USER-SERVICEABLE PARTS INSIDE.
REFER SERVICING TO QUALIFIED SERVICE PERSONNEL.
The exclamation point within the triangle alerts the user to the
presence of important operating and maintenance (servicing)
instructions in the literature accompanying the appliance.
When you see a picture of an “arrow lightning rod” as above, it alerts
the user to the presence of uninsulated “dangerous voltage” within the
product’s enclosure, which may be of sufficient magnitude to
constitute a
NUG.OM.000105.DRM
risk of electric shock.
Page 8
Doremi Labs, Inc.
Version 3.1
CE NOTICE
Marking by the symbol
indicates compliance of the device to the EMC (Electromagnetic
Compatibility) directive and to the Low Voltage directive of the European Community. The
marking is indicative that the device meets or exceeds the following technical standards:
•
EN 55022 "Limits and Methods of Measurement of Radio Interface Characteristics of
Information Technology Equipment."
•
A "Declaration of Conformity" in accordance with the above standard has been made
and is on file at Doremi.
NUG.OM.000105.DRM
Page 9
Doremi Labs, Inc.
Version 3.1
1 Introduction
Thank you for purchasing the Doremi Nugget player. The Nugget is a high quality HD and SD
MPEG2 video player that decodes MPEG2 files up to 80Mbits/sec. The Nugget decodes both
MPEG2 4:2:2 and 4:2:0 files.
Using the Doremi Asset Manager application (which can be downloaded at the following link
http://www.doremilabs.com/support/broadcast-support/broadcast-manuals/, you can transfer
MPEG2 stream files, Quick Time, AVI, WMV and MXF, etc. to the Nugget.
The Nugget-Pro is equipped with HD-SDI & SD-SDI, Genlock and LTC IN/OUT. Genlock can
be used to synchronize several units to play at the same speed. LTC IN/OUT can be used to
chase several units to keep them in frame accurate sync. The HD-SDI and SD-SDI outputs can
be used to connect to professional monitors or to high definition recorders.
The Nugget-Post (version 5.x) was designed to work in post applications (applications used
mainly for editing content, audio, effects, etc.) The Nugget-Post works with I-Only files to
provide full machine control, which include Jog, Shuttle, and Variable speed. For audio post
applications, visual cues can be used instead of the legacy audible cues. The DVB/ASI input is
used as a general purpose input to trigger the visual cue. The Nugget Post does not have
playlist capabilities.
This manual is written for the Nugget Firmware version 2.x (non-post), but it also applies to the
Nugget-Post version 5.x, with some exceptions:
•
•
•
•
Playlist tab is disabled on 5.x version.
Main output is always Auto on 5.x; files will only play at their native frame rate.
Visual Cues section is not present on 2.x
Local/Remote section is not present on 2.x
Doremi Asset Manager:
There are certain sections from the Doremi Asset Manager (DoremiAM) that are incorporated
into this manual (Nugget), for the sole purpose of expanding on and or giving instructions on
how to use the Nugget in conjunction with DoremiAM. These sections are not meant to replace
nor include all of DoremiAm's features/capabilities. This is done for your convenience only and
we recommend that you read and use the DoremiAM manual apart from this manual for all of its
valuable capabilities (see Section 3 below for more information on DoremiAM).
NUG.OM.000105.DRM
Page 10
Doremi Labs, Inc.
Version 3.1
1.1 Contact
If in need of help or assistance, please contact your nearest Doremi Labs Technical Support at:
USA
•
24/7 Technical Support Line: +1-866-484-4004
•
Technical Support Email: [email protected]
Europe
•
24/7 Technical Support Line: +33 (0) 492-952-847
•
Technical Support Link: http://support.doremitechno.org/ticketing
Japan
•
Technical Support Line: +044-966-4855
•
Technical Support Email: [email protected]
Australia ~ China ~ India ~ Indonesia~ Korea ~ Malaysia ~ New Zealand ~ Phillippines ~
Singapore ~ Taiwan ~ Thailand
•
Technical Support Email: [email protected]
NUG.OM.000105.DRM
Page 11
Doremi Labs, Inc.
Version 3.1
2 Nugget Models
There are six different Nugget players: Nugget, Nugget-Pro, Nugget-ProSD, Nugget-2u,
Nugget-2uPro, and Nugget-Post.
The following is a list of all the features of each of the listed Nugget versions:
•
Nugget: MPEG2 player 422/420 up to 80 Mbits/sec with DVI-I video
•
Nugget-Pro: MPEG2 player 422/420 up to 80 Mbits/sec with DVI-I video, plus, HD-SDI
out, Sync in and LTC in/out.
•
Nugget-ProSD:MPEG2 player 422/420 up to 80 Mbits/sec with DVI-I video, plus HDSDI out, Sync in and LTC in/out. Can only load SD files. Can be upgraded to NuggetPro.
•
Nugget-2u: MPEG2 player 422/420 up to 80 Mbits/sec with DVI-I video; 2RU high with a
removable drive
•
Nugget-2uPro: MPEG2 player 422/420 up to 80 Mbits/sec with DVI-I video, plus HDSDI out, Sync in and LTC in/out; 2RU high with a removable drive.
•
Nugget-Post:MPEG2 player 422/420 up to 80 Mbits/sec with DVI-I video, plus HD-SDI
out, Sync in and LTC in/out; with special firmware designed for Post Production
applications.
2.1 Nugget Front Panel
PWR: Lights up when the unit is on
HDD: Indicates hard drive access
LAN: Indicates network access via Ethernet
2.2 Nugget Rear Panel
Ethe
rnet
NUG.OM.000105.DRM
Page 12
Doremi Labs, Inc.
Version 3.1
2.3 Nugget Pro Rear Panel
Ethe
rnet
Specifications of the Nugget Pro Rear Panel:
•
The audio breakout cable is manufactured by Hosa, part number DTM-803, it will
provide 3 pairs of AES/EBU on XLR's 1,2,3. It also provides 3 pairs of unbalanced
analog channels for monitoring purpose on XLRs 5,6,7 (two unbalanced analog audio
channels per XLR. Pin1=GND, Pin2=Left, Pin3=Right).
•
The RS422 port can be used to control the Nugget players using the Odetics protocol.
•
Ethernet (Gigabit) is used for file transfer, firmware update and control.
•
The DVB-ASI-IN is non-functional.
NUG.OM.000105.DRM
Page 13
Doremi Labs, Inc.
Version 3.1
3 Controlling the Nugget
3.1 Doremi Asset Manager
Introduction
The Nugget player comes with a software program called Doremi Asset Manager (DoremiAM).
DoremiAM is designed to help the user take full advantage of the Nugget player by enabling the
user to transfer files, make setting modifications, and have control capabilities.
The Doremi Asset Manager simplifies the selection and Ethernet transfer of video files such as
QuickTime, MXF, AVI, and WMV to the Nugget's internal hard drive. The operator simply adds
the desired files into Asset Manager's clip database and the software will transparently handle
the synchronization and transfer of content to the Nugget's hard drive.
Note: The Doremi Asset Manager will be referred to as DoremiAM throughout this manual.
Please see the actual DoremiAM manual for all features, capabilities, and instructions at the
following site: http://www.doremilabs.com/support/broadcast-support/broadcast-manuals/
The Asset Manager is the only software utility you need to manage your database, playback,
and firmware upgrades.
The Major Features added to the Asset Manager Version 4.4.x include:
1.
Multi-Thread support
2.
Apple ProRes422 Support
3.
Encoding 3D material for the Nugget as: side/side or top/bottom
3.2 DoremiAM Installation
How to install the DoremiAM application:You will see a compressed folder that looks like this:
“Doremi Asset Manager 4.3.25_1.4.28-38_1.5.0 -42_94_4.66f.zip.” NOTE: This is just an
example, the numbers you will see may vary.
To unzip the file and start the install process double click on the “Doremi Asset Manager
4.3.25_1.4.28-38_1.5.0-42_94_4.66f.zip” Icon. Note: If you are using a Mac, you will see
4.3.25_1.4.28-38_1.5.0-42_94_4.66f.dmg.zip
•
•
•
•
•
The first character (e.g. 4.3.25) indicates the DoremiAM version number
The second character (e.g. 1.4.28-38) indicates the Nugget Firmware number
The third character (e.g..5.0-42) indicates the Nugget Post Firmware number
The fourth character (e.g. 94) indicates the NUG-SDI (serial digital interface)
The fifth character (e.g. 4.66f)” indicates the V1 Firmware number (Note: this does not
have anything to do with Nugget players).
NUG.OM.000105.DRM
Page 14
Doremi Labs, Inc.
Version 3.1
3.2.1 Description
DoremiAM runs as a service indicated by a green circle icon in the right section of the toolbar.
The icon will be red if any failure occurs.
When is DoremiAM running?
•
•
•
•
•
•
It is indicated by a Green circle icon in the bottom right section of the tool bar (see
Figure 1 below).
If the circle icon does not appear, DoremiAM is not running.
If any error(s) occur, the circle icon will turn Red which indicates that there is at least one
error.
The “Tasks” tab, explained in further detail in Section 3.8 of this manual, will indicate the
task(s) that has failed.
If the circle icon turns a Brown/Tan color, this indicates that DoremiAM is processing a
task(s).
To quit DoremiAM right-click on the green icon and select “Quit DoremiAM"
“Green Circle Icon”
Green circle icon
3.2.2 Running DoremiAM for the First Time
When you run DoremiAM for the first time, it will prompt you to define a database location (see
“DoremiAM Database Folder Prompt” below. The database (DB) folder created inside the folder
you specify will hold copies of all files you transfer to the Nugget using DoremiAM. The
database location can be on the internal drive, USB or Fire Wire drive or on a NAS connected to
the PC running DoremiAM.
“DoremiAM Database Folder Prompt”
NUG.OM.000105.DRM
Page 15
Doremi Labs, Inc.
Version 3.1
3.3 Adding Nugget Units to DoremiAM
•
If DoremiAM is minimized, double click on its icon to bring it up. Under the Device tab,
select the Default Group or create a new Group then click on New Device.
•
Type the Name, as you want it to appear, and type the IP address of the Nugget you
want to add. You can organize the units by groups if needed.
•
Add all Nugget units in your facility.
Device Manager
The Device Manager will help you manage the devices that are connected to the DoremiAM.
This function is for your convenience and will allow you to easily manage each device. See the
“Device Tab Window” located on the DoremiAM's main GUI below, which shows how each
connected device will appear in the “Device Manager Window.”
•
•
•
For each device, either a red X or a green check mark will appear.
The red X indicates that the device is currently not connected.
The green check mark indicates that the device is connected.
DoremiAM GUI-Device Tab Window
NUG.OM.000105.DRM
Page 16
Doremi Labs, Inc.
Version 3.1
To add a new device, click on the “New Device” button as seen in “Device Tab Window” above.
You will now be prompted to add the name of the device you wish to add and enter the IP
address for that device. NOTE: Make sure to select the proper device type in the “type” field as
shown in the “New Device” Window below.
“New device” Window
NOTE: Make sure to select the proper device type in the “type” field as shown immediately
above
3.4 Nugget IP Address
All Nugget players ship with a default IP address: 192.168.100.191. You can use DoremiAM to
change the IP address of the Nugget. If you have changed the IP address of the Nugget and
don’t remember it, you can use DoremiAM with the RS232 to RS422 cable provided with your
unit to get or change the IP address using the computer’s serial port. The following are brief
instructions on how to change and or “get” the Nugget's IP address. For a full explanation on
how to use this feature please refer to the “Device Control” section of the DoremiAM manual.
NOTE: The default IP and Subnet Mask settings for the Nugget are as follows:
• IP Address: 192.168.100.191
• Subnet Mask: 255. 255. 255. 0
How to connect to the Nugget:
To connect to the Nugget your PC has to have an IP Address within the same range
as the Nugget (ex: if the IP is 192.168.100.191, set your PC to 192.168.100.159) you
can use a crossover cable or an Ethernet switch with 2 standard Ethernet cables.
If you don't know the IP address of your Nugget (Nugget Post):
• Connect the provided serial cable between your computer's RS232 COM port and the
Nugget's RS-422 port.
• You will be prompted to select either “Current device” or “serial port” (see the “Network
Device Configuration” Window below)
• Select “serial port” and then select “Com1” or “Com2”
• The “Device Network Configuration” window (see the“Network Device ConfigurationNugget Connection” Window below) will show you the current settings and allow you
to change the IP Address and Subnet Mask
NOTE: When connected to a Nugget or Nugget Post: to access the Network Configuration
Parameters of the device, go to “Device” from the DoremiAM GUI menu, Select “IP Address,”
the following window will appear:
NUG.OM.000105.DRM
Page 17
Doremi Labs, Inc.
Version 3.1
Network Device Configuration Window
“Device Network Configuration” Window – Nugget Connection
3.5 Nugget Configuration and Parameters
3.5.1 Device Settings Window
The “Device Settings” option allows you to view and make changes to the parameters and
configuration settings of the device. Please see the following instructions on how to access the
“Device Settings” window from the Nugget:
Instructions:
To have access to this “Device settings” window when connected to a Nugget
Player, the Nugget should have firmware version 1.4.27-65 or higher – check
the Nugget’s firmware version using the “Info” tab (see “DoremiAM GUI-Device
Tab Window” above)
To get to the “Device Settings” window, click on the “Info” Tab, which can be
accessed by from the “Device Tab” on the main GUI
If the Nugget does not have the proper firmware, clicking on the “Device
settings” button will bring an alert window asking you to upgrade to version
1.4.27-65 or higher.
NOTE: To upgrade the Nugget firmware using DoremiAM, please refer to Section
11 of this manual.
When connected to a Nugget unit (with the appropriate Nugget firmware version, clicking the
“Device settings” button will prompt you to the “Device settings” window where you will see two
tabs: General and Audio/Video (see the “Device settings for Nugget - General and Audio/Video
Tabs” below).
•
The “General” tab: access general parameters of the connected device.
NUG.OM.000105.DRM
Page 18
Doremi Labs, Inc.
Version 3.1
•
The “Audio/Video ”tab: access audio/video specific parameters of the selected device.
“Device settings” for Nugget - General and Audio/Video Tabs
“Device Setting” functions:
1. To save the changes you have made to the unit, click “Apply” when you are done.
2. To save the changes you have made to the flash (default settings after power up), click
“Save as default”.
3. To export the current settings to a file, click “Save,” you will then be prompted to enter a
settings filename.
4. To abort the changes and restore the unit’s current settings, click “Discard”.
5. To load an existing settings file from your computer, click “Load”, select the
corresponding settings file then hit “Save settings”.
6. The Local/Remote and Visual Cues sections will only appear on the Nugget Post.
7. The Time Mode section is grayed out on the Nugget Post but it is enabled on the Nonpost version
NUG.OM.000105.DRM
Page 19
Doremi Labs, Inc.
Version 3.1
3.6 Transferring Files to Nugget Units
You can transfer files directly to the Nugget using Windows Explorer, Drag and Drop, Drop-in
folders or using the Doremi Asset Manager application. Note: Drag and Drop is available for XP
and OS-X only, Vista drag and drop support will be supported in a future release.
Using Windows Explorer
How to transfer clips to a Nugget using Windows Explorer:
•
Select, Shift select or Control select all media files you want to transfer and “right click”
on one of them. Note: For image sequences, it is necessary to select only the first
image.
•
Scroll down to “Send To” and select “Doremi devices”
•
Click on “Transfer options” and select all units to send the files to. Check the box for the
units you wish the files to be transferred to (see “Send to Doremi Devices Window”
below);
•
Click “Finish” to start the transfer. Note: At this stage you can choose to schedule the
transfer instead of starting the transfer immediately. (see Section 3.7 of the DoremiAM
manual)
•
You can see the progress of the transfers under the “Tasks” tab in the DoremiAM GUI.
Once the transfers are complete, the “Clip Database” tab will list all files in the database.
All media files will be added to the database before they get transferred to the units.
•
“Send to Doremi Devices” Window
NUG.OM.000105.DRM
Page 20
Doremi Labs, Inc.
Version 3.1
The “Send to Doremi Devices” Window above illustrates an example of a folder being
transferred from the database to the Nugget. The green check-mark indicates that the selected
device (the Nugget) is connected. By clicking the “Apply Selection To All” button you are able to
transfer the folder to more than one unit at a time.
Using DoremiAM Database to Transfer a Clip to the Device
To transfer a clip from the database a connected Nugget:
•
Go to the “Clip database” tab;
•
Select the media file(s) to transfer;
•
Click on the “Send to Doremi devices” button;
•
Select the unit(s) you wish to send the file to;
•
Click on “Finish” to start the transfer.
•
Go to the “Tasks” tab to see the progress of the transfers. To see a list of all the new
files, click “Update” on the “Clip Database” tab. Note: The update process takes
approximately 30 seconds.
Note: At this stage you can also choose to schedule the transfer instead of starting it right away.
This procedure is detailed in the DoremiAM manual under the heading “Scheduling Transfers.
You can see the progress of the file transfer in the “Tasks” tab as shown below:
Transfer
progress
Clip Transfer Progress- “Task” tab
NUG.OM.000105.DRM
Page 21
Doremi Labs, Inc.
Version 3.1
3.6.1 Using the Drop-In Folders
If you have already enabled one or more drop-in folder(s) from the Options menu, you can just
drop media files in the designated directory and they will be automatically imported to the
database and transferred to the associated unit(s). See the “Drop-in Folders” Section in the
DoremiAM manual for more information this feature.
When you place a media file in a Drop-In Folder it will be automatically transferred to the
database.
How to Create a new “Drop-In Folder”:
• Go to the File menu;
• Click “Options”;
• Click the “New” button (see Figure 5 above);
• Click on an already existing folder or click on the “Make New Folder” button (see Fig. 5);
• Click “OK,” the folder will then appear in the Drop-In window (see Figure 5 above);
• Clicking “Apply” will automatically import the files in that folder to the corresponding
database. See the “Auto-Transfer” window in Figure 5 above.
• To remove a file(s), check the box next to the file(s) and click the “Remove” button.
• Click on “Close” when you are done.
3.6.2 Drag and Drop
On Windows XP and Mac OS-X (not on Vista), select the media file(s) and drag them to the
DoremiAM Database window.
Note: Go to DoremiAM GUI and click on the “Tasks tab”, you can see the progress of the file
transfer(s). All media files will be added to the Database before they get transferred to the
Nugget units. The Clip database tab will show you all files in the database.
3.6.3 Transferring files from Nugget to DoremiAM Database
How to transfer files to the database using the Nugget:
• Click on the “Device” tab and select the file you wish to add from the “Clip List”;
• Click on the “Import to Database” button (see “Clip List” Window below);
• An “Add to Doremi AM Database” window will appear (see “Add to Doremi database”
Window below)
• Click “Finish” to import the file to the DoremiAM database
• To see the transfer, click on the “Tasks” tab
NOTE:
To have access to the “Import to Doremi AM Database” feature, the
Nugget Player should have firmware version 1.4. 28-1 or higher–
Instructions on how to “Upgrade Firmware” are in Section 11 of this
manual below.
NUG.OM.000105.DRM
Page 22
Doremi Labs, Inc.
Version 3.1
“Import to
Doremi AM
Database”
clip
“Import to
Database”
button
“Clip List” Window
NUG.OM.000105.DRM
Page 23
Doremi Labs, Inc.
Version 3.1
“Add to Doremi database” Window
NUG.OM.000105.DRM
Page 24
Doremi Labs, Inc.
Version 3.1
3.6.4 Transferring Video Files to the Nugget
DoremiAM can be used to transfer popular video formats like QuickTime, AVI, MXF, etc., into
the supported Doremi Devices. The table below shows formats for the Nugget
Nugget
Most popular video formats
Supported AV Media Files
MPEG2 elementary streams
Device Format
MPEG2 elementary streams
DoremiAM Database Format
You can use the DoremiAM to transfer Audio/Video Media Files which can be
wrapped/formatted as Quick Time, AVI, MXF, WMV or Image Sequences. All media will be
converted in the background (this is done automatically during the Import process) to the
DoremiAM Database Format. The conversion is defined by the Profile Settings (see Figure 42
below)
Nugget Specific parameters:
• “Encode non MPEG2 files only”: Encode all files except MPEG2.
• “Encode all files”: Encode all files including MPEG2.
• “Encode all files except I-Only”: Encode all file except I-Only MPEG2. On Nugget
Post installations, select one of the two “Post prod.” Profiles from the list and click on
“Set as default.”
• Select the desired bitrate for SD files. We recommend 15-25 Mbits/sec.
• Select the desired bitrate for HD files. We recommend 40-70 Mbits/sec.
• If you want to add a black or custom image to the beginning and/or the end of a file,
you can enter a duration in seconds, once the duration is positive, you can select
black or custom frame.
• To import 24/30/60 frames per second files as 23.98/29.97/59.94 FPS files, check
the appropriate box. Since playing a file at a lower speed will increase the duration,
DoremiAM will time stretch the audio to keep video and audio synchronization.
NUG.OM.000105.DRM
Page 25
Doremi Labs, Inc.
Version 3.1
3.6.5 Playlists
DoremiAM provides full playlist management for units running version 2.x. The following are
instructions on the Playlist Tab, Generating a Playlist, and Editing the Playslist. For complete
explanation and illustrations please refer to the “Playlist Tab” in the DoremiAM manual.
3.6.5.1 Playlist Tab
NOTE: The Playlist tab is ONLY enabled when connected to a Nugget, not to a Nugget-Post.
The Playlist tab can be accessed from the “Device Tab” from the main GUI.
The Playlist tab allows you to manage and create playlists on the selected Nugget device. The
Playlist tab has two sub-tabs; “Device Playlists” and “Device Clips.” *Playlist files reside on the
Nugget hard drive.
How to send playlists stored on your computer to the Nugget:
•
From the “Device Playlists” sub-tab, click the “Send” button (see Figure 26 below) from
the “Device Playlists” sub-tab;
•
You will be prompted to choose a playlist/file from your computer;
•
Double click on the desired playlist/file;
•
Click the “Update” button from the “Playlists Device” sub-tab (see Figure 26) and wait
approximately 10 seconds for the DoremiAM to update.
In order to get playlists from the Nugget:
•
From the “Device Playlists” sub-tab click on the playlist you want;
•
It will get reverse highlighted, click on “Get”
•
You will be prompted to select a destination folder for which you wish to save this playlist
to your computer.;
•
Select the folder and save
NOTE: Because the playlists are on the Nugget itself and not on your computer, you can exit
DoremiAM when you are playing back a playlist. Make sure however that all playlists are
transferred onto the Nugget before doing so.
3.6.5.2 Playlist Generation
How to create a new playlist using clips from the Nugget:
•
From the Playlist Tab click “New”;
•
The “Playlist clips” window will activate (see “Playlist and Generation” Figure below);
•
Create a new playlist clip-by-clip by choosing from the existing clips from the “Device
clips” tab (see “Playlist and Generation” Figure below);
NOTE: For a “seamless” playlist, the playlist should contain clips with matching
parameters, it cannot be made with different parameters (video standards,
number of audio tracks, frame rate, etc.).
•
Using the “Insert above” and “Insert below” buttons (see “Playlist and Generation” Figure
below), you can choose whether a clip will precede or follow another clip;
•
When you are done creating the playlist, enter a playlist name in the “name field” (see
“Playlist and Generation” Figure below), and click “Save”.
NUG.OM.000105.DRM
Page 26
Doremi Labs, Inc.
Version 3.1
3.6.5.3
Editing the Playlist
•
To move a clip up or down in the “Playlist Edit” window, select the clip in the “Playlist
clips” sub-tab and hit “Move Up” or “Move Down” respectively.
•
To remove a clip from the playlist, select it from the “Playlist clips” tab and click
“Remove”.
•
To remove all the clips from the playlist, click “Clear”.
•
To cancel a playlist creation, click “Abort”.
•
To loop (re-play) the playlist, check the “Loop playlist” check-box.
•
To delete a playlist, select the playlist you wish to delete from the “Device playlists” subtab and click “Delete”. Click ”Update” when done.
•
To play the sequence of clips defined by a playlist, select the corresponding playlist on
the “Device playlists” window and click “Start”. The playback can be monitored from the
“Device Status” window.
3.6.5.4
Playlist Limitation
Short clips (less than 30 frames) are not supported in a playlist. If you have a clip in the playlist
that is shorter than 30 frames, the playlist will stop.
3.6.5.5
Missing clips
If you open a playlist that has missing clips, you will get a warning message and those clips will
appear with “!” as the first character in their name.
“Name” field
Currently
selected clip in
the Edit Playlist
window
“Playlist clips”
window
“Device
clips” tab
“Loop playlist”
check-box
“Clear” button
“Insert Above”
button
“Insert Below”
button
“Abort” button
“Remove”
button
“Playlist Generation and Editing” Figure
NUG.OM.000105.DRM
Page 27
Doremi Labs, Inc.
Version 3.1
3.6.6 Auto Start
Using DoremiAM you can set the Nugget to automatically play a specific file or playlist after
boot. You can also set the Loop mode ON or OFF.
3.7 Timecode Offset
DoremiAM has a feature which allows you to change the timecode offset using the “Device
Settings” feature on DoremiAM. You can set the Nugget to either A-Time or Timecode (version
2.x only, 5.x is always in Timecode mode). This will be explained in more detail in the manual
below).
A-Time: The first frame of video will start at timecode 00:00:00:00 unless you define a
TC offset in the Info tab. This type of offset is created on the Nugget clip and is only
active in A-Time mode.
• Timecode: The first frame of video will start at the Timecode offset value shown under
“Database information > Timecode tab”. If the source file supports timecode (all mpeg2
streams), the Timecode offset value will be automatically calculated during the import
process, otherwise it will be set to 00:00:00:00. In that case, you can create a timecode
offset by changing its value in the Database information window. This type of offset is
created on the Database and is active in Timecode mode. Use Timecode offset when
you send one clip to multiple Nugget devices to avoid creating an A-Time offset on each
unit.
Units running version 5.x (post) are always in Timecode mode, but unlike 2.x, the timecode
offset can be changed from the “Info Tab” on the DoremiAM GUI.
•
Nugget - Non Post Version
Nugget - Post Version
TimeCode (TC) Offset: Enabled for Nugget devices only. It allows you to change the time
code offset of the loaded clip. On version 2.x, TC Offset is only valid when the Nugget is in ATime, but on version 5.x it is valid in Timecode mode. This parameter is file based and is saved
on the video file only. Figure 20.2 above shows the options when connected to Nugget-Post.
The options include “Set Timecode Current Frame,” “Set Timecode for First Frame,” and
“Revert to Original Timecode.”
Audio Delay: Enabled for Nugget devices only. Allows you to set the file audio offset that can
be used to synchronize video and audio on the file level. Audio delay is file based and is
different than Device settings Audio tab “delay” which is unit based (applies to all files).
Figure 22: Audio Delay
NUG.OM.000105.DRM
Page 28
Doremi Labs, Inc.
Version 3.1
4 Features
4.1 Generating 3D Side/Side and Top/Bottom Clips
Beginning with the 4.4.x version of DoremiAM, Nugget users can generate 3D side/side or
top/bottom clips from two left/right eye media files.
Connect the Nugget SDI or DVI output to a Dimension-3D to feed any 3D display device.
“Profile Manager”- General Encoding Options Tab
4.1.1 How does it work?
Left and Right eye files must reside in the same folder and should have identical names, except
for the identifiers defined in the profile (case sensitive). Since the profile does not allow for
“slipping”, both Left and Right eye files must be properly synchronized at merge time.
DoremiAM can generate Side/Side or Top/Bottom 3D material. Note: The side/side and
top/bottom selection mode is available for the Nugget only, not for Nugget-Post
How to generate a 3D file (Nugget Specific):
• Go to the “File” menu of DoremiAM GUI;
• Select “Profiles,” and click on the “General Encoding Options” tab from the “Profile
Manager” window (see “Profile Manager”- General Encoding Options Tab above);
• Check the “Generate 3D” box (see “Profile Manager”- General Encoding Options Tab
above);
NUG.OM.000105.DRM
Page 29
Doremi Labs, Inc.
Version 3.1
•
•
•
You must choose either the “Identifier for Left/Right” eye streams to designate clips for
each eye; or choose one sequence with Odd/Even eye streams;
Examples: For the “Identifier,” the files will be as such: Left0001, Right0001,etc. For
“Odd/Even,” if you have files called 0001, 0002, 0003, 0004...., when you designate
0001 as Odd, for example, 0002 will automatically be designated as Even.
Choose the mode, side/side or top/bottom of the 3D file by using the drop-down arrow
(see Figure 43 above);
To add an audio track to the 3D file, use the drop-down arrow (see Profile Manager”General Encoding Options Tab above);); to dub an audio track to the file, see Section
3.6 of this manual below.
NOTE: This feature requires a license that can be obtained by contacting [email protected].
If you are a Nugget owner, the license is free, otherwise it's a paid option. Nugget owners must
send an e-mail to the above link and request an authorization code. Please include the the
Registration Key number of your DoremiAM in your e-mail. The Registration Key number can be
found by going to the “Help” menu on the DoremiAM GUI, and selecting “About.” Also, please
include the serial number for your Nugget Device in the e-mail.
4.1.2 Audio Dubbing
If you receive the video and audio in separate files or if you want to change the audio of an
existing clip, you can use the Audio Dubbing feature of DoremiAM. If you don’t want to alter the
original clip, you can make a duplicate copy and work on it.
4.1.2.1
Duplicating a clip:
•
From the “Clip Database” tab on the main GUI, select the clip you wish to duplicate
and click the “Duplicate” button (see “Duplicate database” Window below);
• When the window appears, click on “Database Parameters” to edit the database Title
and clip ID and whether you wish to duplicate the clip with or without audio;
•
Click the “Finish” button to start the copy process. The new duplicated clip will
appear in the “Clip Database” window.
NUG.OM.000105.DRM
Page 30
Doremi Labs, Inc.
Version 3.1
Duplicate
with or
without
audio
“Duplicate database” Window
4.1.2.2
Audio Dubbing
• To add audio channels to an existing clip, select the clip from the “Clip database” tab
and click on the “Audio Dubbing” button (See “Audio Dubbing” Window).
•
The “Audio Dubbing” window will appear (see “Audio Dubbing” Window) displaying
the audio channel(s) available in the selected file;
•
You can click on “Clear” to remove all audio channels or select a specific audio track
and click “Remove audio” to remove only the selected track.
•
The “Move up” and “Move down” buttons can be used to place the audio on different
tracks (see “Audio Dubbing” Window below)
•
To add audio channels, click on “Add from file”, “Add from database” (see “Audio
Dubbing” Window below) or “Add silence” button. You will be able to respectively add
an audio channel from any file, add an audio channel from the database or add a
silent audio channel.
NUG.OM.000105.DRM
Page 31
Doremi Labs, Inc.
Version 3.1
“Audio Dubbing” Window
*Choosing the “Add from database” button will prompt you to the following window:
“
”Adding Audio Channel(s) from the Database – Clip Selection”
•
Select the clip you want to use and click “OK”. Then, the window below will allow you to
select the audio channel(s) you want to use from the selected clip: (see “Adding Audio
from Database – Audio Channel(s) Selection” below).
NUG.OM.000105.DRM
Page 32
Doremi Labs, Inc.
Version 3.1
Check to add the
corresponding audio
channel
“Adding Audio from Database – Audio Channel(s) Selection”
•
To complete the operation, click the “OK” button, the “Audio dubbing” window will be
updated according to the audio channel selection you made – note that you can choose
to add silence at the end of the audio files in order to fit the video duration – see “Audio
Dubbing Window Update” below.
•
Click on the “Create audio dub task” button at the bottom of the window to update the
clip with the new audio tracks.
Audio
channels
added
using the
“Add from
database”
feature
Add
silence at
the end of
the audio
files
“Audio Dubbing Window Update”
NUG.OM.000105.DRM
Page 33
Doremi Labs, Inc.
Version 3.1
4.2 Supported Formats
This section provides a partial list of all av media files that can be imported to the DoremiAM
database. Some other formats might be supported but not listed.
4.2.1 Supported Containers
QuickTime, AVI, MXF, Windows Media Video, MP2 transport stream, MP2 program stream and
MP2 elementary stream.
4.2.2 Supported Video Formats
•
•
•
•
•
•
•
•
•
•
•
•
•
•
•
•
•
Divx, Xvid, Mpeg4
Mpeg2 (including Matrox)
DVCPro25, DVCProHD
JPEG-2000
IMX
Blackmagic Uncompressed 8 bit and 10 bit
Component YUV uncompressed
Sorensen Video Codec 1 and 3
Photo JPEG, MJPEG-A and MJPEG-B
H-264
MPEG-1
ProRes422 (requires QuickTime 7)
Avid DnxHD (requires QuickTime 7)
HDV
Apple Component Video
WMV (Windows Media Video)
Others
4.2.3 Supported Image Sequences
• TIFF
• TARGA
• DPX
• JPEG
• Others
Add audio to imported image sequences by using the Audio Dubbing feature (see Section 4.2
above)
4.2.4 Supported Audio Formats
•
•
•
•
•
•
•
•
MPEG audio layer 1-2
LPCM
PCM
AIFF
Wave
WMA (except WMAPro “wmav3”)
AC3 (only on Nugget type database)
AAC (requires QuickTime 7) and others
NUG.OM.000105.DRM
Page 34
Doremi Labs, Inc.
Version 3.1
4.3 Nugget Supported Resolutions
Doremi Asset Manager supports all standard HD and SD video formats. It can also import files
with non-standard video resolutions that will be played on a Nugget using a standard video
format.
The table of supported formats (see the “Supported Formats” Window below) and the
comments below highlight all formats supported by DoremiAM.
The formats listed in the “Supported Formats” Window show the standard video formats that a
Nugget will use to play the clips in Auto mode.
the clips in Auto mode.
Frame Rate
Video 23.98
Height
24
240
480p 23.98
↨
1080p 23.98
480
540
29.97
30
480p 24
↨
1080p 24
480p 29.97
or
NTSC
480p 30
↨
1080p 30
480p 23.98
↨
1080p 23.98
480p 24
480p 29.97
or
NTSC
480p 30
↨
1080p 30
1080p 23.98
↨
1080p 23.98
or
1080i 47.95
↨
1080i 47.95
1080p 24
↨
1080p 24
or
1080i 48
↨
1080i 48
1080p 25
↨
1080p 25
or
1080i 50
↨
1080i 50
1080p 29.97
↨
1080p 29.97
or
1080i 59.94
↨
1080i 59.94
1080p 30
↨
1080p 30
or
1080i 60
↨
1080i 60
576p 24
↨
1080p 24
576p 25
or
PAL
576
25
1080p 24
720
720p 23.98
↨
1080p 23.98
or
720i 47.95
↨
1080i 47.95
720p 24
↨
1080p 24
or
720i 48
↨
1080i 48
720p 25
↨
1080p 25
or
720i 50
↨
1080i 50
720p 29.97
↨
1080p 29.97
or
720i 5994
↨
1080i 59.94
720p 30
↨
1080p 30
or
720i 60
↨
1080i 60
1080
1080p 23.98
or
1080i 47.95
1080p24
or
1080i 48
1080p 25
or
1080i 50
1080p 29.97
or
1080i 59.94
1080p 30
or
1080i 60
50
720p 50
59.94
60
480p 59.94
↨
720p 59.94
480p 60
↨
720p 60
720p 59,94
720p 60
Supported Formats Window
NUG.OM.000105.DRM
Page 35
Doremi Labs, Inc.
Version 3.1
•
•
•
•
The formats highlighted in yellow and in italic denote non-standard video formats that
cannot be played by the Nugget as they are.
Although the files are imported to the Nugget Database, and transferred to the Nugget
as listed above, these formats will be played on the Nugget using the standard video
format denoted in orange and underscored.
The required sync (Bi-level or Tri-level) will follow the playback format, (ex: 720p 23.98
will be played at 1080p 23.98 and will require Tri-level sync at 23.98)
The formats highlighted in green will be imported and played as listed in the above
formats.
Comments:
•
The frame rate for Asset Manager must be equal to: 23.98, 24, 25, 29.97, 30, 50, 59.94
or 60 fps. If not, the file will not be imported.
•
The video height must be within 32 lines of: 240, 480, 540, 576, 720 or 1080 lines. For
example a file with 512 lines will be imported, but a file with 620 lines will not be
imported.
•
Short clips (5 frames or less) cannot be imported.
NUG.OM.000105.DRM
Page 36
Doremi Labs, Inc.
Version 3.1
5 Synchronizing Multiple Nugget Units
Multi-screen applications, like 3D and Stereoscopic, require continuous frame accurate lock that
can be easily achieved on the Nugget players by using its “Chase” feature
NOTE: Synchronizing two or more units require Synchronized Playback.
5.1 Synchronized Playback
When two servers start playback in sync, but each is playing back with its own internal clock,
after a certain time they will drift apart and the frame accurate lock will be lost. Using the Nugget
Pro, players can synchronize their playback to an External Sync source.
5.1.1 Locking to External Sync Source
For 25, 29.97 and 59.94 FPS formats, bi-level or tri-level interlaced video sync must be fed to all
units.
For 23.98, 24 and 60 FPS formats, tri-level interlaced video sync must be fed to a units ll.
For 720p formats, feed 1080i tri-level sync at half the frame rate, so for 720p-60FPS formats
feed 1080i-30FPS.
NOTE: Sync generators that can support bi-level and tri-level sync have come down in cost and
they MUST be used in all installations involving synchronized playback.
5.1.2 Locking to LTC IN
The Nugget can also synchronize using LTC, however, because of the nature of LTC, this kind
of lock can be unstable and is only recommended for extreme measures when a video sync
generator is not available. To use LTC Sync, you must designate one of the Nugget Pro players
as the Master and set its Sync Source to Internal. All other Nugget Pro players will be
designated as Slaves and their Sync Source must be set to LTC IN.
Note: The LTC IN LOCK mode should be used in emergency situations, you should get a low
cost video sync generator and use that on a regular basis.
Locking to LTC requires NUG-SDI version 60 or higher.
5.1.3 Chase
A player in Chase mode can read the incoming timecode and start synchronized playback
without the need for an external controller. Chase mode requires a Master/Slave setup. The
current version of the Nugget firmware supports Chase.
NUG.OM.000105.DRM
Page 37
Doremi Labs, Inc.
Version 3.1
5.2 Synchronizing Nugget Units using Chase
To Synchronize 2 Nugget Units:
• Designate one unit as Master and the other as Slave.
• Connect the LTC Out from the Master to the LTC IN of the slave
• Feed external video sync to both units
• Set the SYNC SRC on both units to SYNC IN
• Set the CHASE MODE on the Master to OFF
• Set the CHASE MODE on the slave to ON
• Set the Chase mode DRIFT to 0 except for 720p formats where the DRIFT must be set
to at least 2.
If you control the Master unit and start playing, the Slave will follow based on the LTC
connection between Master and Slave.
5.3 Synchronizing 2 Nugget Units Automatically
If you want to setup the Nugget units to start synchronous playback at power up:
• Designate one unit as Master and the other as Slave
• Connect the LTC Out from the Master to the LTC IN of the slave
• Feed external video sync to both units
• Set the SYNC SRC on all units to SYNC IN
• Set the CHASE MODE on the Master to OFF
• Set the CHASE MODE on the slave to ON
• Set the LOOP MODE on the Master to ON
• Set the LOOP MODE on the slave to ON
• Set the AUTO START on the Master to File, select the filename and set auto start to
Play
• Set the AUTO start on the Slave to File, select the filename and set auto start to Pause
• Save Defaults on both Master and slave.
If you reboot both units, the Master will load the designated file automatically and starts
playback. The slave will also load the designated file automatically and because Chase is ON
on the slave, it will start reading LTC from the Master and follow. Since LOOP MODE is ON,
both Master and slave will keep on looping for continuous playback.
NUG.OM.000105.DRM
Page 38
Doremi Labs, Inc.
Version 3.1
5.4 Synchronizing more than 2 Nugget Units
If you have more than 2 Nugget units to synchronize:
• Designate one unit as Master and the rest as slaves
• Connect the LTC OUT of the Master to an analog video distribution amplifier (an analog
audio DA is more suitable, but a video DA is easier to connect because it has BNC
connectors)
• Follow the same synchronization instructions in the previous 2 paragraphs. (change this)
NOTE: We strongly recommend using a DA to distribute the LTC from the Master to multiple
Slave units as opposed to daisy chaining LTC between units, but if a DA is not available, daisy
chaining will be acceptable until a DA is added to the system.
5.5 LTC IN Latency
If you want the Nugget to chase 1 or 2 frames ahead of the incoming LTC, you can set the LTC
IN Latency to 1 or 2. Values up to 5 are allowed, default value is 0.
NUG.OM.000105.DRM
Page 39
Doremi Labs, Inc.
Version 3.1
6 Video Outputs
There are 5 different video outputs on the Nugget, they are mapped as follows:
Output
HD-SDI
DVI-D
DVI-A
SD-SDI
Composite
Signal Type
Digital
Digital
Analog
Digital
Analog
Connector Type
BNC
DVI-I
DVI-I
BNC
BNC
Video Out or Aux Out
Video
Video
Video
Aux
Aux
6.1 DVI-I Connector
The DVI-I connector carries 2 signals, analog and digital. The resolution and frame rate of the
DVI signal follows the Video Out settings and can be: 1080i, 1080p, 1080psf or 720p.
• To connect to an analog YPbPr or RGB display device, use a DVI-I to VGA or DVI-I to
BNC cable.
• To connect to a DVI digital display device, use a DVI-D-to-DVI-D cable.
6.2 HD-SDI Connector
The resolution and frame rate of the HD-SDI signal follows the Video Out settings and can be
1080i, 1080p, 1080psf or 720p. It also carries up to 6 channels of embedded audio.
6.3 SD-SDI Connector
The resolution and frame rate of the SD-SDI signal follows the Aux Out settings and can be 480i
(NTSC) or 576i (PAL). It also carries up to 6 channels of embedded audio.
6.4 Composite Connector
The resolution and frame rate of the Composite signal follows the Aux Out settings and can be
NTSC or PAL.
6.5 Color Space Setting
The color space of the Aux Display is always YUV. The color space of the Main Display can be
set to RGB or YPbPr using DoremiAM Device Settings (see Section 16.1 of this manual or see
Section 3 of the DoremiAM manual).
• For use with HD-SDI or analog YPbPr display devices, you must set the color space to
YPbPr
• For use with DVI-D or analog RGB display devices, you must set the color space to
RGB. If you look at the DVI-D output while the color space is set to YPbPr, the colors will
not look correct.
NUG.OM.000105.DRM
Page 40
Doremi Labs, Inc.
Version 3.1
7 Nugget Video Settings
The Nugget has two video settings, Video Out and Aux Out.
• The Video Out settings control signals on the DVI-A, DVI-D and HD-SDI connectors
• The Aux Out settings control signals on the Composite and SD-SDI connectors.
7.1 Best Setup for 1080i, 720p and SD Formats
If you work in 1080i, 720p or SD formats at 29.97 (59.94) or 25 (50) frames per second, both
Video Out and Aux Out can be active at the same time. Using DoremiAM Device Settings set:
•
•
Video Out: Format=Auto and Aspect Ratio=None
Aux Out: Anamorphic
7.2 Best Setup for 1080p Formats
For 1080p formats including 23PSF and 24PSF, the Aux output must be disabled for proper
playback. Using DoremiAM Device Settings set:
•
•
Video Out: Format=Auto and Aspect Ratio=None
Aux Out: OFF
7.3 Video Out Auto Mode
When the Video Out is set to Auto, the output format will be the same as the file format. This
eliminates any scaling from the output and yields the best quality picture.
7.4 Recommended Settings
Output Settings depend on how you are using the Nugget player and the display device
connected to it.
• If you want to run playlists and have seamless transitions, all files should have the same
format and must be encoded in or as I-Only. Set the Video Out to Auto or force it to the
same format the files were encoded with. If the format is 108i or 720p, you can set the
Aux Out ON.
• If you want to run playlists but don’t care about seamless transitions, your files can have
different formats, and the output can be set to Auto or be forced. If you want to avoid
monitor flickers caused by format changes, force the output and don’t set it to Auto. If
you want to avoid bad frames displayed during transitions, have some black at the start
and end of every clip.
• If you are connected to a monitor that does not support the file format you are using, you
must force the output. For example if the file is encoded in 24p and your HD-SDI monitor
does not support 24p, but support 24pSF, you should set the video output mode to
Interlaced Only.
For best HD performance we recommend:
•
•
Video Out: Format=Auto, Aspect=None
Aux Out: OFF.
NUG.OM.000105.DRM
Page 41
Doremi Labs, Inc.
Version 3.1
8 Video Outputs Genlock
All video outputs of the Nugget can be locked to external sync. If your Main video output is
1080i-59.94 and your Aux output is Anamorphic, the HD-SDI, SD-SDI and Composite outputs
can all be locked to the same bi-level or tri-level sync source.
To genlock on the pixel and line of the sync signal, you can change the H and V values. For
some formats, the Nugget might not be able to line and pixel lock on all three outputs, for this
reason we have an extra setting called Lock HD/SD.
•
•
When Lock is set to HD, VTRIG is adjusted internally so when VT is set to 0, the HD-SDI
is line locked to the sync source, The SD-SDI and composite output will still be locked to
the sync source, but for some formats, they will not be line locked.
When Lock is set to SD, VTRIG is adjusted internally so when VT is set to 0, the SD-SDI
is line locked to the sync source, The HD-SDI and composite output will still be locked to
the sync source, but for some formats, they will not be line locked
To line lock the composite output, it’s best to set the Lock to SD, and then change the VT until
the composite output is line locked to the sync source.
The HZ value can be changed for pixel lock.
NUG.OM.000105.DRM
Page 42
Doremi Labs, Inc.
Version 3.1
9 NTSC Closed Caption
The Nugget supports closed caption on extended NTSC video files encoded as 512x720. When
such a file is loaded, you can adjust the VBI using DoremiAM to move the video so the closed
caption data in the file will align with video line 21. For files that are properly encoded the closed
caption will be aligned with video line 21 when VBI is set to +3, which is the default value. If your
file is not properly aligned, you can change the VBI value until the closed caption data aligns
with video line 21.
NUG.OM.000105.DRM
Page 43
Doremi Labs, Inc.
Version 3.1
10 Logo Overlay and Burn In Window (BIW)
The Nugget can display a small logo overlay on the HD-SDI output.
10.1 Logo Overlay
The logo overlay allows you to choose a logo that can be displayed on the SDI output only (not
on a DVI output). This function can be performed from the “Device Settings” window using the
Audio/Video tab.
“Logo overlay” Window
How to use an already existing Logo
•
Use the “Name” field (see the “Logo overlay” Window above) to select any logo files that
are present on the Nugget.
•
Use the “HPAD” and “VPAD” buttons to change the vertical and horizontal positioning of
the logo.
•
Use the “Zoom” window to set the size of the logo from “normal” up to twice its size.
•
When the logo settings are defined, hit “Save settings” on the Audio/Video tab to validate
the changes.
•
Use the Logo Manager to create a logo file (see the section on Logo Manager below)
10.2 Logo Design
Logo files should be designed as PNG without compression with the following restrictions:
• 64x64 with 15 colors + transparency or 128x64 with 3 colors + transparency.
We suggest using “Gimp”, which is a free software utility that can be used to generate PNG
files.
How to create a new Logo for a Nugget or Nugget Post:
•
Go to the DoremiAM GUI and select Device;
•
Select Logo Manager;
•
Click on “Open PNG file” and browse for the logo of your choice;
•
Click “Send” and the new logo will appear under “Device logos” in the Logo Manager
window (see “Logo Manager” Window below).
NUG.OM.000105.DRM
Page 44
Doremi Labs, Inc.
Version 3.1
New Logos
will appear
here under
“Device
Logos”
“Logo manager” Window
10.3 Logo File Transfer
Use DoremiAM’s Logo Manager to send the PNG logo file from your PC to the Nugget.
10.4 Burn In Window
The Nugget can display a Burn in Window (BIW) on both HD-SDI and SD-SDI outputs.
DoremiAM provides separate controls for BIW on both outputs.
NOTE: The BIW is used when performing editing work on a clip such as visual timecode
reference, background settings (Black/White, White/White), positioning, and sizes. The (BIW) is
located in the “General Tab” field has a drop-down folder (see the “Device Settings Window”
Section in the DoremiAM manual.
10.4.1
HD-SDI Options are:
•
BIW: OFF, White on Black, Black on White, White on background, Black on background
•
Mode: Normal or Extended. Normal shows the timecode only, while extended shows
timecode, video format and servo lock status
•
Position: Top Left, Top Center, Top Right, Bottom Left, Bottom Center and Bottom Right.
•
Size: Auto, Small and Large. Auto will change the size to small or large based on the
format specified.
10.4.2
SD-SDI Options are:
•
BIW: OFF, White on Black, Black on White, White on background, Black on background
•
Mode: Normal or Extended. Normal shows the timecode only, while extended shows
timecode, video format and servo lock status.
NUG.OM.000105.DRM
Page 45
Doremi Labs, Inc.
Version 3.1
11 Firmware Upgrade Instructions
The Nugget has two firmware packages: Nugget Firmware and NUG-SDI firmware. The latter
one is only needed for Nugget Players with the SDI option.
This section describes how to perform a firmware upgrade.
To upgrade a Nugget you need to upgrade the Nugget firmware and the NUG-SDI firmware.
The process is the same, but each firmware has a different package file. Nugget firmware files
will start with “nugget” while NUG-SDI firmware files will start with “fpga”.
11.1 Nugget Specific
Note that to be able to use the “Device Settings” button refer to the DoremiAM manual under
the section “Device Settings.” The device needs to have a firmware version number of 1.4.2765 or higher. If you have an earlier Nugget firmware, you need to follow the firmware upgrade
procedure described below.
How to perform a firmware upgrade on a Nugget:
• Go to the “Device” menu (not the tab) from the DoremiAM GUI and select “Firmware
Update” (see “Firmware Update Option” below);
• Click the “Browse” button, you will be prompted to the installation folder which lists the
firmware files that are packaged with DoremiAM (see the Windows labeled “Firmware
Update Option,” “Firmware Update,” and Choose a firmware file” below);
• Select the appropriate firmware version and click “Open,” click “Upgrade Now” (Nugget
Firmware Patch Selected).
“Firmware
update“
option
“Firmware Update Option” Window
NUG.OM.000105.DRM
Page 46
Doremi Labs, Inc.
Version 3.1
“Firmware Update” Window
Note: Nugget firmware files will start with “nugget” while NUG-SDI firmware files will start with
“fpga”
“Choose a firmware file” Window – Nugget Files Example
•
On the “Firmware update” window, click the “Upgrade now” button to start the firmware
update:
“Upgrade now” button
Nugget Firmware Patch Selected
•
During the upgrade process, a progress bar window will be displayed on the screen:
NUG.OM.000105.DRM
Page 47
Doremi Labs, Inc.
Version 3.1
Upgrade Progress Bar
•
When the upgrade is done, a window confirming a successful upgrade should appear as
presented below:
Upgrade Success Message
In case of failure, you will get one of two different messages:
•
If the Nugget firmware upgrade fails, you will get a message asking you to recycle power
on the unit then hit OK and wait
•
If the NUG-SDI firmware fails, you will get a message asking you to redo the upgrade.
NUG.OM.000105.DRM
Page 48
Doremi Labs, Inc.
Version 3.1
12 Nugget MPEG2 File Structure
A Clip ID that is 8 characters long represents each file. In addition to Clip ID, DoremiAM shows
a Title field that has a longer name (usually the original file name unless changed by the user
during import). When browsing from an Odetics controller like the RCV2, ListMaker, or a third
party controller or automation software, only the Clip ID is visible.
Each clip ID has 7 different files placed automatically by DoremiAM in the video data directory:
Filename.aif:
Filename.aif.idx:
Filename.aif.nfo:
Filename.m2v:
Filename.m2v.idx:
Filename.m2v.nfo:
Filename.nug:
Audio elementary stream file
Audio index file
Audio information file
Video elementary stream
Video index file
Video information file
A/V information file
These files are transparent to the user.
12.1 Nugget
MPEG2 422 and 420 player with built in pixel aspect ratio (PAR) converter. 3D support is
provided in conjunction with the Dimension-3D unit. Formats supported are SD and HD.
Because of the Nugget's built in PAR converter, HDV and DVCProHD files are imported to a
Nugget database without scaling (1440x1080 and 1280x1080).
12.2 Nugget + Dimension-3D
Combining the Nugget-Pro with a Dimension-3D will make for a low cost high definition 3D
server that supports most popular 3D display formats like Side/Side, Top/Bottom, Line/Line,
Sequential and dual stream Left and Right SDI. DoremiAM will encode left and right media files
to side/side or top/bottom media that can be transferred to the Nugget. The Dimension-3D will
convert the Nugget output from side/side or top/bottom to the 3D format required by the display
device.
NUG.OM.000105.DRM
Page 49
Doremi Labs, Inc.
Version 3.1
13 Video Duration Limitations
The Nugget Player has some minor limitations:
•
•
To use a file in loop mode or in a playlist, the file duration must be at least 31 frames.
Any clip in a playlist must also be at least 31 frames long to keep the playlist going,
shorter clips will cause the playlist to stop.
If you set Loop Mode ON during the last 60 frames of playback, the unit will not loop mode until
you cue up to start and hit play again.
The “Playlist Tab” feature, explained fully above, is where you can set a file/playlist in “loop
mode” and gives you information on limitations and missing clips. (see Section 3.4 of this
manual above and Section 3 of the DoremiAM manual.
NOTE: The Playlist tab is ONLY enabled when connected to a Nugget, not to a Nugget-Post.
The Playlist tab allows you to manage and create playlists on the selected Nugget device. The
Playlist tab has two sub-tabs; “Device Playlists” and “Device Clips.” *Playlist files reside on the
Nugget hard drive.
NUG.OM.000105.DRM
Page 50
Doremi Labs, Inc.
Version 3.1
14 Control Protocol
The Nugget can be controlled using the RS422 port or using TCP/IP.
The Nugget uses the standard P2 protocol or otherwise known as the Sony 9-pin protocol for
non-file related functions and it uses the Odetics protocol to load and browse files.
Developers can send an email to [email protected] to get a complete Nugget Control
Protocol document.
14.1 Controlling the Nugget using the Serial Port
To control the nugget using the serial port, you need to have the proper RS422 cable.
• If you are using a controller with an RS422 serial port, use the standard RS422 cable.
• If you are using a PC with an RS232 port, use the RS422-PC cable included with the
Nugget
• If you are using a Mac with a mini-DIN8 RS422 cable, use the RS422-MAC.
• All these cables are described in the following sections:
NUG.OM.000105.DRM
Page 51
Doremi Labs, Inc.
Version 3.1
14.1.1
Wiring of the Standard RS422 Cable
CONTROLLING DEVICE
(RCV2-9P)
DB9-M
Front View
1
2
6
3
7
8
1
NUG.OM.000105.DRM
4
RXA
2
TXB
3
CONTROLLE DEVICE
(Nugget)
DB9-M
Front View
1
5
9
2
6
Frame GND
3
7
4
8
5
9
1
2
TXA
Receive B
3
RXB
4
GND
4
5
SPARE
5
6
GND
6
RXB
7
Transmit B
7
TXB
TXA
8
Receive A
8
RXA
9
Frame GND
9
Page 52
Doremi Labs, Inc.
Version 3.1
14.1.2
Wiring of the NUGGET RS422-PC Cable
CONTROLLING DEVICE
(PC/RS232)
DB9-F
Front View
5
4
9
3
8
1
2
7
CONTROLLED DEVICE
(Nugget)
DB9-M
Front View
1
6
2
6
7
4
8
5
9
CD
1
1
Frame GND
RXD
2
2
TXA
TXD
3
3
RXB
DTR
4
4
RX_GND
GND
5
5
SPARE
DSR
6
6
TX_GND
RTS
7
7
TXB
CTS
8
8
RXA
RI
9
9
Frame GND
Shell
Wiring List:
3
Shell
Nugget (1) to Nugget Shell to PC Shell
Nugget (2) to PC (2)
Nugget (8) to PC (3)
Nugget (3 + 4 + 6) to PC (5)
Note: For a true RS422 connection, you can use an adapter made by “KK Systems” (Part
Number K422-99). This adapter connects to the RS232 port on the PC and provides an
RS422 connection on the other side. To connect the K422-99 to the NUGGET, use a
standard RS422 cable (See wiring of the standard RS422 cable). A true RS422
connection allows for a better connection and longer cables.
NUG.OM.000105.DRM
Page 53
Doremi Labs, Inc.
Version 3.1
14.1.3
Wiring of the Nugget RS422-Mac Cable
CONTROLLING DEVICE
Mac DIN8-M
Front View
6
7
CONTROLLED DEVICE
(Nugget) DB9-M
Front View
8
1
3
4
5
1
2
6
3
7
4
8
5
9
2
1
RXA
5
TXB
6
4
Frame GND
1
2
TXA
Receive B
3
RXB
GND
4
5
5
4
GND
6
RXB
8
Transmit B
7
TXB
TXA
3
Receive A
8
RXA
9
NUG.OM.000105.DRM
Page 54
Doremi Labs, Inc.
Version 3.1
14.1.4
Wiring of the DB-25 Audio Connector
The Nugget-Pro has a DB-25 audio connector with the following pinout:
Pin#
Signal Description
Pin#
Signal Description
1
No Connection
14
No Connection
2
No Connection
15
Ch 5 analog
3
Ch 6 analog
16
Ch 5 & 6 analog GND
4
Ch 3 analog
17
Ch 4 analog
5
Ch 3 & 4 analog GND
18
Ch 1 analog
6
Ch 2 analog
19
Ch 1 & 2 analog GND
7
IEC-958 plus
20
IEC-958 minus
8
IEC-958 GND
21
Ch 5 & 6 plus
9
Ch 5 & 6 minus
22
Ch 5 & 6 GND
10
Ch 3 & 4 plus
23
Ch 3 & 4 minus
11
Ch 3 & 4 GND
24
Ch 1 & 2 plus
12
Ch 1 & 2 minus
25
Ch 1 & 2 GND
13
No Connection
•
Analog audio is unbalanced (300mV).
•
Digital audio is balanced (XLR compatible)
•
The audio breakout cable is manufactured by Hosa part number DTM-803, it will provide
3 pairs of AES/EBU on XLRs 1,2,3 and 3 pairs of unbalanced analog channels for
monitoring purposes on XLRs 5,6,7 (two unbalanced analog audio channels per XLR.
Pin1=GND, pin2=left, pin3=right).
NUG.OM.000105.DRM
Page 55
Doremi Labs, Inc.
Version 3.1
15 Specifications
15.1 Interface
RS-422 Serial: Differential 0 to +5 Volts
RS232 Serial: 2U versions only used for Debug purposes using a Null Modem Cable –8V to
+8V.
Ethernet: Gigabit (older units were shipped with 100BT)
15.2 Audio
Analog: 6 unbalanced –10dB (DB-25)
Digital: 3 pairs of AES/EBU (DB-25)
Digital: IEC-958: AC3 encoded output on BNC
Digital: Embedded on SD-SDI and HD-SDI BNC connectors
15.3 Video
Analog: Composite output on BNC
Analog: YPbPr or RGB on DVI-I connector
Analog Sync: Bi-Level or Tri Level Sync on BNC
Digital: DVI Digital on DVI-I connector
Digital: SD-SDI on BNC connector
Digital: HD-SDI on BNC connector
15.4 TimeCode
Analog: LTC IN, accepts signals from 1Vpp to 2Vpp centered at 0V. Signals below 1Vpp will
not be read properly.
Analog: LTC OUT, 1Vpp
Digital: Embedded on HD-SDI BNC connector.
NUG.OM.000105.DRM
Page 56
Doremi Labs, Inc.
Version 3.1
16 Emulation
A controlling DVW500 or BVW75 will cause the Nugget to respond with a Doremi DVW500 or
BVW75 device ID. The default is Doremi and the Nugget will always try to identify the controlled
device by sending a Device ID command. Setting the emulation mode to Doremi.
NUG.OM.000105.DRM
Page 57
Doremi Labs, Inc.
Version 3.1
17 Document Revision History
Date
Version
07/26/2012
3.1
NUG.OM.000105.DRM
Description
Logo and contact information updated.
Page 58
Doremi Labs, Inc.
Version 3.1