1
ProDot
Manual
August 28, 2009 | Version 1.6
© 2009 Robert Bosch GmbH
Content
1
Introduction ................................................................................. 1
1.1 What can you do with ProDot? ...................................................... 2
2.16 Add a video file............................................................................. 25
1.2 What can you not do with ProDot? ................................................ 2
2.18 Creating a new page .................................................................... 29
1.3 What are the basic functions of ProDot? ....................................... 3
2.19 Changing the position of a page................................................... 30
1.4 Browser standards and other preperation ...................................... 4
2.20 Changing the name of a menu entry ............................................ 30
1.5 Your access to ProDot ................................................................... 4
2.21 Edit Meta information ................................................................... 31
1.6 After logging on.............................................................................. 4
2.22 Creating a new area with several sub-pages ............................... 32
2.17 Add an audio file .......................................................................... 27
2.23 Creating a new menu section ....................................................... 33
2 Tutorial .......................................................................................... 5
2.1 Before you start… .......................................................................... 5
2.24 Editing the Start page................................................................... 34
2.2 Editing text ..................................................................................... 8
2.26 Editing BoschLive messages ....................................................... 37
2.3 Editing images ............................................................................... 10
2.27 Setting up Current Messages on the Start page .......................... 38
2.4 Editing Flash .................................................................................. 13
2.28 Imprint .......................................................................................... 40
2.25 Editing, creating and deleting BoschLive articles ......................... 35
2.5 Editing Flash with editable texts..................................................... 14
2.6 Releasing and publishing changes ................................................ 16
3. If you encounter any problems … ................................................. 44
2.7 Generating released pages ........................................................... 17
2.8 Responsible RO staff ..................................................................... 17
4. Attachment ...................................................................................... 45
2.9 Division Editor ................................................................................ 18
4.1 Examples of different templates (content classes) ......................... 45
2.10 AutoStager .................................................................................... 19
2.11 Publishing with external hosts....................................................... 20
2.12 Translation into other languages................................................... 21
2.13 Creating new content .................................................................... 22
2.14 Links to pages within the Web presence ...................................... 23
2.15 Links to external pages or documents .......................................... 24
ProDot – Manual © Robert Bosch GmbH | Version 1.6
5. Contact ............................................................................................ 47
1. Introduction
Page 1
1
Introduction
ProDot is a Content Management System that facilitates
convenient and simple maintenance and extension of Bosch Web
pages. It is based on the RedDot Content Management System
and was specifically extended with functions for the Bosch Group.
This manual serves as a guideline. It contains information and
advice for your work with ProDot. It uses many practical examples
that will help you understand and learn the ProDot functions step
by step.
ProDot – User Manual © Robert Bosch GmbH | Version 1.6
1. Introduction
Page 2
1.1 What can you do with ProDot?
ProDot permits you to maintain and update Bosch Web pages,
delete old pages or add new ones. No programming skills are
required. ProDot uses your commands to create HTML pages that
you can upload on your server.
ProDot includes templates (also known as content classes in
ProDot) you can use to create your own Web pages and fill with
content as you wish.
ProDot is designed for maximum user friendliness. The provided
templates are designed very flexibly to support as many different
types of content presentation as possible.
The system's developers focused on easy learning and
convenient use.
1.2
ProDot has already integrated the corporate design for Bosch Web
pages. Pages you create with this system conform with the current
design and layout regulations of C/SMC32.
ProDot allows you to maintain an unlimited number of pages. You
can use it to present product and corporate information, as well as
current news and topics.
The "Menu Commander" permits you to create new pages and
menus swiftly.
With the "Bookmark Manager", you can generate links within the
Bosch Web site quickly and simply.
It is also easy to integrate external pages using ProDot.
With the "News Commander", ProDot provides the additional
option of administrating BoschLive articles, releasing them online
or saving them in the archive. Articles from the editorial
subscription are already saved in the system.
ProDot – User Manual © Robert Bosch GmbH | Version 1.6
What can you not do with ProDot?
All pages you create with ProDot fulfill the design and layout
regulations of C/SMC32. The system therefore only provides you
with appropriate layout elements and editing functions.
1. Introduction
Page 3
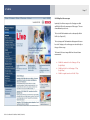
1.3
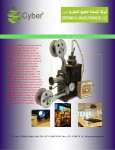
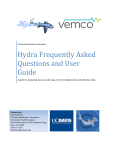
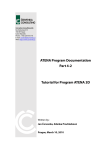
What are the basic functions of ProDot?
Bosch Group Web pages conform to a uniform underlying design.
ProDot allows you to edit the Menu (2) and content in the Content
area (3) – which consists of the Intro Box (4), the Main Column (5)
and the Right Column (6).
In the system, you view the pages as if they were in a browser
and can surf from page to page in the usual way. All areas where
editing is possible are marked with red dots.
In some cases ("open…"), you can create new areas on the page,
while in others ("edit"), you can directly edit texts, images or links.
Schemabild einer Bosch Internetseite
Content edited in ProDot is marked with a red dot. You can click it
to create new pages or entire new areas.
1
Header
2
Menu (Area/Sections)
3
Content Area/ Page Framework
4
Introbox
5
Main Column
6
Right Column
When creating ProDot elements for the first time, they are
always described as a “Page“.
ProDot – User Manual © Robert Bosch GmbH | Version 1.6
You do not need to add content wherever there is a red dot.
Optional fields are marked as "Conditional" (or "cond.").
1. Introduction
Page 4
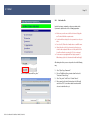
1.4
Browser standards and other preperation
1.5
The following technical standards are required for working with
ProDot:
Internet Explorer Version 5.5 or above
(version 8 in compatibility mode)
Windows 2000, Windows ME or above operating system
In Internet Explorer, select the "Tools" or “Extras” menu, then
"Internet Options".
Select the "Security" tab.* Click the “Trusted Sites” icon and click
the button “Sites”. Add the following domain:
To receive a user name and password to access ProDot, please
contact [email protected].
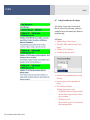
1.6
Your access to ProDot
After logging on
After logging on, Editors are directly shown the Start page of their
Product World. From here, they can surf straight to the places that
require editing.
http://dot.leonhardt.de
In the “Security” window, click the "Custom Level..." button.* In the
list, make sure these options are configured as follows…
"ActiveX controls and plug-ins": The option "Run ActiveX controls
and plug-ins" and “Script ActiveX controls marked safe for
scripting” must be enabled.
“Scripting”: Options “ActiveScripting (Javascript)” and “Allow paste
operations via script” must be enabled.
Select the “Privacy” tab. Make sure the configuration is set to
“Middle”.
The General Editor – who is responsible for publishing all content
on a country's Web site – has more rights than Editors. He can
edit all the country's Web site content and publish edited content
online. The General Editor is therefore initially led to a ProDot
Start page. He can choose between different links in "Edit your
Web site": Start page (including the pages behind it), Imprint,
BoschLive articles (for BoschLive subscribers), and Publish Site
(to publish edited content online).
* If you are not allowed to change these options, please contact your IT
service and ask them to configure it for you.
In case your browser (e.g. IE 7) blocks popup windows:
Disable Popup blocker (“Extras”) or enter the above URL in the
exceptions settings.
In case your browser does not display expected results:
Empty your browser cache (Menu “Extras / Internet Options /
Temporary Internet files / Delete files)
ProDot – User Manual © Robert Bosch GmbH | Version 1.6
All areas that can be edited are marked with a red dot
signifying RedDot.
If you wish to change pages and elements that have no
editing function, contact your regional Internet Coordinator.
2.Tutorial
Page 5
2
Tutorial
This step by step guide uses the following examples to introduce
you to the functions of ProDot.
2.1
Before you start…
You will find that it is quick and easy to make changes in ProDot.
You must, however, take decisions at certain points (e.g. on the
position of a page in the menu structure or the use of a
preformatted page), which cannot be reversed later or may require
producing the affected pages again.
We therefore recommend the following steps:
1.
Roughly assemble and structure the content.
2.
Set the navigation for all pages in a uniform way. Please note
that the menu cannot contain more than 20 entries (including
sub-entries).
3.
Create content in manuscript form using a text program.
Produce translations.
4.
New images (that do not yet exist in the image database) must
be prepared in the relevant formats using an image editing
program.
5.
Log into ProDot, select the main language (see Chapter 2.1.2)
and begin working with ProDot.
ProDot – User Manual © Robert Bosch GmbH | Version 1.6
When creating the navigation and content, please note the
relevant C/SMC32 "Guidelines for Content and Layout" for Bosch
Web pages. The current documentation on the Bosch "Guidelines
for Content and Layout" on the Internet are available on the CD
Extranet at
design.bosch.com.
Find out about various standard image formats in
advance. They are described in Chapter "2.3.1
Standard Image Formats".
2.Tutorial
Page 6
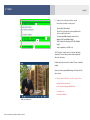
2.1.1
Selecting the language
Bosch Internet pages are mainly published in at least two
languages. To switch between language versions in your project,
click the language function in the menu area marked in dark blue
on the left hand side of the page (see image). Then select the
required language version.
Always begin your ProDot work in the main language (i.e. the
language that first appears when browsers access the Web site
on the Internet) and note the following:
Switching languages: e.g. DEU for German and ENG for UK English or ENU for US English
ProDot – User Manual © Robert Bosch GmbH | Version 1.6
If you intend to create a new page or elements within an
existing page (e.g. a new Right Column Box), first select
the main language for your project (if you have not done
so already). Finish all work in the main language and
release the pages for the translation workflow (Chapters
2.6 and 2.12).
The new pages or boxes will appear in the second
language of your project in the same place. Enter the
translation.
If you change already existing content, the content of the
second language will remain unchanged.
If you delete pages or boxes in one language, they are
automatically deleted in the other language(s).
2.Tutorial
Page 7
2.1.2
Basic functions in the left menu area
Whichever page you are editing in ProDot, you always see the
1
menu area marked dark blue
1
on the left side of the page. It
provides you with access to the following basic functions:
Start Page: You can switch from any page to the project Start
page from here.
2
Main Menu: Here are additional functions you can use depending
on your authorization level, e.g. switching between several
projects.
Search: Search the project using different criteria.
Tasks: Release your edited pages for publication here (Chapter
2.6).
Log Off: Use this function to leave ProDot when you have
completed your work.
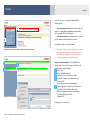
2.1.3
Editing the Web site
To edit the pages of your project, click the link
ProDot – User Manual © Robert Bosch GmbH | Version 1.6
2
Homepage.
2.Tutorial
Page 8
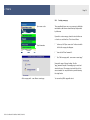
2.2
Editing text
Go to the page where you wish to edit a text. First make all the
changes in your main language (i.e. the language activated when
you log on).
Usually, the text is part of a "Box" you can open with the red dot
("Open: Box…").
Open Box
Edit Text
ProDot – User Manual © Robert Bosch GmbH | Version 1.6
1.
Now click on "Edit: Text ...", to edit the text.
2.
The text is opened in a separate window for editing. The tool
bar shows you the editing options available to you in this
area. In most cases, you can select text formats here, for
instance.
2.Tutorial
Page 9
3.
You can save your editing by clicking "Save". The window
remains open and you can continue editing the text. This
function is particularly useful for work on long text passages.
4.
Once you have entered all the texts, click "OK" to save your
edit. The window closes and the page is displayed with the
new text.
Text Editor
ProDot – User Manual © Robert Bosch GmbH | Version 1.6
When copying text from standard programs (such as
Microsoft Word®), formatting made in those programs
can affect page presentation. Therefore first copy your
text into a neutral Text Editor program and only then into
the ProDot system.
In the Text Editor, a new paragraph with a new empty
line is created when you press the Return button. If you
simply wish to continue writing on the next line, press
Shift+Return at the same time.
2.Tutorial
Page 10
2.3
Open Box
Editing images
Select a page on which you wish to edit an image.
1.
Usually, the image is part of a "Box" that you must first open
with the red dot ("Open: Box …").
2.
Now click "Edit: Image …"
An image dialog opens. Click "Select image". The images
already stored in the system are listed for selection.
Edit Image
Select image
ProDot – User Manual © Robert Bosch GmbH | Version 1.6
3.
Click the file name of an image to view more information on
it.
4.
Click "OK" to select the image. The window closes and your
page is displayed with the new image.
2.Tutorial
Page 11
2.3.1
Screen selection
Inserted in
Ideal width
File size
Intro box
540 px
approx. 20-60 kb
Content (large)
342 px
approx. 10-30 kb
Content (medium)
174 px
approx. 10-30 kb
Content (small)
84 px
approx. 3-15 kb
Margin box
174 px
approx. 10-25 kb
ProDot – User Manual © Robert Bosch GmbH | Version 1.6
Standard image formats
Images are automatically scaled to the right width. The
page ratio remains the same. You can also upload
images that are broader than the required format.
To avoid unfocussed images or similar deficiencies,
select images that conform with the allocated format.
2.Tutorial
Page 12
2.3.2
Uploading your own images
If you wish to upload your own images, click "Select file from local
file system" to transfer your chosen image to the RedDot server.
Select the file on your local hard drive in the following dialog.
Please note that the file size of the image will not be recalculated.
To avoid long upload times, give the image a format suitable for
Web sites before uploading. Use the Standard Image Formats for
guidance.
Select file from local file system
ProDot – User Manual © Robert Bosch GmbH | Version 1.6
You can use the free software "GIMP" to add the usual
semi-transparent bars to the images.
Convert new photos into a packed image format (.jpg,
.gif) before uploading them.
Integrate the pixel size (breadth x height) into the name
of the new image file. This will allow you to sort and
replace images at a later date.
Example: Pw_Productoverview_84x84.jpg
2.Tutorial
Page 13
2.4
Editing Flash
Boxes can contain Flash animations. You can easily adjust Flash
animations with ProDot. To start the editing process, first click
"Edit: Flash box".
1.
2.
Flash box
3.
Edit Flash
ProDot – User Manual © Robert Bosch GmbH | Version 1.6
If you wish to change a page headline, click "Edit: Headline"
and enter the new headline.
If you wish to upload a new Flash animation, click "Edit:
Flash (conditional)". A dialog window opens that is similar to
the "Edit images" window you already know. Continue in
exactly the same way as described in Chapter 2.3 "Editing
images". The same applies to all editing of fallback images
for users without a Flash player.
A so-called fallback image must be set up so that users
without a Flash player can also see an image. Click "Edit:
Fallback" and continue in exactly the same way as described
in the chapter "Editing images".
If you wish to create and use your own Flash files, use the
following standard formats
Used in
Width
Introbox
540 px
Right Column
174 px
2.Tutorial
Page 14
2.5
Editing Flash with editable texts
Some Flash animations allow you to edit their texts.
If you wish to edit existing texts with Flash, first click "Flash
Advanced Settings". You now see a list of all existing texts.
1.
Select the text you wish to edit. First click "Open: Flash Text",
then "Edit: Text".
2.
A text editing window you have already come across now
opens for you to edit the text. Click "OK" when you have
finished.
Flash Box
Make sure the length of the new text is roughly the same as
the length of the old text. Otherwise there might be problems
playing the animation.
3.
Flash Advanced Settings
ProDot – User Manual © Robert Bosch GmbH | Version 1.6
After you have finished editing, leave the page using the
"Back" link.
You can now check the new text directly in your animation and
edit it again if necessary.
2.Tutorial
Page 15
ProDot – User Manual © Robert Bosch GmbH | Version 1.6
Every Flash animation with editable text has a specific
number of allocated text boxes. To maintain the correct
order of texts in Flash, the number and order of the text
boxes should not be changed. So limit your editing to the
text itself.
Should you exchange a Flash animation with editable
text for a new Flash animation, the text (number of text
boxes, wording) must be manually adjusted. Otherwise
the new animation will present the text of the old
animation.
If you wish to create your own Flash animation with
editable text, pay attention to the rules for the structure of
such a file. A preformatted example is available on the
ProDot Start page at "Additional information and help to
use ProDot".
2.Tutorial
Page 16
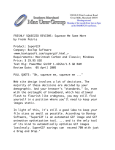
2.6
Releasing and publishing changes
Your changes are initially only visible to you personally in the
ProDot system. To publish them on the Internet, all changes must
be released.
1.
Click the "Tasks" button in the left RedDot bar. The status of
pages awaiting release is shown, as well as elements that
have been edited – for example "1 Edit Pages". Click this
link.
2.
Now all edited pages are shown in an overview. Beside the
name, you have four buttons providing different functions
(see illustration below):
1
View page for checking, 2 Display text changes in
3
red,
Save changes or 4 Delete.
3.
The button "Submit selected pages to workflow" permanently
saves your changes and initially submits the pages to the
translation workflow. Once this has been completed, it is
released for the live version.
„Aufgaben“ Button
Tasks
Submit selected pages to workflow
1
ProDot – User Manual © Robert Bosch GmbH | Version 1.6
2
3
4
Most Bosch Web pages are published in two languages.
Changes should only be published once all content has
been translated into the desired languages (see Chapter
2.7).
2.Tutorial
Page 17
2.7
Generating released pages
Until now, only responsible RO staff were permitted to generate
all pages. With the new RO module, it is now possible to name a
Division Editor for each product world and the HR module, who
will maintain the content of the relevant division and can publish it
separately from other divisions. For this purpose, special Start
pages have been produced to provide different links depending on
the user logged in.
2.8
Responsible RO staff
As before, the responsible RO employee can edit, generate and
publish all pages. The links are presented on the Start page in the
usual way. At "Additional Entrance Pages", all divisions that can
be separately generated and edited by Division editors are
displayed. If no links are listed, no divisions can be separately
edited.
Divisions that can be separately edited by Division editors
ProDot – User Manual © Robert Bosch GmbH | Version 1.6
The described form of separate generation
requires using the AutoStager (standard for all
RO) and not with externally hosted pages.
2.Tutorial
Page 18
2.9
Division Editor
Upon request, content of a division (product world) can be edited
by using a separate ProDot account. This account is assigned to
an additional user whose authorization is limited to the division for
which he is responsible.
The Division editor receives links for modifying, generating and
publishing items in "his" division.
The link "Edit your Website" leads straight to the pages that the
Division editor is permitted to edit. He can switch to other pages
displayed in SmartEdit mode, but cannot edit them due to his
limited authorization. Such articles are marked with a RedDot with
a diagonal white line.
A Division Editor can only edit, separately generate and publish
the division pages for which he has been assigned.
View for Division editor
ProDot – User Manual © Robert Bosch GmbH | Version 1.6
The described form of separate generation
requires using the AutoStager (standard for all
RO) and not with externally hosted pages.
2.Tutorial
Page 19
Notes for all editors:
2.10
Once the edited pages exist in all intended languages
and have been released, you must publish them so they
can be seen online. Click "Publish site" in the ProDot
Start page to do so.
A window opens with a note. Confirm by clicking "Start
publishing".
AutoStager
The AutoStager checks the XML status every hour. If the status
has changed in the last 2 hours, AutoStager collects the
"docs.zip" and unpacks them into the relevant domain directory.
You then receive an email report at the email address you
entered. It must be checked by you in the preview.
(http://www.bosch.[domain].preview.bosch.com)
Publishing edited and released pages
Now you must carry out "manual deployment" on the live server.
ProDot – User Manual © Robert Bosch GmbH | Version 1.6
2.Tutorial
Page 20
2.11
Publishing with external hosts
Once ProDot has generated static HTML pages from the edited
pages, you will receive an email. It contains the generated pages
in an attachment as a ZIP archive or a link to the download area
of a Web server where the ZIP archive has been saved.
o If the ZIP archive is not in the mail:
Select the link in the mail. You need a user name and
password for the download area (please contact the
technical staff listed at the end of the manual).
o In the download area, you can see a link list of all
previously generated ZIP archives and the appropriate log
files (protocol).
o Load the latest ZIP archive onto your local PC.
Unpack the ZIP archive. Copy the "Content" folder it contains into
the "docs" directory of your country on Stager. Then carry out a
preview deployment. If the content is in order, carry out live
deployment. (You will receive advice on this process from your
Bosch CI contact.) The pages can then be seen online
(depending on volume, deployment can take up to one hour).
ProDot – User Manual © Robert Bosch GmbH | Version 1.6
2.Tutorial
Page 21
2.12
Translation into other languages
After you have released all edited content, switch to the second
language using the language selection button (see illustration)
and click "Tasks".
The status display shows which content is still waiting for
translation. Open the pages and enter the translations.
These changes must also be subsequently released in "Tasks"
(see Chapter 2.6).
„
Change language
e.g. DEU for German, ENG for brit. English oder ENU for USEnglish
ProDot – User Manual © Robert Bosch GmbH | Version 1.6
If new pages or boxes have been created, the text
entered in the main language also appears in the second
language page or box.
If you edit existing content, the content for the second
language remains unchanged. Use the Tasks dialog to
view the passages requiring translation. Take each
individual task and enter the translation.
If you delete pages or boxes in one language, they are
also automatically deleted in the other language(s).
2.Tutorial
Page 22
2.13
Creating new content
The Content area of individual pages is divided into three different
sub-areas: "Intro Box", "Main Column" and "Right Column".
2.13.1
Page structure
Any of the above areas can be freely filled with elements based
on preformatted templates. You therefore have many different
layout options for your pages.
1.
Open: Page framework
Setting up or changing the page layout
2.
3.
4.
To create or edit a page layout, select "Open Page
Framework". The three sub-sections are now displayed.
Select "Add/del/sort …" in the page section you wish to edit.
Then select "Create and Connect Page".
A list of available templates (content classes) is now
displayed. A screenshot is displayed alongside each
template name.
Select a template. The window closes and the page is
displayed with the new, still empty template.
You can now enter your text, images and links by clicking the
"Edit" dots.
Add/del/sort Intro Box
5.
„
See chapter 4 for an overview of the different templates and their
possible uses.
Create and Connect Page
ProDot – User Manual © Robert Bosch GmbH | Version 1.6
2.Tutorial
Page 23
2.14
Links to pages within the Web presence
Proceed as follows to create a link (in the intended position on the
template) from one page to another within the Web presence:
1
Add to bookmark manager (Bookmark manager zufügen)
2
1.1
Go to the page where the link should lead and click on the
adjacent symbol ("Add to bookmark manager"). You have
now saved the link to this page.
2.2
Return to the place on the page where you wish the link to be
inserted. Click on the adjacent symbol and select the saved
page you wish to link from the drop-down menu.
All links and their titles are now automatically entered. You can
then edit the link title using "Edit …".
If you wish to integrate several links in one box (i.e. create a link
list), use the "Dynamic Link" function.
Connect with bookmarked page
Expand Dynamic Link
According to the Bosch Internet Styleguide internal or
dynamic links should open in the main window.
ProDot – User Manual © Robert Bosch GmbH | Version 1.6
1.
Click "Edit: Dynamic link" and then select "Expand Dynamic
Link".
2.
You can now add further (initially empty) links. Then link the
pages as described above using the Bookmark Manager.
2.Tutorial
Page 24
2.15
Add/del/sort: External
links/downloads
External links or document links can only be placed in the
right column boxes.
It is also easy to integrate links to external pages or documents
(e.g. for downloading available PDF files).
1.
Open the box in which you wish to add a link to an external
page or documents and click "Add/del/sort: External
links/downloads".
2.
Select "Create and Connect Page". If you want the new page
to appear in the main window, select the
"link_item_Download" template for a link to a document, or
"link_item_external_Link" for a link to an external page. The
links are initially shown empty.
If you wish the page to open in a new window, select
"link_item_external_link popup". The empty external link is
then displayed.
Templates for Download-documents and externe links
You can connect a box with a page or email form in the
contact function of the Bosch Header (see Manual „Service
functions 2.0). Add an external link and enter a call in the
URL field based on the following samples.
For calling up a page:
javascript:openContact('XY')
XY is placeholder for a product world shortcut which you
have to enter in the contact function section.
For calling up an email form:
javascript:openContactEmail('[email protected]')
Use a mail address which has been entered in the contact
function (otherwise the form will not be sent).
ProDot – User Manual © Robert Bosch GmbH | Version 1.6
Links to external pages or documents
3.
A new link has now been added to the box. Use the "Edit …"
buttons to enter the external Web address (URL) or linked
document, to edit the link text and to make settings for the
window that opens. The link must have the following format:
http:// followed by the link to the external Web site (www…)
or path to the document.
According to the Bosch Internet styleguide links to
external pages and documents should open in a new
window
2.Tutorial
Page 25
2.16
Add a video file
Instead of an image or animation, a box may contain a video.
If you want to upload a video do the following preparation:
Make sure your video meets the Bosch Internet Styleguide
and Technical Guidelines requirements.
Scale its width according to the box you want to use for your
video.
Save it as .flv (Flash video format) and use a valid file name.
Upload the video to the Bosch server into a directory you
create for video uploads. Make a note of the path to the file.
You will need it when you enter the URL (see next page).
For browsers not equipped with Flash player, prepare a
fallback image (scale it to the animation’s width and height).
After having done this you can set up a video box in the following
way:
List of Content Classes with “box_video”
1.
2.
3.
4.
ProDot – User Manual © Robert Bosch GmbH | Version 1.6
Select "Open Page Framework".
Choose "Add/del/sort: Boxes in main column" and select
"Create and Connect Page".
Select “box_video” in the “List of Content Classes”.
Enter a name for the item (for internal use in ProDot only)
and click on “OK”. You now have added a new box which
does not contain the video yet.
2.Tutorial
Page 26
5.
1
1
2
2
3
3
4
4
5
5
In order to connect the video to the box, click on
the red dot to open the box. Now, you can …
Add a headline (Edit: Headline)
Enter the URL to the video file you have uploaded to the
Bosch server (Edit: Url to video)
Upload a preview/fallback image by using the Asset
Manager (Edit: Preview/Fallback image)
Edit the height of the video/image (Edit: Video/Fallback
height)
Insert an explanatory text (Edit: Text)
Click “Preview” to check the video box. The video will only be
shown in the “Preview” when you have already deployed the
video to the live system.
Headline and text do not have to be added. These are conditional
settings.
If you do not add any preview/fallback image, the first motif of the
video is shown.
Just have a look at this URL to see the “box_video” online:
http://prodot-show.internetworkbosch.com/content/language2/html/867.htm
User name: bosch
Password: %dot4b0sch
Online use of video box
ProDot – User Manual © Robert Bosch GmbH | Version 1.6
2.Tutorial
Page 27
2.17
Add an audio file
Instead of an image or animation, a box may contain an audio file.
If you want to upload an audio file do the following preparation:
Make sure your audio file meets the Technical Guidelines
requirements.
Save it as .mp3 and use a valid file name.
Upload the audio file to the Bosch server into a directory you
create for audio uploads. Make a note of the path to the file.
You will need it when you enter the URL.
After having done this you can set up an audio box in the
following way:
1.
2.
3.
4.
List of Content Classes with “box_audio”
ProDot – User Manual © Robert Bosch GmbH | Version 1.6
Select "Open Page Framework".
Choose "Add/del/sort: Boxes in main column" and select
"Create and Connect Page".
Select “box_audio” in the “List of Content Classes”.
Enter a name for the item (for internal use in ProDot only)
and click on “OK”. You now have added a new box which
does not contain the audio file yet.
2.Tutorial
Page 28
5.
1
1
2
3
2
3
4
5
4
5
In order to connect the audio file to the box, click on
the red dot to open the box. Now, you can …
Add a headline (Edit: Headline)
Enter the URL to the audio file you have uploaded to the
Bosch server (Edit: Url to audio)
Upload a preview/fallback image by using the Asset
Manager (Edit: Preview/Fallback image)
Edit the height of the preview/fallback image (Edit:
Preview/Fallback height)
Insert an explanatory text (Edit: Text)
Click “Preview” to check the audio box. The audio file will only be
played in the “Preview” when you have already deployed the
audio file to the live system.
Headline and text do not have to be added. These are conditional
settings.
If you do not add any preview/fallback image, the default image is
shown. It is an image which is already placed within the audio box
by setting it up.
Online use of audio box
Just have a look at this URL to see the “box_audio” online:
http://prodot-show.internetworkbosch.com/content/language2/html/867.htm
User name: bosch
Password: %dot4b0sch
ProDot – User Manual © Robert Bosch GmbH | Version 1.6
2.Tutorial
Page 29
2.18
1
Open: menu section
Creating a new page
The menu with which users can access your pages is divided into
main headlines, with the menu items below respectively marked
by a link arrow.
If you wish to create a new page, it must be entered in the menu
so it can be accessed from there. This is done as follows:
2
Menu Commander
3
Add a new page with … same Menu as current page
ProDot – User Manual © Robert Bosch GmbH | Version 1.6
1.
1
In the menu, click "Open: menu section" in the area in which
the link to the new page should appear.
2
2.
Now select the "Menu Commander".
3
3.
Select "Add a new page with… same menu as current page".
Now enter the name of the page heading. Select the
"page_framework" template. A new empty page is created and
entered in the menu. The new page is entered at the end of an
area as standard. You can position it where you wish later using
the sorting function.
You can now freely fill the page with content.
2.Tutorial
Page 30
2.19
Changing the position of a page
If the page is not to be placed at the end of the menu area, you
can use the sorting function to position it elsewhere.
1.
2.
3.
Sort pages
2.20
Click again on "Open: Menu section" and select the "Menu
Commander".
In the window that opens, click "Sort menu items" below the
"Edit current menu" heading.
Use the symbols on the left side of the window to change the
menu position of all pages as desired.
Changing the name of a menu entry
If you want the page to appear in the menu with a different name,
you can change it very easily.
1.
2.
3.
4.
Re-call pagename
ProDot – User Manual © Robert Bosch GmbH | Version 1.6
First click "Open page".
Then click on the red dot to the right of it. The headline is
embedded behind the red dot.
Enter the new headline and click "OK". The new title is now
displayed in the menu.
If the new headline is especially long, enter a shorter
headline for the Back navigation. To do so, click on
"Shortname: Page headline" and change the headline.
2.Tutorial
Page 31
2.21
Edit Meta information
Edit Meta information
Met a information (e.g. keywords) should always be edited in the
default language (DL) of your project.
1.
2.
3.
Click on “Open page”.
Click on “Meta description”.
Enter the Meta description and confirm with “OK”.
4.
5.
In order to edit the Meta Keywords, click the red dot next to it.
Enter Meta Keywords for this page (comma-seperated). Click
„OK“.
6.
In order to edit the Basic Declaration, click the red dot with
the „F“ (Edit via Form). From the drop down, select the
correct Business sector, Business Division and Business
Unit. Confirm with “OK”.
Make sure you release your tasks (if necessary, enter Meta
information tot he second language version of your project).
Publish your pages and deploy to live.
ProDot – User Manual © Robert Bosch GmbH | Version 1.6
2.Tutorial
Page 32
2.22
Creating a new area with several sub-pages
In Chapter 2.16, you created a new page that was directly added
to the existing menu. You can also create complete new areas
with additional sub-pages – for instance for a product catalog. The
number of intermediate and sub-pages you can create and edit
with ProDot is unlimited.
1.
First surf to the area of the main navigation where you wish
to create a new page. Select the "Menu Commander" as
described in the previous chapter.
2.
To create a page, surf to the area in the main navigation
where you wish to create a new page, but select "Add a new
page with … new menu".
A new sub-page for the area is created and opens in its own
still empty menu item. The menu can be filled with further
pages (cf. chapter 2.16 "Creating a new page").
Menu Commander
3.
ProDot automatically creates a back navigation. You just
need to appoint the back-link. In ideal manner the back-links
should be named like the page. Is there not enough space
to do so, a shorter but similar synonym should be found.
ProDot – User Manual © Robert Bosch GmbH | Version 1.6
Enter the page title for the Back navigation. To do so, first
click "Open page". Under the item "Shortname", enter its
name for the Back link.
2.Tutorial
Page 33
2.23
Creating a new menu section
If you wish to create a new area in the menu under your own
headline, select "Open Menu Area".
Create and Connect page
Enter pagename
ProDot – User Manual © Robert Bosch GmbH | Version 1.6
1.
Now click "Add/del/sort: Menu sections" and then "Create
and Connect page".
2.
Now enter a name for the headline of the new menu area
and click "OK".
3.
The new menu area now appears in the menu bar. You can
give it new sub-pages using the "Menu Commander" (cf.
Chapter 2.19 "Creating a new area with several sub-pages")
2.Tutorial
Page 34
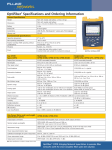
2.24
Editing the Start page
The country Start page contains different formats that also differ
from other pages in terms of how they are edited in ProDot.
1 The marked area contains the header and teaser boxes for the
4 BoschLive articles. Use the New Commander to set up new
BoschLive articles and slot them into one of the four positions on
the Start page.
2 The section "New messages" allows you to link additional short
messages. The links can lead to external sites or a follow-up page
that is directly connected to the link and not linked in the menu.
3 Special content is linked in additional teaser boxes. The
templates are embedded in the marginal column and edited in the
same way as on other pages.
ProDot – User Manual © Robert Bosch GmbH | Version 1.6
2.Tutorial
Page 35
2.25
Editing, creating and deleting BoschLive articles
BoschLive articles are edited using the News Commander.
Proceed as follows: Click the link "BoschLive articles" on the
ProDot Start page. Then select "Editing functions display on/off".
Click "Open News Commander" to open a list of all available
BoschLive articles.
Link to „BoschLive Articles“ on the ProDot-Startpage
Data sheet view
ProDot – User Manual © Robert Bosch GmbH | Version 1.6
The column labeled "Magazine" is used to determine
which articles will be presented online.
The "Start Page" column shows where the Start page
link to the articles is placed.
The "Archive" column determines in which archive
category the article will appear.
The "Save changes" link saves the changes made.
(Changes are only visible after the next publication has
been released.)
2.Tutorial
Page 36
To create a new BoschLive article, select "Create and Connect
Page" in the list. To delete an article, select "Disconnect Page
from List". Use the Menu Commander to change the order of
articles within BoschLive. When a new article is created, a new
page without content is generated for you to fill.
Articles from the BoschLive subscription are automatically
provided every month and are initially placed "on hold" in the list.
You can edit and publish articles in ProDot. Detailed instructions
explain the special aspects of BoschLive. (Please ask your
contact specified at the end of this manual.)
ProDot – User Manual © Robert Bosch GmbH | Version 1.6
2.Tutorial
Page 37
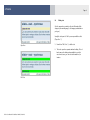
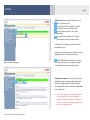
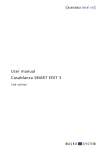
2.26 Editing BoschLive messages
2.26
In principle, BoschLive messages on the Start page are edited
and filled in ProDot in the same way as all other pages. There are
a few additional aspects to note:
The texts in the Flash animations can be subsequently edited in
ProDot (see Chapter 2.5).
The texts, images and Flash animations that appear in the teaser
box on the Start page or the archive pages are entered directly on
the page of the message.
The formats of the teaser images differ from the usual column
measurements:
ProDot – User Manual © Robert Bosch GmbH | Version 1.6
Width of the main article on the Start page: 359 px
(height 233 px)
Width of articles 2-4 on the Start page: 179 px
(height 78 px)
Width of a regular teaser box in ProDot: 174 px
2.Tutorial
Page 38
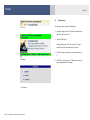
2.27
Setting up Current Messages on the Start page
On the Start page, "Current messages" can now be entered.
Either in the preview or in the generated page, you will only see
something if at least one news item already exists. Otherwise, the
area will remain empty.
ProDot functions:
"Add/del/sort: Messages": Adds a new report
"Edit: Headline": Edits the headline (in the image "Current
Messages"
"Edit link type: URL": Sets the link type
Three different link types can be selected:
ProDot – User Manual © Robert Bosch GmbH | Version 1.6
Internal link: Using a Bookmark Manager, link to an existing
ProDot page
Internal message page: Create a separate page for the
message
URL to external page: External link
The following options can now be selected:
o "Edit: External link": Allows you to embed an external link
and defines whether the pages should be opened in the
same or a new window.
o "Edit: Message teaser text":
Edits a preview of the report text. The text editor provides
different formatting possibilities
2.Tutorial
Page 39
2.27.1 Creating a page for a news item
If you select the link type "Internal message type" when creating
the report, you must give the follow-up page (see image) that
contains the actual content a new layout.
To do so, click the message text you have just set up on the Start
page. It leads to the follow-up page. You can edit the page layout
in the usual way.
2.27.2 Download function
Is available in the template of the news messages under the right
column. The ProDot function is "Add/del/sort: External
links/Downloads". The following file types can be made available
for downloads: pdf; doc; rtf; zip
ProDot – User Manual © Robert Bosch GmbH | Version 1.6
2.Tutorial
Page 40
2.28
Imprint
The imprint is centrally provided for all Bosch websites of a
country. It can be accessed by the public via the button “Imprint”
in the header.
The current imprint is being replaced by a revised new version
which offers these improvements:
- Individual provider information per product world (division) of
a country, e.g. terms and conditions, privacy statement, conditions
of purchase …)
- Context sensitive call of the relevant imprint from the RO or
division website (according entry is displayed at the first position).
The RO internet coordinator is responsible for adding content to
the new format as well as updating its content in the future. Follow
the below instructions in order to make the new imprint available
(until then, the current imprint will remain accessible):
Imprint (current)
Imprint (new)
ProDot – User Manual © Robert Bosch GmbH | Version 1.6
On the ProDot entry page, which appears after the log in, you can
see the links “Imprint” and “Imprint new”. Click “Imprint new” in
order to edit the new imprint.
2.Tutorial
Page 41
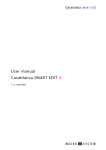
On the left, you can see a completed new imprint with the
following structure:
B
A
A
Vertical main navigation (primary menu level): contains the
divisions of a country with their individual provider information.
First entry contains RO provider information.
B Horizontal tab navigation (secondary menu level): contains
the topics within the provider information of a division.
Now enter the content of your country’s imprint.
If your website offers more than one language version, make
sure that you edit the imprint in the default language (DL).
After finishing your editing, release your tasks, switch to the
second language version and enter the translation.
Imprint with completed main and tab navigation (sample from Germany)
Setting up the main navigation
Setting up the main navigation: The RO imprint has been
entered already. Please add the entry for each division of your
country below the existing RO imprint:
Click on “Open”.
Click on “Add/Del/Sort Divisions”.
In the dialog, select „Create and Connect Page“.
Enter the title of the menu entry (division name) and
confirm with “OK”.
The entry appears in the vertical main navigation.
In order to support the context sensitive call of this menu
entry, signify it: Click on „Edit Basic Declaration...“.
Enter the according division shortcut for each division
(C/CCB31 will tell you the shortcuts).
Confirm with “OK”.
Repeat steps 2-5 for each division.
ProDot – User Manual © Robert Bosch GmbH | Version 1.6
2.Tutorial
Page 42
Continue by setting up the imprint’s tab navigation. B
B
Completed tab navigation (sample from Germany)
For each entry in the main navigation, a first tab will be added
automatically. Add more tabs as is necessary for the topics of
each imprint. You can add as many tabs and name them as you
like (for the content of each tab, 1 page will be available).
Setting up the horizontal tab navigation: Select the first entry in
the main navigation. A
Click on “Open”.
Click on “Add/Del/Sort Imprint sections”.
In the dialog, select “Create and Connect Page”.
Enter a title for the tab (topic name) and confirm with „OK“.
The tab appears in the navigation.
Repeat steps 1-4 for each main navigation entry and for each tab
you need.
A
Now enter imprint content for each topic as described on the next
page.
Contact the divisions of your country and request content for their
imprint topics. When available, enter this content. For orientation,
look at the imprint of www.bosch.de.
If a division consists of different business units (BU), the
according provider information can be entered and displayed in
separate sections within the tab content, using sub headlines.
Setting up the tab navigation
ProDot – User Manual © Robert Bosch GmbH | Version 1.6
2.Tutorial
Page 43
Editing tab content: Select a tab and edit the topic’s content:
Click on „Open Imprint section“,
To edit the tab’s title, click on “Edit Imprint section title”.
To edit the tab’s content, click on “Open content”.
To enter a headline for the topic’s content, click on
“Edit headline”.
To edit the text below the headline, click on “Edit text”
(you can format your text in the text editor as usual).
Repeat steps 1-5 for each tab you have added, in each of the
main navigation’s entries.
If a division consists of different business units (BU), you can edit
and display these BUs in separate sections as follows:
Editing content in the tab navigation
Click on “Add/Del/Sort Items in this section”. In the dialog,
select “Create and Connect Page”. An additional (yet empty)
section is displayed. Enter content according to steps 3-5.
Activating the new imprint: As soon as you have finished your
editing and have released your tasks, publish your pages and
inform [email protected] that your imprint is ready.
The new imprint will be activated. The link to the old imprint will be
removed. Deploy to live.
ProDot – User Manual © Robert Bosch GmbH | Version 1.6
For the context sensitive call of the imprint, the website has
to contain Header version 2.0 plus Basic Declaration
taggings. For websites containing an older Header version,
the context sensitive call can be integrated manually. Please
contact [email protected].
3. If you encounter any problems ...
Page 44
3. If you encounter any problems …
3.1 General
If functions do not work the way described in this manual, first
ensure that your operating system and browser meet the technical
requirements (chapter 1.4).
3.2 Uploading files
Ensure that the name of the file you wish to upload includes no
spaces, "umlauts", special characters or dashes, and that the
permitted maximum file size is not exceeded.
3.3 Making entries
If you can see all functions, but cannot make any entries, change
the language settings of your keyboard.
3.4 The display
If the images or texts are not displayed like you want them to be,
first ensure that the appropriate standard image formats have
been used and that maximum text lengths have not been
exceeded.
ProDot – User Manual © Robert Bosch GmbH | Version 1.6
4. Attachment
Page 45
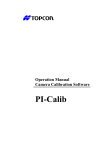
Flashbox with Introtext
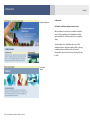
4. Attachment
4.1 Examples of different templates (content classes)
Different templates (content classes) are available for individual
areas. ProDot automatically provides all templates and editing
options permitted in the relevant area when you are creating and
editing.
Usually, templates can be flexibly filled with content. ProDot
distinguishes between optional and compulsory fields. In this way,
a template provides many different options for how it will
subsequently be presented on the Internet, depending on the way
it is filled.
Flash-Top-Box
Topbox with
Introtext
ProDot – User Manual © Robert Bosch GmbH | Version 1.6
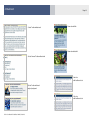
4. Attachment
Page 46
Content Textbox without visual
Column box with link
Column box without link
Content Universal Textbox without visual
Audio box
with headline and text
Content Textbox with visual
and grey background
Video box
with headline and text
ProDot – User Manual © Robert Bosch GmbH | Version 1.6
5. Contact
Page 47
5. Contact
Your contact at C/CCB31
Robert Bosch GmbH | C/CCB31
Ulrich Spieth
+49 711 - 811 69 62
[email protected]
Robert Bosch GmbH | C/CCB31
Markus Huber
+49 711 - 811 38 169
[email protected]
Contact for technical questions and pricing
Leonhardt Multimedia GmbH
[email protected]
+49 30 269 387-0
ProDot – User Manual © Robert Bosch GmbH | Version 1.6
© 2009 Robert Bosch GmbH