1
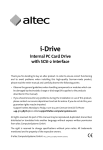
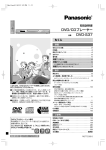
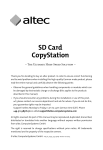
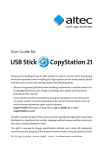
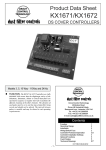
Centronics Drive
PC Card Drive for PC
with parallel interface
Thank you for deciding to buy an altec product. In order to ensure correct functioning
and to avoid problems when installing this high-quality German-made product, please read the entire manual and carefully observe the following points:
• Observe the general guidelines when handling components or modules which can
be damaged by electrostatic charge or discharge (this applies to the products described in this manual).
• If you should encounter any problems during the installation or use of this product, please contact our service department and ask for advice. If you do not do
this, your guarantee rights may be impaired. Hotline: +49-511-9 83 81-70 or
[email protected]
All rights reserved. No part of this manual may be reproduced, duplicated, transcribed,
distributed or translated into another language without express written permission
from altec ComputerSysteme GmbH.
The right is reserved to change specifications without prior notice. All trademarks
mentioned are the property of the respective owners.
© altec ComputerSysteme GmbH.
Cent1_1.qxd4 Version 10/2000.
altec ComputerSysteme GmbH disclaims all liability for errors in this manual. Liability
for direct or consequential damages which arise in connection with the use of this
documentation is specifically excluded insofar as this does not contradict the law.
The Centronics Drive is manufactured to EMC guideline 89/336/EWG and is CE compliant and CE certified to EMVG.
User Manual, Centronics Drive Version 1.1
2
Table of contents
1.
Introduction
4
1.1
Product description
4
1.2
Features
4
1.3
Scope of delivery
4
2.
Hardware installation
4
2.1
Power supply
5
2.2
Data interface
5
2.3
Connecting a printer to the same parallel port
5
3.
Connectors
6
4.
Software installation
6
4.1
Installation under DOS
6
a) Loading the driver with an entry in CONFIG.SYS
6
b) Loading the driver from a DOS command line
6
Installation under Windows
7
4.2.1 Installation under Windows 95/98
7
4.2.2 Installation under Windows NT
8
5.
Using the Centronics Drive
9
5.1
Inserting/removing a PC Card
9
6.
Technical specifications
10
7.
PC Card memory media
11
4.2
3
User Manual, Centronics Drive Version 1.1
1. Introduction
1.1
Product description
The altec Centronics Drive makes it easy to read from and write to PC card storage
media and is suitable for use in industrial environments. It supports all popular card PC
Card ATA or SRAM storage media and PC Card hard disks and has a single PC Card
Type III slot at the front. CompactFlash and MultiMediaCards are also supported with
an optional adapter.
The Centronics Drive is connected to your PC using the standard parallel printer port.
The Centronics Drive is manufactured as an external device and features fast data
transfer. It is ideal for exchanging data between portable and desktop computers and
for easy access to image files produced by digital cameras.
1.2
Features
◆
External device with robust aluminium desktop case fitted with 50-pin HD
socket
◆
Fast data transfer at up to 1 MByte/s
◆
1 PC Card slot for Type I and II PC Cards or Type III hard disks
◆
Supports SRAM and ATA Flash cards of any storage capacity
◆
Drivers supplied for MS-DOS, Windows 95/98, Windows NT
◆
Automatic detection of ATA and standard SRAM/Flash cards
◆
Automatic memory size detection of unformatted PC cards
1.3
Scope of delivery
◆
PC Card Drive in desktop case, external plug-in power supply
◆
User manual
◆
Support Diskette with drivers for DOS, Windows 95/98 and Windows NT
◆
Optional: Keyboard adapter for the power feed as an alternative to using the
external power supply
2. Hardware installation
Please note the following when installing the Centronics Drive:
User Manual, Centronics Drive Version 1.1
4
2.1
Power supply
Power is either provided by the supplied external plug-in power supply with mini
DIN 6 connector or is taken from the PC’s keyboard using the keyboard adapter (available as an accessory).
2.2 Data interface
Connect the supplied Y-cable to the parallel port of the PC (25-pin Sub-D female sockket). Connect the middle of the cable to the 50-pin HD connector on the rear of the
Centronics Drive. The third connector on the shorter side of the cable can be connected to a printer if required (see below).
The Centronics Drive can be connected to the PC at any time, even when the power is
switched on. Under Windows 95/98 and NT, it is then necessary to restart the computer in order to load the driver. The driver can be loaded under DOS without restarting
the computer (see below). You should first connect the Centronics Drive to the power
supply before connecting it to the parallel port of the computer.
The Centronics Drive can be operated either with the slower (but more compatible)
SPP mode of the parallel port or with the faster EPP mode. The latter mode requires an
EPP-compatible parallel interface in the PC; most modern PCs now have EPP parallel
ports. Make sure that the operating mode of the parallel port is configured for “EPP” or
"EPP+ECP" in the PC’s BIOS Setup program. The driver detects the configured mode
automatically and uses the faster option if available.
2.3 Connecting a printer to the same parallel port
The supplied Y-cable allows you to connect the Centronics Drive and a second device
with a parallel interface, e.g. a printer, to the same parallel port of the PC. With this
arrangement, the Centronics Drive is connected between the PC and the printer as
shown in the figure.
PC
Printer
Centronics Drive
5
User Manual, Centronics Drive Version 1.1
3. Connectors
As shown in the figure, all connectors are available on the rear panel of the device:
(switches S1 to S6 are currently unused)
S1 – S6
Parallel data interface
[unused]
Power
4. Software Installation
The Centronics Drive is installed in the operating system using the supplied driver and
appears as an exchangeable drive with logical drive letter. When the driver loads, it
checks all parallel interfaces in the PC for the presence of a Centronics Drive. The
Centronics Drive must be supplied with power during this time.
4.1 Installation under DOS
Create a directory "altec" on the boot drive of the PC and copy all files from the DOS
directory of the supplied Parallel Drive Support Diskette to the "altec" directory.
The driver “cdrive.com” can then be loaded in one of two ways:
a) Loading the driver with an entry in CONFIG.SYS
Use a text editor to add the following entry at any position in the CONFIG.SYS file on
the boot drive of the PC:
device = \altec\cdrive.com
Now reboot the PC. This method has the advantage that the driver is automatically
loaded each time the PC is rebooted.
b) Loading the driver from a DOS command line
Enter the following command line under DOS and press ENTER:
\altec\cdrive.com
User Manual, Centronics Drive Version 1.1
6
This immediately installs an additional logical drive for the Centronics Drive.
The advantage of this method is that it is not necessary to reboot the computer. However, this procedure must be repeated each time the PC is rebooted
because the driver is not automatically loaded in this case.
Ł
4.2 Installation under Windows
Under Windows 95/98 and Windows NT, the driver is installed using the hardware
manager. The driver for Windows 95/98 and/or Windows NT allows the PC Card slot of
the Centronics Drive to be accessed as a logical drive for exchangeable media (PC
Cards). In addition to Type II ATA PC Cards and Type III hard disks, it is also possible to
read, write and format SRAM PC Cards.
Prerequirements
If the Centronics Drive has already been installed under DOS, remove all entries for the
Centronics Drive from the following files:
"config.sys" and/or "autoexec.bat".
4.2.1 Installation under Windows 95
Step 1:
Start Windows 95
Step 2:
Install the driver file as follows:
◆
Insert the supplied Parallel Drive Support Diskette in drive A:
◆
Start the hardware manager from the Control Panel.
◆
Choose the option "Do not search for new hardware".
You will now see a list of device classes such as modems, hard disk controllers
etc.
◆
Choose the device class "SCSI Controller".
After a short delay, you will see a list of SCSI controller types which are already
known to Windows.
◆
Click "Diskette" and confirm the prompt "A:" by clicking "Next".
You should now see the device listed as a virtual SCSI Controller as a single
entry with the name "Parallel Drive Virtual SCSI Controller".
◆
Click “Next” to confirm that you want to install the driver.
◆
Click “Next” to confirm the prompt for the file "cdrive.mpd" with the default
setting of "A:".
7
User Manual, Centronics Drive Version 1.1
Windows will now copy the driver to the following subdirectory:
WINDOWS\SYSTEM\IOSUBSYS
Windows will now prompt you to reboot the computer. You should normally
confirm this prompt with "Yes".
Step 3:
◆
Reboot the computer:
After installing the driver, you must reboot Windows 95/98 in order for the driver to load. Make sure that the Centronics Drive is supplied with power, close
all programs which are running and reboot Windows using the Start button.
4.2.2Installation under Windows NT
Step 1:
Start Windows 95
Step 2:
Install the driver file as follows:
◆
Insert the supplied Parallel Drive Support Diskette in drive A:..
◆
Choose "SCSI Adapter" in the Control Panel of Windows NT.
You will now see a list of installed SCSI adapters. Click the “Drivers” tab
and click “Add”.
After a short delay, you will see a list of SCSI adapter types which are already
known to Windows.
◆
Click "Diskette" and type the text "A:\WINNT" in the field “Copy manufacturer
file from”.
◆
Click "OK" to confirm your entry.
◆
Type the text "A:\WINNT" once again in the field “Copy file from” and click "OK"
to confirm your entry.
Windows NT will now copy the driver "cdrive.sys" from the diskette to the subdirectory "WINNT\SYSTEM32\DRIVERS". This subdirectory contains the drivers
from all manufacturers.
◆
Windows NT will now prompt you to reboot the computer. You should normallly confirm this prompt with "Yes".
Step 3:
◆
Reboot the computer:
After installing the driver, you must reboot Windows NT in order for the driver
to load. Make sure that the Centronics Drive is supplied with power, close all
programs which are running and reboot Windows NT using the Start button.
User Manual, Centronics Drive Version 1.1
8
5.
Using the Centronics Drive
5.1
Inserting/removing a PC Card
After completing installation of the Centronics Drive, insert a Type I, II or III PC Drive into
the slot with the connector end first. The correct way of inserting the card is also
shown by a small arrow or triangle on the label of the card.
You must only insert or remove PC cards when the LED is not lit. If you try to access the
drive when there is no PC card inserted, you will get the error message “Not ready”,
analogously to a diskette drive when the diskette is missing.
Both the size and the type of the inserted memory media are detected automatically.
Ł
The Centronics Drive supports ATA cards of all types (Type III, Type II,
CompactFlash card with adapter, Smart Media card with adapter,
MultiMediaCard with adapter). It also detects SRAM cards automatically. Linear
Flash cards can only be read if they have been formatted with a DOS file
system. The Centronics Drive cannot write to Linear Flash cards.
Press the eject button to eject the PC card from the slot.
9
User Manual, Centronics Drive Version 1.1
6. Technical Specifications
Hardware
– Interface
Parallel port connector
Drive connector
PC Card slot
Parallel port (Centronics)
25-pin Sub-D socket
50-pin HD socket
1 slot, Type III
Performance
– Data transfer rate
max. 1 MB/s
– The effective date transfer rate depends on the storage media used.
Software
Operating systems
Windows 95/98, Windows NT, MS-DOS
Driver
– automatic detection of ATA and standard SRAM/Flash cards
– automatic memory size detection of unformatted PC cards
Mechanical
– Case
Environment
– Temperature:
– Humidity:
Desktop case, metal
125 mm x 43 mm x 184 mm (W x H x D)
Operation:
Storage:
Operation:
Storage:
-0°C to +70°C
-40°C to +75°C
0 to 90% (no condensation)
0 to 90% (no condensation)
Electrical
– Power feed:
5 V +/–5 % via external power supply
Accessories
Keyboard adapter for the power feed
User Manual, Centronics Drive Version 1.1
10
7. PC Card memory media
◆
SanDisk Type II ATA PC Cards
Capacities: 8 MByte – 1.0 GByte
◆
SanDisk CompactFlash memory cards Type I and Type II (requires appropriate
adapter); IBM Microdrives (requires Type II CompactFlash adapter)
Capacities : Type I from 8 – 192 MByte; Type II from 256 – 300 MByte
◆
SmartMedia memory cards
Requires SmartMedia adapter
Capacities : 8 – 64 MByte
◆
SanDisk MultiMedia memory cards
Requires MultiMediaCard adapter
Capacities : 8 – 32 MByte
◆
altec Full Metal Cards (ATA PC Cards Type II)
Capacities : 8 MByte – 1.0 GByte
◆
altec Full Metal Cards IP54 (ATA PC Cards Type II)
Splash-proof, dust-proof, industrial temperature range
Operation: –40°C to +85°C; 5 V
Capacities : 8 MByte – 1.0 GByte
◆
altec Full Metal Cards IP68 (ATA PC Cards Type II)
Immersion-proof, industrial temperature range,
Operation : –40°C to +85°C; 5 V
Capacities : 8 MByte – 1.0 GByte
◆
altec Full Metal Cards Hermetic Military (ATA PC Cards Type II)
Suitable for aerospace applications, certified with Mil standard shock, vacuum
and vibration tests, corrosion-proof, resistant to fungus, splash-proof, dustproof, industrial temperature range
Operation : –40°C to +85°C; 5 V
Capacities : 8 MByte – 1.0 GByte
Please ask for our product overview or visit our website for information on further storage products, drives and solid state disks from altec:
http://www.altec-computersysteme.com
11
User Manual, Centronics Drive Version 1.1