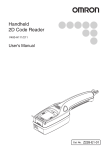
1
ID Link Unit
ID Link Unit V700-L12 User's Manual
V700-L12
User's Manual
This document provides information mainly for selecting suitable models. Please read the Instruction Sheet carefully for information that the user must understand and accept before
purchase, including information on warranty, limitations of liability, and precautions.
OMRON Corporation
Industrial Automation Company
Application Sensors Division
Sensing Devices and Components Division H.Q.
Shiokoji Horikawa, Shimogyo-ku,
Kyoto, 600-8530 Japan
Tel: (81)75-344-7068/Fax: (81)75-344-7107
Regional Headquarters
OMRON EUROPE B.V.
Sensor Business Unit,
Carl-Benz-Str. 4, D-71154 Nufringen,
Germany
Tel: (49)7032-811-0/Fax: (49)7032-811-199
OMRON ELECTRONICS LLC
1 East Commerce Drive, Schaumburg, IL 60173
U.S.A.
Tel: (1)847-843-7900/Fax: (1)847-843-8568
Authorized Distributor:
OMRON ASIA PACIFIC PTE. LTD.
83 Clemenceau Avenue,
#11-01, UE Square,
239920 Singapore
Tel: (65)6835-3011/Fax: (65)6835-2711
OMRON CHINA CO., LTD. BEIJING OFFICE
Room 1028, Office Building,
Beijing Capital Times Square,
No. 88 West Chang'an Road,
Beijing, 100031 China
Tel: (86)10-8391-3005/Fax: (86)10-8391-3688
Cat.No. Z217-E1-01
Cat. No. Z217-E1-01
Printed in Japan
0105
Introduction
Thank you for purchasing the OMRON V700-L12 ID Link Unit. We hope you fully utilize this product and
its performance for many years to come.
• To ensure safety, read this manual carefully before using the V700-L12. In addition, keep this
manual in an easily accessible location for quick reference when needed.
Application Considerations (Read and understand this information first.)
Section 2 Provides information on installation and connection.
Section 3 Provides information on communications.
Section 4 Appendix
ID Link Unit
User's Manual
V700-L12
Section 1 Section 2 Section 3 Section 4
Section 1 Provides information on multidrop connections.
Introduction
Introduction
Introduction
Introduction
READ AND UNDERSTAND THIS DOCUMENT
Please read and understand this document before using the products. Please consult your OMRON representative if you have any
questions or comments.
WARRANTY
OMRON’s exclusive warranty is that the products are free from defects in materials and workmanship for a period of one year (or other
period if specified) from date of sale by OMRON.
OMRON MAKES NO WARRANTY OR REPRESENTATION, EXPRESS OR IMPLIED, REGARDING NON-INFRINGEMENT,
MERCHANTABILITY, OR FITNESS FOR PARTICULAR PURPOSE OF THE PRODUCTS. ANY BUYER OR USER ACKNOWLEDGES
THAT THE BUYER OR USER ALONE HAS DETERMINED THAT THE PRODUCTS WILL SUITABLY MEET THE REQUIREMENTS
OF THEIR INTENDED USE. OMRON DISCLAIMS ALL OTHER WARRANTIES, EXPRESS OR IMPLIED.
LIMITATIONS OF LIABILITY
OMRON SHALL NOT BE RESPONSIBLE FOR SPECIAL, INDIRECT, OR CONSEQUENTIAL DAMAGES, LOSS OF PROFITS OR
COMMERCIAL LOSS IN ANY WAY CONNECTED WITH THE PRODUCTS, WHETHER SUCH CLAIM IS BASED ON CONTRACT,
WARRANTY, NEGLIGENCE, OR STRICT LIABILITY.
In no event shall responsibility of OMRON for any act exceed the individual price of the product on which liability is asserted.
IN NO EVENT SHALL OMRON BE RESPONSIBLE FOR WARRANTY, REPAIR, OR OTHER CLAIMS REGARDING THE PRODUCTS
UNLESS OMRON’S ANALYSIS CONFIRMS THAT THE PRODUCTS WERE PROPERLY HANDLED, STORED, INSTALLED, AND
MAINTAINED AND NOT SUBJECT TO CONTAMINATION, ABUSE, MISUSE, OR INAPPROPRIATE MODIFICATION OR REPAIR.
SUITABILITY FOR USE
THE PRODUCTS CONTAINED IN THIS DOCUMENT ARE NOT SAFETY RATED. THEY ARE NOT DESIGNED OR RATED FOR
ENSURING SAFETY OF PERSONS, AND SHOULD NOT BE RELIED UPON AS A SAFETY COMPONENT OR PROTECTIVE
DEVICE FOR SUCH PURPOSES. Please refer to separate catalogs for OMRON's safety rated products.
OMRON shall not be responsible for conformity with any standards, codes, or regulations that apply to the combination of products in
the customer’s application or use of the product.
At the customer’s request, OMRON will provide applicable third party certification documents identifying ratings and limitations of use
that apply to the products. This information by itself is not sufficient for a complete determination of the suitability of the products in
combination with the end product, machine, system, or other application or use.
The following are some examples of applications for which particular attention must be given. This is not intended to be an exhaustive
list of all possible uses of the products, nor is it intended to imply that the uses listed may be suitable for the products:
• Outdoor use, uses involving potential chemical contamination or electrical interference, or conditions or uses not described in this
document.
• Nuclear energy control systems, combustion systems, railroad systems, aviation systems, medical equipment, amusement
machines, vehicles, safety equipment, and installations subject to separate industry or government regulations.
• Systems, machines, and equipment that could present a risk to life or property.
Please know and observe all prohibitions of use applicable to the products.
NEVER USE THE PRODUCTS FOR AN APPLICATION INVOLVING SERIOUS RISK TO LIFE OR PROPERTY WITHOUT
ENSURING THAT THE SYSTEM AS A WHOLE HAS BEEN DESIGNED TO ADDRESS THE RISKS, AND THAT THE OMRON
PRODUCT IS PROPERLY RATED AND INSTALLED FOR THE INTENDED USE WITHIN THE OVERALL EQUIPMENT OR SYSTEM.
PERFORMANCE DATA
Performance data given in this document is provided as a guide for the user in determining suitability and does not constitute a
warranty. It may represent the result of OMRON’s test conditions, and the users must correlate it to actual application requirements.
Actual performance is subject to the OMRON Warranty and Limitations of Liability.
CHANGE IN SPECIFICATIONS
Product specifications and accessories may be changed at any time based on improvements and other reasons.
It is our practice to change model numbers when published ratings or features are changed, or when significant construction changes
are made. However, some specifications of the product may be changed without any notice. When in doubt, special model numbers
may be assigned to fix or establish key specifications for your application on your request. Please consult with your OMRON
representative at any time to confirm actual specifications of purchased products.
DIMENSIONS AND WEIGHTS
Dimensions and weights are nominal and are not to be used for manufacturing purposes, even when tolerances are shown.
ERRORS AND OMISSIONS
The information in this document has been carefully checked and is believed to be accurate; however, no responsibility is assumed for
clerical, typographical, or proofreading errors, or omissions.
PROGRAMMABLE PRODUCTS
OMRON shall not be responsible for the user’s programming of a programmable product, or any consequence thereof.
COPYRIGHT AND COPY PERMISSION
This document shall not be copied for sales or promotions without permission. This document is protected by copyright and is intended
solely for use in conjunction with the product. Please notify us before copying or reproducing this document in any manner, for any
other purpose. If copying or transmitting this document to another, please copy or transmit it in its entirety.
2
V700-L12
User’s Manual
Introduction
Introduction
Meanings of Signal Words
WARNING
Indicates a potentially hazardous situation which, if not avoided, will result in
minor or moderate injury, or may result in serious injury or death. Additionally,
there may be significant property damage.
CAUTION
Indicates a potentially hazardous situation which, if not avoided, may result in
minor or moderate injury or in property damage.
Precautions
The following signal words are used in this manual.
Meanings of Alert Symbols
The following alert symbols are used in this manual.
Indicates general prohibitions for which there is no spacific symbol.
Indicates instruction for the user to always connect the ground wire.
Indicates prohibition when there is a risk of minor injury from electrical shock or
other source if the product is disassembled.
Alert statements in this Manual
The following alert statements apply to the products in this manual. Each alert statement also appears at
the locations needed in this manual to attract your attention.
WARNING
This product is not designed to be used either directly or indirectly in applications
that detect human presence for the purpose of maintaining safety. Do not use this
product as a sensing device for protecting human lives.
CAUTION
Do not disassemble the Unit or touch the internal parts of the Unit while the power
is turned ON. Doing so may result in electric shock due to the high-voltage
internal parts.
The GR (frame ground) terminal is in the multi-connection port. Always ground
the multi-connection port to 100 Ω or less, regardless of whether it is used or not.
Performance may deteriorate if the port is not ground.
V700-L12
User’s Manual
3
Introduction
Introduction
Precautions for Safe Use
Precautions
Observe the following precautions to ensure safe use of the product.
■ Operating Environment Precautions
Observe the following precautions to ensure safe use of the product.
• Do not use the product in environments with flammable or explosive gases.
• Do not install the product near high-voltage devices or power devices to ensure
safety during operation and maintenance.
• Return the shock prevention cover to its original position after wiring the power supply.
• Make sure that the mounting screws are tightened securely.
• Do not allow water, wires, or any other foreign material to enter through the gaps in
the case. Doing so may cause fire or electric shock.
• Do not attempt to disassemble, repair, or modify the product.
• When disposing of the product, treat it as industrial waste.
4
V700-L12
User’s Manual
Introduction
■ Installation Environment Precautions
Install the product in the following locations:
Precautions
Always observe the following precautions to prevent operation failures, malfunctions, and adverse effects
on performance and equipment.
Introduction
Precautions for Correct Use
1. Locations not subject to direct sunlight.
2. Locations not subject to corrosive gas, dust, metallic powder, or salt.
3. Locations not subject to rapid changes in temperature and condensation outside the
specified ranges.
4. Locations not subject to high humidity and condensation outside the specified
ranges.
5. Locations not subject to direct vibration or shock outside the specified ranges.
6. Locations not exposed to water, oil, or chemicals.
■ Wiring
1. Always turn OFF the power before performing wiring or connecting/disconnecting
cables.
2. To prevent damage from static electricity, use a wrist strap or another device for preventing electrostatic charges when touching terminals or signal lines.
■ Cleaning
Do not clean the product with thinners, benzene, or other organic solvents. These will
dissolve the resin parts and coating on the case.
V700-L12
User’s Manual
5
Introduction
Introduction
How to Read this Manual
How to Read this Manual
■ Page Format
Section number and name
Main header
Summary for main header
Section 1
Multidrop Connections
Operation Flowchart
Sub-header
Barcodes are read by each barcode reader when the trigger is input. The read data is
sent to the Link Unit, and held in the Link Unit's internal buffer.
Summary for sub-header
Normal Protocol (Polling)
After the host sends sequential commands to each Link Unit, the polling command
is used to get the sequential results from each Link Unit.
Section 1 Operation Flowchart
IBM PC/AT or compatible
Interface Converter
Link Unit
Unit number
01
Unit number
02
Unit number
03
Reads data
Reads data
Reads data
Holds data
Holds data
Holds data
RFID Reader/Writer
or barcode reader
Indicates the section number
and title.
Flowchart diagram
Read trigger
RFID Reader Writer/
barcode reader
Link Unit
Polling
Reads Unit 1 data
Index label
Link Unit
Returns data
Polling
Reads Unit 2 data
Link Unit
Returns data
Polling
Reads Unit 3 data
Link Unit
Returns data
Finishes
reading data
Once wiring has been completed, check that all wiring is correct.
Incorrect wiring may cause malfunction.
V700-L12
User's Manual
15
Supplementary information
The following symbols indicate useful information and
reference pages.
* This page is an example only and does not actually exist.
6
V700-L12
User’s Manual
Introduction
Indicates page numbers containing relevant information.
Indicates reference to helpful information and explanations for difficult terminology.
V700-L12
User’s Manual
How to Read this Manual
Indicates particularly important points related to a function, including precautions and application
advice.
Introduction
■ Meanings of Symbols
7
Meanings of Signal Words
3
Meanings of Alert Symbols
3
Alert statements in this Manual
3
Precautions for Safe Use
4
Precautions for Correct Use
5
How to Read this Manual
6
TABLE OF CONTENTS
8
Section 1 Multidrop Connections
11
Multidrop Connection Example
12
RFID System/Barcode Reader Settings
13
Link Unit Settings
14
Operation Flowchart
15
Section 2 Installing and Connecting Link Units
17
Nomenclature
18
Power Supply Wiring
19
Connecting to the Host
20
Section 3 Communications
23
DIP Switch Settings
24
Communications Interface
25
Communications Format
31
V700-L12
User’s Manual
ëÊ 4 èÕ
Section 4 Section 3 Section 2 Section 1
2
ëÊ 3 èÕ
Introduction
ëÊ 2 èÕ
Section 5 Section 6 Section 7 Section 8 Appendix
8
TABLE OF CONTENTS
ÇÕǹÇ?Ç ëÊ 1 èÕ
Introduction
Introduction
Introduction
35
36
Error Codes
38
Specifications and External Dimensions
39
Revision History
41
V700-L12
User’s Manual
Section
ëÊ 1 èÕ1 Section
ëÊ 2 èÕ2 Section
ëÊ 3 èÕ3 Section
ëÊ 4 èÕ4 Section 5 Section 6 Section 7 Section 8 Appendix
Troubleshooting
Introduction
ÇÕǹÇ?Ç
Section 4 Appendix
9
Section 1
Section 1
Multidrop Connections
12
RFID System/Barcode Reader Settings
13
Link Unit Settings
14
Operation Flowchart
15
V700-L12
User's Manual
Multidrop Connections
Multidrop Connection Example
11
Section 1
Multidrop Connections
Multidrop Connection Example
Multidrop Connection Example Section 1
The V700-L12 ID Link Unit (“Link Unit”) enables communications with devices with an RS232C output, such as barcode readers and RFID Reader Writers. The Link Unit enables up to
31 RFID Reader Writers or barcode readers to be connected to a single host using multidrop
connections. The connection configuration depends on the interface used at the host (RS-485
or RS-232C). The following connection example is for ID Link Units (“Link Units”) connected to
the host using RS-485.
The RFID Reader Writer or barcode reader can be supplied with 5-V power from the V700-L12.
Host
IBM PC/AT personal
computer or compatible
K3SC
Interface
Converter
RS-232C
RS-485
V700-L12
ID Link Units
Unit number
01
RS-485
S82K-03024
24-VDC power supply
RFID Reader Writers
or barcode readers
12
V700-L12
User's Manual
Unit number
02
RS-485
Unit number
03
Section 1
Multidrop Connections
RFID System/Barcode Reader Settings
Use the UC command (Set All via Link Unit Connection) to make the following settings.
Section 1
Refer to the RFID System/barcode reader user’s manual.
Setting
Contents
Command
9,600 bps
(Use initial setting.)
Data length
8 bits
(Use initial setting.)
Parity
Even
L3
Stop bits
1 bit
(Use initial setting.)
Header
None
(Use initial setting.)
Footer
CR
(Use initial setting.)
RS/CS control
None
P0
Read failure processing
Sends ?[CR] or >[CR]
5H
Other settings
Use factory settings
---
RFID System/Barcode Reader Settings
Baud rate
V700-L12
User's Manual
13
Section 1
Multidrop Connections
Link Unit Settings Section 1
Link Unit Settings
Setting
Contents
Setting Method
Unit number
Set a different unit number for each Link Use DIP Switch pins 1 to 5.
Unit.
Baud rate
9,600 bps
Turn OFF DIP switch pins 6 and 7.
Transmission protocol
Normal protocol (polling)
Turn OFF DIP switch pin 8.
Connection check
None
Turn OFF DIP switch pin 9
RS-485 terminating
resistance
Turn ON at the two Units at both ends of ON: Turn ON DIP switch pin 10.
the transmission path (see note).
Note: In this connection example, the terminating resistance is ON for the Unit with unit
number 3 and the host (Interface Converter).
Refer to page 18 and 19 for details on specifications and wiring of Link Units.
14
V700-L12
User's Manual
Section 1
Multidrop Connections
Operation Flowchart
Barcodes are read by each RFID Reader Writer or barcode reader when the trigger is
Normal Protocol (Polling)
IBM PC/AT or compatible
Interface Converter
Link Units
Unit number
01
Unit number
02
Unit number
03
Operation Flowchart
After the host sends sequential commands to each Link Unit, the polling command
is used to get the sequential results from each Link Unit.
Section 1
input. The read data is sent to the Link Unit, and held in the Link Unit's internal buffer.
RFID Reader Writers
or barcode readers
Read trigger
RFID Reader Writers
or barcode readers
Reads data
Reads data
Reads data
Link Units
Holds data
Holds data
Holds data
Polling
Reads Unit 1 data
Link Unit
Returns data
Polling
Reads Unit 2 data
Link Unit
Returns data
Polling
Reads Unit 3 data
Link Unit
Returns data
Finishes
reading data
V700-L12
User's Manual
15
Section 1
Multidrop Connections
Through Protocol (Immediate Response)
The host sends a command to the Link Unit, waits for the result, and sends a command
Operation Flowchart Section 1
to another Link Unit.
IBM PC/AT or compatible
Interface Converter
Link Units
Unit number
01
Unit number
02
Unit number
03
RFID Reader Writers
or barcode readers
Unit number 01
Sends read command
Link Unit
Read command executed
Returns results/response
Unit number 02
Sends read command
Link Unit
Read command executed
Returns results/response
Unit number 03
Sends read command
Link Unit
Read command executed
Returns results/response
Finishes reading data
16
V700-L12
User's Manual
Section 2
Installing and Connecting Link Units
Section 2
18
Power Supply Wiring
19
Connecting to the Host
20
V700-L12
User's Manual
Installing and Connecting Link Units
Nomenclature
17
Section 2
Installing and Connecting Link Units
Nomenclature
Multi-connection port (RS-485)
p.27
Host connection port (RS-232C)
Operation indicator
p.25
ID connection port
Nomenclature Section 2
p.30
Mounting hole
Mounting hole
DIP switches (inside cover)
p.24
24-V power supply terminal (inside cover)
p.19
Operation Indicators
The operating status of the Link Unit is shown by four LED indicators
LED
Meaning
RUN
The Link Unit is operating normally.
COMM
Data is being transmitted between the Link Unit and the host.
ID
Data is being transmitted between the Link Unit and barcode reader.
ERR
An error has occurred during communications between the Link Unit and the host or a
barcode reader.
CAUTION
The GR (frame ground) terminal is in the multi-connection port. Always
ground the multi-connection port to 100 Ω or less, regardless of whether it
is used or not. Performance may deteriorate if the port is not ground.
Do not disassemble the Unit or touch the internal parts of the Unit while
the power is turned ON. Doing so may result in electric shock due to the
high-voltage internal parts.
18
V700-L12
User's Manual
Section 2
Installing and Connecting Link Units
Power Supply Wiring
The power supply terminals are located inside the cover on the top of the Unit.
Section 2
Power Supply Wiring
+
−
24 VDC
The terminal block screws are M3. Use crimp terminals suitable for M3screws.
Shape
Size
Forked
6.0 mm max.
Round
6.0 mm max.
Connect a 24-V power supply.
Manufacturer
OMRON
Model
S82K-03024
Once wiring has been completed, check that all wiring is correct.
Incorrect wiring may cause malfunction.
V700-L12
User's Manual
19
Section 2
Installing and Connecting Link Units
Connecting to the Host
■ Connecting to RS-232C
Host
RFID Reader Writer
or barcode reader
RFID Reader Writer
or barcode reader
RFID Reader Writer
or barcode reader
RFID Reader Writer
or barcode reader
Connecting to the Host Section 2
RS-232C
24-V power
supply
−
+
24-V power
supply
−
+
−
+
24-V power
supply
−
+
−
+
DIP switch pins 1 to 5: Set to unit number 1.
DIP switch pin 10: Terminating resistance (ON)
24-V power
supply
−
+
−
+
Set to unit number 2.
No terminating resistance (OFF)
Set to unit number 3.
No terminating resistance (OFF)
Set to unit number 4.
Terminating resistance (ON)
Total length: 1 km max.
When making 1:N connections using Link Units, RS signals from the host with normal control will
need to be input to CS signals. Turn OFF RS signals within 15 ms of the data transmission being
completed. The system will not operate correctly if this control is not performed.
■ When RS Signal Control from the Host Is Not Possible
If a K3SC-10 Converter is used and the host connected to an RS-485 communications
line, RS signals are not required to perform switching control of signals sent and
received.
K3SC-10
Interface Converter
Host
RFID Reader Writer
or barcode reader
RFID Reader Writer
or barcode reader
RFID Reader Writer
or barcode reader
RFID Reader Writer
or barcode reader
RS-232C
Terminating
resistance
RS-485
24-V power
supply
−
+
−
+
DIP switch pins 1 to 5: Set to unit number 1.
DIP switch pin 10: Terminating resistance (ON)
24-V power
supply
−
+
−
+
−
+
Set to unit number 2.
No terminating resistance (OFF)
Total length: 1 km max.
20
V700-L12
User's Manual
24-V power
supply
−
+
24-V power
supply
−
+
−
+
Set to unit number 3.
No terminating resistance (OFF)
Set to unit number 4.
Terminating resistance (ON)
Section 2
Installing and Connecting Link Units
■ Connecting via RS-485
Host
RFID Reader Writer
or barcode reader
−
+
Terminating
resistance
24-V power
supply
−
+
−
+
DIP switch pins 1 to 5: Set to unit number 1.
DIP switch pin 10: Terminating resistance (ON)
−
+
24-V power
supply
−
+
Set to unit number 2.
No terminating resistance (OFF)
RFID Reader Writer
or barcode reader
−
+
24-V power
supply
RFID Reader Writer
or barcode reader
−
+
24-V power
supply
−
+
Set to unit number 3.
No terminating resistance (OFF)
Set to unit number 4.
Terminating resistance (ON)
Set the host to switch to receive data within 15 ms of data transmission. The system will not operate
correctly if this control is not performed.
V700-L12
User's Manual
Connecting to the Host
Total length: 1 km max.
Section 2
RS-485
RFID Reader Writer
or barcode reader
21
Section 3
Communications
Section 3
24
Communications Interface
25
Communications Format
31
V700-L12
User’s Manual
Communications
DIP Switch Settings
23
Section 3
Communications
DIP Switch Settings
Use the DIP switch on the Unit to set functions.
RS-485 terminating
resistance
Check connection of RFID
Reader Writer/barcode reader.
DIP Switch Settings Section 3
Unit No.
Communications protocol
Baud rate
■ Unit No. Settings
Unit No.
DIP switch
1
2
3
4
5
01
OFF
OFF
OFF
OFF
OFF
02
ON
OFF
OFF
OFF
OFF
Unit No.
DIP switch
1
2
3
4
17
OFF
OFF
OFF
OFF
ON
5
18
ON
OFF
OFF
OFF
ON
03
OFF
ON
OFF
OFF
OFF
19
OFF
ON
OFF
OFF
ON
04
ON
ON
OFF
OFF
OFF
20
ON
ON
OFF
OFF
ON
05
OFF
OFF
ON
OFF
OFF
21
OFF
OFF
ON
OFF
ON
06
ON
OFF
ON
OFF
OFF
22
ON
OFF
ON
OFF
ON
07
OFF
ON
ON
OFF
OFF
23
OFF
ON
ON
OFF
ON
08
ON
ON
ON
OFF
OFF
24
ON
ON
ON
OFF
ON
09
OFF
OFF
OFF
ON
OFF
25
OFF
OFF
OFF
ON
ON
10
ON
OFF
OFF
ON
OFF
26
ON
OFF
OFF
ON
ON
11
OFF
ON
OFF
ON
OFF
27
OFF
ON
OFF
ON
ON
12
ON
ON
OFF
ON
OFF
28
ON
ON
OFF
ON
ON
13
OFF
OFF
ON
ON
OFF
29
OFF
OFF
ON
ON
ON
14
ON
OFF
ON
ON
OFF
30
ON
OFF
ON
ON
ON
15
OFF
ON
ON
ON
OFF
31
OFF
ON
ON
ON
ON
16
ON
ON
ON
ON
OFF
Cannot be set.
ON
ON
ON
ON
ON
■ Other Settings
Setting
24
Default
Description
Baud rate
9,600 bps
Sets the baud rate for communications with the host.
• 4,800 bps: DIP switch pin 6 set to ON, DIP switch pin 7 to OFF.
• 9,600 bps: DIP switch pin 6 set to OFF, DIP switch pin 7 to OFF.
• 19,200 bps: DIP switch pin 6 set to OFF, DIP switch pin 7 to ON.
• 38,400 bps: DIP switch pin 6 set to ON, DIP switch pin 7 to ON.
Communications protocol
Normal
Sets the method for data transmission to the host.
• Normal (polling): OFF
• Through (immediate transmission): ON
RFID Read/Write Head or barcode reader connection check
Connection not
checked
Checks whether the RFID Reader Writer is connected to the Link
Unit.
• Connection not checked: OFF
• Connection checked: ON
RS-485 terminating resistance
OFF (disabled)
Connects or disconnects the RS-485 terminating resistance. Set
to ON for the Link Units at both ends of the transmission path.
(Set to ON if only one Link Unit is connected.)
V700-L12
User’s Manual
Section 3
Communications
Communications Interface
Host Connection Port
■ Port Specifications
The host connection port is used to connect to the host via RS-232C. The Unit is
shipped with a dust cover over the port. Remove the dust cover before use.
Item
Specification
Connector specification
D-sub 9-pin connector plug, lock screw: UNC #4-40
Cable length
15 m max.
Communications method
Conforms to RS-232C
Start-stop synchronization
Communications control method
OMRON 1:N
Baud rate (fixed)
4800, 9600, 19200, or 38400 bps (set using DIP switch)
Character format (fixed)
Data bits
Parity bit
Stop bits
Total
8
No parity
1
10
FCS (Frame Check Sequence)/vertical parity method
■ Pin Arrangement
The connector face is not electrically connected to GR (frame ground).
5
9
4
8
3
7
6
2
1
Pin No.
Signal name
Function
Communications Interface
Check code (error detection method)
Start bits
1
Section 3
Sync
Signal direction
1
---
Not connected
---
2
RD
Receive data
Input
3
SD
Send data
Output
4
---
Not connected
---
5
SG
Signal ground
---
6
---
Not connected
---
7
RS
Request to send
(Always ON during operation)
Output
8
CS
Clear to send
Input
9
---
Not connected
---
Control of RS Signal from Host
When using 1:N connections through an RS-232C interface on the host, the RS signal from the host
must be input to the Link Unit's CS signal. Turn OFF the RS signal within 15 ms of completing the
data transmission. The communications will not operate normally if this control is not performed.
ON only during data transmission from host.
Host RS
Host SD
15 ms max.
V700-L12
User’s Manual
25
Section 3
Communications
Wiring
This section describes wiring for connecting an ID Link Unit to an IBM PC/AT or compatible personal computer.
The maximum cable length is 15 m.
Model
Cable
CO-MA-VV-SB 5PX28AWG
Communications Interface Section 3
Connector
Manufacturer
Hitachi Cable, Ltd.
Socket
XM2D-0901
OMRON
Hood
XM2S-0913
OMRON
Wiring Method 1
IBM PC/AT or compatible
personal computer
D-sub 9-pin
Link Unit
D-sub 9-pin
Pin No.
Pin No.
1
1
RD
2
2
RD
SD
3
3
SD
4
4
5
5
6
6
RS
7
7
RS
CS
8
8
CS
9
9
Signal name
SG
Signal name
SG
*1
Wiring Method 2
IBM PC/AT or compatible
personal computer
D-sub 9-pin
Signal name
Link Unit
D-sub 9-pin
Signal name
Pin No.
Pin No.
1
1
RD
2
2
RD
SD
3
3
SD
4
4
5
5
6
6
RS
7
7
RS
CS
8
8
CS
SG
*2
9
SG
9
*1
*1 Ground the shield either at the IBM PC/AT or compatible personal computer or at the
Link Unit.
*2 A loopback line is required if the CS function is to be used on the personal computer.
*3 With wiring method 2, make sure that the cable is connected in the correct direction.
26
V700-L12
User’s Manual
Section 3
Communications
Multi-connection Port
■ Port Specifications
The multi-connection port is used to connect the Link Unit to multi-connection ports on
other Link Units when multiple RFID Reader Writers or barcode readers are connected
to a single RS-232C port on a host.
If the host has an RS-485 port, the multi-connection port can function as the host connection port. If the multi-connection port is used as the host connection port, however,
the Link Unit RS-232C host connection port can no longer be used. The GR (frame
ground) terminal is also located in the multi-connection port.
Specification
Section 3
Item
Connector specification
5-pin connector (provided with Link Unit)
Total cable length: 1 km max.
Communications method
Conforms to RS-485
Sync
Start-stop synchronization
Communications control method
OMRON 1:N
Baud rate (fixed)
4800, 9600, 19200, or 38400 bps (set using DIP switch)
Character format (fixed)
Error detection method
Start bits
Data bits
Parity bit
Stop bits
Total
1
8
No parity
1
10
FCS (Frame Check Sequence)
V700-L12
User’s Manual
Communications Interface
Cable length
27
Section 3
Communications
■ Pin Arrangement
The connector face is not electrically connected to GR (frame ground).
Communications Interface Section 3
5
4
3
2
1
Pin No.
Signal name
Function
5
−
Internally shorted to terminal 2.
4
+
Internally shorted to terminal 1.
3
GR
Frame ground
2
−
Internally shorted to terminal 5.
1
+
Internally shorted to terminal 4.
Switching Between Host Send and Receive
When connecting using an RS-485 interface on the host, enable receiving data within 15 ms after
data has been sent from the host. The Link Unit will not operate correctly if this control is not
performed.
CAUTION
The GR (frame ground) terminal is in the multi-connection port.
Always ground the multi-connection port to 100 Ω or less, regardless of whether it
is used or not. Performance may deteriorate if the port is not ground.
Do not disassemble the Unit or touch the internal parts of the Unit while the power
is turned ON. Doing so may result in electric shock due to the high-voltage internal
parts.
■ Cables
Model
Cable
Crimp
terminals
RS-485 signal line
MVVS 2CX0.5SQ
Frame ground line
(AWG22 to AWG20 cable)
Connecting one wire to one terminal
AI0.5-8WH
When connecting two wires to one terminal AI-TWIN2×0.5-8WH
Crimping tool
28
V700-L12
User’s Manual
Manufacturer
CRIMPFOX UD6
Tachii Electric Wire Co., Ltd
Phoenix Contact
Section 3
Communications
■ Wiring Method
1.
Attach the crimp terminal to the section of the cable where
the sheath has been stripped.
2.
Make sure the connector is facing the right direction and
insert each wire into the correct connector hole.
Section 3
3.
Tighten the connector lock screws.
The correct tightening torque is approximately 0.3 N·m.
partway in and not reach the bottom. Use a
small, flat-blade screwdriver with a tip of
constant thickness.
Side
Front
Small flat-blade screwdriver
with a tip of constant thickness.
Manufacturer
OMRON
0.6 mm
4.
Model
Communications Interface
Normal screwdrivers with a tapering tip will jam
XW4Z-00C
3.5 mm
Connect the connector to the Link Unit.
Line up the Link Unit and cable connectors and push
them together firmly. Tighten the lock screws.
Lock screws
To disconnect connectors, completely
unscrew the two lock screws, hold the
protruding part of the connector and pull the
connector out straight. If the connector is
difficult to disconnect, hold down the Link Unit
and pull the connector. Incorrect disconnection may result in damage to the Unit.
V700-L12
User’s Manual
29
Section 3
Communications
ID Connection Port
■ Port Specifications
The ID connection port is for connecting RFID Reader Writers or barcode readers.
Communications Interface Section 3
Item
Specification
Connector specifications
D-sub 9-pin connector socket, M2.6
Power supply
section
Supplied power
5 V ±5%
Communications
section
Communications
method
Conforms to RS-232C
Sync
Start-stop synchronization
Communications
control method
OMRON 1:1
Baud rate (fixed)
9,600 bps
Character format
(fixed)
Start bits
Data bits
Parity bit
Stop bits
Total
1
8
Even
1
11
Error detection
method
Even parity
■ Pin Arrangement
1
6
2
7
3
8
9
4
5
Pin No.
30
Signal name
Function
Signal direction
1
---
Not connected.
---
2
SD
Send data
Output
3
RD
Receive data
Input
4
RS
Request to send
Output
5
CS
Clear to send (ON during normal
operation)
Input
6
5V
+ 5 V (5 VDC ±5%) supply
Output
7
0V
0 V supply (Connected internally to SG.)
Output
8
---
Not connected
---
9
SG
Signal ground (Connected internally to 0V.) ---
V700-L12
User’s Manual
Section 3
Communications
Communications Format
This section describes the commands used for controlling Link Units (for OMRON 1:N
protocol.)
The interval between each command character must be less than 200 ms during communications. Longer intervals will be detected as command delineators.
Input Command
SOH
Unit No.
Communications data for RFID Reader Writer/barcode reader
Check code CR
$0D
Link Unit processing (DLE) command specification
Explanation
The control code that indicates the start of the command frame ($01)
Unit No.
The unit number that is set using the DIP switch (1 to 32 or 99) If the Unit number is set to
99, all Units are considered local nodes.
Communications data for
RFID Reader Writer/barcode
reader
Host to Link Unit
The communications data will be the command data set to the RFID Reader Writer/
barcode reader.
However, if the first character is DEL (10h), the communications data will be handled as a
Link Unit processing command, which is defined by the next character.
P (50h): Polling Note: Disabled for through protocol.
R (52h): Retry request
C (43h): Buffer clear
Communications Format
Item
SOH (Start Of Header)
Section 3
$01
Link Unit to host
The communications data is the response data from the RFID Reader Writer/barcode.
Check code
The 8 bits resulting from an exclusive OR (XOR) taken for each of the characters from the
character immediately after SOH to the character immediately preceding the check code is
converted to two ASCII characters.
Example: For [SOH]01020000000600(check code)[CR]
Check code = "05"
30h (XOR) 31h (XOR) 30h (XOR) 32h (XOR) 30h (XOR) 30h
(XOR) 30h (XOR) 30h (XOR) 30h (XOR) 30h (XOR) 30h
(XOR) 36h (XOR) 30h (XOR) 30h = 05h
(Converted to ASCII.) →0 (30h) 5 (35h)
CR (Carriage Return)
The control code indicating the end of the frame ($0D).
Response
$01
(Unit No.)
0
0
(Check code) $0D
With normal protocol (polling) only, when data is received from the host, the response
is returned to the host from the Link Unit.
$01
(Unit No.)
9
A
(Check code) $0D
If an RFID Reader Writer is not connected to the ID port, the response is returned to
the host from the Link Unit. The response will only be returned if the setting to check ID
port connection is enabled.
With through protocol (continuous output), the above responses will not be output.
V700-L12
User’s Manual
31
Section 3
Communications
Polling (P)
When the communications protocol is set to “normal” (polling), the oldest data in the
buffer is sent as the response.
Input Command
$01
(Unit No.)
$10
P
(Check code) $0D
Response
Communications Format Section 3
Data in the buffer
$01
(Unit No.)
Communications data for RFID Reader Writer/barcode reader
(Check code) $0D
No data in the buffer
$01
(Unit No.)
7
4
(Check code) $0D
Code to indicate no data.
For “through” protocol (continuous output), the above responses are not output even if
a command is input.
■ Retry Request (R)
Resends the response sent in the last transmission.
Input Command
$01
(Unit No.)
$10
R
(Check code) $0D
Response
$01
Communications data for RFID Reader Writer/barcode reader
(same as immediately preceding data)
(Unit No.)
(Check code) $0D
■ Buffer Clear (C)
Clears all Link Unit buffers.
Input Command
$01
(Unit No.)
$10
C
(Check code) $0D
0
0
(Check code) $0D
Response
$01
32
V700-L12
User’s Manual
(Unit No.)
Refer to page 38 when a code
other than 00 is returned.
Section 3
Communications
Communications Frame Change for RFID Reader
Writer/Barcode Reader
■ Change to CR (X)
Input Command
$01
(Unit No.)
$10
X
(Check code) $0D
0
(Check code) $0D
Response
$01
(Unit No.)
0
Section 3
Refer to page 38 when a code
other than 00 is returned.
The communications frame for the RFID Reader Writer/barcode reader is as
follows: Communications data for RFID Reader Writer/barcode reader
CR
Communications Format
Communications data for RFID Reader Writer/barcode reader
$0D
Control code indicating
end of frame
■ Change to STX/ETX (Y)
Input Command
$01
(Unit No.)
$10
Y
(Check code) $0D
0
0
(Check code) $0D
Response
$01
(Unit No.)
Refer to page 38 when a code
other than 00 is returned.
The communications frame for the RFID Reader Writer/barcode reader is as
follows:
STX
Communications data for RFID Reader Writer/barcode reader
$02
Control code indicating
start of frame
ETX
$03
Control code indicating
end of frame
When the power is cycled, the default setting (CR mode) will be used.
V700-L12
User’s Manual
33
Section 4
Appendix
36
Error Codes
38
Specifications and External Dimensions
39
Section 4
Troubleshooting
Appendix
V700-L12
User’s Manual
35
Section 4
Appendix
Troubleshooting
No Response (Cannot Receive) or Corruption
The error status can be checked by observing which operation indicators are lit.
Troubleshooting Section 4
RUN
36
COMM
ID
ERR
Points to check
Lit
Not lit
Not lit
Not lit
• RS-232C cable connection (incorrect hard wiring)
• Command format ([SOH] included or not)
Lit
Not lit
Not lit
Lit
• Host communications settings (e.g., baud rate) and Link Unit communications settings do not match.
• RS-232C cable wiring (effect of ambient noise)
Lit
Lit
Not lit
Not lit
• Unit numbers specified in the command do not match the Unit number
settings in the Link Unit.
Lit
Lit
Not lit
Lit
• Command format ([CR], check code calculation, command character
interval, etc.)
• RS-232C cable wiring (effect of ambient noise)
• The same unit number has been set for two or more Link Units on the
same system*
Lit
Lit
Lit
Not lit
• RS-232C cable connection (incorrect hard wiring)
• Host send and receive switching timing, when connected to host using
RS-485. (Time)
Not lit
Not lit
Not lit
Not lit
• Check 24 VDC power supply line
* The operation indicators turn repeatedly ON and OFF even when commands are not
being sent.
V700-L12
User’s Manual
Section 4
Appendix
Communications Error for Specific Link Unit Only
The error status can be checked by observing which operation indicators are lit.
RUN
COMM
ID
ERR
Points to check
Lit
Not lit
Not lit
Not lit
• RS-485 cable connection (incorrect hard wiring)
• RS-232C cable connection (incorrect hard wiring)
• Host RS signal control (RS signal always OFF, or turns ON after a delay
after command has been sent.)*
Lit
Not lit
Not lit
Lit
• Host communications settings (e.g., baud rate) and Link Unit communications settings do not match.
• RS-485 cable wiring (effect of ambient noise)
Lit
Lit
Not lit
Not lit
• Host communications settings (e.g., baud rate) and Link Unit communications settings do not match.
Lit
Lit
Not lit
Lit
• Host RS signal control (OFF before command transmission has been
completed)*
Lit
Lit
Lit
Not lit
• Host RS signal control (RS signal is always ON).*
Not lit
Not lit
Not lit
Not lit
• Check 24-VDC power supply line.
Section 4
*
Refer to page 25 for information on host connection ports.
Troubleshooting
V700-L12
User’s Manual
37
Section 4
Appendix
Error Codes
An error has occurred if a code listed below is returned in the response data.
Refer to the following table and check the response code.
Completion code
Points to check
93
RFID Reader Writer/
barcode reader
communications error
• RFID Reader Writer/barcode reader cable wiring (effect of ambient
noise)
9A
RFID Reader Writer/barcode reader error
• RFID Reader Writer/barcode reader interface connector connection
• RFID Reader Writer/barcode reader cable disconnection
Error Codes Section 4
38
Cause of error
V700-L12
User’s Manual
Section 4
Appendix
Specifications and External Dimensions
■ V700-L12 ID Link Unit
(Unit: mm)
110
41.3
41.5
20.3
35.2
65
Two, 4.5 dia.
4
Section 4
4
60
Specifications and External Dimensions
Mounting Hole Dimensions
55
100
Two M4 or 4.2 dia.
V700-L12
User’s Manual
39
Section 4
Appendix
General Specifications
Item
Specifications and External Dimensions Section 4
No. of connectable
Antennas
Specification
1
Power supply voltage
24 VDC +10%/−15%
Power consumption
10 W max.
Insulation resistance
50 MΩ min. (at 500 VDC) between power supply terminals and ground
terminal.
Dielectric strength
100 VAC, 50/60 Hz for 1 min between power supply terminals and ground
terminal, leakage current: 5 mA max.
Vibration resistance
10 to 150 Hz, 0.20-mm double amplitude at 15 m/s2 for 10 sweeps for 8
minutes each in X, Y, and Z directions with no errors
Shock resistance
Shock from acceleration of 150 m/ s2 3 times each in X, Y, and Z directions (18
times in total) with no errors
Ambient temperature
Operating: 0 to 45°C, storage: −15 to 50°C (with no icing or condensation)
Ambient humidity
Operating:/storage: 35% to 85% (with no condensation)
Degree of protection
IP20 (IEC60529 standard)
Ground
Must be grounded to a resistance of 100 Ω or less.
Weight
Approx. 185 g
Communications Functions
Item
Specification
Unit No.
Set a unit number between 01 and 31.
Baud rate for host
communications
Set a baud rate of 4800, 9600, 19200, or 38400 bps.
Protocol for data transmission Normal (Polling)
• When data is input from a host, the data is output immediately to the ID port and a
to host
response is sent to the host to indicate that the data was received.
• When data is input from the ID port, the Unit waits for an inquiry command before
sending the data.
• This protocol is recommended when using 1:N connections.
Through (Immediate Transmission)
• Data input from the host is output immediately to the ID port. No response is sent to
the host to indicate the data was received.
• When data is input from the ID port, it is sent immediately to the host.
RS-485 terminating resistance
Set to either OFF (disconnected) or ON (connected).
Use the DIP switch to set or select functions.
40
V700-L12
User’s Manual
Revision History
A manual revision code appears as a suffix to the catalog number at the bottom of the front
and rear pages.
Cat. No. Z217-E1-01
Revision code
Date
01
January 2005
Revised contents
ëÊ 4 èÕ
Revision code
Original production
V700-L12
User’s Manual
41