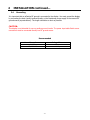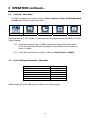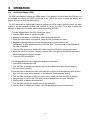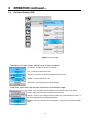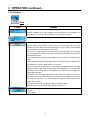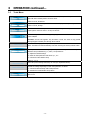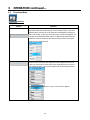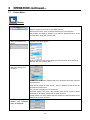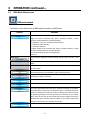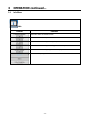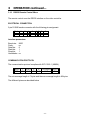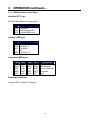
1
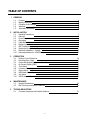
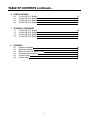
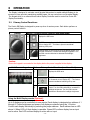
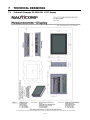
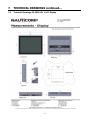
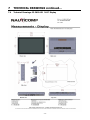
USER MANUAL
Centric GB Display Models
23-1510-GB
23-1910-GB
23-2210-GB
23-2610-GB
Canadian
Nauticomp Inc.
Headquarters: 8 Callaghan Road
Lindsay, Ontario
Canada
K9V 4R4
p: +1 705 328 2992
f: +1 705 328 2990
15.0” Display
19.0” Display
22.0” Display
26.0” Display
United
Nauticomp European Distribution
Kingdom: CA Clase
2 Mornington Place, Waterberry Drive
Waterlooville, Hants, PO7 7XX
United States: Nauticomp International
1200 NE 7th Avenue
Fort Lauderdale
Florida, United States
33304
p: +44 2392 247920
f: +44 2392 261959
URL: www.nauticomp.com E-Mail: [email protected]
p: +1 954 235 4875
f: +1-705-328-2990
TABLE OF CONTENTS
1 GENERAL
1.1
1.2
1.3
1.4
1.5
2
7
7
7
8
9
9
10
11
12
13
Primary Control Functions
Overview Menu Mode
Centric GB Keypad Functions – Menu Mode
On Screen Display (OSD)
Tools Menu
Functions Menu
Picture Menu
RGB Mode Wizard Menu
Info Menu
RS232 Remote Control
14
15
15
16
18
20
22
23
24
25
MAINTENANCE
4.1
4.2
5
Handling Precautions
Planning
Power Requirements
Grounding
Cable Runs
Display Location
EMC Guidelines
Mechanical Installation – Display
Electrical Installation – Display
Recommendations for VGA/DVI Source
OPERATION
3.1
3.2
3.3
3.4
3.5
3.6
3.7
3.8
3.9
3.10
4
4
4
5
6
6
INSTALLATION
2.1
2.2
2.3
2.4
2.5
2.6
2.7
2.8
2.9
2.10
3
Forward
Display Description
Contents of the Package
Warnings
Important Information
Routine Maintenance
EMC Servicing and Safety Guidelines
30
30
TROUBLESHOOTING
5.1
Common Symptoms and Possible Solutions
-2-
31
TABLE OF CONTENTS continued…
6 SPECIFICATIONS
6.1
6.2
6.3
6.4
23-1510-GB
23-1910-GB
23-2210-GB
23-2610-GB
15.0”
19.0”
22.0”
26.0”
Display
Display
Display
Display
32
33
34
35
7 TECHNICAL DRAWINGS
7.1
7.2
7.3
7.4
8
23-1510-GB
23-1910-GB
23-2210-GB
23-2610-GB
15.0”
19.0”
22.0”
26.0”
Display
Display
Display
Display
36
37
38
39
APPENDIX
8.1
8.2
8.3
8.4
8.5
8.6
Warranty Certificate
Warranty Limitations
Return of Goods Information (RMA)
Document Revision History
Contact Details
Product Notes
-3-
40
40
41
41
42
43
1
1.1
GENERAL
Forward
Founded in 1997, Nauticomp Inc. based in Canada designs and manufactures the widest range of
watertight sunlight and daylight readable displays for worldwide markets. Nauticomp Inc. is a fully
accredited ISO 9001:2000 Company with regional offices located in the United States of America and
Europe.
The Centric GB Displays have been tested by DELTA Electronics Testing and found to comply with the
requirements of the International Association of Classification Societies (IACS) as well as the selected
requirements of IEC 60945, IEC 60529 and MIL-STD-810F.
In support of the above, we offer the added value of a global network of experienced Dealers and
Systems Integrators to ensure customer satisfaction.
Please carefully read and follow the procedures stated in this manual.
1.2
Display Description
Centric GB displays are a series of approved LCD displays based on a modular concept. The TFT
LCD’s used in the Centric GB Series displays range from 15.0” thru to 26.0” sizes.
The front, display frame, cover, stand, turntable and sunshade are made of treated aluminium to
reduce weight and eliminate corrosion problems. These basic mechanical parts are all constructed
and assembled the same way.
The electronics include a custom-made power supply, high quality display controller, backlight
inverter with sealed transformers and a custom-made interface board.
All Centric GB displays use the same power supply and OSD – On Screen Display. The power supply
can be supplied with 115 VAC/24 VDC or 230 VAC/24 VDC.
The displays can be surface mounted from the front or simply used as a free standing unit using the
optional Stand and Turntable.
All Centric GB displays have VGA, DVI and RS232 input for remote control purposes. The 19.0” and
26.0” displays also have both S-VHS (S-Video) and CVBS (Composite) video inputs.
-4-
1
GENERAL continued…
All Centric GB Displays operate from an internal regulated power supply with an external switch
converting 115 VAC/24 VDC or 230 VAC/24 VDC.
Each Centric Display is shipped with a 2 Year / 24 Month Limited Warranty parts and labour.
1.3
Contents of the Package
Each Display is shipped with Description
Part Number
Qty
AC Power Cable
00-0600
1
6ft. Grounded power cable
Multi Remote Keypad
00-0107
1
Multi Remote Keypad (Optional)
Remote Keypad
00-0106
1
Single Display Remote Keypad
VGA Cable
00-0622
1
6ft. 15 Pin D-Sub VGA Cable
Front Mounting Kit
As Specified
4
4 x M6 screws and screw covers
User Manual
Manual Rev 6
1
Manual
Cut-Out (Paper) Kit
Cut-out Rev 1
1
Not to Scale
-5-
Remarks
1
GENERAL continued…
1.4
Warnings
1.5
1.4.1
Product Installation: All equipment must be installed and operated in accordance
with the Nauticomp instructions provided. Failure to do so could result in poor product
performance, personal injury and/or damage to connected items.
1.4.2
Electrical Safety: Make sure you have switched off the power before you start
installing this product. The display unit contains high voltages. Adjustments require
specialized service procedures and tools only available to qualified service technicians.
There are no user serviceable parts or adjustments. The user should never attempt to
service the equipment doing so will void the products warranty.
1.4.3
Navigation Aid: If this display is used within a navigation system, it is considered as
an aid to navigation. Its accuracy can be affected by many factors, including equipment
failure or defects, environmental conditions, and improper handling or use. It is the
user’s responsibility to exercise common prudence and navigational judgments. This
unit should not be relied upon as a substitute for such prudence and judgment. Always
maintain a permanent watch so you can respond to situations as they develop.
1.4.4
TFT Colour LCD Displays: The colours of the Display may seem to vary when viewed
against a coloured background or in coloured light. This is a perfectly normal effect that
will be seen with all colour LCD displays. In common with all Thin Film Transistor (TFT)
panels, the screen may exhibit a few (less than 7) wrongly illuminated pixels. These
may appear as black pixels in a light portion of the screen, or as coloured pixels in
black areas.
1.4.5
EMC Conformance: The design and manufacture of Nauticomp equipment and
accessories conform to the appropriate Electromagnetic Compatibility (EMC) standards,
but correct installation is required to ensure that performance is not compromised.
1.4.6
User Manual Content: The technical and graphical information contained in this User
Manual, to the best of our knowledge, was correct as it went to press. However, our
policy of continuous improvement and updating may change product specifications
without prior notice. As a result, unavoidable differences between the product and User
Manual may occur from time to time. Nauticomp cannot accept liability for any
inaccuracies or omissions it may contain.
Important Information
This User manual contains important information on the installation and operation of your new display.
In order to obtain the best results in operation and performance, please read this User Manual
thoroughly. Nauticomp’s Technical Support representatives or your local dealer will be available to
answer any questions you may have.
-6-
2
INSTALLATION
2.1
Handling Precautions
The casing of the Display gives good protection to its internal components. To prevent damage to the
LCD Display, it is important to observe a few simple precautions.
2.2
2.1.1
Unpack your display carefully to prevent damage.
2.1.2
If the surface is soiled, wipe lightly with clean absorbent cotton or other soft cloth.
2.1.3
The TFT panel and circuit boards contain devices that are sensitive to Electrostatic
Discharge. Adequate ESD precautions should be taken during unpacking, handling and
installation of the TFT display.
2.1.4
There are no user serviceable parts inside the display. All servicing must be carried out
by qualified personnel.
2.1.5
The casing should never be opened by unqualified personnel, as there are potentially
harmful voltages within this equipment.
2.1.6
Save the carton and packing in case you need to return the Display for service.
Planning
Before you install your Display, plan the installation considering:
2.2.1
Display location and mounting options.
2.2.2
Power requirements.
2.2.3
Cable runs - do not run video cables near any AC power sources.
2.3
Power Requirements
The display has an internal regulated power supply. With the external switch the display will input
115 VAC/24 VDC or 230 VAC/24VDC.
-7-
2
INSTALLATION continued…
2.4
Grounding
It is important that an effective RF ground is connected to the display. You must ground the display
by connecting the drain (earth) terminal directly on the Nauticomp power supply to the nearest RF
ground source (superstructure). The length should be as short as possible.
CAUTION:
This display is not intended for use on positive ground circuits. The power input cable Earth screen
connections must be connected directly to a RF ground source.
Recommended
Vessel Power Source
24 VDC
115 / 230 VAC
Rating of Fuse
5 Amp
10 Amp
-8-
2
INSTALLATION continued…
2.5
Cable Runs
Consider the following before installing the Display: 2.5.1
All cables should be adequately secured, protected from physical damage and protected
from exposure to heat. Avoid running cables through bilges or doorways, or close to
moving or hot objects.
2.5.2
Acute bends must be avoided.
2.5.3 Where a cable passes through an exposed bulkhead or deckhead, a watertight feedthrough should be used.
2.5.4 Make sure any excess cable is coiled and secured.
2.5.5
Do not run video cables near AC power sources or wires.
CAUTION:
Do not ‘Pull’ cables through the bulkheads, walls or tight spaces using a cord attached to the
connector. This method could damage the connections.
2.6
Display Location
2.6.1 Viewing angle: This LCD panel has been chosen to give the very best performance,
including viewing angle. However, the contrast and colours seen on all LCD displays
vary slightly with viewing angle.
Note: Viewing an LCD panel from the bottom angle (outside specified display viewing
angle characteristic) is typically unacceptable.
2.6.2
Access: There must be sufficient space behind the display to allow cable connections
to the rear connectors, avoiding tight bends in the cable. All connections are bottom
entry.
2.6.3
Interference: The selected location should be far enough away from devices that may
cause interference, such as motors, generators and radio transmitter/receivers (see the
EMC guidelines section 2.7).
2.6.4
Magnetic compass: Mount the display unit at least 3 ft (1m) away from a magnetic
compass.
2.6.5
Environment: To prevent overheating, do not restrict airflow at the front or rear of
the display unit; ensure there is adequate ventilation.
-9-
2
INSTALLATION continued…
2.6.6
Heat Management: The display is designed to work within most high ambient heat
conditions. There are extreme yet rare conditions that may cause the display to go
black or “Blackout”. This is normally caused by concentrated and excessive UV rays
(DIRECT SUNLIGHT) acting on the LCD panel.
To minimize the risk of the Display being subjected to the above one should endeavour
to: -
2.7
2.6.7
Employ additional cooling to assist with heat dissipation.
2.6.8
Provide additional shading.
EMC Guidelines
All Nauticomp Displays and accessories are designed to the best industry standards for use in the
rugged electronic environment. The design and manufacture conforms to the appropriate
Electromagnetic Compatibility (EMC) standards (reference section 1.4.5), but correct installation is
required to ensure that performance is not compromised. Although every effort has been taken to
ensure that they will perform under all conditions, it is important to understand what factors could
affect the operation of the product. The guidelines given here describe the conditions for optimum
EMC performance, but it is recognized that it may not be possible to meet all of these conditions in all
situations. To ensure the best possible conditions for EMC performance within the constraints
imposed by any location, always ensure the maximum separation possible between different items of
electrical equipment.
For optimum EMC performance, it is recommended that where ever possible Nauticomp displays and
cables connected should be:
2.7.1 At least 3 ft (1 m) from any equipment transmitting or cables carrying radio signals e.g.
VHF radios, cables and antennas. In the case of SSB radios, the distance should be
increased to 7 ft (2 m).
2.7.2 More than 7 ft (2 m) from the path of a radar beam. A radar beam can normally be
assumed to spread above and below the radiating element.
2.7.3 Supplied from a separate battery from that used for engine start. Voltage drops below
10 V, and starter motor transients, can cause the equipment to reset and or cause the
loss of some information and may change the operating mode.
2.7.4
Used with Nauticomp specified cables. Cutting and rejoining (Splicing) these cables can
compromise EMC performance and must be avoided.
NOTE:
If a suppression ferrite is attached to a cable, this ferrite should not be removed.
- 10 -
2
INSTALLATION continued…
2.8
Mechanical Installation – Display
Mechanical drawings are included in the enclosed with each manual.
The display is packaged with all accessories for the ordered mounting type.
2.8.1
Front Mounting
The display is mounted to e.g. a console using supplied front mounting hardware
enclosed in the delivery. The screws must be tightened to 70 inch pounds / 7.9 Newton
meters.
Above Illustration –Orientation of bolt and clip located on side of display
2.8.5
Sealing Kit
The kit consists of a gasket for the back of the display and rubber O-rings for the
mounting screws.
The gasket must be inserted into the recess in the display back prior to mounting of the
display.
Please observe that the gasket is firmly fitted inside the recess all the way around and
that the mounting surfaces are clean.
Above Illustration –Orientation of Gasket installed on rear of display
- 11 -
2
INSTALLATION continued…
2.9
Electrical Installation - Display
2.9.1
Cabling – Electrical Supply
All electrical installations are made to the terminals placed on the lower rear side of the
display. All terminal designations are marked on the terminal plate beneath the
terminals.
If the display is exposed to vibration or shock all cables should be fixed to the cable
retainers below the terminal plate using plastic tie straps.
Connect drain (earth) to the nearest RF ground source (superstructure)
Figure1. Terminal Plate for 19” Centric GB Display
2.9.2
Power Supply
The display can be supplied by 115 VAC/ 24 VDC or 230 VAC /24 VDC. The selected AC
voltage is marked on a label on the terminal plate.
The display is connected to AC voltage by means of the standard AC power cable
included in the package. The AC current to the display must be limited by a 10 amp
fuse or similar.
The display is connected to DC voltage by means of DC power plug included in the
package. The DC current to the display must be limited by a 5 amp fuse. The wire used
must be suitable for up to 8 A.
2.9.3 VGA Cable
The VGA cable is included in the package.
On the 15.0” and 19.0” displays the VGA cable is to be connected to the VGA terminal.
On the 26.0” displays the DVI-I to VGA cable is to be connected thru the DVI-I terminal.
Fasten the screws in the terminal for adequate earth connection.
2.9.4 DVI Cable
The DVI cable is not included in a standard delivery but is available as an option.
The DVI cable is connected to the DVI-I terminal.
Fasten the screws on the terminal for adequate earth connection.
- 12 -
2
INSTALLATION continued…
2.9.5 Video / Composite Cables
Video cables can be connected to the display by means of the S-VHS (S-Video) and
CVBS (Composite) terminals. The video cables must be of high quality to avoid
interference on the signal.
2.9.6 RS232 Cable
The display is equipped with a standard 9-Pin D–SUB connecter for RS232 remote
control. Detailed information about this interface and remote control of the display is
given in the remote control section. Refer to section (3.10 - RS232 Remote Control)
2.9.8 Cabling – Connections
2.9.8.1
All cables can only be installed one-way. Do not force cables into
sockets.
2.9.8.2
All cables must be connected to the output source before connecting to
display.
CAUTION:
Always connect all video input cables before connecting the power.
2.10 Recommendations for VGA/DVI Source
All Centric GB Displays comply with VESA DDC1/2B Windows Plug and Play. No driver disks are
required. A computer running Windows 2000, XP and later versions may interrogate the display for its
technical characteristics. For best results Nauticomp recommends that you set the PC or device to
match the “native” resolution, and suggested frequency as suggested in section 6 of this manual.
(See specifications for your particular display)
Example: 1024 x 768 at 60Hz is the preferred resolution and refresh rate. Unlike CRT Displays, LCD
displays do not flicker; hence selecting a higher refresh rate provides no advantage.
- 13 -
3
OPERATION
The Display is designed to minimize overall physical dimensions to enable multiple Displays to be
mounted in close proximity maximizing available space. No user controls are on the actual Display.
The Keypad which is an external three button Display Controller used to control the Centric GB
Display functionality.
3.1
Primary Control Functions:
The Centric GB Display is designed to power up when it receives power. Each button performs a
primary control function.
Keypad
Button – Primary Control Function (non Menu Mode)
1)
Displays the OSD menu
2)
ON/OFF momentarily press for ON / Press & hold for 6 seconds
to turn display OFF – This feature prevents accidental
switching off by user.
Press the DIAL to scroll through all of the display inputs. Turn
the DIAL clockwise to increase the backlight brightness. Turn
the DIAL counter-clockwise to decrease the backlight
brightness.
3)
Caution:
Ensure the keypad is connected to the display before the power is applied to the display.
Multi Remote Keypad
Button – Primary Control Function (non Menu Mode)
1)
Displays the OSD menu
2)
ON/OFF momentarily press for ON / Press & hold
for 6 seconds to turn display OFF – This feature
prevents accidental switching off by user.
Press the DIAL to scroll through all of the display
inputs. Turn the DIAL clockwise to increase the
backlight brightness. Turn the DIAL counterclockwise to decrease the backlight brightness.
3)
Using the Multi Display remote (Optional):
Up to 5 displays can be controlled via one remote. Each display is designated an address of 1
through 5. Control brightness and power of all displays connected using the 1-5 button.
Control each display individually by selecting the proper address. Each address has an LED
above it. When LED is lit that display is operable. Green LED confirms display has an input
and is active. Red LED confirms display is active with no input.
- 14 -
3 OPERATION continued…
3.2
-
Overview – Menu Mode
The OSD is designed with 5 different folders: Tools, Functions, Picture, RGB mode wizard,
and Info, each of which has their own menu.
Tools
Functions
Picture
RGB Mode Wizard
Info
The Keypad buttons 1, 2 & 3 (section 3.1 refers) are used to navigate and select the OSD (On Screen
Display) settings.
3.3
3.2.1
Momentarily pressing button 1 (MENU) activates the Displays Menu Mode. When
this is done the Centric GB Menu is displayed. In Menu Mode the other function for
button 1 is: Exit.
3.2.2
In the Menu the functions for button 3 (DIAL) are Scroll, Select and Adjust.
Centric GB Keypad Functions – Menu Mode
Navigation Function
Button
ACTIVATE the Menu Mode:
MOVE to next folder:
ACCESS selected folder:
SELECT a Desired parameter/setting:
ADJUST parameter/setting:
SAVE parameter/setting:
Press the Menu button
Turn the DIAL
Press the DIAL
Press the DIAL
Turn the DIAL
Press the DIAL
Detailed description of the OSD menus are listed on the following pages:
- 15 -
3
OPERATION
3.4
On Screen Display (OSD)
The OSD is activated by pressing the MENU button. If the display is in locked state the OSD can only
be activated by pressing the MENU control for 5 sec. (When the menu is locked the Display and
Keypad LED’s are at their brightest setting)
The OSD menu can be opened and closed by pressing the MENU button. Once the menu has been
opened it can be navigated up/down and right/left by turning the DIAL. To be able to adjust the
settings, an item has to be active, which is done by pressing the DIAL.
- To make adjustments in the OSD, follow these steps:
1. Press the MENU button to activate the OSD.
2. Navigate up and down in the different folders by turning the DIAL.
3. When the desired folder is highlighted, press the DIAL to activate the menu.
4. Navigate by turning the DIAL until the desired control has been reached (and
highlighted). To gain adjustment control, press the DIAL. The control will be highlighted and
can now be adjusted.
5. Turn the DIAL clockwise to increase the value or counter-clockwise to decrease the value.
6. When the right level has been reached, press the DIAL once again to activate the adjustment
and automatically jump one level back.
7. To exit the OSD, press MENU.
- The following describes how to adjust the settings for Saturation:
1. Press MENU to activate the OSD
2. Turn the DIAL to navigate up or down until you have selected the folder ‘Source enabling’
(the icon will be coloured).
3. Press the DIAL to activate the folder (the folder will turn blue, and automatically the first menu
item in the sub-menu will be selected - in this case the ‘Source enabling’ button)
4. Turn the DIAL to navigate to DVI-A (or other Source input) and press the DIAL to activate.
5. Navigate down by turning the DIAL until you have selected the menu item ‘Saturation’
6. Press the DIAL to activate the menu item.
7. Turn the DIAL to select the desired value for the saturation
8. Press the DIAL to validate the change - the OSD automatically jumps one level back.
- 16 -
3
OPERATION continued…
3.4
On Screen Display (OSD)
Figure 3 On Screen Display
-
Depending on the menu chosen, different types of items can appear:
Push button - activates a sub-menu or a function
List - a value can be chosen from a list
Slide bar – slide the bar to choose the desired level from 0-100%
ON/OFF - turns the settings On or Off
Information - contains pure text or value information
-
Folder items, menu items, and sub-menu items exist in three different stages:
Inactive - when the OSD is opened all folders, menus, and sub-menus are by default
inactive, and the only item that is selected is the ‘Tools’ folder.
Selected - when the user navigates through the OSD, part of the selected item is blue. It
can not be adjusted before activated (Press ENTER).
Activated - the item is activated and can be adjusted. To activate an item, push the ENTER
button.
- 17 -
3 OPERATION continued…
3.5 Tools Menu
Tools
Control
Function
Backlights are used to illuminate displays. In small displays they are often used to
increase readability in low light conditions. The OSD allows for the backlight to be
dimmed from 100 – 0%. At 0%, the backlight is turned off. Value: 0-100%
LED brightness
When showing a graphic signal or video signal, the following scaling modes exists:
Normal: Scaling mode depends on panel and source signal aspect ratio. This mode
preserve the correct aspect ratio of the input signal, so if a 4:3 signal is to be displayed
on a 16:9 display this adds black bars on both sides.
One to one: 1:1 representation of the input signal. If a 640x480 signal is to be displayed
on a 1024x768 panel, you will see the picture centered using 640x480 pixels shown with
a black frame around it.
Fill all: Regardless of input and output resolutions the input picture is scaled to fit the
screen.
Zoom: Slightly zoomed video input signal. Used for removing (in part) the black bars on
top and bottom of the 16:9 image shown on a 4:3 screen.
Auto: This means that for Composite or S-Video signals, provided Wide Screen Signalling
(WSS) is available, input signal is automatically scaled depending on the ancillary data
transmitted. This is usually sent by TV broadcasters or by DVD players according to the
aspect ratio of the video.
Anamorphic: For 16:9 signals generated by DVD players (the signal is 16:9 but is
stretched to fill the screen with no black bars, so the picture, if displayed on a 4:3 screen,
would result in tall people). This will de-stretch the picture so that the given correct
aspect ratio is restored.
Auto and Anamorphic will only appear if video input has been chosen.
Value: Normal, One to one, Fill all, Zoom, Auto and Anamorphic
If a still picture is needed, the present frame can be frozen by selecting ON in this
property.
Value: ON/OFF
- 18 -
3
OPERATION continued…
3.5
Tools Menu
Sets the duration for the time-out of the OSD menu, that is, how many seconds should
pass with menu inactivity before the menu closes.
Value: 5-20 sec, No timeout
How many seconds the logo will be shown on the display at start-up is adjusted here.
Value: 1-20 sec, No logo
Sets the time that should pass before the display changes state to power save after
input signal is removed. Value: 1-20 min, No timeout.
Locks the keypad. To unlock the keypad again, press the MENU button for 5 seconds.
Value: ON/OFF
WARNING: Do not lock keypad if only IR remote is used. The access is only granted
through keypad or RS232, NOT through the IR remote
Reinstalls the settings provided by the factory.
Note: The OSD menu will automatically close after choosing the ‘Factory Default’ button
A setup is a combination of settings adjusted by the user. It is possible to save up to 3
different setup combinations (0, 1, and 2). The procedure is:
1) Adjust the desired settings
2) Enter the ‘Setup selection’ and choose 0, 1, or 2
3) Choose the ‘Save Monitor setup’
Value: 0, 1, or 2
Saves the present settings entered by the user (See explanation above).
Recalls the settings depending on which ‘Setup Selection’ is chosen:
1) Choose the desired setup under ‘Setup selection’
2) Activate the ‘Recall Monitor setup’ button
Horizontal position of the OSD menu on the display.
Value: 0-100
- 19 -
3
OPERATION continued…
3.6
Functions Menu
Functions
Control
Function
The ‘Source enabling’ control decides which input sources should be enabled
and which should not. By activating the ‘Source enabling’ button, a sub-menu
appears where input sources can be activated or deactivated by choosing the
ON or OFF setting. A source has to be set to ON to be able to be adjusted. The
list below is for Marlin Basic scalar boards. If a Marlin Single scalar board with
extension module is used the list will reflect the inputs present on the Marlin
Single plus the extension board.
Which source will be shown here depends on which component is set for the
‘Source A’ value under the menu ‘Picture’ (And eventually Source B in case of
PIP and Side By Side). A sub-menu will appear with the following parameters:
By setting the ‘Color temperature’ to User, a new sub-menu appears:
- 20 -
3
OPERATION continued…
3.6
Functions menu
Brightness specifies the darkness or lightness of a color. It is measured in percent
from black (0) to white (100). At 0% brightness, both hue and saturation are
meaningless.
Value: 0-100%
Contrast is the difference in light intensity between the brightest white and the
darkest black.
Value: 0-100%
Saturation sets the brilliance and purity of a color. A highly saturated hue (pure
color) has a vivid, intense color, while a less saturated hue appears more muted
and grey. At 0% saturation, hue is meaningless.
Value: 0-100%
Hue is what most people refer to as color. A blue button has the hue blue. It is
the dominant wavelength of a color.
Value: 0-100%
The color can be set to Default, User, Cold, or Warm:
Cold: The predominant tones are blue and violet.
Warm: The predominant tones are red and orange.
User: Activates the menu items Red, Green, and Blue, where the value can be set
between 0-100%.
Value: Default, User, Cold, or Warm
- 21 -
3
OPERATION continued…
3.7
Picture Menu
Picture
There are three different display modes:
Single: A single picture is shown on the display (default)
PIP: Picture In Picture, where a small sub-window shows a second picture.
Side by Side: The display is divided into two pictures representing Source A and
Source B Value: Single, PIP, or Side by Side
If ‘Single’ is chosen as display
mode, the following menu
appears:
It is possible to adjust the settings for one input source at a time. If ‘Source A’ is
activated, a sub-menu appears:
In this sub-menu the user chooses which input should be active .Their settings are
adjusted under the ‘Functions’ menu.
If ‘PIP’ is chosen as display
mode, the following menu
will appear:
Source A has already been explained and Source B decides which input should be
the second input.
Swap sources: Swaps the input sources - Source A becomes the PIP picture and
Source B the full size picture.
Size: The size of the PIP picture is chosen here.
Horizontal position: The chosen value decides where the PIP picture is placed
horizontally on the display starting from the upper left corner.
Vertical position: The value decides where the PIP picture is placed vertically on the
display from the upper left corner.
If ‘Side by side’ is
chosen, the following
menu is displayed:
- 22 -
3
OPERATION continued…
3.8
RGB Mode Wizard menu
RGB mode wizard
- This folder is only shown when an RGB signal is present on a RGB input.
Control
Function
Mode selection is a set of parameters telling the display where and how to
display the picture (horizontal total, phase, horizontal resolution, vertical
resolution, horizontal position, and vertical position).
It is possible to enter up to 10 different mode selections:
1) Activate the ‘Mode selection’
2) Choose the desired no.
3) Adjust settings under horizontal total, phase, horizontal resolution, vertical
resolution, horizontal position, and vertical position.
4) Enter and activate the ‘Save mode parameters’
Value: 0-9
Pure information stating the current resolution and Hz. value: No value - pure
text.
Automatically sets the resolution, position, and phase of the picture on the
display.
If new mode parameters have been entered it is possible to delete them by using
the ‘Clear’ button.
The Horizontal Total should be equal to, or higher than, the horizontal resolution
plus horizontal position (See explanation under ‘Horizontal position’).
The phase settings stabilize the picture by removing horizontal noise and
sharpening the image of characters.
The value for the horizontal resolution of the display is adjusted here.
The vertical resolution of the display is adjusted here.
The chosen value decides where the picture is placed horizontally on the display.
Horizontal position is equal to the horizontal front porch + horizontal back porch,
which is the field used to specify the number of dummy pixel clocks to insert at
the beginning (pulsing the line clock pin) and end of each line or row of pixels
before. After the line clock for the previous line has been negated, the value in
horizontal back porch is used to count the number of pixel clocks to wait before
starting to output the first set of pixels in the next line.
The value decides where the picture is placed vertically on the display.
- 23 -
3
OPERATION continued…
3.9
Info Menu
Info
Control
Function
Information about the software version.
Information about the temperature in the Monitor.
Information about the voltage entering the print.
Information about the voltage internally generated on the print.
Information about the voltage supplied for the display.
The name and input signal data of the source enabled will be informed here.
- 24 -
3
OPERATION continued…
3.10
RS232 Remote Control Menu
The remote control uses the RS232 interface on the video controller.
ELECTRICAL CONNECTION
9 pin D-SUB female connector with the following pin assignment:
Pin 1 2
3 4
5
6 7 8
9
+5 V TX RX - GND - - - GND
Interface parameters
Baud rate:
Parity:
Data bits:
Start bits:
Stop bits:
Handshake:
9600
no
8
1
1
no
COMMUNICATION PROTOCOL
The communication protocol complies with IEC 61162-1 (NMEA):
Byte 0
1
2 to 4
5
6 7 to LEN+6 LEN+7
ATT ADR CMD LEN IHC
DAT
IDC
The min message length is 7 bytes and the max message length is 82 bytes.
The different bytes are described below
- 25 -
3
OPERATION continued…
3.10
RS232 Remote Control Menu
Attention (ATT) byte
This byte identifies the message start:
ATT
Description
0x07 Command
0x06 Acknowledge (OK)
0x15 Acknowledge (error)
Address (ADR) byte
ADR
0xFF
0x00
0x01
0x0F
Description
All controllers (0 -15)
Controller 0
Controller 1
etc.
Controller 15
Command (CMD) bytes
CMD0
0x42
0x4D
0x56
0x4D
0x54
CMD1
0x52
0x41
0x45
0x43
0x59
CMD2
0x54
0x4E
0x52
0x43
0x50
ASCII
BRT
MAN
VER
MCC
TYP
Description
Brightness
Manufacturer
Version (Monitor)
Controller
Type
Data length (LEN) byte
Length of DAT in bytes (0-74 bytes)
- 26 -
3
OPERATION continued…
3.10
RS232 Remote Control Menu
Inverse Header Checksum (IHC) byte
It is a simple 8 bit checksum of the header data (bytes 0 to 5) where a bit-wise inversion has
been performed. The checksum must be initialised to 0. The 8 bit sum (without carry) of bytes
0-6 must be 0xFF.
IHC = 0xFF – (ATT+ADD+CMD0+COM1+COM2+LEN), where only 8 bits are used.
If a message checksum fails the controller will reply with the attention byte 0x15 and no data
bytes.
Data (DAT) bytes
The data bytes will only be send if data length (LEN) is greater than 0.
The data bytes are designated DAT0, DAT1, DAT2, etc.
Inverse Data Checksum (IDC) byte
This byte will only be send if data length (LEN) is greater than 0. It is an 8 bit checksum of the
data bytes (bytes 7 to LEN+6) where a bit-wise inversion has been performed. The checksum
is initialised to 0. The 8 bit sum (without carry) of bytes 7 to LEN+7 is be 0xFF.
IDC = 0xFF – (DAT0+DAT1+DAT2+….), where only 8 bits are used
If a message checksum fails the controller will reply with the attention byte 0x15.
MESSAGE EXAMPLES
The following examples are the typical messages used:
Brightness command (BRT)
This command is used to change the brightness of the Monitor.
Change brightness from 40% to 60% on all controllers (default address setting):
ATT ADR
CMD
LEN IHC DAT IDC
0x07 0xFF 0x42 0x52 0x54 0x01 0x10 0x99 0x66
The brightness data is one byte where 0x00 is min and 0xFF is max.
- 27 -
3
OPERATION continued…
3.10
RS232 Remote Control Menu
Acknowledge (OK):
ATT ADR
CMD
LEN IHC DAT IDC
0x06 0xFF 0x42 0x52 0x54 0x01 0x11 0x99 0x66
The controller returns the new brightness data – in this case 0x99 = 60%.
Acknowledge (error):
ATT ADR
CMD
LEN IHC DAT IDC
0x15 0xFF 0x42 0x52 0x54 0x01 0x02 0x66 0x99
The controller returns the previous brightness data - in this case 0x66 = 40%.
Manufacturer command (MAN)
This command is used to identify the manufacturer of the Monitor.
Ask for manufacturer:
ATT ADR
CMD
LEN IHC
0x07 0xFF 0x4D 0x41 0x4E 0x00 0x1D
No data must be sent.
Acknowledge (OK):
ATT ADR
CMD
LEN IHC
DAT
IDC
0x06 0xFF 0x4D 0x41 0x4E 0x03 0x1B 0x4E 0x49 0x68
The controller returns the ASCII string value for the manufacturer – in this case NI (North
Invent).
- 28 -
3
OPERATION continued…
3.10
RS232 Remote Control Menu
Version command (VER)
This command is used to identify the controller model and protocol version.
Ask for model/version:
ATT ADR
CMD
LEN IHC
0x07 0xFF 0x56 0x45 0x52 0x00 0x0C
No data must be sent.
Acknowledge (OK):
ATT ADR
CMD
LEN IHC
DAT
IDC
0x06 0xFF 0x56 0x45 0x52 0x03 0x0A 0x73 0x01 0x00 0x8B
The controller returns the controller model (DAT0) and protocol version (DAT1.DAT2) – in this
case controller model 115 and protocol version 1.0.
- 29 -
4
MAINTENANCE
4.1
Routine Maintenance
Good performance requires maintenance checks regularly. The following are recommended:
4.1.1
Check all cable connectors on the rear of the display to ensure they are secured.
4.1.2
Examine all cables for signs of damage such as; chafing, cuts, nicks or corrosion.
4.1.3
Take care when cleaning the display. Wipe the LCD with clean, damp cloth to remove
dust or salt deposits. Use an LCD cleaner to dissolve the debris and change the cloth
frequently so as not to scratch or damage the glass. To remove O-rings marks,
carefully apply a mild detergent solution or IPA (Isopropyl Alcohol).
CAUTION:
Ensure the Display is disconnected from power before carrying out routine maintenance.
CAUTION:
Do not wipe the Display with a dry cloth - As this could scratch the screen coating.
CAUTION:
Do not use Acid, Ammonia based or abrasive products.
4.2
EMC Servicing and Safety Guidelines
Only authorized Nauticomp service technicians should service Centric GB Displays. They will ensure
that service procedures and replacement parts used will not affect performance.
Kindly note the following:
4.2.1
There are no user serviceable parts in any Centric display or power supply.
4.2.2
Some products generate high voltages. Never handle the cables/connectors when
power is being supplied to the equipment.
4.2.3
When powered up, all electrical equipment produces electromagnetic fields. These can
cause adjacent pieces of electrical equipment to interact with one another with a
consequent adverse effect on operation. In order to minimize these effects and enable
you to get the best possible performance from your Centric display, guidelines are
given in the installation instructions (Reference section 2.9); to enable you to ensure
minimum interaction between different items of equipment, i.e. ensure optimum
Electromagnetic Compatibility (EMC).
4.2.4
Always report any EMC-related problem to your Nauticomp dealer. We use such
information to improve our quality standards.
4.2.5
In some installations, it may not be possible to prevent the equipment from being
affected by internal influences. In general this will not damage the equipment but it can
lead to spontaneous resetting action, or momentarily may result in faulty operation.
- 30 -
5
TROUBLESHOOTING
All Centric GB Displays are subjected to comprehensive testing and quality assurance programs.
However, if this unit should develop a fault, please refer to the following table to identify the most
likely cause and the corrective action required to restore normal operation.
If you still have a problem after referring to the table below, contact Nauticomp Technical Services
Department for further advice at 705-328-2992
Always quote the product serial numbers. Display unit serial number is printed on the back of the
unit.
5.1 Common Symptoms and Possible Solutions
Problem
Solution
No AC or DC indication and no picture on the
screen
a) Momentarily press the Power button
b) Check the AC and/or DC power cable and
make sure that voltage is present at the terminals
a) Check that a valid signal is present on the
selected source – use e.g. another display
b) Turn the DIAL clockwise
c) Press the menu control and select the correct
Video source with the OSD.
Adjust the picture positions and frequency with the
OSD
Check if the video resolution and frequency are
included in the Mode table above
Adjust the backlight to 50% with the OSD
No picture on the screen but AC and/or DC is
present
The picture does not fit the screen size
The picture cannot be adjusted to fit the screen
size
The backlight cannot be adjusted from total
darkness to full brightness using the Dimming
control
Part of or whole picture is blurred
a) Adjust the picture phase with the OSD
b) Check cables – AC interference
- 31 -
6
SPECIFICATIONS
6.1
Specifications: 23-1510-GB 15.0” Display
- 32 -
6
SPECIFICATIONS continued…
6.2
Specifications: 23-1910-GB 19.0” Display
- 33 -
6
SPECIFICATIONS continued…
6.3
Specifications: 23-220-GB 22.0” Display
- 34 -
6
SPECIFICATIONS continued…
6.4
Specifications: 23-2610-GB 26.0” Display
- 35 -
7
TECHNICAL DRAWINGS
7.1
Technical Drawings: 23-1510-GB 15.0” Display
- 36 -
7
TECHNICAL DRAWINGS continued…
7.2
Technical Drawings: 23-1910-GB 19.0” Display
- 37 -
7
TECHNICAL DRAWINGS continued…
7.3
Technical Drawings: 23-2210-GB 22.0” Display
- 38 -
7
TECHNICAL DRAWINGS continued…
7.4
Technical Drawings: 23-2610-GB 26.0” Display
- 39 -
8
APPENDIX continued…
8.1
Warranty Certificate
The Nauticomp warranty terms and conditions as described below do not affect the customer’s
statutory rights: -
Limited Warranty
Nauticomp warrants each new centric display to be of good materials and workmanship. Nauticomp
or its approved agents will repair or exchange under warranty any parts proven to be defective in
material or workmanship under normal use, for a period of 2 years / 24 months from date of
shipment from Nauticomp. Nauticomp’s Limited Warranty covers the parts and labour associated
with any warranty repair as described above, provided that the unit is returned to Nauticomp or one
of its appointed agents.
8.2
Warranty Limitations
Warranty Limitations
Nauticomp Warranty policy does not apply to equipment that has been subjected to accident, abuse
or misuse, shipping damage, alterations, corrosion, incorrect and/or non-authorized service, or
equipment on which the serial number has been altered, mutilated or removed. Nauticomp assumes
no responsibility for damage incurred during installation or as a result of improper installation. This
Warranty does not cover routine system checkouts, alignment/calibration, sea-trials or
commissioning.
A suitable proof of purchase, showing date, place, and serial number must be made available to
Nauticomp or authorized service agent at the time of request for Warranty service.
Overtime/premium labour portion of services outside of normal working hours is not covered by this
Warranty. Travel cost allowance on certain products with a suggested retail price below $2500.00 is
not authorized. When/or if repairs are necessary, these products must be forwarded to a Nauticomp
facility or an authorized dealer at owner’s expense and then will be returned via surface carrier at no
cost to the owner. Travel costs other than auto mileage, tolls and two (2) hours travel time, are
specifically excluded on all products. Travel costs, which are excluded from the coverage of this
Warranty, include but are not limited to: taxi; launch fees, aircraft rental, subsistence, customs,
shipping and communication charges etc. Travel costs, mileage and time, in excess to that allowed
must have prior approval in writing.
To the extent consistent with state and federal law
8.3.1 This warranty is strictly limited to the terms indicated herein, and no other warranties or
remedies shall be binding on Nauticomp including without limitation any warranties of merchantable
or fitness for a particular purpose.
8.3.2 Nauticomp shall not be liable for any incidental, consequential or special (including punitive or
multiple) damages.
All Nauticomp products sold or provided hereunder are merely aids to navigation. It is the
responsibility of the user to exercise discretion and proper navigational skill independent of any
Nauticomp equipment.
- 40 -
8
APPENDIX continued…
8.3
Return of Goods Information (RMA)
Obtaining Warranty Service
In the event of Warranty service being required, contact Nauticomp directly. A suitable proof of
purchase, showing date, place of purchase, and serial number must be made available to Nauticomp
or authorized service agent at the time of request for Warranty service.
Note:
Make sure to call Nauticomp Technical support at 705-328-2992 to obtain an RMA Number before
returning ANY defective product to Nauticomp. Failure to do so may result in rejection of shipment.
8.4
Document Revision History
The current issue is the last on the list.
Revision
6
Date
Nov 30th 2009
Author
J. Smeall
- 41 -
Checked & Approved
8
APPENDIX continued…
8.5
Contact Details
Canadian
Headquarters:
Nauticomp Inc.
8 Callaghan Road
Lindsay, Ontario, K9V 4R4.
p: +1 705 328 2992
f: +1 705 328 2990
United Kingdom:
Nauticomp European Distribution
CA Clase
2 Mornington Place, Waterberry Drive,
Waterlooville, Hants, PO7 7XX
p:+44 2392 247920
f:+44 2392 261959
United States:
Nauticomp International.
1200 NE 7th Avenue.
Ft Lauderdale, Florida, 33304.
p: +1 954-235-4875
f: +1 705-328-2990
Nauticomp Inc. is fully accredited ISO 9001:2000 Company
INTERTEK
Certification Nº 4546
- 42 -
8
APPENDIX continued…
8.6 Product Notes:
- 43 -
Copyright © 2007 Nauticomp Inc.
8 Callaghan Road, Lindsay,
Ontario, CANADA K9V 4R4
Information in this manual is copyrighted to the respective owners.
All other product names or trademarks are properties of their respective owners
All rights are reserved by Nauticomp Inc. This information may not, in whole or in part, be copied,
photocopied, reproduced, translated or reduced to any electronic medium or machine-readable form
without the prior written consent of Nauticomp Inc.
- 44 -