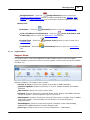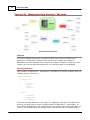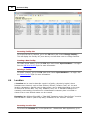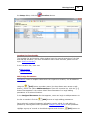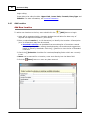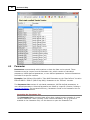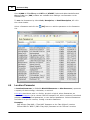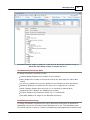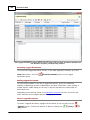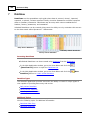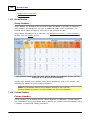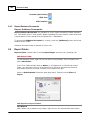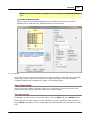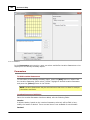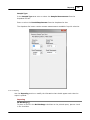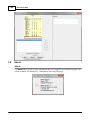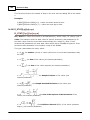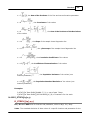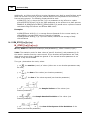
1
Operator10 Help © 2014 AllMax Software, Inc. All rights reserved. No parts of this work may be reproduced in any form or by any means - graphic, electronic, or mechanical, including photocopying, recording, taping, or information storage and retrieval systems - without the written permission of the publisher. Products that are referred to in this document may be either trademarks and/or registered trademarks of the respective owners. The publisher and the author make no claim to these trademarks. While every precaution has been taken in the preparation of this document, the publisher and the author assume no responsibility for errors or omissions, or for damages resulting from the use of information contained in this document or from the use of programs and source code that may accompany it. In no event shall the publisher and the author be liable for any loss of profit or any other commercial damage caused or alleged to have been caused directly or indirectly by this document. Printed: May 2014 Contents 3 Table of Contents Foreword 0 Part I Welcome to Operator10 - Wastewater 17 Part II Introduction to Operator10 - Wastewater 19 1 Getting ................................................................................................................................... Started 19 Installation Overview .......................................................................................................................................................... 19 2 About................................................................................................................................... Operator10 - Wastewater 22 License .......................................................................................................................................................... 22 Keycode ......................................................................................................................................................... 22 Configuration.......................................................................................................................................................... File 23 Help | About .......................................................................................................................................................... 23 System Properties .......................................................................................................................................................... 26 Credits .......................................................................................................................................................... 26 3 Support ................................................................................................................................... 26 Support Menu.......................................................................................................................................................... 27 4 Help File ................................................................................................................................... Conventions 27 5 Copyright ................................................................................................................................... 28 Part III General Features 30 1 Grid ................................................................................................................................... 30 Grid Toolbar .......................................................................................................................................................... 30 Grid Colum ns.......................................................................................................................................................... 36 Grid Data View .......................................................................................................................................................... 38 Grid Print .......................................................................................................................................................... 40 2 Multi-Edit ................................................................................................................................... 40 3 Security ................................................................................................................................... 41 User Security.......................................................................................................................................................... 42 User Facility Security .......................................................................................................................................................... 43 User L:P Perm.......................................................................................................................................................... issions 45 Groups .......................................................................................................................................................... 45 4 Date/Calendar ................................................................................................................................... 47 Relative Dates.......................................................................................................................................................... 48 Tim e .......................................................................................................................................................... 49 5 Audit................................................................................................................................... Trail 49 6 Windows ................................................................................................................................... Login 51 7 Auto-Update ................................................................................................................................... 51 Part IV Main Application 56 1 Application ................................................................................................................................... Characteristics 56 Quick Access.......................................................................................................................................................... Toolbar 56 Menu System.......................................................................................................................................................... 57 File Menu ......................................................................................................................................................... 57 Dashboard......................................................................................................................................................... Ribbon 58 © 2014 AllMax Software, Inc. 3 4 Operator10 Help View Ribbon ......................................................................................................................................................... 59 Setup Ribbon ......................................................................................................................................................... 61 BioSolids Ribbon ......................................................................................................................................................... 62 Tools Ribbon ......................................................................................................................................................... 63 Support Ribbon ......................................................................................................................................................... 65 Help Ribbon ......................................................................................................................................................... 66 Operator10 Options .......................................................................................................................................................... 67 2 Database ................................................................................................................................... 68 Add New Database .......................................................................................................................................................... 69 Add New Facility .......................................................................................................................................................... 71 Delete Database .......................................................................................................................................................... 72 Delete Facility.......................................................................................................................................................... 72 Database Structure .......................................................................................................................................................... 73 Database Properties .......................................................................................................................................................... 75 Database Utilities .......................................................................................................................................................... 79 Database Utilities ......................................................................................................................................................... - Rename 79 Database Utilities ......................................................................................................................................................... - Table properties 80 Database Utilities ......................................................................................................................................................... - Rebuild 80 Database Utilities ......................................................................................................................................................... - Registry 81 Pervasive .......................................................................................................................................................... 82 3 Facility ................................................................................................................................... 83 4 Location ................................................................................................................................... 84 Add Location .......................................................................................................................................................... 86 Delete Location .......................................................................................................................................................... 87 Standard Location .......................................................................................................................................................... 87 5 Parameter ................................................................................................................................... 88 Add Param eter .......................................................................................................................................................... 90 Delete Param eter .......................................................................................................................................................... 91 Stock Param eters .......................................................................................................................................................... 91 6 Location:Parameter ................................................................................................................................... 92 Add Location:Param .......................................................................................................................................................... eter 95 Delete Location:Param .......................................................................................................................................................... eter 96 Location:Param .......................................................................................................................................................... eter Usage 96 7 Data ................................................................................................................................... 98 Add Data .......................................................................................................................................................... 98 Review Data .......................................................................................................................................................... 99 Data Types .......................................................................................................................................................... 100 Alpha Code ......................................................................................................................................................... 100 Data Value ......................................................................................................................................................... 100 Date ......................................................................................................................................................... 101 Greater Than ......................................................................................................................................................... 101 Less Than ......................................................................................................................................................... 101 Non-Detect ......................................................................................................................................................... 101 Time ......................................................................................................................................................... 102 8 Process ................................................................................................................................... Control 102 Process Setup .......................................................................................................................................................... 104 Process Section .......................................................................................................................................................... History 106 Create Process .......................................................................................................................................................... Calculations 107 9 Formula ................................................................................................................................... 108 Add Form ula.......................................................................................................................................................... 109 Delete Form ula .......................................................................................................................................................... 111 © 2014 AllMax Software, Inc. Contents 5 Form ula List.......................................................................................................................................................... 112 Internal Form .......................................................................................................................................................... ulas 113 10 Alpha ................................................................................................................................... Codes 116 11 Chemicals ................................................................................................................................... 118 12 Barcode ................................................................................................................................... Labels 119 Barcode Tem.......................................................................................................................................................... plate Nam e 121 13 Calculations ................................................................................................................................... 121 Averages .......................................................................................................................................................... 123 4-Day Average ......................................................................................................................................................... 123 7-Day Average ......................................................................................................................................................... 124 Average ......................................................................................................................................................... (Mean) 125 Flow -Weighted ......................................................................................................................................................... Average 125 Geometric......................................................................................................................................................... Mean 126 Rounding......................................................................................................................................................... Rules 126 Standard......................................................................................................................................................... Deviation 127 14 Logged ................................................................................................................................... Documents 127 Log Docum ent .......................................................................................................................................................... 129 Logged Docum .......................................................................................................................................................... ents - All 129 Logged Docum .......................................................................................................................................................... ents - DataView 131 Logged Docum .......................................................................................................................................................... ents - Report 132 Logged Docum .......................................................................................................................................................... ents - Graph 133 136 Part V BioSolids 1 BioSolids ................................................................................................................................... List 136 2 BioSolids ................................................................................................................................... Sites 139 Site Detail .......................................................................................................................................................... 142 3 Site ................................................................................................................................... Owner 144 4 Site ................................................................................................................................... Limits 145 5 Nutrient ................................................................................................................................... List 148 6 BioSolids ................................................................................................................................... Application 149 User Values .......................................................................................................................................................... 151 7 Available ................................................................................................................................... Nitrogen 151 Part VI Dashboard 153 1 Views ................................................................................................................................... 153 Create New View .......................................................................................................................................................... 153 View Nam e .......................................................................................................................................................... 154 View List .......................................................................................................................................................... 154 Pages .......................................................................................................................................................... 154 Add Page......................................................................................................................................................... 155 Page Options ......................................................................................................................................................... and Features 155 HotSpots ......................................................................................................................................... 155 Add Container ......................................................................................................................................... 157 Containers ......................................................................................................................................... 157 Data Containers................................................................................................................................... 157 Graph Containers ................................................................................................................................... 159 Gauge Containers ................................................................................................................................... 161 Naviagtion Containers ................................................................................................................................... 163 Container Size ................................................................................................................................... 164 © 2014 AllMax Software, Inc. 5 6 Operator10 Help Page Options ......................................................................................................................................... 165 Part VII DataView 168 1 DataView ................................................................................................................................... List 169 2 Add ................................................................................................................................... DataView 170 3 DataView ................................................................................................................................... Name 171 4 Delete ................................................................................................................................... DataView 171 5 DataView ................................................................................................................................... Data Entry 172 6 DataView ................................................................................................................................... Columns 172 7 DataView ................................................................................................................................... Types 173 Daily Values .......................................................................................................................................................... DataView 173 Hourly Values .......................................................................................................................................................... DataView 174 Sum m ary Values .......................................................................................................................................................... DataView 175 8 DataView ................................................................................................................................... Properties 177 DataView Properties .......................................................................................................................................................... - Display 177 DataView Properties .......................................................................................................................................................... - Colum n Setup 180 DataView Properties .......................................................................................................................................................... - Colum n Properties 182 DataView Properties .......................................................................................................................................................... - Print Properties 184 DataView......................................................................................................................................................... Print Properties - Options 184 DataView......................................................................................................................................................... Print Properties - Page 185 DataView......................................................................................................................................................... Print Properties - Margin 187 DataView......................................................................................................................................................... Print Properties - Header/Footer 188 9 DataView ................................................................................................................................... Application 189 DataView - File .......................................................................................................................................................... Menu 190 DataView - Hom .......................................................................................................................................................... e Ribbon 191 DataView - Edit .......................................................................................................................................................... Ribbon 193 DataView - Tools .......................................................................................................................................................... Ribbon 195 DataView - Window .......................................................................................................................................................... Ribbon 196 Keyboard Shortcuts .......................................................................................................................................................... 196 10 DataView ................................................................................................................................... Features 197 Group Headers .......................................................................................................................................................... 198 Colum n Headers .......................................................................................................................................................... 198 DataView Colum .......................................................................................................................................................... n Icons 199 Find Data .......................................................................................................................................................... 201 Quick Notes .......................................................................................................................................................... 202 Im port Data .......................................................................................................................................................... 204 Export Data .......................................................................................................................................................... 205 Freeze Colum .......................................................................................................................................................... ns 207 Right-Click .......................................................................................................................................................... 207 Block Sum m.......................................................................................................................................................... ary 209 Date Form at .......................................................................................................................................................... Options 210 11 eDV................................................................................................................................... (Electronic DataView) 211 eDV View er .......................................................................................................................................................... 211 Working w ith .......................................................................................................................................................... eDV 213 eDV Templates ......................................................................................................................................................... 214 Part VIII Graphing 217 1 Graph ................................................................................................................................... List 218 2 Graph ................................................................................................................................... Data 218 © 2014 AllMax Software, Inc. Contents 7 Data Source .......................................................................................................................................................... 218 Open Graph .......................................................................................................................................................... Date Range 220 Calendar ......................................................................................................................................................... 220 3 Graph ................................................................................................................................... Options 221 Graph Type .......................................................................................................................................................... 221 Linear Regression .......................................................................................................................................................... 222 Graph Data Type .......................................................................................................................................................... 222 Graph Tools .......................................................................................................................................................... 222 Balloons .......................................................................................................................................................... 222 4 Main................................................................................................................................... Window 223 Menus .......................................................................................................................................................... 223 File menu......................................................................................................................................................... 223 Facility ......................................................................................................................................... 223 Open Graph ......................................................................................................................................... 224 New Graph ......................................................................................................................................... 224 Close ......................................................................................................................................... 224 Save/Save As ......................................................................................................................................... 224 Print ......................................................................................................................................... 225 Graph menu ......................................................................................................................................................... 225 Data Source ......................................................................................................................................... 226 Constants Editor ......................................................................................................................................... 226 Limits Editor ......................................................................................................................................... 227 Refresh ......................................................................................................................................... 227 Graph Properties ......................................................................................................................................... 228 General Properties ................................................................................................................................... 228 Series Properties ................................................................................................................................... 228 Scale Propeties................................................................................................................................... 229 3D View Properties ................................................................................................................................... 229 Titles ................................................................................................................................... 230 Copy Options ......................................................................................................................................... 230 Automatic Scale......................................................................................................................................... 231 Fonts ......................................................................................................................................... 231 Legends ......................................................................................................................................................... menu 232 Legend Box Size ......................................................................................................................................... 234 X Legend Gap ......................................................................................................................................... 234 Window menu ......................................................................................................................................................... 235 Data Window ......................................................................................................................................... 235 Zoom ......................................................................................................................................... 236 Palette Bar ......................................................................................................................................... 237 Pattern Bar ......................................................................................................................................... 237 Help menu ......................................................................................................................................................... 237 About ......................................................................................................................................... 237 Toolbars .......................................................................................................................................................... 237 Main Toolbar ......................................................................................................................................................... 238 Part IX Reporting 240 1 Report ................................................................................................................................... Direct Access Tree 240 2 Report ................................................................................................................................... Picklist 242 3 Create ................................................................................................................................... Reports 242 Add Report .......................................................................................................................................................... 242 New Report Availability .......................................................................................................................................................... 244 Report Nam e.......................................................................................................................................................... 245 © 2014 AllMax Software, Inc. 7 8 Operator10 Help 4 Report ................................................................................................................................... Properties 245 Report Calculations .......................................................................................................................................................... 246 List and Label .......................................................................................................................................................... Report Designer 247 Report Guidance .......................................................................................................................................................... Docum ents 250 5 Report ................................................................................................................................... Folder 250 Report Folder .......................................................................................................................................................... Icons 251 6 Report ................................................................................................................................... Preparation 251 Print Report .......................................................................................................................................................... 252 Print Date .......................................................................................................................................................... 253 Print Preview .......................................................................................................................................................... 253 Report Date .......................................................................................................................................................... 255 Calendar .......................................................................................................................................................... 256 Logged Docum .......................................................................................................................................................... ents 256 Report Verify .......................................................................................................................................................... 257 7 Report ................................................................................................................................... Types 258 Custom Reports .......................................................................................................................................................... 259 Custom Report ......................................................................................................................................................... (Full) 259 Custom Report ......................................................................................................................................................... (From DV) 259 Custom Report ......................................................................................................................................................... Setup 260 General Properties ......................................................................................................................................... 260 General Information ......................................................................................................................................... 262 Report Data ......................................................................................................................................... 263 User Input ......................................................................................................................................... 265 Comments ......................................................................................................................................... 267 Annual Sum m .......................................................................................................................................................... ary Reports 268 5 Year Forecast ......................................................................................................................................................... Report 268 5 Year Forecast ......................................................................................................................................... Setup 268 General Properties ................................................................................................................................... 269 Parameter and ................................................................................................................................... Calculations 271 Additional Parameter ................................................................................................................................... 272 PE/EDU and Industry ................................................................................................................................... Projections 273 Comments ................................................................................................................................... 274 Multi-Year......................................................................................................................................................... Summary Report 275 Multi-Year Summary ......................................................................................................................................... Setup 275 General Properties ................................................................................................................................... 276 Parameters ................................................................................................................................... 277 Summary Columns ................................................................................................................................... 279 Comments ................................................................................................................................... 280 Mass Balance .......................................................................................................................................................... Reports 281 Mass Balance ......................................................................................................................................................... Report Setup 281 General Properties ......................................................................................................................................... 282 General Information ......................................................................................................................................... 284 Row s ......................................................................................................................................... 285 Comments ......................................................................................................................................... 286 Lim it Report.......................................................................................................................................................... 287 Limit Report ......................................................................................................................................................... Setup 287 General Properties ......................................................................................................................................... 287 General Information ......................................................................................................................................... 289 Limits ......................................................................................................................................... 290 Comments ......................................................................................................................................... 292 Weekly Sum.......................................................................................................................................................... m ary Report 292 Weekly Report ......................................................................................................................................................... Setup 293 General Properties ......................................................................................................................................... 293 © 2014 AllMax Software, Inc. Contents 9 General Information ......................................................................................................................................... 295 Parameters ......................................................................................................................................... 296 Comments ......................................................................................................................................... 297 Federal DMR.......................................................................................................................................................... Report 298 Federal DMR ......................................................................................................................................................... Setup 298 General Properties ......................................................................................................................................... 299 General Information ......................................................................................................................................... 301 Row s ......................................................................................................................................... 302 Parameter ................................................................................................................................... 303 Loading ................................................................................................................................... 304 Concentration ................................................................................................................................... 306 Units ................................................................................................................................... 307 Frequency/Sample ................................................................................................................................... Type 308 Reporting ......................................................................................................................................... 309 Comments ......................................................................................................................................... 310 BioSolids Reports .......................................................................................................................................................... 311 BioSolids ......................................................................................................................................................... Application List Report 311 BioSolids Application ......................................................................................................................................... List - General Properties 311 BioSolids Application ......................................................................................................................................... List - General Information 314 BioSolids Application ......................................................................................................................................... List - Comments 315 BioSolids ......................................................................................................................................................... Nutrient Report 316 BioSolids Nutrient ......................................................................................................................................... Report - General Properties 316 BioSolids Nutrient ......................................................................................................................................... Report - General Information 318 BioSolids Nutrient ......................................................................................................................................... Report - Sites 319 BioSolids Nutrient ......................................................................................................................................... Report - Report Inclusions 320 BioSolids Nutrient ......................................................................................................................................... Report - Comments 321 BioSolids ......................................................................................................................................................... Limit Report 322 BioSolids Limit Report ......................................................................................................................................... - General Properties 322 BioSolids Limit Report ......................................................................................................................................... - General Information 324 BioSolids Limit Report ......................................................................................................................................... - Sites 325 BioSolids Limit Report ......................................................................................................................................... - Report Inclusions 326 BioSolids Limit Report ......................................................................................................................................... - Comments 327 8 About ................................................................................................................................... 328 Part X Sampling Events 330 1 Sampling ................................................................................................................................... Event Detail 331 2 Add ................................................................................................................................... Sampling Event 333 3 Delete ................................................................................................................................... Sampling Event 334 4 Print................................................................................................................................... Sampling Event 335 Part XI Notes 337 Part XII Interfaces 340 1 OPC/DDE ................................................................................................................................... Interface 340 OPC/DDE Interface .......................................................................................................................................................... Overview 341 OPC/DDE Main .......................................................................................................................................................... Window 342 OPC/DDE......................................................................................................................................................... Link List 342 OPC/DDE......................................................................................................................................................... Add/Remove/Print/Setup/Log 342 OPC/DDE......................................................................................................................................................... Start & Stop 343 OPC/DDE Links .......................................................................................................................................................... 343 OPC/DDE......................................................................................................................................................... Link Name 344 © 2014 AllMax Software, Inc. 9 10 Operator10 Help OPC/DDE......................................................................................................................................................... Link AllMax Definition 344 OPC/DDE......................................................................................................................................................... Link Server Definition 345 OPC/DDE......................................................................................................................................................... Link Schedule Definition 346 OPC/DDE......................................................................................................................................................... Link Examples 347 OPC/DDE Functionality .......................................................................................................................................................... 348 OPC/DDE......................................................................................................................................................... Setup 348 OPC/DDE......................................................................................................................................................... Log 350 OPC/DDE......................................................................................................................................................... Error Codes 350 DDE Server ......................................................................................................................................................... Functionality 351 NetDDE ......................................................................................................................................................... 353 Part XIII DataPort 355 1 DataPort ................................................................................................................................... Sync - Select L:Ps 355 2 DataPort ................................................................................................................................... Setup 356 3 AllMax ................................................................................................................................... Folder Software 356 Installation .......................................................................................................................................................... 357 Main Window.......................................................................................................................................................... 358 Menu Bar .......................................................................................................................................................... 358 Preferences.......................................................................................................................................................... 358 Security .......................................................................................................................................................... 359 4 Operator10 ................................................................................................................................... DataPort Software 359 About .......................................................................................................................................................... 361 Calendar .......................................................................................................................................................... 361 Graffiti Help .......................................................................................................................................................... 362 HotSync .......................................................................................................................................................... 364 Installation .......................................................................................................................................................... 364 Keypad .......................................................................................................................................................... 366 Main Window.......................................................................................................................................................... 366 Menu Bar .......................................................................................................................................................... 367 Note .......................................................................................................................................................... 368 Picklist .......................................................................................................................................................... 368 Preferences.......................................................................................................................................................... 369 Rem ove Record .......................................................................................................................................................... 370 Review Data .......................................................................................................................................................... 370 Scanner .......................................................................................................................................................... 371 Shortcuts .......................................................................................................................................................... 372 Tim e .......................................................................................................................................................... 372 Tips .......................................................................................................................................................... 373 Edit Com m ands .......................................................................................................................................................... 373 Part XIV Functions 375 1 All Functions ................................................................................................................................... (by groups) 375 2 All Functions ................................................................................................................................... (alphabetically) 380 3 General ................................................................................................................................... Information 386 Data Types .......................................................................................................................................................... 386 LP(l,p); [l:p] (Location:Param .......................................................................................................................................................... eter 387 4 Boolean ................................................................................................................................... Functions 389 AND(x,y) BIT(x,y) EQUAL(x,y) GT(x,y) .......................................................................................................................................................... 389 .......................................................................................................................................................... 390 .......................................................................................................................................................... 390 .......................................................................................................................................................... 390 © 2014 AllMax Software, Inc. Contents 11 IF(x,y,z) .......................................................................................................................................................... 390 ISALPHA([l:p],x) .......................................................................................................................................................... 391 ISBLANK(x) .......................................................................................................................................................... 391 ISDATA(x) .......................................................................................................................................................... 391 ISDATE([l:p],x) .......................................................................................................................................................... 392 ISFECAL([l:p]) .......................................................................................................................................................... 392 ISFLOW([l:p]).......................................................................................................................................................... 392 ISGREAT([l:p],x) .......................................................................................................................................................... 392 ISHR([l:p]) .......................................................................................................................................................... 393 ISLESS([l:p]) .......................................................................................................................................................... 393 ISLP([l:p]) .......................................................................................................................................................... 393 ISND([l:p],x) .......................................................................................................................................................... 394 ISTIME([l:p],x) .......................................................................................................................................................... 394 LT(x,y) .......................................................................................................................................................... 394 NOT(x) .......................................................................................................................................................... 394 OR(x,y) .......................................................................................................................................................... 395 XOR(x,y) .......................................................................................................................................................... 395 5 Constants ................................................................................................................................... 395 Constants .......................................................................................................................................................... 395 BLANK(x) .......................................................................................................................................................... 396 VAR0-9 .......................................................................................................................................................... 396 6 Daily................................................................................................................................... Data Functions 397 D_AVG([l:p],x,y) .......................................................................................................................................................... 398 D_COMP([l:p],x,y) .......................................................................................................................................................... 398 D_COUNT([l:p],x,y) .......................................................................................................................................................... 398 D_FLOW([l:p],x,y) .......................................................................................................................................................... 399 D_FWA([l:p],x) .......................................................................................................................................................... 399 D_GAUGE([l:p],[l:p],x,y) .......................................................................................................................................................... 399 D_GMEAN([l:p],x,y) .......................................................................................................................................................... 400 D_IGAUGE([l:p],[l:p],x,y) .......................................................................................................................................................... 400 D_IMTR([l:p],x,y,z) .......................................................................................................................................................... 401 D_INTER([l:p],x) .......................................................................................................................................................... 401 D_LAST([l:p],x,y) .......................................................................................................................................................... 402 D_LASTN([l:p],x,y,z) .......................................................................................................................................................... 402 D_LASTNM([l:p],x,y,z) .......................................................................................................................................................... 402 D_LASTNN([l:p],x,y,z) .......................................................................................................................................................... 403 D_LASTNP([l:p],x,y,z,w .......................................................................................................................................................... ) 403 D_LOADING([l:p],x,y) .......................................................................................................................................................... 404 D_MAX([l:p],x,y) .......................................................................................................................................................... 404 D_METER([l:p],x,y,z) .......................................................................................................................................................... 405 D_MIN([l:p],x,y) .......................................................................................................................................................... 405 D_NEXT([l:p],x,y) .......................................................................................................................................................... 405 D_STAT([l:p],[l:p],x,y,z) .......................................................................................................................................................... 406 D_STDEV([l:p],x,y) .......................................................................................................................................................... 407 D_SUM([l:p],x,y) .......................................................................................................................................................... 408 D_TOTAL([l:p],x,y) .......................................................................................................................................................... 408 D_VAL([l:p],x,y) .......................................................................................................................................................... 408 7 Date................................................................................................................................... Functions 409 DATE([][j][m ,d,y]) .......................................................................................................................................................... 409 DATE([j,x][m ,d,y,x]) .......................................................................................................................................................... 410 DOM(x) .......................................................................................................................................................... 410 DOW(x) .......................................................................................................................................................... 410 DOY(x) .......................................................................................................................................................... 411 © 2014 AllMax Software, Inc. 11 12 Operator10 Help DVAL(j,x) .......................................................................................................................................................... 411 LOM(x) .......................................................................................................................................................... 411 LOY(x) .......................................................................................................................................................... 411 M_DATE(x,y,z) .......................................................................................................................................................... 412 MOY(x) .......................................................................................................................................................... 412 WDOM(x) .......................................................................................................................................................... 413 WOM(x) .......................................................................................................................................................... 413 YR(x) .......................................................................................................................................................... 413 8 Hourly ................................................................................................................................... Data Functions 413 H_AVG([l:p],x,y) .......................................................................................................................................................... 414 H_CALC([l:p],x,y,z) .......................................................................................................................................................... 415 H_COMB([l:p],[l:p],x,y) .......................................................................................................................................................... 416 H_COUNT([l:p],x,y) .......................................................................................................................................................... 416 H_FUNC([l:p],x,y,z) .......................................................................................................................................................... 417 H_GMEAN([l:p],x,y) .......................................................................................................................................................... 418 H_INTER([l:p],x,y) .......................................................................................................................................................... 418 H_MAX([l:p],x,y,z) .......................................................................................................................................................... 419 H_MED([l:p],x,y) .......................................................................................................................................................... 419 H_METER([l:p],x,y,z) .......................................................................................................................................................... 420 H_MIN([l:p],x,y,z) .......................................................................................................................................................... 421 H_PRTPWR([l:p],[l:p],x,y) .......................................................................................................................................................... 421 H_STD([l:p],x,y) .......................................................................................................................................................... 422 H_SUM([l:p],x,y) .......................................................................................................................................................... 423 H_VAL([l:p],x,y) .......................................................................................................................................................... 423 9 Mathematical ................................................................................................................................... Functions 424 ABS(x) .......................................................................................................................................................... 425 ADD(x,y); x+y.......................................................................................................................................................... 425 AVG(x1,x2,...,xn) .......................................................................................................................................................... 425 COUNT(x1,x2,...xn) .......................................................................................................................................................... 425 DEFAULT(x,y).......................................................................................................................................................... 426 DIST(x) .......................................................................................................................................................... 426 DIV(x,y); x/y .......................................................................................................................................................... 426 EXP(x) .......................................................................................................................................................... 426 FACT(x) .......................................................................................................................................................... 427 FIRST(x1,x2,...,xn) .......................................................................................................................................................... 427 FRAC(x) .......................................................................................................................................................... 427 IDIST(x) .......................................................................................................................................................... 427 INT(x) .......................................................................................................................................................... 428 INTER(a,c,fa,fc,b) .......................................................................................................................................................... 428 INV(x) .......................................................................................................................................................... 428 LIMIT(x,y,z) .......................................................................................................................................................... 428 LN(x) .......................................................................................................................................................... 429 LOG(x) .......................................................................................................................................................... 429 LOG_REM(x,y) .......................................................................................................................................................... 429 MAX(x1,x2,...,xn) .......................................................................................................................................................... 430 MIN(x1,x2,...,xn) .......................................................................................................................................................... 430 MOD(x,y); x%y .......................................................................................................................................................... 430 MUL(x,y); x*y.......................................................................................................................................................... 430 NONBLANK(x).......................................................................................................................................................... 431 NONZERO(x) .......................................................................................................................................................... 431 PCT_REM(x,y) .......................................................................................................................................................... 431 PREC(x,y) .......................................................................................................................................................... 431 PWR(x,y); x^y.......................................................................................................................................................... 432 © 2014 AllMax Software, Inc. Contents 13 RAND(x) .......................................................................................................................................................... 432 ROUND(x,y) .......................................................................................................................................................... 432 ROUNDE(x,y) .......................................................................................................................................................... 433 SQRT(x) .......................................................................................................................................................... 433 SUB(x,y); x-y .......................................................................................................................................................... 433 SUM(x1,x2,...,xn) .......................................................................................................................................................... 434 TRUNC(x,y) .......................................................................................................................................................... 434 VERIFY(x,y,z).......................................................................................................................................................... 434 10 Miscellaneous ................................................................................................................................... Functions 434 ACCRUE([l:p],x) .......................................................................................................................................................... 435 ACODE([l:p],x) .......................................................................................................................................................... 436 ALPHA(ab) .......................................................................................................................................................... 436 APPLY(x,y) .......................................................................................................................................................... 436 ASSIGN([l:p],x,y) .......................................................................................................................................................... 437 BIN(x) .......................................................................................................................................................... 438 BLANK(x) .......................................................................................................................................................... 438 CT(x,y,z,w ) .......................................................................................................................................................... 438 CTI(x,y,z,w ) .......................................................................................................................................................... 439 CTR(x,y,z,w ) .......................................................................................................................................................... 440 CVT(a:b,x) .......................................................................................................................................................... 440 CYL(x,y) .......................................................................................................................................................... 442 FAC(abc,x) .......................................................................................................................................................... 443 FORMULA(abc) .......................................................................................................................................................... 443 HEX(x) .......................................................................................................................................................... 443 HLIME(x,y,z,w .......................................................................................................................................................... ,v) 444 INCLUDE(fn,[l:p],x,y,z) .......................................................................................................................................................... 444 LI(x,y,z,w ,v,n1,n2) .......................................................................................................................................................... 445 LOOK(x,y1,y2,...,yn) .......................................................................................................................................................... 446 NOTE(abc,x) .......................................................................................................................................................... 446 ONCE(x,y) .......................................................................................................................................................... 446 ONCEW(x,y) .......................................................................................................................................................... 447 OPTION(x,y,z,w .......................................................................................................................................................... ) 447 PRE_LMT([l:p],x) .......................................................................................................................................................... 448 QLIME(x,y,z,w .......................................................................................................................................................... ,v) 448 RANGE(x1,y1,y2,...,yn) .......................................................................................................................................................... 449 SETF(x,y) .......................................................................................................................................................... 449 SETVAR(x) .......................................................................................................................................................... 449 SODA(x) .......................................................................................................................................................... 450 SYNC(abc) .......................................................................................................................................................... 450 TYPE(x,y) .......................................................................................................................................................... 451 VAL(abc) .......................................................................................................................................................... 451 WEIR(x,y,z) .......................................................................................................................................................... 452 11 Monthly ................................................................................................................................... Data Functions 452 M_AVG([l:p],x,y,z,w .......................................................................................................................................................... ) 453 M_COMP([l:p],x,y) .......................................................................................................................................................... 454 M_COUNT([l:p],x) .......................................................................................................................................................... 454 M_COUNTH([l:p],x) .......................................................................................................................................................... 455 M_DATE(x,y,z) .......................................................................................................................................................... 455 M_GMEAN([l:p],x) .......................................................................................................................................................... 456 M_MAX([l:p],x,y,z,w .......................................................................................................................................................... ) 456 M_MED([l:p],x,y,z) .......................................................................................................................................................... 457 M_MIN([l:p],x,y,z,w .......................................................................................................................................................... ) 458 M_NTH([l:p],x,y,z,n) .......................................................................................................................................................... 459 © 2014 AllMax Software, Inc. 13 14 Operator10 Help M_PCT([l:p],x,y,w .......................................................................................................................................................... ,p) 460 M_REM([l:p],x,y) .......................................................................................................................................................... 461 M_STAT([l:p],[l:p],x,y) .......................................................................................................................................................... 462 M_STDEV([l:p],x) .......................................................................................................................................................... 464 M_SUM([l:p],x) .......................................................................................................................................................... 464 M_SUM2([l:p],x,y,z,w .......................................................................................................................................................... ) 465 M_SUMH([l:p],x) .......................................................................................................................................................... 466 M_TOTAL([l:p],x) .......................................................................................................................................................... 466 M_TYPE([l:p],x,y) .......................................................................................................................................................... 466 12 OPC/DDE ................................................................................................................................... Functions 467 DDE(a|b!c,x) .......................................................................................................................................................... 467 DDE_P(a|b!c,x,y) .......................................................................................................................................................... 468 DDE_X(a|b!c,x) .......................................................................................................................................................... 469 OPC([a],b,c,x) .......................................................................................................................................................... 469 OPC_W([a],b,c,x,y) .......................................................................................................................................................... 470 13 Process ................................................................................................................................... Section Data Functions 471 ACCUM([l:p],x,y) .......................................................................................................................................................... 471 S_AVG([l:p],x) .......................................................................................................................................................... 472 S_SUM([l:p],x) .......................................................................................................................................................... 472 14 Quaterly ................................................................................................................................... Data Functions 472 Q_CSUM([l:p],x) .......................................................................................................................................................... 472 Q_SUM([l:p],x) .......................................................................................................................................................... 473 15 Trigonometry ................................................................................................................................... Functions 473 ACOS(x) ASIN(x) ATAN(x) COS(x) CSC(x) SEC(x) SIN(x) TAN(x) .......................................................................................................................................................... 473 .......................................................................................................................................................... 474 .......................................................................................................................................................... 474 .......................................................................................................................................................... 474 .......................................................................................................................................................... 474 .......................................................................................................................................................... 475 .......................................................................................................................................................... 475 .......................................................................................................................................................... 475 16 Violation ................................................................................................................................... Data Functions 475 E_SUM([l:p],x,y,z,w .......................................................................................................................................................... ,v) 476 V_AVG([l:p],x,y,z,w .......................................................................................................................................................... ,v) 477 V_CNT([l:p],x,y,z,w .......................................................................................................................................................... ) 478 V_CNTP([l:p],x,y,z,w .......................................................................................................................................................... ) 480 V_DLY([l:p],x,y,z,w .......................................................................................................................................................... ) 481 V_DLYM([l:p],x,y,z,w .......................................................................................................................................................... ) 481 V_MAV([l:p],x,y,z,w .......................................................................................................................................................... ,v) 482 V_MAX([l:p],x,y,z,w .......................................................................................................................................................... ,v) 484 V_MIN([l:p],x,y,z,w .......................................................................................................................................................... ,v) 485 SNC_CJP([l:p],x,y,z,w .......................................................................................................................................................... ,v1,v2) 486 SNC_MAXD([l:p],x,y,z,w .......................................................................................................................................................... ,v) 487 SNC_MAXM([l:p],x,y,z,w .......................................................................................................................................................... ,v) 489 SNC_MIND([l:p],x,y,z,w .......................................................................................................................................................... ,v) 490 SNC_MINM([l:p],x,y,z,w .......................................................................................................................................................... ,v) 491 17 Weekly ................................................................................................................................... Data Functions 492 W_AVG([l:p],x,y,z,w .......................................................................................................................................................... ) 492 W_MAX([l:p],x,y,z,w .......................................................................................................................................................... ) 493 W_MIN([l:p],x,y,z,w .......................................................................................................................................................... ) 495 18 Yearly ................................................................................................................................... Data Functions 496 Y_AVG([l:p],x,y,z) .......................................................................................................................................................... 496 © 2014 AllMax Software, Inc. Contents 15 Y_AVGM([l:p],x,y,z) .......................................................................................................................................................... 497 Y_CAVG([l:p],x,y,z) .......................................................................................................................................................... 497 Y_COUNT([l:p],x,y,z) .......................................................................................................................................................... 498 Y_CSUM([l:p],x) .......................................................................................................................................................... 498 Y_MAX([l:p],x,y) .......................................................................................................................................................... 498 Y_MAXM([l:p],x,y,z) .......................................................................................................................................................... 499 Y_MIN([l:p],x,y) .......................................................................................................................................................... 499 Y_MINM([l:p],x,y,z) .......................................................................................................................................................... 500 Y_RES([l:p],x,y1,y2,y3,y4) .......................................................................................................................................................... 500 Y_SUM([l:p],x,y) .......................................................................................................................................................... 500 Y_TOTM([l:p],x,y) .......................................................................................................................................................... 501 Part XV Utilities 503 1 Database ................................................................................................................................... Backup 503 2 Import/Export ................................................................................................................................... Facility 504 3 Operator10 ................................................................................................................................... Agent 505 Calculation Schedule .......................................................................................................................................................... 509 4 Calculate ................................................................................................................................... Utility 509 5 Locked ................................................................................................................................... Data 510 6 Import ................................................................................................................................... Utility 511 Im port Sam pling .......................................................................................................................................................... Events Data 515 7 Export ................................................................................................................................... Data Utility 518 8 Calculator ................................................................................................................................... Tool 518 9 Operator10 ................................................................................................................................... Tools 519 Index 521 © 2014 AllMax Software, Inc. 15 Part I Welcome to Operator10 - Wastewater 1 17 Welcome to Operator10 - Wastewater Operator10 - Wastewater is a full-featured data management application designed to help meet the data collection and reporting needs for the Water and Wastewater Treatment industries. Operator10 - Wastewater allows users to manage data that has been manually entered, calculated (via internal formula or user-defined formula) or collected from an alternate data source, such as LIMS, SCADA, data import and/or DataPort. Unique Location:Parameter data points provide the means by which data is stored and shown throughout the application. Unlimited Location:Parameters can be created to define regulatory reporting data, process control data and other internal data points. DataViews, custom defined collections of Location:Parameter data, serve as tools to enter and review available data. The Graphing section allows users to produce unlimited fullcolor, 2-dimension and 3-dimension charts capable of displaying raw and summarized data for user-defined multi-day, -month or -year periods. Stock regulatory and custom reports are able to be created and managed for previewing and printing as well as electronic data export. This help file is designed to help users, new and experienced alike, and provide a valuable reference to the tools and features available in Operator10 - Wastewater. Getting Started - General Application Characteristics Review the following topics to learn more! Getting Started Ribbon Interface Getting Started - Users Upgrading from version 9 Main Application Dashboard DataView Operator10 Agent © 2014 AllMax Software, Inc. Part II Introduction to Operator10 - Wastewater 2 19 Introduction to Operator10 - Wastewater Topics in this section provide basic information related to the general usage of Operator10 - Wastewater. In this section: Getting Started About Operator10 - Wastewater Support Help File Conventions Copyright 2.1 Getting Started Topics in this section include: Installation Overview 2.1.1 Installation Overview Important Installation Notes If you are an existing user of Operator10 version 9.19, you will need to make note of the following important items: Prior to installation, perform a backup of all active databases maintained in version 9.19 Install version 10.20 (see Installation Guide and Installation Instructions) Restore version 9.19 database(s) through the version 10.20 application upon initial use Upon restoration, databases will be updated to current version 10.20 structure If you are a new user or installing Operator10 version 10.20 on computer or server which has not been used previously, you may skip to the Installation Guide or Installation Instructions topics. Installation Guide At the server/for stand-alone machines: Install Pervasive Database support (included on CD-ROM, only if necessary) Install Operator10 Application Run Application Update Database(s) At the clients/workstations: Install Pervasive Database support (included on CD-ROM, only if necessary) Install Operator10 Application © 2014 AllMax Software, Inc. 20 Operator10 Help Run Application Installation Instructions 1. Insert the disk in the CD-ROM drive as provided by AllMax Software, Inc. The Autorun feature should immediately begin the install process. Should Autorun not begin, explore the CD and run Setup (App Name).exe NOTE: Microsoft .Net Framework 3.5 SP1 is required. If absent, the installation will alert the user and abort. Download and install Microsoft.Net Framework 3.5 from the Microsoft website. (http://www.microsoft.com/en-us/download/ details.aspx?id=22) NOTE: Microsoft Visual C++2008 SP1 is required and included on this installation media, if necessary, the installation for this will be performed automatically. NOTE: If the software has already been installed on the computer, you will be presented with the option to upgrade the application. Click Yes to proceed. 2. To view the installation instructions, click Instructions or click Next > 3. Please read and select an option for acceptance of the End User License Agreement. Click Next. 4. Enter the AllMax Software key code. Click Next. 5. Select the role of the computer ( ) This computer will store and serve data to others – Choose this option if the computer is the server, a computer acting as a server or a stand-alone computer. Click Next ( ) This computer will access data that is server by another computer – Choose this option if the computer is going to connect to a server or serving computer on the network as a client or workstation. Click Next NOTE: If necessary, Pervasive PSQL Database engine support will be installed. This is a separate installation program and will proceed independently from the AllMax Software installation. 6. Select the Destination Folder to which the application will be installed. To change, click Change.... Click Next to continue. NOTE: The default directory provided is intended for new installations and is not suitable for existing users of version 9.19. The directory/path MUST be modified in order to allow the installation to proceed. Click the Change… button to select a new path or enter a new path to be used. Suggested paths: C:\AllMax Software\Wastewater\ NOTE: If the computer serves data, the selected directory MUST be shared or part of an existing share available to network users. If the selected directory is © 2014 AllMax Software, Inc. Introduction to Operator10 - Wastewater 21 not shared, the installation will alert the user and allow the user to perform the necessary actions to share the folder through Windows or proceed if the share is not necessary (in the case of a stand-alone computer). 7. Click Install to begin the installation. NOTE: If necessary, the installation will begin the installation of the OPC foundation components. 8. Upon the completion of the installation, click Finish. Pervasive Database Installation If necessary, the installation will begin to install the Pervasive PSQL Database Engine. This is a separate installation procedure from the operations software application. Following the successful installation, the software install will continue. Click Next to begin the installation. Choose the "I accept..." option to accept the Pervasive End User License Agreement (EULA). Click Next. To enable the most flexibility, AllMax recommends installing the Pervasive Engine as a Windows Service. Select [ ] Run as Service. Click Next. Choose the [ ] Complete option to continue with the installation. Click Next. The installation will now begin. During the installation, any old Pervasive version will be identified and removed or archived. Following the installation, the option to activate the Pervasive software will appear. Choose [ ] Activate Now to activate if you have a Pervasive license as supplied to you by AllMax Software. If you do not have the key code, a demo license will be installed and will be active for a 30-day period. Click Next. Enter the Pervasive key code as provided and click Next. Upon successful activation, the installation will be complete. Click Finish to return to the AllMax Software installation. Updates Follow these instructions to setup, install, and apply program updates to existing installations of the AllMax operations programs. Updates are normally provided through a web download, for both the Server and Client installation. 1. Download the file from the AllMax Software web site (http://www.allmaxsoftware.com/ downloads/) to the machine that you wish to apply the update. 2. Locate the downloaded update file and run by double-clicking. 3. Click Next to proceed with the update process. 4. Upon completion and upon opening the application for the first time, the database may need to be updated to the latest version. A prompt will be provided when the AllMax program is opened. Follow the prompts provided to complete. 5. Updates will need to be applied to all computers using the AllMax programs. Support Information For more information on additional installation options or help with the installation process, please contact AllMax Software technical support at 800-670-1867, or © 2014 AllMax Software, Inc. 22 Operator10 Help [email protected], or online using our go2tech remote technical support tool. 2.2 About Operator10 - Wastewater Topics in this section discuss the following features and functionality: In this section: License Help | About System Properties Credits 2.2.1 License License Information AllMax provides a separate License for each copy or installation of the Operator10 Wastewater software. It controls access to Number of Concurrent Users, Versions, Demo Mode, etc. Warning: You MUST have a separate License for each copy or installation of the Operator10 - Wastewater software. Contact AllMax for additional information. If you are licensed with Multi-User capabilities, this will allow you to load the software onto a computer network. Multi-user does not allow for installation of the program onto computers at different sites. License Database A license database is created during the installation process or as needed with AllMax Software, Inc. Technical Support staff. The license database holds secure information related to the number of seats purchased, features enabled and support dates. Licenses can be updated via a new keycode, supplied by AllMax Software, Inc. Seats Operator10 - Wastewater is licensed using a seat-based structure which stipulates that a client who has purchased Operator10 - Wastewater may install Operator10 - Wastewater on a total number of computers/workstations/clients as not to exceed your total license seat count. For example, a user who has purchased a 5-user, multi-user version of Operator10 Wastewater is permitted to install the Operator10 - Wastewater client application on up to 5 individual workstations that are connected to a main server or serving computer. The seat count does not include the server, unless the server or serving computer will be used as a workstation where day-to-day usage of the software will occur. 2.2.1.1 Keycode Keycode © 2014 AllMax Software, Inc. Introduction to Operator10 - Wastewater 23 AllMax Software, Inc. provides a separate License for each copy or installation of the Operator10 - Wastewater software. It controls access to Number of Licensed Seats, Versions, Demo Mode, etc. Warning: You MUST have a separate License for each copy or installation of the Operator10 - Wastewater software. Contact AllMax Software, Inc. for additional information. Licenses may be updated by entering the 20-digit KeyCode supplied by AllMax, either when prompted during the installation or at any time from the Help | About screen. 2.2.2 Configuration File Configuration File An application-wide Configuration File, OP10.cfg, is found in the database directory. The configuration file is used to manage application settings and characteristics. Changes to the configuration file are not recommended and should only be made with the help of AllMax Software, Inc. technical support staff. For more information, contact AllMax Software, Inc. using any of the following methods: AllMax Software, Inc. PO Box 40 911 S. Main St. Kenton, OH 43326 Toll-free phone: 800-670-1867 Local phone: 419-673-8863 Fax:419-673-8864 Sales & account email address: [email protected] Technical Support email address: [email protected] Corporate website: www.allmaxsoftware.com go2tech remote support website: www.allmaxsoftware.com/go2tech/ 2.2.3 Help | About Help | About Screen © 2014 AllMax Software, Inc. 24 Operator10 Help The Help | About screen displays important details related the application and database support that can aid and assist the user and technical support in resolving technical support issues. To access the Help | About screen, navigate to the Help menu and choose the option About. The Help | About screen displays important information related to the application and database support for Operator10 - Wastewater. Information presented in the Help | About screen includes but is not limited to the following sections. NOTE: Information presented in the Help | About screen that appears in blue, © 2014 AllMax Software, Inc. Introduction to Operator10 - Wastewater 25 underlined text, similar to a link, allows for users to click and perform an available action. Example: Clicking KeyCode: will bring up the KeyCode entry form. License Information The information presented in the License Information section includes, but is not limited to: Keycode: This is the current keycode associated with the Operator10 Wastewater license in use. To update the keycode, click the Keycode label and enter the provided KeyCode. For more information, see the Keycode Help Topic. Seats: Displays the recent count of the number of seats used to access the license and the total number of licensed seats available based on current licensing. Click the Seats label to view a lists of seats recently used to access the license. Username: Displays the current user logged into Operator10 - Wastewater. For more information on Users, please see the User Security topic. Version: Displays the version number of the application. The version number is displayed in the following format - Version #.Release #.Revision # (ex: 10.20.0123) - and is updated periodically as new versions, releases or updates are provided. Application Information The information present in the Application Information section includes, but is not limited to: Application Folder: Displays the path to the directory/folder where Operator10 Wastewater is currently being run from. Conduit Location: Displays the machine name that the client application (main application) is using to communicate with the Operator10 - Wastewater database. License Location: Displays the machine name (and license database name) where the Operator10 - Wastewater license database is located. Database Location: Displays the machine name (and database name) where the Operator10 - Wastewater database is located. Properties Operator10 - Wastewater maintains multiple settings and properties that apply to the database and application. Depending on user security settings, users may be able to work with these settings and modify database and application characteristics. Click on the available link options to make changes (when applicable). Database Properties: Click this link to work with database-level properties. For more information, see the Database Properties help topic. System Properties: Click this link to view information about the current machine or system settings. For more information, see the System Properties help topic. © 2014 AllMax Software, Inc. 26 Operator10 Help Copyright/Contact Information The Copyright/Contact Information section displays contact information for AllMax Software, Inc. as well as a Credits and Acknowledgements section. For more information, see the Credits help topic. 2.2.4 System Properties The System Properties window displays the basic information related to the computer or system running the Operator10 - Wastewater application. Information here is for display only and typically only necessary during technical support calls. Details provided on this screen include, but are not limited to: Microsoft Windows version Microsoft .Net version Memory (RAM) Hardware information Processor information Disk space (available and total) 2.2.5 Credits Credits and technologies in use include: ComponentOne TrueDBGrid v2.0.20121.61252 (CLR 2.0) List & Label® v13.8 (ListLabel13.dll v13.6.0.18936) ©1992 - 2008 combit® GmbH Ionic DotNetZip Library v1.8.4.3.0 OPC Foundation Data Components v3.00.10102 Microsoft® .NET Framework 3.5 SP1 Microsoft® Visual C++ Runtime 2008 SP1 Palm Desktop v4.1.4 Pervasive® PSQL v11 (and v10) Database Engine 2.3 Support Technical Support is available through AllMax Software, Inc. For more information, please see the available help topics. Support Menu Help | About Help File Conventions © 2014 AllMax Software, Inc. Introduction to Operator10 - Wastewater 27 For more information or to renew support, please contact AllMax Software, Inc. at 800670-1867 or by email at [email protected]. 2.3.1 Support Menu Support Menu The Support menu in the main application toolbar displays specific help and support options available to clients who have a current support contract and keycode with AllMax Software, Inc. Options available in the Support menu include: License #: Displays the license number as provided by AllMax Software. Update Information: Displays the current release of the Operator10 - Wastewater software (Internet Connection required) and current status, 'Current' or 'Out of Date'. File Versions: Opens the Check Version Utility go2tech: (Internet Connection required) Begins a new session with AllMax Software Technical Support. View the go2tech topic to learn more. Web Support: (Internet Connection required) Takes users to support form on AllMax Software's website. Form information is sent directly to Technical Support Representatives. Email Support: (Internet Connection required) Initializes a new email message, addressed to AllMax Software Technical Support staff. Error Log:Provides a link to the error log of Operator10 - Wastewater. 2.4 Help File Conventions Help Topic (action(s)) represents an entry in this help file by the name of "Help Topic" which may be activated in the application by performing the "action(s)" listed. <keyname> represents pressing the keyboard key marked as "keyname". [button name] represents pressing the dialog box pushbutton displaying the name "button name". menu_item1 | menu_item2 represents choosing "menu item1" from the main menu, then choosing "menu item2" from the submenu. © 2014 AllMax Software, Inc. 28 Operator10 Help ( ) radio_name represents choosing the radio button displaying the name "radio name". [ ] check_name represents choosing the checkbox displaying the name "check name". (n1 to n2 characters) represents a text entry of from n1 to n2 characters, including spaces and punctuation. If n1 is 0, no entry is required. Reserved punctuation characters: hyphen, colon, and comma ( - : , ) have special usage, and should not be used for most entries. link click links to navigate to additional topics or information. hover over this style of link to display acronym information and definition. 2.5 Copyright Operator10 - Wastewater Data Management Software for Water and Wastewater is © 1996-2014 by AllMax Software, Inc. AllMax Software, Inc. PO Box 40 911 S. Main St. Kenton, OH 43326 Toll-free phone: 800-670-1867 Local phone: 419-673-8863 Fax:419-673-8864 Sales & account email address: [email protected] Technical Support email address: [email protected] Corporate website: www.allmaxsoftware.com go2tech remote support website: www.allmaxsoftware.com/go2tech/ © 2014 AllMax Software, Inc. Part III 30 3 Operator10 Help General Features Topics in this section include: Grid Multi-Edit Security Date/Calendar Audit Trail Windows Login 3.1 Grid Topics in this section include: Grid Toolbar Grid Columns Grid Data View Grid Print 3.1.1 Grid Toolbar Toolbar The AllMax Grid Toolbar is available throughout the program and has many functions. Users can manipulate the information presented in the grid by using the available features. Depending on the section of the AllMax software program, some features and options may be enabled or disabled. For more information, please contact AllMax Technical Support Representatives for more information. Navigation Navigation through the records displayed in the grid can be controlled through the navigation portion of the toolbar. In order, the buttons provide the following functionality: [Move First] | [Move Previous] | Total Records, Record(s) Selected | [Move Next] | [Move Last] Add Users may create new records for most grids, when available the Add button will allow users to create new records as well as use additional functionality to create similar records or add special items when necessary. © 2014 AllMax Software, Inc. General Features 31 Add New When adding new records, users may click [Add] the button directly, or click the arrow to the on the right-side to select from a menu, this will begin the process of adding a new record. Add Similar When applicable, users may click the arrow on the right side to select Add Similar from the menu, this will begin the process of adding a new record based on a selected record or selection of records. Add Special When available, users may click the arrow on the right side to select from a special option. This option is not present in all grids, but when available, will be a selection in the menu. Delete When available, records can be deleted from the grid. Users can select or multi-select records to be deleted from the available rows of the grid. Click the [Delete] button to remove. Users will be prompted to confirm the deletion of the selected record(s) to complete the delete process. Edit In-Grid Editing To edit records contained in the grid, users can either enter text directly into blank cells or for cells with existing data, double-click the cell or press the F2 key and begin the edit process. Once editing is complete, navigate away from the selected cell using the Tab, Enter or Arrow keys to automatically save changes. Edit Window To edit records in a form-based editor, click the [Edit] button to display the Edit window to make changes. Click the [Save] button to save any changes made. Multi-edit For users who desire to change multiple records at a time, while multiple records have © 2014 AllMax Software, Inc. 32 Operator10 Help been selected in the grid, clicking the data for the selected record(s). [Edit] button will allow users to change Any available fields for editing will shown in the Edit window. Additionally, the fields available for editing will vary depending on the section of the program. Print Data presented in the grids throughout Operator10 - Wastewater can be printed. Several Print options exist. Click the options. [Print] button to review the printing © 2014 AllMax Software, Inc. General Features Orientation: Select from the options () Portrait or () Landscape to set the page orientation Page Size: Select from Letter (8.5"x11"), Legal (8.5" x 14") or Tabloid (11"x14") to set the size of the page Font Size: Select a font size to print grid contents NOTE: By choosing the option [ ] Fit Width to Page the font size will automatically be calculated and used for printing Print Range: Select from the options () All Records or () Selected Records to determine the number of records to be printed Include: Select [ ] Grid Lines if you want to print the records with grid lines Save current settings Click this link if you wish to save the as default: settings as a default to be used during the next print NOTE: The settings are saved by user and by the individual print windows Export Data © 2014 AllMax Software, Inc. 33 34 Operator10 Help Users can export grid data as a .csv (comma-separated values) file. This export file will contain the columns displayed in the grid at the time of export. Users should click on the down arrow beside the [Print] button to select Export then select Export grid as CSV. Users will be able to give a file name and file location for the saved file in the next step. Refresh Grid contents can be refreshed as needed, press the [F5] key or the [Refresh] button in the toolbar to refresh the data from the database. This option re-queries the database to provide new and/or updated data. Grouping Grouping allows users to organize and re-organize data shown in grids. When users click the [Grouping] button, a darkened area will appear above the grid space (see image below). Users are instructed to "Drag a column header here to group by that column". To select a column, single-click and hold on the column header and drag the column header into the darkened space; release the mouse to group by the selected header. The records will reorganize using the selected column to group items together. Users will now see the information in the grid organized by grouped selection. By clicking the button to the left of the information in the grid, users will be able to see the grouped information in the new grouped view. (see image below) © 2014 AllMax Software, Inc. General Features 35 Multiple Groups The picture shown above also demonstrates the ability for users to group by multiple columns. Simply drag another header into the grouping area to add a second group. Grouping is sequential and listed in order. Remove Grouping To remove grouping, click on the Grouping icon in the toolbar. This will remove the groups and replace all columns to their most recent grid position. Tools In the tools menu, users can find helpful features that will aid in the use of the grid and the data presented there. Press the © 2014 AllMax Software, Inc. [Tools] button to display the menu. 36 Operator10 Help Default grid layout: Resets the grid and columns shown to the default Operator10 - Wastewater layout and content Show/hide columns: Shows the menu allowing users to show or hide available columns in the grid Auto-size columns: Resizes the columns to fit the data present in the grid Clear grid filters: Removes any applied grid filters Picklist In many areas, a picklist will be available to help filter and sort records based on Facility. Additionally, when a selection has been made in the picklist, future actions may use this selection to help you create new records and speed the entry process. 3.1.2 Grid Columns Columns The grids in Antero provide users more flexibility by allowing the inclusion or exclusion of columns from any grid. Additional column manipulation or usage is available from the following options. Review this following topic for details. Show/Hide Columns Columns can be shown or hidden based on a users preference. To show additional available columns, click on the [Tools] button in the Grid Toolbar and choose the option Show/hide columns. Columns available to be included or removed will be shown in the list provided. Place a check beside any column you wish to display. Remove the check from any column and the column will be removed. Columns added will be placed to the far right of the grid and can be moved to a desired position, see the topic for Drag/Drop Placement below for details. © 2014 AllMax Software, Inc. General Features 37 Columns can also be quickly removed by right-clicking on the column header and choosing Hide Column from the right-click menu. Drag/Drop Placement To re-order columns, left-click and hold on the column header to be moved. (Users should see the mouse pointer change to a solid, down arrow.) With the column selected, drag the column into the desired position. When the column is held in a position relative to its desired, new position, the user should see a solid, red up arrow. This indicates the new position of the column. To position the column, release the leftclick mouse button, the column should now be in its new position. Users may reposition all columns if desired. NOTE: Column positions are saved for each user and are remembered for next use. Freeze/Unfreeze/Unfreeze All Freeze Columns can be frozen to the left-side of the grid if desired. Right-click on the column to be frozen and choose the option Freeze Column from the right-click menu. The column will now be frozen to the left-side of the grid and the remaining © 2014 AllMax Software, Inc. 38 Operator10 Help columns will scroll while the frozen column is left always in view. Multiple columns can be frozen, right-click on additional columns to be frozen and repeat the steps listed above. NOTE: Frozen columns are saved for each user and are remembered for next use. Unfreeze Columns can be unfrozen from the grid. Right-click on a frozen column in the grid and select Unfreeze Column. The column should become unfrozen and return to its original position in the grid. NOTE: Columns must be unfrozen from right-to-left. When freezing multiple columns, you cannot unfreeze the second column of three columns that have been frozen. Unfreeze All To quickly unfreeze all columns, right-click on any column header and select Unfreeze All. All columns frozen will be returned to their original positions in the grid. Re-size/Auto-size Column width can be defined and saved for each user. To re-size the column to a desired width, move the mouse pointer to the right-edge of the column header to be re-sized. The mouse pointer will change and display with arrows on both the left and right sides. Left-click and hold to begin resizing the column. To automatically size the column to the data presented, click the [Tools] menu and choose the option Auto-size to automatically re-size the column to data. Grouping Grids can be grouped based on desired columns. Grouping can help to compact the data presented in the grid by grouping together like pieces of information. See the Grouping help topic for details. Default Grid Layout Grids can be reset to the default AllMax generated grid layout. This will reset all grid preferences including columns shown/hidden, size and content. 3.1.3 Grid Data View Data The grids in Operator10 - Wastewater allow users to see virtually every piece of data stored in the database. With this increase in data, comes the need for proper view options when working with the Operator10 - Wastewater data. Users can perform the following © 2014 AllMax Software, Inc. General Features 39 actions on data to ensure efficient usage and navigation throughout the application and database. Sorting Columns can be sorted in ascending or descending order. Left-click on the column header to sort in an ascending (A-Z) order. Left-click again sort in a descending (Z-A) order. Filtering Filters can be applied to one or more columns appearing in the grid. Apply Filter Direct Entry To filter the column by entry, enter a search string into the blank field that appears above the column. Filtering begins immediately as the user enters data. Selection To filter the column by selection, click in the filter field to display the drop-down arrow, click the drop-down arrow to display a list of the unique items that appear in the grid column. Quick filters can be applied by selecting from the list. Remove Filter To remove an individual filter, select the option (All) from the selection list of the filter field. To remove all filters, users may: Right-click on the filter area and choose the option Clear all filters Click the [Tools] button to display the Tools menu. From the Tools menu, choose the option Clear grid filters. Grouping Data that appears in each grid can be grouped based on selected columns. Grouped data provides a condensed view of records and allows users to see only the selected information. See the Grouping help topic for details. Right-click Functionality Right-click functionality in any grid is available throughout Operator10 - Wastewater. Users will find different right-click options exist depending on the area of the grid that is clicked on. Filter Fields: Right-clicking on the filter field will allow the user to remove any filters that have been applied to the grid contents. Cells: Right-clicking on any cell in the grid will display a right-click menu with common text commands, such as Cut, Copy, Paste and Delete. Additionally, when right-clicking on a field that is in someway linked to other sections of the program, users may find Edit options available. Selecting an Edit option will display the Edit window for the linked item. © 2014 AllMax Software, Inc. 40 3.1.4 Operator10 Help Grid Print Print Data presented in the grids throughout Operator10 - Wastewater can be printed. Several Print options exist. Click the [Print] button to review the printing options. Orientation: Select from the options Portrait or Landscape to set the page orientation Page Size: Select from Letter (8.5"x11"), Legal (8.5" x 14") or Tabloid (11"x14") to set the size of the page Font Size: Select a font size to print grid contents NOTE: By choosing the option [ ] Fit Width to Page the font size will automatically be calculated and used for printing Print Range: Select from the options ( ) All Records or ( ) Selected Records to determine the number of records to be printed Include: Select this option if you want to print the records with gridlines Save current settings as default: Click this link if you wish to save the settings as a default to be used during the next print NOTE: The settings are saved by user and by the individual print windows 3.2 Multi-Edit Edit The edit window is utilized throughout the program to edit data in a form-style layout allowing navigation from field to field. This presentation is seen when adding, editing and editing multiple pieces of information. Multi-edit © 2014 AllMax Software, Inc. General Features 41 For users who desire to change multiple records at a time, while multiple records have been selected in the grid, clicking the for the selected record(s). [Edit] button will allow users to change data Any available fields for editing will be shown in the Edit window. Additionally, the fields available for editing will vary depending on the section of the program. 3.3 Security To access the Security section of Operator10 - Wastewater, go to the File menu and select Security. The Security section includes the following features; to learn more, click on the linked Help Topics: User Security User Security - The User Security section includes the ability to configure the following items: Users - Create new users and grant/deny access to database related features and functionality Facilities - Setup user access to facilities and facility related features and functionality Groups - Create groups for easy assignment of facility features and functionality L:P Permissions - Define user-specific permissions for Location:Parameters across permitted facilities © 2014 AllMax Software, Inc. 42 Operator10 Help Additional Topics Additional topics related to Security: Audit Trail - Access the program generated, time-stamped list of data and program related entries Windows Login - The method by which Operator10 - Wastewater validates users 3.3.1 User Security User Security To access the User Security section of Operator10 - Wastewater, go to the File menu and select Security. The User Security section allows the creation of new Operator10 Wastewater users and establishes Database-level Security. Create a New User To create a new user, click the [Add] button to begin. Users will see a new window that will allow them to enter a unique User Name (0 to 30 characters) as well as additional user-specific information. NOTE: The creation of new User Names in Operator10 must follow the requirements using Windows Login in order ensure proper access to the application and database. Description - A description of the user (0 to 30 characters) Position - A definition of the position of the user within the organization (0 to 30 characters) Department - A definition of the department of the user within the organization (0 to 30 characters) Region - A definition of the region or section of the user within the organization (0 to 30 characters) Enabled - Determines whether the user is active and able to login into Operator10 (0 to 30 characters) Click the [Save] button to save any data entered. Upon entering the above information, security settings can be established on the right-side of the User Security window. The following security options are available. Audit Trail - Choices include Access or No Access and will enable/disable a user's ability to access the Audit Trail feature of Operator10 Backup - Choices include Access or No Access and will enable/disable a user's ability to create a Backup of the selected database Dashboard - Choice include Edit/No Edit and will allow or disallow a user from editing the Dashboard of the selected database © 2014 AllMax Software, Inc. General Features 43 Database Admin - Choices include Access or No Access and will enable/disable a user's ability to perform database-related operations User Security - Choices include Access or No Access and will enable/disable a user's ability to create and modify user security settings 3.3.2 User Facility Security User - Facility Security To establish facility-specific permissions for a user, access the User Security section of Operator10, go to the File menu and select Security and click on the Facilities Tab. The Facilities tab contains settings to enable or disable specific sections of the Operator10 program based on the selected record or current facility. Add a User to a Facility To allow a user access to a selected facility, click the [Add] button to begin. Users will see a new window that will allow them to select a Facility, User Name and Group. Click the [...] button to the right of each field to choose from the list. Click the [Save] button to save any data entered. Upon selecting the above information, security settings can be established on the right-side of the User Security window. The following security options are available. Applications (Bio) - Choices include No Access/View Only/"Add/Edit"/Delete to limit access to the BioSolids Application section Calculate - Choices include Access/No Access to enable/disable the ability to calculate data Chemical - Choices include No Access/View Only/"Add/Edit"/Delete to limit access to the Chemical section Dataport - Choices include No Access/View Only/"Add/Edit"/Delete to limit access to the Dataport section Dataviews - Choices include No Access/View Only/"Add/Edit"/Delete to limit access to the Dataview section Default L:P Security - Choices include View Only/Data Entry/Edit L:P/Full and acts as a default setting for all Location:Parameters (see note below for more information) Formula - Choices include No Access/View Only/"Add/Edit"/Delete to limit access to the Formula section Graphing - Choices include No Access/View Only/"Add/Edit"/Delete to limit access to the Graphing section Import - Choices include Access/No Access to enable/disable the ability to Import data Limits (Bio) - Choices include No Access/View Only/"Add/Edit"/Delete to limit access to the Limits section of the BioSolids Site Limits section © 2014 AllMax Software, Inc. 44 Operator10 Help Locked Data - Choices include Access/No Access to enable/disable the ability to Lock Data for the selected facility OPC/DDE - Choices include No Access/View Only/"Add/Edit"/Delete to limit access to the OPC/DDE Interface Operator 10 Notes - Choices include No Access/View Only/"Add/Edit"/Delete to limit access to the Notes section Owners List (Bio) - Choices include No Access/View Only/"Add/Edit"/Delete to limit access to the BioSolids Owner section Process History - Choices include No Access/View Only/"Add/Edit"/Delete to limit access to the Process History section Process Setup - Choices include No Access/View Only/"Add/Edit"/Delete to limit access to the Process Setup section Reports - Choices include No Access/View Only/"Add/Edit"/Delete to limit access to the Reports section Sampling Events - Choices include No Access/View Only/"Add/Edit"/Delete to limit access to the Sampling Events section NOTE: By setting the option for Default L:P Security, a single option can be selected for all Location:Parameters. Only those Location:Parameters modified under the L:P Permissions tab will have independent security settings. (see also: L:P Permissions) IMPORTANT: Users assigned to a group will inherit the permissions of the selected group. All security settings will be disabled. The Group setting of Custom will allow exceptions to be made for the selected user. The following is a legend for the various security options: Access - Allows user access to the selected section of Operator10 and enables use of that section No Access - Denies user access to the selected section of Operator10 View Only - Allows user access to the selected section of Operator10 but does not permit any changes to be saved Add/Edit - Allows user access to the selected section of Operator10 AND permits changes to be saved Delete - Allows user access to the selected section of Operator10 AND permits changes to be saved AND ability to delete selected items Data Entry - Applies only to Location:Parameter security and allows users to enter/modify data Edit L:P - Applies only to Location:Parameter security and allows users to enter/ modify data AND edit Location:Parameter details Full - Applies only to Location:Parameter security and allows users to enter/ modify data AND edit Location:Parameter details AND delete Location:Parameters © 2014 AllMax Software, Inc. General Features 3.3.3 45 User L:P Permissions Location:Parameter Permissions To aid in the protection of Location:Parameter Data, Location:Parameter permissions can be established to allow or deny a users ability to manipulate data for selected Location:Parameters. To access the L:P Permissions section of Operator10 - Wastewater, go to the File menu and select Security and click on the L:P Permissions Tab. To change L:P Security, select a user on the left side of the User Security screen. The listings on the left side of the User Security section are automatically populated for all User-Facility combinations from the Facilities tab. Information is read-only and should be modified on the Facilities tab if necessary. L:P Security can be modified by selecting one or more records on the right side of the User Security screen. For individual modifications, users can use the drop-down menu to choose from the available options. For multiple L:P selections, users may use the Multi Edit functionality to make changes en masse. The following is a legend for the various security options: Default - Applies inherited setting from User Security setting Default L:P Security View Only - Allows users to see data, read-only access Data Entry - Allows users to enter/modify data Edit L:P - Allows users to enter/modify data AND edit Location:Parameter details 3.3.4 Groups User Group Security To aid in the creation of facility-specific permissions for a user, access the User Security section of Operator10, go to the File menu and select Security and click on the Groups Tab. The Groups tab contains settings to enable or disable specific sections of the Operator10 program based on the selected record or current facility. Users can be assigned to a group in the Facilities tab when creating User-Facility permissions. Default groups have been created and are ready for use within Operator10 Security. Denied - Denies user access to modify any section of Operator10, users in this group cannot access or use any feature of Operator10 Full - Permits user to access, modify and delete data from any section of Operator10, users in this group have full access Restricted - Permits user to access data from any section of Operator10, users in this group have Read-Only permissions Create a Group To create a new group to assign to users, click the © 2014 AllMax Software, Inc. [Add] button to begin. 46 Operator10 Help Users will see a new window that will allow them to enter a Group Name (1 to 30 characters) and Description (0 to 30 characters). Click the [Save] button to save any data entered. Upon selecting the above information, security settings can be established on the right-side of the User Security window. The following security options are available. Applications (Bio) - Choices include No Access/View Only/"Add/Edit"/Delete to limit access to the BioSolids Application section Calculate - Choices include Access/No Access to enable/disable the ability to calculate data Chemical - Choices include No Access/View Only/"Add/Edit"/Delete to limit access to the Chemical section Dataport - Choices include No Access/View Only/"Add/Edit"/Delete to limit access to the Dataport section Dataviews - Choices include No Access/View Only/"Add/Edit"/Delete to limit access to the Dataview section Default L:P Security - Choices include View Only/Data Entry/Edit L:P/Full and acts as a default setting for all Location:Parameters (see note below for more information) Formula - Choices include No Access/View Only/"Add/Edit"/Delete to limit access to the Formula section Graphing - Choices include No Access/View Only/"Add/Edit"/Delete to limit access to the Graphing section Import - Choices include Access/No Access to enable/disable the ability to Import data Limits (Bio) - Choices include No Access/View Only/"Add/Edit"/Delete to limit access to the Limits section of the BioSolids Site Limits section Locked Data - Choices include Access/No Access to enable/disable the ability to Lock Data for the selected facility OPC/DDE - Choices include No Access/View Only/"Add/Edit"/Delete to limit access to the OPC/DDE Interface Operator 10 Notes - Choices include No Access/View Only/"Add/Edit"/Delete to limit access to the Notes section Owners List (Bio) - Choices include No Access/View Only/"Add/Edit"/Delete to limit access to the BioSolids Owner section Process History - Choices include No Access/View Only/"Add/Edit"/Delete to limit access to the Process History section Process Setup - Choices include No Access/View Only/"Add/Edit"/Delete to limit access to the Process Setup section Reports - Choices include No Access/View Only/"Add/Edit"/Delete to limit access to the Reports section Sampling Events - Choices include No Access/View Only/"Add/Edit"/Delete to limit access to the Sampling Events section © 2014 AllMax Software, Inc. General Features 47 NOTE: By setting the option for Default L:P Security, a single option can be selected for all Location:Parameters. Only those Location:Parameters modified under the L:P Permissions tab will have independent security settings. (see also: L:P Permissions) IMPORTANT: Users assigned to a group will inherit the permissions of the selected group. All security settings will be disabled. The Group setting of Custom will allow exceptions to be made for the selected user. The following is a legend for the various security options: Access - Allows user access to the selected section of Operator10 and enables use of that section No Access - Denies user access to the selected section of Operator10 View Only - Allows user access to the selected section of Operator10 but does not permit any changes to be saved Add/Edit - Allows user access to the selected section of Operator10 AND permits changes to be saved Delete - Allows user access to the selected section of Operator10 AND permits changes to be saved AND ability to delete selected items Data Entry - Applies only to Location:Parameter security and allows users to enter/modify data Edit L:P - Applies only to Location:Parameter security and allows users to enter/ modify data AND edit Location:Parameter details Full - Applies only to Location:Parameter security and allows users to enter/ modify data AND edit Location:Parameter details AND delete Location:Parameters 3.4 Date/Calendar Date/Calendar NOTE: The following description of Date formats assumes the Windows default settings for United States users. The software also supports other Windows configuration settings for International users. Contact AllMax for additional information. Dates for United States users are usually represented in the form "MM/DD/YY" where MM is a month from 01 to 12, DD is a day of the month from 01 to 31, and YY is the last two digits of the year from 0 to 99. Valid dates range from January 1, 1970 through December 31, 2037. Dates for International users are dependent on Windows settings. Dates may be entered in a variety of manners: Delimiters may be omitted when the entered form is "MMDDYY" or "MMYY". Delimiters can be any of the following characters: / - : , . When using delimiters, the leading 0 may be omitted for month, day, or year. When using delimiters, the century may be omitted for the year. © 2014 AllMax Software, Inc. 48 Operator10 Help The day and its delimiter may be omitted when specifying a month, or first day of month, "MM/YY" or "MMYY". Dates "wrap" when digits exceed expected values, e.g. "01/32/2000" represents February 1, 2000. Examples: "020198" = February 1, 1998 "2/1/98" = February 1, 1998 "0298" = February 1, 1998 (first of month assumed) "12/31/04" = December 31, 2004 "12-31-2004" = December 31, 2004 The Date may usually be selected from the Calendar dialog box by pressing the [...] popup button next to the Date. Use the [<] and [>] buttons to select the previous or next month, then press the appropriate [1 to 31] day button to enter the date. NOTE: Easily return to the present date by Left-clicking any non-button area of the dialog box. 3.4.1 Relative Dates Relative Dates Relative Dates may also entered in place of any date: Enter the offset from the system date in the format "±xm", "±d", or "±xm±y". If the month offset is specified, x is the number of months from the current system date, and the first day of the month is assumed. If the day offset is specified, y is the number of days from either the first of the specified month (if a month offset is specified) or the current system date. © 2014 AllMax Software, Inc. General Features 49 NOTE: Relative Dates are especially useful where they do not need to be re-entered, such as data ranges for DataViews, Graphs, Locked Data or Calculations. Examples: "+1m" = The first day of the following month "+0m" = The first day of the current month "+30" = The day 30 days from the current day "-7" = The day one week ago "+1m+15" = The fifteenth of the following month "+1m-1" = The last day of the current month (The day preceding the first day of the following month) 3.4.2 Time Time Times are usually represented in the form "HH:MM" where HH is an hour from 00 to 24 and MM is a minute from 00 to 59. Valid times range from 00:01 through 24:00. Time may be entered in a variety of manners: Delimiters may be omitted when the entered form is "HHMM". Delimiters can be any of the following characters: / - : , . When using delimiters, the leading 0 may be omitted for hour or minute. "a(m)" or "p(m)" may be entered immediately following the time to indicate a.m. or p.m. Examples:"0201" = 02:01 "2:1" = 02:01 "0201p" = 14:01 "02/01a" = 02:01 3.5 Audit Trail Audit Trail The Audit Trail is a secure, computer generated, time-stamped audit trail which independently monitors operator entries and actions that create, update, or delete data. Changes to data do not obscure previously recorded information--new records are created for each event. The Audit Trail also includes information on other user activity such as User login attempts, opening a new Facility, etc. Each event recorded in the Audit Trail will consume approximately 400 bytes of storage space. Auditing features require an Auditing License--when licensed, the Audit Trail cannot be disabled. Contact AllMax for additional information. Accessing the Audit Trail To access the Audit Trail, go to the File menu and choose © 2014 AllMax Software, Inc. Audit Trail to display 50 Operator10 Help the Audit Trail section. The Audit Trail tracks and displays changes to the database made by all users. Enabling the Audit Trail To enable the Audit Trail feature, users must go to the File menu item and choose Open Database. From the Open Database window, users can locate a Database with auditing licenses and check the checkbox in the Auditing column to turn on the Audit Trail. NOTE: When turning the Audit Trail feature on, an initial audit of all data presently stored in the database will take place. For new databases, this period of initial audit is very short, as there is limit or no data in the database to audit. However, for existing and established databases, the initial audit time may be lengthy. Information Recorded in Audit Trail Available information includes: DateTime of Audit Trail record in YYYY/MM/DD HH:MM:SS format Facility ID User Name Application Workstation Action Description Reason data information: DateTime in YYYYMMDDHHMM format (Daily data will have an HHMM of "0000") Location Name Parameter Name Value Previous Value © 2014 AllMax Software, Inc. General Features 51 NOTE: The grids displayed in the Sampling Event section of Operator10 Wastewater have the general properties of the Grid and Grid Edit windows. (For more information about these sections, please see the topic: Grid Functionality). To find audit trail data for a period of time, use the slider bars in the area above the grid. Slide each bar separately to increase or decrease the time frame. 3.6 Windows Login Windows Login Operator10 - Wastewater Data Management utilizes information from the Microsoft Windows Operating System relating to current User. In an effort to make the login process to Operator10 - Wastewater smooth and efficient, AllMax Software has implemented Windows Login which validates the current Windows User against a valid Operator10 Wastewater user and if successful, allows entry into the Operator10 - Wastewater application. In previous versions of Operator10 - Wastewater, users and passwords could be defined and thus permit/deny access to Operator10 - Wastewater. Operator10 - Wastewater now requires a valid user name that would match a user from the Windows Operating System. This effort to validate the current Windows User without requiring a separate password for Operator10 - Wastewater allows a user quicker access and instant validation for use of Operator10 - Wastewater. 3.7 Auto-Update Operator10 - Wastewater updates can now be managed in an automated process whereby Operator10 - Wastewater connects to the AllMax Software website and verifies version information to prompt users when a new version is available for download. This process will be performed automatically by default but can be skipped or turned off if desired. Check for Update Upon opening Operator10 - Wastewater, Operator10 - Wastewater will connect to the AllMax Software website (www.allmaxsoftware.com) and verify the current running version of the application against the newest available version. If the version installed is older than the current available version, a prompt to review new features and functionality is provided as well as a way to update the computer with the newest version of Operator10 - Wastewater. © 2014 AllMax Software, Inc. 52 Operator10 Help The New Version notification displays information related to any new release of Operator10 - Wastewater with details of features and functionality to be found in the new version. Download and Update Once downloaded, the update to Operator10 - Wastewater will be run. Once initiated, it is a requirement that any running instance of Operator10 - Wastewater on the computer be exited. The update process will indicate any running Operator10 - Wastewater applications or support applications and offer to shut these application down as part of the update process. Acknowledge the prompts to confirm forced exit. The update will be performed on the local computer only and will not be pushed or performed on any other workstation(s)/client computer(s) or server(s). The update MUST be performed separately on each computer, however, the same prompt will be received to indicate that an update is available. © 2014 AllMax Software, Inc. General Features 53 Update Options The following options are available to dictate how and when the update notification is received. Check for Updates An option is available to turn off update notifications at the application level. In the main application window, go to the File menu, choose Setup, then choose Options and find the Check for Updates option. Place a check in the checkbox to turn on prompting for new versions on this computer. Removing the checkbox for the option Check for Updates will turn off notifications and prompting for new versions on this computer. Skip This Version When displayed the new version availability window displays a Skip This Version button. Using this option will flag this version and disable the notification until a new version is available. Remind Me Later When displayed the new version availability window displays a Remind Me Later option. Use this option to suppress reminders for a selected period of time. © 2014 AllMax Software, Inc. 54 Operator10 Help © 2014 AllMax Software, Inc. Part IV 56 4 Operator10 Help Main Application Topics in this section include: Application Characteristics Database Facility Location Parameter Location:Parameter Data Process Control Formula Alpha Codes Chemicals Barcode Labels Calculations Logged Documents 4.1 Application Characteristics Topics in this section include: Quick Access Toolbar Menu System Operator10 Options 4.1.1 Quick Access Toolbar The Quick Access Toolbar is a small toolbar that is visible in the top-left hand corner of Operator10 - Wastewater and is able to be customized to include access to features and functionality found in the ribbons of the application. Add Items to Quick Access Toolbar To add icons to the Quick Access Toolbar, users can perform the following steps: © 2014 AllMax Software, Inc. Main Application 57 1. From any icon or menu item right-click and choose Add to Quick Access Toolbar 2. The icon or menu item will be added to the Quick Access Toolbar and available for use Remove Items from Quick Access Toolbar To remove icons from the Quick Access Toolbar, perform the following steps: 1. Right-click on any icon in the Quick Access Toolbar 2. Choose Remove from Quick Access Toolbar 4.1.2 Menu System Topics in this section include: File Menu Dashboard Ribbon View Ribbon Setup Ribbon BioSolids Ribbon Pretreatment Ribbon (Not available in Operator10 for Water and Wastewater) Tools Ribbon Support Ribbon Help Ribbon 4.1.2.1 File Menu Main Application - File Menu © 2014 AllMax Software, Inc. 58 Operator10 Help The Main Application File menu provides users with access to the following features: Change Facility... - Opens a Facility picklist allowing the user to select a Facility from the current Database Open Database... - Opens the Database/Facility picklist allowing the user to choose a new facility from any Database Setup - Provides the following options: Options... - Opens the Operator10 - Wastewater Options dialog Email... - Opens a utility in which email settings can be defined for use when printing/previewing Security... - Opens the User Security section Audit Trail... - Opens the Audit Trail section Operator10 Help - Opens the Operator10 Help File Exit - Closes the Operator10 - Wastewater Application 4.1.2.2 Dashboard Ribbon Main Application - Dashboard Ribbon The Dashboard ribbon provides the following functionality: © 2014 AllMax Software, Inc. Main Application 59 The Dashboard Ribbon allows for the management of Dashboard Views, Pages and Containers. Dashboard Functions The following options are available in the Dashboard ribbon (and are discussed as they appear in the button groups): Dashboard View: Views - Press the [Views] button to drop down a list of available Views for the database; choose Open List of Views... to view the View list Management: Create New View - Press the View for the database [Create New View] button to create a new Add Page to View - Press the a View [Add Page to View] button to add a Page to Add Container to Page - Press the [Add Container to Page] button to select from the list of Container types to be added to the View HotSpot Options: Page Options - Press the the Page [Page Options] button to set Page Properties for Save: Save - Press the Save As... 4.1.2.3 [Save] button to Save the current View settings or to View Ribbon Main Application - View Ribbon The View ribbon provides the following functionality: © 2014 AllMax Software, Inc. 60 Operator10 Help The View Ribbon allows users to access sections of Operator10 like DataViews, Reports, Graphs and more. View Functions The following options are available in the View ribbon (and are discussed as they appear in the button groups): DataView: DataView - Press the [DataView] button to open the DataView List New DataView - Press the [New DataView] button to choose from the list of available DataView Types to create a new DataView Graphing: Graphs - Press the [Graphs] button to open the Graphing section of Operator10 - Wastewater Reporting: Reports - Press the [Reports] button to open the Reporting section of Operator10 - Wastewater Data Entry: Sampling Events - Press the [Sampling Events] button to open the Sampling Events section of Operator10 - Wastewater Event Journal - Press the [Event Journal] button to open the Event Journal section of Operator10 - Wastewater (Event Journal only available in Synexus Pretreatment Data Management Application) OPC/DDE Interface - Press the [OPC/DDE Interface] button to open the OPC/DDE Interface section of Operator10 - Wastewater © 2014 AllMax Software, Inc. Main Application eDV Viewer - Press the application 61 [eDV Viewer] button to open the eDV Viewer Logged Documents: View Documents - Press the [View Documents] button to open the Logged Documents section of Operator10 - Wastewater Notes: View Notes - Press the 4.1.2.4 [View Notes] button to access the Notes section Setup Ribbon Main Application - Setup Ribbon The Setup ribbon provides the following functionality: The Setup Ribbon allows users to access sections of Operator10 like Location:Parameters, Process, Formulas and more. Setup Functions The following options are available in the Setup ribbon (and are discussed as they appear in the button groups): Location:Parameter: Locations - Press the [Locations] button to open the Location list L:Ps - Press the [L:Ps (Location:Parameters)] button to open the Location:Parameter list Stock Parameters - Press the Stock Parameter list [Stock Parameters] button to open the Process: Processes - Press the © 2014 AllMax Software, Inc. [Processes] button to open the Process list 62 Operator10 Help Process History - Press the History list [Process History] button to open the Process Chemical: Chemicals - Press the [Chemicals] button to open the Chemical section Formula: Formulas - Press the [Formulas] button to open the Formulas section Alpha Code: Alpha Codes - Press the section [Alpha Codes] button to open the Alpha Codes Barcode Labels: Labels List - Press the List [Label List] button to access the Barcode Labels Print - Press the [Print] button to select from the list of available data sections to be printed as barcode labels DataPort: Select L:Ps - Press the [Select L:Ps] button to access the list of Location:Parameters to be exported to the DataPort for data entry Setup - Press the [Setup] button to select from a list of setup items related to DataPort Setup items 4.1.2.5 BioSolids Ribbon Main Application - BioSolids Ribbon The BioSolids ribbon provides the following functionality: © 2014 AllMax Software, Inc. Main Application 63 The BioSolids Ribbon allows users to access sections of Operator10 specific to the licensed BioSolids features of Operator10. BioSolids Functions The following options are available in the BioSolids ribbon (and are discussed as they appear in the button groups): Setup: BioSolids - Press the [BioSolids] button to open the BioSolids List BioSolids:Parameters - Press the the BioSolids:Parameters list Sites - Press the [BioSolids:Parameters] button to open [Sites] button to open the BioSolids Site List Site:Parameters - Press the BioSolids Site:Parameters list Site Owners - Press the Owners list Site Limits - Press the list Nutrients - Press the [Site:Parameters] button to open the [Site Owners] button to open the BioSolids Site [Site Limits] button to open the BioSolids Site Limits [Nutrients] button to open the Nutrient list Application: Applications - Press the 4.1.2.6 [Applications] button to open the Application list Tools Ribbon Main Application - Tools Ribbon The Tools ribbon provides the following functionality: © 2014 AllMax Software, Inc. 64 Operator10 Help The Tools ribbon displays various tools and utilities avialable for use within Operator10. Tools Functions The following options are available in the Tools ribbon (and are discussed as they appear in the button groups): Database Backup: Backup Now - Click the database [Backup Now] button to backup the current Calculations: Calculate Now - Press the [Calculate Now] button to calculate functions and formulas for the open database Month-to-Date - Press the [Month-to-Date] button to automatically calculate data for the current month to date Previous Month-to-Date - Press the [Previous Month-to-Date] button to automatically calculate data for the previous month to date Change Order - Press the Order [Change Order] button to edit the Calculation Import/Export Data: Import Now - Press the [Import Now] button to import data Browse for Import File(s) - Press the to browse for specific files to be imported [Browse for Import File(s)] button Export Data - Press the [Export Data] to build an export file containing selected Location:Parameter data Scheduling: © 2014 AllMax Software, Inc. Main Application 65 Setup Schedules - Press the [Setup Schedules] button to open the Operator10 Agent Interface window to begin scheduling items; Backups, Data Imports and Facility Calculations can be scheduled using the Operator10 Agent. Useful Tools: Calculator - Press the [Calculator] button to use the Calculator Tool Tools, Calculators, and Converters - Press the [Tools, Calculators, and Converters] button to open the Operator10 Tools section Custom Tools - Press the Custom Tools Locked Data - Press the tool 4.1.2.7 [Custom Tools] button to select from a list of [Locked Data] button to open the Locked Data Support Ribbon Support Menu The Support menu in the main application toolbar displays specific help and support options available to clients who have a current support contract and keycode with AllMax Software, Inc. Options available in the Support menu include: License #: Displays the license number as provided by AllMax Software. Check for Updates: Displays notification of current updates available from AllMax Software. File Versions: Opens the Check Version Utility go2tech: (Internet Connection required) Begins a new session with AllMax Software Technical Support. View the go2tech topic to learn more. Web Support: (Internet Connection required) Takes users to support form on AllMax Software's website. Form information is sent directly to Technical Support Representatives. Email Support: (Internet Connection required) Initializes a new email message, addressed to AllMax Software Technical Support staff. Error Log: Provides a link to the error log of Operator10 - Wastewater. © 2014 AllMax Software, Inc. 66 4.1.2.8 Operator10 Help Help Ribbon Main Application - Help Ribbon The Help ribbon provides the following functionality: The Help ribbon displays information and access to various help topics and log information. Help Functions The following options are available in the Help ribbon (and are discussed as they appear in the button groups): Application Help: Help Contents - Click the [Help Contents] button to open the Help File Program Manuals: Program Manual - Press the [Program Manual] button to open the PDF manual for Operator10 - Wastewater DataPort Manual - Press the manual for the DataPort Handheld [DataPort Manual] button to open the PDF Report Designer Manual - Press the [Report Designer Manual] button to open the List and Label Report Designer Manual Log Files: Program Log - Press the Wastewater program log file Import Log - Press the file [Program Log] button to open the Operator10 - [Import Log] button to open the Import Utility log DataPort HotSync Log - Press the open the DataPort HotSync log file [DataPort HotSync Log] button to © 2014 AllMax Software, Inc. Main Application OPC/DDE Log - Press the log file 67 [OPC/DDE Log] to open the OPC/DDE Interface What's New: What's New? - Press the [What's New?] button to open the What's New document (opens an externally linked PDF from the AllMax Software, Inc. website) About: About - Press the 4.1.3 [About] button to open the Help | About section Operator10 Options Operator10 Options The Operator10 Options allows users to define and save program options. Program options found in the Operator10 Options dialog are saved based on the current user of the application and information is stored in the registry for the computer. © 2014 AllMax Software, Inc. 68 Operator10 Help Options Items listed under the Options: section include: Exit Confirmation: Place a check in the [ ] Exit Confirmation checkbox to provide a prompt upon exit of the Main Application. Ribbon Theme: Select from the drop-down menu to choose the appearance option for the ribbons and other "themed" elements in the Main Application and DataView sections. Save on Exit Items listed under the Save on Exit: include: Window Position: Place a check in the [ ] Window Position checkbox to save the position of the Main Application and other windows when opening/closing the application. Press the [reset] button to clear all existing positions and reset positions to default Recent Licenses: Place a check in the [ ] Recent Licenses checkbox to save the previous license information to the registry. Press the [reset] button to clear all existing recent licenses Custom Tools Users can define up to 4 custom tools that can be accessed from the Tools ribbon. Custom tools are links to external files. Click the [...] button to browse and select a file to be opened using the custom tools menu option. 4.2 Database Database From the Database/Facility list, users have the ability to perform many actions. Users of Operator10 - Wastewater who have permission to do so can: Create New Database Create New Facility Delete Database Delete Facility Import/Export Facility Data Backup Databases Set Database Properties Accessing Database/Facility To access the Database/Facility section, go to the File menu and choose the Open © 2014 AllMax Software, Inc. Main Application 69 Database... option. 4.2.1 Add New Database Users with permission to do so, may create new databases for use within Operator10. Each database created will allow for separate data storage of facility, location, parameter, data, etc. For more information on database and data storage, see the following help topic for Database Structure. Add New Database 1. In the Database/Facility window, click the arrow beside the select Create a new database. [Add] button, 2. To create a new Database, enter a Database* name (1 to 20 characters) and continue editing. 3. Choose a License* to add this Database to, click the [...] button to view the list of available licenses, select a License and click the [OK] button to choose the license. 4. To enable the Audit Trail for this database, place a check in the checkbox for Auditing. 5. To use Metric units of measurement for this database, place a check in the checkbox for Metric. 6. Click the © 2014 AllMax Software, Inc. [Save] button to create the new database. 70 Operator10 Help Add New Database from Backup (Restore) Backups created from within Operator10 can be restored as full databases. 1. To create a new database from a backup, click the arrow beside the button, select Add New Database From Backup. [Add] 2. In the next window that appears, browse to the location of the Operator10 database backup file. Click [Open] to begin the process. 3. In the next window that appears, enter a new Database* name for use in Operator10. 4. Choose a License* to add this Database to, click the [...] button to view the list of available licenses, select a License and click the [OK] button to choose the license. 5. Click the [Save] button to create the new Database. 6. The Import process will now begin. Upon completion, you will be able to select a facility from the new Database for use. Add New Sample Database A sample database can be created as needed using an option found on the [Add] button. Select Add New Sample Database from the menu to automatically add a sample database for Operator10 - Wastewater. © 2014 AllMax Software, Inc. Main Application 71 The process of adding a sample database is performed in a relatively hands-free manner allowing users to select the option, confirm the operation and allow the application to perform the process of sample database creation. Upon successful creation, the Sample Database and Facility will be able to be selected from the Open Database window. 4.2.2 Add New Facility Add New Facility In the Database/Facility window, click the [Add] button to begin the process. 1. To create a new Facility, enter the name of the Facility* (1 to 30 characters) and continue editing 2. To edit a Facility, fill in any information for the following fields: Address lines [1-3] (0 to 30 characters) City (0 to 20 characters) State/Province (0 to 20 characters) Zip (0 to 10 characters) Country (0 to 17 characters) Report State (selection) Hourly Entry Type (24 Whole Hours or Any Time) NOTE: Hourly Entry Type may allow either 24 hourly times (24 Whole Hours) from 01:00 through 24:00, or all times (Any Time) by specifying minutes such as 12:15 or 08:43. When entries are complete, press © 2014 AllMax Software, Inc. [OK] to close the dialog. 72 4.2.3 Operator10 Help Delete Database Delete Database Databases can be deleted at any time by users with permission to perform this action. To delete a Database, select a Facility belonging to a Database and click the arrow beside the [Delete] button to select Delete Database. WARNING: ALL Facilities belonging to the selected Database will be deleted from Operator10 and will no longer be available for use. Please ensure that you have selected the correct database before proceeding to the Delete Database option. 4.2.4 Delete Facility Delete Facility Facilities can be deleted at any time by users with permission to perform this action. To delete a Facility, select a Facility from the list and click the selected Facility. button to remove the WARNING: ALL Facilities belonging to the selected Database will be deleted from © 2014 AllMax Software, Inc. Main Application 73 Operator10 and will no longer be available for use. Please ensure that you have selected the correct database before proceeding to the Delete Database option. 4.2.5 Database Structure Operator10 - Wastewater Data Structure - Simple Simple Data Structure (typical) Server Pervasive Operator10 - Wastewater requires that the Pervasive.SQL database engine be installed. This engine should be installed as a service whenever possible. Consult with the Pervasive help topic to learn more about the Pervasive database engine and its features. License AllMax Software Product License(s) Each AllMax Software product will install with a keycode that determines features and functionality of the application. Multiple instances of the same product may be present on a server, but each installed product is required to have a unique keycode/license as distributed by AllMax Software, Inc. AllMax Software products include Operator10 - Wastewater® for Wastewater Data Management, Operator10 - Wastewater for Water Data Management, Antero™ Maintenance Data Management and Synexus Pretreatment Data Management. Database A database in Operator10 - Wastewater represents a collection of facilities and the associated information for each. Each database can contain one or many facilities. Certain information is shared between facilities within a database, most notably, Parameters. Add/Create Database See the Add New Database help topic for more information on database creation. Open Database See the Database help topic for more information on opening a database for use. © 2014 AllMax Software, Inc. 74 Operator10 Help Operator10 - Wastewater Data Structure - Advanced Advanced Data Structure Diagram The above diagram illustrates a hypothetical server which has four instances of Operator10 - Wastewater installed. Each instance can contain any number of databases, and each database can contain any number of facilities. Ultimately, these facilities serve as grouping mechanisms for the underlying data in the database. Directory Structure Each instance of Operator10 - Wastewater is installed to the target computer with the following directory structure: \\[PC]\[TARGETDIR]\ | ---Application\ | | | ---lst\ | ---rpt_dll\ | ---lbl\ | ---manuals\ | | ---Data\ | ---License\ ---SampleData ---[NAMED_DB]\ There are two main branches in this structure, Application and Data. The Application directory will be present in every installed instance of Operator10 - Wastewater, as this is where all application files, dependencies, and support files to the application are located. The Data directory will only be found on those machines that serve data to © 2014 AllMax Software, Inc. Main Application 75 other machines. This Data directory has within it a minimum of three database directories. Two of these are installed by default: License and SampleData. In addition to these two stock databases, any number of user-created databases can exist. The first of these is created during the initial installation of Operator10 - Wastewater. Additional databases can be created from within the application. NOTE: This directory structure is required in order for Operator10 - Wastewater to function properly, so it is highly recommended that no changes be made, such as renaming or rearranging the folder structure. Addition of user-created folders to the directory structure is generally acceptable. If you have a need to make changes, please contact AllMax Software Technical Support for more information. NOTE: Not all users will have multiple licenses, databases or facilities. This drawing is only an example of the capabilities of the AllMax Software, Inc., Operator10 - Wastewater data structure in detail. For most users, assume one branch from the "server" with a single license, database and facility. 4.2.6 Database Properties Database Properties Database Properties can be set to determine calculation methods, constants, conversion values, fecal parameters and more for each database created as part of Operator10. The Database properties tab is part of the Database Utilities section and can be accessed by going to the File menu, selecting Open Database... and clicking the [...] button in the column Properties for a selected database. Additionally, users can go to the Help ribbon and choose the About option to access the Help | About screen. From the Help | About screen, click the link for Database Properties. WARNING: Settings found in the Database Properties section will override and overwrite settings or changes for duplicate entries found in the Configuration File. WARNING: Operator10 does NOT allow changes to this section without appropriate User Security. Please contact AllMax Software for additional information. Other Database Properties Functions Additional functions are available in the Database Properties section. See the following links for additional information. Database Utilities - Rename Database Utilities - Table properties Database Utilities - Rebuild tables Database Utilities - Registry © 2014 AllMax Software, Inc. 76 Operator10 Help The following sections are available for editing in the Database properties tab. These sections are able to be selected on the left side of the Database Properties window (as shown above). General Geometric Mean Type: Choose from the following options to change the method by which Operator10 - Wastewater calculates geometric mean. Use Zeros - Any 0 values present in the data set will be used in the calculation of geometric mean Treat Zeros as One - Any 0 values present in the dataset will be seen as 1 and will be used will be in the calculation of geometric mean Ignore Zeros - Any 0 values present in the dataset will be ignored and will not be used in the calculation of geometric mean Standard Deviation: Choose from the following options to change the method by which Operator10 - Wastewater calculates standard deviation. Population - Numerator = n Sample - Numerator = n-1 Rounding Rule: Choose from the following options to change the method by which Operator10 - Wastewater rounds calculated data. © 2014 AllMax Software, Inc. Main Application 77 Arithmetic Rounding - Values greater than 5 round up, otherwise it rounds down Even Biased Rounding - Values greater than 5 round up, exactly 5 rounds to nearest even value, otherwise it rounds down Truncation - Values are truncated rather than rounded Significant Digits - Values are rounded to the specified significant digit Database Timeout (Seconds): Enter a number of seconds to allow for a response from the database before the operation times out. Include in Scheduler Checks: Enable the checkbox for Include in Scheduler Checks to establish the connection between the current database and the Operator10 Agent to allow the database to be included in the processing of the scheduled imports, calculations and backups. Calculation Constants Build this list to define any constants to be used internally and by functions in the calculation of data. Click the [Add] button to begin. Enter the constant (8.34, 0.45359, pi, etc.) to be defined and its value. Calculation Parameters Define calculation parameters to aid in the calculation of process and internal formulas. Specific Gravity, Solids TSS, Solids % and Solids Vol % can be defined. Flow Parameters Use this list to define a set of flow parameters to be used in the conversion to MGD (million gallons per day). Click the [Add] button to begin. Select a Flow Parameter by clicking the [...] button and choosing from the parameter list. Enter a MGD multiplier to convert the selected parameter to MGD. Concentration Units Use this list to define a set of concentration units to be used in the conversion to MG/ L (milligrams/liter). Click the [Add] button to begin. Enter a Concentration Unit and a mg/l multiplier that should be used to convert the unit to mg/l. Bio Solids Units Use this list to define a set of units to be used in the calculation of biosolids related data. Click the [Add] button to begin. Enter a BioSolids Unit and the mg/kg multiplier that should be used to convert the unit to MG/KG (milligrams/kilogram). Fecal Parameters Use this list to define parameters that should have any calculated average perform a calculation of geometric mean instead. This list would typically contain parameters © 2014 AllMax Software, Inc. 78 Operator10 Help such as Fecal Coliform, Total Coliform and E Coli. Any additional parameters may be added, click the [Add] button to select a parameter for inclusion in this list. Import Settings Use these fields to update default configuration of the ImportUtility. Import files path: - the path used by the ImportUtility to find and access files for importing; set this path by clicking the [...] button Extension for import data files: - the custom file extension used by the ImportUtility to seek out data import files (Examples: .txt, .csv, .imp, etc.) Extension for import notes files: - the custom file extension used by the ImportUtility to seek out notes import files (Examples: .note, .notes, .impnote, etc.) Logged Documents For the following sections of Operator10 - Wastewater, select the desired level of prompting for the Logged Documents feature. DataView: Never - Never prompts user to log any printed documents Always - Does not prompt user, automatically logs all printed documents Prompt (default option) - Prompts for logging of printed documents Graph: Never - Never prompts user to log any printed documents Always - Does not prompt user, automatically logs all printed documents Prompt (default option) - Prompts for logging of printed documents Report: Never - Never prompts user to log any printed documents Always - Does not prompt user, automatically logs all printed documents Prompt (default option) - Prompts for logging of printed documents Sampling: Never - Never prompts user to log any printed documents Always - Does not prompt user, automatically logs all printed documents Prompt (default option) - Prompts for logging of printed documents © 2014 AllMax Software, Inc. Main Application 4.2.7 79 Database Utilities From the Database Properties window, the following options are available as Database Utilities: Rename Table properties Rebuild tables Registry 4.2.7.1 Database Utilities - Rename Rename The Rename utility allows users to rename specific items found in the Operator10 database. Users can rename Locations, Location:Parameters, Formulas, Facilities and Facility Directories. Due to the sensitive nature of these items, it is recommended that a backup be completed prior to performing any rename functions. In most cases, the procedure to rename data is as follows: 1. Select the type of data to be renamed 2. Choose the item to be renamed, click the [...] button to select from an available list of items 3. Enter a new item name 4. Click the [Rename] button (located in the top-right) to complete the process © 2014 AllMax Software, Inc. 80 4.2.7.2 Operator10 Help Database Utilities - Table properties Table properties Information regarding the properties of data files used within the Operator10 database are provided in the Table Properties tab. Information presented in the grid is for information purposes only. 4.2.7.3 Database Utilities - Rebuild Rebuild tables The Rebuild tables tab provides functionality allowing for the rebuilding of database files in the event of corruption or data failure. Many different rebuild options are presented and functionality presented within this tab should be performed only with technical support personnel. © 2014 AllMax Software, Inc. Main Application 4.2.7.4 81 Database Utilities - Registry Registry For information purposes, Registry entries used by Operator10 software are presented in the Registry tab. Users can make changes to the Date, Month and Time formats if desired. © 2014 AllMax Software, Inc. 82 4.2.8 Operator10 Help Pervasive Pervasive PSQL v11, v10 and Btrieve Internal database management is provided by Pervasive PSQL/Btrieve software, ©19922014 Pervasive Software, Inc. For Pervasive PSQL products, included with your Operator10 installation are utilities provided by Pervasive and installed in the Pervasive directory (by default C:\Program Files \Pervasive Software\PSQL): For Pervasive.SQL 2000 products, included with your Operator10 installation are utilities provided by Pervasive and installed in the Pervasive directory (by default C:\PVSW\BIN): PCC.EXE - Pervasive Control Center (Version Pervasive.SQL 2000) Pervasive Control Center includes complete utilities for configuration, troubleshooting, file management, and ODBC services. Several of the utilities may also be run individually: PCC.EXE - Pervasive System Analyzer © 2014 AllMax Software, Inc. Main Application 83 PSAWIZRD.EXE - Pervasive System Analyzer (found by default in C:\Program Files\Common Files\Pervasive Software) PVLOCATE.EXE - GateWay Locator (WorkGroup Users) W32MAINT.EXE - File Maintenance and Creation W3MONV75.EXE - Monitor (Files and Users) W32RBLD.EXE - File Rebuild Utility W32UCADM.EXE - User Count Administrator WBEXEC32.EXE - Function Executor The ODBC Administrator (ODBCAD32.EXE) may also be found in the Windows System directory/folder, or run from the Windows Control Panel ODBC Data Sources (32bit) Icon. For Pervasive Version 6.x products, included with your Operator10 installation are utilities provided by Pervasive and found in the Operator 10 directory/folder. DBSETUP.EXE - edit BTI.INI settings (Version 6, Win3.1) W32MKSET.EXE - edit registry settings (Version 6, Win95 or NT) WBMANAGE.EXE - inspect data files (Version 6) WARNING: Please contact AllMax for assistance before making any changes in Pervasive/Btrieve settings. 4.3 Facility A Facility represents the Locations and Parameters that are sampled to meet water and wastewater treatment sampling requirements, internal process control and plant performance. A facility includes tools for data entry, review, graphing and reporting. In terms of Operator10 - Wastewater database structure, a Facility is second in the hierarchy of the database. Facility is used to separate and maintain different lists of items, such as Locations, Location:Parameters, Formulas, Graphs and Reports. Facility can also be used to indicate Security settings and context. © 2014 AllMax Software, Inc. 84 Operator10 Help Accessing Facility List To access the list of Facilities, go to the File menu and choose Change Facility.... This will display the Facility list (seen above) and will allow users to change facilities. Creating a New Facility To create a new facility, go to the File menu and choose Open Database... to begin. See the Add New Facility topic for more information. Deleting a Facility To delete a facility, go to the File menu and choose Open Database... to begin. See the Delete Facility topic for more information. 4.4 Location A Location can be used to describe a point in a facility, physical or logical, where Parameters are located, such as Plant Influent, Effluent, Aeration Tank, etc. At each location, parameters, specific tests or data points, can be added depending on the type of data to be stored: BOD, TSS, VSS, Ammonia, Flow, etc. A standard naming list of commonly used naming conventions for a Wastewater treatment plant is included to choose from or user defined names can be created. Examples: Raw Influent:Flow MGD = "Flow MGD" Parameter at the "Raw Influent" Location Effluent:BOD 5= "BOD 5" (BOD 5 Day MG/L) Parameter at the "Effluent" Location Accessing Location List To access the Location list, in the Operator10 - Wastewater Main Application, go to © 2014 AllMax Software, Inc. Main Application the Setup ribbon, click the 85 Locations button. Location List Functionality The Location list and Location editor window have the general properties of the Grid and Grid Edit windows. (For more information about these sections, please see the topic: Grid Functionality). In the Location List, users can: Add Location Delete Location Add/Assign Parameters Parameters, tests or samples collected at the respective Location, can be added to the Location. Using the [Add] button secondary menu (the drop-down menu arrow or split button), select the option Add Parameters or from the Location list, click the [...] button that appears in the column titled "Show Parameters" to begin adding parameters to a selected location. In the Assigned Parameter list that appears, users can begin to add parameters to the list as needed. Click the [Add] button to begin adding parameters. Once selected, Location:Parameter information can be edited. In-grid editing is possible by entering data where permitted. Multiple-record editing is also permitted. Highlight a group of records to be edited together and click the © 2014 AllMax Software, Inc. [Edit] button to 86 Operator10 Help begin editing. Items able to be edited include: Upper Limit, Lower Limit, Formula, Entry Type and Editable. For more information, see Location:Parameter. 4.4.1 Add Location Add New Location To add a new location to the list, users should click the [Add] button to begin. 1. Users will be presented with a Location window that will allow for data entry of required and optional information. (See below) 2. Enter a unique Location (1 to 16 characters) to identify the Location. A Description (0 to 30 characters) may also be entered. a. Standard Locations can be added from an existing list of Locations created and managed by AllMax utilizing standard naming conventions and suggestions based on industry standards. Click the [...] button to view the list of Standard Locations. 3. Check the [ ]In Service checkbox for Locations/Sampling Points which are currently in use. 4. Notes can be entered for a Location, enter text directly into the Notes field. 5. Click the [Save] button to save any data entered. © 2014 AllMax Software, Inc. Main Application 87 Add Similar Location From the Location list, users are able to create similar locations if one exists. To utilize this feature, highlight an existing Location in the list and click the arrow icon beside the Add button to select Add Similar Location. NOTE: The Location list and Location editor window have the general properties of the Grid and Grid Edit windows. (For more information about these sections, please see the topic: Grid Functionality). 4.4.2 Delete Location Delete Location Locations can be deleted from the database, click the [Delete] button to delete records. Individually selected records can be deleted as well as multiple selections of locations. Confirmation is required when deleting locations from the database. Click the [Yes] button to confirm or [No] to cancel the deletion of data. WARNING: All information associated with the selected record(s) will be deleted upon confirmation of the deletion. This is permanent and cannot be undone. 4.4.3 Standard Location Standard Location The Standard Location list displays a list of locations as defined by AllMax that represent possible locations for use in the Operator10 - Wastewater application. Additionally, when users of a database create new locations, those locations are also added to the list to aid in future setup and Location:Parameter definitions. © 2014 AllMax Software, Inc. 88 4.5 Operator10 Help Parameter Parameters are associated with Locations so that the Data can be stored. These Parameters can be chosen from the Parameter List, which consists of calculated parameters, USEPA defined parameters, or user-defined parameters. Selected Parameters are linked to a specific Location. Examples: Raw Influent:Flow MGD = "Flow MGD" Parameter at the "Raw Influent" Location Effluent:BOD 5= "BOD 5" (BOD 5 Day MG/L) Parameter at the "Effluent" Location The Parameter List consists of calculated parameters, US EPA defined parameters, or user-defined parameters. Selected Parameters are linked to a specific Location, forming a Location:Parameter. For increased efficiency, Parameters found in the Parameter List are shared between all facilities. Accessing the Parameter List The Parameter List is accessed most often when coming from the creation of a new Location:Parameter. When creating a new Location:Parameter, the [...] button is available in the Parameter field, use this button to open the Parameter List. © 2014 AllMax Software, Inc. Main Application 89 Parameter List Functionality The Parameter list and Parameter editor window have the general properties of the Grid and Grid Edit windows. (For more information about these sections, please see the topic: Grid Functionality). In the Parameter List, users can: Add Parameter Delete Parameter Add/Assign Location Locations can be assigned to Parameters. From the Parameter list, click the [...] button that appears in the column titled "Assigned Locations" to begin adding the selected parameter to select locations. In the Assigned Location list that appears, users can begin to add locations to the list as needed. Click the [Add] button to begin adding locations. Once selected, Location:Parameter information can be edited. In-grid editing is © 2014 AllMax Software, Inc. 90 Operator10 Help possible by entering data where permitted. Multiple-record editing is also permitted. Highlight a group of records to be edited together and click the begin editing. [Edit] button to Items able to be edited include: Upper Limit, Lower Limit, Formula, Entry Type and Editable. For more information, see Location:Parameter. 4.5.1 Add Parameter Add New Parameter To create a new parameter, click the [Add] button. 1. In the Parameter window that appears, (see image below) 2. Enter a unique Parameter name or number (1 to 14 characters) in the Parameter field. a. To view a list of Stock Parameters based on US EPA STOrage and RETrieval codes (STORET) and Chemical Abstracts Service (CAS) numbers, press the [...] button. Users can add parameters from the list by selecting and clicking the [OK] button. (see also: Parameter/STORET List) 3. Enter or select the Units of measurement (1 to 16 characters). Units can be chosen from the drop-down list box (Press the [...] button to display the selection list). 4. Enter a Description (0 to 30 characters) to further identify the Parameter in the Description field. 5. Enter the number of Decimal Places normally required for this Parameter. This value becomes the default number of decimal places for setup of DataViews and reports. © 2014 AllMax Software, Inc. Main Application 91 Add Similar Parameter From the Parameter list, users are able to create similar parameters if one exists. To utilize this feature, highlight an existing Parameter in the list and click the arrow icon beside the Add button to select Add Similar Parameter. NOTE: The Parameter list and Parameter editor window have the general properties of the Grid and Grid Edit windows. (For more information about these sections, please see the topic: Grid Functionality). 4.5.2 Delete Parameter Delete Parameter Parameters can be deleted from the database, click the [Delete] button to delete records. Individually selected records can be deleted as well as multiple selections of Parameters. Confirmation is required when deleting Parameters from the database. Click the [Yes] button to confirm or [No] to cancel the deletion of data. WARNING: All information associated with the selected record(s) will be deleted upon confirmation of the deletion. This is permanent and cannot be undone. 4.5.3 Stock Parameters Stock Parameters © 2014 AllMax Software, Inc. 92 Operator10 Help Over 16,000 US EPA STOrage and RETreval (STORET) Codes and abbreviated Chemical Abstracts Service (CAS) numbers are available when adding a new Parameter to the Parameter List. To sort the Parameters by either Code, Description, or Detail Description, left-click the column header. Select a Parameter and click the List. 4.6 [OK] button to add the parameter to the Parameter Location:Parameter A Location:Parameter (or BioSolids BioSolid:Parameter or Site:Parameter) represents a capacity for data storage, calculation, or retrieval. A Location describes a point in a facility, physical or logical, where Parameters are located. A Parameter can be chosen from the Parameter List, which consists of calculated parameters, USEPA defined parameters, or user-defined parameters. Selected Parameters are linked to a specific Location, forming a Location:Parameter. Examples: Raw Influent:Flow MGD = "Flow MGD" Parameter at the "Raw Influent" Location Effluent:BOD 5= "BOD 5" (BOD 5 Day MG/L) Parameter at the "Effluent" Location © 2014 AllMax Software, Inc. Main Application 93 NOTE: The Location:Parameter list and Location:Parameter editor window have the general properties of the Grid and Grid Edit windows. (For more information about these sections, please see the topic: Grid Functionality). Accessing Location:Parameter To access Location:Parameter in Operator10 - Wastewater, in the Setup ribbon, click the [L:Ps (Location:Parameters)] button. The Location:Parameter form uses a List and Detail display to provide information about individual Location:Parameters. General information is available as well as Usage infotmation. Location:Parameter Section Functionality In the Location:Parameter section, functionality includes the ability to create new L:Ps, edit existing L:Ps and delete L:Ps. The list/detail presentation of data allows users to work with items through the List grid (displayed in the top-portion of the L:P section) and the Detail section (displayed in the lower-portion of the window). Data entered via the List or Detail section is saved immediately to the database and changes will be reflected as data is entered. Location:Parameter Usage To view Location:Parameter Usage information, choose the LP Usage tree item displayed at the left of the Location:Parameter window. © 2014 AllMax Software, Inc. 94 Operator10 Help Location:Parameter Properties Location:Parameters have several available fields that allow users to determine the data entry method, calculation and data entry limits. Units: Enter or select units from the available list of common units Decimal: Enter the default number of places following the decimal to be displayed as a default (decimal precision can be set individually in other sections as desired). Entry Type: Data entry can be either Daily or Hourly. Choose from the following options to determine the appropriate data entry type: Daily: Select Daily to allow for daily data entry Hourly non-sum: Select Hourly non-sum to allow for hourly data entry with no daily summary Hourly avg: Select Hourly avg to allow for hourly data entry with a daily summary of average Hourly max: Select Hourly max to allow for hourly data entry with a daily summary of maximum Hourly min: Select Hourly min to allow for hourly data entry with a daily summary of minimum Hourly sum: Select Hourly sum to allow for hourly data entry with a daily summary of sum Hourly count: Select Hourly count to allow for hourly data entry with a daily summary of the count of entries per day Formula: Select a formula for the Location:Parameter by clicking the [...] button. A formula list will be shown, choose a formula to be attached and used in the calculation of the Location:Parameter. Lower Limit: Enter a lower data entry limit to be warned if unexpected values are entered in the DataView. Additionally, for data entered via other methods, the text color of the entry, should it be below the Lower Limit, will be red. Upper Limit: Enter a upper data entry limit to be warned if unexpected values are entered in the DataView. Additionally, for data entered via other methods, the text color of the entry, should it be above the Upper Limit, will be red. Protected: If the Location:Parameter should not have data entry capabilities, uncheck this option. Click the [...] button in the Recent Value column to review data for the selected Location:Parameter. The DataPort column (display only) is marked if the values are selected to be entered using the DataPort handheld unit. The OPC/DDE column (display only) is marked if the values are selected to be automatically entered via the OPC/DDE Interface Application. The Historian column (display only) is marked if the values are selected to be automatically entered via one of the available Historian Interface Applications. © 2014 AllMax Software, Inc. Main Application 4.6.1 95 Add Location:Parameter Add a Location:Parameter To add a new Location:Parameter to the list, click the [Add] button to begin. In the Location:Parameter edit window that opens, see below, enter the following information: 1. Facility Name: The Facility name is required, press the [...] button to select a Facility from the list, click the [OK] button to continue 2. Location: Enter (or select using the [...] button to see a list of Standard Locations) a Location name 3. Location Description: For new Locations, enter a Location Description to further describe the new Location 4. Parameter: Select parameters from the Parameter List, click the [...] button to see the Parameter list, click the [OK] button to continue 5. Units: Enter the unit of measurement for the selected Location:Parameter or choose from the drop-down menu 6. Decimal: Enter the desired, default number of decimal places to be displayed 7. Entry Type: Select the data entry type for the Location:Parameter (for more information see the Location:Parameter Entry topic) 8. Lower Limit: Enter the lower data entry limit for the Location:Parameter (warnings will be displayed when values exceed the entered limit value) 9. Upper Limit: Enter the upper data entry limit for the Location:Parameter (warnings will be displayed when values exceed the entered limit value) 10.Formula: If the Location:Parameter is to be calculated, select the desired formula from the Formula List, click the [...] button to view and select from the list of available Formulas 11.Protected: Check the checkbox for Protected if the Location:Parameter should not allow for data entry Click the [Save] button to create the new Location:Parameter. © 2014 AllMax Software, Inc. 96 4.6.2 Operator10 Help Delete Location:Parameter Delete Location:Parameter Location:Parameters can be deleted from the database, click the [Delete] button to delete records. Individually selected records can be deleted as well as multiple selections of location:parameters. Confirmation is required when deleting location:parameters from the database. Click the deletion of data. [Yes] button to confirm or [No] to cancel the WARNING: All information associated with the selected record(s) will be deleted upon confirmation of the deletion. This is permanent and cannot be undone. 4.6.3 Location:Parameter Usage Location:Parameter Usage information is available from the Detail section. First select a Location:Parameter from the list grid at the top of the Location:Parameter section, next select the tree item, LP Usage to view Location:Parameter Usage information. NOTE: Depending on the selected Location:Parameter, the length of time to display usage information may vary. For Location:Parameters with extensive data history, the progress bar will be visible until all associated information is gathered. © 2014 AllMax Software, Inc. Main Application 97 Location:Parameter Usage is visible for a selected L:P. Information includes usage on DataViews, Date Range, Graphs, Formulas and more. Location:Parameter Usage Data L:P Usage information provided includes: Location Name (displays the full name of the Location) Data (displays the number of records as well as the date range for which data exists) LP Security (displays any security applied to the individual Location:Parameter) DataView (displays any DataViews for which the L:P appears as a column) Graph (displays Graphs upon which the L:P is selected as plotted data) Sampling Events (displays any Sampling Event data) Formula (displays any formulas in which the L:P is identified) OPC/DDE (displays LP usage via the OPC/DDE Interface) Location:Parameter Usage L:P Usage information is presented for help in identifying all sections of Operator10 Wastewater where the selected Location:Parameter is in use. This information does not include Reports or Generic Formula. Information provided appears as formatted text © 2014 AllMax Software, Inc. 98 Operator10 Help and can be copied and pasted as needed. 4.7 Data Data Analytical Results, Calculated Results, and any other entered information is referred to as Data. Data is conveniently entered or viewed using a DataView. This Data is used for calculations, reports, process control, or other needs of the Facility. Data is stored at a specific Location:Parameter, at a specific date or time. It may consist of Daily or Hourly values, Less Than, Greater Than, or Non-Detect values, Time or Date values, or Alpha Codes. Data values are stored internally with 15 significant digit Precision. Internal values are unaffected by the number of display digits or following zeros. Numbers may range to ±1.0E16. NOTE: Entered Data is automatically recognized by its format: - Any entry containing a colon (:) is a Time value. - Any entry containing a slash (/) is a Date value. - Any entry beginning with a number, plus (+), or minus (-) is a Numeric value. - Any entry beginning with a Less Than (<) is a Less Than value. - Any entry beginning with a Greater Than (>) is a Greater Than value. - Any entry beginning with a Tilde (~) is a Non-Detect value. - Any entry beginning with an Alphabetic character (A, B, ...) is an Alpha Code. For storage of the data results, the following table provides a translation of the field 'Type' in the Data.btr table and its equivalent in terms of the data displayed in a section like DataView: Data Type Value Data Type 0 Numeric Data 1 Blank 2 Less Than Data (<) 3 Alpha Code 4 Greater Than Data (>) 5 Non-Detect Data (~) 6 Time (:) 8 Date (/) 4.7.1 Add Data Add Data In the Add Data dialog, users can enter result data for the selected Facility:Location:Parameter and date. Enter a value and click the [Apply] button. Data will immediately be saved to the database and available for use. © 2014 AllMax Software, Inc. Main Application 4.7.2 99 Review Data Review Data The Review Data dialog provides a list of the recent data values for a selected Location and Parameter. All values can be displayed, place a check in the checkbox labeled [ ] All Data in the toolstrip at the top of the window. From this window, users can add, delete or edit records for any date (and optionally time, if the selected Location:Parameter is hourly). Click the Click the [Add] button to create a new entry and fill in the available fields. [Delete] button to remove an entry. For Location:Parameters that are flagged as Protected, click the [Unprotect] button located in the toolstrip and data entry will be allowed for the length of time that the Review Data window remains open. Upon closing the Review Data window, the Location:Parameter will again be protected. © 2014 AllMax Software, Inc. 100 Operator10 Help The Review Data window displays recent data values stored in the database. All data can be displayed for the selected Location:Parameter. 4.7.3 Data Types Topics in this section include: Alpha Code Data Value Date Greater Than Less Than Non-Detect Time 4.7.3.1 Alpha Code Alpha Code Alpha Code data values are one to ten character abbreviations that are stored at a specific Location:Parameter, at a specific date and time. The first character must be nonnumeric, and case is ignored. A description is associated with each Alpha Code. Any entry beginning with an Alphabetic character (A, B, ...) is an Alpha Code value. If set in the Facility Options, the Alpha Code "AA" may be treated in calculations as a zero value. Likewise "T" (True) and "Y" (Yes) may be treated as 1, "F" (False) and "N" (No) may be treated as 0. 4.7.3.2 Data Value Data Value (Numeric) Daily or Hourly Data values are numeric values stored at a specific Location:Parameter, © 2014 AllMax Software, Inc. Main Application 101 at a specific date (and time for Hourly Data). Numbers may range to±1.0E16. Any entry beginning with a number, plus (+), or minus (-) is a Daily or Hourly value. 4.7.3.3 Date Date Data Values Date data values are stored at a specific Location:Parameter, at a specific date and time. Date values may range from 01/01/1900 to 12/31/9999. Any entry containing a Slash (/) is a Date value. (Enter a leading slash (/) for date formats which do not contain the slash (/) character: for example "/+7") Displayed dates for United States users are usually represented in the form "MM/DD/YY" where MM is a month from 01 to 12, DD is a day of the month from 01 to 31, and YY is the last two digits of the year from 0 to 99. Valid dates range from January 1, 1899 through December 31, 9999. Dates for International users are dependent on Windows settings. Date values used in calculations and DataView summaries will be treated as the number of days represented (actually, the number of days since 01/01/4713 BC). The result itself is usually a Date value. Useful summary information is therefore limited to average, maximum, or minimum. 4.7.3.4 Greater Than Greater Than Data Values Greater Than data values are stored at a specific Location:Parameter, at a specific date and time. Greater Than values may range to±1.0E16. Any entry beginning with a Greater Than (>) is a Greater Than value. A Greater Than value used in calculations, DataView summaries, and reports will be treated in one of four ways: Blank (no data), Zero, Twice the Entered Value, Entered Value, or Preserve Greater Than. 4.7.3.5 Less Than Less Than Data Values Less Than data values are stored at a specific Location:Parameter, at a specific date and time. Less Than values may range to±1.0E16. Any entry beginning with a Less Than (<) is a Less Than value. A Less Than value used in calculations, DataView summaries, and reports will be treated in one of four ways: Blank (no data), Zero, Half the Entered Value, Entered Value, or Preserve Less Than. 4.7.3.6 Non-Detect Non-Detect Data Values Non-Detect data values are stored at a specific Location:Parameter, at a specific date © 2014 AllMax Software, Inc. 102 Operator10 Help and time. Non-Detect values may range to±1.0E16. Any entry beginning with a Tilde (~) is a Non-Detect value. A Non-Detect value used in calculations, DataView summaries, and reports will be treated in one of four ways: Blank (no data), Zero, Half the Entered Value, Entered Value, or Preserve Non-Detect. 4.7.3.7 Time Time Data Values Time data values are stored at a specific Location:Parameter, at a specific date and time. Time values may range from 00:00 to 45:12:15. Any entry containing a Colon (:) is a Time value. The format of Time values is d:hh:mm where d is optional days, hh is a two-digit hour, and mm is a two-digit minute. Time values through 24 hours are displayed as hh:mm and compatible with a 24:00 clock, and may be used to store time-of-day values. Any Time values may represent duration values. Time values used in calculations and DataView summaries will be treated as the number of minutes represented. Time values may therefore be used in conjunction with numeric data values (treated as minutes). The result itself is usually a Time value. 4.8 Process Control Process Control The Process Control section of Operator10 - Wastewater allows users to define and identify the specific water treatment processes that occur in the Facility. A Process consists of Process Sections, containing Location:Parameters, summary information, dimension information other values necessary for the calculation of data using standard water and wastewater treatment math. © 2014 AllMax Software, Inc. Main Application 103 Accessing Processes To access the Process section, go to the Setup ribbon/menu and choose [Processes]. The Process list will open. Add a New Process To add a new process, click the [New] button to begin. The Process Setup screen will open, see the Process Setup topic for more information. Edit a Process To edit an existing process highlight an existing process in the list and click the [Edit] button. Editing of the Process Setup will occur in the Process Setup. Delete a Process To delete an existing process, highlight an existing process in the list and click the [Delete] button. Click the the deletion of data. © 2014 AllMax Software, Inc. [Yes] button to confirm or [No] to cancel 104 4.8.1 Operator10 Help Process Setup Process Setup The Process Setup screen allows users to define and maintain process control settings to assist in the calculation of standard water and wastewater math. The Process Setup section allows users to define process influent, process effluent, process section, dimension, flow rate and other information in order to calculate process control values using standard water and wastewater math. The following options can be defined in the Process Setup section: Process Type: Select from the drop-down list to identify the type of process to be created Source Status: In the six available spaces, define the influent source(s) of data; click the [...] button to select locations from the Location list Flow (+): Place a check in the checkbox for Flow (+) if the location selected is a source of positive, influent flow for the process Flow (-): Place a check in the checkbox for Flow (-) if the location selected is a source of flow data which is to be subtracted from the process © 2014 AllMax Software, Inc. Main Application 105 Lab Data: Place a check in the checkbox for Lab Data if the location selected is a source of concentration (mg/L, ug/L, etc) values (examples may include BOD, TSS, Ammonia, etc.) NOTE: This information is used to calculate a single influent flow and appropriate lab data for the Process. Each flow location is listed on a line and checked. If no lab is checked on that line, the flow will "accumulate" to the next line. When a lab is checked, it is assumed that lab data is available at that point, and flow is based on any accumulated flow at that point. Each flow must have, or accumulate to, a lab. Each lab must have, or be preceded by, a flow. Process Effluent: Press the [...] button to select the location which represents the effluent source of data for the process Process Section Flow Based On: % of Process Influent Flow: When selected, users will be required to enter a numeric percentage which will be used to calculate the approximate amount of flow entering the process section Section Flow Meters: When selected, the calculations will assume that there is a flow value present which will be used to calculate Sections: Press the [Add] button to add a location to be used as a process section Press the [Remove] button to remove a location from the section list Section Information: With a process section defined, the following information must be entered for calculation purposes Type of Process Section: Select from the drop-down menu the type of process section that best describes the section to be added Influent % of Process Flow: Enter a numeric value to define the percent of process influent flow that enters the treatment section In Service: [In/Out Service History]: Press the [In/Out Service History button to display a historical list of in service/out of service events for the selected process section Section Summary Only: Place a check in the checkbox to indicate that the process section is a summary section, additional information may be required, see section detail for more information Section Detail: Depending on the type of section selected as well as whether the section is a summary, additional information may be required, please enter any available information. NOTE: The process control section may require additional information, please contact Operator10 - Wastewater technical support for a guided tour or explanation of the section. Create Calculations To create calculations based on the entered process information, click the © 2014 AllMax Software, Inc. 106 Operator10 Help [Create process calculations] button to begin. For more information, see the Create Process Calculations topic. Save Process Setup Press the 4.8.2 [Save] button to save the data entered into the Process Setup section. Process Section History Process Section History The Process Section History displays and allows for the entry of any events in which a process section (clarifier, tank, basin, filter, etc.) is taken in or out of service. In creating this record or history of the process section, Operator10 - Wastewater can properly calculate those process calculations based on whether the section in use or not. Add Process History To add Process History notes for a process section, press the begin. [Add] button to Enter the following information to log an in/out of service event: © 2014 AllMax Software, Inc. Main Application 107 Date: Enter or select a date from the calendar to specify the date on which the section was in or out of service Process Name: Click the [...] button to select a process from the Process list Process Section: Click the [...] button to select a process section from the selected Process Active: Place a check in the checkbox for Active if the section was in service on the date specified, leave unchecked for out of service events 4.8.3 Create Process Calculations Process Create Calculations Upon completing the setup of the process, calculations can be created to generate the desired process data. Depending on the type of process as well as the information provided during process setup, calculations will be provided. Each calculation provided will create a unique Location:Parameter that will help to calculate and store the process data. The Process Create Calculations window displays that list. Create Calculations Upon review of the list of calculations to be generated, users should press the [Create] button to generate the provided Location:Parameters. This process will create the L:Ps as well as the necessary internal formulas used in the calculation of this data. © 2014 AllMax Software, Inc. 108 Operator10 Help Print Calculations list Click the [Print] button to print the provided list of calculations for review. 4.9 Formula Formula Formulas may be entered and used by name for calculating Location:Parameter values. Additionally, formulas can be written for use in DataViews, Reports and Graphs. For more information contact AllMax Technical Support. The Formula List displays all formulas associated with the selected facility. Formula Details displays details of the currently selected formula. Accessing the Formula List To access the Formula list, go to the Setup ribbon and choose the button. This will display the Formula list. [Formula] Internal Formulas To view Internal Formulas only, place a check in the [ ] Internal Formulas checkbox. To view formulas from another facility, use the drop down menu in the toolbar to choose a different facility. © 2014 AllMax Software, Inc. Main Application 109 Formula List Functionality The Formula list and Formula editor window have the general properties of the Grid and Grid Edit windows. (For more information about these sections, please see the topic: Grid Functionality). In the Formula List, users can: Add Formula Delete Formula Edit Formula Calculate 4.9.1 Add Formula Add Formula To add a new formula, click the [Add] button from the Formula list window. 1. Enter a unique Formula Name (1 to 30 characters) for each formula. 2. Remarks can be entered to help describe or define the formula. © 2014 AllMax Software, Inc. 110 Operator10 Help 3. Formulas can be Assigned To Location:Parameters by clicking the [...] button and selecting the desired L:Ps. 4. Functions may be chosen from the drop-down list. The Function Help file can be accessed for additional support while writing formulas. 5. Location:Parameters may be selected from a PickList using the [...] popup button. 6. To increase or decrease the displayed font size for the Formula field, click the buttons. 7. The Formula itself (1 to 1000 characters) is written in mathematical style, using Location:Parameter names, constants, functions, parentheses, etc. The value calculated as a result will be written to the Location:Parameter which uses the Formula. More than one Location:Parameter may use the same Formula. 8. In the Formula Test area, testing of written formulas can be performed in 2 ways. (For date-based or formulas sensitive to dates, enter a test Date to be used when testing the written formula.) () Use values from Test Data: Use this option to test with user-entered data in the fields 1st L:P Value:, 2nd L:P Value, 3rd L:P Value, and 4th+ L:P Value. () Use Data from Database: Use this option to test with a selected L:P from the facility. Note: The Formula is limited by both the number of characters in the Formula (1000 characters), the Parsed size (1500 characters). Contact AllMax for additional information. Examples: [Plant Influent:Flow MGD] * 1000000 the flow of "Plant Influent" in MGD converted to gallons per day [Plant Influent:Flow MGD] + [Recycled:Flow MGD] / 2 add flow of "Plant Influent" to flow of "Recycled" and divide by 2 IF(ISBLANK([Plant Influent:Flow MGD]),0,[Plant Influent:Flow MGD]) if there is no flow at "Plant Influent" then return 0, otherwise return the flow MAX([Aer 1:BOD 5],[Aer 2:BOD 5]) the greater of the BOD value at "Aer 1" or "Aer 2" [Meter:Number] - D_VAL([Meter:Number],0,-1) the value of parameter "Number" at location "Meter" less yesterday's value © 2014 AllMax Software, Inc. Main Application 4.9.2 111 Delete Formula Delete Formula Formulas can be deleted from the database, click the [Delete] button to delete records. Individually selected records can be deleted as well as multiple selections of formulas. Confirmation is required when deleting formulas from the database. Click the [Yes] button to confirm or © 2014 AllMax Software, Inc. [No] to cancel the deletion of data. 112 Operator10 Help WARNING: All information associated with the selected record(s) will be deleted upon confirmation of the deletion. This is permanent and cannot be undone. 4.9.3 Formula List The Formula List window is split into two sections, a Formula list and a Formula editor. Formula List For more information about the functionality of the Formula list, see the Formula help topic. Formula Editor Users can select formula from the Formula list and edit/view the details of the formula in the lower half of the Formula window. For more information, see the following. Assigned To: The Assigned To field displays the Location:Parameter(s) to which the formula is attached. Click the [...] button to add to the list of selected Location:Parameters. Functions List: To edit the formula and use a desired Function, select from available Functions in the drop-down menu. The selected Function will be inserted into the formula in the Formula field. Location:Parameter: To select a Location:Parameter to be used in the written formula, click the [...] button to display a list of available Location:Parameters. The selected Location:Parameter will be inserted into the Formula field. Formula: Edit the formula in the Formula field. NOTE: Changes to the formula are saved immediately. Additional Functionality To increase or decrease the displayed font size for the Formula field, click the buttons. The Formula Result: field will display the calculated result of the formula based on testing information provided: In the Formula Test area, testing of written formulas can be performed in 2 ways. (For date-based or formulas sensitive to dates, enter a test Date to be used when testing the written formula.) () Use values from Test Data: Use this option to test with userentered data in the fields 1st L:P Value:, 2nd L:P Value, 3rd L:P Value, and 4th+ L:P Value. () Use Data from Database: Use this option to test with a selected L:P from the facility. © 2014 AllMax Software, Inc. Main Application 4.9.4 113 Internal Formulas Internal Formulas Several Internal Formulas are supplied with the application. These formulas are automatically attached to appropriate parameters when [Create Calculations] is pressed in the Process Editor. These formulas should not be modified, although they may be attached to other user-defined Location:Parameters. (see also: Process, Formula, Calculate, Internal Parameters) For your information, the Internal Formulas are described below: (Formula Name: example parameter = example method of calculation) accum_process: Accumulated flow to a Process "Flow MGD" and calculated loadings for MGL and % solids parameters (to LB) = flow1 "Flow MGD" ± flow2 "Flow MGD" ± ... accum_section: Accumulated flow to a Process Section "Flow MGD" Vol%: percent volatile solids "Solids Vol %" = volatile solids "Solids TVSS" / total solids "Solids TSS" * 100 Loading: parameter in MGL or UGL to loading in LB "~LBOD 5" = BOD "BOD 5" * flow "Flow MGD" * 8.34 © 2014 AllMax Software, Inc. 114 Operator10 Help Loading%: total solids in LB "~LSolids Vol %" = total solids "Solids Vol %" * flow "Flow MGD" * specific gravity (defaults to 1) "Spec Gravity" * 8.34 * 10000 Loading%Lb: percent volatile solids to LB: percent volatile solids "Solids Vol %" * percent total solids "Solids Vol %" / 100 Inventory: Inventory in LB "~ISolids TSS" = total solids "Solids TSS" * volume of tank * 8.34 / 1000000 Inventory%: Inventory in LB "~ISolids Vol %" = percent total solids "Solids Vol %" * volume of tank * 8.34 / 10000 Inventory%Vol: Inventory in LB "~ISolids Vol %" = percent volatile solids "Solids Vol %" * Inventory in LB "~ISolids Vol %" F/M_CBOD: Food / Microorganism ratio "~F/M" = section influent CBOD in LB "~LBOD Carb 5" / total solids in LB "~LSolids TVSS" or volatile solids in LB "~LSolids TSS" F/M: Food / Microorganism ratio "~F/M" = section influent BOD in LB "~LBOD 5" / total solids in LB "~LSolids TVSS" or volatile solids in LB "~LSolids TSS" F/MV: Food / Microorganism ratio "~F/M" = section influent volatile solids in LB "~LSolids Vol %" or volatile solids in LB "~LSolids TVSS"/ inventory volatile solids in LB "~ISolids Vol %" or inventory volatile solids in LB "~ISolids TVSS" SVI: Sludge Volume Index "~SVI" = settleable solids "Solids Settlbl" / volatile solids "Solids TSS" * 1000 MCRT: Mean Cell Resonance Time "~MCRT" = inventory volatile solids in LB "~ISolids TSS" / sum of waste volatile solids loadings in LB "~LSolids Vol %" or "Solids TSS" MCRTS: solids Mean Cell Residence Time "~MCRT" = inventory volatile solids in LB "~ISolids Vol %" or "~ISolids TVSS" / sum of waste volatile solids in LB "~LSolids Vol %" or "~LSolids TSS" SOR: Surface Overflow Rate in GPD/SF "~SOR" = flow in GAL / surface area of tank SOR_M: Surface Overflow Rate in GPM/SF "~SOR_M" = flow "Flow MGD" / surface area of tank / 1440 * 1000000 WOR: Weir Overflow Rate "~WOR" = flow in GAL / weir length WOR_M: Weir Overflow Rate "~WOR" = flow in GAL per MIN / weir length DT_SEC: Detention Time in Seconds "~DT_SEC" = volume of tank / flow in GAL * 86400 DT_MIN: Detention Time in Minutes "~DT_MIN" = volume of tank / flow in GAL * 1440 DT_HR: Detention Time in Hours "~DT_HR" = volume of tank * runhours "RUNHRS" (defaults to 24) / flow "Flow MGD" / 1000000 DT_DAY: Detention Time in Days "~DT_DAY" = volume of tank / flow in GAL F_VOL: Filtration Volume in Gal "~F_VOL" = flow in GAL * runhours "RUNHRS" / 24 F_RATE: Filtration Rate in G/MIN/SQFT "~F_RATE" = Filtration Vol "~F_VOL" / runhours "RUNHRS" / volume of tank / 60 UFRV: Unit Filter Run Volume in G/SQFT "~UFRV" = Filtration Vol "~F_VOL" / volume of tank B_RATE: Backwash Rate in G/MIN/SQFT "~B_RATE" = Backwash flow in GPM / volume of tank B_VOL: Backwash Vol in Gal "~B_VOL" = Backwash flow in GAL * minutes "BWASHM" / 24 © 2014 AllMax Software, Inc. Main Application 115 B_VOL_P: Backwash Percent "~B_VOL_P" = Backwash Vol "~B_VOL" / Filtration Volume "~F_VOL" / 100 SL_SF: Solids Loading in LB/SF "~SL_SF" = loading in LB "~LSolids Vol %" or "~LSolids TSS" / surface area of tank SL_KCF_CBOD: Solids Loading in LB/1000CF "~SL_KCF" = loading in LB "~LBOD Carb 5" / volume of tank * 7480 SL_KCF: Solids Loading in LB/1000CF "~SL_KCF" = loading in LB "~LBOD 5" / volume of tank * 7480 SL_HSF: Solids Loading in LB/HR/SF "~SL_HSF" = loading in LB "~LSolids Vol %" or "~LSolids TSS" / runhours "RUNHRS" / surface area of tank SL_CF: Solids Loading in LB/CF "~SL_CF" = loading in LB "~LSolids Vol %" or "~LSolids TSS" / volume of tank * 7.48 SL_CFVol: Volitile Solids Loading in LB/CF "~SL_CF" = loading in LB "~LSolids Vol %" or "~LSolids TVSS" / volume of tank * 7.48 RespRate: Respiration Rate in MG/HR/GVSS "RESP" = oxygen uptake in MG/L/HR "OXYUPT" / solids in MGL "Solids TVSS" or "Solids TSS" * 1000 Flow_P: Flow Percent "~FLOW_P" = waste flow "Flow MGD" / influent flow "Flow MGD" * 100 Flow_T: Total Flow in MGD "~FLOW_T" = waste flow "Flow MGD" + influent flow "Flow MGD" HLoad: Hydrolic Loading in GPD/SF "~HLOAD" = waste flow "Flow MGD" + influent flow "Flow MGD" / surface area of tank * 1000000 Alk/NH3: Alkalinity/NH3-N Ratio "~ALK/NH3" = alkalinity "Alkalinity" / ammonia "Nh3 N Ammonia" VolAcid/Alk: Volatile Acid/Alkalinity Ratio "~VA/A" = volatile acids "Volatile Acids" / alkalinity "Alkalinity" or "PhenPhLfinAlk" VolRed%: Percent Volatile Reduction "~VOLRED%" = ( 1 - ( %VSS out "Solids Vol %" / %VSS in "Solids Vol %" ) ) / ( 1 - ( %VSS out "Solids Vol %" / 100 ) ) * 100 A/S: Air/Solids Ratio "~A/S" = airflow in CFM "AIRFLO" * runhours "RUNHRS" / influent loading in LB "~LSolids Vol %" or "~LSolids TSS" * 4.5 WasteFlow: Waste Flow % "~WASTE_F" = waste flow "Flow MGD" + waste flow "Flow MGD" WasteRem: Waste SS Removed "~WASTE_R" = ( solids in MGL "Solids TSS" * flow "Flow MGD" * 8.34 ) + ( solids in MGL "Solids TSS" * flow "Flow MGD" * 8.34 ) AirFlow: Air Flow in MCF "~AIRFLOW" = airflow in CFM "AIRFLO" * 1440 / 1000000 AF/B: Air Flow/BOD in CF/LB "~AF/B" = airflow in CFM "AIRFLO" / loading in LB "~LBOD 5" * 1440 AF/B_R: Air Flow/BOD Removed in CF/LB "~AF/B_R" = airflow in CFM "AIRFLO" / loading removed in LB "~LBOD 5" * 1440 Grit/Grease: Grit or Grease Removed in CF/MG "~GGRTVOL" = volume removed in cubic yards "GRTVOL" / flow "Flow MGD" * 27 GritWeight: Grit Removed in KLB/MG "~GRIT" = volume removed in cubic yards "GRTVOL" / flow "Flow MGD" * specific gravity (defaults to 1) "Solids Vol %" * 1.6848 Yield_HR: Cake Yield in LB/HR "~YLD_HR" = loading in LB "~LSolids Vol %" or "~LSolids TSS" / runhours "RUNHRS" © 2014 AllMax Software, Inc. 116 Operator10 Help Yield_HR_U: Cake Yield in LB/Units/HR "~YLD_HR" = loading in LB "~LSolids Vol %" or "~LSolids TSS" / volume or surface area of tank / runhours "RUNHRS" S_Avg: Summary Average of Sections "~ABC" = average of sections "~ABC" S_Sum: Summary Sum of Sections "~ABC" = sum of sections "~ABC" 4.10 Alpha Codes Alpha Code An Alpha Code is a one to ten character abbreviation that may be defined and entered as Data. The characters may be alphabetic (A-Z) and/or numeric (0-9), and case is ignored. A description (1 to 60 characters) will be associated with each Alpha Code. NOTE: A special case exists for the Alpha Code "AA", which may be printed in place of Less Than values in DataViews and some Reports. Additionally, as a default, "AA" is treated numerically as 0. Likewise "T" (True) and "Y" (Yes) may be treated as 1, "F" (False) and "N" (No) may be treated as 0. Accessing the Alpha Code section To access the Alpha Code section, go to the Setup ribbon and click the Codes] button. [Alpha © 2014 AllMax Software, Inc. Main Application 117 Add Alpha Code Users can create additional Alpha Codes for usage throughout Operator10 Wastewater, click the [Add] button. Enter the desired Alpha Code in the Alpha Code*: field; a Description can be entered as well. Click the [Save] button to save the entry. Delete Alpha Code Users can delete Alpha Codes as needed; with an Alpha Code selected, click the [Delete] button. Confirm the deletion of data by clicking the [No] button. [Yes] or NOTE: Alpha Codes deleted from the Alpha Code list are deleted only from the list and not from the "data" portion of the database. Hence, previously entered Alpha Codes will be preserved in the database. © 2014 AllMax Software, Inc. 118 4.11 Operator10 Help Chemicals Chemical The Chemical section allows the User to define chemicals used for the current Facility. Calculations may then be performed for a Process in which chemicals are used, based on Percent Strength, Specific Gravity, and Cost per Pound, Kilogram, Gallon, or Liter. Accessing the Chemical List To access the Chemical List, go to the Setup ribbon and choose button. [Chemicals] Add Chemical Users can create add Chemicals to the list, click the [Add] button. Enter the following information: Parameter - Click the [...] button to select from a list of Parameters. Select the Parameter that will be used to store the amount of chemical added to a process. Unit - Select from the list of available units, all options for Units are displayed. Percent Strength - Enter the Percent Strength of the chemical being applied. © 2014 AllMax Software, Inc. Main Application 119 Specific Gravity - Enter the Specific Gravity of the chemical being applied. Cost Per Unit - Enter the Cost Per Unit of the chemical being applied. Click the [Save] button to complete the process. Delete Chemical Users can delete Chemicals as needed; with an Chemical selected, click the [Delete] button. Confirm the deletion of data by clicking the [No] button. 4.12 [Yes] or Barcode Labels Barcode Labels Barcode Label Templates can be created and used to print labels with barcodes suitable for use with the DataPort Handheld Data Entry tool. The barcode labels can be managed and optimized for printing to selected label styles and printers. Four categories of barcode labels can be printed: Facility Location Parameter Location:Parameter © 2014 AllMax Software, Inc. 120 Operator10 Help Accessing Barcode Label Templates To access the Barcode Label Templates section, go to the Setup ribbon/menu and choose [labels List] from the ribbon. Creating Barcodes In the Barcode Label Templates window, press the [Add] button to create a new template. Enter a name for the Barcode Label Template and press . After the template has been named, the List and Label Label Designer will open. Edit the label or define label settings using the List and Label designed. Edit Barcode On the Labels list, click the [Edit] button to open the label editor window. This editor provides many options for customizing the current label, or for creating totally new labels and adding them to the available styles list. Variables and a default barcode are provided that are specific to the Operator10 software. NOTE: For more information regarding the use of the List & Label Report Designer, please consult the List & Label user’s manual, which you may access through the main menu’s HELP item under the option Manuals | Report Designer Manual. Print Barcode Labels To print labels using barcode templates defined in the previous topics, go to the Setup menu and select the [Print] option. Choose from the drop-down menu, the type of data to be printed on the label. Select © 2014 AllMax Software, Inc. Main Application 121 from Facility, Location, Parameter or Location:Parameter. Once an option has been selected, a picklist will open, highlight individual or multiple records and click the button to print the selected records as barcodes. In the next window that opens, select the Barcode Template to be used when printing. Highlight an available template and press . Continue with the process by choosing the appropriate options in the Output To... window to proceed with the printing of data. 4.12.1 Barcode Template Name Barcode Template Name Each barcode must be named. Enter a name for the new barcode and press the 4.13 button. Calculations Calculate Calculations may be performed for Location:Parameters in the current Facility using all Hourly, Daily, or Monthly formulas or a range of formulas. Performing a Calculation There are many ways in which calculations can be performed: CALCULATE NOW To immediately calculate formulas for a given database, go to the Tools ribbon and click the © 2014 AllMax Software, Inc. [Calculate Now] button. The following window will appear: 122 Operator10 Help Choose a date range in which the calculations should be applied. Enter appropriate dates or press the [...] popup button to choose from a Calendar dialog. Calculations may take several minutes to complete, depending on the number of days, the number of formulas, and the speed of the computer. Calculations will continue in the background while allowing the Windows operating system to continue normally. NOTE: Relative Dates and the type of calculations selected are restored the next time the dialog is opened. Calculations take place in the following order: Hourly Calculations By Date By Formula Name (in the order they appear in the Formula PickList) By Location:Parameter (in the order they appear in the Location:Parameter PickList) Daily Calculations By Date By Formula Name (in the order they appear in the Formula PickList) By Location:Parameter (in the order they appear in the Location:Parameter PickList) Monthly Calculations By Date By Formula Name (in the order they appear in the Formula PickList) By Location:Parameter (in the order they appear in the Location:Parameter PickList) CALCULATE Month-to-Date To immediately calculate from the first of the month to the current date, click the [Month-to-Date] button. Calculations will automatically be performed starting on the first of the current month through the current date. CALCULATE Previous Month-to-Date To immediately calculate from the first of the previous month to the current date, click © 2014 AllMax Software, Inc. Main Application 123 the [Previous Month-to-Date] button. Calculations will automatically be performed starting on the first of the previous month through the current date. Scheduling a Calculation To schedule a calculation routine, using the Operator10 Agent Scheduling tool, see the Scheduled Calculation help topic. Calculation Order The order in which calculations are performed is vital in order to avoid missing or noncalculated values based on dependencies. As process calculations and user-written formulas may depend on other calculated values, it is important to maintain proper order. To view or reorder the current order in which all data is to be calculated, go to the Tools ribbon and choose the [Change Order] button. To move the calculations up or down, highlight a listed calculation and single left-click on the record to drag the record to the desired position. Changes to calculation order should be immediately visible, click the save the changes. [OK] button to 4.13.1 Averages Topics in this section include: 4-Day Average 7-Day Average Average (Mean) Flow-Weighted Average Geometric Mean Rounding Rules Standard Deviation 4.13.1.1 4-Day Average 4-Day Average 4-Day Averages are calculated by Operator10 - Wastewater software using the following method: Data is averaged for groups of 4 consecutive values beginning with the earliest data available. Only valid data is considered. Groups are considered to be in the month only if the day of the last value of the group is in the month. Any additional days (outliers) are ignored. 4-Day Averages of each period are normally calculated by using the arithmetic mean © 2014 AllMax Software, Inc. 124 Operator10 Help (Average). Fecals are calculated using the Geometric Mean. The Monthly Average is the arithmetic mean (average) of each 4-day average. The Monthly Maximum is the maximum of each 4-day average The Monthly Minimum is the minimum of each 4-day average. 4.13.1.2 7-Day Average 7-Day Average The following 7-Day Averages are calculated by Operator10 - Wastewater software: Continuous, or Floating - Data is averaged for several overlapping 7-day periods, beginning with the first of the month and continuing each consecutive day of the month until a period reaches the end of the month. First of Month (28 day) - Data is averaged for four (4) 7-day periods, beginning with the first day of the month. Any additional days are ignored. First of Month (whole month) - Data is averaged for three (3) 7-day periods, beginning with the first day of the month, and a fourth period extending to the end of the month. Saturday Rule - Data is averaged for 7-day periods beginning on Sunday and extending though the following Saturday. Periods are considered to be in the month containing the Saturday of the period. Wednesday Rule - Data is averaged for 7-day periods beginning on Sunday and extending though the following Saturday. Periods are considered to be in the month containing the Wednesday of the period. Whole Week Rule - Data is averaged for 7-day periods beginning on Sunday and extending though the following Saturday. Periods are considered to be in the month only if the entire period is in the month. Any additional days are ignored. 7-Day Averages of each period are normally calculated by using the arithmetic mean (Average). Some calculations allow the Flow-Weighted Average to be used. Fecals are calculated using the Geometric Mean. Only days containing valid data are averaged for the period. A period containing no valid data is ignored. The Monthly Average is the arithmetic mean (average) of each 7-day average. The Monthly Maximum is the maximum of each 7-day average The Monthly Minimum is the minimum of each 7-day average. © 2014 AllMax Software, Inc. Main Application 125 4.13.1.3 Average (Mean) Average The following Averages are calculated by Operator10 - Wastewater software: The Average is calculated by using the Arithmetic Mean for all parameters except fecal parameters. Arithmetic means are calculated by Operator 10® software using the following formula: Arithmetic Mean = For fecal parameters, the Average is calculated using the Geometric Mean. The default fecal parameters include parameters 31614, 31616, 31617, 31679, and 74055. If the standard list of Fecals is not acceptable, contact AllMax for additional information. A 4-Day Average is calculated according to various 4-Day rules. See: 4-Day Average. The Monthly Average of 4-Day averages is the arithmetic mean (average) of each 4Day Average. A 7-Day Average is calculated according to various 7-Day rules. See: 7-Day Average. The Monthly Average of 7-Day averages is the arithmetic mean (average) of each 7Day Average. 4.13.1.4 Flow-Weighted Average Flow-Weighted Average Flow-weighted averages are calculated by Operator 10® software using the following formula: Flow-Weighted Average = Days that contain any unpaired values (a value without a flow, or a flow without a value) or contain no data (blank) are ignored. NOTE: For loadings, the flow-weighted average is equivalent to the average (arithmetic mean), since daily flow has already been considered. © 2014 AllMax Software, Inc. 126 Operator10 Help 4.13.1.5 Geometric Mean Geometric Mean Geometric means are calculated by Operator 10® software using the following formula: Geometric Mean = An alternate (and equivalent) method for calculation which produces identical results is: Logarithmic Mean = Neither method handles negative data values, so all negative data values are ignored (considered as blank) in calculations. A data value of zero (0) produces a geometric mean equal to 0 using the first formula. (It is not possible to calculate using the logarithmic method, since the log of 0 is undefined.) Although the 0 result is mathematically correct, it is not acceptable to some users. Therefore the following options are possible: Use 0 values in calculations: data values 0, 30, 35, 40 produce a geometric mean of 0. This is the default method of calculation used by the Operator10 software. Treat 0 values as 1 in calculations: data values 0, 30, 35, 40 produce a geometric mean of 14.3, as if the data values were 1, 30, 35, 40. (This is also the same as using the logarithmic method and using 0 in place of the undefined log.) Ignore 0 values in calculations: data values 0, 30, 35, 40 produce a geometric mean of 34.8, as if the data values were 30, 35, 40. This treats 0 in the same manner as negative values. If the default method of calculation is not acceptable, contact AllMax Software, Inc. for additional information. 4.13.1.6 Rounding Rules Rounding Rules AllMax Software, Inc. Operator10 - Wastewater software uses standard rounding rules for all reported values. Although this rule is usually appropriate, it is not acceptable to some users. Therefore the following options are possible on some Reports: Standard Rounding: a data value whose non-significant portion is greater than or equal to 5 rounds up, otherwise it rounds down (2.25 to 1 decimal place produces 2.3). This is the standard rule of rounding used by the Operator10 Wastewater software. © 2014 AllMax Software, Inc. Main Application 127 Even-Biased Rounding: a data value whose non-significant portion is greater than 5 rounds up, exactly 5 rounds to the nearest even value, otherwise it rounds down (2.25 to 1 decimal place produces 2.2; 2.35 to 1 decimal place produces 2.4). Truncated Rounding: a data value's non-significant portion is truncated rather than rounded (2.29 to 1 decimal place produces 2.2). If the standard rule of rounding is not acceptable, contact AllMax Software, Inc. for additional information. 4.13.1.7 Standard Deviation Standard Deviation Standard Deviation = This method is actually the Population Standard Deviation, which uses a numerator of n. However, a more accurate method when using samples may be Sample Standard Deviation, which uses a numerator of n-1: NOTE: Results may be similar for a large number of samples Therefore the following options are possible: Use Population Standard Deviation as the numerator in calculations: data values 28, 30, 30, 32 produce a standard deviation of 1.414. This is the default method of calculation used by the Operator10 software. Use Sample Standard Deviation as the numerator in calculations: data values 28, 30, 30, 32 produce a standard deviation of 1.633. If the default method of calculation is not acceptable, contact AllMax Software, Inc. for additional information. 4.14 Logged Documents Logged Documents The Logged Documents feature allows users to log versions of documents (DataViews, Graphs and Reports) as they are printed. Logged documents can be reprinted at any time, as they were printed the first time. © 2014 AllMax Software, Inc. 128 Operator10 Help The Logged Documents section allows users to view a list of logged documents printed from the DataView, Graphing and Reporting sections. Accessing Logged Documents To access the Logged Document section, in the main application window, go to the View ribbon/menu, click the Documents group. [View Documents] button in the Logged Adding Logged Documents To add new documents to the list of logged documents, go the the DataView, Graphing or Reporting sections of Operator10 and print a document. Upon printing, a prompt may be visible asking for the user to log the document as printed with an associated note. Depending on the settings found in the Database Properties section, users can edit which sections of the program prompt for logging documents. Delete Logged Documents To delete a logged document, highlight the document in the list and click the [Delete] button. Confirm the deletion of data by clicking the [No] button. [Yes] or © 2014 AllMax Software, Inc. Main Application 129 4.14.1 Log Document Log Document When users print from DataView, Graphing or Reporting, a prompt will be presented to log documents as complete or printed. Logging a document saves a copy of the document as the document was printed. The logged document is able to be accessed from the Logged Documents section of the program at any time. When prompted, users can choose to log the document or not, as well as entering a note or comment about the document that has been printed and is being logged. 4.14.2 Logged Documents - All Logged Documents The Logged Documents feature allows users to log versions of documents (DataViews, Graphs and Reports) as they are printed. Logged documents can be reprinted at any time, as they were printed the first time. © 2014 AllMax Software, Inc. 130 Operator10 Help The Logged Documents section allows users to view a list of logged documents printed from the DataView, Graphing and Reporting sections. Accessing Logged Documents To access the Logged Document section, go to the View ribbon/menu, click the [View Documents] button in the Logged Documents group. Adding Logged Documents To add new documents to the list of logged documents, go the the DataView, Graphing or Reporting sections of Operator10 and print a document. Upon printing, a prompt may be visible asking for the user to log the document as printed with an associated note. Depending on the settings found in the Database Properties section, users can edit which sections of the program prompt for logging documents. Delete Logged Documents To delete a logged document, highlight the document in the list and click the [Delete] button. Confirm the deletion of data by clicking the [No] button. [Yes] or © 2014 AllMax Software, Inc. Main Application 131 4.14.3 Logged Documents - DataView Logged Documents The Logged Documents feature allows users to log versions of documents (DataViews, Graphs and Reports) as they are printed. Logged documents can be reprinted at any time, as they were printed the first time. The Logged Documents section allows users to view a list of logged documents printed from the DataView, Graphing and Reporting sections. Accessing Logged Documents To access the Logged Documents section in the DataView application, go to the File menu, click the Logged Documents menu option. Adding Logged Documents To add new documents to the list of logged documents, go the the DataView, Graphing or Reporting sections of Operator10 and print a document. Upon printing, a prompt may be visible asking for the user to log the document as printed with an associated note. Depending on the settings found in the Database Properties section, users can edit which sections of the program prompt for logging documents. © 2014 AllMax Software, Inc. 132 Operator10 Help Delete Logged Documents To delete a logged document, highlight the document in the list and click the [Delete] button. Confirm the deletion of data by clicking the [No] button. [Yes] or 4.14.4 Logged Documents - Report Logged Documents The Logged Documents feature allows users to log versions of documents (DataViews, Graphs and Reports) as they are printed. Logged documents can be reprinted at any time, as they were printed the first time. The Logged Documents section allows users to view a list of logged documents printed from the DataView, Graphing and Reporting sections. Accessing Logged Documents To access the Logged Documents section in the Report application, go to the File menu, click the Logged Documents menu option. Adding Logged Documents To add new documents to the list of logged documents, go the the DataView, © 2014 AllMax Software, Inc. Main Application 133 Graphing or Reporting sections of Operator10 and print a document. Upon printing, a prompt may be visible asking for the user to log the document as printed with an associated note. Depending on the settings found in the Database Properties section, users can edit which sections of the program prompt for logging documents. Delete Logged Documents To delete a logged document, highlight the document in the list and click the [Delete] button. Confirm the deletion of data by clicking the [No] button. [Yes] or 4.14.5 Logged Documents - Graph Logged Documents The Logged Documents feature allows users to log versions of documents (DataViews, Graphs and Reports) as they are printed. Logged documents can be reprinted at any time, as they were printed the first time. The Logged Documents section allows users to view a list of logged documents printed from the DataView, Graphing and Reporting sections. Accessing Logged Documents © 2014 AllMax Software, Inc. 134 Operator10 Help To access the Logged Documents section in the DataView application, go to the File menu, click the Logged Documents menu option. Adding Logged Documents To add new documents to the list of logged documents, go the the DataView, Graphing or Reporting sections of Operator10 and print a document. Upon printing, a prompt may be visible asking for the user to log the document as printed with an associated note. Depending on the settings found in the Database Properties section, users can edit which sections of the program prompt for logging documents. Delete Logged Documents To delete a logged document, highlight the document in the list and click the [Delete] button. Confirm the deletion of data by clicking the [No] button. [Yes] or © 2014 AllMax Software, Inc. Part V 136 5 Operator10 Help BioSolids BioSolids The BioSolids Ribbon, visible when licensed for BioSolids, provides access to BioSolids features: BioSolids Application BioSolids Available Nitrogen BioSolids List BioSolids Nutrient BioSolids Owner BioSolids Site BioSolids Site Detail BioSolids Site Limits 5.1 BioSolids List BioSolids BioSolid The BioSolid List displays all BioSolids created in Operator10 - Wastewater. BioSolids are used to track application and loading values to selected Sites. The BioSolid List displays all defined BioSolids generated at the treatment facility to be applied at Sites. Accessing the BioSolid list © 2014 AllMax Software, Inc. BioSolids Go to the BioSolids ribbon/menu and select list. 137 [BioSolids] to open the BioSolids Add a BioSolid To create a new BioSolid, in the BioSolids List, click the new BioSolid. [Add] button to add a Users will be presented with a Location (BioSolid) window that will allow for data entry of required and optional information. (See below) Press the [...] button to select the Facility Name from the Facility list. Enter a unique Location (1 to 16 characters) to identify the BioSolid. A Description (0 to 30 characters) may also be entered. Select the BioSolid Type by selecting either Cake or Liquid from the list of choices. Check the [ ] Active checkbox for BioSolids which are currently in use. Notes can be entered for a Location, enter text directly into the Notes field. Click the © 2014 AllMax Software, Inc. [Save] button to save any data entered. 138 Operator10 Help Add Similar BioSolid From the BioSolid list, users are able to create similar BioSolids if one exists. To utilize this feature, highlight an existing BioSolid in the list and click the arrow icon beside the [Add] button to select Add Similar Location (BioSolid). NOTE: The Location list and Location editor window have the general properties of the Grid and Grid Edit windows. (For more information about these sections, please see the topic: Grid Functionality). Add/Assign Parameters Parameters, tests or samples collected at the respective BioSolid, can be added to the BioSolid. Using the [Add] button secondary menu (the drop-down menu arrow or split button), select the option Add Parameters or from the BioSolid list, click the [...] button that appears in the column titled "Show Parameters" to begin adding parameters to a selected BioSolid. In the "Assigned Parameter" list that appears, users can begin to add parameters to the list as needed. Click the [Add] button to begin adding parameters. Once selected, Location:Parameter information can be edited. In-grid editing is possible by entering data where permitted. Multiple-record editing is also permitted. Highlight a group of records to be edited together and click the [Edit] button to begin editing. Items able to be edited include: Upper Limit, Lower Limit, Formula, Entry Type and Protected. For more information, see Location:Parameter. Select from available Calc Options to determine how the parameter data is to be used for calculation of daily values for BioSolids Applications. Choose from the drop-down list box the appropriate method by which the data should be obtained. None - Data values for this Parameter are not used in BioSolids calculations Same Day - Use values only from the same day as the Application Month Avg - Average the values for the same month as the Application Next - Looks forward (beginning with the Application date) to find the next value Previous - Looks backward (beginning with the Application date) to find the previous value Prev (2, 3, or 4) Avg - looks backward until (2, 3, or 4) previous values are found, then uses the average NOTE: Hourly data is not available for BioSolids. © 2014 AllMax Software, Inc. BioSolids 139 Available Nitrogen In the BioSolid list, press the [...] button in the Available Nitrogen column to set up percentages for Plant Available Nitrogen. (see: Available Nitrogen) Create Calculation Parameters In the BioSolid list, press the Create Calculation Parameters button to create the Application Parameters for the current BioSolid. 5.2 BioSolids Sites BioSolids Site The BioSolid Site list displays all sites (or fields) used to track applications of defined BioSolids. The Site List, shown below, shows users the number of sites available as well as allows for the definition of parameters or test measured at the sites. Based on applications of known BioSolids, users can genereate Site Limits to aid in the determination of correct application to meet permit requirements. To access the BioSolids Site List, go to the BioSolids menu and select Site List... from the menu. The BioSolid Site List displays all sites (fields) and related information where BioSolids are to be applied. Accessing the Site List Go to the BioSolids ribbon/menu and choose List. [Site List] button to open the Site Site Detail Press the [...] button to set up additional Site information using the Site Detail Editor. See the Site Details Help Topic for more information. © 2014 AllMax Software, Inc. 140 Operator10 Help Add a Site To create a new Site, in the Site List, click the [Add] button to add a new Site. Users will be presented with a Location (Site) window that will allow for data entry of required and optional information. (See below) Select a Facility from from the list, press the [...] button to open the Facility list for selection. Enter a unique Location (1 to 16 characters) to identify the Site. A Description (0 to 30 characters) may also be entered. Select the Site Type by selecting either Land Application, Surface Disposal, Incineration or Other from the list of choices. Site Area (in Acres) for the current site should be entered in the field. Check the [ ] Active checkbox for Sites which are currently in use. Notes can be entered for a Site, enter text directly into the Notes field. Click the [Save] button to save any data entered. Add Similar Site © 2014 AllMax Software, Inc. BioSolids 141 From the Site list, users are able to create similar Sites if one exists. To utilize this feature, highlight an existing Site in the list and click the arrow icon beside the Add button to select Add Similar Location (Site). NOTE: The Site list and Site editor window have the general properties of the Grid and Grid Edit windows. (For more information about these sections, please see the topic: Grid Functionality). Add/Assign Parameters Parameters, tests or samples collected at the respective Site, can be added to the BioSolid. Using the [Add] button secondary menu (the drop-down menu arrow or split button), select the option Add Parameters or from the BioSolid list, click the [...] button that appears in the column titled "Show Parameters" to begin adding parameters to a selected BioSolid. In the "Assigned Parameter" list that appears, users can begin to add parameters to the list as needed. Click the [Add] button to begin adding parameters. Once selected, Location:Parameter information can be edited. In-grid editing is possible by entering data where permitted. Multiple-record editing is also permitted. Highlight a group of records to be edited together and click the [Edit] button to begin editing. Items able to be edited include: Upper Limit, Lower Limit, Formula, Entry Type and Protected. For more information, see Location:Parameter. User Defined Parameters To establish a set of parameters to be considered User-Defined and entered at the BioSolids Application section, choose an option for Application Entry from the list of available options. User-defined entries will appear as User Values in the BioSolids Application Editor, where values are entered by the user. Summaries will be calculated and stored as Daily Data values for the chosen Parameter. Choose the Summary Type from the dropdown List box. A Parameter (1 to 16 characters) should be chosen from a PickList by pressing the [...] popup button. NOTE: Hourly data is not available for BioSolids Sites. © 2014 AllMax Software, Inc. 142 Operator10 Help Create Calculation Parameters In the Site list (see above), press the Create Calculation Parameters button to create the Application Parameters for the current Site. Application parameters created will include the following: ~A parameters to calculate pounds per acre applied ~B parameters to calculate pounds applied ~H parameters to calculate kilograms per hectare Base parameters for MG/KG (milligram per kilogram) applied Additional parameters for the calculation of total amounts (Dry Tons, Metric Tons, Trips, Quantity, etc.) 5.2.1 Site Detail BioSolids Site Detail The Site Detail window displays additional information from the BioSolids Site. © 2014 AllMax Software, Inc. BioSolids 143 Use [Copy From...] to copy all details from another BioSolids Site chosen from a PickList. The following information is available for entry in the Site Detail Editor: Site Address County Soil Texture Slope Restrictions Remarks Approval No. Date Latitude Longitude Set Aside Start Date Distance Distance Map Number Click the [OK] button to save any data entered. © 2014 AllMax Software, Inc. 144 5.3 Operator10 Help Site Owner BioSolids Owner The Site Owner list displays all defined BioSolid Site Owners and details for each. Owners can be assigned to Sites for management and tracking purposes. The BioSolid Site Owner List displays all site owners and related information. Accessing the Owner List Go to the BioSolids ribbon and choose [Owner List] to open the Owner List. Assigned Location In the Site Owner list, to show all sites which belong to the current Owner, press the [...] button in the Assigned Location column. A list of assigned Sites will be displayed. Add Site Owner To add a new Site Owner, click the [Add] button to begin. © 2014 AllMax Software, Inc. BioSolids 145 Press the [...] button to open and select a Facility from the list. Enter a unique Owner Name (1 to 16 characters) to identify the Owner. Enter an Address for the Site Owner. Enter a Contact Name for the Owner. Enter a Phone number for the Owner. Enter a Contract Date (4 to 8 characters) or use the [...] popup button to choose a Date from a Calendar. Enter appropriate Owner information. Information for a Contact Address and Contact Phone may be entered. Enter Owner Comments as required. 5.4 Site Limits BioSolids Site Limits BioSolids Site Limits and Nutrient Targets are set for each Site and used for BioSolids Reporting. Limits can be created to maintain requirements for a number of agencies, including federal, state and local. Additionally, limits can be set for field Nutrients and can aid in the determination of benefit of application. To access the Limits section, go to the © 2014 AllMax Software, Inc. 146 Operator10 Help BioSolids menu and choose Limits to begin. The BioSolid Site Limit List displays all site limits as defined by the user. Accessing the Site Limits List To access the Site Limits List, go to the BioSolids ribbon/menu and press the [Limits] button. Add Limits To create a new Limit, in the Site Limit List, click the [Add] button to add a new Limit. © 2014 AllMax Software, Inc. BioSolids 147 Press the [...] button in the Facility Name field to choose the facility to add the limit to. In the Site Limit editor, click the [...] button in the Location field to choose a Location (Site):Parameter from the list. Select an Agency to associate with this limit. Choose from the available options of: Federal, State, Local or Nutrient. NOTE: If the Nutrient type is selected, enter a Nutrient Target value in the Limit field. Select the Calculation Type for this limit. Choose from: Accum Sum - accumulates ALL data for the selected Location:Parameter Year Sum - accumulates data only for the current calendar year Month Sum - accumulates data only for the current month Soil Sample - treats the Limit as a soil sample or entered result, no accumulation is applied Quarter Sum - accumulates data only for the current quarter Enter the numeric Limit value for the selected Limit. A double asterisk (**) on the reports will signify that the value has exceeded the specified Limit. If a warning should be noted on the reports, enter a Warn at % (a numeric value as a © 2014 AllMax Software, Inc. 148 Operator10 Help percentage to the defined limit). A single asterisk (*) on the reports will signify that the value has exceeded the specified percentage of the Limit. Select the Limit Type for the selected Limit, choose from Lower or Upper. If an additional value (base value, residual, carryover, etc.) is to be considered in the limit, enter a numeric value in the Include field. Add Similar Limit From the Site Limit list, users are able to create similar Limits if one exists. To utilize this feature, highlight an existing Site Limit in the list and click the arrow icon beside the [Add] button to select Add Similar Site Limit. NOTE: The Site Limit list and Site Limit editor window have the general properties of the Grid and Grid Edit windows. (For more information about these sections, please see the topic: Grid Functionality). 5.5 Nutrient List BioSolids Nutrient The Nutrient List allows users to define any parameters that should be treated as nutrients for a site and will calculate a value based on the entered market value for each nutrient. Accessing the Nutrient List Go to the BioSolids ribbon and choose Nutrients list. Adding Nutrients In the Nutrient list, press the [Add] button to Press the [...] popup button to choose a Parameter from a PickList. Enter a Market Value for the Parameter, to be used on BioSolids Nutrient Reports. © 2014 AllMax Software, Inc. BioSolids Press the 5.6 149 [Save] button to save the information entered. BioSolids Application BioSolids Application A BioSolids Application describes the amount of a specific BioSolid applied to a specific Site on a specific day. Application data from applications made to a Site will be used in the calculation of Site data and loadings. Multiple application entries may be made to sites per day for tracking of all applications and data. Application List The BioSolids Application list displays all applications of BioSolids to Sites. Users may create new applications from the BioSolid Application List window as well as edit existing applications and delete applications as needed. The BioSolid Application List displays all applied biosolids to sites. Accessing the Application List To access the Application List, go to the BioSolids ribbon and choose [Applications] from the menu. Add an Application In the BioSolid Application list, click the [Add] button to add a new Application. The window BioSolid Application will appear and allow users to enter the following information. © 2014 AllMax Software, Inc. 150 Operator10 Help Click the [...] button to choose a Facility Name. Click the [...] button to choose a Site to apply a BioSolid. Click the [...] button to choose a BioSolid to apply to a Site. Click the [...] button to choose a Date to select a date for application from the calendar. Select an Application Method for this application of a selected BioSolid. Enter the number of Trips made to the selected Site for application. Enter the Amount of BioSolid applied per trip for the application. Select the Units for the Amount of BioSolid applied per trip for the application. Enter a name or idenitifying value for the user/employee applying the BioSolid in the Applied By field. Enter any comments for the application in the Comments field. Click the [Save] button to save any data entered. © 2014 AllMax Software, Inc. BioSolids 5.6.1 151 User Values User Values In the BioSolid Application List, users may enter specific information about the application, such as Miles Driven, Fuel Usage, etc. as Parameter data. Click the [...] popup button in the list entry for an application to enter specific user data about the application. To record values by application, enter a value in the Data Result field. For more information on User-defined fields for Application entry, see the BioSolids Site User Defined Entry help topic. 5.7 Available Nitrogen BioSolids Available Nitrogen The BioSolids Plant Available Nitrogen Editor edits settings for each BioSolid. Enter information for calculating Plant Available Nitrogen. Press the [...] popup button to choose a Parameter from a PickList. Enter the Percentage of available Nitrogen for Injected or Surface application. For Organic, enter Parameter Names for both TKN and Ammonia. Plant Available Nitrogen will be calculated by adding the percentage of loadings for each specified Parameter. Click the [OK] button to save any data entered. © 2014 AllMax Software, Inc. Part VI Dashboard 6 153 Dashboard The Dashboard feature of Operator10 - Wastewater allows users to create and manage Views. Views are capable of containing and displaying data as well as links to other features of the Operator10 - Wastewater program. For more information, see the following topics: Views Pages Page Options and Features 6.1 Views Views allow the user to combine the functionality of linking to other sections of the program, DataView, Graphs and Reports, as well as to external objects with the ability to highlight individual critical pieces of information using Data Containers, Graph Containers and Gauges. Through the use of Views, users can create Pages to manage each of these sets of information. Using Pages, users can create specific pages allowing users to link directly to the data entry, reporting and graphing tools of Operator10 - Wastewater. HotSpots can be created over plant overview background images giving life to the plant diagram. Containers can also be added to Pages, allowing the user to view data, via raw data displays and visual gauges and graphs. For more information, see the following topics: Create New View View List Pages 6.1.1 Create New View Unlimited Views can be created to manage Pages. Create New View To begin the process of creating a new View, access the Dashboard by clicking the Dashboard ribbon menu item. In the Dashboard ribbon, locate the View] button and click it. [Create New A new View will be created and will be blank, ready for users to begin adding Pages. To add Pages, please see the following topics: Add Page © 2014 AllMax Software, Inc. 154 6.1.2 Operator10 Help View Name Saving a View Once a View is created, users should Save the View to create and name it for future use. Click the [Save] button and choose Save View from the Save menu. If this is a new View, a prompt to name the View will be presented. Enter a name and click the [OK] button to save the view. Save As Changes made to any View will require a Save. However, users may wish to save the modified View separately as a new, different View. To save an existing view as a new View, choose the [Save As...] button from the Save menu. 6.1.3 View List Multiple Views can be created. In order to manage the list of Views, click the [Views] button and choose the [Open List of Views] option. In the View list, users can view and open all created views as well as delete Views. Delete Views From the View List, select Views (either singularly or in multiple) and click the [Delete] button. At the prompt confirm the deletion of the View by click the [Yes] or [No]. NOTE: Information stored on a View, once deleted is not recoverable. 6.1.4 Pages Different Pages can be added to provide access to data or links to internal Operator10 Wastewater sections or external links. Multiple pages can be created for any View, see the following topics for more information. Add Page Page Features and Options © 2014 AllMax Software, Inc. Dashboard 6.1.4.1 155 Add Page Pages can be added to any view. Follow the step discussed below to add a page. Add Page To add a Page, open a View. In the desired View, click the [Add Page to View] button to begin. The new Page will be added and allow users to begin adding HotSpots and Containers. Rename Page To rename any page/tab, right-click on the desired page/tab to be renamed and choose the Rename Page... option. Enter a new name into the field and click the [OK] button to rename the page. Remove Page To remove a page from a View, click the small X that appears on the right side of the tab. A prompt will be displayed confirming the deletion of the Page. Answer appropriately by clicking the 6.1.4.2 [Yes] or [No] button. Page Options and Features Pages can be created and added to Views. Pages allow for users to define and display data in various formats as well as providing shortcuts or links to internal items as well as external files. Pages can be created, for more information, see the following topics: Add HotSpots Add Containers Data Containers Graph Containers Gauge Containers Navigation Containers Page Options 6.1.4.2.1 HotSpots HotSpots allow the user to link to various items, such as DataViews, Report Groups and Graphs created in Operator10 - Wastewater. Additionally, HotSpots can link to external files. Creating a HotSpot To create a HotSpot, open a View and on any Page, left-click and drag the cursor over an © 2014 AllMax Software, Inc. 156 Operator10 Help area. This will draw an outline and upon release of the left mouse button, a HotSpot editor will open. HotSpot Editor In the HotSpot Editor, enter the following information: Description: - Enter a description for this HotSpot [ ] Show Description on HotSpot - Check this box to display the description of the HotSpot on screen Image: - Click the [...] button to view a list of images to use with the HotSpot Image Size: - Choose the size of image to be displayed with the HotSpot from the drop-down menu [ ] Show Image on HotSpot - Check this box to display the image on the HotSpot Link To: - Choose from the following options: ( ) DataView: - Choose the DataView option to open a DataView from the HotSpot ( ) Graph: - Choose the Graph option to open DataView from the HotSpot ( ) Report: - Choose the Report option to open a Report Group from the HotSpot ( ) External Location: - Choose the External Location option to open a file external to Operator10 - Wastewater Link Target: - Click the [...] button in the Link Target field to browse for the selected type of item to link to; for External Location, the Windows Explorer browse window will open, select an external file to be opened © 2014 AllMax Software, Inc. Dashboard With the above information entered, click the 157 [OK] button to save the HotSpot. Editing a HotSpot To edit a HotSpot, right-click on the HotSpot and choose Edit HotSpot from the right-click menu. This will open the HotSpot Editor, see above for more information. Deleting a HotSpot To delete a HotSpot, right-click on the HotSpot and choose Delete HotSpot from the right-click menu. This will delete the HotSpot. 6.1.4.2.2 Add Container Containers allow users to see data based on a selected Location:Parameter as a data table or graphically, like a gauge or graph. Additionally, a navigation container is available to display links to external files. On any Page users can create, modify and remove selected containers. Adding Containers To begin, click the [Add Container to Page] button and select from the following: [Add Data Container] - See the following topic for more information: Data Container [Add Gauge Container] - See the following topic for more information: Gauge Container [Add Graph Container] - See the following topic for more information: Graph Container [Add Navigation Container] - See the following topic for more information: Navigation Container 6.1.4.2.3 Containers Containers allow users to display data in a graphical way as well as it appears in the database. A container type option is also available to display links to external files. Topics in this section include: Data Containers Graph Containers Gauge Containers Navigation Containers Container Size 6.1.4.2.3.1 Data Containers Data Containers allow users to see a snapshot of data for a single Location:Parameter. Summarized and actual data values for the selected Location:Parameter are displayed © 2014 AllMax Software, Inc. 158 Operator10 Help based on the selected date range. Sample Data Container Working with a Data Container To work with a Data Container, see the following topics. Adding a Data Container To add a Data Container, in the Operator10 - Wastewater Main Application, open a Dashboard View and select a Page. With a Page selected, click the button in the ribbon to [Add Container to Page] and select [Add Data Container]. © 2014 AllMax Software, Inc. Dashboard 159 The new Data Container will be displayed at the top left of the page and will be blank and ready for setup. Unlimited Data Containers can be added to any Page. Editing Data Container Settings Select Location:Parameter To select the Location:Parameter to be displayed, click the [Settings] button at the top right of the Data Container window. From the menu that appears, choose Select Location:Parameter... to display the Location:Parameter list. Select the desired Location:Parameter from the list and click the [OK] button. Perform these steps as needed to edit any Data Container at any time. Set Date Range To set the date range for the Data Container, use the drop-down menu displayed on the Data Container. Choose from the following options: Previous 7 Days Current Month Previous Month Previous 30 Days Previous 60 Days Previous 90 Days Current Year Custom NOTE: Using the Custom option will prompt the user for a start and end date. Users can select from dates on the calendar or use the Relative Date feature to enter date options that provide a moving range of data from day to day. Removing a Data Container To remove a Data Container, click the red X in the top right corner of the Data Container. Answer [Yes] or [No] to the prompt when presented. 6.1.4.2.3.2 Graph Containers Graph Containers allow users to see a graph or chart of data for a single Location:Parameter. Data can be graphed using a Line, Horizontal Bar, Vertical Bar or Scatter style based on the selected date range. © 2014 AllMax Software, Inc. 160 Operator10 Help Line Graph Example Horizontal Graph Vertical Graph Example Example Sample Graph Containers Scatter Graph Example Working with a Graph Container To work with a Graph Container, see the following topics. Adding a Graph Container To add a Graph Container, in the Operator10 - Wastewater Main Application, open a Dashboard View and select a Page. With a Page selected, click the button in the ribbon to [Add Container to Page] and select [Add Graph Container]. The new Graph Container will be displayed at the top left of the page and will be blank and ready for setup. Unlimited Graph Containers can be added to any Page. Editing Graph Container Settings Select Location:Parameter To select the Location:Parameter to be displayed, click the [Settings] button at the top right of the Graph Container window. From the menu that appears, choose Select Location:Parameter... to display the Location:Parameter list. Select the desired Location:Parameter from the list and click the [OK] button. Perform these steps as needed to edit any Graph Container at any time. Set Graph Type To set the type for the Graph Container, in the first drop-down menu that appears on the Graph Container, choose from the following options: Line - A connected line graph HorizColumn - A horizontal bar chart VertColumn - A vertical bar chart Scatter - A graph of plotted points, non-connected by a line Set Graph Data Options To set the graph data options, choose from the following options in the second © 2014 AllMax Software, Inc. Dashboard 161 drop-down menu: Hourly - Use this option to graph Hourly data for a selected Hourly Location:Parameter Daily - Use this option to graph Daily data for a selected Hourly Location:Parameter Monthly[xyz] - Use these options to graph a summarized monthly value for the selected Location:Parameter for the selected Date Range; Monthly Sum, Average, Maximum, Minimum and Count are available for selection Yearly[xyz] - Use these options to graph a summarized yearly value for the selected Location:Parameter for the selected Date Range; Yearly Sum, Average, Maximum, Minimum and Count are available for selection Set Date Range To set the date range for the Graph Container, use the third drop-down menu displayed on the Graph Container. Choose from the available options. Based on the Graph Data Options, the quick dates displayed will be different. For each, the quick dates are relative to the type of data to be graphed and will provide familiar, easy to understand date options. The Custom option will be available regardless of the selected Graph Data Option. NOTE: Using the Custom option will prompt the user for a start and end date. Users can select from dates on the calendar or use the Relative Date feature to enter date options that provide a moving range of data from day to day. Removing a Graph Container To remove a Graph Container, click the red X in the top right corner of the Graph Container. Answer [Yes] or [No] to the prompt when presented. 6.1.4.2.3.3 Gauge Containers Graph Containers allow users to see a Gauge or chart of data for a single Location:Parameter. Data can be displayed using a Dial, Gauge and Linear style Gauge based on the selected date range. Dial Gauge Example © 2014 AllMax Software, Inc. Speedometer Gauge Example Linear Gauge Example 162 Operator10 Help Sample Gauge Containers Working with a Gauge Container To work with a Gauge Container, see the following topics. Adding a Gauge Container To add a Gauge Container, in the Operator10 - Wastewater Main Application, open a Dashboard View and select a Page. With a Page selected, click the button in the ribbon to [Add Container to Page] and select [Add Gauge Container]. The new Gauge Container will be displayed at the top left of the page and will be blank and ready for setup. Unlimited Gauge Containers can be added to any Page. Editing Gauge Container Settings Select Location:Parameter To select the Location:Parameter to be displayed, click the [Settings] button at the top right of the Gauge Container window. From the menu that appears, choose Select Location:Parameter... to display the Location:Parameter list. Select the desired Location:Parameter from the list and click the [OK] button. Perform these steps as needed to edit any Gauge Container at any time. Set Gauge Type To set the type for the Gauge Container, in the first drop-down menu that appears on the Gauge Container, choose from the following options: Dial Speedometer Linear Set Gauge Data Options To set the Gauge data options, choose from the following options in the second drop-down menu: Hourly - Use this option to display Hourly data for a selected Hourly Location:Parameter Daily - Use this option to display Daily data for a selected Hourly Location:Parameter Set Date Range To set the date range for the Gauge Container, use the third drop-down menu displayed on the Gauge Container. Choose from the available options. Based on the © 2014 AllMax Software, Inc. Dashboard 163 Gauge Data Options, the quick dates displayed will be different. For each, the quick dates are relative to the type of data to be displayed and will provide familiar, easy to understand date options. The Custom option will be available regardless of the selected Gauge Data Option. NOTE: Using the Custom option will prompt the user for a start and end date. Users can select from dates on the calendar or use the Relative Date feature to enter date options that provide a moving range of data from day to day. Removing a Gauge Container To remove a Gauge Container, click the red X in the top right corner of the Gauge Container. Answer [Yes] or [No] to the prompt when presented. 6.1.4.2.3.4 Naviagtion Containers Navigation Containers allow users to establish a selection of links to external files that may be commonly used or accessed. Sample Navigation Container Working with a Navigation Container To work with a Navigation Container, see the following topics. Adding a Navigation Container To add a Navigation Container, in the Operator10 - Wastewater Main Application, open a Dashboard View and select a Page. With a Page selected, click the button in the ribbon to Container]. © 2014 AllMax Software, Inc. [Add Container to Page] and select [Add Navigation 164 Operator10 Help The new Navigation Container will be displayed at the top left of the page and will be blank and ready for setup. Unlimited Navigation Containers can be added to any Page. Editing Navigation Container Settings Adding Links to a Navigation Container To add links to a Navigation Container, click the [Add] button to display an explorer window allowing you to browse for a file and select it to be included in the container. Removing Links from a Navigation Container To remove a link from a Navigation Container, single-click a displayed icon or link to highlight it. With a link highlighted, click the link will be removed. [Delete] button and the Set View Options To set the view options for the Navigation Container, choose from the following options in the drop-down menu: Large Icon Details Small Icon List Tile Removing a Navigation Container To remove a Navigation Container, click the red X in the top right corner of the Navigation Container. Answer presented. [Yes] or [No] to the prompt when 6.1.4.2.3.5 Container Size Dashboard Containers can be sized, as desired, by users. To set the container size, choose from available preset sizes or define a custom size. Adjusting Container Size To set the size of a container, click on the [Settings] button at the top right of the container. From the menu that is displayed, choose the Window Size... option and select from the available choices. Default sizes are provided and maintained by Operator10 - Wastewater. Choose the option Custom Size... to define a custom size for the Container. Enter a numeric value in the Height and Width fields or use the up/down arrow buttons to © 2014 AllMax Software, Inc. Dashboard 165 adjust the size. Press the [Save] button to set the size of the container. 6.1.4.2.4 Page Options For each Page, the following options are available. Page Options To access Page Options, click the [Page Options] icon in the Dashboard Ribbon. The Page Properties window will open and is shown below. Background Image Each Page has the ability to store a background image. © 2014 AllMax Software, Inc. 166 Operator10 Help Select Background Image To set the background image, press the [...] button. From the browser window that opens, select the appropriate image file (JPG, PNG and BMP files) and the selected image will display as the background image. Delete Background Image To delete the background image for the selected Page, press the [Delete Background Image...] button. This will delete the background image. Image Placement To choose the placement of the background image, use the drop-down menu to select from the available choices. Options include: Top Left Corner Centered on Page Fit to Page Size Background Color To set the color of the background, press the [...] button and user the color picker to choose a background color. HotSpots The following HotSpot options are available for each Page. HotSpot Color To set the color of the border for the HotSpots displayed on the selected Page, press the [...] button and user the color picker to choose a background color. Outline Width To set the width of the border lines for the HotSpots displayed on the selected Page, use the slider to choose the appropriate thickness Show HotSpots To display the HotSpots for a Page, place a checkbox in the Show HotSpots option. © 2014 AllMax Software, Inc. Part VII 168 7 Operator10 Help DataView DataViews are the spreadsheet-style grids where data is entered, viewed , imported, exported, or printed. Columns represent Facility:Location:Parameters and Rows represent dates or summary information. DataViews may be setup with various combinations of headers, footers, parameters, and summaries. Unlimited DataViews can be created giving users the ability to truly customize their access to the data stored within Operator10 - Wastewater. Daily Values DataView Summary Values DataView Hourly Values DataView Accessing DataViews Individual DataViews can be accessed using HotSpots from the Dashboard In the Main Application window, go to the View ribbon and click the [DataView List] button to open the DataView List In the Main Application window, go to the View ribbon and click the DataView] button to create a new DataView [New DataView Types The DataView application provides users with the ability to create 3 unique types of view capable of providing data entry and review: Daily Values DataView Hourly Values DataView Summary Values DataView Additional Topics View the following topics for additional information: DataView Data Entry DataView Properties © 2014 AllMax Software, Inc. DataView 169 DataView Application DataView Features eDV (Electronic DataView) 7.1 DataView List The DataView List allows users to view, access and manage DataViews for the current database. NOTE: The DataView list has the general properties of the Grid and Grid Edit windows. (For more information about these sections, please see the topic: Grid Functionality). DataView List Actions From the DataView list, users can perform the following actions: Create a New DataView To create a new DataView, click the [Add] button or use the drop-down arrow to select from a list of available options. Creating a new DataView will open the DataView application and will present the DataView Properties window to the user. Open a DataView © 2014 AllMax Software, Inc. 170 Operator10 Help To open a DataView, highlight the desired DataView and click the [OK] button. Users can also double-click the desired DataView to open the view. Delete a DataView To delete a DataView, highlight the desired DataView and click the [Delete] button. Confirm the deletion of the DataView by clicking either the [Yes] or [No] button. 7.2 Add DataView There are many ways to create a new DataView: Main Application To create a new DataView from the Main Application, follow these steps: 1. Go to the View ribbon 2. Click the [New DataView] button 3. Choose from the available options: Daily Values DataView Hourly Values DataView Summary Values DataView DataView List To create a new DataView from the Main Application, follow these steps: 1. Locate the [Add] button 2. Clicking directly on the [Add] button will take the user to the DataView Properties section 3. Clicking on the drop-down arrow beside the [Add] button will allow the user to choose from the following: Daily Values DataView Hourly Values DataView Summary Values DataView DataView Application To create a new DataView from the DataView Application, follow these steps: 1. Go to the Home ribbon 2. Click the [New DataView] button 3. Choose from the available options: © 2014 AllMax Software, Inc. DataView 171 Daily Values DataView Hourly Values DataView Summary Values DataView 7.3 DataView Name DataView Name DataViews are saved using a unique name. When saving a new DataView, users will be prompted to enter a DataView name. Users can also use the Save As... feature to save existing DataViews under a new name. Save In the Home ribbon, press the [Save] button and choose Save DataView to save the new DataView. Enter the DataView name into the dialog provided and click the [OK] button to save the DataView. Save As To save an existing DataView using a new name, find the Home ribbon, press the [Save] button and choose Save As... to save the new DataView. Enter the DataView name into the dialog provided and click the [OK] button to save the DataView with the new name. 7.4 Delete DataView DataViews can be deleted as necessary. To delete a DataView, please follow these steps. 1. In the DataView List, highlight the DataView to be deleted. 2. Click the [Delete] button to delete. 3. Confirm the deletion of the DataView by clicking the button. [Yes] or [No] NOTE: Deleting a DataView will not delete data, only the setup and settings of the selected DataView. © 2014 AllMax Software, Inc. 172 Operator10 Help WARNING: All information associated with the selected record(s) will be deleted upon confirmation of the deletion. This is permanent and cannot be undone. 7.5 DataView Data Entry Data Entry Data is conveniently entered directly into any grid cell by selecting the cell and then entering the value via the keyboard. Pressing the Enter or Tab key moves to the next cell. Data is stored at a specific Location:Parameter, at a specific date or time. It may consist of Daily or Hourly values, Less Than, Greater Than, or Non-Detect values, Time or Date values, or Alpha Codes. Data values are stored internally with 15 significant digit Precision. Internal values are unaffected by the number of display digits or following zeros. Numbers may range to ±1.0E16. NOTE: Entered Data is automatically recognized by its format: - Any entry containing a colon (:) is a Time value. - Any entry containing a slash (/) is a Date value. - Any entry beginning with a number, plus (+), or minus (-) is a Numeric value. - Any entry beginning with a Less Than (<) is a Less Than value. - Any entry beginning with a Greater Than (>) is a Greater Than value. - Any entry beginning with a Tilde (~) is a Non-Detect value. - Any entry beginning with an Alphabetic character (A, B, ...) is an Alpha Code. 7.6 DataView Columns DataView Columns Columns defined in the DataView represent Location:Parameters. Location:Parameters can be added to any DataView in order to provide customized display of important data. Location:Parameters are added to DataViews as columns via the DataView Properties Column Setup section. See the DataView Properties - Column Setup help topic for more information. © 2014 AllMax Software, Inc. DataView 173 DataView Columns Setup 7.7 DataView Types Topics included in this section: Daily Values DataView Hourly Values DataView Summary Values DataView 7.7.1 Daily Values DataView Daily Values DataView Daily Values DataView types allow users to display the DataView in a view that provides daily data in a row/column format. In this type of DataView, Location:Parameters are displayed as columns and days are displayed as rows. © 2014 AllMax Software, Inc. 174 Operator10 Help Daily Values DataView Daily Values DataView Functionality For additional information, the following functionality topics are available in the DataView section: Add New DataView DataView Properties - Display Options DataView Properties - Column Setup DataView Properties - Column Properties DataView Application 7.7.2 Hourly Values DataView Hourly Values DataView Hourly Values DataView types allow users to display the DataView in a view that provides daily data in a row/column format. In this type of DataView, Location:Parameters are displayed as columns and date/time intervals are displayed as rows. © 2014 AllMax Software, Inc. DataView 175 Hourly Values DataView Daily Values DataView Functionality For additional information, the following functionality topics are available in the DataView section: Add New DataView DataView Properties - Display Options DataView Properties - Column Setup DataView Properties - Column Properties DataView Application 7.7.3 Summary Values DataView Summary Values DataView Summary Values DataView types allow users to display the DataView in a view that provides daily data in a row/column format. In this type of DataView, Location:Parameters are displayed as columns and summarized monthly intervals are displayed as rows. © 2014 AllMax Software, Inc. 176 Operator10 Help Summary Values DataView Monthly intervals can be summarized as follows: Sum Average Maximum Minimum Count Geometric Mean Maximum 7-Day Average (1st of Month Rule) Minimum 7-Day Average (1st of Month Rule) Maximum 7-Day Average (Continuous Rule) Minimum 7-Day Average (Continuous Rule) User-Selected Formula Daily Values DataView Functionality For additional information, the following functionality topics are available in the DataView section: Add New DataView © 2014 AllMax Software, Inc. DataView 177 DataView Properties - Display Options DataView Properties - Column Setup DataView Properties - Column Properties DataView Application 7.8 DataView Properties Topics in this section include: DataView Properties - Display Properties DataView Properties - Column Setup DataView Properties - Column Properties DataView Properties - Print Properties 7.8.1 DataView Properties - Display DataView Properties - Display In the DataView Properties tab, users can customize display options for the DataView. Users can set the following options: © 2014 AllMax Software, Inc. 178 Operator10 Help DataView Properties - Display Options DataView Properties: Facility (optional): Click the [...] button to select from a list of Facilities. The selection of a Facility in this field indicates to the DataView Application that user security should be applied based on the selected Facility. NOTE: The absence of a Facility in this field will allow the DataView to remain public. A DataView that does not have a Facility selected will be able to be edited by any user of the Operator10 program. DataView Type: Choose from the available options in the drop-down menu to select the type of DataView. Hourly Interval: Choose from the available options in the drop-down menu to select the hourly interval to be displayed. © 2014 AllMax Software, Inc. DataView 179 NOTE: This field is only available when the Hourly DataView Type has been selected. Start Date: Enter or select a date on which the DataView date range should begin. End Date: Enter or select a date on which the DataView date range should end. NOTE: A blank Start and End Date will cause the DataView to open to the current period based on the type of DataView. NOTE: Relative Dates can be entered and saved for Start and End Date. See the Relative Dates help topic for more information. Use Whole Periods: When checked, the option Use Whole Periods will enforce a strict view of data and limit the range to 1 day for Hourly Values DataViews, 1 month for Daily Values DataViews and 1 calender year period for Summary Values DataViews. NOTE: When checked, Use Whole Periods will disable the End Date field and will provide navigation arrows in the Home Ribbon of the DataView. Protected: Place a check in the checkbox for Protected to force the DataView to be saved as a new DataView in the event of modifications. Inverted View: Place a check in the checkbox for Inverted View to switch the display of Location:Parameters as rows rather than columns. DataView Info Cell: Show DataView Name: Place a check in the checkbox to display the DataView Name in the top-left corner cell of the DataView. Show DataView Type: Place a check in the checkbox to display the DataView Type in the top-left corner cell of the DataView. Show Date Range: Place a check in the checkbox to display the Date Range in the top-left corner cell of the DataView. Column Header Properties: Font & Color: Press the [...] button to select the Font properties for the Column Header row. Font, style, size, color, and effects can be selected. Full Column Color: Place a check in the checkbox to display the selected column background color for the whole column. Row Height: Enter a numeric value to define the height of the displayed column header row. Status Bar Summaries: Include (Sum/Average/Maximum/etc.): Place a check in the available checkboxes © 2014 AllMax Software, Inc. 180 Operator10 Help to display the selected summaries at the bottom of the DataView window. Summaries will be calculated in the status bar area based on the selected cells from the DataView. Row Header Properties Date Format: Select from the list of available choices in the Date Format drop-down menu to display date information. Entry of specific date formatting options is available, see the Date Format Options topic for more information. Row Height: Enter a numeric value to define the height of the displayed data rows. Font & Color: Press the [...] button to select the Font properties for the Row Headers. Font, style, size, color, and effects can be selected. Data Display Properties: Limits Color: Press the [...] button to select a color to be used in the display of data values that exceed the Location:Parameter data entry upper and lower limits. Quick Note Color: Press the [...] button to select a color to be used in the display of the Quick Note indicator. Font & Color: Press the [...] button to select the Font properties for the data. Font, style, size, color, and effects can be selected. Row Striping: Place a check in the Row Striping checkbox to display alternating background colors for the data rows. 7.8.2 DataView Properties - Column Setup DataView Properties - Column Setup In the Column Setup tab, users can customize column setup for the DataView. Users can perform the following actions: © 2014 AllMax Software, Inc. DataView 181 DataView Properties - Column Setup Add Column Click the [Add] button to display a list of Location:Parameters. Choose individual or multiple Location:Parameters to be added as columns in the DataView. Multiple Facility Location:Parameters Location:Parameters from multiple facilities can be selected. Use the Facility selection menu in the top-right area of the Location:Parameter list to select the ~ All ~ option. Choose from available Location:Parameters. Insert Column Before Click the drop-down menu beside the [Add] button and select the option Insert Before to insert a Location:Parameter before the selected Location:Parameter. Choose individual or multiple Location:Parameters from the provided picklist. NOTE: Right-click on a selected Location:Parameter in the grid area and select Insert Column Before from the right-click menu to perform the same action. Insert Column After © 2014 AllMax Software, Inc. 182 Operator10 Help Click the drop-down menu beside the [Add] button and select the option Insert After to insert a Location:Parameter after the selected Location:Parameter. Choose individual or multiple Location:Parameters from the provided picklist. NOTE: Right-click on a selected Location:Parameter in the grid area and select Insert Column After from the right-click menu to perform the same action. Delete Column To delete a column, highlight single or multiple Location:Parameters from the displayed list of L:Ps and click the [Delete] button. Confirm the deletion of the selected Location:Parameters by answering dialog. [Yes] or [No] from the confirmation Confirming Column Setup Click the columns. 7.8.3 [OK] button to confirm the addition or removal of Location:Parameters as DataView Properties - Column Properties DataView Properties - Column Properties In the Column Properties tab, users can customize column display options for the DataView. Column Properties are set on the right-hand side of the Properties window. Properties can be set on a single selected Location:Parameter or for multiple selected Location:Parameters. Users can set properties the following items: © 2014 AllMax Software, Inc. DataView 183 DataView Properties - Column Properties Display Options in the Display section section are as follows: Background Color: Click the arrow in the cell for Backgroud Color to set the background color for the column header. If the option for Full Column Color is set, the selected column color will also be used for the full column. Column Header: Use the column header field to enter/modify the header information for the selected Location:Parameter/column. Column Justification: Select the desired justification (left, right. center or general) for the data displayed in the selected column(s). Column Width: Enter a numeric value for the column width. Decimals: Enter a numeric value for the decimal display of the selected column(s). Format String: Select an option from the drop-down menu. Available options are: Currency - displays the local currency symbol Scientific Notation - displays the value in scientific notation format © 2014 AllMax Software, Inc. 184 Operator10 Help General Number - displays the entered value to the last significant digit (0s are not displayed) Number - displays the entered value as a number with 0 following the last significant digit Percent - displays the % (percent) symbol Time - displays data as HH:MM (hour:minute) time values Date - displays data as Date values Group Header: Enter text to be used as a group header or select from available group headers. For more information about Group Headers, see the Group Header help topic. Summaries Select from the list of available summaries to be displayed as column summaries at the bottom of the selected Location:Parameters. Summary Values Types If the selected DataView is the Summary Values Type, the selected option in the Summary Values Types section will determine the type of monthly summary displayed for the column(s). Reset Columns To reset column settings to the default presentation of DataView columns, click the [Reset Column(s) to Default] button. This will update all selected columns to their default display settings. 7.8.4 DataView Properties - Print Properties Topics in this section include: DataView Print Properties - Options DataView Print Properties - Page DataView Print Properties - Margin DataView Print Properties - Header/Footer 7.8.4.1 DataView Print Properties - Options DataView Print Properties - Options In the DataView Print Properties - Options section, users can define options related to printing the selected DataView. Changes to the Print Options will affect the current, open DataView only and be saved independently from other DataViews. © 2014 AllMax Software, Inc. DataView 185 DataView Properties - Print Options Options The following Options are available: Include - Group Headers: Check the checkbox for Group Headers to include Group Headers in the printed DataView. Include - Column Summaries: Check the checkbox for Column Summaries to include the Column Summaries in the printed DataView. Include - Grid Lines: Check the checkbox for Grid Lines to include grid lines (cell borders) in the printed DataView. Include - Data Values (Worksheet): Check the checkbox for Data Values (Worksheet) to print the DataView without data, as a blank worksheet. 7.8.4.2 DataView Print Properties - Page DataView Print Properties - Page In the DataView Print Properties - Page section, users can define options related to printing the selected DataView. Changes to the Page options will affect the current, open © 2014 AllMax Software, Inc. 186 Operator10 Help DataView only and be saved independently from other DataViews. DataView Properties - Page Page Options The following Page options are available: Orientation: ( ) Portrait - Choose Portrait to print the DataView in a Portrait orientation. ( ) Landscape - Choose Landscape to print the DataView in a Landscape orientation. Color/Size/Quality: Color - Choose from the available options using the radio buttons to print in color or in black & white/grayscale. Paper Size - Choose from the available options in the drop-down menu to select a paper size. Draft Quality - Check the box for Draft Quality to print the DataView using the selected printer's draft quality setting. (Low quality print/shortest printing time) © 2014 AllMax Software, Inc. DataView 187 Scaling: ( ) Size to - Select the option for Size to and enter a numeric value to define the size in percent that the DataView should be printed. ( ) Fit to page width - Select the option for Fit to page width to force the page to be printed to the page width. 7.8.4.3 DataView Print Properties - Margin DataView Print Properties - Margin In the DataView Print Properties - Margin section, users can define options related to printing the selected DataView. Changes to the Margin options will affect the current, open DataView only and be saved independently from other DataViews. DataView Properties - Margin Margin Options The following Margin options are available: Margins: (inches) Top: Enter or set, using the up and down arrow controls, a numeric value in inches to define the top margin for the printed DataView © 2014 AllMax Software, Inc. 188 Operator10 Help Right: Enter or set, using the up and down arrow controls, a numeric value in inches to define the right margin for the printed DataView Bottom: Enter or set, using the up and down arrow controls, a numeric value in inches to define the bottom margin for the printed DataView Left: Enter or set, using the up and down arrow controls, a numeric value in inches to define the left margin for the printed DataView Center on Page: Horizontally - Check the checkbox to center the printed DataView on the page horizontally. 7.8.4.4 DataView Print Properties - Header/Footer DataView Print Properties - Header/Footer In the DataView Print Properties - Header/Footer section, users can define options related to printing the selected DataView. Changes to the Header/Footer options will affect the current, open DataView only and be saved independently from other DataViews. DataView Properties - Header/Footer Header/Footer Options © 2014 AllMax Software, Inc. DataView 189 The following Header/Footer options are available: Header: First Page Only - Check the box for First Page Only to print the header information on the first printed page only. Left - Enter the desired text into the Left header field to define the Left header. Center - Enter the desired text into the Center header field to define the Center header. Right - Enter the desired text into the Right header field to define the Right header. NOTE: For the Left, Center and Right fields, a separate font can be defined. Right-click on each field and select Font from the right-click menu. Display Date Range - Check the box for Display Date Range to display the date range as defined by the DataView Properties in the header area of the printed DataView. Display Date Printed - Check the box for Display Date Printed to display the date when the DataView is printed. Font - Click the button for Font to set and save a desired font for the Date/ Header options if displayed on the printed DataView. Footer: Last Page Only - Check the box for Last Page Only to print the footer information on the last printed page only. Left - Enter the desired text into the Left footer field to define the Left footer. Center - Enter the desired text into the Center footer field to define the Left footer. Right - Enter the desired text into the Right footer field to define the Left footer. NOTE: For the Left, Center and Right fields, a separate font can be defined. Right-click on each field and select Font from the right-click menu. Display Page Number - Check the box for Display Page Number to display the current page number on the printed DataView. Font - Click the button for Font to set and save a desired font for the Page/ Footer options if displayed on the printed DataView. 7.9 DataView Application The DataView application presents data stored in the Operator10 - Wastewater database. Location:Parameter Data that has been entered, collected, calculated or otherwise stored in Operator10 - Wastewater is available for usage. DataViews use a row/ column format to provide standardized, easy-to-use tools for data entry and review. Many features and functionality is available in the DataView application. © 2014 AllMax Software, Inc. 190 Operator10 Help The DataView application displays data and provides access to data entered and stored in the database. DataView Application The DataView application uses a ribbon menu system to display options and features. For more information, see the following topics related to the individual ribbons/menus: File Home Edit Tools Window Additionally, the DataView Application makes use of the following features of the Main Application Quick Access Toolbar Windows Theme 7.9.1 DataView - File Menu DataView - File Menu © 2014 AllMax Software, Inc. DataView 191 The DataView File Menu provide users with access to the following options: Open Database... - Provides the user with the ability to open a specific Database from the Open Database/Facility picklist Logged Documents... - Opens the Logged Documents list DataView Help... - Opens the DataView Help File Close DataView - Closes the current DataView Exit Application - Exits the DataView application 7.9.2 DataView - Home Ribbon DataView - Home Ribbon The DateView Home ribbon provides important access to key features and primary functionality of the DataView application. The DataView Home ribbon provides important access to key features and primary functionality. Home Ribbon functions The following options are available in the Home ribbon (and are discussed as they appear in the button groups): DataViews: © 2014 AllMax Software, Inc. 192 Operator10 Help Open DataView - Press the DataView List [Open DataView] button to display the New DataView - Press the [New DataView] button to select from a list of new DataView Types to create a new DataView Save - Press the [Save] button to choose Save or Save As... NOTE: The Save As... option exists as a secondary option and allows the user to save the DataView using a different name. Properties: Properties - Press the [DataView Properties] to select from a list of DataView Properties sections Date Range: Start Date - Enter or choose a start date (use the [...] button to display a Calendar) for the DataView End Date - Enter or choose an end date (use the [...] button to display a Calendar) for the DataView NOTE: Relative Dates can be entered and saved for Start and End Date. See the Relative Dates help topic for more information. Previous & Next - When visible, press the [Previous] or buttons to move to the next whole period in the DataView. [Next] NOTE: The DataView Properties option Use Whole Periods must be turned on to display and use the previous and next buttons. Use Whole Periods enables the user to navigate from defined period to defined period consecutively. - For Hourly DVs, the period is 1 day - For Daily DVs, the period is 1 month - For Summary DVs, the period is 1 calendar year (beginning in January) To enable, see the DataView Properties help topic Quick Date - Press the button to choose from the available options to set a Start and End Date for the current DataView © 2014 AllMax Software, Inc. DataView 193 NOTE: Depending on the type of DataView in use, the Quick Date options will be adjusted to provide options relative the the type. Hourly Options: Interval - When the DataView type is Hourly, choose from the available Hourly Interval options to display data entered on the selected interval Show All Hourly When the DataView type is Hourly, check the Show All Hourly option to show all Hourly data entered, regardless of the selected Interval Display Options: Refresh - Press the from the Database [Refresh] button to refresh or re-query the DataView Intermittent - Press the [Intermittent] button to change the DataView to show only data entered for the date range, excluding any blank cells from display Resize Columns - Press the [Resize Columns] button to select from the available options to resize all columns or resize selected columns only Calculations: Calculate - Press the Utility [Calculate Now] button to bring up the Calculate Printing: Print - Press the Preview or Print. 7.9.3 [Print] button to select from the available options of Print DataView - Edit Ribbon DataView - Edit Ribbon The DateView Edit ribbon provides access to functionality to edit data displayed in the DataView cells. The DataView Edit ribbon provides access to functionality related to data entry. © 2014 AllMax Software, Inc. 194 Operator10 Help Edit Ribbon functions The following options are available in the Edit ribbon (and are discussed as they appear in the button groups): Edit: Undo - Press the [Undo] button to undo recent data entries Redo - Press the [Redo] button to redo recent data entries Cut - Press the memory/clipboard [Cut] button to cut data from the selected data cells into Copy - Press the memory/clipboard [Copy] button to copy data from the selected cells into Paste - Press the memory/clipboard Delete - Press the [Paste] button to paste data into the selected cells from [Delete] button to delete data from the selected cells Fill Block - Press the [Fill Block] button to fill the selection of cells with data from the first selected cell in a column; multiple columns will be filled with values from the first selected (top) cell in each column individually Block Summary - Press the [Block Summary] button to open a pop-up of dialog window displaying summarized results based on the selected cells; common functions such as Sum, Average, Maximum, Minimum and more will be displayed based on the selected cells Read Block - Press the [Read Block] button to have selected values read back to the user from the computer Add Data - Press the [Add Data] button to perform data entry using the Add Data dialog for the selected Location:Parameter Review Data - Press the [Review Data] button to Review Data in the database for the selected Location:Parameter Quick Note - Press the [Quick Note] button to select from the available options of View/Edit Quick Note or Print Quick Notes for the selected cells Alpha Code - Press the [Alpha Code] button to view a list of Alpha Codes available for entry into the selected cell © 2014 AllMax Software, Inc. DataView Find - Press the 195 [Find] button to find data entered in the DataView Find Data: Previous - Use the [(Find) Previous] button to find and highlight the previous matching data value entered in the DataView based on the [Find Data Field] entry [Find Data Field] - Enter a value in the Find field to find data displayed in the open DataView Next - Use the [(Find) Next] button to find and highlight the next matching data value entered in the DataView based on the [Find Data Field] entry 7.9.4 DataView - Tools Ribbon DataView - Tools Ribbon The DateView Tools ribbon provides access to functionality to import and export data displayed in the DataView cells. The DataView Tools ribbon provides access to functionality related to the import and export of data. Tools Ribbon functions The following options are available in the Tools ribbon (and are discussed as they appear in the button groups): Import/Export: Import - Press the [Import] button to begin the Import data process Export - Press the file options [Export] button to choose from a list of available Export NOTE: See the linked help topics for Import and Export for more information about the Import and Export processes. © 2014 AllMax Software, Inc. 196 7.9.5 Operator10 Help DataView - Window Ribbon DataView - Window Ribbon The DateView Window ribbon provides access to functionality to DataView application window behaviors. The DataView Window ribbon provides access to functionality related to the behaviors of the DataView windows. Window Ribbon functions The following options are available in the Window ribbon (and are discussed as they appear in the button groups): Arrange Windows: Arrange Windows - Press the the drop-down menu: [Arrange Windows] button and select from Cascade - arrange all open DataView Windows in normal overlapping windows, with the current DataView window in front Tile Horizontally - arrange all open DataView Windows in tiled windows, with the current DataView window at the top left Tile Vertically - arrange all open DataView Windows in tiled windows, with the current DataView window at the top left Arrange Icons - arrange any iconized/minimized windows along the lower left of the DataView application window. Minimize All - minimize all open DataView windows Restore All - restore all minimized DataView windows Switch Window - Press the [Switch Window] button to select from a list of open DataView windows to switch to 7.9.6 Keyboard Shortcuts Keyboard Shortcuts The following list is a listing of available keyboard shortcuts found in the DataView section. Ctrl+A - Select All Data Cells © 2014 AllMax Software, Inc. DataView Ctrl+C - Copy Ctrl+E - Block Read Ctrl+F - Toggle Full-Column Color Ctrl+H - AddData Editor Ctrl+J - Column Properties Ctrl+L - Alpha Code Picklist Ctrl+M - Block Summary Ctrl+N - Edit Quick Note Ctrl+P - Print To Printer Ctrl+Shift+P - Print To Preview Ctrl+R - Toggle Row Striping Ctrl+S - Save DataView Ctrl+V - Paste Ctrl+W - Review Data Ctrl+X - Cut Ctrl+Y - Redo Data Ctrl+Z - Undo Data Ctrl+Space - Displays calculator Ctrl+Home - Move Selection to Top-Left Cell Ctrl+End - Move Selection to Bottom-Right Cell Space - Edit Current Cell Delete - Delete Enter - Move Down 1 Cell F3 - Find Next Shift+F3 - Call FindValue Dialog F5 - Refresh DataView F12 - Save DataView As Tab - Move across to next cell Shift+Tab - Move across to previous cell 7.10 DataView Features Topics in this section include: Group Headers Column Headers DataView Column Icons Find Data Quick Notes Import Data Export Data Freeze Columns © 2014 AllMax Software, Inc. 197 198 Operator10 Help Right-Click Functionality Block Summary 7.10.1 Group Headers Group Headers Group Headers can be defined for selected columns and based on proximity to identical group headers, will provide the user with an additional header row in a DataView. The entered Group Header will appear, centered, for the grouped columns. Group Header information can be entered in the DataView Properties - Column Properties section under the Display options. The DataView displayed here has been setup to display Group Headers. See the top row displayed above the normal column header. Columns with defined Group Headers, when placed immediately next to one another, will automatically display the group header information. NOTE: For DataViews without Group Headers defined for any selected Location:Parameter/Column, the group header row will not be displayed. 7.10.2 Column Headers Column Headers Column Headers can be defined for any column displayed in a DataView. Column headers are customized in a way that allows users to identify the Facility:Location:Parameter using a common, or understood, naming convention. © 2014 AllMax Software, Inc. DataView 199 Defining a Column Header To define a column header, users can Right-click on the existing column header for any column on the open DataView. Choose the Edit Column Header button from the right-click menu. In the Column Header dialog that opens, enter the desired column header text. Open the Column Properties section and choose the Column Header property on the right side of the Column Properties section. 7.10.3 DataView Column Icons DataView Column Icons Depending on the status of the selected Location:Parameter as a column or the database, various icons may be displayed automatically in the column header area as well as the status bar area at the bottom of the displayed DataView. These icons help to identify important information about the selected column or cell. Calculator Icon denotes that the selected Location:Parameter has an attached Formula. Right-click on the column header and select Formula: (Formula Name) to display the attached formula information. © 2014 AllMax Software, Inc. 200 Operator10 Help Hourly L:P Icon denotes that the selected Location:Parameter is flagged as an Hourly Location:Parameter. Locked Data Icon - denotes that for a period of time, based on the current Locked Data setting, access to the selected Location:Parameter is denied as it is locked. Protected Icon denotes that the selected Location:Parameter is flagged as Protected and data entry is denied. Restricted Icon denotes that the user is restricted to the Location:Parameter based on LP Permissions in the security section. Upper Limit denotes that the selected Location:Parameter has a data entry limit set for the Upper Entry Limit Lower Limit denotes that the selected Location:Parameter has a data entry limit set for the Lower Entry Limit Dual Limit denotes that the © 2014 AllMax Software, Inc. DataView 201 selected Location:Parameter has both Upper and Lower Entry Limits defined. Entered Value Limit (Upper) displayed in each data cell when an entered value has exceeded the Upper Entry Limit defined for the selected Location:Parameter Entered Value Limit (Lower) displayed in each data cell when an entered value has exceeded the Lower Entry Limit defined for the selected Location:Parameter 7.10.4 Find Data Find Data Data values in a DataView may be easily found by selecting the Find icon on the Edit ribbon. © 2014 AllMax Software, Inc. 202 Operator10 Help Finding Data 1. Enter the partial phrase or criteria (0 to 255 characters) desired for the Data Value to be found. 2. Select either the ()Current Column or ()Entire DataView radio button to set the Scope of data searched. Mark the [ ] Current Period Only checkbox if the search should stay within the current DataView time period. Otherwise the search will continue through all available data. 3. The search Direction may be specified by selecting the ()Previous or ()Next radio button. 4. Press the [OK] button to begin searching records. If a matching data value is found, the cell which contains the data will be highlighted. Press the <F3> key to repeat the find. 7.10.5 Quick Notes The Quick Note Editor dialog box allows notes to be easily entered and linked to the current Location:Parameter data cell. Notes may also be viewed and printed from the Notes section of the Operator10 - Wastewater main application. Creating Quick Notes The following options allow users to create Quick Notes: © 2014 AllMax Software, Inc. DataView 203 Right-click on any data cell and choose Quick Note Editor from the right-click menu Select any data cell and choose [Quick Note] from the Edit ribbon. Choose View/Edit Quick Note from the menu that opens Select any data cell and use the keyboard shortcut Ctrl + N to View/Edit the Quick Note Quick Note Display NOTE: Cells which have a corresponding Quick Note are denoted with a small triangle in the upper-right hand corner. The highlight color may be specified in the DataView Properties setup section. Viewing Quick Notes To view a Quick Note, either Hover the mouse cursor over a data cell displaying the small triangle in the upperright corner, or Right-click on any data cell and choose Quick Note Editor from the right-click menu © 2014 AllMax Software, Inc. 204 Operator10 Help Select any data cell and choose [Quick Note] from the Edit ribbon. Choose View/Edit Quick Note from the menu that opens Select any data cell and use the keyboard shortcut Ctrl + N to View/Edit the Quick Note Deleting Quick Notes In the event that Quick Notes are no longer valid, open the Quick Note Editor from the instructions shown above and clear all data from the Quick Note data field. Click [Save] to save and clear the Quick Note. 7.10.6 Import Data Import Data can be imported directly into the DataView based on a known file format. Based on the file format chosen, the import process using the DataView will import data with options. Beginning an Import To begin an import, navigate to the Tools ribbon and select [Import] to begin. In the Select a File to Import window that opens, on the lower-right side of the window, select from the following file types to import: Text Files (*.csv, *.txt) Excel Files (*.xls) XML Files (*.xml) Once the file type is selected, navigate to the file location and select the desired file to be imported. Click [Open]. Import Options Based on the selected file type to imported, file format options may need to be provided: Text File Import Options For importing text files, the following options are available: First Row is Column Headers - Check this box if the import file contains a first row of data that are for column headers First Column is Data Date - Check this box if the import file contains a first column of data that is date Has Summary Rows - Check this box if the import file contains summary rows at the end of the date/data rows © 2014 AllMax Software, Inc. DataView Click 205 [OK] to begin the import. Export File Import Options NOTE: Presently no data options exist, press the [OK] button to begin the file import. XML/Text File Import Options NOTE: Presently no data options exist, press the [OK] button to begin the file import. 7.10.7 Export Data Export Data can be exported from the DataView using one of the available formats for export. Each format provides the user with individual options and functionality. Creating an Export file To begin creating an export file, go to the Tools ribbon and choose the button to begin. [Export] Choose from the available options to begin the export process: eDV - Exports data in the Electronic DataView format ready for use with the eDV Viewer CSV - Exports data into a Comma Separated Values file, suitable for use with a text editor or Microsoft Excel Excel - Exports data as a Microsoft Excel formatted file XML/Text - Exports data in a XML formatted file File Export Options Each export options provides the user with data export options, if applicable. eDV Export Options When exporting data using the eDV format, the process and options are as follows: 1. From the Tools ribbon, click the Export button 2. From the Export menu, choose eDV 3. Enter the Export Start Date and Export End Date 4. If desired, check the checkbox for Export as Template: (see Note below) 5. Click [OK] 6. Select a file location and enter a file name using the Explorer window that opens 7. Click [Save] © 2014 AllMax Software, Inc. 206 Operator10 Help NOTE: The eDV Viewer now supports a template file format which allows users to export a .edvt file that when opened in the eDV Viewer stand-alone application, prompts the user for a date range and upon completing data entry, requires the user to save the entered data as a .edv file. eDV Template files are considered read-only and do no allow for adjustment once exported. CSV Export Options When exporting data using the CSV format, the process and options are as follows: 1. From the Tools ribbon, click the Export button 2. From the Export menu, choose CSV 3. Select a file location and enter a file name using the Explorer window that opens 4. Click [Save] 5. Choose from the available options: First Row is Column Headers - Exports column header text as first row of data Include Summary Rows in Export - Exports summary information displayed at the bottom of the DataView Non-Data in Quotes - Exports non-numeric data in quotes ("") for text handling Data in Quotes - Exports numeric data in quotes ("") <, >, ~ Exported with Qualifier - Exports qualifying symbols, less-than (<), greater-than (>) and non-detect (~), with data 1. Click [OK] Excel Export Options When exporting data using the Excel format, the process is as follows: 6. From the Tools ribbon, click the Export button 7. From the Export menu, choose Excel 8. Select a file location and enter a file name using the Explorer window that opens 9. Click [Save] NOTE: Data and most formatting options from the DataView are preserved during the export to Excel. Colors, however, are not supported in the export process. XML/Text Export Options When exporting data using the XML/Text export option, the process is as follows: 10.From the Tools ribbon, click the Export button 11.From the Export menu, choose XML/Text 12.Select a file location and enter a file name using the Explorer window that opens 13.Click [Save] © 2014 AllMax Software, Inc. DataView 207 NOTE: Data, date and location:parameter information are exported from the DataView using an XML format. Data exported could be parsed using any third-party XML editing tool, text editor and/or Microsoft Excel. 7.10.8 Freeze Columns Freeze Columns Columns can be temporarily moved to the left side of the DataView and be locked in place while scrolling. Any number of columns can be frozen as needed. Columns can be unfrozen once set or upon closing the DataView, the columns will be returned to their original locations. Freeze Columns To freeze a DataView column, right-click on the column header and choose the Freeze Column option from the right-click menu. Unfreeze Columns To unfreeze a DataView column, right-click on a column header that has been frozen/ locked to the left side and choose the Unfreeze Column option from the right-click menu. 7.10.9 Right-Click Right-Click Options Many functions of the DataView application can be performed from the right-click menu. Depending on where the right-click is performed AND what items have been selected, the menu options will be displayed. DataView Info Cell © 2014 AllMax Software, Inc. 208 Operator10 Help In the top-left corner of every DataView is an Info Cell that can be used to display DataView information such as the name, date range and type of DataView. Right-click options on the DataView Info Cell include: Column Properties: Opens the DataView Column Properties section Autosize All Columns: Automatically re-sizes all columns based on current text present in the Column Header Column Header Right-clicking on any column header in the DataView will provide access to the following options: Facility: Location:Parameter: The first option in the right-click menu displays the Facility:Location:Parameter (F:L:P) that is represented as a column Formula: Depending on the F:L:P selected, the Formula associated with the F:L:P will be displayed, click on the Formula text to display the complete formula information Limit(s): Depending on the F:L:P selected, if limits have been defined, Upper and/ or Lower Limits will be displayed Column Properties: Opens the DataView Column Properties section Edit Column Header: Opens the Column Header edit window Freeze Column: Select this option to Freeze the column to the left side of the DataView Autosize...: Choose from the available options to automatically re-size the width of the selected column or all columns in the DataView Go To: Choose from the list of F:L:Ps displayed as columns on the open DataView to be taken to that column directly Data Cell Right-click on any cell in the DataView and select from the following options: Column Properties: Opens the DataView Column Properties section Add Data: Opens the Add Data dialog for specific date/time data entry for the selected column/F:L:P Alpha Code: Opens the Alpha Code picklist and based upon selection, inserts the selected Alpha Code into the data cell Cut: Select Cut to remove the entered data from the data cell(s) and place it on the Windows Clipboard for use Copy: Select Copy to make a copy of entered data from the data cell(s) and place it on the Windows Clipboard for use Paste: Select Paste to paste data stored on the Windows Clipboard into the selected cell(s) Delete: Select Delete to delete data stored in the selected data cell(s) Show Summary: Opens the Block Summary dialog displaying summary information for the selected cell(s) data © 2014 AllMax Software, Inc. DataView 209 Read Selected Data: Allows a utility to read back the data entered in the DataView cell(s) Print Selected Data: Prints the data from the selected cell(s) Quick Note Editor: Opens the Quick Note Editor allowing the user to enter, edit or view a quick note associated with the selected data cell Calculator: Opens a calculator allowing the user to quickly perform a handcalculation, the result of which is entered into the data cell Review Data: Opens the Review Data section which allows users to view recent values (all data can be displayed as an option) entered in the database Row Header Right-click on any row header to select from the following options: Go To...: Opens a Calendar allowing users to select a date to browse to NOTE: If the selected date from the Calendar is not displayed as part of the current DataView date range, navigation to the selected date is not performed. 7.10.10 Block Summary Block Summary Use the Block Summary feature to display a summary of data based on the selected data cells from the DataView. Accessing Block Summary To open the Block Summary dialog, highlight a selection of data cells in any DataView. With a selection of cells made, right-click on the cells and choose Block Summary from the right-click menu. Summaries © 2014 AllMax Software, Inc. 210 Operator10 Help Available data summaries include: Sum Average (Avg) Maximum (Max) Minimum (Min) Count Geometric Mean (GMean) Standard Deviation (Std Dev) 7.10.11 Date Format Options Date Format The date format displayed in the Row Header cell is able to be set using pre-defined options available in the DataView Properties section as well as the options shown below. Directly enter the format string using the options displayed below: d - single-digit day of month (1 - 31) dd - 2-digit day of month (01 - 31) ddd - abbreviated name of day of the week (Mon) dddd - full name of day of the week (Monday) h - single-digit hour, 12 hour clock hh - 2-digit hour, 12 hour clock H - single-digit hour, 24 hour clock HH - 2-digit hour, 24 hour clock m - single-digit minute (0- 59) mm - 2-digit minute (00 - 59) M - month number (1 - 12) MM - 2-digit month number (01 - 12) MMM - abbreviated month name (Dec) MMMM - full month name (December) s - single-digit second (0 - 59) ss - 2-digit second (00 - 59) tt - AM or PM for the time y - single-digit year (0 - 99) yy - 2-digit year (00 - 99) yyyy - 4-digit year : - time separator / - date separator Examples: dd ddd = 01 Fri dd ddd MMM = 01 Fri Feb MMMM dd yyyy = February 01 2013 H:m ddd dd MMM = 5:10 Fri 01 Feb © 2014 AllMax Software, Inc. DataView 7.11 211 eDV (Electronic DataView) eDV Documents An eDV Document is a special electronic document representing an Operator10 Wastewater DataView. (DataViews are the spreadsheet-style grids where data is entered, viewed , imported, exported, or printed. Columns represent Location:Parameters and Rows represent dates or summary information.) The default (and recommended) file extension is ".eDV", which allows Windows to associate the files with the eDV Viewer. An eDV Document contains only Facility, Column Headers, Location:Parameters, and a particular month's data. It does NOT include Entry Limits, Data Notes, Alpha Code descriptions, or Summaries. (Summaries are recalculated in the eDV Viewer.) See the following help topic for information on how to create an eDV export file: eDV Export Options Upon receiving an eDV Document, either by e-mail or another method, the user opens it with the associated eDV Viewer. The eDV Viewer displays the data in the familiar DataView format, including Headers and recalculated basic Summary information. The viewer supports editing data values (where the original was editable), and Windows clipboard functions. The eDV Document may be Saved or E-mailed to another user. If the eDV Viewer is on a workstation where Operator10 - Wastewater is running, a "Transfer" ribbon item is also available, which transparently puts the edited data into the database using the Facility, Location:Parameter, and Date of the eDV. In practice, one user may e-mail an eDV to a second user, who may either simply view the data, copy it to other applications via the Windows clipboard, save it into their own database, or edit the data and return it so that the first user may then view and/or save the data into the original database. Note that only the Operator10 - Wastewater DataView application can initially "create" eDVs--the eDV Viewer simply "forwards" or "returns" the edited document. The eDV Viewer requires a very small installation, since it does not require separate database engines or other Operator10 - Wastewater products. Topics in this section include: eDV Viewer Working with eDV eDV Templates 7.11.1 eDV Viewer eDV Viewer - Main Window The eDV Viewer main window uses a ribbon-style toolbar to provide access to features and functionality. The following options are available as menu options in the View ribbon: © 2014 AllMax Software, Inc. 212 Operator10 Help View ribbon functions The following options are available in the Home ribbon (and are discussed as they appear in the button groups): Open: Open eDV - Press the [Open eDV] button to browse for and open an eDV Date Range: Select Dates - Press the the open eDV [Select Dates] button to select a date range for Save & Email: Save eDV - Press the options: [Save eDV] button to choose from the following Save eDV - Saves the eDV with all data entered Save eDV As - Prompts the user to save the eDV with a new file name and/ or location Email eDV - Press the attachment to a recipient [Email eDV] button to send the eDV by email as an Transfer to DB: Transfer - Press the [Transfer] button to transfer the data into the Operator10 - Wastewater database NOTE: The transfer of data is only available when the Operator10 - Wastewater full application has been installed and is available on the same computer. Printing: © 2014 AllMax Software, Inc. DataView Print eDV - Press the options: 213 [Print eDV] button to choose from the following Print eDV - Sends the eDV direct to the printer Preview eDV - Previews the eDV and provides an opportunity to print during Preview Calculate: Calculate - Press the [Calculate] button to calculate/refresh the parameter column summaries for the eDV Window Ribbon functions The following options are available in the Window ribbon (and are discussed as they appear in the button groups): Arrange Windows: Arrange Windows - Press the the drop-down menu: [Arrange Windows] button and select from Cascade - arrange all open eDV Windows in normal overlapping windows, with the current eDV window in front Tile Horizontally - arrange all open eDV Windows in tiled windows, with the current eDV window at the top left Tile Vertically - arrange all open eDV Windows in tiled windows, with the current eDV window at the top left Arrange Icons - arrange any iconized/minimized windows along the lower left of the eDV application window. Minimize All - minimize all open eDV windows Restore All - restore all minimized eDV windows Switch Window - Press the [Switch Window] button to select from a list of open eDV windows to switch to 7.11.2 Working with eDV Working with eDV This topic provides basic information for working with the eDV Viewer. eDV Presentation Data is displayed in a row/column format similar to a spreadsheet. Columns are presented and represent the Location:Parameters defined in the originating DataView in Operator10 - Wastewater. © 2014 AllMax Software, Inc. 214 Operator10 Help Column Headers are provided based on the originating DataView and correspond to the Location:Parameter of the values listed. Columns may be resized by dragging the right edge of each Column Header. Left-clicking on a Column Header selects the entire column. Columns which correspond to calculated Location:Parameters in the original DataView (shown with Red Header Text) are not editable. Row Labels correspond to the Date or Summary of the values listed. Left-clicking on a Row Label selects the entire row. Left-clicking on the square in the upper left corner of the grid (where Column Headers and Row Labels intersect) will Select All cells. The Grid, similar in style to a spreadsheet, shows all data values for the current month. Each Cell is identified by the Column (Location:Parameter) and Row (Date or Summary). Data may be edited or entered in the Current Cell, identified by a dotted line around its perimeter. Data values are stored internally with 15 significant digit Precision. Internal values are unaffected by the number of display digits or following zeros. Numbers may range to ±1.0E16. NOTE: Data is conveniently entered directly into any grid cell by selecting the cell and then entering the value via the keyboard. Pressing the Enter or Tab key moves to the next cell. (See Data in theOperator10 - Wastewater main application for additional information on Data Types.) Data is automatically recognized by its format: Any entry containing a colon (:) is a Time value. Any entry containing a slash (/) is a Date value. Any entry beginning with a number, plus (+), or minus (-) is a Numeric value. Any entry beginning with a Less Than (<) is a Less Than value. Any entry beginning with a Greater Than (>) is a Greater Than value. Any entry beginning with a Tilde (~) is a Non-Detect value. Any entry beginning with an Alphabetic character (A, B, ...) is an Alpha Code. eDV Summaries Data summary values are provided by default at the bottom of each column. When opened initially, summary values will be calculated based on the data that may already be present. Press the [Calculate] button to recalculate summary values. 7.11.2.1 eDV Templates eDV Templates eDV Templates (file extension .edvt)can be created when exporting the original © 2014 AllMax Software, Inc. DataView 215 DataView in order to provide a read-only copy of the eDV. eDV Templates, when opened, allow for data entry to be performed as normal. However, the eDV must then be saved as a new eDV while the template file is unchanged and can be reopened as a blank. Create eDV Templates eDV Templates can be created when exporting from the DataView application. For more information, see the following topic: eDV Export Options Opening eDV Templates When opening the eDV Template file, the eDV Viewer will prompt for a date range. Enter the start and end date for the eDV. Once the date is provided, the eDV will open and allow for data entry to begin. Saving eDV Templates eDV Templates are not saved with data, but instead, are saved as eDV files while the template remains blank. Once data entry is complete, if the eDV is to be saved, choose the Save eDV As option from the [Save eDV] button in the ribbon. At the prompt, enter the file name in the File name: field and navigate to a location to which the file will be saved. Press the [Save] button to finish the Save As process. © 2014 AllMax Software, Inc. Part VIII Graphing 8 217 Graphing Graphing The Graphing application in Operator10 - Wastewater allows users to produce full-color, 2and 3-dimensional graphs using any data stored in the Operator10 - Wastewater database. Data can be graphed for hourly and daily values, days, weeks, months and years. The Graphing application allows users to produce a variety of graph/chart types with titles, legends, scale, dual Y-axis plotting, displayed values, linear regression, constant lines and bands, limit details and much more. The Operator10 Graphing application provides users with full-featured, full-color graphs. Accessing Graphing To open the Graphing application, go to the View ribbon/menu and choose [Graphs] to open the graphing application. Users will be presented with an option to open an existing graph from the Graph List, or to create a [New] graph. Graphing Application Functionality © 2014 AllMax Software, Inc. 218 Operator10 Help The following options are available in the Graphing application Graph List Graph Data Graph Options Main Window 8.1 Graph List Graph List The Graph List is a dialog box displaying a list of items that the user may choose (pick) or edit. To open an existing graph, highlight the item in the Graph list and press [Select], or double-click on the item. To create a new Graph, press [New] to open a new graph. To filter the list and only display items which match filter criteria, enter a filter (0 to 255 characters) in the box and press [!]. See the Operator10 - Wastewater main application help for details on filtering. 8.2 Graph Data Topics in this section include: Data Source Open Graph Date Range 8.2.1 Data Source Data Source Go to the Graph menu and select Data Source... to open the Data Source dialog. © 2014 AllMax Software, Inc. Graphing 219 Data Source Editor The Data Source Editor links the Graph to its underlying database by specifying the appropriate data and formulas. Enter a Start Date and End Date for the Data Range, or press the [...] popup button to choose the date from a Calendar dialog. If you wish to be prompted each time you open the graph, mark the [ ]Prompt On Open checkbox. Relative Dates may be entered to open the graph to dates relative to the system date. Select an appropriate option from the Display Data Values group. To graph time intervals along the x-axis (hours, days, or months, as selected by the () 24 Hourly, () Daily, () Monthly, or () Yearly radio buttons) and the Location:Parameters Data values along the y-axis, or the () X-Y Scatter radio button to graph the first Location:Parameter along the x-axis and the second Location:Parameter Data values along the y-axis. For X-Y Scatter graphs, mark the [ ] Regression check box to display a Linear Regression line. In the Data Series area: Enter a Location:Parameter for each Data series, by pressing the [...] popup button and selecting from a PickList. Enter a value for Decimal to display that number of places after the decimal points for all Data Series. © 2014 AllMax Software, Inc. 220 Operator10 Help If a Formula is required, mark the [ ] Formula checkbox and enter the Formula Name, or press the [...] popup button to choose from a PickList. NOTE: Monthly and Yearly Graphs default to the average of monthly or yearly data unless a formula is specified. 24 Hourly Graphs default to the average of multiple data values within an hour. NOTE: The first several Formula Names listed in the PickList are special internal Formulas available for graphing. They include Monthly and Yearly summaries of daily data values, Daily inverse and logarithms, and Hourly summaries. Up to two y-axis scales are available for graphing. Select the () 2 radio button if the Location:Parameter Data values should be graphed along a secondary y-axis. NOTE: The Graph will be refreshed upon completion of the Data Editor dialog box 8.2.2 Open Graph Date Range Date Range An option, [ ] Prompt on Open, is available when defining the Data Source properties for any graph. This prompt, when enabled, upon opening a graph will provide the user with the ability to set the graph start and end dates. Enter a date or click the [...] button to use the Calendar option. Users may also use the Relative Dates feature to provide dates relative to the current date. 8.2.2.1 Calendar Calendar When prompted, users will be able to select or enter dates as it applies to the start and end of data to be displayed on any given graph. Use the calender tool to enter or select a date. For more information, see the Date/Calendar help topic, as well as the Relative Dates topic. © 2014 AllMax Software, Inc. Graphing 8.3 221 Graph Options Topics in this section include: Graph Type Linear Regression Graph Data Type Graph Tools Balloons 8.3.1 Graph Type Graph Type Graphs are available in 14 basic Graph Types, and several Multiple Types can be created by assigning different types to each Location:Parameter Series. Up to 8 Location:Parameters or Formulas can be graphed at once, using a secondary y-axis if required. Graph types, colors, patterns, point shapes, lines, multiple series types, 3-D qualities and rotation, linear or logarithmic scales, units, grids, titles, legends, fonts, and sizes are all configurable by the user. Available basic Graph Types include: Area, Lines, Horizontal Bars, Pie, Surface, Bars, Marks, Scatter (X-Y), Doughnut, Pareto, Cubes, Fit to Curve, [Open-]Hi-Lo-Close, Polar © 2014 AllMax Software, Inc. 222 8.3.2 Operator10 Help Linear Regression Linear Regression A Linear Regression line can be shown on the graph for X-Y Scatter graphs. Mark the [ ] Regression checkbox in the Data Editor. The slope, intercept, and correlation coefficient values will be shown in the upper left corner of the graph. 8.3.3 Graph Data Type Graph Data Type/Range The Data Type and Date Range may be shown at the lower left side of the graph by marking the Graph Data Type/Range menu item. The text will use the same font as the x legend. NOTE: If the graph is printed, the page number will also be printed at the lower right side of the graph. 8.3.4 Graph Tools Graph Tools The Graph Tools toolbar item provide quick access to commonly used features and functionality. (Image contains hotspots click options to learn more!) 8.3.5 Balloons Balloon © 2014 AllMax Software, Inc. Graphing 223 Popup Balloons are available for additional information about Graphed Data, x-axis Legends, and the Toolbar. LeftDoubleClick (or Right-click) on Graphed data to display a Balloon showing legends and actual Data value. LeftDoubleClick (or Right-click) on x-axis Legend to display a Balloon showing full legend text. Right-click on a Toolbar Button to display a Balloon showing a description of the Tool. 8.4 Main Window Topics in this section include: Menus Toolbars 8.4.1 Menus Topics in this section include: File menu Graph menu Legends menu Window menu Help menu 8.4.1.1 File menu Topics in this section include: Facility Open Graph New Graph Close Save/Save As Print 8.4.1.1.1 Facility Facility Go to the File menu and choose Facility to open a list of Facilities contained in the opened database. Select from the list and press [Select] to open a Facility. NOTE: The Graphing application maintains a contextual reference to the current facility that a user selects. While the Location:Parameter picklist is capable of showing multiple facilities-worth of L:Ps, the Graphing application will only be able to © 2014 AllMax Software, Inc. 224 Operator10 Help work with the Location:Parameters of the current facility. Open Graph Use the File menu option and choose the Open Graph option to select a graph from the current facility. 8.4.1.1.2 Open Graph Open Graph Go to the File menu and choose Open Graph to display the Graph List. Highlight an existing Graph from the list and press the [Select] button to open the graph in a new window. Press the [New] button to open a new window containing an empty graph. 8.4.1.1.3 New Graph Create a New Graph To create a new Graph, perform one of the following actions: Go to the File menu and choose New Graph... Go to the File menu and choose Open Graph... and click the [New] button Performing either of the above actions will begin the process of creating a new graph and take the user to the Data Source Editor dialog. For more information, see the help topic for Data Source. 8.4.1.1.4 Close Close Go to the File menu and choose Close to close the current graph. Users can also click the small [X] that appears in the upper-right hand corner of the graph to close the graph. 8.4.1.1.5 Save/Save As Save/Save As Go to the File menu and choose the Save menu item to save a Graph as the same Graph Name as it was opened previously. NOTE: Choosing Save does not ask for confirmation before overwriting the existing graph. The existing graph will be replaced with the current Graph. Choose the Save As menu item to save a Graph as a new Graph Name from what it was opened previously. Enter a Graph Name, or press the [...] popup button to choose a Graph Name from a PickList. Save may also be chosen by pressing the appropriate Toolbar button. © 2014 AllMax Software, Inc. Graphing 225 8.4.1.1.6 Print Print Go to the File menu and choose Print to print the open graph. The print prompt that is first displayed contains various options related to printing the graph. Print Options The following print options are available: Orientation: Click the orientation button to switch between portrait and landscape orientations [ ] Fit to Page: Check the Fit to Page option to force the graph to be printed on 1 sheet of paper Print Size: Size (%): Enter a value (0-100) to define the size, in percent; the graph will be displayed at the entered percentage X Offset: Enter a numeric value, in inches, to which the graph will be displayed from the top of the printed page Y Offset: Enter a numeric value, in inches to which the graph will be display from the left of the printed page Starting page number: Enter a numeric value to set the page number to be printed Click [Continue] to begin printing. 8.4.1.2 Graph menu Topics in this section include: Data Source © 2014 AllMax Software, Inc. 226 Operator10 Help Constants Editor Limits Editor Refresh Graph Properties Copy Options Automatic Scale Fonts 8.4.1.2.1 Data Source Data Source See the Data Source Editor topic for more information. 8.4.1.2.2 Constants Editor Constants Editor The Constants Editor determines Constant Lines and Bands on the graph. Constant Lines Select a Type of "-none-" if the Constant Line should not be shown. Select a Type of "const" if the Constant Line should always be the supplied Value. Enter a numeric Value for each const Type. Select a Type of "avg", "max", or "min" if the Constant Line should be recalculated whenever the graph is refreshed. Select the Series to be used for the summary. The Value is optional, and displays the value from the most recent refresh. A Label (0 to 255 characters) may also be entered for each Constant Line. © 2014 AllMax Software, Inc. Graphing 227 Choose a Line Style from the drop down Listbox. Left-click on the [Line Color] button to choose a color from a Windows Common Dialog. Constant Bands Select a Type of "-none-" if the Constant Band should not be shown. Select a Type of "const" if the Constant Band should always be between the supplied Values. Enter a numeric Lower and Upper Value for each const Type. Select a Type of "max-min", "2stdev", or "3stdev" if the Constant Band should be recalculated whenever the graph is refreshed. Select the Series to be used for the summary. The Values are optional, and display the values from the most recent refresh. Left-click on the [Color] button to choose a color from a Windows Common Dialog. 8.4.1.2.3 Limits Editor Limits Editor Go to the Graph menu and choose Limits Editor... to display the Limits Editor dialog. The Limits Editor determines limits shown on the graph. Limits are shown for Bar, Line, Mark, Cube, and Fit to Curve Graphs. For each Series, enter a Limit value. 8.4.1.2.4 Refresh Refresh Select the Graph menu item, Refresh to Refresh the Graph. Refresh transfers data from the underlying database to the Graph and calculates formula values. If the Default Legends menu item is marked, all legend text is updated. In a multi-user environment, Refresh always obtains the most current data. © 2014 AllMax Software, Inc. 228 Operator10 Help 8.4.1.2.5 Graph Properties Graph Properties Several types of Graph Properties may be set from menu items or Toolbar buttons, and dialog boxes. General Properties include basic Graph Type, Appearance, Grids, and Color/Pattern options for the entire Graph. Series Properties include Graph Type, Appearance, and Color options for each Location:Parameter. Scale Properties include Linearity and Scaling options for the x and y-axis. 3-D Properties allow 2-Dimensional or 3-Dimensional Graphs, including full 3-D Rotation and Shadows. Title Properties include a Top, Bottom, Left, and/or Right Titles for the Graph. Font Properties may be set individually for Titles, Legends, Legend Boxes, and Data Values. Graph Properties may also be chosen by pressing the appropriate Toolbar button. 8.4.1.2.5.1 General Properties General Properties General Properties include basic Graph Type, Appearance, Grids, and Color/Pattern options for the entire Graph. 8.4.1.2.5.2 Series Properties Series Properties Series Properties include Graph Type, Appearance, and Color options for each Location:Parameter. © 2014 AllMax Software, Inc. Graphing 229 8.4.1.2.5.3 Scale Propeties Scale Properties Scale Properties include Linearity and Scaling options for the x and y-axis. 8.4.1.2.5.4 3D View Properties 3-D Properties 3-D Properties allow 2-Dimensional or 3-Dimensional Graphs, including full 3-D Rotation and © 2014 AllMax Software, Inc. 230 Operator10 Help Shadows. 8.4.1.2.5.5 Titles Titles Title Properties include a Top, Bottom, Left, and/or Right Titles for the Graph. 8.4.1.2.6 Copy Options Copy as Bitmap/Metafile/Data Choosing one of the Copy as ... menu items copies the current Graph to the windows clipboard in one of the following formats: © 2014 AllMax Software, Inc. Graphing 231 Select Copy as Bitmap to place a windows bitmap or DIB (Device Independent Bitmap) bitmap onto the windows clipboard. The bitmap will be the same size (number of pixels) as is shown on the screen. It will include stationary or fixed Legend Boxes, but not the Toolbar, Palette Bar, Pattern Bar, or floating Legend Boxes. Select Copy as MetaFile to place a windows metafile onto the windows clipboard. The metafile will be resizable. It will include stationary or fixed Legend Boxes, but not the Toolbar, Palette Bar, Pattern Bar, or floating Legend Boxes. Select Copy as Data to place the Data as ASCII text onto the windows clipboard. It will include the x-axis Legend as row labels, the Series (Location:Parameter) Legend as column headers, and the data will be separated by tabs. Copy as Bitmap and Copy as Data may also be chosen by pressing the appropriate Toolbar button. 8.4.1.2.7 Automatic Scale Automatic Scale If the Automatic Scale menu item is checked, the application will automatically choose an appropriate scale for the data values. 8.4.1.2.8 Fonts Fonts Separate Fonts may be specified for several graph features, including Left, Right, Top and Bottom Titles, X and Y Legends, Legend Boxes, and Values. Fonts are chosen from a standard Windows Font Dialog Box. Fonts may also be chosen by pressing the appropriate Toolbar button. © 2014 AllMax Software, Inc. 232 8.4.1.3 Operator10 Help Legends menu Legends menu Legends identify Graphed Data values by specifying the Location:Parameter (and Formula), value, and/or Date (and Time) of the Data point. The Legends menu displays several on/off options. Use the Legends menu to turn on or off the following options: The Series or Location:Parameter Legend Box may be shown. The legend may be displayed in a Legend Box. Series or x-axis Legend text may be edited in the Data Window. If the Default Legend Text menu item is marked, legend text will be updated whenever the Graph is refreshed. © 2014 AllMax Software, Inc. Graphing 233 The x-axis Legend is displayed from left to right at the bottom of the Graph. It is usually an abbreviated form of the Date (or Month, Year, or Time) for the associated Data. The full text legend may be displayed in an x-axis Legend Box. Use the Vertical X Legend option to rotate the text on the X Legend by 90 degrees. Use the Bi-Level X Legend option to display the text on two lines, in an alternating fashion. The y-axis Legend is displayed from bottom to top at the left side of the Graph. It is a numeric Scale for the associated Data. A Secondary y-axis Legend may be displayed from bottom to top at the right side of the Graph. © 2014 AllMax Software, Inc. 234 Operator10 Help A Legend Box may be moved as required. Right-click on any Legend Box and choose the Left, Right, Top, or Bottom menu item to attach it to the edge of the Graph window. Choose the Float menu item to make the Legend Box a floating (moveable by dragging with the mouse) and resizable window. If the Floating Legend Box is within the Graph window, choose the Fixed menu item to attach it (in place) to the Graph. To change the appearance of a Legend Box, Right-click on any Legend Box and choose the Options menu item to select appearance options from a dialog box. Legend Box Size To resize a Left, Right, Top, or Bottom Legend Box, drag the Splitter Bar (available according to the Options settings). To resize a Floating or Fixed Legend Box, go to the Legends menu and choose the menu option Series Legend Box Size. X Legend Gap The X Legend Gap defines the display options for the X Legend as it appears on the graph. Several options are available, see the X Legend Gap topic for more information. 8.4.1.3.1 Legend Box Size Series Legend Box Size The Series Legend Box Size allows users to customize the dimensions and position of the series legend when floating or fixed on the graph. Go to the Legends menu and choose Series Legend Box Size to set the values for the legend. Enter numeric values for Left, Top, Width and Height. Setting values for Top and Left will define where the box is positioned from the top and left edges of the graph and setting the width and height will define the size of the box. Click [Continue] to apply the settings and see the changes. Click [Apply] to define the settings but leave the dialog open. Click [Default Size] to set the dimensions based on the legend text to be displayed. 8.4.1.3.2 X Legend Gap X Legend Gap © 2014 AllMax Software, Inc. Graphing 235 The X Legend Gap may be specified by using the X Legend Gap Editor. The X Legend Gap is the minimum distance between the x-axis marks (ticks). Choose the ( ) Fixed radio button and enter a value in pixels (screen points). The ( ) Automatic radio button allows the application to choose an appropriate value. If the [ ]Clip Legend Text checkbox is marked, overlapping legend text will be clipped (cut) to an appropriate size. To label the x-axis non-sequentially, enter a value for Label Every ? Marks. The first mark, and the first mark of each normal period for the data range type, is always labeled (i.e. the first of each month for daily data). NOTE: Entering a value for Label Every ? Marks that is greater than the number of normal periods in the data range type (i.e. greater than 31 for daily data), then the value for the normal period will be displayed. For example, daily data with a value greater than 31 will display the month label, instead of a day. 8.4.1.4 Window menu Topics in this section include: Data Window Zoom Palette Bar Pattern Bar 8.4.1.4.1 Data Window Data Window Go to the Window menu and choose Data Window to displays the data in spreadsheet form instead of a graph. It includes the x-axis Legend text as row labels, the Series (Location:Parameter) Legend text as column headers, and the data shown in each Data cell. Legend text may be edited by LeftDoubleClicking the appropriate label. Graphed Data values may be edited by LeftDoubleClicking the appropriate Data cell. NOTE: Changing graphed Data values does not change the data in the underlying database. Use the Operator10 - Wastewater DataView application for permanently © 2014 AllMax Software, Inc. 236 Operator10 Help editing Data values. NOTE: Data values will be updated whenever the Graph is refreshed. Refresh will overwrite any changes you have made to graphed Data. NOTE: If the Default Legend Text menu item is marked, legend text will be updated whenever the Graph is refreshed. In that case, Refresh will overwrite any changes you have made to the legend text. 8.4.1.4.2 Zoom Zoom/Resize Graph To Zoom in or magnify any section of the current Graph, check the Zoom menu item, then LeftDrag through the area of the graph that should be shown in the window. Uncheck the Zoom menu item to return to normal viewing. Zoom may also be chosen by pressing the appropriate Toolbar button. To Resize a Graph within its window, LeftDrag the edges (of the walls) of the graph as necessary. (The mouse cursor will change to arrows when moved directly over the edges of the graph.) NOTE: The edges of a 3-D Graph are located at the edges of the inner walls, not the outer 3-D thickness of the walls. The edges of a 3-D Rotated Graph are located where the edges would be if not rotated. Hint: If it is difficult to locate the edges of a 3-D Graph for resizing, return to 2-D mode, resize as desired, then restore 3-D mode. © 2014 AllMax Software, Inc. Graphing 237 8.4.1.4.3 Palette Bar Palette Bar Go to the Window Menu and choose the Palette Bar option. Press the Left or Right Arrows to make the desired Color visible. LeftDrag it onto any part of the Graph to use that Color on that part of the Graph. LeftDoubleClick any Color on the Palette Bar to edit the Color. 8.4.1.4.4 Pattern Bar Pattern Bar Go to the Window Menu and choose the Palette Bar option. Press the Left or Right Arrows to make the desired pattern visible. LeftDrag it onto any graphed data to use that pattern on the data. LeftDoubleClick any Pattern on the Pattern Bar to edit the pattern. 8.4.1.5 Help menu Topics in this section include: About 8.4.1.5.1 About About Go to the Help menu and select About Operator10 - Wastewater. The About dialog shows current information about the application including copyright and version numbers for OP10 software. 8.4.2 Toolbars Topics in this section include: Main Toolbar © 2014 AllMax Software, Inc. 238 8.4.2.1 Operator10 Help Main Toolbar Toolbar Most common menu items are available from the Toolbar. Click on the graphic below for additional information: © 2014 AllMax Software, Inc. Part IX 240 9 Operator10 Help Reporting Operator10 - Wastewater Report section allows users to create comprehensive reports using stock report templates as well as full custom reports. Certain state-specific reports allow for the export of data using transformations that meet system requirements for import into state-based electronic reporting. For more information see the following topics: Report Direct Access Tree Create Reports Report Properties Report Folder Report Preparation Report Types 9.1 Report Direct Access Tree The Report Direct Access Tree pane lists the available Report Form Pages. Reports are categorized under Report Folders. Press the [+] button next to each folder to expand and view the available reports. Report Preparation Double-click the listed report to begin the print/preview process. (see: Print Report) Double-click the listed Report Folders to begin the print/preview process for all listed reports of the selected folder. (see: Report Folder) © 2014 AllMax Software, Inc. Reporting 241 Right-click the listed report to view the available options: Print Select Print to begin the printing process. (see: Print Report) Properties To edit/view the properties of a selected report, select Properties (see: Report Properties) Rename If the selected report should be renamed, select Rename from the menu and enter a new report name in the Rename window that appears. Press the [Save] button to rename the report. Delete To remove a report from this section, select Delete from the menu. Confirm the deletion by pressing the [Yes] or [No] button. Save As... Select Save As... to create an exact copy of the selected report, with a new name. Enter the name into the Save As window that appears and click the [Save] button to save the report. Protected To make a report read-only, select Protected from the menu. A check should appear the next time a right-click is made on the selected report. Changes can be made to the report properties, but when exiting the properties section the user will be prompted to save the report with a new name. © 2014 AllMax Software, Inc. 242 Operator10 Help About To view the settings of the selected report, select About... 9.2 Report Picklist PickList The Report PickList is a dialog box displaying a list of reports that the user may choose to print. To choose an item, highlight the item in the PickList and press [Select], or DoubleClick on the item. To filter the list and only display items which match filter criteria, enter a filter (0 to 255 characters) in the box and press [!]. See the Operator10® main application help for details on filtering. Enter the Report Date and Print Date by pressing the [...] buttons or entering a date. 9.3 Create Reports Topics in this section include: Add Report New Report Availability Report Name 9.3.1 Add Report Unlimited report pages can be added to the Operator10 - Wastewater Report section. Add a New Report To Add a Report, right-click in the Direct Access Report Tree (left pane) and select New Report... In the New Reports window (below) place a check in the appropriate checkbox beside the report you wish to create. © 2014 AllMax Software, Inc. Reporting 243 Multiple Pages If you wish to create multiple pages of a multipage report, press the [+] button beside the report, and enter in the number of pages you wish to create. (below) Report Folder To create the selected reports in a selected Report Folder, choose from the dropdown list box Create In:. If -new folder- is selected, you will be prompted to create a new folder name with a selected icon for shortcut use in the Operator10 - Wastewater Report section. (below) © 2014 AllMax Software, Inc. 244 9.3.2 Operator10 Help New Report Availability Reports available in the New Report... selection window can be limited. To add to or reduce the number of available reports to users, go to the File menu and select New Report Availability from the menu. Remove Report Availability To remove a report from the New Reports... selection window, click the [X] button beside the selected report. Repeat as necessary and click the [Save] button to save the changes. Add to Report Availability To add a report to the New Reports... selection window, click the [ ] space beside the selected report. Repeat as necessary and click the [Save] button to save the changes. © 2014 AllMax Software, Inc. Reporting 9.3.3 245 Report Name Report Name Reports can be named uniquely in order to identify the report and purpose of the report. In the Rename dialog, enter the report name in the Rename Report field. Press the [Save] button to commit the change. 9.4 Report Properties Report Properties Once a report has been created, user must edit the report and define it's properties so that data may be output. Right-click a selected report and select Properties from the Right-click menu. A new window titled Report Properties will open. Report properties and options vary by report, consult this help file and look for the report style for specific information about it's properties. See the Report Types topic for more information. General Help: The Report Properties window is divided into two panes. In the left pane, there is a reduced image representing the selected report style. Areas in the image have been enabled so that a Left-click will bring up the corresponding fields and options in the right pane. Edit the available fields in the right pane as necessary. In the left pane: Press the [Save] button to save the current setup. Press the [Preview] button to preview the current setup. See Report Print Preview for more information. Press the [Guidance] button to view additional information regarding the selected report style. See Report Guidance Documents for more information. NOTE: Use the <Page Up> and <Page Down> buttons on your keyboard to navigate through the mapped sections in the left pane. NOTE: Use the scroll bar at the bottom of the Report Properties window to navigate to other reports in the Report Folder. © 2014 AllMax Software, Inc. 246 9.4.1 Operator10 Help Report Calculations In select reports, users may choose from a list of stock formulas and user-written formulas for use during reporting. Highlight the calculation or formula and press [Select]. Maximum, minimum, average, and sum formulas calculate based on daily or hourly values for the selected reporting period. Lower limit options for Average (Lower Limit), Average (Hourly Lower Limit), and Avg % Removal (Lower Limit) have been provided for reporting requirements that specify a lower limit. Example: lower limit of 85 for percent removal. Weekly average formulas are designed to meet state reporting requirements and determine when the 7-day period begins. Averages are calculated for each week in the selected reporting period and a summary value is returned based on the selected weekly formula: minimum, average or maximum. Continuous - Overlapping 7-day averages begin on the first day of the reporting period. First of Month - 7-day averages begin on the first day of the reporting period. Sat Rule - Weekly average (Sun-Sat) when the Saturday is in the reporting period. © 2014 AllMax Software, Inc. Reporting 247 Wed Rule - Weekly average (Sun-Sat) when the Wednesday is in the reporting period. Full Weeks - Weekly average (Sun-Sat) only when all 7 days are in the reporting period. NOTE: average calculations for fecal parameters use a geometric mean (logarithmic mean). 9.4.2 List and Label Report Designer Operator10 - Wastewater® uses an integrated 3rd party report generator known as List & Label. This report generator includes a fully featured designer capable of creating incredibly robust reports that make use of data stored in the Operator10 - Wastewater database. Access to the List & Label template designer is given in both the Barcode Label and Reporting sections of Operator10 - Wastewater. Getting Help The List & Label report template designer comes with its own user’s manual, and that manual can be accessed through the Operator10 - Wastewater main menu under: Help | Manuals | Report Designer. Assistance is also available by contacting the AllMax technical support department. Additionally, users in the Designer window can click on the ? menu and select Contents to view the List & Label Report Designer Help. NOTE: This help file page is only meant to serve as a primer for the List & Label Designer. Please consult the combit List & Label Help file for detailed information or © 2014 AllMax Software, Inc. 248 Operator10 Help contact AllMax Software Technical Support for more help. Creating Reports When creating Custom Reports, press the [Edit Template] button to open the Designer window and begin editing the report template. NOTE: The Designer window will open and there may be several panes visible, this help file will be concentrating on the Layout Preview area and the List of variables pane. To modify a report template, you can drag variables into the Layout Preview pane. In the List of variables pane, there is a tree displaying the available variables for the template. Expand the folders by pressing the [+] button next to each folder. In each folder there are available variables. The folders labeled Itemxxx correspond to the selected Location:Parameters. For single values, under the Variables folder, find the Itemxxx folder and expand it, within that folder you may see: Calc (Calculation) Header (Header) Locat (Location) Param (Parameter) Result (Numeric Result) Units (Units) For repeating values, under the Fields folder, find the Itemxxx folder and expand it, within that folder you may see: Date (Date) Result (Numeric Result) Modifying Objects Once an object has been placed on the report, you can modify it's appearance by double-clicking on it to view the Properties window. Several appearance options are visible in the right pane of the Properties window. Click in the appropriate appearance option to modify it. To add information to be displayed in the selected object, press the button and a new window Edit Text will open. In the Edit Text window, add the information to be © 2014 AllMax Software, Inc. Reporting 249 displayed. A status message will appear below the entered text alerting users whether the data can and/or will be displayed as entered. Available Objects On the left side of the Designer window, a toolbar displays the list of available objects to be added to the report. Select Text Line Rectangle Ellipse/Circle Picture Barcode Table Formatted Text Form Control Chart © 2014 AllMax Software, Inc. 250 Operator10 Help Crosstab (Pivot Table) HTML Text OLE Container 9.4.3 Report Guidance Documents Report Guidance Documents Report Guidance Documents are available for every report provided by AllMax Software, Inc. This allows users to view specific details regarding the stock reports, state forms and custom reports to be created from the Operator10 - Wastewater. To access the Guidance Document for a report, press the [Guidance] button and a new window will be visible. Guidance documents may be printed for future use. 9.5 Report Folder Report Folders contain links to existing Report Pages and serve as a grouping tool. Add Report Folder To Add a Report Folder, right-click in the Direct Access Report Tree (left pane) and select New Folder... In the Tree Folder window enter a Name: (1-30 characters) to identify the report folder. You may select an icon by pressing the [...] button and selecting from the drop-down list box or entering a number in the field to the right. Select a Default Action: frosm the drop-down menu. Choices include Print and Export. Add Reports to Report Folders New Reports New reports can be added to any folder, right-click on the desired folder and choose © 2014 AllMax Software, Inc. Reporting 251 New Report... from the right-click menu to begin. Continue the process using the Add Report help topic. Existing Reports Existing reports can be moved to existing folders as needed. In the Report Direct Access Tree, click the [+] button to expand any folders in which reports are currently stored. With the list of report pages expanded, press and hold the left mouse button. With the left mouse button held, drag the report to the other report folder where the report should be located. Release the left mouse button. A menu should appear, choose from the 3 available options: Add to folder - this option will add a reference to the report page to the selected folder, the report will "exist" in two or more folders as defined. Move to folder - this option will move the existing report page from the previous folder to the selected folder. Save As... - this option will allow the user to save a copy of the report page with a new name in the selected folder. 9.5.1 Report Folder Icons Icons provide shortcuts to Reports-- Double-Click on an icon to Print/Preview the associated Reports. Choose an icon bitmap from the available pictures by typing in the number of the icon or by using the [...] button. Enter a Name (1 to 30 characters) which will be displayed below the icon. NOTE: Icon spacing and font are dependent on Windows icon settings. 9.6 Report Preparation Topics in this section include: Print Report Print Preview Report Date Calendar Logged Documents © 2014 AllMax Software, Inc. 252 9.6.1 Operator10 Help Print Report Print Report Pages In the Report Direct Access Tree, highlight the Report Folder or Reports you wish to print. In the right pane of the Report application, double-click the Report Folder Icon you wish to print. The Report (MultiSelect) picklist will be visible, from the picklist, choose from the list of reports to be printed. If you have selected a Report Folder to print, all pages listed under the Report Folder will be highlighted. Enter a Report Date: and Print Date: then press the [Select] button to begin the print process. A window, Output Options (below) will open, press the [Change...] button choose the printer. Select the output method by choosing from the Direct to... drop-down list box. Many options are available, view the list for available options. Press [Start] to begin the process. © 2014 AllMax Software, Inc. Reporting 9.6.2 253 Print Date Print Date/Report Date Enter the Date Reported: or select the date from the calendar by pressing the [...] button. The Date Reported is the date on which the report will begin processing and displaying data. Typically, entering the first of the month to be reported will provide the necessary information for the report to begin printing. Enter the Form Date: or select the date from the calendar by pressing the [...] button. The Form Date is the date on which the report is being printed or prepared. Press [Continue] to prepare the report. 9.6.3 Print Preview Print Preview shows a screen representation of printer output prior to actual printing. In the Preview window, there are two panes, in the left pane a reduced image representing the report page to be printed is visible, left-click the desired report page to make it visible in the right pane. In the right pane of the Preview window, the report is visible. The shaded area around the outside of the report represents the unprintable area of the selected printer. From left to right in the Preview window, use the following toolbar options to preview © 2014 AllMax Software, Inc. 254 Operator10 Help your reports. Use the <, >, |< and >| buttons to navigate through the selected previews, or select from the drop-down list box showing the number of pages available Zoom In or Out using the % drop-down list box, magnifying glasses or the 1:1 buttons To print the current page, press To print all pages, press To save the report, press NOTE: List and Label report previews can be saved in a variety of formats, in the Save dialog window, use the drop-down list box Save as type: to select from available formats. To email the report, press To exit the preview, press © 2014 AllMax Software, Inc. Reporting 255 Print Preview Window 9.6.4 Report Date Reports are usually printed for a particular date (Report Date:), and are printed on a particular day (Print Date:). A form may be printed for any Date Reported, and the form may be printed with any Form Date. For information on entering dates, see the Date/Calendar section. © 2014 AllMax Software, Inc. 256 9.6.5 Operator10 Help Calendar The Date may usually be selected from the Calendar dialog box by pressing the [...] popup button next to the Date. Use the [<] and [>] buttons to select the previous or next month, then press the appropriate [1 to 31] day button to enter the date. With a date selected, click the [Continue] button. 9.6.6 Logged Documents The Logged Documents feature is available in the Main Application, as well as in DataView, Graphing and Reporting. The Logged Documents option allows users to save or "log" any and all printed documents, including graphs, DataViews, and Reports. To access logged documents in the Reporting Application, click on the File menu and © 2014 AllMax Software, Inc. Reporting 257 select Logged Documents. In Reporting, the Logged Documents list is automatically filtered to include only those documents created in the Reporting section. Place a check the []Include All box to see the logged documents for all sections. In the Logged Documents window, information for each document is displayed in the grid, including description, date of the first document (useful if the item is actually a group of reports, or if the data spans a wide time frame), user who logged the document, the date of document logging, and type of document. For each item in the Logged Documents list, a note may be entered in the box provided. Notes may be modified at any time. Click the [Open Doc] button to preview the document, or [Remove] to permanently delete the logged document. Notes may be saved for each logged document as well, enter any notes into the field labeled, Note:. 9.6.7 Report Verify Report Verify Remarks/Comments Enter remarks or comments to be printed on the Report Form Page. If you wish to always be prompted for remarks, mark the []Allow Comments checkbox in the Report Properties dialog box. Remarks are preserved for the next time of printing. © 2014 AllMax Software, Inc. 258 Operator10 Help Exceptions/Sample Enter or edit the Number of Exceptions, Frequency of Analysis, and Sample Type for the Parameter shown to be printed on the Report Form Page. If you wish to be prompted for Exceptions, mark the []Verify Exceptions checkbox in the Report Properties window, General Properties section. 9.7 Report Types Many stock report styles or types are provided within Operator10 - Wastewater. See the following topics for more information: Custom Reports Annual Summary Reports Mass Balance Reports Limit Report © 2014 AllMax Software, Inc. Reporting 259 Weekly Summary Report Federal DMR Report BioSolids Reports Pretreatment Reports (not available in Operator10 Wastewater and Water Data Management Applications) 9.7.1 Custom Reports Topics in this section include: Custom Report (Full Custom) Custom Report (From DataView) Custom Report Setup 9.7.1.1 Custom Report (Full) Custom Reports can be created in Operator10 - Wastewater® Software using the Custom Report Style. There are several options available for custom reports, single data values, daily tables, monthly tables, and graphs can be added to a custom report. The custom report is created by adding parameters, choosing calculation and data types, then editing a template in the List and Label Report Designer. There are 5 sections in which the Custom Report can be defined in addition to the template: General Properties General Information Report Data User Input Comments 9.7.1.2 Custom Report (From DV) Custom Report from DV can be created in Operator10 - Wastewater® Software using the Custom Report Style. There are several options available for custom reports, single data values, daily tables, monthly tables, and graphs can be added to a custom report. The custom report is created by adding parameters, choosing calculation and data types, then editing a template in the List and Label Report Designer. To create a Custom Report from DV, choose the Custom from DV report style when choosing the new report. Once you click [Create] you will be asked to select a DataView from the DataView picklist. Highlight the DataView to be used in the creation of your custom report and press [Select]. A confirmation dialog window will appear asking about orientation, answer [Yes] or [No] appropriately. Once created a new Custom Report will be visible. Location:Parameters will already be selected based on the chosen DataView. There are 5 sections in which the Custom Report can be defined in addition to the template: General Properties © 2014 AllMax Software, Inc. 260 Operator10 Help General Information Report Data User Input Comments 9.7.1.3 Custom Report Setup Topics in this section include: General Properties General Information Report Data User Input Comments 9.7.1.3.1 General Properties In the General Properties setup section for the Custom Report, users can edit the following fields: Page Adjustment and Print settings: Size (%): Enter a percentage to which you would like to reduce the printed form. X Offset: Adjust the X coordinate to which you would like to offset the printed form. Y Offset: Adjust the Y coordinate to which you would like to offset the printed form. Range: Select the range (in months) that the report should cover. Choose the range from the dropdown list box. Choose Custom from the drop-down and enter a number of days in the Custom Days: field Sampling Events Fields: Press the [...] button to view a list of available fields from the Sampling Events section of Operator10 - Wastewater Software. Individually select the fields from the list, when selected a check will appear by each field, press Continue to add those fields to the report. [Edit Template] Press the [Edit Template] button to open the List and Label Report Designer window. Treat <>~ Data As: Select from the drop-down menu to determine the method by which data with the less-than (<), greater-than (>) or non-detect (~) data qualifiers will be treated. Available options are: © 2014 AllMax Software, Inc. Reporting 261 Preserve Types: Calculations will preserve the available data qualifiers and calculated results will display the appropriate data qualifier. Example: results = 3, 6, <2, 1; average = (3+6+2+1)/4 = <3 as the less-than symbol to be preserved for the final calculation Entered Value: Calculations will drop the data qualifiers from data and calculated results will display without the qualifiers using only the numeric entered portion of the data Example: results = 3, 6, <2, 1; average = (3+6+2+1)/4 = 3 as the less than symbol will be dropped for the final calculation Half Entered Value: Calculations will drop the data qualifiers from data and calculated results will display without the qualifiers using one-half the entered value of the data Example: results = 3, 6, <2, 1; average = (3+6+1+1)/4 = 2.75 as the less than symbol is dropped and 2 is divided in half for final calculation Zero: Calculations will drop the data qualifiers from data and calculated results will display without the qualifiers using zero (0) in place of any entered data Example: results = 3, 6, <2, 1; average = (3+6+0+1)/4 = 2.5 as the less than symbol is dropped and 0 is used in place of <2 for the final calculation Blank (no data): Calculations will drop the data qualifiers from data and calculated results will display without the qualifiers treating data entered with qualifiers to be seen as blank. Example: results = 3, 6, <2, 1; average = (3+6+1)/3 = 3.333 as the less than symbol is dropped and no data is used in place of <2 in the final calculation © 2014 AllMax Software, Inc. 262 Operator10 Help 9.7.1.3.2 General Information In the General Information setup section for the Custom Report, users can edit the following fields: General Information Data: Report Name: Enter a name for the report. Facility: Enter a facility name for the Limit Report. The default facility name will initially be filled in, modify this as necessary. Report Header: Enter up to 3 (three) lines of text to be used as a header for the report. Beginning Page # Enter the beginning page #. The Custom Report will continue to number subsequent pages if applicable. Leave this field blank to use default numbering. © 2014 AllMax Software, Inc. Reporting 263 9.7.1.3.3 Report Data In the Report Data setup section for the Custom Report users can define the following pieces of information. Items: To add Items (Location:Parameters) to be displayed on the Custom Report, press the [Add] button on the left pane of the window. Select a Location:Parameter from the picklist that appears. Highlight the desired Location:Parameter and press the [Select] button. Each Location:Parameter added will be given an Item name (beginning with Item001) this Item name will be the identifier when editing the Template in the List and Label Report Designer. Item Data Location:Parameter: To change a selected Location:Parameter, press the [...] button to select a Location:Parameter to be reported on the Custom Report. Find the Location:Parameter in the Location:Parameter Picklist that appears and press the [Select] button. NOTE: The Location value is available for display on a custom report, add Itemxxx.Locat to view. © 2014 AllMax Software, Inc. 264 Operator10 Help NOTE: The Parameter value is available for display on a custom report, add Itemxxx.Param to view. Header: To modify the header of the selected Location:Parameter, modify this field. Two lines of text may be entered. NOTE: This field is available for display on a custom report, add Itemxxx.Header to view. Calculation: Press the [...] button to display a picklist of available calculations for the selected Location:Parameter. To review the list of available calculations, consult the Calculations help file page. Daily values is the default selection and will display the single daily value is chosen. Additionally, custom formulas will also be available at the bottom of the picklist. Consult the Main help file for Formula help. NOTE: This field is available for display on a custom report, add Itemxxx.Calc to view. To show the entered data or to calculate a loading value select from: ( ) value ( ) kg/day loading ( ) g/day loading ( ) lb/day loading To define how the data should be shown on the report, choose from: ( ) Single Result; will show daily data as single value, non-repeating ( ) Repeat Daily; will repeat the selected daily data value for the defined report period, choose this to display daily data in a table ( ) Repeat Monthly; will calculate a monthly value for the selected report period, choose this to display monthly data in a table As: - The As: field will change as you select from the listed options above it, however, there are other options available: Variables (Displays single value, non-repeating, best when used with Single Result) Fields (Displays repeating values, best when used with Repeat Daily) Transposed Fields (Displays repeating values, but the X and Y axis are reversed, allowing for a result similar to the Daily or Weekly DataViews) Chart Data (Readies data to be available for List and Label's Report Chart Object) Decimal: Indicate the desired number of decimal precision to be shown on the report. Units: Enter the Units to be reported for a selected Item. The default units of the selected Location:Parameter will be shown, modify as necessary. © 2014 AllMax Software, Inc. Reporting 265 NOTE: This field is available for display on a custom report, add Itemxxx.Units to view. [ ] Include Sampling Events Place a check in the Include Sampling Events checkbox to include the selected Sampling Event fields from the General Properties setup section. 9.7.1.3.4 User Input User Input can be created and entered at the time of printing, to provide a more dynamic report. Data setup in the User Input section is passed through to the List and Label Template Designer and is available for usage on the printed report. User Input Setup In the User Input section, users can define up to 10 groups of user input entries. Each group of user input options provides 6 items that can be defined. User Input Groups To Navigate to each Group of User Input items, click the [Next > ] or [ < Back] buttons Each group of user input options can be verified at the time of printing. Place a check in the [ ] Verify checkbox to receive the prompt when printing and enter information at that time. © 2014 AllMax Software, Inc. 266 Operator10 Help User Input Item Definition Label: Enter text into the Label field to help define the User Input item Type: Items can be defined as follows: Text - provides a single-line text entry field Multi-line Text - provides a multi-line text entry field Password - provides a text-masked entry field Checkbox - provides a true/false checkbox Grid - provides a customizable grid for table-based entry Default Enter text into the Default: field to be used each time the report is printed. Read Only Each item can be flagged as read only, preventing changes from being made at the time of printing. Report Usage User Input items are passed through with the following syntax to the Report Template as data: UserX.ItemY.Label - Passes through the information defined in the field Label: UserX.ItemY.Text - Passes through the information defined in the field Default: or what is entered at the time of printing UserX.ItemY.Text.Z - Passes through field information based on entered data in the Grid, when selected © 2014 AllMax Software, Inc. Reporting 267 9.7.1.3.5 Comments In the Comments setup section for the Custom Report, users can edit the following information: Comments Enter the default comments to appear on report at the time of printing. Users can modify these comments at the time of printing if the [ ] Verify Comments: checkbox is marked. © 2014 AllMax Software, Inc. 268 9.7.2 Operator10 Help Annual Summary Reports Topics in this section include: 5 Year Forecast Report Multi-Year Summary Report 9.7.2.1 5 Year Forecast Report The 5-Year Forecast Report provides a projection for the next 5 years based on data from the previous 5 years. The form is consistent with methods for Pennsylvania Chapter 94 reports. Setup options include: General Properties and Information Parameter and Calculation Settings Additional Parameter PE/EDU and Industry Projections Comments 9.7.2.1.1 5 Year Forecast Setup Topics in the section include: General Properties and Information © 2014 AllMax Software, Inc. Reporting 269 Parameter and Calculation Settings Additional Parameter PE/EDU and Industry Projections Comments 9.7.2.1.1.1 General Properties In the General Properties and Information setup section for the 5-Year Forecast Report, users can edit the following fields: Page Adjustments and Print Settings: Size (%): Enter a percentage to which you would like to reduce the printed form. X Offset: Adjust the X coordinate to which you would like to offset the printed form. Y Offset: Adjust the Y coordinate to which you would like to offset the printed form. ()Plain Paper Mark the ()Plain Paper radio button to print the entire form, including all lines, headers, and data. ()Form Mark the ()Form radio button if you are printing directly on, or will be copying onto a blank form. Preprinted Form If generic information is already preprinted on the form, mark the ()Preprinted Form radio button to print only the data and appropriate information. []Allow Remarks: To enter comments at the time of printing, check the []Allow Remarks checkbox. []Include Graph A graph representing the reported data and projections can be included if the [] Include Graph checkbox is marked. Page # Enter a page number of total pages into these fields. Report Title To customize the title of this report enter it into this field. Facility To customize the name of the facility on this report, enter it into this field. The field will be set to the default facility name coming from the name of your current facility. Treat <>~ Data As: Select from the drop-down menu to determine the method by which data with the © 2014 AllMax Software, Inc. 270 Operator10 Help less-than (<), greater-than (>) or non-detect (~) data qualifiers will be treated. Available options are: Preserve Types: Calculations will preserve the available data qualifiers and calculated results will display the appropriate data qualifier. Example: results = 3, 6, <2, 1; average = (3+6+2+1)/4 = <3 as the less-than symbol to be preserved for the final calculation Entered Value: Calculations will drop the data qualifiers from data and calculated results will display without the qualifiers using only the numeric entered portion of the data Example: results = 3, 6, <2, 1; average = (3+6+2+1)/4 = 3 as the less than symbol will be dropped for the final calculation Half Entered Value: Calculations will drop the data qualifiers from data and calculated results will display without the qualifiers using one-half the entered value of the data Example: results = 3, 6, <2, 1; average = (3+6+1+1)/4 = 2.75 as the less than symbol is dropped and 2 is divided in half for final calculation Zero: Calculations will drop the data qualifiers from data and calculated results will display without the qualifiers using zero (0) in place of any entered data Example: results = 3, 6, <2, 1; average = (3+6+0+1)/4 = 2.5 as the less than symbol is dropped and 0 is used in place of <2 for the final calculation Blank (no data): Calculations will drop the data qualifiers from data and calculated results will display without the qualifiers treating data entered with qualifiers to be seen as blank. Example: results = 3, 6, <2, 1; average = (3+6+1)/3 = 3.333 as the less than symbol is dropped and no data is used in place of <2 in the final calculation © 2014 AllMax Software, Inc. Reporting 271 9.7.2.1.1.2 Parameter and Calculations In the Parameter and Calculation Settings setup section for the 5-Year Forecast Report, users can edit the following fields: Parameter and Calculation Settings Location:Parameter: Press the [...] button to select a Location:Parameter to be reported on the 5 Year Forecast Report. Find the Location:Parameter in the Location:Parameter Picklist that appears and press the [Select] button. Header: To modify the header of the selected Location:Parameter, modify this field. Report Label: Enter the report label for Location:Parameter selected. Decimal: Indicate the desired number of decimal precision to be shown on the report. Calculation Type: Select the type of calculation to be performed on the selected Location:Parameter. Select from Month Sum, Month Average, Month Maximum, Month Minimum, Month Count, Month Formula, Geometric Mean, Standard Deviation, Max 7-Day Continuous, Min 7-Day Continuous, Max 7-Day First of Month, or Min 7-Day First of Month from the drop-down list box. © 2014 AllMax Software, Inc. 272 Operator10 Help Maximum Type: Choose the correct maximum type for the report, choose from Maximum 1 Month or Max 3 Month Avg. Design Limit: Enter the design limit for comparison with PE/EDU calculations. PE/EDU: Choose the calculation method by select the option ()PE or ()EDU. 9.7.2.1.1.3 Additional Parameter In the Additional Parameter setup section for the 5-Year Forecast Report, users can edit the following fields: Additional Parameter Location:Parameter: Press the [...] button to select a Location:Parameter to be reported on the 5 Year Forecast Report. Find the Location:Parameter in the Location:Parameter Picklist that appears and press the [Select] button. Header: To modify the header of the selected Location:Parameter, modify this field. © 2014 AllMax Software, Inc. Reporting 273 Decimal: Indicate the desired number of decimal precision to be shown on the report. Calculation Type: Select the type of calculation to be performed on the selected Location:Parameter. Select from Year Total or Year Average from the drop-down list box. 9.7.2.1.1.4 PE/EDU and Industry Projections In the PE/EDU and Industry Projections setup section for the 5-Year Forecast Report, users can edit the following fields: PE/EDU and Industry Projections For PE/EDU and Industry Projections, enter the previous and projected totals and increases for the specified years. Enter the values directly into the labeled fields. © 2014 AllMax Software, Inc. 274 Operator10 Help 9.7.2.1.1.5 Comments In the Comments setup section for the 5-Year Forecast Report, users can edit the following information: Comments: Enter the default comments to appear on report at the time of printing. Users can modify these comments at the time of printing if the [ ]Allow Comments checkbox is marked in the General Properties and Settings screen. © 2014 AllMax Software, Inc. Reporting 9.7.2.2 275 Multi-Year Summary Report The Multi-Year Summary Report provides information for multiple years of data. The form can report up to 8 columns containing the Sum, Average, Maximum, Minimum, Maximum, or Count of Daily Values, the Average, Maximum, or Minimum Monthly Average, the Average, Maximum, or Minimum Daily Loading, or the Average, Maximum, or Minimum Monthly Average Loading. Multi-Year Summary Report Setup options include: General Properties and Information Parameters Summary Columns Comments 9.7.2.2.1 Multi-Year Summary Setup Topics in this section include: General Properties and Information Parameters Summary Columns Comments © 2014 AllMax Software, Inc. 276 Operator10 Help 9.7.2.2.1.1 General Properties In the General Properties and Information setup section for the Multi-Year Summary Report, users can edit the following fields: Page Adjustment and Print Settings: Size (%): Enter a percentage to which you would like to reduce the printed form. X Offset: Adjust the X coordinate to which you would like to offset the printed form. Y Offset: Adjust the Y coordinate to which you would like to offset the printed form. Beginning Page #: Enter the beginning page #. The Multi-Year Report will continue to number subsequent pages if applicable. Leave this field blank to use default numbering. Header: Enter up to 3 (three) lines of text to be used as a header for the Limit Report. The default header will be the Facility Address. Facility: To customize the name of the facility on this report, enter it into this field. The field will be set to the default facility name coming from the name of your current facility. []Allow Comments: To enter comments at the time of printing, check the [ ]Allow Comments checkbox. Treat <>~ Data As: Select from the drop-down menu to determine the method by which data with the less-than (<), greater-than (>) or non-detect (~) data qualifiers will be treated. Available options are: Preserve Types: Calculations will preserve the available data qualifiers and calculated results will display the appropriate data qualifier. Example: results = 3, 6, <2, 1; average = (3+6+2+1)/4 = <3 as the less-than symbol to be preserved for the final calculation Entered Value: Calculations will drop the data qualifiers from data and calculated results will display without the qualifiers using only the numeric entered portion of the data Example: results = 3, 6, <2, 1; average = (3+6+2+1)/4 = 3 as the less than symbol will be dropped for the final calculation © 2014 AllMax Software, Inc. Reporting 277 Half Entered Value: Calculations will drop the data qualifiers from data and calculated results will display without the qualifiers using one-half the entered value of the data Example: results = 3, 6, <2, 1; average = (3+6+1+1)/4 = 2.75 as the less than symbol is dropped and 2 is divided in half for final calculation Zero: Calculations will drop the data qualifiers from data and calculated results will display without the qualifiers using zero (0) in place of any entered data Example: results = 3, 6, <2, 1; average = (3+6+0+1)/4 = 2.5 as the less than symbol is dropped and 0 is used in place of <2 for the final calculation Blank (no data): Calculations will drop the data qualifiers from data and calculated results will display without the qualifiers treating data entered with qualifiers to be seen as blank. Example: results = 3, 6, <2, 1; average = (3+6+1)/3 = 3.333 as the less than symbol is dropped and no data is used in place of <2 in the final calculation 9.7.2.2.1.2 Parameters In the Parameters setup section for the Multi-Year Summary Report: Parameters © 2014 AllMax Software, Inc. 278 Operator10 Help To ADD Location:Parameters To add values to the Multi-Year Summary report, press the [Add] button to select from the Location:Parameter (Multi-select) Picklist. Highlight a desired Location:Parameter and press the [Select] button in the Picklist. NOTE: Location:Parameters may be selected more than once to allow for multiple calculations and limits. Location:Parameter Definition Once the Location:Parameter has been added, edit the following fields to define: Header: A default Header, based on the Location:Parameter selected, will be filled in here, modify the header if desired. There are two lines of text available for each header. Number of Years Select the number of years to be calculated for the selected Location:Parameter. Choose from the drop-down list box. Decimal Default decimal precision, based on the selected Location:Parameter will be shown in the Decimal field, modify this value as necessary. [Remove] Press the [Remove] button to remove a selected Location:Parameter from the Limit Report. [Move Up]/[Move Dn] To re-arrange the order in which the selected Location:Parameters are shown on the Limit Report, press the [Move Up] or [Move Dn] button(s). © 2014 AllMax Software, Inc. Reporting 279 9.7.2.2.1.3 Summary Columns In the Summary Columns setup section for the Multi Year Summary Report, users can choose from the following summary calculations for the selected location:parameters (select no more than 8): Calculation Options: Sum Daily Avg Daily Max Daily Min Daily Count Daily Avg Monthly Max Monthly Min Monthly Avg Loading Max Loading Min Loading Avg Mo. Loading Max Mo. Loading Min Mo. Loading © 2014 AllMax Software, Inc. 280 Operator10 Help For Loading summaries, choose from ( )English (lb/day) or ( )Metric (kg/day) to determine calculation method. 9.7.2.2.1.4 Comments In the Comments setup section for the Multi-Year Summary Report, users can edit the following fields: Comments Comments: Enter the default comments to appear on report at the time of printing. Users can modify these comments at the time of printing if the [ ]Allow Comments checkbox is marked in the General Properties screen. © 2014 AllMax Software, Inc. Reporting 9.7.3 281 Mass Balance Reports The Mass Balance report was designed to allow the quantification of material flow in to and out of a given process. The report determines if all streams and production growth in and out of a process is accounted for. There are four setup sections: General Properties General Information Rows Comments 9.7.3.1 Mass Balance Report Setup Topics in this section include: General Properties General Information Rows Comments © 2014 AllMax Software, Inc. 282 Operator10 Help 9.7.3.1.1 General Properties In the General Properties setup section for the Mass Balance Report, users can edit the following fields: Page Adjustment and Print settings: Size (%): Enter a percentage to which you would like to reduce the printed form. X Offset: Adjust the X coordinate to which you would like to offset the printed form. Y Offset: Adjust the Y coordinate to which you would like to offset the printed form. ()Plain Paper: Mark the ( )Plain Paper radio button to print the entire form, including all lines, headers, and data. ()Form: Mark the ( )Form radio button if you are printing directly on, or will be copying onto a blank form. Preprinted Form: If generic information is already preprinted on the form, mark the ( )Preprinted Form radio button to print only the data and appropriate information. []Allow Comments: To enter comments at the time of printing, check the [ ]Allow Comments checkbox. Calculate Increase Using: Three options are available to calculate increase using: First and last value - uses the first and the last values of the month to determine the increase. First and last week - uses the average of the first 7 days and the last 7 days of the month to determine the increase. Month averages - uses the averages for the current and previous months to determine the increase. Multiplier: Enter a mulitplier for calculating solids production. Decimal: Enter the decimal precision for the overall report. Loading Units: Select the units in which loadings are reported: ()kilograms/day ()grams/day ()pounds/day © 2014 AllMax Software, Inc. Reporting 283 Treat <>~ Data As: Select from the drop-down menu to determine the method by which data with the less-than (<), greater-than (>) or non-detect (~) data qualifiers will be treated. Available options are: Preserve Types: Calculations will preserve the available data qualifiers and calculated results will display the appropriate data qualifier. Example: results = 3, 6, <2, 1; average = (3+6+2+1)/4 = <3 as the less-than symbol to be preserved for the final calculation Entered Value: Calculations will drop the data qualifiers from data and calculated results will display without the qualifiers using only the numeric entered portion of the data Example: results = 3, 6, <2, 1; average = (3+6+2+1)/4 = 3 as the less than symbol will be dropped for the final calculation Half Entered Value: Calculations will drop the data qualifiers from data and calculated results will display without the qualifiers using one-half the entered value of the data Example: results = 3, 6, <2, 1; average = (3+6+1+1)/4 = 2.75 as the less than symbol is dropped and 2 is divided in half for final calculation Zero: Calculations will drop the data qualifiers from data and calculated results will display without the qualifiers using zero (0) in place of any entered data Example: results = 3, 6, <2, 1; average = (3+6+0+1)/4 = 2.5 as the less than symbol is dropped and 0 is used in place of <2 for the final calculation Blank (no data): Calculations will drop the data qualifiers from data and calculated results will display without the qualifiers treating data entered with qualifiers to be seen as blank. Example: results = 3, 6, <2, 1; average = (3+6+1)/3 = 3.333 as the less than symbol is dropped and no data is used in place of <2 in the final calculation © 2014 AllMax Software, Inc. 284 Operator10 Help 9.7.3.1.2 General Information In the General Information setup section for the Mass Balance Report, users can edit the following fields: General Information Report Title: Enter the desired title (1 to 40 characters) for the Mass Balance Report. This name is different than the report name shown in the Direct Access tree. Facility: Enter a facility name for the Mass Balance Report. The default facility name will initially be filled in, modify this as necessary. © 2014 AllMax Software, Inc. Reporting 285 9.7.3.1.3 Row s Report Rows The report contains two sections, with an influent section on top and a distribution section on the bottom. The summaries of these sections will be used to determine the influent-to-distribution ratio. Influent - upper section of the report contains four rows for selecting location:parameter combinations that represent streams contributing to the process. These can be where solids are produced and/or areas where a solids increase occurs. A name can be defined as a header for each row that will be displayed on the report. Distribution - lower section of the report contains six rows for selecting location:parameter combinations that represent streams discharged from the process. A name can be defined as a header for each row that will be displayed on the report. Row Options - several options are available for each row of the report. Each parameter can be set to either ()Add or ()Subtract from the report section. The parameter can also be set to calculated loading, calculate increase, and calculate using the multiplier by checking the desired option(s). © 2014 AllMax Software, Inc. 286 Operator10 Help 9.7.3.1.4 Comments In the Comments setup section for the Mass Balance Report, users can edit the following fields: Comments: Comments: Enter the default comments to appear on report at the time of printing. Users can modify these comments at the time of printing if the []Allow Comments checkbox is marked in the General Properties screen. © 2014 AllMax Software, Inc. Reporting 9.7.4 287 Limit Report A Limit Report provides the ability to set upper and lower data limits for early error or limit detection, for any Parameter based upon quantity and concentration. Setup options for the Limit Report include: General Properties General Information Limits Comments 9.7.4.1 Limit Report Setup Topics in this section include: General Properties General Information Limits Comments 9.7.4.1.1 General Properties In the General Properties setup section for the Limit Report, users can edit the following fields: © 2014 AllMax Software, Inc. 288 Operator10 Help Page Adjustment and Print settings: Size (%): Enter a percentage to which you would like to reduce the printed form. X Offset: Adjust the X coordinate to which you would like to offset the printed form. Y Offset: Adjust the Y coordinate to which you would like to offset the printed form. []Allow Comments: To enter comments at the time of printing, check the []Allow Remarks checkbox. Months: Select a number of months from the drop-down list box. The report will calculate the desired amount of data based on this selection. Treat <>~ Data As: Select from the drop-down menu to determine the method by which data with the less-than (<), greater-than (>) or non-detect (~) data qualifiers will be treated. Available options are: Preserve Types: Calculations will preserve the available data qualifiers and calculated results will display the appropriate data qualifier. Example: results = 3, 6, <2, 1; average = (3+6+2+1)/4 = <3 as the less-than symbol to be preserved for the final calculation Entered Value: Calculations will drop the data qualifiers from data and calculated results will display without the qualifiers using only the numeric entered portion of the data Example: results = 3, 6, <2, 1; average = (3+6+2+1)/4 = 3 as the less than symbol will be dropped for the final calculation Half Entered Value: Calculations will drop the data qualifiers from data and calculated results will display without the qualifiers using one-half the entered value of the data Example: results = 3, 6, <2, 1; average = (3+6+1+1)/4 = 2.75 as the less than symbol is dropped and 2 is divided in half for final calculation Zero: Calculations will drop the data qualifiers from data and calculated results will display without the qualifiers using zero (0) in place of any entered data Example: results = 3, 6, <2, 1; average = (3+6+0+1)/4 = 2.5 as the less than symbol is dropped and 0 is used in place of <2 for the final calculation © 2014 AllMax Software, Inc. Reporting 289 Blank (no data): Calculations will drop the data qualifiers from data and calculated results will display without the qualifiers treating data entered with qualifiers to be seen as blank. Example: results = 3, 6, <2, 1; average = (3+6+1)/3 = 3.333 as the less than symbol is dropped and no data is used in place of <2 in the final calculation 9.7.4.1.2 General Information In the General Information setup section for the Limit Report, users can edit the following fields: General Information: Report Name: Enter the desired name (1 to 40 characters) for the Limit Report. This name is different than the report name shown in the Direct Access tree. Facility: Enter a facility name for the Limit Report. The default facility name will initially be filled in, modify this as necessary. Header: Enter up to 3 (three) lines of text to be used as a header for the Limit Report. The default header will be the Facility Address. © 2014 AllMax Software, Inc. 290 Operator10 Help Beginning Page # Enter the beginning page #. The Limit Report will continue to number subsequent pages if applicable. Leave this field blank to use default numbering. 9.7.4.1.3 Limits In the Limits setup section for the Limit Report: Location:Parameter Setup To ADD Location:Parameters To add values to the limit report, press the [Add] button to select from the Location:Parameter (Multiselect) Picklist. Highlight a desired Location:Parameter and press the [Select] button in the Picklist. NOTE: Location:Parameters may be selected more than once to allow for multiple calculations and limits. Location:Parameter Definition Once the Location:Parameter has been added, edit the following fields to define your limit. Header: © 2014 AllMax Software, Inc. Reporting 291 A default Header, based on the Location:Parameter selected, will be filled in here, modify the header if desired. There are two lines of text available for each header. Calculation: Press the [...] button to select from the Formula Picklist, click [Select] to choose the highlighted formula. (see also: Report Calculations) Units: Default Units will be shown based on the selected Location:Parameter. Modify this field as desired. Limit: Enter the actual Limit value (1 to 14 characters). A double asterisk (**) on the report will signify that the value has exceeded the specified Limit. Decimal: Default decimal precision, based on the selected Location:Parameter will be shown in the Decimal field, modify this value as necessary. [Remove] Press the [Remove] button to remove a selected Location:Parameter from the Limit Report. [Move Up]/[Move Dn] To re-arrange the order in which the selected Location:Parameters are shown on the Limit Report, press the [Move Up] or [Move Dn] button(s). © 2014 AllMax Software, Inc. 292 Operator10 Help 9.7.4.1.4 Comments In the Comments setup section for the Limit Report, users can edit the following information: Comments: Comments: Enter the default comments to appear on report at the time of printing. Users can modify these comments at the time of printing if the [ ]Allow Comments checkbox is marked in the General Properties and Settings screen. 9.7.5 Weekly Summary Report A Weekly Summary Report provides the ability to define Location:Parameters for the report which displays a month's worth of data, broken into weekly summary periods, allowing for users to see the Weekly Maximum and Minimum. Month types are selected to define how the weekly periods are defined and what data is to be used in reporting. Setup options for the Weekly Summary Report include: General Properties General Information Parameters Comments © 2014 AllMax Software, Inc. Reporting 9.7.5.1 293 Weekly Report Setup Topics in this section include: General Properties General Information Parameters Comments 9.7.5.1.1 General Properties In the General Properties setup section for the Weekly Summary Report, users can edit the following fields: Page Adjustment and Print settings: Size (%): Enter a percentage to which you would like to reduce the printed form. X Offset: Adjust the X coordinate to which you would like to offset the printed form. Y Offset: Adjust the Y coordinate to which you would like to offset the printed form. []Allow Comments: To enter comments at the time of printing, check the []Allow Remarks checkbox. Month Type: Select from the drop-down menu to determine the method by which weekly periods will be defined. Available options are: Continuous (Floating): Data is averaged for several overlapping 7-day periods, beginning with the first of the month and continuing each consecutive day of the month until a period reaches the end of the month. Saturday Rule: Data is averaged for 7-day periods beginning on Sunday and extending though the following Saturday. Periods are considered to be in the month containing the Saturday of the period. Wednesday Rule: Data is averaged for 7-day periods beginning on Sunday and extending though the following Saturday. Periods are considered to be in the month containing the Wednesday of the period. First of Month: Data is averaged for three (3) 7-day periods, beginning with the first day of the month, and a fourth period extending to the end of the month. Full Weeks Only: Data is averaged for 7-day periods beginning on Sunday and extending though the following Saturday. Periods are considered to be in the month only if the entire period is in the month. Any additional days are ignored. Treat <>~ Data As: Select from the drop-down menu to determine the method by which data with the © 2014 AllMax Software, Inc. 294 Operator10 Help less-than (<), greater-than (>) or non-detect (~) data qualifiers will be treated. Available options are: Preserve Types: Calculations will preserve the available data qualifiers and calculated results will display the appropriate data qualifier. Example: results = 3, 6, <2, 1; average = (3+6+2+1)/4 = <3 as the less-than symbol to be preserved for the final calculation Entered Value: Calculations will drop the data qualifiers from data and calculated results will display without the qualifiers using only the numeric entered portion of the data Example: results = 3, 6, <2, 1; average = (3+6+2+1)/4 = 3 as the less than symbol will be dropped for the final calculation Half Entered Value: Calculations will drop the data qualifiers from data and calculated results will display without the qualifiers using one-half the entered value of the data Example: results = 3, 6, <2, 1; average = (3+6+1+1)/4 = 2.75 as the less than symbol is dropped and 2 is divided in half for final calculation Zero: Calculations will drop the data qualifiers from data and calculated results will display without the qualifiers using zero (0) in place of any entered data Example: results = 3, 6, <2, 1; average = (3+6+0+1)/4 = 2.5 as the less than symbol is dropped and 0 is used in place of <2 for the final calculation Blank (no data): Calculations will drop the data qualifiers from data and calculated results will display without the qualifiers treating data entered with qualifiers to be seen as blank. Example: results = 3, 6, <2, 1; average = (3+6+1)/3 = 3.333 as the less than symbol is dropped and no data is used in place of <2 in the final calculation © 2014 AllMax Software, Inc. Reporting 295 9.7.5.1.2 General Information In the General Information setup section for the Weekly Summary Report, users can edit the following fields: General Information: Header: Enter the desired header (1 to 40 characters) for the Weekly Summary Report. Facility: Enter a facility name for the Weekly Summary Report. The default facility name will initially be filled in, modify this as necessary. © 2014 AllMax Software, Inc. 296 Operator10 Help 9.7.5.1.3 Parameters In the Parameters setup section, users can select and define Location:Parameters to be displayed on the Weekly Summary Report. Parameters To ADD Location:Parameters To add values to the weekly summary report, press the [Add] button to select from the Location:Parameter (Multi-select) Picklist. Highlight a desired Location:Parameter and press the [Select] button in the Picklist. NOTE: Location:Parameters may be selected more than once to allow for multiple calculations and limits. Location:Parameter Definition Once the Location:Parameter has been added, edit the following fields: Header: A default Header, based on the Location:Parameter selected, will be filled in here, modify the header if desired. There are two lines of text available for each header. Decimal © 2014 AllMax Software, Inc. Reporting 297 Default decimal precision, based on the selected Location:Parameter will be shown in the Decimal field, modify this value as necessary. Avg Type: Select from the drop-down menu, the type of Average to be calculated. Available options include: Average Geometric Mean Flow-Weighted [Remove] Press the [Remove] button to remove a selected Location:Parameter from the Limit Report. [Move Up]/[Move Dn] To re-arrange the order in which the selected Location:Parameters are shown on the Limit Report, press the [Move Up] or [Move Dn] button(s). 9.7.5.1.4 Comments In the Comments setup section for the Limit Report, users can edit the following information: Comments: © 2014 AllMax Software, Inc. 298 Operator10 Help Comments: Enter the default comments to appear on report at the time of printing. Users can modify these comments at the time of printing if the [ ]Allow Comments checkbox is marked in the General Properties and Settings screen. 9.7.6 Federal DMR Report The Federal DMR (Discharge Monitoring Report, EPA 3320) provides information for Federal EPA and many State reporting requirements. There are five setup sections: General Properties General Information Rows Reporting Comments 9.7.6.1 Federal DMR Setup Topics in this section include: General Properties General Information Rows © 2014 AllMax Software, Inc. Reporting 299 Reporting Comments 9.7.6.1.1 General Properties In the General Properties setup section for the Federal DMR Report, users can edit the following fields: Page Adjustment and Print settings: Size (%): Enter a percentage to which you would like to reduce the printed form. X Offset: Adjust the X coordinate to which you would like to offset the printed form. Y Offset: Adjust the Y coordinate to which you would like to offset the printed form. ()Plain Paper: Mark the ()Plain Paper radio button to print the entire form, including all lines, headers, and data. ()Form: Mark the ()Form radio button if you are printing directly on, or will be copying onto a blank form. Preprinted Form If generic information is already preprinted on the form, mark the ()Preprinted Form radio button to print only the data and appropriate information. [] Verify Comments To enter comments at the time of printing, check the [] Verify Comments checkbox. [] Verify Exceptions To review and/or modify reported exceptions at the time of printing, check the [] Verify Exceptions checkbox. Default Text for Rows Enter the default text that should appear when there is no calculation required or there is no data to be calculated. Fill in the Sample:, Permit:, and Units: fields. Treat <>~ Data As: Select from the drop-down menu to determine the method by which data with the less-than (<), greater-than (>) or non-detect (~) data qualifiers will be treated. Available options are: Preserve Types: Calculations will preserve the available data qualifiers and calculated results will display the appropriate data qualifier. Example: results = 3, 6, <2, 1; average = (3+6+2+1)/4 = <3 as the less-than symbol to be preserved for the final calculation © 2014 AllMax Software, Inc. 300 Operator10 Help Entered Value: Calculations will drop the data qualifiers from data and calculated results will display without the qualifiers using only the numeric entered portion of the data Example: results = 3, 6, <2, 1; average = (3+6+2+1)/4 = 3 as the less than symbol will be dropped for the final calculation Half Entered Value: Calculations will drop the data qualifiers from data and calculated results will display without the qualifiers using one-half the entered value of the data Example: results = 3, 6, <2, 1; average = (3+6+1+1)/4 = 2.75 as the less than symbol is dropped and 2 is divided in half for final calculation Zero: Calculations will drop the data qualifiers from data and calculated results will display without the qualifiers using zero (0) in place of any entered data Example: results = 3, 6, <2, 1; average = (3+6+0+1)/4 = 2.5 as the less than symbol is dropped and 0 is used in place of <2 for the final calculation Blank (no data): Calculations will drop the data qualifiers from data and calculated results will display without the qualifiers treating data entered with qualifiers to be seen as blank. Example: results = 3, 6, <2, 1; average = (3+6+1)/3 = 3.333 as the less than symbol is dropped and no data is used in place of <2 in the final calculation © 2014 AllMax Software, Inc. Reporting 301 9.7.6.1.2 General Information In the General Information setup section for the Federal DMR Report, users can edit the following fields: General Information: Name: Enter the name of the facility. Address: Enter the address of the reported facility. The default address from the selected facility will initially be entered, modify this as necessary. Facility: Enter a facility name for the Limit Report. The default facility name will initially be filled in, modify this as necessary. Location: Fill in the location field if necessary. Attn: Fill in the Attn: field to be displayed on the report. Permit Number: Enter the permit number for the reported facility. © 2014 AllMax Software, Inc. 302 Operator10 Help Discharge Number: Enter the discharge number for the reported facility. Form Title: Enter a form title to be displayed on the report. Header: Enter up to 4 (four) lines of text to be used as a header for the DMR. Page # of # Enter the starting page # and the final page #. 9.7.6.1.3 Row s Report Rows The report contains 7 rows available for reporting different location:parameters per page. Each row has 9 setup sections. Parameter Quantity or Loading, Row x Avg Quantity or Loading, Row x Max Quantity or Loading, row x Units Quality or Concentration, row x Min © 2014 AllMax Software, Inc. Reporting 303 Quality or Concentration, row x Avg Quality or Concentration, row x Max Quality or Concentration, row x Units Frequency/Sample Type, row x 9.7.6.1.3.1 Parameter For each row to be reported on the Federal DMR follow these directions. Row Setup: Parameter Location:Parameter: Press the [...] button next to the Location:Parameter field. This will display the Location:Parameter picklist, select the desired Location:Parameter to be reported, and press [Select]. Header Text: In the Header Text: field, a default header will be displayed for recognized Location:Parameters. If there is no header or if the default header is not correct simply modify the information in the field. To see the available headers for recognized Location:Parameters, press the [...] button. Find the desired header text in the picklist and press [Select]. To automatically refresh the header, or to reset it to the default, press the [!] button. © 2014 AllMax Software, Inc. 304 Operator10 Help 9.7.6.1.3.2 Loading Two fields, Average and Maximum, for the calculation of loadings are available, the process is exactly the same for both the Average and Maximum fields. Row Setup: Loading Average/Maximum: Press the [...] button to select the desired calculation type for the selected report. The available calculations are reviewed on the Calculations help file page. Select the type of data to be reported: () value () kg/loading () g/day loading © 2014 AllMax Software, Inc. Reporting 305 () lb/day loading Permit: Enter the permitted limit into the first field in the Permit area. This number can be alpha or numeric based. If numeric, the calculated value will be compared to the value entered and an exception, if found, will be reported. In the dropdown list box, select a description for the type of calculation that is reported for the row. Alternate Text: In the event that there is no data or the field is unused, enter text to be displayed. The default will be entered as set in the Federal DMR General Properties settings. Additionally, if a detection limit is needed and if the calculated value is below the detection limit, alternate text should be shown, enter the comparison value in the If Less Than field and the alternate text into the Text: field. © 2014 AllMax Software, Inc. 306 Operator10 Help 9.7.6.1.3.3 Concentration Three fields, Minimum, Average and Maximum, for the calculation of concentrations are available, the process is exactly the same for both the Minimum, Average and Maximum fields. Row Setup: Concentration Minimum/Average/Maximum: Press the [...] button to select the desired calculation type for the selected report. The available calculations are reviewed on the Calculations help file page. Permit: Enter the permitted limit into the first field in the Permit area. This number can be alpha or numeric based. If numeric, the calculated value will be compared to the value entered and an exception, if found, will be reported. In the dropdown list box, select a description for the type of calculation that is reported for the row. Alternate Text: In the event that there is no data or the field is unused, enter text to be displayed. The default will be entered as set in the Federal DMR General Properties settings. Additionally, if a detection limit is needed and if the calculated value is below the detection limit, alternate text should be shown, enter the comparison value in the If Less Than field and the alternate text into the Text: field. © 2014 AllMax Software, Inc. Reporting 307 9.7.6.1.3.4 Units For both the loadings and concentrations, decimal precision and units can be edited. Row Setup: Units Decimal Precision In the Decimal field, enter the desired precision for the loadings or concentration values. Units In the Units area, a default unit, based on the Parameter selected will be displayed. Modify the units directly or select from a list of commonly used units, by pressing the [V] dropdown list box to the right of the field. © 2014 AllMax Software, Inc. 308 Operator10 Help 9.7.6.1.3.5 Frequency/Sample Type Each row of the Federal DMR report contains setup information required to define the Frequency of Analysis and Sample Type. Row Setup: Frequency of Analysis / Sample Type Frequency In the Frequency area, enter the Sample Measurement by entering directly into the field or selecting from a list of common measurements. NOTE: To allow the Operator10 - Wastewater report to automatically calculate the number of samples, select or enter a ~ (tilde) character. Enter the Permit Requirement or select from common requirements in the dropdown list box. © 2014 AllMax Software, Inc. Reporting 309 Sample Type In the Sample Type area enter or select the Sample Measurement from the dropdown list box. Enter or select the Permit Requirement from the dropdown list box. The dropdown list boxes contain common measurements available for quick selection. 9.7.6.1.4 Reporting Use the Reporting section to modify the information that should appear each time the report is printed. Reporting No Discharge [] To place a check in the No Discharge checkbox on the printed report, place a check in the checkbox. © 2014 AllMax Software, Inc. 310 Operator10 Help Months: To modify the number of months to be used for reporting and calculation purposes, select a number of months from the dropdown list box. Name/Title Officer: Enter the name and title of the official responsible for report submission. Telephone: Enter the telephone number of the contact person responsible for report submission. 9.7.6.1.5 Comments In the Comments setup section for the Federal DMR Report, users can edit the following fields: Comments: Comments: Enter the default comments to appear on report at the time of printing. Users can modify these comments at the time of printing if the [] Verify Comments checkbox is marked in the General Properties screen. © 2014 AllMax Software, Inc. Reporting 9.7.7 311 BioSolids Reports Topics in this section include: BioSolids Application List Report BioSolids Nutrient Report BioSolids Limit Report 9.7.7.1 BioSolids Application List Report Bio App List Report The Bio App List Report (BioSolids Application List Report) allows users to review all applications of Biosolids for up to a 12 month period. The application list report can be sorted by Date of application, Biosolid type applied, or Site of application. There are 3 sections of the report that can be setup: General Properties General Information Comments 9.7.7.1.1 BioSolids Application List - General Properties General Properties © 2014 AllMax Software, Inc. 312 Operator10 Help In the General Properties section of the Bio App List Report users can modify several options, including: Page Adjustment and Print settings: Size (%): Enter a percentage to which you would like to reduce the printed form. X Offset: Adjust the X coordinate to which you would like to offset the printed form. Y Offset: Adjust the Y coordinate to which you would like to offset the printed form. []Allow Comments Place a check in this checkbox to verify/enter comments at the time of printing the Bio App List Report Order By: Date: Select this option to sort the App List Report by the Date of Biosolid application. Biosolid: Select this option to sort the App List Report by the Biosolid applied to the sites. Site: Select this option to sort the App List Report by the Site of Biosolid application. Months Reported Choose a number of months to be reported on the Biosolid App List Report. Select a number from the dropdown list box. Decimal Precision Enter a value into the Decimal Precision field to indicate the number of decimals to be shown. Treat <>~ Data As: Select from the drop-down menu to determine the method by which data with the less-than (<), greater-than (>) or non-detect (~) data qualifiers will be treated. Available options are: Preserve Types: Calculations will preserve the available data qualifiers and calculated results will display the appropriate data qualifier. Example: results = 3, 6, <2, 1; average = (3+6+2+1)/4 = <3 as the less-than symbol to be preserved for the final calculation © 2014 AllMax Software, Inc. Reporting 313 Entered Value: Calculations will drop the data qualifiers from data and calculated results will display without the qualifiers using only the numeric entered portion of the data Example: results = 3, 6, <2, 1; average = (3+6+2+1)/4 = 3 as the less than symbol will be dropped for the final calculation Half Entered Value: Calculations will drop the data qualifiers from data and calculated results will display without the qualifiers using one-half the entered value of the data Example: results = 3, 6, <2, 1; average = (3+6+1+1)/4 = 2.75 as the less than symbol is dropped and 2 is divided in half for final calculation Zero: Calculations will drop the data qualifiers from data and calculated results will display without the qualifiers using zero (0) in place of any entered data Example: results = 3, 6, <2, 1; average = (3+6+0+1)/4 = 2.5 as the less than symbol is dropped and 0 is used in place of <2 for the final calculation Blank (no data): Calculations will drop the data qualifiers from data and calculated results will display without the qualifiers treating data entered with qualifiers to be seen as blank. Example: results = 3, 6, <2, 1; average = (3+6+1)/3 = 3.333 as the less than symbol is dropped and no data is used in place of <2 in the final calculation © 2014 AllMax Software, Inc. 314 Operator10 Help 9.7.7.1.2 BioSolids Application List - General Information General Information In the General Information section of the Bio App List Report setup: Report Name: Enter the desired report name (1 to 40 characters) for the Bio App List Report. This name is different than the report name shown in the Direct Access tree. Facility: Enter a facility name for the Bio App List Report. The default facility name will initially be filled in, modify this as necessary. Beginning Page #: Enter the beginning page number, if the report is greater than 1 page, Operator10 Wastewater will continue the numbering sequence. Leave this field blank if you simply want to start at page number 1. © 2014 AllMax Software, Inc. Reporting 315 9.7.7.1.3 BioSolids Application List - Comments Comments Enter default comments to be displayed on the printed report, if the []Allow Comments checkbox is checked in the General Properties section, users can edit these comments when printed. © 2014 AllMax Software, Inc. 316 9.7.7.2 Operator10 Help BioSolids Nutrient Report Bio Nutrient Report The BioSolids Nutrient Report allow users who have created a Biosolids-type facility, to review the defined nutrients of Biosolid sites. Users can add as many or as few sites to the report. The Bio Nutrient report generally shows the defined nutrients along with their levels and their applied values. There are 5 sections of the reports that can be setup for each report are: General Properties General Information Site Reporting Inclusions (Bio Nutrient Report) Comments 9.7.7.2.1 BioSolids Nutrient Report - General Properties General Properties In the General Properties section of the Bio Nutrient Report users can modify several options, including: © 2014 AllMax Software, Inc. Reporting 317 Page Adjustment and Print settings: Size (%): Enter a percentage to which you would like to reduce the printed form. X Offset: Adjust the X coordinate to which you would like to offset the printed form. Y Offset: Adjust the Y coordinate to which you would like to offset the printed form. []Allow Remarks Place a check in this checkbox to verify/enter comments at the time of printing the Bio Nutrient Report Treat <>~ Data As: Select from the drop-down menu to determine the method by which data with the less-than (<), greater-than (>) or non-detect (~) data qualifiers will be treated. Available options are: Preserve Types: Calculations will preserve the available data qualifiers and calculated results will display the appropriate data qualifier. Example: results = 3, 6, <2, 1; average = (3+6+2+1)/4 = <3 as the less-than symbol to be preserved for the final calculation Entered Value: Calculations will drop the data qualifiers from data and calculated results will display without the qualifiers using only the numeric entered portion of the data Example: results = 3, 6, <2, 1; average = (3+6+2+1)/4 = 3 as the less than symbol will be dropped for the final calculation Half Entered Value: Calculations will drop the data qualifiers from data and calculated results will display without the qualifiers using one-half the entered value of the data Example: results = 3, 6, <2, 1; average = (3+6+1+1)/4 = 2.75 as the less than symbol is dropped and 2 is divided in half for final calculation Zero: Calculations will drop the data qualifiers from data and calculated results will display without the qualifiers using zero (0) in place of any entered data Example: results = 3, 6, <2, 1; average = (3+6+0+1)/4 = 2.5 as the less than symbol is dropped and 0 is used in place of <2 for the final calculation © 2014 AllMax Software, Inc. 318 Operator10 Help Blank (no data): Calculations will drop the data qualifiers from data and calculated results will display without the qualifiers treating data entered with qualifiers to be seen as blank. Example: results = 3, 6, <2, 1; average = (3+6+1)/3 = 3.333 as the less than symbol is dropped and no data is used in place of <2 in the final calculation 9.7.7.2.2 BioSolids Nutrient Report - General Information General Information In the General Properties section of the Bio Nutrient Report setup: Report Name: Enter the desired report name (1 to 40 characters) for the Bio Nutrient Report. This name is different than the report name shown in the Direct Access tree. Facility: Enter a facility name for the Bio Nutrient Report. The default facility name will initially be filled in, modify this as necessary. Beginning Page #: Enter the beginning page number, if the report is greater than 1 page, Operator10 will continue the numbering sequence. Leave this field blank if you simply want to start at page number 1. © 2014 AllMax Software, Inc. Reporting 319 9.7.7.2.3 BioSolids Nutrient Report - Sites Site Each Nutrient report that is created can contain a number of Biosolid sites for which values can be reported. Follow these instructions to add sites to the report. 1. Press the [Add] button in the left pane of the Report Properties window, in the Location picklist that appears, select the Biosolid application site to be reported. Once selected, press the [Select] button. 2. Once the site has been added, brief information about that site will be visible in the right pane of the window. 3. To change sites once it has been added, press the [...] button. [Remove] Press the [Remove] button to remove the selected Site from the report. [Move Up/Dn] To reorder the sites to be reported, highlight a site in the list and press the [Move Up] or [Move Dn] button. © 2014 AllMax Software, Inc. 320 Operator10 Help 9.7.7.2.4 BioSolids Nutrient Report - Report Inclusions Reporting Inclusions (Bio Nutrient Report) Place a check or select an available option from the options on the right pane of the Report Properties window. For additional help regarding the information to be included, see the Biosolid Nutrients section of the Main Help file. Limit Type - Choose from the available Limit Types to be shown []Accum Sum []Year Sum []Month Sum []Soil Sample []Quarter Sum Not In Service - Select an option regarding the display of sites that are marked as Not In Service. ()Include ()Status Only ()Ignore © 2014 AllMax Software, Inc. Reporting 321 9.7.7.2.5 BioSolids Nutrient Report - Comments Comments: Enter default comments to be displayed on the printed report, if the []Allow Comments checkbox is checked in the General Properties section, users can edit these comments when printed. © 2014 AllMax Software, Inc. 322 9.7.7.3 Operator10 Help BioSolids Limit Report Bio Limit Report The BioSolids Limit Report allow users who have created a Biosolids-type facility, to review the defined limits of Biosolid sites. Users can add as many or as few sites to the report. The Bio Limit report generally shows the defined limits or warning levels of the identified parameters applied to the selected sites. There are 5 sections of the reports that can be setup for each report are: General Properties General Information Site Reporting Inclusions (Bio Nutrient Report) Comments 9.7.7.3.1 BioSolids Limit Report - General Properties General Properties In the General Properties section of the Bio Limit Report users can modify several options, including: © 2014 AllMax Software, Inc. Reporting 323 Page Adjustment and Print settings: Size (%): Enter a percentage to which you would like to reduce the printed form. X Offset: Adjust the X coordinate to which you would like to offset the printed form. Y Offset: Adjust the Y coordinate to which you would like to offset the printed form. []Allow Comments Place a check in this checkbox to verify/enter comments at the time of printing the Bio Limit Report Treat <>~ Data As: Select from the drop-down menu to determine the method by which data with the less-than (<), greater-than (>) or non-detect (~) data qualifiers will be treated. Available options are: Preserve Types: Calculations will preserve the available data qualifiers and calculated results will display the appropriate data qualifier. Example: results = 3, 6, <2, 1; average = (3+6+2+1)/4 = <3 as the less-than symbol to be preserved for the final calculation Entered Value: Calculations will drop the data qualifiers from data and calculated results will display without the qualifiers using only the numeric entered portion of the data Example: results = 3, 6, <2, 1; average = (3+6+2+1)/4 = 3 as the less than symbol will be dropped for the final calculation Half Entered Value: Calculations will drop the data qualifiers from data and calculated results will display without the qualifiers using one-half the entered value of the data Example: results = 3, 6, <2, 1; average = (3+6+1+1)/4 = 2.75 as the less than symbol is dropped and 2 is divided in half for final calculation Zero: Calculations will drop the data qualifiers from data and calculated results will display without the qualifiers using zero (0) in place of any entered data Example: results = 3, 6, <2, 1; average = (3+6+0+1)/4 = 2.5 as the less than symbol is dropped and 0 is used in place of <2 for the final calculation © 2014 AllMax Software, Inc. 324 Operator10 Help Blank (no data): Calculations will drop the data qualifiers from data and calculated results will display without the qualifiers treating data entered with qualifiers to be seen as blank. Example: results = 3, 6, <2, 1; average = (3+6+1)/3 = 3.333 as the less than symbol is dropped and no data is used in place of <2 in the final calculation 9.7.7.3.2 BioSolids Limit Report - General Information General Information In the General Properties section of the Bio Limit Report setup: Report Name: Enter the desired report name (1 to 40 characters) for the Bio Limit Report. This name is different than the report name shown in the Direct Access tree. Facility: Enter a facility name for the Bio Limit Report. The default facility name will initially be filled in, modify this as necessary. Beginning Page #: Enter the beginning page number, if the report is greater than 1 page, Operator10 will continue the numbering sequence. Leave this field blank if you simply want to start at page number 1. © 2014 AllMax Software, Inc. Reporting 325 9.7.7.3.3 BioSolids Limit Report - Sites Site Each Limit report that is created can contain a number of Biosolid sites for which values can be reported. Follow these instructions to add sites to the report. 1. Press the [Add] button in the left pane of the Report Properties window, in the Location picklist that appears, select the Biosolid application site to be reported. Once selected, press the [Select] button. 2. Once the site has been added, brief information about that site will be visible in the right pane of the window. 3. To change sites once it has been added, press the [...] button. [Remove] Press the [Remove] button to remove the selected Site from the report. [Move Up/Dn] To reorder the sites to be reported, highlight a site in the list and press the [Move Up] or [Move Dn] button. © 2014 AllMax Software, Inc. 326 Operator10 Help 9.7.7.3.4 BioSolids Limit Report - Report Inclusions Reporting Inclusions (Bio Limit Report) Place a check or select an available option from the options on the right pane of the Report Properties window. For additional help regarding the information to be included, see the Biosolid Limits section of the Main Help file. Include - Choose to display Limits and/or Warnings (%) []Limits []Warnings Limit Type - Choose from the available Limit Types to be shown []Accum Sum []Year Sum []Month Sum []Soil Sample []Quarter Sum Agency - Select the appropriate agency limits to be included on the report © 2014 AllMax Software, Inc. Reporting 327 []Federal []State []Local Not In Service - Select an option regarding the display of sites that are marked as Not In Service. ()Include ()Status Only ()Ignore 9.7.7.3.5 BioSolids Limit Report - Comments Comments: Enter default comments to be displayed on the printed report, if the []Allow Comments checkbox is checked in the General Properties section, users can edit these comments when printed. © 2014 AllMax Software, Inc. 328 9.8 Operator10 Help About About The About dialog shows current information about the application including copyright and version numbers for Operator10 - Wastewater Reporting Software. © 2014 AllMax Software, Inc. Part X 330 10 Operator10 Help Sampling Events Sampling Events The Sampling Events section is provided to track supporting information about a sampling event. This information would be similar to the information that would be on a chain of custody or laboratory bench sheet. To access the Sampling Events section click the View ribbon and select Sampling Events... or click on the icon in the toolbar. SAMPLING EVENT LIST The sampling event application has two displayed grids. The upper grid, or Eventlevel, displays a list of sampling events that have been entered, along with the information associated with the event: Facility, Date, Location, COC# (Chain of Custody #), Employee, Sample Type, Sample #, Sampler #, Collection Method, Lab Certification, Sampling Time, Duration, Status, Comments and more... The lower grid, or Parameter-level allows specific information about the tests performed on the sample to be added, such as: Parameter, Units, Multi-Values (when applicable), Result, Method #, Bottle #, Previous #, Special, Analysis Date, Analyst Number, Comments, and more... Test results can be entered or modified at the Parameter grid. If data already exists in the database, it will be displayed. Information can be entered into all columns. The navigation toolbar includes add, delete, group and allows a forward or backward search through the records. Grouping, filtering and sorting capabilities are available for all columns displayed in each grid. NOTE: The grids displayed in the Sampling Event section of Operator10 - Wastewater have the general properties of the Grid and Grid Edit windows. (For more information about these sections, please see the topic: Grid Functionality). © 2014 AllMax Software, Inc. Sampling Events 331 The Sampling Events section displays information related to the samples taken as well as data. Sampling Events Topics Additional Sampling Events topics include: Sampling Event Detail Add Sampling Event Delete Sampling Event Print Sampling Event 10.1 Sampling Event Detail SAMPLING EVENT DETAIL In the lower portion of the Sampling Event window, the Parameter-level information will be displayed. Parameters assigned to the Location of the selected Sampling Event are displayed automatically. In this area, users may enter results and testing information as it pertains to the selected parameter(s). Data Entry There are three possible types of data entry permitted for Location:Parameters in the Sampling Event program: 1. Multiple Values - For results that require more than a single daily value to be recorded, multiple value entries can be made. Location:Parameter setup will dictate which option is available, but 2 options exist. 1. Mulitple Daily Values - For Location:Parameters that are set for Daily Data Entry, multiple values can be entered and summarized as a single daily result as chosen by the user. (See Image 1 below) © 2014 AllMax Software, Inc. 332 Operator10 Help 2. Hourly Values - For Location:Parameters that are set for Hourly Data Entry, hourly values can be entered and summarized as a daily result as selected in the Location:Parameter setup. (See Image 2 below) 2. Result - For a daily value, enter the result in this column. For Location:Parameters that are set for Hourly Data Entry or that have used Multiple Values for entry, the summarized result will be displayed here. Image 1 - Multiple Values: Enter multiple single results for select parameters and summarize © 2014 AllMax Software, Inc. Sampling Events 333 Image 2 - Hourly Values: Enter hourly results for select parameters 10.2 Add Sampling Event ADD SAMPLING EVENT To add a new sampling event, click the [Add] button in the toolbar. A pop-up window will be displayed, allowing you to enter all pertinent information about the Event. © 2014 AllMax Software, Inc. 334 Operator10 Help ADD SIMILAR SAMPLING EVENT If a sampling event that has occurred is similar to an event that has already been entered into the Sampling Events section, adding a similar sampling event will allow users to copy and modify information for this new event based on previous events. To Add a Similar Sampling Event, select an existing Sampling Event and click the dropdown arrow beside the [Add] button and choose Add similar Sampling Event. In the Sampling Event window that appears, information will be present based on the selected record. Place a check in the box for [ ] Include Parameters located in the top-most portion of the window. This will ensure that similar parameter-level data is copied as well. Click the 10.3 [Save] button to continue. Delete Sampling Event DELETE SAMPLING EVENT To delete a sampling event, single-select or multi-select a group of records, click the [Delete Sampling Event] button in the toolbar. You will be prompted to answer [Yes] or [No] before the record is deleted. © 2014 AllMax Software, Inc. Sampling Events 335 NOTE: When applicable, users may choose to delete accompanying data from the database. This data would include multiple value results, hourly data and daily data. 10.4 Print Sampling Event PRINT SAMPLING EVENT To print a list-style or detail report of Sampling Events and their data, click the [Print] button to begin. To view all available printing options, click the arrow to the right of the print icon. Choose from additional options to print specific reports. © 2014 AllMax Software, Inc. Part XI Notes 11 337 Notes Notes Notes can be entered as they relate to specific data entered into the application (Quick Notes) as well as for day-to-day operation (Operator Notes). The Notes section provides access to the notes stored in the database as well as the ability to add, edit and delete notes. The Operator Notes section displays notes entered for data as well as day-to-day notes. Accessing Operator Notes The Notes section can be accessed by going to the View menu/ribbon and clicking the [Notes] button. Add Note To create a new note, click the [Add] button to begin. Enter a date/time stamp for the note by clicking the [...] button. © 2014 AllMax Software, Inc. 338 Operator10 Help Begin entering notes or comments in the text entry field that appears at the bottom of the window. Check the [ ] Protected checkbox to indicate that this note should not be edited by other users. Edit Note To edit an existing note, highlight the note in the grid and click the to begin editing the note. [Edit] button Delete Note To delete an existing note, highlight the note in the grid and click the [Delete] button to delete the note. Confirm the deletion of the note by clicking the [Yes] or [No] button. © 2014 AllMax Software, Inc. Part XII 340 12 Operator10 Help Interfaces Topics in this section include: OPC/DDE Interface 12.1 OPC/DDE Interface OPC/DDE Interface Application NOTE: Access to the OPC/DDE Interface requires OPC/DDE Interface License, consult with AllMax Account Representatives or Technical Support for more information. The AllMax OPC/DDE Interface (OLE for Process Control)/(Dynamic Data Exchange) is a separate Client/Server application that can be used both to Retrieve data on a Daily or periodic (Real-Time) basis, and to allow DDE Access to Operator10 data values. Data can be exchanged with any running application which supports OPC or DDE Linking. Since the OPC/DDE Interface application is able to both share and retrieve data, it is technically known as both a DDE Server, a DDE Client, and an OPC Client. It is capable of linking with any running application which supports OPC or DDE links, such as most SCADA software, Microsoft Excel or Access, Wonderware InTouch Viewer, or Intellution FIX. OPC/DDE Interface Application Overview OPC/DDE Interface Main Window Start/Stop Buttons Add, Edit, Remove, Print, Setup, Log Buttons OPC/DDE Links Listbox OPC/DDE Link Definition DDE Link Examples DDE Server Functionality DDE Error Codes NetDDE (Network DDE) © 2014 AllMax Software, Inc. Interfaces 341 (Image has hotspots, click to view more information) 12.1.1 OPC/DDE Interface Overview OPC/DDE Interface Application Overview The AllMax Operator10® OPC/DDE Interface (OLE for Process Control)/(Dynamic Data Exchange) is a separate Client/Server application that can be used both to Retrieve data on a Daily or periodic (Real-Time) basis, and to allow DDE Access to Operator10 data values. Data can be exchanged with any running application which supports DDE Linking. Since the DDE Interface application is able to both share and retrieve data, it is technically known as both a DDE Server and a DDE Client. It is capable of linking with any running application which supports DDE links using the ASCII text format, such as Microsoft Excel or Access, Wonderware InTouch Viewer, or Intellution FIX. When the application is started, sign in with a User Name and Password that has been assigned OPC/DDE rights for a "DEFAULT" Facility. As an OPC or DDE Client, the AllMax Operator10® OPC/DDE Interface can retrieve and summarize data from several data sources. See the OPC/DDE Interface Main Window help topic for complete information. As a DDE Server, the AllMax Operator10® OPC/DDE Interface provides an individual data or formula value, or a month or hourly range of values. The Facility which is to be accessed MUST be configured to "Allow sharing of Facility data" in the Facility Options. The data is identified by specifying the Facility, optional Formula, Location, Parameter, and optional Date with optional time. See DDE Server Functionality for complete information. The DDE Link format is as follows: Service: OP10 Topic: DATA or MONTH or HOUR or FORMULA or DV Item: facility[.dataview][[.formula].location.parameter][.[<]date[ [<][#][time] [00:00]] © 2014 AllMax Software, Inc. 342 Operator10 Help 12.1.2 OPC/DDE Main Window OPC/DDE Interface Main Window The AllMax Operator10® OPC/DDE Interface Main Window provides complete OPC/DDE Client capabilities. Click on any item below for additional information: (Image has hotspots, click to view more information) 12.1.2.1 OPC/DDE Link List OPC/DDE Links Listbox The OPC/DDE Links Listbox displays list of all created OPC/DDE Links. The listed order can be sorted by clicking the header of the desired column (Name, Location:Parameter, Item, Data Type). To view Link details, simply highlight the OPC/DDE Link--the details will appear to the right side of the dialog box in the Link Status frame. To edit Link details, simply highlight the OPC/DDE Link, and click the [Edit] button to modify the link. NOTE: Any links which are inactive (have been reset, or are scheduled for zero times per day) appear at the end of the Listbox with a date and time of zero. 12.1.2.2 OPC/DDE Add/Remove/Print/Setup/Log OPC/DDE Add, Edit, Remove, Print, Setup, Log Buttons [ADD] Press the [Add] button to begin the process of adding a new OPC/DDE Link. (see: © 2014 AllMax Software, Inc. Interfaces 343 OPC/DDE Link) [EDIT] Press the [Edit] button to edit an existing link. (see: OPC/DDE Links) [REMOVE] Press the [Remove] button to remove a selected OPC/DDE Link. When prompted acknowledge the removal by pressing [Yes] or [No]. [PRINT] Press the [Print] button to print the list of OPC/DDE links. [SETUP] Press the [Setup] button to view the setup configuration of the Operator10 OPC/DDE Interface (see: OPC/DDE Setup) [LOG] Press the [Log] button to show the OP10_DDE.LOG log file (see: OPC/DDE Log) 12.1.2.3 OPC/DDE Start & Stop Start and Stop Buttons Press the [Start] button to start the internal timer which controls when OPC/DDE Links are enacted. The Current Date and Time will be displayed and update while the timer is running. Any overdue Links will be immediately enacted, and Daily Summary information collected. The links will continue to be enacted at their set times, even if the OPC/DDE Interface window is iconized or hidden behind other windows. Press the [Stop] button to stop or pause the internal timer. The Current Date and Time display will freeze, and no links will be enacted. Daily Summary information remains unchanged. 12.1.3 OPC/DDE Links OPC/DDE Links The addition or editing of links is performed using the OPC/DDE Link dialog seen below. Link Name AllMax Definition Server Definition Schedule © 2014 AllMax Software, Inc. 344 Operator10 Help (Image has hotspots, click on sections to learn more!) 12.1.3.1 OPC/DDE Link Name OPC/DDE Link Name Enter the Link Name (1 to 30 characters) for an OPC or DDE Link to be created. The name must be unique, and will be shown in the OPC/DDE Links Listbox and Log File. Check the [ ] Enabled checkbox to tell the OPC/DDE Interface to read this at the next scheduled time. 12.1.3.2 OPC/DDE Link AllMax Definition AllMax Database Definition A valid Facility, Location:Parameter, and Data type must be specified for each OPC/DDE Link. Press the [...] button beside the Parameter field to select the Facility, Location and Parameter together. Choose a the Data Type in the Save Data As: frame from the drop-down list boxes. Daily : A single data value is stored for each day. © 2014 AllMax Software, Inc. Interfaces 345 Daily - Current Day: A single data value is obtained each day. Daily - Previous Day: A single data value is obtained each day, but it is written to the previous day. Time: A single data value is obtained each time interval as selected from the second drop-down list box. Time - Actual Time: A single data value is stored as hourly data using the current time. Hourly - Hourly, 30, 15, 10, 5 Minute Precision: Any value received is Quantized to force data to be moved to the preceding 60, 30, 15, 10, or 5 minute interval. (For example, a 15 minute interval will force data from 08:25 to 08:15.) Summary: Multiple retrieved values are summarized for the day then written once as a daily value. Daily Sum, Average, Maximum, Minimum, Count, and Geometric Mean: Multiple retrieved values are summarized for the day, then written once as a daily value according to the selected calculation type. 12.1.3.3 OPC/DDE Link Server Definition OPC/DDE Link Server Definition The data value returned by a OPC/DDE (OLE for Process Control)/(Dynamic Data Exchange) Link with another application requires specific Service, Topic, and Item DDE strings, or Node, Server, and Item OPC strings (see documentation of the other application). Retrieving data via OPC/DDE links is very dependent upon another application, and may therefore be somewhat slower than other data transfers, especially if the link must "time out" because of errors. In most cases, the other application must be running and the appropriate file must be open. Operator10 ® DDE Links require the other DDE application to be able to return a single value in the ascii text (CF_TEXT) format. For DDE Links: The Server string (1 to 30 characters) is usually the name of the application, the Topic string (1 to 90 characters) is usually the filename and/or page, and the Item string (1 to 90 characters) is usually a reference to the specific data. The Service, Topic, and Item strings for a DDE Link which has been copied to the Windows clipboard may be entered by pressing the [Paste] button. For OPC Links: The optional Node string (0 to 30 characters) is the name or IP address of the of the workstation where the server is running, the Server string (1 to 90 characters) is the name of the OPC Server, and the Item string (1 to 90 characters) is a reference to the specific data. Enter an optional Node string, or choose from a PickList by pressing the [...] popup button. If the Node string is left blank, the local workstation is assumed. © 2014 AllMax Software, Inc. 346 Operator10 Help Enter the Server string, or if a valid Node is already entered (or the Node is blank), choose from a PickList by pressing the [...] popup button. Enter the Item string, or if a valid Server is already entered, choose from a PickList by pressing the [...] popup button. For both Link types: The [Test] button allows users to test communication with the selected Server or Node. Press the button to see a display of the value collected at the time of pressing [Test]. 12.1.3.4 OPC/DDE Link Schedule Definition OPC/DDE Link Schedule Definition The OPC/DDE Link Schedule controls when, and how often, links are enacted each day. Press the [Schedule] button to schedule the OPC/DDE Link. In the window that opens, choose the appropriate interval from the Schedule Task: dropdown list box. In the Start time: list box, select the appropriate time to begin collecting data each day. Press the [Advanced] button to view advanced features. NOTE: Choose Daily then a Start time, and then press [Advanced] to schedule the link to be read on an hourly basis or on an interval of minutes. NOTE: Users unfamiliar with Windows Task Scheduler should contact AllMax Software Technical Support for help and insight into scheduling with the new OPC/DDE Interface. © 2014 AllMax Software, Inc. Interfaces 347 12.1.3.5 OPC/DDE Link Examples DDE Link Examples The following examples describe common DDE Service, Topic, and Item strings for other applications. See documentation of the other application for details. The Service string is usually the name of the application, the Topic string is usually the filename and/or page, and the Item string is usually a reference to the specific data. Microsoft Excel example: Server:EXCEL Topic:[filename or bookname]sheetname (e.g. [Book1.xls]Sheet1) Item:R#C# (e.g. R1C4) Microsoft Access example: Server:MSACCESS Topic:filename;TABLE tablename (e.g. DB1.mdb;TABLE OP10Data) Item:DATA Microsoft Word example: Server:WINWORD Topic:filename (e.g. C:/MyDocs/Document1.doc) Item:bookmark (e.g. DDE_LINK1) © 2014 AllMax Software, Inc. 348 Operator10 Help Wonderware InTouch Viewer example: Server:VIEW Topic:TAGNAME Item:tagname (e.g. RawFlow) Intellution FIX example: Server:DMDDE Topic:DATA Item:node:tag.field (e.g. NODE1.TEMP.A_CV) Citect example: Server:CITECT Topic:VARIABLE Item:variable tag (e.g. FILTER_TANK_LEV) LookOut example: Server:LOOKOUT Topic:process file (e.g. svgaeval) Item:object (e.g. RawFlow) RSLinx example: Server:RSLINX Topic:station (e.g. S1) Item:label (e.g. F8:25) 12.1.4 OPC/DDE Functionality Topics in this section include: OPC/DDE Setup OPC/DDE Log OPC/DDE Error Codes DDE Server Functionality NetDDE 12.1.4.1 OPC/DDE Setup OPC/DDE Setup In the OPC/DDE Setup window users of the Operator10 OPC/DDE Interface can modify certain aspects of data collection. © 2014 AllMax Software, Inc. Interfaces 349 License Path: To store data in a location other than the directory/folder where the OPC/DDE Interface is running from, press the [...] button to navigate and direct the interface to the correct location for data storage. Group ID: If you are using the OPC/DDE Interface on multiple computers and would like to create groups, select a Group ID from the drop-down list for each instance of the OPC/DDE Interface. For more information, contact the AllMax Software Technical Support Department. Logging: Check the [ ] Log Data Values checkbox to show all data retrieved by OPC/DDE Links. The data collection written to the database is also recorded in the log file. NOTE: It is recommended that the []Log Data Values checkbox is left unmarked, to decrease the size of the log file and increase the speed of OPC/DDE Links. The option is provided for verification of data values and Data Summary information, or where a detailed record of data entry is required. Sampling Intervals Fill in a value (in minutes) for the OPC/DDE Interface to poll for active links. Midnight Avoidance: If the OPC/DDE Interface should avoid writing values before or after midnight, enter a number of minutes. © 2014 AllMax Software, Inc. 350 Operator10 Help DDE Links: Timeout: The timeout value, measured in milliseconds, tells the OPC/DDE Interface how long it should try to collect a reading before timing out. "N/A" string: If the application the OPC/DDE Interface is to read from has a specific string for blank data, enter it here. 12.1.4.2 OPC/DDE Log OPC/DDE Log The OPC/DDE Log, found in the main application directory, using the Windows Notepad application. The file includes dates and times for all events such as Loading and unloading the application, Starting, Stopping, and Resetting the timer, and and any errors encountered. In the Setup section, if the [ ]Log Data checkbox is marked, all data retrieved by OPC/DDE Links and written to the database is also recorded in the log file. NOTE: It is recommended that the [ ]Log Data checkbox is left unmarked, to decrease the size of the log file and increase the speed of OPC/DDE Links. The option is provided for verification of data values and Data Summary information, or where a detailed record of data entry is required. 12.1.4.3 OPC/DDE Error Codes DDE Error Codes DDE Link errors may show the following Error Codes: 01 Advise Timeout 02 Busy 03 Data Timeout 04 DLL Not Initialized 05 DLL Usage 06 Exec Timeout 07 Invalid Parameter 08 Low Memory 09 Memory Error 10 Not Processed 11 No Conversation 12 Poke Timeout 13 PostMessage Failed 14 Reentrancy 15 Server Died 16 System Error 17 Unadvise Timeout © 2014 AllMax Software, Inc. Interfaces 18 351 Queue ID Not Found 12.1.4.4 DDE Server Functionality DDE Server Functionality As a DDE Server, the AllMax Operator10® OPC/DDE Interface provides an individual data or formula value, or a month or hourly range of values. The Facility which is to be accessed MUST be configured to "Allow sharing of Facility data" in the Facility Options. The data is identified by specifying the Facility, optional Formula, Location, Parameter, and optional Date with optional time. The DDE Link format is as follows: Service: OP10 Topic: DATA or MONTH or HOUR or FORMULA or DV (see below) Item: facility[.dataview][[.formula].location.parameter][.[<][date][ [<][#][time] [00:00]] (see below) (see below for specific usage examples) The returned value for the each Topic is as follows: DATA: the actual data value as a text string, including Less Than, Greater Than, NonDetect values, Time values, or Alpha Codes. MONTH: the daily data values for the entire month, each on a separate line, as a single text string, including including Less Than, Greater Than, Non-Detect values, Time values, or Alpha Codes. HOUR: the 24 hourly data values for the entire day, each on a separate line, as a single text string, including Less Than, Greater Than, Non-Detect values, Time values, or Alpha Codes. DV: the daily or hourly data values for an entire DataView, each separated by tabs with each day or hour on a separate line, as a text string, including Less Than, Greater Than, Non-Detect values, Time values, or Alpha Codes. FORMULA: the result of the formula as a text string. The formula uses the location, parameter, and date specified as if it was being calculated in the main Operator10 application. SYSTEM: the text string corresponding to the result of several Windows-specified topic strings such as "SysItems", "Topics", "Formats", "Status", or "Version". NOTE: If any data does not exist, the string "#N/A" is substituted. The Item string is specified as follows: facility: the facility name (1 to 31 characters) (required for all topics) dataview: the dataview name (1 to 31 characters) (required for DV Topic, illegal for others) formula: the formula name (1 to 31 characters) (required for FORMULA Topic, illegal for © 2014 AllMax Software, Inc. 352 Operator10 Help others) location: the location name (1 to 16 characters) (required for DATA, MONTH, HOUR, FORMULA Topics, illegal for others) parameter: the parameter name (1 to 16 characters) (required for DATA, MONTH, HOUR, FORMULA Topics, illegal for others) date: the date in any valid format (optional, but required by time) (see also: Date) If the '<' prefix is used, the previous day's date is substituted. If the date is omitted, the current system date is assumed. time: the time in any valid format (optional, but requires date) (see also: Time) If the '<' prefix is used, the previous hour is substituted. If the '#' prefix is used, the whole hour is substituted. For example, 02:01 through 03:00 is considered as 03:00. If the hour is "00:00", the current system time is assumed. NOTE: If either or both of the '<' and '#' prefixes are used, the hour may be omitted and the current system time is assumed. NOTE: All components are separated by the '.' (period) character, except for the date and time which are separated by a space. For example, Item "AllMax WasteWater Sample Data.Inf Dom.00400.01/02/10 08:00" would retrieve hourly data from 01/02/2010 at 8:00am from Location:Parameter "Inf Dom:00400" of the "AllMax WasteWater Sample Data" Facility. Or, use "AllMax WasteWater Sample Data.Inf Dom.00400.01/02/10" for the daily value, or "AllMax WasteWater Sample Data.Inf Dom.00400" to receive the daily value for today's current date. Or, use "AllMax WasteWater Sample Data.Disinfection Process" to receive all the daily values for the DataView using the current month. Note that each major portion of the Item is separated by the "." character, and no additional spaces are introduced other than between the date and time. The Item is not case specific. To retrieve OP10 data values in Microsoft Excel, for example, the format for a cell would be "=OP10|DATA!'AllMax WasteWater Sample Data.Inf Dom.00400.01/02/10' ". Note that Excel requires the pipe character "|" and exclamation point "!" to separate Service, Topic, and Item portions, and it also requires all portions with embedded spaces to be surrounded by single quote characters " ' ". NOTE: The DDE Server can support both "hot" links (automatically updated) as well as the normal static links. To refresh the data supplied over "hot" links, use either the DDE_A() function during calculations or the Data|Data Utilities|DDE Advise menu item in the Operator 10 main application. NOTE: DDE Server capabilities are also provided by the Operator10 main application, since both load a common .DLL file. For most users, however, the OPC/DDE Interface is more practical because of its ability to act as a OPC/DDE Client, its small memory requirements (especially if it must stay loaded at all times), and its ability to be run without requiring an additional user license for multi-user installations. © 2014 AllMax Software, Inc. Interfaces 353 12.1.4.5 NetDDE NetDDE (Also known as: Network DDE) NetDDE (Network Dynamic Data Exchange) services allow DDE links between different computers over a network. The NetDDE services are usually included in the Microsoft Windows operating system, but may need to be started and configured. "Shares" must be set up on any computer which will serve or "share" DDE data. Run the DDE Share utility (DDESHARE.EXE, usually found in the System directory/folder) to create and configure shares. The AllMax Operator10® OPC/DDE Interface is fully compliant as both a NetDDE Server and a NetDDE Client. It is capable of linking with any running application which supports DDE links using the ASCII text format, such as Microsoft Excel or Access, Wonderware InTouch Viewer, or Intellution FIX. To set up a NetDDE link: 1) Run the DDE Share utility on the computer where the software that provides data will be running. 2) Add a new Share: In the list of shares, press the [Add a Share] button. For the Share Name, enter a name ending with a "$" character. For the Static Application Name, enter the DDE Service string for the application. For the Static Topic Name, enter the DDE Topic string for the application. Mark the [] Is Service checkbox, to eliminate extra verification 3) "Trust" the new share Highlight the new share in the list of shares and press the [Trust Shares] button. Mark the [] Start Application Enable and [] Initiate to Application Enable checkboxes. Press the [Set] button to Set the trust. In the AllMax Operator10® OPC/DDE Interface, specify the new NetDDE share: Service: \\computername\NDDE$ (where computername is the network identifier for the computer) Topic: sharename$ (where sharename$ is the Share Name entered in the DDE Share Utility) Item: R#C# (e.g. R1C4) Microsoft Excel example: Run DDE Share on a computer named "SRVR003", create a new Share, and "Trust" it using these names: Share Name: Excel_Book1$ Static Application Name: EXCEL Static Topic Name: [filename or bookname]sheetname (e.g. [Book1.xls]Sheet1) In the AllMax Operator10® DDE Interface, set up a DDE Link for: Service: \\SRVR003\NDDE$ Topic: Excel_Book1$ Item: R#C# (e.g. R1C4) © 2014 AllMax Software, Inc. Part XIII DataPort 13 355 DataPort Topics in this section include: DataPort Sync - Select L:Ps DataPort Setup AllMax Folder Software Operator10 DataPort Software 13.1 DataPort Sync - Select L:Ps DataPort Sync - Select L:Ps The DataPort Sync - Select L:Ps option allows users identify Location:Parameters for which readings and results should be entered on the DataPort Handheld Device using the Operator10 application. This allows users to potentially scan barcodes, enter and save results while in the field. The device will capture and store data as entered by users. Individual users can be created and L:P lists can be maintained independently from other users. Accessing DataPort Sync - Select L:Ps To access the Location:Parameter selection tool, go to the Setup ribbon/menu and choose the [Select L:Ps] button. Selecting L:Ps To select Location:Parameters to be sent to the DataPort when the HotSync operation is performed, follow these steps: 1. In the DataPort Sync window, click the [Add] button 2. In the window that opens press the [...] button to select a DataPort User ID for which the L:P should be exported a. Unlimited users can be created and individual lists can be maintained for each created user; the lists will export independently of one another and be used only when the appropriate ID is entered when performing the HotSync 3. In the Facility Name field, press the [...] button to choose a Facility from which the L:P will be selected 4. In the Location:Parameter field, press the [...] button to choose individual or multiple Location:Parameters to be exported for the selected User ID 5. Press the [Save] button to commit the selections to the database Repeat the steps above as needed to produce a list of Location:Parameters for each DataPort user. © 2014 AllMax Software, Inc. 356 Operator10 Help Export L:P Lists Once the L:P lists have been built for DataPort Users, the data must be exported as files that the DataPort HotSync operation can use to populate the DataPort with data. In the DataPort Sync window, find the [Export Location:Parameter list to DataPort] button. Press the button to build the lists. Text-based, indexed lists of Location:Parameters will be built to the database directory. Repeat the Export step following the addition (or removal) of the desired Location:Parameters. HotSync Once lists of Location:Parameters have been exported, users should perform a HotSync operation to sync the selected Location:Parameter lists to the DataPort. See the DataPort HotSync topic for more information. 13.2 DataPort Setup Prior to use of the DataPort, the following basic steps must be performed in order for proper communication between the HotSync support, Operator10 - Wastewater and DataPort. The communication chain allows for the transfer of data to and from the DataPort and Operator10 - Wastewater applications. 1. Install Palm Desktop Software, version 4.1.4 as provided by AllMax Software 2. Install Operator10 - Wastewater HotSync Support 3. Select Location:Parameters 4. Export Location:Parameter lists 5. Perform HotSync Each of the basic steps will potentially require additional steps to be taken. Contact AllMax Software technical support for more information or refer to the linked help topics mentioned above. 13.3 AllMax Folder Software AllMax Folder Software The AllMax DataPort Folder Software provides easy access to the whole line of DataPort software products: Operator10 - for Operator10 users Antero™ DataPort Meter/Gauge Software - for Antero™ users Antero™ DataPort Parts/Material Software - for Antero™ users Antero™ DataPort Work Order Software - for Antero™ users 3Com® HotSync® Utility - for all users Installation © 2014 AllMax Software, Inc. DataPort 357 Main Window Menu Bar Preferences Security 13.3.1 Installation Installation Software installation for the AllMax Folder requires only one step: Installing Software into the DataPort The OP10 DataPort handheld data entry unit available from AllMax will usually have the AllMax Folder Software pre-installed. Additionally, the same software can be used on 3Com PalmOS compatible PDAs, but without scanning capabilities. If you need to install or reinstall the software into a handheld unit, follow these steps: In the Operator10 - Wastewater main application, select the Setup ribbon/menu, DataPort group, Setup icon and choose Install AllMax software into DataPort menu item. If more than one handheld is used on the workstation, select the appropriate Username when requested. Press the [Done] button in the confirmation dialog. Note that the software will be installed during the next HotSync operation. © 2014 AllMax Software, Inc. 358 Operator10 Help Press the HotSync button on the DataPort cradle to initiate a HotSync action and transfer the software. NOTE: This step does not need to be repeated on multiple workstations, but should be repeated for multiple DataPort handheld units. 13.3.2 Main Window Main Window The AllMax Folder Software Main Window contains icons representing available software. Tap the icon to run the corresponding software. When the software is closed by tapping its [Exit] button, control returns to the Main Window. Icons may be disabled (hidden) or enabled (shown) by setting the Preferences. Security may be enforced for all DataPort applications. Contact AllMax for additional information. Enter a DataPort ID (1 to 3 characters) to identify the data to transfer to the DataPort during a HotSync. Tap the [X] button to exit the software. NOTE: The Battery Meter is displayed at the top of the window. The notch represents the battery level necessary for scanning. NOTE: The Menu Bar is activated by tapping the title bar, or the [Menu] silkscreen at the left of the Graffiti area. 13.3.3 Menu Bar Menu Bar The Menu Bar is activated by tapping the [Menu] silkscreen at the left of the Graffiti area. 13.3.4 Preferences Preferences Several Icons may be enabled (and shown) by highlighting their corresponding PushButton: Operator 10® Operations © 2014 AllMax Software, Inc. DataPort Antero™ Meter/Gauge Antero™ Parts/Material Antero™ Work Order 3Com® HotSync® 13.3.5 Security Security Security may be enforced for all DataPort applications. Security requires selections by BarCode Scanning instead of using the PickLists, and always saves hourly data according to the system time. NOTE: Contact AllMax for additional information and password. 13.4 Operator10 DataPort Software Operator10 - Wastewater DataPort Software The Operator10 - Wastewater DataPort software provides easy entry of data for © 2014 AllMax Software, Inc. 359 360 Operator10 Help Operator10 Wastewater, Water and Synexus users. Installation About Calendar Graffiti Help KeyPad Main Window Menu Bar Note PickList Preferences Remove Record Review Data Scanner Shortcuts Time Tips Undo/Cut/Copy/Paste/Select All © 2014 AllMax Software, Inc. DataPort 361 13.4.1 About About (Options | About) In addition to copyright and trademark information, the About dialog provides version information for the software and scanner drivers. 13.4.2 Calendar Calendar Tap the calendar to select the date. © 2014 AllMax Software, Inc. 362 Operator10 Help 13.4.3 Graffiti Help Graffiti Help Common Graffiti strokes are illustrated through Graffiti Help. NOTE: An alternative to graffiti is the internal popup keyboard, accessible by tapping the "abc·" logo at the bottom left corner of the graffiti area. © 2014 AllMax Software, Inc. DataPort © 2014 AllMax Software, Inc. 363 364 Operator10 Help 13.4.4 HotSync HotSync The DataPort HotSync operation is responsible for transmitting data between the Operator10 - Wastewater application and DataPort. HotSync operations can be initiated from the DataPort cradle (hardware button) or from the HotSync app found on the DataPort Home screen (software button) as well as the AllMax Folder application on the DataPort. When initiated, the HotSync manager application should be visible on screen and the transfer of data will begin. 13.4.5 Installation Installation Software installation for the DataPort requires these four steps: Installing the HotSync Software on a Workstation Installing the Operator10 HotSync Support Installing Software into the DataPort © 2014 AllMax Software, Inc. DataPort 365 Export Location:Parameters for the DataPort 1. Installing the HotSync Software on a Workstation Install the 3Com HotSync support software according to the provided instructions. If this is the first time you have installed the software, enter the name that will be used to identify the DataPort handheld unit. 2. Installing the OP10 HotSync Support HotSync conduits provide data exchange capabilities between the DataPort handheld and the Operator10 - Wastewater main application. In the Operator10 - Wastewater main application, select the Setup ribbon/menu, DataPort group, Setup icon and choose Install HotSync Support menu item. If the HotSync Manager is already loaded in the workstation's system tray, it must be restarted for the new support to take effect. 3. Installing Software into the DataPort The DataPort handheld data entry unit available from AllMax will usually have Operator 10® software preinstalled. Additionally, the same software can be used on 3Com PalmOS compatible PDAs, but without scanning capabilities. If you need to install or reinstall the software into a handheld unit, follow these steps: In the Operator10 - Wastewater main application, select the Setup ribbon/menu, DataPort group, Setup icon and choose Install Operator10 software into DataPort menu item. If more than one handheld is used on the workstation, select the appropriate Username when requested. Press the [Done] button in the confirmation dialog. Note that the software will be installed during the next HotSync operation. Press the HotSync button on the DataPort cradle to initiate a HotSync action and transfer the software. NOTE: This step does not need to be repeated on multiple workstations, but should be repeated for multiple DataPort handheld units. 4. Export Location:Parameters for the DataPort In the Operator10 - Wastewater Main Application, go to the setup ribbon/menu and choose Select L:Ps and review the list of Location:Parameters to be exported. For more information on this process, see the DataPort Sync - Select L:Ps topic. Once all Location:Parameters are selected, find the toolstrip button to export the list. The Location:Parameter list will be installed during the next HotSync operation. (This step does not need to be repeated on multiple workstations.) Press the HotSync button on the DataPort cradle to initiate a HotSync action and transfer the software. © 2014 AllMax Software, Inc. 366 Operator10 Help NOTE: This step does not need to be repeated on multiple workstations, but should be repeated whenever exported Locations or Parameters are changed. 13.4.6 Keypad KeyPad (Main Window [Key] button) A popup KeyPad is available for entry of data values. 13.4.7 Main Window Main Window The DataPort Main Window is the central screen for data entry. All scanning should take place from this window. Tap the [Date] selector to set the date by using a popup calendar. If hourly data entries are entered, tap the [Time] selector to edit the time. The default setting , the [Use System] pushbutton, always uses the current DataPort time, but by selecting the [Use Entered] pushbutton a specific time may be entered for hourly data. Daily data values ignore time settings. Facility, Location, and Parameter may be scanned, selected from a PickList, or entered using graffiti. Enter a data Value using the popup KeyPad by tapping the [Key] button. Data values may also be entered by using graffiti, or the scanner. All data types (Daily or Hourly values, Less Than, Greater Than, or Non-Detect values, Time values, or Alpha Codes.) are supported. Enter "- -" or "blank" to enter a BLANK data value. © 2014 AllMax Software, Inc. DataPort 367 Tap the [Value] selector to quickly select the entire data Value text for replacement or editing. The Minimum (lo:) and Minimum (hi:) data entry limits, and the Parameter units, are shown below the value, when available. Tap the [Save] button to store the data. The data will be transferred during the next HotSync operation. If a valid combination of Facility, Location, and Parameter is not entered, or the format of the data Value is not recognized, or the value is not within the data entry limits, an error message is displayed. If all data is valid, a confirmation message is displayed. If a data value already exists for that combination of Facility, Location, Parameter, and Date (and Time), a warning message is displayed, with the option to cancel or replace the previous data value. Optionally tap the [Note] button to enter or edit a Note for the Date, Location, and Parameter combination. Tap the [X] button to exit the software. Control will return to the AllMax Folder software, if it is installed. NOTE: The Battery Meter is displayed at the top of the window. The notch represents the battery level necessary for scanning. NOTE: The Menu Bar is activated by tapping the title bar, or the [Menu] silkscreen at the left of the Graffiti area. 13.4.8 Menu Bar Menu Bar The Menu Bar is activated by tapping the [Menu] silkscreen at the left of the Graffiti area. © 2014 AllMax Software, Inc. 368 Operator10 Help 13.4.9 Note Note DataPort Notes are transferred to the Operator 10® application as Operator Notes. (Also as Quick Notes in the DataView application.) Tap the [Note] button to enter or edit a Note for the Date, Location, and Parameter combination. If a valid combination of Facility, Location, and Parameter is not entered, an error message is displayed. Enter the text by using graffiti, or by the popup keyboard (tap the "abc" logo in the graffiti area). To remove a note, highlight and backspace to delete the entire text. The button displays a + character ( [Note+] ) when a note is present. 13.4.10 Picklist PickList Although Facilities, Locations, or Parameters are most quickly entered using the built-in scanner, they may also be easily selected from a PickList. Both Facilities and Locations display a complete list of available items. Once a valid Location has been entered, the Parameter PickList displays a filtered list of parameters. If there is no Location, or the [Loc:Par] button is pressed, a complete list of Location:Parameters is displayed. Select any item in the PickList by tapping on the item. The previous item (from the main screen) is automatically highlighted when opening the PickList. To Find another item, enter the first characters by using graffiti, or by the popup keyboard (tap the "abc" logo in the graffiti area). The first item matching the characters will scroll into place and the item will be highlighted. © 2014 AllMax Software, Inc. DataPort 369 NOTE: A valid Facility must be entered prior to displaying the Location or Parameter PickList. A valid Location (or no Location) must be entered prior to displaying the Parameter (or Loc:Par) PickList. 13.4.11 Preferences Preferences Several Scanner Preferences may be selected with the following PushButtons: Tap [Hold] to scan only while a scan trigger button is depressed. Tap [Click] if scan should continue after the trigger buttons are released. (Either until a good scan is received, or it times out) Tap [Wide] to use a wide scanning angle (wide field of vision). (about 53 deg.) Tap [Narrow] if the scanner should use a narrower scanning angle. (about 38 deg.) Tap [Scan Only] if the scanner should scan when triggered. Tap [Aim Prior] to use a laser pointer to aim (1 second) before scanning. Tap [Beep] to sound a beep when a good scan is received. Tap [Quiet] if no sound should be heard. Tap [Text Types] to scan only BarCode types which support alphabetic characters. Tap [All Types] to scan all recognized BarCode types, including numeric-only. Tap [Standard] to scan standard BarCode types without optional checkdigits. Tap [Extended] to scan BarCode types with optional checkdigits or extensions. Tap the [Reset Scanner] selector to reinitialize the scanner. © 2014 AllMax Software, Inc. 370 Operator10 Help 13.4.12 Remove Record Remove Record (Edit | Remove Record) Remove (delete) the record matching the current Facility, Location, Parameter, and Date. WARNING: Removing data will delete existing data! Do not proceed unless you are sure you wish to remove data. 13.4.13 Review Data Review Data (Edit | Review Data...) Use the scrollbar, or the PageUp and PageDown hardware buttons, to Review previously entered Data. Tap the [Remove] button to remove (delete) the current record. WARNING: Removing data will delete existing data! Do not proceed unless you are sure you wish to remove data. © 2014 AllMax Software, Inc. DataPort 371 13.4.14 Scanner Scanner Open the OP10 DataPort Main Window. If BarCodes do not include an AutoSelection Digit (when scanning a Facility, Location, or Parameter) or if scanning a Data Value, tap to place the cursor in the appropriate field. Press either scanner trigger button to begin the scan. When a good scan is received, the DataPort will beep and display a green light. Otherwise, the scan will time out and the "No Scan" message will be displayed. Entering data is as simple as 1-2-3! 1. Scan a Location:Parameter BarCode (use the default Date and Facility) 2. Enter the Data value from the popup KeyPad (or by using graffiti) 3. Press the [Save] button CAUTION: Laser Light--Do Not Stare Into Beam. 630-680nm Laser, 1.0 mW Max Output Class II Laser Product NOTE: The possible scanning range is from 2 to 24 inches, depending on BarCode bar width. NOTE: Recommended operating temperature is from 10 to 90 degrees F. NOTE: Possible BarCode scanning formats include: © 2014 AllMax Software, Inc. 372 Operator10 Help Text Formats: Code 128 (recommended for most users) Code 39 (Code 3 of 9) Code 93 Numeric Formats: Bookland EAN Codabar Coupon D25 EAN/JAN-8 EAN/JAN-13 Interleaved 2 of 5 ISBT 128 MSI Plessey Trioptic 39 UCC/EAN-128 UPC-A UPC-E UPC-E1 13.4.15 Shortcuts Shortcuts Graffiti: Command+A - About Dialog Command+C - Copy Command+D - Remove Record Command+F - Preferences Command+G - Graffiti Help Command+P - Paste Command+R - Review Data Command+S - Select All Command+T - Tips Command+U - Undo Command+X - Cut NOTE: Commands are entered by drawing a graffiti Command character ( / ) from lower left to upper right, then the character. 13.4.16 Time Time © 2014 AllMax Software, Inc. DataPort 373 If hourly data entries are entered, tap the [Time] selector to edit the time. The default setting , the [Use System] pushbutton, always uses the current DataPort time, but by selecting the [Use Entered] pushbutton a specific time may be entered for hourly data. Daily data values ignore time settings. If hourly data entries should be saved only on even hours (08:00, 09:00, etc.), select the [Whole Hour] pushbutton. Enter the number of minutes past the hour that the entry should be saved as the next hour. 13.4.17 Tips Tips (Options | Tips) Entering data is as simple as 1-2-3! 1. Scan a Location:Parameter BarCode (use the default Date and Facility) 2. Enter the Data value from the popup KeyPad (or by using graffiti) 3. Press the [Save] button 13.4.18 Edit Commands Undo/Cut/Copy/Paste/Select All (Edit | Undo/Cut/Copy/Paste/Select All) Cut, Copy, Paste, or Select All text in any field using these menu items or shortcut commands, using the clipboard. Use Undo to restore a field to its previous value. © 2014 AllMax Software, Inc. Part XIV Functions 14 Functions General Information: Data Types Accessing Location:Parameter data values Function Categories: Boolean (TRUE/FALSE) Functions Constant Daily Data Functions Date Functions OPC/DDE Functions Hourly Data Functions Mathematical Functions Miscellaneous Functions Monthly Data Functions Process Section Data Functions Quarterly Data Functions Trigonometry Functions Violation Data Functions Weekly Data Functions Yearly Data Functions All Functions (by groups) All Functions (alphabetically) 14.1 All Functions (by groups) All Functions (by groups) See also: All Functions (alphabetically) Data Types Accessing Location:Parameter data values Boolean (TRUE/FALSE) Functions: AND(x,y); x&y; if x<>0 AND y<>0 then 1, else 0 BIT(x,y); if BIT x of y is 1 then 1, else 0 EQUAL(x,y); x=y; if x EQUALs y, 1, else 0 GT(x,y); x>y; if x is Greater Than y, 1, else 0 IF(x,y,z); IF x<>0 then y, else z ISALPHA([l:p],x); if value IS an ALPHA code then 1, else 0, offset x days ISBLANK(x); if x IS BLANK then 1, else 0 ISDATA(x); if x IS valid DATA then 1, else 0 ISDATE([l:p],x); if value IS a DATE value then 1, else 0 ISFECAL(l:p]); if p IS a FECAL parameter then 1, else 0 © 2014 AllMax Software, Inc. 375 376 Operator10 Help ISFLOW(l:p]); if p IS a FLOW parameter then 1, else 0 ISGREAT([l:p],x); if value IS a GREATer than value then 1, else 0, offset x days ISHR([l:p]); if l:p IS set for HouRly data entry then 1, else 0 ISLESS([l:p],x); if value IS a LESS than value then 1, else 0, offset x days ISLP([l:p]); if L:P IS valid then 1, else 0 ISND([l:p],x); if value IS a Non-Detect value then 1, else 0, offset x days ISTIME([l:p],x); if value IS a TIME value then 1, else 0, offset x days LT(x,y); x<y; if x is Less Than y, 1, else 0 NOT(x); if x is NOT equal to 0 then 1, else 0 OR(x,y); x|y; if x<>0 OR y<>0, 1, else 0 XOR(x,y); if x OR y eXclusively then 1, else 0 Constants: ASK, BLANK, BEEP, TRUE, FALSE, pi, e , 8.3, 3.785, .45359 Daily Data Functions: D_AVG([l:p],x,y); AVeraGe, offset x days, for y days D_COMP([l:p],x,y); offset x Days, COMPare offset y days D_COUNT([l:p],x,y); COUNT, offset x days, for y days D_FLOW([l:p],x,y); FLOW value, offset x months, for y days D_FWA([l:p],x); Flow-Weighted Avg, offset x days, for y days D_GAUGE([l:p],[l:p],x,y); GAUGE value, supply l:p, offset x days, multiplier y D_GMEAN([l:p],x,y); Geometric MEAN, offset x days, for y days D_IGAUGE([l:p],[l:p],x,y); Interpolated GAUGE value, supply l:p, offset x days, multiplier y D_IMTR([l:p],x,y,z); Interpolated MeTeR value, offset x days, max meter reading y, multiplier z D_INTER([l:p],x,y); INTERpolate from adjacent data, offset x days D_LAST([l:p],x,y); LAST value not later than date, offset x months, y days D_LASTN([l:p],x,y); average of LAST z Number of values not later than date, offset x months, y days D_LASTNM([l:p],x,y,z); Median of LAST z Number of values not later than date, offset x months, y days D_LASTNN([l:p],x,y,z,n); Nth highest of LAST z Number of values not later than date, offset x months, y days D_LASTNP([l:p],x,y,z,w); wth Percentile of LAST z Number of values not later than date, offset x months, y days D_LOADING([l:p],x,y); LOADING value, offset x months, for y days D_MAX([l:p],x,y); MAXimum, offset x days, for y days D_METER([l:p],x,y,z); METER value, offset x days, max meter reading y, multiplier z D_MIN([l:p],x,y); MINimum, offset x days, for y days D_NEXT([l:p],x,y); NEXT value not prior to date, offset x months, y days D_STAT([l:p],[l:p],x,y,z); Daily STATistics, offset x days, for y days, type z D_STDEV([l:p],x,y); STandard DEViation, offset x days, for y days D_SUM([l:p],x,y); SUM, offset x days, for y days D_TOTAL([l:p],x,y); avg * range, offset x days, for y days D_VAL([l:p],x,y); VALue, offset x mon, y days LP(l,p); [l:p]; Location:Parameter data Date Functions: © 2014 AllMax Software, Inc. Functions 377 DATE([][j][m,d,y]); current, julian, or m/d/y DATE DATE([j,x][m,d,y,x]); value x calculated on a julian or m/d/y DATE DOM(x); Day Of Month, 1-31, offset x days DOW(x); Day Of Week, 1-7, offset x days DOY(x); Day Of Year, 1-365, offset x days DVAL(j,x); VALue x for the julian Date j LOM(x); Length Of Month 28-31, offset x months LOY(x); Length Of Year 365-366, offset x years M_DATE(x,y,z); Monthly DATE, offset x months, for month type y MOY(x); Month Of Year, 1-12, offset x months WDOM(x); WeekDay Of (1st of) Month, 1-7, offset x months WOM(x); Week Of Month, 1-5, offset x days YR(x); the YeaR, 1970-2037, offset x years Hourly Data Functions: H_AVG([l:p],x,y); Hourly AVeraGe, offset x days, hour y H_CALC([l:p],x,y,z); Houlry CALCulations, value x, offset y days, type z H_COMB([l:p],[l:p],x,y); COMBined Hourly, offset x days, type y H_COUNT([l:p],x,y); Hourly COUNT, offset x days, hour y H_FUNC([l:p],x,y,z); Hourly FUNCtion, offset x days, value y, type z H_GMEAN([l:p],x,y); Hourly Geometric MEAN, offset x days, hour y H_INTER([l:p],x,y); Hourly INTERpolate from adjacent data, offset x days, hour y H_MAX([l:p],x,y,z); Hourly MAXimum, offset x days, hour y, option z H_MED([l:p],x,y); Hourly MEDian, offset x days, hour y H_METER([l:p],x,y,z); Hourly METER value, offset x days, max meter reading y, multiplier z H_MIN([l:p],x,y,z); Hourly MINimum, offset x days, hour y, option z H_PRTPWR([l:p],[l:p],x,y); Hourly PoWeR of PaRTicle counts, particle diameter X for first L:P, particle diameter Y for second L:P H_STD([l:p],x,y); Hourly STandard Deviation, offset x days, hour y H_SUM([l:p],x,y); Hourly SUM, offset x days, hour y H_VAL([l:p],x,y); Hourly VALue, offset x days, minutes y Mathematical Functions: ABS(x); ABSolute value of x ADD(x,y);x+y; ADD x and y AVG(x1,x2, ... ,xn); AVeraGe of all non-blank values COUNT(x1,x2, ... ,xn); COUNT of all non-blank values DEFAULT(x,y); value y, or DEFAULT x if y is blank DIST(x); standard normal DISTribution of value x DIV(x,y); x/y; DIVide x by y EXP(x); EXPonential of x, e^x FACT(x); FACTorial of value x; 1*2*3*...*x FIRST(x1,x2, ... ,xn); FIRST non-blank value FRAC(x); FRACtional part of value x IDIST(x); Inverse of standard normal DISTribution INT(x); INTeger value of x INTER(a,c,fa,fc,b); INTERpolated value fb INV(x); INVersion of x, 1/x LIMIT(x,y,z); LIMIT make value x >=y, <=z LN(x); Natural Log of x © 2014 AllMax Software, Inc. 378 Operator10 Help LOG(x); LOG base 10 of x LOG_REM(x,y); LOGarithm of REMoval, x in, y out MAX(x1,x2, ... ,xn); MAXimum of all values MIN(x1,x2, ... ,xn); MINimum of all values MOD(x,y); x%y; MODulus or remainder of x/y MUL(x,y); x*y; MULtiply x and y NONBLANK(x); NONBLANK value of x NONZERO(x); NON-ZERO value x, or blank if x is 0 PCT_REM(x,y); PerCenT REMoval, x in, y out PREC(x,y); value x to y significant digits PRECision PWR(x,y); x^y; x to the PoWeR of y RAND(x); RANDom value less than x ROUND(x,y); value x ROUNDed to y decimal places ROUNDE(x,y); value x Even-biased ROUNDed to y places SQRT(x); SQuare RooT of x SUB(x,y); x-y; SUBtract y from x SUM(x1,x2, ... ,xn); SUM of all non-blank values TRUNC(x,y); TRUNCate value x to y decimal places VERIFY(x,y,z); VERIFY value x >=y, <=z, else blank Miscellaneous Functions: ACCRUE([l:p],x); ACCRUE all values, offset x months ACODE([l:p],x); numeric Alpha CODE, offset x days ALPHA(ab); numeric ALPHA code representation for "ab" APPLY(x,y); apply function 2 (y) to data in function 1 (x) ASSIGN([l:p],x,y); ASSIGN value y, type x, to location:parameter BIN(x); BINary value of x, expressed as an AlphaCode BLANK(x); BLANK; data BLANK, no data exists CT(x,y,z,w); disinfection CT (Concentration * Time) for temp, pH, Cl, LI CTI(x,y,z,w); interpolated disinfection CT (Concentration * Time) for temp, pH, Cl, LI CTR(x,y,z,w); Regression method disinfection CT (Concentration * Time) for temp, pH, Cl, LI CVT(a:b,x); ConVerT value x from "abc" units to "def" units CYL(x,y); CYLinder volume ratio, height x, diameter y FAC(abc,x); value x from another FACility abc FORMULA(abc); value from another FORMULA HEX(x); HEXadecimal value of x, expressed as an AlphaCode HLIME(x,y,z,w,v); Hydrated LIME required in mg/l INCLUDE(fn,lp,x,y,z,m); INCLUDE location:parameter with calculated formula LOOK(x,y1,y2, ... ,yn); LOOK up the xth value NOTE(abc,x) = Note text abc is associated with the return the value x ONCE(x,y); value y ONCE per month, on x'th day ONCEW(x,y); value y ONCE per Week, on x'th day OPTION(x,y,z,w); value x using OPTIONs for less than (y), greater than (z), or nondetect (w) PRE_LMT(x,y); PREtreatment LiMiT, limit type x QLIME(x,y,z,w,v); QuickLIME required in mg/l RANGE(x1,y2,y3,...,yn); find RANGE of data SETF(x,formula); SET an internal reference Formula SETVAR(x,y); SET VARx variable to value y SODA(x); SODA required in mg/l SYNC(abc); SYNCronize location with facility abc © 2014 AllMax Software, Inc. Functions 379 TYPE(x,y); TYPE of data x, set type y VAL(abc); VALue (and data type) of abc WEIR(x,y,z); WEIR rectangular, gal/min for head x inches, width y ft, type z Monthly Data Functions: M_AVG([l:p],x,y,z,w); AVG, offset x months, type, rule, avg M_COMP([l:p],x,y); offset x Days, COMPare offset y days M_COUNT([l:p],x); COUNT of values, offset x months M_COUNTH([l:p],x); COUNT of Hourly values, offset x months M_DATE(x,y,z); Monthly DATE, offset x months, for month type y M_GMEAN([l:p],x); Geometric MEAN, offset x months M_MAX([l:p],x,y,z,w); MAX, offset x months, type, rule, avg M_MED([l:p],x,y,z); Monthly MEDian, offset x months, type y, rule z M_MIN([l:p],x,y,z,w); MIN, offset x months, type, rule, avg M_NTH([l:p],x,y,z,n); NTH value, offset x months, type y, avg z, n M_PCT([l:p],x,y,w,p); PerCenTile, offset x months, type y, avg w, % p M_REM([l:p],x,y); Monthly percent REMoval, offset x months, type y M_STAT([l:p],[l:p],x,y); Monthly STATistics, offset x months, type y M_STDEV([l:p],x); STandard DEViation, offset x months M_SUM([l:p],x); SUM of values, offset x months M_SUM2([l:p],x,y,z,w); SUM, offset x months, type, rule, avg M_SUMH([l:p],x); SUM of Hourly values, offset x months M_TOTAL([l:p],x); TOTAL, offset x months, avg * days M_TYPE([l:p],x,y); Monthly data TYPE, offset x months, range type y OPC/DDE Functions: DDE(a|b!c,x); DDE link, replacing char '?' with x DDE_P(a|b|c,x,y) DDE Poke value y DDE_X(a|b!c,x); DDE eXecute command c OPC([a],b,c,x); OPC link for node a, server b, item c OPC_W([a],b,c,x,y); OPC Write link for node a, server b, item c, integer x, value y Process Section Data Functions: ACCUM([l:p],x,y); ACCUMulate, offset x months, y days S_AVG([l:p],x); AVG of process sections S_SUM([l:p],x); SUM of process sections Quarterly Data Functions: Q_CSUM([l:p],x); Calendar Quarter SUM of daily values, offset x months Q_SUM([l:p],x); Quarterly SUM of daily values, offset x months Trigonometry Functions: ACOS(x); ArcCOSine of x ASIN(x); ArcSINe of x ATAN(x); ArcTANgent of x COS(x); COSine of x CSC(x); CoSeCant of x © 2014 AllMax Software, Inc. 380 Operator10 Help SEC(x); SECant of x SIN(x); SINe of x TAN(x); TANgent of x Violation Data Functions: E_SUM([l:p],x,y,z,w,v); Exceedance SUM, offset, type, rule, avg, limit V_AVG([l:p],x,y,z,w,v); offset, type, rule, avg, Violation AVG V_CNT([l:p],x,y,z,w); offset, type, rule, Violation CouNT values V_CNTP([l:p],x,y,z,w); offset, type Period, Violation CouNT values, month V_DLY([l:p],x,y,z,w); DaiLY Violation, offset, type, max, min V_DLYM([l:p],x,y,z,w); DaiLY Multiple Violation, offset, type, max, min V_MAV([l:p],x,y,z,w,v); offset, type, rule, avg, Violation Min AVerage V_MAX([l:p],x,y,z,w,v); offset, type, rule, avg, Violation MAX V_MIN([l:p],x,y,z,w,v); offset, type, rule, avg, Violation MIN SNC_CJP([l:p],x,y,z,w,v1,v2); offset, type, rule, avg, daily violation, avg violation SNC_MAXD([l:p],x,y,z,w,v); offset, type, rule, avg, SNC violation MAX Daily SNC_MAXM([l:p],x,y,z,w,v); offset, type, rule, avg, SNC violation MAX Monthly SNC_MIND([l:p],x,y,z,w,v); offset, type, rule, avg, SNC violation MIN Daily SNC_MINM([l:p],x,y,z,w,v); offset, type, rule, avg, SNC violation MIN Monthly Weekly Data Functions: W_AVG([l:p],x,y,z,w); Weekly AVG, offset x months, week, rule, avg W_MAX([l:p],x,y,z,w); Weekly MAX, offset x months, week, rule, avg W_MIN([l:p],x,y,z,w); Weekly MIN, offset x months, week, rule, avg Yearly Data Functions: Y_AVG([l:p],x,y,z); Yearly AVG Daily value, offset, months, type Y_AVGM([l:p],x,y,z); Yearly AVG, Monthly average, offset, months, type Y_CAVG([l:p],x,y); Calendar Year AVG of daily values, offset x months, type Y_COUNT([l:p],x,y); Yearly COUNT of daily values, offset x months, for y months Y_CSUM([l:p],x); Calendar Year SUM of daily values, offset x months Y_MAX([l:p],x,y); Yearly MAX daily value, offset x months, for y months Y_MAXM([l:p],x,y,z); Yearly MAX Monthly average, offset, months, type Y_MIN([l:p],x,y); Yearly MIN daily value, offset x months, for y months Y_MINM([l:p],x,y,z); Yearly MIN Monthly average, offset, months, type Y_RES([l:p],x,y1,y2,y3,y4); Yearly RESidual, offset x years, percents y1, y2, y3, y4 Y_SUM([l:p],x,y); Yearly SUM of daily values, offset x months, for y months Y_TOTM([l:p],x,y); Yearly sum of Monthly TOTals, offset x months, for y months 14.2 All Functions (alphabetically) All Functions (alphabetically) See also: All Functions (by groups) A BCDEF GHILMNOP QRS T V W XY Data Types Accessing Location:Parameter data values © 2014 AllMax Software, Inc. Functions 381 .45359 = .45359 (kg/lb as set in the OP10.CFG configuration file) (see also: Constants) 3.7853 = 3.7853 (liter/gal as set in the OP10.CFG configuration file) (see also: Constants) 8.34 = 8.34 (lb/gal as set in the OP10.CFG configuration file) (see also: Constants) A ABS(x); ABSolute value of x ACCRUE([l:p],x); ACCRUE all values, offset x months ACCUM([l:p],x,y); ACCUMulate, offset x months, y days ACODE([l:p],x); numeric Alpha CODE, offset x days ACOS(x); ArcCOSine of x ADD(x,y);x+y; ADD x and y ALPHA(ab); numeric ALPHA code representation for "ab" AND(x,y); x&y; if x<>0 AND y<>0 then 1, else 0 APPLY(x,y); apply function 2 (y) to data in function 1 (x) ASIN(x); ArcSINe of x ASSIGN([l:p],x,y); ASSIGN value y, type x, to location:parameter ATAN(x); ArcTANgent of x AVG(x1,x2, ... ,xn); AVeraGe of all non-blank values B BIN(x); BINary value of x, expressed as an AlphaCode BIT(x,y); if BIT x of y is 1 then 1, else 0 BLANK = BLANK (internally stored as -3.402823466e+38) (see also: Constants) BLANK(x); BLANK; data BLANK, no data exists C Constants: ASK, BLANK, BEEP, TRUE, FALSE, pi, e , 8.3, 3.785, .45359 COS(x); COSine of x COUNT(x1,x2, ... ,xn); COUNT of all non-blank values CSC(x); CoSeCant of x CT(x,y,z,w); disinfection CT (Concentration * Time) for temp, pH, Cl, LI CTI(x,y,z,w); interpolated disinfection CT (Concentration * Time) for temp, pH, Cl, LI CTR(x,y,z,w); Regression method disinfection CT (Concentration * Time) for temp, pH, Cl, LI CVT(a:b,x); ConVerT value x from "abc" units to "def" units CYL(x,y); CYLinder volume ratio, height x, diameter y D D_AVG([l:p],x,y); AVeraGe, offset x days, for y days D_COMP([l:p],x,y); offset x Days, COMPare offset y days D_COUNT([l:p],x,y); COUNT, offset x days, for y days D_FLOW([l:p],x,y); FLOW value, offset x months, for y days D_FWA([l:p],x); Flow-Weighted Avg, offset x days, for y days D_GAUGE([l:p],[l:p],x,y); GAUGE value, supply l:p, offset x days, multiplier y D_GMEAN([l:p],x,y); Geometric MEAN, offset x days, for y days D_IGAUGE([l:p],[l:p],x,y); Interpolated GAUGE value, supply l:p, offset x days, multiplier y © 2014 AllMax Software, Inc. 382 Operator10 Help D_IMTR([l:p],x,y,z); Interpolated MeTeR value, offset x days, max meter reading y, multiplier z D_INTER([l:p],x,y); INTERpolate from adjacent data, offset x days D_LAST([l:p],x,y); LAST value not later than date, offset x months, y days D_LASTN([l:p],x,y); average of LAST z Number of values not later than date, offset x months, y days D_LASTNM([l:p],x,y,z); Median of LAST z Number of values not later than date, offset x months, y days D_LASTNN([l:p],x,y,z,n); Nth highest of LAST z Number of values not later than date, offset x months, y days D_LASTNP([l:p],x,y,z,w); wth Percentile of LAST z Number of values not later than date, offset x months, y days D_LOADING([l:p],x,y); LOADING value, offset x months, for y days D_MAX([l:p],x,y); MAXimum, offset x days, for y days D_METER([l:p],x,y,z); METER value, offset x days, max meter reading y, multiplier z D_MIN([l:p],x,y); MINimum, offset x days, for y days D_NEXT([l:p],x,y); NEXT value not prior to date, offset x months, y days D_STAT([l:p],[l:p],x,y,z); Daily STATistics, offset x days, for y days, type z D_STDEV([l:p],x,y); STandard DEViation, offset x days, for y days D_SUM([l:p],x,y); SUM, offset x days, for y days D_TOTAL([l:p],x,y); avg * range, offset x days, for y days D_VAL([l:p],x,y); VALue, offset x mon, y days DATE([][j][m,d,y]); current, julian, or m/d/y DATE DATE([j,x][m,d,y,x]); value x calculated on a julian or m/d/y DATE DDE(a|b!c,x); DDE link, replacing char '?' with x DDE_P(a|b|c,x,y) DDE Poke value y DDE_X(a|b!c,x); DDE eXecute command c DEFAULT(x,y); value y, or DEFAULT x if y is blank DIST(x); standard normal DISTribution of value x DIV(x,y); x/y; DIVide x by y DOM(x); Day Of Month, 1-31, offset x days DOW(x); Day Of Week, 1-7, offset x days DOY(x); Day Of Year, 1-365, offset x days DVAL(j,x); VALue x for the julian Date j E e = 2.718281828459045 (as set in the OP10.CFG configuration file) (see also: Constants) E_SUM([l:p],x,y,z,w,v); Exceedance SUM, offset, type, rule, avg, limit EQUAL(x,y); x=y; if x EQUALs y, 1, else 0 EXP(x); EXPonential of x, e^x F FAC(abc,x); value x from another FACility abc FACT(x); FACTorial of value x; 1*2*3*...*x FALSE = 0 (equal to 0) (see also: Constants) FIRST(x1,x2, ... ,xn); FIRST non-blank value FORMULA(abc); value from another FORMULA FRAC(x); FRACtional part of value x © 2014 AllMax Software, Inc. Functions 383 G GT(x,y); x>y; if x is Greater Than y, 1, else 0 H H_AVG([l:p],x,y); Hourly AVeraGe, offset x days, hour y H_CALC([l:p],x,y,z); Houlry CALCulations, value x, offset y days, type z H_COMB([l:p],[l:p],x,y); COMBined Hourly, offset x days, type y H_COUNT([l:p],x,y); Hourly COUNT, offset x days, hour y H_FUNC([l:p],x,y,z); Hourly FUNCtion, offset x days, value y, type z H_GMEAN([l:p],x,y); Hourly Geometric MEAN, offset x days, hour y H_INTER([l:p],x,y); Hourly INTERpolate from adjacent data, offset x days, hour y H_MAX([l:p],x,y,z); Hourly MAXimum, offset x days, hour y, option z H_MED([l:p],x,y); Hourly MEDian, offset x days, hour y H_METER([l:p],x,y,z); Hourly METER value, offset x days, max meter reading y, multiplier z H_MIN([l:p],x,y,z); Hourly MINimum, offset x days, hour y, option z H_PRTPWR([l:p],[l:p],x,y); Hourly PoWeR of PaRTicle counts, particle diameter X for first L:P, particle diameter Y for second L:P H_STD([l:p],x,y); Hourly STandard Deviation, offset x days, hour y H_SUM([l:p],x,y); Hourly SUM, offset x days, hour y H_VAL([l:p],x,y); Hourly VALue, offset x days, minutes y HLIME(x,y,z,w,v); Hydrated LIME required in mg/l I IDIST(x); Inverse of standard normal DISTribution IF(x,y,z); IF x<>0 then y, else z INCLUDE(fn,lp,x,y,z,m); INCLUDE location:parameter with calculated formula INT(x); INTeger value of x INTER(a,c,fa,fc,b); INTERpolated value fb INV(x); INVersion of x, 1/x ISALPHA([l:p],x); if value IS an ALPHA code then 1, else 0, offset x days ISBLANK(x); if x IS BLANK then 1, else 0 ISDATA(x); if x IS valid DATA then 1, else 0 ISDATE([l:p],x); if value IS a DATE value then 1, else 0 ISFECAL([l:p]); if p IS a FECAL parameter then 1, else 0 ISFLOW([l:p]); if p IS a FLOW parameter then 1, else 0 ISGREAT([l:p],x); if value IS a GREATer than value then 1, else 0, offset x days ISHR([l:p]); if l:p IS set for HouRly data entry then 1, else 0 ISLESS([l:p],x); if value IS a LESS than value then 1, else 0, offset x days ISLP([l:p]); if L:P IS valid then 1, else 0 ISND([l:p],x); if value IS a Non-Detect value then 1, else 0, offset x days ISTIME([l:p],x); if value IS a TIME value then 1, else 0, offset x days L LI(x,y,z,w,v,n1,n2); Log Inactivation LIMIT(x,y,z); LIMIT make value x >=y, <=z LN(x); Natural Log of x LOG(x); LOG base 10 of x © 2014 AllMax Software, Inc. 384 Operator10 Help LOG_REM(x,y); LOGarithm of REMoval, x in, y out LOM(x); Length Of Month 28-31, offset x months LOOK(x,y1,y2, ... ,yn); LOOK up the xth value LOY(x); Length Of Year 365-366, offset x years LP(l,p); [l:p]; Location:Parameter data LT(x,y); x<y; if x is Less Than y, 1, else 0 M M_AVG([l:p],x,y,z,w); AVG, offset x months, type, rule, avg M_COMP([l:p],x,y); offset x Days, COMPare offset y days M_COUNT([l:p],x); COUNT of values, offset x months M_COUNTH([l:p],x); COUNT of Hourly values, offset x months M_DATE(x,y,z); Monthly DATE, offset x months, for month type y M_GMEAN([l:p],x); Geometric MEAN, offset x months M_MAX([l:p],x,y,z,w); MAX, offset x months, type, rule, avg M_MED([l:p],x,y,z); Monthly MEDian, offset x months, type y, rule z M_MIN([l:p],x,y,z,w); MIN, offset x months, type, rule, avg M_NTH([l:p],x,y,z,n); NTH value, offset x months, type y, avg z, n M_PCT([l:p],x,y,w,p); PerCenTile, offset x months, type y, avg w, % p M_REM([l:p],x,y); Monthly percent REMoval, offset x months, type y M_STAT([l:p],[l:p],x,y); Monthly STATistics, offset x months, type y M_STDEV([l:p],x); STandard DEViation, offset x months M_SUM([l:p],x); SUM of values, offset x months M_SUM2([l:p],x,y,z,w); SUM, offset x months, type, rule, avg M_SUMH([l:p],x); SUM of Hourly values, offset x months M_TOTAL([l:p],x); TOTAL, offset x months, avg * days M_TYPE([l:p],x,y); Monthly data TYPE, offset x months, range type y MAX(x1,x2, ... ,xn); MAXimum of all values MIN(x1,x2, ... ,xn); MINimum of all values MOD(x,y); x%y; MODulus or remainder of x/y MOY(x); Month Of Year, 1-12, offset x months MUL(x,y); x*y; MULtiply x and y N NONBLANK(x); NONBLANK value of x NONZERO(x); NON-ZERO value x, or blank if x is 0 NOT(x); if x is NOT equal to 0 then 1, else 0 NOTE(abc,x) = Note text abc is associated with the return the value x O ONCE(x,y); value y ONCE per month, on x'th day ONCEW(x,y); value y ONCE per Week, on x'th day OPC([a],b,c,x); OPC link for node a, server b, item c, integer x OPC_W([a],b,c,x,y); OPC Write for node a, server b, item c, integer x, value y OPTION(x,y,z,w); value x using OPTIONs for less than (y), greater than (z), or nondetect (w) OR(x,y); x|y; if x<>0 OR y<>0, 1, else 0 P © 2014 AllMax Software, Inc. Functions 385 PCT_REM(x,y); PerCenT REMoval, x in, y out pi = 3.141592653589793 (as set in the OP10.CFG configuration file) (see also: Constants) PRE_LMT(x,y); PREtreatment LiMiT, limit type x PREC(x,y); value x to y significant digits PRECision PWR(x,y); x^y; x to the PoWeR of y Q Q_CSUM([l:p],x); Calendar Quarter SUM of daily values, offset x months Q_SUM([l:p],x); Quarterly SUM of daily values, offset x months QLIME(x,y,z,w,v); QuickLIME required in mg/l R RAND(x); RANDom value less than x RANGE(x1,y2,y3,...yn); find RANGE of data ROUND(x,y); value x ROUNDed to y decimal places ROUNDE(x,y); value x Even-biased ROUNDed to y places S S_AVG([l:p],x); AVG of process sections S_SUM([l:p],x); SUM of process section SEC(x); SECant of x SETF(x,formula); SET an internal reference Formula SETVAR(x,y); SET VARx variable to value y SIN(x); SINe of x SNC_CJP([l:p],x,y,z,w,v1,v2); offset, type, rule, avg, daily violation, avg violation SNC_MAXD([l:p],x,y,z,w,v); offset, type, rule, avg, SNC violation MAX Daily SNC_MAXM([l:p],x,y,z,w,v); offset, type, rule, avg, SNC violation MAX Monthly SNC_MIND([l:p],x,y,z,w,v); offset, type, rule, avg, SNC violation MIN Daily SNC_MINM([l:p],x,y,z,w,v); offset, type, rule, avg, SNC violation MIN Monthly SODA(x); SODA required in mg/l SQRT(x); SQuare RooT of x SUB(x,y); x-y; SUBtract y from x SUM(x1,x2, ... ,xn); SUM of all non-blank values SYNC(abc); SYNCronize location with facility abc T TAN(x); TANgent of x TRUE = 1 (not equal to 0) (see also: Constants) TRUNC(x,y); TRUNCate value x to y decimal places TYPE(x,y); TYPE of data x, set type y V V_AVG([l:p],x,y,z,w,v); offset, type, rule, avg, Violation AVG V_CNT([l:p],x,y,z,w); offset, type, rule, Violation CouNT values V_CNTP([l:p],x,y,z,w); offset, type Period, Violation CouNT values, month V_DLY([l:p],x,y,z,w); DaiLY Violation, offset, type, max, min V_DLYM([l:p],x,y,z,w); DaiLY Multiple Violation, offset, type, max, min © 2014 AllMax Software, Inc. 386 Operator10 Help V_MAV([l:p],x,y,z,w,v); offset, type, rule, avg, Violation Min AVerage V_MAX([l:p],x,y,z,w,v); offset, type, rule, avg, Violation MAX V_MIN([l:p],x,y,z,w,v); offset, type, rule, avg, Violation MIN VAL(abc); VALue (and data type) of abc VAR1 through VAR9 = variable set using SETVAR() (see also: Constants) VERIFY(x,y,z); VERIFY value x >=y, <=z, else blank W W_AVG([l:p],x,y,z,w); Weekly AVG, offset x months, week, rule, avg W_MAX([l:p],x,y,z,w); Weekly MAX, offset x months, week, rule, avg W_MIN([l:p],x,y,z,w); Weekly MIN, offset x months, week, rule, avg WDOM(x); WeekDay Of (1st of) Month, 1-7, offset x months WEIR(x,y,z); WEIR rectangular, gal/min for head x inches, width y ft, type z WOM(x); Week Of Month, 1-5, offset x days X XOR(x,y); if x OR y eXclusively then 1, else 0 Y Y_AVG([l:p],x,y,z); Yearly AVG Daily value, offset, months, type Y_AVGM([l:p],x,y,z); Yearly AVG, Monthly average, offset, months, type Y_CAVG([l:p],x,y); Calendar Year AVG of daily values, offset x months, type Y_COUNT([l:p],x,y); Yearly COUNT of daily values, offset x months, for y months Y_CSUM([l:p],x); Calendar Year SUM of daily values, offset x months Y_MAX([l:p],x,y); Yearly MAX daily value, offset x months, for y months Y_MAXM([l:p],x,y,z); Yearly MAX Monthly average, offset, months, type Y_MIN([l:p],x,y); Yearly MIN daily value, offset x months, for y months Y_MINM([l:p],x,y,z); Yearly MIN Monthly average, offset, months, type Y_RES([l:p],x,y1,y2,y3,y4); Yearly RESidual, offset x years, percents y1, y2, y3, y4 Y_SUM([l:p],x,y); Yearly SUM of daily values, offset x months, for y months Y_TOTM([l:p],x,y); Yearly sum of Monthly TOTals, offset x months, for y months YR(x); the YeaR, 1970-2037, offset x years 14.3 General Information Topics in this section include: Data Types LP(l,p); [l:p] (Location:Parameter) 14.3.1 Data Types Data Types The Data Type represents the type of a single data item or the calculated result based on multiple data items. Data Types carry through multiple functions, and are often used for reporting final results on state forms. (For example, a monthly average may be considered a Less Than value if the month contains daily Less Than values) In some cases, the Data Type cannot be logically established, and the result will revert to © 2014 AllMax Software, Inc. Functions 387 a Numeric Data Type. (For example, when adding a Less Than and a Greater Than value.) Most errors set the Data Type to 0, even though the result may be BLANK. The Data Type is one of the following: 1 (1st bit set, bit 0) if the result is considered a Numeric value 2 (2nd bit set) if the result is considered a BLANK value 4 (3rd bit set) if the result is considered a Less Than value (<) 8 (4th bit set) if the result is considered an Alpha Code value 16 (5th bit set) if the result is considered a Greater Than value (>) 32 (6th bit set) if the result is considered a Non-Detect value (~) 64 (7th bit set) if the result is considered a Time value 128 (8th bit set) if the result is considered a Note value 256 (9th bit set) if the result is considered a Date value Multiple Data Types usually produce: Numeric with Alpha Code produces Numeric Less Than with Numeric, Alpha Code, and/or Non-Detect produces Less Than Greater Than with Numeric and/or Alpha Code produces Greater Than Non-Detect with Numeric produces Non-Detect Less Than and Greater Than with Numeric, Alpha Code, and/or Non-Detect produces Numeric Time with any other Data Type produces Time Date with any other Data Type produces Date Blank with any other Data Type produces Blank Notes have no effect unless they are the final result Special cases or exceptions: Subtraction, Division (second argument is inverted, for example: 20 - <5 = >15) Flow Calculations (produce Numeric) True/False Boolean (produce Numeric) Sine, Cosine, Tangent, etc. (produce Numeric) Count, Standard Deviation (produce Numeric) Meter (produce Numeric) Date Offsets, Violation Durations (produce Numeric) Internal BioSolids Calculations (produce Numeric) The Alpha Code "TNTC" is treated specially 14.3.2 LP(l,p); [l:p] (Location:Parameter LP(l,p); [l:p]; LP(f:l,p); [f:l:p]; The data value of a specific Location and Parameter from the specified Facility for the current date Value: The data value of a specific location and parameter from the specified facility for the current date of calculation. NOTE: The facility, location and parameter to which the formula is attached is used as a Default Location and Parameter for the following Special Cases: © 2014 AllMax Software, Inc. 388 Operator10 Help If f is ~ then the Default Facility is used If l is ~ then the Default Location is used If l is ?n then a Process Section Location is used: ? for Process Section Location ?0 for Process Location (returns Section Flow if p is ! (see below) or p is a flow parameter) (returns Section Loading if p is a ~L parameter) ?1 to ?5 for Location n of process section setup (as found in section setup) ?6 to ?8 for Size (n-5) (in english units) of process section setup (as found in section setup) ?9 for Effluent Location of process If l is ! then the Unit Multiplier is returned for flow or concentration parameters [!:flow_parname] returns the multiplier for mgal/day [!:concentration_parname] returns the multiplier for mg/l If l is ~CALC_LP then the result of a reference formula is returned. This is especially useful within other functions which use [l:p] syntax as a data source, for example M_SUM([~CALC_LP:MyFormula],0) or Y_AVG([~CALC_LP:MyFormula],0,0,0) If p is a formula name then the result of that formula is returned If p is a formula name then the formula name must be no more than 16 characters in length If p is ~~n (where n is a number from 1 to 99) then the result of the internal reference formula set by the SETF() function is returned. (see also: SETF()) NOTE: ~CALC_LP will only work in place of normal direct database access-not within functions which do not identify a specific date (such as D_LAST()), not within functions which modify data (such as those which calculate loadings), and not with hourly functions If p is ~ then the Default Parameter is used If p is ! then the Flow for the current location is returned ( ! or !m for mgal/day, !g for gal/day, !k for km3/day, !l for liter/day) If p is @ then the loading is returned (@ for lb, # for kg, assuming mg/l) If p is @parname then the loading of parameter "parname" is returned (@ for lb, # for kg, assuming mg/l) If p is @@ or @@parname then the loading is returned (@ for lb, # for kg, & for g) (for mg/l, ug/l, ng/l, etc.) If p is $ then if the section (or BioSolids Site) is currently In Service, TRUE (1) is returned; otherwise FALSE (0) is returned. If p is 'n then a BioSolids Site parameter is used: '0 for BioSolids Site size in acres '1 to '4 for User Defined Parameter n of BioSolids Site If p is ? then Base Parameter is used (~A00000 becomes 00000) If p is ?a (where a=A toZ) then the parameter ~A00000 to ~Z00000 is used (even if the parameter is already ~?00000) When a parameter to calculate loading is specified (@, #, &, @@, ##, or &¶meter), a separate flow location (and parameter) may also be specified: add the additional parameter ([f:l:p],[f:l_flow:p_flow]) © 2014 AllMax Software, Inc. Functions 389 To return the stored data without conversion to a numeric type (to return an Alpha Code, for example): add the additional parameter LP(f,l,p,1) Examples: [Sample Facility:Influent:50050] = 3.14 MGD Flow LP(Sample Facility,Influent,50050) = 3.14 LP(Sample Facility,Influent,!) = 3.14 LP(~,~,!) = 3.14 when attached to location "Influent" 14.4 Boolean Functions Topics in this section include: AND(x,y); x&y; if x<>0 AND y<>0 then 1, else 0 BIT(x,y); if BIT x of y is 1 then 1, else 0 EQUAL(x,y); x=y; if x EQUALs y, 1, else 0 GT(x,y); x>y; if x is Greater Than y, 1, else 0 IF(x,y,z); IF x<>0 then y, else z ISALPHA([l:p],x); if value IS an ALPHA code then 1, else 0, offset x days ISBLANK(x); if x IS BLANK then 1, else 0 ISDATA(x); if x IS valid DATA then 1, else 0 ISDATE([l:p],x); if value IS a DATE value then 1, else 0 ISFECAL([l:p]); if p IS a FECAL parameter then 1, else 0 ISFLOW([l:p]); if p IS a FLOW parameter then 1, else 0 ISGREAT([l:p],x); if value IS a GREATer than value then 1, else 0, offset x days ISHR([l:p]); if l:p IS set for HouRly data entry then 1, else 0 ISLESS([l:p],x); if value IS a LESS than value then 1, else 0, offset x days ISLP([l:p]); if L:P IS valid then 1, else 0 ISND([l:p],x); if value IS a Non-Detect value then 1, else 0, offset x days ISTIME([l:p],x); if value IS a TIME value then 1, else 0, offset x days LT(x,y); x<y; if x is Less Than y, 1, else 0 NOT(x); if x is NOT equal to 0 then 1, else 0 OR(x,y); x|y; if x<>0 OR y<>0, 1, else 0 XOR(x,y); if x OR y eXclusively then 1, else 0 14.4.1 AND(x,y) AND(x,y); x&y If x AND y are TRUE, then TRUE, else FALSE Value: If x is TRUE (not equal to 0) and y is TRUE (not equal to 0), the value TRUE (1) is returned. If either x or y is FALSE (0) or BLANK, FALSE is returned. Examples: © 2014 AllMax Software, Inc. 390 Operator10 Help AND(3.14,3) = 1 3.14&0 = 0 14.4.2 BIT(x,y) BIT(x,y) If BIT x of value y is 1, then TRUE, else FALSE Value: If the bit (binary digit) x of value y is equal to 1, the value TRUE (1) is returned. If it is equal to 0, the value FALSE (0) is returned. If x is less than 0 or greater than 15, or y is negative or greater than 65535, the function returns BLANK. Examples: BIT(1,2) = 1 (bit 1 of binary 00000010) BIT(0,5) = 1 (bit 0 of binary 00000101) BIT(1,4) = 0 (bit 1 of binary 00000100) 14.4.3 EQUAL(x,y) If x is EQUAL to y, then TRUE, else FALSE Value: If x is equal to y, the value TRUE (1) is returned. If x is not equal to y, the value FALSE (0) is returned. If x and y are both BLANK, the function returns TRUE. Examples: EQUAL(3.14,3) = 0 3.14=3.14 = 1 EQUAL(BLANK,BLANK) = 1 14.4.4 GT(x,y) GT(x,y); x>y If x is Greater Than y, then TRUE, else FALSE Value: If x is greater than y, the value TRUE (1) is returned. If x is less than or equal to y, the value FALSE (0) is returned. If y is BLANK and x is a value, the function returns TRUE. If x is BLANK, the function returns FALSE. Examples: GT(3.14,3) = 1 3.14>3.14 = 0 14.4.5 IF(x,y,z) IF(x,y,z) IF x is true, then y, else z Value: If x is TRUE (not equal to 0), the value y is returned. If x is FALSE (equal to 0), © 2014 AllMax Software, Inc. Functions 391 the value z is returned. If x is BLANK, the function returns BLANK. NOTE: The value z is never processed when x is TRUE, the value y is never processed when x is FALSE. Examples: IF(1,3.14,10) = 3.14 IF(0,3.14,10) = 10 14.4.6 ISALPHA([l:p],x) ISALPHA([l:p),x) If the value, offset x days, IS an ALPHA code, then TRUE Value: If the value of a specific location and parameter for the date x days from the current date is an Alpha Code, the value TRUE (1) is returned. Otherwise the function returns FALSE (0). The function considers only Alpha Codes--it ignores data, Less Than, Greater Than, or Non-Detect values. Examples: ISALPHA([Effluent:50050,0) = 1 if an Alpha Code, otherwise 0 ISALPHA([Effluent:50050,-1) = 1 if the previous day contained an Alpha Code 14.4.7 ISBLANK(x) ISBLANK(x) If x IS BLANK then TRUE Value: If x is equal to BLANK, the value TRUE (1) is returned. Otherwise the function returns FALSE (0). The function considers only valid data--it ignores Alpha Codes, Less Than, Greater Than, or Non-Detect values (if Facility options are set to blank). Examples: ISBLANK(3.14) = 0 ISBLANK(BLANK) = 1 14.4.8 ISDATA(x) ISDATA(x) If x IS valid DATA then TRUE Value: If x is a valid data value (non-BLANK), the value TRUE (1) is returned. Otherwise the function returns FALSE (0). The function considers only valid data--it ignores Alpha Codes, Less Than, Greater Than, or Non-Detect values (if Facility options are set to blank). Examples: © 2014 AllMax Software, Inc. 392 Operator10 Help ISDATA(3.14) = 1 ISDATA(BLANK) = 0 14.4.9 ISDATE([l:p],x) ISDATE([l:p),x) If the value, offset x days, IS a DATE code, then TRUE Value: If the value of a specific location and parameter for the date x days from the current date is a Date value, the value TRUE (1) is returned. Otherwise the function returns FALSE (0). Examples: ISALPHA([Effluent:50050,0) = 1 if a Date value, otherwise 0 ISALPHA([Effluent:50050,-1) = 1 if the previous day contained a Date value 14.4.10 ISFECAL([l:p]) ISFECAL([l:p]) If l:p IS a FECAL parameter then TRUE Value: If parameter p is a fecal parameter, the value TRUE (1) is returned. Otherwise the function returns FALSE (0). Examples: ISFECAL([Effluent:31614]) = 1 ISFECAL([Effluent:50050]) = 0 14.4.11 ISFLOW([l:p]) ISFLOW([l:p]) If l:p IS a FLOW parameter then TRUE Value: If parameter p is a flow parameter, the value TRUE (1) is returned. Otherwise the function returns FALSE (0). Examples: ISFLOW([Effluent:50050]) = 1 ISFLOW([Effluent:31614]) = 0 14.4.12 ISGREAT([l:p],x) ISGREAT([l:p],x) If the value, offset x days, IS a GREATer than value, then TRUE © 2014 AllMax Software, Inc. Functions 393 Value: If the value of a specific location and parameter for the date x days from the current date is a Greater Than value, the value TRUE (1) is returned. Otherwise the function returns FALSE (0). The function considers only Greater Than values--it ignores data, Alpha Codes, Less Than, or Non-Detect values. Examples: ISGREAT([Effluent:50050,0) = 1 if a Greater Than value, otherwise 0 ISGREAT([Effluent:50050,-1) = 1 if the previous day contained a Greater Than value 14.4.13 ISHR([l:p]) ISHR([l:p]) If l:p IS set for HouRly data entry then TRUE Value: If the location:parameter is set up for hourly data entry, the value TRUE (1) is returned. Otherwise the function returns FALSE (0). Examples: ISHR([Effluent:00400]) = 1 ISHR([Effluent:Daily]) = 0 14.4.14 ISLESS([l:p]) ISLESS([l:p],x) If the value, offset x days, IS a LESS than value, then TRUE Value: If the value of a specific location and parameter for the date x days from the current date is a Less Than value, the value TRUE (1) is returned. Otherwise the function returns FALSE (0). The function considers only Less Than values--it ignores data, Alpha Codes, Greater Than, or Non-Detect values. Examples: ISLESS([Effluent:50050,0) = 1 if a Less Than value, otherwise 0 ISLESS([Effluent:50050,-1) = 1 if the previous day contained a Less Than value 14.4.15 ISLP([l:p]) ISLP([l:p]) If l:p IS a valid Location and Parameter then TRUE Value: If parameter p is a valid parameter for location l, the value TRUE (1) is returned. Otherwise the function returns FALSE (0). Examples: ISLP([Effluent:50050]) = 1 ISLP([Effluent:No Way]) = 0 © 2014 AllMax Software, Inc. 394 Operator10 Help 14.4.16 ISND([l:p],x) ISND([l:p],x) If the value, offset x days, IS a Non-Detect value, then TRUE Value: If the value of a specific location and parameter for the date x days from the current date is a Non-Detect value, the value TRUE (1) is returned. Otherwise the function returns FALSE (0). The function considers only Non-Detect values--it ignores data, Alpha Codes, Less Than, or Greater Than values. Examples: ISND([Effluent:50050,0) = 1 if a Non-Detect value, otherwise 0 ISND([Effluent:50050,-1) = 1 if the previous day contained a Non-Detect value 14.4.17 ISTIME([l:p],x) ISTIME([l:p],x) If the value, offset x days, IS a TIME value, then TRUE Value: If the value of a specific location and parameter for the date x days from the current date is a Time value, the value TRUE (1) is returned. Otherwise the function returns FALSE (0). The function considers only Time values--it ignores data, Alpha Codes, Less Than, Greater Than, or Non-Detect values. Examples: ISTIME([Effluent:50050,0) = 1 if a Time value, otherwise 0 ISTIME([Effluent:50050,-1) = 1 if the previous day contained a Time value 14.4.18 LT(x,y) LT(x,y); x<y If x is Less Than y, then TRUE, else FALSE Value: If x is less than y, the value TRUE (1) is returned. If x is greater than or equal to y, the value FALSE (0) is returned. If x is BLANK and y is a value, the function returns TRUE. If y is BLANK, the function returns FALSE. Examples: LT(3,3.14) = 1 3.14<3.14 = 0 14.4.19 NOT(x) NOT(x) NOT x © 2014 AllMax Software, Inc. Functions 395 Value: If x is TRUE (not equal to 0), FALSE(0) is returned. If x is FALSE (equal to 0), the value TRUE (1) is returned. If x is BLANK, the function returns BLANK. Examples: NOT(3.14) = 0 NOT(0) = 1 14.4.20 OR(x,y) OR(x,y); x|y If x OR y is TRUE, then TRUE, else FALSE Value: If either x or y is TRUE (not equal to 0), the value TRUE (1) is returned. If both x and y are FALSE (equal to 0) or BLANK, FALSE (0) is returned. Examples: OR(3.14,3) = 1 3.14|0 = 1 14.4.21 XOR(x,y) XOR(x,y) If x OR y is eXclusively TRUE, then TRUE, else FALSE ("exclusive or") Value: If either x is TRUE (not equal to 0) and y is FALSE (equal to 0), or y is TRUE and x is FALSE, the value TRUE (1) is returned. Otherwise FALSE (0) is returned. If either x or y is BLANK, the function returns FALSE. Examples: XOR(3.14,3) = 0 XOR(3.14,0) = 1 14.5 Constants Topics in this section include: Constants BLANK(x) VAR0-9 14.5.1 Constants Constants Value: Several Constants may be specified in formulas, and the actual values will be used during calculation: © 2014 AllMax Software, Inc. 396 Operator10 Help BLANK = BLANK (the absence of any valid data) VAR0 through VAR9 = variable set using SETVAR() TRUE = 1 (not equal to 0) FALSE = 0 (equal to 0) NOW = the current system date (NOT the current date of the calculation!) as a julian date value; see: Date Functions pi = 3.141592653589793 (as set in the OP10.CFG configuration file) e = 2.718281828459045 (as set in the OP10.CFG configuration file) 8.34 = 8.34 (lb/gal as set in the OP10.CFG configuration file) 3.7853 = 3.7853 (liter/gal as set in the OP10.CFG configuration file) .45359 = .45359 (kg/lb as set in the OP10.CFG configuration file) NOTE: The special Alpha Code "TNTC" is treated as BLANK in most calculations, but produces a Greater Than type as a result. However when considered in monthly maximum or violation functions it is treated as an infinitely large value. When returned as a result, it is usually preserved as the Alpha Code "TNTC". Several Functions are associated with constants: BLANK(x) = BLANK (ignores x) SETVAR(x,y) = sets variable VARx 14.5.2 BLANK(x) BLANK(x); BLANK BLANK returns BLANK Value: The value BLANK is returned. The value x is calculated, but the value is ignored. BLANK is defined as the absence of any valid data. NOTE: Most functions assume BLANK for unentered values. For example "IF([l:p],100, )" assumes "IF([l:p],100,BLANK)". Examples: BLANK = no data value BLANK(SHOW(MONTH LENGTH IS:,LOM(0))) = Shows the month length, but does not return a value 14.5.3 VAR0-9 SETVAR(x,y); SET VARx variable to value y Value: The previous value of the variable is returned. The ten available variables are named "VAR0" through "VAR9". By specifying an x value of 0 to 9, each may be set to the value y. The value y may be BLANK. Variables "VAR0" through "VAR9" may be used in any formula to represent the value. © 2014 AllMax Software, Inc. Functions 397 NOTE: VARx variables are shared for ALL Facilities and users of the OP10 application. The values are saved even when the application is exited. The variables only change when given a new value using SETVAR(). Examples: SETVAR(0,45.1) = the previous value of VAR0. VAR0 will now be 45.1 SETVAR(2,BLANK) = clears the value of VAR2 [RawWW:50050]*VAR4 = the flow multiplied by the (previously set) variable VAR4 14.6 Daily Data Functions Topics in this section include: D_AVG([l:p],x,y); AVeraGe, offset x days, for y days D_COMP([l:p],x,y); offset x Days, COMPare offset y days D_COUNT([l:p],x,y); COUNT, offset x days, for y days D_FLOW([l:p],x,y); FLOW value, offset x months, for y days D_FWA([l:p],x); Flow-Weighted Avg, offset x days, for y days D_GAUGE([l:p],[l:p],x,y); GAUGE value, supply l:p, offset x days, multiplier y D_GMEAN([l:p],x,y); Geometric MEAN, offset x days, for y days D_IGAUGE([l:p],[l:p],x,y); Interpolated GAUGE value, supply l:p, offset x days, multiplier y D_IMTR([l:p],x,y,z); Interpolated MeTeR value, offset x days, max meter reading y, multiplier z D_INTER([l:p],x); INTERpolate from adjacent data, offset x days D_LAST([l:p],x,y); LAST value not later than date, offset x months, y days D_LASTN([l:p],x,y,z); average of LAST z Number of values not later than date, offset x months, y days D_LASTNM([l:p],x,y,z); Median of LAST z Number of values not later than date, offset x months, y days D_LASTNN([l:p],x,y,z,n); Nth highest of LAST z Number of values not later than date, offset x months, y days D_LASTNP([l:p],x,y,z,w); wth Percentile of LAST z Number of values not later than date, offset x months, y days D_LOADING([l:p],x,y); LOADING value, offset x months, for y days D_MAX([l:p],x,y); MAXimum, offset x days, for y days D_METER([l:p],x,y,z); METER value, offset x days, max meter reading y, multiplier z D_MIN([l:p],x,y); MINimum, offset x days, for y days D_NEXT([l:p],x,y); NEXT value not prior to date, offset x months, y days D_STAT([l:p],[l:p],x,y,z); Daily STATistics, offset x days, for y days, type z D_STDEV([l:p],x,y); STandard DEViation, offset x days, for y days D_SUM([l:p],x,y); SUM, offset x days, for y days D_TOTAL([l:p],x,y); avg * range, offset x days, for y days D_VAL([l:p],x,y); VALue, offset x mon, y days © 2014 AllMax Software, Inc. 398 Operator10 Help LP(l,p); [l:p]; Location:Parameter data LOG_REM(x,y); LOGarithm of REMoval, x in, y out PCT_REM(x,y); PerCenT REMoval, x in, y out 14.6.1 D_AVG([l:p],x,y) D_AVG([l:p],x,y) Daily AVeraGe for location and parameter, offset x days, for y days Value: The average of data values of a specific location and parameter for the date x days from the current date and extending for a range of y days. When a parameter to calculate loading is specified (@, #, &, @@, ##, or &¶meter), a separate flow location (and parameter) may also be specified: add the additional parameter D_AVG([l:p],[l_flow:p_flow],x,y) Examples: D_AVG([Effluent:50050],-7,7) = average of past 7 days D_AVG([Effluent:50050],-3,7) = average of week beginning 3 days ago 14.6.2 D_COMP([l:p],x,y) D_COMP([l:p],x,y) Daily COMPare for location and parameter, offset x days, offset y days Value: The difference in data values for a specific location and parameter, comparing the date x days from the current date to the date y days from the current date. Examples: D_COMP([Effluent:50050],0,-7) = increase for past week (since 7 days ago) D_COMP([Effluent:50050],-3,3) = increase for week beginning 3 days ago 14.6.3 D_COUNT([l:p],x,y) D_COUNT([l:p],x,y) Daily COUNT for location and parameter, offset x days, for y days Value: The count of data values of a specific location and parameter for the date x days from the current date and extending for a range of y days. The function counts only valid data--it ignores Alpha Codes, Less Than, Greater Than, or Non-Detect values (if Facility options are set to blank). When a parameter to calculate loading is specified (@, #, &, @@, ##, or &¶meter), a separate flow location (and parameter) may also be specified: add the additional parameter D_COUNT([l:p],[l_flow:p_flow],x,y) Examples: © 2014 AllMax Software, Inc. Functions 399 D_COUNT([Effluent:50050],-7,7) = count of past 7 days D_COUNT([Effluent:50050],-3,7) = count of week beginning 3 days ago 14.6.4 D_FLOW([l:p],x,y) D_FLOW([l:p],x,y) Daily FLOW for location and parameter, offset x months, for y days Value: The flow value in MG/D for any location, including a process or section. The value p is ignored (use ~). An additional parameter z may be added to return: 1 for gal/d 2 for km3/d 3 for l/d Examples: D_FLOW([Effluent:~],0,0) = flow value today D_FLOW([Effluent:~],-3,0) = flow value from 3 months ago D_FLOW([Effluent:~],0,0,1) = flow value from today, converted to gallons per day 14.6.5 D_FWA([l:p],x) D_FWA([l:p],x,y) Daily Flow-Weighted Average for location and parameter, offset x days, for y days Value: The flow-weighted average of data values of a specific location and parameter for the date x days from the current date and extending for a range of y days. Data values where either the parameter or the flow is BLANK are ignored. (see also: Flow-Weighted Average in the main Synexus application) When a parameter to calculate loading is specified (@, #, &, @@, ##, or &¶meter), a separate flow location (and parameter) may also be specified: add the additional parameter D_FWA([l:p],[l_flow:p_flow],x,y) Examples: D_FWA([Effluent:50050],-7,7) = flow-weighted average of past 7 days D_FWA([Effluent:50050],-3,7) = flow-weighted average of week beginning 3 days ago 14.6.6 D_GAUGE([l:p],[l:p],x,y) D_GAUGE([l:p],[l:p],x,y) Daily GAUGE value for location and parameter, supply value from second location and parameter, multiplier y, offset x days Value: The value calculated from the decrease in gauge reading at a specific location and parameter. The function uses the gauge data from the date x days from the current date, © 2014 AllMax Software, Inc. 400 Operator10 Help the last data prior to that date, an additional supply value from the date x days from the current date, and a multiplier. It returns the change in gauge reading, multiplied by the multiplier value, less the added supply. The function considers only valid data, and will return BLANK if there is no valid gauge data for the current or past dates. NOTE: The supply value location and parameter is optional, and may be left blank. NOTE: The function may also be used for gauges that increase, by specifying a negative value for the multiplier y. Examples: D_GAUGE([Effluent:M92225],[Effluent:CL2 Tank],0,1000) change in gauge reading, multiplied by 1000, with CL2 supply D_GAUGE([Effluent:M92225],,0,1) = change in gauge reading (no multiplier, no supply) 14.6.7 D_GMEAN([l:p],x,y) D_GMEAN([l:p],x,y) Daily Geometric MEAN for location and parameter, offset x days, for y days (equivalent to logarithmic mean) Value: The geometric mean of data values of a specific location and parameter for the date x days from the current date and extending for a range of y days. Data values less than 0 are ignored. The function is equivalent to a logarthmic mean (A logarithmic mean returns the same value, although it may use a different calculation method). When a parameter to calculate loading is specified (@, #, &, @@, ##, or &¶meter), a separate flow location (and parameter) may also be specified: add the additional parameter D_GMEAN([l:p],[l_flow:p_flow],x,y) Examples: D_GMEAN([Effluent:50050],-7,7) = geometric mean of past 7 days D_GMEAN([Effluent:50050],-3,7) = geometric mean of week beginning 3 days ago 14.6.8 D_IGAUGE([l:p],[l:p],x,y) D_IGAUGE([l:p],[l:p],x,y) Daily Interpolated GAUGE value for location and parameter, supply value from second location and parameter, multiplier y, offset x days Value: The value calculated from the decrease in gauge reading at a specific location and parameter. The function uses the gauge data from the date x days from the current date, the last data prior to that date, an additional supply value from the date x days from the current date, and a multiplier. It returns the interpolated change in gauge reading, multiplied by the multiplier value, less the added supply. The function considers only valid data, and will return BLANK if there is no valid gauge data for the current or past dates. © 2014 AllMax Software, Inc. Functions 401 NOTE: The supply value location and parameter is optional, and may be left blank. NOTE: The function may also be used for gauges that increase, by specifying a negative value for the multiplier y. Examples: D_IGAUGE([Effluent:M92225],[Effluent:CL2 Tank],0,1000) change in gauge reading, multiplied by 1000, with CL2 supply D_IGAUGE([Effluent:M92225],,0,1) = change in gauge reading (no multiplier, no supply) 14.6.9 D_IMTR([l:p],x,y,z) D_IMTR([l:p],x,y,z) Daily Interpolated MeTeR value for location and parameter, maximum meter reading y, multiplier z, offset x days Value: The value calculated from the positive change in meter reading at a specific location and parameter. The function uses the meter data from or following the date x days from the current date, the last data prior to that date, the maximum possible whole number meter reading, and a multiplier. It returns the interpolated change in meter reading, multiplied by the multiplier value. The function considers only valid data, and will return BLANK if there is no valid meter data for the future or past dates. NOTE: The function may also be used for meters that count down, by specifying a negative value for the maximum meter reading y. Examples: D_IMTR([Effluent:M92225],0,99999,.001) interpolated change in meter reading, divided by 1000 D_IMTR([Effluent:M92225],0,999,1) = interpolated change in meter reading (no multiplier) 14.6.10 D_INTER([l:p],x) D_INTER([l:p],x) Daily INTERpolation of adjacent data for location and parameter, offset x days Value: The interpolated data value for a specific location and parameter for the date x days from the current date. If a value exists for the the date, it is returned. Otherwise the function considers the last data (the last data not later than the date) and the next data (the next data not prior to the date), and returns an interpolated (linear) value. If there are no valid last or next values, the function returns BLANK. Examples: D_INTER([Effluent:50050],0) = value interpolated from adjacent values © 2014 AllMax Software, Inc. 402 Operator10 Help 14.6.11 D_LAST([l:p],x,y) D_LAST([l:p],x,y) Daily LAST value for location and parameter, offset x months and y days Value: The data value of a specific location and parameter equal to or prior to the date x months and y days from the current date (the last data not later than the date). The function considers only valid data, and will return BLANK if there is no valid data equal to or earlier than the date. The function will return the number of days to the previous value by adding 256 to the month x. Examples: D_LAST([Effluent:50050],-1,0) = value one month ago or earlier D_LAST([Effluent:50050],0,-7) = value one week ago or earlier 14.6.12 D_LASTN([l:p],x,y,z) D_LASTN([l:p],x,y,z) Daily average of LAST z Number of values for location and parameter, offset x months and y days Value: The average of z number of data values of a specific location and parameter equal to or prior to the date x months and y days from the current date (the last data values not later than the date). The function considers only valid data, and will return BLANK if there is no valid data equal to or earlier than the date. If z is less than or equal to zero, the function returns BLANK. If z is 1, the function returns the same value as D_LAST(). The average Loading may be returned by adding the additional parameter D_LASTN([l:p],x,y,z,1) A Geometric Mean may be returned instead of an average by adding the additional parameter D_LASTN([l:p],x,y,z,2) Examples: D_LASTN([Effluent:50050],-1,0,2) = average of two values one month ago or earlier D_LASTN([Effluent:50050],0,-7,1) = value one week ago or earlier 14.6.13 D_LASTNM([l:p],x,y,z) D_LASTNM([l:p],x,y,z) Daily Median of LAST z Number of values for location and parameter, offset x months and y days Value: The median of z number of data values of a specific location and parameter equal to or prior to the date x months and y days from the current date (the last data values not later than the date). In the distribution of data values, the middle value is returned. Where there are an even number of values, the average (arithmetic mean) of the two © 2014 AllMax Software, Inc. Functions 403 middle values is returned. The function considers only valid data, and will return BLANK if there is no valid data equal to or earlier than the date. If z is less than or equal to zero, the function returns BLANK. The median Loading may be returned by adding the additional parameter D_LASTNM([l:p],x,y,z,1) Examples: D_LASTNM([Effluent:50050],-1,0,7) = median of seven values one month ago or earlier 14.6.14 D_LASTNN([l:p],x,y,z) D_LASTNN([l:p],x,y,z,n) Daily Nth value of LAST z Number of values for location and parameter, offset x months and y days Value: The Nth data value of z number of data values of a specific location and parameter equal to or prior to the date x months and y days from the current date (the last data values not later than the date). The values are ordered from minimum to maximum, and the nth highest value is returned. (For instance, if the data values are 6, 2, 5, 8, and 3, the 4th value would be 6.) If -n is used, the values are ordered from maximum to minimum, and the nth lowest value is returned. If n is blank, zero, or greater than the number of data values, the function returns BLANK. The function considers only valid data, and will return BLANK if there is no valid data equal to or earlier than the date. If z is less than or equal to zero, the function returns BLANK. The Nth Loading may be returned by adding the additional parameter D_LASTNN([l:p],x,y,z,n,1) Examples: D_LASTNN([Effluent:50050],-1,0,7,2) = 2nd of seven values one month ago or earlier 14.6.15 D_LASTNP([l:p],x,y,z,w) D_LASTNP([l:p],x,y,z,w) Daily Percentile of LAST z Number of values for location and parameter, offset x months and y days, percent w Value: The w-th percentile of z number of data values of a specific location and parameter equal to or prior to the date x months and y days from the current date (the last data values not later than the date). The function considers only valid data, and will return BLANK if there is no valid data equal to or earlier than the date. In the distribution of data values into 100 groups having equal frequencies: w percent of the values lie at or below the w-th percentile. If z is less than or equal to zero, the function returns BLANK. The w-th percentile Loading may be returned by adding the additional parameter D_LASTNP([l:p],x,y,z,w,1) © 2014 AllMax Software, Inc. 404 Operator10 Help Examples: D_LASTNP([Effluent:50050],-1,0,7,70) = 70th percentile of seven values one month ago or earlier 14.6.16 D_LOADING([l:p],x,y) D_LOADING([l:p],x,y) Daily LOADING for location and parameter, offset x months, for y days Value: The loading value in pounds per day (LB/D) for any location, including a process or section. The function always uses the base parameter. A second Location:Parameter may be used to specify the flow location: D_LOADING([l:p],[l:p],x,y) The flow value p is ignored (use ~). The optional parameter z may be added to return: 1 for kg/d 2 for g/d Examples: D_LOADING([Effluent:BOD 5],0,0) = loading value for BOD 5 at the Effluent location. (Assumes flow parameter exists at location.) D_LOADING([Effluent:BOD 5],[Influent:~],-3,0) = loading value for BOD 5 at the Effluent location, using the Influent location for Flow. D_LOADING([Effluent:BOD 5],0,0,1) = loading value for BOD 5 at the Effluent location in kilograms per day (KG/D) 14.6.17 D_MAX([l:p],x,y) D_MAX([l:p],x,y) Daily MAXimum for location and parameter, offset x days, for y days Value: The maximum of data values of a specific location and parameter for the date x days from the current date and extending for a range of y days. When a parameter to calculate loading is specified (@, #, &, @@, ##, or &¶meter), a separate flow location (and parameter) may also be specified: add the additional parameter D_MAX([l:p],[l_flow:p_flow],x,y) Examples: D_MAX([Effluent:50050],-7,7) = maximum of past 7 days D_MAX([Effluent:50050],-3,7) = maximum of week beginning 3 days ago © 2014 AllMax Software, Inc. Functions 405 14.6.18 D_METER([l:p],x,y,z) D_METER([l:p],x,y,z) Daily METER value for location and parameter, maximum meter reading y, multiplier z, offset x days Value: The value calculated from the positive change in meter reading at a specific location and parameter. The function uses the meter data from the date x days from the current date, the last data prior to that date, the maximum possible whole number meter reading, and a multiplier. It returns the change in meter reading, multiplied by the multiplier value. The function considers only valid data, and will return BLANK if there is no valid meter data for the current or past dates. NOTE: The function may also be used for meters that count down, by specifying a negative value for the maximum meter reading y. Examples: D_METER([Effluent:M92225],0,99999,.001) change in meter reading, divided by 1000 D_METER([Effluent:M92225],0,999,1) = change in meter reading (no multiplier) 14.6.19 D_MIN([l:p],x,y) D_MIN([l:p],x,y) Daily MINimum for location and parameter, offset x days, for y days Value: The minimum of data values of a specific location and parameter for the date x days from the current date and extending for a range of y days. When a parameter to calculate loading is specified (@, #, &, @@, ##, or &¶meter), a separate flow location (and parameter) may also be specified: add the additional parameter D_MIN([l:p],[l_flow:p_flow],x,y) Examples: D_MIN([Effluent:50050],-7,7) = minimum of past 7 days D_MIN([Effluent:50050],-3,7) = minimum of week beginning 3 days ago 14.6.20 D_NEXT([l:p],x,y) D_NEXT([l:p],x,y) Daily NEXT value for location and parameter, offset x months and y days Value: The data value of a specific location and parameter equal to or later than the date x months and y days from the current date (the first data not prior to the date). The function considers only valid data, and will return BLANK if there is no valid data equal to or later than the date. © 2014 AllMax Software, Inc. 406 Operator10 Help The function will return the number of days to the next value by adding 256 to the month x. Examples: D_NEXT([Effluent:50050],1,0) = value one month ahead or later D_NEXT([Effluent:50050],0,-7) = value one week ago or later 14.6.21 D_STAT([l:p],[l:p],x,y,z) D_STAT([l:p],[l:p],x,y,z) Daily STATistics values for location(s) and parameter(s), offset x days, for y days, type z Value: The statistics result for data values of specific location(s) and parameter(s) for the date x days from the current date and extending for a range of y days. If two locations and parameters are used, data values where either is BLANK are ignored. If the second location:parameter is not needed, it may be left BLANK. The type z determines the result, where: z =0 , the number (count) of values (either one or two location:parameters may be used) z =1 z =2 , the Sum of the values (one location:parameter) , the Sum of the values squared (one location:parameter) z =3 location:parameter) , the Sample Variance of the values (one z =4 , the Sample Standard Deviation of the values (one location:parameter) z =5 , the Sum of the Squares of the Deviations of the values (one location:parameter) z =6 , the Confidence Interval (95%) of the values (assumes large n) (one location:parameter) © 2014 AllMax Software, Inc. Functions z =7 , the Sum of the Products of the first and second location:parameter z =8 , the Covariance of the values z =9 of the values , the Sum of the Products of the Deviations z = 10 , the Slope of the sample Linear Regression line z = 11 , the y Intercept of the sample Linear Regression line z = 12 z = 13 407 , the Correlation Coefficient of the values , the Coefficient of Determination of the values z = 14 location:parameter) , the Population Variance of the values (one z = 15 , the Population Standard Deviation of the values (one location:parameter) Examples: D_STAT([Inf Dom:50050],BLANK,-7,7,1) = sum of past 7 days D_STAT([Inf Dom:50050],[Inf Ind:50050],0,7,8) = Covariance for the week 14.6.22 D_STDEV([l:p],x,y) D_STDEV([l:p],x,y) Daily STandard DEViation for location and parameter, offset x days, for y days Value: The standard deviation of data values of a specific location and parameter for the © 2014 AllMax Software, Inc. 408 Operator10 Help date x days from the current date and extending for a range of y days. When a parameter to calculate loading is specified (@, #, &, @@, ##, or &¶meter), a separate flow location (and parameter) may also be specified: add the additional parameter D_STDEV([l:p],[l_flow:p_flow],x,y) Examples: D_STDEV([Effluent:50050],-7,7) = standard deviation of past 7 days D_STDEV([Effluent:50050],-3,7) = standard deviation of week beginning 3 days ago 14.6.23 D_SUM([l:p],x,y) D_SUM([l:p],x,y) Daily SUM for location and parameter, offset x days, for y days Value: The sum of data values of a specific location and parameter for the date x days from the current date and extending for a range of y days. When a parameter to calculate loading is specified (@, #, &, @@, ##, or &¶meter), a separate flow location (and parameter) may also be specified: add the additional parameter D_SUM([l:p],[l_flow:p_flow],x,y) Examples: D_SUM([Effluent:50050],-7,7) = sum of past 7 days D_SUM([Effluent:50050],-3,7) = sum of week beginning 3 days ago 14.6.24 D_TOTAL([l:p],x,y) D_TOTAL([l:p],x,y) Daily TOTAL for location and parameter, offset x days, for y days (average * number of days) Value: The total of data values of a specific location and parameter for the date x days from the current date and extending for a range of y days. The total is defined as the average of values, multiplied by the number of days in the range. Examples: D_TOTAL([Effluent:50050],-7,7) = total of past 7 days D_TOTAL([Effluent:50050],-3,7) = total of week beginning 3 days ago 14.6.25 D_VAL([l:p],x,y) D_VAL([l:p],x,y) Daily VALue for location and parameter, offset x months and y days Value: The data value of a specific location and parameter for the date x months and y days from the current date. © 2014 AllMax Software, Inc. Functions 409 Examples: D_VAL([Effluent:50050],-1,0) = value last month D_VAL([Effluent:50050],0,-7) = value last week 14.7 Date Functions Topics in this section include: DATE([][j][m,d,y]); current, julian, or m/d/y DATE DATE([j,x][m,d,y,x]); value x calculated on a julian or m/d/y DATE DOM(x); Day Of Month, 1-31, offset x days DOW(x); Day Of Week, 1-7, offset x days DOY(x); Day Of Year, 1-365, offset x days DVAL(j,x); VALue x for the julian Date j LOM(x); Length Of Month 28-31, offset x months LOY(x); Length Of Year 365-366, offset x years M_DATE(x,y,z); Monthly DATE, offset x months, for month type y MOY(x); Month Of Year, 1-12, offset x months WDOM(x); WeekDay Of (1st of) Month, 1-7, offset x months WOM(x); Week Of Month, 1-5, offset x days YR(x); the YeaR, 1970-2037, offset x years 14.7.1 DATE([][j][m,d,y]) DATE([][j][m,d,y]) current, julian, or m/d/y DATE Value: The numeric date value calculated from the specified information and returned as a (julian) date value. Julian dates are expressed in days since 1/1/4713 B.C. if DATE() is specified, then the current date is returned. if DATE(j) is specified, then the date returned is based on the julian value. if DATE(m,d,y) is specified, then the date returned is based on the month, day, and year. The value y may be either a two or four digit year. Any value may be omitted to use the month, day, or year of the current date. (For example: "DATE(1,1,)" = January 1 of the current year.) The resultant date may be used in further calculations: using addition or subtraction with any numeric value will add a number of days to the (julian) date value; for example: "DATE() - 7" = the date one week prior. using subtraction with two (julian) date values will return the difference in days as a numeric value; for example: "DATE() - DATE(1,1,)" = the number of days since the beginning of the year. Example: DATE() = the current calculation date © 2014 AllMax Software, Inc. 410 Operator10 Help DATE(2458850) = the date of January 1, 2020 DATE(1,1,2020) = the date of January 1, 2020 DATE(MOY()-1,,) = the date of the same day last month 14.7.2 DATE([j,x][m,d,y,x]) DATE([j,x][m,d,y,x]) the value x calculated on a julian or m/d/y DATE Value: The value x calculated on a particular date given by the specified information. if DATE(j,x) is specified, then the value x is returned for the date based on the julian value. if DATE(m,d,y) is specified, then the value x is returned for the date returned is based on the month, day, and year. The value y may be either a two or four digit year. Any value may be omitted to use the month, day, or year of the current date. (For example: "DATE(1,1,,x)" = the value on January 1 of the current year.) Example: DATE(2458850,[Plant Eff:Flow MGD]) = the value on January 1, 2020 DATE(1,1,2020,[Plant Eff:Flow MGD]) = the value on January 1, 2020 DATE(MOY()-1,,,D_AVG([Plant Eff:BOD 5],-3,7)) = the value calculated on the same day last month 14.7.3 DOM(x) DOM(x) Day Of the Month, offset x days Value: The numeric value (1 to 31) of the day of the month, for the date x days from the current date. Example: DOM(0) = current day of the month 14.7.4 DOW(x) DOW(x) Day Of the Week, offset x days Value: The numeric value (1 to 7) of the day of the week, for the date x days from the current date. Example: DOW(0) = current day of the week © 2014 AllMax Software, Inc. Functions 411 14.7.5 DOY(x) DOY(x) Day Of the Year, offset x days Value: The numeric value (1 to 365 (or 366)) of the day of the year, for the date x days from the current date. Example: DOY(0) = current day of the year 14.7.6 DVAL(j,x) DVAL(j,x) VALue x for the julian Date j Value: The numeric value x calculated for the date specified by j instead of the current date. The value j may be from either a data value or the result of the DATE() or VAL() functions. Example: DVAL([Raw WW:TestDate],[Raw WW:50050]) = flow value for the date specified in a DataView DVAL(201108010000,[Raw WW:50050]) = daily flow value for August 1, 2011 (using the AllMax Software date format YYYYMMDDHHMM) DVAL(VAL(01/01/2020),[Raw WW:50050]) = flow value for January 1, 2020 DVAL(DATE(,,YR(-1)),[Raw WW:50050]) = flow value for the same day last year 14.7.7 LOM(x) LOM(x) Length Of the Month, offset x months Value: The numeric value (28 to 31) of the length of the month x months from the current month. Examples: LOM(0) = length of the current month LOM(-1) = length of the previous month 14.7.8 LOY(x) LOY(x) Length Of the Year, offset x years Value: The numeric value (365 to 366) of the length of the year x years from the current year. © 2014 AllMax Software, Inc. 412 Operator10 Help Examples: LOY(0) = length of the current year LOY(-1) = length of the previous year 14.7.9 M_DATE(x,y,z) M_DATE(x,y,z) Monthly DATE, offset x months, for month type y, return type z Value: The numeric date value, offset, or length for the month x months from the current month. if y is 0 then the result uses a calendar month if y is 1 then a week falls in the month which contains its Saturday if y is 2 then a week falls in the month which contains its Wednesday if y is 3 then the result uses the first of month, for 4 weeks, 28 days if y is 4 then the first of month 4th week extends to the end of the month (the value 5 is unused, for compatibility with other monthly functions) if y is 6 then only full weeks (Sun - Sat) in the month are considered The Return Type z is one of the following: 0 if the 1 if the date) 2 if the 3 if the 4 if the result is the beginning of the month as a (julian) date value result is the beginning of the month as an offset (in days from the current result is the end of the month as a (julian) date value result is the end of the month as an offset (in days from the current date) result is the length of the month in days NOTE: Julian dates are expressed in days since 1/1/4713 B.C. The resultant date may be used in further calculations: using addition or subtraction with any numeric value will add a number of days to a (julian) date value; for example: "M_DATE(0,2,0) - 7" = the date one week prior to the start of the month. using subtraction with two (julian) date values will return the difference in days as a numeric value; for example: "M_DATE(0,2,0) - M_DATE(-1,2,0)" = the number of days between the start of the current month and the previous month. Examples: M_DATE(0,2,0) = the date of the start of the current month, using a "Wednesday" rule M_DATE(0,1,4) = the length the current month, using a "Saturday" rule 14.7.10 MOY(x) MOY(x) Month Of the Year, offset x months © 2014 AllMax Software, Inc. Functions 413 Value: The numeric value (1 to 12) of the month of the year x months from the current month. January returns 1, February returns 2, etc. The value x is usually 0. Example: MOY(0) = current month 14.7.11 WDOM(x) WDOM(x) WeekDay Of the first day of the Month, offset x months Value: The numeric value (1 to 7) of the weekday of the first day of the month x months from the current month. Sunday returns 1, Monday returns 2, etc. Examples: WDOM(0) = weekday of the current month WDOM(-1) = weekday of the previous month 14.7.12 WOM(x) WOM(x) Week Of the Month, offset x days Value: The numeric value (1 to 5) of the week of the month, for the date x days from the current date. Example: WOM(0) = current week of the month 14.7.13 YR(x) YR(x) the YeaR, 1970-2037, offset x years Value: The numeric value (1970 to 2037) of the year x years from the current year. The value x is usually 0. Example: YR(0) = current year 14.8 Hourly Data Functions Topics in this section include: H_AVG([l:p],x,y); Hourly AVeraGe, offset x days, hour y © 2014 AllMax Software, Inc. 414 Operator10 Help H_CALC([l:p],x,y,z); Houlry CALCulations, value x, offset y days, type z H_COMB([l:p],[l:p],x,y); COMBined Hourly, offset x days, type y H_COUNT([l:p],x,y); Hourly COUNT, offset x days, hour y H_FUNC([l:p],x,y,z); Hourly FUNCtion, offset x days, value y, type z H_GMEAN([l:p],x,y); Hourly Geometric MEAN, offset x days, hour y H_INTER([l:p],x,y); Hourly INTERpolate from adjacent data, offset x days, hour y H_MAX([l:p],x,y,z); Hourly MAXimum, offset x days, hour y, option z H_MED([l:p],x,y); Hourly MEDian, offset x days, hour y H_METER([l:p],x,y,z); Hourly METER value, offset x days, max meter reading y, multiplier z H_MIN([l:p],x,y,z); Hourly MINimum, offset x days, hour y, option z H_PRTPWR([l:p],[l:p],x,y); Hourly PoWeR of PaRTicle counts, particle diameter X for first L:P, particle diameter Y for second L:P H_STD([l:p],x,y); Hourly STandard Deviation, offset x days, hour y H_SUM([l:p],x,y); Hourly SUM, offset x days, hour y H_VAL([l:p],x,y); Hourly VALue, offset x days, minutes y NOTE: Valid times range from 00:01 through 24:00. 14.8.1 H_AVG([l:p],x,y) H_AVG([l:p],x,y) Hourly AVeraGe for location and parameter, offset x days, hour y Value: The average of hourly data values of a specific location and parameter for the date x days from the current date. If y is 0, the values for the entire day are used. If y is from 1 to 24, a single hour is used (i.e. y=3 for values from 02:01 through 03:00). NOTE: The function may also use the values for an entire day beginning at a specific hour y, by adding the additional parameter H_AVG([l:p],x,y,1) (i.e. y=3 for values from 03:01 the current day through 03:00 the next day). NOTE: The function may also offset the period to begin on an even hour y, by adding the additional parameter H_AVG([l:p],x,y,2) (i.e. y=3 for values from 02:00 through 02:59, the third hourly period of the day). Examples: H_AVG([Effluent:50050],0,0) = average for the day H_AVG([Effluent:50050],0,15) = average for 14:01 through 15:00 H_AVG([Effluent:50050],-7,0) = average 7 days ago © 2014 AllMax Software, Inc. Functions 415 14.8.2 H_CALC([l:p],x,y,z) H_CALC([l:p],x,y,z) Hourly CALCulation of values x, offset y days, type z, corresponding to an interval or Control Location:Parameter Value: The hourly values calculated from hourly data, at times based either on a time interval, or at the times corresponding to each data value of the Control Location:Parameter. The function uses the hourly data for the date y days from the current date. It stores the result at the location:parameter where the formula is attached. The function then returns the Hourly Calculation as configured for the location:parameter where the formula is attached. The function considers only valid data, and will return BLANK if there is no valid data. The function uses the following type z to determine the calculation method: if z is 0 then the hourly results are at the times corresponding to each data value of the Control Location:Parameter (calculates only at necessary times) if z is 1 then the hourly results are at 60 minute intervals (fastest calculation) if z is 2 then the hourly results are at 30 minute intervals (fast calculation) if z is 3 then the hourly results are at 15 minute intervals (...) if z is 4 then the hourly results are at 10 minute intervals (slow calculation) if z is 5 then the hourly results are at 5 minute intervals (slow calculation) if z is 6 then all hourly results are calculated (slowest calculation) A specific whole hour may be specified: where h is the number of whole hours past midnight, add the additional parameter H_CALC([l:p],x,y,z,h) The value x may use most functions which do not specify multiple days, weeks, months, or years. LP(l,p) [l:p] Boolean (TRUE/FALSE) Functions Constants Date Functions (except DATE()) DDE Functions Mathematical Functions Miscellaneous Functions (except ACCRUE(), ASSIGN(), ONCE(), SYNC()) Trigonometry Functions WARNING: The function will calculate and save hourly values in the Location:Parameter where the formula is attached. NOTE: If the control location:parameter is NOT the location:parameter where the formula is attached, uncalculated data will be deleted. NOTE: Uncalculated data values will not be deleted if the location:parameter where the formula is attached is also the Control Location:Parameter, or if a specific whole hour is specified. © 2014 AllMax Software, Inc. 416 Operator10 Help NOTE: If data values from the location:parameter where the formula is attached are to be used in the value x, either it must be the Control Location:Parameter, or a specific whole hour must be specified. NOTE: If a specific hour is specified, the hourly result will always be saved, even if the control Location:Parameter data value is BLANK. NOTE: Any functions for the value x which allow an offset must use an offset of 0 or BLANK. Examples: H_CALC([Eff1:50050],[Eff2:50050]/2,0,0) half the flow from eff2, whenever a corresponding eff1 flow exists H_CALC([Flow1:50050],[OverFlow:50050],0,2) = OverFlow values every 30 minutes 14.8.3 H_COMB([l:p],[l:p],x,y) H_COMB([l:p],[l:p],x,y) Hourly COMBination of two locations and parameters, type y, offset x days Value: The hourly values calculated from the hourly data at two specific locations and parameters. The function uses the hourly data for the date x days from the current date. It stores the result at the Location:Parameter where the formula is attached, at the time corresponding to each data value. The function then returns the Hourly Calculation as configured for the Location:Parameter where the formula is attached. The function considers only valid data, and will return BLANK if there is no valid data. The function uses the following type z to determine the calculation method: if if if if if if if y y y y y y y is is is is is is is 0 1 2 3 4 5 6 then then then then then then then the the the the the the the hourly hourly hourly hourly hourly hourly hourly result result result result result result result is is is is is is is the the the the the the the first data values + the second first data value - the second first data value * the second first data value / the second maximum of the data values minimum of the data values average of the data values WARNING: The function will calculate and save hourly values in the Location:Parameter where the formula is attached. Examples: H_COMB([Eff1:50050],[Eff2:50050],0,0) hourly sum of two effluents H_COMB([Effluent:50050],[OverFlow:50050],0,1) = the difference of hourly data 14.8.4 H_COUNT([l:p],x,y) H_COUNT([l:p],x,y) Hourly COUNT for location and parameter, offset x days, hour y © 2014 AllMax Software, Inc. Functions 417 Value: The count of hourly data values of a specific location and parameter for the date x days from the current date. If y is 0, the values for the entire day are used. If y is from 1 to 24, a single hour is used (i.e. y=3 for values from 02:01 through 03:00). The function counts only valid data--it ignores Alpha Codes, Less Than, Greater Than, or Non-Detect values (if Facility options are set to blank). NOTE: The function may also use the values for an entire day beginning at a specific hour y, by adding the additional parameter H_COUNT([l:p],x,y,1) (i.e. y=3 for values from 03:01 the current day through 03:00 the next day). NOTE: The function may also offset the period to begin on an even hour y, by adding the additional parameter H_COUNT([l:p],x,y,2) (i.e. y=3 for values from 02:00 through 02:59, the third hourly period of the day). Examples: H_COUNT([Effluent:50050],0,0) = count for the day H_COUNT([Effluent:50050],0,15) = count for 14:01 through 15:00 H_COUNT([Effluent:50050],-7,0) = count 7 days ago 14.8.5 H_FUNC([l:p],x,y,z) H_FUNC([l:p],x,y,z) Hourly FUNCtion for location and parameter, value y, type z, offset x days Value: The hourly values calculated from the hourly data at a specific location and parameter. The function uses the hourly data for the date x days from the current date, and the value y. It stores the result at the Location:Parameter where the formula is attached, at the time corresponding to each data value. The function then returns the Hourly Calculation as configured for the Location:Parameter where the formula is attached. The function considers only valid data, and will return BLANK if there is no valid data. The function uses the following type z to determine the calculation method: if if if if if if if if if if z z z z z z z z z z is is is is is is is is is is 0 1 2 3 4 5 6 7 8 9 then then then then then then then then then then the the the the the the the the the the hourly hourly hourly hourly hourly hourly hourly hourly hourly hourly result result result result result result result result result result is is is is is is is is is is the data value + y the data value - y the data value * y the data value / y the maximum of the data value or y the minimum of the data value or y the average of the data value and y BLANK if the data value exceeds the upper limit y BLANK if the data value exceeds the lower limit y y A specific whole hour may be specified:: where h is the number of whole hours past midnight, add the additional parameter H_FUNC([l:p],x,y,z,h) WARNING: The function will calculate and save hourly values in the Location:Parameter where the formula is attached. © 2014 AllMax Software, Inc. 418 Operator10 Help NOTE: If type z is 9 and a specific hour is specified, the hourly result will always be returned, even if the data value is BLANK. Examples: H_FUNC([Effluent:50050],0,10,2) multiply all hourly data by 10 H_FUNC([Effluent:50050],0,1000,4) = the max of hourly data or 1000 14.8.6 H_GMEAN([l:p],x,y) H_GMEAN([l:p],x,y) Hourly Geometric MEAN for location and parameter, offset x days, hour y Value: The geometric mean of hourly data values of a specific location and parameter for the date x days from the current date. If y is 0, the values for the entire day are used. If y is from 1 to 24, a single hour is used (i.e. y=3 for values from 02:01 through 03:00). NOTE: The function may also use the values for an entire day beginning at a specific hour y, by adding the additional parameter H_GMEAN([l:p],x,y,1) (i.e. y=3 for values from 03:01 the current day through 03:00 the next day). NOTE: The function may also offset the period to begin on an even hour y, by adding the additional parameter H_GMEAN([l:p],x,y,2) (i.e. y=3 for values from 02:00 through 02:59, the third hourly period of the day). Examples: H_GMEAN([Effluent:50050],0,0) = geometric mean for the day H_GMEAN([Effluent:50050],0,15) = geometric mean for 14:01 through 15:00 H_GMEAN([Effluent:50050],-7,0) = geometric mean 7 days ago 14.8.7 H_INTER([l:p],x,y) H_INTER([l:p],x,y) Hourly INTERpolation of adjacent data for location and parameter, offset x days, hour y Value: The interpolated hourly data value for a specific location and parameter for the date x days from the current date. The hour y is from 1 to 24 (i.e. y=3 for the value at 03:00). If a value exists for the the hour, it is returned. Otherwise the function considers the last data (the last data not later than the hour) and the next data (the next data not prior to the hour), and returns an interpolated (linear) value. If there are no valid last or next values, the function returns BLANK. Examples: H_INTER([Effluent:50050],0,15) = interpolated value for 15:00 H_INTER([Effluent:50050],-7,3) = interpolated value for 03:00, 7 days ago © 2014 AllMax Software, Inc. Functions 419 14.8.8 H_MAX([l:p],x,y,z) H_MAX([l:p],x,y,z) Hourly MAXimum for location and parameter, offset x days, hour y, option z Value: The maximum of hourly data values of a specific location and parameter for the date x days from the current date. Parameters: [l:p] - Define a Location:Parameter for which the function will evaluate the hourly maximum x - The x parameter allows a daily offset to be passed to the function. Use a positive or negative numeric value to calculate values x days from the current date. y - The y parameter allows numeric values, in the range 0-24 to be passed to the function. Use 0-24 to define the hour of the day to be evaluated. Use 0 to evaluate the entire day, use 1-24 to evaluate the specific single hour of the day (i.e. y=3 for values from 02:01 through 03:00). z - The optional parameter z, can be used to define special handling options for the calculation and return of values. The optional parameter z can be either 0, 1, 2 or the preceding options (0, 1 or 2) plus 256. Parameter options: 0 - If z is set to 0, the function will return the value for the day x days from the current date only. 1 - If z is set to 1, the function will use the values for an entire 24 hour period beginning at a specific hour y. (i.e. y=3, z=1 for values from 03:01 the current day through 03:00 the next day) 2 - If z is set to 2, the function will offset the period to begin on an even hour y. (i.e. y=3, z=2 for values from 02:00 through 02:59, the third hourly period of the day) +256 - While z is set to 0, 1 or 2, add 256 to z to return the time of the maximum value for the day x days from the current date. (i.e. y=0, z=256 for the corresponding time of the maximum value for the day) Examples: H_MAX([Effluent:50050],0,0,0) = maximum for the day H_MAX([Effluent:50050],0,15,0) = maximum for 14:01 through 15:00 H_MAX([Effluent:50050],-1,15,1) = maximum value for period beginning 14:01 yesterday and ending 24 hours later at 14:00 the next day (today) H_MAX([Effluent:50050],-7,0,256) = corresponding time value for the maximum 7 days ago 14.8.9 H_MED([l:p],x,y) H_MED([l:p],x,y) Hourly MEDian for location and parameter, offset x days, hour y Value: The median of hourly data values of a specific location and parameter for the date x days from the current date. In the distribution of data values, the middle value is returned. Where there are an even number of values, the average (arithmetic mean) of © 2014 AllMax Software, Inc. 420 Operator10 Help the two middle values is returned. If y is 0, the values for the entire day are used. If y is from 1 to 24, a single hour is used (i.e. y=3 for values from 02:01 through 03:00). NOTE: The function may also use the values for an entire day beginning at a specific hour y, by adding the additional parameter H_MED([l:p],x,y,1) (i.e. y=3 for values from 03:01 the current day through 03:00 the next day). NOTE: The function may also offset the period to begin on an even hour y, by adding the additional parameter H_MED([l:p],x,y,2) (i.e. y=3 for values from 02:00 through 02:59, the third hourly period of the day). Examples: H_MED([Effluent:50050],0,0) = median for the day H_MED([Effluent:50050],0,15) = median for 14:01 through 15:00 H_MED([Effluent:50050],-7,0) = median 7 days ago 14.8.10 H_METER([l:p],x,y,z) H_METER([l:p],x,y,z) Hourly METER for location and parameter, maximum meter reading y, multiplier z, offset x days Value: The sum of hourly values calculated from the positive change in hourly meter readings at a specific location and parameter. The function uses the hourly meter data for the date x days from the current date, the last data prior to each hourly reading for that date, the maximum possible whole number meter reading, and a multiplier. It stores the change in meter reading, multiplied by the multiplier value, at the Location:Parameter where the formula is attached, at the time corresponding to each meter data value. The function considers only valid data, and will return BLANK if there is no valid meter data for the current or past dates. WARNING: The function will calculate and save hourly values in the Location:Parameter where the formula is attached. NOTE: The function may also be used to return the sum without recording hourly values, by adding the additional parameter H_METER([l:p],x,y,z,1) NOTE: The function may also be used to calculate and save hourly values only where none already exist, by adding the additional parameter H_METER([l:p],x,y,z,2) (Note that changing a meter reading will therefore not recalculate the result unless the result is first deleted.) NOTE: The function may also be used for meters that count down, by specifying a negative value for the maximum meter reading y. Examples: H_METER([Effluent:Meter],0,99999,.001) change in meter reading, divided by 1000 © 2014 AllMax Software, Inc. Functions 421 H_METER([Effluent:Meter],0,999,1) = change in meter reading (no multiplier) 14.8.11 H_MIN([l:p],x,y,z) H_MIN([l:p],x,y,z) Hourly MINimum for location and parameter, offset x days, hour y, option z Value: The minimum of hourly data values of a specific location and parameter for the date x days from the current date. Parameters: [l:p] - Define a Location:Parameter for which the function will evaluate the hourly minimum x - The x parameter allows a daily offset to be passed to the function. Use a positive or negative numeric value to calculate values x days from the current date. y - The y parameter allows numeric values, in the range 0-24 to be passed to the function. Use 0-24 to define the hour of the day to be evaluated. Use 0 to evaluate the entire day, use 1-24 to evaluate the specific single hour of the day (i.e. y=3 for values from 02:01 through 03:00). z - The optional parameter z, can be used to define special handling options for the calculation and return of values. The optional parameter z can be either 0, 1, 2 or the preceding options (0, 1 or 2) plus 256. Parameter options: 0 - If z is set to 0, the function will return the value for the day x days from the current date only. 1 - If z is set to 1, the function will use the values for an entire 24 hour period beginning at a specific hour y. (i.e. y=3, z=1 for values from 03:01 the current day through 03:00 the next day) 2 - If z is set to 2, the function will offset the period to begin on an even hour y. (i.e. y=3, z=2 for values from 02:00 through 02:59, the third hourly period of the day) +256 - While z is set to 0, 1 or 2, add 256 to z to return the time of the minimum value for the day x days from the current date. (i.e. y=0, z=256 for the corresponding time of the minimum value for the day) Examples: H_MIN([Effluent:50050],0,0,0) = minimum for the day H_MIN([Effluent:50050],0,15,0) = minimum for 14:01 through 15:00 H_MIN([Effluent:50050],-1,15,1) = minimum value for period beginning 14:01 yesterday and ending 24 hours later at 14:00 the next day (today) H_MIN([Effluent:50050],-7,0,256) = corresponding time value for the minimum 7 days ago 14.8.12 H_PRTPWR([l:p],[l:p],x,y) H_PRTPWR([l:p],[l:p],x,y) Hourly PoWeR of PaRTicle counts, particle diameter X for first L:P, particle diameter Y for second L:P © 2014 AllMax Software, Inc. 422 Operator10 Help Value: The hourly values calculated from the hourly data at two specific locations and parameters. The function uses the hourly data for the current date. It stores the result at the Location:Parameter where the formula is attached, at the time corresponding to each data value. The function then returns the Hourly Calculation as configured for the Location:Parameter where the formula is attached. The function considers only valid data, existing at the same time for both parameters, and will return BLANK if there is no valid data. The two L:Ps are two concentrations (usually expressed as a number per ml, or #/ml) of particles larger than a given diameter (usually expressed as microns, or µm, or um). The variable x is the given particle diameter for the first L:P, variable y is for the second. The resultant hourly values are an exponent (or "power") for a "power law distribution" comparing the data values. If the particles are naturally distributed (in a "log normal distribution"), the exponents should theoretically be similar. The function is best used to observe changes which might indicate particles not uniformly distributed. WARNING: The function will calculate and save hourly values in the Location:Parameter where the formula is attached. Example: H_PRTPWR([Eff:Part Cnt >2],[Eff:Part Cnt >10],2,10) hourly power values for two Particle Count parameters 14.8.13 H_STD([l:p],x,y) H_STD([l:p],x,y) Hourly STandard Deviation for location and parameter, offset x days, hour y Value: The standard deviation of hourly data values of a specific location and parameter for the date x days from the current date. If y is 0, the values for the entire day are used. If y is from 1 to 24, a single hour is used (i.e. y=3 for values from 02:01 through 03:00). NOTE: The function may also use the values for an entire day beginning at a specific hour y, by adding the additional parameter H_STD([l:p],x,y,1) (i.e. y=3 for values from 03:01 the current day through 03:00 the next day). NOTE: The function may also offset the period to begin on an even hour y, by adding the additional parameter H_STD([l:p],x,y,2) (i.e. y=3 for values from 02:00 through 02:59, the third hourly period of the day). Examples: H_STD([Effluent:50050],0,0) = standard deviation for the day H_STD([Effluent:50050],0,15) = standard deviation for 14:01 through 15:00 H_STD([Effluent:50050],-7,0) = standard deviation 7 days ago © 2014 AllMax Software, Inc. Functions 423 14.8.14 H_SUM([l:p],x,y) H_SUM([l:p],x,y) Hourly SUM for location and parameter, offset x days, hour y Value: The sum of hourly data values of a specific location and parameter for the date x days from the current date. If y is 0, the values for the entire day are used. If y is from 1 to 24, a single hour is used (i.e. y=3 for values from 02:01 through 03:00). NOTE: The function may also use the values for an entire day beginning at a specific hour y, by adding the additional parameter H_SUM([l:p],x,y,1) (i.e. y=3 for values from 03:01 the current day through 03:00 the next day). NOTE: The function may also offset the period to begin on an even hour y, by adding the additional parameter H_SUM([l:p],x,y,2) (i.e. y=3 for values from 02:00 through 02:59, the third hourly period of the day). Examples: H_SUM([Effluent:50050],0,0) = sum for the day H_SUM([Effluent:50050],0,15) = sum for 14:01 through 15:00 H_SUM([Effluent:50050],-7,0) = sum 7 days ago 14.8.15 H_VAL([l:p],x,y) H_VAL([l:p],x,y) Hourly VALue for location and parameter, offset x days and y minutes Value: The data value of a specific location and parameter for the time x days from the current date and y minutes after midnight. NOTE: If y is blank or 0, the daily value is returned. The function can also return the number of hourly values for the day, or additional information about a particular hourly value can be returned: if y is 0, where y add 256 add 512 add 256 to x in order to return the count of the hourly values is the number of the hourly value (1 is the first, 2 is the second, etc.) to x in order to return the offset (in minutes) of the hourly value to x in order to return the value of the hourly value Examples: H_VAL([Effluent:50050],-1,480) = value yesterday at 8:00am H_VAL([Effluent:50050],-7,720) = value at noon one week ago © 2014 AllMax Software, Inc. 424 14.9 Operator10 Help Mathematical Functions Topics included in this section: ABS(x); ABSolute value of x ADD(x,y);x+y; ADD x and y AVG(x1,x2, ... ,xn); AVeraGe of all non-blank values COUNT(x1,x2, ... ,xn); COUNT of all non-blank values DEFAULT(x,y); value y, or DEFAULT x if y is blank DIST(x); standard normal DISTribution of value x DIV(x,y); x/y; DIVide x by y EXP(x); EXPonential of x, e^x FACT(x); FACTorial of value x; 1*2*3*...*x FIRST(x1,x2, ... ,xn); FIRST non-blank value FRAC(x); FRACtional part of value x IDIST(x); Inverse of standard normal DISTribution INT(x); INTeger value of x INTER(a,c,fa,fc,b); INTERpolated value fb INV(x); INVersion of x, 1/x LIMIT(x,y,z); LIMIT make value x >=y, <=z LN(x); Natural Log of x LOG(x); LOG base 10 of x LOG_REM(x,y); LOGarithm of REMoval, x in, y out MAX(x1,x2, ... ,xn); MAXimum of all values MIN(x1,x2, ... ,xn); MINimum of all values MOD(x,y); x%y; MODulus or remainder of x/y MUL(x,y); x*y; MULtiply x and y NONBLANK(x); NONBLANK value of x NONZERO(x); NON-ZERO value x, or blank if x is 0 PCT_REM(x,y); PerCenT REMoval, x in, y out PREC(x,y); value x to y significant digits PRECision PWR(x,y); x^y; x to the PoWeR of y RAND(x); RANDom value less than x ROUND(x,y); value x ROUNDed to y decimal places ROUNDE(x,y); value x Even-biased ROUNDed to y places SQRT(x); SQuare RooT of x SUB(x,y); x-y; SUBtract y from x SUM(x1,x2, ... ,xn); SUM of all non-blank values TRUNC(x,y); TRUNCate value x to y decimal places VERIFY(x,y,z); VERIFY value x >=y, <=z, else blank © 2014 AllMax Software, Inc. Functions 425 14.9.1 ABS(x) ABS(x) ABSolute value of x ("absolute value") Value: The positive value of x. If x is BLANK, the function returns BLANK. Examples: ABS(-3.14) = 3.14 ABS(3.14) = 3.14 14.9.2 ADD(x,y); x+y ADD(x,y); x+y ADD x and y ("addition") Value: The sum of x and y. If either x or y is BLANK, the function returns BLANK. Examples: ADD(3,2) = 5 3.14+2.14 = 5.28 14.9.3 AVG(x1,x2,...,xn) AVG(x1,x2, ... ,xn) AVeraGe of all non-BLANK values from x1 through xn Value: The average of values x1 through xn. Any number of values may be specified. If any value is BLANK, the value is ignored. The value BLANK is returned if all values are BLANK. Examples: AVG(3,2) = 2.5 AVG(1.2,BLANK,3.2,4.0) = 2.8 14.9.4 COUNT(x1,x2,...xn) COUNT(x1,x2, ... ,xn) COUNT of all non-BLANK values from x1 through xn Value: The count of values x1 through xn. Any number of values may be specified. If any value is BLANK, the value is ignored. The value BLANK is returned if all values are BLANK. Examples: COUNT(3,2) = 2 COUNT(1.2,BLANK,3.2,4.0) = 3 © 2014 AllMax Software, Inc. 426 Operator10 Help 14.9.5 DEFAULT(x,y) DEFAULT(x,y) Value y, or DEFAULT value x if y is blank Value: The value y is returned unless it is BLANK, where the default value x is returned instead. Examples: DEFAULT(50,[Influent:00021]) = 50 degrees F if there is no value recorded DEFAULT(0,[Influent:50050]) = same result as NONBLANK([Influent:50050]) 14.9.6 DIST(x) DIST(x) standard normal DISTribution of value x Value: The area under the standard normal distribution curve for the value x. Examples: DIST(1.96) = .975 DIST(0) = .5 14.9.7 DIV(x,y); x/y DIV(x,y); x/y DIVide x by y ("division") Value: The quotient of x and y (x divided by y). If either x or y is BLANK, the function returns BLANK. Examples: DIV(7.5,30) = .25 3.14/2 = 1.57 14.9.8 EXP(x) EXP(x) EXPonential of x ("exponential") Value: Exponential of x, e^x. The constant e (2.718) raised to the power of x. If x is BLANK, the function returns BLANK. Examples: EXP(0) = 1 EXP(3.14) = 23.104 © 2014 AllMax Software, Inc. Functions 427 14.9.9 FACT(x) FACT(x) FACTorial of value x; 1*2*3*...*x Value: The factorial of the integer value of x, 1*2*3*...*x. If x is BLANK or less than 0, the function returns BLANK. Examples: FACT(4) = 24 (1*2*3*4) FACT(3.5) = 6 (1*2*3) 14.9.10 FIRST(x1,x2,...,xn) FIRST(x1,x2, ... ,xn) FIRST non-BLANK value from x1 through xn Value: The first of values x1 through xn. Any number of values may be specified. If any value is BLANK, the value is ignored. The value BLANK is returned if all values are BLANK. NOTE: If the last value is a constant "default" value, the function will always return a value. NOTE: Once the first value has been found, remaining values are never processed. Examples: FIRST(x,y,z) = x, if it is not blank; or else y, if it is not blank; or else z, if it is not blank FIRST([Influent:50050],[Effluent:50050],3.2) = the first flow value found, or the default 3.2 14.9.11 FRAC(x) FRAC(x) FRACtional part of the value x Value: The fractional part of the value x is returned. If x is BLANK, the function returns BLANK. Examples: FRAC(123.456) = .456 FRAC(-3.14) = -.14 14.9.12 IDIST(x) IDIST(x) © 2014 AllMax Software, Inc. 428 Operator10 Help Inverse of the standard normal DISTribution for value x Value: The value of the standard normal distribution curve for the area x. If x is not between 0 and 1, the function returns BLANK. Examples: IDIST(.975) = 1.96 IDIST(.5) = 0 14.9.13 INT(x) INT(x) INTeger value of x Value: The largest integer not greater than x. If x is BLANK, the function returns BLANK. Examples: INT(3.14) = 3 INT(-3.14) = -4 14.9.14 INTER(a,c,fa,fc,b) INTER(a,c,fa,fc,b) INTERpolated value fb Value: The interpolated result for b, where fa and fc are the known function results for values a and b. Examples: INTER(2,5,40,100,3) = interpolated result for 3 ( 60 ) 14.9.15 INV(x) INV(x) INVersion of x, 1/x Value: The value equal to 1/x. If x is BLANK or x is equal to 0, the function returns BLANK. Examples: INV(.25) = 4 INV(1000) = .001 14.9.16 LIMIT(x,y,z) LIMIT(x,y,z) LIMIT the value x so that it is not less than y, and not greater than z © 2014 AllMax Software, Inc. Functions 429 Value: The value x. If x is less than the limit y, it is increased to equal y. If x is greater than the limit z, it is decreased to equal z. If the limit y or z is BLANK, it is not used. Examples: LIMIT(3.14, 0, 10) = 3.14 (the value is already within the limits) LIMIT(3.14, 10, 20) = 10 LIMIT(240, 100, BLANK) = 240 (no upper limit) 14.9.17 LN(x) LN(x) Natural Logarithm (base e) of x Value: The natural logarithm (base e) of x. The power of the constant e (2.718) which will equal the value x. If x is negative or x is 0 or BLANK, the function returns BLANK. Examples: LN(1) = 0 LN(3.14) = 1.144 14.9.18 LOG(x) LOG(x) LOGarithm (base 10) of x Value: The logarithm (base 10) of x. The power of 10 which will equal the value x. If x is negative or x is 0 or BLANK, the function returns BLANK. Examples: LOG(100) = 2 LOG(3.14) = .497 14.9.19 LOG_REM(x,y) LOG_REM(x,y) LOGarithm of REMoval, x in, y out Value: The logarithm of the removal or reduction from the value x to the value y. If either x or y is BLANK, the function returns BLANK. If a removal percentage is: 90%, the Log Removal is equal to 1 99%, the Log Removal is equal to 2 99.9%, the Log Removal is equal to 3 99.99%, the Log Removal is equal to 4 etc. © 2014 AllMax Software, Inc. 430 Operator10 Help Examples: LOG_REM([Inf:BOD 5],[Eff:BOD 5]) = the logarithm of the removal of BOD LOG_REM(127,0.4) = 2.5 14.9.20 MAX(x1,x2,...,xn) MAX(x1,x2, ... ,xn) MAXimum of all values from x1 through xn Value: The maximum of values x1 through xn. Any number of values may be specified. If any value is BLANK, the value is ignored. The value BLANK is returned if all values are BLANK. Examples: MAX(3.14,2.14) = 3.14 MAX(-5,BLANK,2.14) = 2.14 14.9.21 MIN(x1,x2,...,xn) MIN(x1,x2, ... ,xn) MINimum of all values from x1 through xn Value: The minimum of values x1 through xn. Any number of values may be specified. If any value is BLANK, the value is ignored. The value BLANK is returned if all values are BLANK. Examples: MIN(3.14,2.14) = 2.14 MIN(5,BLANK,2.14) = 2.14 14.9.22 MOD(x,y); x% y MOD(x,y); x%y MODulus or remainder of x / y Value: The remainder of x / y such that x = i * y + remainder, where i is an integer and the remainder is less than y. Examples: MOD(17,5) = 2 153%10 = 3 14.9.23 MUL(x,y); x*y MUL(x,y); x*y MULtiply x and y ("multiply") © 2014 AllMax Software, Inc. Functions 431 Value: The product of x and y. If either x or y is BLANK, the function returns BLANK. Examples: MUL(3,2) = 6 3.14*2 = 6.28 14.9.24 NONBLANK(x) NONBLANK(x) NONBLANK returns the value x, or returns 0 if x is BLANK Value: The value returned is guaranteed to be a valid, non-BLANK value. The value 0 is returned if x is BLANK. Examples: [Influent:50050] + NONBLANK([Inf2:50050]) = ... returns value even if "Inf2 flow" does not exist NONBLANK(1.2/0) = 0, returns 0 even though division by 0 is undefined 14.9.25 NONZERO(x) NONZERO(x) NONZERO returns the value x, or returns BLANK if x is 0 Value: The value returned is a non-zero value. The value BLANK is returned if x is 0. Examples: NONZERO([Inf2:00310]) = ... returns BLANK if 0 was entered NONZERO(0/3.14) = BLANK 14.9.26 PCT_REM(x,y) PCT_REM(x,y) PerCenT REMoval, x in, y out Value: The percentage of the removal or reduction from the value x to the value y. If either x or y is BLANK, the function returns BLANK. Examples: PCT_REM([Inf:BOD 5],[Eff:BOD 5]) = the percent removal of BOD PCT_REM(127,0.4) = 99.685 % 14.9.27 PREC(x,y) PREC(x,y) © 2014 AllMax Software, Inc. 432 Operator10 Help Value x to y significant digits PRECision Value: The value of x rounded to y significant digits of precision. The value of y may range from 0 to 15. If y is equal to 0, 7 digits are used. NOTE: Although calculations can use up to 15 significant digits (double precision), a maximum of 15 significant digits (float precision) are returned or stored. Examples: PREC(123.45,4) = 123.5 PREC(123.45,1) = 100 14.9.28 PWR(x,y); x^y PWR(x,y); x^y x to the PoWeR of y Value: The value of x raised to the y power. If either x or y is BLANK, the function returns BLANK. If both x and y are zero, the function returns BLANK. If x is negative and y is not an integer, the function returns BLANK. Examples: PWR(2,3) = 8 3.14^2 = 9.8596 14.9.29 RAND(x) RAND(x) RANDom value less than x Value: A random value between (or equal to) 0 and the value of x. If x is BLANK, the function returns BLANK. Examples: RAND(1) = .52678 RAND(10) = 9.45988 14.9.30 ROUND(x,y) ROUND(x,y) Value x ROUNDed to y decimal places Value: The value of x rounded to y decimal places. Positive y values signify places to the right of the decimal point; negative y values signify places to the left of the decimal point. If x or y is BLANK, the function returns BLANK. Values whose discarded portion is exactly © 2014 AllMax Software, Inc. Functions 433 between values (i.e. the digit 5) will round up to the next value. Examples: ROUND(123.456,2) = 123.46 ROUND(123.456,-1) = 120 14.9.31 ROUNDE(x,y) ROUNDE(x,y) Value x Even-biased ROUNDed to y decimal places Value: The value of x even-biased rounded to y decimal places. Positive y values signify places to the right of the decimal point; negative y values signify places to the left of the decimal point. If x or y is BLANK, the function returns BLANK. Values whose discarded portion is exactly between values (i.e. the digit 5) will round to the nearest even value. Examples: ROUNDE(123.45,1) = 123.4 ROUNDE(123.35,1) = 123.4 ROUNDE(123.45,-1) = 120 14.9.32 SQRT(x) SQRT(x) SQuare RooT of x Value: The square root of x. If x is negative or x is BLANK, the function returns BLANK. Examples: SQRT(9.8596) = 3.14 SQRT(100) = 10 14.9.33 SUB(x,y); x-y SUB(x,y); x-y SUBtract y from x Value: The difference of x and y (y subtracted from x). If either x or y is BLANK, the function returns BLANK. Examples: SUB(3,2) = 1 3.14-2 = 1.14 © 2014 AllMax Software, Inc. 434 Operator10 Help 14.9.34 SUM(x1,x2,...,xn) SUM(x1,x2, ... ,xn) SUM of all non-BLANK values from x1 through xn Value: The sum of values x1 through xn. Any number of values may be specified. If any value is BLANK, the value is ignored. The value BLANK is returned if all values are BLANK. Examples: SUM(3,2) = 5 SUM(1.2,BLANK,3.2,4.0) = 8.4 14.9.35 TRUNC(x,y) TRUNC(x,y) Value x TRUNCated to y decimal places Value: The value of x truncated to y decimal places. Positive y values signify places to the right of the decimal point; negative y values signify places to the left of the decimal point. If x or y is BLANK, the function returns BLANK. Examples: sTRUNC(123.456,-1) = 120 14.9.36 VERIFY(x,y,z) VERIFY(x,y,z) VERIFY that the value x is not less than y, and not greater than z Value: The value x. If x is less than the limit y, or if x is greater than the limit z, the function returns BLANK. If the limit y or z is BLANK, it is not used. Examples: VERIFY(3.14, 0, 10) = 3.14 (the value is within the limits) VERIFY(12.6, 0, 10) = BLANK VERIFY(12.6, 0, BLANK) = 12.6 (no upper limit) 14.10 Miscellaneous Functions Topics in this section include: ACCRUE([l:p],x); ACCRUE all values, offset x months ACODE([l:p],x); numeric Alpha CODE, offset x days ALPHA(ab); numeric ALPHA code representation for "ab" © 2014 AllMax Software, Inc. Functions 435 APPLY(x,y); apply function 2 (y) to data in function 1 (x) ASSIGN([l:p],x,y); ASSIGN value y, type x, to location:parameter BIN(x); BINary value of x, expressed as an AlphaCode BLANK(x); BLANK; data BLANK, no data exists CT(x,y,z,w); disinfection CT (Concentration * Time) for temp, pH, Cl, LI CTI(x,y,z,w); interpolated disinfection CT (Concentration * Time) for temp, pH, Cl, LI CTR(x,y,z,w); Regression method disinfection CT (Concentration * Time) for temp, pH, Cl, LI CVT(a:b,x); ConVerT value x from "abc" units to "def" units CYL(x,y); CYLinder volume ratio, height x, diameter y FAC(abc,x); value x from another FACility abc FORMULA(abc); value from another FORMULA HEX(x); HEXadecimal value of x, expressed as an AlphaCode HLIME(x,y,z,w,v); Hydrated LIME required in mg/l INCLUDE(fn,lp,x,y,z,m); INCLUDE location:parameter with calculated formula LI(x,y,z,w,v,n1,n2); Log Inactivation LOOK(x,y1,y2, ... ,yn); LOOK up the xth value NOTE(abc,x) = Note text abc is associated with the return the value x ONCE(x,y); value y ONCE per month, on x'th day ONCEW(x,y); value y ONCE per Week, on x'th day OPTION(x,y,z,w); value x using OPTIONs for less than (y), greater than (z), or nondetect (w) PRE_LMT(x,y); PREtreatment LiMiT, limit type x QLIME(x,y,z,w,v); QuickLIME required in mg/l RANGE(x1,y2,y3,...yn); find RANGE of data SETF(x,formula); SET an internal reference Formula SETVAR(x,y); SET VARx variable to value y SODA(x); SODA required in mg/l SYNC(abc); SYNCronize location with facility abc TYPE(x,y); TYPE of data x, set type y VAL(abc); VALue (and data type) of abc WEIR(x,y,z); WEIR rectangular, gal/min for head x inches, width y ft, type z 14.10.1 ACCRUE([l:p],x) ACCRUE([l:p],x) ACCRUE all values for location and parameter, offset x months Value: The sum of all values prior to and including the month x months from the current month. All valid data is considered. Additional summary information can be returned: © 2014 AllMax Software, Inc. 436 Operator10 Help where n is the type of summary: add 256*1 to x in order to return add 256*2 to x in order to return add 256*3 to x in order to return add 256*4 to x in order to return the the the the average of all values max of all values min of all values count of all values Examples: ACCRUE([Raw:50050],0) = the sum of all flow values through the current month ACCRUE([Raw:50050],-1) = the sum through the previous month 14.10.2 ACODE([l:p],x) ACODE([l:p],x) Numeric Alpha CODE representation of the value, offset x days Value: The value equal to the Alpha Code for a specific location and parameter for the date x days from the current date. This represents the internal storage format for Alpha Codes, useful for comparison or in the ASSIGN() function. If there is no valid Alpha Code for the day, the function returns BLANK. Examples: ACODE([Inflow:50050],-1) = Alpha Code representation for the previous day IF(ACODE([Inflow:50050],0)=ALPHA(AF),2.5,BLANK) = if the value is equal to "AF", then return 2.5 14.10.3 ALPHA(ab) ALPHA(ab) Numeric ALPHA code representation for "ab" Value: The value representing the internal storage format for Alpha Codes, useful for comparison or in the ASSIGN() function. Examples: ALPHA(ABCDE) = -2738179 ALPHA(AH) = -217 IF(ACODE([Inflow:50050],0)=ALPHA(AF),2.5,BLANK) = if the value is equal to "AF", then return 2.5 14.10.4 APPLY(x,y) APPLY(x,y) APPLY function 2 (y) to the data used in function 1 (x), before returning the result. Function 1 (x) can be most formulas which use a "range" of data for their source, i.e. most fo the D_, H_, M_, V_, etc. functions, SUM(), AVG(), COUNT(), MAX(), MIN(), etc. © 2014 AllMax Software, Inc. Functions 437 Function 2 (y) can be any function, and replaces option parameter ".." with each data value. An optional 3rd parameter where if the parameter is "1", function 2 (y) is applied as the source for data, instead of after the data is obtained. Examples: APPLY(SUM(1,2,3),MUL(..,..)) = 1*1 + 2*2 + 3*3, i.e. = 14 APPLY(M_COUNT([l:p],0,0),VERIFY(..,50,100)) = the count of monthly values >= 50 and <= 100 APPLY(SUM(1,2,3),MUL(..,..),1) = 1 * 2 * 3, i.e. = 6 14.10.5 ASSIGN([l:p],x,y) ASSIGN([l:p],x,y) ASSIGN value x, type y, to location:parameter, and return x Value: The value x is written to the given location:parameter as data type y, and also returned. The type y determines the type of data: if if if if if if if if y y y y y y y y is is is is is is is is 0 1 2 3 4 5 6 7 then then then then then then then then the the the the the the the the value value value value value value value value is is is is is is is is Data BLANK a Less Than value (<) an Alpha Code a Greater Than value (>) a Non-Detect value (~) a Time value a Date value An Alpha Code should be in its internal representation as returned by the ALPHA() function. The function can also write data values with the current system date and/or time. Add 8 to y in order to write data to the current system date; add 16 to y in order to write data to the current system time (hourly data entries). WARNING: The function will calculate and save a value in the given location:parameter, NOT where the formula is attached. NOTE: The ASSIGN() function must be the first function in a formula unless the return value is to be used. Examples: ASSIGN([Influent:00310],.02,2) = assigns <.002 to the l:p, but does not return a value (see Note above) ASSIGN([Influent:00310],ALPHA(AA),3) = writes "AA" to the l:p © 2014 AllMax Software, Inc. 438 Operator10 Help .5 * ASSIGN([Primary:00310],[Influent:00310],0) = writes the Influent value to Primary, and half the value to the l:p where the formula is attached (since ASSIGN() is NOT the first function in the formula; see Note above) 14.10.6 BIN(x) BIN(x) The BINary value x expressed as an AlphaCode Value: The value returned is the value of x, expressed as an AlphaCode. (The maximum value is BIN(511) or "B111111111") NOTE: Conversely, a value may be entered into a formula in binary format by preceeding the digits with the characters "0b": for example "0b1111" equals the value 15 (The maximum value is "0b11111111111111111111111111111111" or 4294967295) Example: BIN(15) = AlphaCode "B1111" BIN(8) = AlphaCode "B1000" 0b1111 = the value 15 14.10.7 BLANK(x) BLANK(x); BLANK BLANK returns BLANK Value: The value BLANK is returned. The value x is calculated, but the value is ignored. BLANK is defined as the absence of any valid data. NOTE: Most functions assume BLANK for unentered values. For example "IF([l:p],100, )" assumes "IF([l:p],100,BLANK)". Examples: BLANK = no data value BLANK(SHOW(MONTH LENGTH IS:,LOM(0))) = Shows the month length, but does not return a value 14.10.8 CT(x,y,z,w) CT(x,y,z,w,n1,n2) Disinfection Concentration and contact Time required for a particular temp, pH, Cl, LI Value: The value returned is the "CT", the product of the disinfection concentration ("C" in mg/l) and the time ("T" in minutes) required to treat water for disinfection, where: x is the lowest water temperature, in degrees centigrade y is the highest pH © 2014 AllMax Software, Inc. Functions 439 z is the lowest disinfectant (Chlorine) concentration, in mg/l w is the Log Inactivation, (e.g. 0.5 for conventional, 1.0 for slow sand) NOTE: The results are returned from a table with 5 degree (0.5 to 25), 0.5 pH (6 to 9 pH), 0.2 mg/l disinfectant (0.4 to3), and 0.5 log inactivation (0.5 to 3) steps. Values between these steps are not interpolated. The following optional parameters n1, n2 may be specified for other results: if if if if if if if if n1 n1 n1 n1 n1 n1 n1 n1 is is is is is is is is 0 then the result is for Giardia Lamblia, Free Chlorine 1 then the result is for Giardia Lamblia, Chlorine Dioxide 2 then the result is for Giardia Lamblia, Ozone 3 then the result is for Giardia Lamblia, Chloramine 8 then the result is for Virus, Free Chlorine 9 then the result is for Virus, Chlorine Dioxide 10 then the result is for Virus, Ozone 11 then the result is for Virus, Chloramine if n2 is 0 then the result is from a CT table if n2 is 1 then the result is interpolated from a CT table (see: CTI()) if n2 is 2 then the result is from a regression formula (see: CTR()) NOTE: Not all combinations of optional values are supported. Examples: CT(20, 8.2, 1.90, .5) = required CT in mg/l * minutes CT([Tap:00010],[Tap:00400],[Tap:50064], .5) = required CT in mg/l * minutes 14.10.9 CTI(x,y,z,w) CTI(x,y,z,w) Interpolated Disinfection Concentration and contact Time required for a particular temp, pH, Cl, LI Value: The value returned is the interpolated product of the disinfection concentration ("C" in mg/l) and the time required ("T" in minutes) to treat water for disinfection, where: x is the lowest water temperature, in degrees centigrade y is the highest pH z is the lowest disinfectant (Chlorine) concentration, in mg/l w is the Log Inactivation, (e.g. 0.5 for conventional, 1.0 for slow sand) NOTE: The results are interpolated from a table with 5 degree (0.5 to 25), 0.5 pH (6 to 9 pH), 0.2 mg/l disinfectant (0.4 to3), and 0.5 log inactivation (0.5 to 3) steps. Examples: CT(20, 8.2, 1.90, .5) = required CT in mg/l * minutes CT([Tap:00010],[Tap:00400],[Tap:50064], .5) = required CT in mg/l * minutes © 2014 AllMax Software, Inc. 440 Operator10 Help 14.10.10CTR(x,y,z,w) CTR(x,y,z,w) Regression method for Disinfection Concentration and contact Time required for a particular temp, pH, Cl, LI Value: The value returned uses the regression method for calculating the product of the disinfection concentration ("C" in mg/l) and the time required ("T" in minutes) to treat water for disinfection, where: x is the lowest water temperature, in degrees centigrade y is the highest pH z is the lowest disinfectant (Chlorine) concentration, in mg/l w is the Log Inactivation, (e.g. 0.5 for conventional, 1.0 for slow sand) NOTE: The formula where x < 12.5 is: (0.353 * w) * (12.006 + exp(2.46 - (0.073 * x) + (0.125 * z) + (0.389 *y))) The formula where x >= 12.5 is: (0.361 * w) * (-2.261 + exp(2.69 - (0.065 * x) + (0.111 * z) + (0.361 * y))) Examples: CTR(20, 8.2, 1.90, .5) = required CT in mg/l * minutes CTR([Tap:00010],[Tap:00400],[Tap:50064], .5) = required CT in mg/l * minutes 14.10.11CVT(a:b,x) CVT(abc:def,x) ConVerT value x from "abc" units to "def" units Value: The value returned is the value of x, as expressed in "abc" units, converted to "def" units, where "abc" and "def" are each one of the following measurement units: NOTE: The value x may be omitted to return the conversion factor: CVT(abc:def) length units MM millimeters CM centimeters IN inches FT feet YD yards M meters KM kilometers MI miles area units CM2 square centimeters SQIN square inches SQFT square feet SQYD square yards M2 square meters ACRE acres HECT hectares SQMI square miles © 2014 AllMax Software, Inc. Functions 441 volume units mass units (volume may convert to mass at a ratio of 8.34 lb/gal) (mass may convert to volume at a ratio of 8.34 lb/gal) ML milliliters CC cubic centimeters CUIN cubic inches FLOZ fluid ounces QT quarts L liters GAL gallons CUFT cubic feet CUYD cubic yards KL kiloliters M3 cubic meters ACREIN acre inches KM3 thousand cubic meters ACREFT acre feet MGAL million gallons concentration units NGL nanograms per liter UGL micrograms per liter PPB parts per billion LBMGAL pounds per million gallon KGHECT kilograms per hectare LBACRE pounds per acre MGL milligrams per liter PPM parts per million MGKG milligrams per kilogram GRGAL grains per gallon KGMTON kilograms per metric ton GL grams per liter PCT percent (%) LBCUFT pounds per cubic foot flow rate units LPD liters per day GPD gallons per day CFD cubic feet per day GPH gallons per hour M3D cubic meters per day LPM liters per minute GPM gallons per minute CFM cubic feet per minute LPS liters per second © 2014 AllMax Software, Inc. NG nanograms UG micrograms MG milligrams G grams OZ ounces KG kilograms LB pounds TON tons (english) MTON tons (metric) time units SEC seconds HHMM hours, minutes MIN minutes HR hours HH.MM hours, minutes DAY days WK weeks MO months YR years LYR leap years pressure units KGM2 kilograms per square meter PSF pounds per square foot MMHG millimeters of mercury FTW feet of water INHG inches of mercury PSI pounds per square inch KGCM2 kilograms per square centimeter BAR bars 442 Operator10 Help KM3D thousand cubic meters per day CFS cubic feet per second MGD million gallons per day temperature units ATM atmospheres numeric units (any other unit may be converted, such as CVT(G:MILLI,20) for grams to thousandths) DK degrees Kelvin DC degrees Centigrade DF degrees Fahrenheit PICO trillionths NANO billionths MICRO millionths MILLI thousandths CENTI hundredths DECI tenths UNIT ones (blank) ones DEKA tens HECTO hundreds KILO thousands MEGA millions GIGA billions TERA trillions Examples: CVT(CM:IN,20) = 20 centimeters converted to inches (7.87) CVT(IN:CM,20) = 20 inches converted to centimeters (50.8) CVT(IN:CM) = conversion factor of inches to centimeters (2.54) 14.10.12CYL(x,y) CYL(x,y) CYLinder volume ratio, height x, diameter y Value: The value returned is the ratio of a partially filled cylindrical tank or pipe, where x is the height of the liquid and y is the diameter of the tank. NOTE: Multiply the total volume of the tank by the volume ratio to find the volume of liquid. Examples: CYL(2,10) = ratio for a 10 ft diameter cylinder filled 2 ft deep © 2014 AllMax Software, Inc. Functions 443 14.10.13FAC(abc,x) FAC(dbname:abc,x) Value x from Database named "dbname" and FACility named "abc" Value: The data value from another Facility from a database. The Facility specified MUST be set to "Allow Sharing of Facility Data" in its Facility Options. See additional help in the Synexus main application. NOTE: Omitting the database name will assume to use data from the current database. Examples: FAC(AllMax Sample Data,[Influent:50050]) = flow data from sample Facility in current database (no database name specified) FAC(MyDBName:AllMax Sample Data,[Effluent:50050]) = flow data from sample Facility from named database "MyDBName" FAC(Synexus:East Station,D_VAL([Effluent:50050],-1,0)) = value last month from database "Synexus" 14.10.14FORMULA(abc) FORMULA(x) a FORMULA named x Value: The value returned by another formula named x. Internal formula names (provided by AllMax) begin with the character "~". Examples: FORMULA(My Formula) = 12, where MyFormula is 4*3 FORMULA(~Loading) = 3.14 14.10.15HEX(x) HEX(x) The HEXadecimal value x expressed as an AlphaCode Value: The value returned is the value of x, expressed as an AlphaCode. (The maximum value is HEX(4294967295) or "0xffffffff") NOTE: Conversely, a value may be entered into a formula in hexadecimal format by preceeding the digits with the characters "0x": for example "0x7fff" equals the value 32767 (The maximum value is "0xffffffff" or 4294967295) Example: HEX(32767) = AlphaCode "H7fff" HEX(256) = AlphaCode "H100" © 2014 AllMax Software, Inc. 444 Operator10 Help 0xffff = the value 32767 14.10.16HLIME(x,y,z,w,v) HLIME(x,y,z,w,v) Hydrated LIME required in mg/l Value: The value returned is the hydrated lime Ca(OH)2 required (in milligrams per liter) to treat water for softening, where: x is the available carbon dioxide (CO2), in mg/l (e.g. parameter 00405) y is the bicarbonate hardness as CaCO3 (or alkalinity), in mg/l (e.g. parameter 00425) z is the magnesium hardness as CaCO3, in mg/l (e.g. parameter 00920) w is the excess hydroxide alkalinity as CaCO3, in mg/l (e.g. parameter 00420) v is the percent strength (purity) of the hydrated lime (usually 90 - 92%) NOTE: Unused variables may be left as BLANK. Examples: HLIME([Raw:00405],[Raw:00425],[Raw:00920],[Raw:00420],90) = mg/l lime required HLIME([Raw:00405],[Raw:00425],[Raw:00920], ,90) * 1.15 = 15% excess of lime required 14.10.17INCLUDE(fn,[l:p],x,y,z) INCLUDE(fn,[l:p],x,y,z) INCLUDE location:parameter [l:p] in execution of Function fn, offset X months, using Y values and Z rule. Value: The data value from fn including data from [l:p] offset x months, using y values and z rule. if y is 0 then included data uses a calendar month for daily data if y is 1 then included data uses the Z month rule for daily data if y is 2 then included data uses hourly values from the calendar month if z is 0 then the result uses a calendar month if z is 1 then a week falls in the month which contains its Saturday if z is 2 then a week falls in the month which contains its Wednesday if z is 3 then the result uses the first of month, for 4 weeks, 28 days if z is 4 then the first of month 4th week extends to the end of the month (the value 5 is unused, for compatibility with other monthly functions) if z is 6 then only full weeks (Sun - Sat) in the month are considered Hourly data for a single day can be included for calculation: where x is the day offset. INCLUDE(fn,[l:p],x) Additional months may be included for calculation: © 2014 AllMax Software, Inc. Functions 445 where m is the number of months to be included starting from the month offset, add the additional parameter m. INCLUDE(fn,[l:p],x,y,z,m) A daily range of data can be specified for calculation: use the function as INCLUDE(fn,[l:p],x,y) where: offset x days, for y days Individual values can also be used: use the function INCLUDE(fn,x1,x2, ... ,xn) The function (fn) used can be most formulas which use a "range" of data for their source, i.e. most of the D_, H_, M_, V_, etc. functions, SUM(), AVG(), COUNT(), MAX(), MIN(), etc. Examples: INCLUDE(SUM(1,2),3,4,5) = 15 INCLUDE(M_MAX([l:p],x,y,z,w),100) = max of monthly values or 100 INCLUDE(M_MAX([l:p],x,y,z,w),[l:p2],x,y,z,w) = monthly max of two parameters INCLUDE(M_MAX([l:p],0,y,z,w),[l:p],-12,y,z,w) = monthly max this and last year 14.10.18LI(x,y,z,w,v,n1,n2) LI(x,y,z,w,v,n1,n2) Log Inactivation for a particular temp, pH, Cl, LI, T, n1, n2 Value: The value returned uses calculation based either tables or the regression method for calculating the actual Log Inactivation in treating water for disinfection, where: x is the lowest water temperature, in degrees centigrade y is the highest pH z is the lowest disinfectant (Chlorine) concentration, in mg/l w is the Log Inactivation required, (e.g. 3.0 for giardia, 4.0 for viruses) v is the contact Time in seconds if if if if if if if if n1 n1 n1 n1 n1 n1 n1 n1 is is is is is is is is 0 then the result is for Giardia Lamblia, Free Chlorine 1 then the result is for Giardia Lamblia, Chlorine Dioxide 2 then the result is for Giardia Lamblia, Ozone 3 then the result is for Giardia Lamblia, Chloramine 8 then the result is for Virus, Free Chlorine 9 then the result is for Virus, Chlorine Dioxide 10 then the result is for Virus, Ozone 11 then the result is for Virus, Chloramine if n2 is 0 then the result is based on a CT table if n2 is 1 then the result is based oninterpolation from a CT table (see: CTI()) if n2 is 2 then the result is based on a regression formula (see: CTR()) NOTE: In general, LI(temp,pH,C,LI,T) = li*(C*T)/CT(temp,pH,C,li) Examples: © 2014 AllMax Software, Inc. 446 Operator10 Help LI(20, 8.2, 1.90, 3.0, 60, 0, 0) = Log Inactivation of Giardia Lamblia using Free Chlorine by table LI([Tap:00010],[Tap:00400],[Tap:50064], .5, 60, 9, 2) = Log Inactivation using Chlorine Dioxide for Virus by regression 14.10.19LOOK(x,y1,y2,...,yn) LOOK(x1,y1,y2, ... ,yn) LOOK up the xth value from the values y1 through yn Value: The xth value of values y1 through yn. Any number of values may be specified. The value BLANK is returned if there is no xth value. NOTE: Only the xth value is processed, all other values are never processed. Examples: LOOK(3,10,20,30,40,50) = 30 LOOK(DOW(0),0,1,0,1,0,1,0) = TRUE (1) on Mon, Wed, or Friday, otherwise FALSE(0) 14.10.20NOTE(abc,x) NOTE(abc,x) The NOTE text abc is associated with the return the value x Value: The value x is returned. If the function is the final result of a formula, then the Note text abc is also saved as a Data Note. (Data Notes are visible as Operator Notes in the Synexus main application, and as QuickNotes in the DataView application.) If the Note text is an empty string, any Data Note is removed. Note: The function returns the value with a Data Type identifying it as containing an associated Note. Therefore this function is only useful when it is the final result of a formula, such as the primary function in a formula or within an IF() function. Note: The comma and x may be optionally omitted. If so, the function returns the value BLANK. Note: The function may also used with some Reports to return text in place of a value. Examples: NOTE(THIS IS PI.,3.14) = 3.14 (with "THIS IS PI." associated) NOTE(NO DATA TODAY) = BLANK (with "NO DATA TODAY" associated) NOTE(,3.14) = 3.14 (calculation will remove any associated Data Note) 14.10.21ONCE(x,y) ONCE(x,y) © 2014 AllMax Software, Inc. Functions 447 The value y ONCE per month, on the x'th day of the month Value: The value y is returned Once per month on the x'th day of the month, or on the last day of the month if x is 0. On all other days, or if x is BLANK, the function returns BLANK. Examples: ONCE(15,[Raw WW:50050]) = the flow only on the 15th of the month ONCE(0,[Raw WW:50050]) = the flow only on the last day of the month 14.10.22ONCEW(x,y) ONCEW(x,y) The value y ONCE per Week, on the x'th day of the week Value: The value y is returned once per week on the x'th day (1 to 7) of the week. On all other days, or if x is BLANK, the function returns BLANK. Examples: ONCEW(4,[Raw WW:50050]) = the flow only on each Wednesday ONCEW(7,[Raw WW:50050]) = the flow only on the last day of the week 14.10.23OPTION(x,y,z,w) OPTION(x,y,x,w) Value x calculated using OPTIONs for Less Than (y), Greater Than (z), or Non-Detect (w) values Value: The value of x is returned. The value x may be a single data item, or the result based on multiple data items. The option y, z, or w is one of the following: BLANK to use the Facility Options for Less Than (y), Greater Than (z), or Non-Detect (w) values 0 to treat Less Than (y), Greater Than (z), or Non-Detect (w) values as BLANK 1 to treat Less Than (y), Greater Than (z), or Non-Detect (w) values as 0 2 to treat Less Than (y), Greater Than (z), or Non-Detect (w) values as half (or twice) the value 3 to treat Less Than (y), Greater Than (z), or Non-Detect (w) values as the value 4 to preserve Less Than (y), Greater Than (z), or Non-Detect (w) values Examples: OPTION([Inf Dom:BOD],4,0,0) = preserves a Less Than, but treats others as BLANK OPTION(M_SUM([Inf Dom:MGD Flow],0,0),0,0,0) = treats all as BLANK OPTION([Inf Dom:BOD],2,1,BLANK) = treats a Less Than as half, a Non-Detect as 0, and uses the Facility options for a Greater Than © 2014 AllMax Software, Inc. 448 Operator10 Help 14.10.24PRE_LMT([l:p],x) PRE_LMT([l:p],x,y) PREtreatment LiMiT for sampling point and parameter, limit type y, offset x months Value: The limit for a specific sampling point and parameter for the current date. y is the type of limit: if y is 0 then the result if y is 1 then the result if y is 2 then the result if y is 3 then the result if y is 4 then the result if y is 5 then the result if y is 6 then the result if y is 7 then the result 1=Maximum, 2=Sum) if y is 8 then the result is is is is is is is is the the the the the the the the TRC multiplier only average limit maximum limit minimum limit surcharge limit surcharge limit rate surcharge base rate surcharge summary option value (0=Average, is the include facility value The TRC multiplier for Conventional or Non-Conventional parameters may also be considered by adding 16 to the type y. Examples: PRE_LMT([Effluent:50050],0,2) = maximum limit for the current months PRE_LMT([Effluent:50050],-6,4) = surcharge limit six months ago 14.10.25QLIME(x,y,z,w,v) QLIME(x,y,z,w,v) QuickLIME required in mg/l Value: The value returned is the quicklime CaO required (in milligrams per liter) to treat water for softening, where: x is the available carbon dioxide (CO2), in mg/l (e.g. parameter 00405) y is the bicarbonate hardness as CaCO3 (or alkalinity), in mg/l (e.g. parameter 00425) z is the magnesium hardness as CaCO3, in mg/l (e.g. parameter 00920) w is the excess hydroxide alkalinity as CaCO3, in mg/l (e.g. parameter 00420) v is the percent strength (purity) of the quicklime (usually 88 - 95%) NOTE: Unused variables may be left as BLANK. Examples: QLIME([Raw:00405],[Raw:00425],[Raw:00920],[Raw:00420],90) = mg/l lime required QLIME([Raw:00405],[Raw:00425],[Raw:00920], ,90) * 1.15 = 15% excess of lime required © 2014 AllMax Software, Inc. Functions 449 14.10.26RANGE(x1,y1,y2,...,yn) RANGE(x1,y1,y2, ... ,yn) find which RANGE contains the value x from the range limits y1 through yn Value: The index (1 through n) of the first range limit (y1 through yn) which contains the value x (x does not exceed the range limit). Any number of range limits may be specified, and they must be in ascending order. If a range limit is BLANK, it is considered to have no limit and will always contain the value x. If the value x is BLANK, it is contained in the first range. The value BLANK is returned if there is no range which contains the value x. NOTE: Only the limits through the range which includes the value are processed, all other limits are never processed. Examples: RANGE(27.5,10,20,30,40,50) = 3 (27.5 exceeds 10 and 20, but not 30, the 3rd value) RANGE(LOM(0),29,30,31) = 1 if the month has 28 or 29 days, 2 if 30, 3 if 31 14.10.27SETF(x,y) SETF(x,formula); SET an internal reference Formula Value: The function sets an internal reference formula for later use, and the value TRUE (1) is returned. An internal reference formula may be used in place of any data using the LP(~CALC_LP:~~n) syntax. (see also: LP()) Any internal reference formulas set by SETF() remain in place for as long as the application is loaded. Use an empty string (for example SETF(x,)) to clear a formula. SETF() may be combined with a LP(~CALC_LP:~~n) syntax, for example: IF( SETF(1,RAND(100)), M_SUM([~CALC_LP:~~1],0), BLANK) will return the sum of 30 random daily values Examples: SETF(1,RAND(100)) = sets reference formula 1 to "RAND(100)". And following formulas, such as LP(~CALC_LP:~~1), will now return a random number SETF(2,) = clears reference formula 2 14.10.28SETVAR(x) SETVAR(x,y); SET VARx variable to value y Value: The previous value of the variable is returned. The ten available variables are named "VAR0" through "VAR9". By specifying an x value of 0 to 9, each may be set to the value y. The value y may be BLANK. Variables "VAR0" through "VAR9" may be used in any formula to represent the value. © 2014 AllMax Software, Inc. 450 Operator10 Help NOTE: VARx variables are shared for ALL Facilities and users of the OP10 application. The values are saved even when the application is exited. The variables only change when given a new value using SETVAR(). Examples: SETVAR(0,45.1) = the previous value of VAR0. VAR0 will now be 45.1 SETVAR(2,BLANK) = clears the value of VAR2 [RawWW:50050]*VAR4 = the flow multiplied by the (previously set) variable VAR4 14.10.29SODA(x) SODA(x) SODA required in mg/l Value: The value returned is the soda ash (Na2CO3) required (in milligrams per liter) to treat water for softening, where x is the noncarbonate hardness as CaCO3, in mg/l (e.g. parameter 00902) Examples: SODA([Raw:00902]) = mg/l soda required SODA([Raw:00902]) / .99 = soda of 99% purity required 14.10.30SYNC(abc) SYNC(abc); SYNCronize location with Facility abc Value: The value TRUE (1) is returned if the function is successful; the value FALSE (0) if not. The function will copy ALL data for the current date at ALL matching parameters of the matching location of the Facility named "abc". Data values which are BLANK at the Facility will be made BLANK. Parameters which do not exist at both Facilities are unaffected. Warning: This function affects multiple parameters of the location, and will overwrite any existing data. NOTE: Attach the formula to ANY single parameter of the location that should be syncronized. The Facility "abc" MUST be set to allow access to data in its Facility Options Editor. See additional help in the Operator 10 main application. Examples: SYNC(AllMax Wastewater Facility) = all data values of matching parameters of the current location are copied © 2014 AllMax Software, Inc. Functions 451 14.10.31TYPE(x,y) TYPE(x,y) Value representing the Data TYPE of value x, or set the type of x to type y Value: If y is BLANK, the Data Type of x is returned; if y is not BLANK, the Data Type is set to the Data Type y, and the value x is returned. The value x may be a single data item, or the result based on multiple data items. See Data Type for additional information. The Data Type is one of the following: 1 (1st bit set, bit 0) if the result is considered a Numeric value 2 (2nd bit set) if the result is considered a BLANK value 4 ( 3rd bit set) if the result is considered a Less Than value (<) 8 ( 4th bit set) if the result is considered an Alpha Code value 16 ( 5th bit set) if the result is considered a Greater Than value (>) 32 ( 6th bit set) if the result is considered a Non-Detect value (~) 64 ( 7th bit set) if the result is considered a Time value 128 ( 8th bit set) if the result is considered a Note value 256 ( 9th bit set) if the result is considered a Date value NOTE: The value 8 (Alpha Code) is rarely returned as a result, since Alpha Codes must be converted to numeric values for calculations. Use the function ISALPHA() to test for Alpha Code values. NOTE: The function cannot set the Data Type to Note. Instead use the NOTE() function to associate a note. NOTE: Most errors set the Data Type to 0, even though the value may be BLANK. Examples: TYPE(1.23,BLANK) = 1 (numeric data) TYPE([Inf Dom:50050],BLANK) = 4 if the flow value is a Less Than TYPE(M_SUM([Inf Dom:50050],0,0),BLANK) = 4 if some values are Less Than TYPE([Inf Dom:50050],4) = flow value, but considered as produced by a Less Than 14.10.32VAL(abc) VAL(abc) The VALue represented by abc Value: The value equal to the representation of "abc". If there is no valid representation, the function returns BLANK. Any Any Any Any entry entry entry entry © 2014 AllMax Software, Inc. containing a colon (:) is a Time value. containing a slash (/) is a Date value. beginning with a number, plus (+), or minus (-) is a Numeric value. beginning with a Less Than (<) is a Less Than value. 452 Operator10 Help Any entry beginning with a Greater Than (>) is a Greater Than value. Any entry beginning with a Tilde (~) is a Non-Detect value. Any entry beginning with an Alphabetic character (A, B, ...) is an Alpha Code. NOTE: The function cannot set the Data Type to Note. Instead use the NOTE() function to associate a note. The Facility Options may be applied to the value: add the additional parameter VAL(abc,1) Examples: VAL(<10) = a Less Than value of 10 VAL(AA) = The Alpha Code "AA" VAL(2:15) = The Time "2:15" (135 minutes) 14.10.33WEIR(x,y,z) WEIR(x,y,z) WEIR flow, gal/min for head x inches, width y feet, type z Value: The estimated flow in gal/min for a weir with a head of x inches and a width of y feet (or angle in degrees). if z is 0 then the result is the flow for a rectangular contracted weir: 1495 * (width - (height * .2)) * height ^ 3/2 (height x in inches, width y in feet) if z is 1 then the result is the flow for a 90-degree v-shaped weir: 2.25 * height ^ 5/2 (height x in inches, y is ignored) if z is 2 then the result is the flow for an angled v-shaped weir: 2.25 * tan (y / 2) * height ^ 5/2 (height x in inches, angle y in degrees) if z is 3 then the result is the flow for a Cipolletti (trapezoidal) weir: 1512 * width * height ^ 3/2 (height x in inches, width y in feet) if z is 4 then the result is the flow for a rectangular suppressed weir: 1495 * width * height ^ 3/2 (height x in inches, width y in feet) Examples: WEIR(4,5,0) = flow through a rectangular weir, 4 inches by 5 ft wide 14.11 Monthly Data Functions Topics in this section include: M_AVG([l:p],x,y,z,w); AVG, offset x months, type, rule, avg M_COMP([l:p],x,y); offset x Days, COMPare offset y days M_COUNT([l:p],x); COUNT of values, offset x months M_COUNTH([l:p],x); COUNT of Hourly values, offset x months © 2014 AllMax Software, Inc. Functions 453 M_DATE(x,y,z); Monthly DATE, offset x months, for month type y M_GMEAN([l:p],x); Geometric MEAN, offset x months M_MAX([l:p],x,y,z,w); MAX, offset x months, type, rule, avg M_MED([l:p],x,y,z); Monthly MEDian, offset x months, type y, rule z M_MIN([l:p],x,y,z,w); MIN, offset x months, type, rule, avg M_NTH([l:p],x,y,z,n); NTH value, offset x months, type y, avg z, n M_PCT([l:p],x,y,w,p); PerCenTile, offset x months, type y, avg w, % p M_REM([l:p],x,y); Monthly percent REMoval, offset x months, type y M_STAT([l:p],[l:p],x,y); Monthly STATistics, offset x months, type y M_STDEV([l:p],x); STandard DEViation, offset x months M_SUM([l:p],x); SUM of values, offset x months M_SUM2([l:p],x,y,z,w); SUM, offset x months, type, rule, avg M_SUMH([l:p],x); SUM of Hourly values, offset x months M_TOTAL([l:p],x); TOTAL, offset x months, avg * days M_TYPE([l:p],x,y); Monthly data TYPE, offset x months, range type y 14.11.1 M_AVG([l:p],x,y,z,w) M_AVG([l:p],x,y,z,w) Monthly AVeraGe for location and parameter, offset x months, type y, rule z, average w Value: The average of data values of a specific location and parameter for the month x months from the current month. The function uses the following parameters to determine the calculation method: y is the type of average: if y is 0 then the result is a monthly, or 30-day, average if y is 1 then the result is a weekly, or 7-day, average if y is 2 then the result is an hourly average z is the rule used for a 7-day average: (see also: W_AVG() ) if if if if if if if z z z z z z z is is is is is is is 0 1 2 3 4 5 6 then then then then then then then the result uses a continuous, or floating, average a week falls in the month which contains its Saturday a week falls in the month which contains its Wednesday the result uses the first of month, for 4 weeks, 28 days the first of month 4th week extends to the end of the month the first of month is controlled by facility option only full weeks (Sun - Sat) in the month are considered w is the type of average used: if w is 0 then the average is the arithmetic mean (average) if w is 1 then the average is the geometric mean (for fecals) if w is 2 then the average is the flow-weighted average Daily values may be considered as persistent (calculations use the last data not later than © 2014 AllMax Software, Inc. 454 Operator10 Help the date) by adding 32 to the type y. The number of months may be specified for monthly, 7-day, and hourly calculations: where m is the number of months, add the additional parameter M_AVG([l:p],x,y,z,w,m) When a parameter to calculate loading is specified (@, #, &, @@, ##, or &¶meter), a separate flow location (and parameter) may also be specified: add the additional parameter M_AVG([l:p],[l_flow:p_flow],x,y,z,w) Examples: M_AVG([Effluent:50050],0,0,0,0) = current month, monthly average M_AVG([Effluent:31614],-1,1,0,1) = previous month, 7-day continuous average for fecals 14.11.2 M_COMP([l:p],x,y) M_COMP([l:p],x,y) Monthly COMPare for location and parameter, offset x months, offset y months Value: The difference in data values for a specific location and parameter, comparing the date x months from the current date to the date y months from the current date. Examples: M_COMP([Effluent:50050],0,-1) = increase since the previous month M_COMP([Effluent:50050],0,-12) = increase since the previous year 14.11.3 M_COUNT([l:p],x) M_COUNT([l:p],x) Monthly COUNT for location and parameter, offset x months. Value: The count of data values of a specific location and parameter for the month x months from the current month. The function counts only valid data--it ignores Alpha Codes, Less Than, Greater Than, or Non-Detect values (if Facility options are set to blank). The number of months may be specified: where m is the number of months, add the additional parameter M_COUNT([l:p],x,m) Examples: M_COUNT([Effluent:50050],0) = count of present month M_COUNT([Effluent:50050],-2,3) = count of 3 months of values beginnging 2 months prior © 2014 AllMax Software, Inc. Functions 455 14.11.4 M_COUNTH([l:p],x) M_COUNTH([l:p],x) Monthly COUNT for Hourly data values at location and parameter, offset x months Value: The count of hourly data values of a specific location and parameter for the month x months from the current month. The function counts only valid data--it ignores Alpha Codes, Less Than, Greater Than, or Non-Detect values (if Facility options are set to blank). The number of months may be specified: where m is the number of months, add the additional parameter M_COUNTH([l:p],x,m) Examples: M_COUNTH([Effluent:50050],0) = count of present month M_COUNTH([Effluent:50050],-2,3) = count of 3 months of values beginning 2 months prior 14.11.5 M_DATE(x,y,z) M_DATE(x,y,z) Monthly DATE, offset x months, for month type y, return type z Value: The numeric date value, offset, or length for the month x months from the current month. if y is 0 then the result uses a calendar month if y is 1 then a week falls in the month which contains its Saturday if y is 2 then a week falls in the month which contains its Wednesday if y is 3 then the result uses the first of month, for 4 weeks, 28 days if y is 4 then the first of month 4th week extends to the end of the month (the value 5 is unused, for compatibility with other monthly functions) if y is 6 then only full weeks (Sun - Sat) in the month are considered The Return Type z is one of the following: 0 if the 1 if the date) 2 if the 3 if the 4 if the result is the beginning of the month as a (julian) date value result is the beginning of the month as an offset (in days from the current result is the end of the month as a (julian) date value result is the end of the month as an offset (in days from the current date) result is the length of the month in days NOTE: Julian dates are expressed in days since 1/1/4713 B.C. The resultant date may be used in further calculations: using addition or subtraction with any numeric value will add a number of days to a (julian) date value; for example: "M_DATE(0,2,0) - 7" = the date one week prior to the © 2014 AllMax Software, Inc. 456 Operator10 Help start of the month. using subtraction with two (julian) date values will return the difference in days as a numeric value; for example: "M_DATE(0,2,0) - M_DATE(-1,2,0)" = the number of days between the start of the current month and the previous month. Examples: M_DATE(0,2,0) = the date of the start of the current month, using a "Wednesday" rule M_DATE(0,1,4) = the length the current month, using a "Saturday" rule 14.11.6 M_GMEAN([l:p],x) M_GMEAN([l:p],x) Monthly Geometric MEAN for location and parameter, offset x months (equivalent to logarithmic mean) Value: The geometric mean of data values of a specific location and parameter for the month x months from the current month. Data values less than 0 are ignored. The function is equivalent to a logarithmic mean (A logarithmic mean returns the same value, although it may use a different calculation method). (see also: Geometric Mean in the main Synexus application) The number of months may be specified: where m is the number of months, add the additional parameter M_GMEAN([l:p],x,m) When a parameter to calculate loading is specified (@, #, &, @@, ##, or &¶meter), a separate flow location (and parameter) may also be specified: add the additional parameter M_GMEAN([l:p],[l_flow:p_flow],x) Examples: M_GMEAN([Effluent:50050],0) = geometric mean of present month M_GMEAN([Effluent:50050],-1) = geometric mean of previous month 14.11.7 M_MAX([l:p],x,y,z,w) M_MAX([l:p],x,y,z,w) Monthly MAXimum for location and parameter, offset x months, type y, rule z, average w Value: The maximum of data values of a specific location and parameter for the month x months from the current month. The function uses the following parameters to determine the calculation method: y is the type of maximum: if if if if y y y y is is is is 0 1 2 3 then then then then the the the the result result result result is is is is a monthly, or 30-day, maximum a weekly, or 7-day, maximum an hourly maximum a 4-day maximum © 2014 AllMax Software, Inc. Functions 457 z is the rule used for a 7-day average: (see also: W_MAX() ) if if if if if if if z z z z z z z is is is is is is is 0 1 2 3 4 5 6 then then then then then then then the result uses a continuous, or floating, average a week falls in the month which contains its Saturday a week falls in the month which contains its Wednesday the result uses the first of month, for 4 weeks, 28 days the first of month 4th week extends to the end of the month the first of month is controlled by facility option only full weeks (Sun - Sat) in the month are considered w is the type of average used: if w is 0 then the average is the arithmetic mean (average) if w is 1 then the average is the geometric mean (for fecals) if w is 2 then the average is the flow-weighted average Daily values may be considered as persistent (calculations use the last data not later than the date) by adding 32 to the type y. The offset and count of maximum values may also be returned using the following syntax: add 256*num+type to the value y, where: num = the number of the maximum type = 4 for the offset 8 for the value 12 for the time, if data is hourly 16 for the count of maximums, if there are multiple equal values The number of months may be specified for monthly, 7-day, and hourly calculations: where m is the number of months, add the additional parameter M_MAX([l:p],x,y,z,w,m) When a parameter to calculate loading is specified (@, #, &, @@, ##, or &¶meter), a separate flow location (and parameter) may also be specified: add the additional parameter M_MAX([l:p],[l_flow:p_flow],x,y,z,w) Examples: M_MAX([Effluent:50050],0,0,0,0) = current month, monthly maximum M_MAX([Effluent:31614],-1,1,0,1) = previous month, 7-day continuous maximum for fecals 14.11.8 M_MED([l:p],x,y,z) M_MED([l:p],x,y,z) Monthly MEDian for location and parameter, offset x months, type y, average w Value: The median of data values of a specific location and parameter for the month x months from the current month. In the distribution of data values, the middle value is returned. Where there are an even number of values, the average (arithmetic mean) of the two middle values is returned. The function uses the following parameters to © 2014 AllMax Software, Inc. 458 Operator10 Help determine the calculation method: y is the type of minimum: if y is 0 then the result is a median of monthly, or 30-day values if y is 1 then the result is a median of weekly, or 7-day continuous, or floating, average of values if y is 2 then the result is a median of hourly values z is the type of average used: if z is 0 then the average is the arithmetic mean (average) if z is 1 then the average is the geometric mean (for fecals) if z is 2 then the average is the flow-weighted average Values may be considered as persistent (calculations use the last data not later than the date) by adding 32 to the type y. The number of months may be specified for monthly, 7-day, and hourly calculations: where m is the number of months, add the additional parameter M_MED([l:p],x,y,w,m) When a parameter to calculate loading is specified (@, #, &, @@, ##, or &¶meter), a separate flow location (and parameter) may also be specified: add the additional parameter M_MED([l:p],[l_flow:p_flow],x,y,z) Examples: M_MED([Effluent:50050],0,0,0) = median, current month M_MED([Effluent:31614],-1,1,1) = median, previous month, 7-day continuous avg for fecals 14.11.9 M_MIN([l:p],x,y,z,w) M_MIN([l:p],x,y,z,w) Monthly MINimum for location and parameter, offset x months, type y, rule z, average w Value: The minimum of data values of a specific location and parameter for the month x months from the current month. The function uses the following parameters to determine the calculation method: y is the type of minimum: if if if if y y y y is is is is 0 1 2 3 then then then then the the the the result result result result is is is is a monthly, or 30-day, minimum a weekly, or 7-day, minimum an hourly minimum a 4-day minimum z is the rule used for a 7-day average: (see also: W_MIN() ) if z is 0 then the result uses a continuous, or floating, average if z is 1 then a week falls in the month which contains its Saturday © 2014 AllMax Software, Inc. Functions if if if if if z z z z z is is is is is 2 3 4 5 6 then then then then then 459 a week falls in the month which contains its Wednesday the result uses the first of month, for 4 weeks, 28 days the first of month 4th week extends to the end of the month the first of month is controlled by facility option only full weeks (Sun - Sat) in the month are considered w is the type of average used: if w is 0 then the average is the arithmetic mean (average) if w is 1 then the average is the geometric mean (for fecals) if w is 2 then the average is the flow-weighted average Daily values may be considered as persistent (calculations use the last data not later than the date) by adding 32 to the type y. The offset and count of minimum values may also be returned using the following syntax: add 256*num+type to the value y, where: num = the number of the minimum type = 4 for the offset 8 for the value 12 for the time, if data is hourly 16 for the count of minimums, if there are multiple equal values The number of months may be specified for monthly, 7-day, and hourly calculations: where m is the number of months, add the additional parameter M_MIN([l:p],x,y,z,w,m) When a parameter to calculate loading is specified (@, #, &, @@, ##, or &¶meter), a separate flow location (and parameter) may also be specified: add the additional parameter M_MIN([l:p],[l_flow:p_flow],x,y,z,w) Examples: M_MIN([Effluent:50050],0,0,0,0) = current month, monthly minimum M_MIN([Effluent:31614],-1,1,0,1) = previous month, 7-day continuous minimum for fecals 14.11.10M_NTH([l:p],x,y,z,n) M_NTH([l:p],x,y,w,n) Monthly NTH value for location and parameter, offset x months, type y, average w, rank n Value: The nth data value of a specific location and parameter for the month x months from the current month. The values are ordered from minimum to maximum, and the nth highest value is returned. (For instance, if the data values are 6, 2, 5, 8, and 3, the 4th value would be 6.) If -n is used, the values are ordered from maximum to minimum, and the nth lowest value is returned. If n is blank, zero, or greater than the number of data values, the function returns BLANK. The function uses the following parameters to determine the calculation method: y is the type of minimum: © 2014 AllMax Software, Inc. 460 Operator10 Help if y is 0 then the result is the nth value of monthly, or 30-day values if y is 1 then the result is the nth value of weekly, or 7-day continuous, or floating, average of values if y is 2 then the result is the nth value of hourly values w is the type of average used: if w is 0 then the average is the arithmetic mean (average) if w is 1 then the average is the geometric mean (for fecals) if w is 2 then the average is the flow-weighted average Values may be considered as persistent (calculations use the last data not later than the date) by adding 32 to the type y. The number of months may be specified for monthly, 7-day, and hourly calculations: where m is the number of months, add the additional parameter M_MED([l:p],x,y,w,n,m) When a parameter to calculate loading is specified (@, #, &, @@, ##, or &¶meter), a separate flow location (and parameter) may also be specified: add the additional parameter M_NTH([l:p],[l_flow:p_flow],x,y,w,n) Examples: M_NTH([Effluent:50050],0,0,0,4) = 4th highest value, current month M_NTH([Effluent:31614],-1,1,1,-4) = 4th lowest value, previous month, 7-day continuous avg for fecals 14.11.11M_PCT([l:p],x,y,w,p) M_PCT([l:p],x,y,w,p) Monthly PerCenTile for location and parameter, offset x months, type y, average w, percent p Value: The percentile of data values of a specific location and parameter for the month x months from the current month. In the distribution of data values into 100 groups having equal frequencies: p percent of the values lie at or below the p-th percentile. The function uses the following parameters to determine the calculation method: y is the type of percentile: if y is 0 then the result is a percentile of monthly, or 30-day values if y is 1 then the result is a percentile of weekly, or 7-day continuous, or floating, average of values if y is 2 then the result is a percentile of hourly values w is the type of average used: if w is 0 then the average is the arithmetic mean (average) if w is 1 then the average is the geometric mean (for fecals) if w is 2 then the average is the flow-weighted average © 2014 AllMax Software, Inc. Functions 461 Values may be considered as persistent (calculations use the last data not later than the date) by adding 32 to the type y. The number of months may be specified for monthly, 7-day, and hourly calculations: where m is the number of months, add the additional parameter M_PCT([l:p],x,y,w,p,m) When a parameter to calculate loading is specified (@, #, &, @@, ##, or &¶meter), a separate flow location (and parameter) may also be specified: add the additional parameter M_PCT([l:p],[l_flow:p_flow],x,y,w,p) Add 256+y to get the interpolated percentile, similar to Microsoft 2007 Excel calculations using the PERCENTILE() function. Examples: M_PCT([Effluent:50050],0,0,0,70) = 70th percentile, current month, monthly minimum M_PCT([Effluent:31614],-1,1,1,70) = 70th percentile, previous month, 7-day continuous avg for fecals 14.11.12M_REM([l:p],x,y) M_REM([l:p],x,y) Monthly percent REMoval for location and parameter, offset x months Value: The average Percent Removal of data values of a specific Efficiency Process and parameter for the month x months from the current month. The location must either be an Efficiency Process location or the effluent location for an Efficiency Process. y is the type of calculation: if y is 1 then the result if y is 2 then the result concentrations if y is 3 then the result if y is 4 then the result (mass) is the average of daily percent removals of loadings (mass) is the percent reduction of the average of daily is the average of daily percent reductions of concentrations is the percent removal of the average of daily loadings The number of months may be specified: where m is the number of months, add the additional parameter M_REM([l:p],x,m) NOTE: The parameter may be a concentration parameter (00310, etc.) or any internal parameter based on that parameter (~L00310, ~P00310, etc.)--the correct parameter will be found during calculation. NOTE: If an effluent location is specified, the first Efficiency Process with an effluent location which matches will be used for calculation. When a parameter to calculate loading is specified (@, #, &, @@, ##, or &¶meter), a separate flow location (and parameter) may also be specified: add the additional parameter M_REM([l:p],[l_flow:p_flow],x,y) © 2014 AllMax Software, Inc. 462 Operator10 Help Additionally, an influent and effluent Location:Parameter may both be specified that would allow the function to return a percent removal without the requirement of an Efficiency Process being present. The following format should be used: M_REM([l:p],[l:p],x) where the first [l:p] is a parameter at the influent to a plant process and the second [l:p] is the same parameter at the effluent to a plant process. EXAMPLE: M_REM([Influent:BOD 5],[Effluent:BOD 5],0) would return a percent removal calculated using the Influent and Effluent BOD values. Examples: M_REM([Effluent:00310],0,1) = average Percent Removal for the current month, as calculated by averaging daily percent removals of loadings M_REM([Effluent:00310],-1,2) = previous month, based on the average of daily concentrations 14.11.13M_STAT([l:p],[l:p],x,y) M_STAT([l:p],[l:p],x,y) Monthly STATistics values for location(s) and parameter(s), offset x months, type y Value: The statistics result for data values of specific location(s) and parameter(s) for the month x months from the current month. If two locations and parameters are used, data values where either is BLANK are ignored. If the second location:parameter is not needed, it may be left BLANK. The type y determines the result, where: y =0 , the number (count) of values (either one or two location:parameters may be used) y =1 y =2 , the Sum of the values (one location:parameter) , the Sum of the values squared (one location:parameter) y =3 location:parameter) , the Sample Variance of the values (one y =4 , the Sample Standard Deviation of the values (one location:parameter) y =5 , the Sum of the Squares of the Deviations of the values (one location:parameter) © 2014 AllMax Software, Inc. Functions 463 y =6 , the Confidence Interval (95%) of the values (assumes large n) (one location:parameter) y =7 , the Sum of the Products of the first and second location:parameter y =8 , the Covariance of the values y =9 of the values y = 10 , the Sum of the Products of the Deviations , the Slope of the sample Linear Regression line y = 11 , the y Intercept of the sample Linear Regression line y = 12 y = 13 , the Correlation Coefficient of the values , the Coefficient of Determination of the values y = 14 location:parameter) , the Population Variance of the values (one y = 15 , the Population Standard Deviation of the values (one location:parameter) The number of months may be specified: where m is the number of months, add the additional parameter M_STAT([l:p], [l:p],x,y,m) © 2014 AllMax Software, Inc. 464 Operator10 Help Examples: M_STAT([Inf Dom:50050],BLANK,-1,1) = sum of past month M_STAT([Inf Dom:50050],[Inf Ind:50050],0,8) = Covariance for the month 14.11.14M_STDEV([l:p],x) M_STDEV([l:p],x) Monthly STandard DEViation for location and parameter, offset x months Value: The standard deviation of data values of a specific location and parameter for the month x months from the current month. (see also: Standard Deviation in the main Synexus application) The number of months may be specified: where m is the number of months, add the additional parameter M_STDEV([l:p],x,m) When a parameter to calculate loading is specified (@, #, &, @@, ##, or &¶meter), a separate flow location (and parameter) may also be specified: add the additional parameter M_STDEV([l:p],[l_flow:p_flow],x) Examples: M_STDEV([Effluent:50050],0) = standard deviation of present month M_STDEV([Effluent:50050],-1) = standard deviation of previous month 14.11.15M_SUM([l:p],x) M_SUM([l:p],x) see also: M_SUM2() Monthly SUM for location and parameter, offset x months Value: The sum of data values of a specific location and parameter for the month x months from the current month. The number of months may be specified: where m is the number of months, add the additional parameter M_SUM([l:p],x,m) When a parameter to calculate loading is specified (@, #, &, @@, ##, or &¶meter), a separate flow location (and parameter) may also be specified: add the additional parameter M_SUM([l:p],[l_flow:p_flow],x) Examples: M_SUM([Effluent:50050],0) = sum of present month M_SUM([Effluent:50050],-1) = sum of previous month © 2014 AllMax Software, Inc. Functions 465 14.11.16M_SUM2([l:p],x,y,z,w) M_SUM2([l:p],x,y,z,w) see also: M_SUM() Monthly SUM for location and parameter, offset x months, type y, rule z, average w Value: The sum of data values of a specific location and parameter for the month x months from the current month. The function uses the following parameters to determine the calculation method: y is the type of sum: if if if if y y y y is is is is 0 1 2 3 then then then then the the the the result result result result is is is is a monthly, or 30-day, sum a weekly, or 7-day, sum an hourly sum a 4-day sum z is the rule used for a 7-day average: if if if if if if if z z z z z z z is is is is is is is 0 1 2 3 4 5 6 then then then then then then then the result uses a continuous, or floating, average a week falls in the month which contains its Saturday a week falls in the month which contains its Wednesday the result uses the first of month, for 4 weeks, 28 days the first of month 4th week extends to the end of the month the first of month is controlled by facility option only full weeks (Sun - Sat) in the month are considered w is the type of average used: if w is 0 then the average is the arithmetic mean (average) if w is 1 then the average is the geometric mean (for fecals) if w is 2 then the average is the flow-weighted average Daily values may be considered as persistent (calculations use the last data not later than the date) by adding 32 to the type y. The number of months may be specified for monthly, 7-day, and hourly calculations: where m is the number of months, add the additional parameter M_SUM([l:p],x,y,z,w,m) When a parameter to calculate loading is specified (@, #, &, @@, ##, or &¶meter), a separate flow location (and parameter) may also be specified: add the additional parameter M_SUM2([l:p],[l_flow:p_flow],x,y,z,w) Examples: M_SUM2([Effluent:50050],0,0,0,0) = current month, monthly sum M_SUM2([Effluent:31614],-1,1,0,1) = previous month, sum of 7-day continuous averages for fecals © 2014 AllMax Software, Inc. 466 Operator10 Help 14.11.17M_SUMH([l:p],x) M_SUMH([l:p],x) Monthly SUM for Hourly data values at location and parameter, offset x months Value: The sum of hourly data values of a specific location and parameter for the month x months from the current month. The number of months may be specified: where m is the number of months, add the additional parameter M_SUMH([l:p],x,m) When a parameter to calculate loading is specified (@, #, &, @@, ##, or &¶meter), a separate flow location (and parameter) may also be specified: add the additional parameter M_SUMH([l:p],[l_flow:p_flow],x) Examples: M_SUMH([Effluent:50050],0) = sum of present month M_SUMH([Effluent:50050],-1) = sum of previous month 14.11.18M_TOTAL([l:p],x) M_TOTAL([l:p],x) Monthly TOTAL for location and parameter, offset x months (average * number of days) Value: The total of data values of a specific location and parameter for the month x months from the current month. The total is defined as the average of values, multiplied by the number of days in the month. The number of months may be specified: where m is the number of months, add the additional parameter M_TOTAL([l:p],x,m) When a parameter to calculate loading is specified (@, #, &, @@, ##, or &¶meter), a separate flow location (and parameter) may also be specified: add the additional parameter M_TOTAL([l:p],[l_flow:p_flow],x) Examples: M_TOTAL([Effluent:50050],0) = total of present month M_TOTAL([Effluent:50050],-1) = total of previous month 14.11.19M_TYPE([l:p],x,y) M_TYPE([l:p],x,y) Monthly data TYPEs for location and parameter, offset x months, range type y Value: The return value is a combination representing the types of data values of a specific location and parameter for the month x months from the current month. © 2014 AllMax Software, Inc. Functions 467 The value of y determines the range of data: if if if if if if y y y y y y is is is is is is 0 1 2 3 4 5 then then then then then then the result represents a monthly range a week falls in the month which contains its Saturday a week falls in the month which contains its Wednesday the result uses the first of month, for 4 weeks, 28 days only full weeks (Sun - Sat) in the month are considered the result represents a monthly range of hourly values The number of months may be specified: where m is the number of months, add the additional parameter M_TYPE([l:p],x,y,m) The return value is a sum of the following types: add add add add add add add add add 1 to the return (1st bit set, bit 0) if the range contains Numeric values 2 to the return (2nd bit set) if the range contains BLANK values 4 to the return (3rd bit set) if the range contains Less Than values (<) 8 to the return (4th bit set) if the range contains Alpha Code values 16 to the return (5th bit set) if the range contains Greater Than values (>) 32 to the return (6th bit set) if the range contains Non-Detect values (~) 64 to the return (7th bit set) if the range contains Time values 128 to the return (8th bit set) if the range contains Note values 256 to the return (9th bit set) if the range contains Date values For example, a month containing both Numeric and Less Than values returns the value 5 (1 + 4). NOTE: The return value may be interpreted using the BIT() function Examples: M_TYPE([Effluent:50050],0,0) = current month, daily values M_TYPE([Effluent:31614],-1,5) = previous month, hourly values 14.12 OPC/DDE Functions Topics in this section include: DDE(a|b!c,x); DDE link, replacing char '?' with x DDE_P(a|b|c,x,y); DDE Poke value y DDE_X(a|b!c,x); DDE eXecute command c OPC([a],b,c,x); OPC link for node a, server b, item c, integer x OPC_W([a],b,c,x,y); OPC Write for node a, server b, item c, integer x, value y 14.12.1 DDE(a|b!c,x) DDE(a|b!c,x) Value from a DDE link, Service a, Topic b, Item c, replacing char '?' with value x Value: The data value returned by a Dynamic Data Exchange (DDE) link with another open © 2014 AllMax Software, Inc. 468 Operator10 Help application. The other application requires specific Service, Topic, and Item strings (see documentation of the other application). The '|' and '!' characters separate the strings, and the '?' character in any string is replaced by the integer value of x (For example, if x is equal to 4 then "R?C1" becomes "R4C1"). If the DDE link does not succeed, the original value of the Location:Parameter will be returned (the data will be unchanged). If the DDE link succeeds but no valid data is returned, the returned value will be BLANK. Calculations using DDE links are very dependent upon another application, and may therefore be much slower than normal calculations, especially if the link must "time out" because of errors. In most cases, the other application must be running and the appropriate file must be open. Synexus DDE links require the other application to be able to return a single value in the ascii text (CF_TEXT) format. The Service string is usually the name of the application, the Topic string is usually the filename and/or page, and the Item string is usually a reference to the specific data. Use the '?' character and specify the value x when, for example, the link depends on the day of the month (using the DOM() function) to determine a row or column. NOTE: Additional '?' characters may be replaced by using additional x values, separated by commas. NOTE: Use this function with care! AllMax cannot offer technical support for other applications, so be sure you understand DDE links before using this function. NOTE: Several DDE formats for other applications are described in the Synexus DDE Interface Application. (see: DDE Link Server Definition) Examples: DDE(EXCEL|[Book1.XLS]Sheet1!R?C1,DOM(0)) Retrieves value from Microsoft Excel, the file "BOOK1.XLS" and sheet "SHEET1", using the row based on the day of the month, and using the first column DDE(EXCEL|Sheet1!R?C?,MOY(0),DOM(0)+4) Retrieves value from Microsoft Excel, any open file having sheet "SHEET1", using the row based on the month, and using the column beginning after the fourth column and based on the day of the month 14.12.2 DDE_P(a|b!c,x,y) DDE_P(a|b!c,x,y) Poke value y via a DDE link, Service a, Topic b, Item c, replacing char '?' with value x Value: A Dynamic Data Exchange (DDE) link is established with another open application, and the value y is Poked (exported to the other application without its request). The other application requires specific Service, Topic, and Item strings (see documentation of the other application). The '|' and '!' characters separate the strings, and the '?' character in any string is replaced by the integer value of x (For example, if x is equal to 4 then "R? C1" becomes "R4C1"). If the DDE link succeeds, the value TRUE is returned, otherwise FALSE is returned. © 2014 AllMax Software, Inc. Functions 469 In most cases, the other application must be running and the appropriate file must be open. Operator 10® DDE links require the other application to be able to return a single value in the ascii text (CF_TEXT) format. The Service string is usually the name of the application, the Topic string is usually the filename and/or page, and the Item string is usually a reference to the specific data. Use the '?' character and specify the value x when, for example, the link depends on the day of the month (using the DOM() function) to determine a row or column. NOTE: Additional '?' characters may be replaced by using additional x values, separated by commas. NOTE: Use this function with care! AllMax cannot offer technical support for other applications, so be sure you understand DDE links before using this function. Examples: DDE_P(EXCEL|[Book1.XLS]Sheet1!R?C1,DOM(0),[Influent:50050]) Pokes value into Microsoft Excel, the file "BOOK1.XLS" and sheet "SHEET1", using the row based on the day of the month, and using the first column DDE_P(EXCEL|Sheet1!R?C?,MOY(0),DOM(0)+4,[Influent:50050]) Pokes value into Microsoft Excel, any open file having sheet "SHEET1", using the row based on the month, and using the column beginning after the fourth column and based on the day of the month 14.12.3 DDE_X(a|b!c,x) DDE_X(a|b!c) DDE EXecute, Service a, Topic b, Comand c, returning value TRUE or FALSE Value: A Dynamic Data Exchange (DDE) link is established with another open application, and the Command is executed. The other application requires specific Service, Topic, and Command strings (see documentation of the other application). The '|' and '!' characters separate the strings. If the DDE link succeeds, the value TRUE is returned, otherwise FALSE is returned. In most cases, the other application must be running and the appropriate file must be open. Synexus DDE links require the other application to be able to return a single value in the ascii text (CF_TEXT) format. The Service string is usually the name of the application, the Topic string is usually either the string "SYSTEM" or the filename and/or page, and the Command string is usually a command or macro name. NOTE: Use this function with care! AllMax cannot offer technical support for other applications, so be sure you understand DDE links before using this function. 14.12.4 OPC([a],b,c,x) OPC([a],b,c,x) © 2014 AllMax Software, Inc. 470 Operator10 Help Value from an OPC link, specifying Node a (optional), Server b, Item c, Integer x (optional) Value: The data value returned by an OLE for Process Control (OPC) link with an OPC Server. The Node is an optional workstation name or IP address where the OPC Server is running. The OPC Server application requires specific Service and Item strings (see documentation of that application). If the OPC link does not succeed, the original value of the Location:Parameter will be returned (the data will be unchanged). If the OPC link succeeds but no valid data is returned, the returned value will be BLANK. The '?' character in any string is replaced by the integer value of x (For example, if x is equal to 4 then "R? C1" becomes "R4C1"). Calculations using OPC links are very dependent upon another application, and may therefore be much slower than normal calculations, especially if the link must "time out" because of errors. In most cases, the Server application should already be running. Synexus OPC links require the Server application to be able to return a numeric value-Less Than, Alpha Code, Greater Than, Non-Detect, and Time values are not supported. Use the '?' character and specify the value x when, for example, the link depends on the day of the month (using the DOM() function) to determine a row or column. NOTE: Additional '?' characters may be replaced by using additional x values, separated by commas. NOTE: Use this function with care! AllMax cannot offer technical support for other applications, so be sure you understand OPC links before using this function. NOTE: Item names are Case Specific--"MyTag" is NOT the same as "Mytag". Examples: OPC(Hexatec.PCData.1,Memory.Load) Retrieves the current Memory Load percentage value from the Hexatec PC Data Server OPC(SERVER1,MyServer,Tag_001) or OPC(\\SERVER1,MyServer,Tag_001) or OPC(192.168.0.1,MyServer,Tag_001) Item from MyServer running on the workstation SERVER1 at IP address 192.168.0.1 14.12.5 OPC_W([a],b,c,x,y) OPC_W([a],b,c,x,y) Write value y via an OPC link, Node a, Server b, Item c, replacing char '?' with value x Value: A OLE for Process Control (OPC) link is established with another open application, and the value y is Written (exported to the other application without its request). The other application requires specific Topic, and Item strings (see documentation of the other application). The '|' and '!' characters separate the strings, and the '?' character in any string is replaced by the integer value of x (For example, if x is equal to 4 then "R?C1" becomes "R4C1"). If the DDE link succeeds, the value TRUE is returned, otherwise FALSE is returned. © 2014 AllMax Software, Inc. Functions 471 In most cases, the other application must be running and the appropriate file must be open. Synexus DDE links require the other application to be able to return a single value in the ascii text (CF_TEXT) format. The Service string is usually the name of the application, the Topic string is usually the filename and/or page, and the Item string is usually a reference to the specific data. Use the '?' character and specify the value x when, for example, the link depends on the day of the month (using the DOM() function) to determine a row or column. NOTE: Additional '?' characters may be replaced by using additional x values, separated by commas. NOTE: Use this function with care! AllMax cannot offer technical support for other applications, so be sure you understand OPC links before using this function. Examples: OPC_W(\\SERVER1,MyServer,Tag?,DOM(0),[Influent:50050]) Writes value into MyServer, the tag "Tag", using the row based on the day of the month, and using the first column 14.13 Process Section Data Functions Topics in this section include: ACCUM([l:p],x,y); ACCUMulate, offset x months, y days S_AVG([l:p],x); AVG of process sections S_SUM([l:p],x); SUM of process sections 14.13.1 ACCUM([l:p],x,y) ACCUM([l:p],x,y) Flow ACCUMulation for location and parameter, offset x months and y days Value: Flow for a specific location for the month x months and y days from the current date. If the location is a process, the flow is based on process accumulation settings. If the location is a process section, the flow is based on section location or flow percentage. The value p is ignored (use ~ ). WARNING: If the location is a process, the function will also calculate and save loadings for any existing parameters. If a matching process effluent parameter exists, the function will also calculate and save removals and percent removals, and loadings left if it is an efficiency process. NOTE: If the Facility uses Metric calculations, this function will return metric results for all calculations. Examples: © 2014 AllMax Software, Inc. 472 Operator10 Help ACCUM([Process:~],0,0) = returns process flow, calculates and saves process loadings, removals, percent removals ACCUM([Section:~],0,0) = returns section flow 14.13.2 S_AVG([l:p],x) S_AVG([l:p],x) Section AVeraGe for location and parameter, offset x days Value: The average of like parameter values of process sections of the same process and the same section type as the specified location, x days from the current date. Example: S_AVG([Section:50050],0) = average section flow for all similar process sections 14.13.3 S_SUM([l:p],x) S_SUM([l:p],x) Section SUM for location and parameter, offset x days Value: The sum of like parameter values of process sections of the same process and the same section type as the specified location, x days from the current date. Example: S_SUM([Section:50050],0) = sum of section flow for all similar process sections 14.14 Quaterly Data Functions Topics in this section include: Q_CSUM([l:p],x); Calendar Quarter SUM of daily values, offset x months Q_SUM([l:p],x); Quarterly SUM of daily values, offset x months 14.14.1 Q_CSUM([l:p],x) Q_CSUM([l:p],x) Calendar Quarter SUM of daily values for location and parameter, offset x months Value: The sum of data values of a specific location and parameter for the calendar quarter (beginning January, April, July, or October) from the first month of the quarter through the month x months from the current month. When a parameter to calculate loading is specified (@, #, &, @@, ##, or &¶meter), a separate flow location (and parameter) may also be specified: © 2014 AllMax Software, Inc. Functions 473 add the additional parameter Q_CSUM([l:p],[l_flow:p_flow],x) Examples: Q_CSUM([Effluent:50050],0) = quarterly sum through the present month Q_CSUM([Effluent:31614],-1) = quarterly sum through the previous month 14.14.2 Q_SUM([l:p],x) Q_SUM([l:p],x) Quarterly SUM of daily values for location and parameter, offset x months Value: The sum of data values of a specific location and parameter for a quarter (3 months) beginning x months from the current month. When a parameter to calculate loading is specified (@, #, &, @@, ##, or &¶meter), a separate flow location (and parameter) may also be specified: add the additional parameter Y_SUM([l:p],[l_flow:p_flow],x) Examples: Q_SUM([Effluent:50050],0) = current month, quarterly sum Q_SUM([Effluent:31614],-3) = previous quarter sum 14.15 Trigonometry Functions Topics included in this section: ACOS(x); ArcCOSine of x ASIN(x); ArcSINe of x ATAN(x); ArcTANgent of x COS(x); COSine of x CSC(x); CoSeCant of x SEC(x); SECant of x SIN(x); SINe of x TAN(x); TANgent of x 14.15.1 ACOS(x) ACOS(x) ArcCOSine of x in degrees Value: The arccosine of x returned in degrees. The value of x must be between -1 and 1. If x is BLANK, the function returns BLANK. Examples: ACOS(.707107) = 45 © 2014 AllMax Software, Inc. 474 Operator10 Help ACOS(0) = 90 14.15.2 ASIN(x) ASIN(x) ArcSINe of x in degrees Value: The arcsine of x returned in degrees. The value of x must be between -1 and 1. If x is BLANK, the function returns BLANK. Examples: ASIN(.707107) = 45 ASIN(1) = 90 14.15.3 ATAN(x) ATAN(x) ArcTANgent of x in degrees Value: The arctangent of x returned in degrees. If x is BLANK, the function returns BLANK. Examples: ATAN(.57735) = 30 ATAN(1) = 45 14.15.4 COS(x) COS(x) COSine of x degrees Value: The cosine of x degrees. If x is BLANK, the function returns BLANK. Examples: COS(45) = .707107 COS(90) = 0 14.15.5 CSC(x) CSC(x) CoSeCant of x degrees Value: The cosecant of x degrees. If x is BLANK, the function returns BLANK. Examples: CSC(45) = 1.41421 © 2014 AllMax Software, Inc. Functions CSC(90) = 1 14.15.6 SEC(x) SEC(x) SECant of x degrees Value: The secant of x degrees. If x is BLANK, the function returns BLANK. Examples: SEC(45) = 1.41421 SEC(0) = 1 14.15.7 SIN(x) SIN(x) SINe of x degrees Value: The sine of x degrees. If x is BLANK, the function returns BLANK. Examples: SIN(45) = .707107 SIN(90) = 1 14.15.8 TAN(x) TAN(x) TANgent of x degrees Value: The tangent of x degrees. If x is BLANK, the function returns BLANK. Examples: TAN(45) = .57735 TAN(30) = 0 14.16 Violation Data Functions Topics in this section include: E_SUM([l:p],x,y,z,w,v); Exceedance SUM, offset, type, rule, avg, limit V_AVG([l:p],x,y,z,w,v); offset, type, rule, avg, Violation AVG V_CNT([l:p],x,y,z,w); offset, type, rule, Violation CouNT values V_CNTP([l:p],x,y,z,w); offset, type Period, Violation CouNT values, months © 2014 AllMax Software, Inc. 475 476 Operator10 Help V_DLY([l:p],x,y,z,w); DaiLY Violation, offset, type, max, min V_DLYM([l:p],x,y,z,w); DaiLY Multiple Violation, offset, type, max, min V_MAV([l:p],x,y,z,w,v); offset, type, rule, avg, Violation Min AVerage V_MAX([l:p],x,y,z,w,v); offset, type, rule, avg, Violation MAX V_MIN([l:p],x,y,z,w,v); offset, type, rule, avg, Violation MIN SNC_CJP([l:p],x,y,z,w,v1,v2); offset, type, rule, avg, daily violation, avg violation SNC_MAXD([l:p],x,y,z,w,v); offset, type, rule, avg, SNC violation MAX Daily SNC_MAXM([l:p],x,y,z,w,v); offset, type, rule, avg, SNC violation MAX Monthly SNC_MIND([l:p],x,y,z,w,v); offset, type, rule, avg, SNC violation MIN Daily SNC_MINM([l:p],x,y,z,w,v); offset, type, rule, avg, SNC violation MIN Monthly 14.16.1 E_SUM([l:p],x,y,z,w,v) E_SUM([l:p],x,y,z,w,v) monthly Exceedance SUM limit z for location and parameter, offset x months, type y, rule z, average w, limit v Value: The sum of the portions which exceed the limit v, of data values for a specific location and parameter for the month x months from the current month. The function uses the following parameters to determine the calculation method: y is the type of sum: if if if if y y y y is is is is 0 1 2 3 then then then then the the the the result result result result is is is is a monthly, or 30-day, sum a weekly, or 7-day, sum an hourly sum a 4-day sum z is the rule used for a 7-day average: if if if if if if if z z z z z z z is is is is is is is 0 1 2 3 4 5 6 then then then then then then then the result uses a continuous, or floating, average a week falls in the month which contains its Saturday a week falls in the month which contains its Wednesday the result uses the first of month, for 4 weeks, 28 days the first of month 4th week extends to the end of the month the first of month is controlled by facility option only full weeks (Sun - Sat) in the month are considered if z is 16 then the result uses a continuous, or floating, average, but only counts violations based on unique data w is the type of average used: if w is 0 then the average is the arithmetic mean (average) if w is 1 then the average is the geometric mean (for fecals) if w is 2 then the average is the flow-weighted average v is the violation limit © 2014 AllMax Software, Inc. Functions 477 NOTE: A lower limit (instead of an upper limit) may be used by adding 4 to the type y. NOTE: The sum of the entire data values (instead of the portions) may be used by adding 8 to the type y. Daily values may be considered as persistent (calculations use the last data not later than the date) by adding 32 to the type y. When a parameter to calculate loading is specified (@, #, &, @@, ##, or &¶meter), a separate flow location (and parameter) may also be specified: add the additional parameter E_SUM([l:p],[l_flow:p_flow],x,y,z,w,v) The number of months may be specified for monthly, 7-day, and hourly calculations: where m is the number of months, add the additional parameter E_SUM([l:p],x,y,z,w,v,m) Examples: E_SUM([Effluent:50050],0,0,0,0,3.14) = sum of exceedances for current month, exceeding 3.14 E_SUM([Effluent:31614],-1,1,0,0,3.14) = sum of exceedances for previous month, 7day continuous avg exceeding 3.14 14.16.2 V_AVG([l:p],x,y,z,w,v) V_AVG([l:p],x,y,z,w,v) monthly AVG Violation for location and parameter, offset x months, type y, rule z, average w, limit v NOTE: For average violations which are below a limit, see V_MAV(). Value: The average violation of data values (a violation occurs when the average is above the limit) of a specific location and parameter for the month x months from the current month. The function uses the following parameters to determine the calculation method: y is the type of average: if y is 0 then the result is a monthly, or 30-day, average if y is 1 then the result is a weekly, or 7-day, average if y is 2 then the result is an hourly average z is the rule used for a 7-day average: if if if if if z z z z z is is is is is 0 1 2 3 4 then then then then then © 2014 AllMax Software, Inc. the result uses a continuous, or floating, average a week falls in the month which contains its Saturday a week falls in the month which contains its Wednesday the result uses the first of month, for 4 weeks, 28 days the first of month 4th week extends to the end of the month 478 Operator10 Help if z is 5 then the first of month is controlled by facility option if z is 6 then only full weeks (Sun - Sat) in the month are considered if z is 16 then the result uses a continuous, or floating, average, but only counts violations based on unique data w is the type of average used: if w is 0 then the average is the arithmetic mean (average) if w is 1 then the average is the geometric mean (for fecals) if w is 2 then the average is the flow-weighted average v is the violation limit Daily values may be considered as persistent (calculations use the last data not later than the date) by adding 32 to the type y. The number of months may be specified for monthly, 7-day, and hourly calculations: where m is the number of months, add the additional parameter V_AVG([l:p],x,y,z,w,v,m) The function will return the number of violations for the month. Additional information about a particular violation can be returned: where vnum is the number of the violation (1 is the first, 2 is the second, etc.) add 256*vnum+4 to y in order to return the offset of the day of the violation add 256*vnum+8 to y in order to return the value of the violation When a parameter to calculate loading is specified (@, #, &, @@, ##, or &¶meter), a separate flow location (and parameter) may also be specified: add the additional parameter V_AVG([l:p],[l_flow:p_flow],x,y,z,w,v) Examples: V_AVG([Effluent:50050],0,0,0,0,3.14) = number of violations for current month, monthly average exceeding 3.14 V_AVG([Effluent:31614],-1,1,0,1,3.14) = number of violations for previous month, 7day continuous average for fecals exceeding 3.14 V_AVG([Effluent:31614],-1,(256*2+8)+1,0,1,3.14) = value of the second violation for previous month, 7-day continuous average for fecals exceeding 3.14 14.16.3 V_CNT([l:p],x,y,z,w) V_CNT([l:p],x,y,z,w) monthly CouNT Violation for location and parameter, offset x months, type y, rule z, limit w Value: The count violation of data values of a specific location and parameter for the month x months from the current month. The function uses the following parameters to determine the calculation method: © 2014 AllMax Software, Inc. Functions 479 y is the type of minimum: if y is 0 then the result is a monthly, or 30-day, count (violation if count of daily values is less than w) if y is 1 then the result is a weekly, or 7-day, count (violation if count of daily values is less than w per week) if y is 2 then the result is an hourly count (violation if count of hourly values is less than w per day) z is the rule used for a 7-day average: if if if if if if if z z z z z z z is is is is is is is 0 1 2 3 4 5 6 then then then then then then then the result uses a continuous, or floating, average a week falls in the month which contains its Saturday a week falls in the month which contains its Wednesday the result uses the first of month, for 4 weeks, 28 days the first of month 4th week extends to the end of the month the first of month is controlled by facility option only full weeks (Sun - Sat) in the month are considered if z is 16 then the result uses a continuous, or floating, average, but only counts violations based on unique data w is the violation limit Daily values may be considered as persistent (calculations use the last data not later than the date) by adding 32 to the type y. The number of months may be specified for monthly, 7-day, and hourly calculations: where m is the number of months, add the additional parameter V_CNT([l:p],x,y,z,w,m) The function will return the number of violations for the month. Additional information about a particular violation can be returned: where vnum is the number of the violation (1 is the first, 2 is the second, etc.) add 256*vnum+4 to y in order to return the offset of the day of the violation add 256*vnum+8 to y in order to return the value (count of data values) of the violation When a parameter to calculate loading is specified (@, #, &, @@, ##, or &¶meter), a separate flow location (and parameter) may also be specified: add the additional parameter V_CNT([l:p],[l_flow:p_flow],x,y,z,w) Examples: V_CNT([Effluent:31614],0,1,1,3) = number of violations for current month if count is less than 3 per week V_CNT([Effluent:31614],0,(256*2+8)+1,1,3) = value of the second violation for previous month V_CNT([Effluent:31614],(256*3)-3,0,0,4) = number of violations for previous quarter if count is less than 4 per month © 2014 AllMax Software, Inc. 480 Operator10 Help 14.16.4 V_CNTP([l:p],x,y,z,w) V_CNTP([l:p],x,y,z,w) monthly Period CouNT Violation for location and parameter, offset x months, type y, limit z, months w Value: The count violation of data values of a specific location and parameter for the month x months from the current month. The function uses the following parameters to determine the calculation method: y is the type of period where the limit is applied: if y is 1 then the result is based on values is less than z per day) if y is 2 then the result is based on less than z per week) if y is 3 then the result is based on is less than z per month) if y is 4 then the result is based on is less than z per quarter) if y is 5 then the result is based on values is less than z per 6-month) if y is 6 then the result is based on less than z per year) a daily period (violation if count of hourly or daily a weekly period (violation if count of daily values is a monthly period (violation if count of daily values a quarterly period (violation if count of daily values a semi-annual period (violation if count of daily a yearly period (violation if count of daily values is z is the violation limit w is the number of months The function will return the number of violations for the month. Additional information about a particular violation can be returned: where vnum is the number of the violation (1 is the first, 2 is the second, etc.) add 256*vnum+8 to y in order to return the offset of the day of the violation add 256*vnum+16 to y in order to return the value (count of data values) of the violation When a parameter to calculate loading is specified (@, #, &, @@, ##, or &¶meter), a separate flow location (and parameter) may also be specified: add the additional parameter V_CNTP([l:p],[l_flow:p_flow],x,y,z,w) Examples: V_CNTP([Effluent:31614],0,2,3,1) = number of violations for current month if count is less than 3 per week V_CNTP([Effluent:31614],0,(256*2+16)+2,3,1) = value of the second violation for previous month V_CNTP([Effluent:31614],(256*3)-3,3,4,3) = number of violations for previous quarter if count is less than 4 per month © 2014 AllMax Software, Inc. Functions 481 14.16.5 V_DLY([l:p],x,y,z,w) V_DLY([l:p],x,y,z,w) DaiLY Violation for location and parameter, offset x days, type y, max limit z, min limit w Value: The count or duration of violations for hourly data values of a specific location and parameter for the date x days from the current date. Hourly data values that exceed maximum limit z, or minimum limit w, are considered. If the limit z or w is BLANK, it is not used. The type y determines the information returned: if y is 0 then the result is the count of the number of violations for the day if y is 1 then the result is the duration (for the entire day) in hours that hourly data values exceed limits x or y. The result will range from 0 to 24 hours. If the previous day's last value exceeds the limits, then the duration starts at the beginning of the day. Durations are accumulated until the violation ends, or the end of the day. NOTE: The duration is the same as that returned be the V_DLYM function. NOTE: Additional information about a particular violation can be returned: where vnum is the number of the violation (1 is the first, 2 is the second, etc.), or 0 for the longest violation, if y is 256*vnum+2 then the result is the time of the start of the violation in hours since midnight if y is 256*vnum+3 then the result is the duration of the violation in hours (This may be greater than 24 hours) if y is 256*vnum+4 then the result is the value of the data at the violation Examples: V_DLY([Effluent:00058],0,0,BLANK,100) = number of flow readings that fall below 100 g/min V_DLY([Effluent:00058],0,1,500,BLANK) = hours that flow exceeds 500 g/min for the day V_DLY([Effluent:50050],0,256*1+2,500,BLANK) = the time in hours of the start of the first violation V_DLY([Effluent:50050],0,516,500,BLANK) = the value of the second violation (y is equal to 256 * 2 + 4) 14.16.6 V_DLYM([l:p],x,y,z,w) V_DLYM([l:p],x,y,z,w) DaiLY Multiple Violation for location and parameter, offset x days, type y, max limit z, min limit w Value: The count or duration of multiple violations for hourly data values of a specific location and parameter for the date x days from the current date. Multiple violations are defined as violations which extend through one or more data readings, and are considered as one violation. Hourly data values that exceed maximum limit z, or minimum limit w, are considered. If the limit z or w is BLANK, it is not used. The type y determines the © 2014 AllMax Software, Inc. 482 Operator10 Help information returned: if y is 0 then the result is the count of the number of violations for the day if y is 1 then the result is the duration (for the entire day) in hours that hourly data values exceed limits x or y. The result will range from 0 to 24 hours. If the previous day's last value exceeds the limits, then the duration starts at the beginning of the day. Durations are accumulated until the violation ends, or the end of the day. NOTE: The duration is the same as that returned be the V_DLY function. NOTE: Additional information about a particular violation can be returned: where vnum is the number of the violation (1 is the first, 2 is the second, etc.), or 0 for the longest violation, if y is 256*vnum+2 then the result is the time of the start of the violation in hours since midnight if y is 256*vnum+3 then the result is the duration of the violation in hours (This may be greater than 24 hours) if y is 256*vnum+4 then the result is the maximum value of the data recorded during the violation if y is 256*vnum+5 then the result is the minimum value of the data recorded during the violation if y is 256*vnum+6 then the result is the average value of the data recorded during the violation Examples: V_DLYM([Effluent:00058],0,0,BLANK,100) = number of times flow readings fall below 100 g/min V_DLYM([Effluent:00058],0,1,500,BLANK) = hours that flow exceeds 500 g/min for the day V_DLYM([Effluent:50050],0,256*1+2,500,BLANK) = the time in hours of the start of the first multiple violation V_DLYM([Effluent:50050],0,516,500,BLANK) = the maximum value of the second violation (y is equal to 256 * 2 + 4) 14.16.7 V_MAV([l:p],x,y,z,w,v) V_MAV([l:p],x,y,z,w,v) monthly Minimum AVerage Violation for location and parameter, offset x months, type y, rule z, average w, limit v NOTE: For average violations which are above a limit, see V_AVG(). Value: The minimum average violation (a violation occurs when the average is below the limit) of data values of a specific location and parameter for the month x months from the current month. The function uses the following parameters to determine the calculation method: y is the type of average: © 2014 AllMax Software, Inc. Functions 483 if y is 0 then the result is a monthly, or 30-day, average if y is 1 then the result is a weekly, or 7-day, average if y is 2 then the result is an hourly average z is the rule used for a 7-day average: if if if if if if if z z z z z z z is is is is is is is 0 1 2 3 4 5 6 then then then then then then then the result uses a continuous, or floating, average a week falls in the month which contains its Saturday a week falls in the month which contains its Wednesday the result uses the first of month, for 4 weeks, 28 days the first of month 4th week extends to the end of the month the first of month is controlled by facility option only full weeks (Sun - Sat) in the month are considered if z is 16 then the result uses a continuous, or floating, average, but only counts violations based on unique data w is the type of average used: if w is 0 then the average is the arithmetic mean (average) if w is 1 then the average is the geometric mean (for fecals) if w is 2 then the average is the flow-weighted average v is the violation limit Daily values may be considered as persistent (calculations use the last data not later than the date) by adding 32 to the type y. The number of months may be specified for monthly, 7-day, and hourly calculations: where m is the number of months, add the additional parameter V_MAV([l:p],x,y,z,w,v,m) The function will return the number of violations for the month. Additional information about a particular violation can be returned: where vnum is the number of the violation (1 is the first, 2 is the second, etc.) add 256*vnum+4 to y in order to return the offset of the day of the violation add 256*vnum+8 to y in order to return the value of the violation When a parameter to calculate loading is specified (@, #, &, @@, ##, or &¶meter), a separate flow location (and parameter) may also be specified: add the additional parameter V_MAV([l:p],[l_flow:p_flow],x,y,z,w,v) Examples: V_MAV([Effluent:50050],0,0,0,0,3.14) = number of violations for current month, monthly average exceeding 3.14 V_MAV([Effluent:31614],-1,1,0,1,3.14) = number of violations for previous month, 7day continuous average for fecals exceeding 3.14 V_MAV([Effluent:31614],-1,(256*2+8)+1,0,1,3.14) = value of the second violation for previous month, 7-day continuous average for fecals exceeding 3.14 © 2014 AllMax Software, Inc. 484 Operator10 Help 14.16.8 V_MAX([l:p],x,y,z,w,v) V_MAX([l:p],x,y,z,w,v) monthly MAXimum Violation for location and parameter, offset x months, type y, rule z, average w, limit v Value: The maximum violation of data values of a specific location and parameter for the month x months from the current month. The function uses the following parameters to determine the calculation method: y is the type of maximum: if if if if y y y y is is is is 0 1 2 3 then then then then the the the the result result result result is is is is a monthly, or 30-day, maximum a weekly, or 7-day, maximum an hourly maximum a 4-day maximum z is the rule used for a 7-day average: if if if if if if if z z z z z z z is is is is is is is 0 1 2 3 4 5 6 then then then then then then then the result uses a continuous, or floating, average a week falls in the month which contains its Saturday a week falls in the month which contains its Wednesday the result uses the first of month, for 4 weeks, 28 days the first of month 4th week extends to the end of the month the first of month is controlled by facility option only full weeks (Sun - Sat) in the month are considered if z is 16 then the result uses a continuous, or floating, average, but only counts violations based on unique data w is the type of average used: if w is 0 then the average is the arithmetic mean (average) if w is 1 then the average is the geometric mean (for fecals) if w is 2 then the average is the flow-weighted average v is the violation limit Daily values may be considered as persistent (calculations use the last data not later than the date) by adding 32 to the type y. The number of months may be specified for monthly, 7-day, and hourly calculations: where m is the number of months, add the additional parameter V_MAX([l:p],x,y,z,w,v,m) The function will return the number of violations for the month. Additional information about a particular violation can be returned: where vnum is the number of the violation (1 is the first, 2 is the second, etc.) add 256*vnum+4 to y in order to return the offset of the day of the violation add 256*vnum+8 to y in order to return the value of the violation © 2014 AllMax Software, Inc. Functions 485 add 256*vnum+12 to y in order to return the time of the violation for hourly min/max When a parameter to calculate loading is specified (@, #, &, @@, ##, or &¶meter), a separate flow location (and parameter) may also be specified: add the additional parameter V_MAX([l:p],[l_flow:p_flow],x,y,z,w,v) Examples: V_MAX([Effluent:50050],0,0,0,0,3.14) = number of violations for current month, monthly maximum exceeding 3.14 V_MAX([Effluent:31614],-1,1,0,1,3.14) = number of violations for previous month, 7day continuous maximum for fecals exceeding 3.14 V_MAX([Effluent:31614],-1,(256*2+8)+1,0,1,3.14) = value of the second violation for previous month, 7-day continuous maximum for fecals exceeding 3.14 14.16.9 V_MIN([l:p],x,y,z,w,v) V_MIN([l:p],x,y,z,w,v) monthly MINimum Violation for location and parameter, offset x months, type y, rule z, average w, limit v Value: The minimum violation of data values of a specific location and parameter for the month x months from the current month. The function uses the following parameters to determine the calculation method: y is the type of minimum: if if if if y y y y is is is is 0 1 2 3 then then then then the the the the result result result result is is is is a monthly, or 30-day, minimum a weekly, or 7-day, minimum an hourly minimum a 4-day minimum z is the rule used for a 7-day average: if if if if if if if z z z z z z z is is is is is is is 0 1 2 3 4 5 6 then then then then then then then the result uses a continuous, or floating, average a week falls in the month which contains its Saturday a week falls in the month which contains its Wednesday the result uses the first of month, for 4 weeks, 28 days the first of month 4th week extends to the end of the month the first of month is controlled by facility option only full weeks (Sun - Sat) in the month are considered if z is 16 then the result uses a continuous, or floating, average, but only counts violations based on unique data w is the type of average used: if w is 0 then the average is the arithmetic mean (average) if w is 1 then the average is the geometric mean (for fecals) if w is 2 then the average is the flow-weighted average v is the violation limit © 2014 AllMax Software, Inc. 486 Operator10 Help Daily values may be considered as persistent (calculations use the last data not later than the date) by adding 32 to the type y. The number of months may be specified for monthly, 7-day, and hourly calculations: where m is the number of months, add the additional parameter V_MIN([l:p],x,y,z,w,v,m) The function will return the number of violations for the month. Additional information about a particular violation can be returned: where vnum is the number of the violation (1 is the first, 2 is the second, etc.) add 256*vnum+4 to y in order to return the offset of the day of the violation add 256*vnum+8 to y in order to return the value of the violation add 256*vnum+12 to y in order to return the time of the violation for hourly min/max When a parameter to calculate loading is specified (@, #, &, @@, ##, or &¶meter), a separate flow location (and parameter) may also be specified: add the additional parameter V_MIN([l:p],[l_flow:p_flow],x,y,z,w,v) Examples: V_MIN([Effluent:50050],0,0,0,0,3.14) = number of violations for current month, monthly minimum exceeding 3.14 V_MIN([Effluent:31614],-1,1,0,1,3.14) = number of violations for previous month, 7day continuous minimum for fecals exceeding 3.14 V_MIN([Effluent:31614],-1,(256*2+8)+1,0,1,3.14) = value of the second violation for previous month, 7-day continuous minimum for fecals exceeding 3.14 14.16.10SNC_CJP([l:p],x,y,z,w,v1,v2) SNC_CJP([l:p],x,y,z,w,v1,v2) monthly Significant Non Compliance (SNC) using CJP for location and parameter, offset x months, type y, rule z, average w, daily limit v1, average limit v2 Value: The Significant Non Compliance (SNC) violation using the Compliance Judgement Point (CJP) for data values of a specific location and parameter for 6 months beginning x months from the current month. The SNC is expressed as a ratio equal to the count of values exceeding the daily limit plus the count of averages exceeding the average limit, divided by the CJP (the count of all values plus the count of all averages). The function uses the following parameters to determine the calculation method: y is the type of average: if y is 0 then the result is based on a daily average if y is 1 then the result is based on weekly, or 7-day, averages z is the rule used for a 7-day average: © 2014 AllMax Software, Inc. Functions if if if if if if if z z z z z z z is is is is is is is 0 1 2 3 4 5 6 then then then then then then then 487 the result uses a continuous, or floating, average a week falls in the month which contains its Saturday a week falls in the month which contains its Wednesday the result uses the first of month, for 4 weeks, 28 days the first of month 4th week extends to the end of the month the first of month is controlled by facility option only full weeks (Sun - Sat) in the month are considered w is the type of average used: if w is 0 then the average is the arithmetic mean (average) if w is 1 then the average is the geometric mean (for fecals) if w is 2 then the average is the flow-weighted average v1 is the daily violation limit v2 is the average violation limit The count of violations and values may be returned instead of the ratio: add 4 to y in order to return the count of violations add 8 to y in order to return the count of values Daily values may be considered as persistent (calculations use the last data not later than the date) by adding 32 to the type y. The number of months is assumed to be 6, but may be specified for monthly, 7-day, and hourly calculations: where m is the number of months, add the additional parameter SNC_CJP([l:p],x,y,z,w,v1,v2,m) When a parameter to calculate loading is specified (@, #, &, @@, ##, or &¶meter), a separate flow location (and parameter) may also be specified: add the additional parameter SNC_CJP([l:p],[l_flow:p_flow],x,y,z,w,v1,v2) Examples: SNC_CJP([Effluent:00400],0,0,0,0,8.5,8) = current 6 months SNC, daily maximum exceeding 8.5, monthly avg exceeding 8 SNC_CJP([Effluent:00400],-6,1,3,0,8.5*1.2,8*1.2) = previous 6 months SNC, 7-day 1st of Month, exceeding limits by 20% SNC_CJP([Effluent:00400],-6,1,3,0,8.5*1.2,8*1.2)>.33 = TRUE if the ratio is greater than 33% 14.16.11SNC_MAXD([l:p],x,y,z,w,v) SNC_MAXD([l:p],x,y,z,w,v) monthly Significant Non Compliance (SNC) MAXimun Daily violation for location and parameter, offset x months, type y, rule z, average w, limit v Value: The maximum daily Significant Non Compliance (SNC) violation for data values of a specific location and parameter for 6 months beginning x months from the current month. © 2014 AllMax Software, Inc. 488 Operator10 Help The SNC is expressed as a ratio equal to the count of values exceeding the limit divided by the count of all values. The function uses the following parameters to determine the calculation method: y is the type of average: if if if if y y y y is is is is 0 1 2 3 then then then then the the the the result result result result is is is is based based based based on on on on a daily maximum a weekly, or 7-day, maximum an hourly maximum a 4-day maximum z is the rule used for a 7-day average: if if if if if if if z z z z z z z is is is is is is is 0 1 2 3 4 5 6 then then then then then then then the result uses a continuous, or floating, average a week falls in the month which contains its Saturday a week falls in the month which contains its Wednesday the result uses the first of month, for 4 weeks, 28 days the first of month 4th week extends to the end of the month the first of month is controlled by facility option only full weeks (Sun - Sat) in the month are considered w is the type of average used: if w is 0 then the average is the arithmetic mean (average) if w is 1 then the average is the geometric mean (for fecals) if w is 2 then the average is the flow-weighted average v is the violation limit The count of violations and values may be returned instead of the ratio: add 4 to y in order to return the count of violations add 8 to y in order to return the count of values Daily values may be considered as persistent (calculations use the last data not later than the date) by adding 32 to the type y. The number of months is assumed to be 6, but may be specified for monthly, 7-day, and hourly calculations: where m is the number of months, add the additional parameter SNC_MAXD([l:p],x,y,z,w,v,m) When a parameter to calculate loading is specified (@, #, &, @@, ##, or &¶meter), a separate flow location (and parameter) may also be specified: add the additional parameter SNC_MAXD([l:p],[l_flow:p_flow],x,y,z,w,v) Examples: SNC_MAXD([Effluent:00400],0,0,0,0,8.5) = current 6 months SNC, monthly maximum exceeding 8.5 SNC_MAXD([Effluent:00400],-6,1,3,0,8.5*1.2) = previous 6 months SNC, 7-day 1st of Month maximum exceeding 8.5 by 20% SNC_MAXD([Effluent:00400],-6,1,3,0,8.5*1.2)>.33 = TRUE if the ratio is greater than © 2014 AllMax Software, Inc. Functions 489 33% 14.16.12SNC_MAXM([l:p],x,y,z,w,v) SNC_MAXM([l:p],x,y,z,w,v) monthly Significant Non Compliance (SNC) MAXimun Monthly violation for location and parameter, offset x months, type y, rule z, average w, limit v Value: The maximum monthly average Significant Non Compliance (SNC) violation for data values of a specific location and parameter for 6 months beginning x months from the current month. The SNC is expressed as a ratio equal to the count of monthly averages exceeding the limit divided by the count of all months having values. The function uses the following parameters to determine the calculation method: y is the type of average: if if if if y y y y is is is is 0 1 2 3 then then then then the the the the result result result result is is is is based based based based on on on on a daily maximum a weekly, or 7-day, maximum an hourly maximum a 4-day maximum z is the rule used for a 7-day average: if if if if if if if z z z z z z z is is is is is is is 0 1 2 3 4 5 6 then then then then then then then the result uses a continuous, or floating, average a week falls in the month which contains its Saturday a week falls in the month which contains its Wednesday the result uses the first of month, for 4 weeks, 28 days the first of month 4th week extends to the end of the month the first of month is controlled by facility option only full weeks (Sun - Sat) in the month are considered w is the type of average used: if w is 0 then the average is the arithmetic mean (average) if w is 1 then the average is the geometric mean (for fecals) if w is 2 then the average is the flow-weighted average v is the violation limit The count of months having violations and values may be returned instead of the ratio: add 4 to y in order to return the count of months having violations add 8 to y in order to return the count of months having values Daily values may be considered as persistent (calculations use the last data not later than the date) by adding 32 to the type y. The number of months is assumed to be 6, but may be specified for monthly, 7-day, and hourly calculations: where m is the number of months, add the additional parameter © 2014 AllMax Software, Inc. 490 Operator10 Help SNC_MAXM([l:p],x,y,z,w,v,m) When a parameter to calculate loading is specified (@, #, &, @@, ##, or &¶meter), a separate flow location (and parameter) may also be specified: add the additional parameter SNC_MAXM([l:p],[l_flow:p_flow],x,y,z,w,v) Examples: SNC_MAXM([Effluent:00400],0,0,0,0,8.5) = current 6 months SNC, monthly average exceeding 8.5 SNC_MAXM([Effluent:00400],-6,1,3,0,8.5*1.2) = previous 6 months SNC, 7-day 1st of Month average exceeding 8.5 by 20% SNC_MAXM([Effluent:00400],-6,1,3,0,8.5*1.2)>.33 = TRUE if the ratio is greater than 33% 14.16.13SNC_MIND([l:p],x,y,z,w,v) SNC_MIND([l:p],x,y,z,w,v) monthly Significant Non Compliance (SNC) MINimun Daily violation for location and parameter, offset x months, type y, rule z, average w, limit v Value: The minimum daily Significant Non Compliance (SNC) violation for data values of a specific location and parameter for 6 months beginning x months from the current month. The SNC is expressed as a ratio equal to the count of values exceeding the limit divided by the count of all values. The function uses the following parameters to determine the calculation method: y is the type of average: if if if if y y y y is is is is 0 1 2 3 then then then then the the the the result result result result is is is is based based based based on on on on a daily minimum a weekly, or 7-day, minimum an hourly minimum a 4-day minimum z is the rule used for a 7-day average: if if if if if if if z z z z z z z is is is is is is is 0 1 2 3 4 5 6 then then then then then then then the result uses a continuous, or floating, average a week falls in the month which contains its Saturday a week falls in the month which contains its Wednesday the result uses the first of month, for 4 weeks, 28 days the first of month 4th week extends to the end of the month the first of month is controlled by facility option only full weeks (Sun - Sat) in the month are considered w is the type of average used: if w is 0 then the average is the arithmetic mean (average) if w is 1 then the average is the geometric mean (for fecals) if w is 2 then the average is the flow-weighted average v is the violation limit © 2014 AllMax Software, Inc. Functions 491 The count of violations and values may be returned instead of the ratio: add 4 to y in order to return the count of violations add 8 to y in order to return the count of values Daily values may be considered as persistent (calculations use the last data not later than the date) by adding 32 to the type y. The number of months is assumed to be 6, but may be specified for monthly, 7-day, and hourly calculations: where m is the number of months, add the additional parameter SNC_MIND([l:p],x,y,z,w,v,m) When a parameter to calculate loading is specified (@, #, &, @@, ##, or &¶meter), a separate flow location (and parameter) may also be specified: add the additional parameter SNC_MIND([l:p],[l_flow:p_flow],x,y,z,w,v) Examples: SNC_MIND([Effluent:00400],0,0,0,0,5.5) = current 6 months SNC, monthly minimum below 5.5 SNC_MIND([Effluent:00400],-6,1,3,0,5.5*.8) = previous 6 months SNC, 7-day 1st of Month minimum pH below 5.5 by 20% SNC_MIND([Effluent:00400],-6,1,3,0,5.5*.8)>.33 = TRUE if the ratio is greater than 33% 14.16.14SNC_MINM([l:p],x,y,z,w,v) SNC_MINM([l:p],x,y,z,w,v) monthly Significant Non Compliance (SNC) MINimun Monthly violation for location and parameter, offset x months, type y, rule z, average w, limit v Value: The minimum monthly average Significant Non Compliance (SNC) violation for data values of a specific location and parameter for 6 months beginning x months from the current month. The SNC is expressed as a ratio equal to the count of monthly averages exceeding the limit divided by the count of all months having values. The function uses the following parameters to determine the calculation method: y is the type of average: if if if if y y y y is is is is 0 1 2 3 then then then then the the the the result result result result is is is is based based based based on on on on a daily minimum a weekly, or 7-day, minimum an hourly minimum a 4-day minimum z is the rule used for a 7-day average: if z is 0 then the result uses a continuous, or floating, average if z is 1 then a week falls in the month which contains its Saturday © 2014 AllMax Software, Inc. 492 Operator10 Help if if if if if z z z z z is is is is is 2 3 4 5 6 then then then then then a week falls in the month which contains its Wednesday the result uses the first of month, for 4 weeks, 28 days the first of month 4th week extends to the end of the month the first of month is controlled by facility option only full weeks (Sun - Sat) in the month are considered w is the type of average used: if w is 0 then the average is the arithmetic mean (average) if w is 1 then the average is the geometric mean (for fecals) if w is 2 then the average is the flow-weighted average v is the violation limit The count of months having violations and values may be returned instead of the ratio: add 4 to y in order to return the count of months having violations add 8 to y in order to return the count of months having values Daily values may be considered as persistent (calculations use the last data not later than the date) by adding 32 to the type y. The number of months is assumed to be 6, but may be specified for monthly, 7-day, and hourly calculations: where m is the number of months, add the additional parameter SNC_MINM([l:p],x,y,z,w,v,m) When a parameter to calculate loading is specified (@, #, &, @@, ##, or &¶meter), a separate flow location (and parameter) may also be specified: add the additional parameter SNC_MINM([l:p],[l_flow:p_flow],x,y,z,w,v) Examples: SNC_MINM([Effluent:00400],0,0,0,0,5.5) = current 6 months SNC, monthly average below 5.5 SNC_MINM([Effluent:00400],-6,1,3,0,5.5*.8) = previous 6 months SNC, 7-day 1st of Month average pH below 5.5 by 20% SNC_MINM([Effluent:00400],-6,1,3,0,5.5*.8)>.33 = TRUE if the ratio is greater than 33% 14.17 Weekly Data Functions Topics in this section include: W_AVG([l:p],x,y,z,w); Weekly AVG, offset x months, week, rule, avg W_MAX([l:p],x,y,z,w); Weekly MAX, offset x months, week, rule, avg W_MIN([l:p],x,y,z,w); Weekly MIN, offset x months, week, rule, avg 14.17.1 W_AVG([l:p],x,y,z,w) W_AVG([l:p],x,y,z,w) AVeraGe of Weekly average (7-day) values for location and parameter, offset x months, © 2014 AllMax Software, Inc. Functions 493 week y, rule z, average w Value: The average of weekly averages of data values of a specific location and parameter for the month x months from the current month. The function uses the following parameters to determine the calculation method: y is the week of average: if y is 0 then M_AVG() ) if y is 1 then if y is 2 then if y is 3 then if y is 4 then if y is 5 then etc. the result is the weekly average for a monthly period (see also: the the the the the result result result result result is is is is is the weekly, or 7-day, average for the first week for the second week for the third week for the fourth week for the fifth week special cases: if y is 32 then the result is the offset (from the first of the calendar month) of the start day of the monthly period if y is 33 then the result is the offset of the last day of the monthly period z is the rule used for a 7-day average: if if if if if if if z z z z z z z is is is is is is is 0 1 2 3 4 5 6 then then then then then then then the result uses a continuous, or floating, average a week falls in the month which contains its Saturday a week falls in the month which contains its Wednesday the result uses the first of month, for 4 weeks, 28 days the first of month 4th week extends to the end of the month the first of month is controlled by facility option only full weeks (Sun - Sat) in the month are considered w is the type of average used: if w is 0 then the average is the arithmetic mean (average) if w is 1 then the average is the geometric mean (for fecals) if w is 2 then the average is the flow-weighted average When a parameter to calculate loading is specified (@, #, &, @@, ##, or &¶meter), a separate flow location (and parameter) may also be specified: add the additional parameter W_AVG([l:p],[l_flow:p_flow],x,y,z,w) Examples: W_AVG([Effluent:50050],0,0,0,0) = current month, monthly 7-day average W_AVG([Effluent:31614],-1,1,6,1) = previous month, first full week average for fecals 14.17.2 W_MAX([l:p],x,y,z,w) W_MAX([l:p],x,y,z,w) MAXimum of Weekly average (7-day) values for location and parameter, offset x months, © 2014 AllMax Software, Inc. 494 Operator10 Help week y, rule z, average w Value: The maximum of weekly averages of data values of a specific location and parameter for the month x months from the current month. The function uses the following parameters to determine the calculation method: y is the week of average: if y is 0 then M_MAX() ) if y is 1 then if y is 2 then if y is 3 then if y is 4 then if y is 5 then etc. the result is the maximum weekly average for a monthly period (see also: the the the the the result result result result result is is is is is the weekly, or 7-day, average for the first week for the second week for the third week for the fourth week for the fifth week special cases: if y is 32 then the result is the calculated offset based on the "z" calculation type; the numeric offset represents the beginning of the reporting period in which the weekly calculations are to be made. if y is 33 then the result is the calculated offset based on the "z" calculation type; the numeric offset represents the end of the reporting period in which the weekly calculations are to be made. if y is 34 then the result is the calculated offset based on the "z" calculation type; the numeric offset represents the beginning of the 7 day period (week) which is calculated as the weekly maximum average using the value returned when using the special case "32" to determine the beginning of the period to be reported. z is the rule used for a 7-day average: if if if if if if if z z z z z z z is is is is is is is 0 1 2 3 4 5 6 then then then then then then then the result uses a continuous, or floating, average a week falls in the month which contains its Saturday a week falls in the month which contains its Wednesday the result uses the first of month, for 4 weeks, 28 days the first of month 4th week extends to the end of the month the first of month is controlled by facility option only full weeks (Sun - Sat) in the month are considered w is the type of average used: if w is 0 then the average is the arithmetic mean (average) if w is 1 then the average is the geometric mean (for fecals) if w is 2 then the average is the flow-weighted average When a parameter to calculate loading is specified (@, #, &, @@, ##, or &¶meter), a separate flow location (and parameter) may also be specified: add the additional parameter W_MAX([l:p],[l_flow:p_flow],x,y,z,w) Examples: W_MAX([Effluent:50050],0,0,0,0) = current month, monthly 7-day maximum © 2014 AllMax Software, Inc. Functions 495 W_MAX([Effluent:31614],-1,1,6,1) = previous month, first full week average for fecals 14.17.3 W_MIN([l:p],x,y,z,w) W_MIN([l:p],x,y,z,w) MINimum of Weekly average (7-day) values for location and parameter, offset x months, week y, rule z, average w Value: The minimum of weekly averages of data values of a specific location and parameter for the month x months from the current month. The function uses the following parameters to determine the calculation method: y is the week of average: if y is 0 then M_MIN() ) if y is 1 then if y is 2 then if y is 3 then if y is 4 then if y is 5 then etc. the result is the minimum weekly average for a monthly period (see also: the the the the the result result result result result is is is is is the weekly, or 7-day, average for the first week for the second week for the third week for the fourth week for the fifth week special cases: if y is 32 then the result is the calculated offset based on the "z" calculation type; the numeric offset represents the beginning of the reporting period in which the weekly calculations are to be made. if y is 33 then the result is the calculated offset based on the "z" calculation type; the numeric offset represents the end of the reporting period in which the weekly calculations are to be made. if y is 34 then the result is the calculated offset based on the "z" calculation type; the numeric offset represents the beginning of the 7 day period (week) which is calculated as the weekly minimum average using the value returned when using the special case "32" to determine the beginning of the period to be reported. z is the rule used for a 7-day average: if if if if if if if z z z z z z z is is is is is is is 0 1 2 3 4 5 6 then then then then then then then the result uses a continuous, or floating, average a week falls in the month which contains its Saturday a week falls in the month which contains its Wednesday the result uses the first of month, for 4 weeks, 28 days the first of month 4th week extends to the end of the month the first of month is controlled by facility option only full weeks (Sun - Sat) in the month are considered w is the type of average used: if w is 0 then the average is the arithmetic mean (average) if w is 1 then the average is the geometric mean (for fecals) if w is 2 then the average is the flow-weighted average © 2014 AllMax Software, Inc. 496 Operator10 Help When a parameter to calculate loading is specified (@, #, &, @@, ##, or &¶meter), a separate flow location (and parameter) may also be specified: add the additional parameter W_MIN([l:p],[l_flow:p_flow],x,y,z,w) Examples: W_MIN([Effluent:50050],0,0,0,0) = current month, monthly 7-day minimum W_MIN([Effluent:31614],-1,1,6,1) = previous month, first full week average for fecals 14.18 Yearly Data Functions Topics in this section include: Y_AVG([l:p],x,y,z); Yearly AVG Daily value, offset, months, type Y_AVGM([l:p],x,y,z); Yearly AVG, Monthly average, offset, months, type Y_CAVG([l:p],x,y); Calendar Year AVG of daily values, offset x months, type Y_COUNT([l:p],x,y); Yearly COUNT of daily values, offset x months, for y months Y_CSUM([l:p],x); Calendar Year SUM of daily values, offset x months Y_MAX([l:p],x,y); Yearly MAX daily value, offset x months, for y months Y_MAXM([l:p],x,y,z); Yearly MAX Monthly average, offset, months, type Y_MIN([l:p],x,y); Yearly MIN daily value, offset x months, for y months Y_MINM([l:p],x,y,z); Yearly MIN Monthly average, offset, months, type Y_RES([l:p],x,y1,y2,y3,y4); Yearly RESidual, offset x years, percents y1, y2, y3, y4 Y_SUM([l:p],x,y); Yearly SUM of daily values, offset x months, for y months Y_TOTM([l:p],x,y); Yearly sum of Monthly TOTals, offset x months, for y months 14.18.1 Y_AVG([l:p],x,y,z) Y_AVG([l:p],x,y,z) Yearly AVeraGe of daily values for location and parameter, offset x months, for y months, average z Value: The average of daily data values of a specific location and parameter for y months beginning x months from the current month. If y is 0 or BLANK, the function assumes 1 year. The value z is the type of average used: if z is 0 then the average is the arithmetic mean (average) if z is 1 then the average is the geometric mean (for fecals) if z is 2 then the average is the flow-weighted average When a parameter to calculate loading is specified (@, #, &, @@, ##, or &¶meter), a separate flow location (and parameter) may also be specified: add the additional parameter Y_AVG([l:p],[l_flow:p_flow],x,y,z) Examples: Y_AVG([Effluent:50050],0,0,0) = start current month, yearly average Y_AVG([Effluent:31614],-6,6,1) = previous 6 month average for fecals © 2014 AllMax Software, Inc. Functions 497 14.18.2 Y_AVGM([l:p],x,y,z) Y_AVGM([l:p],x,y,z) Yearly AVeraGe of Monthly averages for location and parameter, offset x months, for y months, average z Value: The average of monthly averages for a specific location and parameter for y months beginning x months from the current month. If y is 0 or BLANK, the function assumes 1 year. The value z is the type of monthly average used: if z is 0 then the average is the arithmetic mean (average) if z is 1 then the average is the geometric mean (for fecals) if z is 2 then the average is the flow-weighted average When a parameter to calculate loading is specified (@, #, &, @@, ##, or &¶meter), a separate flow location (and parameter) may also be specified: add the additional parameter Y_AVGM([l:p],[l_flow:p_flow],x,y,z) Examples: Y_AVGM([Effluent:50050],0,0,0) = start current month, yearly average Y_AVGM([Effluent:31614],-6,6,1) = previous 6 month average for fecals The Average 3-Month Average (of monthly averages) may be specified by adding the additional parameter Y_AVGM([l:p],x,y,z,3) 14.18.3 Y_CAVG([l:p],x,y,z) Y_CAVG([l:p],x,y) Calendar Year AVeraGe of daily values for location and parameter, offset x months, average y Value: The average of data values of a specific location and parameter for the calendar year from January through the month x months from the current month. The value y is the type of average used: if y is 0 then the average is the arithmetic mean (average) if y is 1 then the average is the geometric mean (for fecals) if y is 2 then the average is the flow-weighted average When a parameter to calculate loading is specified (@, #, &, @@, ##, or &¶meter), a separate flow location (and parameter) may also be specified: add the additional parameter Y_CAVG([l:p],[l_flow:p_flow],x,y) Examples: Y_CAVG([Effluent:50050],0,0) = yearly average from January through the present month Y_CAVG([Effluent:31614],-1,1) = yearly geometric mean through the previous month The start month of the calendar may be specified: where m is the start month (January is 1), add the additional parameter © 2014 AllMax Software, Inc. 498 Operator10 Help Y_CAVG([l:p],x,m) 14.18.4 Y_COUNT([l:p],x,y,z) Y_COUNT([l:p],x,y) Yearly COUNT of daily values for location and parameter, offset x months, for y months Value: The count of data values of a specific location and parameter for y months beginning x months from the current month. If y is 0 or BLANK, the function assumes 1 year. The function counts only valid data--it ignores Alpha Codes, Less Than, Greater Than, or Non-Detect values (if Facility options are set to blank). When a parameter to calculate loading is specified (@, #, &, @@, ##, or &¶meter), a separate flow location (and parameter) may also be specified: add the additional parameter Y_COUNT([l:p],[l_flow:p_flow],x,y Examples: Y_COUNT([Effluent:50050],0,0) = start current month, yearly count Y_COUNT([Effluent:31614],-6,6) = previous 6 month count 14.18.5 Y_CSUM([l:p],x) Y_CSUM([l:p],x) Calendar Year SUM of daily values for location and parameter, offset x months Value: The sum of data values of a specific location and parameter for the calendar year from January through the month x months from the current month. When a parameter to calculate loading is specified (@, #, &, @@, ##, or &¶meter), a separate flow location (and parameter) may also be specified: add the additional parameter Y_CSUM([l:p],[l_flow:p_flow],x) Examples: Y_CSUM([Effluent:50050],0) = yearly sum from January through the present month Y_CSUM([Effluent:31614],-1) = yearly sum through the previous month The start month of the calendar may be specified: where m is the start month (January is 1), add the additional parameter Y_CSUM([l:p],x,m) 14.18.6 Y_MAX([l:p],x,y) Y_MAX([l:p],x,y) Yearly MAXimum for location and parameter, offset x months, for y months Value: The maximum of data values of a specific location and parameter for y months beginning x months from the current month. If y is 0 or BLANK, the function assumes 1 © 2014 AllMax Software, Inc. Functions 499 year. When a parameter to calculate loading is specified (@, #, &, @@, ##, or &¶meter), a separate flow location (and parameter) may also be specified: add the additional parameter Y_MAX([l:p],[l_flow:p_flow],x,y) Examples: Y_MAX([Effluent:50050],0,0) = start current month, yearly maximum Y_MAX([Effluent:31614],-6,6) = previous 6 month maximum 14.18.7 Y_MAXM([l:p],x,y,z) Y_MAXM([l:p],x,y,z) Yearly MAXimum of Monthly averages for location and parameter, offset x months, for y months, average z Value: The maximum of the monthly averages for a specific location and parameter for y months beginning x months from the current month. If y is 0 or BLANK, the function assumes 1 year. The value z is the type of monthly average used: if z is 0 then the average is the arithmetic mean (average) if z is 1 then the average is the geometric mean (for fecals) if z is 2 then the average is the flow-weighted average When a parameter to calculate loading is specified (@, #, &, @@, ##, or &¶meter), a separate flow location (and parameter) may also be specified: add the additional parameter Y_MAXM([l:p],[l_flow:p_flow],x,y,z) Examples: Y_MAXM([Effluent:50050],0,0,0) = start current month, yearly maximum Y_MAXM([Effluent:31614],-6,6,1) = previous 6 month maximum for fecals The Maximum 3-Month Average (of monthly averages) may be specified by adding the additional parameter Y_MAXM([l:p],x,y,z,3) 14.18.8 Y_MIN([l:p],x,y) Y_MIN([l:p],x,y) Yearly MINimum for location and parameter, offset x months, for y months Value: The minimum of data values of a specific location and parameter for y months beginning x months from the current month. If y is 0 or BLANK, the function assumes 1 year. When a parameter to calculate loading is specified (@, #, &, @@, ##, or &¶meter), a separate flow location (and parameter) may also be specified: add the additional parameter Y_MIN([l:p],[l_flow:p_flow],x,y) © 2014 AllMax Software, Inc. 500 Operator10 Help Examples: Y_MIN([Effluent:50050],0,0) = start current month, yearly minimum Y_MIN([Effluent:31614],-6,6) = previous 6 month minimum 14.18.9 Y_MINM([l:p],x,y,z) Y_MINM([l:p],x,y,z) Yearly MINimum of Monthly averages for location and parameter, offset x months, for y months, average z Value: The minimum of the monthly averages for a specific location and parameter for y months beginning x months from the current month. If y is 0 or BLANK, the function assumes 1 year. The value z is the type of monthly average used: if z is 0 then the average is the arithmetic mean (average) if z is 1 then the average is the geometric mean (for fecals) if z is 2 then the average is the flow-weighted average When a parameter to calculate loading is specified (@, #, &, @@, ##, or &¶meter), a separate flow location (and parameter) may also be specified: add the additional parameter Y_MINM([l:p],[l_flow:p_flow],x,y,z) Examples: Y_MINM([Effluent:50050],0,0,0) = start current month, yearly minimum Y_MINM([Effluent:31614],-6,6,1) = previous 6 month minimum for fecals The Minimum 3-Month Average (of monthly averages) may be specified by adding the additional parameter Y_MINM([l:p],x,y,z,3) 14.18.10Y_RES([l:p],x,y1,y2,y3,y4) Y_RES([l:p],x,y1,y2,y3,y4) Yearly RESidual carryover for location and parameter, offset x years, percents y1, y2, y3, y4 Value: The residual carryover of the yearly sums of data values of a specific location and parameter beginning x years from the current year. Beginning with the previous year and moving backward, each year's sum is multiplied by the y percentage for that year, and the total is returned as the residual. Examples: Y_RES([Effluent:50050],0,50,20,10,0) = residual carryover from previous years Y_RES([Effluent:31614],1,50,20,10,0) = next year's residual 14.18.11Y_SUM([l:p],x,y) Y_SUM([l:p],x,y) © 2014 AllMax Software, Inc. Functions 501 Yearly SUM of daily values for location and parameter, offset x months, for y months Value: The sum of data values of a specific location and parameter for y months beginning x months from the current month. If y is 0 or BLANK, the function assumes 1 year. When a parameter to calculate loading is specified (@, #, &, @@, ##, or &¶meter), a separate flow location (and parameter) may also be specified: add the additional parameter Y_SUM([l:p],[l_flow:p_flow],x,y) Examples: Y_SUM([Effluent:50050],0,0) = start current month, yearly sum Y_SUM([Effluent:31614],-6,6) = previous 6 month sum 14.18.12Y_TOTM([l:p],x,y) Y_TOTM([l:p],x,y) Yearly sum of Monthly TOTals (average * number of days) for location and parameter, offset x months, for y months Value: The sum of the monthly totals for a specific location and parameter for y months beginning x months from the current month. The total is defined as the average of values, multiplied by the number of days in the range. If y is 0 or BLANK, the function assumes 1 year. If 256 is added to y, the count of days with flow data is used instead of the number of days. When a parameter to calculate loading is specified (@, #, &, @@, ##, or &¶meter), a separate flow location (and parameter) may also be specified: add the additional parameter Y_TOTM([l:p],[l_flow:p_flow],x,y) Examples: Y_TOTM([Effluent:50050],0,0) = start current month, yearly total Y_TOTM([Effluent:31614],-6,6) = previous 6 month total © 2014 AllMax Software, Inc. Part XV Utilities 15 503 Utilities Topics in this section include: Database Backup Import/Export Facility Operator10 Agent Calculate Utility Locked Data Import Utility Export Data Utility Calculator Tool Operator10 Tools 15.1 Database Backup A Backup of all current Facility data files in the Operator10 - Wastewater can be made in a compressed file format (.zip). The data files of the current database are compressed and copied to the file location chosen by the user, with a name given by the user. The backup file can then be stored to an external source or location. Database Backup - Manual There are several ways in which the database can be backed up. Backup Method #1 - Open Database window 1. To perform a database backup, click the [Backup Selected Database] button, located in the grid tool-strip, to begin. 2. In the Save As window that opens, select a location in which to store the backup file. 3. In the File name: field, give the backup file a suitable file name. 4. Press the [Save] button to perform the backup. Backup Method #2 - Tools ribbon 1. To perform a database backup, go to the Tools menu/ribbon, click the [Backup Now] button. 2. In the Save As window that opens, select a location in which to store the backup file. 3. In the File name: field, give the backup file a suitable file name. 4. Press the [Save] button to perform the backup. Database Backup - Scheduled To schedule a backup, using the Operator10 Agent Scheduling tool, see the Scheduled © 2014 AllMax Software, Inc. 504 Operator10 Help Backup help topic. 15.2 Import/Export Facility Users may Import or Export Facility data into and from existing databases. To begin the process of Importing or Exporting Facility data, go to the File menu and choose Open Database. Locate and click the [Import/Export Facility] button. The Import/Export Facility window will open, follow the steps below to Import or Export facility data. Import Facility When importing data, users will be able to create a new facility based on the selected export file from Operator10 - Wastewater. The new facility will be added to the current database. 1. Choose the ( ) Import Facility option to begin. 2. Enter a new Facility Name: (1 to 30 characters). 3. Click the [...] button in the FileName field to choose the Exported facility file (*.zip) to be imported. 4. Click the [OK] button to import the facility. Export Facility When exporting data, the created file will be suitable for importing into other installations of Operator10 - Wastewater, importing into other databases in Operator10 - Wastewater as well as sending to AllMax Software Technical Support staff. 1. Choose the ( ) Export Facility option to begin. 2. The Facility Name: field will be filled with the Facility you have chosen to Export. 3. Click the [...] button in the File Name: field to choose a file location and name the file to be saved as the Export file. (The file will be created in a zip or compressed file format, suitable for importing into Operator10 - Wastewater.) © 2014 AllMax Software, Inc. Utilities 4. Click the 15.3 505 [OK] button to import the facility. Operator10 Agent Operator10 Agent The Operator10 Agent is an interactive Windows Service that runs silently in the background of the Windows Operating System. The Operator10 Agent silently monitors configuration information which tells the service which scheduled tasks to perform. Based on selected servers and databases, scheduled tasks are performed based on the desired schedules, as set by the end user. © 2014 AllMax Software, Inc. 506 Operator10 Help The Operator10 Agent performs scheduled task operations such as backups, calculations and data imports. Accessing the Operator10 Agent To access the Operator10 Agent information, go to the Tools menu, choose Setup. Adding Server/Database to Agent To instruct the Operator10 Agent to perform the scheduled tasks associated with backups, calculations or data imports, follow these steps: 1. Click the [Add] button to begin © 2014 AllMax Software, Inc. Utilities 507 2. In the Server list that opens, select the server where the Operator10 Database resides 3. Click [OK] 4. In the Database list that opens, select the database to be processed when the Operator10 Agent performs the scheduled tasks 5. Click [OK] Upon adding the server/database combination to the list, the scheduled tasks will be displayed. NOTE: An additional security measure is required to establish the full connection of the Operator10 Agent to the server/database combination listed. The Database Properties option for Include in Scheduler Check. Enable the checkbox option for Include in Scheduler Check to finalize the connection. Scheduled Tasks From the Operator10 Agent Service Options window, the following tasks are available to be scheduled: Scheduled Backups 1. In the area labeled Individual Schedule Definitions press the [Schedule] button for Backup Schedule: to begin 2. Enter the desired name of the file to be created in the File Name: file 3. Select the desired path where the backup file is to be created. Press the [...] button. 4. In the Multiple Backup Copies area: a. Check the [ ] Create multiple backup copies checkbox to create unique backup files that will have the date appended to the name of the file. Example: Operator10Backup_20121219.zip b. Select from the available options: i. ( ) Keep all backup files - This option will preserve all backup files created at the selected location ii. ( ) Delete backup files after ____ Days - Enter a numeric value and the backup process will remove any files that have been created via the scheduled backup utility that were created X number of days prior to the current date. iii.( ) Delete backup files after ____ Months - Enter a numeric value and the backup process will remove any files that have been created via the scheduled backup utility that were created X number of months prior to the current date. 5. Press [Schedule Setup] button to continue 6. In the Schedule dialog that opens, if this schedule is New - press the [New] button to begin scheduling Existing - proceed to the schedule information, step 5 © 2014 AllMax Software, Inc. 508 Operator10 Help 7. Select from the options in the Schedule Task menu to determine the frequency of the task 8. Provide additional information based on the choice of schedule frequency to continue 9. Click [OK] to continue 10.Press [OK] to complete the scheduling process Your task is now scheduled and ready for processing with the Operator10 Agent, provided that you have added the server/database to the list to be processed. Scheduled Calculation 1. Go to the Tools ribbon/menu and choose group to begin. Schedule in the Calculations 2. Choose the facility (multiple facilities can be selected) to be calculated 3. Enter a number of days from the current date to perform calculations 4. Press [OK] to continue 5. In the Schedule dialog that opens, if this schedule is New - press the [New] button to begin scheduling © 2014 AllMax Software, Inc. Utilities 509 Existing - proceed to the schedule information, step 6 6. Select from the options in the Schedule Task menu to determine the frequency of the task 7. Provide additional information based on the choice of schedule frequency to continue 8. Click [OK] to continue Your task is now scheduled and ready for processing with the Operator10 Agent, provided that you have added the server/database to the list to be processed. Scheduled Import 1. Go to the Tools ribbon/menu and choose to begin. Schedule Imports from the menu 2. In the Schedule dialog that opens, if this schedule is New - press the [New] button to begin scheduling Existing - proceed to the schedule information, step 3 3. Select from the options in the Schedule Task menu to determine the frequency of the task 4. Provide additional information based on the choice of schedule frequency to continue 5. Click [OK] to continue NOTE: The Import Utility relies on information provided in the Database Properties - Import Settings section, see the Import Settings for more information Your task is now scheduled and ready for processing with the Operator10 Agent, provided that you have added the server/database to the list to be processed. 15.3.1 Calculation Schedule The Calculation Schedule Utility allows for users to define and manage a schedule of tasks to calculate specified Facility data. The Calculation Schedule allows all formulas for a selected Facility to be calculated on a scheduled task basis with the help of the Operator10 Agent. For more information see the following topics: Operator10 Agent Scheduled Calculations 15.4 Calculate Utility Calculate Utility © 2014 AllMax Software, Inc. 510 Operator10 Help The Calculate Utility is used to perform calculations for a given database. The utility can calculate all formulas or a selection of formulas based on user provided date range. Calculating To perform a calculation, select/enter the following pieces of information: Start Date: Enter the date on which the Calculate Utility should begin performing calculations. Enter a date or click the [...] button to select using a calendar. End Date: Enter the date on which the Calculate Utility should end performing calculations. Enter a date or click the [...] button to select using a calendar. ( ) All formulas for facility: Select this option and click the [...] button to select from a list of facilities, select one or multiple facilities, to have all formulas for the selected facilities calculated. ( ) Calculate selected formulas: Select this option and click the [...] button to browse a list of formulas to be calculated. Select individual or multiple formulas to be calculated. Click the [OK] button to begin calculating the database. More information For more information about calculations, see the following topic: Calculations Scheduled Calculations 15.5 Locked Data Locked Data Data may be Locked (protected) for any Facility. Locked Data allows data values to be viewed, reported, exported, and used in calculations, but does not allow data values to be changed within the Operator10 application. © 2014 AllMax Software, Inc. Utilities 511 Select the Facility to lock data. Use the drop-down menu to choose the Facility for which you want to Lock Data. Select the ( ) No locked data radio button to disable Data Locking and release all data for the current Facility. To Lock Data prior to a specified date, select the ( ) Locked prior to date: radio button and enter a date or press the [...] popup button to choose a date from a Calendar. NOTE: The use of Relative Dates is supported in the Locked Data feature. Using the Relative Date option will provide the facility with the ability to automatically lock data based on an entry relative to the current date. Example: -60d (or -60) will allow the database to lock data for the selected Facility 60 days prior to the current date. To Lock All Data for the current Facility, select the ( ) Lock all data radio button. Click the 15.6 [OK] button to make the changes for the current Facility. Import Utility Import Utility The Operator10 - Wastewater Import Utility (ImportUtility.exe) allows seamless integration of data from other application into the Operator10 - Wastewater database, and may be used to import data to multiple Facilities. The utility must be run from the directory where the Operator10 - Wastewater Application (Operator10.exe) is located. It runs transparently, and can be run without interaction from the user. Basic information and all errors are recorded in the "Import.log" file. Default Usage The following information relates to the default usage of the ImportUtility.exe application: The data import file must named using the following file extension .imp © 2014 AllMax Software, Inc. 512 Operator10 Help The data import file must be stored in the Database directory The notes import file must be named using the following file extension .impnote The notes import file must be stored in the Database directory Custom Usage To make use of custom settings, edit the Database Properties for Import Settings. The following information is provided in order to customize the usage of the ImportUtility.exe application: Import files path: - the path used by the ImportUtility to find and access files for importing; set this path by clicking the [...] button Extension for import data files: - the custom file extension used by the ImportUtility to seek out data import files (Examples: .txt, .csv, .imp, etc.) Extension for import notes files: - the custom file extension used by the ImportUtility to seek out notes import files (Examples: .note, .notes, .impnote, etc.) The ImportUtility will read through the default database directory or the defined custom directory and process all files matching the .imp/.impnote (default) or userdefined file extensions. Users will now benefit from the ability to process multiple incoming files from LIMS, SCADA, Historian and other exported data files. Data Import - File Structure Each line in the data file must either be: Blank A comment, beginning with a semicolon ( ; ) or tab A data line consisting of: A Date A space and a Time (optional) A comma (,) or tab A Facility ID A comma (,) or tab A Location A comma (,) or tab A Parameter A comma (,) or tab A Data value optionally, if the Data value is numeric: A comma (,) or tab A DataType number (See the Data help topic for more information about data types and equivalent values.) © 2014 AllMax Software, Inc. Utilities 513 NOTES: - There should be NO spaces before or after commas. - Imported data fields may be enclosed in double (") or single (') quotes. - All portions of the line must be valid in order for the import to succeed. - The Date may be in any of the supported OP10 date formats. - The Data value may be a numeric value, or a Less Than, Greater Than, Alpha Code, etc. Example #1: The following line: 09/01/00,001,Plant If,Flow MGD,1.600 imports a numeric daily data value of 1.6 into the Facility referenced as '001', using Location 'Plant If' and Parameter 'Flow MGD'. Example #2: The following line: 09/01/00 10:00,001,Plant If,Flow MGD,1.600 imports a numeric hourly data value of 1.6 into the Facility referenced as '001', using Location 'Plant If' and Parameter 'Flow MGD'. Example #3: The following line: 09/01/00,001,Plant Ef,BOD,2,2 imports a numeric daily data value of <2 (data type = '2', or less-than) into the Facility referenced as '001', using Location 'Plant Ef' and Parameter 'Flow MGD'. (See the Data help topic for more information about data types and equivalent values.) Sampling Events Data Sampling Events data can be imported using the ImportUtility.exe application. For more information, please see the following help topic: Import Sampling Events Data. Data Notes Import - File Structure A secondary data file named "OP10Note.impnote" may be imported into the Operator Notes database as Data Notes (QuickNotes). It must also reside in the License directory. Each line in the note file must either be: Blank A comment, beginning with a semicolon ( ; ) or tab A data line consisting of: © 2014 AllMax Software, Inc. 514 Operator10 Help A Date A comma (,) or tab A Facility ID A comma (,) or tab A Location A comma (,) or tab A Parameter A comma (,) or tab A Note (1 through 2000 characters) NOTE: - Use a backslash character "\" to represent any ends of lines within the Note field. - Imported data fields may be enclosed in double (") or single (') quotes. Use quotes to enclosed notes which contain commas (,) in order to allow for proper import into database. Non-enclosed notes containing commas will cause the import utility to fail for the entered notes. Example #1: The following line: 09/01/00,001,Plant If,Flow MGD,"This is a data note.\This is a new line in my data note. imports a quick note into the database for the Facility referenced as '001', using Location 'Plant If' and Parameter 'Flow MGD'. ImportUtility.exe Usage The Operator10 Import Utility must be aware of the server and database to which the user will be importing data. This information can be provided in several ways. Manually: When running ImportUtility.exe as an application, i.e. double-clicking the application file ImportUtility.exe, a prompt for the Database/Facility window will appear and users are requried to select a server and database from this window. The utility will then begin the import. Command line: When creating a shortcut or running the import from a command line prompt, users may include the server and database in the command line as follows: C:\AllMaxWater\Application\ImportUtility.exe "localhost,WATER" In the above example the command-line parameters of localhost (server name) and WATER (database name) are provided to ensure correct import. via Scheduling: When using the Scheduled Import option (Tools ribbon/menu, Import/Export Data group, Schedule Imports button), server and database information is automatically included when the import is scheduled. © 2014 AllMax Software, Inc. Utilities 515 Automatically: When a user calls the ImportUtility from within a running Operator10 application, the program is aware of the current database and server on which the database is located. Call the Import Utility from the Tools ribbon/ menu, Import/Export Data group, Import Now button. Browse for Import File(s): Users may process one file at a time as desired utilizing the Import Browse functionality. Go to the Tools ribbon/menu, choose Import/Export Data group, and choose Browse for Import File(s) to browse for selected file(s) for import into the database. NOTE: Import Browse will allow users to select files matching the defined (or default) file extensions as found in the Database Properties section. 15.6.1 Import Sampling Events Data Import Sampling Events Data The ImportUtility.exe application can be used to import data into the Sampling Events sections of the database. Data can be imported for the Sampling Event Location and Parameter sections respectively. Importing Sampling Events data makes use of the data import process with some adjustments to each line to be imported. See the Import Utility help topic for information on Default Usage and Custom Usage of the data import process. Data Import - File Structure Importing data as Sampling Events data requires each line to be slightly modified. The following information is provided as a guide to correctly import Sampling Events data. Import Sampling Event Location Data (top-level grid of Sampling Events section) Each line in the data file must either be: Blank A comment, beginning with a semicolon ( ; ) or tab A data line consisting of: A Date A space and a Time (optional) A comma (,) or tab A Facility ID A comma (,) or tab A Location A comma (,) or tab A Parameter field of '' (NOTE: Parameter must be left empty AND the field be enclosed using single-quote ('')) A comma (,) or tab A Sampling Event value A comma (,) or tab © 2014 AllMax Software, Inc. 516 Operator10 Help Sampling Event field name containing one of the following phrases: COCNum Employee SampleType SampleNum SamplerNum CollectMeth LabCert SampTime Duration Status Comments CollPhone PwsIDNum FacCode SampPointID SampLocType Import Sampling Event Parameter Data (lower-level grid of Sampling Events section) Each line in the data file must either be: Blank A comment, beginning with a semicolon ( ; ) or tab A data line consisting of: A Date A space and a Time (optional) A comma (,) or tab A Facility ID A comma (,) or tab A Location A comma (,) or tab A Parameter A comma (,) or tab A Sampling Event value A comma (,) or tab Sampling Event field name containing one of the following phrases: MethodNum BottleNum PreviousNum © 2014 AllMax Software, Inc. Utilities 517 Special AnalCompDate AnalystNumber Comments DataQuality DataQualReas DataQualReslt AnalStartDate AnalStartTime AnalCompTime RunNum BasisCode QACode PriorityReview QCDate AnalyteCode AnalyticalLab NOTES: - Field names are taken verbatim from the field names as given in the database. For more information contact Technical Support at 800-670-1867. - There should be NO spaces before or after commas. - Imported data fields may be enclosed in double (") or single (') quotes. - All portions of the line must be valid in order for the import to succeed. Example #1: The following lines: 09/01/00,001,Downstream,'',001-892111,COCNum 09/01/00,001,Downstream,'',BGS,Employee 09/01/00,001,Downstream,'',Grab,SampleType 09/01/00,001,Downstream,'',Grab,CollectMeth 09/01/00,001,Downstream,'',08:05,SampTime 09/01/00,001,Downstream,pH,441-B,MethodNum 09/01/00,001,Downstream,pH,09/01/00,AnalStartDate 09/01/00,001,Downstream,pH,10:00,AnalStartTime 09/01/00,001,Downstream,pH,No,Special 09/01/00,001,Downstream,pH,0023,BottleNum 09/01/00,001,Downstream,pH,No,PriorityReview import several results into the Sampling Events section of the database for Location-level and Parameter-level data. © 2014 AllMax Software, Inc. 518 15.7 Operator10 Help Export Data Utility Export Data Utility The Export Data Utility allows users to create a simple export file, suitable for importing into Operator10 - Wastewater databases. The export file is created as an ASCII text, comma-separated values file. The file format is defined in more detail in the Import Utility help topic, see Import Utility for more information. Create Export File To begin creating an export file, go to the Tools ribbon/menu. Choose the [Export Data] button to begin. In the Location:Parameter list that opens, select Location:Parameters (as single or in multiple) and click the [OK] button. Enter or select a date range from the Calendar dialog that opens, and click [OK]. The Export Data Utility will process the information provided and create a data export file in the database directory. NOTE: The path to the database directory is able to be found using the Help | About dialog. The name of the export file will be named as follows: OP10Export_[date_of_export].exp The export file can be opened with any text editor, such as Notepad, and modified if necessary. 15.8 Calculator Tool Calculator Tool The Calculator Tool allows users to perform evaluation of formulas, functions and other mathematical calculations prior to writing data to the database or attaching the formula to a Location:Parameter. © 2014 AllMax Software, Inc. Utilities 519 The Calculator Tool provides an area in which users can test possible formulas, functions and other mathematical calculations. Accessing the Calculator Tool To access the Calculator Tool, go to the Main Application window and find the Tools ribbon/menu. In the Tools ribbon, click the Calculator Tool. [Calculator] button to open the For more information about usage, see the Formula List topic. 15.9 Operator10 Tools Operator10 Tools Several calculator-style Tools are available. In the main application, go to the Tools © 2014 AllMax Software, Inc. 520 Operator10 Help ribbon/menu, select group. [Tools, Calculators, and Converters] from the Useful Tools Available tools, calculators and converters are presented on the left side of the window in the tree. Select from the available options and review necessary data/information on the right side of the window. Enter appropriate information where required or press [...] to select information using PickList and/or Calendar dialogs. Calculated results are immediately shown. NOTE: Functions may be used in numeric entries: e.g. "10+(3*2.2)" may be entered in place of "16.6". Available tools include: Units Conversion Concentration x Time (CT) Lime/Soda Mineralization Residual Area/Volume Percent Solutions Flow Estimate Loading OPC/DDE © 2014 AllMax Software, Inc. Index Index + --- 430 -&& 389 101, 394 -== 390 ->101, 390 -1- 430 1/x -..45359 < > -** 425 -<- 433 - %% -+- 395 -[[F:L:P] 387 [L:P] 387 428 -33.7853 395 3320 298 3D View Properties -4- -^- 4-Day Average ^ -5- 432 -|| 229 123 5-Year Forecast Report 5-Yr Forecast 268 268 395 -~~ 101, 443 ~CALC_LP 387 -77-day 413, 492, 493, 495 7-Day Average 124 -88.34 © 2014 AllMax Software, Inc. 395 521 522 Operator10 Help -990 degree Weir 452 -AAbout 23, 328, 361 ABS() 425 Absolute Value 425 Accrue 435 ACCRUE() 435 ACCUM() 471 Accumulate 435, 471 ACODE() 436 ACOS() 473 Add 30, 416, 417, 425, 434 Add Alpha Code 116 Add Alpha Codes 116 Add Chemical 118 Add Container 157 Add Data 98 Add DataView 170 Add Formula 109 Add Formulas 109 Add Limits 145 Add Link 342 Add Location 86 Add Location:Parameter 95 Add LP 95 Add new 30 Add Owner 144 Add Page 155 Add Parameter 90 Add Process 102 Add Report 242 Add Sampling Event 333 Add similar 30 Add Similar Limit 145 Add Similar Location 86 Add Similar Parameter 90 Add Similar Site 139 Add Site 139 Add Site Owner 144 Add special 30 Add() 425 Addition 425, 434 Admin Security 42 Administrator 42 After 401, 403, 405, 418, 459 All Functions 375, 380 AllMax Data Definition 344 AllMax Folder 358 AllMax Folder Software 356 Alpha 436 Alpha Code 100, 116, 386, 391, 436, 437, 451 Alpha Code List 116 ALPHA() 436 And 389 AND() 389 Angled Weir 452 Annual 500 Applicaiton List 149 Application 149, 364 Application Report 311 Application Values 151 Apply 436 APPLY() 436 Arccosine 473 Arcsine 474 Arctangent 474 Area 519 Arithmetic Mean 125 ASIN() 474 Assign 437 ASSIGN() 437 ATAN() 474 Audit Trail 49, 57 Automatic Scale 231 Available Nitrogen 151 Average 125, 126, 398, 399, 401, 402, 414, 418, 422, 425, 453, 457, 461, 472, 477, 482, 486, 492, 496, 497, 501 Average Percent Reduction 461 Average Percent Removal 461 Averages 123, 124, 125, 126, 127 Avg 398, 402, 414, 425, 453, 457, 472, 477, 482, 486, 492, 496, 497, 501 AVG() 425 A-Z 380 -BBackground 165 Background Image 165 © 2014 AllMax Software, Inc. Index Backup 503 Backup Schedule 505 Barcode 119 Barcode Label 119 Barcode Name 121 Barcode Template Name 121 BarCodes 369, 371 Base 438, 443 Before 401, 402, 403, 418, 459 BIN() 438 Binary 438, 443 BioSolid 136 BioSolid Application 149 BioSolid Application List Report 311 BioSolid Application User Values 151 BioSolid Available Nitrogen 151 BioSolid Limit Report 322 BioSolid Limits 145 BioSolid List 136 BioSolid Nutrient Report 316 BioSolid Owner 144 BioSolid Owner List 144 BioSolid Site 139 BioSolid Site Detail 142 BioSolids 136, 149 BioSolids List 136 BioSolids Nutrient 148 BioSolids Nutrients 148 BioSolids Ribbon 62 BioSolids Sites 139 BioSolids Units 75 Bit mask 390 BIT() 390 Blank 386, 391, 395, 396, 431, 451, 466 BLANK() 395, 396 Block Summary 209 Boolean 389, 390, 391, 392, 393, 394, 395, 446, 449 Boolean Functions 389 Branching 390, 446, 449 -CCake 136 Cake BioSolid 136 Calculate 121, 509 Calculate Now 121 Calculate Utility 509 © 2014 AllMax Software, Inc. Calculation 121 Calculation Constants 75 Calculation Order 121 Calculation Parameters 75 Calculation Schedule 505 Calculations 519 Calculator Tool 518 Calendar 47, 220, 256, 361 Calendar Quarter 472 Calendar Year 497, 498 Carryover 500 Change 398, 399, 400, 401, 405, 420, 454 Change Facility 57 Chapter 94 268 Characters 436, 451 Chemical 118 Chemical List 118 Chemicals 118 Cipolletti Weir 452 Citect 347 CJP 486 Client 19 Client/Server 19 Close Graph 224 Coefficient 406, 462 Column Header 198 Commands 372 Comment 368 Comments 202, 257, 337 Compare 398, 454 Compliance Judgement Point 486 Concentraion x Time 440 Concentration Units 75 Concentration x Time 438, 439, 445 Conditional 390, 446, 449 Conduit 364 Confidence Interval 406, 462 Config 23 Configuration 23 Configuration File 23 Constant 396 Constants 226, 395, 438, 440, 443, 449 Constants Editor 226 Contact 26 Contact Time 438, 439, 440, 445 Container Page 155 Containers 157, 159, 161, 163 Contents 17 523 524 Operator10 Help Contracted Weir 452 Control L:P 415 Converions 519 Conversion 438, 440, 443 Convert 438, 440, 443 Copy 373 Copy As 230 Copy As Bitmap 230 Copy As Data 230 Copy As Metafile 230 Copy Graph 230 Copyright 28 Correlation 406, 462 COS() 474 Cosecant 474 Cosine 473, 474 Cost 118 Count 398, 425, 446, 449, 454, 478, 480, 498 COUNT() 425 Covariance 406, 462 Create Calculation Parameters 139 Create Calculations 104 Create DataView 170 Create New View 153 Create Process Calculations 104, 107 Credits 26 CSC() 474 CT 438, 439, 440, 445, 519 CT() 438 CTI() 439 CTR() 440 Custom Report 259 Custom Report from DataView 259 Custom Report from DV 259 Custom Reports 259 Custom Tools 67 Cut 373 CVT() 440 CYL() 442 Cylinder 442 -DD_AVG() 398 D_COMP() 398 D_COUNT() 398 D_FLOW() 399 D_FWA() 399 D_GAUGE() 399 D_GMENA() 400 D_IGAUGE() 400 D_IMTR() 401 D_INTER() 401 D_LAST() 402 D_LASTN() 402 D_LASTNM() 402 D_LASTNN() 403 D_LASTNP() 403 D_LOADING() 404 D_MAX() 404 D_METER() 405 D_MIN() 405 D_NEXT() 405 D_STAT() 406 D_STDEV() 407 D_SUM() 408 D_TOTAL() 408 D_VAL() 408 Daily 398, 399, 400, 401, 402, 403, 404, 405, 406, 407, 408, 446, 447 Daily Data Functions 397 Daily DataViews 168 Daily Values DataView 173 Dashboard 153, 154, 155, 157, 159, 161, 163 Dashboard Ribbon 58 Data 98, 99, 100, 101, 172, 386, 391, 392, 437, 451 Data Comments 202 Data Containers 157 Data Entry 172, 362, 366, 370 Data Export 205 Data Functions 375, 397, 413, 452, 471, 472, 475, 492 Data Note 368 Data Notes 202, 337 Data Permissions 45 Data Type 447, 451, 466 Data Types 451 Data Value 100 Data Window 235 Database 68, 73 Database Backup 503 Database Properties 75 Database Security 42 Database Structure 73 Database Timeout 75 Database Utilities 79, 80, 81 © 2014 AllMax Software, Inc. Index DataPort 119, 355, 356, 357, 361, 364, 366 DataPort Application 364 DataPort Setup 356 DataPort Sync 355 DataView 168, 169, 170, 171, 172, 173, 174, 175, 180, 182, 189 DataView Application 189 DataView Block Summary 209 DataView Column 182 DataView Column Header 198 DataView Column Icons 199 DataView Column Properties 182 DataView Column Setup 180 DataView Columns 172, 180 DataView Data Entry 172 DataView Data Export 205 DataView Edit Ribbon 193 DataView File Menu 190 DataView Find Data 201 DataView Freeze Column 207 DataView Group Header 198 DataView Home Ribbon 191 DataView Icons 199 DataView Import 204 DataView Keyboard Shortcuts 196 DataView List 169 DataView Logged Documents 131 DataView Name 171 DataView Properties 177 DataView Right-Click Menu 207 DataView Tools Ribbon 195 DataView Window Ribbon 196 DataViews 168, 169, 170 Date 47, 101, 256, 361, 366, 386, 392, 409, 410, 411, 412, 413, 451, 455 Date Data 101 Date Functions 409 Date Reported 253 DATE() 409, 455 Day 409, 411 Day of Month 410 Day of Week 410 Day of Year 411 Days in Month 411 DDE 340, 341, 342, 343, 467 DDE Client 340 DDE Link 342 DDE Link Name 344 © 2014 AllMax Software, Inc. DDE Linking 467, 468, 469 DDE Server 340, 345 DDE() 467 DDE_P() 468 DDE_X() 469 Decay 500 Decimal 432, 433, 434 Default 426, 427 DEFAULT() 426 Delete 30, 370 Delete Chemical 118 Delete Database 72 Delete DataView 171 Delete Facility 72 Delete Formula 111 Delete Formulas 111 Delete Location 87 Delete Location:Parameter 96 Delete LP 96 Delete Parameter 91 Delete Process 102 Delete Sampling Event 334 Delta 398, 454 Deviation 407, 422, 464 Difference 398, 454 Digits 432, 433, 434 Direct Access 240 Discharge Monitoring Report 298 Disinfection 438, 439, 440, 445 DIST() 426 Distribution 426 DIV() 426 Divide 416, 417, 426 Division 426 DMR 298 DMR 3320 298 DOM() 410 DOW() 410 DOY() 411 DP 355 Duration 102, 481 DV 168 DV Column Properties 182 DV Columns 172 DV Display Options 177 DV Format 177 DV Properties 177 DVAL() 411 525 526 Operator10 Help DVs 168 Dynamic Data Exchange 340 Dynamic Data Exchange (DDE) 467 -Ee 395 e^x 426 E_SUM() 476 Earlier 401, 402, 403, 418 Edit 30, 40, 373 Edit Label 119 Edit Link 342 Edit multiple 30 Edit Process 102 eDV 211 eDV Viewer 211 Electronic DataView 211 Email 57 Enabled 344 English 440 Entering Data 362, 366 Equal 390 EQUAL() 390 Equality 390 Even-Biased Rounding 126, 433 Exceed 476 Excel 347, 467, 468, 469 Exceptions 257 Exclusive Or 395 Execute 469 Exit 57 EXP() 426 Exponential 426, 432 Export 30, 364, 468, 470 Export Data Utility 518 Export Facility 504 Export L:Ps 355 Export Location:Parameters 355 -FFAC() Facility Facility Facility Facility 443 83, 223, 366, 368, 443 Export 504 Import 504 Security 43 Facility:Location:Parameter 387 FACT() 427 Factorial 427 FALSE 395 Fecal 392 Fecal Parameters 75 Federal DMR 298 File Menu 57 Filtering 38 Find 30, 368, 427 First 405, 427 FIRST() 427 Flow 392, 399, 452 Flow Estimate 519 Flow Parameters 75 Flow-Weighted Average 125, 399 Follow 401, 405, 418 Fonts 231 Form Date 253 Formatting Options 177 Formula 108, 109, 111, 113, 443 FORMULA() 443 Formulas 108, 111, 113 FRAC() 427 Fraction 427 Fractional 427 Freeze 36 Freeze Column 207 Frequency 257 Full Custom Report 259 Functions 108, 375, 389, 397, 409, 413, 424, 434, 452, 467, 471, 473, 475, 492, 496 Future 401, 405, 418 FWA 399 -GGauge 399, 400 Gauge Containers 161 Gauge Reading 399, 400 General Properties 75, 228 Geo Mean 126 Geometric Mean 126, 400, 418, 456 Geometric Mean Type 75 gmean 418 Graffiti 362, 372 Graph 217 Graph 3D View Properties 229 © 2014 AllMax Software, Inc. Index Graph Balloons 222 Graph Constants 226 Graph Containers 159 Graph Data 218 Graph Data Range 222 Graph Data Source 218 Graph Data Type 222 Graph Data Window 235 Graph Date 220 Graph Date Range 220 Graph Display Zoom 236 Graph Facility 223 Graph Fonts 231 Graph General Properties 228 Graph Help About 237 Graph Legends 232 Graph Limits 227 Graph List 217, 218 Graph Logged Documents 133 Graph Main Toolbar 238 Graph Palette Bar 237 Graph Pattern Bar 237 Graph Properties 228 Graph Scale 231 Graph Scale Properties 229 Graph Series Properties 228 Graph Titles 230 Graph Tools 222 Graph Type 221 Graph X Legend Gap 234 Graphing 217 Graphs 217 Greater Than 101, 386, 390, 392, 447, 451, 466 Greater Than Data 101 Greatest 403, 459 Grid 30 Grid Columns 36 Grid Print 40 Grid Toolbar 30 Group 30 Group Header 198 Grouping 30, 38 Groups 375 Growth 398, 454 GT() 390 © 2014 AllMax Software, Inc. 527 -HH_AVG() 414 H_CALC() 415 H_COMB() 416 H_COUNT() 416 H_FUNC() 417 H_GMEAN() 418 H_INTER() 418 H_MAX() 419 H_MED() 419 H_METER() 420 H_MIN() 421 H_PRTPWR() 421 H_STD() 422 H_SUM() 423 H_VAL() 423 Header/Footer 188 Help 23, 362, 373 Help | About 328 Help About 237 Help File Conventions 27 Help Ribbon 66 HEX() 443 Hexadecimal 443 Hide Column 36 Highest 403, 459 HLIME() 444 Hotspot Options 165 HotSpots 155 HotSync 355, 364 Hour 372, 394 Hourly 393, 414, 415, 416, 417, 418, 419, 420, 421, 422, 423, 455, 466, 481 Hourly Calculation 415 Hourly Data Functions 413 Hourly DataViews 168 Hourly Values 331 Hourly Values DataView 174 -IIcons 251 IDIST() 427 If 390, 446, 449 IF() 390 528 Operator10 Help iFix 347 Import 467, 469 Import Data Utility 511 Import DataView Data 204 Import Facility 504 Import Schedule 505 Import Settings 75 Import/Export Facility 504 In Service 106 Include 444 Include in Scheduler 75 INCLUDE() 444 Increase 398, 454 Install 19, 357, 364 Install DataPort Software 357 Installation Guide 19 INT() 428 Integer 428 Intellution 347 INTER() 428 Intercept 406, 462 Interface 340 Internal Calculations 113 Internal Formula 108 Internal Formulas 108, 113 Interpolate 400, 401, 418, 428 Interpolated 428 InTouch 347 INV() 428 Inverse 428 Inversion 428 ISALPHA() 391 ISBLANK() 391 ISDATE() 392 ISFECAL() 392 ISFLOW() 392 ISGREAT() 392 ISHR() 393 ISLESS() 393 ISLP() 393 ISND() 394 ISTIME() 394 Item 345 -JJulian 409, 411 -KKey 366 Keyboard Control 196 Keyboard Shortcuts 196 Keycode 22 KeyPad 366 -LL&L 247 L:P 92 L:P Permissions 45 Land Application 149 Last 401, 402, 403, 418 Later 401, 405, 418 Least 403, 459 Legend Box Size 234 Legends 232 Length of Month 411 Length of Year 411 Less Than 101, 386, 393, 394, 437, 447, 451, 466 Less Than Data 101 Level 399, 400 LI 438, 440 LI() 445 License 22 License Database 22 Lime 444, 448 Lime-Soda 444, 448, 450 Limit 428, 434, 448, 449, 475, 476, 477, 478, 480, 481, 482, 484, 485, 486, 487, 489, 490, 491 Limit Report 287, 322 LIMIT() 428 Limits 227 Limits Editor 227 Linear Regression 222, 406, 462 Link 344 Link Data 344 Link Examples 347 Link Schedule 346 Link Server Definition 345 Linking 467, 468, 469, 470 Links 342 Liquid 136 Liquid BioSolid 136 © 2014 AllMax Software, Inc. Index List 368 List and Label 247 LN() 429 Loading 107, 404 Loadings 107 Location 84, 86, 87, 366, 368, 387, 393 Location:Parameter 92, 95, 96, 364, 368, 387, 392, 393 Location:Parameters 172, 180 Lock and Load 247 Lock Data 510 Locked Data 510 Log 350, 429 Log Document 129 Log File 350 Log Inactivation 438, 440, 445 LOG() 429 LOG_REM() 429 Logarithm 429 Logarithm Removal 429 Logarithmic Mean 400, 456 Logged Docs 127, 129, 131, 132, 133 Logged Document 127, 129, 131, 132, 133 Logged Document List 127, 129, 131, 132, 133 Logged Documents 75, 127, 129, 131, 132, 133, 256 Logged Documents Options 75 Login 51 LOM() 411 Look Up 446, 449 LOOK() 446 Lower Limit 287 Lowest 403, 459 LOY() 411 LP 92, 95, 96, 180 LP() 387 LPs 172 LT() 394 -MM_AVG() 453 M_COMP() 454 M_COUNT() 454 M_COUNTH() 455 M_DATE() 455 M_GMEAN() 456 M_MAX() 456 © 2014 AllMax Software, Inc. 529 M_MED() 457 M_MIN() 458 M_NTH() 459 M_PCT() 460 M_REM() 461 M_STAT() 462 M_STDEV() 464 M_SUM() 464 M_SUM2() 465 M_SUMH() 466 M_TOTAL() 466 M_TYPE() 466 Main Window 366 Market Value 148 Mass Balance 281 Mass Balance Report 281 Mathematical Functions 424 Max 403, 404, 416, 417, 419, 430, 456, 459, 484, 486, 487, 489, 493, 498, 499 MAX() 430 Maximum 403, 404, 416, 417, 419, 430, 456, 459, 484, 486, 487, 489, 493, 498, 499 Mean 125, 126, 400, 418, 425, 453, 456, 492, 496, 497 Med 419 Median 402, 419, 457 Menu Bar 358, 367 Meter 401, 405, 420 Meter Reading 401, 405, 420 Metric 440 Middle 402, 419, 457 Min 403, 405, 416, 417, 421, 430, 458, 459, 482, 485, 490, 491, 495, 499, 500 MIN() 430 Mineralization 500, 519 Minimum 403, 405, 416, 421, 430, 458, 459, 482, 485, 490, 491, 495, 499, 500 Minimumax 417 Minus 398, 433, 454 Minute 394 Miscellaneous 446 Miscellaneous Functions 434 MOD() 430 Modulus 430 Month 409, 411 Month of Year 412 Monthly 446, 447, 453, 454, 455, 456, 457, 458, 459, 460, 461, 462, 464, 465, 466, 476, 496, 497, 499, 500, 501 530 Operator10 Help Monthly Average 461 Monthly Data Functions 452 MOY() 412 MUL() 430 Multi-Edit 30, 40 Multiple Data Values 331 Multiple Violations 481 Multiplication 430 Multiply 416, 417, 430 Multi-Year Summary Report 275 -NNatural Logarithm 429 Navigate 30 Navigation 30, 155 Navigation Containers 163 Nested If 390 NetDDE 353 New Database 69 New DataView 170 New Event 330 New Facility 71 New Graph 224 New Label 119 New Process 102 New Report Availability 244 New Sampling Event 333 New User 42 New View 153 Next 401, 405, 418 No data 396 Node 345 Nonblank 426, 427 Non-Blank 431 NONBLANK() 431 Non-Detect 101, 386, 394, 447, 451, 466 Non-Detect Data 101 Non-Zero 431 NONZERO() 431 Normal Distribution 426 Not 394 NOT() 394 Note 368, 386, 446, 451 NOTE() 446 Notes 337 NOW 395 nth 403, 446, 449, 459 Number 398, 416, 425, 454, 478, 480, 498 Numbers 366 Numeric 386, 451 Numeric Data 100 Nutrient List 148 Nutrient Report 316 -OOLE for Process Control 340 OLE for Process Control (OPC) 467 ONCE() 446 ONCEW() 447 OPC 340, 341, 342, 343, 467 OPC Client 340 OPC Link 342 OPC Link Name 344 OPC Linking 469, 470 OPC Server 345 OPC() 469 OPC/DDE 340, 341, 342, 343, 344, 345, 346, 347, 348, 350, 351 OPC/DDE Error 350 OPC/DDE Error Codes 350 OPC/DDE Errors 350 OPC/DDE Functions 467 OPC/DDE Links 342 OPC/DDE Log 350 OPC/DDE Server 351 OPC/DDE Server Functionality 351 OPC/DDE Setup 342, 348 OPC_W() 470 Open Database 57 Open Graph 224 Operator Log 337 Operator Notes 337 Operator10 Agent 505 Operator10 Help 57 Operator10 Options 67 Operator10 Tools 519 Operators Log 337 Option 447 OPTION() 447 Options 57, 67, 165 Or 395 OR() 395 Out of Service 106 Owner 144 © 2014 AllMax Software, Inc. Index Owner List 144 -PPage 155, 165 Page Features 155 Page Options 165 Pages 154, 155 Palette Bar 237 Parameter 88, 90, 91, 366, 368, 387, 392, 393 Part 402 Particle Power 421 Particles 421 Past 401, 402, 403, 418 Paste 373 Pattern Bar 237 PCT_REM() 431 Pennsylvania Chapter 94 268 Percent 461 Percent Reduction 461 Percent Removal 431, 461 Percent Strength 118 Percentile 403, 460 Period 480 Pervasive 82 Pervasive Database 19, 82 Pervasive Database Engine 82 pi 395 PickList 30, 242, 368 Plant Available Nitrogen 151 Poke 468 Population Standard Deviation 127 Popup KeyPad 366 Positive 425 Power 432 PRE_LMT() 448 PREC() 431 Precision 431 Preferences 358, 369 PreTreatment 448 Previous 401, 402, 403, 418 Print 30, 40, 225, 240 Print Barcode 119 Print Graph 225 Print Grid 40 Print Label 119 Print Preview 253 Print Properties 184, 185, 187, 188 © 2014 AllMax Software, Inc. Print Properties Footer 188 Print Properties Header 188 Print Properties Margin 187 Print Properties Options 184 Print Properties Page 185 Print Report 252 Print Sampling Event 335 Prior 401, 402, 403, 418 Process 106, 471, 472 Process Control 102, 104 Process Create Calculations 107 Process Section Data Functions 471 Process Section History 106 Process Setup 104 Properties 240, 245 PSQL 82 PWR() 432 -QQ_CSUM() 472 Q_SUM() 473 QLIME() 448 Quarterly 472, 473 Quarterly Data Functions 472 Quick Access 56 Quick Access Toolbar 56 Quick Note 368 Quick Notes 202, 337 -RRAND() 432 Random 432 Range 449, 455 RANGE() 449 Rank 402, 403, 457, 459, 460 Rebuild Tables 80 Recent 402 Rectangular Weir 452 Reduction 461 Refresh 227 Refresh Graph 227 Registry 81 Registry Entries 81 Regression 406, 440, 445, 462 Relative Dates 48 531 532 Operator10 Help Remainder 427, 430 Remarks 257 Removal 107, 429, 431, 461 Removals 107 Remove Link 342 Remove Record 370 Rename 30, 79, 240, 245 Rename Facility 79 Rename Facility Directory 79 Rename Formula 79 Rename Location 79 Rename Location:Parameter 79 Rename LP 79 Rename Report 245 Report Calcs 246 Report Calculation 246 Report Date 253, 255 Report Folder 242, 250 Report Folder Icons 251 Report Folders 250 Report Guidance 250 Report Guidance Documents 250 Report Logged Documents 132 Report Name 245 Report Prep 240 Report Preparation 252 Report Preperation 240 Report Print Date 253 Report Properties 245 Report Setup 245 Report Types 258 Report Verification 257 Reporting 240, 242, 244, 245, 246, 250, 251, 252, 253, 255, 256, 257, 258, 259, 268, 275, 281, 287, 292, 298, 311, 316, 322, 328 Reset Column 182 Reset DataView Column 182 Reset DV Column 182 Residual 500 Results 98, 331 Review Data 99, 370 Right-click 38 Right-Click Menu 207 Root 433 Round 431, 432, 433, 434 ROUND() 432 ROUNDE() 433 Rounding 431, 432, 433, 434 Rounding Rule Rounding Rules RSLinx 347 75 126 -SS_AVG() 472 S_SUM() 472 Sample Database 69 Sample Standard Deviation 127 Sampling Event 330, 331, 334, 335 Sampling Event Detail 331 Sampling Event List 330 Sampling Events 330, 331 Sampling Point 448 Save 224, 437 Save As 224 Save Data 366 Save Graph 224 SCADA 340, 469 Scale Properties 229 Scanner 366, 369, 371 Scanner Preferences 369 Scanning 369, 371 Schedule Backup 503 Seats 22 SEC() 475 Secant 475 Section 471, 472 Section Data Functions 471 Section History 106 Security 41, 57, 359 Select 368 Select All 373 Series Legend Box Size 234 Series Properties 228 Server 19, 345 Service 505 Service Agent 505 Service Setup 57 Set Variables 395 Setting Variables 449 Setup 57, 245, 342, 348, 364 Setup Ribbon 61 SETVAR() 395, 449 Shortcuts 367, 372 Show Column 36 Show/Hide 36 © 2014 AllMax Software, Inc. Index Significant Digits 431 Significant Non Compliance 486, 487, 489, 490, 491 SIN() 475 Sine 474, 475 Site Detail 142 Site Limits 145 Site Owner 144 Sites 139 Slope 406, 462 SNC 486, 487, 489, 490, 491 SNC_CJP() 486 SNC_MAXD() 487 SNC_MAXM() 489 SNC_MIND() 490 SNC_MINM() 491 Soda Ash 450 SODA() 450 Softening 444, 448, 450 Sort 402, 403, 457, 459, 460 Sorting 38 Specific Gravity 118 SQRT() 433 Square Root 433 Squares 406, 462 Standard Deviation 127, 407, 422, 464 Standard Deviation Type 75 Standard Location 87 Standard Location Name 87 Standard Normal Distribution 426 Standard Rounding 126 Start DDE 343 Start OPC 343 Statistics 406, 462 Stock Parameter 91 Stock Parameter Name 91 Stop DDE 343 Stop OPC 343 Sub 398, 416, 417, 433, 454 SUB() 433 Subtract 398, 416, 417, 433, 454 Subtraction 433 Sum 406, 408, 416, 423, 434, 435, 462, 464, 465, 466, 472, 473, 476, 498, 500, 501 SUM() 434 Summary DataViews 168 Summary Values DataView 175 Support 26 Support Menu 27 © 2014 AllMax Software, Inc. 533 Support Ribbon 65 Suppressed Weir 452 System Properties 26 -TTable Properties 80 TAN() 475 Tangent 474, 475 Tank 399, 400 Technical Support 26 Text 446 Then 390, 446, 449 Time 49, 102, 366, 372, 386, 394, 451 Time Data 102 Time of Day 102 Tips 373 Titles 230 Toolbar 238 Tools 30 Tools Ribbon 63 Topic 345 Total 408, 423, 434, 435, 464, 465, 466, 472, 473, 476, 498, 500, 501 Trapezoidal Weir 452 Trigonometric 473, 474 Trigonometry 473, 475 Trigonometry Functions 473 TRUE 395 True/False Functions 389 TRUNC() 434 Truncate 432, 433, 434 Truncated Rounding 126 Type 257, 386, 447, 451, 455, 466 TYPE() 451 -UUndo 373 Unfreeze 36 Units 440 Units Conversion 519 Updates 19 Upper Limit 287 Usage 399, 400 Use Whole Periods 179 User Defined Parameters 139 534 Operator10 Help User Facility Security 43 User Groups 45 User Security 41, 42 User Security Groups 45 User Values 151 -VV_AVG() 477 V_CNT() 478 V_CNTP() 480 V_DLY() 481 V_DLYM() 481 V_MAV() 482 V_MAX() 484 V_MIN() 485 VAL() 451 Valid 391, 392, 393 Valid Location:Parameter 393 Value 408, 423, 451 Values 98, 395 Var 395 Variable 347 Variables 395, 449 Variance 406, 462 Verify 428, 434 VERIFY() 434 Version 361 View 347 View List 154 View Name 154 View Ribbon 59 Views 153 Violation 287, 428, 434, 476, 477, 478, 480, 481, 482, 484, 485, 487, 489, 490, 491 Violation Data Functions 475 Volume 442, 519 V-shaped Weir 452 -WW_AVG() 492 W_MAX() 493 W_MIN() 495 WDOM() 413 Week 413 Week Day of Month Week of Month 413 Weekly 447, 455, 492, 493, 495 Weekly Data Functions 492 Weekly Summary Report 292 Weir 452 WEIR() 452 Welcome 17 Windows Login 51 WOM() 413 Wonderware 347 Workgroup 19 Workstation 19 Write 437, 470 -XX Legend Gap xor 395 XOR() 395 234 -YY_AVG() 496 Y_AVGM() 497 Y_CAVG() 497 Y_COUNT() 498 Y_CSUM() 498 Y_MAX() 498 Y_MAXM() 499 Y_MIN() 499 Y_MINM() 500 Y_RES() 500 Y_SUM() 500 Y_TOTM() 501 Year 409, 411, 413 Yearly 496, 497, 498, 499, 500, 501 Yearly Data Functions 496 YR() 413 -ZZero Zoom 431 236 413 © 2014 AllMax Software, Inc.