1
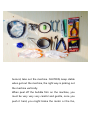
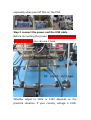
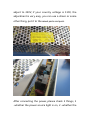
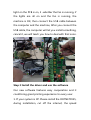
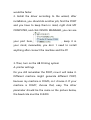
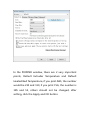
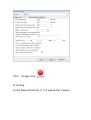
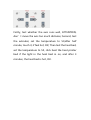
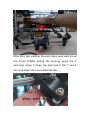
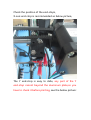
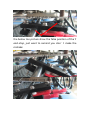
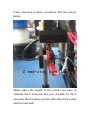
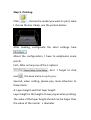
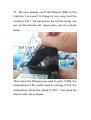
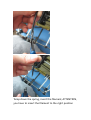
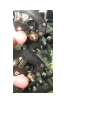
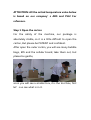
ATTENTION: All the setted temperature value below
is based on our company’s ABS and PLA! For
reference.
Step 1 Open the carton
For the safety of the machine, our package is
absolutely stable, so it is a little difficult to open the
carton, But please be PATIENT and confident.
After open the outer carton, you will see many bubble
bags, EPE and the cellular board, take them out, but
please be gentle,
soon you will see a smaller box, it is the tool box, first
let’s us see what is in it.
Second, take out the machine. CAUTION, keep stable
when get out the machine, the right way is picking out
the machine vertically.
When peel off the bubble film on the machine, you
must be very very very careful and gentle, once you
push it hard, you might broke the motor or the fan,
especially when peel off film on the PCB.
Step 2 connect the power and the USB cable
Before connecting the power, please check your power
AC input voltage,you can see it here,
Whether adjust to 230V or 115V depends on the
practical situation. If your country voltage is 220V,
adjust to 230V, if your country voltage is 115V, the
adjustment is very easy, you can use a driver or some
other thing, put it to the raised parts and push.
After connecting the power, please check 3 things, 1
-whether the power source light is on, 2 -whether the
light on the PCB is on, 3 -whether the fan is running, if
the lights are all on and the fan is running, the
machine is OK, then connect the USB cable between
the computer and the machine, After you connect the
USB cable, the computer will let you install something,
cancel it, we will teach you how to deal with that soon.
Step 3 Install the driver and use the software
Our new software features easy cooperation and it
could bring great printing experience to every user.
1. If your system is XP. Please install the DOTNETFX35,
during installation, cut off the internet, the speed
would be faster.
2. Install the driver according to the wizard, after
installation, you should do another job, find the PORT
and you have to keep them in mind, right click MY
COMPUTER, and click DEVICE MANAGER, you can see
your port here,
, keep it in
your mind, meanwhile, you don’t need to install
anything after connect the machine and the PC
3. Then, turn on the HB Printing system
A. printer settings
Do you still remember the PORT, now it will make it.
Different machine might generate different PORT,
because my machine is COM5, so I choose it. If your
machine is COM7, choose that, easy. The other
parameter should be the same as the picture below,
the baud rate must be 115200.
In the PRINTER window, there are 2 very important
points, Default Extruder Temperature and Default
Heated Bed Temperature, if you print ABS, the number
would be 230 and 110, if you print PLA, the number is
185 and 55, others should not be changed, after
setting, click the Apply and OK button.
Don’t forget click
.
B. testing
In the Manual Control, X, Y, Z equals the 3 axises.
Firstly, test whether the axis runs well, ATTENTION,
don’t move the axis too much distance; Second, test
the extruder, set the temperature to 50,after half
minute, touch it, if feel hot, OK; Then test the heat bed,
set the temperature to 50, click heat the heat printer
bed if the light in the heat bed in on, and after 3
minutes, the heat bed is hot, OK.
After that, test whether the end-stops work well, move
the X-axis 10MM, during the running, press the X
end-stop, when it stops, the end-stop is OK, Y and Z
axis end-stops also are tested like this,
Check the position of the end-stops,
X-axis end-stop is recommended as below picture,
The Y end-stop is easy to slide, any part of the Y
end-stop cannot beyond the aluminum plate,so you
have to check it before printing, see the below picture:
the below too picture show the false position of the Y
end-stop, just want to remind you don’t make the
mistake:
Z-axis end-stop position should be like the picture
below,
When adjust the height of the nozzle, you have to
calibrate the Z end-stop, but you’d better fix the Z
end-stop like the above picture after adjust the nozzle
and the heat bed.
Step 4, adjust the heat bed and the nozzle
Name card testing
Move the nozzle to the left down corner, there should
some distance between the nozzle and the heat bed,
Lower down the nozzle very close to the heat bed,
when the X motor holder touch the end stop, put a
name card between the nozzle and the heat bed, If you
feel very easy to put it there, then lower down the Z
end-stop a little, down the X axis, put the name card
again, if still feel easy to put the name card, lower
down the Z end-stop little by little, put the name card
again, if feel some resistance, then the height between
the nozzle and the bed is OK,
The other 3 corner also use the above method, but the
different adjust method, the other 3 corner you might
need adjust the screws on the heat bed, until you feel
resistance to put the name card.
ATTENTION: when move nozzle from one corner to
another, better 1mm distance every move.
Step 5, Printing
Click
,choose the model you want to print, Here
I choose the bar clamp, see the picture below:
After loading, configurate the slicer settings here
.
About the configuration, I have to emphasize some
points:
First, After set anyone of the 3 options
, don’t forget to click
save
, the save name is up to you;
Second, when setting, please pay more attention to
these items:
A. Layer height and first layer height
Layer height is the height of every layer when printing.
The value of the layer height should not be larger than
the value of the nozzle’s diameter
The value of the First layer height should be smaller
than that of other layers, because the first layer would
be flattened, if too higher, the filament would
accumulated and have a bad influence on printing.
You can set value according to the below picture:
B. First layer speed, The value of the First layer speed
cannot be setted too higher, otherwise the filament
would not adhesive on the hotbed, this is the most
important one. You can refer to the below picture
C. Filament diameter, Set the diameter as the filament
diameter, generally 3mm and 1.75mm
D. TEMPERATURE, this set is important, because
different filament, different temperature. ABS should
be setted like this, EXTRUDER 230℃, BED 110℃. PLA
like this, EXTRUDER 185 ℃ , BED 55 ℃ . If you set an
exact temperature, then the equipment would not
print until the temperature is to your setted value.
E. Nozzle diameter,filling the value according to
practical situation.Generally 0.4MM.
The other options is recommended as default.
After the configuration, click
to generate GCODE, if your
model is large, long time, smaller, less time.
Then, in the manual control, first
,
when the temperature of the bed is to the setted, then
,
You
can
also
heat
them
simultaneously.
Please keep that in your bottom of heart, when
printing ABS, the temperature of extruder should be
setted to
be
, that of the heat bed should
,if printing PLA, the value should be 185
and 55. When the temperature is OK, you can click
to start. I have a very important printing
method to introduce to you, that is, OFF-LINE SD card
Printing:
1. Connect the SD card to your computer, in the
window
G-code
Editor, click
, find your SD card position in your
PC, input a name, please attention, when you input a
name, you have to obey the rule of 8.3 Naming
Convention, after saving the gcode to SD card, put the
SD card to the printer’s port, click
,
choose
the file in the popping window, and click start button
to run the printer.
2. Rename the GCODE file you want print to INIT.G, put
it to the Root Directory in the SD card, restart the
printer(press the RESET button or cut off the power
and
connect
automatically.
it
again),
the
printer
will
start
PS:We have already insert the filament (ABS) to the
machine, if you want to change it, very easy, heat the
nozzle to 230℃, then tamp down the extruder spring, and
pull out the filament with nipper pliers, see the pictures
below,
Then insert the filament you want to print, if ABS, the
temperature of the nozzle need no change, if PLA, the
temperature should be setted to 185℃, then sharp the
filament with cutting nippers
Tamp down the spring, insert the filament, ATTENTION,
you have to insert the filament to the right position