1
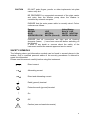
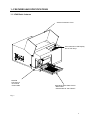
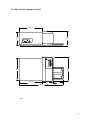
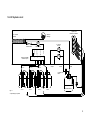
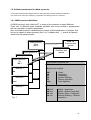
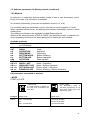
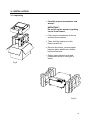
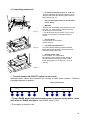
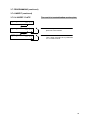
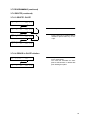
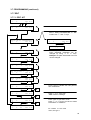
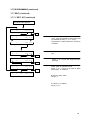
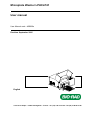
Microplate Washer LP40/LP41
User manual
User Manual code : 40B030e
Revision September 2005
English
3 rue Denis Papin – 67300 Schiltigheim – France – tel. (33) 3 88 19 70 50 – fax (33) 3 88 62 52 98
TABLE OF CONTENTS
ABOUT THIS MANUAL
4
IMPORTANT NOTICE
4
SAFETY INFORMATION
5
SAFETY SYMBOLS
6
1•FEATURES AND
SPECIFICATIONS
7
1.1
1.2
1.3
1.4
1.5
1.6
1.7
1.7.1
1.7.2
1.7.3
1.7.4
1.8
1.8.1
1.8.2
1.8.3
LP40 BASIC FEATURES
LP40 OUTSIDE DIMENSIONS [mm]
LP40 HYDRAULIC CIRCUIT
LP41 BASIC FEATURES
LP41 OUTSIDE DIMENSIONS [mm]
LP41 HYDRAULIC CIRCUIT
TECHNICAL FEATURES
ELECTRICAL DATA
PHYSICAL DATA
HARDWARE SPECIFICATIONS
SOFTWARE SPECIFICATIONS
SOFTWARE PARAMETERS FOR
WASH PROTOCOLS
WASH PROTOCOL DEFINITION
METHODS
PARAMETER’S DEFINITIONS
7
8
9
10
11
12
13
13
13
13
14
15
15
16
18
2• INSTALLATION
27
2.1
27
UNPACKING
3• OPERATING
INSTRUCTIONS
3.1
3.1.1
3.2
3.3
3.4
3.4.1
3.4.2
3.5
3.5.1
3.5.3
3.5.4
3.6
3.6.1
3.6.2
3.7
RUN MODE
HOW TO USE THE KEYBOARD
MICROPLATE LOADING
SELECT ONE KIT
WASH INTERRUPTION OR POWER
FAILURE
WASH INTERRUPTION
POWER FAILURE
RINSE
RINSE (W ITH LP40)
RINSE (W ITH LP41)
AUTOMATIC RINSING (W HIT LP41)
CONFIGURATION
MAIN MENU
WASHER'S CONFIGURATION
PROGRAMMING
29
29
29
30
31
33
33
33
34
34
35
35
36
36
37
40
3.7.1
3.7.2
3.7.3
3.7.4
3.7.4.1
3.7.4.2
3.7.4.3
3.7.4.4
3.7.4.5
3.7.4.6
3.7.5
3.7.5.1
3.7.5.2
3.7.5.3
3.7.5.4
3.7.6
3.7.6.1
3.7.6.2
3.7.6.3
3.7.6.4
3.7.7
3.7.7.1
3.7.7.2
3.7.8
3.7.8.1
3.7.8.2
3.7.8.3
3.7.8.4
3.7.9
3.7.10
KIT STRUCTURE
ACCESS TO PROGRAMMING MODE
PROGRAMMING SYNOPSIS
ADD
ADD: KIT
ERRORS in KIT programming
ADD: METHOD
ERRORS on METHOD programming
ADD: PLATE
ERRORS on PLATE programming
INSERT
INSERT:KIT
TEMPORARY KIT
INSERT : METHOD
INSERT: PLATE
DELETE
DELETE:KIT
DELETE: METHOD
DELETE: PLATE
ERROR in PLATE deletion
EDIT
EDIT: KIT
EDIT: PLATE
COPY
COPY: KIT
ERRORS in KIT copy
COPY : PLATE
ERRORS in PLATE copy
PLATE TEST
RAM INITIALIZATION
4• MAINTENANCE &
TROUBLESHOOTING
4.1
4.1.1
4.1.2
4.2
4.2.1
4.2.2
4.3
4.3.1
62
ROUTINE MAINTENANCE
PROCEDURES
DAILY MAINTENANCE
WASHER STORAGE CONDITIONS
CLEANING AND DISINFECTION
CLEANING THE MANIFOLD
DISINFECTION
TROUBLESHOOTING
HARDWARE AND SOFTWARE VERSION
RECOMMENDATIONS FOR OPTIMIZED
CONDITIONS ON LP40 / LP41 WASHERS
40
41
42
43
43
44
45
46
47
50
51
51
51
51
52
53
53
53
54
54
55
55
57
58
58
58
59
59
60
61
62
62
62
63
63
64
65
65
WASHING
66
APPENDIX
67
REVISION UPGRADE DESCRIPTION
67
INDEX
68
2
IMPORTANT
Please read carefully before using the PLATE WASHERS LP40 or LP41
This document is the copyright of Bio-Rad and must not be copied or reproduced in
any form without prior consent.
Bio-Rad reserves the right to make technical improvements to this equipment and
documentation without prior notice as part of a continuous program or product
development. This manual supersedes all previous editions.
NOTA :
The LP40/41 microplate washers can be integrated into a system together with
other instruments, in order to make biologic medical assays.
3
About this manual
This manual has been written for the laboratory technician and
describes how to use the LP40 and LP41 plate washers.
This manual is designed to give you the necessary information you
need to :
• install the LP40 or the LP41
• operate with the LP40 or the LP41 to suit your particular
needs
• perform the LP40 or the LP41 basic maintenance procedures,
including disinfection.
This manual also describes all the features and specifications of the
LP40 and LP41 hardware and configuration software.
Important Notice
Before installing this unit, please read carefully the installation
instructions.
This instrument can only be used to wash 96-well microplates with
8, 12 or 2*8 channel manifolds or 384 well micro-plates with 1*16
channel manifold.
This washer is intended for clinical diagnostic and research
laboratory use and must be operated only by specialized personnel
aware of the potential risks connected to the chemical and
bacteriological agents normally used with this unit.
The Aerosol Protection Cover must always be closed when the
instrument is operated to reduce the risk of contamination from
ambient air. Since the unit is not completely sealed, this risk is not
completely eliminated, and the operator should dress with
appropriate safety protection when using hazardous substances or
biological agents.
While the unit is connected to the power, it is dangerous to operate
without the protective cover. Operation without the cover may be
performed only by specialized and trained service personnel.
Read carefully the recommendations for optimized washing
conditions provided in the appendix of this manual.
Contact your local representative if service is required.
4
SAFETY INFORMATION
WARNING:
ELECTRIC’S
SHOCK
HAZARD
To operate, the instrument must be mandatory connected
to a wall socket equipped with earth.
The access to the mains supply input plug, located on the
instrument’s rear panel, must be kept free in order to use
this plug, if necessary, as cut-off device.
Although this instrument is fully insulated and grounded, it is
important for all users to be aware of the potential hazards of
using liquids in close proximity to an electrical supply. In the
event of any spillage, the instrument must be immediately
isolated from the electrical supply and drained. Spilt liquid
should be removed as soon as possible.
Serious damage to the instrument may occur if fluid is allowed
to penetrate the case. The electrical supply MUST NOT be
reconnected until the instrument has been fully inspected by a
qualified technician or service engineer.
SERVICING MUST ONLY BE CARRIED OUT
QUALIFIED TECHNICIAN OR SERVICE ENGINEER.
WARNING:
SPILLAGES
BY
A
In some operating modes (e.g. dispensing fluids or purging the
system, particularly under automatic control) it is possible to
overfill the wells of a microplate. This can result in spillage of
liquids and/or contamination with hazardous substances. Care
should be taken to ensure that overfilling does not occur.
If environmentally hazardous fluid is spilled, the instrument must
first be isolated from the electrical supply and physically isolated
from the working environment by placing it in a fume cupboard
or similar location. Contact the nearest service centre for
assistance, advising them of the health hazards associated with
the spilled materials.
WARNING:
INCORRECT
OPERATION
OPERATING THIS EQUIPMENT IN WAYS OTHER THAN
DETAILED IN THIS MANUAL MAY IMPAIR THE
PROTECTION PROVIDED BY THE INSTRUMENT.
DO NOT operate this equipment with the covers removed –
potentially dangerous voltages are contained within.
DO NOT operate this equipment with the safety earth (ground)
disconnected.
5
CAUTION
DO NOT poke fingers, pencils or other implements into plate
carrier entry slot.
BE PREPARED for unexpected movement of the plate carrier
and noise from the Washer pump when the Washer is
controlled by external computer.
ENSURE that the main power cable is correctly wired. Colour
codes are as follows :
Europe
BROWN
BLUE
GREEN/YELLOW
LIVE
NEUTRAL
EARTH (Ground)
United States
BLACK LIVE
WHITE NEUTRAL
GREEN GROUND
ENSURE that all connections are tight and all blocking
elements (foams, …) have been removed before switching on
the Washer.
If there is any doubt or concern about the safety of the
instrument contact the nearest approved service center.
SAFETY SYMBOLS
The following alarm and information symbols can be found in several places in the
washer. Only a qualified personal aware of the security procedures is allowed to
repair this instrument.
Please read this manual carefully before using this instrument.
Direct current
Alternating current
Direct and alternating current
Earth (ground) terminal
Protective earth (ground) terminal
ú
On
Off
!
Caution (see enclosed documents)
6
1• FEATURES AND SPECIFICATIONS
1.1 LP40 Basic features
Aerosol Protection Cover
2x20 characters LCD Display
and 5 "soft" Keys
Manifold
8-Channel or
12-Channel
• Removable
8-Mode/12-Mode Plate Carrier
• Removable
• Autoclavable at 120°C/250°F
Fig. 1
7
1.2 LP40 Outside dimensions [mm]
280
325
174
193
277,5
277,5
123
125
525,5
Fig. 2
8
1.3 LP40 Hydraulic circuit
8- channel or
12- channel
Manifold
Electro-valve
WASH or RINSE
Solution Input
Liquid Pump
Blue
Vaccum
Pump
Red
Yellow
Air
Output
Hydrophobic
Filter
WASH
RINSE
WASTE bottle
Fig : 3
9
1.4 LP41 Basic features
Aerosol Protection Cover
RS232 serial port for connection to PC
2x20 characters LCD Display
and 5 "soft" Keys
4 liquid inputs
Manifold
82*83*8-Channel or
122*12-Channel
• Removable
8-Mode/12-Mode Plate Carrier
• Removable
• Autoclavable at 120°C/250°F
Fig. 4
10
1.5 LP41 Outside dimensions [mm]
325
280
174
193
277,5
277,5
123
125
525,5
Fig. 5
11
1.6 LP41 Hydraulic circuit
Liquid Level
Detection in Bottle *
Vacuum
Sensing *
R
G
E
U
2 Vaccum
Pumps
Liquid Pump
G
R
N
L
2
W
1
O
L
WASH or RINSE
Solution Inputs
Air
Output
Blue
E
E
Y
Rinse *
4
E
Input #3*
Input #2*
Input #1
3
Y
A
Electro-valve
L
B
2*8 - Channel
Manifold
Gray
Yellow
Red
Green
Hydrophobic
Filter
Fig : 6
Wash 1
Wash 2
Wash 3
RINSE
WASTE bottle
* : Depending on options
12
1.7 Technical features
1.7.1 Electrical Data
Voltage
Consumption
Fuses
Power Cord
240 / 100 VAC, 50 / 60 Hz
100 VA max
2,5 AT (2 fuses, 5x20 mm)
on CEI socket
1.7.2 Physical data
Dimensions, including bottles
W idth
368 mm,LP40
683mm, LP41
Length
530 mm, Plate carrier out,
LP40 & LP41.
Height
483 mm, LP40
443 mm, LP41.
Weight
(without accessories)
11,0 Kg, LP40
11,6 Kg, LP41
Operating conditions
15 - 30 °C / 15 - 85 %R.H.
1.7.3 Hardware specifications
Manifold
LP40:
LP41:
Vacuum power LP40 :
LP41 :
Volume of WASTE bottle
LP40 :
LP41:
User interface :
8 or 12 channel
8, 2*8, 3*8, 12 or 2*12 channel
1 integrated vacuum pump (maxi 8 L/min)
2 integrated vacuum pumps
(maxi 16 L/min).
2 litres
8 litres
Flat keyboard with 5 diaphragm keys
2x20 characters LCD screen , backlighted
on LP41.
13
1.7 Technical features (continued)
1.7.4 Software specifications
Kits
Up to 75 washing kits programmable.
Each kit is saved under its own name (up to 15
characters) and is a combination of methods
repeated or not, with or without soaking times, in strip
mode or in plate mode.
Method
6 single-cycle washing methods :
Wash, Aspiration, Dispensing, Bottom Washing,
Bottom Aspiration, Agitation.
4 two-cycle washing methods :
Wash + Aspiration, Wash + Bottom Aspiration,
Bottom Wash + Aspiration, Bottom Wash + Bottom
Aspiration.
Soak time
0 to 9,9 sec Strip mode
0 to 59 min 59 sec in Plate mode.
Repetition
Every method can be repeated from 1 up to 9 times.
Wash mode
Strip mode or Plate mode.
Omit strip
Strips can be omitted at kit programmation.
Plates
Up to 10 plate parameter sets programmable.
Accepts flat or curved bottom microplates.
Vertical and horizontal speeds, vertical and horizontal
positions of the aspirating needle in relation with the
wells are programmable.
Other features -Priming sequence of the hydraulic system at change
of Wash solution.
-Disinfection program of the hydraulic circuit.
-User programming can be inhibited.
14
1.8 Software parameters for Wash protocols
This section describes the Wash protocols, their methods and their software parameters.
It is useful to be read prior starting to programme new wash protocols or new kits.
1.8.1 WASH protocol definition:
A WASH protocol, also called a KIT, is made of a succession of wash Methods.
There are 10 different wash methods available and every method is programmed
with its own batch of specific parameters.
Also, the Wash protocol is associated to a batch of plate parameters -Positions- that
are set in respect to plate geometry (flat, U or V shaped well, …) as well as Speeds
needed for the wash process.
Plate 10
Positions and
speeds
Wash protocol
75 or
Kit 75
Plate 1
Positions and
speeds
Qqqqqqqqqq d 1
Wash protocol 3
Wash protocol 2
Wash protocol 1
Or
Kit 1
Wash
or
Method 1
Kit 100
NW
Wash p
or
Method 2
Kit 100
NAG
Method 3
NA
Fig. 7
The available methods are:
Method
Method name
Single-cycle method
nW
nA
nD
nw
na
nA g
Wash
Aspiration
Dispensing
Bottom Washing
Bottom aspiration
Plate Agitation
Two-cycle method
nW + A
nW + a
nw + A
nw + a
Wash + Aspiration
Wash + Bottom Aspiration
Bottom Wash + Aspiration
Bottom Washing + Bottom
Aspiration
15
1.8 Software parameters for Wash protocols (continued)
1.8.2 Methods
A method is a completely defined module made of one or two elementary cycles.
Every kit is made of a succession of methods.
In a method, elementary cycles can be repeated n times (n =1 to 9).
For a method using two elementary cycles, only the first cycle is applied “n” times.
When repeated several times, the waiting time between elementary cycles is called
soaking time.
The waiting time between two methods is called Method Interval.
Whatever the selected mode, STRIP or PLATE (see definition below), a method is always completely finished on the whole plate prior to starting the next method.
Available methods:
Method Abbreviated name
on LCD display
Single-cycle method
nW
WASH
nA
ASPIRATION
nD
DISPENSING
nw
BOTTOM WASH.
na
BOTTOM ASP.
nAg
AGITATION
Two-cycle method
nW + A WASH + ASP
nW + a WASH+BOT.ASP
nw + A BOT.WASH+ASP
nw + a
B.WASH+B.ASP
Method name
Wash
Aspiration
Dispensing
Bottom Washing
Bottom aspiration
Plate Agitation
Wash + Aspiration
Wash + Bottom Aspiration
Bottom Wash + Aspiration
Bottom Washing + Bottom Aspiration
Kit parameters associated to method:
• MODE
STRIP or PLATE
STRIP mode:
the total method is applied on
the strip prior processing the
next strip.
Example: STRIP mode
3W + A on 1st strip
Method
3W + A on 2nd strip
3W +A
etc…
3W + A on last strip
PLATE mode:
the elementary cycle is
executed successively on all
strips prior applying the next
elementary cycle.
PLATE mode
W on the whole plate
W on the whole plate
W on the whole plate
A on the whole plate
16
1.8 Software parameters for Wash protocols (continued)
1.8.2 Methods (contunued)
No. OF CYCLES Number of Cycles = n
1 to 9, step 1
number of elementary cycles that will be applied within the method.
• SOAKING Soak time
0min 0s to 59min 0s, step 1s
in PLATE mode.
0min 0s to 9.9s, step 0.1 s
in STRIP mode.
Waiting time between two consecutive elementary cycle within one method.
• MET. INTER Method Interval
0min 0s to 59min 0s, step 1 sec
Waiting time between two consecutive methods.
17
1.8 Software parameters for Wash protocols (continued)
1.8.3 Parameter’s definitions
Parameters directly depending on the KIT or Wash protocol (such as dispensing, aspirating times, liquids, etc…) are called “KIT Parameters”,
Parameters depending on the microplate dimensions (mainly POSITION and SPEED
parameters) are called “PLATE parameters”.
In the washer, the elementary cycles are as follows :
A
ASPIRATION
The aspirating needle goes down and aspirates until reaching the well bottom. The needle is shifted close to wall (Aspiration Horizontal Position) for
flat bottom well;
it remains centered for a curved bottom well.
Programmed parameters:
Kit parameters:
• CROSW. ASP. Crosswise aspiration “CWA” (for flat bottom only)
YES or NO
the aspiration needle is shifted close to the wall (Aspiration Horizontal Position) while going down to well bottom and aspirates; once the aspiration
time has elapsed, the aspiration needle is going up to approx middle of
well height and is shifted opposite end of wall (no scratch on the bottom);
the needle goes down to bottom and a second aspiration sequence takes
place.
• ASP. TIME Aspiration Time
0.1 to 9.9 s, step 0.1 s
Time during which the aspirating needle is kept at the well bottom and aspirates.
Plate parameters:
• ASP. HOR. POS. Aspiration Horizontal Position (for flat bottom only)
0.0 (centered) to 2.0 mm, step 0.1 mm
(see also fig. 8 at the end of § 1.8)
• ASP.VERT.POS. Aspiration Vertical Position
0.1 to 15.0 mm, step 0.1 mm (see also fig. 8 at the end of § 1.8)
0.1 is the highest needle position
15.0 is the lowest needle position
• ASP. DOWNW. SPEED Aspiration Downward Speed
0 to 9, step 1. (speed min. = 0; speed max. = 9)
18
1.8 Software parameters for Wash protocols (continued)
1.8.3 Parameter’s definitions (continued)
D.DISPENSING
The dispensing needle is placed over the well and dispenses a wash solution in the well.
When the dispensed volume is higher than well capacity, the aspiration
needle aspirates the overflow to prevent liquid spilling on next wells.
Programmed parameters:
Kit parameters:
• VOLUME (for one well)
50 to 3000 µl, step 50 µl
(the well volume is approx. 370 µl)
• OVERFLOW
1.0 to 12.9 mm, step 0.1 mm (see also fig.8 at the end of § 1.8).
This parameter sets the height of the aspirating needle and thus the height
of the liquid in the well.
1.0 is the highest needle position
12.9 is the lowest needle position (for the overflow).
It is recommended to dispense a volume slightly higher than wished and
have an overflow phase in order to obtain an equal dispensing of volume
in each well. The slight flow rate variations among dispensing needles are
compensated by the overflow phase.
• LIQUID
Wash W1 to Wash W9
When launching a kit in the RUN mode, the display will remind you to
connect correct Wash bottle prior starting.
• FLOW Flow rate compensation
-5 to +5, step 1.
The flow rate of the dispensing pump is adapted to the operating manifold.
However, the flow rate can be slightly modified with this parameter (lower
flow rate whith negative value, higher flow rate with positive value).
Plate parameters:
• DISP. UPW. SPEED Dispensing Upward Speed
0 to 9, step 1. (speed min. = 0; speed max. = 9)
19
1.8 Software parameters for Wash protocols (continued)
1.8.3 Parameter’s definitions (continued)
W
WASH
Aspiration sequence followed by a Dispensing sequence.
Programmed parameters:
Kit parameters:
• CROSW. ASP. Crosswise aspiration “for flat bottom only”
YES or NO (See details on page 18)
• ASP. TIME Aspiration time
0.1 to 9.9 s, step 0.1 s (See details on page 18)
• VOLUME “for one well”
50 to 3000 µl, step 50 µl
(the well volume is approx. 370 µl)
• OVERFLOW
1.0 to 12.9 mm, step 0.1 mm
1.0 is the highest needle position
12.9 is the lowest needle position “for the overflow”
(See details on page 19)
• LIQUID
Wash W1 to Wash W9 (See details on page 19)
• FLOW flow rate compensation
-5 to +5, step 1. (See details on page 19)
Plate parameters
• ASP. HOR. POS. Aspiration Horizontal Position “for flat bottom only”
0.0 to 2.0 mm, step 0.1 mm (see also Fig. 8, at the end of §1.8)
• ASP.VERT.POS. Aspiration Vertical Position
0.1 to 15.0 mm, step 0.1 mm
(see also fig.8, at the end of § 1.8)
0.1 is the highest needle position
15.0 is the lowest needle position
• ASP. DOWNW. SPEED Aspiration Downward Speed
0 to 9, step 1. (speed min. = 0; speed max. = 9)
• DISP. UPW. SPEED Dispensing Upward Speed
0 to 9, step 1. (speed min. = 0; speed max. = 9)
20
1.8 Software parameters for Wash protocols (continued)
1.8.3 Parameter's definitions (continued)
w
BOTTOM
WASH . Bottom Washing
The bottom of the well is thoroughly washed, followed by a normal Wash
(W) sequence.
Following sequences are applied :
- Downward aspirating movement of the needle into the well down to Aspiration Vertical Position.
Aspiration at Aspiration Vertical Position during Aspiration Time.
- One or two upward dispensing movements up to Bottom Wash Vertical
Position, dispensing at this position during a Bottom Wash Time
…
- Followed by a downward aspirating movement down to Aspiration Vertical Position.
- Aspiration at Aspiration Vertical Position during Aspiration Time.
- Dispensing up to Overflow Position.
In case of a crosswise aspiration (for flat bottom only):
each aspiration sequence (close to the wall) is immediately followed by
another aspiration sequence to the opposite end of the wall as described
on page 18.
Programmed parameters:
Kit parameters:
• CROSW. ASP. Crosswise aspiration “for flat bottom only “
YES or NO (See details on page 18)
• ASP. TIME Aspiration time
0.1 to 9.9 s, step 0.1 s (See details on page 18)
• VOLUME “for one well”
50 to 3000 µl, step 50 µl
(the well volume is approx. 370 µL)
Volume is applied at the last Dispensing sequence.
• OVERFLOW
1.0 to 12.9 mm, step 0.1 mm
1.0 is the highest needle position
12.9 is the lowest needle position (for the overflow).
Overflow is applied at the last Dispensing sequence.
(See details on page 19)
• LIQUID Wash W1 to Wash W9
(See details on page 19)
• FLOW flow rate compensation
-5 to +5, step 1. (See details on page 19)
21
1.8 Software parameters for Wash protocols (continued)
1.8.3 Parameter's definitions (continued)
W
Bottom Washing (continued)
• BOT. WASH NUMBER Bottom Wash Number
1 or 2
Number of Bottom Wash Occurence.
• BOTTOM TIME Bottom Wash Time
0.1 to 9.9 s, step 0.1 s
Time when dispensing at the Bottom Wash Vertical Position.
Plate parameters:
• ASP. HOR. POS. Aspiration Horizontal Position “for flat bottom only”
0 to 2.0 mm, step 0.1 mm (see also fig. 8 at the end of § 1.8)
Aspiration Horizontal Position is applied for all Aspiration, Bottom Wash
and Bottom Aspiration sequences.
• ASP.VERT.POS. Aspiration Vertical Position
0.1 to 15.0 mm, step 0.1 mm (see also fig. 8 at the end of § 1.8)
0.1 is the highest needle position
15.0 is the lowest needle position
Aspiration Vertical Position is applied for all Aspiration sequences.
• B.W.VERT.POS. Bottom Wash Vertical Position
0.1 to 15.0mm, step 0.1mm (see also fig. 8 at the end of § 1.8)
0.1 is the highest needle position
15.0 is the lowest needle position
Bottom Wash Vertical Position is the height of the aspirating needle during
the dispensing sequence of the bottom wash.
• ASP. DOWNW. SPEED Aspiration Downward Speed
0 to 9, step 1. (speed min. = 0; speed max. = 9)
This speed is applied only at the first Aspiration sequence.
• DISP. UPW. SPEED Dispensing Upward Speed
0 to 9, step 1. (speed min. = 0; speed max. = 9)
Dispensing Upward Speed is applied at the last Dispensing sequence.
• BOT. DOWNW. SPEED Bottom Downward Speed
0 to 9, step 1. (speed min. = 0; speed max. = 9)
Speed of all downward movements for all bottom sequences (wash and
aspiration).
• BOT. UPWARD SPEED Bottom Upward Speed
0 to 9, step 1. (speed min. = 0; speed max. = 9)
Speed of all upward movements for all bottom sequences (wash and aspiration).
22
1.8 Software parameters for Wash protocols (continued)
1.8.3 Parameter's definitions (continued)
a
Bottom aspiration
BOTTOM ASP.
The following sequence are applied:
- Downward aspirating movement of the needle into the well down to Aspiration Vertical Position.
- Aspiration at Aspiration Vertical Position during Aspiration Time.
- One or two upward aspirating movements up to Bottom (Aspiration) Position followed by a downward aspirating movement down to Aspiration Vertical Position.
- Aspiration at Aspiration Vertical Position during Aspiration Time.
In the case of crosswise aspiration (for flat bottom only):
every aspiration sequence (close to the wall) is immediately followed by
another aspiration sequence to the opposite end of the wall as described
on page 18.
Programmed parameters:
Kit parameters:
• CROSW. ASP. Crosswise aspiration “for flat bottom only"
YES or NO (See details on page 18)
• ASP. TIME Aspiration time
0.1 to 9.9 s, step 0.1 s (See details on page 18)
• BOT. ASP. NUMBER Bottom Aspiration Number
1 or 2 Number of Bottom Aspiration Occurence
Plate parameters:
• ASP. HOR. POS. Aspiration Horizontal Position “For flat bottom only”
0.0 to 2.0 mm, step 0.1 mm (see also fig. 8 at the end of § 1.8)
Aspiration Horizontal Position is applied for all Aspiration, Bottom Wash
and Bottom Aspiration sequences.
• ASP.VERT.POS. Aspiration Vertical Position
0.1 to 15.0 mm, step 0.1 mm (see also fig. 8 at the end of § 1.8)
0.1 is the highest needle position
15.0 is the lowest needle position
Aspiration Vertical Position is applied for all Aspiration sequences.
23
1.8 Software parameters for Wash protocols (continued)
1.8.3 Parameter's definitions (continued)
a
Bottom aspiration (continued)
BOTTOM ASP. (continued)
Plate parameters (continued) :
• BOT.VERT.POS. Bottom (Aspiration) Vertical Position
0.1 to 15.0 mm, step 0.1 mm (see also fig. 8 at the end of § 1.8)
0.1 is the highest needle position
15.0 is the lowest needle position.
Bottom (Aspiration) Vertical Position is the height of the aspirating needle
during the aspiration sequence of the bottom aspiration.
• ASP. DOWNW. SPEED. Aspiration Downward Speed
0 to 9, step 1. (speed min. = 0; speed max. = 9)
Aspiration Downward Speed is applied at the first Aspiration sequence.
• BOT. DOWNW. SPEED. Bottom Downward Speed
0 to 9, step 1. (speed min. = 0; speed max. = 9)
Speed of all downward movements for all bottom sequences
(wash and aspiration).
• BOT. UPWARD SPEED. Bottom Upward Speed
0 to 9, step 1. (speed min. = 0; speed max; = 9)
Speed of all upward movements for all bottom sequences
(wash and aspiration).
24
1.8 Software parameters for Wash protocols (continued)
1.8.3 Parameter's definitions (continued)
Ag
Plate Agitation
AGITATION
The microplate is shaken horizontally during the Agitation Time with an
Agitation Amplitude and an Agitation Speed.
Programmed parameters:
Kit parameters:
• SHAKE TIME Agitation Time
0.1 to 59.9 s, step 0.1 s
Plate parameters :
• SHAKING AMPLITUDE Agitation Amplitude
0 to 9, step 1
• SHAKING SPEED Agitation Speed
0 to 9, step 1
25
1.8 Software parameters for Wash protocols (continued)
1.8.3 Parameter's definitions (continued)
Dispensing needle
0 = HOME POSITION
The Identification and range
of parameters related to the
location of the needle in
relation to the microplate well.
Overflow Position
1.0 to 12.9 mm (Kit
parameter)
Microplate
well
Graduations in this sketch are only for
better understanding.
Set these parameters in real conditions
with real plate. Well dimension may vary from one plate type to another one.
Aspirating
needle
• Aspiration
Vertical Position
• Bottom (Aspiration)
Vertical Position
• Bottom Wash
Vertical Position
0.1 to 15.0 mm
(Plate parameters)
• Aspiration Horizontal Position
0.1 to 2.0 mm
(Plate parameter)
Fig. 8
26
2• INSTALLATION
2.1 Unpacking
· Carefully unpack accessories and
washer.
IMPORTANT :
Do not lift up the washer by pulling
on the foam frames!
· First remove accessories at the top
and beside the washer.
· Then, hold the washer (not the
foams) and lift up.
· Remove the foams, remove plastic
bag and place washer on a stable,
horizontal surface.
·
Fig.9
Slightly open aerosol cover and
remove thin piece of foam (pull it
down).
.
Fig.10
27
2.1 Unpacking (continued)
· In washer working area (Fig. 11, 12 & 13):
-Remove adhesive tape blocking aerosol cover.
-Remove adhesive tape blocking plate carrier to
bottom plate ( fig. 11).
· Pull and push plate carrier to check that it
moves freely.
Fig. 11
· Manifold
-Remove the tie blocking the manifold on the left
side (fig. 12) : push the tie to the left. Remove
the tie from the vertical shaft.
- Turn blocking device as shown on fig. 12 and
ensure to not hinder the manifold Up/Down
motion.
· On rear panel :
Connect tubes on rear panel
(match colours).
Fig. 12
· Vacuum pump protection :
Cut yellow tube at halfway between WASTE
bottle and washer and place hydrophobic filter
(supplied in maintenace kit).
· Connect power cord.
Fuse installed : 2,5 A Slow Blow.
Plug Power Cord to mains socket; washer is
equipped with universal input switch mode
power supply (85 VAC to 264 VAC; 47 Hz to
440 Hz).
Fig. 13
· Turn the washer ON (ON/OFF switch on rear panel)
Whereas plate carrier and manifold are moving to their home position, following
message appears on display :
After initialization
V ERSION:2.xxx.2Y
LP41
SELECT:RUN
- - ¯ I N¯ Y EISN O U T Y E S
OUT
• Fill one RINSE bottle with demineralized water and prime the hydraulic circuit
with at least 5 RINSE operations (see RINSE mode, § 3.5).
• The washer is ready for use.
28
3• OPERATING INSTRUCTIONS
3.1 Run Mode
3.1.1 How to use the Keyboard?
VERSION: 4.xx.2Y
LP 41
SELECT : R U N
¯
IN
YES
OUT
Press the “OUT” key to set or remove microplate: plate carrier moves
out and is locked for 10 seconds to
allow the microplate to be placed in
carrier.
Press “-“ or “¯”keys to
scroll the main menu
See §
3.6.1
Main
menu on page 36.
Press the “YES” key to
enter the selected mode.
Press "IN" key to move
plate carrier in.
R U N: K IT 75
W A S H + ASP.
E S C
The function of the key is displayed on the
screen.
Depending on the displayed menu,
• some keys are activated,
• some others have no function and are therefore deactivated.
29
3.2 Microplate loading
The plate carrier supports both 8- and 12-modes for processing 96-well microplates.
Place the microplate on the plate carrier according to the mode selected :
Washer configurated in 8-mode (with 8-,2*8-, 3*8-Channel Manifold) :
One strip is made of 8 wells (numbered A to H)
Number of strips : 12 (numbered 1 to 12)
Fig. 13
Washer configurated in 12-mode (with 12-, 2*12-Channel Manifold) :
One strip is made of 12 wells (numbered 1 to 12)
Number of strips : 8 (numbered A to H)
Fig. 14
30
3.3 Select one KIT
A
SELECT:RUN
¯
IN
YES
OUT
RU N : K I T 0 1
¯
YES
ESC
RU N : K I T 7 5
¯
YES
ESC
LAST STRIP
¯
CONNECT T H E
ON
A
8
YES
WASH W9
YES
PUMP PRIMING
RU N : K I T 7 5
Strip 8
YES
RU N : K I T 7 5
WA S H + A S P .
RU N : K I T 7 5
¯
ESC
ESC
ESC
ESC
ESC
YES
Use the “-” and “¯” keys to select
kit.
Use the “-” and “¯” keys to select last
strip to be processed.
For LP40 only: This message is displayed when the requested wash buffer
is not connected.
Once you have connected the correct
WASH bottle, press “YES” and the
pump will start to prime in order to operate with the correct WASH liquid.
For LP41: See ERR 21 on next page.
Summary of the selected item
· Kit name
· Number of strip
B
Once the kit is launched, the ongoing
method is displayed on lower display line.
Press “ESC” to stop running the kit.
The kit is terminated.
Display is back to
previous kit selection
ESC
B
: See § 3.4.1
31
3.3 Select one KIT (continued)
ERR:21 with LP41:
SELECT:RUN
¯
IN
YES OUT
RUN: KIT 01
¯
YES ESC
RUN: KIT 75
¯
YES ESC
L AST STRIP
¯
12
YES ESC
ERR:21 WASH W9 NOT
CONNECTED
YES
SELECT:RUN
¯
IN
YES OUT
Error 21 indicates that Wash buffer W9
requested in "KIT 75" is not connected.
Connect Wash buffer W9 at input 1, 2
or 3.
Then enter washer CONFIGURATION
to modify the input assignment
accordingly (see § 3.6.2).
32
3.4 WASH interruption or Power Failure
3.4.1 WASH interruption
When the “ESC” key is pressed whereas a kit is running, the following message is
displayed:
B
STOP THE TEST
0 h 3 min 1 7 s
RES
ESC
A
RUN: KIT 75
WASH + ASP.
ESC
The elapsed time since the kit has been
stopped is displayed.
Press the “RES” key to resume the kit at
the point where it has been stopped or
press the “ESC” key to go back to main
menu.
A
RUN: KIT 75
-
¯
YE S
E SC
A : Back to the main menu
(see § 3.3).
3.4.2 POWER Failure
When a power failure occurs whereas a kit is running, the following message will be
displayed when power is back :
POWER FAILURE
0 h 4 3 min 5 2 s
RES ESC
A
RUN: KIT 75
WASH + ASP.
ESC
The elapsed time since the kit has been
stopped is displayed.
Press the “RES” key to resume the kit at
the point where it has been stopped or
press the “ESC” key to go back to main
menu.
A
RUN: KIT 75
¯
YES
E SC
A : Return to the main menu
(see § 3.3).
33
3.5 RINSE
3.5.1 Rinse (with LP40)
SELECT:PRIME/RINSE
¯
IN
YES OUT
CONNECT
ON
A
THE
RINSE
YES ESC
A
Connect blue tube on RINSE bottle,
ensure the plate carrier is not removed,
then press “YES”.
P RIMING/RINSING
ESC
A
SELECT:RUN
¯
IN
A
YES OUT
: Back to main menu
(See § 3.3).
3.5.2 Please RINSE (with LP40)
The message
PLEASE RINSE
YES
Is displayed to incite user to perform a RINSE operation when the washer has not
been used during 10 minutes after a WASH operation.
Press “YES” Key to go back to main menu and launch a RINSE.
IMPORTANT
The washer should never be switched off with the WASH solution inside the tubing
and manifold.
Solid crystals from the dried WASH solution could clog the dispense needles and
clamp the electrovalve tube.
34
3.5 RINSE (continued)
3.5.3 Rinse (with LP41)
SELECT:PRIME/RINSE
¯
IN
YES OUT
SELECT WAY:A
YES
Way is mandatory "A" on LP41.
Press YES to continue.
ESC
A
I N PUT SELECT.:4
¯
YES ESC
Select washer input according to the
rinsing or priming that you want to do.
INPUT 4 SOL.:RINSE
¯
YES ESC
Indication of the liquid connected to the
selected input. If you change the liquid,
use "-" or "¯" keys to modify input
assignment (same as in the washer
configuration on page 37).
Note
-Input 4 is mandatory RINSE.
PRIMING/RINSING
ESC
A
SELECT:RUN
¯
IN
A
YES OUT
: Back to the main menu
(See § 3.3).
3.5.4 Automatic Rinsing (whit LP41)
PRIMING/RINSING
ESC
One automatic rinsing sequence will take place as soon as the time set in "RINSE
PARAM." (see § 3.6.2. Washer’s configuration) has elapsed after the last wash.
Note
When the washer won’t be used for several days, it is recommended to connect all
channels all inputs to rinse bottle and rinse every input as described above in order
to clean the pinch valve tube of every input. See also § 4.1.2 Storage condition.
IMPORTANT
The washer should never be switched off with WASH solution inside tubing and manifold.
Solid crystals from the dried WASH solution could clog the dispense needles and
clamp the electrovalve tube.
35
3.6 Configuration
3.6.1 Main menu
A
S E L E C T : R U N
¯
I N
Y E S
O U T
RUN
See § 3.1Run Mode
S E L E C T : P R I M E / R I N S E
¯
I N
Y E S
O U T
PRIME/RINSE
See § 3.5 RINSE
S E L E C T : D I S I N F E C T I O N
¯
I N
Y E S
O U T
DISINFECTION
See § 4.2.2 DISINFECTION
S E L E C T : C O N F I G U R A T I O N
¯
I N
Y E S
O U T
CONFIGURATION
See § 3.6.2 Washer’s configuration
S E L E C T : S E R V I C E / V E R
¯
I N
Y E S
O U T
SERVICE / VER
See § 4.3.1 Hardware and
software version
36
3.6 Configuration (continued)
3.6.2 Washer's configuration
Enter “CONFIGURATION" menu
SELECT:CONFIGURATION
¯
IN
YES OUT
GROUP :MANIFOLD
¯
YES ESC
Selection of Manifold.
A
MANIFOLD A : 2 * 8
¯
YES ESC
Use “-” and “¯” keys to set the type
according to installed manifold
(x-channel manifold)
LP41 only
F
Assignment of Wash & Rinse
inputs on the rear panel
GROUP :VALVE PARAM.
¯
YES ESC
A
INPUT SELECT.:1
¯
YES ESC
Use “-” and “¯” keys to select the input
number.
F
INPUT 1 SOL.:WASH W1
¯
YES ESC
F
GROUP :RINSE PARAM.
¯
YES ESC
Use “-” and “¯” keys to assign wash
(W1 to W9) or rinse solution to the
selected input.
Note: input #4 is mandatory assigned to
Rinse.
Setting of
countdown prior
launching automatic rinsing
to
A
AUTO RINSE IN:
10 min
¯
YES ESC
Use “-” and “¯” keys to set countdown
(from 0 to 240 minutes).
Automatic Rinse is deactivated when
Rinse Time is set at "0".
Selection of the multiwash selector
type on rear panel.
G R O U P : VALVE TYPE
¯
YES ESC
A
VAL
-
TYP : MOTOR
¯
YES ESC
Go to page 38
Default setting is "MOTOR".
Use “-” and “¯” keys to select "PINCH"
if the washer is equipped with a 4 pinch
valve system (old device).
A : Return to the main menu,
See § 3.3.
37
3.6 Configuration (continued)
3.6.2 Washer's configuration (continued)
Continued from page 37
LP41 only
G R OUP :VACUUM DET.
¯
YES ESC
Activation of the vacuum detection
A
VAC.
-
TRSH :
¯
20 pts
YES ESC
Use "-" and "¯
¯" keys to set the
vaccum sensing thershold.
(Default valvue : 20 points.)
A
VACUUM
DET ON A
YES
¯
YES ESC
Use “-” and “¯” keys to activate (YES)
or deactivate (NO) the vacuum
detection.
GROUP :RS232 PARAM
¯
YES ESC
Setting of the RS232 serial port for
connection to PC.
A
BAUDS:9600 WAKE UP:Y
¯
®
YES ESC
Baud rate can be reduced in case of
transmission problem between PC and
washer.
Use “-” and “¯” keys to set the Baud
rate.
(Setting of Wake up function is ignored)
G
GROUP :LIQUID DET.
¯
YES ESC
Activation of the liquid detection in
Wash and Waste bottles
A
WASH
LEVEL DET:YES
¯
YES ESC
Use “-” and “¯” keys to activate (YES)
or deactivate (NO) liquid level detector
in Wash bottle, then in Waste bottle.
G
WASTE LEVEL DET:YES
¯
YES ESC
G
Go to page 39
38
3.6 Configuration (continued)
3.6.2 Washer's configuration (continued)
Continuation from
page 38
GR O U P : G E N E R A L
-
¯
Setting
of
parameters
YES ESC
dialogue
interface
A
LANG:ENGLISH
BEEP:Y
¯
®
YES ESC
Use “-” and “¯” keys to set language,
then “®” key and ”-” and “¯” keys to activate (Y) or deactivate (N) the Beep.
G R O U P : MINI PRIME
¯
YES ESC
Activation of a mini priming sequence
before every wash protocol.
A
Mini Prime: Y
¯
®
VOL : 13 ml
YES ESC
Use “-” and “¯” keys to activate (Y) or
deactivate (N), then “ ®” key and ”-”
and “¯” to set the volume from 1 to 30ml.
GROUP :Secured Stop
¯
YES ESC
A
S e curStop:N VOL:13ml
¯
®
YES ESC
GROUP
-
Use “-” and “¯” keys to activate (Y) or
deactivate (N), then “ ®” key and ”-”
and “¯” to set the volume from 1 to 30ml.
Reboot all configurations’s parameters
: RESET CONFIG
¯
YE S
Activation of the secured stop after
every wash protocol to remove air
from manifold..
ES C
A
VALID MODIFICATION
-
¯
YES
ESC
Press "Yes"
reinitialisation
A
key
to
valid
the
: Back to the main menu (see § 3.3).
39
3.7 PROGRAMMING
3.7.1 Kit Structure
KIT PROGRAMME
Parameters depending
on Kit (reagents)
KIT 2
PLATE PROGRAMME
Parameters depending
on Plate dimensions
PLATE 10
KIT 75
(Kit) NAME
PLATE 1
Name
Bottom Form
Aspiration Horizontal Position
KIT 1
(Kit) NAME
Plate Name
MANIFOLD
STRIP (omitted)
METHOD
MODE
Crosswise Aspiration
Aspiration Time
(Dispensed) VOLUME
OVERFLOW
LIQUID
FLOW (compensation)
BOT WASH NUMBER
BOTTOM(Wash) TIME
BOT. ASP. NUMBER
SHAKE TIME
No. OF CYCLES
SOAK (time)
END OF KIT?: NO
MET(hod) INTER(val)
Centring
Bottom Aspiration vertical position
Aspiration Vertical Position
Bottom Aspiration Vertical Position
Bottom Wash Vertical Position
Horizontal Speed
Vertical Speed
Aspiration Speed In
Dispensing Speed Out
Bottom Wash Speed In
Bottom Wash Speed Out
Agitation Amplitude
Agitation Speed
Fig : 15
METHOD
MODE
Crosswise Aspiration
Etc…
END OF KIT?: YES
NR OF KIT?:
KIT INTER(val)
Fig : 15
As seen on § 1.8.3 Parameter's definitions (KIT and
PLATE), parameters directly depending on KIT (such
as dispensing, aspirating times, liquids, etc..) are called “KIT parameters”.
Parameters depending on microplate dimensions
(mainly POSITION and SPEED parameters) are called “PLATE parameters”.
At programming, each kit is mandatory linked to one plate with the “Plate number”
parameter (Fig. 15).
This implies that the PLATE must be already existing or must be programmed prior
the associated KIT is programmed.
Up to 10 PLATES can be programmed.
Up to 75 KITS can be programmed.
40
3.7 PROGRAMMING (continued)
3.7.2 Access to PROGRAMMING mode
SELECT:RUN
¯
IN
YES
OUT
Enter the programming mode: press simultaneously
the "IN" and "OUT" keys.
PRG:
-
ADD
¯
YES
41
3.7 PROGRAMMING (continued)
3.7.3 Programming Synopsis
Programming
Mode
PRG: ADD
See § 3.7.4
ADD: KIT
ADD: METHOD
ADD: PLATE
PRG: INSERT
See § 3.7.5
INSERT: KIT
INSERT: METHOD
INSERT: PLATE
PRG: DELETE
See § 3.7.6
DELETE: KIT
DELETE: METHOD
DELETE: PLATE
PRG: EDIT
See § 3.7.7
EDIT: KIT
EDIT: PLATE
PRG: COPY
See § 3.7.8
COPY: KIT
COPY: PLATE
Fig : 16
PRG:PLATE TEST
See § 3.7.9
RUN: KIT 75
42
3.7 PROGRAMMING (continued)
3.7.4 ADD
3.7.4.1 ADD: KIT
A D D:
-
¯
The kit is added at the end of the existing kit list
K I T
YES ESC
N A M E: K I T N r.2
¯
®
YES ESC
• Use “-” and “¯” keys to scroll the
available menu.
• Press “YES” key to initiate the
displayed selection.
• Press “ESC” key to escape and go
back to former prompt.
Enter the kit name: select
character with “-” and
“¯” keys, then press “®”
key to move to next
character (up to 15 characters).
P L A T E: P L A T E 0 1
¯
YES ESC
Select the plate to be
associated to kit.
M A N I F O L D:
¯
Select manifold type :
LP40 : 8- or 12-channels
LP41 : 8-, 2*8-, 3*8- or 12-,
2*12-channels.
8
YES ESC
STRIP:1 X 3 4 5 6
¯
®
YES ESC
STRIP:7 8 9 10 X 12
¯
®
YES ESC
M E T H O D: W A S H + A S P .
¯
YES ESC
-
¯
YES ESC
E N D O F K I T:
¯
NO
YES ESC
M E T . I N T E R:
¯
®
0MN45S
YES ESC
Omit strip : place cursor on strip
with “®” key, then press “-” or
“¯” key to have strip omitted
(“X”).
In RUN mode, the omitted strips
will never be processed.
Select the first method of kit.
See method parameter selection on
§ 3.7.4.3.
Answer "NO" in order to add another
method.
Set "Method interval" with "-" or "¯" and
the "®" keys.
(from 0 min 0 s up to 59 min 0 s).
M E T H O D: DISP E N S I N G
¯
YES ESC
-
¯
YES ESC
Go to page 44
43
3.7 PROGRAMMING (continued)
3.7.4 ADD (continued)
3.7.4.1 ADD : KIT (continued)
Continued from page 43
E N D O F K I T:
¯
YES
Y E S ESC
Answer "YES" when no more methods have to be added.
N o. O F K I T S :
2
¯
YES ESC
Select the Nr. of times the kit has
to be run with "-" or "¯"keys
(up to 9 times).
KIT INTER:
¯
®
0 MIN 0 S
YES ESC
When run more than once, set "Kit interval"
with "-" or "¯" and "®"keys.
(from 0 min 0 s up to 59 min 59 s).
SELECT:RUN
¯
IN
YES OUT
The new kit is added to the end of the existing
kit list.
Display is back to main menu.
3.7.4.2 ERRORS in KIT programming
ERR:24 TOO MANY KIT
PROGRAMMED
YES
SELECT:RUN
¯
IN
YES OUT
ERR:32 K I T N A M E
IMPOSSIBLE
YES
NAME:
¯
®
The name or the kit name you have entered is
already existing. Enter a new name to continue kit programming.
YES ESC
ERR:25 NOT ENOUGH
MEMORY
YES
SELECT:RUN
¯
IN
75 kits are already programmed! You must
first delete an existing kit programming a new
one.
Memory is full because one or several kits
are containing a large number of methods.
You must first delete an existing kit prior
programming a new one.
YES OUT
44
3.7 PROGRAMMING (continued)
3.7.4 ADD (continued)
3.7.4.3 ADD: METHOD
A D D:
-
MET H O D
YES ESC
¯
The method is added after the last method of the selected kit
• Use "-" and "¯" keys to scroll
the available menu.
• Press "YES" key to initiate the
displayed selection.
• Press "ESC" key to escape
and go back to former prompt.
K I T : K I T N o.23
¯
YES ESC
Select kit to which you want to add a method with the "-" and "¯" keys.
M E T . I N T E R : 0 MIN 0 S
¯
®
YES ESC
Set “Method interval” between last existing method and added method with “-”
or “¯” and “®” keys.
(from 0 min 0 s up to 59 min 0 s).
METHOD :WASH + ASP.
¯
YES ESC
Select the method to be added
MODE: PLATE
¯
Set kit parameters associated to selected
method.
See table next page and kit
parameter definition § 1.8.3
YES ESC
CROSW. ASP.:NO
¯
YES ESC
ASP. TIME
¯
VOLUME:
¯
: 0.5S
YES ESC
750ul
YES ESC
OVERFLOW:
¯
V
3.0mm
YES ESC
LIQUID : WASH W9
¯
YES ESC
FLOW : -3
¯
YES ESC
N o. O F C Y C L E S :
2
¯
YES ESC
SOAKING
¯
Press “V” key to show the modification at
the real time. To go out from this mode,
just press “V” key again.
This mode can be kept during all the
steps of modifications
:
1MN 0S
YES ESC
Only the first cycle is played “n” times
(here twice) for a “two-cycle” method
such as Wash + Asp (nW + A).
S EL EC T: R UN
-
¯
IN
YES OU T
45
3.7 PROGRAMMING (continued)
3.7.4 ADD (continued)
3.7.4.3 ADD: METHOD (continued)
ASPIRATION
DISPENSING
BOTTOM
WASH.
BOTTOM ASP.
AGITATION
nD
nw
na
nAg
*
*
*
BOT.WASH +
BOT ASP
nA
BOT.WASH +
ASP
Nw+a nW
WASH+
BOT. ASP
Method Code:
WASH + ASP .
METHOD:
WASH
Summary of kit parameters associated to method.
nW+
A
NW+
a
nw+
A
Kit Parameter
Value
See def.
MODE:
p . 16
*
*
*
*
*
*
CROS. ASP.:
STRIP or
PLATE
YES or NO
p . 18
*
*
*
*
*
*
*
*
ASP. TIME:
0.1 to 9.9 s.
p . 18
*
*
*
*
*
*
*
*
VOLUME:
50 to 3000 ul
p . 19
*
*
*
*
*
*
*
OVERFLOW:
1.0 to 12.9 mm
p . 19
*
*
*
*
*
*
*
LIQUID:
Wash W1 to
Wash W9
-5 to +5
p . 19
*
*
*
*
*
*
*
p . 19
*
*
*
*
*
*
*
BOT. WASH
NUMBER:
BOTTOM TIME:
1 or 2
p . 22
*
*
*
0.1 to 9.9 s.
p . 22
*
*
*
BOT. ASP.
NUMBER:
SHAKE TIME:
1 or 2
p . 23
0.1 to 59.9 s.
p . 25
No. OF CYCLES:
1 to 9
p . 17
*
*
*
*
*
*
*
*
*
*
SOAKING:
0 to 59 min. in
PLATE mode
0 to 9.9 s. in
STRIP mode
p . 17
*
*
*
*
*
*
*
*
*
*
FLOW:
*
*
*
*
*
3.7.4.4 ERRORS on METHOD programming
ERR:25 NOT ENOUGH
MEMORY
YES
SELECT:RUN
¯
IN
YES OUT
Memory is full because one or several
kits are containing a large number of
methods.
You must first delete an existing kit or
existing method prior programming a
new one.
46
3.7 PROGRAMMING (continued)
3.7.4 ADD (continued)
The plate is added at the end of the existing plate list
3.7.4.5 ADD: PLATE
ADD
-
: PLATE
YES ESC
• Use “-” and “¯” keys to scroll the available menu.
• Press “YES” key to initiate the displayed
selection.
• Press “ESC” key to escape and go back
to former prompt.
NAME:PLATE 10
¯
®
YES ESC
Enter plate name: select character with
“-” and “¯” keys, then press the “®” key
to move to next character (up to 8 characters).
BOT. SHAPE: FLAT
¯
YES ESC
Indicate well bottom shape:
FLAT or CURVED
CENTERING
:
0.3mm
¯
V
YES ESC
Press “V” key to show the modification at
the real time. To go out from this mode,
just press “V” key again.
This mode can be kept during all the steps
of modifications
Centring of the µplate wells relatively to
manifold needle in the In/Out direction
-2.0 mm (IN) to +2.0 mm (OUT), step 0.1
mm.
Important parameter when a crosswise
aspiration must be made close to the wall
of wells.
-
¯
+
Bad
-
+
Good
-
+
Bad
IN
2,0mm
OUT
+2,0mm
ASP.HOR. POS. :
¯
V
1.4 m m
YES ESC
Aspiration Horizontal Position
(for FLAT bottom only).
See definition on para 1.8.3.
.
ASP.VERT.POS.:13.5mm
¯
V
YES ESC
Aspiration Vertical Position.
See definition on para 1.8.3.
Go to page 48
47
3.7 PROGRAMMING (continued)
3.7.4 ADD (continued)
3.7.4.5 ADD: PLATE (continued)
Continued from page 47
BOT.VERT.POS.:11.8mm
¯
V
YES ESC
B.W.VERT.POS.:11.8mm
¯
V
YES ESC
HORIZONTAL SPEED : 6
¯
V
YES ESC
V ERTICAL SPEED
: 6
¯
V
YES ESC
ASP. DOWNW. SPEED: 6
¯
V
YES ESC
Bottom (aspiration) Vertical Position.
See definition on para 1.8.3.
Bottom Wash Vertical Position.
See definition on para 1.8.3.
Horizontal Speed:
In/Out plate carrier speed during non
work movements.
(movement to home position, return
movement from last to first strip etc..).
0 to 9, step 1.
(speed min. = 0; speed max. = 9)
Vertical speed:
Up / Down manifold speed during non
work movements.
(movement to home position, etc...).
0 to 9, step 1.
(speed min. = 0; speed max = 9)
Aspiration Downward Speed.
See definition on para 1.8.3.
Go to page 49
48
3.7 PROGRAMMING (continued)
3.7.4 ADD (continued)
3.7.4.5 ADD: PLATE (continued)
Continued from page 48
DISP. UPW. SPEED : 6
¯
V
YES ESC
BOT. DOWNW. SPEED: 3
¯
V
YES ESC
BOT. UPWARD SPEED: 6
¯
V
YES ESC
SHAKING AMPLITUDE: 2
¯
V
YES ESC
SHAKING SPEED
: 9
¯
V
YES ESC
Dispensing Upward Speed.
See definition on para 1.8.3.
Bottom Downward Speed.
See definition on para 1.8.3.
Bottom Upward Speed.
See definition on para 1.8.3.
Shaking Amplitude.
See definition on para1.8.3.
Shaking Speed.
See definition on para1.8.3.
ASP
SELECT:RUN
¯
IN
YES OUT
49
3.7 PROGRAMMING (continued)
3.7.4 ADD (continued)
3.7.4.6 ERRORS on PLATE programming
ERR:26 ALREADY
10 PLATES!!
YES
SELECT:RUN
¯
IN
10 plates are already programmed! You must first delete an existing plate prior to
programming a new one.
YES OUT
ERR:33 PLATE NAME
IMPOSSIBLE
YES
NAME:
¯
®
YE S
ES C
You have entered no name or
the plate name you have entered is already existing. You are
prompted to enter a new name
to continue plate programming.
50
3.7 PROGRAMMING (continued)
3.7.5 INSERT
3.7.5.1 INSERT:KIT
INSERT
¯
The new kit is inserted before another kit
: KIT
YES ESC
B E F . : K I T N o. 2 3
¯
YES ESC
Select kit before which you
want to insert new kit.
N A M E : K I T N o. 2 4
¯
®
YES ESC
Enter new kit name.
Then, same procedure as in
§ 3.7.4.1 ADD:KIT.
3.7.5.2 TEMPORARY KIT
RUN: TEMPORARY KIT
¯
YES ESC
Power failure or erroneous OFF switching during KIT insertion will cause the kit to be
lost unless the first method has been completely programmed. In this case the completely programmed methods can be found in a kit named “TEMPORARY KIT”. This
kit is always inserted at the first place of the kit list. It is then possible to COPY this
Temporary Kit and write its correct name, then continue with programming of next
methods and kit repetition parameters.
Once saved under its correct name, it is highly recommended to DELETE the TEMPORARY KIT.
3.7.5.3 INSERT : METHOD
INSERT
¯
The new method is inserted before another method
: METHOD
YES ESC
K I T : K I T N r. 23
¯
YES ESC
Select kit where a method has
to be inserted.
BEF.: 1:WASH + ASP.
¯
YES ESC
Select method before which the
new method has to be inserted.
METHOD :DISPENSING
¯
YES ESC
Enter the new method name.
Then, same procedure as in
§ 3.7.4.3 ADD:METHOD
51
3.7 PROGRAMMING (continued)
3.7.4 INSERT (continued)
3.7.5.4 INSERT: PLATE
INSERT
¯
The new kit is inserted before another plate
: PLATE
YES ESC
BEF.: PLATE 01
¯
YES ESC
Select the plate before which the new
plate has to be inserted.
NAME:PLATE 00
¯
YES ESC
Enter new method name.
Then, same procedure as in parameter
3.7.4.5 ADD: PLATE.
52
3.7 PROGRAMMING (continued)
3.7.6 DELETE
3.7.6.1 DELETE:KIT
DELETE
¯
: KIT
YES ESC
K I T : K I T N r. 2 4
¯
YES ESC
D E L . : K I T N r. 2 4
¯
YES ESC
SELECT:RUN
¯
IN
Select kit to be deleted.
Press “YES” key to confirm kit is deleted or press “ESC” key to escape.
YES OUT
3.7.6.2 DELETE: METHOD
DELETE
¯
: METHOD
YES ESC
K I T : K I T N r. 2 3
¯
IN
YES ESC
Select kit to which you want to delete a method.
DEL.
3:ASPIRATION
¯
YES ESC
Select the method to be deleted.
METHOD :ASPIRATION
¯
YES ESC
Press “YES” key to confirm method
is deleted or press “ESC” key to
escape.
SELECT:RUN
¯
IN
YES OUT
Note
Deleting the method in a “one-method” kit
is equivalent to delete this kit.
53
3.7 PROGRAMMING (continued)
3.7.6 DELETE (continued)
3.7.6.3 DELETE: PLATE
DELETE
¯
: PLATE
YES ESC
PLATE :PLATE 10
¯
IN
YES ESC
Select plate to be deleted.
DEL.: PLATE 10
¯
YES ESC
Press “YES” key to confirm plate is
deleted or press “ESC” key to escape.
SELECT:RUN
¯
IN
YES OUT
3.7.6.4 ERROR in PLATE deletion
ERR:29 PLATE ASSOC.
TO
A KIT
YES
SELECT:RUN
¯
IN
The plate is still associated with
one or several kits.
You must first associate an other
plate to affected kits or deleted kits
prior deleting this plate.
YES OUT
54
3.7 PROGRAMMING (continued)
3.7.7 EDIT
3.7.7.1 EDIT: KIT
EDIT
¯
: KIT
YES ESC
C
K I T : K I T N r. 2 4
¯
YES ESC
Select kit to be edited.
Select “MAIN PARAMETERS” or “METHOD” with ”-” and “¯” keys.
EDIT:METHOD
¯
EDIT:MAIN PARAMETERS
¯
YES ESC
YES ESC
Go to page 56
Edit main parameters:
Every displayed parameter can be
changed by using "-" or "¯" keys.
Example: the plate associated to this kit
can be changed.
PLATE :PLATE 10
¯
YES ESC
MANIFOLD:
¯
8
YES ESC
STRIP:1 X 3 4 5 6
¯
®
YES ESC
Nr OF KITS :
2
¯
YES ESC
KIT INTER
¯
0MN 0S
YES ESC
V ALID MODIFICATION
¯
YES ESC
Press “YES” to validate the main parameters modification.
A
EDIT:MAIN PARAMETERS
¯
YES ESC
Press “-” or “¯” keys until
“END of EDIT” message.
C
EDIT:END OF EDIT
¯
YES ESC
C
SELECT:RUN
¯
IN
YES OUT
Press “YES” to quit EDIT mode.
Press “-” or “¯” keys to go back to “Main
Parameters” or “Method”.
A : Return to the main
menu, see § 3.3.
55
3.7 PROGRAMMING (continued)
3.7.7 EDIT (continued)
3.7.7.1 EDIT: KIT (continued)
Continued from page 55
EDIT:METHOD
¯
YES ESC
C
MET.: 4:ASPIRATION
¯
YES ESC
YES ESC
Select method to be edited.
Then, every parameter of the method can
be modified by using “-” or “¯” keys.
Note that the "Liquid: Wash Wx" cannot be
modified.
V ALID MODIFICATION
¯
YES ESC
Press “YES” to validate method modification.
-
¯
A
EDIT:METHOD
¯
Press “-” or “¯” keys until “END OF EDIT”
message.
YES ESC
C
EDIT:END OF EDIT
¯
YES ESC
C
SELECT:RUN
¯
IN
YES OUT
Press “YES” to quit EDIT mode.
Press “-” or “¯” keys to go back to “Main
Parameters” or “Method”.
A: Back to main menu
see § 3.3.
C: Back to kit edition
see § 3.7.7.1.
56
3.7 PROGRAMMING (continued)
3.7.7 EDIT (continued)
3.7.7.2 EDIT: PLATE
EDIT
¯
: PLATE
YES ESC
PLATE :PLATE 10
¯
YES ESC
Select plate to be edited.
BOT. SHAPE: FLAT
¯
YES ESC
Every parameter of the selected
plate can be modified by using
“-” or “¯” keys.
-
¯
YES ESC
V ALID MODIFICATION
¯
YES ESC
Press “YES” to validate main parameters modification.
A
SELECT:RUN
¯
IN
displayed selection.
YES OUT
A: Back to main menu
see § 3.3.
57
3.7 PROGRAMMING (continued)
3.7.8 COPY
3.7.8.1 COPY: KIT
D
COPY
¯
: KIT
YES ESC
K I T : K I T N r. 2 4
¯
YES ESC
Select kit to be copied.
B E F . : K I T N r. 2 6
¯
YES ESC
Select kit before which you want to place copy.
N A M E : K I T N r. 2 5
¯
®
YES ESC
Enter copy name: select character with
“-” and “¯” keys. Then press “®” key to
move to the next character (up to 15 characters).
D
SELECT:RUN
¯
IN
YES OUT
3.7.8.2 ERRORS in KIT copy
ERR:27 NO KIT
PROGRAMMED
YES
SELECT:RUN
¯
IN
YES OUT
No kit programmed!
You must first “ADD” a kit.
See also ERR: 24
ERR: 25
ERR: 32
On § 3.7.4.2.
58
3.7 PROGRAMMING (continued)
3.7.8 COPY (continued)
3.7.8.3 COPY : PLATE
E
COPY
¯
: PLATE
YES ESC
PLATE :PLATE 05
¯
YES ESC
Select the plate to be copied.
BEF.:PLATE 05
¯
YES ESC
Select the plate before which want to
place copy.
NAME:PLATE 04
¯
®
YES ESC
Enter copy name: select character
with “-” and “¯” keys. Then press
“®” key to move to next character
(up to 8 characters)
E
SELECT:RUN
¯
IN
YES OUT
3.7.8.4 ERRORS in PLATE copy
ERR:28 NO PLATE
PROGRAMMED
YES
SELECT:RUN
¯
IN
No plate programmed!
You must first “ADD” a plate.
See also ERR : 26
ERR : 33
On § 3.7.4.6.
YES OUT
59
3.7 PROGRAMMING (continued)
3.7.9 Plate Test
Step-by-Step RUN
The programmed kit can be used in a step-by-step mode, i.e. manifold and plate
carrier are stopped at each programmed positions (Aspiration Horizontal Position,
Aspiration Vertical Position, Overflow Position etc…) in order to check if these
positions are correct. If not correct, the user must edit (see § 3.7.7) the tested kit or
its assigned plate in order to modify position parameter(s).
G
PRG: PLATE TEST
¯
YES ESC
RUN:KIT 08
¯
YES ESC
RUN:KIT 08
WASH + ASP.
YES ESC
WASH + ASP.
YES ESC
RUN:KIT 08
¯
YES ESC
Use “-” or “¯” keys to select kit to
be tested.
Press "YES" key to move to next
programmed position.
Keep "YES" key pressed for a
continuous
motion
(preferably
deactivate the beep).
The kit is processed on the whole
plate.
G
60
3.7 PROGRAMMING (continued)
3.7.10 RAM initialization
Every programmed kit and programmed plate are saved on a RAM (Random Access
Memory).
The contents of this MEMORY can be erased by a “RAM initialization” thus deleting
the whole set of kits and plates that have been programmed by the user.
Instrument software and DEMO kits and plates are not deleted as they are saved in
an EPROM not affected by RAM initialization.
How to perform the RAM initialization?
• Turn the unit ON while keeping those keys pressed :
SELECT:RUN
¯
IN
YES OUT
Following message is displayed:
RAM INITIALIZATION
YES
SELECT:RUN
¯
IN
Press “YES” to have the
RAM reset.
YES OUT
61
4• MAINTENANCE & TROUBLESHOOTING
4.1 Routine maintenance procedures
4.1.1 Daily maintenance
Prior starting to wash:
It is recommended to pour an appropriate disinfection solution into the bottom of the
WASTE bottle prior connecting it to the washer. Thus, the infected liquid coming from
the washer and going into the WASTE bottle will be deactivated.
IMPORTANT: Avoid bleach
Fill the rinse bottle with deionized water. Connect it to the washer. Launch a Rinsing
sequence and check that the pinch valve tube and manifold are not clogged.
Otherwise, change the pinch valve tube and clean manifold (see § 4.2.1 hereafter).
When washing is terminated:
Rinse the washer. Use only deionized water for rinsing. Turn the washer off. Tubes
and manifold will be kept wet with water that will prevent them from clogging.
Empty the WASH bottle, rinse it thoroughly with deionized water.
4.1.2 Washer storage conditions
The washer should never be stored with Wash solution inside dispensing tubes and
manifold. Otherwise the liquid pump, the pinch valve tube and the manifold might be
clamped if completely dry, thus preventing any further dispensing of liquid.
In this case priming must be made with the help of a syringe filled with deionized
water connected to the Rinse input of the washer.
62
4.2 Cleaning and disinfection
4.2.1 Cleaning the manifold
The manifold is infectious.
Disinfect it prior to any further cleaning.
See disinfection procedure on next § 4.2.2.
Aspirate needle and chamber
•Remove the manifold.
•Using a duster or a non scratching utensil, thoroughly clean the outside of the
dispense and aspirate needles.
•Remove the silicon top seal of the manifold.
•Using the big pin supplied in the maintenance kit, clean the big aspirating needles.
•Rinse out the aspirate chamber with deionized or distilled water. Thoroughly clean
the walls of the aspirating cavity.
•Look through the aspirate needles to ensure that cleaning is adequate.
•Put the silicon top seal back in its place.
Dispense needle and chamber
•Push the silicon cap from the chamber of the manifold using a stem or a
screwdriver entered from the opposite end of the cylindrical chamber.
•Using one of the small pin supplied in maintenance kit, clean the small dispense
needle.
•Using the cylindrical brush supplied in maintenance kit, thoroughly clean the small
dispense chamber. Thoroughly rinse dispense chamber with deionized water. Ensure
that all impurities are removed from the manifold.
•Plug dispense chamber of the manifold with the silicon plug. Place it as close as
possible to the first needle however without blocking it. Extra silicon caps are
supplied in the maintenance kit.
•Remount the manifold, replace the tubing and reprime.
63
4.2 Cleaning and disinfection (continued)
4.2.2 Disinfection
The disinfection program applies to internal surfaces of tubing, connectors, manifold
and manifold needles.
SELECT:DISINFECTION
¯
IN
YES OUT
CONNECT THE DISINF.
ON
A
YES ESC
A
Use disinfection solution approved by your laboratory. Connect the tube(s) on rinse bottle cap. Fill
the RINSE bottle with the disinfection solution.
Ensure the plate carrier is not removed, then press
“YES”.
PUMP PRIMING
ESC
A
DISINFECTION
0 H30mn00s
Pumps are stopped whereas dispensing circuits are
filled with disinfection solution.
A countdown of 30 min. is started after which you
are prompted to perform a RINSE operation.
ESC
Remove disinfection solution and fill RINSE bottle
with deionized water (DiH2O).
Then press "YES".
C ONNECT THE RINSE
YES ESC
PUMP PRIMING
ESC
A
SELECT:RUN
¯
IN
YES OUT
Then prior launching a Wash protocol, assign
the correct Wash solution to the wash input(s)
in the CONFIGURATION menu or by priming
the circuit with the PRIMING/RINSING menu.
A
: Return to the main
menu
IMPORTANT:
• Avoid bleach in disinfecting the washer as a thorough rinsing of the tubes will not
prevent traces of bleach from remain inside the tubing and manifold. This can be
enough to corrupt the reagents of next wash.
• Disinfect the washer when it has not been used for more than one day. When used
daily, disinfect it at least once a week.
• Disinfect the washer prior to any servicing or handling action, shipment or change of
site.
The final RINSING sequence must be performed in all cases after the disinfection
procedure has been started (even for demonstration purpose).
The software uses this final rinsing sequence to set the “Rinse” liquid at all 4 inputs.
The automatic rinsing will not be possible (ERR 18) if rinsing is not done after
disinfection.
64
4.3 Troubleshooting
4.3.1 Hardware and software version
SELECT:SERVICE/VER
¯
IN
YES OUT
F
GROUP :VERSIONS
¯
YES ESC
“-” and “¯” keys are deactivated on this
prompt.
A
-
LP 41
¯
Hardware version.
YES ESC
F
-
VERSION
¯
3.xx . 2 Y
YES ESC
Software version of the washer.
F
DEMO xxx
-
¯
YES ESC
F
Default User Data version
• Kit list and
• Plate list
programmed in the factory and saved on
EPROM.
(Default user data are not deleted by a
RAM initialisation).
A : Back to main menu
see § 3.3.
65
Recommendations for optimized
Washing conditions on LP40 / LP41 washers
Bad Washing condition
Inadequate aspiration
Factor generating risks
How to restore good washing conditions?
Comments
Adjust Aspiration Parameters
Too much residual volume in the wells
- Aspiration Vertical Position not set correctly
- Aspiration Horizontal Position not set correctly
ASPiration VERTical POSition must be touching bottom of well to
avoid aspiring needles blocked by foam (*)
ASPiration HORizontal POSition must be as possible to well’s wall.
3
Plate parameter
6
Use CROSswise ASPiration
One neddle “forgets” temporarily to aspirate
Aspiration
Vertical Position
9
- Aspiration Downward Speed not set correctly
Compensable possible horizontal offset with CENTERING parameter
Reduce ASPiration DOWNward SPEED
- High concentration of wetting agent in wash buffer :
needle might be blocked by foam
Respect dilution factor. Never use higer wetting agent
concentration than required.
- Waste bottle is full
Check waste bottle, ensure no foam goes on the yellow tube.
Empty Waste Bottle prior starting to wash
- Hydrophobic Filter is clogged
Home Position
0
[m
m]
Plate parameter
Kit parameter
Plate parameter
12
15
[mm] 2
1
Aspiration
Horizontal position
0
Plate parameter
Hydrophobic
Filter
Waste Bottle
Change Hydrophobic Filter
Trap Vial
Possibly install a trap vial
Contact your application specialist for advice
Inadequate dispensing
Adjust Dispensing Parameters
- Flow Rate is not set correctly
Adjust FLOW rate compensation between –5 (weak) and +5 (strong)
Kit parameter
Not enough quantity
- Volume is not set correctly
Adjust VOLUME between 50 to 3000 µL by step of 50 µL
Always dispense slightly more than the awaited volume in the well
and aspirate the volume in excess by setting the OVERFLOW position
(see below)
Kit parameter
Not the same volume in every well
- One or several dispensing needles must be cleaned
Always ensure dispensing needles are clean
Use metallic cleaning pin supplied in maintenance kit
- Owerflow position not set correctly
Adjust OVERFLOW position of the apsirating needle in order to
aspirate the excess of dispensed VOLUME
- High concentration of wetting agent in wash buffer
Respect dilution factor. Never use higher wetting agent concentration
Too strong
Too weak
st
Often less volume in 1
strip than in the nextones.
(Manifold dripping in rinsing tank when on standby before
wash process)
than required.
- Rubber stopper in manifold dispensing chamber not set
correctly
“A” dimension for Rubber Stopper [mm]
Shape of rubber stopper
Manifold channel
This might create an excessive air bibble inside the
dispensing chamber of manifold leading to dripping
- Manifold is dirty
Maniflod dripping during Wash process
Kit parameter
Rubber Stopper
Square
Round
8
23£ A £24
26£ A £27
2*8
0
0
3*8
0
0
12
5£ A £6
8£ A £9
2*12
0
0
A
Manifold
Dispensing needles
Clean manifold, rinse and dry it completely
Cleaning set supplied in Maintenance Kit
Spray silicone grease onto dispensing needles
-Protect aspirating needles with adhesive tape
-Clean inside of dispensing needles with metallic pin
supplied in maintenance Kit.
In Main menu, select “CONFIGURATION”, available in
firmware equal or more recent than
1.50.2Y for LP40
And
4.43.2Y for LP41
Spare supplied in Maintenance Kit
Spare supplied in Maintenance Kit
- If still dripping
Active “MiniPrime” and “Secured Stop” to compensate and
minimize dripping
- Pinch Valve Tube is leaking
- Manifold connector with O-rings is leaking
Change pinch Valve tube
Ensure O-rings are correctly seated in manifold connector if still
leaking, change O-rings.
Contact your application specialist for advice
66
APPENDIX
Revision
Upgrade Description
December 1996
First official release of the user manual compatible for both
LP40 and LP41 washers.
April 1997
Implementation of the new motorised multiwasher selector.
Modified pages
-page 13 § 1.6 LP41 Hydraulic circuit
-page 38 § 3.6.2 Washer’s configuration
Implementation of the selection between the new multiwash
selector (MOTOR) and the old one (PINCH valve).
Page 39 modified accordingly and page 40 created.
September 1997
Implementation of the new, internal design with integrated
blocking device of the manifold.
Modified pages
-page 28 § 2. installation
January 2000
Added: “Important Notice” §
Modified page - 4
New Adil logo, e-mail address ans website
Modified Front page
November 2000
ADD “V” function
Modified pages 46, 48, 49, 50
Inversion of “Aspiration horizontal position” and “Centering”
functions
Modified page 48
ADD “reset config.” function
Modified page 40
March 2003
Manual User converted in Word format
April 2005
Adil instruments logo remplecement by Bio-Rad’s one
September 2005
Addition of NOTA on page 3.
67
INDEX
Symbols
D
A
Access to PROGRAMMING
ADD: KIT
ADD: METHOD
ADD: PLATE
Aerosol Protection Cover
AGITATION
Agitation Amplitude
Agitation speed
Agitation Time
ASP. DOWNW. SPEED
ASP. HOR. POS.
ASP. TIME
ASP.VERT.POS.
ASPIRATION
Aspiration Downward Speed
Aspiration Horizontal Position
Aspiration time
Aspiration Vertical Position
Autoclavage
41
43
45
47
7
16, 25
25
25
25
18
18
18
18
16, 18
18
18
18
18
7
B
BEEP
39
B.W.VERT.POS.
22
B.WASH+B.ASP
16
BOT.ASP. NUMBER
23
BOT.DOWNW. SPEED
22
BOT.SHAPE
47
BOT.UPWARD SPEED
22
BOT.VERT.POS.
24
BOT.WASH NUMBER
22
BOT.WASH+ASP
16
Bottom (Aspiration) Vertical Position
24
BOTTOM ASP.
16, 23, 24
Bottom Aspiration Number
23
Bottom Downward Speed
22
BOTTOM TIME
22
Bottom Upward Speed
22
Bottom Wash Number
22
Bottom Wash Time
22
Bottom Wash Vertical Position
22
BOTTOM WASH.
16, 21
C
CENTERING
Cleaning the manifold
Compensation
Contents
COPY: KIT
Crosswise aspiration
CROSW. ASP.
cut-off device
CWA
47
63
19
2
58
18
18
5
18
Daily maintenance
DELETE
DELETE: METHOD
DELETE: PLATE
DELETE:KIT
Disinfection
DISP. UPW. SPEED
DISPENSING
Dispensing Upward Speed
62
53
53
54
53
64
19
16, 19
19
E
EDIT:METHOD
END OF EDIT
EDIT: KIT
Electric Shock hazard
Electrical Data
ERR:21
ERR:24
ERR:25
ERR:26
ERR:27
ERR:28
ERR:29
ERR:32
ERR:33
ERROR on PLATE deletion
ERRORS in KIT programming
ERRORS in METHOD programming
ERRORS on PLATE programming
56
55
55
5
13
32
44
44, 46
50
58
59
54
44
50
54
44
46
50
F
FLOW
Flow rate compensation
19
19
H
Hardware specifications
Hardware version
HORIZONTAL SPEED
13
65
48
I
IN
INSERT
INSERT : METHOD
INSERT: PLATE
INSERT:KIT
29
51
51
52
51
K
Keyboard
KIT
KIT Parameter
Kit parameters
Kit Structure
29
15
18
18
40
68
R
L
LIQUID
LP40 Basic features
LP40 Outside dimensions
LP41 Basic features
LP41 Outside dimensions
19
7
8
10
11
M
Main Parameters
maintenance
Manifold
MEMORY
MET. INTER
method
Method Interval
Methods
Microplate loading
Mini Priming
55
62
7
61
17
16
17
15, 16
30
39
O
Omit Strip
Out
OVERFLOW
Overflow Position
43
29
19
26
P
Physical data
Plate Agitation
Plate Carrier
Plate Mode
PLATE parameter
Please RINSE
Prime
PROGRAMMING in Advanced Mode
Programming Synopsis
Pump Priming
Routine maintenance
RS232 serial port for connection to PC
62
10
S
Secured Stop
safety information
SHAKE TIME
SHAKING AMPLITUDE
SHAKING SPEED
Soak time
SOAKING
Software parameters for Wash protocols
Software specifications
Software version
Strip Mode
39
5
25
25
25
17
17
15
14
65
16
T
Technical features
TEMPORARY KIT
Troubleshooting
13
51
65
U
Unpacking
27
V
13
25
10
16
18
34
31
41
42
31
Vertical Speed
VOLUME
48
19
W
WASH
WASH + ASP
Wash + Aspiration
Wash + Bottom Aspiration
WASH+BOT.ASP
2*8- CHANNEL
3 LIQUID INPUTS
8- CHANNEL
16, 20
16
16
16
16
10
10
7
69