1
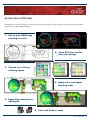
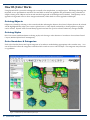
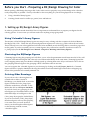
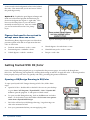
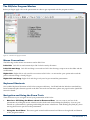
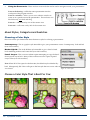
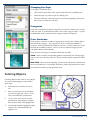
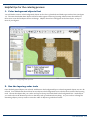
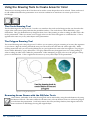
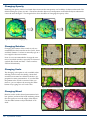
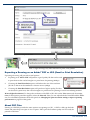
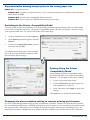
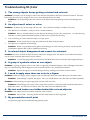
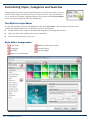
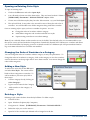
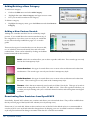
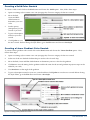
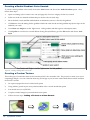
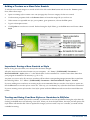
In This Guide: System Requirements 2 Installation 2 DS|Color Overview 3 How DS|Color Works 4 Before You Start 5 Preparing Your Drawing 6 Starting the Coloring Process 10 Editing Colored Objects 17 Printing and Exporting 22 Troubleshooting 27 Creating Custom Styles & Swatches The Color Style Editor 28 Quick Reference 34 Color User Guide Welcome to DynaSCAPE Color! This User Guide tells you how to quickly learn to use DS|Color to create color presentations from your designs. Please read this guide carefully. Installation Before you install DS|Color, please take a moment to ensure your computer meets the requirements for this software. Note: Running DS|Color on systems that do not meet the recommended requirements can result in poor performance. Finding Your System Information: To get information about your operating system, proces‐ sor speed, and RAM, right‐click My Computer icon and then select Properties. The General tab displays your system information. System Requirements: Windows Vista or Windows 7 (32‐bit or 64‐bit operating systems) Install Windows with the English version or set the language to English (may need to download a language pack) Intel Core 2 Duo or 2.8 GHz Pentium 4 Processor or Equivalent (Minimum: 1.5 GHz Pentium 4) Memory: 2GB RAM Video Card: 128 MB DirectX 9 Video Card (Common Video Cards: ATI Radeon models 9550, 9600, 9800, and X ‐Series, Intel GMA900 Model 915G, Intel GMA950 Model 945G, NVidia Geforce FX Series, 6xxx Series, and 7xxx Series) Note: DS|Color will run on Windows XP, however you may experience performance issues when working with large presentation drawings. Installing DS|Color from an Installation Disk (CD) 1. 2. 3. 2 Insert the CD into your CD/DVD drive and the install screen should automatically appear. (If it fails to appear, press the Windows Start button then type “D:\autorun.exe”, where D: is the letter associated with your CD‐ROM drive. If your CD‐ ROM drive is associated with another letter, type that letter instead) Click on the Install DynaSCAPE Color link to begin the installation. The Install Shield Wizard appears on the screen, which will guide you through the installation process. In the Customer Information panel type your name and your company name. DynaSCAPE Software 4. Type in the Serial Number provided with the purchase of your software. (Note: Serial Numbers are case sensitive.) Click Next. 5. The installation will check your system to ensure that the Microsoft .NET 3 framework is present. If it is not present, the installation will install it before proceeding to install Color. 6. After installation is complete, a DS|Color icon will appear on your desktop. Need Help? If you experience any difficulties during installation please call us at 1‐800‐710‐1900 An Overview of DS|Color This guide will cover everything you need to know about using DS|Color in order to create spectacular presenta‐ tions from your DS|Design drawings. 1. Set up your DS|Design drawing for color Contemporary Pencil Crayon 3. Choose one of three coloring styles Marker Hybrid 2. Open DS|Color and import your design 4. Apply color and adjust layering order 5. Apply drop shadows to add depth 6. Save and Print or email Color User Guide 3 How DS|Color Works Using DynaSCAPE’s powerful coloring tool is actually a lot simpler than you might expect. DS|Design drawings are imported as new presentations into DS|Color and then swatches are applied to the presentation using a handful of simple coloring tools. Objects can be moved into the foreground or the background as needed. Transparency can be applied to foreground colors to show images underneath, while shadows can be applied to add depth. Coloring Objects Objects are colored by selecting a color swatch and then selecting the object to be colored. Objects that can be colored will be highlighted blue when your cursor is placed over it. Only objects enclosed by a closed polyline or polygon can be colored. DynaSCAPEʹs newest library figures have been set up to be colored without any changes needed. Coloring Styles DS|Color comes with three distinct coloring styles, each having a wide selection of swatches to choose from: Pencil Crayon, Marker Hybrid and Contemporary Color Swatches & Categories Each style is broken down into logical categories of swatches to make finding appropriate color swatches easy. You are not forced to follow the categories to decide which swatch to use to color an object. The categories are just meant as a guideline. Figure 1 ‐ Finished Project in the Marker Hybrid style 4 DynaSCAPE Software Before you Start - Preparing a DS|Design Drawing for Color Before opening a DS|Design drawing in DS|Color, make sure it is properly set up in DS|Design to be colored as easily and quickly as possible. The key to be able to color everything on your drawing depends on two things: 1. Using ‘colorable’ library figures 2. Creating closed areas for walkways, patios, lawn and beds etc. 1. Setting up DS|Design Library Figures In order to get the best results from DS|Color it is important to understand how to prepare your figures for the coloring process. In most cases you will not need to do anything except group them. Using ’Colorable’ Library Figures The majority of the DS|Design library figures are setup for easy coloring with the exception of the four libraries that begin with ‘CLR‐’. There also may be some figures that requires two colors (e.g. ponds with rocks and water). These will only have one color applied and will need to be modified on each drawing (this is covered on page 10‐11 in this guide). If you have created your own custom figures, they will need to contain a closed area on the Col‐ or_Setup layer (see the DS|Design User’s Manual ‐ Chapter 11: Working with Library Figures). Clustering the DS|Design Figures Clustering figures using the grouping tool will allow you to color the presentation much faster since DS|Color will recognize each individual figure and color each one of them individually at the same time. Clustering figures like rocks, stepping stones and paver borders will help speed up coloring them since all you will need to do is click on the grouping and each figure in the grouping will be colored the same at one time. You can recognize the ’colorable’ figures on your drawing by clicking on the All_Layers_On Mode. Clustered figures will have a purple, dotted line showing the outline of each individual figure where the overlapping seg‐ ments of the perimeter are normally trimmed out. Coloring Older Drawings If you wish to color a drawing that was created with an older version of DS|Design, you should check to see if the figures contain the Color_Setup layer needed to make them ’colorable’. In the Modes list click on All Layers On Mode. If you look closely at a grouping of clus‐ tered figures you should be able to see the individual shape of each figure on the Color_Setup layer (purple, dashed lines). If you can not see the Color_Setup layer, then these figures will not color properly, or in some cases, not at all. In this in‐ stance you should replace all the figures on the drawing with the current, ‘colorable’ figures. Figure 3 ‐ Old vs. ‘Colorable’ figures Color User Guide 5 2. Preparing Areas for Color in DS|Design In order to color areas such as walkways, patios, lawns, plant beds etc. you must first define those areas by sur‐ rounding them with a closed polygon. Depending on the size and complexity of the drawing, this may take some time. Once you have done this a few times you will intuitively change the way you draw, effectively reducing setup time. Creating Closed Areas to Color DS|Color requires that areas to be colored to have a closed polyline that defines the shape of the area. This closed polyline can be created using the Rectangle and Circle tools, the Polyline tool using the ‘Close polyline’ option or using the Join contiguous arcs and lines tool (to join lines together to form a closed polygon): Rectangles and Circles: Use these tools to define simple shapes on the drawing. Closed Polylines: Use the closed polyline tool to trace around more complex objects in the drawing. Choose the ‘Close polyline op‐ tion in the modifier to insure the area drawn is com‐ pletely and accurately enclosed. Figure 4 ‐ Close Polyline Option The Join Tool: Use the Join contiguous arcs and lines tool to join existing lines, polylines and arcs on your drawing together to form closed polygons. This tool requires all the segments to be accurately attached end to end (using Inference). These segments must be selected in the order that they are connect‐ ed in order to be joined together. Figure 5—Closed Areas in DS|Design 6 DynaSCAPE Software Using the Color_Setup Layer in DS|Design The Color_Setup (layer # 22) was created specifically for the purpose of having a common layer on which to place closed areas for coloring. This layer does not have to be turned on (or made visible) when the drawing has been saved in DS|Design. DS|Color is still able to recognize any closed polygons that are on this layer and apply color to them. This means that you can have lines drawn in the Color_Setup layer in addition to all the other lines on your Drawing on the Correct Layer drawing and not have them effect the output when printed The Color_Setup layer should always be the layer from Design, as you normally would. to place closed polygons on that are needed to be prepared for color. Using the DS|Design Modes There are two modes in DynaSCAPE that can be used to assist with the process of setting up drawings for coloring. Color_Layer_Mode: This mode is a single‐layer mode that only shows objects on the Color_Setup layer (layer 22). Use the Color_Layer Mode to help see which areas have been properly enclosed without having all the layers in the drawing cluttering up the screen. Color_Setup_Mode: This mode is a multi‐layer mode that shows the new layer (Color_Setup) in addition to the layers for the main components of the design. This mode turns off your shrub figures to provide a cleaner view of the drawing page while setting the drawing up for color. Use this mode while drawing all of the closed areas. Steps for Creating Closed Areas 1. Click on the Color_Setup_Mode to turn the Color_Setup layer on and turn all your shrub symbols off. The Color_Setup layer is now the active layer, automatically set when choosing the new mode. Always use this Figure 6—Closed Areas Colored in DS|Colored Color User Guide 7 layer for creating your closed areas that you need for applying color to. 2. Select the appropriate tools to create the closed areas needed for color. 3. Create your closed areas and then click on Color_Ready_Mode. This turns the Color_Setup layer off and the shrub symbols back on. 4. Click Save. 5. Your drawing is now ready to be brought into DS|Color. Time Saving Tips for Creating Closed Areas: Tip # 1: Use existing geometry: Using closed polylines is the simplest way to create these closed areas. Use the existing geometry in your design to save time. Follow these steps: 1. Select the existing geometry that surrounds or partially surrounds an area and copy it to an open space on your drawing. 2. Using your drawing tools, close off any ’open’ sides of the area. 3. Using your trim tools, trim off any lines that extend past corners. 4. Using your Join tool, join all the lines together to form a closed polygon. 5. Revise this polygon to the Color_Setup layer. 6. Move the polygon back into position on the drawing, on top of the original lines. The result will be the new polygon in the Col‐ or_Setup layer on top of the existing geometry. Repeat this for all the similar areas on the drawing. Figure 7—Use Existing Geometry Tip # 2: Make use of DS|Color’s layering order: Since DS|Color uses a layering order, where colored objects can be moved behind or in front of other objects (covered later in this guide), you can use this to your advantage and create simpler shapes: 8 1. If your design has a pond inside a large plant bed, you do not need to draw a polygon around the pond to prevent the mulch swatch from going through the pond. In DS|Color you can move the mulch to the back‐ ground so pond colors end up on top. 2. If you have a front walkway with a plant bed on both sides, you can create one large closed area that includes both plant beds and one just for the walkway. In DS|Color you can move the plant bed to the background and the walkway color can sit on top. DynaSCAPE Software Before You Open Your Drawing in DS|Color Before you save your DS|Design drawing to start coloring, there are a few things you can do to achieve the best results in the color process: 1. Save Drawing in Color_Ready_Mode: It is recommended that you select Color_Ready_Mode (version 5.0) before saving your draw‐ ing prior to bringing into DS|Color. Color_Ready_Mode turns off the Temp (Detail), Col‐ or_Setup and Patterns layers so they are not visible when brought into DS|Color. Note: DS|Color will still be able to recognize all geometry that has been placed on the Col‐ or_Setup layer, even when it has been turned off in Design. 2. Figures that require more than one color may need to be revised: Some figures such as ponds will require at least two different color swatches to be colored effectively. DS|Color can only apply one color to a library figure. In the case of a pond, which consists of rocks and water, you will need to apply two different swatches. There are several options: Option # 1: Leave the figure as it is and open the drawing in DS|Color. In the case of the pond, the rocks will be the only part that will color (see Figure 8). To color the water you will need to use the polygon tool to create an outline of the area to be colored as water. Option # 2: Leave the figure as it is and draw a closed pol‐ yline on the Color_Setup layer, tracing the outline of the pond (see Figure 9—left side). Keep in mind that you can move the Figure 8—One color per figure Figure 9— Options for setting figures up for two colors Color User Guide 9 water swatch to the background in DS|Color, behind the rocks. This means that you do not have to follow the pond edge exactly. Option # 3: Explode the pond figure in Design and make use of the closed polyline that has been pre‐ drawn in the figure (see Figure 9—right side). This line is on the Temp layer so you will need to manually turn this layer on. Once it is visible you can revise this line to the Color_Setup layer. Figures that need to be revised to accept more than one color: Figure 10—Revised figure with color applied The following library figures require one of the three previous options to be able to accept more than one color in DS|Color. Ponds & water features—rocks + water Hot tub figures—hot tub frame + water Furniture figures—umbrella + chairs Waterfalls into pools—rocks + water Vehicle figures—vehicle + windows Fire pit—rocks + fire Getting Started With DS|Color Once a drawing has been properly set up, as explained in the previous pages, it is ready to be brought into DS|Color. The following will explain how to bring the drawing in and how to apply the color. A drawing that has been properly set up will color very quickly and easily, providing the greatest satisfaction. Opening a DS|Design Drawing in DS|Color To open your DynaSCAPE Design drawing in DS|Color, follow these steps: 1. Open DS|Color—double‐click on the DS|Color icon on your desktop or go to Start | All Programs | DynaSCAPE | Color | DynaSCAPE Color to open the program. It will open to a blank screen. 2. To open your DS|Design drawing, click on the File menu and select New… or click on the icon in the toolbar called Create a new presen‐ tation from a DynaSCAPE Design. 3. DS|Color will load your DS|Design drawing. Large drawings can take a few moments to load. 4. Save your presentation before you start applying color. 10 DynaSCAPE Software The DS|Color Program Window Before you begin apply color to the presentation it is best to get acquainted with the program window: Figure 11—The DS|Color program window Mouse Conventions The following are the mouse conventions used in DS|Color: Left-click: Left‐click is used extensively in DS|Color for nearly all actions Left-click and drag: Left‐click and drag is not used in a DS|Color drawing except to move the slider and the scroll buttons Right-click: Right‐click is only used for two actions in DS|Color—to activate the ‘pan’ option and to end the process when drawing a closed polygon Right-click and drag: Right‐click and drag is only used to pan around the presentation Keyboard Shortcuts Weʹve added keyboard shortcuts to DS|Color to improve efficiency. Youʹll find both the Windows standard key‐ board commands plus shortcuts specific to the DS|Color tools and functions, please see page 25 on the Quick Ref‐ erence for details Navigation and Using the Zoom Tools There are three ways to navigate around your presentation in DS|Color: 1. New for v 2.5! Using the Mouse wheel to Zoom and Pan: You can zoom in and out of the presentation by rolling the mouse wheel forward or backward while holding the [Shift] key. You can ‘pan’ around on a presentation by pressing and holding the mouse wheel down while holding the [Shift] key, then moving the mouse to pan across the presentation. 2. Using the Scroll Bars: There are typical vertical and horizontal scroll bars on the right side and bottom of the program window Color User Guide 11 3. Using the Zoom tools: There are four zoom tools that can be used to navigate around your presentation: Zoom to fit drawing—will fit the entire presentation into the workspace of the program window Zoom to a window— allows you to use a selection window to zoom in on a specific area in the presentation. This tool uses two left‐clicks only, not click and drag Zoom in— will zoom in by 50% of the current view Zoom out— will zoom out by 50% of the current view Figure 12—The zoom tools About Styles, Categories and Swatches Choosing a Color Style DS|Color comes pre‐loaded with three distinctive styles for coloring a presentation: Contemporary: This is a graphic style intended to give your presentation a more ‘Contemporary’ look and feel (over 170 swatches) Marker Hybrid: This is the boldest style intended to give a hand‐colored look combining markers and watercolor (over 250 swatches) Pencil Crayon: This is a more realistic option attempting to copy the hand‐ drawn pencil crayon look. Many of the swatches are exact copies of pencil crayon color (over 250 swatches) Note: When DS|Color opens for the first time, the default style is Marker Hy‐ brid. Subsequently, DS|Color will open to the last style that was active when it was closed. Figure 13—Color styles Choose a Color Style That is Best For You: Marker Hybrid Style 12 DynaSCAPE Software Pencil Crayon Style Contemporary Style Changing the Style To change to a different styles 1. Click on the name of the active style to open the list of available styles 2. Select the style you wish to open by clicking on it 3. The style will load—this may take a few seconds depending on the num‐ ber of color swatches in each style Categories Each style is divided into logical categories of swatches to make it easy to find what you need. To switch between them, click on the category name. A panel of thumbnails of the swatches for the category selected will appear. Color Swatches Each category contains a number of appropriate swatches for coloring objects that fit into the category. Any category can have an unlimited number of swatches, with nine thumbnails visible at one time. Use the scroll bar to scroll through the available swatches. Once a swatch is selected a larger preview will appear below the thumbnails. There are two basic types of swatches: Tiled and non‐tiled Tiled: These swatches are repeating patterns used mainly for coloring large areas such as turf, mulch, pavers etc. These swatches repeat a pattern to fill an area. Non-Tiled: These are non‐repeating swatches that will stretch to fill the area they are inserted into. For example, all the tree, shrub and perennial swatches are non‐tiled swatches (except groundcovers). Figure 14—Categories and swatches Coloring Objects Coloring objects in DS|Color is very simple. To color an object (figure or area) follow these steps: 1. Select the color swatch you wish to use. 2. Move your mouse over to the object you wish to apply the color to. Your cursor will look like a paint brush. 3. As you move your mouse over the presentation, the perimeter of objects that can be colored will highlight blue. 4. Click inside the blue highlighted object and the color will immediately be applied to it. Figure 15—Applying color to an object Color User Guide 13 Understanding the Layering Order As you begin applying color to your presentation you may notice that it may appear as if some objects cannot be selected. This could be for a number of reasons. One reason could be the layering order of objects on the presenta‐ tion. The layering order in DS|Color works different than DS|Design but very similar to most graphic programs. What does layering order mean? Layering order means that overlapping objects on the presenta‐ tion are either on top or below each other, each sitting on their own ‘layer’. Without color applied to them, they all appear to be on the same layer but they are not. It is not until color is ap‐ plied, or attempted to be applied, that it becomes apparent. Figure 16—Objects and the layering order How is the layering order determined? The original layering order is determined by the sequence in which objects were drawn in DS|Design. For exam‐ ple, if the last thing you drew in Design was the outline of your plant bed, then the entire area inside the shape drawn is on the top layer. This means that when you try to apply color to plants or rocks inside the plant bed, the only object that will select will be the plant bed. In order to select the objects ‘under’ the plant bed, the plant bed would need be to ‘moved’ to a layer ‘behind’ the objects to be colored. Each object on the presentation is on its own layer. How do you change the layering order of objects? To change the layering order of objects in DS|Color you can use one of the four layering tools found on the toolbar. To use them: 1. Click on one of the layering tools 2. Click once on the object you wish to move forward or backward. Since a presentation can have many objects on it, using the tools that move one layer forward or backward may not produce noticeable changes. As a result, you will find that using the tools that move objects to the front or to the background will give the best results. How to tell if an object has changed layers Until color is applied, changes made to the order of objects is not obvious. Without any color applied, the only way to tell if an object is behind another object is if it cannot be selected. Move the front objects to the background layer in order to color objects beneath them. 14 DynaSCAPE Software Helpful tips for the coloring process 1. Color background objects first You will find it easier to color background objects such as lawn, plant beds and hardscape surfaces first (see figure 17). The areas that define these objects will most often appear on the top layering order because the outlines of these areas were the last objects drawn in Design. Objects drawn last will appear on the front layers, on top of most of your figures. Figure 17 ‐ Coloring background objects first 2. Use the layering order tools Once the background objects are colored, send them to the background layer so that foreground objects can now be colored. You will find that the tool that moves objects to the background layer to be the most useful of the layering tools. Choose the objects that you wish to end up on the top and send them to the background first. Send objects you wish to be on the bottom layer last so that they end up underneath everything. As you work on coloring the remaining objects you may need to revise the order of objects to get the best results. Color User Guide 15 Using the Drawing Tools to Create Areas for Color There are two drawing tools in DS|Color that can be used to create shapes that can be colored. These can be used to add additional detail to the presentation or to create an outline for an area that was not set up for color in DS|Design. The Circle Drawing Tool The first drawing tool is the circle tool. It works very similar to the circle tool in Design in that you first select the origin of the circle (center point) and then the perimeter (radius). The circle drawn will be defined by a grey dashed line. This grey dashed line may disappear from view when printing or when working on other areas with‐ in the presentation. When you mouse over to apply color to it the circle will appear as a solid blue line. Color is applied in the same way as any other object in the presentation. The Polygon Drawing Tool The second drawing tool is the polygon tool. It allows you to create a polygon consisting of as many line segments as you choose. Begin by clicking around the area you wish to fill with color and end with a right‐click. While clicking around the area you can use the [Delete] key on your keyboard to remove the last segment. The polygon drawn will be defined by a grey dashed line. This grey dashed line may disappear from view when printing or when working on other areas within the presentation. When attempting to apply color to it, the polygon will ap‐ pear as a solid blue line. Color is applied in the same way as any other object in the presentation. Figure 18—Using the drawing tools Removing Areas Drawn with the DS|Color Tools Areas drawn with either of the color drawing tools can be removed by using the undo button or by using the Remove Fill tool. The remove fill tool will remove any color in the drawn area as well as the polygon or circle from the presentation. It will only remove the color (and drop shadow) from figures and areas that were drawn in DS|Design, leaving the original object. 16 DynaSCAPE Software Revising your Design If you have spent time coloring a drawing but realize you have forgotten to create a closed area or you need to revise something on your original DS|Design drawing, you do not have to start over. DS|Color has a Update Presentation feature that allows you to make changes to your DS|Design drawing and then update your DS|Color presentation, even after you have colored it entirely. To update your DS|Color file follow these steps: 1. Locate your original DS|Design drawing and make the changes needed. Save the drawing. 2. In DS|Color, go to the File menu and select Update Presentation. 3. Locate the DS|Design drawing and click Open. 4. In the panel that appears, click Yes to continue. Your presentation will update based on the changes you made in the DS|Design drawing, maintaining color for all areas or figures that have not changed. Editing Colored Objects As you apply color to the presentation there are a number of editing options that can be used to change the appear‐ ance of colored objects: Adjust Opacity, Rotation, Scale and Bleed Copy the properties of swatch (adjusted or unadjusted) to another object Apply Shadows Using the Edit Fill Tool to adjust Opacity, Rotation, Scale and Bleed To make changes to the appearance of colored objects on your drawing, select the Edit Properties tool and then select the object you wish to change. A thumbnail of the swatch from the selected object will appear on the left panel along with the accompanying fill settings. Objects that have been colored with ‘tiled’ swatches such as paving stone, flagstone, mulch etc. will have an additional Scale setting. How to Change a fill setting There are two ways to change the value of a fill setting: 1. 2. Left‐click on the slider button and drag it to change the value or Highlight the value number, type in a new value and press [Enter] Figure 19—Non‐tiled Fill Settings Figure 20—Tiled Fill Settings Color User Guide 17 Changing Opacity Reducing the opacity value of a colored object increases the transparency and visibility of objects underneath. The default setting for opacity is 100%. This means that the object is not transparent at all and that objects underneath cannot be seen through it. The images below show the effects of changing the opacity value. 100% 75% 50% Figure 21—The effects of changing opacity Changing Rotation Changing the rotation of the swatch is only rec‐ ommended for tiled swatches such as Paver, Stone and Deck Patterns. It is best to manually type in a new angle for the exact rotation. 0° Note: It is not recommended to change the rota‐ tion of non‐tiled swatches, especially for clustered symbols like shrubs and trees. These swatches will not fill uniformly. Figure 22—The effects of rotating a swatch Changing Scale The changing scale option is only available when selecting a tiled swatch for editing. Most tiled swatches are inserted at a default scale the is ap‐ propriate for most presentations. If you find that the pattern in the swatch is incorrect after you insert it, you can adjust it by moving the slider button or by typing in a new scale value. Figure 23—The effects of changing scale Changing Bleed Bleed is used to make colored presentations look less ‘perfect’ and more like hand rendering where the color spills out over the edges of the objects. Use the slider button to adjust the bleed as de‐ sired. Figure 24—The effects of changing bleed 18 DynaSCAPE Software 45° Removing color from an object Color can be removed from an object by using the undo button (to undo the last change) or by using the Remove Fill tool. When using the Remove Fill tool to remove color in the areas drawn with the polygon or circle tools, the shape that is drawn will be removed as well. Copying Color Settings from one Object to Another When applying color to objects on a presentation you may come across a situation were you need to ad‐ just opacity, scale or rotation to a swatch that needs to be repeated for other objects on the presentation as well. Instead of being required to apply and then edit each object individually, you can use the Copy Fill and Shadows tool to copy these settings from one object to another. To use this tool, follow these steps (see figure 25): 1. Apply color to an object on the presentation and edit the opacity, scale or rotation and then click on the Copy Fill and Shadows tool. 2. Click on the object you wish to copy the properties from. A thumbnail of the selected swatch will appear the left panel. 3. Click on any other object or area in the presentation that you wish to apply color with the exact same settings to. Figure 25—Copying fill properties Color User Guide 19 Adding Drop Shadow Effects The last step in creating that stunning presentation is adding the shadow effects to objects in the presentation. Shadows add depth to the presentation and improve it’s readability. Shadows can be used to show which objects on the presentation are the largest or tallest and they can also be used to show grade changes such as steps and retaining walls. When should drop shadows be applied? Please note that shadows should only be applied at the very end of the coloring process. Adding shadows will slow the performance of DS|Color, especially on larger drawings. Applying Drop Shadows to Colored Objects Adding drop shadows is very simple process: 1. Click on the Add drop shadows tool 2. Click on the object you wish to add a drop shad‐ ow to. Important note about drop shadows: Do not add any drop shadows until the very end of the coloring process. Drop shadows will slow the performance of DS|Color. Applying drop shadows should always be the last thing you do. It is also recommended that you save your presentation before adding shadow effects. Figure 26—Applying drop shadows Drop Shadows and the Layering Order It is important to have the correct layering order with objects you are adding drop shadows to. If the layering order is not correct, shadows may not appear or they may be cut off. Also, they may fall on the wrong objects giving a false impression of hierarchy of objects on the presentation. After applying shadows you may need to use the layering order tool to make adjustments for the best results Changing the Drop Shadow Settings When you click on the drop shadow tool a Shadow Override panel will appear in the left panel below the swatches. This panel will allow you to change any of the five settings for drop shadows. Use the slider buttons to 20 DynaSCAPE Software change each setting: Direction: Determines the side of the object a drop shadow will appear on. The default direction matches the light source of the color swatches. Depth: Determines the length of the drop shadow Opacity: Determines how transparent the drop shadow appears Noise: Increasing ‘noise’ will add a textured appearance to the shadow. In‐ creasing noise is more suitable for the Pencil Crayon style swatches Softness: Determines how defined a drop shadow appears without changing opacity Tip: Using Drop Shadows Effects to Show Grade Changes Drop shadows can be used to effectively convey grade changes such as steps, retaining walls and pools. Use the shadow override panel to adjust the direction and depth of the shadow to suit the grade change you are go‐ ing to show. You do not need to worry about using a light source direction that matches the majority of other drop shadows used in the presentation, since these are strictly used to show a change in grade for the benefit of your client. Figure 27— Drop shadow to show a step Changing the Drop Shadow Defaults Each time you open the drop shadow tool the settings will return back to the program defaults. If you wish to change these defaults to settings you prefer to use, follow theses steps: 1. Click on the View menu and then Options 2. In the Options panel that appears, select the Shadow Defaults tab 3. Change any setting you wish to be the new default by typing in the new value 4. Click Ok to save the new settings for the next time you use the Drop Shadow tool About Shadow Direction The default direction of the shad‐ ow is 0°. If you enter a value greater than ‘0’, the drop shadow will move in a counter‐clockwise direction. Figure 28— Changing the drop shadow defaults Color User Guide 21 Printing and Exporting as an Image File Once your drawing is complete there are a number of options available to you: 1. Print directly from DS|Color to your printer 2. Export to a JPG or Adobe® PDF file to email to a client or send to a print shop for printing 3. Export as a PDF file and then print from PDF to your printer 4. Export as a PDF file to email to a client or send to a print shop for printing Important notes about printing If you are printing from a computer that does not meet the recommended system requirements you may have difficulty printing larger colored drawings. You may also experience problems exporting as a JPG. It is not recommended to print to paper larger than ARCH‐D (24”x36”) size. The print file size may be too large for some printers to handle. If you are experiencing problems, choose the smallest paper size that is appropriate for the drawing to reduce the chance of a problem occurring. Using the PDF option is always a good alternative for anyone experiencing printing problem. Always save your drawing before printing or exporting as a JPG. Please Note: If you plan to print a lot of large colored drawings (D‐ and E‐size), consider upgrading your comput‐ er and your printer. Printing Directly from DS|Color To print a presentation directly from DS|Color, follow these steps: 1. Save your presentation to prevent any lost work 2. Click on the File menu and select the Print option 3. In the panel that appears select the printer you wish to print to print to 4. Next, click on the Preferences option to open your printerʹs preferences panel (Note: you do not need to choose preferences every time) 5. Choose the correct Orientation, Quality (color) and paper size (Note: if you wish to print your presentation to scale you must choose a paper size that matches your page size, which was originally set in DS|Design) and click OK. 6. Back in the Print Presentation panel, ensure the preview of shows the correct di‐ mensions and orientation of the paper you wish to print to. Click on the Print button if the settings appear correct. 7. A print status bar will appear until the presentation has been sent to the printer. This can take some time if the presentation is large. 22 DynaSCAPE Software Figure 29—Printing from DS|Color Note: Larger drawings may take some time to print, so be patient. Exporting a Drawing as an Adobe® PDF or JPG (Email or Print Resolution) Exporting a drawing will provide several options: 1. Exporting as an Adobe PDF will produce a good quality file that can be used to print from or that can be brought to a print‐house for printing (200dpi) 2. Choosing the Email Resolution option will reduce the size of the resultant JPG file so that it can be emailed to a client to review (96dpi) 3. Choosing the Print Resolution option will produce a higher quality JPG that can be used to print from, that can be brought to a print house for printing or used for marketing material. Want a higher Resolution? To change the resolution of the PDF or JPG click on the View menu and choose Op‐ tions. In the Options panel that appears, select the Print tab. Here you can adjust both the Print DPI and the Buffer size. For a detailed explanation about this panel see Changing the print resolution setting to improve printing performance on page 25 of this guide. About PDF Files Printing to a PDF file provides the same options as exporting to a JPG. A PDF is a file type the both clients and print shops can open to view or print. PDF’s provide excellent quality and can easily be printed to and from. Color User Guide 23 Acquiring a separate PDF Writer You may wish to use a PDF writer/converter to create a PDF from your drawing. There are a number of PDF writ‐ ers that can be bought or downloaded for free. It is important to find one that has architectural sheet sizes that will be needed for presentations larger than 11x17 (tabloid). Here are two free PDF writers that are recommended: 1. CutePDF 2. PDFCreator (download free at: http://sourceforge.net/projects/pdfcreator or directly from the DynaSCAPE website at: http://www.dynascape.com/downloads/files/pdfcreator.msi (download free at: http://www.cutepdf.com) How to Print to a PDF Printing to a PDF follows the exact same steps as printing to a regular printer, except that the end result is a PDF file as opposed to a printed piece of paper: 1. Save your presentation to prevent any lost work 2. Click on the File menu and select the Print option 3. In the print panel that appears select your PDF writer you wish to print to (installation of a PDF writer re‐ quired (see above) 4. Click on the Preferences option to open your printerʹs preferences panel 5. Choose the correct Orientation, Quality (color) and Paper size (Note: if you wish to print your presentation to scale you must choose a paper size that matches your page size, which was originally set in DS|Design) and click OK. 6. Back in the Print Presentation panel, ensure the preview of shows the correct dimensions and orientation of the paper you wish to print to. Click on the Print button if the settings appear correct. 7. A print status bar will appear until a Save As panel opens 8. Type in a name for the PDF , choose a location for the file and click Save 9. A PDF file will be created (This may take a few minutes if the presentation is large) Once completed, the newly created PDF can be opened with a Adobe Reader® where it can be viewed or printed. This file can be shared with the client or sent to a print shop. Troubleshooting Printing My presentation drawing won’t print If you experience problems printing your presentation, there could be a number of causes: Cause # 1: Your system does not meet the recommended requirements—crashes during printing Solution # A: Upgrade your system up to the recommended requirements—add more memory Solution # B: Switch to the Compatibility Mode and/or reduce print quality (see following page) Cause # 2: Old printer drivers—nothing will print Solution # A: Upgrade your printer drivers—go to your print manufacturer’s website and download and install the latest drivers available Solution # B: Switch to the Compatibility Mode and/or reduce print resloution (see following page) Solution # C: Print or export to a PDF file and then print from the PDF file instead Solution # D: Add more memory to your printer 24 DynaSCAPE Software My presentation drawing always prints to the wrong paper size Cause # 1: Old printer drivers Solution # A: Upgrade your printer drivers—go to your print manufacturer’s website and download the latest drivers available Solution # B: Switch to the Compatibility Mode (see below) Solution # C: Print or export to a PDF file instead (see previous page) Switching to the Printer ‘Compatibility Mode’ You may need to resort to this option if you are experiencing problems printing: nothing comes out of the printer or you cannot change the paper size. The printer ‘Compatibility Mode’ will force your printer’s drivers to accept your requested sheet sizes. To switch to this mode, follow these steps: 1. Click on the View menu and then Options 2. In the Options panel that appears, select the Print tab 3. Click on the Compatibility Mode option to activate it and click OK Try printing the drawing again. If this still does not work, try using the export or print to a PDF file instead (see previous page). Figure 30—Printer Compatibility Mode Printing Using the Printer ‘Compatibility Mode’ When printing in printer ‘Compatibility Mode’ the print panel allows you to pick all the settings manually. You will need to select three settings: 1. Choose your printer from the list 2. Click on Preferences and choose paper size and orientation etc. Click Ok. 3. In the Print panel, click Apply to apply your settings. Click Print and you should see better results. Figure 31—Print panel for Printer Compatibility Mode Changing the print resolution setting to improve printing performance If you are experiencing problems trying to print a presentation, it could be a result of a system that does not meet the recommended requirements. If adding more memory is not an option, you can try reducing the default resolu‐ tion setting that DS|Color prints out to or change the amount of memory allocated to the printing process. The default print resolution is 200DPI and most systems with 1GB of RAM or more should not have any trouble han‐ Color User Guide 25 dling this level of resolution. However if you are experiencing problems, you may wish to try changing the Print DPI setting and/or adjust the Buffer Size. Follow these steps to change the default print resolution (DPI) and the buffer size: 1. Click on the View menu and then Options 2. In the Options panel that appears, select the Print tab 3. First try to use the Autodetect option—if your system requirements are low the Print DPI should change from the default of 200 to a lower number and the Buffer Size may change as well (the default Buffer Size is 256 4. You can also use your mouse to move the slider buttons to the left to reduce the print DPI or buffer size 5. Try printing again. You may have to reduce the DPI further to print with your system Figure 32—Changing print quality Note: Changing the Buffer Size can effect the quality of the output, mostly with larger sheet sizes and scales. Once your system reaches your Buffer Size setting it will reduce print quality in order to continue the printing process. You may need to test printing with different settings to get the best results and performance. About Reducing Resolution (DPI) If reducing DPI or Buffer Size does not a solve your printing issues or if the reduced quality does not meet your standards, upgrade your system to meet or exceed the minimum requirements. Recommended Printers and Paper Choosing the Best Paper for Printing Standard bond papers can be used for printing in color, however using coated papers will produce the best results. If you are using bond paper, a heavier weight is recommended (24‐28lb papers are ideal). It is not necessary to use glossy papers as they are expensive, give off too much glare and take a long time to dry. Recommended Printers Printing large (Arch C & D) colored drawings requires a printer with a sufficient amount of memory. The following is a recommended large format printer that will work well with DS|Color: Canon imagePROGRAF iPF610—this is 24‐inch large format printer is the fastest out there and can handle large print jobs. This printer is new on the market and uses brand new technology. This is your best option for printing from DS|Color. Canon also has 36‐inch models available (iPF 710). 26 DynaSCAPE Software Troubleshooting DS|Color 1. The wrong objects keeps getting selected and colored: Problem: Example: you are trying to color a tree and the swatch fills in the lawn or bed area instead. This may be because the tree you are trying to color is on a layer beneath the lawn or bed. Solution: Use the layering order tools and move the object that keeps getting colored to the background layer 2. An object won’t select or color: Problem: An object on your drawing will not color. This could be caused by a number of reasons: 1. The object is not ‘colorable’ ‐ it may not have a closed boundary Solution: Draw a closed boundary for the object in DS|Design on the Color_Setup layer , save the drawing and then use the Update Presentation option in DS|Color to update the drawing. 2. You are clicking on a line within the object, not open space Solution: Zoom in and click on open space between the lines inside the object 3. The object was ‘exploded’ in DS|Design Solution: Redraw or join them back together in DS|Design, save the drawing and then use the Update Presentation option in DS|Color to update the drawing. 3. A colored object disappeared and cannot be selected: Problem: You have colored an object and now others have disappeared—the objects won’t select because they are on a layer under the object that was just colored Solution: Use the layering order tools and move the object that was just colored to the background layer 4. A group of symbols colors as one object: Problem: A group of figures colors as one ‘blob’ as apposed to individual figures—this will happen if the draw‐ ing is on older drawing and the figures were not created with the Color_Setup layer included. Solution: Replace the figures on the DS|Design drawing with figures from the current version. 5. I need to apply more than one color to a figure: Problem: When you apply color to a figure such as a table and chairs, the entire object gets colored the same Solution: In DS|Design, ‘explode’ the figure. Now you will be able to color the chairs and table separately Problem: When coloring an Aquascape pond, only the rocks will color Solution: In DS|Design, turn on the Color_Setup layer and draw a closed polyline inside the pond area to define the water. You will now be able to color the water and rocks different colors 6. My text and leaders are hidden behind the colored objects: Problem: You cannot see text or leaders under the color swatches Solution: Press CTLR + T to bring all text and text with leaders to the foreground 7. My presentation won’t print See previous pages about troubleshooting printing issues Color User Guide 27 Customizing Styles, Categories and Swatches Although DS|Color comes with an ample selection of great color swatches, you have access to some simple tools that allows you to create your own. The tool that allows you to create new swatches, categories and even new styles is called the Style Editor and it is accessed through the DS|Color Tools menu. The DS|Color Style Editor To open the Style Editor, click on the Tools menu and select Style Editor. The style editor will open to the current style loaded in DS|Color. At this point you have three options: Edit the current style ‐ add new swatches and categories or rearrange the swatches Open one of the other existing color styles to edit them Create a brand new style of your own Style Editor Components Style Name Buttons for Moving Swatches Categories Swatch Preview Swatches Add New Swatch Button Figure 33—The DS|Color Style Editor 28 DynaSCAPE Software Swatch Settings Opening an Existing Color Style To open an existing style: 1. Click on the File menu and select Open Style 2. You will need to locate one of the three styles. They are found in the C: | Users | [USERNAME] |Documents | DYNASCAPECLR | Styles folder 3. Choose one of the three styles (they have the file extension ‘.sty’) and click Open 4. The style will load. It may take a few seconds for one of the styles with a lot of swatches. You will be able to see all the categories along with their swatches. Once an existing style is open you have a number of options. You can: Change the order of swatches within a category *Add/delete categories and swatches and add new styles *Open existing swatches to revise their settings Note: If you wish add, delete or edit swatches in one of the DS|Color default styles, it is recommended to save the style as a new style and make the changes there. Periodically DynaSCAPE releases new swatches and allows you to download them. By keeping your new or edited swatches in a different style will prevent them from be‐ ing overwritten when the new swatches are installed. Changing the Order of Swatches in a Category You can change the order of swatches within a category to suit your preferences. To change the order of swatches in a category, click on the category to view the swatches and use the arrows on the top right side to move them around. You cannot change the order of the categories. Adding a New Style To add a new style click on the File menu and select New Style. The screen will be blank with no categories or swatches. To add swatches to your new style, follow these steps: 1. Create a category first by clicking on <New Category> 2. Type in a new name for the Category 3. Add swatches to the category as needed Deleting a Style Deleting a style cannot be done from the Style Editor. To delete a style: 1. Close DS|Color 2. Open Windows Explorer (My Computer) 3. Navigate to C: | Users | [USERNAME] |Documents | DYNASCAPECLR | 4. Delete the style you wish to remove. 5. Open DS|Color and the style deleted will no longer be in the list. Color User Guide 29 Adding/Deleting a New Category To add a new category: 1. Click on the Edit menu and select Add Category. 2. Highlight the name <New Category> and type in a new name. 3. Now you can add swatches to this category. To delete a category: 1. Highlight the category name, go to the Edit menu and select Remove Category. Adding a New Custom Swatch Adding new swatches into DS|Color is a relatively simple process. If you would like to have more swatches in any of the categories or if you have your own style you would like to use, follow the steps outlined on pages 31—33 in this guide. There are four types of swatches that you can choose to add, two of which are for more advanced users and will not be outlined here. These can be selected by clicking on the New button located above the swatches: Figure 34—Choosing a new swatch type Solid—solid color swatches allow you to select a specific solid color. This swatch type was only used in the Contemporary Style. Linear Gradient—this type of swatch allows two or more colors to fade into each other from one direction. This swatch type was only used in the Contemporary Style. Radial Gradient—this type of swatch allows two or more colors to fade into each other from the center. This swatch type was only used in the Contemporary Style. Texture—this is the most commonly used swatch in all the Color Styles. This type of swatch is created from an image file such as a JPEG, TIF, BMP or PNG. This is the type that will allow you to create your style starting with your own hand colored swatches and turning them into digital swatches. Downloading New Swatches from DynaSCAPE Periodically, DynaSCAPE releases new swatches and allows you to download them. They will be available from the My Account page of the DynaSCAPE website (www.dynascape.com). Please note, if you wish add, delete or edit swatches in one of the DS|Color default styles, it is recommended to save the style as a new style and make the changes there. By keeping your new or edited swatches in a different style will prevent them from being overwritten when the new swatches are installed. 30 DynaSCAPE Software Creating a Solid Color Swatch To create a solid swatch click on the New button and choose the Solid option. Next, follow these steps: 1. Open an existing style or create a new one (see page 29). Choose a category for the new swatch 2. Move the Red, Green and Blue slider buttons to determine your new color 3. Set the opacity (transparency) of the swatch if you wish 3. Type in a descriptive name for your new swatch 4. Click Update to save Figure 35—Creating a solid color swatch the new swatch. Before closing the Style Editor, go to the File menu and choose Save Style Creating a Linear Gradient Color Swatch To create a linear gradient color swatch click on the New button and choose the Linear Gradient option. Next, follow these steps: 1. Open an existing style or create a new one (see page 29). Choose a category for the new swatch 2. Select one of the two default Gradient Stops to set the color for each Stop 3. Move the Red, Green and Blue slider buttons to determine your new color for the gradient 4. Click Save to save the setting for the gradient and do the same for the second gradient stop (more stops can be added if you wish) 5. Use Start Set to set the angle of the gradient. 6. Type in a descriptive name for your new swatch and then click Update to save the new swatch. Before closing the Style Editor, go to the File menu and choose Save Style Figure 36—Creating a linear gradient color swatch Color User Guide 31 Creating a Radial Gradient Color Swatch To create a radial gradient color swatch click on the New button and choose the Radial Gradient option. Next, follow these steps: 1. Open an existing style or create a new one (see page 29). Choose a category for the new swatch 2. Select one of the two default Gradient Stops to set the color for each Stop 3. Move the Red, Green and Blue slider buttons to determine your new color for the gradient 3. Click Save to save the setting for the gradient and do the same for the second gradient stop (more stops can be added if you wish) 4. Use Center and Origin to set the `light source` of the gradient and then type in a descriptive name 5. Click Update to save the new swatch. Before closing the Style Editor, go to the File menu and choose Save Style Figure 37—Creating a radial gradient color swatch Creating a Custom Texture This is the type of swatch that most of the swatches in DS|Color are made with. The process to create your own is surprisingly simple. You can create one from any JPG image or you can start with a hand‐drawn texture and then turn it into a swatch: 1. On a piece of paper draw two to three inch square 2. Using marker, pencil crayon or any other medium color a swatch inside this square 3. Scan it and save it as a JPEG file 4. Crop the scanned image to just inside the drawn square 5. Follow the next steps: Adding a Texture as a New Swatch 32 DynaSCAPE Software Adding a Texture as a New Color Swatch To add this new texture image as a swatch in DS|Color click on the New button and choose the Texture option. Next, follow these steps: 1. Open an existing style or create a new one (see page 29). Choose a category for the new swatch 2. Under texture properties click on the Browse button to locate the image file you wish to use 3. If the texture is a repeatable one (i.e. paver pattern, grass pattern etc.) choose the Tile option 3. Type in a descriptive name. 4. Click Update to save the new swatch. Before closing the Style Editor, go to the File menu and choose Save Style Figure 38—Creating a texture color swatch Important: Saving a New Swatch or Style Before closing the style editor, save the style that has been changed. All styles must me saved in this location on your computer: C: | Users | [USERNAME] |Documents | DYNASCAPECLR | Styles (Note: ‘C’ is the default drive Color is installed on—use the correct drive letter that your program is installed on if necessary e.g. ‘D’ or ‘E’) Any time you save a style, all your new swatches will have their corresponding images (texture files) copied into the following folder: C: | Users | [USERNAME] |Documents | DYNASCAPECLR | Styles | Textures If you are adding new swatches to an existing style it is recommended that you use the ‘Save Style As’ option un‐ der the File menu to save the style as a new one. This way you can identify any styles that have been customized. If you are creating a new style use the ‘Save Style’ option under the File menu and save in the correct folder note earlier. Testing and Using Your New Styles or Swatches in DS|Color To use your newly created styles and/or swatches you first need to save the style before closing the style editor by clicking on the File menu and selecting ‘Save Style’. When you close the Style Editor, the Style you had open in the Style Editor will reload in DS|Color to update the changes you have made. Any new swatches you made will be available for testing. Color User Guide 33 The File Menu: New For opening a new DS|Design drawing for coloring Open Presentation For opening a presentation that has been saved in DS|Color Save Presentation For saving the current presentation in DS|Color Save Presentation As For saving the current presentation in DS|Color as a new name Update Presentation For updating changes made to the DS|Design drawing (NEW for v2.0) Pack Presentation Unpack Presentation Export For saving a presentation along with all the color swatches and any rasters used in the presentation in order for it to be opened in a version DS|Color that may not have all the same swatches For unpacking a presentation that has been packed with all the color swatches and rasters Adobe PDF: For saving the presentation as a PDF file at a resolution suitable for printing. The original sheet size is maintained. Email Resolution Image: For saving the presentation as a JPEG to a size suitable for emailing to a client for review. The size and resolution is reduced. Print Resolution Image: For saving the presentation as a JPEG at a resolu‐ tion suitable for printing. The original sheet size is maintained. Print For sending a presentation to a printer or PDF writer Exit Closes DS|Color The Edit Menu: Undo For undoing the last command(s) Redo For redoing the last command(s) The View Menu: Options Opens the Options panel for the default settings for swatches, shadows, printing and performance The Tools Menu: Style Editor Opens the Style Editor tool for modifying and creating new styles, categories and swatches The Help Menu: About For viewing your version number of DS|Color Welcome Screen Opens the Welcome Screen giving access to the Color introductory videos 34 DynaSCAPE Software The DS|Color Toolbar: For opening a new DS|Design drawing for coloring For opening a presentation that has been saved in DS|Color For drawing polygons to which color can be applied Object layering tool—for moving objects to the foreground (the top layer) Object layering tool—for moving objects one layer forward For saving the current presentation in DS|Color Object layering tool—for moving objects to the background (the bottom layer) A zoom tool to fit the entire presentation into the workspace of the program window A zoom tool that allows you to use a selec‐ tion window to zoom in on a specific area in the presentation. Object layering tool—for moving objects one layer backward Keyboard Shortcuts: Keystroke Command Esc Cancels anything you are in the process of doing Alt+F4 Same as clicking the File menu, then Exit Delete Deletes a selected fill (and shadow) Ctrl+N Same as clicking the File menu, then New… For redoing the last command(s) Ctrl+S Same as clicking the File menu, then Save Presentation For applying color to an object. Automati‐ cally sets when you click on a color swatch Ctrl+O Same as clicking the File menu, then Open Presentation Ctrl+P Same as clicking the File menu, then Print Ctrl+Z Same as clicking the Undo button Ctrl+R Same as clicking the Redo button Ctrl+U Same as clicking the File menu, then Update Ctrl+C Same as clicking on the Copy Fill and Shadow tool Ctrl+E Same as clicking on the Edit fill and shad‐ ow properties tool Ctrl+F Same as clicking the Bring the selected item to the foreground button A zoom tool that will zoom in to 50% of the current view A zoom tool that will zoom out to 50% of the current view For undoing the last command(s) For copying swatch settings (opacity, scale, rotation and shadow) from one object to another. For editing opacity, rotation, scale and bleed of a selected swatch For removing color from a swatch well as the polygon or circle from the presentation that were drawn in Color. For adding drop shadows to objects on the presentation For drawing circles to which color can be applied Ctrl+B Same as clicking the Send the selected item to the background button Ctrl+T Brings all text and text with leaders to the foreground Color User Guide 35 Thank you for choosing a DynaSCAPE software product. You have joined thousands of businesses that rely on DynaSCAPE every day to help them run their business in a professional way. We are committed to helping you spend less time with old‐fashioned and inefficient systems and spend more time on your business. Products: This CAD software is perfect for the Landscape Designer or the Design/Build Contractor looking for professional software . It includes a full‐featured 2‐D CAD functionality with a built in customizable plant list that connects to DynaSCAPE’s Online Plant Database. Design also integrates with DS|Manage, a powerful estimating and business management tool. Check our website for more details. This is the ultimate presentation tool that adds full color to your DS|Design drawings. DS|Color is a separate mod‐ ule that provides all the tools needed to turn a DynaSCAPE drawing into a colored masterpiece that looks like it was colored by hand. Check our website for more details. DynaSCAPE Sketch3D helps you transform your 2D DynaSCAPE or AutoCAD drawings into full 3D models. It’s a convenient, easy to use add‐on for Google SketchUp, the worlds most popular and readily available 3D modeling tool. DS|Sketch3D expands Google SketchUp’s capabilities by adding landscape‐specific tools and content. Introduce your business to the most powerful estimating, business management and job costing software for the green industry. Built specifically for the landscape professional, DS|Manage360 consolidates your entire business into one software package. This is a web‐based solution for your convenience. Check our website for more details. The leading source of horticultural information software for the Green Industry since 1991. Horticopia Professional software contains detailed cultural data and full color images for thousands of plants. It allows you to view plant pictures and information for a single plant or a group of plants and find, organize, and manage plant information and lists. Check our website for more details. For our full line of products visit our website at www.dynascape.com To speak to a DynaSCAPE Sales Representative call us 1.800.710.1900 36 DynaSCAPE Software Version: 2.5 Date: 7/4/2012