1
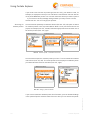
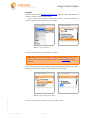
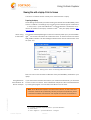
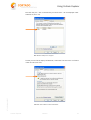
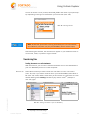
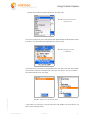
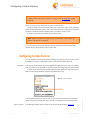
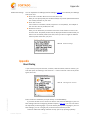
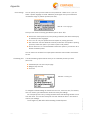
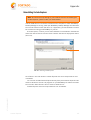
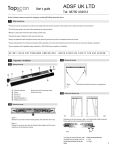
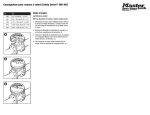
Cortado Explorer
■ Version 3.6
User manual
Cortado. A Division of ThinPrint
ThinPrint GmbH
Alt-Moabit 91 a/b
10559 Berlin
Germany / Alemania
ThinPrint Pty. Ltd.
L 10, 275 Alfred Street
North Sydney / NSW / 2060
Australia
ThinPrint, Inc.
20525 Center Ridge Rd, Suite 630
Cleveland, Ohio 44116
USA / EEUU
ThinPrint, Inc.
8703 Yates Drive, Suite 200
Westminster, Colorado 80031
USA / EEUU
E-mail: [email protected]
Web: www.cortado.com
Issued: December 6, 2007 (v10)
Contents
© Copyright
This document is the intellectual property of ThinPrint GmbH. This document may be copied in whole or in part, provided this
Copyright notice is included in every copy.
® Registered Trade Marks
All hardware and software names mentioned in this document are the registered trademarks of their respective companies
or should be regarded as such.
Why Cortado Explorer?
.......................................................................................... 4
Installing Cortado Explorer
................................................................................... 4
Installation via the BlackBerry browser .............................................................................. 4
Installation with the BlackBerry Desktop Manager .............................................................. 5
Using Cortado Explorer
.......................................................................................... 7
Managing folders and files ............................................................................................... 9
Reloading and renaming folders ................................................................................
Renaming and arranging files ....................................................................................
Using online directories ............................................................................................
Adding a folder to favorites .......................................................................................
10
11
11
13
Viewing documents ...................................................................................................... 14
Printing and faxing files ................................................................................................. 14
Printing files ............................................................................................................ 14
Faxing files ............................................................................................................. 17
Viewing files with a laptop: Print-to-Screen ...................................................................... 19
Preparing the laptop ................................................................................................ 19
Viewing files with the laptop ..................................................................................... 22
Transferring files .......................................................................................................... 23
Sending documents as e-mail attachments ................................................................. 23
Transferring files with Copy&Paste ............................................................................. 24
E-mail functions ........................................................................................................... 25
2
Manual
Cortado Explorer
© ThinPrint GmbH 2007
Printing e-mails and attachments .............................................................................. 25
Faxing e-mails and attachments ................................................................................ 26
Saving e-mails and attachments on the company server ............................................... 26
Contents
Cortado Push Print
Cortado Short Fax
................................................................................................ 28
.................................................................................................. 30
Configuring Cortado Explorer ............................................................................. 32
Appendix .................................................................................................................... 33
Direct Printing .............................................................................................................. 33
© ThinPrint GmbH 2007
Uninstalling Cortado Explorer ......................................................................................... 35
Cortado Explorer
Manual
3
Why Cortado Explorer?
Why Cortado Explorer?
Cortado Explorer allows you to use a BlackBerry to manage, print, and fax all files
located in the user directories on the company server, in online directories (via WebDAV) and in local file directories1, as well as e-mails and attachments. Traveling
employees can print out documents in their original format on any available Bluetooth or network printers.
Cortado Explorer also offers the option Print-to-Screen which sends the print job
to a notebook instead of a printer, allowing you to view the document on a notebook
monitor.
The Cortado Push Print component lets you automatically print out selected
e-mails or attachments, while the Cortado Short Fax component allows you to create
short texts and send them as a fax.
The Cortado Corporate software solution consists of two components – the Cortado
Corporate Server and the client-side Cortado Explorer.
Installing Cortado Explorer
Before you can use Cortado Explorer, you must install the software onto your BlackBerry. If you received the link to the software directly from your administrator
“over-the-air”, you can download the Explorer (client) via the BlackBerry browser (see
below). You can also install the client onto your device by using the BlackBerry Desktop Manager (see Installation with the BlackBerry Desktop Manager).
Installation via the BlackBerry browser
Open your handheld’s browser and enter the link your administrator provided you
with. A new window opens. Click DOWNLOAD to start the installation (Illus. 1)
Illus. 1
Illus. 1
Downloading Cortado Explorer
1
2
4
LOCAL DRIVES are supported by all handhelds from firmware version 4.2 and higher
depending on the content of the .alx file provided by your administrator
Manual
Cortado Explorer
© ThinPrint GmbH 2007
Now the Cortado Explorer will be installed on your BlackBerry. The applications Cortado Push Print and Cortado Short Fax will also be installed if necessary2.
Installing Cortado Explorer
Installation with the BlackBerry Desktop Manager
Note! For detailed information about installing BlackBerry Desktop Manager,
please refer to your BlackBerry user manual.
Connect your handheld to your computer with a USB cable. Then open the BlackBerry Desktop Manager and select the APPLICATION LOADER function (Illus. 2).
Illus. 2
Illus. 2
Installing programs with BlackBerry Desktop Manager
If applicable, you will be asked to confirm the port connecting your BlackBerry device
to your PC. A new window opens (Illus. 3). Click ADD to navigate the file structure
on your computer.
Illus. 3
Illus. 3
Add programs
© ThinPrint GmbH 2007
Select the directory in which the Cortado Explorer (.alx file) has been stored.
Different versions are available depending on the device type – an Explorer for the
devices 8100, 8800 and newer handhelds3 and an Explorer for the devices 8700,
7290 and older handhelds4 (Illus. 4).
3
4
Cortado Explorer
for firmware versions 4.2 and higher
for firmware versions under 4.2
Manual
5
Installing Cortado Explorer
Open the directory appropriate for you (Illus. 4).
Illus. 4
Illus. 4
Selecting a software directory (example)
The opened software directory contains a .alx file type, e.g., Cortado.alx, which you
now select for installation (Illus. 5).
Illus. 5
Illus. 5
Selecting the installation file (example for Cortado.alx)
A new window opens in which the selected application is displayed. Enable the
checkbox next to CORTADO CLIENT (Illus. 6).
As soon as you click NEXT and FINISH in the next window, the installation will start.
© ThinPrint GmbH 2007
6
Manual
Cortado Explorer
Using Cortado Explorer
Illus. 6
Illus. 6
Installing Cortado Explorer (Client)
Installation of Cortado Explorer also installs the applications Cortado Push Print and
Cortado Short Fax if necessary2.
Using Cortado Explorer
Cortado Explorer allows you to manage files located on the BlackBerry, on a remote
computer (the company server), or in a web directory. You can also print out the files
on a local printer or network printer, fax them, view them on a laptop, or forward
them as an e-mail attachment. Devices with a local file system5 can also be used to
upload local files to a remote computer.
© ThinPrint GmbH 2007
Note! When using Cortado Explorer for the first time, you will be asked for
your domain password, and you have the option to save it at this point. If you
want to undo this save later, perhaps because you want to pass on your device
to someone else, select OPTIONS in the main menu of your handheld and click
Cortado Client and call up the Reset option. Please note your RegPIN beforehand as you will then be asked to enter it again.
If you do not save your domain password, you must enter it multiple times
where required when using Cortado Explorer.
5
Cortado Explorer
BlackBerry 8100, 8800 and newer devices
Manual
7
Using Cortado Explorer
Open Cortado Explorer by clicking its application icon (Illus. 7.
Illus. 7
Illus. 7
Cortado Explorer application
icon selected
A list of directories is now displayed (Illus. 8):
■ FAVORITES: Here you can add any directories that you want to have direct access
to.
■ LOCAL DRIVES4: Use this directory when you want to edit, print, or fax files stored
locally on your BlackBerry.
■ HOME DRIVES: This directory gives you access to files located on a remote computer (the company server).
6
■ ONLINE DRIVES: This directory gives you access to files provided by WebDAV
(on the Internet/Intranet).
Illus. 8
Illus. 8
Drives
in Cortado Explorer
Note!Please note that you will receive a
security prompt the first time you connect with Cortado Corporate Server.
Allow the connection to be established
by placing a checkmark next to the HTTP
connections to Cortado Corporate Server
and then click ALLOW THIS CONNECTION.
8
© ThinPrint GmbH 2007
6
Web-based Distributed Authoring and Versioning
Manual
Cortado Explorer
Using Cortado Explorer
Managing folders and files
If you are in one of the folders named above, click the menu button and then EXPAND
to access the subdirectories (Illus. 9). Use the COLLAPSE function to hide the subdirectories again.
Illus. 9
Illus. 9
Expanding directories
Once you have found the desired subdirectory, open it with the menu option OPEN
(Illus. 10).
Illus. 10
Illus. 10 Opening a directory
© ThinPrint GmbH 2007
You also have the option to create new folders. Select the directory to which you want
to add a new folder and click the menu button and NEW FOLDER (Illus. 11, left). You
can then enter a folder name (Illus. 11, right).
Cortado Explorer
Manual
9
Using Cortado Explorer
Illus. 11
Illus. 11 Creating a new folder
Reloading and renaming folders
The RELOAD function is used when files in a folder are to be updated, for example,
due to changes. Select the folder to be reloaded and click RELOAD in the option menu
(Illus. 12).
Illus. 12
Illus. 12 Reloading a directory
You can also rename folders. To do so, scroll to the respective folder and select
RENAME in the menu (Illus. 13, left). Next enter the desired name and click OK
(Illus. 13, right).
Illus. 13
© ThinPrint GmbH 2007
Illus. 13 Renaming a folder
10
Manual
Cortado Explorer
Using Cortado Explorer
Renaming and arranging files
To rename a file, scroll to the appropriate document and click the menu button and
the RENAME option (Illus. 14, left). Next enter the desired name and then click OK
(Illus. 14, middle).
Illus. 14
Illus. 14 Renaming a file
You can also arrange files by the criteria NAME, SIZE or DATE. Open the directory in
which you want to arrange the documents. Click the menu button and then the SORT
option (Illus. 15, left). Now you can select how the files are to be arranged (Illus. 15,
middle).
Illus. 15
Illus. 15 Arranging files
Using online directories
To retrieve files made available on the Internet/Intranet, first select ONLINE DRIVES
(Illus. 16).
Illus. 16
© ThinPrint GmbH 2007
Illus. 16 Selecting ONLINE DRIVES
Cortado Explorer
Manual
11
Using Cortado Explorer
Click the menu button and then NEW CONNECTION. A list of preconfigured connections
– 1und1 and GMX – is displayed as well as the option NEW CONNECTION (Illus. 17).
If you do not want to use a preconfigured connection, select NEW CONNECTION
(Illus. 17).
Illus. 17
Illus. 17 Selecting NEW CONNECTION
Enter the following (Illus. 18):
– NAME: Give the connection a descriptive name, for example, Microsoft Sharepoint.
– ADDRESS: Enter the address to the online directory. Internet providers often use
an IP address or web address (for example mediacenter.gmx.de). If you want to
establish an internal connection enter the IP address or server name/share or
path. Please note that you must not use HTTP(S) in the address.
– USER: Enter the user name required here.
– PASSWORD: Enter the appropriate password here.
For internal connections SECURED BY MDS must also be selected (Illus. 18).
Illus. 18
Illus. 18 Defining a new connection
(internal connection as
example)
If you want to establish a secure, external (Internet) connection, select SSL ENCRYPTION (Illus. 18), if supported.
© ThinPrint GmbH 2007
12
Manual
Cortado Explorer
Using Cortado Explorer
Adding a folder to favorites
If you want to access important or frequently used directories directly, you have the
option to add them to FAVORITES. You can manage folders located in FAVORITES just
like in any other directory.
Select the appropriate folder, click the menu button and then ADD TO FAVORITES
(Illus. 19)
Illus. 19
Illus. 19 Adding folder to FAVORITES
If you want to remove a folder from FAVORITES, scroll to the folder and select DELETE
(Illus. 20).
Illus. 20
FROM FAVORITES
© ThinPrint GmbH 2007
Illus. 20 Deleting a folder from
FAVORITES
Cortado Explorer
Manual
13
Using Cortado Explorer
Viewing documents
Open the directory (see Managing folders and files, Page 9) where the desired document is located. Scroll to the document and click the menu button and then OPEN
(Illus. 21, left).
The document view is opened, as you recognize from the BlackBerry Attachment
Viewer (Illus. 21, right).
Illus. 21
Illus. 21 Opening the document view
Printing and faxing files
Printing files
Note! If you want to use “Local Printers” make sure that your BlackBerry's
Bluetooth interface is active and all desired Bluetooth devices are paired with
your BlackBerry device. To pair devices with your BlackBerry device, select
BLUETOOTH from the BlackBerry options. Click the track wheel for the ADD
DEVICE option. Click the name of the device that you want to pair. Authenticate
this device by entering the correct passkey. For a Pentax printer you would
enter, for example, 0000. The newly added device then appears in the list of
paired devices. Should you experience problems, please contact the hardware
manufacturer and request the relevant documentation.
With the Cortado Explorer it is possible to print files from Local Drives, Home Drives,
and Online Drives. Open the directory where the desired document is located (see
Managing folders and files, Page 9). Scroll to the document.
© ThinPrint GmbH 2007
14
Manual
Cortado Explorer
Using Cortado Explorer
Click the menu button and then PRINT (Illus. 22).
Illus. 22
Illus. 22 Printing a document
A moment later, the BlackBerry displays a list of available printer types (Illus. 23).
Illus. 23
Illus. 23 List of installed printer types
© ThinPrint GmbH 2007
Depending on where you want to print, you can now choose between Local Printers
or Network Printers as printer type. If, for example, you chose NETWORK PRINTERS as
printer type (Illus. 23), a hierarchical list of printers7 will now lead you to the correct
printer (Illus. 24). The printer list can be configured so that, for instance, you first
see the country (Illus. 24, left), then the city (Illus. 24, middle), and lastly the room
in which the network printer is located (Illus. 24, right).
Illus. 24
Illus. 24 Network printer in USA, New York, conference room selected
7
Cortado Explorer
This list varies depending on which printer types have been set up server-side by the administrator.
Manual
15
Using Cortado Explorer
If you chose LOCAL PRINTERS as printer type (see Illus. 23), your selection could, for
example, be displayed so that you can first select a manufacturer and then see the
list of paired Bluetooth printers. You can then select the device you want to print to.
If you receive a security message asking whether you really want to connect,
answer with YES. You can now get your printout.
Searching for
network printers
You also have the possibility to select the SEARCH (see Illus. 25, left) option to search
for network printers in the corporate network. Next a list of print servers will be displayed, for example (Illus. 25, middle). Select the appropriate server and then one of
the shared printers (Illus. 25, right).
Illus. 25
Illus. 25 Network printer – searched for and found
You also have the option to save the printer you found. To do so enable the checkbox
next to SAVE (Illus. 26, left). The saved printer will be displayed immediately when
you select NETWORK PRINTERs next time (Illus. 26, right).
Illus. 26
Illus. 26 Saving a printer as favorite
If you want to delete the selected printer from Favorites, open the Cortado Settings
in the opened Explorer and then select FAVORITES. Now you can remove the printer.
© ThinPrint GmbH 2007
16
Manual
Cortado Explorer
Using Cortado Explorer
Faxing files
Open the directory (see Managing folders and files, Page 9) in which the desired document is located. Scroll to the document.
To fax it, click the menu button and then PRINT (Illus. 27, left). Then select FAX in
the list of printer types displayed (Illus. 27, right).
Illus. 27
Illus. 27 Faxing a document
You then have the option of entering a fax number.
Note! Make sure that the fax number contains the international code (+ and
country code). Learn how to preset a fax prefix in the Fax settings chapter,
Page 18.
If you would like to enter the number manually, select ENTER MANUALLY (Illus. 28,
left), and enter the fax number on your keypad (Illus. 28, right).
Illus. 28
© ThinPrint GmbH 2007
Illus. 28 Manual entering of fax number
Once you confirm your entry with OK, your fax will be sent.
Cortado Explorer
Manual
17
Using Cortado Explorer
The fax number can also be chosen from your contact list. In this case, select the
option FROM ADDRESS BOOK (Illus. 29, left).
The contact list will be displayed, and you will be able to select the specific contact
person you want to send a fax to (Illus. 29, right).
As soon as you click the contact, the fax will be sent.
Illus. 29
Illus. 29 Selecting a contact
Note! Please note that only persons with a fax number in their profile will
appear from the list of contacts.
To fax a contact in the global address book (for example, the Exchange Server
address book), select GLOBAL LOOKUP8 (Illus. 29, left).
Fax settings
Select the BlackBerry OPTIONS and then CORTADO CLIENT to open the client settings.
Scroll down to the heading ADDITIONAL SETTINGS¡ FAX SETTINGS. Here you can preset
a fax prefix. Click CHANGE OPTION (Illus. 30, left) and select the country where your
SIM card agreement was signed (Illus. 30, middle).
The international fax prefix of this country then appears in the FAX SETTINGS
(Illus. 30, right).
Illus. 30
© ThinPrint GmbH 2007
Illus. 30 Setting the international fax prefix
8
18
firmware versions 4.2 and higher
Manual
Cortado Explorer
Using Cortado Explorer
Viewing files with a laptop: Print-to-Screen
The PRINT-TO-SCREEN function allows you to view files with a laptop.
Preparing the laptop
A few settings are necessary to enable sending documents from the BlackBerry handheld to a notebook. The settings vary according to the selected type of transmission.
In every case, a .print Client Windows9 is required because it enables the document to be viewed on the laptop. Install the client10 onto your laptop from the ThinPrint website.
When using
a USB cable
First, start the Desktop Manager or install it if necessary. Now open .print Client Manager11 and click the ADVANCED tab. Enable the PRINT-TO-SCREEN function and select
RIM_USB as interface. All other settings under ADVANCED are not relevant here. Click
OK (Illus. 31).
Illus. 31
Illus. 31 Enabling Print-to-Screen and selecting RIM-USB as interface
Data can now be sent across the USB cable from your BlackBerry handheld to your
laptop.
Using Bluetooth
with Windows XP
SP2 as example
If you would like to send the document to your notebook via Bluetooth, you first need
to allow a serial connection. Insert a Bluetooth adapter and then activate Bluetooth
by clicking the program icon and then OPEN BLUETOOTH SETTINGS.
© ThinPrint GmbH 2007
Note! Some Bluetooth adapters come with various drivers, for which the serial
connection must be set up differently. Should you experience problems, please
contact the hardware manufacturer and request the relevant documentation.
9 For further information request the manual “.print Client Windows“.
10 TCP/IP version
11 Start¡ Programs ¡ .print Client Windows ¡ Configure
Cortado Explorer
Manual
19
Using Cortado Explorer
Click the COM Ports tab (Illus. 32) and then ADD to add a new COM port.
Illus. 32
Illus. 32 Add a COM port
You will be prompted to specify the type of COM port. Select INCOMING (Illus. 33)
Illus. 33
Illus. 33 Define the type of COM port
© ThinPrint GmbH 2007
20
Manual
Cortado Explorer
Using Cortado Explorer
Now the new port – with a number that you should note – will be displayed under
COM PORTS (Illus. 34).
Illus. 34
Illus. 34 New COM port is displayed
© ThinPrint GmbH 2007
So that you can find the laptop via Bluetooth, enable the TURN DISCOVERY ON function
under OPTIONS (Illus. 35).
Illus. 35
Illus. 35 Make notebook visible for Bluetooth
Cortado Explorer
Manual
21
Using Cortado Explorer
Note! Once a connection has successfully been established between the
BlackBerry handheld and the laptop and you have paired the two devices, you
should disable the discoverability of your laptop for security reasons.
Now go to the ADVANCED tab of .print Client. Enable the PRINT-TO-SCREEN function
and select the newly created COM port as interface (COM3 in the example in
Illus. 36). You do not need any of the other settings under Advanced. Click OK.
Illus. 36
Illus. 36 Enable Print-to-Screen and select port
Viewing files with the laptop
Once you have made all necessary settings on your laptop, you can use the
PRINT-TO-SCREEN function. Select the document and then select PRINT from the
BlackBerry OPTIONS menu. A list of printer types appears; select the PRINT-TO-SCREEN
option (Illus. 37).
Illus. 37
© ThinPrint GmbH 2007
Illus. 37 Selecting Print-to-Screen
22
Manual
Cortado Explorer
Using Cortado Explorer
You will be shown a list of printers; select RIM_USB or the name of your paired laptop depending on the type of transmission you have chosen (Illus. 38).
Illus. 38
Illus. 38 Selecting interface
Note! Ensure that .print Client is running (indicated by its icon in the task bar;
see illustration, left) while you pair your BlackBerry device and the laptop.
After selecting the interface, the document will appear on your notebook screen. It
can be read, saved, or printed in original format.
Transferring files
Sending documents as e-mail attachments
With this function, you can send a selected document as an e-mail attachment to
your own BlackBerry device or to other recipients.
© ThinPrint GmbH 2007
Send to me
Select the document you want to send and click SEND AS E-MAIL in the menu
(Illus. 39, left). If you want to send the file to your own BlackBerry select SEND TO
ME (Illus. 39, center). After a short while you will receive an e-mail from an e-mail
address starting with cortado@ followed by any domain name12 (example in
Illus. 39, right).
Illus. 39
Illus. 39 Sending a document to your own BlackBerry
12 depending on the server settings
Cortado Explorer
Manual
23
Using Cortado Explorer
This function is especially recommended for anyone who uses a device without local
file management (all devices prior to firmware 4.2). Files can be transferred from the
company server to the handheld in this way.
Send to others
If you want to send a document from the company server as e-mail, first select the
respective file and then click SEND AS E-MAIL in the menu (Illus. 40, left). Next enter
the e-mail address manually (Illus. 40, center and right) or select it from your local
contacts (FROM CONTACTS, see Illus. 36, center). If you want to address a contact from
the global address book (as the Exchange Server’s address book, click GLOBAL LOOKUP
(see Illus. 36, center). As soon as you click OK, the document will be sent as e-mail.
The e-mail address will start with cortado@ followed by any domain name11.
Illus. 40
Illus. 40 Sending a document as e-mail
Transferring files with Copy&Paste
With Cortado Explorer you can easily copy files back and forth between a BlackBerry
and the company server. Select the desired document in the appropriate directory.
Click the menu button and then COPY (Illus. 41).
Illus. 41
Illus. 41 Copying files
© ThinPrint GmbH 2007
24
Manual
Cortado Explorer
Using Cortado Explorer
Next select the desired target directory and paste the document by clicking the menu
button and then PASTE (Illus. 42).
Illus. 42
Illus. 42 Pasting a document
Note! If you want to save files from the company server to your local drive, we
recommend saving to the SD card and not to the STORE subdirectory. The subdirectory's limited storage capacity can lead to problems in this case.
Note! Please note, that due to the BES architecture’s safety standards, data
that is to be transferred back and forward between the online network and the
local or company network should not exceed a size of 256 KB.
E-mail functions
Printing e-mails and attachments
To send an e-mail text or attachment to a printer, first select the relevant e-mail.
Press the menu button and select PRINT (Illus. 43).
Illus. 43
© ThinPrint GmbH 2007
Illus. 43 Print option
on a BlackBerry device
Cortado Explorer
Manual
25
Using Cortado Explorer
You will be prompted to select the mail text or the attachment (if existent) for printing
(Illus. 44).
Illus. 44
Illus. 44 Selection of object to print
After you selected the object to be printed, a list of printer types will be displayed on
your BlackBerry. Depending on where you want to print, select LOCAL PRINTERS or
NETWORK PRINTERS. Proceed as described in Printing files, Page 14.
Faxing e-mails and attachments
To send an e-mail text or attachment to a fax machine, begin the same as when printing. Select the print option in the menu (see Illus. 43). You will be given a list of
printer types; select FAX here (Illus. 45).
Illus. 45
Illus. 45 Selecting fax
Now you will have the option to enter the fax number.
Note! Make sure that the fax number contains the international code (+ and
country code). Learn how to preset a fax prefix in the Fax settings chapter,
Page 18.
Proceed as described in Faxing files, Page 17.
The SAVE AS function enables you to save attachments and e-mail texts from your
inbox to the company server. Open the e-mail with the text or attachment you want
to save to the company server.
26
Manual
Cortado Explorer
© ThinPrint GmbH 2007
Saving e-mails and attachments on the company server
Using Cortado Explorer
Use the menu button and then select SAVE AS (Illus. 46).
Illus. 46
Illus. 46 Saving document on the
company server
Once you click SAVE AS, the e-mail text and the attachment(s) are displayed for selection (Illus. 47). Now select the object that you want to save.
Illus. 47
Illus. 47 Selecting e-mail text
or attachment
© ThinPrint GmbH 2007
The HOME DRIVES are called up immediately (Illus. 48, left). Click the menu button
and EXPAND to select the desired folder. Once you click SELECT, the file is saved to
the selected folder (Illus. 48, right).
Illus. 48
Illus. 48 Saving a file on the company server
If you select an e-mail text, a .txt file with the e-mail subject line as its name is created on the company server.
Cortado Explorer
Manual
27
Cortado Push Print
Cortado Push Print
The component Cortado Push Print lets you automatically print e-mails and attachments received with your BlackBerry. There are a few settings to make beforehand
to specify which incoming e-mails or their attachments are to be printed immediately
upon receipt.
To set up Cortado Push Print open the application with the program icon in the
main BlackBerry menu (Illus. 49).
Illus. 49
Illus. 49 Cortado Push Print in the main menu (left: disabled, right: enabled)
Before you can enable Cortado Push Print you have to enter some settings. To do so,
click OPTIONS¡ CONFIGURE (Illus. 50).
Illus. 50
Illus. 50 Configure Push Print
© ThinPrint GmbH 2007
28
Manual
Cortado Explorer
Cortado Push Print
Now you can make several settings:
■ OVERWRITE IT POLICY: Your administrator can preset your Push Print settings via
IT policies on the server. If you want to change these settings, enable the option
OVERWRITE IT POLICY (Illus. 51). When the checkbox is not marked, the pre-settings on the server will be effective.
■ Define which e-mails are to be printed automatically. You can choose between
e-mails with a specific subject and/or all e-mails coming from a specific sender
(Illus. 51).
Illus. 51
Illus. 51 Push Print settings
Click the box next to SUBJECT and/or the box next to FROM and then select
CHANGE OPTION from the menu. Next, enter a subject and/or sender in the relevant box. If you use a subject, please note that all e-mails with a subject that
starts exactly like your entry will be printed. If you enter a sender, though, it is
possible to use an asterisk (*) as wildcard before the @ sign; e.g., *@thinprint.com. All incoming e-mails from the domain thinprint.com will then be
printed automatically.
■ Also specify whether the e-mail text or the attachment13 is to be printed. Click
the relevant line and make your choice by selecting CHANGE OPTION from the
menu (Illus. 52).
■ If desired, you can specify in the next line whether the e-mails are to be deleted
after successful printing. Click the relevant box and then select CHANGE OPTION
from the menu (Illus. 52).
Illus. 52
Illus. 52 Other Push Print settings
Click the line in which you predefine the printer driver to be used (Illus. 53).
Via CHANGE OPTION you can choose between different printer drivers.
■ Once you have set a printer driver, specify the printer in the next line. Click the
line and select CHANGE OPTION to see a list of all previously paired printers.
Furthermore, you have the additional option of printing to a network printer. In
this case, you will need to select the relevant printer driver and then the option
NETWORK PRINTER in the list of paired printers (Illus. 53).
© ThinPrint GmbH 2007
■
Cortado Explorer
Manual
29
Cortado Short Fax
Illus. 53
Illus. 53 Printer settings
Save your settings via the option SAVE. The status menu will be displayed
automatically. Enable Push Print by clicking the menu button and ENABLE (Illus. 54).
If the application is already running, it does not have to be restarted; all settings will
be applied immediately.
Illus. 54
Illus. 54 Enable Push Print
When you re-open Push Print at a later time, the status of the application – enabled
or disabled – will be displayed first. If you want to change the settings, open the
menu and then select CONFIGURE (see Illus. 50).
Cortado Short Fax
With Cortado Short Fax, you can create and send short texts directly from your BlackBerry.
Open Short Fax by clicking on its icon in the main menu of your device (Illus. 55).
Illus. 55
Illus. 55 Opening Cortado Short Fax
30
Manual
Cortado Explorer
© ThinPrint GmbH 2007
13 If you selected ATTACHMENT in your Push Print settings and receive e-mails without one, the mail
text will be printed instead.
Cortado Short Fax
ThinPrint provides you with a selection of different templates in which your text can
be embedded. Click the line SELECT TEMPLATE and select one of the templates now
displayed (for example, ORDER in Illus. 56). Then enter the desired text.
Illus. 56
Illus. 56 Complete Short Fax
Press the menu button and select SEND (Illus. 57).
Illus. 57
Illus. 57 Sending a Short Fax
© ThinPrint GmbH 2007
You then have the option of entering a fax number. If you would like to enter the number manually, select ENTER MANUALLY, and enter the fax number on your keypad
(Illus. 58).
Illus. 58
Illus. 58 Entering the fax number manually
Cortado Explorer
Manual
31
Configuring Cortado Explorer
Note! Make sure that the fax number contains the international code (+ and
country code). Learn how to preset a fax prefix in the Fax settings chapter,
Page 18.
Once you confirm your entry with OK, your fax will be sent.
The fax number can also be chosen from your contact list. In this case, select the
option FROM ADDRESS BOOK (Illus. 58). The contact list will be displayed, and you will
be able to select the specific contact person you want to send a fax to.
As soon as you click the contact, the fax will be sent.
Note! Please note that only persons with a fax number in their profile will
appear from the list of contacts.
To fax a contact in the global address book (for example, the Exchange Server
address book), select GLOBAL LOOKUP (Illus. 58).
Configuring Cortado Explorer
You can adjust several Cortado Explorer settings by selecting CORTADO CLIENT in the
BlackBerry OPTIONS or selecting SETTINGS in the opened Cortado Explorer.
Corporate
Your Device ID, BlackBerry PIN, and RegPIN are listed here (Illus. 59). If problems
arise, the latter can be updated via the menu after consulting with your administrator.
In order to use Cortado Explorer, MDS (Mobile Data System) is required; the USE
MDS function must therefore always be activated (Illus. 59).
Illus. 59
Illus. 59 Cortado Settings
Direct Printing
32
The settings possible here are listed in the section Direct Printing, Page 33.
Manual
Cortado Explorer
© ThinPrint GmbH 2007
The ALTERNATIVE REGISTRATION function should not be activated, unless otherwise
specified by your administrator. Only activate it if requested by the administrator.
Appendix
Additional settings
You can adjust the fax settings (see Fax settings, Page 18) and several print settings
here (Illus. 60):
■ SHOW ONLY AVAILABLE BLUETOOTH DEVICES (Illus. 60):
Here you can specify that your handheld always only shows paired devices that
are actually available in your area.
■ PRINT MAIL DETAILS:
If this function is selected, sender, recipient or cc recipient(s), and subject of
the mail will also be printed (Illus. 60)
■ PREDEFINE PRINTER:
Here you can define the print device to be used. Click CHANGE OPTION in the
OPTIONS menu. All paired printers will be displayed. Select the device that you
want to use as default printer (Illus. 60). Now you will no longer be asked to
select a printer each time you print.
Illus. 60
Illus. 60 Additional settings
Appendix
Direct Printing
If you want to print pure mail text, contacts, calendar entries, tasks or memos, you
have the option of selecting LOCAL PRINTERS¡ DIRECT PRINTING in the list of printer
types (Illus. 61).
Illus. 61
Illus. 61 Selecting DIRECT PRINTING
© ThinPrint GmbH 2007
DIRECT PRINTING creates the print job directly on the BlackBerry.
If you have set the OUTPUT function to ALWAYS ASK (see Print settings) in your Cortado settings (see also Configuring Cortado Explorer, Page 32), you can now select
the respective printer language. If you have already set a printer language in your Cortado settings, you can now get your printout from the selected printer.
There are additional settings available to help you set up printing optimally.
Cortado Explorer
Manual
33
Appendix
Print settings
You can specify how your document is to be printed out. Under OUTPUT you can
select a printer language or install additional printer types onto your handheld to
increase the range of possible printers (Illus. 62).
Illus. 62
Illus. 62 Printer languages
Here you will find the following preinstalled options (Illus. 62):
ALWAYS ASK: If this option is set, once printing is selected, the device will display
all installed printer languages.
■ TEXT: You can only use printers that are capable of printing pure text.
■ HP COMPATIBLE PRINTER: Because some HP printers are not capable of printing
pure text, select this option if you want to print to HP printers.
■ PENTAX POCKETJET: It is recommended to select this option if you want to use a
Pentax PocketJet printer.
■
You can select one of these four output options with the menu button and CHANGE
OPTION.
Formatting text
The text formatting options below allow you to create the printout you want
(Illus. 63):
Characters per line and lines per page
Margins (top and left)
■ Font size
■
■
Illus. 63
Illus. 63 Formatting text
34
Manual
Cortado Explorer
© ThinPrint GmbH 2007
To change the default settings for CHARACTERS PER LINE, LINES PER PAGE, TOP MARGIN,
and LEFT MARGIN, just overwrite the values and save your settings.
You can specify FONT SIZE by clicking the track wheel and selecting CHANGE OPTION
from the menu. You can then modify the font size. Select the SAVE in the menu to
confirm your settings.
The changes only take effect after restarting Cortado Explorer.
Appendix
Uninstalling Cortado Explorer
Note! Should the security settings on your handheld not allow uninstalling the
Cortado Explorer, please contact your administrator.
Use the USB cable to connect the handheld to the computer on which BlackBerry
Desktop Manager is running. Now open BlackBerry Desktop Manager and select the
APPLICATION LOADER function (see Illus. 2). If applicable, you will be asked to confirm
the connection linking your BlackBerry to your PC.
A window opens, in which you can select software for uninstallation. Remove the
check from the box next to CORTADO CLIENT. REMOVE will then be displayed as action
(Illus. 64).
Illus. 64
Illus. 64 Removing Cortado Explorer
© ThinPrint GmbH 2007
Click FINISH in the next window. Cortado Explorer and all its components are now
uninstalled.
You can also uninstall Cortado Explorer directly from your handheld. Open OPTIONS
and then ADVANCED OPTIONS. All programs on your BlackBerry are listed here under
APPLICATIONS. Select CORTADO CLIENT and then select DELETE.
Cortado Explorer and all its components are now uninstalled.
Cortado Explorer
Manual
35