1
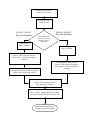
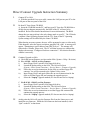
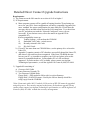
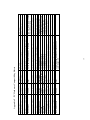
________________________________________________
Firmware Upgrade Instructions
CD-ROM Upgrade Kit
Agilent 86140 Series Optical Spectrum Analyzers
July 2001
This OSA Firmware Upgrade kit is intended for use with a desktop or laptop PC. For
information on PC hardware requirements, please refer to page 4 item 2 of these
instructions. The kit contains the following:
• A bootable Linux CD-ROM –acts as a file server that holds firmware files
• Two Floppy disks*
Floppy Disk 1. Only needed in OSAs with A revision firmware.
Floppy Disk 2, B.04.02 Firmware. Used by the OSA to identify which files
to ftp (copy) from the CD-ROM
• Cross-over LAN cable to connect the PC to the OSA
*It is possible to make new floppy disks if the original disks are lost. See Appendix B.
How to use these instructions
The upgrade procedure works by transferring new firmware files from the Linux CDROM in your PC to the OSA via a LAN connection. The PC and the OSA may be
connected directly with the crossover LAN cable provided, or they may be connected
over a network.
A networked connection offers greater flexibility, and may be preferable for upgrading
multiple instruments. The most straightforward upgrade method, however, is via direct
connection.
The instructions on page 3 provide summary of the direct connect upgrade method. More
detailed instructions on direct connect follow on page 4. Appendixes C and D of this
document provide information on using the Linux CD-ROM to upgrade firmware over a
network. If you wish to perform a firmware upgrade over a network, please download
instructions from the Agilent website. Follow the links at
www.agilent.com/comms/osaupgrade. For more background information on the Linux
CD, please see Appendix E.
1
Connect PC to OSA with
cross-over LAN cable
Re-Boot PC from
CD-ROM drive
A.01.00 - A.02.03
Revision Firmware
B.01.00 - B.04.02
Revision Firmware
Determine OSA
firmware revision?
(System > Help >
Revision)
Insert Floppy
Disk 1 into OSA
Insert Floppy
Disk 2 into OSA
Launch upgrade utility on OSA
(System > More System Functions >
Service Menu > Firmware Upgrade >
Continue)
Follow on-screen instructions to
copy floppy disk contents. When returned to
Update Utility, insert Floppy Disk 2
Launch upgrade utility on OSA
(System > More System Functions >
Service Menu > Firmware Upgrade >
Continue)
Follow on-screen instructions to
copy floppy disk contents.
Select “Laptop” upgrade Method. The OSA
will copy the needed files from the Linux CD
When firmware installation is
complete, power down laptop
Direct Connect Upgrade Instruction Summary
I.
Connect PC to OSA
A. With the provided Cross-over cable, connect the LAN port on your PC to the
LAN port on the rear-panel of the OSA.
II.
Re-boot PC from Linux CD-ROM
A. Insert the CD-ROM into the PC, and boot your PC from the CD-ROM drive.
(If this does not happen automatically, the BIOS of the PC will need to be
modified. Refer to the detailed instructions for more information). The BIOS
change that you may perform is the only change made to your PC. The CD loads
a separate Linux Operating System from the CD. None of the PC Operating
System settings will be affected by the Linux CD-ROM.
When booting on some systems, the user will be prompted to enter a video mode.
If this happens, select the lowest resolution, generally 640 x 480. A message will
appear, “Attempting to get IP address from DHCP server”. The attempt will
timeout after 1 minute, please wait. The PC will then boot up to a window that
displays the message “Configured for direct connection”. No selection from this
window is necessary.
III.
Continue Upgrade on OSA
A. Check the current firmware revision on the OSA (System > Help > Revision).
B. For A.01.00 – A.02.03 revision firmware
i)
Insert Floppy Disk 1 into the OSA floppy disk drive.
ii)
Launch the update utility on the OSA The OSA will reboot.
(System > More System Functions > Service Menu > Firmware Upgrade).
iii)
Follow the on-screen instructions for the OSA to read the floppy disk
contents. You will be returned to the Update Utility screen.
iv)
Insert Floppy Disk 2 and again follow the on-screen instructions for the
OSA to read the floppy disk and continue the upgrade process.
v)
Select the “Laptop” upgrade method (PC does not need to be a laptop).
C. For B.01.00 – B.04.02 revision firmware
i)
Insert Floppy Disk 2 into the OSA floppy disk drive.
ii)
Launch the update utility on the OSA. The OSA will reboot.
(System > More System Functions > Service Menu > Firmware Upgrade).
iii)
Follow the on-screen instructions to read the floppy disk contents and
continue the upgrade process.
iv)
Select the “Laptop” upgrade method (PC does not need to be a laptop).
IV.
At this point the OSA will copy the firmware files from the Linux server, and
install the new firmware. When the OSA firmware has been installed, select
“Quit” on the PC to shut down.
Detailed Direct Connect Upgrade Instructions
Requirements:
1) The Firmware on the OSA must be at revision A.01.00 or higher.*
2) PC Requirements
a) Most computer systems will be capable of booting from the CD and acting as a
server for your OSA. Some configurations will not be compatible. In general, the
more ‘standard’ the system configuration, the more likely the CD will have the
necessary drivers needed to boot and use the LAN connection. Try to boot from
your PC, and when you reach the “Network Configured” screen, you are
successful. If you run into errors, refer to the matrix in Appendix F for
compatible PCs.
Known compatibility issues are:
i)
Toshiba Laptops – will not boot the CD-ROM
ii)
Embedded LAN Cards – mixed success
iii)
Recently released LAN Cards
iv)
ISA LAN Cards
b) If your PC has more than one CD-ROM drive, use the primary drive to boot the
Linux CD.
c) Appendix F contains a matrix of PCs that have successfully booted the Linux CD,
and whose LAN cards have been recognized. If the Linux CD-ROM does not
boot on your PC, or is unable to recognize your LAN card, please refer to this
matrix for compatible hardware. Locate another PC or LAN card that is
supported. If you do not have a PC available, please contact your Agilent
Technologies representative, or call the Agilent Call Center at (800) 452-4844.
3) Upgrade Kit consisting of
a) Crossover LAN Cable
b) Linux Firmware Upgrade CD
c) Two Firmware Upgrade Disks
Floppy Disk 1. Only needed in OSAs with A revision firmware.
Floppy Disk 2, B.04.02 Firmware. Used by the OSA to identify which files
to ftp (copy) from the CD-ROM
*Note: Demo units with A.00.111 and the 10.30 version of HP-UX cannot be upgraded
using this process. They must be returned to the factory for hardware upgrade. Please
contact please contact your Agilent Technologies representative, or call the Agilent Call
Center at (800) 452-4844 to make the necessary arrangements.
PROCEDURE
I.
Connect PC to OSA
II.
III.
A. Connect the Crossover LAN Cable between the LAN port on the laptop and
the 10BaseT LAN connector on the rear panel of the OSA.
Reboot PC from Linux CD-ROM
A. Insert the Upgrade CD-ROM into CD-ROM drive.
B. Reboot the PC. If necessary, reset boot device priority in your BIOS to boot
from the CD-ROM drive. See Appendix A for more information.
The BIOS change is the only change made to your PC. The CD loads a
separate Linux Operating System from the CD, none of the PC Operating
System settings will be affected by the Linux CD-ROM.
C. When booting on some systems, the user will be prompted to enter a video
mode. If this happens, select the lowest resolution, generally 640 x 480.
D. The laptop will now boot into a Linux operating system.
1. If “LAN CARD DETECTION ERROR” screen appears, please check
that the LAN interface available in the laptop is on the list of supported
hardware in Appendix F. Locate another LAN card or PC that is
supported for the upgrade.
E. The PC will attempt to contact a DHCP Server for networking configuration.
Ignore this message for direct connection. This will be used if you wish to
upgrade instruments over a network. Please refer to Appendix C for more
information on this upgrade option.
F. The CD will boot up to a window that displays the message “Configured for
direct connection”. No selection from this window is necessary. Leave the
laptop in its current state and continue the upgrade process.
Continue with the upgrade on the OSA
A. Check the current firmware revision of the OSA
1. On the OSA front panel, press System > Help > Revision
The firmware revision information is displayed. The first line shows the
OSA name and model number. The second line shows the current
firmware version. For revisions p.01.38 and higher, follow the instructions
for B.01.00 revision firmware. For revisions earlier than p.01.38, follow
the instructions for A.02.03 revision firmware.
B. For A.01.00 – A.02.03 revision firmware
1. Insert Floppy Disk 1 into the OSA floppy drive. If necessary, it is
possible to make new floppy disks. Please see Appendix B for
instructions.
2. On the OSA front panel, press System > More System Functions >
Service Menu > Firmware Upgrade, and press Continue. The OSA
will now restart the operating system and load the update utility.
3. When the message “Update-Will install a new release of the OSA
Firmware into the OSA from the update floppy(s)” is displayed, press
Update to continue.
4. From the OSA Update Utility window, press Continue. The system
will read the information from the floppy disk.
5. When the message “Update unloaded from Floppy” is displayed, press
Continue Update. At this point, you may remove the floppy disk to
begin the upgrade procedure on another OSA.
6. When the message “The OSA will now be restarted” is displayed,
press OK to restart the operating system.
7. After the OSA has been restarted, the OSA Update Utility window will
be displayed. Remove Floppy Disk 1 and insert Floppy Disk 2 into
the OSA floppy disk drive.
8. When the message “Update will install a new release of the OSA
Firmware into the OSA from the update floppy(s)...” will be displayed.
Press Update.
9. When the message “OSA LAN Based Update B.04.02” is displayed,
press Continue to proceed with the firmware installation.
If you do not wish to continue the upgrade process, press Cancel to
return the OSA to the previous version of firmware and exit the update
process.
10. “Updating System from Floppy” will be displayed briefly on the
screen and a task bar will indicate the progress. When the message,
“Update unloaded from Floppy. About to install. This will take a few
minutes” is displayed, press Continue Update. At this point, you may
remove the floppy disk to begin the upgrade procedure on another
OSA.
11. Next, you will see a screen labeled “LAN UPDATE” with five
upgrade options, and the option to Cancel. Press the “LapTop” key.
You will see messages indicating that the OSA is “Attaching to the
LAN” and “Update getting Archive Files from Server”, followed by
installation messages. When the first installation message “Installing
OSA Firmware” appears, the OSA has received the files that it needs
from the PC. At this time, the cross-over LAN cable can be removed
from the OSA, and plugged into another OSA for additional
upgrades. Please allow the current OSA to complete its upgrade
cycle.
12. The message “Update Completed. The OSA will now be restarted”
will appear, press OK. The system will restart using the new firmware.
13. To update another OSA, repeat from the beginning of Step III,
remembering to connect the cross-over LAN cable to the next OSA.
14. When OSA firmware has been installed, select “Quit” on the PC to
shut down. When the laptop reboots, re-enter the BIOS and reset the
boot priority to its original configuration.
C. For B.01.00 – B.04.02 revision firmware
1. Insert Floppy Disk 2 into the OSA floppy drive. If necessary, it is
possible to make new floppy disks. Please see Appendix B for
instructions.
2. On the OSA front panel, press System > More System Functions >
Service Menu > Firmware Upgrade, and press Continue. The OSA
will now restart the operating system and load the update utility.
3. When the message, “Update-Will install a new release of the OSA
Firmware into the OSA from the update floppy(s)” is displayed, press
Update to continue.
4. When the message “OSA LAN Based Update B.04.02” is displayed,
press Continue to proceed with the firmware installation.
If you do not wish to continue the upgrade process, press Cancel to
return the OSA to the previous version of firmware and exit the update
process.
5. “Updating System from Floppy” will be displayed briefly on the
screen and a task bar will indicate the progress. When the message,
“Update unloaded from Floppy. About to install. This will take a few
minutes” is displayed, press Continue Update. At this point, you may
remove the floppy disk to begin the upgrade procedure on another
OSA.
6. Next, you will see a screen labeled “LAN UPDATE” with five
upgrade options, and the option to Cancel. Press the “LapTop” key.
You will see messages that the OSA is “Attaching to the LAN”, and
“Update getting Archive Files from Server”, followed by installation
messages. When the first installation message “Installing OSA
Firmware” appears, the OSA has received the files that it needs from
the PC. At this time, the cross-over LAN cable can be removed from
the OSA, and plugged in to another OSA for additional upgrades.
Please allow the current OSA to complete its upgrade cycle.
7. The message “Update Completed. The OSA will now be restarted”
will appear, press OK. The system will restart using the new
firmware.
8. To update another OSA, repeat from the beginning of Step III,
remembering to connect the cross-over LAN cable to the next OSA.
9. When OSA firmware has been installed, select “Quit” on the PC to
shut down. When the laptop reboots, re-enter the BIOS and reset the
boot priority to its original configuration.
Appendix A. Resetting the boot device priority in your PC’s BIOS.
This requires modifying the priority of available boot devices. In order for the PC to boot
the Agilent Upgrade CD, the BIOS must be configured to boot from the CD-ROM drive
first. Please consult your PC user’s manual or IT professional for detailed instructions on
how to reset the boot prioroity on your system. The example below details the steps to
change the boot priority on an HP Omnibook Laptop. In general, you will interrupt the
boot of the PC, and navigate the BIOS menu to reorder the boot device priority.
1) Restart the Laptop, during bootup press F2 to enter setup.
2) Under the ‘Boot’ menu, select CD-ROM/DVD.
3) Write down the current boot priority (the order of the boot disks) so that you can
restore it after you have completed this procedure.
4) Use the keys indicated at the bottom of the screen (F5/F6) to move the CDROM/DVD drive to the top of the boot list.
5) Press ESC to exit and save changes.
Appendix B Creating New Floppy Disks
It is possible to create new floppy disks in the Linux environment, or within a Windows
environment. If you are not able to access a floppy disk drive and a CD-ROM drive
simultaneously, you will need to create the floppy disks within Windows.
In Linux
1) From the Main Menu, use the arrow keys to highlight Option 2 “Create Floppy Disk”,
and press “Enter”.
2) Insert a formatted floppy disk into the floppy drive of the PC.
3) If the OSA you wish to upgrade has A.01.00 – A.02.03 revision firmware, you will
need to create both floppy disks.
a) Select Floppy Disk 1 and press enter. Label this “Floppy Disk 1”
b) When the floppy disk is copied, select Option 2 again.
c) Insert a second formatted floppy disk in to the floppy drive of your PC.
d) Select Floppy Disk 2 and press enter. Label this “Floppy Disk 2”
4) If the OSA you wish to upgrade has B.01.00 – B.04.02 revision firmware, you will
need only the second floppy disk.
a) Insert a formatted floppy disk in to the floppy drive of your PC.
b) Select Floppy Disk 2 and press enter. Label this “Floppy Disk 2, B.04.02”
In Windows
1) With your PC running in Windows, insert the Upgrade CD into the CD-ROM drive.
2) Copy the folder “make_floppy” to your hard disk.
CAUTION There are separate raw write executables for Windows 95/98
(write_95.exe) and Windows NT/2000 (write_nt.exe) operating systems. Matching
the correct utility to your PC’s operating system is critical.
3) Insert a formatted floppy disk into the PC’s floppy disk drive.
4) From the Windows Start menu, click on Programs > MS DOS Command Prompt
to open the MS DOS window. Navigate to the directory where you stored the update
files. For example if the directory, “make_floppy”, is located under the C: drive, at
the prompt type, C:> cd make_floppy and press Enter.
a) At the prompt, type dir and press Enter. All of the downloaded files in the
directory should be listed.
b) To copy the firmware upgrade files, perform one of the following steps:
i)
For Windows NT/2000, at the prompt type write_nt floppy2.upd a:
(“a:”represents the designation of your disk drive) and press Enter.
ii)
For Windows 95/98, at the prompt type write_95 floppy2.upd a: (“a:”
represents the designation of your disk drive) and press Enter.
This will be Floppy Disk 2. The disk contents cannot be examined because the entire
disk contains the disk image, not a directory structure.
c) Remove Floppy Disk 2 from the disk drive and insert another formatted disk to
copy the upgrade utility files.
5) Repeat Step 3 to copy the Floppy Disk 1. For example, type
“write_nt floppy1.upd a:”
This disk will be Floppy Disk 1. The disk cannot be examined because the entire disk
contains the disk image, not a directory structure.
6) Remove the disk from the PC disk drive.
Appendix C. Using the Linux CD-ROM to upgrade OSAs over a network
In addition to connecting a PC directly to an OSA to transfer firmware files, the Upgrade
CD-ROM can be used to upgrade instruments over a network. The Linux CD acts as a
server, which the OSA contacts through the network and ftps (copies) the necessary files
from. In order to perform a networked upgrade, it is necessary to configure both the
Linux CD and the OSA as machines on the network. Specifically, this option requires
configuring the OSA onto your network by specifying a temporary IP address, Gateway
IP address, and the subnetwork mask. The Linux CD acts as an internal (within your
firewall) anonymous ftp server. The IP location of the OSA and the Linux server must be
separated by no more than one gateway.
For complete instructions on how to perform an OSA upgrade from a local server, please
download instructions from the Agilent website. Follow the links at
www.agilent.com/comms/osaupgrade.
To exercise this upgrade option, you must first decide how you will assign the
networking parameters to the Linux server. If your PC is configured on a network which
allows DHCP, or dynamic addressing, the Linux CD will contact the DHCP Server for
dynamic configuration. If successful, the CD will boot to a window displaying the
message “Configured for local server LAN upgrade”. To access the network parameters
that have been assigned the Linux Server, select 1. View Network Settings from the
Main Menu. The IP Address, Netmask (or subnetwork mask), and Gateway IP address
will be displayed.
The “Local Server” upgrade option from the OSA requires the IP address that the Linux
server has been assigned. You will be queried for this value during a LAN based upgrade
on the OSA.
Appendix D. Using the Upgrade CD with a local server
Instead of using the CD-ROM as a server itself, the firmware files may be transferred to
an ftp server in your network. The Upgrade CD can also be used to easily transfer
firmware files to a local server for distribution. Any network based upgrade requires
configuring the OSA onto your network by specifying a temporary IP address, Gateway
IP address, and a subnetwork mask. The IP location of the OSA and the internal server
must be separated by no more than one gateway, and the local ftp server must support
anonymous ftp (no password required for login).
The files necessary for upgrading are located on the Upgrade CD at
\live\home\agilent\dist. They must be copied or ftp’d to the local server’s home\dist
folder. The files are:
unpackrelease.upl
osaproj.cpio.B0402.gz.e.upl
patches3.cpio.gz.upl
express5.0.cpio.gz.upl
For complete instructions on how to perform an OSA upgrade from a local server, please
download instructions from the Agilent website. Follow the links at
www.agilent.com/comms/osaupgrade.
Appendix E. Linux CD-ROM Background Information
The CD-ROM provided is a bootable Linux operating system. The CD-ROM is used
with a PC or a laptop to act as a file server which holds OSA firmware files. The OSA
and PC can be connected directly with the provided cross-over LAN cable, or over a
network. Once the Linux CD-ROM has booted up, it is possible to change the
configuration of the network parameters. Once configured correctly, the PC’s role is to
wait to be queried for the firmware files by the OSA.
Transferring firmware files is a pull by the OSA. Once the Upgrade Utility is started, a
floppy disk is used to tell the instrument the target firmware revision, and the files that it
needs to pull to upgrade to that revision. The floppy disk is provided in the upgrade kit.
After the disk has been read, the target firmware revision will appear in a window. When
you choose to continue at this point, the instrument will query you for an upgrade
method. A CD-ROM used in a PC that has been left on the network will use the “Local
Server” upgrade. A directly configured OSA will use the “Laptop” method.
It is possible to connect the Linux server on the CD-ROM to the OSA in two ways. The
most straightforward method uses the cross-over LAN cable provided in the upgrade kit.
Directly connect the LAN port on your PC to the LAN port on the rear panel of the OSA.
When the CD boots, the message “Configured for direct connection” will be displayed.
The second option is to connect the server to the OSA via your network. This will
require knowledge of your network, and a static IP address for the OSA. If you wish to
upgrade OSA firmware over the network, the Linux server must be no more than one
gateway from the instrument(s). The Linux server configuration can be set either by
DHCP (if the PC has DHCP support on the network), or by manual configuration. If the
PC is currently on the LAN, the message “Configure for Local Server LAN Upgrade”
will appear when the CD boots up. The dynamically configured parameters are available
under “View Network Settings”.
Under the Configure Network menu on the CD, it is possible to change the network
parameters used to configure the Linux server. There are three possible configuration
options.
1) Default Networking Parameters The recommended method is direct connection
between the PC and the OSA. The CD-ROM is automatically configured for direct
connection on a PC not currently on the network.
2) DHCP If the PC used is connected to a dynamically configured network, the CDROM will request dynamic configuration. If able to obtain a dynamic IP address, the
PC will boot up to a window which displays the message “Configured for Local
Server Upgrade” The network parameters are available under the “View Network
Configuration” menu selection. The IP address assigned will be needed to perform
the upgrade over a network.
3) Static IP address If DHCP is not available, or you wish to configure a specific IP
address for the Linux Server, this is possible under the Network Configuration Menu.
You will need to enter an IP address, a Subnetwork Mask, and a Gateway IP address.
Once these values are installed, they can be viewed from the Main Menu under
“View Network Configuration.”
If the PC is not dynamically configured, or you wish to manually configure the
networking, select “Change Network Configuration” then ”Manual Network
Configuration”.
Processor
PIII 600
Duron 900
PIII 500
PIII 700
PII 450
PIII Xeon 550
Duron 800
Athlon K7 950
PII 350
PIII 550
PIII 933
Athlon K7 800
PIII 600
PMMX 233
PII 366
PII 366
PII 400
PII 366
PII 366
Manufacturer
Dell Precision 410
PC Clone
Dell Dimension XPS T500
Dell Dimension XPS T700
HP Vectra VL
Gateway2000 E5250
Compaq Presario 5000
Alien Ware
Micron Millennia
HP Pavilion 8495
PC Clone
IBM Aptiva
Gateway 2000 Performance
IMB Thinkpad770
HP Omnibook 4150
HP Omnibook 900
Dell Inspiron 7500
HP Omnibook 4150
HP Omnibook 900
Intel 440GX
VIA KT133
VIA KX133
Intel 440BX
Intel 440BX
vIA Apollo pro 133
AMD 750
Intel 440BX
Intel
Intel
Intel
Intel
Intel
Intel
Chipset
Intel 440BX
SiS 630/730
Intel
Intel
Intel
IDE CD-ROM / Dual Channel
PCI -IDE Controller
Toshiba XM-6041B SCSI
Compaq CRD-8484B
Pioneer DVD-115 IDE
Delta OIP-CD5200A IDE
Pioneer DVD-113 IDE
Creative Labs CD 5230E IDE
Hitachi GD-5000 IDE
Hitachi DVD GD-5000
Toshiba CD-C2002
CD ROM
NEC 446 SCSI
56X G6D
16
PCI 3com fast etherlink XL 3c905-TX
PCI Accton EN1207D
PCI D-Link DFE 530TX
PCI LanPro (Realtek) EN-5200PXA
PCI MPX EN5038
PCI NetGear FA310TX
PCI NetGear FA310TX
PCI Netgear FA310TX
PCMCIA 3Com 10/100 LAN CardBus
PCMCIA 3Com 10/100 LAN Cardbus 3CXFE575BT
PCMCIA 3Com 10/100 LAN Cardbus 3CXFE575CT
PCMCIA Dlink DFE-650
Toshiba XM-1902B IDE
PCMCIA Xircom Credit Card 10/100 LAN
PCMCIA Xircom Realport Ethernet 10/100
LAN+Modem 56
Lan Card
Embedded 3Com 3c906B
Embedded Realtek RTL8139
PCI 3COM Etherlink 10 TPCNIC (3C900B-TPC)
PCI 3COM Etherlink XL 10/100 (3C905c-TX)
PCI 3Com Fast EtherLink XL 10/100Mb
Appendix F. PC Hardware Compatibility Matrix