1
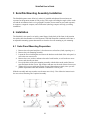
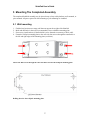
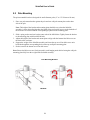
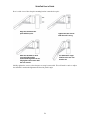
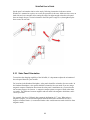
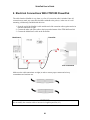
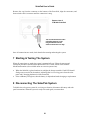
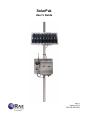
SolarPak User’s Guide
3 SolarPak Mounting Assembly Installation
The SolarPak operates most effectively when it is installed and adjusted for maximum sun
exposure for the greatest amount of time per day. This requires checking the angle relative to the
sun and the orientation relative to its geographic location (for true north or true south exposure).
A computer, a magnetic compass, and a mechanical (drawing) compass will help you during
installation.
4 Installation
The SolarPak’s solar panel is set inside a metal frame. On the back of the frame is the junction
box with a cable that attaches to a RAE Systems FTB-1000 PowerPak. Attached to the frame is
an adjustable mounting system that attaches to a bracket for wall mounting or pole mounting.
4.1 Solar Panel Mounting Preparation
1. Remove the solar panel and place it face-down on a soft surface (cloth, carpeting, etc.).
2. Remove the pole-mounting assembly.
3. Loosen the screws holding the two arms to the brackets on the back of the solar panel, as
well as the two extra screws.
4. Remove the screw, washer, and nut at the end of each bracket, as well as the two extra
screws, and raise the two arms.
5. Line up the holes of the pole-mounting assembly with the holes at the ends of the two
arms and insert the hex screws. Slip washers and nuts over the ends of those four screws.
6. Tighten all six screws with your fingers. Do not tighten them too much, since you will
perform adjustments when the SolarPak is attached to a wall or pole.
Slide the assembly and arms to make sure the arms move freely. Then follow the instructions in
the next section, Mounting The Completed Assembly.
1
2
3
4
5
6
6