1
CHAPTER 2. TRANSMITTER INSTALLATION
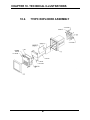
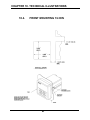
two mounting retaining screws (see 770PC
Front Mounted in 1/4 DIN Panel Opening”
Each 770PC is packed in an individual illustration in the rear of this manual.
biodegradable carton. Customers are
advised to retain packaging in the event
CAUTION: Turn the mounting
that the instrument must be returned to
retaining screw counterclockThornton Associates for service. Open
wise until the meter is tight
cartons carefully to insure that products
against the panel. Tighten the
are not damaged or dropped.
second mounting retaining screw
2.1. UNPACKING
counterclockwise until tight. Verify that both screws are tight and
the meter is firmly mounted to the
panel.
Carton contents:
1-770PC Transmitter
1-Manual
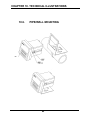
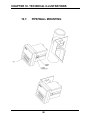
2.2.1. Wall/Pipe Mounting & Installation
2.2. PANEL MOUNTING
CUT-OUT AND
INSTALLATION
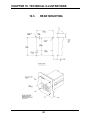
Panels must have openings cut to 3 5/8” X
3 5/8” (92mm x 92mm, 1/4 DIN). Take note
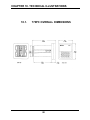
of transmitter case dimensions to insure
proper spacing on panels for multiple bezel
clearance, if more than one transmitter is
mounted on a panel.
Panel cutouts must be clean and free of
burrs and sharp edges. The proper dimensions allow a transmitter to slide freely into
the cutout.
WARNING: PIPE MOUNTING IS
NOT RECOMMENDED IF THE
PIPE IS SUBJECT TO VIBRATION.
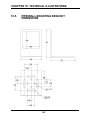
A versatile Wall/Pipe mounting bracket
(part number 15533) is available for various mounting locations. A 3.625” X 3.625”
(92mm X 92mm) 1/4 DIN cut-out is provided for installing the instrument on this right
angle painted aluminum bracket. Four
mounting holes are provided for securing
the bracket to a flat surface or around a
pipe. Four slots are also provided for fastening with banding tape, worm clamps or
other fastening hardware.
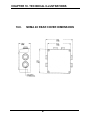
If the NEMA 4X Rear Cover is used in a
panel mounted installation, the 770PC unit
must be installed in the panel opening Slide the meter into the cutout. From the
before the NEMA 4X Rear Cover is rear of the meter, insert a long slotted
screwdriver into on of the two mounting
installed.
retaining screws (see 770PC Front MountInstall panel gasket, slide the meter into ed in 1/4 DIN Panel Opening” illustration in
the cutout. From the rear of the meter, the rear of this manual). Turn the mounting
insert a long screwdriver into one of the retaining screw counterclockwise until the
15