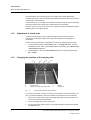
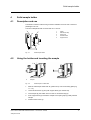
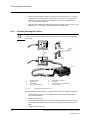
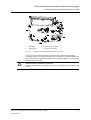
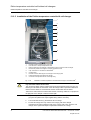
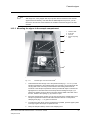
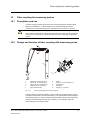
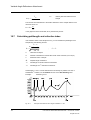
1
Accessories
UV VIS Spectrophotometer
SPECORD® 200 / 205 / 210 / 250
Analytik Jena AG
Kundendienst
Konrad-Zuse-Str. 1
07745 Jena
Phone:
e-mail:
Hotline:
+ 49 (3641) 77-7407
Fax:
+ 49 (3641) 77-7449
[email protected]
General information about Analytik Jena AG
on the internet: http://www.analytik-jena.de
Copyrights and Trademarks
Microsoft, Windows 2000, Windows XP, Windows NT, MS Excel are registered trademarks of Microsoft
Corp.
Publication No.: 221:426.23
Edition – July 2005
Technical documentation made by:
Analytik Jena AG
This documentation describes the state of this product at the time of publishing. It
need not necessarily agree with future versions of the product.
Subject to change!
© Copyright 2005 Analytik Jena AG
Contents
Contents
®
1
Introduction .....................................................................5
1.1
Safety notes .....................................................................................................6
1.2
Care of accessories..........................................................................................7
1.3
Basics of SPECORD alignment........................................................................7
1.3.1
Sample compartment of SPECORD® ...............................................................7
1.3.2
Adjustment of zeroth order ...............................................................................8
1.3.3
Changing the position of the carrying rails .......................................................8
2
Universal holder ............................................................11
2.1
Description and use........................................................................................11
2.2
Description .....................................................................................................11
2.3
Using the universal holder ..............................................................................12
3
100 mm cylindrical cell (absorption tube) ...................13
3.1
Description and use........................................................................................13
3.2
Description .....................................................................................................13
3.3
Inserting the 100mm cylindrical cell................................................................13
3.4
Care and transportation of cylindrical cell.......................................................14
4
Solid sample holder ......................................................15
4.1
Description and use........................................................................................15
4.2
Using the holder and inserting the sample .....................................................15
5
Holder for cylindrical cells............................................17
5.1
Description and use........................................................................................17
5.2
Description .....................................................................................................17
5.3
Using the holder for cylindrical cells ...............................................................17
6
Holder for round cells ...................................................19
6.1
Description and use........................................................................................19
6.2
Description .....................................................................................................19
6.3
Using the holder for round cells......................................................................19
7
Holder for semi-microcells and microcells .................21
7.1
Description and use........................................................................................21
7.2
Holder for semi-microcells..............................................................................21
7.3
Adjustable holder for microcells, non-thermostatted, (8.5 mm / 15 mm beam
height) ............................................................................................................22
7.4
Adjustable holder for microcells, non-thermostatted (8.5 mm beam height)...23
8
Thermostatted cell holder.............................................25
8.1
Description and use........................................................................................25
8.2
Description .....................................................................................................25
8.3
Using the thermostatted cell holder ................................................................25
8.3.1
Connection and installation in sample compartment ......................................25
User’s Manual SPECORD 200/205/210/250 – Accessories 07/2005
Analytik Jena AG
1
Contents
2
8.3.2
Inserting the magnetic stirrer ..........................................................................26
9
Adjustable cell holder, thermostatted .........................29
9.1
Inserting the cell .............................................................................................30
9.2
Aligning the cell ..............................................................................................30
10
6-cell changer, thermostatted ......................................31
10.1
Description and use........................................................................................31
10.2
Design ............................................................................................................32
10.3
Installation and insertion in sample compartment...........................................33
10.3.1
Installation of magnetic stirrers.......................................................................33
10.3.2
Connection to a thermostat ............................................................................34
10.3.3
Installation in sample compartment ................................................................35
10.4
Operation .......................................................................................................36
10.4.1
Settings in Measurement Parameters window ...............................................36
10.4.2
Measurements with the 6-cell changer...........................................................38
10.4.3
Operating modes of cell changers..................................................................38
11
8-cell changer ................................................................41
11.1
Removal of transport lock on non-temperature-controlled 8-cell changer ......41
11.2
Design of 8-cell changer.................................................................................42
11.3
Installation of 8-cell changer...........................................................................42
11.4
Operation of the 8-cell changer ......................................................................44
11.4.1
Software settings............................................................................................44
11.4.2
Measurements with the 8-cell changer...........................................................45
11.5
Use of two 8-cell changers .............................................................................45
11.5.1
Staggered operation of two 8-cell changers for more than 8 samples............46
11.5.2
Synchronous operation of two 8-cell changers...............................................47
12
Cell carousel ..................................................................49
12.1
Description and use........................................................................................49
12.2
Design ............................................................................................................49
12.3
Installation in sample compartment ................................................................50
12.4
Operation .......................................................................................................51
13
Peltier temperature-controlled cell holders/cell
changers ........................................................................53
13.1
Peltier temperature-controlled cell holder, air-cooled .....................................54
13.1.1
Safety notes ...................................................................................................55
13.1.2
Technical data of Peltier temperature-controlled cell holder, air-cooled .........56
13.1.3
Design of Peltier-temperature-controlled cell holder, air-cooled .....................57
13.1.4
Installation of Peltier temperature-controlled cell holder in SPECORD®.........58
13.1.5
Care ...............................................................................................................60
13.2
Peltier temperature-controlled cell holder with heat exchanger ......................62
User’s Manual SPECORD 200/205/210/250 – Accessories 07/2005
Analytik Jena AG
Contents
®
13.2.1
Safety notes for the use of the Peltier temperature-controlled cell holder with
heat exchanger...............................................................................................62
13.2.2
Technical data of Peltier temperature-controlled cell holder with heat
exchanger ......................................................................................................64
13.2.3
Design of Peltier temperature-controlled cell holder with heat exchanger......66
13.2.4
Installation of the cell holder in the SPECORD® .............................................66
13.3
Peltier temperature-controlled 6-cell changer.................................................69
13.3.1
Use.................................................................................................................69
13.3.2
Safety notes ...................................................................................................70
13.3.3
Technical data of Peltier temperature-controlled 6-cell changer ....................71
13.3.4
Design of Peltier temperature-controlled 6-cell changer.................................73
13.3.5
Installation of the Peltier-temperature-controlled 6-cell changer ....................74
13.3.6
Settings in WinASPECT® software.................................................................77
13.3.7
Measurement procedure ................................................................................78
13.4
Peltier temperature-controlled 8-cell changer.................................................79
13.4.1
Safety notes ...................................................................................................80
13.4.2
Technical data of Peltier temperature-controlled 8-cell changer ....................81
13.4.3
Design of Peltier temperature-controlled 8-cell changer.................................83
13.4.4
Installation of Peltier temperature-controlled 8-cell changer...........................84
13.4.5
Settings in WinASPECT® software.................................................................88
13.4.6
Measurement procedure ................................................................................89
13.5
Connection and operation of temperature control unit....................................90
13.5.1
Connecting the temperature control unit ........................................................90
13.5.2
Settings on temperature control unit...............................................................91
13.5.3
Replacing fuses on the temperature control unit ............................................93
13.6
Connection and operation of the heat exchanger...........................................94
13.6.1
Preparing the coolant .....................................................................................94
13.6.2
Connecting the heat exchanger......................................................................94
13.6.3
Replacing fuses on the heat exchanger .........................................................95
14
Cassette sipper..............................................................97
14.1
Intended use ..................................................................................................97
14.2
Design of cassette sipper ...............................................................................97
14.3
Mounting the cassette sipper .........................................................................98
14.3.1
Mounting the tube set.....................................................................................98
14.3.2
Mounting the sipper in the sample compartment............................................99
14.3.3
Adjusting the flow cell...................................................................................100
14.4
Sample measurement ..................................................................................101
14.4.1
Settings on the PC .......................................................................................101
14.4.2
Performing a sample measurement .............................................................102
14.5
Care and maintenance .................................................................................103
User’s Manual SPECORD 200/205/210/250 – Accessories 07/2005
Analytik Jena AG
3
Contents
4
15
APG 53/100 XYZ Autosampler....................................105
15.1
Intended use ................................................................................................105
15.2
Safety notes .................................................................................................105
15.3
Design and installation of the APG 53/100...................................................106
15.4
Connecting the XYZ autosampler to the SPECORD® ..................................108
15.5
Sample measurement ..................................................................................110
15.6
Finding the appropriate pump time...............................................................111
16
Fiber coupling for measuring probes ........................113
16.1
Description and use......................................................................................113
16.2
Design and function of fiber coupling with measuring probe ........................113
16.3
Design and function of the fiber coupling with SMA connectors ...................114
16.4
Installation of the adapter in the sample compartment .................................114
16.5
Alignment of fiber coupling ...........................................................................114
17
Absolute Reflectance Attachment .............................115
17.1
Description and use......................................................................................115
17.2
Design ..........................................................................................................115
17.3
Installation in sample compartment ..............................................................116
17.4
Operating principle .......................................................................................116
17.5
Adjustment ...................................................................................................117
17.6
Measurements with the Absolute Reflectance Attachment ..........................117
17.7
Care and maintenance .................................................................................118
18
Variable Angle Reflectance Attachment....................119
18.1
Description and use......................................................................................119
18.2
Design and operating principle .....................................................................119
18.3
Installation in sample compartment ..............................................................121
18.4
Adjusting the angle of reflection ...................................................................121
18.5
Measuring with the reflectance attachment ..................................................121
18.6
Calculating the reflectance ...........................................................................121
18.7
Calculating pathlength and refractive index..................................................122
18.8
Care and maintenance .................................................................................123
18.9
Technical data ..............................................................................................123
19
Integrating Sphere.......................................................125
19.1
Description and use......................................................................................125
19.2
Design of integrating sphere ........................................................................126
19.3
Measurements with the integrating sphere...................................................127
19.4
Transmittance measurements ......................................................................127
19.5
Reflectance measurements..........................................................................129
19.6
Technical Data .............................................................................................133
20
Figures .........................................................................135
User’s Manual SPECORD 200/205/210/250 – Accessories 07/2005
Analytik Jena AG
Introduction
Safety notes
1
Introduction
This manual contains the description of the following devices
•
SPECORD® 200, from S/N 222 U (or V W X) 100
•
SPECORD® 205
•
SPECORD® 210
•
SPECORD® 250.
If the descriptions equally refer to all three models, only the collective term SPECORD®
will be used.
In this manual, the following symbols are used to refer you to warnings and notes:
Danger!
Danger messages must be strictly observed to prevent personal injury.
Caution!
Caution messages refer you to procedures which, if not observed, could result in damage
to the equipment.
Warning! Dangerous electric voltage!
Warning! Emission of UV radiation!
Disconnect power cable!
Note
This note must be followed to obtain correct measurement results.
For easier navigation within the manual, the manual uses the following system:
•
Chapters and illustrations are numbered consecutively.
•
Every illustration has its own caption.
•
Steps of operation are consecutively numbered.
•
Cross-references are marked by an arrow, e.g. → Section "Introduction" p. 1.
User’s Manual SPECORD 200/205/210/250 – Accessories 07/2005
Analytik Jena AG
5
Introduction
Safety notes
1.1
Safety notes
Handling of the accessories is subject to the safety instructions given for the SPECORD®
basic unit (→ User's Manual SPECORD®, Section Safety Notes).
For all accessories of the SPECORD® Series, the following safety instructions are
applicable:
Intended use!
®
The SPECORD , including original accessories, may only be used for the applications
described in this manual. The manufacturer cannot assume any liability for any other
application, including that of individual modules or single parts. This also applies to all
service or repair work that is not carried out by authorized service personnel. All
warranty claims shall be forfeited.
Transportation and storage!
Accessories not in use should always be stored in the provided packaging!
For transportation, always use the provided original packaging!
Risk of corrosion!
Do not set up the device near aggressive vapors, e.g. strongly corrosive acid or caustic
vapors! The vapors might corrode the connections, mechanical and optical components
of the device.
Avoid exposing the sample compartment and the accessories to strongly corrosive
substances! For the analysis of such samples, use vapor-tight stoppered cells.
Observe specific instructions!
Accessory-specific instructions are given in the chapter describing its use.
Caution! Contamination!
Never touch any optical mirrors of accessory units!
Additionally, observe the operating instructions and safety notes of any supplied system
components of other manufacturers (e.g. fluid thermostats
6
User’s Manual SPECORD 200/205/210/250 – Accessories 07/2005
Analytik Jena AG
Introduction
Care of accessories
1.2
Care of accessories
The accessories are largely maintenance-free.
The following rules apply to all accessories:
Avoid any contamination by handling sample substances carefully.
Wipe off spilt samples or reagents immediately with an absorbent cloth or cleaning
tissue.
Do not expose accessories to corrosive atmospheres to prevent corrosion.
If provided, observe the additional instructions on the care of individual accessory
units.
1.3
Basics of SPECORD alignment
1.3.1
Sample compartment of SPECORD®
1
2
3
4
5
6
7
8
9
10
11
12
Fig. 1-1
Sample beam path with two
carrying rails
Reference beam path with two
carrying rails
Connector for sipper and cell
changer
Connector (reserve)
Stopper for duct of optical fiber of
measuring probe or electrical
cables
Duct for coolant tubes
Receptacle for cells with turbid
samples
Mount for cell holder
Receptacle for cells with turbid
samples
Mount for cell holder
Duct for drain tube (not visible)
Ducts for sample-aspirating
tubes (sipper)
Sample compartment
Sample (1) and reference beam (2) enter the sample compartment through the left-hand
wall.
The mounts for the cell holders (8), (10) are arranged in front of the exit windows in the
right-hand sample compartment wall.
The two pairs of carrying rails serve to accommodate the accessories, which easily
clamp to the rods.
The receptacles for the cells (7), (9) with turbid samples are located directly in front of
the detector at the right-hand sample-compartment wall.
Two 9-pin connectors (3), (4) allow the connection of electrically driven accessories,
such as the automatic temperature-controlled cell changer or the sipper system.
User’s Manual SPECORD 200/205/210/250 – Accessories 07/2005
Analytik Jena AG
7
Introduction
Basics of SPECORD alignment
The optical fibers of the measuring probe or the cables of the Peltier temperaturecontrolled cell holder or the cell changer are threaded through the recess in the rear wall
of the sample compartment (5).
The three ducts (6,11) in the right-hand sample compartment wall are used for threading
through the sample drain tube and the coolant tubes for the thermostat.
The ducts in the front side of the device cover (12) are provided for threading through the
aspirating tubes of the sipper system.
1.3.2
Adjustment of zeroth order
In zeroth order adjustment, white, undispersed light passes through the sample
compartment. This high-intensity beam is particularly suitable for the alignment of
accessories.
Open the Service Check utility of WinASPECT® software by following this procedure:
1.3.3
1.
On the Windows taskbar, click the Start button. In the Programs folder, open the
WinASPECT folder. There, click on Service xxx. This will bring up the Specord xxx
- Service Check dialog box.
2.
In this dialog box, click on the Zeroth Order button and choose the halogen lamp
(HL – Lamp).
Changing the position of the carrying rails
1
2
Knurled screw
Support in sample compartment wall
Fig. 1-2
3
4
Adapter
Carrying rail
Carrying rails mounted in bottom position
To use the cell carousel, you have to mount the carrying rails in the bottom position. For
that, you need two adapters, which are included in the equipment of the cell carousel.
8
1.
Unscrew one of the carrying rails in the sample beam path (front pair) and remove
the rod from the sample compartment.
2.
Screw one adapter (3) onto the carrying rail.
3.
Put the carrying rail onto the bottom, cone-shaped journal in the right-hand sample
compartment wall.
User’s Manual SPECORD 200/205/210/250 – Accessories 07/2005
Analytik Jena AG
Introduction
Basics of SPECORD alignment
4.
Hold the carrying rail with adapter from the bottom against the support (2) and
fasten the carrying rail by means of the knurled screw. Fasten the knurled screw
hand-tight so that the carrying rail cannot be moved.
5.
Repeat the above procedure for the second carrying rail.
User’s Manual SPECORD 200/205/210/250 – Accessories 07/2005
Analytik Jena AG
9
Universal holder
2
Universal holder
2.1
Description and use
The universal holder accommodates the following accessory units:
2.2
•
Holder for 100 mm cylindrical cell
•
Holder for cells of up to 50 mm pathlength
•
Thermostatted cell holder for accommodation and temperature control of a
cell of up to 10 mm pathlength (may be fitted with magnetic stirrer)
•
Thermostatted cell holder for accommodation and temperature control of a
cell of up to 50 mm pathlength
•
Solid sample holder for accommodation of films and sample plates of up to
25 mm pathlength and a minimum diameter of ≥ 20 mm
•
Holder for round cells
•
Holder for semi-microcells and microcells
Description
1
2
Fig. 2-1
Universal holder
User’s Manual SPECORD 200/205/210/250 – Accessories 07/2005
Analytik Jena AG
Mounting plate for cell or solid
sample holders
Clamp lever
11
Universal holder
2.3
Using the universal holder
Fig. 2-2
Attaching and clamping the universal holder
1.
Put the universal holder with its hook onto the rear of the carrying rails allocated to
sample or reference channel. Then, slide it to the right-hand wall of the sample
compartment as far as it will go.
2.
Throw clamp lever (2) to the right to clamp the universal holder.
3.
After you have attached and clamped the universal holder, slide the cell holder or
the solid sample holder onto its mounting plate.
Note
It is necessary to position the universal holder at the right-hand wall of the sample
compartment if the inserted sample shall be analyzed in the position where the beam
cross-section is minimal.
This position ensures optimum signal-to-noise ratio.
If you want to arrange the sample in a different position, you can slide the universal
holder to another place on the carrying rail and clamp it there.
You may also mount it inversely so that the plate (1) that accommodates the cell or solid
sample holder is on the left-hand side.
12
User’s Manual SPECORD 200/205/210/250 – Accessories 07/2005
Analytik Jena AG
100 mm cylindrical cell (absorption tube)
3
100 mm cylindrical cell (absorption tube)
3.1
Description and use
The cylindrical cell serves for measuring liquid samples requiring a pathlength of 100
mm. The effective pathlength of the cell (in cm) is engraved to the cell body.
The 100mm cylindrical cell comes with a special holder (1) for cylindrical cells.
3.2
Description
1
2
3
4
Holder for cylindrical cell
Universal holder
Clamping lever
Mounting plate of universal holder
Fig. 3-1
3.3
5
6
7
100mm cylindrical cell
Filling port with stopper
Effective pathlength of the cell
100 mm cylindrical cell
Inserting the 100mm cylindrical cell
1.
Put the universal holder (2) with its hook onto the rear of the two front carrying rails.
Slide it to the right-hand wall of the sample compartment as far as it will go.
2.
Throw clamping lever (3) over to the right to clamp the universal holder.
3.
Slide holder (1) for cylindrical cells from top onto mounting plate (4) of the universal
holder.
4.
Insert the 100mm cylindrical cell (5) flush right in holder (1) for cylindrical cells and
slide the complete universal holder (2) assembly to the right-hand sample
compartment wall.
User’s Manual SPECORD 200/205/210/250 – Accessories 07/2005
Analytik Jena AG
13
100 mm cylindrical cell (absorption tube)
3.4
Care and transportation of cylindrical cell
Store and carry the cylindrical cell only in the original packing.
Clean the cylindrical cell after every use.
14
User’s Manual SPECORD 200/205/210/250 – Accessories 07/2005
Analytik Jena AG
Solid sample holder
4
Solid sample holder
4.1
Description and use
The holder is suited for solids having a minimum diameter of 20 mm and a maximum
pathlength of 25 mm.
The size of samples should not exceed 80 mm x 140 mm.
1
2
3
4
5
Fig. 4-1
4.2
Guide
Mechanical stop
Spring clip
Knurled screw
Support block
Solid sample holder
Using the holder and inserting the sample
6
Sample
Fig. 4-2
Solid sample in holder slide
1.
Slide the solid sample holder with its guide from top onto the mounting plate (Fig.
1-1 / 10).
2.
Loosen knurled screw (4) and push support block (5) to the left stop.
3.
Insert sample (6) into holder so that it rests on mechanical stop (2).
4.
Push support block (5) towards the sample so that spring clips (3) safely hold the
sample.
5.
Fasten knurled screw (4).
User’s Manual SPECORD 200/205/210/250 – Accessories 07/2005
Analytik Jena AG
15
Holder for cylindrical cells
5
Holder for cylindrical cells
5.1
Description and use
These holders serve for the accommodation of cylindrical cells without and with
temperature control (thermocell) having an outside diameter of 22 mm and a length of up
to 100 mm.
5.2
Description
1
2
Fig. 5-1
5.3
Support rods for cells of up to 50 mm length
Support rods for cells of up to 100 mm length
Holders for cylindrical cells
Using the holder for cylindrical cells
1
2
3
Fig. 5-2
Fill-in port
Window
Connectors for thermostatting tubes
10 mm thermocell (cylindrical)
Slide the holders from to onto the mounting plate for cell holders (Fig. 1-1 / 10).
Put the cylindrical cell onto the support rods. If the thermostatted cell is being used, the
thermostatting tubes must be threaded outside the sample compartment through the
provided holes in the same way as with the thermostatted cell holder (→ see Section
“Thermostatted cell holder”).
User’s Manual SPECORD 200/205/210/250 – Accessories 07/2005
Analytik Jena AG
17
Holder for round cells
6
Holder for round cells
6.1
Description and use
This holder accommodates round cells or ampoules (cell test) or test tubes.
6.2
Cell diameter
12 mm to 20 mm
Cell height
40 mm to 70 mm
Minimum filling level
20 mm
Description
1
2
3
4
Fig. 6-1
6.3
Support
Round cell
Spring rocker
Vee-guide
Holder for round cells
Using the holder for round cells
1.
Plug the holder for round cells from top onto the mounting plate for cell holders
(User's Manual, Instrument Description, Fig. 8, Item 4) in the front beam path.
2.
Carefully withdraw the spring rocker (3).
3.
Slide the round cell (2) down along the vee-guide (4) between support and spring
rocker.
4.
Carefully let spring rocker return to hold the cell.
Note
Some manufacturers of cell tests provide round cells with a line mark. Position round
cells of this type in such a way that the line mark is aligned to the sample beam axis.
If this mark is missing, take several measurements and turn the cell between the
measurements each to avoid pathlength errors in high-precision measurements.
User’s Manual SPECORD 200/205/210/250 – Accessories 07/2005
Analytik Jena AG
19
Holder for semi-microcells and microcells
7
Holder for semi-microcells and microcells
7.1
Description and use
Semi-micro and microcells have the standard outside width of 12.5 mm, but a reduced
inside width or filling aperture of 1 to 4 mm. This requires accurate alignment of the cell
to the sample and, if necessary, to the reference beam of the SPECORD®.
Three cell holders are available that meet this requirement for precise alignment to the
beam:
7.2
1.
The non-adjustable holder with a fixed mask of 2.5 mm diameter for semi-microcells
of glass or quartz and a beam height of 8.5 mm.
2.
The non-thermostatted holder for glass or quartz microcells with black sidewalls.
This holder is adjustable both vertically and at right angles to the beam axis. The
beam heights possible are 8.5 mm and 15 mm.
3.
The non-thermostatted holder for glass or quartz microcells with black sidewalls.
This holder is adjustable at right angles to the beam axis. The beam height is 8.5
mm.
Holder for semi-microcells
Pathlength of semi-microcell
max.
10
Height of beam center
8.5
mm
External width of cell
12.5
mm
Minimum filling level
15
mm
Fig. 7-1
Holder for semi-microcells
1.
Slip this holder onto the mount for cells (Fig. 1-1/ 10) or the universal holder (→
Section "Universal holder" p. 11) and push it down as far as it will go.
2.
When you insert the semi-microcell, take care that the leaf spring definitely presses
the cell against the left-hand wall.
User’s Manual SPECORD 200/205/210/250 – Accessories 07/2005
Analytik Jena AG
mm
21
Holder for semi-microcells and microcells
7.3
Adjustable holder for microcells, non-thermostatted, (8.5 mm
/ 15 mm beam height)
1
2
3
4
5
6
7
Fig. 7-2
Handle
Spring
Holder
Screw for vertical
adjustment
Thrust pad
Knurled screw
Slit position
Holder for microcells (adjustable) with beam heights of 8.5 mm and 15 mm
(adjustable)
Technical Data
Pathlengths of microcell
up to 10 mm
Height of beam center
8.5 and 15 mm
Outside cell dimensions
12.5 x 12.6 x 45 mm³
Installing the cell holder in the SPECORD®
The cell holder contains a 6.5 mm high insert, which is to be inserted in an opening
below the cell, when using cells of 8.5 mm beam height.
1.
To insert a cell, pull out handle (1) a little bit and insert the cell from top. Shift thrust
pad (5), if necessary, by turning knurled screw (6).
2.
From top, slide down holder (3) onto the mount for cells (Fig. 1-1 / 10) as far as it will
go.
Alignment of cell
When you use the holder for the first time or when it is misaligned, it is advisable to
realign the cell to the beam path.
First, look at the passage of undispersed "white" light through the cell:
1.
Adjust zeroth order in the beam path (→ Section "Adjustment of zeroth order", p. 8).
2.
Look through the slit (7) to see how the light is incident on the cell aperture. Turn
knurled screw (6) until the light appears centered on the cell aperture.
Fine adjustment is done by taking an energy measurement:
3.
22
In the device driver (menu command: Measurement / Set Parameters), create a
parameter record with e.g. the following parameters:
User’s Manual SPECORD 200/205/210/250 – Accessories 07/2005
Analytik Jena AG
Holder for semi-microcells and microcells
7.4
Wavelength:
500nm
Integration time:
0.1s
Slit:
2nm
Correction:
No
Cycle Mode: Manual:
20
Display:
Energy
4.
Align the cell holder at right angles to the beam path by taking repeated
measurements and turning knurled screw (6) each to shift the cell mount until you
obtain the maximum energy.
5.
Turn screw (4) to adjust the cell holder vertically until you obtain maximum energy.
Adjustable holder for microcells, non-thermostatted (8.5 mm
beam height)
1
2
3
4
5
6
7
Fig. 7-3
Fastening screw
Knurled screw for fastening the rider
Rider
Knurled screw for horizontal
adjustment
Leaf springs
Cell guide
Locating holes
Holder for microcells (adjustable)
Technical Data
Pathlengths of microcell
1, 2, 5, 10
Height of beam center
8.5
mm
Width of cell
12.5
mm
mm
Inserting the holder
1.
Slightly unscrew knurled screw (1) on the holder to avoid jamming when you insert
the holder.
2.
Slip this holder onto the mount for cells or the universal holder and push it down as
far as it will go. The universal holder must be moved as far as possible to the righthand wall of the sample compartment.
3.
Tighten knurled screw (1) to fix the holder in the optical path of the SPECORD®.
4.
Adjust the rider (3) using knurled screw (2) to suit the pathlength of the cell to be
used. For this, unscrew rider (3) completely by means of knurled screw (2) and
User’s Manual SPECORD 200/205/210/250 – Accessories 07/2005
Analytik Jena AG
23
Holder for semi-microcells and microcells
insert it in the appropriate locating hole (7). Then screw it down again using knurled
screw (2).
5.
Insert either an empty cell in the holder or a cell filled with solvent. Leaf spring (5)
will press the cell against cell guide (6).
6.
In the device driver (menu command: Measurement / Set Parameters), create a
parameter record with e.g. the following measurement parameters:
7.
24
Wavelength:
500nm
Integration time:
0.1s
Slit:
2nm
Correction:
No
Cycle Mode: Manual:
20
Display:
Energy
Adjust the cell holder transversely to the beam by activating a transmission
measurement program. Run repeated measurements and move the cell holder by
turning knurled screw (4) until you obtain a maximum transmission value.
User’s Manual SPECORD 200/205/210/250 – Accessories 07/2005
Analytik Jena AG
Thermostatted cell holder
8
Thermostatted cell holder
8.1
Description and use
The thermostatted cell holder accommodates a 10mm pathlength cell of 12.5 x 12.5 x 45
(L x W x H in mm) with a minimum filling level of 25 mm. You may optionally insert a
magnetic stirrer in its bottom plate.
Temperature control is by an external fluid thermostat.
Observe the operating instructions provided with the thermostat!
The thermostatted cell holder is not suitable for the accommodation of HPLC cells (→
Section "Adjustable cell holder, thermostatted" p. 29).
You can place the thermostatted cell holder in the sample beam while working with the
cell changer in the reference beam. Both devices may be operated from the same
thermostat or cryostat. For this mode, a corresponding set of tubes is available.
You can insert flow cells in the thermostatted cell holder used in combination with the
sipper system.
8.2
Description
1
2
3
4
5
6
7
8
9
Fig. 8-1
Inlet connector
Outlet connector
Thermostatting tube (inlet)
Thermostatting tube (outlet)
Sleeve nut
Guide
Knurled screws for magnetic
stirrer
Cell
Aperture
Thermostatted cell holder
8.3
Using the thermostatted cell holder
8.3.1
Connection and installation in sample compartment
1.
Thread the coolant tubes from the interior of the sample compartment through the
tubes in the right-hand sample compartment wall of the SPECORD® (Fig. 1-1 / 6).
The tube ducts in the wall are provided with steps to achieve a higher light-tightness.
If the tube is caught on these steps, try to loosen it by slightly turning it. When it
becomes visible in the outer opening, you can bend it towards the opening e.g. by
means of a pen.
User’s Manual SPECORD 200/205/210/250 – Accessories 07/2005
Analytik Jena AG
25
Thermostatted cell holder
8.3.2
2.
Connect the thermostatting tubes (3, 4) between the tube connectors (1, 2) of the
thermostatted cell holder and the corresponding connectors on the external fluid
thermostat. The tubes have an inside diameter of 4 mm and a wall thickness of
1mm. The tubes are transparent.
3.
Slide the thermostatted cell holder with its guide (6) from top onto the mount for cell
holders (Fig. 1-1 / 10) or the mounting plate of the universal holder.
Inserting the magnetic stirrer
Caution! Incorrect line voltage may damage the unit!
Make sure the operating voltage of the power supply unit (7) agrees with the available
line voltage.
1
2
3
4
Knurled screws
Bottom plate
Metal block
Coil of magnetic stirrer
Fig. 8-2
5
6
7
8
Flat cable for connector
Connector
Power supply with speed control
Knurled screws
Inserting the magnetic stirrer coil
Attach the magnetic stirrer before you insert the cell holder in the sample compartment.
26
1.
Loosen knurled screws (1) on the underside of the thermostatted cell holder and
remove bottom plate (2).
2.
Remove metal block (3).
3.
Put the coil of the magnetic stirrer (4) into the square opening at the bottom of the
thermostatted cell holder taking care that the flat cable (5) is flush with the bottom
plate.
4.
Tighten knurled screws (8).
User’s Manual SPECORD 200/205/210/250 – Accessories 07/2005
Analytik Jena AG
Thermostatted cell holder
5.
Without twisting the flat cable, thread it under the rear carrying rails and through the
stopper in the rear wall of the sample compartment (Fig. 1-1 / 5).
6.
Push plug and cable through under the sample compartment cover. Lay the cables
in the groove in the SPECORD®. Take care that the sample compartment cover
does not squeeze the cables.
7.
Plug the plug of the flat cable (5) into the connector (6) of the power supply with
speed control (7).
8.
Connect the power supply to a power outlet.
9.
Insert the thermostatted cell holder with magnetic stirrer exactly in the same way as
the thermostatted cell holder without stirrer (see above).
10. Put a stirring magnet into the cell and insert the cell in the holder.
11. Turn the speed control knob to adjust the stirring frequency.
User’s Manual SPECORD 200/205/210/250 – Accessories 07/2005
Analytik Jena AG
27
Adjustable cell holder, thermostatted
9
Adjustable cell holder, thermostatted
The adjustable thermostatted cell holder accommodates a cell of 10 mm pathlength and
the following external dimensions: 12.5 x 12.5 x 35 (L x W x H in mm). The height of
beam transmission is 15 mm.
The holder is designed for the accommodation of cells with very small window apertures
(e.g. 1mm on HPLC cells). It provides defined location and hold in, and alignment to the
beam. With such small apertures, even minimum misalignment of the cell may impair the
signal-to-noise ratio.
2
1
4
5
3
5
6
1
2
3
4
5
6
8
7
6
8
Screws
Lid
Tube connector with sleeve nut
Screws for vertical adjustment
Screws to fasten the cell holder
(4th screw obscured)
Screws for horizontal
adjustment (2nd screw
obscured)
Top part of adjustable cell
holder
Lever
5
7
Fig. 9-1
Adjustable thermostatted cell holder
1
2
3
Fig. 9-2
HPLC cell
User’s Manual SPECORD 200/205/210/250 – Accessories 07/2005
Analytik Jena AG
Sample feed
Sample aspiration
Beam aperture
29
Adjustable cell holder, thermostatted
9.1
9.2
Inserting the cell
1.
Unscrew three screws (1) and remove lid (2).
2.
Insert the cell and screw down lid (2) again.
3.
Put the adjustable cell holder onto the two front carrying rails of the sample
compartment (Fig. 1-1 / 1).
4.
Push it to the right as far as it will go and clamp it by throwing over lever (8) to the
left.
Aligning the cell
For rough orientation, it is advisable to observe the passage of the sample beam through
the cell:
1.
Adjust the zeroth order of the monochromator grating as described in → Section
"Adjustment of zeroth order", p. 8. In this mode, undispersed "white" light is passing
through the sample compartment, which can be observed very well.
2.
You can check the illumination of the cell by means of a white screen (e.g. a strip of
paper). Align the cell so that the sample beam is centered on the aperture of the
cell.
Fine adjustment is done by taking an energy measurement:
3.
30
In the device driver (menu command: Measurement / Set Parameters), create a
parameter record with e.g. the following parameters:
Wavelength:
500nm
Integration time:
0.1s
Slit:
2nm
Correction:
No
Cycle Mode: Manual:
20
Display:
Energy
4.
Loosen the four screws that fix the cell holder in position (5), until the top part of the
adjustable cell holder (7) can be moved smoothly.
5.
Successively, turn the screws for vertical adjustment (4) and the screws for
horizontal adjustment (6).
6.
Check the adjustment by taking an energy measurement. In these measurements,
take care to always keep the sample compartment cover closed.
7.
Repeat the adjustment procedure until the energy value of the sample beam I(M)
has reached its maximum.
8.
Secure the optimum adjustment by retightening the four screws that fix the cell
holder in position (5).
User’s Manual SPECORD 200/205/210/250 – Accessories 07/2005
Analytik Jena AG
6-cell changer, thermostatted
10
6-cell changer, thermostatted
10.1
Description and use
The six-cell changer is an automatic sample changing system that is connected to and
controlled through the SPECORD®. Temperature control is by means of a water
thermostat.
It consists of two separable modules
•
a thermostatted cell holder
•
a driving unit with stepping motor drive.
The cell holder has six positions for the accommodation of 10-mm pathlength cells of the
following outer dimensions: 12.5 x 12.5 x 45 (L x W x H in mm).
The cell holder is equipped with a quick-lock tube coupling allowing drip-free connection
and disconnection of the thermostatting tubes.
The stepping motor drive of the driving unit moves the cell holder within approx. 1 s to
the next position. In combination with an optocoupler defining the initial and the end
points of the motion range, it ensures exact and reproducible alignment of the cells to the
sample beam.
Optional cell changer equipment
The 6-cell changer can be equipped optionally with magnetic stirrers.
In addition, a cell changer is available, which is designed for the accommodation of cells
of 1, 2 and 5cm pathlength. However, this cell changer neither can be thermostatted nor
equipped with magnetic stirrers.
User’s Manual SPECORD 200/205/210/250 – Accessories 07/2005
Analytik Jena AG
31
6-cell changer, thermostatted
10.2
Design
1
2
3
4
Interface cable
Clamping lever
Support for cell holder
Quick-lock couplings for coolant inlet
Fig. 10-1
32
2
Holder for magnetic coils of stirrer
Flat cable
Fig. 10-2
Cell holder with thermostatting jacket
Connector for magnetic stirrer
Driving unit with stepping motor
Thermostatted cell holder and driving unit
1
1
2
5
6
7
3
3
4
4
Magnetic coil under measuring position
Magnetic coil under the next position
Thermostatted cell holder with magnetic stirrer
User’s Manual SPECORD 200/205/210/250 – Accessories 07/2005
Analytik Jena AG
6-cell changer, thermostatted
10.3
Installation and insertion in sample compartment
10.3.1 Installation of magnetic stirrers
6
5
4
1
2
3
4
3
Stirring magnet
Carrier for stirrer coils
Flat cable
Connectors of flat cable
Fig. 10-3
8
7
2
5
6
7
8
1
Adapter
Connector on power supply
Power supply
Speed control
Installation of magnetic stirrer
Caution! Incorrect line voltage may damage the unit!
Make sure the operating voltage of the power supply unit (7) agrees with the available
line voltage.
The driving unit may optionally be fitted with a stirrer containing two magnets.
One magnet is located underneath the measuring place, the other one underneath the
place before the measuring position.
The magnetic stirrers are to be mounted outside the sample compartment.
1.
Lift the cell holder off the driving unit.
2.
Put the carrier (Fig. 10-3 / 1) for the stirrer coils onto the provided place (Fig. 10-2)
and fasten it by means of the screws from the bottom.
3.
Connect the connectors (Fig. 10-3 / 4) to the adapter (Fig. 10-3 / 5). Plug the
adapter plug into the corresponding socket (Fig. 10-3 / 6) of the power supply (Fig.
10-3 / 7).
4.
Reattach the cell holder to its support on the driving unit.
User’s Manual SPECORD 200/205/210/250 – Accessories 07/2005
Analytik Jena AG
33
6-cell changer, thermostatted
5.
Put the stirring magnets (Fig. 10-3 / 1) into the cells.
6.
Connect the power supply (Fig. 10-3 / 7) to a power outlet and turn the speed
control knob (Fig. 10-3 / 8) to adjust the stirring speed.
The magnetic stirrer is operating.
10.3.2 Connection to a thermostat
1
1
2
2
Thermostatting tube
Male tube connector
Fig. 10-4
3
4
3
4
Female tube connector
Locking lever
Cell holder with quick-lock tube coupling
The cell holder is connected to an external fluid thermostat through tubes with quick-lock
couplings. The cell holder is provided with female tube connectors.
1.
Connect the male connectors with the thermostatting tubes.
2.
Push the male connectors into the female connectors until you can hear them
clicking in.
3.
For the connection to a fluid thermostat (after insertion in the SPECORD®), it may
be necessary to use tube adapters to compensate for any differences in tube width.
Disconnecting the quick-lock tube couplings
4.
Depress the locking lever (4) and remove the male connector (2) from the quick-lock
tube coupling.
When you work with the device without cell changer, you may also leave the tubes with
the quick-lock tube couplings in the tube ducts.
34
User’s Manual SPECORD 200/205/210/250 – Accessories 07/2005
Analytik Jena AG
6-cell changer, thermostatted
10.3.3 Installation in sample compartment
3
4
5
6
2
7
1
1
2
3
4
Driving unit
Clamping lever
Interface cable
Flat-cable duct with plastic cover
Fig. 10-5
5
6
7
Ducts for thermostatting tubes
Cell holder
Quick-lock tube couplings
Installation of cell changer
The description below refers to the use of a thermostatted cell changer with magnetic
stirrer. If you do not intend to install these components, skip the corresponding item.
Caution! Lay thermostatting tubes properly!
Lay the thermostatting tubes in the sample compartment so that they neither hinder the
movement of the cell changer.
1.
Lay the thermostatting tubes underneath the front and rear carrying rails. Thread the
tubes through the provided tube ducts in the right-hand sample compartment wall
(Fig. 10-5 / 6).
The tube ducts in the wall are provided with steps to achieve a higher light-tightness.
If the tube is caught on these steps, try to loosen it by slightly turning it. When it
becomes visible in the outer opening, you can bend it towards the opening e.g. by
means of a pen.
2.
Replace the plastic foam stopper inserted in the recess of the sample compartment
wall by the supplied plastic foam strips.
User’s Manual SPECORD 200/205/210/250 – Accessories 07/2005
Analytik Jena AG
35
6-cell changer, thermostatted
3.
Thread the cable of the magnetic stirrer under the rear carrying rails and push it
through between the two plastic foam strips in the recess in the sample
compartment. In doing so, take care that the cover of the sample compartment is not
hindered by projecting plastic foam when closing the cover and make sure it closes
light-tight.
4.
Thread the cable through underneath the cover of the sample compartment. Make
sure the cable is not squeezed when the cover is closed.
5.
Connect the ribbon cable to the power supply (Fig. 10-3 / 7) by means of the
adapter (Fig. 10-3 / 5).
6.
With the clamping lever pointing to the back, place the 6-cell changer onto the front
carrying rails. Push the 6-cell changer to the right-hand sample compartment wall as
far as it will go. Clamp it to the carrying rails by throwing the clamping lever to the
left.
7.
Thread the interface cable through underneath the rear carrying rails and connect
ists plug to the left connector in the back wall of the sample compartment.
Adjustment of the cell changer
The cell changer can be adjusted computer-controlled to optimally position the cells in
the beam.
Adjustment is necessary
10.4
•
At the first use of the cell changer
•
After wavelength calibration
•
After relocation of the SPECORD®
•
When working with microcells.
1.
Install the empty cell changer in the sample compartment.
2.
On the Accessories tab, activate the 6cell-changer option.
3.
If you intend to use standard cells (1cm x 1cm) or semi-microcells for the following
analyses, perform the adjustment without any cells being inserted.
If you intend to use microcells in the analyses, insert a microcell filled with water in
every of the six positions.
4.
Start automatic adjustment by a click on the [Adjustment] button.
Operation
10.4.1 Settings in Measurement Parameters window
The cell changer is controlled via WinASPECT® software. In the device driver dialog
box (menu command: Measurement / Set Parameters), choose the 6-cell changer
option on the Accessories tab.
36
User’s Manual SPECORD 200/205/210/250 – Accessories 07/2005
Analytik Jena AG
6-cell changer, thermostatted
Fig. 10-6
Accessories tab – Cell changer
For the control of the cell changer via WinASPECT®, the following options are available:
Parameter /
Button
Description
First sample
Position of the first sample on the cell changer.
Last sample
Position of the last sample on the cell changer.
1st sample
reference
To be activated, if the first place on the cell changer holds the
reference.
In this case, it is not necessary to take a separate reference
measurement. The reference measurement is then integrated in the
normal sample measurement process.
Manual start
If activated, a small dialog box appears: "Start cycle [OK]". The actual
sample measurement is started only after you confirmed the request.
You can use this option for kinetic measurements. The measurement
in the respective cell will then be started only after you added a
starting substance.
Slow time scan Activate this option, if in cyclic measurement mode you want to
measure all samples on the cell changer successively first.
Deactivate the Slow time scan option, if in cyclic measurements you
want to measure all cycles of one sample first before the cell changer
moves to the next cell position.
Interval
Accessible only, if the slow time scan option has been activated.
The interval time is the time from the beginning of a cycle to the
beginning of the next cycle. Hence, it also includes the time required
for sample measurement.
Enter the desired interval time in the textbox. From the list box beside,
select the unit of time.
[Pos.1]
Cell changer moves to the first position.
[Pos. +1]
Cell changer moves to the next position.
[Adjustment]
Starts the adjustment of the cell changer.
[Parking]
Cell changer moves to the parking position with the cell block being
centric above the base plate. In this position, the cell changer can be
easily removed from and installed in the SPECORD® as well as
packed.
User’s Manual SPECORD 200/205/210/250 – Accessories 07/2005
Analytik Jena AG
37
6-cell changer, thermostatted
10.4.2 Measurements with the 6-cell changer
Measurement without reference cell in cell changer
1.
Place the reference cell onto the cell position in the beam path.
2.
Start the reference measurement by a click on the [Reference] toolbar button or by
activating menu command Measurement / Reference.
3.
Load the cell changer beginning with the position selected as “First sample“.
Place the other cells continuously onto the following cell positions up to the position
defined as “Last sample“.
4.
Start the sample measurement with the corresponding [Start Measurement] toolbar
butto or menu command Measurement / Measurement.
Measurement with reference cell in cell changer
1.
Place the cell containing the reference onto the position selected as “First sample“.
Place the other cells continuously onto the following cell positions up to the position
defined as "Laset sample".
2.
Start the sample measurement with the corresponding [Start Measurement] toolbar
butto or menu command Measurement / Measurement.
10.4.3 Operating modes of cell changers
Beside the normal operating mode, you can operate the cell changers in Slow time
scan mode.
1
2
Normal mode
Fig. 10-7
1
6
2
6
Slow time scan mode
Cell changer -Operating modes
In normal mode, first all cycles of a measurement are executed for the sample on a
defined cell position, before the measurement cycles of the sample on the next position
are started. For kinetic measurements, this means that the complete reaction-kinetic
measurement is taken on one sample first, before the next kinetic reaction is started
(requires Manual start check box to be activated!).
In Slow time scan mode, the reaction-kinetic measurement can be optimized by
measuring the samples cyclically in a time-shared mode. This means that in this mode
the samples are measured successively in every cycle beginning with the sample on
position 1, before the next cycle is executed for all samples.
For the Slow time scan mode, observe the following notes regarding parameter
selection:
38
User’s Manual SPECORD 200/205/210/250 – Accessories 07/2005
Analytik Jena AG
6-cell changer, thermostatted
Tab
Settings
Mode
Measuring mode: Time Scan
In this mode, it is not possible to subdivide the total measuring time in
several periods with different data points. Therefore, enter the total
measuring time here.
The entries in the Data Points text box will not be taken into account.
Instead, enter the interval time on the Accessories tab.
Accessories
Activate the Interval check box and enter the desired interval time. If
you fail to do so, the measurements will be taken at the fastest possible
cycle time until the end of the total measuring time.
Any activation of the Manual start check box will be disregarded.
Instead, the measurement of the first sample begins after you
confirmed the query "Start time scan?", whereas the measurement of
all following samples will be started automatically.
User’s Manual SPECORD 200/205/210/250 – Accessories 07/2005
Analytik Jena AG
39
8-cell changer
11
8-cell changer
D This cell changer is an automatic sample changing system. The driving unit with
stepper motor is controlled by WinASPECT® software.
The cell changer has eight cell positions for holding 10-mm pathlength cells of the
following outer dimensions 12.5 x 12.5 x 45 (L x W x H in mm).
The stepper motor drive of the driving unit conveys the cell holder within approx. one
second to the next position. Together with a reflection coupler that defines the initial point
of the motion range, the stepper motor drive provides exactly reproducible alignment of
the cells to the sample beam.
The 8-cell changer is optionally available with temperature control (via an external thermostat) and/or magnetic stirrer. Magnetic stirrer and thermostat connectors must be
factory-fitted and cannot be retrofitted.
In addition, a Peltier temperature-controlled 8-cell changer is available (→ Section
"Peltier temperature-controlled 8-cell changer”, p. 79).
11.1
Removal of transport lock on non-temperature-controlled
8-cell changer
The non-temperature-controlled cell changer is protected in transport by a red plastic
foam pad under the cell block.
Fig. 11-1
Transport lock on non-temperature-controlled 8-cell changer
Make sure to remove the red plastic foam pad from underneath the cell block before
using the cell changer the first time.
Replace this pad for any relocation of the cell changer.
User’s Manual SPECORD 200/205/210/250 – Accessories 07/2005
Analytik Jena AG
41
8-cell changer
11.2
Design of 8-cell changer
1
2
3
4
5
6
Cell block with insulation
Stepper motor drive
Connecting cable for connection to stirrer control unit
Stirrer control unit
®
Connecting cable for connection to SPECORD
Water tubes for connection to thermostat
Fig. 11-2
11.3
8-cell changer
Installation of 8-cell changer
This section describes the installation of the 8-cell changer with connection to a fluid
thermostat and a magnetic stirrer. If your cell changer does not have these additional
components, you can skip this part of the description.
Caution! Lay cables and tubes properly!
Lay all connection cables and tubes for connection to SPECORD®, fluid thermostat
and/or magnetic stirrer so that they do not project into the beam in the sample
compartment.
Lay the connection tubes to the fluid thermostat tension-free to ensure freedom of
motion of the cell block of the cell changer.
42
User’s Manual SPECORD 200/205/210/250 – Accessories 07/2005
Analytik Jena AG
8-cell changer
1
2
3
4
5
Fig. 11-1
8-cell changer installed in sample compartment of SPECORD
®
1.
Mount the carrying rails in their bottom position (→ Section "Changing the position
of the carrying rails" p. 8).
2.
Replace the plastic foam stopper (2) in the rear recess of the sample compartment
by the plastic foam strips supplied along with the accessory.
3.
Thread the cable of the magnetic stirrer under the rear carrying rails and push it
through between the two plastic foam strips in the recess in the sample
compartment. In doing so, take care that the cover of the sample compartment is not
hindered by projecting plastic foam when closing the cover and make sure it closes
light-tight.
3.
Thread the cable through underneath the cover of the sample compartment. Make
sure the cable is not squeezed when the cover is closed.
4.
Connect the cable to the magnetic stirrer. Conect the control unit of the magnetic
stirrer to the power outlet.
5.
Thread the thermostat tubes through underneath the rear carrying rails. Thread the
tubes through the provided ducts in the right-hand sample compartment wall (4).
The ducts in the sample compartment wall are provided with steps to increase the
light tightness. If the tube hooks to these steps when threading it through, try to
release it by slightly turning it. When it becomes already visible at the other end of
the duct, bend it to the opening e.g. by means of a pen.
6.
Connect the tubes to a thermostat. We recommend using quick-lock couplings that
allow drip-free connection and disconnection of the thermostat.
4.
Put the cell changer with the clamping lever facing the back onto the relocated
carrying rails. Push the cell changer to the righ-hand sample compartment wall as
far as it will go. Clamp it to the carrying rails by throwing the clamping lever over to
the left.
User’s Manual SPECORD 200/205/210/250 – Accessories 07/2005
Analytik Jena AG
Connection cable for control unit of stirrer
Recess in sample compartment wall with
plastic foam stopper
®
Connection to SPECORD
Water tubes
8-cell changer
43
8-cell changer
5.
Thread the interface cable to the back underneath the rear carrying rails and
connect the plug to the left connector on the back wall of the sample compartment.
Adjustment of the cell changer
The cell changer can be adjusted computer-controlled to optimally position the cells in
the beam.
Adjustment is necessary
11.4
•
At the first use of the cell changer
•
After wavelength calibration
•
After relocation of the SPECORD®.
1.
Install the empty cell changer in the sample compartment.
2.
On the Accessories tab, activate the 6cell-changer option.
3.
If you intend to use standard cells (1cm x 1cm) or semi-microcells for the following
analyses, perform the adjustment without any cells being inserted.
If you intend to use microcells in the analyses, insert a microcell filled with water in
every of the eight cell positions.
4.
Start automatic adjustment by a click on the [Adjustment] button.
Operation of the 8-cell changer
11.4.1 Software settings
The cell changer is controlled by WinASPECT® software. On the Accessories tab of the
measurement parameter window, choose the 8-cell changer option.
Fig. 11-2
8-Cell changer options for the SPECORD
®
Parameter /
Button
Description
First sample
Position of the first sample on the cell changer.
Last sample
Position of the last sample on the cell changer.
1st sample
reference
To be activated, if the first place on the cell changer holds the
reference.
In this case, it is not necessary to take a separate reference
measurement. The reference measurement is then integrated in the
normal sample measurement process.
Start manually
44
If activated, a small dialog box appears: "Start cycle [OK]". The
actual sample measurement is started only after you confirmed the
User’s Manual SPECORD 200/205/210/250 – Accessories 07/2005
Analytik Jena AG
8-cell changer
request.
You can use this option for kinetic measurements. The
measurement in the respective cell will then be started only after
you added a starting substance.
Slow time scan
Activate this option, if in cyclic measurement mode you want to
measure all samples on the cell changer successively first.
Deactivate the Slow time scan option, if in cyclic measurements you
want to measure all cycles of one sample first before the cell
changer moves to the next position.
Interval
Accessible only, if the slow time scan option has been activated.
The interval time is the time from the beginning of a cycle to the
beginning of the next cycle. Hence, it also includes the time required
for sample measurement.
Enter the desired interval time in the textbox. From the list box
beside, select the unit of time.
[Pos.1]
Cell changer moves to the first position.
[Pos. +1]
Cell changer moves to the next position.
[Adjustment]
Starts the adjustment of the cell changer).
[Parking]
Cell changer moves to the parking position with the cell block being
centric above the base plate. In this position, the cell changer can
be easily removed from and installed in the SPECORD® as well as
packed.
11.4.2 Measurements with the 8-cell changer
The measurement procedure with the 8-cell changer is analogous to that of the 6-cell
changer (→ Section "
Measurements with the 6-cell changer", p. 38).
11.5
Use of two 8-cell changers
You can also use two 8-cell changers in combination. This way it is possible to analyze
every sample against a specific reference (synchronous operation) or to increase the
number of samples analyzed within a measurement series (staggered operation).
To this end, install the second cell changer analogously to the first one clamping it to the
carrying rails (in bottom position) in the reference beam path (→ Section "Installation of
8-cell changer" p. 42).
Align the two 8-cell changers in the same way as a standard cell changer.
If the cell changers shall be temperature controlled by an external thermostat, connect
the two cell changers with each other by a short piece of tube. Lay a connection tube
each from every cell changer to the thermostat.
Caution! Ensure correct connections in sample compartment!
Connect the cable of the cell changer in the rear reference beam path to the righthand connector in the sample compartment.
Connect the cable of the cell changer in the front sample beam path to the left-hand
connector.
User’s Manual SPECORD 200/205/210/250 – Accessories 07/2005
Analytik Jena AG
45
8-cell changer
The software settings for the combined use of two 8-cell changers are to be selected on
the Accessories tab, after having activated the 2 x 8-Cell changer option.
The major functions available are the same as those for a single 8-cell changer (see
Section "Operation of the 8-cell changer" p. 44).
Same as for the use of a single 8-cell changer, the options “slow time scan” and the
manual start of measurements are selectable for the combined use of two 8-cell
changers.
11.5.1 Staggered operation of two 8-cell changers for more than 8 samples
In staggered operation with two cell changers, up to 14 samples can be analyzed in one
measurement series. In this mode, all samples are analyzed against the same reference;
Sample and reference beam path are interchanged by computer control so that samples
can also be measured in the reference beam path. Irrespective of this, in the further
description below, the rear cell changer will always be referred to as "cell changer in the
reference beam path" and the front cell changer as "cell changer in the sample beam
path".
In staggered operation, the eighth cell position of the cell changer in the reference beam
path and the first cell position of the cell changer in the sample beam path remain blank.
In the analysis, first the cell changer in the sample beam path will drive to the first
position and stay there while the cell changer in the reference beam path will
successively move its cell positions into the beam. When all samples of the cell changer
in the reference beam path have been analyzed, this cell changer will stop in its eighth
position. Afterwards, the cell changer arranged in the sample beam path will
successively move its samples into the beam.
Measurement parameters for staggered operation
Fig. 11-3
Software settings for the combination of two 8-cell changers in staggered operation
In staggered operation, the Synchronous option must always be deactivated.
Using the First sample and Last sample slider buttons, you can set up to 14 cell
positions. Beside the slider bar, the number of the sample and its position on the two
changers is displayed. R denotes the cell changer in the reference beam path and M
denotes the cell changer in the sample beam path, e.g. R1 – first position of the cell
changer in the reference beam path.
In the presentation of the currently selected measurement parameters on the
WinASPECT® workplace, the assignment of cell positions is displayed according to your
choice:
46
User’s Manual SPECORD 200/205/210/250 – Accessories 07/2005
Analytik Jena AG
8-cell changer
Fig. 11-4
®
Measurement parameter presentation on WinASPECT workplace
Beginning with the first position of the cell changer in the reference beam path, load the
cells continuously on the following cell positions. In the measurement parameter display,
the following abbreviations are used for this:
R
Reference
S
Sample
0
Blank cell position
Taking measurements in staggered operation
In staggered operation, the reference measurement can be performed in one of the
following ways:
1.
The reference is not measured separately before taking sample measurements, but
in the sample measurement process. The first cell position on the cell changer
holds the reference cell.
In the measurement parameters on the Accessories tab, activate the 1st sample
reference option.
2.
The reference is measured before samples are analyzed.
In the measurement parameters on the General tab, activate the Reference option,
and on the Accessories tab, the 1st sample reference option.
For the reference measurement, place the reference cell in the sample beam path
and keep the reference beam path blank.
3.
Measurements with strongly absorbing reference.
In the case of strongly absorbing references, it is useful to use the reference to
additionally attenuate the reference signal for sample measurements and to create
a balanced energy ratio between reference and sample beam path.
In the measurement parameters on the General tab, activate the Reference option,
and on the Accessories tab, deactivate the 1st sample reference option.
The reference measurement is taken with blank sample and reference beam paths.
For the sample analysis, place a reference cell each on the eighth position in the
reference beam path and on the first position in the sample beam path.
11.5.2 Synchronous operation of two 8-cell changers
In synchronous operation of the two cell changers, every sample is analyzed against a
sample-specific reference. Hence, you can simultaneously analyze a maximum of eight
samples with their corresponding references. To this end, load the samples in the front
cell changer (in the sample beam path) while placing the corresponding references in the
cell changer positioned in the reference beam path.
User’s Manual SPECORD 200/205/210/250 – Accessories 07/2005
Analytik Jena AG
47
8-cell changer
Measurement parameters for synchronous operation
The following measurement parameters must be selected specifically for the
synchronous operating mode:
General tab
Correction
Select the Reference option.
Accessories tab – 2 x 8-cell changer selected
1st sample reference
To be deactivated
Synchronous
To be activated
Fig. 11-5
Software settings for the combination of two 8-cell changers in synchronous mode
Taking measurements in synchrounous operation
48
1.
Take the reference measurement with blank cell changers.
2.
Load the cell changer. Place the samples in the cell positions on the front cell
changer and the references in the corresponding positions on the rear cell changer.
3.
Start the sample measurement.
User’s Manual SPECORD 200/205/210/250 – Accessories 07/2005
Analytik Jena AG
Cell carousel
12
Cell carousel
12.1
Description and use
The cell carousel is an automatic sample changing system connected to and controlled
by the SPECORD®.
It consists of two separable modules
•
a cell holder
•
a driving unit with stepper motor.
The cell carousel contains 15 places for 10-mm pathlength cells of the following outer
dimensions: 12.5 x 12.5 x 45 (L x W x H in mm).
12.2
Design
1
2
3
4
5
Driving unit
Tray support with guiding slot
Sample tray
Cell holder
Handle
Fig. 12-1
Knurled screw
Clamping lever
Stop bolt
®
Connection cable to SPECORD
Cell carousel – Driving unit and sample tray
User’s Manual SPECORD 200/205/210/250 – Accessories 07/2005
Analytik Jena AG
6
7
8
9
49
Cell carousel
12.3
Installation in sample compartment
Fig. 12-2
50
Cell carousel installed in sample compartment
1.
First, mount the carrying rails in the sample compartment in their bottom positions
(→Section "Changing the position of the carrying rails" p. 8).
2.
With clamping lever (Fig. 12-1/ 7) facing the rear side, place the driving unit (Fig.
12-1/ 1) of the cell carousel onto the two front remounted carrying rails in the sample
compartment.
3.
Push the driving unit to the right-hand sample compartment wall so that the stop bolt
touches the right-hand wall.
4.
Fasten the driving unit to the carrying rails by throwing the clamping lever down left
as far as it will go. If the clamping lever points upward, it will hinder the motion of the
sample tray.
5.
Put the sample tray (Fig. 12-1 / 3) onto the corresponding support (Fig. 12-1 / 2) of
the driving unit. In doing so, slightly turn the tray so that it engages in the guiding
slot.
6.
Fix the sample tray to the driving unit by means of the knurled screw (Fig. 12-1 / 6).
7.
Thread the connection cable underneath the rear carrying rails so that it does not
project into the beam path. Insert the plug of the connection cable into the left
connector in the sample compartment wall.
User’s Manual SPECORD 200/205/210/250 – Accessories 07/2005
Analytik Jena AG
Cell carousel
12.4
Operation
The cell carousel is controlled via WinASPECT® software. In the Device Driver dialog
box, on the Accessories tab, choose the Carousel option.
Set the operating parameters of the cell carousel analogously to the cell changer. Here,
the maximum number of used cells is 15 (→ Section "6-cell changer, thermostatted,
Operation", p.36).
User’s Manual SPECORD 200/205/210/250 – Accessories 07/2005
Analytik Jena AG
51
Peltier temperature-controlled cell holders/cell changers
Operation
13
Peltier temperature-controlled cell holders/cell changers
The following cell holders and cell changers with Peltier temperature control are
available:
•
Peltier temperature-controlled cell holder, air-cooled
•
Peltier temperature controlled cell holder with heat exchanger
•
Peltier temperature-controlled 6-cell changer with heat exchanger
•
Peltier temperature-controlled 8-cell changer with heat exchanger.
Temperature control is through a separate temperature control unit fitted to the
corresponding cell holder or cell changer, respectively. However, the connection and the
operation of each of these units is the same. For a description, refer to Section
"Connection and operation of temperature control unit” p. 90.
The heat exchanger used as counter cooler for cell holders/cell changers is described in
Section "Connection and operation of the heat exchanger", p. 94
User’s Manual SPECORD 200/205/210/250 – Accessories 07/2005
Analytik Jena AG
53
Peltier temperature-controlled cell holders/cell changers
Peltier temperature-controlled cell holder, air-cooled
13.1
Peltier temperature-controlled cell holder, air-cooled
1
2
3
Peltier temperature-controlled cell holder
Electric cables between control unit and cell holder
Temperature control unit
Fig. 13-1
Peltier temperature-controlled 1x cell holder with control unit
The Peltier temperature-controlled cell holder permits the temperature of cells of
12.5 mm x 12.5 mm x 45 mm - 46 mm size (L x W x H) and 10 mm pathlength to be
controlled.
Temperature control of the cell holder is performed via a separate control unit. The rear
side of the Peltier elements is air-cooled through a heat-transfer system with cooling fins.
The controlling sensor used is a Pt100 measuring sensor located at the outer bottom
corner of the cell block. In addition to the controlling sensor, the cell holder contains two
further Pt100 sensors for optional monitoring of either the holder or the cell temperature.
The cell sensor is specially designed for standard cells with round PTFE stopper. It may
remain in the cell during the analytical measurement.
Caution! Risk of distorted results!
When using other cells, the measuring sensor may project into the sample beam thus
distorting the measurement results.
By standard, the cell holder is equipped with a magnetic stirrer, which ensures fast and
even temperature distribution within the cell. The stirring speed is adjusted on the
temperature control unit.
Note
The sample is optimally mixed up, if you use stirring magnets of 3 mm diameter and a
length of 6 – 8 mm.
54
User’s Manual SPECORD 200/205/210/250 – Accessories 07/2005
Analytik Jena AG
Peltier temperature-controlled cell holders/cell changers
Peltier temperature-controlled cell holder, air-cooled
13.1.1 Safety notes
The Peltier temperature-controlled cell holder has been made and tested in compliance
with the following standards and directives:
•
DIN EN 61010-1 (IEC 1010-1)
•
73/23/EEC
•
89/336/EEC
It was delivered by Analytik Jena AG in perfect condition. To keep this condition and
ensure safe operation, please observe the safety notes and the notes marked by
symbols.
Warning! Risk of electric shocks!
Disconnect the power pug, before opening the instrument or removing any covers to
avoid that components carrying line voltage or high tension become accessible.
Earth conductor required!
Only connect the device to a power outlet with earth conductor to ensure operation as
per Protection Class I (earth-conductor connection). Do not make the protection
ineffective by the use of extension cables without earth conductor.
Correct fusing!
Only use fuses of the specified type and rating (→ Section “Technical data of Peltier
temperature-controlled cell holder, air-cooled”, p. 56).
Warning! Do not operate the equipment in explosion-risk rooms!
Warning! Risk of burns!
Before replacing the cell after operation at higher temperatures, wait until it has
sufficiently cooled down!
There is the risk of burns.
Caution! Accumulation of heat!
Accumulation of heat might result in overheating and faults on the device. Make sure
that you do not cover the ventilation slots of the control device and of the heat exchanger
of the cell holder!
Caution! Handling liquids!
Take care that no liquids can get into the control device to avoid damage of the device.
Particularly do not place any glasses or other vessels containing liquids on the device.
When working with an aqueous system at temperatures below the freezing point there is
the risk of cell damage by the expansion of ice.
User’s Manual SPECORD 200/205/210/250 – Accessories 07/2005
Analytik Jena AG
55
Peltier temperature-controlled cell holders/cell changers
Peltier temperature-controlled cell holder, air-cooled
13.1.2 Technical data of Peltier temperature-controlled cell holder, air-cooled
Principle
Thermoelectric heating and cooling
Cooling at rear panel of TEC
Air-cooled
Guaranteed regulated temperature range at 25 °C
ambient temperature
heat transfer
+10...+60 °C on models with Type A
-5...+105 °C on models with Type B
heat transfer
Block temperature adjusting range
-20 - +105 °C
Setting accuracy
0.1 degree
Reading accuracy
0.1 degree
Regulating accuracy
+/- 0.1 degree
Overview 13-1 Technical data of Peltier temperature-controlled cell holder
Technical data of control unit
Weight of control unit
2.5 kg
Dimensions (W x H x D)
225 x 130 x 200 mm3
Line voltage
100 - 240 V
Frequency
50 ... 60 Hz
Power consumption
75 VA
Line fuses
2 x T 2.5 A/H 250V, Type 19181
(Wickmann)
EMC (jamming and noise immunity) acc. to DIN
EN 61326 and 61326/A1
The device may be installed and
operated in all areas.
Fire resistance of the control unit case acc. to
UL94
HB / 1,6
Enclosure Protection
IP 20
Data interface
RS232 port
Working temperature range
+15°C...+35°C
Transport and storage temperature range
-40°C...+60°C
Relative humidity
up to 90% (at +30°C)
Overview 13-2 Other technical data of Peltier temperature-controlled cell holder
56
User’s Manual SPECORD 200/205/210/250 – Accessories 07/2005
Analytik Jena AG
Peltier temperature-controlled cell holders/cell changers
Peltier temperature-controlled cell holder, air-cooled
13.1.3 Design of Peltier-temperature-controlled cell holder, air-cooled
12
13
11
10
9
14
8
7
6
5
4
15
1
1
2
3
4
5
6
7
8
Cell block with insulation
Cell with cell temperature sensor
Spacing pin
Connectors for connection to the
control device
Right guide rail stop
Quartz window
Lock screws
Recess
Fig. 13-2
14
15
3
Cover cap
Contact cap
Lock screw for contact cap
Heat transfer device
Heat-exchanger housing with
intake slots
Clamping lever
Pressure plate
Peltier temperature-controlled cell holder, air-cooled
User’s Manual SPECORD 200/205/210/250 – Accessories 07/2005
Analytik Jena AG
2
9
10
11
12
13
57
Peltier temperature-controlled cell holders/cell changers
Peltier temperature-controlled cell holder, air-cooled
13.1.4 Installation of Peltier temperature-controlled cell holder in SPECORD®
5
4
3
2
1
1
2
3
4
5
Clamping lever
Electrical cables to temperature control unit
Recess with plastic foam stopper
Hole with slot in sample compartment cover
Knurled screws for fastening the cover prop
Fig. 13-3
58
Installation of the PTC 100 in the sample compartment
1.
The air cooling juts out through an opening in the sample compartment cover.
Remove the knurled nuts from the sample compartment cover and remove the
cover that closes the opening.
Carefully retain the cover and the knurled nuts.
2.
Slightly incline the cell holder backward to put it onto the front carrying rails of the
sample compartment with the cell mount facing the detector.
Push the cell holder to the right-hand sample compartment wall as far as it will go.
Throw the clamping lever (1) to the left to fasten the cell holder to the carrying rails.
3.
Replace the plastic foam stopper in the rear recess (3) of the sample compartment
by the plastic foam strips supplied along with the accessory.
4.
Thread the electrical cables (2) to the back underneath the carrying rails. Put the
cables between the plastic foam strips in the rear sample compartment wall (3).
Take care that the cover of the sample compartment is not hindered by projecting
plastic foam when closing the cover and make sure it closes light-tight.
User’s Manual SPECORD 200/205/210/250 – Accessories 07/2005
Analytik Jena AG
Peltier temperature-controlled cell holders/cell changers
Peltier temperature-controlled cell holder, air-cooled
SPECORD® with recess underneath the sample compartment cover
5.
Thread the cables through underneath the sample compartment cover and put the
cable into the recess so that they are not squeezed when you close the cover.
SPECORD® without recess underneath the sample compartment cover
5.
Remove the knurled screws from the cover prop (5).
Fold the cover backward.
Put the connecting plug of the electrical cables (2) through the slit between sample
compartment cover and SPECORD® basic device.
Screw on the cover prop again.
Remove the cover cap from the opening in the sample compartment cover (4).
Put the electrical cable through the slit in the opening.
Slip the annular stopper over the electrical cables and insert it with the slit on top
into the opening (Fig. 13-4).
Fig. 13-4
6.
Sample compartment cover with cables threaded through
Connect the cell holder to the temperature control unit (see Section "Connection
and operation of temperature control unit”, p. 90)
Inserting the cell
1.
Turn the cover cap (Fig. 13-2 / 9) until the opposite recesses (Fig. 13-2 / 8) are in
line with the lock screws (Fig. 13-2 / 7).
2.
Pull the cover cap upward and carefully put the cell into the block.
3.
Finally, reattach the cover cap to the cell block.
Note
Closing the cell block prevents the cell from being steamed up when working at
temperatures below room temperature. Besides, this ensures the temperature constancy
over the entire temperature range as specified.
You need not lock the cap unless you use the cell-temperature sensor. To lock the cap,
slightly twist it.
User’s Manual SPECORD 200/205/210/250 – Accessories 07/2005
Analytik Jena AG
59
Peltier temperature-controlled cell holders/cell changers
Peltier temperature-controlled cell holder, air-cooled
Monitoring the cell internal temperature
Caution! Fragile sensor!
Do not use force when attaching the sensor. It is not necessary to press on the sensor,
as it receives sufficient pressure through the contact pins in the cover cap.
Caution! Flashing temperature display!
If the temperature display (Fig. 13-17 /2 and 3) on the temperature-control unit is
flashing, either the cell sensor is not properly connected to the connector on the control
unit or the sensor is defective.
1.
Close a standard cell with round stopper by means of the supplied cell sensor.
2.
Put the cell into the cell block and close it by means of the cover cap (the grooves
are facing the lock screws).
3.
Lock the cover cap by slightly twisting it.
4.
On the temperature-control unit, switch the holder/cell temperature selector to “cell“.
Extending the immersion depth of the measuring sensor
The contact cap (Fig. 13-2 / 10) is fixed in the cover cap with a grub screw. By loosening
this screw, you can vary the immersion depth of the contact pins in the cover cap by
maximally 4 mm. This allows the cell sensor to be used in a certain range also for nonstandard cells.
13.1.5 Care
The cell holder is largely maintenance-free.
60
•
Handle sample substances carefully to avoid contamination especially inside
the cell block.
•
If despite all care sample substance is spilt, instantly wipe it away with
absorbent cloth or paper.
•
If despite all care the cell holder should become contaminated (e.g. by
sample substance), you may clean the interior of the cell block with ethanol
or water plus a dash of a detergent. On the bottom of the base plate
(Fig. 13-5 / 1) there is a M4 Allen screw (Fig. 13-5 / 3) for draining the
washing liquid.
User’s Manual SPECORD 200/205/210/250 – Accessories 07/2005
Analytik Jena AG
Peltier temperature-controlled cell holders/cell changers
Peltier temperature-controlled cell holder, air-cooled
4
1
3
2
1
2
Base plate
Guide rail stop
Fig. 13-5
3
4
Draining screw with gasket
Cell block with insulation
Bottom of Peltier temperature-controlled 1x cell holder
The part of the cell sensor immersing in the cell is made of Teflon and thus largely
chemically resistant. The upper part of the sensor consists of an anodized aluminum cap
with an opening for the gold-plated conductive tracks. These materials, too, are as far as
possible corrosion-resistant.
Caution! Ingress of solvents in the sensor!
Avoid immersing the sensor completely in solvents, as they might enter the interior of the
sensor.
User’s Manual SPECORD 200/205/210/250 – Accessories 07/2005
Analytik Jena AG
61
Peltier temperature-controlled cell holders/cell changers
Peltier temperature-controlled cell holder with heat exchanger
13.2
Peltier temperature-controlled cell holder with heat
exchanger
The Peltier temperature-controlled cell holder allows the temperature control of 10-mm
pathlength cells of the following dimensions: 12.5 x 12.5 x 45 - 46 (L x W x H in mm).
Temperature control of the cell holder is performed by a separate control unit. The rear
side of the Peltier elements is cooled by a connected heat exchanger. The sensor used
for the control is a Pt100 measuring sensor located at the outer bottom corner of the cell
block. Beside the measuring sensor for temperature control, two additional Pt100
sensors are used for the optional measurement of the temperature of the holder or the
cell.
A heat exchanger is used for the counter cooling of the Peltier elements.
The cell sensor is specially designed for standard cells with round PTFE stopper. This
sensor can be left in the cell when taking the optical measurement.
Caution! Risk of getting faulty results!
When using other types of cell, the measuring sensor may project into the the sample
beam and thus distort the results of measurement.
The standard equipment of the cell holder includes a magnetic stirrer in order to obtain
fast and homogeneous temperature adjustment in the cell.
The stirring speed can be adjusted on the temperature control unit.
Note
Samples are optimally mixed when using stirring magnets of 3mm diameter and 6 to
8 mm length.
13.2.1 Safety notes
The Peltier temperature-controlled cell holder has been made and tested in compliance
with the following standards and directives:
•
DIN EN 61010-1 (IEC 1010-1)
•
73/23/EEC
•
89/336/EEC.
It was delivered by Analytik Jena AG in perfect condition. To keep this condition and
ensure safe operation, please observe the safety notes and the notes marked by
symbols.
Warning! Risk of electric shocks!
Disconnect the power plug before opening the unit or removing any covers in order to
avoid that components carrying line voltage or high tension become accessible.
Only connect the power cable to a power outlet having an earth conductor to ensure
operation of the unit according to Protection Class I (earth-conductor connection). The
protection must not be made ineffective by the use of extension cables without earth
conductor.
Caution! Correct fusing!
Only use fuses of the specified type and rating. (→ Section "Technical data of Peltier
temperature-controlled cell holder with heat exchanger", p.64).
62
User’s Manual SPECORD 200/205/210/250 – Accessories 07/2005
Analytik Jena AG
Peltier temperature-controlled cell holders/cell changers
Peltier temperature-controlled cell holder with heat exchanger
Warning! Do not operate the equipment in explosion-risk rooms!
Warning! Hot surface!
Before replacing any cells after operation at higher temperatures, wait until they have
cooled down sufficiently!
There is the risk of burns.
Caution! Accumulation of heat!
Accumulation of heat might result in overheating and faults on the device. Make sure
that you do not cover the ventilation slots of the temperature control unit and of the heat
exchanger!
Caution in handling liquids!
Take care to ensure that no liquids enter the temperature control unit to avoid any
damage to the unit.
Particularly do not place any glasses or other vessels containing liquids on the device.
When working with an aqueous system at temperatures below the freezing point there is
the risk of cell damage by the expansion of ice.
User’s Manual SPECORD 200/205/210/250 – Accessories 07/2005
Analytik Jena AG
63
Peltier temperature-controlled cell holders/cell changers
Peltier temperature-controlled cell holder with heat exchanger
13.2.2 Technical data of Peltier temperature-controlled cell holder with heat
exchanger
Principle
Thermoelectric heating and cooling
Cooing at rear panel of TEC
Water-cooled by connection of an external
thermostat
Guaranteed regulated temperature
range at 25 °C ambient temperature
-10 ... +15 °C
Block temperature adjusting range
-20 ... +105 °C
Setting accuracy
0.1 degree
Reading accuracy
0.1 degree
Regulating accuracy
+/- 0.1 degree
Overview 13-3 Technical data of Peltier temperature-controlled cell holder with heat exchanger
Technical data of control unit
Weight of control unit
2.5 kg
Dimensions (B x H x T)
225 x 130 x 200 mm3
Line voltage
100 - 240 V
Line frequency
50 ... 60 Hz
Power consumption
75 VA
Line fuses
2 x T 2.5 A/H 250V, Type 19181 (Wickmann)
EMC (jamming and noise immunity)
acc. to DIN EN 61326 and 61326/A1
The device may be installed and operated in all
environments.
Fire resistance of the control unit acc.
to UL94
HB / 1,6
Enclosure Protection
IP 20
Data interface
RS232 port
Operating temperature range
+15°C...+35°C
Transport and storage temperature
range
-40°C...+60°C
Relative humidity
Up to 90% (at +30°C)
Overview 13-4 Technical data of temperature control unit
64
User’s Manual SPECORD 200/205/210/250 – Accessories 07/2005
Analytik Jena AG
Peltier temperature-controlled cell holders/cell changers
Peltier temperature-controlled cell holder with heat exchanger
Technical data of heat exchanger WC 600 / WC 601
Weight without coolant
3.2 kg
Dimensions (W x H x T)
225 x 175 x 200 mm3
Line voltage
220 - 240 V
Line frequency
50 Hz
Power consumption
50 VA
Line fuses for WC601
2 x T 0.5 A/H 250V, Type 19181
(Wickmann)
Line fuses for WC601
2 x T 1.6 A/H 250V, Type 19181
(Wickmann)
EMC (jamming and noise immunity) as
per DIN EN 61326 and 61326/A1
The device can be installed and operated in
all environments.
Fire resistance of the case of the heat
exchanger according to UL94
HB / 1,6
Protection Type
IP 20
Coolant
Approximately 0.4 l distilled water with an
addition of 4 ml isopropanol
Maximum delivery head
1.2 m
Operating temperature range
+15°C ... +35°C
Transport and storage temperature range
-40°C...+60°C
Relative humidity
up to 90% (at +30°C)
Overview 13-5 Technical data of heat exchanger for PTC 600 / PTC 601
User’s Manual SPECORD 200/205/210/250 – Accessories 07/2005
Analytik Jena AG
65
Peltier temperature-controlled cell holders/cell changers
Peltier temperature-controlled cell holder with heat exchanger
13.2.3 Design of Peltier temperature-controlled cell holder with heat
exchanger
9
1
1
2
3
4
5
6
7
8
9
8
3
2
6
7
4
5
Connector for connection to heat exchanger
5-pole and 9-pole connector for connection to temperature control unit
Clamping lever
Cell block with insulation
Quartz window
Tubes for connection to heat exchanger
Cover cap
Lock screws
Grooves
Fig. 13-6
Peltier temperature-controlled cell holder with heat exchanger
13.2.4 Installation of the cell holder in the SPECORD®
Lay connection cables tension-free!
Connection cables and coolant tubes must be laid tension-free. Rule out tensile stress to
electrical cables and bending of coolant tubes.
Coolant tubes and connection cables must not project into the beam paths.
Installing the holder in the sample compartment
66
1.
Slightly incline the cell holder backward to put it onto the front carrying rails of the
sample compartment with the cell mount facing the detector.
Push the cell holder to the right-hand sample compartment wall as far as it will go.
Throw the clamping lever (3) to the left to fasten the cell holder to the carrying rails.
2.
Thread the coolant tubes through underneath the rear carrying rails. Put the tubes
into the provided ducts in the right-hand sample compartment wall.
The tube ducts are provided with steps to achieve a higher light-tightness. If the
tube is caught on these steps, try to loosen it by slightly turning it. When it becomes
visible in the outer opening, you can bend it towards the opening e.g. by means of a
pen.
User’s Manual SPECORD 200/205/210/250 – Accessories 07/2005
Analytik Jena AG
Peltier temperature-controlled cell holders/cell changers
Peltier temperature-controlled cell holder with heat exchanger
Connect the tubes to a thermostat. We recommend using quick-lock couplings that
allow drip-free connection and disconnection of the thermostat.
3.
Replace the plastic foam stopper in the rear recess of the sample compartment by
the plastic foam strips supplied along with the accessory.
4.
Thread the electrical cables (2) to the back underneath the carrying rails. Put the
cables between the plastic foam strips in the rear sample compartment wall (3).
Take care that the cover of the sample compartment is not hindered by projecting
plastic foam when closing the cover and make sure it closes light-tight.
SPECORD® with recess underneath the sample compartment cover
5.
Thread the cables through underneath the sample compartment cover and put the
cable into the recess so that they are not squeezed when you close the cover.
SPECORD® without recess underneath the sample compartment cover
5.
Remove the knurled screws from the cover prop.
Fold the cover backward.
Put the connecting plug of the electrical cables (2) through the slit between sample
compartment cover and SPECORD® basic device.
Screw on the cover prop again.
Remove the cover cap from the opening in the sample compartment cover.
Put the electrical cable through the slit in the opening.
Slip the annular stopper over the electrical cables and insert it with the slit on top
into the opening (Fig. 13-4, p. 59).
6.
Connect the temperature control unit and the heat exchanger (see Sections
"Connection and operation of temperature control unit”, p. 90 and "Connection and
operation of the heat exchanger”, p. 94).
Installing a second cell holder
The second cell holder is installed largely in the way described above. However, the
recess in the rear sample compartment wall is too small for allowing the electrical cables
of two cell holders to be threaded through. Therefore, the accessory is supplied along
with a different right-angled bracket.
1.
Undo the right-angled bracket mounted in the recess of the sample compartment. In
its place, mount the supplied bracket. Put the two supplied plastic foam strips into
the recess.
2.
Install the second cell holder in the reference beam path.
3.
Lay the electrical cables as described above.
4.
Connect the cell holders to each other by means of a short piece of tube. Connect
one water tube each to every cell holder. Establish the connections to the heat
exchanger as described above.
5.
Connect the electrical cables to the temperature control units.
Inserting the cell
1.
Turn the cover cap (Fig. 13-6 / 7) until the opposite grooves of the cover cap (Fig.
13-6 / 9) are in line with the lock screws (Fig. 13-6 / 8).
2.
Pull the cover cap upward and carefully put the cell into the block.
3.
Finally, reattach the cover cap to the cell block.
User’s Manual SPECORD 200/205/210/250 – Accessories 07/2005
Analytik Jena AG
67
Peltier temperature-controlled cell holders/cell changers
Peltier temperature-controlled cell holder with heat exchanger
Note
Closing the cell block prevents the cell from being steamed up when working at
temperatures below room temperature. Besides, this ensures the temperature constancy
over the entire temperature range as specified.
You need not lock the cap unless you use the cell-temperature sensor. To lock the cap,
slightly twist it.
Monitoring the cell internal temperature
Caution! Fragile measuring sensor!
Do not use force when attaching the sensor. It is not necessary to press on the sensor,
as it receives sufficient pressure through the contact pins in the cover cap.
Caution! Flashing temperature display!
If the temperature display (Fig. 13-17 / 2 and 3) on the temperature control unit is
flashing, either the cell sensor is not properly connected to the corresponding connector
ort he sensor is defective.
1
2
1
Fig. 13-7
Cell sensor
Cover cap of cell holder
2
Cell temperature measuring sensor PT100
1.
Close a standard cell with round stopper by means of the supplied cell sensor.
2.
Put the cell into the cell block and close it by means of the cover cap (the grooves
are facing the lock screws).
3.
Lock the cover cap by slightly twisting it.
4.
On the temperature-control unit, switch the holder/cell temperature selector to “cell“.
Extending the immersion depth of the measuring sensor
The contact cap is fixed in the cover cap with a grub screw. By loosening this screw, you
can vary the immersion depth of the contact pins in the cover cap by maximally 4 mm.
This allows the cell sensor to be used in a certain range also for non-standard cells.
68
User’s Manual SPECORD 200/205/210/250 – Accessories 07/2005
Analytik Jena AG
Peltier temperature-controlled cell holders/cell changers
Peltier temperature-controlled 6-cell changer
13.3
Peltier temperature-controlled 6-cell changer
13.3.1 Use
The cell changer is an automatic sample changing system. Its stepper motor driving unit
is driven by the software. Temperature control of the cell holder is performed via a
separate temperature-control unit. The coolant circuit of the heat exchanger keeps the
rear side of the Peltier elements at a temperature near the ambient temperature.
The controlling sensor used is a Pt100 measuring sensor located in the upper part of the
cell block. In addition to the controlling sensor, the cell holder contains two further Pt100
sensors for optional monitoring of either the holder or the cell temperature.
The cell holder contains six positions for cells having a pathlength of 10 mm and external
dimensions of 12.5 x 12.5 x 45 (L x W x H in mm).
The cell sensor is specially designed for standard cells with round PTFE stopper. It may
remain in the cell during the analytical measurement.
Note
When using other cells, the immersed measuring sensor may project into the sample
beam thus distorting the measurement results.
The stepper-motor drive of the driving unit moves the cell holder to the next sampling
place within approximately 1 second. In combination with a reflected-light optocoupler,
which defines the starting point of the motion range, the stepper drive ensures exactly
reproducible alignment of the cells to the measuring beam.
1
2
3
Temperature control unit with status indicator for heat exchanger
Heat exchanger
Peltier temperature-controlled 6-cell changer
Fig. 13-8
User’s Manual SPECORD 200/205/210/250 – Accessories 07/2005
Analytik Jena AG
®
Peltier temperature-controlled 6-cell changer with SPECORD 210
69
Peltier temperature-controlled cell holders/cell changers
Peltier temperature-controlled 6-cell changer
13.3.2 Safety notes
Electric shock!
The temperature-control unit and the heat exchanger are electrically powered. At several
parts inside the system, extremely hazardous electrical voltages are accessible.
To ensure Protection Class I (protective earth connection) of the device, connect the
power plug of the device only to a power outlet with protective earth conductor.
Connect control unit, heat exchanger and SPECORD® to the same phase of the line
power supply (e.g. to a multiple socket power outlet).
Before connecting the devices to the power outlet, make sure the line voltage supplied
agrees with the operating voltage specified on the rating plate at the rear panel of the
devices. Operation of the devices with any other operating voltage than that specified
may result in their destruction.
Only use fuses of the specified type (→ Section "Technical data of Peltier temperaturecontrolled 6-cell changer", p.71).
Do not operate the device in explosion-risk rooms!
Type label and warning labels!
Observe the type label and the warning labels on the devices!
Accumulation of heat!
Make sure that you do not cover the ventilation slots in the bottom plate and on the rear
panel of the device as well as on the front panel of the heat exchanger.
Heat accumulation might result in overheating and faults on the equipment.
Ingress of water!
Take care to ensure that no liquids can get into the control unit to avoid any damage to
the device.
Do not place the heat exchanger or containers with liquids onto the control unit.
The control unit complies with the requirements of Protection Type IP 20.
The PTC 600 / PTC 601 Peltier temperature-controlled 6-cell changer was produced and
tested in compliance with the following standards and regulations:
70
•
DIN EN 61010-1 (IEC 1010-1)
•
73/23/EC
•
89/336/EC
User’s Manual SPECORD 200/205/210/250 – Accessories 07/2005
Analytik Jena AG
Peltier temperature-controlled cell holders/cell changers
Peltier temperature-controlled 6-cell changer
13.3.3 Technical data of Peltier temperature-controlled 6-cell changer
Operating principle
Thermoelectric heating and cooling
Cooling of rear panel of TEC
Water-cooled
Guaranteed regulated
temperature range at 25°C
ambient temperature
PTC 600 with heat exchanger WC 600:
+10°C...+60°C
Block temperature setting range
PTC 600 with heat exchanger WC 600:
+5°C - +65°C
PTC 601 with heat exchanger WC 601:
-5°C...+105°C
PTC 601 with heat exchanger WC 601:
-20°C...+105°C
Setting accuracy
0.1 degree
Reading accuracy
0.1 degree
Regulating accuracy
+/– 0.1 degree
Overview 13-6 Technical data of PTC 600 / PTC 601
Technical data of control unit
Weight
2.5 kg
Dimensions (W x H x T)
225 x 130 x 200 mm3
Line voltage
100 - 240 V
Line frequency
50 ... 60 Hz
Power consumption
150 VA
Line fuses
2 x T 2.5 A/H 250V, Type 19181
(Wickmann)
EMC (jamming and noise immunity) as per
DIN EN 61326 and 61326/A1
The device can be installed and
operated in all environments.
Fire resistance of the case of the control unit
according to UL94
HB / 1,6
Protection Type
IP 20
Data interface
RS232 port
Operating temperature range
+15°C...+35°C
Transport and storage temperature range
-40°C ... +60°C
Relative humidity
up to 90% (at +30°C)
Overview 13-7 Technical data of control device for PTC 600 / PTC 601
User’s Manual SPECORD 200/205/210/250 – Accessories 07/2005
Analytik Jena AG
71
Peltier temperature-controlled cell holders/cell changers
Peltier temperature-controlled 6-cell changer
Technical data of heat exchanger WC 600 / WC 601
Weight without coolant
3.2 kg
Dimensions (W x H x D)
225 x 175 x 200 mm3
Line voltage
220 - 240 V
Line frequency
50 Hz
Power consumption
50 VA
Line fuses for WC600
2 x T 0.5 A/H 250V, Type 19181
(Wickmann)
Line fuses for WC600
2 x T 1.6 A/H 250V, Type 19181
(Wickmann)
EMC (jamming and noise immunity) as
per DIN EN 61326 and 61326/A1
The device can be installed and operated in
all environments.
Fire resistance of the case of the heat
exchanger according to UL94
HB / 1,6
Protection Type
IP 20
Coolant
Approximately 0.4 l distilled water with an
addition of 4 ml isopropanol
Maximum delivery head
1.2 m
Operating temperature range
+15°C ... +35°C
Transport and storage temperature range
-40°C...+60°C
Relative humidity
up to 90% (at +30°C)
Overview 13-8 Technical data of heat exchanger for PTC 600 / PTC 601
Pay attention to any different technical data on the type label!
If the data given above are different from that on the type label, the data on the type
label are valid.
72
User’s Manual SPECORD 200/205/210/250 – Accessories 07/2005
Analytik Jena AG
Peltier temperature-controlled cell holders/cell changers
Peltier temperature-controlled 6-cell changer
13.3.4 Design of Peltier temperature-controlled 6-cell changer
1
9
1
2
3
4
5
6
7
8
9
2
8
7
6
5
Cell block with insulation
Block sensor
Connector for cell sensor in storage receptacle
Connectors for connection to temperature control unit
®
Connector for connection to SPECORD S600
Connector for connection to heat exchanger
Stepper motor drive with lead screw
Knurled screw for clamping the unit to the carrying rails
Water tubes for connection to the heat exchanger
Fig. 13-9
Design of Peltier temperature-controlled 6-cell changer
User’s Manual SPECORD 200/205/210/250 – Accessories 07/2005
Analytik Jena AG
4
3
73
Peltier temperature-controlled cell holders/cell changers
Peltier temperature-controlled 6-cell changer
13.3.5 Installation of the Peltier-temperature-controlled 6-cell changer
1
2
3
4
5
6
7
8
9
1
2
3
4
5
6
7
8
9
Knurled screws for fastening the cover prop
Hole with slot in sample compartment cover
Electric cables from cell changer to temperature-control unit and to heat exchanger
Recess with plastic foam stopper in sample compartment wall
®
9-pin connector for connection to SPECORD
Coolant tubes
Knurled screw for fastening the cell changer to the carrying rails
Peltier temperature-controlled 6 cell changer
Connector of temperature sensor in storage cavity
Fig. 13-10
Installation of Peltier temperature-controlled 6-cell changer in the SPECORD
®
Lay connection cables tension-free!
The connecting cables and the coolant tubes must be laid without tension and in a way
that they do not hinder the movement of the cell changer while in operation. Make sure
that the electric cables are not tensioned and the coolant tubes are not folded.
Take care to ensure that the coolant tubes and the connecting cables do not project into
the light path of the sample or reference beam path.
74
1.
Replace the plastic foam stopper in the recess in the rear sample compartment wall
(4) by the two plastic foam strips supplied along with the accessory.
2.
Turn the knurled screw (7) clockwise as far as it will go.
3.
Put the cell changer from top onto the front carrying rails of the sample
compartment so that its guideways rest on the carrying rails. Then, push the cell
changer to the right-hand sample compartment wall as far as it will go.
User’s Manual SPECORD 200/205/210/250 – Accessories 07/2005
Analytik Jena AG
Peltier temperature-controlled cell holders/cell changers
Peltier temperature-controlled 6-cell changer
4.
Clamp the cell changer to the carrying rails by turning the knurled screw
counterclockwise. Fastening the knurled screw hand-tight will do to lock the cell
changer reliably!
5.
Thread the cable with connector to the SPECORD® (5) underneath the rear
carrying rails and connect it to the left connector on the sample compartment wall.
6.
Lay the coolant tubes underneath the rear carrying rails. Thread them through the
provided ducts in the right-hand sample compartment wall (6).
The tube ducts are provided with steps to achieve a higher light-tightness. If the
tube is caught on these steps, try to loosen it by slightly turning it. When it becomes
visible in the outer opening, you can bend it towards the opening e.g. by means of a
pen.
7.
Thread the electrical cables (3) to the back underneath the rear carrying rails. Put
the cables between the two plastic foam strips in the recess in the rear sample
compartment wall (4).
Take care that the cover of the sample compartment is not hindered by projecting
plastic foam when closing the cover and make sure it closes light-tight.
SPECORD® with recess underneath the sample compartment cover
8.
Thread the cables through underneath the sample compartment cover and put the
cable into the recess so that they are not squeezed when you close the cover.
SPECORD® without recess underneath the sample compartment cover
8.
Remove the knurled screws from the cover prop (5).
Fold the cover backward.
Put the connecting plug of the electrical cables (3) through the slit between the
sample compartment cover and the SPECORD® basic device.
Screw on the cover prop again.
Remove the cover cap from the opening in the sample compartment cover (2).
Put the electrical cable through the slit in the opening.
Slip the annular stopper over the electrical cables and insert it with the slit on top
into the opening (Fig. 13-4 p. 59).
9.
Connect the temperature control unit and the heat exchanger (see Sections
"Connection and operation of temperature control unit”, p. 90 and "Connection and
operation of the heat exchanger”, p. 94).
Adjustment of the Peltier temperature-controlled 6-cell changer
The cell changer can be adjusted computer-controlled to optimally position the cells in
the beam.
Adjustment is necessary
•
At the first use of the cell changer
•
After wavelength calibration
•
After relocation of the SPECORD®
•
When working with microcells.
1.
Install the empty cell changer in the sample compartment.
2.
On the Accessories tab of the measurement parameter window, activate the 6-cell
changer (Peltier) option.
3.
If you intend to use standard cells (1cm x 1cm) or semi-microcells for the following
analyses, perform the adjustment without any cells being inserted.
User’s Manual SPECORD 200/205/210/250 – Accessories 07/2005
Analytik Jena AG
75
Peltier temperature-controlled cell holders/cell changers
Peltier temperature-controlled 6-cell changer
If you intend to use microcells in the analyses, insert a microcell filled with water in
every of the six cell positions.
4.
Start automatic adjustment by a click on the [Adjustment] button.
Monitoring the cell internal temperature
1
2
3
4
Cell changer
Connector for cell
sensor
Cell sensor
Storage receptacle for
connector
4
1
3
Fig. 13-11
2
Cell measuring sensor for the Peltier temperature-controlled 6-cell changer
1.
Close a standard cell with round stopper with the supplied cell measuring sensor
(Fig. 13-11 / 3) in place of the standard stopper.
2.
Put the cell onto any desired position. Take the connector (Fig. 13-11 / 2) from the
storage receptacle (Fig. 13-11 / 4) and plug the connector onto the cell measuring
sensor.
3.
On the temperature-control unit, switch the selector switch to “cell“.
4.
If you no longer need the cell sensor, disconnect it from the connector and plug it
into the storage receptacle.
Fault indication!
If the temperature displays (Fig. 13-17, 2 and 3) on the control unit are flashing, either
the cell measuring sensor has not been connected properly to the connector, or the
sensor is defective.
Operation without heat exchanger
When operating the Peltier temperature-controlled 6-cell changer without heat exchanger
or with the heat exchanger switched off, cooling is electronically suppressed, heating
however is possible. In this case, if the ambient temperature is constant and the selected
nominal temperature is about 5 degrees above sample compartment temperature, the
selected nominal temperatures can be kept to an accuracy of 0.1 – 0.2 degrees at
increased settling time. However, the setting accuracy specified in Section "Technical
data of Peltier temperature-controlled 8-cell changer", p.81 refers to the operation of the
cell changer with heat exchanger.
76
User’s Manual SPECORD 200/205/210/250 – Accessories 07/2005
Analytik Jena AG
Peltier temperature-controlled cell holders/cell changers
Peltier temperature-controlled 6-cell changer
Operation with purging of sample compartment
Below a certain cell block or cell temperature (dew point) and depending on room
temperature and relative humidity, the water contained in the ambient atmosphere
condenses at the cell walls and the cell block. This will result in a distortion of
measurement results.
For the beginning of condensation (dew-point temperature), the following relation
applies:
⎛ relative humidity ⎞
ϑK = ⎜
⎟
100
⎝
⎠
0.1247
* (109.8 + ϑR ) − 109.8
ϑ K - Dew-point temperature in °C
ϑ R - Room temperature in °C
At a room temperature of 20°C and a relative humidity of 60%, the dew-point
temperature is 12°C. Condensation can be prevented by purging the sample
compartment with dry gas.
1.
Thread a tube as thick as possible (inside diameter of at least 6 mm) through the
front duct provided for the drain tube into the sample compartment (Fig. 4-1 / 11,
p .4-1).
2.
Lay the tube mouth in the middle of the front sample compartment wall. To prevent
instable temperatures, the gas must not be blown directly onto the cell changer.
3.
Purge the sample compartment with 800 – 1000 l/h of dry gas, e.g. air, nitrogen or
argon.
Note
Before starting analyses at low temperatures, it is advisable to pre-dry the sample
compartment. Heat up the sample compartment by letting the Peltier temperaturecontrolled cell changer operate for about ten minutes at +80°C.
Avoid opening the sample compartment unnecessarily long and thus the inflow of humid
room air, when running analyses at low temperatures.
13.3.6 Settings in WinASPECT® software
The cell changer is controlled by WinASPECT® software. On the Accessories tab of the
measurement parameter window, choose the 6-cell changer (Peltier) option.
Fig. 13-12
Options for Peltier temperature-controlled 6-cell changer for SPECORD
Option / button
Description
First sample
Position of the first sample on the cell changer.
Last sample
Position of the last sample on the cell changer.
User’s Manual SPECORD 200/205/210/250 – Accessories 07/2005
Analytik Jena AG
®
77
Peltier temperature-controlled cell holders/cell changers
Peltier temperature-controlled 6-cell changer
st
1 sample Reference
st
The sample placed on the 1 position selected above is
treated as reference.
In this case, it is not necessary to run the reference
measurement separately. The reference measurement will
be performed within the normal sample measurements.
Start manually
Before every measurement of a cell, a message box
appears „Start cycle [OK]“. The actual sample measurement
is started only after you confirmed this prompt.
This option may be used, for instance, for kinetic
measurements. The measurement in the respective cell will
be started only after you added the starting substance.
Slow time scan
Activate this checkbox, if you intend to record a slow kinetic
reaction in cyclic measurements in all samples in a
staggered mode (→ Section "Fehler! Verweisquelle
konnte nicht gefunden werden.", p. Fehler! Textmarke
nicht definiert.).
[Pos.1]
Cell changer moves to the first position.
[Pos. +1]
Cell changer moves to the next position.
[Adjustment]
Starts the adjustment of the cell changer.
[Parking]
Cell changer moves to the parking position with the cell
block being centric above the base plate. In this position, the
cell changer can be easily removed from and installed in the
SPECORD® as well as packed.
13.3.7 Measurement procedure
78
1.
Choose the measurement parameters according to your analytical needs.
2.
Switch on the temperature control unit and the heat exchanger at the power
switches located at the back panels each.
3.
Adjust the desired temperature on the temperature control unit (→ Section "Settings
on temperature control unit", p. 91).
4.
The measurement procedure is analogous to that with the water-thermostatted 6cell changer (→ Section "
5.
Measurements with the 6-cell changer", p.38).
User’s Manual SPECORD 200/205/210/250 – Accessories 07/2005
Analytik Jena AG
Peltier temperature-controlled cell holders/cell changers
Peltier temperature-controlled 8-cell changer
13.4
Peltier temperature-controlled 8-cell changer
1
2
3
Temperature control unit
Heat exchanger
Peltier temperature-controlled 8-cell changer
Fig. 13-1
Peltier temperature-controlled 8-cell changer
The cell changer is an automatic sample changing system. Its driving unit with stepper
motor drive is controlled by software. Temperature control of the cell holder is performed
via a separate temperature-control unit. The coolant circuit of the heat exchanger keeps
the rear side of the Peltier elements at a temperature near the ambient temperature.
The controlling sensor used is a Pt100 measuring sensor located in the upper part of the
cell block. In addition to the controlling sensor, the cell holder contains two further Pt100
sensors for optional monitoring of either the holder or the cell temperature.
The cell holder contains eight positions for cells having a pathlength of 10 mm and
external dimensions of 12.5 x 12.5 x 45 (L x W x H in mm).
The cell sensor is specially designed for standard cells with round PTFE stopper. It may
remain in the cell during the analytical measurement.
Note
When using other cells, the immersed measuring sensor may project into the sample
beam thus distorting the measurement results.
Optionally, the 8-cell changer may be factory-equipped with a magnetic stirrer. The
stirring speed is adjusted at the temperature control unit.
You can also use two Peltier temperature-controlled 8-cell changers in combination to
increase the number of samples that can be measured to a maximum of 14 samples or
to analyze every sample against a specific reference. The second cell changer needs a
separate control unit. Countercooling is perfomed via a common heat exchanger.
User’s Manual SPECORD 200/205/210/250 – Accessories 07/2005
Analytik Jena AG
79
Peltier temperature-controlled cell holders/cell changers
Peltier temperature-controlled 8-cell changer
13.4.1 Safety notes
Electric shock!
The temperature-control unit and the heat exchanger are electrically powered. At several
parts inside the system, extremely hazardous electrical voltages are accessible.
To ensure Protection Class I (protective earth connection) of the device, connect the
power plug of the device only to a power outlet with protective earth conductor.
Connect control unit, heat exchanger and SPECORD® to the same phase of the line
power supply (e.g. to a multiple socket power outlet).
Before connecting the devices to the power outlet, make sure the line voltage supplied
agrees with the operating voltage specified on the rating plate at the rear panel of the
devices. Operation of the devices with any other operating voltage than that specified
may result in their destruction.
Only use fuses of the specified type (→ Section "Technical data of Peltier temperaturecontrolled 8-cell changer", p.81).
Disconnect the power cable, before replacing any fuses.
Do not operate the device in explosion-risk rooms!
Type label and warning labels!
Observe the type label and the warning labels on the devices!
Accumulation of heat!
Make sure that you do not cover the ventilation slots in the bottom plate and on the rear
panel of the device as well as on the front panel of the heat exchanger.
Heat accumulation might result in overheating and faults on the equipment.
Ingress of water!
Take care to ensure that no liquids can get into the control unit to avoid any damage to
the device.
Do not place the heat exchanger or containers with liquids onto the control unit.
The control unit complies with the requirements of Protection Type IP 20.
The Peltier temperature-controlled 8-cell changer was made and tested in compliance
with the following standards and directives:
80
•
DIN EN 61010-1 (IEC 1010-1)
•
73/23/EEC
•
89/336/EEC
User’s Manual SPECORD 200/205/210/250 – Accessories 07/2005
Analytik Jena AG
Peltier temperature-controlled cell holders/cell changers
Peltier temperature-controlled 8-cell changer
13.4.2 Technical data of Peltier temperature-controlled 8-cell changer
Operating principle
Thermoelectric heating and cooling
Cooling of rear panel of TEC
Water-cooled
Guaranteed regulated
temperature range at 25°C
ambient temperature*
PTC 800 with heat exchanger WC 600:
10°C...+60°C
Block temperature setting range
PTC 800 with heat exchanger WC 600:
+5°C...+65°C
PTC 801 with heat exchanger WC 601:
-5°C...+ 105°C
PTC 801 with heat exchanger WC 601:
-20°C...+105°
Setting accuracy
0.1 degree
Reading accuracy
0,1 degree
Regulating accuracy
+/- 0.1 degree
*) Temperatures below room temperature may result in steaming up of cells.
Overview 13-9 Technical data of Peltier temperature-controlled 8-cell changer
Technical data of temperature control unit
Weight
2.5 kg
Dimensions (W x H x T)
225 x 130 x 200 mm³
Line voltage
100 - 240 V (-15% / +10%)
Line frequency
50 ... 60 Hz
Power consumption
150 VA
Line fuses
2 x T 2.5 A/H 250V, Type 19181
(Wickmann)
EMC (jamming and noise immunity) as per
DIN EN 61326 and 61326/A1
The device can be installed and operated
in all environments.
Fire resistance of the case of the control
unit according to UL94
HB / 1,6
Protection Type
IP 20
Data interface
RS232 port
Operating temperature range
+15°C...+35°C
Transport and storage temperature range
-40°C...+60°C
Relative humidity
Up to 90% (at +30°C)
Overview 13-10 Technical data of temperature control unit PTC 800 / PTC 801
User’s Manual SPECORD 200/205/210/250 – Accessories 07/2005
Analytik Jena AG
81
Peltier temperature-controlled cell holders/cell changers
Peltier temperature-controlled 8-cell changer
Technical data of heat exchanger
Weight without coolant
3.2 kg
Dimensions (W x H x D)
225 x 175 x 200 mm3
Line voltage
220 - 240 V (-15% / +10%)
Line frequency
50 Hz
Power consumption
50 VA
Line fuses for WC 600
2 x T 0.5 A/H 250V, Type 19181
(Wickmann)
Line fuses for WC 601
2 x T 1.6 A/H 250V, Type 19181
(Wickmann)
EMC (jamming and noise immunity) as per
DIN EN 61326 and 61326/A1
The device can be installed and
operated in all environments.
Fire resistance of the case of the heat
exchanger according to UL94
HB / 1,6
Protection Type
IP 20
Coolant
Approximately 0.4 l distilled water with
an addition of 4 ml isopropanol
Maximum delivery head
1.2 m
Operating temperature range
+15°C...+35°C
Transport and storage temperature range
-40°C...+60°C
Relative humidity
Up to 90% (at +30°C)
Overview 13-11 Technical data of heat exchanger
Pay attention to any different technical data on the type label!
If the data given above are different from that on the type label, the data on the type
label are valid.
82
User’s Manual SPECORD 200/205/210/250 – Accessories 07/2005
Analytik Jena AG
Peltier temperature-controlled cell holders/cell changers
Peltier temperature-controlled 8-cell changer
13.4.3 Design of Peltier temperature-controlled 8-cell changer
1
2
3
4
5
6
7
8
Cell block with insulation
Stepper motor drive
Connector for cell sensor in storage receptacle
Connectors for connection to temperature control unit
Connector for connection to heat exchanger
®
Connector for connection to SPECORD
Water tubes for connection to heat exchanger
S600 clamping lever
Fig. 13-13
Design of Peltier temperature-controlled 8-cell changer
User’s Manual SPECORD 200/205/210/250 – Accessories 07/2005
Analytik Jena AG
83
Peltier temperature-controlled cell holders/cell changers
Peltier temperature-controlled 8-cell changer
13.4.4 Installation of Peltier temperature-controlled 8-cell changer
1
2
3
4
5
6
7
8
Cover prop
Opening with slit in sample compartment cover
Connection cables to temperature control unit
Recess in rear sample compartment wall
®
Connector to SPECORD
Water connection tubes to heat exchanger
Clamping lever
Cell block with insulation
Fig. 13-2
Installation of Peltier temperature-controlled 8-cell changer
Lay connection cables tension-free!
The connecting cables and the coolant tubes must be laid without tension and in a way
that they do not hinder the movement of the cell changer while in operation. Make sure
that the electric cables are not tensioned and the coolant tubes are not folded.
Take care to ensure that the coolant tubes and the connecting cables do not project into
the light path of the sample or reference beam path.
84
1.
Replace the plastic foam stopper in the recess in the rear sample compartment wall
(4) by the two plastic foam strips supplied along with the accessory.
2.
Remove the carrying rails from their top position and mount them in their bottom
position (→ Section “Changing the position of the carrying rails“, p. 8).
3.
Place the cell changer onto the relocated carrying rails with its clamping lever facing
the back. Push the cell changer to the right-hand sample compartment wall as far as
it will go. Clamp it to the carrying rails by throwing the clamping lever to the left.
4.
Thread the connection cable to the SPECORD® to the back underneath the rear
carrying rails and connect it to the left connector in the rear sample compartment
wall.
User’s Manual SPECORD 200/205/210/250 – Accessories 07/2005
Analytik Jena AG
Peltier temperature-controlled cell holders/cell changers
Peltier temperature-controlled 8-cell changer
5.
Put the electrical cables (3) into the recess in the rear sample compartment wall (4)
and close the recess again using the plastic foam strips. Fix the plastic foam strips
by attaching the supplied metal bracket. Make sure that the recess is closed lighttight.
SPECORD® with recess underneath the sample compartment cover
6.
Thread the cables through underneath the sample compartment cover and put the
cable into the recess so that they are not squeezed when you close the cover.
SPECORD® without recess underneath the sample compartment cover
6.
Remove the knurled screws from the cover prop.
Fold the cover backward.
Put the connecting plug of the electrical cables (3) through the slit between the
sample compartment cover and the SPECORD® basic device.
Screw on the cover prop again.
Remove the cover cap from the opening in the sample compartment cover (2).
Put the electrical cable through the slit in the opening.
Slip the annular stopper over the electrical cables and insert it with the slit on top
into the opening (Fig. 13-4 p. 59).
7.
Lay the thermostatting tubes underneath the rear carrying rails. Thread them
through the provided ducts in the right-hand sample compartment wall.
The tube ducts are provided with steps to achieve a higher light-tightness. If the tube
is caught on these steps, try to loosen it by slightly turning it. When it becomes
visible in the outer opening, you can bend it towards the opening e.g. by means of a
pen.
Connect the tubes to the thermostat. We recommend using quick-lock couplings that
allow drip-free connection and disconnection of the thermostat.
8.
Connect the cell changer to the temperature control unit (→ Section "Connection
and operation of temperature control unit”, p. 90).
9.
Connect the heat exchanger (→ Section "Connection and operation of the heat
exchanger", p. 94).
Installing a second cell changer
Caution! Correct cable connections in sample compartment!
Connect the cell changer installed in the rear reference beam path to the right
connector in the sample compartment.
Connect the cell changer installed in the front sample beam path to the left
connector.
The second Peltier temperature-controlled 8-cell changer is installed largely in the way
described above. However, the recess in the rear sample compartment wall is too small
for allowing the electrical cables of two cell changers to be threaded through. Therefore,
the accessory is supplied along with a different right-angled bracket.
1.
Undo the right-angled bracket mounted in the recess of the sample compartment. In
its place, mount the supplied bracket. Put the two supplied plastic foam strips into
the recess.
2.
Install the second 8-cell changer in the reference beam path.
3.
Lay the electrical connection cables as described above. Additionally fasten the
supplied metal bracket above the recess in the sample compartment wall to avoid
that the cables slip out of the recess.
User’s Manual SPECORD 200/205/210/250 – Accessories 07/2005
Analytik Jena AG
85
Peltier temperature-controlled cell holders/cell changers
Peltier temperature-controlled 8-cell changer
4.
Connect the second 8-cell changer to the right connector in the sample
compartment.
5.
Both 8-cell changers use the same heat exchanger. Connect the two 8-cell
changers to each other by means of a short piece of tube. Connect one water tube
each to the heat exchanger and to every 8-cell changer. Establish the connections
to the heat exchanger as described above.
6.
Connect the 7-pole connectors of the cell changers with the enclosed y cable.
Connect the plug of the y cable with the heat exchanger.
7.
Connect the electrical cables to the temperature control units.
Adjustment of the Peltier temperature-controlled 8-cell changer
The cell changer can be adjusted computer-controlled to optimally position the cells in
the beam.
Adjustment is necessary
•
At the first use of the cell changer
•
After wavelength calibration
•
After relocation of the SPECORD®
•
When working with microcells.
1.
Install the empty cell changer in the sample compartment.
2.
On the Accessories tab of the measurement parameter window, activate the 8-cell
changer (Peltier) option.
3.
If you intend to use standard cells (1cm x 1cm) or semi-microcells for the following
analyses, perform the adjustment without any cells being inserted.
If you intend to use microcells in the analyses, insert a microcell filled with water in
every of the six positions.
4.
Start automatic adjustment by a click on the [Adjustment] button.
Note
The adjustment for two 8-cell changers is to be performed in the same way.
86
User’s Manual SPECORD 200/205/210/250 – Accessories 07/2005
Analytik Jena AG
Peltier temperature-controlled cell holders/cell changers
Peltier temperature-controlled 8-cell changer
Monitoring the cell internal temperature
1
2
Cell sensor
Connector for cell sensor
4
1
3
Fig. 13-14
2
Cell measuring sensor for the Peltier temperature-controlled 8-cell changer
1.
Close a standard cell with round stopper with the supplied cell measuring sensor
(Fig. 13-14 / 1) in place of the standard stopper.
2.
Put the cell onto any desired cell position. Take the connector (Fig. 13-14 / 2) from
the storage receptacle (Fig. 13-13 / 3) and plug the connector onto the cell
measuring sensor.
3.
On the temperature-control unit, switch the selector switch to “cell“.
4.
If you no longer need the cell sensor, disconnect it from the connector and plug it
into the storage receptacle (Fig. 13-13 / 3).
Fault indication!
If the temperature displays (Fig. 13-17, 2 and 3) on the control unit are flashing, either
the cell measuring sensor has not been connected properly to the connector, or the
sensor is defective.
Operation without heat exchanger
When operating the Peltier temperature-controlled 6-cell changer without heat exchanger
or with the heat exchanger switched off, cooling is electronically suppressed, heating
however is possible. In this case, if the ambient temperature is constant and the selected
nominal temperature is about 5 degrees above room compartment temperature, the
selected nominal temperatures can be kept to an accuracy of 0.1 – 0.2 degrees at
increased settling time. However, the setting accuracy specified in Section “Technical
data of Peltier temperature-controlled 8-cell changer” on p. 81 refers to the operation of
the cell changer with heat exchanger.
Operation with purging of sample compartment
Below a certain cell block or cell temperature (dew point) and depending on room
temperature and relative humidity, the water contained in the ambient atmosphere
condenses at the cell walls and the cell block. This will result in a distortion of
measurement results.
For the beginning of condensation (dew-point temperature), the following relation
applies:
User’s Manual SPECORD 200/205/210/250 – Accessories 07/2005
Analytik Jena AG
87
Peltier temperature-controlled cell holders/cell changers
Peltier temperature-controlled 8-cell changer
⎛ relative humidity ⎞
ϑK = ⎜
⎟
100
⎝
⎠
0.1247
* (109.8 + ϑR ) − 109.8
ϑ K - Dew-point temperature in °C
ϑ R - Room temperature in °C
At a room temperature of 20°C and a relative humidity of 60%, the dew-point
temperature is 12°C. Condensation can be prevented by purging the sample
compartment with dry gas.
1.
Thread a tube as thick as possible (inside diameter of at least 6 mm) through the
front duct provided for the drain tube into the sample compartment (Fig. 4-1 / 11,
p .4-1).
2.
Lay the tube mouth in the middle of the front sample compartment wall. To prevent
instable temperatures, the gas must not be blown directly onto the cell changer.
3.
Purge the sample compartment with 800 – 1000 l/h of dry gas, e.g. air, nitrogen or
argon.
Note
Before starting analyses at low temperatures, it is advisable to pre-dry the sample
compartment. Heat up the sample compartment by letting the Peltier temperaturecontrolled cell changer operate for about ten minutes at +80°C.
Avoid opening the sample compartment unnecessarily long and thus the inflow of humid
room air, when running analyses at low temperatures.
13.4.5 Settings in WinASPECT® software
The cell changer is controlled by WinASPECT® software. On the Accessories tab of the
measurement parameter window, choose the 8-cell changer option.
Fig. 13-15
Options for Peltier temperature-controlled 8-cell changer for SPECORD
Option / button
Description
First sample
Position of the first sample on the cell changer.
Last sample
Position of the last sample on the cell changer.
st
1 sample - reference
®
st
The sample placed on the 1 position selected above is
treated as reference.
In this case, it is not necessary to run the reference
measurement separately. The reference measurement will
be performed within the normal sample measurements.
Start manually
88
Before every measurement of a cell, a message box appears
“Start cycle [OK]“. The actual sample measurement is started
only after you confirmed this prompt.
This option may be used, for instance, for kinetic
User’s Manual SPECORD 200/205/210/250 – Accessories 07/2005
Analytik Jena AG
Peltier temperature-controlled cell holders/cell changers
Peltier temperature-controlled 8-cell changer
measurements. The measurement in the respective cell will
be started only after you added the starting substance.
Slow time scan
Activate this checkbox, if you intend to record a slow kinetic
reaction in cyclic measurements in all samples in a staggered
mode (→ "Fehler! Verweisquelle konnte nicht gefunden
werden.", p. Fehler! Textmarke nicht definiert.).
[Pos.1]
Cell changer moves to the first position.
[Pos. +1]
Cell changer moves to the next position.
[Adjustment]
Starts the adjustment of the cell changer.
[Parking]
When two Peltier temperature-controlled 8-cell changers have been installed, they can
be used in two modes. In synchronous mode, every sample will be analyzed against a
specific reference. In staggered mode, the number of samples in a measurement series
increases to a maximum of 14.
For this, in the measurement parameters on the Accessory tab, the 2x 8-cell changer
must be selected. The possible modes are described in Section "Use of two 8-cell
changers", p.45).
13.4.6 Measurement procedure
1.
Choose the measurement parameters according to your analytical needs.
2.
Switch on the temperature control unit and the heat exchanger at the power
switches located at the back panels each.
3.
Adjust the desired temperature on the temperature control unit (→ Section "Settings
on temperature control unit", p. 91).
4.
The measurement procedure is analogous to that with the water-thermostatted 6cell changer (→ Section "
5.
Measurements with the 6-cell changer", p. 38).
User’s Manual SPECORD 200/205/210/250 – Accessories 07/2005
Analytik Jena AG
89
Peltier temperature-controlled cell holders/cell changers
Connection and operation of temperature control unit
13.5
Connection and operation of temperature control unit
13.5.1 Connecting the temperature control unit
1
2
3
4
5
6
1
2
3
4
5
6
9-pole and 15-pole connectors
RS232 port
Power input connector
Fuse holder for line fuse
Power switch
Type label
Fig. 13-16
90
Back panel of temperature control unit
1.
Connect the 9-pole and the 15-pole connectors of the cell holder/cell changer to the
corresponding connectors (Fig. 13-16 / 1) on the back panel of the temperature
control unit.
2.
Connect the power cable to the power input connector (Fig. 13-16 / 3) and then to a
power outlet.
User’s Manual SPECORD 200/205/210/250 – Accessories 07/2005
Analytik Jena AG
Peltier temperature-controlled cell holders/cell changers
Connection and operation of temperature control unit
13.5.2 Settings on temperature control unit
1
4
5
2
8
3
9
10
6
1
2
3
4
5
6
7
8
9
10
7
Control module
Block temperature display
Temperature display of holder / cell
Decrement button
Increment button
PGM button
EXIT button
Speed control for stirring magnets (only for cell holders / cell changers with magnetic
stirrer)
Holder/cell temperature selector switch
Status lamp for heat exchanger (not used on air-cooled Peltier temperature-controlled
cell holders)
Fig. 13-17
Front panel of temperature control unit
Indicators for heat exchanger (does not apply to air-cooled Peltier
temperature-controlled cell holders)
The indicator LED (Fig. 13-17 / 9) located on the front panel of the control unit indicates
the three possible states of the heat exchanger
LED off
No heat exchanger available or the heat exchanger has not been
connected to the control unit via the 6-pin connector.
LED red
The heat exchanger is connected to the control unit via the 6-pin
connector, but has not been switched on.
LED green
The heat exchanger is connected to the control unit via the 6-pin
connector and has been switched on.
User’s Manual SPECORD 200/205/210/250 – Accessories 07/2005
Analytik Jena AG
91
Peltier temperature-controlled cell holders/cell changers
Connection and operation of temperature control unit
Pre-selecting the temperature on the temperature-control unit
Caution!
In selecting the nominal temperature, consider that this value always refers to the block
temperature. Depending on the temperature in the sample compartment, the type of cell
used as well as the type and volume of the sample material, different end values of the
temperature inside the cell may result and also different times for reaching these values
(Fig.13-18).
1.
Press the PGM button (Fig. 13-17 / 6). On the cell holder or cell temperature display
(Fig. 13-17 / 3), it appears “SP 1“.
2.
Press the decrement button (Fig. 13-17 / 4) to reduce the pre-selected temperature
or the increment button (Fig. 13-17 / 5) to increase it.
3.
Confirm the pre-selected temperature by pressing the PGM button (Fig. 13-17 / 6).
After two seconds, the selected value will automatically be stored.
Note
The nominal temperature can only be varied within the permissible temperature range.
4.
Exit the programming mode by pressing the EXIT button (Fig. 13-17 , 7).
°C
38
37
36
35
34
33
3ml H2O, Quartz 1x1 block temperature
3ml H2O, Quartz 1x1 cell temperature
3ml H2O, Plastic 1x1 block temperature
3ml H2O, Plastic 1x1 cell temperature
2ml H2O, Plastic 1x0.4 block temperature
2ml H2O, Plastic 1x0.4 cell temperature
32
31
30
29
28
27
26
25
0
100
200
300
400
500
600
700
800
900
1000
s
Fig.13-18
Temperature distribution in cell block and in cell for different types of cells
(measured on air-cooled, Peltier temperature-controlled cell holder)
92
User’s Manual SPECORD 200/205/210/250 – Accessories 07/2005
Analytik Jena AG
Peltier temperature-controlled cell holders/cell changers
Connection and operation of temperature control unit
13.5.3 Replacing fuses on the temperature control unit
Replace any blown fuses on the temperature control unit by following this procedure:
1.
Disconnect the power cable.
2.
Open the fuse holder by pulling its lid.
3.
Replace the defective fuses considering the technical data of the cell holder or the
cell changer you are using.
4.
Close the fuse holder again.
5.
Reconnect the power cable.
6.
®
Switch the SPECORD on again.
User’s Manual SPECORD 200/205/210/250 – Accessories 07/2005
Analytik Jena AG
93
Peltier temperature-controlled cell holders/cell changers
Connection and operation of the heat exchanger
13.6
Connection and operation of the heat exchanger
Heat accumulation!
Always keep ventilation slits free!
The warning “
Danger! Heat accumulation! Keep free slits!” is located at the front
panel of the heat exchanger.
1
2
3
Danger! Heat accumulation! Keep free slits!
1
Screw cap
Compensating tank
Coolant tube connectors
2
3
Fig. 13-19
Heat exchanger, front panel
1
2
5
3
4
4
5
Power switch
Fuse holder for
line fuse
Power input
connector
7-pole connector
for temperature
control unit
Type label
3
1
Fig.13-20
2
Heat exchanger, rear panel
13.6.1 Preparing the coolant
In a separate vessel, mix approximately 400 ml of distilled water with 4 to 5 ml of
isopropanol.
13.6.2 Connecting the heat exchanger
1.
94
Connect the 7-pin connector of the cell holder / changer (with the appropriate
connector (Fig.13-20 / 4) on the rear panel of the temperature-control unit.
User’s Manual SPECORD 200/205/210/250 – Accessories 07/2005
Analytik Jena AG
Peltier temperature-controlled cell holders/cell changers
Connection and operation of the heat exchanger
2.
Connect the power cable to the power input connector (Fig.13-20 / 3) and then to a
power outlet.
3.
Slip the tubes from the cell holder/changer over the appropriate tube connectors of
the heat exchanger (Fig. 13-19 / 3) and lock them in place by turning the knurled
nuts anti-clockwise.
4.
Remove screw cap (Fig. 13-19 / 1) by turning it anti-clockwise.
5.
Switch on the heat exchanger with power switch (Fig.13-20 / 1).
6.
Fill the prepared coolant through the opening in the compensating tank (Fig. 13-19 /
2) until the filling level is approximately 1.5 cm below the top edge of the
compensating tank and the coolant circuit is free of air bubbles (no bubbles rising in
the tank and a noise-free circulation of the coolant).
7.
Close the compensating tank hand-tight with the screw cap.
Note
When installing the heat exchanger, please consider that the maximum delivery head of
the device is approximately 1.2 m.
Depending on the place of installation of the heat exchanger, the laying of the tubes and
for technical reasons it may happen, that air cushions are forming when filling the
coolant system, which disappear only after several minutes. Briefly switching the device
on and off may accelerate the removal of these air cushions.
13.6.3 Replacing fuses on the heat exchanger
Replace any defective fuses on the heat exchanger by following this procedure:
1.
Disconnect the power cable.
2.
Open the fuse holder by pulling its lid.
3.
Replace the defective fuses considering the technical data of the cell holder or the
cell changer you are using.
4.
Close the fuse holder again.
5.
Reconnect the power cable.
6.
®
Switch the SPECORD on again.
User’s Manual SPECORD 200/205/210/250 – Accessories 07/2005
Analytik Jena AG
95
Cassette sipper
14
Cassette sipper
14.1
Intended use
The cassette sipper rationalizes manual laboratory work in laboratories with medium
sample batches. Sample feed is computer controlled. A peristaltic pump transfers the
sample for the measurement into the flow cell. After the measurement, the sample is
pumped into the waste bottle.
Sample feed can be manual or automatic by an autosampler.
The cassette sipper can also aspirate sample and reference simultaneously. In this case,
equip the pump with two tube cassettes and place the reference cell in the adjustable
cell holder in the reference beam of the SPECORD®.
14.2
Design of cassette sipper
1
2
3
4
5
6
7
Flow cell
Inlet connector of flow cell
Outlet connector of flow cell
Vertical adjusting screw
Sample aspirating tube
Tube cassette
Pump rollers
Fig. 14-1
8
9
10
11
12
13
14
Eccentric
Ready-made pump tube with stoppers
Drain tube
Clamping lever
Horizontal adjusting screw
Cell retaining spring
Connecting plug
Design of cassette sipper
The cassette sipper consists of:
•
Adjustable holder for flow cells of 1, 2, and 5 cm pathlength
•
Peristaltic pump
•
Tube set.
User’s Manual SPECORD 200/205/210/250 – Accessories 07/2005
Analytik Jena AG
97
Cassette sipper
14.3
Mounting the cassette sipper
14.3.1 Mounting the tube set
1
2
3
Sample aspirating tube
Flow cell
Pump tube
Fig. 14-2
4
5
6
Tube cassette
Eccentric
Drain tube
Tube set for cassette sipper
Mount the tube set as illustrated in Fig. 14-2:
1.
Fasten the pump tube in the tube cassette by tensioning it between two stoppers.
2.
®
Fix the sample aspirating tube to the flow cell. To this end, slip the Tygon tube end
over the inlet connector of the cell (observe the marking indicating the direction of
flow on the cell). The black Viton® gasket must rest on the inlet connector and the
Teflon tube project into the cell. This is to prevent that a sample reservoir forms at
the inlet connector, which would cause measuring errors by carry-over.
3.
Fix the pump tube with the tube adapter and the short silicon tube to the outlet
connector of the cell. In doing so, observe the proper direction of the tube cassette.
If the direction is wrong, the pumping direction will be wrong, too.
4.
Use the tube adapter to interconnect pump tube and drain tube.
Insert the tube set in the sample holder:
98
5.
Plug the cell retaining spring onto the place that corresponds to the pathlength of the
cell.
6.
Insert the cell in the cell holder with the outlet connector facing the pump.
7.
Fasten the tube cassette to the pump rollers (Fig. 14-1).
8.
Press the pump tube to the rollers with the eccentric so that it is fully squeezed.
User’s Manual SPECORD 200/205/210/250 – Accessories 07/2005
Analytik Jena AG
Cassette sipper
Note
After longer use, it may happen that the pump tube section tensioned in the cassette
sipper loosens its elasticity. If the tube did not additionally become porous, you can
tension the second tube section between the middle and the third stopper in the tube
cassette.
14.3.2 Mounting the sipper in the sample compartment
1
1
2
3
4
Interface cable
Drain tube
Flow cell
Sample aspirating
tube
2
3
4
Fig. 14-3
Cassette sipper mounted in SPECORD
1.
Thread the drain tube through one of the provided ducts (Fig. 1-1 / 6 or 11) in the
sample compartment to the collecting bottle set up outside. Lay the tube under the
carrying rails so that it cannot jut into the beams when taking measurements.
The ducts in the sample compartment wall are provided with steps to increase the
light tightness. If the tube hooks to these steps when threading it through, try to
release it by slightly turning it. When it becomes already visible at the other end of
the duct, bend it to the opening e.g. by means of a pen.
2.
Place the cassette sipper system onto the carrying rails in the sample beam of the
sample compartment so that the cell holder faces the detector. In this position,
clamping lever (Fig. 1-1 / 11) points to the back.
3.
To position the flow cell as close to the detector as possible, push the sipper system
to the right against the sample compartment wall.
4.
Clamp the sample holder by means of the clamping lever.
User’s Manual SPECORD 200/205/210/250 – Accessories 07/2005
Analytik Jena AG
®
99
Cassette sipper
5.
Thread the sample aspirating tube through one of the openings in the front wall (Fig.
1-1 / 12).
Take care not to fold the tube. The tube has a particularly smooth surface to avoid
gas nucleation centers. At tube folds, however, gas bubbles may form. When these
bubbles get into the sample cell, they will strongly distort the results.
6.
Lead the interface cable for connection to the SPECORD® underneath the rear
carrying rails to the connectors in the sample compartment wall and plug its plug
into one of these connectors.
14.3.3 Adjusting the flow cell
For the first use of the cassette sipper and after a change of the flow cell, it is advisable
to adjust the cell in the beam.
1.
First, check the passage of non-dispersed "white" light through the cell. To this end,
set the zeroth order of light in the optical path (→ Section Adjustment of zeroth
order, p. 8.)
2.
For visual observation, insert an approximately 10 mm wide strip of paper in the cell
cavity for turbid samples and, from top, look at the beam passing through.
Successively turn the screws for vertical (Fig. 14-1 / 4) and horizontal adjustment
(Fig. 14-1 / 12).
Then, carry out an energy measurement for fine adjustment:
3.
4.
100
Activate the menu command Measurement / Set Parameters to create a parameter
data record with e.g. the following settings:
Wavelength:
500nm
Integration time:
0.1s
Slit:
2nm
Correction:
No
Cycle automatic:
5
Display:
Energy
Successively turn the vertical and horizontal adjusting screws and, after every
adjustment, measure the energy with the sample compartment cover closed.
Repeat the procedure until the energy of the sample beam I(M) has reached its
maximum value.
User’s Manual SPECORD 200/205/210/250 – Accessories 07/2005
Analytik Jena AG
Cassette sipper
14.4
Sample measurement
14.4.1 Settings on the PC
In the device driver, choose the following accessory-specific measurement parameters:
1.
In WinASPECT® software, open the device driver.
2.
Choose the general measurement parameters (slit, wavelength, ordinate display,
etc.).
3.
As correction mode, choose either Reference or Special (correction based on a
stored file).
4.
On the Accessory tab, choose the Sipper option.
This will bring up the following options for the use of the sipper:
Fig. 14-4
Device driver, Accessories tab with selected Sipper option
For the control of the sipper via WinASPECT®, the following options are available:
Option / Button
Description
Pump time [s]
The pump time is the time needed to optimally transfer the
sample into the cell. Because of the rinse effect,
approximately 2/3 of the sample should flow through the cell
and 1/3 of the sample be before the cell.
Adjusting range: 0 ... 300 s
Wash before
measurement
Performs a wash step before sample measurement.
The wash time is 1.5 x Pump time.
At the end of the entry procedure, the time will be rounded
by software to tenths of a second.
Wash after measurement
Performs an additional wash step after sample
measurement.
[Pump ON / OFF]
Click on the Pump ON button if you want to check the
aspiration process or determine the optimum pump time.
The label of this button changes depending on the switching
state of the pump.
User’s Manual SPECORD 200/205/210/250 – Accessories 07/2005
Analytik Jena AG
101
Cassette sipper
14.4.2 Performing a sample measurement
Reference measurement
If this Measurement parameter option was selected in the device driver, take a reference
measurement. Feed the sample as described in the Section Sample measurement
below.
Start the reference measurement by a click on the corresponding button on the
WinASPECT ® desktop. Then, follow the procedure described below under Sample
measurement.
Sample measurement
Without additional wash steps
Hold the sample to be analyzed to the aspirating tube.
Start the measurement by a click on the Measurement start button.
The sample is being aspirated and the measurement started.
With activated "Wash before measurement" option
On the WinASPECT® desktop, click on the measurement start button.
This will bring up a message window prompting you to hold the wash vessel to the
aspirating tube.
Bring the wash solution to the aspirating tube.
Start the wash process with [OK].
When the wash process is finished, a message window appears prompting you to
prepare the sample to be analyzed.
Bring the sample to the aspirating tube.
Start the measurement with [OK].
The sample is being aspirated and the measurement started.
With activated "Wash after measurement" option
Bring the sample to be analyzed to the aspirating tube.
Start the measurement by a click on the measurement start button.
The sample is being aspirated and the measurement started.
When the measurement process is finished, a message window appears prompting you
to prepare the wash solution.
Bring the wash solution to the aspirating tube.
Start the wash process with [OK].
102
User’s Manual SPECORD 200/205/210/250 – Accessories 07/2005
Analytik Jena AG
Cassette sipper
14.5
Care and maintenance
Maintenance
Maintenance on the cassette sipper is restricted to replacing the pump tubes (→ Section
“Mounting the tube set”, p. 98).
Pump tubes of other materials or with different inside diameters can be ordered from our
Service Department.
Care
Observe the following advice on device care:
•
Avoid any contamination on the sample holder. Wipe off spilt samples or
reagents instantly with an absorbent cloth or tissue. Remove sticking dirt with
a soft cloth moistened with a commercial detergent.
•
When you finish using the sipper, fill the flow cell with distilled water. When
the cell dries out, sample residues may remain stuck to the flow cell.
•
When you finished working with the sipper, detach the tube cassette from the
pump rollers thus slackening the pump tube. In this way, the elasticity of the
pump tube is maintained longer.
User’s Manual SPECORD 200/205/210/250 – Accessories 07/2005
Analytik Jena AG
103
APG 53/100 XYZ Autosampler
15
APG 53/100 XYZ Autosampler
15.1
Intended use
The APG 53/100 is an XYZ autosampler. Used in combination with a sipper, it serves to
transfer the sample to the flow cell in the spectrophotometer. The autosampler is
controlled by the PC.
The APG is supplied with a sample rack for 53 sample cups (APG 53) and equipped with
a magnetic stirrer. In addition, an upgrade kit is available for a sample rack with 100
sample cups without stirrer (APG 100).
For cleaning the flow-through system, rinse liquid can be aspirated from a rinse vessel.
15.2
Safety notes
Warning!
Electric shock!
Prior to opening the device, switch it off and disconnect the power plug!
Take care that no liquids get onto cable connectors or into the electrical system of the
device!
Proper earth conductor!
Connect the power cable only to a properly installed power outlet with earthing contact to
ensure protection as per Protective Class I (protective multiple earthing). Do not use an
extension cable without earth conductor, as this would make the protection ineffective. If
you use multiple socket connectors, make sure the permissible earth current is not
exceeded.
Make sure the power cables are free from defects.
Correct line voltage!
Prior to connecting the XYZ autosampler to a power outlet, make sure the operating
voltage specified on the rating plate on the rear panel agrees with the local line voltage.
Operation on other than the specified line voltage may destroy the device.
The device may be converted for use on other line voltages only by service staff!
Risk of accidents!
Mind the motion range of the guiding arm of the uptake tube! While the device is in
operation, there is the risk of accidents!
Do not put your fingers into the guiding aperture of the arm while the device is operating!
Observe the operating manual!
Additionally, observe the instructions and advice given in the accompanying operating
manual provided by the manufacturer!
Do not fold the sample tube!
Take care that the sample tube is not folded! Folds in the tube will hinder sample flow.
Do not reel up the sample tube in narrow bends!
User’s Manual SPECORD 200/205/210/250 – Accessories 07/2005
Analytik Jena AG
105
APG 53/100 XYZ Autosampler
15.3
Design and installation of the APG 53/100
15
14
1
13
12
11
2
10
3
9
4
5
8
1
2
3
4
5
6
7
8
9
10
11
12
13
14
15
6
XYZ autosampler basic unit
Screws (4x) for fastening the base covering
Base covering for the accommodation of the sample rack and for covering the motion range
of the magnetic stirrer bracket
Knurled screws (4x) for fastening the feet of the device in the foot sockets
Plastic fork (2x) for fastening the base covering to the feet of the device
Foot of basic unit
Sample tray for the accommodation of 53 sample cups and 1 rinse vessel
Sample cup
Aspirating tube
Knurled screw for fastening the stirrer bracket to the Z-dome
Knurled screw for fixing the aspirating tube
Tube holder
Stirring bracket carrying the movable magnetic stirrer underneath the current sample cup
Rinse vessel
Guiding arm
Fig. 15-1
106
7
APG 53 (front view)
User’s Manual SPECORD 200/205/210/250 – Accessories 07/2005
Analytik Jena AG
APG 53/100 XYZ Autosampler
1
16
17
18
19
20
2
2
4
13
1
2
4
13
16
17
18
19
20
XYZ autosampler, basic unit
Screws (4x) for fastening the base covering to the device
Knurled screw (4x) for fastening the feet of the device in the foot sockets
Stirrer bracket carrying the movable magnetic stirrer underneath the current sample cup
®
Connector for connection to SPECORD
Diode connector for connection of magnetic stirrer
Power switch assembly
230V/115V line voltage selector
Appliance mains input connector
Fig. 15-2
Connections of APG53 (rear panel)
Installation of XYZ autosampler
When installing the autosampler, additionally observe the description provided by the
manufacturer.
1.
Put the XYZ autosampler on its rear side.
2.
Remove the red transport lock. To this end, unscrew the two screws located on the
underside of the device.
Further installation procedure for the APG 53 model
3.
Push the four feet into the foot sockets and fasten the feet with knurled screws (4).
Put the XYZ autosampler upright on the table and check its stability. Readjust the
feet, if necessary.
4.
Slide the stirrer bracket onto the underside of the Z dome into the grooves.
Align the bracket so that it is centered.
Tighten the knurled screw (10).
If mounted properly, the middle of the stirrer plate is exactly underneath the tube
holder. The bracket points to the back and projects under the basic device.
User’s Manual SPECORD 200/205/210/250 – Accessories 07/2005
Analytik Jena AG
107
APG 53/100 XYZ Autosampler
5.
Put the base covering from the front onto the basic device and fasten it by means of
the four bolts (2).
The stirrer bracket is now under the base covering without touching it.
6.
Put the sample rack onto the base covering. The rack rests on the conical plug and
the stop strips on the base covering.
7.
Insert the rinse vessel, if required.
Further installation procedure for the APG 100 model
Use the upgrade kit for the installation of the APG 100.
15.4
3.
Push the four longer feet into the foot sockets and fasten the feet with the knurled
screws (4).
Put the XYZ autosampler upright on the table and check its stability. Readjust the
feet, if necessary.
4.
In place of the stirrer bracket of the APG 53, slide the adapter with the duct for the
sample tube onto the underside of the Z dome into the grooves.
Tighten the knurled screw (10).
5.
Put the base covering from the front onto the basic device and fasten it by means of
the four bolts (2).
6.
Put the sample rack onto the base covering. The rack rests on the conical plug and
the stop strips on the base covering.
Connecting the XYZ autosampler to the SPECORD®
1.
Set up the autosampler to the right of the SPECORD® keeping a minimum spacing
of 10 cm.
2.
Use the provided cable to interconnect the 15-pin connector (16) of the XYZ
autosampler and the connector labeled “APG” on the right side of the SPECORD®.
3.
Verify that the operating voltage setting of the XYZ autosampler (label on (19))
agrees with the available line voltage.
4.
Connect a power cable to mains input connector (20). Then, connect this cable to a
power outlet.
5.
Put the sipper into the sample compartment and connect it.
Inserting the sample tube
Before adjusting the sample tube, make sure the autosampler is switched off!
The sample tube is supplied ready for use. The tube consists of
•
an MFA tube for sample transfer,
•
the tube connection to the flow cell (silicone tube with black stopper) and
•
1.
108
a piece of tube for stabilization (black) and improved guidance of the MFA
tube.
Shift the MFA tube within the black guiding tube so that the following tube length juts
out from the guiding tube:
APG 53
80 mm
APG 100
100 mm
User’s Manual SPECORD 200/205/210/250 – Accessories 07/2005
Analytik Jena AG
APG 53/100 XYZ Autosampler
In the following adjustment, take care that the MFA tube is not displaced within the
guide tube and the above lengths be kept.
®
2.
Slip the Tygon tube piece of the sample tube over the inlet connector of the flow
cell.
In connecting the tube observe the directions of flow possibly marked on the flow
cell.
3.
Thread the MFA tube together with the tube for stabilization from inside through one
of the ducts (Fig. 1-1 / 12) in the front wall of the sample compartment to the
outside.
4.
For the time being, clamp the guide tube only loosely in the tube holder (12) of the
XYZ autosampler.
Insert a sample cup in the sample tray.
5.
With the autosampler switched off (!) move the guide arm (15) of the tube holder
until the sample tube is in the middle above the sample cup. Move the tube holder
(12) down as far as it will go.
6.
Push the sample tube down until it is about 1 – 2 mm above the bottom of the cup.
When using a magnetic stirrer, put the stirrer magnet first into the cup. Adjust the
immersion depth so that the MFA tube does not touch the magnet.
7.
Make sure that the black guide tube does not immerse in the sample.
If the guide tube immerses in the sample, push it up. Then, move down the MFA
tube within the guide tube until its end is again about 1 – 2 mm above the bottom of
the cup or the stirrer magnet.
8.
Tighten the knurled screw (11) on the tube holder (12).
Switching on the XYZ autosampler
Caution! Correct order of switch-on!
Make sure to follow the above order in switching on the system to ensure that the
autosampler is moved to the correct starting position. If you should have switched off the
autosampler in the mean time, restart the software once more after switching on the
autosampler.
®
Switch on autosampler and SPECORD in the following order:
1.
Switch on autosampler (18, Fig. 15-2).
2.
Switch on PC and SPECORD®
3.
®
®
Start WinASPECT software and initialize the SPECORD .
4.
Activate the device driver (measurement parameter dialog box).
User’s Manual SPECORD 200/205/210/250 – Accessories 07/2005
Analytik Jena AG
109
APG 53/100 XYZ Autosampler
15.5
Sample measurement
In the Device Driver, choose the following accessory-specific measurement parameters:
1.
In WinASPECT®, open the Device Driver.
2.
Choose the general measurement parameters (slit, wavelength, ordinate display,
etc.)
3.
Under Correction, choose the Reference option or use a saved file (Special
option).
4.
On the Accessories tab, choose either APG 53 or APG 100 depending on the
sample rack used (53 or 100 samples).
Fig. 15-3
Accessories tab – APG 53 selected
Parameter /
Button
Description
Samples
Number of samples placed on the sample rack (including reference
and wash solution).
Setting range for APG 53: 1-53
Setting range for APG 100: 1-100
Sampling always starts with rack position 1. Make sure to fill the tray
consecutively without leaving any empty places in between.
Pump time [s]
The pump time is the time needed for optimum transfer of the
sample to the cell.
Setting range:
0 ... 300 s
Wash before
every sample
Executes a cleaning step between two sample measurements. For
that, the aspiration tube dips into the wash vessel. When you enter a
wash time, this step includes the aspiration of the wash solution and
rinsing of the sipper system.
Wash time
Pump time for the wash solution.
Setting range:
[Reference]
0 ... 300 s
Use of one or several references on the sample rack.
After a click on [Reference], a small dialog box appears showing
the list of samples. Mark the tray position(s) accommodating the
reference(s).
The selected positions appear beside the [Reference] button.
Maximum number of selectable references: 10
110
User’s Manual SPECORD 200/205/210/250 – Accessories 07/2005
Analytik Jena AG
APG 53/100 XYZ Autosampler
Taking the sample measurement
1.
Load the samples on the sample rack and insert the rack in the autosampler.
2.
Start the measurement by a click on the corresponding toolbar button on the
WinASPECT® desktop.
The measurement is started immediately. The reference measurements are performed
and considered according to the options selected in the measurement parameters.
15.6
Finding the appropriate pump time
To find the appropriate pump time, use a liquid having a viscosity similar to that of the
sample to be analyzed.
1.
Put a vessel containing the test liquid in the sample holder.
2.
With the sampler switched off (!), move the guide arm of the device over the
vessel and push the aspiration tube holder down as far as it will go so that the
aspiration tube dips into the test liquid.
To ascertain the optimum pump time, use the parameter options of the sipper.
3.
In the Device Driver, on the Accessories tab, choose the Sipper option.
4.
Choose the desired Pump time and save the measurement parameters.
5.
Start a measurement by a click on the corresponding button on the WinASPECT®
desktop.
6.
Watch whether the liquid has flown through the cell. The pump time is optimum, if
about 2/3 of the sample volume has flown through the cell and 1/3 of the sample is
in the aspirating tube before the cell. That way, the cell can be rinsed with the
sample before the measurement and carry-over errors be minimized.
7.
Enter the found optimum pump time in the measurement parameters of the XYZ
sampler.
User’s Manual SPECORD 200/205/210/250 – Accessories 07/2005
Analytik Jena AG
111
Fiber coupling for measuring probes
16
Fiber coupling for measuring probes
16.1
Description and use
The fiber coupling provides optical connection of measuring probes with their optical
fibers to the SPECORD®. It allows samples to be analyzed outside the sample
compartment. The operating range of the optical fibers is from 220 nm to 1100 nm.
Caution! Aging of optical fibers by exposure to UV radiation!
Please note that optical fibers may be damaged in the long term if used at wavelengths
below 220 nm. That is why you should use them only in the wavelength range above
220 nm.
16.2
Design and function of fiber coupling with measuring probe
3
2
7
8
6
4
9
5
1
1
2
3
4
5
Adapter for coupling light in/out
Optical fiber for coupling light in
Optical fiber for coupling light out
Measuring probe (schematic)
Spring-loaded handle
Fig. 16-1
6
7
8
9
10
10
Holder
Setscrew for vertical adjustment
Knurled screw
Slit position
Adapter (1) - schematic
Fiber-coupling adapter with measuring probe
The fiber coupling consists of adapter (1), which couples out the light from the sample
compartment and sends it into the optical fiber (2). The optical fiber transmits the light to
the measuring probe (4). A second optical fiber (3) transmits the light attenuated by the
sample in the measuring probe back to the adapter (1). The adapter couples the
attenuated light into the sample beam.
User’s Manual SPECORD 200/205/210/250 – Accessories 07/2005
Analytik Jena AG
113
Fiber coupling for measuring probes
Caution! Extraneous light!
Like with all other measurements, too, take care that no extraneous light enters the
sample compartment. For that, it is necessary to make sure that the measuring probe
does not capture any extraneous light. Among others, use the facilities for shielding
extraneous light provided by the probe manufacturer.
16.3
Design and function of the fiber coupling with SMA
connectors
In this case, the adapter (Fig. 16-1 / 1) contains two optical fibers that are equipped with
SMA connectors each.
16.4
Installation of the adapter in the sample compartment
Caution! Do not squeeze the optical fibers!
When you close the sample compartment cover, take care that the optical fibers are not
squeezed.
16.5
1.
Slide the adapter holder onto the cell-holder mount of the sample beam in the
sample compartment wall (Fig. 1-1 / 10).
2.
Put the adapter through at the back underneath the sample compartment cover.
Remove the lid from the rear circular opening of the sample compartment cover.
From the back, put the adapter through this opening.
Close the opening again with the lid.
3.
Insert the adapter in the adapter holder.
4.
Put the optical fibers between the plastic strips in the opening for the optical fibers
(Fig. 1-1 / 5) in the sample compartment.
5.
Close the sample compartment cover taking care that the optical fibers rest in the
groove of the device cover under the sample compartment cover. The optical fibers
must not be squeezed by the cover.
Alignment of fiber coupling
If the fiber coupling is used for the first time, the adapter with its holder will have to be
aligned in the beam path.
If you use optical fibers with SMA connectors, first connect the fibers with the measuring
device to be used for the analysis.
To do this, proceed as described in Section “Adjustable holder for microcells, nonthermostatted (8.5 mm beam height)” p. 23.
114
User’s Manual SPECORD 200/205/210/250 – Accessories 07/2005
Analytik Jena AG
Absolute Reflectance Attachment
17
Absolute Reflectance Attachment
17.1
Description and use
With this accessory, you can determine the absolute reflectance of reflecting layers. The
layers must be homogeneous, smoothly polished and have a constant thickness.
This accessory accommodates samples of a size between 40 x 40 mm and 70 x 70 mm
and a thickness of 1 ... 20 mm. The angle of reflection is 7°.
17.2
Design
1
2
3
4
5
Fig. 17-1
Sample
Sample locating plate
Carrier for swivel mirror
Swivel mirror
Stop screw for "W" beam configuration
Stop screw for "V" beam configuration
Fixed mirrors
Clamping lever
Stop screw to sample compartment wall
Sample holder
Absolute reflectance attachment
User’s Manual SPECORD 200/205/210/250 – Accessories 07/2005
Analytik Jena AG
6
7
8
9
10
115
Absolute Reflectance Attachment
17.3
Installation in sample compartment
Caution! Contamination of mirrors!
Do not touch any mirror surfaces!
17.4
1.
Put the accessory onto the front carrying rails of the sample compartment with its
clamping lever (8) pointing frontward.
2.
Push the accessory to the right-hand wall of the sample compartment as far as it will
go. Secure it in position by throwing over clamping lever (8) to the right.
Operating principle
The absolute reflectance of the sample is determined in two steps:
Reference measurement
Fig. 17-2
Sample measurement
Beam geometry in Absolute Reflectance Attachment
Reference measurement
Without any sample inserted turn carrier (3) with swivel mirror (4) up to the stop of
the "V" beam configuration.
Sample measurement
Turn carrier (3) with swivel mirror (4) by 180° in the position for "W" beam
configuration.
Withdraw sample holder (10) from locating plate (2).
Put sample (1) to locating plate and let sample holder return until it touches the
sample.
The measurement is taken at a reflecting angle of 7°.
116
User’s Manual SPECORD 200/205/210/250 – Accessories 07/2005
Analytik Jena AG
Absolute Reflectance Attachment
17.5
Adjustment
The Reflectance Attachment has been adjusted for the use on SPECORD® 200/205/210.
You can use it on these SPECORD® models without any additional adjustment.
If you want to use a reflectance attachment already available, it is advisable to check the
adjustment of this unit. For that, follow this procedure:
17.6
1.
Place the reflectance attachment onto the two front carrying rails in the sample
compartment. Push it to the right-hand wall of the sample compartment as far as it
will go. Clamp it in this position by means of clamping lever (Fig. 17-1 / 8).
2.
Set "V" beam configuration.
3.
Adjust the zeroth order of the monochromator (→ Section Adjustment of zeroth
order, p. 8).
4.
Turn stop screw (Fig. 17-1 / 6) to adjust the unit so that the beam passes through
the center of the cell receptacle for turbid samples thus being incident on the center
of the detector surface. Put a white screen, e.g. a white paper strip, in the cell
receptacle for turbid samples.
5.
To adjust the unit in "W" beam configuration, put a flat mirror against the sample
locating plate (Fig. 17-1 / 2). Then, proceed as described above for the adjustment
of the "V" beam configuration. To adjust the unit, turn stop screw (Fig. 17-1 / 5).
Measurements with the Absolute Reflectance Attachment
1.
Create the desired measurement parameter record in WinASPECT® software.
For the reflectance measurements, choose the following accessory-specific options:
Measurement
parameter
Option to be activated
Correction
Reference
Display
Reflectance
Accessory
Reflectance / fixed angle
2.
Take the reference measurement. For that, set the reflectance attachment to the "V"
beam configuration shown above.
3.
When the reference measurement is finished, turn the unit to set it for "W" beam
configuration.
4.
Withdraw sample holder (10) from sample locating plate (2), insert the sample (1)
and let the sample holder return to the sample.
5.
Take the sample measurement.
User’s Manual SPECORD 200/205/210/250 – Accessories 07/2005
Analytik Jena AG
117
Absolute Reflectance Attachment
Calculation of reflectance
The measured reflectance R is calculated from the (sample measurement) / (reference
measurement) ratio.
R=
RSample – Sample measured in W configuration
rSample
rReference - Reference measurement in V
configuration
r Reference
rRe ference =
rSample =
IRS –
I RS
I reference beam
Intensity after reflection at the
reference mirror
IReference beam – Intensity in reference beam path
I PS1 × I RS × I PS2
I Reference beam
IPS1 –
Intensity after the first reflection at the
sample
IPSl2 –
Intensity after the second reflection at
the sample
The result of the measurement is:
R = IPS1 x IPS2
If the sample is sufficiently homogeneous, it applies IPS1 = IPS2,. The absolute reflectance
of the sample Rabs resulting from this is:
R abs = R .
In the graph and in the result table, Rabs is presented in percent.
17.7
Care and maintenance
Caution! Contamination of reflectance attachment!
Take care not to damage the mirrors by contamination. Observe the instructions on the
care of mirrors.
118
•
Keep all mirrors of the reflectance attachment free of dust and grease!
Don't touch mirror surfaces with bare fingers!
•
Remove dust particles on mirrors using a soft, clean and grease-free brush.
•
Carefully wipe off traces of grease from mirrors using a cotton swab soaked
with distilled water and curd soap. Don't exert any pressure in wiping.
Then, wipe with a new cotton swab soaked with distilled water only.
Finally, dab metal mounts dry.
•
Carry and store the absolute reflectance attachment only in a closed box.
User’s Manual SPECORD 200/205/210/250 – Accessories 07/2005
Analytik Jena AG
Variable Angle Reflectance Attachment
18
Variable Angle Reflectance Attachment
18.1
Description and use
With this accessory, you can determine pathlength and refractive index of solid samples.
This is done by measuring the reflectance at different angles of reflection over a defined
wavelength range.
For the determination of pathlength, the interferences that occur during the measurement
are utilized by evaluating the number of interference maxima appearing in the defined
wavelength region. Prior to sample measurement, you must take a reference
measurement inserting the provided mirror in place of the sample.
18.2
Design and operating principle
1
2
3
4
Base plate
Table
Large tabletop
Sample holding clip
7
8
9
10
Scale for reproducible sample positioning
Scale for adjusting the angle of reflection
Index for reading the set angle of reflection
Knurled screw for locking the angular setting
5
Marks indicating the illuminated sample
area for defined angles of reflection
11
12
Clamping lever
Beam entrance
6
Measuring aperture
13
Beam exit
Fig. 18-1
Reflectance attachment with large sample table
The accessory has a base plate (1) that accommodates imaging and reflecting optics as
well as the sample table.
User’s Manual SPECORD 200/205/210/250 – Accessories 07/2005
Analytik Jena AG
119
Variable Angle Reflectance Attachment
The sample table can be swiveled horizontally to vary the angle of reflection in the
range 11° – 60°. The optical path of the measuring beam is the same for all angles that
can be set.
You can slide either a large tabletop with small measuring aperture – preferably for small
samples – or a small tabletop with large measuring aperture – preferably for larger
samples – onto the table. The samples are clamped to the tabletop. The large tabletop
rigidly lies on the table during the measurement. The marks on the tabletop provide
reproducible positioning of the sample.
The small tabletop permits the sample on the table to be gradually shifted and
measured, for instance, for testing its homogeneity. Here, the marks on the table permit
the sample to be positioned reproducibly.
14
15
Fig. 18-2
Mirror and small tabletop
16
17
18
19
Fig. 18-3
120
Mirror for reference
measurement and
protective cap
Point support to protect
the sample surface from
scratches
Quartz lens
Reflecting mirror
Plane mirror
Sample
Optical path in reflectance attachment (front view)
User’s Manual SPECORD 200/205/210/250 – Accessories 07/2005
Analytik Jena AG
Variable Angle Reflectance Attachment
18.3
18.4
Installation in sample compartment
1.
Put the accessory onto the two rear carrying rails of the sample compartment with
the clamping lever pointing frontward.
2.
Push it to the right-hand wall of the sample compartment as far as it will go. Secure
it by throwing clamping lever (11) to the right.
Adjusting the angle of reflection
Loosen knurled screw (10) to set the sample table to the desired angular position.
Retighten knurled screw (10) to lock the sample table in position.
Note
In the angular range from 11° to 15°, the beam is partly masked thus impairing the
signal-to-noise ratio.
18.5
Measuring with the reflectance attachment
1.
Create the desired measurement parameter record in WinASPECT® software.
For the reflectance measurements, choose the following accessory-specific options:
Measurement parameter Option to be activated
18.6
Correction
Reference
Display
Reflectance
Wavelength range
Sufficiently large to get a sufficient number of
interference maxima, if you intend to carry out a layer
thickness measurement.
Accessory
Reflectance (variable)
2.
Place the provided reference mirror onto the tabletop (3) and clamp it with the
sample holding clips (4). Carry out the reference measurement with this mirror.
3.
Replace the reference mirror by the sample to be measured. Carry out the sample
measurement.
Calculating the reflectance
The measured reflectance R is calculated from the (sample measurement) / (reference
measurement) ratio.
R=
RSample – Sample measured in W configuration
rSample
rReference - Reference measurement in V
configuration
r Reference
rRe ference =
I RS
I reference beam
User’s Manual SPECORD 200/205/210/250 – Accessories 07/2005
Analytik Jena AG
IRS –
Intensity after reflection at the
reference mirror
IReference beam – Intensity in reference beam path
121
Variable Angle Reflectance Attachment
IPS –
I PS
rSample =
Intensity after the reflection at the
sample
I Reference beam
The result of the measurement is the relative reflectance of the sample relative to the
reference mirror Rrel:
Rrel = R =
IPS
IRS
In the graph and in the result table, Rrel is presented in percent.
18.7
Calculating pathlength and refractive index
If the refractive index of the sample is know, you can calculate the pathlength of the
sample using the following formula:
m⋅
d=
λ 2 ⋅ λ1
2(λ 2 − λ 1)
;
n 2 − sin 2 Θ
λ >λ
2
1
d
Thickness of sample
m
Number of interference maxima after zeroth order maximum (see Example)
n:
Refractive index of sample
Θ:
Adjusted angle of reflection
λ1 :
λ2 :
Wavelength of zeroth interference maximum
Wavelength of mth interference maximum
Wavelengths λ1 and λ2 must be determined as accurately as possible. For that, in
®
WinASPECT software, use the Peaklist function of the Data Handling menu.
Example:
Fig. 18-4
122
Measuring curve
Example of interferences at an angle of reflection Θ = 60°
User’s Manual SPECORD 200/205/210/250 – Accessories 07/2005
Analytik Jena AG
Variable Angle Reflectance Attachment
The curve shown above has been scanned at an angle of reflection of 60°.
It contains maxima of zeroth to fourth order.
18.8
Care and maintenance
Caution! Contamination of reflectance attachment!
Take care not to damage the mirrors by contamination. Observe the instructions on the
care of mirrors.
18.9
•
Keep all mirrors of the reflectance attachment free of dust and grease!
Don't touch mirror surfaces with bare fingers!
•
Remove dust particles on mirrors using a soft, clean and grease-free brush.
•
Carefully wipe off traces of grease from mirrors using a cotton swab soaked
with distilled water and curd soap. Don't exert any pressure in wiping.
Then, wipe with a new cotton swab soaked with distilled water only.
Finally, dab metal mounts dry.
•
Carry and store the absolute reflectance attachment only in a closed box.
Technical data
Angle of reflection
11° – 60°
Graduation of angular scale
1°
Accuracy of angular adjustment
0.5°
Vignetting of beam
in angular range 11° ... 15°
Minimum sample size
12 mm x 10 mm
Maximum sample thickness
30 mm
Illuminated sample area
2.5 mm x 6 mm to 2.5 mm x 12 mm, depending
on adjusted angle of reflection
Reference sample
Aluminized mirror with protective coating
Dimensions
165 mm x 115 mm x 135 mm
Size of large tabletop
115 mm x 80 mm
Size of small tabletop
70 mm x 80 mm
Weight
ca. 2 kg
User’s Manual SPECORD 200/205/210/250 – Accessories 07/2005
Analytik Jena AG
123
Integrating Sphere
19
Integrating Sphere
19.1
Description and use
The integrating sphere is suitable for the measurement of transmittance and diffuse
reflectance of scattering solid or liquid samples on these spectrophotometers.
In diffuse reflectance measurements, the measuring geometry of the sphere is 8°/d.
Consider that due to the effect of the sphere the level of the measured signal drops to a
small percentage compared to the optical path without sphere. This means that you can
take measurements at a high accuracy only with an absorbance of up to about 2 A.
The integrating sphere with a sphere diameter of 75 mm consists of two Spectralon®
hemispheres with apertures for beam entrance and exit, beam reflecting optics and
holders for samples and cells for transmittance and diffuse reflectance measurements. It
is inserted in the optical path of the SPECORD® sample compartment. For loading
powdery samples, it may be removed from the sample compartment and reproducibly
reinserted.
Caution! Observe the following conditions of use!
With its uncovered mirrors and high-reflectivity Spectralon® components, the integrating
sphere is a very sensitive optical device. Especially when handling powdery samples,
take care to avoid that powder or other dirt particles get into the sphere and thus reduce
their reflectivity. A decrease in reflectivity of the Spectralon® units from 99% to 98% will
result in a reduction to half of the standard efficiency of the integrating sphere. The
Spectralon® inserts and the gloss trap, too, should be treated with the same care, as the
efficiency of the unit will also be reduced by a decrease in the reflectivity of these
components.
Unpacking
Carefully remove the sphere body from the transport and storage box taking care not to
touch the mirrors. Hold the sphere body only at the side plates.
Storage
In periods of non-use of the integrating sphere, store it along with all its accessory items
in the corresponding box. Though the mirrors carry a protective coating of SiO2, you
should protect them from contamination. Besides, take care that you remove the reflector
from the SPECORD®, if you do not use the integrating sphere. Otherwise, its bright
aluminum surface might be affected.
Cleaning
Despite all care it may become necessary to clean the mirrors, particularly mirror 3 (Fig.
19-1 / 7). For that, only use dry, dust-free and oil-free compressed air or nitrogen.
You may also clean the Spectralon® locating surfaces. For that, use dry and clean
compressed air, then rinse the surfaces with distilled water and finally blow them dry. To
remove sticky dirt from these surfaces, you may also use fine-grained abrasive paper
(grain size 220 – 240). Subsequently wash the surfaces with distilled water and then dry
them with compressed air.
User’s Manual SPECORD 200/205/210/250 – Accessories 07/2005
Analytik Jena AG
125
Integrating Sphere
19.2
Design of integrating sphere
1
2
3
4
5
6
7
8
9
10
11
Retaining clip 1 for reflectance sample
Guide pin for retaining clip 1
Mirror 1
Adjustable stop for cells
Handle for retaining clip
Mirror 2
Mirror 3
Retaining clip 2 for transmission samples
Guide for cells
Aperture for transmittance measurements
Aperture for gloss trap
Fig. 19-1
12
13
14
15
16
17
18
19
20
21
22
Knurled locating pin
Aperture to detector angle
Locating surface 1 for horizontal mounting
Locating surface for vertical mounting
Locating surface 2 for horizontal mounting
Aperture for reflectance measurements
®
Spectralon insert in place of gloss trap
Gloss trap
Reflector
Holder for powdery samples
®
Spectralon insert for reflectance aperture
Integrating sphere with accessory items
The integrating sphere is shown in that position it is inserted into the SPECORD® for
reflectance measurements of powdery samples (vertical arrangement). With this
arrangement, the reflectance sample is located underneath the sphere body.
The sphere body may also be inserted swiveled by 90° (horizontal arrangement) for
transmittance measurement of solid or liquid samples in cells.
It is placed with its locating surfaces (14), (15) or (16) onto the carrying rails in the
sample compartment of the SPECORD®.
126
User’s Manual SPECORD 200/205/210/250 – Accessories 07/2005
Analytik Jena AG
Integrating Sphere
19.3
Measurements with the integrating sphere
In transmittance or diffuse reflectance measurements, the sample is brought into direct
contact with the sphere. In this way, the sample presents a part of the inner sphere
surface thus affecting the efficiency of the sphere.
So, for instance, in transmittance measurement, the radiation is weakened by the
absorption in the sample. As the sample itself, however, is part of the sphere, the sphere
efficiency changes depending on the reflective or reflectance properties of the sample.
This means that the efficiency of the sphere depends on sample properties. This
dependence results in a non-linear functional relation between sample absorbance and
the measured signal.
For high-precision measurements, it is therefore advisable to take this non-linear relation
into account by calibrating the system by analogy with quantitative analysis.
For the calibration, certified standards should be used.
19.4
Transmittance measurements
The integrating sphere causes even illumination of the detector surface in the
spectrometer independent of any influence (scatter, deflection) of the beam through the
sample. In this way, the accuracy of results is improved.
For the analysis of solid transparent samples of a large optical pathlength,
measurements with the integrating sphere are the only way to avoid the systematic
measuring error otherwise caused by the influences on the beam.
Fig. 19-2 illustrates the optical path in transmittance measurements of a scattering
sample.
User’s Manual SPECORD 200/205/210/250 – Accessories 07/2005
Analytik Jena AG
127
Integrating Sphere
Fig. 19-2
1
2
3
4
5
6
Optical path in transmittance measurements
Mirror 2
Mirror 3
Cell with scattering sample
Baffle plate 1
®
Spectralon insert in place of gloss trap
Non-scattered radiation
7
8
9
10
11
12
Reflector
®
Detector of SPECORD
Baffle plate 2
®
Spectralon insert for reflectance aperture
Mirror 1
®
Beam path of SPECORD
Baffle plate 1 (Fig. 19-2 / 4) prevents the direct light of the sample from being incident on
the detector surface. Baffle plate 2 (Fig. 19-2 / 9) prevents the light not scattered by the
sample from being incident on the detector of the SPECORD® after the first reflection by
the SPECORD® insert (Fig. 19-2 / 10).
If you want to measure samples in cells, you can vary the height of beam transmission
through the cell by adjusting the stop (Fig. 19-1 / 4). In this way, you can set the following
beam heights: 8.5 and 15 mm.
For the transmittance measurement of larger solid samples, you may remove the stop
(Fig. 19-1 / 4) and the knurled screw on the Spectralon® insert (Fig. 19-1 / 18). You can
place the sample onto the thus arising smooth surface.
Preparing the measurement
128
1.
First, insert reflector (Fig. 19-1 / 20) as far as it will go into the round aperture in the
middle of the rear mount for the cell holder. The flange of the reflector should rest on
the mount.
2.
Insert the Spectralon® insert (Fig. 19-1 / 18) in aperture (Fig. 19-1 / 11). Screw in
locating pin (Fig. 19-1 / 12) to ensure correct position of the insert.
3.
Adjust stop (Fig. 19-1 / 4) to the desired beam transmission height.
User’s Manual SPECORD 200/205/210/250 – Accessories 07/2005
Analytik Jena AG
Integrating Sphere
4.
If required by the type of sample, unscrew the stop (Fig. 19-1 / 4) and the knurled
screw on the Spectralon® insert (Fig. 19-1 / 18).
5.
Place the integrating sphere onto the two front carrying rails and push it to the right
as far as it will go. Make sure to position it reproducibly against the stop for every
measurement. Insert the unit in the way appropriate for the type of sample to be
analyzed:
Position for transmittance measurement of solid samples
Install the sphere body either with the carrier of mirrors 2 and 3 (Fig. 19-1 / 6 and 7)
pointing upward (vertical installation) or with the carriers of the two mirrors rotated by 90°
and pointing to the front side of the instrument (horizontal installation).
Position for the measurement of liquid samples in cells
Install the sphere body with the carrier of the two mirrors rotated by 90° and pointing to
the front side of the instrument (horizontal installation).
Transmittance measurement procedure
1.
In the Device Driver dialog of WinASPECT® software, create the desired
measurement parameter record.
Choose the following accessory-specific options for the transmittance measurement:
Measurement parameter
Option to be activated
Correction
Reference
Slit
As wide as possible to obtain a high energy level.
2.
Insert the two Spectralon® inserts for the gloss trap (Fig. 19-1 / 18) and the
reflectance aperture (Fig. 19-1 / 22) in the sphere body.
3.
Carry out the reference measurement. For that, you may insert a standard.
4.
Insert the sample and fix it by means of retaining clip 2 (Fig. 19-1 / 8) by moving it
towards the sample with the handle (Fig. 19-1 / 5) until it is slightly clamped. Make
sure to install the sphere body in the SPECORD® exactly in the same way as you
did for the reference measurement. Then, carry out the sample measurement.
If you want to take very accurate transmittance measurements at a defined wavelength,
first calibrate the system using several certified standards same as in Quantitative
Analysis. Then, as you are used to do from concentration determination in Quantitative
Analysis, measure the unknown sample based on the found calibration curve.
19.5
Reflectance measurements
The colored appearance or the gray tone of an opaque body is due to its wavelengthdependent back reflection (reflectance). Reflectance measurements can be performed
with different illumination and measurement geometries depending on the surface
structure of the sample.
To preclude the effect of the surface structure as far as possible, the sample surface is
diffusely illuminated via the inside wall of the integrating sphere. The sphere captures the
radiation reflected by the sample and sends it diffusely to the detector of the
SPECORD®.
User’s Manual SPECORD 200/205/210/250 – Accessories 07/2005
Analytik Jena AG
129
Integrating Sphere
The measurement geometry of 8°/d (d = diffuse) means, that the surface of the sample is
illuminated at an angle of 8° relative to the surface normal and the light reflected by the
sample surface into the integrating sphere is diffusely sent to the detector.
The reflectance of the sample is the ratio of the radiation reflected from its surface and
the radiation reflected from a completely matt white surface of a standard (e.g. a
Spectralon® standard) under the same optical conditions.
The integrating sphere is preferably used for reflectance measurements of textured
(rough, grained, etc.) surfaces, such as cellulose, leather or fabrics and of samples with
azimuthal gloss, i.e. a gloss that varies while rotating the sample about its surface
normal.
Fig. 19-3 illustrates the optical path in reflectance measurements.
1
2
3
4
5
Mirror 2
Mirror 3
Gloss trap
Reflector
Detector
Fig. 19-3
6
7
8
9
10
Spectralon® insert for reflectance aperture
Reflectance aperture for reflecting powder sample
Diffuse reflectance
Mirror 1
®
Optical path of SPECORD
Optical path in reflectance measurements
Preparing the measurements
130
5.
First, insert reflector (Fig. 19-1 / 20) as far as it will go into the round aperture in the
middle of the rear mount for the cell holder. The flange of the reflector should rest on
the mount.
6.
You can take reflectance measurements of solid and powder samples. For the
measurement of solid samples it is advisable to insert the sphere body in such a
way that the carrier of mirrors 2 and 3 (Fig. 19-1 / 6 and 7) points to the back and
aperture (Fig. 19-1 / 17) is well visible. For the measurement of powder samples,
insert the sphere in such a way that the samples are always at the bottom of the
sphere.
User’s Manual SPECORD 200/205/210/250 – Accessories 07/2005
Analytik Jena AG
Integrating Sphere
7.
The samples do not always scatter back 100% of the incident radiation; a significant
portion is also reflected specularly as by the surface of a mirror. To eliminate this
portion, insert the gloss trap (Fig. 19-1 / 19) in aperture (Fig. 19-1 / 11) after having
removed locating pin (Fig. 19-1 / 12).
Loading powder samples
1
2
3
4
Retaining clip
Guiding pin
Sample holder for powder samples
Cylindrical support for integrating sphere
Fig. 19-4
5
6
7
Thrusting disk
Knurled screw
Integrating sphere
Integrating sphere with sample-loading fixture
Uncompressed powder samples must be loaded outside the SPECORD®. For that, a
special holding fixture (Fig. 19-4) is provided.
8.
Fill the sample into the holder for powder samples (Fig. 19-1 / 21). Slightly compress
the sample and smooth the surface.
9.
Place the sphere onto the support (Fig. 19-4 / 4). Turn knurled screw (Fig. 19-4 / 6)
to move the thrusting disk (Fig. 19-4 / 5) towards the sphere body. Fasten the
knurled screw only as much as is necessary to hold the sphere body reliably.
User’s Manual SPECORD 200/205/210/250 – Accessories 07/2005
Analytik Jena AG
131
Integrating Sphere
10. Put the sample holder (Fig. 19-4 / 3) into the recess located at the underside.
Slightly clamp the sample holder by means of retaining clip (Fig. 19-4 / 1) by
pushing down the clip on the guiding pin (Fig. 19-4 / 2).
11. Carefully insert the sphere body in the SPECORD® and move it to the right as far as
it will go against the cell mount in the sample compartment (Fig. 1-1 / 10).
Reflectance measurement procedure
The measurement procedure is similar to that of transmittance measurements.
If you want to measure the diffuse reflectance as relative quantity in order to compare
two only slightly different surfaces, it will do to perform a reference measurement with a
purely white Spectralon® standard and subsequently take the sample measurement.
Insert the reflector into the round aperture in the rear mount for the cell holder as
described above.
1.
In the Device Driver dialog of WinASPECT® software, create the desired
measurement parameter record.
For the reflectance measurements, choose the following accessory-specific options:
Measurement
parameter
Option to be activated
Correction
Reference
Slit
As wide as possible to obtain a good energy level
Accessory
Integrating Sphere
2.
®
Insert the two Spectralon inserts for gloss trap (Fig. 19-1 / 18) and reflectance
aperture (Fig. 19-1 / 22) in the sphere body.
3.
Carry out a reference measurement. For that, you may use a standard.
4.
If you have to analyze a powder sample, fill it into the corresponding holder (Fig.
19-1 / 21) outside the SPECORD®. Accommodate the sphere body in the sampleloading fixture (Fig. 19-4). Attach the holder for powder samples to the sphere body.
5.
Make sure to install the sphere body in the SPECORD® exactly in the same way as
you did for the reference measurement.
6.
By taking two measurements – with and without gloss trap – you can determine the
percentages of scattered and reflected radiation.
If you want to take very accurate diffuse reflectance measurements at a defined
wavelength, first calibrate the system using several certified standards same as in
Quantitative Analysis. Then, as you are used to do from concentration determination in
Quantitative Analysis, measure the unknown sample based on the found calibration
curve.
132
User’s Manual SPECORD 200/205/210/250 – Accessories 07/2005
Analytik Jena AG
Integrating Sphere
19.6
Technical Data
Spectral range:
380 – 1100 nm
Sphere material:
Spectralon®
Sphere diameter:
75 mm
Light entrance aperture:
∅ 10 mm
Reflectance aperture:
∅ 12 mm
Light exit aperture:
∅ 16 mm
Dimensions (L x W x H):
150 mm x 105 mm x 145 mm
Weight:
1.0 kg
Transmittance cells for liquid samples:
Width
12.5mm
Pathlength up to 10 mm
Solid samples for transmittance
measurement (L x W x H):
up to 250 mm x 85 mm x 15 mm
Samples for diffuse reflectance
Diameter up to 50 mm
Depth up to 20 mm
Sample holder for powder samples
Diameter 16 mm
Depth 5 mm
User’s Manual SPECORD 200/205/210/250 – Accessories 07/2005
Analytik Jena AG
133
Figures
20
Figures
Fig. 1-1
Sample compartment .......................................................................................7
Fig. 1-2
Carrying rails mounted in bottom position ........................................................8
Fig. 2-1
Universal holder .............................................................................................11
Fig. 2-2
Attaching and clamping the universal holder ..................................................12
Fig. 3-1
100 mm cylindrical cell ...................................................................................13
Fig. 4-1
Solid sample holder........................................................................................15
Fig. 4-2
Solid sample in holder slide............................................................................15
Fig. 5-1
Holders for cylindrical cells.............................................................................17
Fig. 5-2
10 mm thermocell (cylindrical)........................................................................17
Fig. 6-1
Holder for round cells .....................................................................................19
Fig. 7-1
Holder for semi-microcells..............................................................................21
Fig. 7-2
Holder for microcells (adjustable) with beam heights of 8.5 mm and 15 mm
(adjustable) ...............................................................................................22
Fig. 7-3
Holder for microcells (adjustable) ...................................................................23
Fig. 8-1
Thermostatted cell holder...............................................................................25
Fig. 8-2
Inserting the magnetic stirrer coil....................................................................26
Fig. 9-1
Adjustable thermostatted cell holder ..............................................................29
Fig. 9-2
HPLC cell .......................................................................................................29
Fig. 10-1
Thermostatted cell holder and driving unit .................................................32
Fig. 10-2
Thermostatted cell holder with magnetic stirrer .........................................32
Fig. 10-3
Installation of magnetic stirrer ....................................................................33
Fig. 10-4
Cell holder with quick-lock tube coupling ...................................................34
Fig. 10-5
Installation of cell changer .........................................................................35
Fig. 10-6
Accessories tab – Cell changer .................................................................37
Fig. 10-7
Cell changer -Operating modes .................................................................38
Fig. 11-1
Transport lock on non-temperature-controlled 8-cell changer ...................41
Fig. 11-2
8-cell changer ............................................................................................42
Fig. 12-1
Cell carousel – Driving unit and sample tray..............................................49
Fig. 12-2
Cell carousel installed in sample compartment..........................................50
Fig. 13-1
Peltier temperature-controlled 1x cell holder with control unit....................54
Fig. 13-2
Peltier temperature-controlled cell holder, air-cooled.................................57
Fig. 13-3
Installation of the PTC 100 in the sample compartment ............................58
Fig. 13-4
Sample compartment cover with cables threaded through ........................59
Fig. 13-5
Bottom of Peltier temperature-controlled 1x cell holder .............................61
User’s Manual SPECORD 200/205/210/250 – Accessories 07/2005
Analytik Jena AG
135
Figures
136
Fig. 13-6
Peltier temperature-controlled cell holder with heat exchanger .................66
Fig. 13-7
Cell temperature measuring sensor PT100 ...............................................68
Fig. 13-8
Peltier temperature-controlled 6-cell changer with SPECORD® 210 .........69
Fig. 13-9
Design of Peltier temperature-controlled 6-cell changer ............................73
Fig. 13-10
Installation of Peltier temperature-controlled 6-cell changer in the
SPECORD® ..............................................................................................74
Fig. 13-11
Cell measuring sensor for the Peltier temperature-controlled
6-cell changer ...........................................................................................76
Fig. 13-12
Options for Peltier temperature-controlled 6-cell changer for SPECORD® 77
Fig. 13-13
Design of Peltier temperature-controlled 8-cell changer ............................83
Fig. 13-14
Cell measuring sensor for the Peltier temperature-controlled
8-cell changer ...........................................................................................87
Fig. 13-15
Options for Peltier temperature-controlled 8-cell changer for SPECORD® 88
Fig. 13-16
Back panel of temperature control unit ......................................................90
Fig. 13-17
Front panel of temperature control unit......................................................91
Fig.13-18
Temperature distribution in cell block and in cell for different types of cells
(measured on air-cooled, Peltier temperature-controlled cell holder) .......92
Fig. 13-19
Heat exchanger, front panel.......................................................................94
Fig.13-20
Heat exchanger, rear panel .......................................................................94
Fig. 14-1
Design of cassette sipper ..........................................................................97
Fig. 14-2
Tube set for cassette sipper.......................................................................98
Fig. 14-3
Cassette sipper mounted in SPECORD® ...................................................99
Fig. 14-4
Device driver, Accessories tab with selected Sipper option .....................101
Fig. 15-1
APG 53 (front view) .................................................................................106
Fig. 15-2
Connections of APG53 (rear panel).........................................................107
Fig. 15-3
Accessories tab – APG 53 selected.........................................................110
Fig. 16-1
Fiber-coupling adapter with measuring probe..........................................113
Fig. 17-1
Absolute reflectance attachment..............................................................115
Fig. 17-2
Beam geometry in Absolute Reflectance Attachment..............................116
Fig. 18-1
Reflectance attachment with large sample table......................................119
Fig. 18-2
Mirror and small tabletop .........................................................................120
Fig. 18-3
Optical path in reflectance attachment (front view) ..................................120
Fig. 18-4
Example of interferences at an angle of reflection Θ = 60° ......................122
Fig. 19-1
Integrating sphere with accessory items ..................................................126
Fig. 19-2
Optical path in transmittance measurements...........................................128
Fig. 19-3
Optical path in reflectance measurements...............................................130
Fig. 19-4
Integrating sphere with sample-loading fixture.........................................131
User’s Manual SPECORD 200/205/210/250 – Accessories 07/2005
Analytik Jena AG