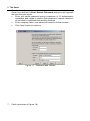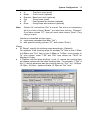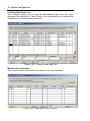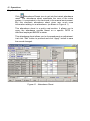
1
User’s Manual DiGiTIME http://www.wincom.com.my WinCom + Copyright Notice Copyright 2001-2002 HRM System Sdn Bhd. All right reserved. Any technical documentation that is made available by HRM System Sdn Bhd is the copyright work of HRM System Sdn Bhd and is owned by HRM System Sdn Bhd. Information in this document is subject to change without notice. Companies, names, and data used in examples are fictitious unless otherwise noted. No part of this document may be reproduced or transmitted in any form or by any means, electronic or mechanical, for any purpose, without the express written permission of HRM System Sdn Bhd. Trademarks DiGiTIME+ is the registered trademark of HRM System Sdn Bhd. Microsoft, MS and Microsoft Excel are either registered trademarks or trademarks of Microsoft in the United States and/or other countries. Printed in Malaysia. January 2003 HRM SYSTEM SDN BHD SOFTWARE LICENSE AGREEMENT The terms of this license agreement apply to you as the original licensee of this HRM System Sdn Bhd Software. THIS PRODUCT IS SUPPLIED SUBJECT TO LIMITATIONS ON PERMITTED USE CUSTOMARY IN THE SUPPLY OF MICROCOMPUTER SOFTWARE FOR PERSONAL USE. THESE LIMITATIONS AND THE WARRANTY ARE SET OUT BELOW AND BY OPENING THIS PACKAGE YOU ACCEPT THEM ON YOUR OWN BEHALF. IF YOU DO NOT ACCEPT OR AGREE TO THE TERMS YOU MAY RETURN THIS PACKAGE, WITH PROOF OF PAYMENT, TO YOUR AUTHORIZED DEALER WITHIN 7 DAYS FOR A FULL REFUND OF THE PRICE. ALL RETURNED PROGRAMS MUST BE UNUSED OR UNOPENED. The material in this package is protected by copyright. HRM System Sdn Bhd (HRM) retains all rights not expressly granted and your right to use HRM Software automatically terminates upon your failure to comply with any provision of this Software License Agreement. This copy of HRM Software is supplied to you on the following terms: Permitted Uses You MAY : • Install HRM Software on a computer hard disk, and provided the HRM Software is used on only one computer and by one user at a time, and provided you have an original copy of the HRM Compact Disc. • Use HRM Software on a network or file server provided that you have an original copy of the unlimited user license. PROHIBITED USES You MAY NOT, without written permission from HRM : • Make copies of the HRM Documentation or the HRM Compact Disc. • Distribute, rent, sub-license, or lease the HRM Software or Documentation. • Alter, modify, translate, reverse engineer, de-compile, disassemble, adapt or create derivative works based on the HRM Software or Documentation. • Allow someone else to use the HRM Software. Please Remember : You must fill out and return the HRM Registration Form by which you agree to the terms of this Agreement and become a valid registered HRM Software licensee. Update Policy : HRM may create, from time to time, updated versions of HRM Software. At its option, HRM will make such updates available to licensee who have paid the update fee and returned the registration form to HRM. Software Support : HRM authorized dealer will provide software maintenance support to registered HRM Software licensee who have paid the annual support fee and return a Software Maintenance Agreement to Dealer. A Software Maintenance may be obtained by writing to the HRM Authorized Dealer Support Department. LIMITED WARRANTY If you discover physical defects in the media on which HRM Software is distributed or in the Documentation, HRM will replace the media or documentation at no charge to you, provided you return the item to be replaced, with proof of payment, to HRM during the 3 months period after you receive the HRM Software. Although HRM has tested the Software and reviewed the Documentation, HRM MAKES NO WARRANTY OR REPRESENTATION, EITHER EXPRESS OR IMPLIED, WITH RESPECT TO THIS SOFTWARE OR DOCUMENTATION, ITS QUALITY, PERFORMANCE, MERCHANTABILITY, OR FITNESS FOR A PARTICULAR PURPOSE. AS A RESULT, THIS SOFTWARE AND DOCUMENTATION ARE LICENSED “AS IS,” AND YOU, THE LICENSEE, ARE ASSUMING THE ENTIRE RISK AS TO THEIR QUALITY AND PERFORMANCE. IN NO EVENT WILL HRM BE LIABLE FOR DIRECT, INDIRECT, SPECIAL, INCIDENTAL, OR CONSEQUENTIAL DAMAGES ARISING OUT OF THE USE OR INABILITY TO USE THE SOFTWARE OR DOCUMENTATION, even if advised of the possibility of such damages. In particular, HRM shall have no liability for any programs or data stored or used with HRM Software, including costs of recovering such programs or data. Contents i Contents Welcome.......................................... Introduction...................................... v vi Chapter 1 : The Basics Minimum System Requirements..... Installation....................................... Getting Started – DiGiTIME+....…… Setup Wizard .................................. Main Menu ………………………….. Update Service …………………….. 1 2 4 5 9 10 Chapter 2 : System Configuration and Clock Terminal To Configure Time Policy Date / Hour Format ......................… Day Type.....................................…. Leave Type..................................…. Clocking Schedule.......................…. Group Duty Roster …………………. Company & Contact Person....…..... Change Password..................…...... Preferred Language..............…........ Re-build Database Index ....…......... Backup/Restore Database Files…… Department Definition……….……… Section Definition…………….……… Remark Definition………..….………. 14 15 16 17 23 25 25 26 26 27 28 29 30 To Set Clock Terminal Setup Clock Terminals…………….. Set Repeat Clocking Interval.......…. Set Clock Date and Time.............…. Set Automatic Download Interval.…. Download Data From Clock........….. Clear All Data In Clock…............….. Clocking Data Audit List……………. Monitor Clock Activities…………….. 32 32 33 33 34 35 36 36 ii Contents Chapter 3 : Badge Cards Badge Cards To Add A New Card.….………….………………… To Attach/Remove Photograph..…………………. To Change Staff Information..…………………….. To Remove A Card.………………………………… Staff Attendance Setting…………………………… 38 38 38 39 39 Chapter 4 : Operations Activate DiGiTIME+ Program….…………………. Retrieve Clock Data….…………….……………… Attendance Sheets………………………………… Report Printing…………..…………………………. To Shutdown from DiGiTIME+……………………. 41 41 42 43 44 Chapter 5 : Others More About Attendance Sheet…….….…………. Post Attendance to Payroll…….….……………… Export and Import Attendance…………………… Multiple Shift Configuration…………………….…. Siren Timer Schedule……….………………….…. Running DiGiTIME+ In A Network..……………… 46 47 49 50 51 52 Appendix A : DiGiAccess What does DiGiAccess has to offer………………. Activating DiGiAccess………..…….…………….… 55 55 To Set Access Terminal Setup Access Terminals…………………………… Set Terminal Access Settings…………………….. Set Terminal Date and Time…………………….… Set Automatic Download Interval……………….… Download Data From Terminal…………………… Clear All Data From Terminal……………………... Terminal Data Audit List…………………………… Monitor Terminal Activities………………………… 57 57 59 59 60 61 62 62 Contents iii Appendix B : Capture Station What is Capture Station……….……..……………. Activating Capture Station………….……………… How Does Capture Station Function……………… 63 63 64 Appendix C : SPWaktu+ What does SPWaktu+ has to offer………………... Activating SPWaktu+………..…….………………… Flow chart of badge card color changes….……… Explanation of badge card color change…………. Example of badge card color change…………….. Appendix D : Sample Reports 65 65 66 67 68 Welcome v Welcome Welcome to DiGiTIME+. With DiGiTIME+, all the things you do now will be easier and faster, and what you have always wanted to do is now possible. This book introduces you to DiGiTIME+ and gets you up and running quickly. It shows you how to do the most common tasks and points you to some of the fun and exciting features that come with this software. vi Introduction Introduction Welcome to DiGiTIME+ – a computerized Windows based time and attendance that offers you a simple and better alternative to your manual punch card. You should be able to set it up with minimum supervision - DoIt-Yourself. The objective is to mimic the simplicity of a manual punch card system and in addition, gives you the esthetic to match your office design and place all attendance information right on your desktop PC. It is easy to use and provides attendance (normal and overtime hours) and tardiness (lateness, absenteeism, etc) reports instantly as the system is on-line and no processing is required. DiGiTIME+ is designed for companies which requires a simplified and downto-earth time and attendance application, and yet, expandable for future needs. It allows you to connect up to a maximum of 16 clock terminals into one standalone software. By offering the optional DiGiAccess module, you may also utilize the same piece of software for security door access control. SPWaktu+ module is designed to cater to the monthly punctuality system used by Government Malaysia. The monthly punctuality system will adjust the badge color base on the analysis result of the punctuality pattern of a particular employee. By activating SPWaktu+ in DiGiTIME+, this software will change its name to SPWaktu+. CHAPTER 1 The Basics Contents DiGiTIME+ Minimum System Requirements Installation Getting Started – DiGiTIME+ Setup Wizard Main Menu Update Service The Basics 1 THE BASICS This chapter gives you quick and simple instructions to get you up and running. MINIMUM SYSTEMS REQUIREMENTS ♦ ♦ ♦ ♦ ♦ ♦ ♦ ♦ Pentium 32 MB of memory Windows 95 or higher At least 8 MB free disk space for DiGiTIME+ (recommended allocation of 30MB or higher for company database) VGA monitor or higher Hard Disk Drive , CD ROM Drive Dot Matrix printer Laser Printer (optional) 2 The Basics INSTALLATION DiGiTIME+ files are shipped in a compressed format and automatically decompressed during the installation process. Therefore, to install and run DiGiTIME+ on your computer, you must first run the setup program. Do not just copy DiGiTIME+ files into a directory on your hard disk. There are 2 ways to run the setup program: i) Autorun 1. Insert the DiGiTIME+ CD into your computer’s CD-ROM drive, the system will automatically run the Setup program. ii) Manually (In case your CD drive doesn’t support AutoRun feature) 1. Insert the DiGiTIME+ CD into your computer's CD-ROM drive. 2. Make sure the Windows 95 or higher program is running on your computer. 3. Choose RUN from the Windows 95 or higher program - Start Menu and type D:\Setup in the Open text box, click "OK". For example : D:\Setup The Basics 3 For AutoRun and manually run setup program, please follow the on screen instruction. We recommend you accept all the preset options for the most complete installation. Questions When Installing What the choices are? What you should do? Select Directory for DiGiTIME+ Accept the preset choice: C:\DiGiPLUS At the end of the installation, a shortcut will be created on the desktop. If it is not created, below are the steps to do so. To create a shortcut on the desktop ♦ ♦ ♦ ♦ ♦ ♦ ♦ ♦ Move the mouse or pointing device to the Start Menu at the bottom left of the screen. Click on the right mouse button, and a menu will appear. Click Explore, and a Windows Explorer will appear with contents of Start Menu folder shown. Note: Do not maximize the Windows Explorer. Double click the Programs folder. Look for WinCom DiGiPLUS. Use the right mouse button to click on the WinCom DiGiPLUS and drag it to the desktop. Release the mouse button, and a menu will appear. Click Create Shortcut(s) Here. The Shortcut will be created on your desktop. 4 The Basics GETTING STARTED – DIGITIME+ Once installation completed, you may start to run DiGiTIME+ as shown in the following steps: ♦ Click on the Start Menu bar and choose PROGRAMS. Point to WinCom DiGiTIME+ and click on it as shown in Figure 1.1 Or ♦ From the Windows desktop, double click the WinCom DiGiTIME+ icon as shown in Figure 1.2 Figure 1.1 - Getting Started from Start Menu → Programs Figure 1.2 - Getting Started from Desktop → Shortcut Icon If you are running the program for the first time, Setup Wizard will be launched. The Basics 5 SETUP WIZARD This Setup Wizard will guide you for the initial setup of DiGiTIME+. The following sections describe the wizard screens and the information required. Once successfully performed, the system will be ready. 1. Language Select (as shown in Figure 1.3) This allows you to select the language to be use. Figure 1.3 - Language selection 2. Welcome message for the Setup Wizard. Key in the CD key and click Next button to proceed. You may fine your CD key on the genuine hologram security sticker on your software setup CD. Figure 1.4 - Language selection 3. Date / Hour Format (as shown in Figure 1.5) This allows you to select the required date format based on your country of origin. Click to select the required date format. Click “Next” button to continue. 6 The Basics Choice of date format Figure 1.4 - Date / Time Format Note: Where MM is month, DD is day and YYYY is the year. 4. Day Type (as shown in Figure 1.5) This function is to specify the keywords that represent the day type for each day of the week. We recommend you accept the preset choice (default setting by the system) and there are: 5. Normal working day default is ‘WORKDAY’ Non-working holiday default is ‘HOLIDAY’ Other non-working days default are ‘RESTDAY’ or ‘OFFDAY’ Click “Next” button to continue. Figure 1.5 - Day Type Daily Work Schedule (as shown in Figure 1.6) The Basics 7 In order for the system to automatically determine the best appropriate clocking time slot, the wizard need you to tell the official work time for all days in a week (MONDAY right up to SUNDAY). Click on the drop list from day type column to indicate the day type for each weekday. Fill in the official work time on the appropriate time slot. In - The first in time (must) Break - Out for lunch (optional) Resume - Back from lunch (optional) Out - Going Home (must) OT - Coming back for overtime (optional) Done - Going home after overtime (optional) Click ‘Next’ button to continue Figure 1.6 - Daily Work Schedule Note: Column ‘In’ and column ‘Out’ is a must. The rest is not compulsory but if you have column ‘Break’, you must have column ‘Resume’. If you have column ‘OT’, you must have column ‘Done’. They go in pair. Overtime is classified into two types: • continuous (extended time after ‘Out’) • with special clocking (column ‘OT’ and column ‘Done’) 6. Password and Contact (as shown in Figure 1.7) 8 The Basics This function allows you to protect the system from unauthorized entry. Once this is defined, a Enter Access Password dialog box will appears the next time you log on. Enter your secret password using a maximum of 10 alphanumeric characters and retype to confirm your password. Leaves it blanks if do not wish to implement the security measure. Enter company name, user name and email for further contact. Click ‘Next’ button to continue. Figure 1.7 - Password and Contact 7. Finish (as shown in Figure 1.8) The Basics 9 If you have answer all the questions successfully, clicking “Finish” button will bring you to a Welcome to DiGiTIME+ dialog box as shown in Figure 1.8. If not, back track to answer the questions. Figure 1.8 - Finish Figure 1.9 - Welcome to DiGiTIME+ Dialog Box ♦ Click OK, system will prompt to enter password if password is set, otherwise the DiGiTIME+ main menu will appears as shown in Figure 1.10. 10 The Basics MAIN MENU Self-Help Connect to DiGiTIME+ Internet Server System Configuration Clock Terminal Print Reports Badge Cards History Attendance Sheets Attendance Sheets Shutdown Program Figure 1.10 - DiGiTIME+ Main Menu Self-Help provides you with links to the online help and the troubleshooting. Connect to DiGiTIME+ Internet Server allows you to register online and to download latest update. CD-ROM update is also accessible here. System configuration tells the whole company’s requirement before actual usage of the DiGiTIME+. Clock Terminal allows you to configure your clock setting. Print reports - A list of reports provided in the system. Badge Cards is to keep track of your badge records. The Basics 11 History Attendance Sheets provides you with archived attendance records. Attendance Sheets provides you with instant attendance result. Shutdown program allows you to quit from the DiGiTIME+. 12 The Basics UPDATE SERVICE As and when an update is available, it will be uploaded into the DiGiTIME+ Internet Server. If you do not have internet access for the DiGiTIME+ computer, you may request your vendor to send you the latest update CD. To retrieve the latest update from internet, make sure the computer is connected with a modem and it is switched on, then just click on the Connect to DiGiTIME+ Internet Server icon and click Connect button to start the process. To retrieve the latest update from the update CD, just click on the Connect to DiGiTIME+ Internet Server icon and click CD-ROM button. You will be presented with a select directory dialog. Point the directory to your CD-ROM drive and click Select button to start the process. As a new user to DiGiTIME+, you are entitled to a free 12 months update service. Upon expiry of the 12 months period, you are advised to extend the update service for another 12 months with a minimal update fee. Just print out the update service license from Company & Contact Person within System Configuration, fill it up and send it together with your payment to us. Figure 1.14 - Connect to DiGiTIME+ Internet Server CHAPTER 2 System Configuration And Clock Terminal Contents To Configure Time Policy Date / Hour Format Day Type Clocking Schedule Group Duty Roster Company & Contact Person Change Password Preferred Language Re-build Database Index Backup/Restore Database Files Department Definition Section Definition Remark Definition To Set Clock Terminal Setup Clock Terminals Set Repeat Clocking Interval Set Clock Date and Time Set Automatic Download Interval Download Data From Clock Clear All In Clock Clocking Data In Clock Monitor Clock Activities DiGiTIME+ Leave Type System Configuration 13 SYSTEM CONFIGURATION AND CLOCK TERMINAL TO CONFIGURE TIME POLICY This chapter will guide you to set up the system configuration and clock terminal based on your company’s time policy. This function is activated by clicking on the screwdriver icon. It tells the whole company time policy before actual usage of the DiGiTIME+. It consists of the following topics as shown in Figure 2.1. 1. 2. 3. 4. 5. 6. 7. 8. 9. 10. Date / hour format Day type Leave type Clocking schedule Group duty roster Company & contact person Change password Preferred language Re-build database indexes Backup/Restore database files 11. Department definition 12. Section definition 13. Remark definition Figure 2.1 - System Configuration Note: You may ignore whichever is completed during setup wizard. Please refer to individual topic for elaboration. Date / Hour Format (as shown in Figure 2.2) 14 System Configuration This function is to set the display format of date and time throughout the system. You may choose from one of the three formats and the sample of the date will be displayed. You may also choose the choice of hour presentation format you like. 1. 2. Double click “Date format” and select the required date format that you implement. There are three types of date format are available :♦ ♦ ♦ 3. Two types of hour format are available :♦ ♦ 4. MM / DD / YYYY – denotes month, day & year DD / MM / YYYY – denotes day, month & year YYYY / MM / DD – denotes year, month & day hh.hh – denotes time in hour. For example, 08:30am will be presented as 09.50 hh.mm – denotes time in hour & minute. For example, 08:30am will be presented as 08.30 Upon selection, click “Close” to confirm date format. Note: Where MM is month, DD is day and YYYY is the year. Figure 2.2 – Date/Time Format System Configuration 15 Day Type (as shown in Figure 2.3) This function is to specify the keywords that represent the day type for each day of the week. We recommend you leave the default system setting. 1. 2. 3. 4. Double click “Day type” Specify the keyword that represent the day type for :♦ Normal Working Day (system default setting - WORKDAY) ♦ Non-working Holiday (system default setting - HOLIDAY) ♦ Other non-working Days (system default setting - RESTDAY or OFFDAY) The column Wages x % is available to calculate the payable amount for overtime done. By defining the Rate/Hour in Badge and overtime percentages, Gross Wages Report will be able to present the payable overtime amount. Click “Close” to confirm day type keyword. Figure 2.3 - Day Type Leave Type (as shown in Figure 2.4) 16 System Configuration This function specify the type of leave allowed in the system. Absent on a working day is a special type of leave. This ABSENT leave means there is no prior approval given. An additional 9 different type of leaves is made available for your convenience. Feel free to change the default description. 1. 2. Double click “Leave type” and specify the leave type that implement by the company. Click “Close” to confirm leave type keyword. Figure 2.4 - Leave Type System Configuration 17 Clocking Schedule (as shown in Figure 2.5) In order for the system to automatically determine the best appropriate clocking time slot, here you need to assign the official work time. To begin, double click “Clocking schedule”. Figure 2.5 - Clocking Schedule There are 2 ways of defining clocking schedules, namely weekly schedule and daily schedule. Weekly schedule is utilized when working time is repeated in weekly basis throughout the entire year. Daily schedule is make available to define others working time such as morning shift, afternoon shift and night shift for those working under rotational work pattern such as production workers. 18 System Configuration Defining Weekly Schedule Weekly Schedule is reserved to schedule code 0 to 9. For example, SCHEDULE 0 1 2 3 WORKDAY Monday to Saturday Tuesday to Sunday Thursday to Tuesday Saturday to Thursday REST DAY Sunday CLOCKING RANGE 9:00am to 5:00pm Monday 9:00am to 5:00pm Wednesday 9:00am to 5:00pm Friday 9:00am to 5:00pm Each weekly clocking schedule consists of 3 pages, they are: 1. Clocking 2. Range 3. Settings Clocking ♦ At “Clocking”, move pointer to day type column; indicate the day type for each weekday. For example, if Sunday is "Restday", move pointer to daytype - Sunday and choose "Restday" from pull down menu. Once activated, it will change to Grey in colour as shown as below screen: ♦ System Configuration 19 Fill in the official work time on the appropriate time slot. ♦ In - The first in time (must) ♦ Break - Out for lunch (optional) ♦ Resume - Back from lunch (optional) ♦ Out - Going home (must) ♦ OT - Coming back for overtime (optional) ♦ Done - Going home after overtime (optional) Note: Column “In” and column “Out” is a must, The rest is not compulsory but if you have column “Break”, you must have column “Resume”. If you have column “OT”, then you must have column “Done”. They must go in pair. Overtime is classified into two types: continuous (extended time after “Out”) with special clocking (column “OT” and column “Done”) Range ♦ At “Range”, specify the clocking range accordingly. (Optional) For example, if the clocking range for workday "In" time is from 7:00am to 9:00am and "Out" time is from 6:00pm to 7:00pm, move pointer to "In" time column, enter "7:00" and "Out" time column as "19:00" for Monday to Friday. ♦ If "Replace with the latest clocking" is tick (√), means the clocking time will always replace with the latest clocking time. For example, if "Out" is tick (√) and an employee has few clocking time for "Out", e.g. 18:05pm, 18:10pm, 18:15pm - system will take 18:15pm as "Out" time. 20 System Configuration Note: It’s recommend that you should leave this option blank as default setting. Settings ♦ At “Settings”, specify the necessary settings when conducting attendance calculation. ♦ Grace period in minutes for late in and early out is the tolerance time in minutes when dealing with late in and early out. For example, if an employee is late for 15 minutes, by setting a grace period of 5 minutes, the employee will be reported as having 10 minutes late in. ♦ Click “Close” to save record. System Configuration 21 Defining Daily Schedule Daily Schedule is defined when schedule code a to z is selected. For example, SCHEDULE a b c DESCRIPTION Morning Shift Afternoon Shift Night Shift CLOCKING RANGE 7:00am to 15:00pm 15:00pm to 23:00pm 23:00pm to 7:00am Each daily clocking schedule consists of 2 pages, they are: 1. Clocking 2. Settings Clocking ♦ At “Clocking”, 3 sections are available. ♦ At Clocking Time section, fills in the official work time on the appropriate time slot. ♦ In - The first in time (must) ♦ Break - Out for lunch (optional) ♦ Resume - Back from lunch (optional) ♦ Out - Going home (must) ♦ OT - Coming back for overtime (optional) ♦ Done - Going home after overtime (optional) Note: Column “In” and column “Out” is a must, The rest is not compulsory but if you have column “Break”, you must have column “Resume”. 22 System Configuration If you have column “OT”, then you must have column “Done”. They must go in pair. Overtime is classified into two types: continuous (extended time after “Out”) with special clocking (column “OT” and column “Done”) ♦ At Clocking Range section, specify the clocking range accordingly. (Optional) For example, if the clocking range for workday "In" time is from 7:00am to 9:00am and "Out" time is from 6:00pm to 7:00pm, move pointer to "In" time column, enter "7:00" and "Out" time column as "19:00" for Monday to Friday. ♦ At Latest Clocking section, by placing a tick (√) at a particular column, means that clocking time will always replace with the latest clocking time. For example, if "Out" is tick (√) and an employee has few clocking time for "Out", e.g. 18:05pm, 18:10pm, 18:15pm - system will take 18:15pm as "Out" time. Note: It’s recommend that you should leave this option blank as default setting. ♦ “If this is a rotational shift, specify the qualify minutes before the shift starts”. This option will only be utilized when multiple shifts setting are activated. Refer to Chapter 5 for more information. Settings ♦ At “Settings”, specify the necessary settings when conducting attendance calculation. The screen shot is the same as weekly clocking schedule. ♦ Grace period in minutes for late in and early out is the tolerance time in minutes when dealing with late in and early out. For example, if an employee is late for 15 minutes, by setting a grace period of 5 minutes, the employee will be reported as having 10 minutes late in. ♦ Click “Close” to save record. System Configuration 23 24 System Configuration Group Duty Roster (as shown in Figure 2.6) This function allows you to define the duty rosters used by each employee in the company. As Clocking Schedule has reserved 0 to 9 for weekly clocking schedule, group code 0 to 9 has also been reserved to reflect each of the 10 weekly clocking schedules through out the years. As you may see in the screen shot below, boxes highlighted in white are represented as "Workday", grey are represented as "Restday" or "Offday" and blue are represented as "Holiday”. Figure 2.6 – Group Duty Roster If weekly clocking schedule cannot justify your company’s time policy, you may define additional duty roster by using group code A to Z. System Configuration 25 Change the group code to the desire group code (those between A to Z), and click on “Auto Schedule” button to automate the generation of duty roster by defining the pattern of daily clocking schedule rotation. For example, Effective from 1st January 2002, work 5 days of daily schedule “a”, 1 rest day, follow by another 5 days of daily schedule “b” and rest 1 day. Then repeat with the entire rotation again until end of the year. Thus, in the Auto Schedule Assistant, you will need to define day 1 to day 5 as daily clocking schedule “a”, day 6 as Rest day, day 7 to day 11 as daily clocking schedule “b” and day 12 as Rest day. When “Okay” button is pressed, the roster will be created as per Figure 2.6. ♦ Click “Close” to save record. 26 System Configuration Company & Contact Person (as shown in Figure 2.7) This allows you to specify company name, person of contact and e-mail for future correspondence. ♦ ♦ ♦ Double click “Company & contact person” and enter your name and email. To print Update License Request Form by clicking on the “License” button. Click “Close” to save record. Figure 2.7 - Contact Person Change Password (as shown in Figure 2.8) This allows you to protect the system from unauthorized entry. ♦ ♦ Double click “Change password” and enter your secret password using maximum of 10 alphanumeric characters and retype to confirm your password. Click “Close” to save record. System Configuration 27 Figure 2.8 - Change Password 28 System Configuration Preferred Language (as shown in Figure 2.9) This system is capable of displaying multiple languages. Two languages are provided as default and these are English and Bahasa Malaysia. For other languages please check with your nearest distributor or vendor. Once activated, you will be presented with the various language options. ♦ ♦ Double click “Preferred language” and click on your preferred language. Click “Apply” on System Configuration to confirm. Note : This new language selected will be used the next time you login. Figure 2.9 - Preferred Language Re-build Database Indexes This function is used to rebuild all the database indexes. Normally, this is not required unless your indexes are not up-to-date or corrupted. ♦ Double click “Re-build database indexes”, all the indexes will be re-built in a matter of seconds. System Configuration 29 Backup/Restore Database Files (as shown in Figure 2.10) This function is to backup existing database to another storage media , or restore database from previous backuped database into system. ♦ Select Backup Command radio button If you are using ARJ command, enter the command as follow:arj a –va –i2 -y a:\DiGiPLUS *.dbf ♦ Select Restore Command radio button If you are using ARJ command, enter the command as follow:arj x –va –y a:\DiGiPLUS *.dbf Figure 2.10 - Backup/Restore database files 30 System Configuration Department Definition (as shown in Figure 2.11) You can use this function to define your department by name. There are three things you can do here. They are: 1. 2. 3. Add a new department name. Edit department name. Remove a department name. To add a new department, use down-arrow key to move the pointer point to the bottom of the list then enter the new department name. To edit a department name, point to the selected department name then change the description To remove a department, points to the selected department then erase the description. Figure 2.11 - Department Definition System Configuration 31 Section Definition (as shown in Figure 2.12) You can use this function to define your section by name. There are three things you can do here. They are: 1. 2. 3. Add a new section name. Edit section name. Remove a section name. To add a new section, use down-arrow key to move the pointer point to the bottom of the list then enter the new section name. To edit a section name, point to the selected section name then change the description To remove a section, points to the selected section then erase the description. Figure 2.12 – Section Definition 32 System Configuration Remark Definition (as shown in Figure 2.13) You can use this function to define your remark by name. There are three things you can do here. They are: 1. 2. 3. Add a new remark. Edit remark. Remove a remark. To add a new remark, use down-arrow key to move the pointer point to the bottom of the list then enter the new remark. To edit a remark, point to the selected remark then change the description To remove a remark, points to the selected remark then erase the description. Figure 2.13 - Remark Definition IMPORTANT! Before exist from the System Configuration, click “Apply” button after each of the above setting is done. System Configuration 33 TO SET CLOCK TERMINAL Clock terminal is the electronic hardware device your employees clock in for the day instead of the manual punch card. You may configure the below clock setting from the system by clicking the clock terminal pop up screen will be displayed: - Please refer to individual topic for elaboration. Clock Terminal icon. A 34 System Configuration Setup Clock Terminals (as shown in Figure 2.14) This function specifies the communication parameters for each installed clock terminals. The system will automatically determine the communication port by default to “COM?”. It is recommended that you use this automatic setting. Figure 2.14 - Setup Clock Terminals Set Repeat Clocking Interval (as shown in Figure 2.15) This function set the double clocking time frame. This means the same badge cannot swipe more than one time in a given time (normally within a minute). This is to prevent multiple clockings in a short span of time. Figure 2.15 - Set Repeat Clocking Interval System Configuration 35 Set Clock Date and Time (as shown in Figure 2.16) This function is use to send your date and time to the terminal. This is used in the event that the terminal date or time is inaccurate. Figure 2.16 - Set Clock Date and Time Set Automatic Download Interval (as shown in Figure 2.17) This function specifies the interval time in which the system will automatically download data from terminal and drop into the attendance sheet. ♦ Specify the time interval in seconds. Default setting is 0 second. For example, If it is set as "60" seconds - means data will be automatically downloaded in every 60 seconds, you will notice the green light on the right of the help icon indication system is pulling information from terminal. Amber color means it is updating and red color means no download is being performed. ♦ Specify the time interval in minute. Default setting is 0 minute. For example, if it is as 30 minutes and your "In" time is 9:00am, "Out" time is 18:00pm - system will activate the automatic data download from the clock, 30 minutes before "In" time (between 8:30am to 9:30am) and 30 minutes after "Out" time (i.e. between 17:30pm to 18:30pm). 36 System Configuration Figure 2.17 - Set Clocking Auto Download Interval Download Data From Clock This function allows you to download data on request. It will download data residing in the terminal. This is not normally use. Use it only if you want to reprocess lost information in the attendance sheet. If not, do not use this option. Two ways to download data :· Download latest - Download the latest data consists of all new badge clocking data. · Download all - Download all the data stored in the clock ♦ ♦ ♦ Double click “Download Clocking Data”, screen as shown in Figure 2.17 will prompt out. Select the way for downloads data. Click “Apply” to start download data. System Configuration 37 Figure 2.18 - Download Clocking Data Clear All Data In Clock This function allows you to clear all the clocking data in terminal. Figure 2.19 – Clear All Data In Clock 38 System Configuration Clocking Data Audit List This function allows you to view all downloaded data from the clock terminals. By clicking the “Pause” button, you are allowed to run convert for attendance or to delete existing records. Figure 2.20 – Clocking Data Audit List Monitor Clock Activities This function allows you monitor the status of the clock terminals. Figure 2.21 – Monitor Clock Activities CHAPTER 3 Badge Cards Contents DiGiTIME+ Badge Cards To Add a New Card To Attach/Remove Photograph To Change Staff Information To Remove a Card Staff Attendance Setting Badge Card 37 BADGE CARDS To utilize DiGiTIME+, each employee is given a badge card. The badge card as shown in Figure 3.1 is the equivalent of the punch card. The difference is that employees do not need to have a new card issued for every new month. This card is also known as proximity card. As the name suggest, user merely need to place the card near the DiGiTIME+ terminal (approx. 10mm) and a beep sound will indicate that the date, time and badge number have been recorded in the terminal. All the cards come with a six-digit number printed on it. This same six-digit number is the badge number. In addition, you have the option to use this card as a company identity card by printing of name, photo, Company name and logo on top of it. This function of the Badge Card is used to store the Name, Department and Group Duty Roster information of all your employees. It also displays the photograph of your staff. Figure 3.1 - Badge Cards 38 Badge Cards There are five things you can do here. They are: 1. Add a new card 2. Attach or remove a photograph 3. Change staff information 4. Remove a card 5. Assignment of staff attendance setting To add a new card ♦ There are four ways to add new card, 1. 2. 3. 4. Click "Add Badge" and key in the badge number, employee name, department and others information. Click “Download Badge” and simply touch the new badge on the clock terminal. Repeat the step for all the new badge cards that you want to add. When you have completed, click "Finish" and all the new badges will be registered. Click “Import Badge” to import from an external document. The supported file type must be either Microsoft Excel or a commadelimited text file. If you had stored the badge information in a Microsoft Excel file, click on “EXCEL”, select the file and click OK to import it. Review the imported content and click “Apply” to register the imported badges. Automatic update by the system. The first time when he/she touches the DiGiTIME+ terminal, the six-digit number associated with the proximity card will automatically be transferred to this screen during data download from clock terminal. To attach or remove a photograph ♦ To attach a photograph, simply click on the Badge number to select the staff record. Then, click on the box with label “Click for photo” and assign the scanned photo (JPEG only). The photograph will be displayed immediately. ♦ To remove a photograph, drag the photograph into the dustbin icon To change staff information ♦ Simply click on the Badge number to select the staff record. ♦ Move the cursor to the information you need to make changes. Column Badge Name Emp. No. Department Section Group Rate/Hr Description Badge number Employee name Employee number Department description Section description Group duty roster, refer Chapter 2. Defaulted to 0. Rate per hour, reporting purpose Badge Card 39 Column Suspend Issued Expired Description Stop monitoring for the selected card Issued date, 1st day of card utilization Expiry date, last day of card utilization To remove a card Simply drag the required Badge number to the on Apply to confirm your deletion. dustbin icon and click Assignment of staff attendance setting ♦ To ensure the accuracy of the staff attendance, you need to assign each employee with his/her respective group duty roster code. As each employee attend to work base on a scheduled duty roster, all the employees which had been assigned to the same duty roster will be assigned with the same group duty roster code. Refer to Chapter 2 for setting up of group duty roster. ♦ To activate the monitoring of staff attendance, update the issued date for each badge card. For lost card or temporary card, update the expired date when the employee is instructed to stop using the card to avoid discrimination. IMPORTANT! Before exiting from the Badge Card screen, you must click "Apply" button to save records added or edited. CHAPTER 4 Operations Contents Activate DiGiTIME+ Program Retrieve Clock Data Report Printing To Shutdown from DiGiTIME+ DiGiTIME+ Attendance Sheets Operations 41 OPERATIONS This chapter covers the simple procedures to run the DiGiTIME+. Follow the steps below for the most efficient operations. Assumption: System configuration and clock terminal have been setup. Step 1 Activate DiGiTIME+ Program • • Click on the Start Menu bar and choose PROGRAMS. Double click on WinCom DiGiTIME+. OR • Double click the WinCom DiGiTIME+ icon on the desktop. Step 2 Retrieve Clock Data From Clock Terminal There are two choices to download clock terminal data: 1. 2. Auto Download Manual Download If Auto Download, clock terminal data will be automatically downloaded based on the preset time as explained in Chapter 1 – Set automatic download interval. Clock If Manual download, at DiGiTIME+ main menu - click Terminal icon and choose “Download Data From Clock”. Select Download Latest and click on “Apply” to begin download. 42 Operations Step 3 Attendance Sheets Attendance Sheets icon to get into the instant attendance Click result. This attendance sheet represents the core of the entire system. It is equivalent to the time card in the manual environment. But this electronic attendance sheet gives user much more information relating to an attendance. (as shown in Figure 4.1) This attendance sheet is a pretty neat section. It allows you to query the attendance records based on a specific DATE or individual employee BADGE number. This attendance sheet allows you to do amendments or adjustment. Just click “Edit” button to proceed and click “Apply” button to save the record changed. Figure 4.1 - Attendance Sheet Operations 43 Step 4 Report Printing Click Print Reports icon, a Report Generation pop up screen will be displayed as shown in Figure 4.2. All the reports available will be listed and simply click on the report you want. You may shortlist your report with badge range and date range selection. By default all of the badges and a month date range will be used if you do not specify any range. All reports have departmental subtotal as default. To print on hard copy • Click “Print” button to have a hardcopy printed. To view on screen • Click “Preview” button for a on-screen view only To export file • Click “File” button for download of attendance data to Microsoft Excel spreadsheet. Only available for Badge Attendance in Microsoft Excel spreadsheet option. To quit from report • Click “Cancel” button to quit from report. Figure 4.2 - Report Generation 44 Operations Step 5 To Shutdown From DiGiTIME+ Click Congratulation !!! Shutdown Program icon to exit from DiGiTIME+. You have successfully completed the process of DiGiTIME+. CHAPTER 5 Others Contents More About Attendance Sheet Post Attendance to Payroll Multiple Shift Configuration Siren Timer Schedule Running DiGiTIME+ In A Network DiGiTIME+ Export and Import Attendance Records Others 45 OTHERS This chapter covers the more advanced features in the DiGiTIME+. As the DiGiTIME+ is accompanied with a configuration file, DiGiTIME.INI, a number of advance settings are stored here. Three sections out of the six in this Chapter, Appendix A and B will guide you in understanding these advanced settings. 46 Others More About Attendance Sheet This section is supplement to what had been covered in Chapter 4. Figure 5.1 – Attendance Sheet You may choose to show the list by dates or by badge number. Click on the “Date” or “Badge” button to trigger the changes. You may also select a daily clocking schedule from the “Select Schedule” list, to show only those who are scheduled for a particular daily clocking schedule. Or you can select to show just a particular department. To view those who are with tardiness (lateness, absenteeism and etc) or attendance (overtime or on leave), click on the tardiness or attendance checking you need and the data will refresh automatically. At the bottom of the screen, there are a few buttons. Clicking on “Download” will automatically download latest data from all the terminals installed and the data will be display immediately on the attendance sheet. Clicking on “To History “ will transfer attendance records into History Attendance base on a selected date range. By clicking on “Edit” button, a few more buttons will be activated. th For “Multiple Shift”, refer to the 4 section of this Chapter. “Leave Taken” presents you a quick entry screen for leave taken. Update it and click Apply to register in Attendance Sheet. “Import Leave” allows you to import leave Others 47 records from external document, either in Microsoft Excel format or commadelimited text file. In the center of the screen, you will notice the attendance sheet. The 1st part comprises of four columns. This section will presents the day nd type and clocking schedule for the day. The 2 part, which may comprises of a minimum of 2 columns and a maximum of 6 columns, is the attendance time slots. By clicking into this section, downloaded clock data will appear in the top right box, presenting possible data to be update into the selected time slot. rd The 3 part will present the worked hours, overtime hours and tardiness total. All calculation will be presented in the form of hours. The 4th part is the th leave taken and finally the 5 part, is the remark column. Post Attendance to Payroll Only a number of selected payroll software solution is available, contact your vendor to see whether your payroll software solution is included. To activate this feature, you must amend the DiGiTIME+ configuration file, DIGITIME.INI. Firstly, shutdown all active DiGiTIME+ application. Then from My Computer, look for DiGiPLUS directory and double click on it. From DiGiPLUS directory, look for DIGITIME.INI and double click on it. When DIGITIME.INI is opened, you may see something similar to picture below. Figure 5.2 – DIGITIME.INI To activate, change the setting for PostPayroll from PostPayroll=0 into PostPayroll=1 48 Others Save the new setting and exit from the file. screwdriver icon and System Launch the DiGiTIME+ again. Click on the Configuration screen will appear. Scroll to the bottom, and you will find a new option “Post attendance to payroll”. To utilize, double click on it. Figure 5.3 – Post attendance to Payroll As you may observe in the screen shot above, we at HRM System Sdn Bhd, do provides payroll software solutions. Namely: WinCom DiGiPAY and WinCom Payroll. WinCom DiGiPAY is designed to cater to the D-I-Y environment where functionality is keep to a minimal. While WinCom Payroll is designed as a complete payroll software solution, it allows user define formulae and also caters for retire benefit, gratuity and service point. Contact your vendor for more details. Define the payroll software solution you are using and define the dates of attendance records needed. Depending on the payroll software solution chosen, types of information transferred would be varies. However, working days and overtime hours worked are compulsory contents. Others 49 Export and Import Attendance Records By activating this feature, you are allowed to transfer the attendance records to or from other DiGiTIME+ installations. Export attendance records will save the chosen records into an external attendance file. In the mean time, import attendance records allows you to replace the existing data with contents from a saved external attendance file. To activate this feature, you must amend the DiGiTIME+ configuration file, DIGITIME.INI. Firstly, shutdown all active DiGiTIME+ application. Then from My Computer, look for DiGiPLUS directory and double click on it. From DiGiPLUS directory, look for DIGITIME.INI and double click on it. Refer to Figure 5.2 for a screen shot of DIGITIME.INI. To activate export, change the setting for ExportAttendance from ExportAttendance=0 into ExportAttendance=1 To activate import, change the setting for ImportAttendance from ImportAttendance=0 into ImportAttendance=1 Save the new setting and exit from the file. screwdriver icon and System Launch the DiGiTIME+ again. Click on the Configuration screen will appear. Scroll to the bottom, and you will find two new options “Export attendance records” and “Import attendance records”. To utilize, double click on the needed function and follow the instructions on the screen to complete the task. 50 Others Multiple Shift Configuration By activating this feature, you are allowed to trigger the detection of employees working on multiple shifts in a day. However, the maximum working hours for a working day should not exceed 24 hours. To activate this feature, you must amend the DiGiTIME+ configuration file, DIGITIME.INI. Firstly, shutdown all active DiGiTIME+ application. Then from My Computer, look for DiGiPLUS directory and double click on it. From DiGiPLUS directory, look for DIGITIME.INI and double click on it. Refer to Figure 5.2 for a screen shot of DIGITIME.INI. To activate multiple shifts, change the setting for MultipleShift from MultipleShift=0 into MultipleShift=1 Save the new setting and exit from the file. Now, you need to amend the system configuration to tolerate for multiple shift checking. Launch the DiGiTIME+ again. Click on the Configuration screen will appear. screwdriver icon and System Select Clocking Schedule and double click to open. For each clocking schedule involved in multiple shift duty roster, assign a valid qualify minutes for “If this is a rotational shift, specify the qualify minutes before shift starts”. After the amendments are done for all possible clocking schedules, close the screen. Note: Only clocking schedule a to z will contains the above setting. Select Group Duty Roster and double click to open. For each group duty roster, which requires multiple shifts, click on the Multi-Shift list to switch to roster 2 or roster 3 and assign the clocking schedule in the calendar accordingly. You may also utilize the “Auto Schedule” for this purpose. After the amendments are done for all possible group duty rosters, close the screen. Click Apply on the System Configuration to save the amended settings. Now, the system is able to detect multiple shifts. In the Attendance Sheet, multiple shifts will be presented with 2 or 3 same date attendance for the same person with different daily clocking schedule. You may also create multiple shifts by assigning clocking schedule in the Others 51 Multi-Shift entry screen by clicking on the “Edit” button and “Multi-Shift” button. 52 Others Siren Timer Schedule By activating this feature, you can set the siren to sound base on the timer defined for each day of the week. To activate this feature, you must amend the DiGiTIME+ configuration file, DIGITIME.INI. Firstly, shutdown all active DiGiTIME+ application. Then from My Computer, look for DiGiPLUS directory and double click on it. From DiGiPLUS directory, look for DIGITIME.INI and double click on it. Refer to Figure 5.2 for a screen shot of DIGITIME.INI. To activate siren scheduling, change the setting for ActivateSiren from ActivateSiren=0 into ActivateSiren=1 Save the new setting and exit from the file. Now, you need to amend the system configuration to tolerate for multiple shift checking. Launch the DiGiTIME+ again. Click on the Clock Terminal screen will appear. Clock Terminal icon and You will now notice that a new option “Set siren timer schedule” is added as nd the 2 option. Double click to launch this feature. Figure 5.4 – Set Siren Timer Schedule Others 53 You may setup a total of 4 sets of timers, each with 18 time zones. On each day only 1 set of timer can be used. After the setting up is completed, click Apply and it will be send the settings to all active clock terminals. However, only the clock terminal with the siren installed with it will be able to trigger the siren when the terminal time has reaches activation time zone. Running DiGiTIME+ In A Network This part is provided as a guideline for those who are planning to use a single copy of installed DiGiTIME+ from a few workstations within the same network. You must assign a particular computer as Server. Server setting up: 1. Install the DiGiTIME+ software in the Server as usual. 2. Plug in the WinCom Network Control Device at the Printer Port. 3. At Desktop, double click My Computer. Look for DiGiPLUS directory and double click on it. 4. In DiGiPLUS directory, you will find a file called NETCFG.EXE. Figure 5.5 - My Computer’s View of DiGiPLUS Directory 5. 6. 7. 8. Double click the NETCFG.EXE and the program will execute. Click on Yes button to enable the network detection. You will hear a beep sound and a new icon will be created at the taskbar. Go back to My Computer. Right click on the DiGiPLUS directory. Select Sharing and share the directory as DiGiPLUS. 54 Others Workstation setting up: 1. At Desktop, double click My Network or Network Neighborhood. 2. Look for the Server’s computer name and double click on it. 3. You will find DiGiPLUS directory in it. Right click on it. Select Map Network Drive and set it to Drive F (You may change it to others). 4. At Desktop, double click My Computer and look for Drive F and double click it. 5. In Drive F, you will discover DiGiTIME+ programs. 6. Use the right mouse button to click on the DiGiTIME.EXE and drag it to the Desktop. Release the mouse button, and a menu will appear. 7. Click Create Shortcut(s) Here. 8. The Shortcut is now created on your desktop. 9. From the Desktop, you may now utilize the shortcut to access the DiGiTIME+ software through your network. APPENDIX A DiGiAccess Contents What does DiGiAccess has to offer Activating DiGiAccess Setup Access Terminals Set Terminal Access Settings Set Terminal Date and Time Set Automatic Download Interval Download Data From Terminal Clear All Data From Terminal Terminal Data Audit List Monitor Terminal Activities DiGiTIME+ To Set Access Terminal Appendix A 55 WHAT DOES DIGIACCESS HAS TO OFFER DiGiAccess is designed to help in the implementation of door access. With a terminal that is capable to communicate with a computer, DiGiAccess can transfer information to the terminal and vice versa. By installing a proper model, you can even identify the accessible time zone for each access card. In short, DiGiAccess provides you with the following: easy maintenance of the active access cards list in the terminals assignment of time zone to limit access to selected time range monitoring of door status capable of using door access records to generate attendance records Activating DiGiAccess To activate this feature, you must amend the DiGiTIME+ configuration file, DIGITIME.INI. Firstly, shutdown all active DiGiTIME+ application. Then from My Computer, look for DiGiPLUS directory and double click on it. From DiGiPLUS directory, look for DIGITIME.INI and double click on it. Refer to Figure 5.2 for a screen shot of DIGITIME.INI. To activate DiGiAccess, change the setting for AccessControl from AccessControl=0 into AccessControl=1 Save the new setting and exit from the file. Now, you can start utilizing the access control feature. 56 Appendix A TO SET ACCESS TERMINAL Access terminal is the electronic hardware device your employees swipe his/her card to access a particular door. You may configure the below Access Terminal icon. terminal setting from the system by clicking the An Access Control pop up screen will be displayed: - Please refer to individual topic for elaboration. Appendix A 57 Setup Access Terminals (as shown in Figure A.1) This function specifies the communication parameters for each installed access terminals. The system will automatically determine the communication port by default to “COM?”. It is recommended that you use this automatic setting. Figure A.1 - Setup Access Terminals Set Terminal Access Settings (as shown in Figure A.2) This function helps you to install access card into the access terminals. It also allows you to control the access time of each access card by setting up of timer range for each weekday. It will also allow you to define the duration of lock release. 58 Appendix A Figure A.2 – Set Terminal Access Settings, page Access Card Figure A.3 – Set Terminal Access Settings, page Access Time Appendix A 59 Set Terminal Date and Time (as shown in Figure A.4) This function is use to send your date and time to the terminal. This is used in the event that the terminal date or time is inaccurate. Figure A.4 - Set Terminal Date and Time Set Automatic Download Interval (as shown in Figure A.5) This function specifies the interval time in which the system will automatically download data from terminal and drop into the Terminal Data Audit List. ♦ Specify the time interval in seconds. Default setting is 0 second. For example, If it is set as "60" seconds - means data will be automatically downloaded in every 60 seconds, you will notice the green light on the right of the help icon indication system is pulling information from terminal. Amber color means it is updating and red color means no download is being performed. ♦ Specify the time interval in minute. Default setting is 0 minute. For example, if it is as 30 minutes and your "In" time is 9:00am, "Out" time is 18:00pm - system will activate the automatic data download from the clock 30 minutes before "In" time (between 8:30am to 9:30am) and 30 minutes after "Out" time (between 17:30pm to 18:30pm). 60 Appendix A Figure A.5 - Set Clocking Auto Download Interval Download Data From Terminal This function allows you to download data on request. It will download data residing in the terminal. The data downloaded will be stored in Terminal Data Audit List. Two ways to download data :· Download latest - Download the latest data from the terminals · Download all - Download all the data stored in the terminals ♦ ♦ ♦ Double click “Download data from terminal”, screen as shown in Figure A.6 will prompt out. Select the way for downloads data. Click “Apply” to start download data. Appendix A 61 Figure A.6 - Download Clocking Data Clear All Data In Terminal This function allows you to clear all the clocking data in terminal. Figure A.7 – Clear All Data In Clock 62 Appendix A Terminal Data Audit List This function allows you to view all downloaded data from the access terminals. By clicking “Pause” button, you are allowed to run convert for attendance or to delete existing records. Figure A.8 – Terminal Data Audit List Monitor Terminal Activities This function allows you monitor the status of the access terminals. Figure A.9 – Monitor Terminal Activities APPENDIX B Capture Station Contents What is Capture Station Activating Capture Station DiGiTIME+ How Does Capture Station Function Appendix B 63 WHAT IS CAPTURE STATION Caption Station is designed to remove attendance sheet generation feature in DiGiTIME+. By activating it, DiGiTIME+ will still be able to communication with the clock terminals and even access terminals. But, no attendance records will be created. In short, Capture Station provides you with the following: maintenance of installed clock terminals monitoring of clock status easy maintenance of the active access cards list in the access terminals assignment of time zone to limit access to selected time range monitoring of door status storage of downloaded data Activating Capture Station To activate this feature, you must amend the DiGiTIME+ configuration file, DIGITIME.INI. Firstly, shutdown all active DiGiTIME+ application. Then from My Computer, look for DiGiPLUS directory and double click on it. From DiGiPLUS directory, look for DIGITIME.INI and double click on it. Refer to Figure 5.2 for a screen shot of DIGITIME.INI. To activate DiGiAccess, change the setting for CaptureStation from CaptureStation=0 into CaptureStation=1 Save the new setting and exit from the file. Now, you can start utilizing the capture station feature. 64 Appendix B How Does Capture Station Function When Capture Station is activated, the main menu will change to as per below. Figure B.1 – Capture Station Main Menu The attendance, history attendance and report icons are removed and replaced with 2 new icons. Namely: View Clocking and Upload Clocking. View Clocking allows you to view the downloaded data from the clock terminals or access terminals. Upload Clocking allows you to save the downloaded data into a selected directory base on the selected date range. APPENDIX C SPWaktu+ Contents What does SPWaktu+ has to offer Activating SPWaktu+ Explanation of badge card color change Example of badge card color change DiGiTIME+ Flow chart of badge card color changes Appendix C 65 WHAT DOES SPWAKTU+ HAS TO OFFER SPWaktu+ is designed to cater to the monthly punctuality system used by Government Malaysia. The monthly punctuality system is presented by the color of badge cards. This system will adjust the badge color base on the analysis result of the punctuality pattern of a particular employee. In short, SPWaktu+ provides you with the following: complete attendance related information status of monthly punctuality Activating SPWaktu+ To activate this feature, you must amend the DiGiTIME+ configuration file, DIGITIME.INI. Firstly, shutdown all active DiGiTIME+ application. Then from My Computer, look for DiGiPLUS directory and double click on it. From DiGiPLUS directory, look for DIGITIME.INI and double click on it. Refer to Figure 5.2 for a screen shot of DIGITIME.INI. To activate SPWaktu+, change the setting for PerakamWaktu from PerakamWaktu=0 into PerakamWaktu=1 Save the new setting and exit from the file. Now, you can start utilizing the punctuality analysis feature. 66 Appendix C Flow Chart of Badge Card Color Changes No Late in, Back early or incomplete attendance, these are group and term as Record Red Badge: Yellow Record Red? Yes Yes Explanation accepted? No Yes # Record Red < 3 ? No (Color changes automatically) Badge: Green Issue letter for Badge Color change to Green No Badge: Green Yes No Record Red? Complete 1 month Yes Yes Explanation accepted? No Yes # Record Red < 5 ? No Badge: Red (Color changes automatically) Issue letter for Badge Color change to Red Yes No Badge: Red Complete 1 month Record Red? No Yes Explanation accepted? No Disciplinary Action Yes Appendix C 67 Explanation of Badge Card Color Changes At the beginning, all employees will be issued with Yellow card. The following is the explanation of color change:- Yellow – Green ¾ Record Red < 3 • For each Record Red recorded, its date will used as the starting date for analysis. This analysis runs for 1 month (observation period). • During observation period, if the employee receives more Record Red, the quantity will be increased. Whereas the observation period will reset to start from the new date. • If the employee do not receive any Record Red within the observation period, Record Red recorded will be ignored. ¾ Record Red > 3 • Badge card for the employee will be change to Green color. Green – Red ¾ For any employee who holds a green badge card, when he/she receives 2 more Record Red with no acceptable explanation, he/she will receive final warning and badge card will be change to Red color. Red - Green ¾ While holding a red badge card, if the employee do not receive any Record Red in 1 month, his/her badge card will be change back to Green color. Green - Yellow ¾ While holding a green badge card, if the employee do not receive more than 2 Record Red in 1 month, his/her badge card will be change back to Yellow color. 68 Appendix C Example of Badge Card Color Changes Badge Card Number : 139175 Name : Padilah Bt Juda Tardiness Date Record Red 19/06/2000 26/06/2000 28/06/2000 04/07/2000 05/07/2000 08/07/2000 10/07/2000 12/07/2000 19/07/2000 21/07/2000 26/07/2000 29/07/2000 02/08/2000 07/08/2000 15/08/2000 17/08/2000 18/08/2000 23/08/2000 26/08/2000 29/08/2000 06/09/2000 09/09/2000 13/09/2000 20/09/2000 03/10/2000 05/10/2000 06/10/2000 12/10/2000 16/10/2000 23/10/2000 25/10/2000 28/10/2000 30/10/2000 2 1 1 1 1 1 1 1 1 1 1 1 1 1 1 1 1 2 1 1 1 1 1 1 1 1 1 1 1 1 1 1 1 Explanation Accepted Yes No √ √ √ √ √ √ √ √ √ √ √ √ √ √ √ √ √ √ √ √ √ √ √ √ √ √ √ √ √ √ √ √ √ √ √ Badge Card Color Yellow Yellow Green Green Green Red Red Red Red Red Red Red Red Red Red Red Red Red Red Red Red Red Red Green Green Green Green Green Green Yellow Yellow Yellow Yellow APPENDIX A Sample Reports Contents Correction Report Tardiness Report Day by Day Analysis Month by Month Analysis On Leave Report Electronic Time Card Daily Attendance Listing Duty Calendar Attendance Sheet Gross Wages Report Staff Movement Analysis Terminal Activity Report Terminal Transaction Listing DiGiAccess Staff Movement Analysis Terminal Activity Report Terminal Transaction Listing SPWaktu+ Badge Color Status Laporan Mingguan – Lampiran 8.2 Laporan Bulanan – Lampiran 8.3 All sample reports are for reference only. The fonts and layout may defer slightly from the original printouts. DiGiTIME+ Overtime Approval Worksheet Attendance Summary Correction Report 01/06/2000 – 30/06/2000 WinCom DiGiTime Group : 0 Badge Name Date Sche In Break Resume Out 22/10/2002 17:22:47 OT Done Work Page: Overtime Short ADMINISTRATION 1. 190685 ROSLAWATI BT 01/06/2000 SHARIFF 06/06/2000 0 08:51 0 17:03 0.05 12/06/2000 0 17:36 0.60 16/06/2000 0 18:29 1.48 22/06/2000 0 27/06/2000 0 08:59 15:22 1.13 1 Remark Tardiness Report 01/06/2000 – 30/06/2000 WinCom DiGiTime Group : 0 Badge Name Date Break 22/10/2002 17:21:47 Resume Out Sche In 01/06/2000 0 08:51 06/06/2000 0 17:03 12/06/2000 0 17:36 14/06/2000 0 16/06/2000 0 22/06/2000 0 27/06/2000 0 28/06/2000 0 Short ADMINISTRATION 190685 ROSLAWATI BT SHARIFF 09:02 0.03 17:32 0.03 18:29 08:59 08:50 1 0.03 15:22 1.13 1.13 16:40 0.33 0.33 1.46 1.49 2 Page: 1 Leave Taken Overtime Approval Worksheet 01/06/2000 – 30/06/2000 WinCom DiGiTime Group : 0 Badge Name Date Sche WORKDAY HOLIDAY Appr. ADMINISTRATION 190685 ROSLAWATI BT SHARIFF 02/06/2000 05/06/2000 06/06/2000 0 0 0 0.18 0.02 0.05 07/06/2000 08/06/2000 0 0 0.93 0.10 09/06/2000 10/06/2000 0 0 0.47 0.17 12/06/2000 0 0.60 13/06/2000 0 0.98 14/06/2000 0 0.53 15/06/2000 0 1.15 16/06/2000 19/06/2000 0 0 1.48 0.37 20/06/2000 0 0.48 21/06/2000 0 0.87 23/06/2000 0 0.58 26/06/2000 0 0.80 29/06/2000 0 0.30 30/06/2000 0 0.37 22/10/2002 17:21:47 RESTDAY Appr. Page: 1 OFFDAY Appr. Appr. Attendance Summary 01/06/2000 - 30/06/2000 WinCom DiGiTime Group : 0 9=Perfect Badge OT AB=Absent LV=Leave Taken Name ADMINISTRATION 1 190685 ROSLAWATI BT SHARIFF LI=Late-In Workrate % 73.57 AB 9 16 LV EO=Early-Out LI 1 4 MP=Miss-Punch Short WORKDAY OT MP 2 6 1.49 1.58 149.42 6.72 3 0.73 162.77 13.64 0.57 182.43 10.45 81.65 16 1 3 3 910373 SHUHIMI MD TALIB 88.95 16 4 1 4 910375 AMRAN BIN JALIL 99.69 21 1 2 5 910376 ISMAIL BIN SUBOH 10.66 1 2 6 910868 DORAISINGAM A/L SUPPIAH 78.42 19 3 5 1.19 2 134.64 Page: HOLIDAY OT RESTDAY OT OFFDAY 10.43 19.50 7.65 143.50 4.53 3.23 7 910870 CLARENCE DERAMAN 76.52 14 4 2 3 1 3.47 140.03 7.53 8 910872 AMIR AWANG BIN SHAHABIDIN 57.90 12 9 1 1 1 2.05 105.95 4.70 9 910884 ROPITAH BT MOHD. NOOR 85.96 16 2 1 4 1 2.20 157.30 5.59 72.59 133 38 12 18 19 13.28 1195.54 71.24 0.00 0.00 0.00 0.00 0.00 72.59 133 38 12 18 19 13.28 1195.54 71.24 0.00 0.00 0.00 0.00 0.00 Total 3.23 1 OT=Overtime EO 2 206432 LEE YOK LIN 3 16 22/10/2002 17:25:44 3.23 WinCom DiGiTime 9=Perfect AB=Absent Date Weekday OT 01/06/2000 02/06/2000 03/06/2000 04/06/2000 05/06/2000 06/06/2000 07/06/2000 08/06/2000 09/06/2000 10/06/2000 11/06/2000 12/06/2000 13/06/2000 14/06/2000 15/06/2000 16/06/2000 17/06/2000 18/06/2000 19/06/2000 20/06/2000 21/06/2000 22/06/2000 23/06/2000 24/06/2000 25/06/2000 26/06/2000 27/06/2000 28/06/2000 29/06/2000 30/06/2000 Total Thursday Friday Saturday Sunday Monday Tuesday Wednesday Thursday Friday Saturday Sunday Monday Tuesday Wednesday Thursday Friday Saturday Sunday Monday Tuesday Wednesday Thursday Friday Saturday Sunday Monday Tuesday Wednesday Thursday Friday 29/10/2002 17:27:44 Day by Day Analysis LV=Leave Taken Workrate % 9 59.74 82.07 12 14 LI=Late-In AB 7 3 LV EO=Early-Out LI EO 2 4 2 4 MP=Miss-Punch MP Short 3 1 0.55 4.97 WORKDAY OT 119.47 164.13 Page: 1 OT=Overtime HOLIDAY OT RESTDAY OT OFFDAY 5.06 6.13 3.23 71.76 87.84 89.49 91.57 87.03 100.00 16 19 16 19 20 25 4 1 1 1 1 58.83 78.89 83.55 97.21 83.32 12 16 16 22 17 7 3 3 83.35 79.03 80.34 75.25 78.02 82.40 16 15 17 15 15 18 4 3 2 2 4 3 1 63.32 71.20 67.42 12 14 15 2 70.99 77.80 14 17 6 5 6 6 4 79.05 392 79 36 2 4 3 2 1 3 3 2 3 2 2 1 1 1 3 1 3 2 1 1 2 1 4 5 5 3 4 3 3 3 5 2 3 2 3 2 1 1 2 0.71 0.33 6.02 0.94 1.95 143.51 175.67 178.98 183.13 174.05 87.50 5.13 17.79 6.39 13.15 14.57 13.51 4 2 1 1 0.34 2.22 0.90 5.58 1.37 111.66 157.78 167.10 194.42 166.63 9.46 20.84 13.38 18.07 6.31 2 3 4 1 1 1.79 1.94 2.27 1.51 4.47 1.73 166.70 158.06 160.67 150.49 156.03 72.10 2.34 4.23 5.32 3.51 2.82 5.52 1.85 2.73 0.68 126.63 142.40 134.84 5.07 3.69 4.41 2.03 4.40 141.97 155.60 4.17 5.77 4 2 3 2 2 1 1 62 41 51.28 3589.52 196.64 0.00 0.00 0.00 0.00 0.00 3.23 Month by Month Analysis WinCom DiGiTime 22/10/2002 17:02:50 Page: 1 01/04/2000 - 31/07/2000 3=Perfect Month AB=Absent Head Count LV=Leave Taken Workrate % 3 AB LV LI=Late-In LI EO EO=Early-Out MP Short WORKDAY MP=Miss-Punch OT=Overtime OT HOLIDAY OT RESTDAY OT OFFDAY OT 5.94 04/2000 26 84.38 436 85 31 16 46 124.70 3740.73 232.94 4.83 05/2000 25 72.41 395 98 27 17 102 120.99 3457.65 201.82 4.72 78.46 392 79 36 62 41 51.28 3589.15 196.64 34.66 167 380 17 13 9.98 1484.78 59.37 67.54 1390 642 111 202 306.95 12272.7 690.77 06/2000 07/2000 Total 24 95 2.67 3.23 0.00 0.00 0.00 0.00 9.55 11.84 WinCom DiGiTime Group : 0 Badge Name On Leave Report 01/06/2000 – 30/06/2000 22/10/2002 17:30:44 Date Weekday Day Type Sche Leave Taken ADMINISTRATION 1 190685 ROSLAWATI BT SHARIFF 10/06/2000 15/06/2000 Saturday Thursday WORKDAY WORKDAY 0 0 ABSENT ABSENT 2 206432 LEE YOK LING 10/06/2000 Saturday WORKDAY 0 ABSENT 12/06/2000 Monday WORKDAY 0 ABSENT 13/06/2000 Tuesday WORKDAY 0 ABSENT 14/06/2000 15/06/2000 Wednesday Thursday WORKDAY WORKDAY 0 0 ABSENT ABSENT 16/06/2000 Friday WORKDAY 0 ABSENT 10/06/2000 Saturday WORKDAY 0 ABSENT 15/06/2000 Thursday WORKDAY 0 ABSENT 3 910373 SHUHIMI MD TALIB Page:1 Electronic Time Card PADILAH BT JUDA WinCom DiGiTime 139175 Date Weekday 01/06/2000 02/06/2000 03/06/2000 04/06/2000 05/06/2000 06/06/2000 07/06/2000 08/06/2000 09/06/2000 10/06/2000 11/06/2000 12/06/2000 13/06/2000 14/06/2000 15/06/2000 16/06/2000 17/06/2000 18/06/2000 19/06/2000 20/06/2000 21/06/2000 22/06/2000 23/06/2000 24/06/3000 25/06/2000 26/06/2000 27/06/2000 28/06/2000 29/06/2000 30/06/2000 Thursday WORKDAY Friday WORKDAY Saturday OFFDAY Sunday RESTDAY Monday WORKDAY Tuesday WORKDAY Wednesday WORKDAY Thursday WORKDAY Friday WORKDAY Saturday WORKDAY Sunday RESTDAY Monday WORKDAY Tuesday WORKDAY Wednesday WORKDAY Thursday WORKDAY Friday WORKDAY Saturday OFFDAY Sunday RESTDAY Monday WORKDAY Tuesday WORKDAY Wednesday WORKDAY Thursday WORKDAY Friday WORKDAY Saturday WORKDAY Sunday RESTDAY Monday WORKDAY Tuesday WORKDAY Wednesday WORKDAY Thursday WORKDAY Friday WORKDAY Day Type Total Days WORKDAY 24 HOLIDAY RESTDAY 4 OFFDAY 2 30 Day Type Sche In 0 0 0 0 0 0 0 0 0 0 0 0 0 0 0 0 0 0 0 0 0 0 0 0 0 0 0 0 0 0 Break Resume Out 22/10/2002 17:31:51 Page: 1 ADMINISTRATION OT Done Work Overtime Short Leave Taken Remark ABSENT 08:52 17:33 8.00 0.55 08:50 08:58 11:11 09:00 08:59 09:00 17:32 17:00 17:00 17:00 8.00 8.00 5.82 8.00 0.53 12:33 3.50 0.05 17:37 17:32 17:00 17:00 6.33 8.00 8.00 8.00 0.62 0.53 16:43 17:00 7.53 8.00 17:35 17:31 12:58 8.00 7.70 3.50 0.58 0.52 0.47 17:32 17:00 19:00 17:00 8.00 8.00 8.00 8.00 0.53 08:51 10:40 08:41 08:56 08:39 09:11 08:08 08:29 08:46 09:18 08:42 08:29 08:16 08:44 09:00 08:46 Present 23 23 3.18 1.67 0.46 0.30 0.48 Absent 1 1 Work 138.38 138.38 Overtime 6.38 6.38 Short 6.09 6.09 2.00 ABSENT ANNUAL SICK NO PAY LEAVE 1 1 WinCom DiGiTime Group : 0 Badge Name Daily Attendance Listing 01/06/2000 Thursday Break Resume Out Day Type Sche In ADMINISTRATION 1 139175 PADILLAH BT JUDA WORKDAY 2 139181 JAAFAR BIN SAAD WORKDAY 3 160975 TAN AH KAM WORKDAY 4 160980 SHAHARUM BIN CHE DAN WORKDAY 5 160989 FAUZIAH BT ABU SAMAH WORKDAY 6 160993 RUSIKAH BIN MAHMUD WORKDAY 7 160998 MAHANUM BT AZMAN WORKDAY 8 161003 NOR AIDORA BT HJ WORKDAY 9 161009 FAUZIAH BT AWANG WORKDAY 10 161011 MOHD HABAFIAH GHAUS WORKDAY 11 161012 HAMZAH CHE HUSAIN WORKDAY 12 161016 WAN RDHANAH BT WAN WORKDAY 13 161017 TOMMY JOSEPH WORKDAY 14 161024 SELVA MUTHU WORKDAY 15 161025 ZABEDAH BT HARUN WORKDAY 16 161040 NOORSIAH BT ABDUL AZIZ WORKDAY 17 190685 ROSLAWATI BT SHARIFF WORKDAY 18 206432 LEE YOK LING WORKDAY 19 910373 SHUHIMI WORKDAY 20 910375 AMRAN BIN JALIL WORKDAY 21 910376 ISMAIL BIN SUBOH WORKDAY 22 910868 DORAISINGAM A/L SUPPIAH WORKDAY 23 160993 RUSIKAH BIN MAHMUD WORKDAY 24 910872 AMIR AWANG BIN WORKDAY 25 910884 ROPITAH BT MOHD. NOOR WORKDAY Day Type Total Days Present WORKDAY 25 18 HOLIDAY RESTDAY OFFDAY 25 18 Badge w/o Attendance 1 22/10/2002 17:22:47 OT Done Work Overtime Short Page: 1 Leave Taken ABSENT 09:00 08:42 09:00 17:00 19:21 16:36 8.00 8.00 7.60 08:54 08:55 08:40 17:31 17:00 17:34 8.00 8.00 8.00 08:45 08:03 08:00 17:00 17:00 17:33 8.00 8.00 8.00 2.35 0.40 ABSENT 0.52 0.57 ABSENT 0.55 ABSENT 08:24 08:58 08:56 08:51 09:05 09:00 09:03 08:37 17:23 17:01 8.00 8.00 0.38 0.02 17:00 17:00 17:31 16:59 17:09 7.92 8.00 7.95 0.52 8.00 0.15 0.08 0.05 0.02 ABSENT ABSENT ABSENT Absent 7 7 Work 119.47 119.47 Overtime 5.06 Short 0.55 5.06 0.55 ABSENT ANNUAL SICK NO PAY LEAVE 7 7 Duty Calendar WinCom DiGiTime 22/10/2002 17:02:50 Page: 1 Group : A W=WORKDAY H=HOLIDAY R=RESTDAY O=OFFDAY •: Overwritten Clocking Year Month 1 2 3 4 5 6 7 8 9 10 11 12 13 14 15 16 17 18 19 20 21 22 23 24 25 26 27 28 29 30 31 2000 1 H R W W W W W O R 2 W W W W O R 3 W W W O R 4 O R 5 W W W W W O R 6 W W O R 7 O R 8 W W W W O R 9 W O R 10 R 11 W W W O R 12 W O R W W W W W O R W W W W W W R W W W W W W R W W W W W W R W W W W W O R W W W W W O R W W W W W O R W W W W W W R W W W W W W R W W W W W W R W W W W W W R W W W W W O R W W W W W W R W W W W W W R W W W W W O R W W W W W W W W W W W R W W W W W O R W W W W W W W W W R W W W W W W R W W W W W O R W W W W W W W W W W W R W W W W W W R W W W W W O R W W W W W W W W W R W W W W W W R W W W W W O R W W W W W W R W W W W W W R W W W W W W R W W W W W O R W W W W W W R W W W W W W R W W W W W O R W W W W W O R W W W W W W R W W W W W W R W W W H W W W W W W W W W W W W R W W W W W W R W W W W W W R W W W W W W W H W W W W W R Attendance Sheet WinCom DiGiTime Group : 0 9=Perfect Badge 01/10/2002 - 31/10/2002 AB=Absent Name L1=ANNUAL L7= 1 2 3 4 L2=SICK L8= 5 6 7 8 R = RESTDAY 22/10/2002 17:25:44 Page: 1 O = OFFDAY H = HOLIDAY L3=HOSPITAL L4=MATERNITY L5=PATERNITY L6=EMERGENCY L9= 9 10 11 12 13 14 15 16 17 18 19 20 21 22 23 24 25 26 27 28 29 30 31 ADMINISTRATION R 1 021228 JENNY HEE 2 021935 MOHAMMAD ZUHIR 9 9 9 9 9 3 300001 ALI AHMAD 9 9 9 9 9 4 030381 DOLLY LIM LAI YEE 9 9 9 L1 L1 5 042947 GEORGE CHEE MUN KIT 9 9 9 AB 9 R 9 9 9 9 9 9 R R 9 9 9 9 9 9 R 9 9 9 9 9 9 9 9 9 9 9 9 L2 L2 L2 L2 R R 9 9 9 9 9 9 R R 9 9 9 9 9 9 R R 9 9 9 9 9 9 9 9 9 9 9 L1 9 9 9 9 R 9 9 9 9 9 9 9 9 9 9 FINANCE R R 9 9 9 9 9 R R 9 9 9 9 9 9 9 9 9 9 9 AB R 9 9 9 9 9 9 R 9 9 9 9 9 9 9 9 9 9 9 9 9 9 9 9 R R 9 9 9 9 9 9 9 9 9 9 Gross Wages Report 01/10/2002 – 30/10/2002 WinCom DiGiTime Group : 0 Badge Name Rate/Hr WORKDAY x100% 22/10/2002 17:21:47 Page: 1 OT x100% HOLIDAY x100% OT x100% RESTDAY x100% OT x100% OFFDAY x100% OT x100% ADMINISTRATION 1 021228 2 021935 3 300001 JENNY HEE $ 10.00 16.25 160.25 7.80 78.00 0.00 0.00 0.00 0.00 0.00 0.00 $ 15.00 0.00 0.00 0.00 0.00 0.00 0.00 0.00 0.00 $ 6.00 0.00 0.00 0.00 0.00 0.00 0.00 0.00 0.00 $ 10.00 6.25 60.25 2.00 20.00 0.00 0.00 0.00 0.00 0.00 0.00 $ 15.00 0.00 0.00 0.00 0.00 0.00 0.00 0.00 0.00 220.50 98.00 0.00 0.00 0.00 0.00 0.00 0.00 MOHAMMAD ZUHIR ALI AHMAD FINANCE 4 030381 5 042947 DOLLY LIM LAI YEE GEORGE CHEE MUN KIT TOTAL $ WinCom DiGiTime Card Name 021228 JENNY HEE Staff Movement Analysis 01/10/2002 00:00 - 31/10/2002 00:00 Date Page: 1 ---------------------------------------------------- Transaction ----------------------------------------------------------- 1 22/10/2002 17:25:44 02/10/2002 | 08:48 19:49 02 00 02 00 03/10/2002 | 09:15 17:32 02 02 02 00 05/10/2002 | 15:27 15:31 15:40 15:56 02 00 02 00 02 00 02 02 06/10/2002 | 08:50 08:58 19:01 19:08 02 00 02 00 02 00 02 00 07/10/2002 | 05:19 05:41 02 00 02 00 00: 12 02: 2 WinCom DiGiTime ID Description 01 Guard House Terminal Activity Report 01/10/2002 00:00 - 31/10/2002 00:00 Date 22/10/2002 17:25:44 Page: ---------------------------------------------------- Transaction ----------------------------------------------------------- 1 1 02/10/2002 | 06:29 00 038036 08:48 00 021228 15:30 00 038036 19:49 00 021228 23:30 00 038036 03/10/2002 | 09:15 02 021228 10:31 00 038036 17:32 00 021228 05/10/2002 | 06:54 00 017531 06:54 00 038036 07:03 00 038036 07:09 00 038036 15:27 00 021228 15:28 03 017531 15:31 00 021935 15:31 00 038036 15:39 00 021935 15:39 00 038036 15:39 00 017531 15:40 00 021228 15:44 00 017531 15:50 01 021935 15:51 01 021935 15:51 00 021935 15:56 02 021228 15:56 00 038036 15:57 00 021935 15:57 00 017531 15:58 00 038036 15:59 00 038036 16:00 03 017531 16:03 02 038036 22:50 00 038036 22:50 01 017531 00: 26 01: 3 02: 3 03: 2 WinCom DiGiTime 1 2 3 4 5 6 7 8 9 10 11 12 13 14 15 16 17 18 19 20 Date 02/10/2002 06:29 02/10/2002 08:48 02/10/2002 15:30 02/10/2002 19:49 02/10/2002 23:30 03/10/2002 09:15 03/10/2002 10:31 03/10/2002 17:32 05/10/2002 06:54 05/10/2002 06:54 05/10/2002 07:03 05/10/2002 07:09 05/10/2002 15:27 05/10/2002 15:28 05/10/2002 15:28 05/10/2002 15:31 05/10/2002 15:31 05/10/2002 15:31 05/10/2002 15:31 05/10/2002 15:39 Terminal Transanction Listing 01/10/20002 00:00 – 31/10/2002 00:00 ID 01 01 01 01 01 01 01 01 01 01 01 01 01 01 01 01 01 01 01 01 Description Guard House Guard House Guard House Guard House Guard House Guard House Guard House Guard House Guard House Guard House Guard House Guard House Guard House Guard House Guard House Guard House Guard House Guard House Guard House Guard House Card 038036 021228 038036 021228 038036 021228 038036 021228 017531 038036 038036 038036 021228 017531 017531 021935 038036 017531 021228 021935 22/10/2002 17:31:51 Page: 1 Name EUGENE PRESLEY JENNY HEE EUGENE PRESLEY JENNY HEE EUGENE PRESLEY JENNY HEE EUGENE PRESLEY JENNY HEE MAHENDRAN A/L MUTHU EUGENE PRESLEY EUGENE PRESLEY EUGENE PRESLEY JENNY HEE MAHENDRAN A/L MUTHU MAHENDRAN A/L MUTHU MOHAMMAD ZUHIR EUGENE PRESLEY MAHENDRAN A/L MUTHU JENNY HEE MOHAMMAD ZUHIR Transaction 00: Okay 00: Okay 00: Okay 00: Okay 00: Okay 02: Over Slept 00: Okay 00: Okay 00: Okay 00: Okay 00: Okay 00: Okay 00: Okay 00: Okay 03: Traffic Jam 00: Okay 00: Okay 02: Over Slept 00: Okay 00: Okay Staff Movement Analysis 01/10/2002 00:00 - 31/10/2002 00:00 WinCom DiGiTime Card Name Date 017531 MAHENDRAN A/L MUTHU 22/10/2002 17:25:44 Page: ---------------------------------------------------- Transaction ----------------------------------------------------------- 1 07/10/2002 | 06:35 01 1 12/10/2002 | 13:27 01 0 0= 1 1= 1 2 021228 JENNY HEE 06/10/2002 | 06:34 06:34 06:35 01 1 01 1 01 1 1= 3 0: Valid Entry 5: Pulse Door Open 1 1: Invalid Entry 6: 2: 7: Invalid Time Zone 3: Invalid PIN 8: 4: Force Open Alarm 9: Valid Exit Terminal Activity Report 01/10/2002 00:00 - 31/10/2002 00:00 WinCom DiGiTime ID Description Date 01 Administration Office 22/10/2002 17:25:44 Page: ---------------------------------------------------- Transaction ----------------------------------------------------------- 1 06/10/2002 | 06:15 1 021935 06:34 1 038036 06:34 1 021228 06:34 1 021228 06:34 00 038036 06:35 1 021228 06:35 1 038036 06:35 1 017531 07/10/2002 | 06:23 4 021228 12/10/2002 | 13:27 0 017531 0= 2 0: Valid Entry 5: Pulse Door Open 1 1= 8 1: Invalid Entry 6: 4= 1 2: 7: Invalid Time Zone 3: Invalid PIN 8: 4: Force Open Alarm 9: Valid Exit WinCom DiGiTime 1 2 3 4 5 6 7 8 9 10 Date 06/10/2002 06:15 06/10/2008 06:34 06/10/2002 06:34 06/10/2002 06:34 06/10/2002 06:34 06/10/2002 06:35 06/10/2002 06:35 06/10/2002 06:35 06/10/2002 06:35 07/10/2002 06:23 0= 1 1= 8 Terminal Transanction Listing 01/10/20002 00:00 – 31/10/2002 00:00 ID 01 01 01 01 01 01 01 01 01 01 Description Administration Administration Administration Administration Administration Administration Administration Administration Administration Administration Card 021935 038036 021228 021228 038036 021228 038036 017531 021935 038036 4= 1 22/10/2002 17:31:51 Page: 1 Name MOHAMMAD ZUHIR EUGENE PRESLEY JENNY HEE JENNY HEE EUGENE PRESLEY JENNY HEE EUGENE PRESLEY MAHENDRAN A/L MUTHU MOHAMMAD ZUHIR EUGENE PRESLEY Transaction 1: Invalid Entry 1: Invalid Entry 1: Invalid Entry 1: Invalid Entry 0: Valid Entry 1: Invalid Entry 1: Invalid Entry 1: Invalid Entry 1: Invalid Entry 4: Force Open Alarm 22/11/2000 17:20:33 Mukasurat: 1 Status Warna Kad Lencana 01/07/2000 - 31/07/2000 --------------------------------------------------------------------------------------------------------------------------------------------------------------Narna No. Tidak Tidak Datang Balik Jumlah Tardy Warna Kad Pekerja hadir Mengetik Lewat Awal --------------------------------------------------------------------------------------------------------------------------------------------------------------Industri -----------------------------------------------------------------------------------------------------------------------1 SUBRMANIAM A/L MUNIANDY 0 Kuning Kesihatan Alam -----------------------------------------------------------------------------------------------------------------------2 ALISON LIM MEI HONG 0 Kuning Pentadbiran 3 PADILLAH BT JUDA -----------------------------------------------------------------------------------------------------------------------2 4 1 5 Merah --------------------------------------------------------------------------------------------------------------------------------------------------------------Ringkasan Warna Kad:Kuning Hijau Merah 2 0 1 22/11/2000 17:24:33 Mukasurat: 1 LAPORAN MINGGUAN - LAMPIRAN 8.2 Nama Pegawai Bertugas : __________________________________ Tarikh: 01/07/2000 Hingga 31/07/2000 Bil Nama Pegawai/kakitangan yang datang lambat/pulang awal Jumlah Catitan merah dalam tempoh seminggu Warna kad pegawai/ kakitangan pada akhir minggu Pentadbiran --------------------------------------------------------------------------------------------------------------------------------1 PADILLAH BT JUDA 5 Merah Jumlah Pegawai/Kakitangan : Jumlah Pegawai/Kakitangan yang memegang kad yang berwarna hijau : Jumlah Pegawai/Kakitangan yang memegang kad yang berwarna merah : 10 0 1 22/11/2000 17:24:33 Mukasurat: 1 LAPORAN BULANAN - LAMPIRAN 8.3 Nama Pegawai Bertugas : __________________________________ Tarikh: 01/07/2000 Hingga 31/07/2000 Bil Nama Pegawai/kakitangan yang datang lambat/pulang awal Jumlah Catitan merah dalam tempoh seminggu Warna kad pegawai/ kakitangan pada akhir minggu Pentadbiran --------------------------------------------------------------------------------------------------------------------------------1 PADILLAH BT JUDA 5 Merah Jumlah Pegawai/Kakitangan : 10 Jumlah Pegawai/Kakitangan : yang memegang kad yang berwarna hijau 0 Jumlah Pegawai/Kakitangan yang memegang kad yang berwarna merah : 1