1
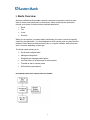
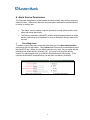
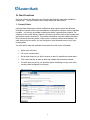
Eastern Bank TreasuryConnect Alerts Manual This user manual provides instructions for setting up an alert to be sent when a certain criteria is meet. Alert notifications available are: Account Activity Notification for previous day activity Account Balance Notification previous day ACH Batch Approval Electronic Report Delivery Money Transfer Sent Money Transfer Approval November 2013 1 Table of Contents I. ALERTS OVERVIEW..............................................................................................................................3 A. ALERTS SERVICE PERMISSIONS ................................................................................................4 1. Permitting Users.........................................................................................................................4 B. ALERT FUNCTIONS .......................................................................................................................5 1. Contact Points ..................................................................................................................................5 2. Setup Alerts ......................................................................................................................................7 3. Alerts History ................................................................................................................................12 C. DELIVERY CHANNEL PERMISSIONS .......................................................................................13 2 I. Alerts Overview Alerts are notifications that enable corporate customers to request to receive an alert when a certain event takes place on an account. Alerts will provide the information through your choice of communication methods listed below: Email Fax Voice Wireless When you set up alerts, you select which notifications you want to receive and specify criteria for alert generation. You also designate to which contact point you want the alert delivered. Some alerts are delivered every day on a regular schedule, while others are sent in real time depending on their type. The Alerts system allows you to: Set up and configure alerts Manage existing alerts Designate and manage contact points View the history of all alerts sent to contact points Forward an alert to contact points Define delivery permissions 3 A. Alerts Service Permissions The Corporate Administrator will be granted the Alerts module; they will then setup any additional users. Within Alerts there are two permissions available to the administrator to assign to another user. 1. The “Alerts” service enables corporate personnel to setup contact points, setup alerts and review alert history. The Delivery permission (AlertsDCP) enables corporate administrators to define delivery channels such as telephone or email or the default delivery channel for the user. Permitting Users To enable a user so they may create their own alerts, go to the User Administration service and click on User Admin. Check Alerts and if the user is an administrator check the AlertsDCP also. When you give Alerts permission to a user, they are setup with the predetermined default delivery channels (all). If you want to change the delivery channel, the administrator must go to Delivery Permissions and edit the user. (If the user has the AlertsDCP permission they can edit their own delivery channels). 4 B. Alert Functions Once you click on the Alerts tab, you will notice that there are three tabs available to choose from. They are Contact Points, Setup Alerts and Alert History. 1. Contact Points Contact points are devices to which notifications about certain events are delivered. Examples of contact points are e-mail address, mobile phone numbers, and fax machine numbers. You can set up multiple contact points within a given delivery channel. For example, for the e-mail delivery channel, you can set up both a work e-mail contact point and a home e-mail contact point. This can be achieved by using the Additional Contact Point, located in the lower portion of the screen, to add your home email address. For each alert you opt to receive, you can configure it to be delivered to any or all of your contact points. You will need to setup the standard contact point first, this is your information. Select your time zone Fill in your contact points. Set up quiet times so you will not receive an alert for a particular contact point. Click on the test link to send an alert and validate the information entered. For each alert you set up, you have the option of sending it to any or all of the contact points configured on this page. 5 1. The default Time Zone is Eastern, use the down arrow to change this if you would like. 2. Enter the information for each delivery channel you wish to receive. Validate the information by clicking the Test link. You should receive a short message within a few minutes, if you do not; verify the accuracy of the information. 3. If you want to enable the quite times, click the box next to “No calls from”. You can change the quite time if you do not want to use the default times. 4. If you would like to receive a wireless text alert click on the link “Click here to setup”. The system will display the Wireless Text-Phone Address Page. a. Enter your email address, click save. This is a phone # b. If you do not know your email address, click the radio button to the left of wireless address finder. Select your carrier and plan from the drop-down lists, click next c. Enter you phone number. 5. The Additional Contact Points can be used to add an additional person to receive your selected alerts or an additional delivery channel such as your home phone. Use the drop down arrow to choose which method you want and click Add. You can change the generic name such as telephone to a descriptive name such as home phone or if you want another person to receive the alert, enter their name. Each additional contact should have a unique name. 6. Click the Update Changes and go on to Setup Alerts 6 2. Setup Alerts The Setup Alerts page is used to add new alerts and manage existing alerts. The page will also display a list of all alerts that are currently configured and the contact points you selected to receive it. Click the Add New Alert button to add a new category of alerts. Depending on what modules you have on TreasuryConnect, there are seven different types of alerts that are available to setup. The seven types of alerts available to setup are: Account Activity Notification Account Balance Notification ACH Approval Notification Electronic Report Availability Notification Money Transfer Approval Required Notification Money Transfer Sent Notification 7 1. Account Activity Notification - Allows you to setup a notification to send an alert when a defined activity has taken place in your previous day activity. Provide a name for the alert Select the accounts you want to receive the alert for by selecting an account and click the >> arrow key. Select your Transactions criteria. If you select Selected Transactions from the list you must select the transactions for the alert. There are 2 filters you can use to filter the list. The type codes list 1. All type codes 2. Credit type codes 3. Debit Amount Sort drop-down list to display 1. By name 2. By transaction code/BAI code Set threshold criteria by selecting the threshold type from dropdown list and enter dollar amount 1. amount 2. Greater Any Than 3. Less Than 4. Equal To 5. Between Click the Save button 8 Note: The checkbox for “Immediately Available Funds” is not a valid selection for Eastern Bank. 2. Account Balance Notification – Allows you to setup a notification to send an alert when an account balance from the previous day or summary measurement moves above or below the predefined amount that you have set. Provide a name for the alert Select the accounts you want to receive the alert for then click the >> arrows to move the accounts over Select your Transactions type to monitor. The choice is either Account Balance or Account Statistic You can further define what type of balance or account statistic you want to receive the alert for. For instance if balance, closing ledger, available balance or if statistic total debits or credits. Set threshold criteria by selecting a threshold type either greater than or less than. Enter dollar amount Check the appropriate box for each contact point to receive the alert. Click the Save button 3. ACH Approval Notification – At this time this alert is for ACH batches only, you can not setup an alert for ACH pass thru files. There can only be one instance of this alert. The alert will be sent when an ACH batch you are authorized to approve is in the approval required status. 9 Add the Alert name Check the appropriate box for each contact point to receive the alert Click the update button 4. Electronic Report Availability Notification – This alert will notify you when the report you have requested has been delivered and is ready for viewing. Add the Alert name Choose the report you want to receive the alert for use >> to move over Check the appropriate box for each contact point to receive the alert Click the update button 10 5. Money Transfer Approval Required Notification – This alert will notify you when a pending money transfer that you are authorized to approve is in an approval required status. You can set up only one instance of money transfer alert. Add the alert name Select which accounts you should be notified on use >> to move over Select contact points and then click save button. 6. Money Transfer Sent Notification – Allows you to setup an alert to be sent when the criteria you defined for a money transfer has been submitted for final processing. You can setup multiple instances of the money transfer sent notification alert. Provide a name for the alert Select the accounts you want to receive the alert for then use the >> arrow key to move the accounts over 11 Set threshold criteria, there are 5 choices. 1. Any Amount 2. Greater Than 3. Less Than 4. Equal To 5. Between Check the appropriate box for each contact point to receive the alert Click the save button 3. Alerts History Use this page to view a list of the alerts you received, delete alerts from the history, and access the alert details. The system sorts alerts by alert name, description, or date. To re-sort the list of alerts, click the header of the column that you want to sort by Alert, Description or Date. Alerts that have not been read will display in bold text. All alerts will display in the list but to display only unread alerts, click Show Unread. If the list of alerts is longer than one page, use the navigation links at the bottom for scrolling through the list. Select the check box next to the Alert column heading to select all of the alerts on the current page. This history is stored for 90 days. To delete an alert check the box next to the alert you wish to delete Click the delete selected button To display an alert click on the link of the alert you wish to view. 12 C. Delivery Channel Permissions Delivery channel permissions are authorizations for an Alerts user to receive alerts through a particular delivery channel. Examples of delivery channels include e-mail, telephone, fax, and wireless device. The user can be assigned permissions to one or more delivery channels, or be assigned the default delivery channel permission, which gives the user permission to all channels set as default channels. After you assign a user permission to a particular delivery channel, the user can display the Setup Contact Points page to specify a contact point within that delivery channel. Note: If a user is not assigned permission to a particular delivery channel, that channel is not available to the user on the Setup Contacts Point page. 13 14