1
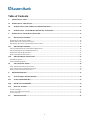
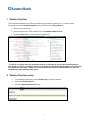
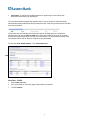
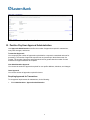
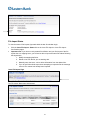
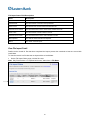
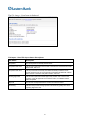
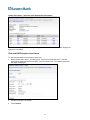
Eastern Bank TreasuryConnect Positive Pay User’s Manual This user’s manual provides instructions for setting up new users, setting up Alerts for Positive Pay and accessing services found within Positive Pay. Those services are: Setup new User Exceptions Manager Setup File Definitions Positive Pay Import Manual Issue or Void Setup Alerts Welcome page December 2013 1 v.3 Table of Contents I. POSITIVE PAY USER ................................................................................................................................................ 3 II. POSITIVE PAY USER SET UP.................................................................................................................................. 3 III. POSITIVE PAY USER APPROVAL ADMINISTRATION................................................................................ 8 IV. POSITIVE PAY – FILE IMPORT, DECISIONS AND ISSUES....................................................................... 11 V. POSITIVE PAY EXCEPTIONS MANAGER ......................................................................................................... 12 VI. ISSUE MANUAL ENTRY .................................................................................................................................... 14 ENTER SINGLE CHECK ISSUE ITEMS ................................................................................................................................... 14 ENTER SEQUENTIAL CHECK ISSUE ITEMS........................................................................................................................... 15 EDIT SINGLE CHECK ISSUE ITEM OR SEQUENTIAL ITEMS ................................................................................................... 15 VII. IMPORT FILE IMPORT...................................................................................................................................... 15 CREATING DELIMITED ISSUE FILE IMPORT DEFINITIONS .................................................................................................... 15 CREATE FIXED ISSUE FILE IMPORT DEFINITIONS ............................................................................................................... 18 MODIFY FILE IMPORT DEFINITIONS.................................................................................................................................... 21 DELETE FILE IMPORT DEFINITIONS .................................................................................................................................... 22 VIII. IMPORT CHECK ISSUE FILES......................................................................................................................... 24 FILE IMPORT STATUS ......................................................................................................................................................... 25 VIEW FILE IMPORT DETAIL ................................................................................................................................................ 26 IX. UPDATE ISSUE ITEMS....................................................................................................................................... 28 VIEW AND EDIT EXCEPTION ISSUE ITEMS .......................................................................................................................... 29 VIEW AND EDIT OUTSTANDING ISSUE ITEMS ..................................................................................................................... 30 DELETE AN OUTSTANDING ISSUE ITEM .............................................................................................................................. 31 X. DECISIONS REPORT............................................................................................................................................... 32 XI. OUTSTANDING ISSUES REPORT.................................................................................................................... 34 XII. STALE ISSUES REPORT .................................................................................................................................... 35 XIII. ISSUES STATUS REPORT.................................................................................................................................. 36 XIV. MANAGE ALERTS .............................................................................................................................................. 38 ACCOUNT ALERTS .............................................................................................................................................................. 39 NON-ACCOUNT RELATED ALERTS ...................................................................................................................................... 41 CUSTOM ALERTS ................................................................................................................................................................ 41 XV. WELCOME PAGE................................................................................................................................................ 42 2 I. Positive Pay User The Corporate Administrator will permit the positive pay permission to other users. To grant the User Permission, go to the User Administration service and click on the User Admin tab: 1. Select a user from the list 2. Click on Services link. Check Positive Pay in the Outbound SSO Services. 3. Click the submit button. That is all that is needed here. ****If this is a new User when you submit the form for a new token be sure the box for Positive Pay is also checked. If this is an existing user there is a component that the bank must perform on your behalf to complete this user setup. Please call our Business Service Team at 1-800-333-8000 once you have completed the steps outlined in this guide. II. Positive Pay User set up 1. To complete the User setup, choose Positive Pay in the drop down list. 2. Click on the Positive Pay tab. 3. Click the Login to Positive Pay button. 3 The Account Services section will display. 1. Click the Administration tab. 2. Click User Administration to add a user or select an existing user to edit, copy, or delete. The process to create a new User consists of the 5 steps below. Profile - The user's demographic information, including e-mail and phone number. For security purposes, the User ID, Name, Telephone, or Password information is not copied from user to user. Roles - The role or roles user has in the company (Administration, Approval, and/or Setup). Services and Accounts - The services and accounts to which the user is allowed to use. Limits - User-limits are not applicable for Positive Pay. 4 Verification - A page that gives Administrators an opportunity to review the profile information before saving or submitting it. The user administration progress bar appears when a user is created or copied and helps Administrators easily determine how many steps there are in the setup process and ensure that none are overlooked. User profiles are automatically saved after each step in the setup process is completed. Administrators can use the Save as draft link to save user profiles at any point in the setup process and complete the setup at a later time if necessary. The user profile will remain in the User Admin section until the setup is complete or they are deleted. To start click User Administration. Click Create New User New User - Profile 1. Click Create new user. 2. Fill in all the fields on the profile page unless stated it is optional. 3. Click Continue. 5 New User – Roles 1. Click Do not copy user or Copy a user if it is applicable. 2. Select one or more of the following User Roles: a. Allow this user to setup templates. b. Allow this user to approve transactions. c. Grant this user administration privileges. 3. Click Continue. If the new User is not an admin they should be given the User Roles Allow this user to setup templates Allow this user to approve transactions 6 New User - Services & Accounts Click Add to the Service. This opens the service and allows you to add the account. 1. For each service that is added click Save Changes. 2. Click Continue New User - Limits Page 1. Positive Pay does not have Limits click Continue. New User - Verification Page 1. Review the user's profile and then click Submit. Changes can be made by clicking the links on the right side of the page. 7 2. You will receive a Confirmation for the new user. III. Positive Pay User Approval Administration Use Approvals Administration to define the number of approvals required for transactions, user profile changes, and issues. Transaction Approvals You can specify the number of approvals required before a request is transmitted and sent for processing. The number of approvals required can vary based upon the dollar amount of a request. The number of approvers assigned should not be greater than the number of users authorized to approve/transmit the requests. User Administration Approval You can set the number of approvals required for user profile additions, deletions, and changes. Issue Approval You can set number of approvals required for issues. Requiring Approvals for Transactions To set approval requirements for transactions, do the following: 1. Click Administration > Approvals administration. 8 2. Go to the Approvals Required For Transactions section, enter a Request Amount for each service and the number of required approvals if a request is initiated that is less than or equal to or greater than the request amount. The number of approvals required can vary based upon the dollar amount of a request. 3. Click Save changes. The page refreshes and a confirmation message is displayed. Requiring Approvals for User Administration To set approval requirements for user profile additions, changes, or deletions, do the following: 1. Click Administration > Approvals administration. 2. Go to the Approvals Required For Setup section and enter the number of Approvals Required for Administration. Up to nine approvals can be required. 9 3. Click Save changes. The page refreshes and a confirmation message is displayed. Requiring Approvals for Issues and Decisions To set approval requirements for issues and decisions, do the following: 1. Click Administration > Approvals administration. 2. Go to the Approvals Required For Issues/Decisions section and enter the number of Approvals Required for each service. Up to nine approvals can be required. 3. Click Save changes. 10 IV. Positive Pay – File import, Decisions and Issues Positive Pay helps prevent check fraud by allowing you to examine questionable checks and to make decisions (pay or reject) those checks. The Positive Pay functions and reports are located within the Account Services. The features of Positive Pay are: Exceptions Manager Exceptions Manager is used to view, decision, and approve exception items. Issue Manual Entry Issue Manual Entry is used to enter check issues items, both individually and sequentially. Issue File Import Issue File Import is used to import check issue files. Detailed information can be viewed for files that completed the import process but have records that contain invalid data. Update Issue Items Update Issue Items is used to update exception items or outstanding issue items. Issue Approval Issue Approval is used to approve check issues and issue files. Decisions Report The Decisions Report shows the decisions made on exception items for entitled accounts. Outstanding Issues Report The Outstanding Issues Report shows the outstanding check issue items (that have not yet passed the stale date) for entitled accounts. Stale Issues Report The Stale Issues Report shows the stale check issue items (issues that have passed the stale date) for entitled accounts. Issues Status Report The Issues Status Report shows the status of one or more issues for your entitled Positive Pay accounts. 11 V. Positive pay exceptions manager Positive pay exceptions manager is used to view, decision, and approve exception items. 1. Click the Positive pay exceptions manager link to view items that need to be decisioned or approved. The exception items will be available to view after 10:00AM. Decisions must be completed by 2:00PM. Check Exceptions awaiting approval. If using additional approval you will have items in there. Check Exceptions awaiting decisions – this will list the items that need to be decisioned for the day. 2. Click on the Select decision link, a list of reasons will be presented. 3. Select the appropriate reason for the item. (To apply the same decision to multiple exception items, click the Apply this decision to the selected exceptions.) 4. To view the details for the exception click the check number link. 5. To view the image of the check click on the camera icon. ( ) 6. Once decisions have been made click Continue. You will be taken to a verification page. 12 7. Review the exceptions, as needed. 8. Click Approve or Transmit (depending upon the number of approvals required for exception decisioning). Delete Exception Decisions Exceptions can be deleted; however, once deleted, the decision and approvals previously applied to the exception item are no longer applicable. To delete an exception decision: 1. On the Exceptions Manager page, click the Check number link associated with the exception. Exception Detail Page 2. Click the Delete decision link. 3. The Delete Verification page will then display 13 VI. Issue Manual Entry Use Issue Manual Entry to manually enter single or multiple check items. Click the Issue Manual entry link: Enter Single Check Issue Items To enter a single check issue item: 1. Select an Account. 14 2. Enter the Check number. 3. Enter the Amount. 4. Enter the Issued date or click the calendar icon and select a date. 5. Select an Issue type: Issue or Void. 6. Enter the Payee. Required if using payee matching. 7. Click Continue. 8. Receive the Verification page. Enter Sequential Check Issue Items A range of check issue items can be entered at one time by clicking the Sequential entry box. Edit Single Check Issue Item or Sequential items To edit an issue item: 1. Click the Edit Item link Verification page by clicking the check number. 2. Edit the detail needed and click Continue. VII. Import File Import Use Issue File Import to import check issue files, view the status of check issue file imports, and create, edit, delete a file definition. Issue File Import Page – there are only 2 types of files available on this page. definitions according to your file specifications using the File Import Definition. You will create your file Note: The MICASH or Format A formats cannot be edited or deleted. File import definitions may be either delimited or fixed. A delimited file is a flat text file consisting of data items separated by a specific character. A fixed file is a text file consisting of data that have specific lengths and positions. Creating Delimited Issue File Import Definitions To create a delimited file definition: 1. Click the File Import Definition link on the Issue File Import page. 15 File Import Definition – Description Page 2. Type the Definition name (up to 20 characters). 3. Type a Description (up to 20 characters). 4. Select the file content Issues. 5. Select the Delimited (CSV) file type. 6. Click Continue. The File Import Definition – Characteristics page is displayed. 7. Select a Field delimiter: Comma, Dash, Semi-colon or Tab. 8. Select a Text qualifier: Double Quote, Single Quote or None. 9. Select an Amount format. 16 Note: If decimals are not included, an applied decimal format must be selected. If you do check decimal included and there are not decimals in the file a decimal will be assumed, the file does not fail. For instance 100 will be entered as 100.00 not 1.00 10. Select a Date Format (for example MMDDYYYY). 11. Click Continue. 12. The Default Field Values section is labeled Optional but you can enter default values for ABA/TRC, Account, and Issue action that will be applied to all issues in your import file unless there are multiple accounts in your file. This will eliminate the need to include this information in the file to be imported. 13. Click Continue. 17 14. Enter the Position Number (numeric order) of the fields as they appear the file you are importing. For example, if the first field in your file is Account, and the second file is Check Number, those would be listed as number 1 and number 2. Note: If default values were entered for ABA/TRC, Account and/or Issue type, these fields will not display under Field Properties. Refer to the table below for valid field properties for the fields included in the check issue file. Field Name Valid Field Properties ABA/TRC Numeric only (0-9) Account Numeric only (0-9), 17 characters max Check number Numeric only (0-9), 15 characters max Amount Numeric only (0-9), greater than 0.00 and less than 100,000,000.00 Issued Date Numeric date in specified format (for example, MMDDYY) Issue Type Issue, I, Void, V Issue Action Add, A, Delete, D Debit/Credit (optional) Debit, D, Credit, C Payee Alpha (a-z, A-Z), numeric (0-9), special characters (including spaces), 96 characters max 15. Click Add file definition. Create Fixed Issue File Import Definitions To create a fixed file definition: 1. Click the File Import Definition link on the Issue File Import page. 18 2. Type the Definition name (up to 20 characters). 3. Type a Description (up to 20 characters). 4. Select the Issues file contents. 5. Select the Fixed file type. 6. Click Continue. 7. Select an Amount format. Note: If decimals are not included, an applied decimal format must be selected. If you do check decimal included and there are not decimals in the file a decimal will be assumed, the file does not fail. For instance 100 will be entered as 100.00 not 1.00 8. Select the Date Format (for example MMDDYYYY). 9. Click Continue. 19 10. Optional: The Default Field Values section is labeled Optional but you can enter default values for ABA/TRC, Account, and Issue action that will be applied to all issues in your import file unless there are multiple accounts within the file. This will eliminate the need to include this information in the file to be imported. 11. Click Continue. 12. Enter the Position Number (numeric order) of the fields as they appear in the file you are importing. For example, if the first field in your file is Account, and the second field is Check Number, those would be listed as number 1 and number 2 to import. 20 Note: If default values were entered for ABA/TRC, Account and/or Issue type, these fields will not display under Field Properties. 13. Enter the Length of each field. Field Name Valid Field Properties ABA/TRC Numeric only (0-9) Account Numeric only (0-9), 17 characters max Check number Numeric only (0-9), 15 characters max Amount Numeric only (0-9), greater than 0.00 and less than 100,000,000.00 Issued Date Numeric date in specified format (for example, MMDDYY) Issue Type Issue, I, Void, V Issue Action Add, A, Delete, D Debit/Credit (optional) Debit, D, Credit, C Payee Alpha (a-z, A-Z), numeric (0-9), special characters (including spaces), 96 characters max 14. Click Add file definition. The File Import Definition – Confirmation page is displayed. Modify File Import Definitions The file import description, characteristics, default field values and field properties may be modified from the File Import Definition Detail page. To access the File Import Definition Detail page: On the Issue File Import page, click the file Name. The File Import Definition Detail page is displayed. 21 The file import definition description, characteristics, default field values and field properties can be modified by clicking the appropriate Edit links. Once your modifications have been completed, click Save Changes. Delete File Import Definitions Warning: Once deleted, the file import definition cannot be recovered. To delete a file import definition: 1. On the Issue File Import page, click the file definition Name. Issue File Import Page 22 The File Import Definition Detail page is displayed. 2. Click the Delete file import definition link. The Delete File Import Definition – Verification page is displayed. 3. Review the file import definition information, as needed. 4. Click Delete. The Delete File Import Definition – Confirmation page is displayed. 23 VIII. Import Check Issue Files The file import process consists of selecting a file import definition and importing a check issue file. File import definitions outline the formats for the imported files. A file import will be rejected if it has an invalid format, invalid data, or if it is a duplicate file. All approvals must be received before a file will be fully processed. To import a check issue file: 1. On the Issue File Import page, select the appropriate file definition radio button. 2. Click Continue. The Issue File Import – File Selection page is displayed. 3. Type the path of the File to import or click Browse to select the file. 4. Click Import file. The Issue File Import - Confirmation page is displayed. 24 File Import Status To view the status of file imports (imported within the last 40 calendar days): Click the Issue File Import - Status link on the Issue File Import or Issue File Import Confirmation pages. Important note: if you have a newly created file definition and your first import of the file rejects due to a mapping issue, you will not be able to import the same file without following the steps below: 1. Modify the mapping definition. 2. Delete a line from the file you are working with. 3. Manually enter the issue, void or delete information from the deleted line. 4. If you do not follow these steps when attempting to import the file the message return is File content has already been imported. Issue File Import Page The File Import Status page is displayed. 25 File Import Status Field Descriptions Field Description File Name The name of the imported file. Total Records The total number of records in the imported file. Issues In File The total amount of check issues included in the file. Total Amount for Issues The total dollar amount of the check issues included in the file. Voids In File The total number of voids included in the file. Total Amount for Voids The total dollar amount of the voids included in the file. Date Imported The date the check issue file was imported. Status The status of the file import. View File Import Detail Details can be viewed for files that have completed the import process but contained at least one record with invalid data. To view the records in a file that was not imported due to invalid data: On the File Import Status page, click the file name. Note: Only files that have a "Completed with errors" status have a File Name 26 The File Import – Detail page is displayed. File Import – Detail File Import Status Descriptions File Status Description Completed The file imported successfully without issues. Completed with errors The file was imported but some records in the file were not because of invalid data, format, and so on. Completed with notes The file processed successfully with additional details provided for some records in the file such as, the record was successfully uploaded with a $0.00 dollar amount or the issue was paid on X date, and so on. Pending Approvals The file was imported and needs approval by another user or users in the company. Once all approvals are received for a file, it is validated and the status is updated. Rejected The file was not imported because it had an incorrect file format. Processing The file is the process of being imported. This status is typically seen when importing large issue files. 27 IX. Update Issue Items Use Update Issue Items to update or delete exception items or outstanding issue items. Use the Update Issue Items Criteria page to specify filter criteria to limit the number of items that are displayed. To search for issue items: Click Account Services > Positive pay update issue. 1. Select an Account. 2. Select a Date range. The calendar icons can be clicked to select a date. 3. Choose to include Exception issue items or Outstanding issue items. 4. If desired, enter a Check number. 5. Click Search. The Update Issue Items – Summary page is displayed. 28 Update Issue Items – Summary Page (Outstanding Issue Items) Note: Issue items that have changes pending approval cannot be deleted until the changes are approved or cancelled. View and Edit Exception Issue Items To view and edit details for an exception issue item: 1. On the Update Issue Items – Summary page, click the Check number link. To view the check image associated with an exception, click the camera icon. The Update Issue Item – Edit page is displayed. 2. Edit the information, as needed. 3. Click Continue. 29 4. Review the information and click Save changes. The Update Issue Items – Edit Confirmation page is displayed. View and Edit Outstanding Issue Items To view and edit details for an outstanding issue item: 1. On the Update Issue Items – Summary page, click the Check number link. Note: The Edit issue and Delete issue links do not appear if the issue item has an outstanding change or delete pending approval. 2. Click the Edit issue link. 30 3. Edit the information, as needed. 4. Click Continue. 5. Review the information and click Save changes. (The issue changes are not applied until all approvals have been received.) The Update Issue Items – Edit Confirmation page is displayed. Note: If you entered an Issue and it should be a Void you cannot just change it to a Void. You first need to delete the Issue and then enter a Void. Delete an Outstanding Issue Item To manually delete an outstanding issue item: 1. On the Update Issue Items – Summary page, click the Delete link associated with the issue item. 31 The Delete Issue Item – Verification page is displayed. 2. Click Delete. The Update Issue Items – Summary page is displayed with the issue item removed. Note: The issue delete is not applied until all approvals have been received. X. Decisions Report Use the Decisions Report to view the decisions made on exception items for entitled accounts. To access the Decisions Report Criteria page: 1. Click Account Services > Positive pay decisions report. 32 The Decisions Report Criteria page is displayed. 2. Select an Output to option. Screen is selected by default. 3. Select one or more Accounts options. 4. Select a Decision date range. The calendar icons can be clicked to select the date. 5. Select a Decision option: Include all decisions, Paid only, Return only, or Correction only. Note: The Correction only option is not currently generally available to all companies. 6. Click Generate report. 33 The Decisions Report page is displayed. XI. Outstanding Issues Report Use the Outstanding Issues Report to view the outstanding issues (that have not yet passed the stale date) for entitled accounts. To access the Outstanding Issues Report Criteria page: 1. Click Account Services > Positive pay outstanding issues report. 34 The Outstanding Issues Report Criteria page is displayed. 2. Select an Output to option. Screen is selected by default. 3. Select one or more Accounts options. 4. Select an Issued Date range. The calendar icons can be clicked to select the date. Note: If you have uploaded a file with a future date, you need to select the range from today to the future date. Selecting the specific date with a future will not produce your report. 5. Choose to include Issues and voids, Issues only, or Voids only. 6. Click Generate report. XII. Stale Issues Report Use the Stale Issues Report to view the stale issues (issues that have passed the stale date) for entitled accounts. To access the Stale Issues Report Criteria page: 1. Click Account Services > Positive pay stale issues report. The Stale Issues Report Criteria page is displayed. Stale Issues Report Criteria Page 35 2. Select one or more Accounts options. 3. Select an Issued date range. The calendar icons can be clicked to select the date. 4. Click Generate report. Stale Issues Report Page XIII. Issues Status Report Use the Issues Status Report to view the status of one or more issues for entitled accounts. Checks that have been converted into ACH electronic payments are displayed with an ACH indicator beside the check number. Paid check images can be viewed by clicking a camera icon. To access the Issues Status Report Criteria page: 1. Click Account Services > Positive pay issue status report. Issues Status Report Criteria Page 36 2. Select an Output to option. Screen is selected by default. 3. Select one or more Accounts options. 4. Select a Date range. The calendar icons can be clicked to select the date. Note: If you have uploaded a file with a future date, you need to select the range from today to the future date. Selecting the specific date with a future will not produce your report. 5. Select a Date type: Issued date, Posted date or Status updated date. Issued date The date a check issue is entered Posted date The date a check transaction is posted Status updated date The date the status of check issue is changed 6. Optional: Type the dollar Amount of the issues you want to view or a dollar amount Range. Date range and date type criteria are not required when searching for a specific amount value. 7. Optional: In the Check number field, enter a check number. Date range and date type criteria are not required when searching for a specific check number. 8. Click Generate report. 37 Issues Status Report Page XIV. Manage Alerts Use Manage Alerts to manage your account, non-account, and custom alert subscriptions and choose how you want to receive the alerts. To have alerts delivered to your primary or secondary e-mail address and/or mobile telephone number (if applicable) you must set up those delivery options on the Personal Preferences page. (Alerts are always sent to your online banking mailbox located on the Welcome page) To access the Manage Alerts page: Click Administration > Manage alerts. The Manage Alerts page is displayed. The Manage Alerts page always opens to the Account Alerts tab. 38 Account Alerts The Account Alerts tab shows the alert subscriptions available to you based on your entitled services and accounts. We recommend that you enable the Positive Pay and Positive Pay Exception Reminder alert. (The Information Reporting Alerts are not available; please do not enable them within this service. Use the Alerts function in the drop down list to setup any balance alerts) Mandatory alerts notify you of important events and cannot be turned off. Mandatory alerts appear with a checkmark () and do not have a Delete link. Account Related Alerts Positive Pay Alerts Check Issue Approval Pending Notifies you when there is an account that has a check issue approval pending for which you are an approver. Optional Positive Pay Notifies you when there is an exception item for this account that requires your attention. Optional Positive Pay Exception Reminder Notifies you an hour before your decisioning window closes when there are exception items that have not yet been decisioned. Optional Add an Account Alert Subscription To add an account alert subscription: Click on the Manage Alerts page, click the Account Alerts tab. The Account Alerts tab is displayed. Manage Alerts Page (Account Alerts) 39 1. Select an account. Click the Go box. 2. Click the Add link associated with the alert subscription. The table row expands, revealing the alert details. Tip: Multiple rows can be expanded. Manage Alerts Page (Account Alerts – Expanded Row) If you click the Set Up Account Alerts you can choose all accounts at once. Choose which Alert you want from the drop down list and press Go. 40 If applicable, enter the alert criteria. Click the check box associated with each Send To option to which you want the alert sent. The Send To column does not appear if you do not have an e-mail or mobile telephone (if applicable) defined on the Personal Preferences page. Click Add alert to save the changes. Clicking Do not add alert collapses the row without adding the alert. The Alert sent to you will have an address of: Non-account Related Alerts The Non-account tab shows your non-account alerts. Mandatory alerts notify you of important events and cannot be turned off. Mandatory alerts appear with a checkmark () and do not have a Delete link. Custom Alerts Custom alerts are notifications with message text you define. The Custom Alerts tab allows you to create, change, and delete custom alerts and choose where the custom alerts are delivered. 41 XV. Welcome Page The Welcome page provides links to your messages and favorites. It will also display the last login. 1 Welcome message: User first and last name with last login date and time. 2 Message Center: Links to view mail and alert messages, and send secure mail. 3 Favorites: Links to frequently used functions or pages. 42