1
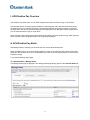
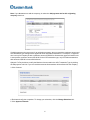
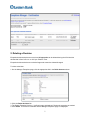
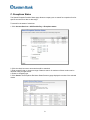
Eastern Bank TreasuryConnect ACH Positive Pay Manual This user manual provides instructions for setting up Alerts and managing services for ACH Positive Pay. Those services are: Setup Alerts Manage Exceptions Exceptions Status Manage Payment Rules October 2015 Table of Contents I. ACH POSITIVE PAY OVERVIEW................................................................................................ 3 A. ACH POSITIVE PAY ALERTS ............................................................................................... 3 B. MANAGING EXCEPTIONS .................................................................................................... 4 1. Making a Decision ........................................................................................................... 5 2. Deleting a Decision .......................................................................................................... 7 C. EXCEPTIONS STATUS .......................................................................................................... 8 D. MANAGE PAYMENT RULES............................................................................................... 10 1. Adding a Payment Rule ................................................................................................. 10 2. Editing a Payment Rule ................................................................................................. 11 3. Deleting a Payment Rule ............................................................................................... 12 I. ACH Positive Pay Overview ACH Positive Pay allows users to view ACH exceptions and make decisions to pay or return them. ACH transactions are compared against conditions, called payment rules, that determine whether they are debited from your accounts or blocked. If a transaction matches the condition criteria, it processes normally and is sent to post. Blocked transactions are displayed on the Manage Exceptions page where you can make decisions to pay or return them. Users can also create new payment rules based on exceptions they have decided to pay, which prevents future exceptions from being generated for the originating companies. A. ACH Positive Pay Alerts Use Manage Alerts to manage your account and non-account alert subscriptions. Alerts are always sent to your online banking mailbox located on the Welcome page within Positive Pay. Alerts can also be delivered to your e-mail address; you must set up this delivery option on the Personal Preferences page. To access the Manage Alerts page: Click Administration > Manage alerts. The Manage Alerts page is displayed. The Manage Alerts page always opens to the Account Alerts tab 3 The Account Alerts tab shows the alert subscriptions available to you based on your entitled services and accounts. We recommend that you enable the ACH Positive Pay and the ACH Positive Pay Exception Reminder alert. There are 2 types of Alerts you can setup for ACH Positive Pay. We strongly suggest that you activate both. The address on the alert is: [email protected]. • ACH Positive Pay – This alert will be sent by 8:00AM ET the alert will inform you of any items that have been detected and blocked. • ACH Positive Pay Exception Reminder – This alert will remind you at 2:00 ET if there are items that have not been decisioned. The deadline for decisioning is 3:00 ET. Note: The default for items that have not been decisioned by 3:00 ET is Return. B. Managing Exceptions The Manage Exceptions page displays rejected ACH transactions (exceptions). A transaction can be rejected for one of three reasons: 1. Unauthorized originating company 2. Unauthorized SEC (standard entry class) code 3. Unauthorized dollar amount Note: Users can only view exceptions for each account they are entitled to. To access the Manage Exceptions page: Click Account Services > ACH Positive Pay > Manage Exceptions. 4 Manage Exceptions Field Descriptions Field Description Decision Pay or Return. Debit Account The number of the account that will be debited. Originator Company Name The name of the originating company. Debit Amount The amount of the debit transactions. Effective Date The date the payment is effective. Reject Reason The reason why the payment was rejected. Approval Status The number of approvals received out of the total approvals required. Maximum Amount The maximum allowed for future ACH debit transactions for the company. ACH Transaction Type The ACH entry classes allowed for future ACH debit transactions for the company. 1. Making a Decision Decisions can be made on ACH exceptions during the ACH exception decision window which is from 8:00 a.m. to 3:00 p.m. Eastern Time. If a decision is not made on an exception during the decision window, then the default decision of Return will be applied. To make a decision, do the following: 1. Click the check box associated with the exception. 2. Click the Decision dropdown arrow and select Pay or Return. If a Pay decision is applied, a payment rule is automatically added to your list of originator company payment rules. 5 Note: If you do not want to add the company, de-select the Add payment rule for this originating company check box. If multiple payment rules are set up for an originating company, the most restrictive maximum amount and ACH transaction type settings will be applied to future ACH debit transactions. For example, if a payment rule is set up for Company A with a maximum amount of $50.00 for all transaction types and another rule is set up with a maximum amount of $100.00 for the CCD transaction type, only CCD debit transactions with amounts of $50.00 or less will be allowed. Optional: For Pay decisions, modify the Maximum Amount and/or the ACH Transaction Type by clicking the Edit payment rule link. If you do not add an amount all transactions will be allowed for this company. 3. Click Continue. 4. Review and verify the exceptions. To change your selections, click the Change Selections link. 5. Click Approve/Transmit. 6 2. Deleting a Decision Exception decisions that have not received all approvals can be deleted during the ACH decision window that is from 8:00 a.m. to 3:00 p.m. Eastern Time. Exception decisions that have received all approvals cannot be deleted/changed. To delete a decision: 1. On the Manage Exceptions page, click the appropriate link in the Debit Account column. 2. Click the Delete decision link. 3. The Delete Exception Decision - Verification page is displayed. Review the exception as needed. 4. Click Delete. The decision is deleted and the Manage Exceptions page is redisplayed. 7 C. Exceptions Status The Search Exception Decision Status page allows a company user to search for exceptions for all or specific accounts for a date or date range. To search for the status of a decision: 1. Click Account Services > ACH Positive Pay > Exceptions status. 2. Click the check box next to accounts that will be searched. 3. Enter a specific date, or choose a range of dates to search. A maximum of three months can be retrieved during a single search. 4. Select an exception type. 5. Click Search. The Exceptions Decisions Status Summary page displays the results of the selected criteria. 8 Exceptions appear with one of the following decisions: Decision Description Pay A Pay decision made on the exception. All approvals are required before the decision is applied to the exception. Return A Return decision made on the exception. All approvals are required before the decision is applied to the exception. Pending Decision The decision window is still open and a decision has not been made. Default The financial organization-defined default decision was applied because a decision was not made on the exception or the decision was not fully approved during the decision window. Exception details and approval information can be viewed by clicking on the Debit Account link. 9 D. Manage Payment Rules The Manage Payment Rules page is used to add, edit, and delete payment rules at any time. Submitting maintenance forms to Eastern Bank to add, edit or delete payment rules is no longer required. A payment rule prevents future exceptions from being generated for an originating company. Payment rules can be added, edited, and deleted at any time, even when there is not an exception to decision. Originating companies that have ACH exceptions with a Pay decision are added to your list of originator company payment rules automatically. By default, the payment rule is set up with No maximum for the Maximum Amount and ALL - Select All for the ACH Transaction Type (ACH entry class). If multiple payment rules are set up for an originating company, the most restrictive maximum amount and ACH transaction type settings will be applied to future ACH debit transactions. For example, if a payment rule is set up for Company A with a maximum amount of $50.00 for all transaction types and another rule is set up with a maximum amount of $100.00 for the CCD transaction type, only CCD debit transactions with amounts of $50.00 or less will be allowed. 1. Adding Payment Rules To add a new payment rule, do the following: 1. Click Account Services > ACH Positive Pay > Manage payment rules. 2. Click Add Authorization. 10 3. Select the type of rule from the drop down menu. The options are as follows: Payment Rule Type Description One-time A debit filter that is only applied once to a specified criteria. After the conditions of the filter have been met, the filter is removed and replaced by a block. Ongoing A debit filter for specified criteria that is effective until the expiration date. Do not allow A debit block that blocks all transactions for a specified criteria. 4. Select the debit account and enter the maximum amount, if applicable. 5. Select the ACH transaction type from the drop down menu. The options are as follows: Type Description Type Description ALL Select All POS Point-of-sale ADV Automated Accounting Advice PPD Prearranged payment and Deposit ARC Accounts Receivable RCK Re-presented Check BOC Back office Conversion SHR Shared network Transaction CCD Corporate Credit or Debit TEL Telephone-Initiated CTX Corporate Trade Exchange TRC Truncated Entry IAT International ACH Transaction TRX Truncated Entries Exchange MTE Machine Transfer Entry WEB Internet-initiated POP Point-of purchase XCK Destroyed Check 6. Enter the originator company name, originator company ID, and the expiration date. 7. Click Save Changes. 2. Editing a Payment Rule The company user can edit the maximum amount, originator company name, and expiration date of payment rules within the system. If any of the other payment rule values need modification, the existing payment rule must be deleted and a new rule added instead. To edit a payment rule: 1. On the Manage Payment Rules screen, click the Edit link associated with the payment rule being edited. 11 2. Change the payment settings based on the required update. 3. Click Save Changes. 3. Deleting a Payment Rule To delete a payment rule: 1. On the Manage Payment Rules screen, click the Delete link associated with the payment rule being removed. 2. Click OK to the popup confirmation message. 12