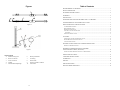
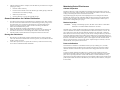
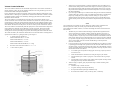
1
World Headquarters
Millar Instruments, Inc.
6001-A Gulf Freeway
Houston, Texas 77023-5417 USA
Phone: 832.667.7000 or 800-669-2343 (in the USA)
Fax: 832.667.7001
Email: [email protected]
Web site: www.millarinstruments.com
Millar Worldwide Distribution
Millar Instruments, Inc. has a network of Authorized Distributors in most countries around the world.
For information on the Millar distributor in your country, please contact the Millar Customer Service
Department at our headquarters in Houston.
European Authorized Representative
FMI Föhr Medical Instruments GmbH
In der Grube 13
D-64342 Seeheim/Ober-Beerbach
Germany
Telephone: +49 (0) 62 57 - 96 22 60
Fax: +49 (0) 62 57 - 96 22 62 + 8 20 17
Email: [email protected]
0086
Sensors.Systems.Solutions.®
OBSERVE PRECAUTIONS
FOR HANDLING
ELECTROSTATIC
SENSITIVE DEVICES
Mikro-Tip® Ultra-Miniature
Pressure-Volume Catheter
© 2007 Millar Instruments, Inc. All rights reserved.
Millar, Mikro-Tip and Sensors.Systems.Solutions. are registered trademarks of Millar Instruments,
Inc.
Products and company names used are the trademarks or trade names of their respective companies.
Models referred to herein are protected by USA and International patents.
M.I. P/N: 004-2102 Rev. F
Animal Use Only
Instructions for Use
Service Provision
Consult web site below for service information:
www.millarinstruments.com
Millar Limited Warranty
Millar warrants that at the time of sale to the original purchaser, the device shall be free from defects
in materials and workmanship for a period of six (6) months from its date of shipment to the original
purchaser. If there is such a defect, Millar will, at no charge and at its option, either repair or replace
any Mikro-Tip P-V catheter as appropriate. Millar’s limited warranty does not cover damage to the
product from alterations, misuse, abuse, negligence, or accident.
The user shall determine the suitability for use of these devices for research purposes only. Therefore,
the user accepts these devices subject to all the terms hereof. Furthermore, Millar does not warrant
that the equipment is suitable for any specific purpose, other than that explicitly stated by Millar.
Furthermore, Millar does not warrant its Mikro-Tip P-V catheter for use with signal conditioning
hardware that is not manufactured by Millar. Using the Mikro-Tip P-V catheter with signal
conditioning hardware that is not manufactured by Millar will render the warranty null and void and
the catheters will not be considered for evaluation or repair.
In addition, Millar makes no warranty regarding device efficacy after three (3) years from the date of
manufacture. Catheters beyond the age of three (3) years will not be considered for evaluation or
repair.
This warranty is in lieu of and excludes all other warranties not expressly set forth herein, whether
expressed or implied warranties of merchantability or fitness of purpose. Since handling, storage,
cleaning and sterilization of the product, as well as factors relating to catheterization procedures, and
other matters beyond Millar’s control directly affect the product and the results obtained from its use,
Millar shall not be liable for incidental or consequential loss, damage, or expense directly or
indirectly arising from the use of this product.
16
Figures
Table of Contents
RECOMMENDED ACCESSORIES ...................................................................................................... 1
DEVICE DESCRIPTION........................................................................................................................ 1
INTENDED USE/INDICATIONS.......................................................................................................... 2
WARNINGS ............................................................................................................................................ 2
PRECAUTIONS ...................................................................................................................................... 2
HANDLING PRECAUTIONS FOR MIKRO-TIP P-V CATHETERS ................................................. 3
TROUBLESHOOTING AND CORRECTIVE ACTION ...................................................................... 3
Figure 2
MAINTAINING DEVICE EFFECTIVENESS ...................................................................................... 4
CATHETER PREPARATION .................................................................................................................... 4
ROUTINE INSPECTION ........................................................................................................................... 4
PRESSURE CALIBRATION...................................................................................................................... 4
VOLUME CUVETTE CALIBRATION ....................................................................................................... 5
Procedure......................................................................................................................................... 6
OPERATING INSTRUCTIONS .................................................................................................................. 7
CLEANING ............................................................................................................................................. 9
APPROVED CLEANERS AND DISINFECTANTS ....................................................................................... 9
WATER RESISTANT CONNECTOR CAPS ............................................................................................... 9
CLEANING PROCEDURE ........................................................................................................................ 9
GENERAL INSTRUCTIONS FOR CATHETER DISINFECTION ................................................... 11
RINSING AFTER DISINFECTION ........................................................................................................... 11
Figure 3
METHOD OF STERILIZATION FOR CATHETERS
AND EXTENSION CABLES (OPTIONAL) ....................................................................................... 12
ETHYLENE OXIDE STERILIZATION CYCLE PARAMETERS .................................................................. 12
Figure Legend
1. Pressure Sensing Area
SENSOR SPECIFICATIONS ............................................................................................................... 13
6.
Mercury Manometer
CATHETER SPECIFICATIONS.......................................................................................................... 13
2.
Wires to Connector
7.
Tee Fitting
SCHEMATICS ...................................................................................................................................... 14
3.
Vent to Connector
8.
Plastic Dome
4.
Catheter
9.
Pressure Transducer Catheter
5.
Silicone Rubber Diaphragm
10.
To Recorder
FIGURES ............................................................................................................................................... 15
SERVICE PROVISION ........................................................................................................................ 16
MILLAR LIMITED WARRANTY ...................................................................................................... 16
15
Recommended Accessories
M.I. P/N
M.I. P/N
M.I. P/N
M.I. P/N
880-0127, MPCU-200, 220V
880-0128, MPCU-200, 110V
850-1308, TEC-10D Pressure Cable
850-5066, CEC-10A Volume Cable
M.I. P/N
M.I. P/N
M.I. P/N
M.I. P/N
880-0160, MPVS-300
880-0159, MPVS-400
850-5103, PEC-4D Pressure Cable
850-5099, CEC-4B Volume Cable
Schematics
M.I. P/N 910-1048, Large Volume Calibration Cuvette
M.I. P/N 910-1049, Small Volume Calibration Cuvette
All accessories sold separately.
Electrode & Redel Connector
Definition of Symbols
Attention, consult accompanying documents
Date of Manufacture
Catalog Number
Serial Number
Sensor & Low Profile Connector
Batch Code
Use By Date
Electrostatic Sensitive Device
EU Declaration of Conformity
Device Description
The Mikro-Tip Pressure-Volume (P-V) catheter combines an ultra-miniature pressure sensor(s) and a
series of electrodes mounted at various locations along the distal end of the catheter (Figure 2). The
catheter terminates at two electrical connectors at the proximal end. The pressure sensor produces an
electrical output signal, which varies in direct proportion to the magnitude of sensed pressure. The
electrodes allow for estimation of left ventricular volume changes by impedance measurements.
Mikro-Tip catheters are intended for multiple uses. Experience has proven that the instruments are
safe and effective for extended service if proper handling, cleaning, and sterilization procedures are
followed.
Immediately upon receipt of the catheter, and prior to its initial cleaning, sterilization, and use, the
customer should verify that the catheter is operational.
1
14
Intended Use/Indications
Sensor Specifications
1.4 - 2F Catheter
1F Catheter
Type of Sensor
Diffused Semiconductor, piezoresistive
Pressure Range
-50 to + 300 mmHg (-6.7 to 40 kPa)
Overpressure
+4000 mmHg (+530 kPa), -760 mmHg (-100 kPa)
Rated Excitation*
2.5-7.5 VDC or VAC rms
Sensitivity
2.0-10.0 VDC or VAC rms
5 µV/V/mmHg, nominal (37.6 µV/V/kPa)
Temperature Error Band at Zero Pressure
±3 mmHg (± 0.4 kPa) BSL, 23 - 38 ºC
Linearity and Hysteresis (Combined)
±1%, BSL of full scale
Drift**
±2%, BSL of full scale
Use of the ultra-miniature Mikro-Tip P-V catheter is indicated when combined physiological pressure
and volume (as estimated by electrical impedance measurements) monitoring is required in small
animals such as mice and rats.
Mikro-Tip P-V catheters may be introduced into the left ventricle using a closed chest carotid artery
approach or using an open chest approach through an entry site made in the apex of the heart with a
needle.
Proper catheter positioning within the left ventricle can be verified with the aid of echocardiography.
Warnings
•
The Mikro-Tip P-V catheter should be stored in a cool, dry place.
•
The Mikro-Tip P-V catheter is shipped with a foam dome fitting over the catheter tip to
protect the sensor/electrode area. The catheter tip should be left in the foam dome when
the catheter is in the tray.
< 6 mmHg (0.8 kPa) in 12 hours
Natural Frequency
≥10 kHz
Bridge Resistance
1000 ohms, nominal
Reference Pressure
Atmosphere
Single Pressure
< 10 µA at 180 VDC
< 10 µA at 120 VAC
< 10 µA at 25 VDC
Double Pressure
< 10 µA at 25 VDC
< 10 µA at 25 VDC
Electrical Leakage
Zero Offset
< ±50 mmHg (± 6.7 kPa)
* Performance specifications are for 5 VDC. Transient voltages up to 20 volts will not damage the
transducer.
** Based on 30 minute presoak.
Catheter Specifications
Precautions
Proper handling of the Mikro-Tip P-V catheter is critical to avoid damage and
maximize the catheter’s use-life.
•
Use of the Mikro-Tip P-V catheter should be restricted to specialists who are familiar
with, and have been trained to perform, the catheterization procedures for which the
device is intended.
•
Do not under any circumstances bend, kink, fold, cut, pinch, crush, etc. the Mikro-Tip P-V
catheter especially around the sensor/electrode area. These actions could severely damage
the catheter and/or render the catheter unusable and result in costly repair or replacement
charges.
•
The Mikro-Tip P-V catheter should be inspected for damage (cracking, kinks, etc.) prior
to each use.
•
Do not grip the Mikro-Tip P-V catheter with forceps, tweezers, or fingers anywhere near
the sensor/electrode area.
When using metal forceps or tweezers to grip the Mikro-Tip P-V catheter, slip some soft
tubing over the tips of the metal instrument to cushion the interface between the
instrument and the catheter body.
Always grip the Mikro-Tip P-V catheter proximal to the sensor/electrode area. Never grip
the catheter between the electrodes or between the electrodes and the pressure sensor case.
Always be mindful of the location of the catheter tip.
Do not set heavy objects or metal instruments on top of the Mikro-Tip P-V catheter.
Do not tighten sutures over the sensor/electrode area on the Mikro-Tip P-V catheter.
When using the carotid artery approach to insert the Mikro-Tip P-V catheter into the left
ventricle, advance the sensor/electrode area completely beyond the proximal suture before
tightening the suture.
When using the carotid artery approach to insert the Mikro-Tip P-V catheter into the left
ventricle, take care not to damage the catheter with the tips of any forceps or tweezers that
are used to grip the artery when inserting the catheter.
When using the open chest approach to insert the Mikro-Tip P-V catheter into the left
ventricle, do not push the catheter tip directly through the left ventricular wall. First, make
an entry hole in the ventricular apex with a needle and then insert the catheter through the
hole.
Never apply excessive force when inserting the Mikro-Tip P-V catheter. The catheter may
incur damage and could puncture through the left ventricular wall or damage the aortic
valve.
•
Pin-to-Electrode Resistance: <15 ohms
Catheter Size: Per package labeling
Usable Length: Per package labeling
•
Electrodes: 0.25 mm
•
•
•
•
•
•
•
13
2
•
•
•
•
If resistance is encountered while inserting the Mikro-Tip P-V catheter, pull back slightly
and then try advancing again.
When removing the Mikro-Tip P-V catheter through the carotid artery, loosen the
proximal suture before pulling the catheter out to insure the pressure sensor or electrodes
do not catch on the suture and lift or tear away from the catheter.
The Mikro-Tip P-V catheter should be cleaned immediately after each use (see Cleaning).
The pressure sensor element on the Mikro-Tip P-V catheter is sensitive to electrostatic
discharge. Refrain from touching the sensor element while the catheter is not connected to
monitoring equipment.
Handling Precautions for Mikro-Tip P-V Catheters
Pressure
Sensor &
Electrodes
DO:
Clean immediately after use
Protect with dome when not in use
Disconnect during electrical defibrillation
or electrosurgery
Catheter
Clean immediately after use
Connectors
& Cables
Cleaning
Protect connectors from fluid
Disinfection
or
Sterilization
Keep catheter and sensor wet until
cleaning
Clean thoroughly with approved
enzymatic cleanser immediately after use
Dry catheter before sterilizing
Remove plastic dome from catheter
DO NOT:
Clean with stiff-bristled brush
Clean with high pressure water jet
Tap the sensor or electrodes against
a rigid surface
Apply excessive force to the sensor
or electrodes
Expose to excessive pressure
Cut, crease, knot, fold, kink, or
crush with forceps or clamps of any
kind
Immerse connectors in liquid
Expose to alcohol, cresols, phenols,
mercury compounds, hypochlorites,
acetone, peroxide, silicone chlorine,
xylenes, trichloroethylene, or freon
Use ultrasonic cleaner.
Immerse electrical connector
Autoclave, irradiate (gamma/ebeam), plasma, peroxide or
formaldehyde vapor solutions
Use Sporox or Cidex PA solutions
Troubleshooting and Corrective Action
Problem
Excessive
pressure signal
drift
Pressure sensor
will not balance
(zero)
Probable Cause
Deposit of foreign material on the
diaphragm of the pressure sensor.
Corrective Action
Follow Cleaning Instructions. If
problem persists, contact Millar.
Moisture in the connector, damage to
wires in the catheter, or fractured
strain gauge within pressure sensor.
Noisy or erratic
volume signal
Damage to electrodes or electrodewire bond (“open electrode”).
Follow Operating Instructions or
substitute a transducer known to be
operating properly into the recording
system. If problem persists, contact
Millar.
Follow Operating Instructions or
substitute a transducer known to be
operating properly into the recording
system. If problem persists, contact
Millar.
3
Method of Sterilization for Catheters and Extension Cables
(Optional)
CAUTION:
DO NOT sterilize by autoclaving, radiation (gamma or e-beam), plasma, peroxide or
formaldehyde vapor solutions.
Catheters must be completely cleaned and dried before sterilization. Aerate at room temperature or in
a heated aeration cabinet (max. 145 ºF, 63 ºC). Catheters may be sterilized in the white plastic
shipping tray. The foam dome and connector caps must be removed and placed alongside the catheter
inside the pouch during sterilization. The caps should be saved and reused each time the catheter is
cleaned.
The tray, with lid, should be placed in a breathable polyethylene pouch (e.g., 3M™ Steri-Lok™).
CAUTION:
The catheter should be completely dry before sterilization.
Ethylene Oxide Sterilization Cycle Parameters
Preheat phase:
Starting Temperature 110 ºF (43ºC) min.
Duration 30 minutes
6.0 inHgA (20.3 kPa)
Rate: 3 minutes
Initial Vacuum:
Nitrogen Flush: 2 cycles
Nitrogen Addition to:
Rate:
Evacuation:
Rate:
Conditioning
Humidification:
Steam Conditioning:
Humidity Dwell:
Relative Humidity:
Ethylene Oxide Concentration:
Dwell Pressure:
Dwell Time:
Temperature:
Relative Humidity:
After Vacuum
Vacuum:
Rate:
Vacuum Hold:
Gas Wash A:
Release:
Rate:
Vacuum
Rate:
Release (Filtered Air):
Rate:
Aeration (Hot Cell)
Duration:
Temperature:
CAUTION:
28.0 ± 0.5 inHgA (94.8 ± 1.7 kPa)
1.4 ± 0.5 inHgA/min. (4.7 ± 1.7 kPa/min.)
6.0 ± 0.5 inHgA (20.3 ± 1.7 kPa)
1.0 ± 0.5 inHgA/min. (3.4 ± 1.7 kPa)
1.5 ± 0.5 inHgA (5.1 ± 1.7 kPa)
10 min.
30 ± 5 min. at 7.5 ± 0.5 inHgA (25.4 ± 1.7 kPa)
15-70%
500 ± 50 mg/L
16.5 ± 1.0 inHgA (55.8 ± 3.4 kPa)
2 hours
110-130 ºF (43-54 ºC)
30-70% (35-44% nominal)
6.0 ± 0.5 inHgA (20.3 ± 1.7 kPa)
1.0 ± 0.5 inHgA/min. (3.4 ± 1.7 kPa)
10 min.
4 cycles (minimum)
30.0 inHgA/min. (94.8 ± 1.7 kPa)
1.4 ± 0.5 inHgA/min. (4.7 ± 1.7 kPa)
6.0 ± 0.5 inHgA (20.3 ± 1.7 kPa)
1.0 ± 0.5 inHgA/min. (3.4 ± 1.7 kPa)
28.0 ±0.5 inHgA (94.8 ± 1.7 kPa)
2.0 ± 0.5 inHgA/min. (6.6 ± 1.7 kPa)
At least 8 hours
110 ± 10 ºF (43 ºC)
The Mikro-Tip transducer should not be used earlier than 5 days after sterilization.
12
6.
After the cleaning procedure is complete, return the Mikro-Tip P-V catheter to its original
packaging for storage:
Maintaining Device Effectiveness
•
Return the catheter to the tray.
Catheter Preparation
•
Protect the sensor/electrode area on the catheter tip by carefully placing it within the
foam dome that came with the packaging,
•
Slide the tray inside the box.
Presoak the catheter tip in saline or distilled water maintained at body temperature for at least 30
minutes prior to use. Only soak the catheter tip, do not submerge the catheter’s electrical connectors,
as doing so will damage the sensitive electronics housed inside!
•
Store the catheter in a cool, dry place until the next use.
General Instructions for Catheter Disinfection
1.
2.
3.
The catheter must be cleaned, rinsed and dried prior to disinfection. Soil, debris, proteins,
and water can interfere with the effectiveness of the following procedure, posing a risk to
the patient and the user. Note that some disinfectants have a limited usable life after
activation or opening the container. Failure to heed such warnings can inhibit the
effectiveness of the disinfection process.
Prepare the disinfectant according to the manufacturer’s instructions.
Submerge the catheter into the disinfectant up to the strain relief.. Do not submerge the
strain relief or the connector as it will damage the transducer and void the warranty.
Soak the transducer in the disinfectant at the temperature and time intervals listed.
The presoak helps prepare the pressure sensor diaphragm for the "wet" biological environment.
Presoaking the catheter tip in body temperature fluid also helps prevent pressure signal drift and
negative pressure recordings. The presoak can be done by gently inserting the catheter tip into a
beaker or dish or through the tip of a syringe.
Routine Inspection
CAUTION:
If damage is found during inspection, DO NOT use the catheter. Contact Millar
Instruments or an authorized Millar distributor for assistance.
1.
Rinse the device by submerging all exterior disinfected surfaces in sterile pyrogen-free
water. The volume of the water should be at least two gallons (7.6 liters) and the soak time
should be at least one minute.
The Mikro-Tip P-V catheter should be thoroughly inspected under magnification before and after
each use to determine its condition. Carefully examine the catheter for cuts, kinks, or creases. The
active surface of the sensor and electrodes should be examined for any film, blood, or biological
debris that has not been removed by cleaning. Any film, blood, or biological debris may cause shortterm baseline drift and should be removed. Such removal should consist of a thorough soaking in an
enzymatic cleaning solution (Terg-A-Zyme®) followed by a persistent and gentle wiping action along
the sensor or electrodes with a moist tissue, gauze, or cotton tipped swab. The connectors should
undergo visual inspection for corrosion or bad contacts. Liquid entering the connector(s) can cause
electrical hazard, erratic operation, and corrosion.
2.
At least three separate rinses are required. Do not reuse any of the water used for rinsing
since it will be contaminated with the disinfectant.
Pressure Calibration
4.
Rinsing after Disinfection
Each transducer is calibrated for a standardized sensitivity of 5μV/V/mmHg (37.6 µV/V/kPa).
Since the transducer electrical calibration may be altered by the effects of variations in monitors,
calibration should be confirmed with a pressure manometer to help guarantee the most accurate
results.
To properly calibrate and balance the Mikro-Tip P-V catheter pressure transducer, follow the
instructions for the Millar control unit being used (MPCU-200 or MPVS-300/400, for more details
please see the “Operating Instructions” section of this manual). To confirm calibration accuracy,
compare the pressure output produced using the pressure manometer with the electrical output signal
produced by the Millar control unit for the Mikro-Tip P-V catheter pressure transducer (see Figure 3
for more detail).
11
4
Volume Cuvette Calibration
1.
After the P-V loop data acquisition is complete, immediately remove the Mikro-Tip P-V
catheter from the biological environment. When using the carotid artery approach, loosen
the proximal suture before pulling the catheter back through the blood vessel. Loosening
the proximal suture will help prevent the electrodes and pressure sensor from catching on
the suture and breaking.
2.
Upon removing the Mikro-Tip P-V catheter from the biological environment, immediately
soak the catheter tip in a beaker, syringe, or dish filled with fresh saline or distilled water.
Keep the tip soaking until you are ready to continue cleaning it or you are ready to
catheterize another research subject. This step will help lyse any cells that adhere to the
catheter and help loosen and prevent clot formations and protein build-up on the catheter
tip.
The cuvette calibration method uses an actual blood sample to make a more accurate assessment of
the left ventricular volume. The cuvette calibration method involves using insulator-type cuvettes of
known diameter filled with heparin-treated blood.
Figure 1 illustrates the procedure for measuring volume using the conductance method when a fourelectrode catheter is submerged in a cylindrical non-conductive tube filled with a conductive solution.
Conductance/Volume readings can be obtained by submerging the catheter electrodes into bloodfilled tubes of known diameter.
The cuvette calibration is recommended for researchers who are interested in obtaining a more
accurate assessment of left ventricular volume. Researchers can enhance the accuracy of their volume
measurements by coupling the acquired calibration data with their own mathematical models and/or
physical simulations to convert the volume measurements derived from the Millar hardware (MPCU200 or MPVS-300/400) into what they believe are the true volumes present within the left ventricle.
The cuvette calibration can dramatically affect the quality of the volume measurements. Many factors
must be addressed to make the cuvette calibration as accurate as possible. These factors include:
maintaining the cuvette at body temperature, minimizing blood clotting in the cuvette, properly
cleaning the cuvette before performing the experiment, and centering the catheter within the cuvette.
The volume measured by the conductance method when a four-electrode catheter is submerged into a
cylindrical non-conductive (e.g. Plexiglas) tube is given in Figure 1.
•
NOTE
Never let blood dry on the catheter tip! Always keep the tip soaking in saline or distilled water
between experiments or until you are ready to proceed with the next cleaning step.
Do not submerge the catheter connectors, as moisture will damage the sensitive electronics that are
housed inside!
3.
The Mikro-Tip P-V catheter should be thoroughly inspected under magnification after
each use to determine its condition. Carefully examine the catheter for cuts, kinks, or
creases. The active surface of the sensor and electrodes should be examined for any film
or biological debris. Any film may cause short-term baseline drift and should be removed.
Such removal should consist of a thorough soaking in Terg-A-Zyme (see below) followed
by a persistent and gentle wiping action along the sensor or electrodes with a moist tissue,
gauze or cotton tipped swab. The connectors should undergo visual inspection for
corrosion or bad contacts.
4.
Using an enzymatic cleaner on the distal portion of the Mikro-Tip P-V catheter is essential
to preventing protein buildup on the pressure sensor and electrodes. Without the use of an
enzymatic cleaner, a protein film will form on the pressure sensor that ultimately results in
pressure signal drift. Millar provides the following guidelines for using enzymatic cleaners
with the ultra miniature P-V catheters:
L = distance between electrodes 2-3:
Catheter Model PVR-1045, L = 4.5 mm
Catheter Model SPR-839, L = 4.5 mm
Catheter Model SPR-869, L = 6.0 mm
Catheter Model’s SPR-838 & SPR-847, L = 9 mm
•
The actual volume between electrodes 2-3 = π * r2 * L
•
r = inner radius of cylinder
5.
•
Use a Millar approved enzymatic cleaning agent such as Terg-A-Zyme by Alconox.
www.alconox.com.
•
Follow the manufacturer's instructions for mixing the Terg-A-Zyme solution
•
Soak the catheter tip in a beaker or syringe for 15-30 minutes in the Terg-A-Zyme
solution.
•
After the Mikro-Tip P-V catheter is done soaking in the enzymatic cleaning solution,
thoroughly rinse the tip with fresh distilled water.
After the rinsing is complete, gently dry the Mikro-Tip P-V catheter according to the
following steps:
•
Fold a Kim-wipe or similar soft tissue.
•
Use gentle stroking to brush dry the catheter tip.
•
Do not pull the catheter tip through a folded Kim-wipe.
•
Do not allow the catheter to air dry on the tray, table, or countertop.
Figure 1.
5
10
data acquisition sampling rate of 1 kHz (1000 samples/second) in order to accurately
capture all of the features of the P-V waveforms produced by the fast beating hearts
of mice and rats]. To ensure activation of the catheter tip transducers, make sure that both
the Pressure Transducer/Calibration Switch and Volume Transducer/Relative Volume
Units (RVU) Calibration Switch on the front panel of the Millar control unit (MPCU-200,
MPVS-300/400) are switched away from the calibration reference settings and are set to
Transducer. After the P-V data has been collected by the data acquisition software, please
refer to the PVAN software user’s guide for instructions on how to export P-V data
selections out of the data acquisition software to perform a comprehensive data analysis in
PVAN.
Cleaning
The electronic RVU calibrator built into the Millar control unit (MPCU-200 or MPVS-300/400)
provides a quick and efficient way of calibrating the system. Units of conductance (RVU, μmho, μS)
can be converted into volume units by following the cuvette calibration procedure listed below:
Procedure
1.
In the data acquisition software, calibrate the hardware output using the electronic RVU
calibrator built into the Millar control unit (MPCU-200 or MPVS-300/400). A linear twopoint calibration is recommended at 5RVU and 50RVU (for more details on RVU
calibration, please see the “Operating Instructions” section of this manual).
2.
During the course of the experiment withdraw fresh slightly heparinized blood from the
experimental subject and inject the blood into the different tubes of a calibration cuvette
(insulated tubes with different diameters) to a depth that will submerge the Mikro-Tip P-V
catheter electrodes when the catheter is dipped in the tube.
Approved Cleaners and Disinfectants
Type
Enzymatic
Detergent
Trade Name
Manufacturer
®
Enzol
(in UK:
Cidezyme®)
Advanced
Sterilization
Products (J&J)
Endozime®
Ruhoff Corporation
®
High-Level
Disinfectant
Terg-A-Zyme
Alconox
Cidex
Activated
Dialdehyde
Solution
Cidex® OPA
Advanced
Sterilization
Products (J&J)
MetriCide®
Advanced
Sterilization
Products (J&J)
Metrex
Active
Ingredient.
Propylene
Glycol
Soak
Time/Temperature
15 minutes / room
temperature
Propylene
Glycol
Sodium
Dodecylbenzene
Glutaraldehyde
15 minutes / room
temperature
15 minutes / room
temperature
1-2 hours / 25 °C
(77°F)
Orthophthalaldehyde
16-30 minutes / 20 °C
(68°F)
Glutaraldehyde
1-2 hours / 25 °C
(77°F)
DO NOT USE:
•
Glutaraldehyde solutions containing surfactants (e.g., Cidex 7 or Cidex Plus 28 Day)
•
Solutions containing hydrogen peroxide (e.g. Sporox)
•
Cidex PA solution
Water Resistant Connector Caps
Each catheter has water-resistant caps to protect electrical pins and circuitry. Place caps over the open
end of the connectors before cleaning and disinfecting. Remove caps prior to sterilization. Save and
reuse these caps each time the catheter is cleaned and disinfected.
Cleaning Procedure
CAUTION:
DO NOT submerge the wye junction or connectors. This will damage the catheter
and void its warranty! Wipe with cleaner and gauze.
CAUTION:
Use only the listed cleaners and disinfectants for the times/temperatures indicated.
CAUTION:
Delays in rinsing greatly reduce cleaning effectiveness!
9
NOTE
Millar Instruments can provide standard calibration cuvettes for mice (Part No. 910-1049) and rats
(Part No. 910-1048). Researchers who are interested in enhancing the accuracy of their volume
calibrations may choose to fabricate their own cuvettes based on the size of their research animals.
3.
Dip the Mikro-Tip P-V catheter in the center of the blood-filled tubes and record the
conductance output in RVUs. Keep the catheter centered in the tube (cuvette). If the
bottom of the tube is not flat, then be careful to keep all four electrodes in the cylindrical
portion of the tube.
NOTE
The blood used to perform the cuvette calibration must be free of saline or any other solution that
may alter the conductance of the blood and affect the data unless you are developing calibration
curves to help identify the changes in blood conductance that may be occurring as a result of
introducing some type of compound, drug, etc.
4.
Correlate the known volumes calculated from the catheter electrode spacing and the
cuvette tubes with their respective conductance outputs to plot a graph of volume vs.
conductance (RVU).
5.
Obtain the equation of the line (slope and y-intercept) and use it to convert conductance
units (RVU) to volume units (uL).
NOTE
As an alternative to a two-point calibration, some researchers follow the rules of good statistical
sampling and choose to perform a multiple-point cuvette calibration of volume vs. conductance. This
data can be recorded then plotted in a spreadsheet program such as Microsoft Excel to obtain the
conductance (RVU) to volume (uL) calibration. Please remember that the volume of blood within the
animal as well as the size and number of calibration cuvettes used in the experiment limit the number
of data points that can be acquired.
The cuvette calibration procedures listed above do not take into account the parallel volume
contribution of the myocardium. Please consult Millar’s PVAN Pressure-Volume Analysis user’s
guide for more details on how to obtain a value for parallel volume.
6
Operating Instructions
1.
Unpack the hardware, software, and cables.
2.
Inspect the equipment for any obvious signs of external and/or internal damage. If
anything is missing or the equipment seems to be damaged in any way, contact Millar
Instruments or the authorized Millar distributor in your area immediately.
3.
Power up the computer that will be used to acquire and analyze the P-V data and install
the necessary software (DAQ software, Millar PVAN, etc.).
4.
Connect the P-V channel outputs on the back panel of the Millar control unit (MPCU-200
or MPVS-300/400) directly to a computer (USB cable for MPVS-400) or to the input
channels on the data acquisition system using BNC-BNC cables or BNC cables that
terminate at a connector that is compatible with the data acquisition system (MPCU-200
or MPVS-300/400). Turn on the data acquisition system.
5.
Connect the power cord to the power input jack on the back of the Millar control unit
(MPCU-200 or MPVS-300/400). Please ensure the power cord conforms to the standards
in the country of operation. The end user may be responsible for providing his own power
cords if the cords supplied by Millar are not sufficient for the country of operation. Cords
must connect to a grounded power outlet for safety.
6.
Turn on the Millar control unit (MPCU-200 or MPVS-300/400). Ensure that the Power
Indicator located on the front panel lights up.
7.
Connect the pressure cable (PEC-4D or similar) and volume cable (CEC-4B or similar) to
the appropriate input connectors on the back of the Millar control unit (MPCU-200 or
MPVS-300/400).
8.
Unpack a Mikro-Tip P-V catheter, being careful to handle it with a high degree of care.
9.
Connect the pressure transducer connector on the Mikro-Tip P-V catheter to the pressure
cable (PEC-4D or similar).
10. Connect the conductance/volume transducer connector on the Mikro-Tip P-V catheter to
the volume cable (CEC-4B or similar).
11. Using a shallow dish, beaker, or syringe, soak the catheter tip in body temperature distilled
water or saline for at least 30 minutes prior to insertion into the biological environment.
12. Set the Pressure Transducer/Calibration Switch on the front panel of the Millar control
unit (MPCU-200 or MPVS-300/400) to 0 mmHg.
13. Set the Volume Transducer/Relative Volume Units (RVU) Calibration Switch on the front
panel of the Millar control unit (MPCU-200 or MPVS-300/400) to 5 RVU.
14. For the MPVS-300/400, verify that the appropriate segment length has been selected using
the Segment Select switch located on the front panel. For standard four-electrode P-V
catheters, select the “Short” position. For six-electrode P-V catheters, select either the
“Short” or “Long” position depending on the desired electrode spacing (segment length).
15. Open the data acquisition software on the computer.
7
16. Configure the data acquisition software according to user preferences so that it can
effectively acquire, display, and record the P-V data produced by the Millar control unit
(MPCU-200 or MPVS-300/400).
17. Calibration Setup: Follow the instructions in the data acquisition software user’s manual
as well as Millar’s PVAN user’s guide to perform two-point calibration procedures for
both the pressure and volume channels. For simplified electronic calibration verification,
use the transducer/calibration controls on the front panel of the Millar control unit
(MPCU-200 or MPVS-300/400) to provide fixed voltage signal references for pressure (0100 mmHg) and volume (5-50 RVU) that may be used to quickly perform the two-point
calibration procedure. Remember that RVU verification is only for Relative Volume
Units, not absolute volume. Conversion of Relative Volume Units into true volume units
requires additional steps (please refer to Millar’s PVAN user’s guide for additional
instructions regarding volume calibration techniques). Volume calibration for a given
catheter may be performed using small tubes of known diameters (a calibration cuvette,
which can be supplied by Millar Instruments) filled with fresh, slightly heparinized blood
drawn from an experimental subject. Validation of the volume estimates provided by the
Millar hardware can be performed by other means, e.g. by thermodilution, flow probes,
hypertonic saline dilution, echo, etc.
CAUTION:
The “zero” output produced by placing the pressure control unit switch in the 0
mmHg position is an electrical zero, not an atmospheric zero.
18. Pressure Transducer Balancing: After the catheter tip has soaked for at least 30 minutes,
set the Pressure Transducer/Calibration switch on the front panel of the Millar control unit
(MPCU-200 or MPVS-300/400) to Transducer. Unlock and adjust the Balance control
knob for the pressure channel the catheter is connected to. Use the Balance control knob to
adjust the pressure transducer output while dipping the transducer just below the surface
of distilled water or saline (essentially a zero pressure environment). Adjust the Balance
control knob until the output signal reads approximately 0 mmHg (as displayed by an
indicator in the data acquisition software or similar monitor) then lock the knob into
position.
CAUTION:
Do not submerge the electrical connectors on the catheter.
For best stability and zero adjustment, shield the sensor from bright ambient light during
the balancing procedure and allow the catheter-tip to soak in body temperature sterile
water or saline for 30 minutes prior to insertion into the biological environment. Zero
balancing of the pressure transducer should be done prior to each catheterization
procedure.
NOTE
A pressure manometer (mercury, digital, etc.) may also be used to check the zero balance of the
transducer and calibrate the pressure output at two points. To pressurize the transducer, a manometer
can be connected to one end of a hemostasis valve or Toughy-Borst/Luer adapter with flexible tubing.
Carefully slip the catheter through the other end of the valve/adapter and seal the valve/adapter
around the catheter shaft proximal to the sensor/electrode area. See Figure 3 for more detail.
19. The system is now ready to begin conducting P-V experiments. Prepare the experimental
subject for catheter insertion according to the lab’s established experimental protocols.
When the experimental subject is ready, insert the Mikro-Tip P-V catheter into the left
ventricle and begin recording P-V data [Please Note: Millar Instruments recommends a
8