1
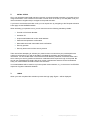
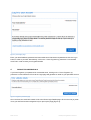
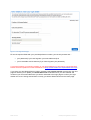
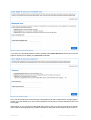
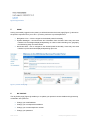
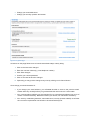
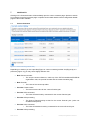
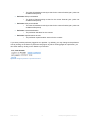
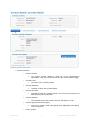
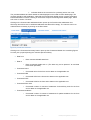
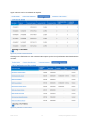
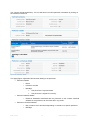
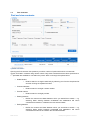
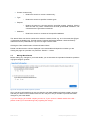
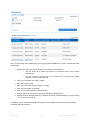
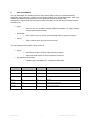
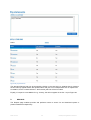
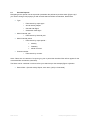
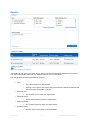
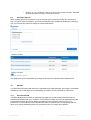
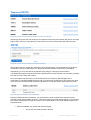
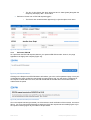
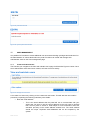
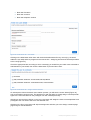
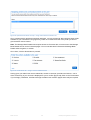
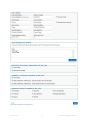
Dental Portal User Manual
Date: 21/7/12
i
Dental portal guidance manual v.1
CONTENTS
1
INTRODUCTION.........................................................................................................................1
2
INITIAL STEPS...........................................................................................................................2
3
LOGIN ........................................................................................................................................2
4
FORGOTTEN CREDENTIALS....................................................................................................3
5
HOME.........................................................................................................................................6
6
MY PROFILE ..............................................................................................................................6
7
CONTRACTS .............................................................................................................................8
7.1
Current Contracts...............................................................................................................8
7.2
Contract Details – Provider view.......................................................................................10
7.3
Contract Details – Performer View....................................................................................15
7.4
Find Contracts..................................................................................................................16
7.5
Manage Bank Details .......................................................................................................17
8
PAY STATEMENTS..................................................................................................................19
9
REPORTS.................................................................................................................................20
9.1
Provider Reports ..............................................................................................................21
9.2
Performer Reports............................................................................................................23
10
EDI PIN................................................................................................................................23
10.1
Provider EDI PIN..............................................................................................................23
10.2
Performer EDI PIN ...........................................................................................................25
11
USER MANAGEMENT.........................................................................................................26
11.1
Create an Administrator....................................................................................................26
11.2
Manage Administrator Users ............................................................................................30
Date: 21/7/12
ii
Dental portal guidance manual v.1
1
INTRODUCTION
This guide will take you through the functions and features of the dental portal and explains how to
access the various features.
The guide takes you through the initial portal activation process, logging in to your portal account and
then how to access the information and features in the portal.
More functionality will become available in the portal over the next month or so and this guide will be
updated to reflect the new features as soon as they become available.
In the meantime if you have any feedback on this guide or on the portal then you can email your
comment to [email protected]
Date: 21/7/12
1
Dental portal guidance manual v.1
2
INITIAL STEPS
Once your activation letter/email has been received you should be able to activate your portal account
using the activation code contained in the letter or email. Click on the link (or cut and paste it into your
internet browser navigation bar) to navigate to the portal activation.
If you haven’t received an activation code you can request one by navigating to the Request Activation
Letter page via the NHSBSA website.
When activating your portal account, you will need to enter the following mandatory details:
Provider or Performer Number
Activation ID
Unique email address & confirm email address
Password and password confirmation
Memorable word and memorable word confirmation
Security question
Security answer and confirm security answer
Take care before attempting to activate your portal account to ensure that your provider/performer
number is to hand since you will not be able to complete the activation process without this
information. You should also bear in mind that the email address, password, memorable word and in
some cases your security question and answer credentials will be required to login to the portal. Be
sure to use credentials that comply with the on-screen requirements and that can be remembered
easily. All of these details entered are also case sensitive.
Your email address will be used for any further portal communications, e.g. in the event of an EDI PIN
request or forgotten credentials situation.
3
LOGIN
When you have completed the activation process the login page Figure 1 will be displayed:
Date: 21/7/12
2
Dental portal guidance manual v.1
Figure 1: portal login page
Enter your email address, password and memorable word characters requested and click the Log in
button in order to proceed. Alternatively, click on the “I have forgotten my password or memorable
word” link in order to reset your forgotten details.
4
FORGOTTEN CREDENTIALS
If you have forgotten your password or memorable word, clicking on the “I have forgotten my
password or memorable word” link via the Login page will generate an email to your specified account.
Figure 2: forgotten password page
Once received, the email will contain a link to the Reset Login Details page. Click on the link (or paste
it into your internet browser navigation bar) to open up the page [Figure 3].
Date: 21/7/12
3
Dental portal guidance manual v.1
Figure 3: reset login details page
Fill out the required fields with your provider/performer number, your security answer and –
your password (if you have forgotten your memorable word) or
your memorable word characters (if you have forgotten your password).
If you have forgotten your security question or your email address you will need to contact the NHS
Dental Services helpdesk for further assistance via http://www.nhsbsa.nhs.uk/DentalServices.aspx.
If you enter your provider/performer number, password and security answer correctly then the next
page will enable you to update your memorable word credentials. Once you have entered and
confirmed your new memorable word you will be redirected to the login page to confirm your login
details once more. Having entered them correctly you will be allowed access to the Home page.
Date: 21/7/12
4
Dental portal guidance manual v.1
Figure 4: change memorable word page
If you enter your provider/performer number, password and memorable word correctly then the next
page will enable you to update your password credentials.
Figure 5: reset password page
Once you have entered and confirmed your new password you will be redirected to the login page to
confirm your login details once more. Having entered them correctly you will be allowed access to the
Home page.
After logging in, you may logout of the portal at any time by clicking on the Log Out link in the top lefthand corner of the page [Figure 6]. Please remember to close your internet browser after you do so.
Date: 21/7/12
5
Dental portal guidance manual v.1
Figure 6: logout button
5
HOME
Having successfully logged into the portal you will be directed to the home page [Figure 7], tailored to
the specific requirements of your role i.e. provider, performer or provider/performer
Navigation Links – click to navigate to the desired portal functionality.
System Messages – announcements and information from the BSA. Users may see some
variation in the messages displayed depending on various criteria including role, geography,
commissioning body and other factors.
Quick-start links - click to navigate to the desired portal functionality. Users may see some
variation in quick-start links displayed depending upon role.
Figure 7: provider home page
6
MY PROFILE
The My Profile page [Figure 8] enables you to update your personal contact details and login/security
credentials, with options to:
Change your email address
Change your correspondence address
Change your contact telephone number
Change your password
Date: 21/7/12
6
Dental portal guidance manual v.1
Change your memorable word
Change your security question and answer
Figure 8: my profile page
All actions on this page follow more or less the same basic steps, namely being:
1. Click on the item to be changed
2. Enter the new item values (e.g. new telephone number)
3. Click Save changes
4. Confirm your current password
5. Click on Proceed to save the changes
6. Optionally you may quit the change at any time by clicking on the Cancel button
Some things you should be aware of:
If you change your email address, you will never be able to revert to the previous email.
Please think very carefully before you go ahead with this action since it is irrevocable.
Your correspondence address can be searched for by postcode and selected from a list of
results or entered manually. Whichever method you choose, the Title field is mandatory.
Your security credentials (password, memorable word, security question details) must follow
the on-screen requirements and should not be shared with anyone.
Date: 21/7/12
7
Dental portal guidance manual v.1
7
CONTRACTS
Clicking on the Contracts button will immediately open the current contracts page. Options to search
for contracts via the find contracts page or update contract bank details via the manage bank details
page are also made available.
7.1
Current Contracts
Figure 9: current contracts (provider view)
Depending on whether you are a provider [Figure 9: current contracts (provider view)Figure 9] or a
performer [Figure 11] you may see a slightly different view:
Both Contract number
o
The unique contract reference, made up of the PCT/Commissioner/PDS/SHA
organisation code, the provider number and the contract iteration [tag].
Both Provider
o
The name of the contract provider.
Provider Contract value
o
The total contract value for the current financial year.
Provider UDA contracted
o
The Units of Dental Activity contracted for the current financial year.
Provider UDA processing
o
The Units of Dental Activity to-date for the current financial year. (value not
available till Sep 2012)
Provider UOA contracted
o
The Units of Orthodontic Activity contracted for the current financial year.
Provider UOA processing
Date: 21/7/12
8
Dental portal guidance manual v.1
o
The Units of Orthodontic Activity to-date for the current financial year. (value not
available till Sep 2012)
Performer UDA pre-scheduled
o
The Units of Dental Activity to-date for the current financial year. (value not
available till Sep 2012)
Performer UOA pre-scheduled
o
The Units of Orthodontic Activity to-date for the current financial year. (value not
available till Sep 2012)
Performer contracted allocation
o
The performer allocation for the contract
Performer superannuation amount.
o
The performer superannuation amount for the contract.
If you are a provider-performer (logged in as a provider - by default), you may change to the performer
view by clicking on the Switch to performer link [Figure 10]. When viewing pages as a performer, you
can switch back by clicking on the Switch to provider link.
Figure 10: change to performer or provider view here
Date: 21/7/12
9
Dental portal guidance manual v.1
Each column can be sorted into alphabetic or numeric order (depending on the column data) by
clicking on the filter button below the column header (highlighted in red - Figure 11).
Figure 11: current contracts (performer view)
Clicking on the Contract number link will open up the contract details page.
7.2
Contract Details – Provider view
As with the current contracts view, the information available in the contract details page(s) will vary
depending on whether you are a provider or a performer, or a provider-performer in provider/performer
view – see above.
Clicking on the contract number as a provider opens the provider details page initially with several
further pages enabling you to drill down further into contract information:
Contract other addresses
Contractual summary
Performers on this contract
We’ll go through each page in turn. All information on these pages is read only.
Date: 21/7/12
10
Dental portal guidance manual v.1
Figure 12: provider contract details
Contract summary
o
Contract number
o
Provider name
o
Date: 21/7/12
The intended remit of the contract. General, orthodontic or both.
Contract type & [Contract sub-type]
o
The date on which the contract ended. If it is a current contract the end
date field may not be populated.
Contract purpose
o
The date on which the contract started.
Contract end date
o
The name of the contract provider.
Contract start date
o
The unique contract reference, made up of the commissioning
organisation code, the provider number and the contract iteration [tag].
The type of contract. GDS, GDS [Pilot], PDS, PDS [Plus], PDS [Pilot],
Trust, Trust [Plus].
Prison contract
11
Dental portal guidance manual v.1
Indicates whether the contract is for a prison(s) with a Yes or No.
The providers address and bank details are also displayed on the initial contract details page. The
contents should be self explanatory. Note that the Provider bank details section contains a Manage
bank details button however. Clicking on this button will open the Manage bank details page, which
we’ll cover in section 7.5 below.
Clicking on the Contract other addresses button opens up the Provider other addresses view.
Obviously where there are no additional addresses the table will be empty. The columns can be reordered where necessary by clicking on the filter button.
Figure 13: provider other addresses
Clicking on the Contractual summary button opens up the Contractual details view containing figures
for each year (or period) during the contracts previous history:
Date from
o
Date contractual details start from.
o
Date contractual details end on. (The date may not be present if an end date
hasn’t been specified).
Date to
Contracted value
o
Contracted value for the from and to dates on the applicable row.
Contracted UDA
o
Contracted UDA for the from and to dates on the applicable row.
Contracted UOA
o
Contracted UOA for the from and to dates on the applicable row.
Contracted Dom visits
o
Contracted number of courses of treatments for domiciliary visits for the from
and to dates on the applicable row.
Contracted sedations
o
Date: 21/7/12
Contracted number of courses of treatments for patient sedations for the from
and to dates on the applicable row.
12
Dental portal guidance manual v.1
Again columns can be re-ordered as required.
Figure 14: provider contractual details
Clicking on the Performers on this contract button opens up the List of performers associated with the
contract.
Figure 15: performers on the contract
Date: 21/7/12
13
Dental portal guidance manual v.1
The columns are self explanatory. You can drill down into further performer information by clicking on
the Performer name link.
Figure 16: performer details
This page [Figure 16] details various items relating to the performer:
Performer Details
o
Name
o
Performer number
o
Message
This performer is superannuable.
This performer is eligible for seniority.
Performer address details
o
Details of addresses associated with the performer on the contract. Personal
address for the performer can be found within ‘my profile’.
Performer contractual details
Date: 21/7/12
o
May contain more or less items depending on relevance to specific performer.
o
Message
14
Dental portal guidance manual v.1
There will be no contributions to the NHS Pension scheme and no life
insurance can be paid if Annual Net Pensionable Earnings does not
have an amount.
•
o
Displayed if the performer is superannuable but the net
pensionable amount is zero.
To comply with the NHS Pension scheme requirements the Annual Contracted
Allocation must be completed to ensure the correct calculation of the Net
Pensionable Earnings for the contract.
Displayed if the performer is superannuable but the allocated annual
amount is zero.
o
Trainer
o
VDP salary
o
Annual gross allocation
o
Allocated annual amount – displayed in the event the allocated amount for the
performer is > 0 and the performer is superannuable.
o
Annual allocation
o
Displayed if the performer is not superannuable.
Annual net pensionable earnings
Displayed if the performer is superannuable.
o
Annual ERNIC amount
o
Annual Grant amount
o
Annual service costs
o
Start date
o
VDP contractual earnings start date for contract.
o
End date
o
VDP contractual earnings end date for contract.
Clicking on the internet browser back button at this point will take you back to the list of performers for
further scrutiny. Alternatively you can use the navigation links to open up another view, e.g. the find
contracts page [section 7.4].
7.3
Contract Details – Performer View
Clicking on the contract number as a performer directs you straight to the performer details view
described in section 7.2 above.
Date: 21/7/12
15
Dental portal guidance manual v.1
7.4
Find Contracts
Figure 17: find contracts
Opening the find contracts view presents you with a number of options with which to locate both
current and historic contracts using various criteria. Only those contracts that have been opened since
1st April 2006 are available to view within the portal. We’ll run through the options below:
Health Bodies
o
Restrict search to a single health body by selecting one from the drop down list
and then clicking the Update list button.
Contract Numbers
o
Restrict search to a single contract number.
Provider names
o
Restrict search to a single provider.
Starting between
o
Refine the contract start dates between which you would like to search – e.g.
selecting dates starting between 01/06/2006 and 28/06/2010 will return
contracts that started on or between the two selected dates.
Ending between
o
Date: 21/7/12
Refine the contract end dates between which you would like to search – e.g.
selecting dates ending between 01/09/2008 and 28/02/2011 will return
contracts that ended on or between the two selected dates.
16
Dental portal guidance manual v.1
Current contracts only
o
Restrict the search to current contracts only.
o
Restrict the search to specified contract types.
o
Restrict the search to contracts with the specified purpose. Warning! Clicking
Both here will only return contracts that are both general and orthodontic, not
contracts that are general or orthodontic.
Type
Purpose
Attributes
o
Restrict the search to contracts of the specified attributes.
The search filters can also be combined to restrict the search further, e.g. as in the screenshot [Figure
17] selecting the Health body, Provider names, Purpose and Starting between criteria sufficiently
restricts the search parameters to only return a single contract result.
Clicking the Clear criteria button will reset all search filters.
Please note also that the columns displayed in the results table will depend on whether you are
viewing the page as a provider or a performer. Section 7.1 refers.
7.5
Manage Bank Details
Before making any changes to your bank details, you must answer the important information questions
in [Figure 18Figure 1] below.
Figure 18: manage bank details important questions
Once you have confirmed that you are not changing your bank details to a limited company account,
and that your bank account resides within the UK – only then will you be able to proceed and make
changes to your bank details.
If you are changing to a limited company account or, if your account is based outside of the UK –
please contact your commissioning body regarding the change.
Date: 21/7/12
17
Dental portal guidance manual v.1
Figure 19: manage bank details view
Once on the manage bank details view, you may proceed and update one or many contracts with valid
bank details:
1. Select the contract you wish to update by checking the checkbox(es).
o
Use the Select all or Select none button to check all or none of the contract
checkboxes.
o
Use the Current contracts only or All contracts link to toggle the display
between current and all contracts.
2. Enter your valid bank sort code – 6 digits.
3. Enter the account name.
4. Enter your valid bank account number – 8 digits.
5. Enter the roll number if necessary.
6. Click on the Update selected contracts button.
7. Confirm identify and authority to change by validating your password.
8. Confirm that you definitely want to go ahead and change the bank details (or not) by clicking
Yes (or No) on the pop-up.
If validation of your account details fails (see steps 2-5), the update will fail with an error message
indicating what the problem is.
Date: 21/7/12
18
Dental portal guidance manual v.1
8
PAY STATEMENTS
The Pay statements view enables performer and provider users to search for and download Pay
statements. When selecting a contract from the list and clicking on the Show details button, a list of the
available pay statements are displayed for the highlighted financial year [Figure 20].
Clicking on the report month link in the Month column will spawn a new web internet browser window
with options to:
Open
o
Open the file for immediate viewing (additional software e.g. Adobe Reader
may be required for this action).
Download
o
Save the file to your PC (check your downloads folder or specify a location).
o
Take no further action and exit the new window.
Cancel
The pay statements list consists of three columns:
Month
o
Identifies the month to which the pay statement pertains.
o
Opens download window in internet browser if clicked on.
Pay statement & Schedule
o
Indicates type of pay statement - examples in table below:
Month
Pay Statement
Schedule
Description
March
Yes
Yes
Pay Statement
March
Yes
No
Copy Pay Statement
February
Yes
Yes
Cleared previous month pay statement
January
No
Yes
Schedule
December
Yes
Yes
Released payment statement
November
Yes
No
Extra payment statement
Date: 21/7/12
19
Dental portal guidance manual v.1
Figure 20: pay statements
The selected financial year can be changed by clicking on the year link (e.g. 2009/10 above), however
the link will only appear if there are reports held for the year. If for example there are no reports held
for 2009/10, for the contract selected – the financial year link will not be visible.
Equally, if a report is not available for e.g. January, this will not appear in the list – as per Figure 20.
9
REPORTS
The Reports page enables provider and performer users to search for and download reports or
pension statements respectively.
Date: 21/7/12
20
Dental portal guidance manual v.1
9.1
Provider Reports
Navigating to the reports view as a provider (remember the performer-provider switch [Figure 10] if
you need to change view) equips you with several search and filter mechanisms, listed below:
Type
o
Filter search by report type –
o
Annual Activity Report
o
General Vital Signs
o
Orthodontic Vital Signs
Within financial year
o
Filter search by financial year.
Within financial period
o
Filter search by report period –
Monthly
Quarterly
Mid & Year end.
Contract number
o
Filter search by contract.
Note: If there are no instances of a report type, year or period the checkbox filter will not appear for the
associated filter mechanism (checkbox).
The filters can be combined in order to refine your search as per the example [Figure 21] below:
Search filter = {Annual Activity Report, 2011-2012, (5C3) 117242 0002}
Date: 21/7/12
21
Dental portal guidance manual v.1
Figure 21: provider reports example
The Select all and Select none links can be used to check/uncheck all filter checkboxes as required.
The clear criteria button wipes out any changes made so you can start again.
The results table consists of the following columns:
Type
o
The type of report to be downloaded
o
Clicking on the report name opens the internet browser download window with
options to Open, Download or Cancel.
Financial year
o
The financial year to which the report refers.
Financial period
o
The financial period to which the report refers.
Contract number
o
The contract number to which the report refers.
Guidance notes
o
Date: 21/7/12
Support notes for the report to be downloaded.
22
Dental portal guidance manual v.1
o
9.2
Clicking on the Guidance notes link opens the internet browser download
window with options to Open, Download or Cancel.
Performer Reports
When viewing reports as a performer, only the financial year can be used to filter the reports since
only one type of report is available – the Personal Superannuation Statement, displayed by selecting
one or more financial years and clicking the Show details button.
Figure 22: performer reports
The statements can be downloaded by clicking on the Personal Superannuation Statement link.
10
EDI PIN
Your EDI PIN or temporary EDI PIN can be requested via the EDI PIN page. Once again, the facilities
available to you on this page will vary depending on whether you are a provider or a performer.
10.1
Provider EDI PIN
The EDI PIN page when viewed as a provider will enable you to request temporary EDI PINs for
performers associated with your contracts. Their performer number and name is displayed along with
a request EDI PIN link [Figure 23]. Before requesting an EDI Temporary PIN for one of your
performers you will need to know the Site Number that they transmit from. The temporary PIN will
allow you to submit outstanding claims for a performer who is no longer at the practice.
Date: 21/7/12
23
Dental portal guidance manual v.1
Figure 23: Provider request temporary EDI PIN for Performer initial page
Selecting a performer and then clicking on the Request a temporary EDI PIN link will open a new page
[Figure 24] in which you may specify the site number for which the temporary EDI PIN is required.
Figure 24: Provider requests temporary EDI PIN for Performer
After entering the site number and clicking the Send request button, the portal will ask for password
confirmation. Having completed this, the temporary EDI PIN request will be sent for processing.
Alternatively you may discontinue the request at any stage by clicking the Cancel button.
If an additional PIN(s) is required for the same performer then further requests can be made, providing
they are not for the same site number.
Once the request has been sent you will be returned to the Temporary EDI PIN page with a
confirmation of request(s) displayed [Figure 25]. You will receive a response for the request via email
within 24 hours, the PIN number will not be held within the email this will be visible within the portal.
Figure 25: temporary EDI PIN request confirmation
After the request has been processed, you will receive an email confirming the request outcome
(normally within approximately 24 hours) – EDI PIN created or EDI PIN request rejected. The outcome
can also be verified (with the rejection reason if the request failed) on the portal EDI PIN page as per
Figure 26 below.
Performer 280992 has 2x EDI PIN requests logged –
o
Date: 21/7/12
The pin for site 12345 has been rejected.
24
Dental portal guidance manual v.1
o
The pin for site 54321 has been approved and is listed [2222] alongside the
temporary PIN expiry date – 30-07-2012.
Performer 770213 has 1x EDI PIN request logged –
o
The PIN for site 12345 has been approved [1111] and expires 30-07-2012.
Figure 26: temporary EDI PIN status
10.2
Performer EDI PIN
As a performer the EDI PIN request relates to your personal EDI PIN number. As such, the page
appearance is slightly less complex [Figure 27].
Figure 27: performer EDI PIN view
Clicking on the Request new EDI PIN button will redirect you to the confirm password page. Once your
credentials have been verified the request will be logged [Figure 28]. You will receive a response for
the request via email within 24 hours, the PIN number will not be held within the email this will be
visible within the portal.
Figure 28: performer EDI PIN request confirmation
Once the request has been processed you will receive an email notification of the outcome, success or
failure. You may view the EDI PIN page to obtain the PIN if the request was successful [Figure 29] or
the rejection reason [Figure 30] if it could not be processed.
Date: 21/7/12
25
Dental portal guidance manual v.1
Figure 29: performer EDI PIN
Figure 30: rejected performer EDI PIN
11
USER MANAGEMENT
It is possible for Providers to create additional user accounts and assign privileges and restrictions for
the administration of various tasks within the portal. Providers can create and manage their
administrator-users on the User management page.
11.1
Create an Administrator
The first time you navigate to the View and maintain user’s page it will look like Figure 31 below. Once
some administrator users have been created, we’ll see a bit more activity.
Figure 31: manage users first view
Let’s create our first one by clicking on the Create new user button. This will start the user creation
process by requesting the following mandatory user details:
New user email address
o
Date: 21/7/12
This is the email address that the portal will use to communicate with your
admin-user. Be sure to use the correct address as they will need to activate
their account (refer to section 2 Initial Steps for more information about the
activation process) via the email address entered here. The email address
should be unique. Duplicate email addresses will not be accepted by the
system.
26
Dental portal guidance manual v.1
New user forename
New user surname
New user telephone number
Figure 32: create admin-user - new details
Clicking on the Next button when done will check the details entered for any errors (e.g. the email
address is not valid) and then progress to the next section – Assigning actions and contracts/providers
to the user [Figure 33].
Check the appropriate box according to which contract(s) you would like your admin-user to be able to
administrate on your behalf, then click the Next button to proceed when done.
Figure 33: create admin-user - assign or restrict contracts
On subsequent visits to the admin-user creation process, you will see the screen below [Figure 34]
prior to the Assign contracts view. This provides you with the facility to simply assign contract/provider
rights to the new user based on the privileges of a user created previously.
Selecting a user and then clicking on the Copy user button will assign the same contract/provider level
privileges to the new admin-user as for the selected user.
Clicking on the Don’t copy button will skip the assignment and take you to the Assign contracts page
[Figure 33] for manual selection.
Date: 21/7/12
27
Dental portal guidance manual v.1
Figure 34: optional create admin-user step – assign actions based on another user
Once contracts and/or providers have been assigned, you may proceed to select which actions will be
available to your new admin-user [Figure 35]. Check or uncheck the areas of the portal you wish to
give the admin-user access to.
Note: The Manage Bank Details area requires access to Contracts also, since access to the Manage
Bank Details area is via the Contracts pages. You must enable both Contracts and Manage Bank
Details actions together, or neither.
Once done, click the Next button to proceed.
Figure 35: create admin-user - assign or restrict available actions
Having given your admin-user some credentials, access to contracts, providers and actions – we’re
done! A summary of your choices is displayed for you to confirm [Figure 36]. Click on the Finish button
if you’re happy. Otherwise, click Back through the admin-user creation pages and modify as required.
Date: 21/7/12
28
Dental portal guidance manual v.1
Figure 36: create admin-user - confirm details
Once done, a confirmation message is displayed [Figure 37]. An email will be sent to the users email
address containing an activation link. Once activated [section 2 Initial Steps refers] your admin-user
will be ready to go.
Figure 37: create admin-user - confirm creation
An overview of the permissions available to admin-users is included below for reference.
•
•
•
Update the Provider(s) associated with the user
o Where more than one provider is available, admin-users can be restricted to one or
more providers as required using the All providers or individual provider checkboxes.
Update the contracts accessible to the user
o Where more than one contract is available, admin-users can be restricted to one or
more contracts as required using the All contracts or individual contract checkboxes.
Update the actions available to the user
o The user may be restricted to areas of the portal by selecting or deselecting actions
as required, or by checking the All Actions checkbox. Actions correspond to chapters
of this document as follows:
Contracts – section 7
Reports – section 9
My Profile – section 6
Pay statements – section 8
EDI PIN – section 10
User management – section 11
Manage Bank Details - section 7.5
Date: 21/7/12
29
Dental portal guidance manual v.1
11.2
Manage Administrator Users
Once some admin-users have been created, we need to manage them. This can be done via the user
management screens. Clicking on the User management link opens up the View and maintain users
summary page with a list of all our admin-users [Figure 38].
We can see there are two admin-users listed below. One with an active account (i.e. they have
received their activation link and used it to activate and login to their user account) and one non-active
user [Account status column]. We can examine these users more closely by clicking on the Manage
user link and thereby opening the User details view [Figure 39].
Clicking on the admin-user email address instead of the Manage user link will open up the User details
view in non-editable mode. Clicking on the Edit button at the bottom of the page will enable you to
make changes where required.
Note: The user details view will open by default if you have only one user (there is no list to display).
Clicking on the Edit button enables changes to be made.
Figure 38: manage admin-users view
Once in the edit user details view [Figure 39], we can make various changes:
User details
Account locked
o
Check this box to force the admin-user to change their security credentials
(password or memorable word) the next time they login.
o
Or, if the the user has forgotten their password checking this box will enable
them to reset their details (section 4 – Forgotten Credentials refers).
Account access removed
o
Check this box to remove the user-admin from the system. Please note that
this action is irreversible. The user will not be able to login again using the
same email – ever!
Copy existing user profile
o
Copy provider or contract privileges from a previous admin-user.
Update the Provider(s) associated with the user
o
Date: 21/7/12
Add or remove provider privileges by checking the relevant boxes.
30
Dental portal guidance manual v.1
Update the contracts accessible to the user
o
Add or remove contract privileges by checking the relevant boxes.
Update the actions available to the user
o
Add or remove action privileges by checking the relevant boxes.
When done, click Save to confirm the changes or Cancel to revert.
Date: 21/7/12
31
Dental portal guidance manual v.1
Figure 39: edit admin-user details view
Date: 21/7/12
32
Dental portal guidance manual v.1