1
CANPAY SOFTWARE INC. LICENSE AGREEMENT
This License Agreement is an agreement between you (“the Customer”) and CanPay Software Inc. (“CanPay”). It
governs your use of the software ("the Software") supplied to you by CanPay and related documentation. By
downloading, installing or otherwise using the Software, you agree to be legally bound by the terms of this
License Agreement.
THIS AGREEMENT SUPERSEDES ANY PRIOR VERSION LICENSE AND GOVERNS YOUR USE OF THE
SOFTWARE.
LICENCE AND RESTRICTIONS:
CanPay grants the Customer the right to install the software and related documentation onto a single computer
for personal and/or business use. The Customer may not: Sublicense the Software; Reverse engineer,
decompile, or disassemble the Software; Use the Software for any undesirable or illegal activities; Make copies of
the Software other than for back-up purposes, and the Customer may not use the back-up copies other than as a
replacement for the original copy. The Customer must include on the back-up copies all copyright and other
notices included on the Software. The Customer may not use, copy, modify, sell, transfer or disclose any part of
the Software except as provided in this Agreement.
OWNERSHIP AND COPYRIGHT OF MATERIALS:
Except for the license expressly granted hereunder, CanPay retains all rights, title and interests in and to the
Software and all copies thereof. The Software is copyrighted and is protected by copyright laws and international
treaty provisions. The Customer may not remove the copyright and other proprietary rights notices from the
Software. The Customer agrees that this Agreement shall be retained with all printed and electronic copies the
Software. The Customer agrees to prevent any unauthorized copying of the Software. Except as expressly
provided herein, CanPay does not grant any express or implied right to the Customer under CanPay copyrights,
trademarks, or trade secret information.
LIMITATION OF LIABILITY
In no event shall CanPay be liable to the Customer for any damages whatsoever, including any lost profits, lost
savings, or other incidental or consequential damages arising out of the use or inability to use the software even if
CanPay has been advised of possibility of such damages, or for any claim by any third party.
TERMINATION:
Upon violation of any of the provisions of this Agreement, The Customer’s right to use the Software shall
automatically terminate and the Customer shall be obligated to destroy all their copies of the Software.
MISCELLANEOUS
This Agreement is governed by the laws of the Province of Manitoba and the laws of Canada in force therein. If
any part of this Agreement is found to be unlawful, void or unenforceable, then that provision shall be deemed
severed from this Agreement and will not affect the validity and enforceability of any of the remaining provisions.
"CanPay", “GrandMaster”, CanPay product logos and other CanPay Software product names are trademarks of
CanPay. Other trademarks are the property of their respective owners.
Copyright CanPay Software Inc., 1985 - 2004. All rights reserved.
User Guide 3
Table of Contents:
CHAPTER 1: GRANDMASTER II FOR WINDOWS GETTING STARTED GUIDE...................................................11
CanPay, The Canadian Payroll Experts ............................................................................................................................................. 11
ABOUT THIS GUIDE ................................................................................................................................................................11
REGISTRATION........................................................................................................................................................................12
Registration Entitlement .................................................................................................................................................................... 12
MANUAL CONVENTIONS .........................................................................................................................................................12
BEFORE YOU BEGIN... ............................................................................................................................................................12
GETTING HELP........................................................................................................................................................................12
Context Sensitive............................................................................................................................................................................... 13
The Help Menu.................................................................................................................................................................................. 13
SYSTEM REQUIREMENTS ........................................................................................................................................................13
THE GRANDMASTER II FOR WINDOWS CD-ROM..................................................................................................................13
The AutoPlay Feature........................................................................................................................................................................ 13
To Start the CD Manually ................................................................................................................................................................. 14
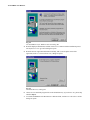
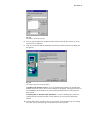
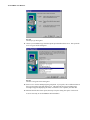
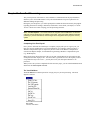
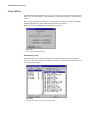
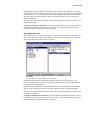
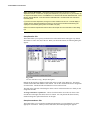
CHAPTER 2: INSTALLING GRANDMASTER II FOR WINDOWS ..............................................................................15
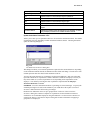
To Install GrandMaster II for Windows: ........................................................................................................................................... 15
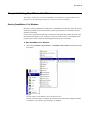
CHAPTER 3: STARTING GRANDMASTER II FOR WINDOWS ..................................................................................19
STARTING GRANDMASTER II FOR WINDOWS .........................................................................................................................19
To Start GrandMaster II for Windows:.............................................................................................................................................. 19
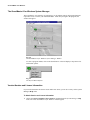
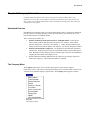
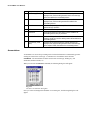
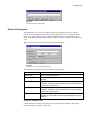
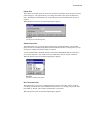
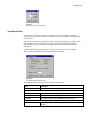
THE GRANDMASTER II FOR WINDOWS SYSTEM MANAGER ...................................................................................................20
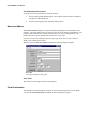
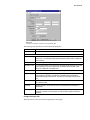
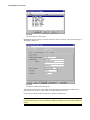
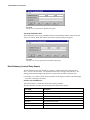
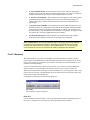
VERSION NUMBER AND LICENSE INFORMATION.....................................................................................................................20
To Obtain Version and License Information ..................................................................................................................................... 20
CHAPTER 4: SYSTEM CONCEPTS....................................................................................................................................22
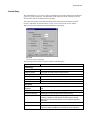
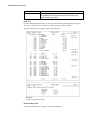
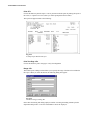
GENERAL LEDGER ACCOUNT STRUCTURE .............................................................................................................................22
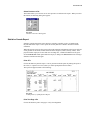
CONTROLLING THE PAYROLL .................................................................................................................................................23
Balancing........................................................................................................................................................................................... 23
CHAPTER 5: MANAGING PAYROLLS.............................................................................................................................25
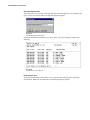
PAYROLL MANAGEMENT ........................................................................................................................................................25
SELECTING A PAYROLL...........................................................................................................................................................25
PAYROLL SECURITY ...............................................................................................................................................................26
Network ............................................................................................................................................................................................. 26
Terminate Other Login <F7> ............................................................................................................................................................ 27
ADDING A PAYROLL ...............................................................................................................................................................27
To Add a Payroll ............................................................................................................................................................................... 27
DELETING A PAYROLL ............................................................................................................................................................28
To Delete a Payroll............................................................................................................................................................................ 28
THE PAYROLL MODULE W INDOW ..........................................................................................................................................28
CHAPTER 6: EMPLOYEE INFORMATION .....................................................................................................................30
UPDATE EMPLOYEES COMMAND ............................................................................................................................................30
HOURS ENTRY COMMAND ......................................................................................................................................................30
To Enter Employee Hours ................................................................................................................................................................. 31
Keyboard Shortcuts ........................................................................................................................................................................... 33
EMPLOYEE ..............................................................................................................................................................................34
Automatic Saving of Information ...................................................................................................................................................... 34
SELECTING EMPLOYEES BY NAME..........................................................................................................................................34
To Select an Employee by Name....................................................................................................................................................... 34
Entering Part of an Employee's Name ............................................................................................................................................... 35
Previous and Next Employees ........................................................................................................................................................... 35
SELECTING EMPLOYEES BY NUMBER .....................................................................................................................................36
4 GrandMaster II for Windows
To Select an Employee by Number ................................................................................................................................................... 36
Previous and Next Employees ........................................................................................................................................................... 36
SELECTING EMPLOYEES FROM A LIST ....................................................................................................................................36
To Select Employees From a List...................................................................................................................................................... 36
Numeric or Alphabetical Sequence ................................................................................................................................................... 37
ADDING A NEW EMPLOYEE ....................................................................................................................................................37
To Add a New Employee .................................................................................................................................................................. 37
Add Employee <F7> ......................................................................................................................................................................... 38
Use Default Class <F8>..................................................................................................................................................................... 38
DELETING AN EMPLOYEE .......................................................................................................................................................38
To Delete an Employee ..................................................................................................................................................................... 38
SCROLLING THROUGH EMPLOYEES ........................................................................................................................................39
Next Period <F7> .............................................................................................................................................................................. 39
Previous Period <F8> ........................................................................................................................................................................ 39
EARNINGS ..............................................................................................................................................................................39
Basic Earning Types.......................................................................................................................................................................... 39
PERMANENT SALARY .............................................................................................................................................................40
Add <F8> .......................................................................................................................................................................................... 41
Delete <F9>....................................................................................................................................................................................... 41
Distribution <F7> .............................................................................................................................................................................. 41
Table <F2> ........................................................................................................................................................................................ 42
PERMANENT HOURLY .............................................................................................................................................................42
Add <F8> .......................................................................................................................................................................................... 42
Delete <F9>....................................................................................................................................................................................... 42
Distribution <F7> .............................................................................................................................................................................. 43
Table <F2> ........................................................................................................................................................................................ 43
SALARY OVERRIDES ...............................................................................................................................................................43
Distribution <F7> .............................................................................................................................................................................. 44
Reload <F8>...................................................................................................................................................................................... 44
HOURLY OVERRIDES ..............................................................................................................................................................44
Distribution <F7> .............................................................................................................................................................................. 45
Reload <F8>...................................................................................................................................................................................... 45
YEAR-TO-DATE EARNINGS .....................................................................................................................................................45
To Update an Earning Amount.......................................................................................................................................................... 46
DEDUCTIONS/BENEFITS ....................................................................................................................................................46
PERMANENT DEDUCTIONS ......................................................................................................................................................47
Table <F2> ........................................................................................................................................................................................ 48
Distribution <F7> .............................................................................................................................................................................. 49
Add <F8> .......................................................................................................................................................................................... 49
Delete <F9>....................................................................................................................................................................................... 49
DEDUCTION OVERRIDE ...........................................................................................................................................................49
Distribution <F7> .............................................................................................................................................................................. 50
Reload <F8>...................................................................................................................................................................................... 50
Off/On <F9>...................................................................................................................................................................................... 50
STATUTORY DEDUCTION OVERRIDE.......................................................................................................................................51
YEAR-TO-DATE DEDUCTIONS ................................................................................................................................................51
YEAR-TO-DATE STATUTORY DEDUCTIONS ............................................................................................................................52
PERSONAL..............................................................................................................................................................................53
PERSONAL INFORMATION .......................................................................................................................................................53
MISCELLANEOUS INFORMATION .............................................................................................................................................55
TAX INFORMATION .................................................................................................................................................................56
Provincial Tax Parameters <F7> ....................................................................................................................................................... 57
Statutory Deduction Expense Accounts <F8>................................................................................................................................... 58
WCB AND STATS CANADA ....................................................................................................................................................58
IMPORTANT DATES .................................................................................................................................................................59
BANK INFORMATION ..............................................................................................................................................................60
User Guide 5
<Page Up> and <Page Down> .......................................................................................................................................................... 61
E.I. OVERRIDE ........................................................................................................................................................................61
ARREARS OVERRIDE...............................................................................................................................................................62
E.I. INSURABLE EARNINGS .....................................................................................................................................................62
ACCUMULATORS.................................................................................................................................................................63
Distribution <F2> .............................................................................................................................................................................. 64
CHAPTER 7: COMPANY INFORMATION .......................................................................................................................65
AUTOMATED FEATURES .........................................................................................................................................................65
THE COMPANY MENU ............................................................................................................................................................65
Two Simple Payroll Procedures ........................................................................................................................................................ 66
NAME AND ADDRESS ..............................................................................................................................................................66
Save <F10> ....................................................................................................................................................................................... 66
CONTROL INFORMATION ........................................................................................................................................................66
STATUTORY DEDUCTIONS ......................................................................................................................................................68
EARNINGS INFORMATION .......................................................................................................................................................69
DEDUCTIONS AND BENEFITS...................................................................................................................................................71
Update Calculation Parameters <F4> ................................................................................................................................................ 73
Update Selected Earnings <F5> ........................................................................................................................................................ 74
Benefit Calculation Codes ................................................................................................................................................................. 74
Accumulator Calculation Codes ........................................................................................................................................................ 83
ACCUMULATORS ....................................................................................................................................................................84
Change Earnings <F2> ...................................................................................................................................................................... 85
To Pay out the Entire Balance of an Accumulator............................................................................................................................. 86
To Pay out a Fixed Amount of an Accumulator ................................................................................................................................ 86
Base Rate........................................................................................................................................................................................... 86
WORKERS COMPENSATION .....................................................................................................................................................87
PROVINCIAL HEALTH .............................................................................................................................................................88
EARNINGS ...............................................................................................................................................................................89
Change Row Description <F7> ......................................................................................................................................................... 90
Change Column Description <F8>.................................................................................................................................................... 90
DEFAULTS (GLOBAL)..............................................................................................................................................................90
Earnings <F4> ................................................................................................................................................................................... 91
Deductions <F5> ............................................................................................................................................................................... 91
Accumulators <F6>........................................................................................................................................................................... 91
JOB COSTING ..........................................................................................................................................................................92
Job Cost Description Report <F2> .................................................................................................................................................... 92
Edit Description................................................................................................................................................................................. 92
List <F6> ........................................................................................................................................................................................... 92
OK <F3> ........................................................................................................................................................................................... 93
Restart List <F4>............................................................................................................................................................................... 93
Insert Code <F2>............................................................................................................................................................................... 93
Add <Enter>...................................................................................................................................................................................... 94
Delete <F4>....................................................................................................................................................................................... 94
CHAPTER 8: PROCESS ........................................................................................................................................................95
SELECT EARNINGS ..................................................................................................................................................................95
SELECT DEDUCTIONS .............................................................................................................................................................96
SELECT ACCUMULATORS .......................................................................................................................................................97
SETUP NEXT PAYROLL ...........................................................................................................................................................97
Process Pay Group <F4> ................................................................................................................................................................... 98
NORMAL PAY.................................................................................................................................................................................................................98
ADDITIONAL .................................................................................................................................................................................................................98
EXTRA ............................................................................................................................................................................................................................99
REVERSAL......................................................................................................................................................................................................................99
TEMPORARY BACKUP/RESTORE .............................................................................................................................................99
Backup Master <F7> ....................................................................................................................................................................... 100
Restore Master <F8> ....................................................................................................................................................................... 100
6 GrandMaster II for Windows
Change Backup Path........................................................................................................................................................................ 100
PAYROLL CALCULATION ......................................................................................................................................................100
Begin Calculation <F7> .................................................................................................................................................................. 101
Calculation time............................................................................................................................................................................... 101
Multi-user Environments................................................................................................................................................................. 101
Calculating More than Once............................................................................................................................................................ 101
CLEAR PAYROLL ..................................................................................................................................................................102
BACKUP MASTER FILE .........................................................................................................................................................103
RESTORE MASTER FILE ........................................................................................................................................................103
ADVANCE CHEQUE RUN .......................................................................................................................................................104
Run Settings <F7>........................................................................................................................................................................... 105
Run <F7> ........................................................................................................................................................................................ 105
Change Deduction <F8>.................................................................................................................................................................. 105
Set Dates <F9> ................................................................................................................................................................................ 105
CHAPTER 9 - CREATING REPORTS ..............................................................................................................................107
PAYROLL REGISTER..............................................................................................................................................................107
Print Test Page <F6> ....................................................................................................................................................................... 108
Print <F7> ....................................................................................................................................................................................... 108
Final Totals...................................................................................................................................................................................... 109
CHEQUES/STUBS...................................................................................................................................................................110
Message <F5> ................................................................................................................................................................................. 111
Print Test <F6>................................................................................................................................................................................ 111
Print <F7> ....................................................................................................................................................................................... 111
Single Cheque <F8>........................................................................................................................................................................ 111
AUDIT TRAIL ........................................................................................................................................................................112
Test <F6> ........................................................................................................................................................................................ 113
Print <F7> ....................................................................................................................................................................................... 113
Select Information <F8>.................................................................................................................................................................. 113
Select User IDs ................................................................................................................................................................................ 114
NAME AND ADDRESS ............................................................................................................................................................114
Print <F7> ....................................................................................................................................................................................... 115
Range <F5> ..................................................................................................................................................................................... 115
Print Test Page <F6> ....................................................................................................................................................................... 115
LABELS .................................................................................................................................................................................116
Print <F7> ....................................................................................................................................................................................... 116
Range............................................................................................................................................................................................... 117
Configure <F5> ............................................................................................................................................................................... 117
Print Test <F6>................................................................................................................................................................................ 118
Message <F8> ................................................................................................................................................................................. 118
RECORD OF EMPLOYMENT....................................................................................................................................................119
Select New Employee <F4> ............................................................................................................................................................ 119
JOURNAL ENTRY...................................................................................................................................................................121
Print <F7> ....................................................................................................................................................................................... 122
Print Test Page <F6> ....................................................................................................................................................................... 122
Export <F2> .................................................................................................................................................................................... 123
Select Format <F2> ......................................................................................................................................................................... 123
G/L Transaction <F4> ..................................................................................................................................................................... 123
Job Cost Translation <F5> .............................................................................................................................................................. 124
DATA DICTIONARY (JOURNAL ENTRY REPORT) ...................................................................................................................124
CHEQUE REGISTER ...............................................................................................................................................................127
Print <F7> ....................................................................................................................................................................................... 128
Print Test Page <F6> ....................................................................................................................................................................... 128
EMPLOYEE PROFILE ..............................................................................................................................................................128
Print <F7> ....................................................................................................................................................................................... 129
Print Test Page <F6> ....................................................................................................................................................................... 130
Range <F5> ..................................................................................................................................................................................... 130
Select Provinces <F4>..................................................................................................................................................................... 130
INPUT WORK SHEET .............................................................................................................................................................131
Print <F7> ....................................................................................................................................................................................... 132
User Guide 7
Print Test Page <F6> ....................................................................................................................................................................... 132
Range <F5> ..................................................................................................................................................................................... 132
Select Provinces <F4>..................................................................................................................................................................... 133
STATISTICS CANADA REPORT ...............................................................................................................................................133
Print <F7> ....................................................................................................................................................................................... 133
Print Test Page <F6> ....................................................................................................................................................................... 133
New Hires Report <F8> .................................................................................................................................................................. 134
Print Settings <F5>.......................................................................................................................................................................... 134
WORKERS COMPENSATION ...................................................................................................................................................135
General Information ........................................................................................................................................................................ 135
The WCB Report............................................................................................................................................................................. 136
Print <F5> ....................................................................................................................................................................................... 136
Print Test Page <F6> ....................................................................................................................................................................... 137
Select Provinces <F4>..................................................................................................................................................................... 137
REPORT GENERATOR ............................................................................................................................................................137
DATA ENTRY REPORTS .........................................................................................................................................................137
Print <F7> ....................................................................................................................................................................................... 138
Configure <F4> ............................................................................................................................................................................... 138
Print Test Page <F6> ....................................................................................................................................................................... 139
Range <F5> ..................................................................................................................................................................................... 139
Select Earnings ................................................................................................................................................................................ 139
DEPARTMENT DISTRIBUTION ................................................................................................................................................140
Print Test Page <F6> ....................................................................................................................................................................... 141
JOB COSTING REPORTS .........................................................................................................................................................141
Setup................................................................................................................................................................................................ 141
Print <F7> ....................................................................................................................................................................................... 142
Print Test Page <F6> ....................................................................................................................................................................... 142
Range <F5> ..................................................................................................................................................................................... 142
Select Earnings ................................................................................................................................................................................ 142
PAY PERIOD SUMMARY ........................................................................................................................................................143
Print <F7> ....................................................................................................................................................................................... 144
Print Test Page <F6> ....................................................................................................................................................................... 144
Range <F5> ..................................................................................................................................................................................... 144
CUSTOM REPORTS ................................................................................................................................................................144
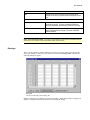
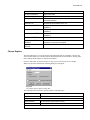
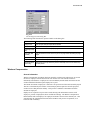
CHAPTER 10: REPORT GENERATOR ...........................................................................................................................145
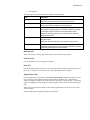
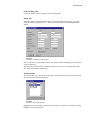
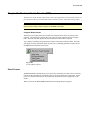
The Report Generator Dialog Box................................................................................................................................................... 145
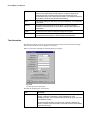
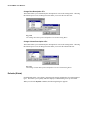
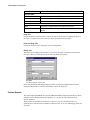
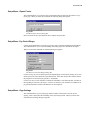
FILE MENU ...........................................................................................................................................................................145
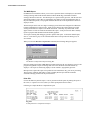
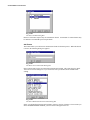
FILE MENU - NEW .................................................................................................................................................................146
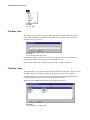
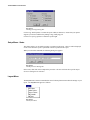
FILE MENU - OPEN ...............................................................................................................................................................146
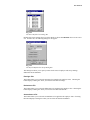
FILE MENU - SAVE.................................................................................................................................................................147
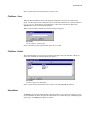
FILE MENU - DELETE ............................................................................................................................................................147
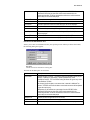
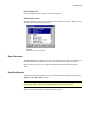
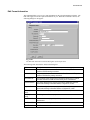
SETUP MENU ........................................................................................................................................................................147
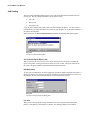
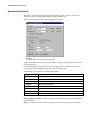
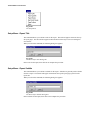
SETUP MENU - REPORT TITLE ................................................................................................................................................148
SETUP MENU - REPORT SUBTITLE ..........................................................................................................................................148
SETUP MENU - REPORT FOOTER ............................................................................................................................................149
SETUP MENU - PAY PERIOD RANGE .......................................................................................................................................149
SETUP MENU - PAGE SETTINGS ..............................................................................................................................................149
SETUP MENU - NOTES ...........................................................................................................................................................150
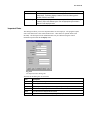
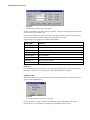
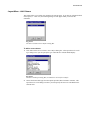
LAYOUT MENU .....................................................................................................................................................................150
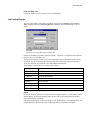
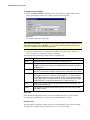
LAYOUT MENU - ADD COLUMN ..............................................................................................................................................151
To define a new column: ................................................................................................................................................................. 151
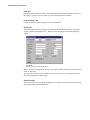
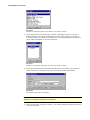
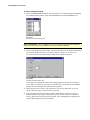
LAYOUT MENU - UPDATE COLUMN ........................................................................................................................................153
To Update Column Settings: ........................................................................................................................................................... 154
Next <F4> ....................................................................................................................................................................................... 154
Previous <F5> ................................................................................................................................................................................. 154
Change Field <F6>.......................................................................................................................................................................... 155
Range <F7> ..................................................................................................................................................................................... 155
LAYOUT MENU - REMOVE COLUMN........................................................................................................................................155
8 GrandMaster II for Windows
To Remove a Column:..................................................................................................................................................................... 155
LAYOUT MENU - EDIT FORMULAS ..........................................................................................................................................155
To Create a Simple Formula............................................................................................................................................................ 156
To Create a Complex Formula ........................................................................................................................................................ 157
Edit Field 1 <F4> ............................................................................................................................................................................ 158
Operator <F5> ................................................................................................................................................................................. 158
Edit Field 2 <F6> ............................................................................................................................................................................ 159
LAYOUT MENU - EDIT SUMS ..................................................................................................................................................159
To Create a Sum .............................................................................................................................................................................. 159
Change <F4> ................................................................................................................................................................................... 160
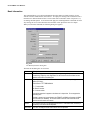
OPTIONS MENU ....................................................................................................................................................................160
OPTIONS MENU - SORT BY .....................................................................................................................................................161
OPTIONS MENU - SUB TOTALS ...............................................................................................................................................162
OPTIONS MENU - STATUS/REVENUE CANADA .........................................................................................................................162
PRINT MENU .........................................................................................................................................................................163
PRINT MENU - PRINT .............................................................................................................................................................164
What Happens When You Print a Report? ...................................................................................................................................... 164
SET PRINTER.........................................................................................................................................................................165
Print Test <F6>................................................................................................................................................................................ 166
CHAPTER 11: YEAR-END PROCESSING.......................................................................................................................167
Completing Your Final Payroll ....................................................................................................................................................... 167
The Year-End Menu ........................................................................................................................................................................ 167
CREATE T4/T4AS .................................................................................................................................................................168
Setup Earnings <F4> ....................................................................................................................................................................... 168
Setup Deductions <F6> ................................................................................................................................................................... 169
Setup Benefits <F5> ........................................................................................................................................................................ 170
Setup Accumulators <F8> ............................................................................................................................................................... 170
Create T4 File <F7> ........................................................................................................................................................................ 171
PENSION ADJUSTMENTS .......................................................................................................................................................171
Pension Adjustment Method ........................................................................................................................................................... 172
Pension Adjustment Type................................................................................................................................................................ 172
PRINT T4 SUMMARY ............................................................................................................................................................173
Print <F7> ....................................................................................................................................................................................... 173
Print Settings <F5>.......................................................................................................................................................................... 174
Print Test <F6>................................................................................................................................................................................ 174
PRINT T4A SUMMARY..........................................................................................................................................................174
Print <F7> ....................................................................................................................................................................................... 175
Printer Settings <F5>....................................................................................................................................................................... 175
Print Test <F6>................................................................................................................................................................................ 175
YEAR-END WCB..................................................................................................................................................................175
Print <F7> ....................................................................................................................................................................................... 176
BACKUP/RESTORE FILE ........................................................................................................................................................176
Backup............................................................................................................................................................................................. 176
Restore............................................................................................................................................................................................. 176
EDIT T4S ..............................................................................................................................................................................176
Save ................................................................................................................................................................................................. 178
Previous <F5> ................................................................................................................................................................................. 178
Next <F4> ....................................................................................................................................................................................... 178
Select <F2> ..................................................................................................................................................................................... 178
Add <F8> ........................................................................................................................................................................................ 178
Delete <F9>..................................................................................................................................................................................... 178
Company Info <F3> ........................................................................................................................................................................ 178
WCB Info <F10>............................................................................................................................................................................. 179
PRINT ALL T4S .....................................................................................................................................................................179
Magnetic Media Filing .................................................................................................................................................................... 180
Reprint............................................................................................................................................................................................. 182
EDIT T4AS............................................................................................................................................................................182
OK ................................................................................................................................................................................................... 183
Previous <F5> ................................................................................................................................................................................. 183
User Guide 9
Next <F4> ....................................................................................................................................................................................... 183
Select <F2> ..................................................................................................................................................................................... 184
Add <F8> ........................................................................................................................................................................................ 184
Delete <F9>..................................................................................................................................................................................... 184
PRINT ALL T4AS ..................................................................................................................................................................184
Reprint............................................................................................................................................................................................. 185
Serial Number.................................................................................................................................................................................. 185
CLEAR YTDS .......................................................................................................................................................................185
Configuring the Clear YTD Dialog Box.......................................................................................................................................... 186
Retaining Items (Carrying Forward to the Following Pay Year) ..................................................................................................... 186
Removing Items............................................................................................................................................................................... 187
Clearing the YTD Amounts............................................................................................................................................................. 187
CHAPTER 12: UTILITIES ..................................................................................................................................................188
The Utilities Menu........................................................................................................................................................................... 188
SETUP PASSWORD.................................................................................................................................................................188
Add <F8> ........................................................................................................................................................................................ 189
Delete <F9>..................................................................................................................................................................................... 189
SET PAGE LAYOUTS .............................................................................................................................................................189
Print Test Page <F6> ....................................................................................................................................................................... 191
SETUP CHEQUES ...................................................................................................................................................................191
IMPORT DATA .......................................................................................................................................................................192
Backup Master File <F6>................................................................................................................................................................ 193
CREATING IMPORT FORMATS ...............................................................................................................................................193
IMPORT TAGS .......................................................................................................................................................................194
IMPORT FIELDS .....................................................................................................................................................................194
IMPORT FORMAT ..................................................................................................................................................................199
IMPORTING NORMAL ............................................................................................................................................................199
IMPORTING DATA-ENTRY (ONE EARNING PER LINE) .............................................................................................................200
EXPORT DATA ......................................................................................................................................................................202
Export Data <F7>............................................................................................................................................................................ 203
CREATING EXPORT FORMATS ...............................................................................................................................................203
EXPORT TAGS .......................................................................................................................................................................203
EXPORT FIELDS ....................................................................................................................................................................204
Sample Export Formats: .................................................................................................................................................................. 207
CHAPTER 13: ELECTRONIC FUNDS TRANSFER (EFT)............................................................................................209
Computer Requirements .................................................................................................................................................................. 209
SELECT FORMAT...................................................................................................................................................................209
Add Format...................................................................................................................................................................................... 210
EDIT FORMAT INFORMATION ................................................................................................................................................211
SELECT PAYROLLS ...............................................................................................................................................................212
CREATE TRANSMISSION FILE................................................................................................................................................212
CHAPTER 14: BANK RECONCILIATION .....................................................................................................................214
Features of the Bank Reconciliation Module: ................................................................................................................................. 214
BASIC STEPS TO FOLLOW .....................................................................................................................................................214
INSTALLING THE MODULE ....................................................................................................................................................215
To Install the Bank Reconciliation module: .................................................................................................................................... 215
RUNNING THE MODULE ........................................................................................................................................................216
Assigning Names............................................................................................................................................................................. 216
To Select a Bank Reconciliation File .............................................................................................................................................. 216
Adding and Deleting Bank Reconciliation Files.............................................................................................................................. 216
To Change the Name of a Bank Reconciliation File........................................................................................................................ 216
FILE MENU ...........................................................................................................................................................................217
SELECTING PAYROLLS ..........................................................................................................................................................217
To select a payroll for import: ......................................................................................................................................................... 217
BEGIN IMPORT ......................................................................................................................................................................217
10 GrandMaster II for Windows
Begin Import.................................................................................................................................................................................... 217
EXPORT CHEQUES ................................................................................................................................................................218
Begin Export ................................................................................................................................................................................... 218
PROCESS MENU ....................................................................................................................................................................218
MANUAL CHEQUES...............................................................................................................................................................218
To Manually Enter Cheques: ........................................................................................................................................................... 219
RETURNED CHEQUES ............................................................................................................................................................219
To Entering Returned Cheques (i.e. To Cancel a Cheque) .............................................................................................................. 219
PRINT OUTSTANDING CHEQUES ...........................................................................................................................................219
Test Page ......................................................................................................................................................................................... 220
Print ................................................................................................................................................................................................. 220
PRINT RETURNED CHEQUES .................................................................................................................................................220
Test Page ......................................................................................................................................................................................... 220
Print ................................................................................................................................................................................................. 220
PURGE RETURNED CHEQUES ................................................................................................................................................220
Purge ............................................................................................................................................................................................... 221
SETUP MENU ........................................................................................................................................................................221
SETUP - IDS AND PASSWORDS...............................................................................................................................................221
ADDING A NEW USERID .......................................................................................................................................................221
To Add a new UserId....................................................................................................................................................................... 221
To Delete a UserId: ......................................................................................................................................................................... 222
ENABLING/DISABLING PASSWORDS .....................................................................................................................................222
To enable/disable passwords: .......................................................................................................................................................... 222
REPORT LAYOUT ..................................................................................................................................................................222
BACKUP BANK RECONCILIATION FILE .................................................................................................................................223
To Create a Backup Copy of the Bank Reconciliation File: ............................................................................................................ 223
Backup............................................................................................................................................................................................. 223
RESTORE BANK RECONCILIATION FILE ................................................................................................................................223
Restoring a Backup Copy of the Bank Reconciliation File: ............................................................................................................ 223
User Guide 11
Chapter 1: GrandMaster II for Windows Getting Started Guide
Welcome to the GrandMaster II for Windows payroll processing software program. This unique
Windows-based application integrates Payroll, Electronic Funds Transfer and Bank Reconciliation
in a single, easy-to-use application. You can use the program's powerful features to process your
payroll in-house for anywhere from 2 to 2000+ employees.
GrandMaster II for Windows is user-friendly and designed for basic payroll operations yet has all
the features required for the most complex payroll situations.
Some of the outstanding features of GrandMaster II for Windows are:
• expanded earnings fields to a maximum of 50
• table-driven earnings and rate tables for union payrolls
• expanded deduction fields to a maximum of 50
• up to three bank accounts for one employee
• industry-specific customization
• ten accumulators for vacation seniority, sick, etc. accruals
• context sensitive online help
Add on modules include:
• Bank Reconciliation
• Electronic Funds Transfer
• Job Costing
• Personnel
CanPay, The Canadian Payroll Experts
CanPay is committed to customer satisfaction by specializing in all payroll requirements. Our
payroll experts possess extensive payroll knowledge and our priority is responding to customer
needs. We hope you enjoy using GrandMaster II for Windows, and hope to maintain a longlasting relationship!
About This Guide
This Getting Started guide is designed for new users of GrandMaster II for Windows, as well as
for users who simply want to freshen-up their skills. It explains how to install, run and operate the
program, as well as how to perform basic payroll tasks. If you are a first-time user of
GrandMaster II for Windows, you should read the opening chapter of this guide carefully before
installing the program. Once you are comfortable with the procedures outlined here, you can
proceed to the Chapter 2: Installing GrandMaster II for Windows.
Important - Changes in government regulations may have occurred since publication of this
software. Changes usually occur on July 1 and January 1. It is important that you forward your
Update Service Card to us immediately. If your software becomes outdated, CanPay will be able to
provide you with a current version.
12 GrandMaster II for Windows
Registration
It is important to fill out and send in your Update Service Card as soon as possible. Please
include the completed card and proof of purchase within 30 days of registration.
Registration Entitlement
Registration entitles you to one year of service and technical assistance. This includes eligibility
for further upgrades with changes in provincial and federal regulations. Technical assistance
applies to both GrandMaster II for Windows and help with specific payroll situations related to the
program.
Manual Conventions
This guide uses the following conventions for menu commands, shortcuts and other instructions:
• Menu commands are listed in bold, italic (e.g. Choose the Payroll Information
command).
• Multiple menu commands are listed together, separated by hyphens (e.g. Choose the
Earnings - By Position command from the Payroll menu.).
• Buttons, Tabs, Combo-boxes and other window controls appear in Italic (e.g. Choose the
Apply button, then click OK to continue.).
• Text that you must enter on your keyboard appears in Bold (Move to the Address field
and enter 123 Fourth Street.).
• Keyboard references appear in uppercase with angled brackets. Plus signs (+) are shown
between keys that must be pressed together (e.g. <CTRL>+<G>)
• Other special terms and keywords appear in Italics for emphasis.
Before You Begin...
Before you begin using this guide, you should be familiar with the following basic Microsoft
Windows actions.
• Using the mouse (click, double-click, drag and drop).
• Moving, resizing and closing windows.
• Navigating through dialog boxes and using scroll bars.
• Choosing menu commands and selecting options from windows and submenus.
If you are unsure on how to perform any of these Windows actions, please refer to the "How To"
topic in the Microsoft Windows Online Help.
Getting Help
Online Help is the fastest way to obtain information about a command, dialog box or item.
GrandMaster II for Windows provides two methods of receiving help for a given topic: Context
Sensitive or through the commands found under the Help menu.
User Guide 13
Context Sensitive
Context Sensitive help displays information that is directly related to the action or operation
presently being carried out. This type of help is available in all dialog boxes, windows and
reports. To access this help, simply press the <F1> key.
The Help Menu
The Help menu contains commands that allow you to view help for the active window along with
general help for the GrandMaster II for Windows program. To access this help, select the Help
menu and choose the desired option from the list provided.
Note: To keep the Help screen from disappearing behind other windows when you click on a
GrandMaster II for Windows window, choose the Keep Help on Top - On Top command from the
Help window's Options menu.
System Requirements
Your computer must meet the following requirements to run GrandMaster II for Windows:
• Pentium processor or equivalent
• Microsoft Windows 95, 98, NT, 2000, ME or XP
• Approximately 50MB of hard disk space for complete GrandMaster II for Windows
installation (all modules). Additional 100KB (average) of disk space per year for each
active employee.
• 32 MB of RAM (64 or greater recommended).
• CD-ROM drive
• Mouse or compatible pointing device
The GrandMaster II for Windows CD-ROM
The GrandMaster II for Windows CD-ROM contains a full release version of the software. It also
contains GrandMaster II for Windows Installation guide, product order forms, and the installation
program for Adobe Acrobat® Reader, which allows you to view and print the documentation.
The AutoPlay Feature
The GrandMaster II for Windows CD-ROM plays automatically when you insert the disk into
your CD-ROM drive. If this does not happen, try the following:
• Remove the disk, and then re-insert it.
• Remove the disk and wipe it with a soft, dry cloth to remove fingerprints or paper dust.
Re-insert the disk.
If the AutoPlay problems continue, it may be because your CD-ROM driver does not support
AutoPlay, or the AutoPlay feature is disabled. In either case, you can start the CD manually.
14 GrandMaster II for Windows
To Start the CD Manually
1.
Start Windows, and then insert the GrandMaster II for Windows CD into your CD-ROM
drive.
2.
On the Windows taskbar, click the Start button and select Run.
3.
Type c:\autorun\autorun.exe (replacing C: with the letter of your CD-ROM drive) in the Open
field, and then click OK.
User Guide 15
Chapter 2: Installing GrandMaster II for Windows
The following section describes the steps you must take to install GrandMaster II for Windows.
The instructions assume that you are installing from drive A onto drive C. If you install to or from
another drive, substitute the name of the drive you use in the following instructions (e.g.. type D:\
instead of E:\).
To Install GrandMaster II for Windows:
1.
Start Windows, and then insert the GrandMaster II for Windows CD into your CD-ROM
drive. The AutoPlay window will appear (if it does not, please refer to " The GrandMaster II
for Windows CD-ROM" section that precedes this one).
Fig. 2-1
The AutoPlay Welcome Window
2.
Choose the GrandMaster II for Windows option then select the Read Me First link to open
the corresponding document. Read the contents carefully.
3.
When you are ready to proceed, choose the Install GrandMaster II for Windows option.
The Welcome dialog box appears.
16 GrandMaster II for Windows
Fig. 2-2
The GrandMaster II for Windows Welcome Dialog Box
4.
Read the displayed information, and then click Next to continue with the installation process.
The Software License Agreement dialog box opens.
5.
Read the License Agreement information carefully, and if you accept the terms of the
agreement, click Yes. The Install Directory dialog box opens.
Fig. 2-3
The Install Directory Dialog Box
6.
Choose Next to install the program files in the default directory (if you choose Yes, please skip
ahead to Step 9).
7.
To install GrandMaster II for Windows in a different folder, click Browse. The Choose Folder
dialog box opens.
User Guide 17
Fig. 2-4
The Choose Folder Dialog Box
8.
Select or type the path to the destination folder, and then click OK. This returns you to the
Install Directory dialog box.
9.
Click Next to continue with the installation, then define your data location in the dialog box
that appears:
Fig. 2-5
The Choose Data Location Dialog Box
Upgrading from the DOS Version - If you are installing this program as an upgrade from
the DOS version, the Choose Data Location dialog box will appear. This step is necessary so
that GrandMaster II for Windows can use the same payroll data that you created from the
DOS version.
Normal Updates or Windows-Only Installations - If you are installing this version on a
computer that does not have the DOS version installed, you can accept the default data
location.
10. Once the data location is defined, click Next to continue. This opens the Setup Type dialog
box where you can specify the type of installation you wish to perform.
18 GrandMaster II for Windows
Fig. 2-6
The Setup Type Dialog Box
11. Choose your installation type from the options provided then choose Next. This opens the
Select Program Folder dialog box.
Fig. 2-7
The Select Program Folder Dialog Box
12. Select Next to use the default program group name. If you prefer, enter a different name in
the Program Folder field, then choose Next. This starts the file copy procedure and a
message box appears displaying the status of each file as it is copied to your hard disk.
13. When all the files have been copied, the Setup Complete dialog box opens. Click Finish.
You are now ready to use GrandMaster II for Windows!
User Guide 19
Chapter 3: Starting GrandMaster II for Windows
This chapter explains how to start the GrandMaster II for Windows program and discusses the
Logon process, System Manager and License and Version number information.
Starting GrandMaster II for Windows
Each time you start GrandMaster II for Windows, GrandMaster II for Windows scans the required
initialization parameters and verifies that the required system data files are available and can be
opened for processing.
If a file error is encountered at this stage, a message box will appear that contains the name of the
file and the associated error code. If such an event occurs when you start your installation of the
program, please contact CanPay Technical Support and report the error message
To Start GrandMaster II for Windows:
1.
Choose the GrandMaster II for Windows - GrandMaster II for Windows command from the
Start button.
Fig. 3-1
The Start Menu with GrandMaster II for Windows Selected
After the verification stage is complete, the software license information is displayed and the
GrandMaster II for Windows System Manager is displayed.
20 GrandMaster II for Windows
The GrandMaster II for Windows System Manager
The GrandMaster II for Windows System Manager is the starting point for all program functions.
It provides access to each of your installed modules. Each time you login to the program, this
window will appear.
Fig. 3-2
The GrandMaster II for Windows System Manager Window
To select a program module, click on the desired button. This will display a drop down a list
with further options.
Fig. 3-3
The Payroll Button Options
Version Number and License Information
If you need to determine the current version and license status, you can do so easily via the System
Manager's Help menu.
To Obtain Version and License Information
1.
Choose the About GrandMaster II for Windows command from the System Manager's Help
menu. The About GrandMaster II for Windows window appears.
User Guide 21
Fig. 3-4
The About GrandMaster II for Windows Window
• System Information - This button opens a window that displays the program's system
files along with their version numbers and dates.
• Tech Support - This button opens a help file that provides the pertinent information on
how to contact CanPay Technical Support.
22 GrandMaster II for Windows
Chapter 4: System Concepts
General Ledger Account Structure
For the purposes of distributing payroll information, GrandMaster II for Windows uses a general
ledger account number (GL number) comprised of the following:
DDDDDD-AAAAAA-SSSSSS
DDDDDD
AAAAAA
SSSSSS
Departmental
Code/Number
Account
Code/Number
Sub-Account
Code/Number
Fig. 4-1
General Ledger Account Number Breakdown
Note: Exporting Payroll Information - When exporting payroll information to general ledger
accounting systems, the order and size of the above code/numbers may be altered.
GrandMaster II for Windows will distribute the payroll by using a series of general ledger
numbers that have been set up at both the company information and the employee information
levels.
When setting up the company information, fields are available to enter the liability ledger numbers
(credit entry) and a default expense ledger number (debit entry). The liability ledger numbers are
entered as department, account, and sub-account. The expense ledger numbers are entered as
account and sub-account. The department number needed to complete the entry will be the
employee's department code.
When entering employee information, fields are available to enter general ledger numbers for
salary/wages and benefit expenses. The format for these numbers will be department, account,
and sub-account. If a ledger number is not entered for the department, account, or sub-account,
the missing information will use the default account number entered using the Miscellaneous
option under the Personal menu. If any of this information has not been specified, GrandMaster
II for Windows will then default to the number entered at the company information level.
The following table illustrates how the general ledger account structure is applied.
User Guide 23
Ledger Number
Dept.
Description
Ledger Number Source
Results
Acct.
Sub.
1101
01
Net Payroll
Company - Misc. Info.
Sum of cheques issued
2101
01
Receiver General - Tax
Company - Stat. Ded.
Total tax deducted
2101
02
Receiver General - CPP
Company - Stat. Ded.
Employee+Company
CPP
2101
03
Receiver General - UIC
Company - Stat. Ded.
Employee+Company EI
3100
01
Union Dues - payable
Company - Deductions
Employee+Company
Union Deduction
3100
02
Life Insurance - payable
Company - Deductions
Employee+Company
Life Deduction
4100
01
Accrued Vacation
Liability
Company Accumulators
Net change to Vacation
Pay (accrued less paid)
01
5800
01
Salary Expense
Employee-Distribution*
Extended Wage
Expense
01
5800
02
Overtime Premium
Employee-Distribution*
Extended Wage
Expense
01
5801
01
Company CPP
Company-Tax
Information**
Company's Share of
CPP
01
5801
02
Company UIC
Company-Tax
Information**
Company's Share of UIC
01
5801
03
Accrued Vacation Pay
CompanyAccumulators**
Accrued Vacation Pay
01
5801
04
WCB Expense
Company-Workers
Compensation**
WCB Expense
01
5801
05
Provincial Health
Company-Provincial
Health**
Prov. Health Expense
* If not entered, the number will default to the number entered using the Miscellaneous option
under the Personal menu. If no number is found here, the number entered using the Earnings
Information option under the Company menu is used.
Controlling the Payroll
GrandMaster II for Windows has built-in controls to ensure that your calculations will always be
in balance. These controls help prevent problems such as the payroll not balancing, and T4s, EI
forms, etc., not agreeing with records.
Balancing
Totals are provided on the register and the audit reports for balancing the total current hours
entered to a batch total from the time cards or time sheets. The batch total can be separated by type
of hours (Regular, Overtime, Shift, etc.).
24 GrandMaster II for Windows
Note: Checking Balances - Each time the payroll register is printed, you should check the balance
by adding the current gross earnings to the previous register's year-to-date gross, which will be
equal to the current year-to-date gross. This will confirm that your payroll is in order.
Create a log sheet as shown below. Enter totals each time a payroll has been run and confirm that
the totals are correct. This is an example of a simple payroll log:
Run #
Current Gross
YTD Gross
Backup File
EFT
JE
01
12,000.00
12,000.00
A:\pay01
Run 3
No
02
10,000.00
22,000.00
A:\pay02
Run 4
Yes
03
8,000.00
30,000.00
A:\pay03
Run 5
No
Fig. 4-2
A Sample Payroll Log
The payroll register is assigned a sequential run number that appears in the top left-hand corner of
the report. Reports should be filed according to this run number. An audit check can quickly
confirm that the records are complete. This run number automatically increases by one each time
the payroll is calculated and cleared. The run number will revert back to 1 for the first payroll of
the new year.
Note: Run Numbers - You should never have a missing run number or a duplicate run number. If
either situation occurs, you may have made an error. Check your payroll log total and make the
necessary corrections.
User Guide 25
Chapter 5: Managing Payrolls
GrandMaster II for Windows allows you to set up an unlimited number of payrolls. The criteria
for determining the number of payrolls required is based on the run frequency and the company
name.
EXAMPLE - A semi-monthly payroll would not be included with a bi-weekly payroll. Similarly,
a payroll for ABC Company would not be included with a payroll for XYZ Company.
At times it may be more convenient to separate a single payroll into several smaller payrolls, for
reasons including:
• organization (office payroll kept separate from the plant payroll)
• security (executive payroll processed separately by persons other than the payroll
department)
• timing (payroll data from branch operations may require more time to reach the payroll
department than from other branches)
Each payroll should have a unique directory name, conforming to DOS directory naming
conventions (no more than eight characters and no spaces). Refer to your DOS user guide for
more information on DOS directory naming conventions.
Payroll Management
All operations regarding the management of payrolls are available under the Payroll menu. The
Payroll menu appears as follows:
Fig. 5-1
The Payroll Options
The options available for payroll management are:
• Selecting payrolls
• Adding payrolls
• Deleting payrolls
Selecting a Payroll
To work with an existing payroll, you must choose the Select Payroll option. When you choose
this command, a dialog box appears listing the names of the available payrolls.
26 GrandMaster II for Windows
Fig. 5-2
The Select Payroll Dialog Box
Highlight the desired payroll name and choose the Select button. GrandMaster II for Windows
will prompt you for security information, if security is activated for the selected payroll.
Payroll Security
Once a payroll has been selected, you must choose the appropriate User ID to access the data. If
passwords are enabled, you will be prompted to enter one.
Fig. 5-3
The Select User ID Dialog Box
Refer to the Setup Password section of the Utilities chapter for information on setting up user
ID's and passwords.
Once system security has been cleared, GrandMaster II for Windows will display the Payroll
module window that shows the current payroll name run number.
Network
GrandMaster II for Windows is designed to run as a stand-alone application or in a networked,
multi-user environment. When installed on a network volume, the USER ID that you use to start
the program is considered the "Active" ID. No other user may run the program with this USER ID
while it is in use. Once you exit GrandMaster II for Windows, the ID is no longer in use and
becomes available again.
User Guide 27
Terminate Other Login <F7>
Sometimes a payroll will not be closed properly (e.g. when the computer's power is interrupted or
is not shut down properly). If GrandMaster II for Windows terminates abnormally for any reason,
you will may have to re-select your USER ID when you return to the Login screen (that is, the
USER ID that was active when the program terminated).
In such a case, the active User ID will have the words IN USE or EXCLUSIVE appearing beside
it to indicate that it is presently in use. To log in once again simply select the User Id, choose the
Select button and then click the Terminate Other Login button.
Fig. 5-4
The Select Payroll Dialog Box
This step is necessary since GrandMaster II for Windows will assume your USER ID is still in use
(and therefore unavailable). In this case, you have the option of using the terminating the original
USER ID, thus making it available again.
Adding a Payroll
GrandMaster II for Windows allows you to create as many payrolls as you required. Each payroll
will be treated as a unique entity and will not share data with other payrolls.
To Add a Payroll
1.
Select the Payroll button, then choose the Add Payroll command. This opens the Add
Payroll dialog box so you can enter a descriptive name:
Fig. 5-5
The Add Payroll Dialog Box
2.
Enter a unique, descriptive name that will help you identify this payroll in future sessions,
then choose the Add button. Your payroll is now created and the Payroll module window
appears ready for you to begin entering the required data.
Note: The Payroll Location - A sub-folder will be created based on this name; it will be located in
the same folder where you installed GrandMaster II for Windows. This folder will contain the files
associated with the new payroll.
You may wish to add a test payroll for experimentation with the various payroll functions to
negate the risk of affecting important payroll data.
28 GrandMaster II for Windows
Deleting a Payroll
The Delete Payroll command may be used to remove an existing payroll from GrandMaster II for
Windows. Only users with Supervisor status may delete a payroll. When this command is
selected, a deletion warning will be displayed, and you will be prompted for the Supervisor's
password.
Note: Deleting Payrolls - The Delete Payroll option completely erases all information pertaining to
a payroll. It is a good idea to verify that the payroll you are about to delete is safe to remove.
Be sure to complete the year-end cycle (T4s, etc.) before deleting any payrolls pertaining to the
current year. It is advisable to backup the payroll before deleting it.
To Delete a Payroll
1.
Select the Payroll button, then choose the Delete Payroll command. This opens the Select
Payroll dialog box that displays the available payrolls.
2.
Choose the desired payroll from the list, then click OK. You can use the <Up Arrow> or
<Down Arrow> keys to highlight a given payroll. This displays a message box that prompts
you for a Supervisor password.
3.
Enter the Supervisor's password, then click OK to complete the removal. If you have not
created a password, you can use the program's default (contact CanPay Support to receive this
password).
The Payroll Module Window
Once a payroll has been selected or added, the Payroll module window appears:
Fig. 5-6
The Payroll Module Window
The menu bar provides a list of commands that allow you to perform payroll operations under
several different categories. A brief listing of menu command is provided here.
•
File Menu - This menu provides basic file-based operations (presently, the Exit command).
•
Employee Menu - This menu provides commands to add, change and delete individual
employee information.
User Guide 29
•
Company Menu - This menu provides commands to customize the payroll for company
requirements and to establish default settings
•
Process Menu - This menu provides commands to physically calculate the payroll.
•
Reports Menu - This menu provides commands that allow you to generate various printed
reports.
•
Year-End Menu - This menu provides commands for closing off the calendar year-end and
producing T4s, T4As, Releve1's
•
Utilities Menu - This menu provides command for setting up passwords, page layout,
import/export settings, etc.
Note: Manual Structure - This manual is structured similarly to the menu system of the
GrandMaster II for Windows program. Both the program and this guide discuss Employee
Information before Company Information.
When setting up a payroll, however, company information must be defined before employee
information. This is because much of the information for individual employees is drawn from the
information defined at the Company level.
30 GrandMaster II for Windows
Chapter 6: Employee Information
The Employee menu provides the following commands:
Fig. 6-1
The Employee Menu
The commands under this menu allow you to access the Employees dialog box as well as enter the
hours that each employee has worked.
Update Employees Command
The Update Employees command allows you to update an individual employee's payroll-related
information. You can also use the various commands to apply or remove payroll settings that were
defined at the Company level. Choosing the command opens the Employees dialog box.
Fig. 6-2
The Employees Dialog Box
The top section of the dialog box displays two fields that show an employee's name and number.
When an employee's name and number appear in these fields, this employee is considered the
"Active" employee. When an employee is active, all modifications made in the Employees dialog
box will apply only to him/her.
Hours Entry Command
This command is used by data entry personnel or when earnings are to be entered by date. The
Hours Entry command allows you to enter up to 200 records for individual employees' hourly
information. You can enter hours based on several methods:
User Guide 31
• Hours Only
• Hours by Date
• Hours by Date, Account
• Hours by Account
• Hours by Job
Note: Overriding Hours - The hours information entered using the Hours Entry command
overrides settings defined using the Permanent Hours command. In effect, it's the same as
defining an hourly override using the Hourly Override command.
To Enter Employee Hours
1.
Choose the Hours Entry command from the Employees dialog box. This opens the Select
Employee dialog box.
Fig. 6-3
The Select Employee Dialog Box
2.
Choose the desired employee from the list provided then click Select. This opens the Hours
Entry dialog box where you can define the hours that this employee has worked.
32 GrandMaster II for Windows
Fig. 6-4
The Hours Entry Dialog Box
GrandMaster II for Windows allows you to enter hours based on several different methods
(e.g. by Date, by Account, both, etc.). You can decide which method to use by choosing the
Entry Screens command.
Fig. 6-5
The Entry Screens Menu
The different methods include:
•
Hours Only - This form allows you to specify an hourly earnings type, a rate and the number
of hours worked. The list of defined hourly earnings may be accessed with the F7 key. When
an hourly earnings type is entered, the program will display the earning's default rate. Simply
enter a new rate to override the default.
•
Hours by Date - This form allows you to specify an hourly earnings type, a rate, the number
of hours worked and a date for the entry. The list of defined hourly earnings may be accessed
with the F7 key. When an hourly earnings type is entered, the program will display the
earning's default rate. Simply enter a new rate to override the default.
•
Hours by Date and Account - This form allows you to specify an hourly earnings type, a
rate, the number of hours worked, the date and a general ledger account number for the entry.
The list of defined hourly earnings may be accessed with the F7 key. When an hourly
earnings type is entered, the program will display the earning's default rate. Simply enter a
new rate to override the default.
User Guide 33
•
Hours by Account - This form allows you to specify an hourly earnings type, a rate, the
number of hours worked, and a general ledger account number for the entry. The list of
defined hourly earnings may be accessed using the <F7> key. When an Hourly earning type
is entered, the program will display the earning's default rate. If required, enter a new rate to
override the default.
•
Job Cost Entry - The Job Cost system is an add-on module and available by purchase. This
facility allows you to enter hours by job, phase, and sub-phase. Similar to the Hours by
Account method, the extra 3 fields allow for wage analysis by job phase and sub-phase.
The available editing fields in this dialog box will vary depending on the type of entry screen
you have chosen. For example, if you choose the Job Cost Entry method of entering hours,
extra editing fields will appear at the bottom of the dialog box as shown here:
Fig. 6-6
The Job Costing Edit Fields
Keyboard Shortcuts
•
<F7> (view earnings) - Displays a list of defined hourly earnings types and their
corresponding number.
•
<Enter> - Accepts the entered value and moves the cursor to the next field. If no value is
entered, the <Enter> key will "pop in" the value from the previous record. This does not apply
to the Hours field.
•
<Esc> - Saves all records appearing in the dialog box with the exception of any information
appearing on the bottom line of the dialog box (the "edit line"), and closes the window.
•
<F4> (next employee) - Allows you to switch to the next employee in order without leaving
the hours entry form.
•
<F5> (previous employee) - Allows you to switch to the previous employee in order without
leaving the hours entry form.
•
<F6> (list) - Allows you to select a different employee from a selection list.
34 GrandMaster II for Windows
<Up Arrow> and <Down Arrow> - Moves the highlighted bar to a different row in the table (up
or down). When a record is highlighted, the corresponding fields at the bottom of the dialog box
will display the current record's data.
<Left Arrow> and <Right Arrow> - Moves the highlighted bar to a different row in the table
(left or right). When a record is highlighted, the corresponding fields at the bottom of the dialog
box will display the current record's data.
Employee
For efficiency, GrandMaster II for Windows offers several different methods for selecting the
current employee. The options available for employee selection are found in the Employee menu,
which appears as follows:
When an employee has been selected, regardless of method used, the chosen employee's name and
number will appear above at the top of the Employee menu bar. This employee is now considered
to be the "current" employee.
Note: Shortcut Keys - The Select by Name, Select by Number, Select by List and the
Next/Previous commands are available throughout all Employee-related dialog boxes using
shortcut key equivalents.
Automatic Saving of Information
When you switch to a new employee, any information you have changed for the original employee
is saved. The information for the new employee is then loaded.
Selecting Employees by Name
An employee may be located by surname using the Select by Name command (or by pressing
<ALT>+<2>).
To Select an Employee by Name
1.
Open the Employee dialog box then choose the Select by Name command from the Employee
menu. This removes the edit fields in the dialog box and leaves only the Name field.
User Guide 35
Fig. 6-7
The Select by Name Command is Chosen
2.
Enter part of or the desired employee's entire surname and click OK. If the name does not
exist in the payroll, GrandMaster II for Windows will locate the next surname in alphabetical
sequence. If there is more than one name meeting the search criteria, the first occurrence will
be selected.
When performing a name search, only the first 10 characters specified will be used.
3.
If you wish to cancel the search, press the <Esc> key.
Entering Part of an Employee's Name
In the following list of three employee surnames:
Johnson - Johnston - Jones
...the surname Jones may be located by typing jon. Entering j or jo will locate the name
"Johnson". With the name Johnson activated, it would be possible to access Johnston by pressing
<F4> (next employee).
Note: Name Searches are not Case Sensitive - The name search is not case sensitive. For
example, the surname MacDonald could be found by typing macdonald or MACDONALD.
Previous and Next Employees
After an employee has been selected using his/her surname, pressing the Next button will display
the next employee in alphabetical sequence. Correspondingly, pressing the Previous button will
display the previous employee in alphabetical sequence.
The quickest way to select the first employee alphabetically on file is to enter "A". GrandMaster II
for Windows will find the first employee alphabetically.
36 GrandMaster II for Windows
Selecting Employees by Number
An employee may be located by number using the Select by Number command (or by pressing
<ALT>+<1>).
To Select an Employee by Number
1.
Open the Employee dialog box, then choose the Select by Number command from the
Employee menu. This removes the edit fields in the dialog box and leaves only the Number
field.
Fig. 6-8
The Select by Number Command is Chosen
2.
Enter the desired employee's number, and click OK. If the employee number is not found, the
employee with the next employee number in numerical sequence will be displayed.
3.
If you wish to cancel the search, press the <Esc> key.
Previous and Next Employees
After an employee has been selected using his/her surname, pressing the Next button will display
the next employee in alphabetical sequence. Correspondingly, pressing the Previous button will
display the previous employee in alphabetical sequence.
The quickest way to select the first employee alphabetically on file is to enter 1. GrandMaster II
for Windows will find the first employee numerically.
Selecting Employees From a List
The Select by List command allows you to choose an employee from a list of available employees.
This is useful when you are not familiar with all of the employees' names.
To Select Employees From a List
1.
Open the Employees dialog box, then choose the Select by List command from the
Employees menu. This opens the Select Employees dialog box.
User Guide 37
Fig. 6-9
The Select Employee Dialog Box
2.
Select the desired employee from the list, then choose Select. This action closes the dialog
box and populates the Employees dialog box with the information for the selected employee.
Numeric or Alphabetical Sequence
It is possible to set the starting point for the list displayed. This may be done using numerical
(employee #) or alphabetical (surname) sequence.
Alphabetic Sequence - Press <TAB> twice to access the Name field, then enter the surname of
the first employee you wish to appear in the list. A list of employees in alphabetical order will be
displayed, beginning with the specified surname.
Numeric Sequence - Press <TAB> once to access the Number field, then enter the employee
number of the first employee you wish to appear in the list. A list of employees in numerical
order will be displayed, beginning with the specified employee number.
Adding a New Employee
You may add new employees to the payroll at any time. Each time you add an employee, certain
values will be defaulted automatically.
To Add a New Employee
1.
Open the Employees dialog box then choose the New Employee command from the
Employees menu. This opens the Employee Information dialog box.
Fig. 6-10
The Employee Information Dialog Box
38 GrandMaster II for Windows
2.
Enter the last and first name of the new employee into the Surname and Given fields
respectively.
3.
Move to the Number field and enter a number by which the new employee may be referenced.
The employee number must be unique within the current payroll. If you enter a number that
already exists, the employee will not be added (at which point you will have to re-enter their
information).
When an employee is added to the payroll, the required fields for the new employee are set to
default values by the program. It is advisable to step through the employee-level dialog boxes and
enter additional information and verify the various default values.
Add Employee <F7>
The Add Employee button allows you to add other employees without closing the dialog boxes.
After you have added all the required employees, you can choose each one individually to check
default values.
Use Default Class <F8>
If you are using default Employee Classes, this button can be used to select which default settings
(type of earning, deduction, and accumulators) the new employee is to be given. For more
information on default Employee Classes, refer to the Global Defaults section of the Company
Information chapter.
Fig. 6-11
The Select Default Class Dialog Box
Deleting an Employee
The current employee may be removed from the payroll at any time. This may be necessary of the
employee was added incorrectly of if they are no longer with the company. Refer to the last note
in this section regarding T4/T4A information.
Note: Only Supervisors Can Delete Employees - Only the SUPERVISOR and Level 2 users
may delete employees from the payroll.
To Delete an Employee
1.
Open the Employees dialog box then choose the Delete Employee command from the
Employee menu. This displays a message prompting if you are sure you want to remove the
employee.
2.
Choose Yes to proceed with the deletion or No to cancel the operation.
User Guide 39
Note: T4/T4Ainformation - Delete employees from the payroll that were added incorrectly or only
after T4/T4As have been produced. When an employee is deleted, there is no way to recover the
employee's payroll information!
Scrolling Through Employees
To move through the employee list quickly, you can scroll forward or backward one employee at a
time. This can be done while viewing any employee level dialog box. The following commands
are available via the buttons at the bottom of the Employees dialog box:
• To scroll forward one employee at a time, press F4 (next).
• To scroll backward one employee at a time, press F5 (previous).
If the current employee was selected by Employee Number, the scrolling will occur in numerical
sequence. If the current employee was selected by Employee Surname, the scrolling will occur in
alphabetical sequence (by surname).
• To display a selection list of employees, press F6 (list).
• To select a new employee by employee number, press ALT+1.
• To select a new employee by employee surname, press ALT+2.
If the data for the current employee is changed, the program will automatically save the changes
before proceeding to the next employee.
Once the payroll has been calculated, the results of the calculation can be viewed for each
employee by closing all of the open windows.
Next Period <F7>
Use this button to view the next payroll information for the employee.
Previous Period <F8>
Use this button to view the previous payroll information for the employee.
Earnings
You may apply up to 50 different types of earnings to an employee, with multiple distributions for
each earning type. These earning types must be set up using the Earnings Information command
available under the Company menu. Earnings amounts entered must be the amount paid per pay
period.
Earning types are broken down into 2 different categories:
• salary types (given amount per pay period)
• hourly types (units X rate)
Basic Earning Types
Examples of salary type earnings would be basic salary, bonuses, commissions, director's fees,
etc. Examples of hourly type earnings would be regular hours, overtime hours, shift premiums,
piece work, mileage, etc.
40 GrandMaster II for Windows
You have two options when selecting earnings for the current employee:
• Permanent Earnings - Once selected, these earnings will remain in effect until you
change them again.
• Earning Overrides - A one-time substitute for the permanent earning
If changes are made to permanent earnings and overrides are present, a warning will be displayed.
You will then have to change items if applicable.
EXAMPLE - A salary amount would normally be set up as a Permanent Salary earning type. (i.e.
paid the same amount every payroll). When an employee goes on vacation, you would select the
Salary Override command and override the salary by setting it to $0.00 (zero) and also set up a
one-time vacation earning.
The options for selecting/de-selecting earning types for the current employee are located in the
Earnings menu as follows:
Fig. 6-12
The Earnings Menu
Permanent Salary
The Permanent Salary command is used to set up salary type earnings that occur on a regular
basis for a given employee. These settings are permanent and will remain in effect until you
change them. These settings may be overridden on a one-time basis using the Salary Override
command.
All salary earnings may be globally activated/deactivated during the pay calculation using the
Select Earnings command under the Process menu.
You could set up a Permanent Salary earning on a weekly payroll for a car allowance, which is
paid on a monthly basis. Using the Select Earnings command under the Process menu, you
would then activate the car allowance to be paid out on the last payroll of the month.
When you select the Permanent Salary command, the following dialog box will appear:
User Guide 41
Fig. 6-13
The Salary Earnings - Permanent Dialog Box
Add <F8>
Use this button to add an existing salary earning type to the list of earning types that apply to the
current employee. Once selected, you may choose an existing salary earning type from a list of
earning types.
Delete <F9>
Use this button to remove a salary earning type. Choosing the button displays a list of salary
earning types that have been applied to the current employee. Select a salary earning type to
remove it from the current employee's list and click OK.
Year-to-date balances are not affected by the deletion of a salary earning type.
When an Earning has been set up as FIXED (F) or MULTIPLE (M) no changes to the earning
amount can be made in this dialog box.
Note: The Multiple Earning Type - Before a Multiple earning type can be assigned to an
employee, the corresponding earning on which it is indexed must first be added to the employee.
Similarly, before an earning can be deleted, any other Multiple earnings that are based on this
earning must be deleted first.
EXAMPLE - If you define a Salary earning entitled "additional premium" at the Company level
with 0.5 X "salary". This "additional premium" cannot be added to the employee's list of earnings
until the "salary" has been added to the list.
Distribution <F7>
All earnings will default to the employee's home general ledger account number. Choose this
button to allocate these costs to multiple general ledger accounts. This expands the dialog box to
include accounting information. Account numbers for each salary earning can be entered. You
also have the option to divide a salary into multiple accounts by using the Add button.
EXAMPLE - The salary for a manager of three departments is allocated proportionally to each
department. You would choose Distribution to access the distribution, select the earning type to
be split, then select the Add button twice. You would then divide salary values and enter the
account number for each of the three departments.
42 GrandMaster II for Windows
Table <F2>
This button displays the earnings table. From the earnings table, a table cell may be selected that
will serve as the source for the salary amount. Use of the earnings table allows for global changes
in salary based on the values in the table. Use the Earnings Table command under the Company
menu for creating/modifying the earnings table. The selected cell row/column and a "T" will
appear beside the salary amount.
EXAMPLE - A teacher's salary is based on a union agreement that is dependent on education and
seniority. These two factors are used to create a table of salaries. Each teacher's salary is then
linked to a cell in the earnings table. When union negotiation cause values in the table to change,
each teacher's salary will be updated automatically.
Permanent Hourly
Choose this command when you need to set up hourly type earnings that occur on a regular basis
for a given employee. These settings are permanent and will remain in effect until changed by you.
These settings may be overridden on a one-time basis using the Hourly Override command.
All hourly earnings may be globally activated/deactivated during the pay calculation using the
Select Earnings command under the Process menu.
When you select the Permanent Hourly command, the following dialog box will appear:
Fig. 6-14
The Salary Earnings - Permanent Dialog Box
Add <F8>
This button is used to add an existing hourly earning type to the list of earning types that apply to
the current employee. Once chosen, you may select an existing hourly earning type from a list of
earnings.
Delete <F9>
This button displays a selection list displaying hourly earning types that have been applied to the
current employee. Select the hourly earning type to remove from the current employee's list and
click OK.
User Guide 43
Distribution <F7>
All earnings will default to the employee's home general ledger account number. Choose this
button to allocate these costs to multiple general ledger accounts. This expands the dialog box to
include accounting information. Account numbers for each hourly earning can be entered. You
also have the option to divide a salary into multiple accounts by using the Add Distribution button.
Year-to-date balances are not affected by the removal of an hourly earning type.
EXAMPLE - Joe works in three different departments in a pay period. His hourly wage can be
allocated proportionally to each department. You would choose the Distribution button to access
the distribution, highlight the hourly earning type to be split and choose the Add button twice.
You could then enter the hours and the account number for each of the three departments.
When an Earning has been set up as FIXED (F) or MULTIPLE (M) no changes to the earning rate
can be made in this dialog box.
Note: The Multiple Earning Type - Before a Multiple earning type can be assigned to an
employee, the corresponding earning on which it is indexed must first be added to the employee.
Similarly, before an earning can be deleted, any other Multiple earnings that are based on this
earning must be deleted first.
EXAMPLE - A salary earning called "overtime" has been defined at the Company level as 1.5 X
"regular". This "overtime" cannot be added to the employee's list of earnings until the "regular"
has been added to the list.
Table <F2>
This button displays the earnings table. From the earnings table, a table cell may be selected that
will serve as the source for the salary amount. Use of the earnings table allows for global changes
in salary based on the values in the table. Use the Earnings Table command under the Company
menu for creating/modifying the earnings table.
EXAMPLE - A union shop worker's hourly wage is based on seniority. A table of hourly rates is
defined based on a union agreement. Each worker's hourly rate is then linked to a cell in the
earnings table. When union negotiation cause rates in the table to change, each worker's hourly
rate will be updated automatically.
Salary Overrides
The Salary Override command operates in a similar manner to the Permanent Salary command,
with the following differences:
• Amounts entered will override permanent settings.
• Amounts entered apply to the current pay period only, and will subsequently revert back
to permanent settings for the next pay period.
• Existing earnings types cannot be added or deleted.
EXAMPLE - Joe normally receives a permanent salary of $1000/month and he takes a leave of
absence without pay for 2 days. His salary amount would then be reduced (overridden) to reflect
his absence. Because the Salary Override option was used, the change would only affect the
current payroll, and would revert back to the permanent salary for the next payroll.
When you select the Salary Override command, the following dialog box appears:
44 GrandMaster II for Windows
Fig. 6-15
The Salary Earnings - Override Dialog Box
Distribution <F7>
Allows you to add/modify/delete Permanent Salary distribution settings for this pay period only.
EXAMPLE - An employee is temporarily moved from department A to department B for a
portion of the pay period. You would use this button to allocate the employee's time to the new
department.
Reload <F8>
Resets salary earning information for the current employee to the settings defined using the
Permanent Salary command.
EXAMPLE - In error, you define a salary override for the wrong employee. You would choose
Reload to reset the current employee's earnings back to permanent salary.
Hourly Overrides
The Hourly Override command operates in a similar manner to the Permanent Hourly command,
with the following differences:
• Amounts entered will override permanent settings.
• Amounts entered pertain to the current pay period only, and will subsequently revert back
to permanent settings for the next pay period.
• Earning types cannot be added or deleted.
Note: Alternative to Hourly Overrides - An alternative method to using the Hourly Override
command is to use the Hours Entry command under in the Payroll dialog box's Employee menu.
The Hours Entry command is designed to make entering hours information for many employees
faster and easier.
EXAMPLE - A casual employee does not work a set number of hours in each pay period.
Because the number of hours always varies, a permanent hourly amount can't be defined. Rather,
you would use the Hourly Override command to enter the employee's hours for each pay period.
When you select the Hourly Override command, the following dialog box appears:
User Guide 45
Fig. 6-16
The Hourly Earnings - Override Dialog Box
Distribution <F7>
Allows you to add/modify/delete Permanent Hourly distribution settings for this pay period only.
EXAMPLE - An employee is temporarily moved from department A to department B for a
portion of the pay period. You would use this button to allocate the employee's time to the new
department.
Reload <F8>
Resets hourly earning information for the current employee to the settings defined using the
Permanent Hourly command.
EXAMPLE - In error, you define an hourly override for the wrong employee. You would then
choose Reload to reset the current employee's earnings back to permanent hourly.
Year-to-Date Earnings
This screen is used to adjust an employee's year-to-date balances or set starting balances when a
payroll is initialized.
Caution: We recommend that you use this feature only as a last resort or when initializing a
payroll. Use the Permanent Hourly/Salary or Override Hourly/Salary fields to make adjustments for
the current pay period, as this will provide a proper audit trail.
EXAMPLE - You start using GrandMaster II for Windows in March. Balances to date from your
previous payroll system would be entered using the Year-to-Date Earnings command.
EXAMPLE - A cheque is issued in error, and is canceled. You would use the Year-to-Date
Earnings command to adjust the year-to-date balances to reflect the cancellation.
When you select the YTD Earnings command, the following dialog box appears:
46 GrandMaster II for Windows
Fig. 6-17
The Year-to-Date Earnings Dialog Box
This dialog box displays all of the salary and hourly earning types for a given employee.
To Update an Earning Amount
1.
Select an earning row from the table, then choose the Edit button (or double-click on the row).
This opens the Update Current Selection dialog box so you can to view or change the
employee's year-to-date balances.
Fig. 6-18
The Update Current Selection Dialog Box
Note: Current Pay Period Entries - Do not include the current pay period entries when entering
year-to-date amounts. The current pay period entries are added to the year-to-date amounts when
the payroll is cleared using the Clear Payroll command.
Deductions/Benefits
Deductions/benefits are defined using the Deductions and Benefits command under the Company
menu. Using the options under the Employee dialog box's Deductions menu, you may select up to
50 deductions/benefits for each employee in the payroll. You may also override the 5 statutory
deductions that are applied to employees automatically.
Deductions are broken down into two basic categories:
• Regular deductions
• Statutory deductions
Examples of regular deductions include dental plan deduction, life insurance deduction, etc.
Examples of statutory deductions include income tax,CPP, EI, etc.
You have two options for applying deductions to an employee:
User Guide 47
• Permanent - once selected, these amounts/calculations will remain in effect until you
change them.
• Override - A one-time substitute for the permanent deduction
EXAMPLE - A union deduction that is calculated as 2 times the employee's hourly rate would be
set up as a Permanent Deduction. An additional initiation fee that is deducted on hiring would be
entered as a Deduction Override.
The Deductions menu appears as follows:
Fig. 6-19
The Deductions Menu
Permanent Deductions
The Permanent Deduction command is used to set up deductions that occur on a regular basis for
a given employee. These settings are permanent and will remain in effect until you change them.
These settings may be overridden on a one-time basis using the Deduction Override command.
EXAMPLE - An example of a permanent deduction would be a pension deduction that is
calculated as 5% of the employee's gross earnings each time the payroll is processed.
Note: Deactivating Deductions - All deductions may be globally activated/deactivated during the
pay calculation using the Select Deductions option under the Process menu.
EXAMPLE - A life insurance premium which is deducted on a monthly basis would be activated
for the last pay of the month using the Select Deduction command under the Process menu.
When you select the Permanent Deduction command, the following dialog box appears:
48 GrandMaster II for Windows
Fig. 6-20
The Deductions - Permanent Dialog Box
Any amounts entered under the Deduction or Benefit columns of this dialog box will override any
calculation as defined using the Deductions and Benefits command under the Company menu.
The value entered is a fixed dollar amount.
Table <F2>
This button displays a table of available parameters for use with the selected deduction/benefit.
Each set of parameters is given a group number by which it is identified. Each group can contain
up to 5 parameters for use in the deduction/benefit calculation.
A parameter can be:
• A fixed dollar amount.
• A percentage.
• A minimum amount.
• A maximum amount.
EXAMPLE - You have a pension deduction that is calculated as a percentage of gross earnings.
Group 1 employees' pension would be deducted at 2%. Group 2 employees' pension would be
deducted at 3%. Group 3 employees' pension would be deducted at 5%. You would use the Table
button to access the parameters for the pension deduction. You would then select the appropriate
group for each employee. The corresponding percentage (i.e., 2%, 3%, 5%) would be applied.
The parameters in the table are defined using the Deductions and Benefits command under the
Company menu.
When you select this button, the following dialog box appears:
Fig. 6-21
The Table Dialog Box
User Guide 49
Distribution <F7>
This button allows you to specify an account number for each benefit cost. By default, the benefit
cost will be charged to the global benefit account that is set up using the Deductions and Benefits
command under the Company menu. The benefit will be divided proportionally among the
departments in which the employee works.
EXAMPLE - Joe works in both department A and department B. His pension benefit cost would
be proportionally allocated based on percentage of income earned in each department. Using this
button, you could specify a benefit cost account number for both department A and B, other than
the default.
When you choose this button, the following dialog box appears:
Fig. 6-22
The Deductions - Permanent (Distribution) Dialog Box
Add <F8>
This button is used to add an existing deduction/benefit type to the list of deduction/benefits types
that apply to the current employee. Choosing this button opens a dialog box where you can select
a deduction/benefit to be added.
EXAMPLE - After a 3-month probation period, Joe is eligible to join the group life insurance
plan. While viewing the Permanent Deduction dialog box for the Joe, you would choose the Add
button to access a selection list of defined deductions. You would then select the group life
insurance deduction.
Delete <F9>
This button displays a dialog box with the deduction/benefit types that have been applied to the
current employee. Select the deduction/benefit type you wish to remove, then click OK.
EXAMPLE - Joe is promoted and is no longer required to contribute union dues. While viewing
the Permanent Deduction dialog box for Joe, you would choose Delete to access a selection list of
deductions for him. You would then select the union deduction and click OK.
Deduction Override
The Deduction Override command operates in a similar manner to the Permanent Deduction
command, with the following differences:
• Amounts entered will override permanent settings.
50 GrandMaster II for Windows
• Amounts entered pertain to the current pay period only, and will subsequently revert back
to permanent settings for the next pay period.
• Deduction/benefit types cannot be added or deleted.
• Fixed dollar amounts must be entered for Deduction and/or Benefit (i.e., no calculation
will be performed).
• Deductions that have been overridden will be deducted on the next payroll calculation
regardless of Global selections for deductions, see the Process, Select Deduction section
of this guide.
EXAMPLE - Joe will be on vacation next pay period and as a result, the union deduction must be
doubled this pay period. You would use the Deduction Override command to enter the fixed
dollar amount of the doubled union deduction for the current pay period.
When you select the Deduction Override command, the following dialog box appears:
Fig. 6-23
The Deductions - Override Dialog Box
Distribution <F7>
Overrides the Permanent Deduction account number for each benefit cost, on a one-time basis.
The benefit will be proportionally divided among the departments in which the employee works.
EXAMPLE - For the current pay period only, an employee works in a different department.
Using this button you could specify a benefit cost account number for the new department.
Reload <F8>
Resets deduction/benefit information for the current employee to the settings defined using the
Permanent Deduction command.
EXAMPLE - You define a deduction override for the wrong employee. You would then choose
Reload to reset the current employee's deductions/benefits back to permanent settings.
Off/On <F9>
Use this button to turn off a deduction/benefit that is calculated. Choosing the button again will
turn it back on. A zero will appear next to the description when it is turned off.
User Guide 51
Statutory Deduction Override
Statutory deductions are deductions defined by federal and provincial governments including:
Federal Tax, Quebec Tax, CPP, QPP and EI. When an employee is added to the payroll, the
statutory deductions are automatically set up for them.
These calculations are integrated into the program and cannot be modified. You may, however,
override the program calculation using the Statutory Deduction Override command.
EXAMPLE - An employee is paid a bonus of $5000. GrandMaster II for Windows would
calculate federal tax as if the bonus is paid every pay period. To override the program's federal tax
calculation, you would use the Statutory Deduction Override command to enter an adjusted
amount.
When you select the Statutory Deduction Override command, the following dialog box appears:
Fig. 6-24
The Statutory Deductions - Override Dialog Box
To override the program's calculation of a statutory deduction, click the checkbox beside the
appropriate item and enter the desired deduction amount.
Note: Overriding Zero Amounts - To override the program calculation with an amount of zero
(0), activate the checkbox without entering a deduction value.
To have the program calculate the statutory deduction, remove the check form the Override
checkbox.
Year-to-Date Deductions
GrandMaster II for Windows maintains an accumulating total of deduction balances for the
calendar year, which will be used to produce T4s, T4As and Releve1's. The YTD Deductions
option allows you to adjust these balances or initialize balances for commencement of a new
payroll. Any entries made using the YTD Deductions option will appear as adjustments on the
next payroll register.
Caution - We recommend that you use this feature as a last resort to make adjustments. If
possible, use the Deductions Override command to make adjustments, as this will provide a
proper audit trail.
52 GrandMaster II for Windows
EXAMPLE - A benefit for a company car allowance was taken in error. To rectify this, you
would enter negative value equal to the error amount in the YTD benefits field in the YTD
Deductions dialog box.
When you select the YTD Deductions command, the following dialog box appears:
Fig. 6-25
The Year-to-Date Deductions Dialog Box
This dialog box displays all of the YTD deductions and benefits for the current employee. Select
the desired item, then choose the Edit button to enter the new amount for year-to-date
deduction/benefit amounts.
Note: YTD Amounts - The year-to-date balances displayed in this dialog box are prior to the
current pay calculation. When the Clear Payroll command is selected, the year-to-date balances
will be updated to include the current pay period.
Year-to-Date Statutory Deductions
GrandMaster II for Windows maintains an accumulating total of statutory deduction balances for
the calendar year, which will be used to produce T4s, T4As and Releve1's. The YTD Statutory
Deduction command allows you to adjust these balances or initialize balances for commencement
of a new payroll. Entering values in this field will alter the year-to-date statutory deductions.
Caution - We recommend that you use this feature as a last resort to make adjustments. If
possible, use the Statutory Deduction Override command to make adjustments, as this will
provide a proper audit trail.
EXAMPLE - A cheque was issued to an employee in error. To rectify this, you would reduce the
balance for both the Deduction and Benefit fields of the YTD Statutory Deduction dialog box.
When you select the YTD Statutory Deduction command, the following dialog box appears:
User Guide 53
Fig. 6-26
The Year-to-Date Statutory Deductions Dialog Box
This dialog box displays all of the statutory deductions and benefits for the current employee. Use
the <Arrow> keys to move the cursor bar to the appropriate field, and enter the correct amount for
the employee's year-to-date statutory deduction/benefit amounts.
Personal
This menu allows you to specify a variety personal information for each employee. This
information is used in calculations and reports.
The Personal menu appears as follows:
Fig. 6-27
The Personal Menu
Personal Information
This dialog box allows you to specify information about individual employees, such as employee
number, name, address, gender, phone number, and SIN number. The SIN number is validated
using a modulus 10 check-digit formula. The employee number may be a combination of
numbers and letters. The province must be indicated by a 2-letter provincial code, as set out by
CCRA Guidelines. The postal code will accept up to 10 characters to allow for US zip codes.
When this command is selected, the following dialog box appears:
54 GrandMaster II for Windows
Fig. 6-28
The Personal Information Dialog Box
If you are not sure of the required postal code, enter a space in the Province field to display a list
of valid province codes. The tax province will default to the province of residence. Only change
this if the employee works in a province other than their province of residence.
The fields in this dialog box are as follows:
Field
Description
Number
The employee's number on the payroll. This number must be unique (this field can not
be left blank). Changes to the Number field will affect the position of the employee in
selection lists.
Surname
The employee's surname or last name. It cannot have more than 1 blank space
between parts of the name (e.g. "Van Nostrom" is acceptable). Changes to the
Surname field will affect the position of the employee in selection lists.
Given Name
The employee's given name. It cannot have more than 1 blank between parts of name
(e.g. "Mary Jane" is acceptable)
Address
The employee's physical street address (documentation only -- for reports).
City
The employee's City of residence.
Province
The employee's Province of residence. (mailing abbreviation)
Tax Province
The employee's Province where their tax is assessed. This field will default to their
province of residence.
Postal Code
The employee's Postal or Zip code. (maximum 10 digits). If you are not sure of the
required code, enter a space in the Province field to display a list of valid province
codes.
Phone Number
The employee's phone number. This field is optional.
Social Insurance
Number
The employee's Social Insurance Number. This value must be a valid number (it is
verified using a simple check digit formula).
Sex
The employee's gender.
User Guide 55
Note: Employee List Positions - Changes to the Number or Surname fields will affect the
position of the employee in selection lists.
Miscellaneous Information
Miscellaneous information is data about the current employee that is not suited to any one distinct
area of the payroll system.
When you select the Miscellaneous Information command, the following dialog box appears:
Fig. 6-29
The Miscellaneous Information Dialog Box
This dialog box allows you to specify the following information for each employee:
Field
Description
Status
Indicates the employment status of the current employee. Available options are
ACTIVE, ON LEAVE, TERMINATED, and SPECIAL (flags to indicate extra, additional
pay, or reversal payroll).
Rev. Canada
Selects a Revenue Canada number; used for companies with reduced EI rates.
Available options are FULL TIME, PART TIME, and OTHER.
Language
A 1 character description (E or F) to indicate the language in which the cheque will be
printed.
Position
A 20 character description of an employee's title/rank in a company.
Field A
A 20 character optional user-defined field. The description of the field may be defined
in the Control Information dialog box under the Company menu.
Field B
Another 20 character optional user-defined field. The description of the field may be
defined in the Control Information dialog box under the Company menu.
Numeric Field 1
A 9 digit numeric (2 decimal places) optional user-defined field. The description of the
field may be defined in the Control Information dialog box under the Company menu.
Numeric Field 2
Another 9 digit numeric (2 decimal places) optional user-defined field. The description
of the field may be defined in the Control Information dialog box under the Company
menu.
56 GrandMaster II for Windows
Message
A 30 character message to the employee that will show both on the employee's pay
stub and on the payroll register (for audit purposes). If a global message (on all
employees' pay stubs) is required, enter it when printing cheques (refer to the
Cheques/Stubs section of the Creating Reports chapter). If the message is required to
be permanent, precede the message with an ampersand (&).
Notes
A 35 character message for internal use by the payroll department. This message will
not be printed.
Hour/Pay
An employee's normal hours worked per pay period. This value is not used in
calculation of the employee's pay. It can be used to calculate certain deductions or
accumulations.
Account
The default account to which the employee's wage(s) will be charged.
FTE
Full Time Equivalent. If the current employee does not work full time, you would enter
a percentage of full time equivalent. Used to calculate certain deductions.
Tax Information
This dialog box allows you to set up a permanent override for Federal or Provincial Tax settings
and enter claim amounts from the employee's TD1 form.
When you select this command, the following dialog box appears:
Fig. 6-30
The Tax Information Dialog Box
The fields in this dialog box are as follows:
Field
Description
Tax Override
Indicates the type of override. The following options are available F (fixed), N (net
cheque), X (exempt), % (percentage), <space> (additional tax), and S
(salesperson routine). The Tax Override setting will dictate the type of entry made
in the Additional Tax field.
Net cheque (N) will calculate to a net amount that is entered in Additional Tax
amount. CPP/QPP and EI will calculate as normal and tax amount will be adjusted
to give the exact net pay.
User Guide 57
Salesperson (S) will calculate as a percentage of tax but CPP/QPP will be
calculated from the last pay date which will be stored automatically in the
anniversary date field. EI will be calculated from dollar one to annual maximum.
Used mainly for real estate salespeople.
Additional Tax
Indicates the amount applicable to the tax override.
Net Claim Amount
The Net Claim Amount found on the employee's MR-19-V form.
LCP Amount
The labour-sponsored venture tax credit amount for the current employee.
Other Allowance
Special tax allowance amounts approved by CCRA.
Remote Allowance
An allowance for persons living in a designated area as per CCRA guidelines.
No. of Dependents
The number of dependents (children under the age of 18, or disabled) for the
current employee.
Exempt CPP
Indicates whether or not the current employee is exempt from CPP.
Exempt EI
Indicates whether or not the current employee is exempt from EI.
Provincial Tax Parameters <F7>
Allows you to enter tax information for the your specific province. When you choose this button,
the following dialog box appears:
Fig. 6-31
The Provincial Tax Parameters Dialog Box
The fields in this dialog box are as follows:
Field
Description
Tax Override
Indicates the type of override. The following options are available F (fixed), N (net
cheque), X (exempt), % (percentage), <space> (additional tax), and S
(salesperson routine). The Tax Override setting will dictate the type of entry made
in the Additional Tax field.
Net cheque (N) will calculate to a net amount that is entered in Additional Tax
amount. CPP/QPP and EI will calculate as normal and tax amount will be adjusted
to give the exact net pay.
Salesperson (S) will calculate as a percentage of tax but CPP/QPP will be
calculated from the last pay date which will be stored automatically in the
anniversary date field. EI will be calculated from dollar one to annual maximum.
Used mainly for real estate salespeople.
Additional Tax
Indicates the amount applicable to the tax override.
Net Claim Amount
The Net Claim Amount found on the employee's MR-19-V form.
LCP Amount
The labour-sponsored venture tax credit amount for the current employee.
58 GrandMaster II for Windows
Statutory Deduction Expense Accounts <F8>
Allows you to change account numbers for CPP, UIC, WCB and Provincial Health expenses.
When you choose this button, the following dialog box appears:
Fig. 6-32
The Statutory Deductions Expense Accounts Dialog Box
The fields in this dialog box are as follows:
Field
Description
Dept.
Enter the Department number for this employee's CPP/QPP, EI, WCB and
Provincial Health expenses.
Account
Enter the Account number for this employee's CPP/QPP, EI, WCB and Provincial
Health expenses.
Sub
Enter the Sub-account number for this employee's CPP/QPP, EI, WCB and
Provincial Health expenses.
WCB and Stats Canada
Statistics Canada periodically selects certain businesses to participate in a survey of employment.
The survey is based on geographical regions assigned by Stats Canada. GrandMaster II for
Windows supports this survey by allowing you to assign a Statistics Canada earning type code and
region to each employee. The program will use these codes to compile a survey report.
When you select the WCB and Stats Canada command, the following dialog box appears:
Fig. 6-33
The WCB and Stats Canada Dialog Box
The following table describes the codes necessary for the survey:
Survey Code
Description
WCB Code
Indicates the WCB rate for the current employee. This rate will have been defined in
User Guide 59
the Workers Compensation option under the Company menu.
Stats Can. Code
Indicates the pay classification of the current employee, as indicated on the Stats
Canada report. Invalid entry displays a selection list with the following options:
SALARY, HOURLY, and OTHER.
Stats Can. Region
If the company has employees in more than one region in Canada, you would assign
a number (1-99) to each different region. Enter the appropriate region number in
which the current employee works.
Important Dates
This dialog box allows you to enter important dates for each employee. The program requires
some of the dates such as Start Date and Birth Date. Other dates are optional and are used
internally. The description of the Additional Dates may be redefined using the Control
Information option under the Company menu.
Fig. 6-34
The Important Dates Dialog Box
The fields in this dialog box are as follows:
Field
Description
Start
The employee's starting date.
Birth
The employee's birth date.
Anniversary
The one-year anniversary date that the employee began working.
Termination
The date the employee's position was terminated.
Rehire
The date when the employee will be re-hired.
Date 1, 2, 3
Optional dates that are can be set up through Company-level menus.
60 GrandMaster II for Windows
Bank Information
This command allows you to define information about the employee's bank account(s) for use
with the electronic funds transfer (EFT) feature. An employee's earnings can be transferred into a
maximum of 3 different bank accounts. The accounts will be satisfied in order of sequence (1-3),
as earnings amounts permit. A zero amount will apply the remaining balance to that bank account.
Any earnings in excess of the allotted account amounts will be paid in the form of a cheque.
When you select this command, the following dialog box appears:
Fig. 6-35
The Bank Information Dialog Box
The fields in this dialog box are as follows:
Field
Description
Account
This label displays the account that you are presently viewing. Multiple accounts can be
viewed using <Page Up> and <Page Down> or the Previous Account and Next Account
buttons at the bottom of the dialog box.
Account No.
The employee's actual bank account number where monies will be deposited (you can
define up to three).
Field format is TTTTT-BBB-AAAAAA.
T = Transit number.
B = Bank ID number.
A = Account number.
It should be entered as it appears on the bottom of a cheque form. Do not suppress the
preceding zero.
Dashes or spaces can be used between the TRANSIT and BANK and between the BANK
and ACCOUNT for readability. An account number or amount must be entered for this
bank account information to be saved.
Amount
The maximum amount to be deposited into the account. If this field is blank, the entire (or
remainder) of the amount will be deposited.
Bank Name
The name of employee's bank where monies are to be deposited.
User Guide 61
Address
The street address of employee's bank.
City
The city where the employee's bank is located.
Province
The province where the employee's bank is located.
Postal Code
The Postal Code of the employee's bank.
<Page Up> and <Page Down>
Used to display the previous/next account (of the 3 available).
E.I. Override
The program assumes that an employee has worked a full pay period. When an employee has
worked a partial pay period or more than one pay period, it is required that the employee's hours
and earnings be entered on a weekly basis. You can enter the insured earnings/insured weeks for
the current payroll in the EI Overrides dialog box.
When you select the EI Override command, the program will prompt for the number of weeks for
which the employee is to be paid.
When you enter the number of weeks and click OK, the EI Override dialog box is displayed:
Fig. 6-36
The E.I. Override Dialog Box
The fields in this dialog box are as follows:
Field
Description
Pay Period EI
Override
The number of weeks employee is to be paid.
Permanent EI Hours
The number of hours the employee has worked in that week.
Temporary Adjustment
to EI Hours
Enter the employee's insurable earnings.
If an EI override is entered, the exact amounts of hours and earnings must also be entered. When
amounts are entered, the program will not perform any further calculation.
This option should be used instead of Statutory Deduction Overrides to maintain the insured
hours and earnings correctly within the program.
62 GrandMaster II for Windows
Arrears Override
Arrears are carry-forwards from the previous pay period. If an employee did not have enough
earnings to offset his deductions in the previous pay period, these amounts are automatically
carried forward until the employee's income exceeds his/her deductions or until you remove the
arrears amount.
Choosing this command displays the following dialog box:
Fig. 6-37
The Arrears Override Dialog Box
If a manual adjustment is required, enter the new value for the arrears using the Current Amount
Owing field. The adjustment amount displays the difference between the amount entered and the
previous value for arrears.
Note: What Causes Arrears? - Arrears are usually caused by a fixed amount deduction that
exceeds the amount of earnings paid.
EXAMPLE - An employee is paid $45.00 on the last payroll and has a fixed bond deduction of
$50.00 per pay. This situation would place the employee in arrears for $5.00. In this case, the
$5.00 would be deducted on the next pay.
Manual adjustments to the current amount owing should only be made as a last resort. If an
adjustment is made, you should verify the year-to-date amounts for the item(s) that created the
arrears situation.
EXAMPLE - An employee had no pay in the pay period but a $20.00 union deduction was taken
off in error. On the next payroll you would enter a $-20.00 union deduction to offset the arrears.
To prevent an employee from entering into an arrears situation, set the employee Status to On
Leave before the payroll is calculated (refer to the Miscellaneous Information section of this guide
for more information).
E.I. Insurable Earnings
The Insured Earnings options allows you to edit an employee's insured weeks in terms of hours
and earnings. This information is used only to create the Record of Employment form. Weeks
entered are actual weeks. The program will, by default, assume the earnings are insured. Enter
zero if there is no insured earning in that period.
Caution - Use this option only as a last resort. Care should be taken when modifying insured
earnings. Once settings are saved, they cannot be reversed (even with the Reverse Pay function).
When you select this command, the following dialog box is displayed:
User Guide 63
Fig. 6-38
The EI Insurable Earnings Dialog Box
The column tables display the following information:
COLUMN LABEL
Description
P.P.
The year and pay period number.
Type
The type of pay period and a "y" if this has been printed on an ROE.
Weeks
The number of weeks in the given pay period.
EI Hours
The amount of hours in the given pay period.
Earnings
The amount of earnings in the given pay period.
Warning: Be careful when modifying insured earnings. Once settings are saved, they cannot be
undone with a reverse pay.
Accumulators
Accumulators are used to calculate and pay, or maintain a running balance of pay types such as
vacation pay/hours, statutory holiday pay, sick entitlement, etc.
The Accumulators menu appears as follows:
Fig. 6-39
The Accumulators Menu
In the Accumulators dialog box, you may invoke accumulators that have been previously set up
(using the Accumulators command under the Company menu), for the current employee. You
may then change accumulator settings specific to individual employees.
When you choose the Accumulators command, the following dialog box appears:
64 GrandMaster II for Windows
Fig. 6-40
The Accumulators Dialog Box
The three edit fields near the bottom of the dialog box may be modified as follows:
Field
Description
Before Calculation
Displays the accumulated balance prior to the pay calculation. You can edit this
balance as required.
Pay
Specifies whether the accumulator should always pay the balance (A), accumulate
the balance (N), or pay the balance this pay only (T) (and will revert back to
accumulate (A) for the next pay).
% of Earnings
Indicates the accumulator rate (in terms of earnings) for the current employee.
Distribution <F2>
This button allows you to modify the expense accounts for the accumulators (if applicable).
Choosing the button opens the following dialog box:
Fig. 6-41
The Expense Account Dialog Box
Note: Paying Out a Fixed Amount or Entire Balance of an Accumulator -To learn how to
perform either task, refer to the Accumulators chapter in the Company Information section of this
guide.
User Guide 65
Chapter 7: Company Information
Company Information applies only to the specific payroll you have loaded. That is, any
information you enter here will be unique to this payroll and will not affect other payrolls you
have created. The Company Information section is normally the starting point when you begin
working with a new payroll.
Automated Features
GrandMaster II for Windows utilizes several automated features and it is important to understand
how they function. By taking advantage of these powerful features you can satisfy all of your
payroll requirements in an expedient manner.
Three of these special features are:
• Statutory Deductions (Federal/Provincial tax, CPP/QPP and EI) - These options
follow CCRA guidelines and incorporate the Option 1 Tax formula. These features
generally change twice a year (July 1 and January 1). CanPay carefully monitors these
changes and forwards software updates when required. You can not change the formulas.
• Earnings (amounts paid to employees) - The program will accommodate 50 different
earning types. Employees in the payroll are assigned the earning categories that apply to
them. Distribution of the earning to specific General Ledger accounts is accomplished by
assigning account number at the employee level.
• Deduction/Benefits (amounts deducted from the employees pay/company payment on
behalf of the employee). Fifty deduction/benefits are available.
The Company Menu
The Company menu allows you to customize the program to meet specific company
requirements. This is achieved by activating/deactivating a series of options which in turn may be
selected to meet individual employee requirements. The Company menu appears as follows:
Fig. 7-01
The Company Menu
66 GrandMaster II for Windows
Two Simple Payroll Procedures
Generally, there are two procedures to setting up a payroll:
• Set up company (global) defaults/options. These options will then become available for
all employees within this payroll.
• Activate required options on an individual employee basis
Name and Address
The Name and Address dialog box contains information regarding the name and address of the
company. The Name, Address and City fields will accept up to 40 characters of information. The
province must be indicated by a 2-letter provincial code, as set out by CCRA guidelines. The
postal code will accept up to 10 characters to allow for U.S. zip codes.
If you are not sure of the required postal code, enter a space in the Province field. This will
display a list of valid province codes.
When you select the Name and Address command, the following dialog box appears:
Fig. 7-02
The Name and Address Dialog Box
Save <F10>
This button saves the changes and closes the dialog box.
Control Information
This dialog box contains information necessary to control the processing of the payroll. When
you select the Control Information command, the following dialog box appears:
User Guide 67
Fig. 7-03
The Control Information Dialog Box
This information is described in the following table:
Field
Description
Pay Periods/Year
Indicates the number of pay periods per year, e.g. weekly (52), biweekly (26),
semimonthly (24) or monthly (12).
Start Date Payroll year
Indicates the start date of the first pay of the year.
Maximum Net/Period
Sets the maximum net pay per period. This does not suppress the pay but will
print a warning when net amount exceeds the amount.
Accounts
Net Pay
Specifies the general ledger account numbers for the net payroll.
Arrears
Specifies the general ledger account number for arrears (negative net cheques).
Arrears Description
Specifies the arrears description.
Enable Audit
Enables the audit change-tracking feature. This option will increase file size.
Allow Arrears on gross
pay of zero
Check this box if you want to arrears to be generated even if an employee's gross
pay is a zero amount.
Descriptions (Optional)
Additional Date 1 - 3
There are 3 user-definable date fields that will appear in the Personal, Important
Dates dialog box under the Employee menu bar.
Miscellaneous
Miscellaneous
Field A-B
Numeric 1-2
There are 2 user-definable character fields that will appear in the Personal,
Miscellaneous dialog box under the Employee menu bar.
There are 2 user-definable numeric fields that will appear in the Personal,
Miscellaneous dialog box under the Employee menu bar.
Expense Accounts
Use Company
Account
This causes the account search to bypass the Employee screen, Personal menu,
Miscellaneous option, Default Account number and accept the account from the
Company Accounts. Not valid for earnings.
68 GrandMaster II for Windows
Use Sub Account
This causes the account search to bypass the Employee screen, Personal menu,
Miscellaneous option, Default Account number and accept the sub-account from
the Company Accounts. Not valid for earnings.
Statutory Deductions
Statutory deductions are fixed calculations based on the Option 1 formula which is supplied by the
CCRA, which incorporates Federal Tax, Provincial Tax, Canada/Quebec Pension Plan, and
Employment Insurance (EI). This dialog box allows you to change descriptions, enter CCRA
Business numbers and general ledger account numbers.
Note: Overriding Statutory Deductions - Use the Statutory Deduction Override command
under the Deductions menu under the Employee menu bar to override the program statutory
deduction calculations for an individual employee.
Once the CCRA numbers are defined, you can assign a number to individual employees using the
Personal - Miscellaneous command in the Employees dialog box.
EXAMPLE - Some statutory deductions are: Federal Tax, Quebec Tax, C.P.P., Q.P.P., and EI.
GrandMaster II for Windows will allow you to set up a maximum of three (3) CCRA/Revenue du
Quebec numbers per payroll. This will aid those employers who have a reduced EI rate.
When the Statutory Deductions command is selected, the program prompts you to select a CCRA
account as follows:
Fig. 7-04
The Select CCRA Account Dialog Box
Once an account is selected the following dialog box appears:
User Guide 69
Fig. 7-05
The CCRA Account Setup Dialog Box
The following table describes the options available in the Account Setup dialog box:
Field
Description
Current Class
A description of the employment category. Options available are FULL TIME, PART
TIME and OTHER.
CCRA Acct or BN
The CCRA remittance account number. The program validates CCRA numbers using
the Modulus 10 check-digit formula.
Quebec Acct.
The province of Quebec remittance account number. This is only required if
employees are working in the province of Quebec.
EI Rate
The employer's EI Commission rate expressed as a multiple of the employees' rate.
Normally this would be 1.4 X the employees' EI rate.
Liability Account
Indicates the default liability general ledger account number. The account number
uses the following structure:
DEPARTMENT, ACCOUNT, SUBACCOUNT
The total deduction and the total benefit will be credited to this account.
Expense Accounts
Indicates the default expense general ledger account number. The account number
uses the following structure:
ACCOUNT, SUBACCOUNT
The employee's wage expense department code will be inserted in front of the
account number.
Earnings Information
The Earnings Information dialog box allows you to set up and/or modify earning types. Once the
earning types are set up, they may be applied to individual employees by using the commands
under the Earnings menu in the Employees dialog box.
There are 2 basic types of earnings:
• Salary - a fixed pay amount.
• Hourly - a pay rate X hours (or units).
70 GrandMaster II for Windows
Either earning type can have the following settings:
• Normal - entered on an individual employee basis.
• Fixed - a fixed rate for all employees on the payroll.
• Multiple - a rate determined by a factor times an existing earning type.
EXAMPLE - An hourly rate would be defined as Normal type. Overtime rate that is 1.5 times
the regular hourly rate would be an example of a Multiple earning type. A travel expense (e.g.
$0.35 per kilometer) that is standard for all employees would be an example of a Fixed earning
type.
When you select the Earnings Information command, the following dialog box appears:
Fig. 7-06
The Select Earning Dialog Box
When you select an earning type and click Setup, the following dialog box appears:
Fig. 7-07
The Payroll Earning Setup Dialog Box
The following table describes the fields found in the Payroll Earning Setup dialog box:
Field
Description
Description
A 10 character field used to describe the earnings.
Type
Indicates the type of earning. Invalid entry displays a selection list with the following
options: SALARY (a fixed amount per pay period) and HOURLY (a rate times units).
User Guide 71
Account
Indicates the default expense general ledger account number. The account number
uses the following structure: ACCOUNT, SUBACCOUNT The employee's wage
expense department code will be inserted in front of the account number.
Subject to
Subject to Tax
Indicates whether the earning is eligible for federal/provincial tax. An employee is
subject to Quebec tax only if the employee works in Quebec.
Subject to
CPP/QPP
Indicates whether the earning is eligible for CPP/QPP.
Subject to EI
Indicates whether the earning is eligible for EI.
Subject to WCB
Indicates whether the earning is eligible for Workers Compensation.
Fixed Amount/
Multiple of
Indicates how the earning/rate is to be determined by the program. Invalid entry will
display a selection list with the following options: NORMAL (entered on an individual
employee basis), FIXED (a global rate that applies to all employees) and MULTIPLE
(calculated based on another earning type). If you select the FIXED, or MULTIPLE,
the program will prompt for further information.
Split Earning on
Journal Entry
Check this box if want the Earning to be split when it appears on the Journal Entry
report.
Deductions and Benefits
The Deductions and Benefits dialog box allows you to set up new deduction/benefit types, and
modify existing deductions/benefits types. When a deduction/benefit type is defined, both a
deduction and the associated benefit are created. You have the option of utilizing the deduction
only, the benefit only, or both.
A deduction is an amount subtracted from the employee's gross pay. The deduction/benefit can be
calculated using a variety of methods or fixed amounts can be entered on a per-pay-period basis.
A benefit represents payments made by the company on the employee's behalf. Benefits can be
calculated as a factor of a deduction or as a percentage of an earning type. They can also be
entered as a fixed amount on a per-pay-period basis. Benefits are expensed to the various
departments in which an employee works.
EXAMPLE - The amount subtracted from an employee's earnings that is paid into a dental plan
would be considered a deduction. The amount that the company contributes to the dental plan on
the employee's behalf would be a benefit.
When you select the Deductions and Benefits command, the following dialog box will appear:
Fig. 7-08
The Select Deduction Dialog Box
72 GrandMaster II for Windows
When you select a deduction and click Setup, the following dialog box appears:
Fig. 7-09
The Payroll Deduction and Benefits Setup Dialog Box
The following table describes the fields found in this dialog box:
Field
Description
Description
A 10 character description of the deduction.
Liability Account
The general ledger liability (credit) account number for the deduction and the
benefit. The account number uses the following structure:
DEPARTMENT, ACCOUNT, SUBACCOUNT
Expense Account
The general ledger expense account number for the benefit. The employee's
wage expense department will be used to complete the journal account. The
account number uses the following structure:
ACCOUNT, SUBACCOUNT
Journalize Benefit
Specifies whether or not to include benefit information in the journal entry.
Deduction Settings
Pension Deduction
Indicate if the current deduction is a registered pension plan. If you enter Y,
these amounts will be deducted prior to the income tax calculation. See the
CCRA Taxation Guide.
Union Deduction
Indicate if the current deduction is a union dues deduction. If you enter Y,
these amounts will be deducted prior to the income tax calculation. See the
CCRA Taxation Guide.
Maintenance/Alimony
Deduction
Indicates the current deduction is a court order for payment of maintenance
or alimony support. If you enter Y, these amounts will be deducted prior to
the income tax calculation. See the CCRA Taxation Guide.
None
Indicates no specific Pension, Union or Maintenance/Alimony settings for the
deduction.
Journalize Benefit
Indicates that the benefit information should be logged so it will appear in
the Journal Entry report.
Print Benefit on Cheques
Indicates whether the benefit needs to be printed on the cheque. In most
User Guide 73
cases the benefit would not be printed on the cheque.
Benefit Subject to
Tax
Indicates whether or not the benefit is subject to Federal tax.
Quebec Tax
Indicates whether or not the benefit is subject to Quebec tax.
CPP
Indicates whether or not the benefit is subject to CPP.
EI
Indicates whether or not the benefit is subject to EI.
WCB
Indicates if the benefit is to be included on the Workers Compensation
reports.
Calculation Method
Indicates the method by which the deduction is to be calculated. An invalid
entry will display a selection list of available calculation methods.
Update Calculation Parameters <F4>
Allows you to enter up to 25 parameters that are to be used in the calculation method. The number
of parameters will vary depending on which calculation method is chosen. Choosing this button
opens the following dialog box:
Fig. 7-10
The Deduction Parameters Dialog Box
This dialog box allows you to enter the parameters required for the current deduction. Depending
on the calculation method selected, the definition of these fields will change. The title above each
column represents what the values in that column are used for.
You may enter more than one set of parameters for the current deduction. Each row in the table
represents a different set of parameters. When a deduction is added to an employee's record you
may choose which set (or class) of parameters to use, depending on the requirements of the
employee. You do this by selecting the class of parameters required under the Employee
Permanent Deductions command.
EXAMPLE - You select calculation method 2 (a percentage of selected earnings). To specify the
available percentages to be used in the calculation, you would choose the Update Calculation
Parameters button and enter all necessary percentages.
Parameters for deductions can be set up in groups/classes. Each row of the Calculation
Parameters dialog box contains a complete set of parameters for the calculation code and is
available for use on individual employees using this deduction. See the Permanent Deductions
section in the Employee Information chapter of this guide for more information on applying a
group/class to an employee.
74 GrandMaster II for Windows
Update Selected Earnings <F5>
Allows you to specify the earning(s) types that will be used in the calculation. Choosing this
button displays a list of earnings for this employee. Choose one or more earnings from this list,
then click OK.
EXAMPLE - You select calculation method 2 (a percentage of selected earnings). To specify the
earning type on which the calculation is to be based, you would choose this button, then select the
necessary earnings from the list.
Benefit Calculation Codes
The following table outlines available deduction/benefit calculation codes:
Code
Calculation
Parameters
Description
1
Fixed Dollar
amount
Ded. Amount
Ben. Amount
The default deduction code. A fixed amount would be
entered for the deduction and/or benefit.
2
% of Selected
Earnings
Ded. Percent
Ben. Percent
A calculation based on a percentage of selected
earning for the deduction and/or benefit.
3
Rate * Selected
Hours
Ded. Rate
Ben. Rate
A calculation based on a rate times hours of a selected
earnings for the deduction and/or benefit.
4
Rate * Selected
Hourly Rate
Ded. Rate
Ben. Rate
A calculation based on a rate times hourly base rate of a
selected earning for the deduction and/or benefit.
8
% of Selected
Earnings to
deduction
maximum
Ded. Percent
Ben. Percent
Ded. YTD Max.
A calculation based on a percentage of selected
earnings for the deduction and/or benefit. The deduction
is subject to a YTD deduction maximum.
9
% of Selected
Earnings to
deduction
maximum (Ded.
only)
Ded. Percent
Ded. YTD Max
A calculation based on a percentage of selected
earnings for the deduction only to a maximum YTD
deduction.
11
Rate * Selected
Multiple Hourly
Value (Ded.
only)
Ded. Rate
A calculation based on a rate times the hourly base
value of selected earnings for the deduction only. The
hourly base value is the multiple hourly rate.
12
Rate * Selected
Multiple Hourly
Value. (Ben.
only)
Ben. Rate
A calculation based on a rate times the hourly base
value of selected earnings for the benefit only. The
hourly base value is the multiple hourly rate.
13
Fixed Dollar
Amount up to
YTD maximum
(Ded. only)
Ded. Amount
Ded. YTD Max.
A fixed amount up to a year to date maximum deduction.
It may have employee parameters.
14
% < YMPE +
% > YMPE On
selected
earnings
% <YMPE % >
YMPE
Ben. rate of
deduction
A calculation performed on a pay period basis on a
percentage of earnings less than YMPE + a percentage
greater than YMPE. The benefit is taken as a rate times
the deductions. The YMPE amount and the number of
pay periods are used in the calculation.
15
Rate * Selected
Multiple Hourly
Value
Ded. Rate
Ben. Rate
A calculation based on a rate times hourly base value of
selected earnings for deduction and/or benefits. The
hourly base value is the multiple hourly rate.
User Guide 75
20
Life Insurance
Plan on selected
earnings
Ded. Rate
Ben. Rate
Multiplier
Maximum per
1000
Minimum per
1000
The premium is calculated as a rate per thousand on the
annual salary times the multiplier (rounded up to the
next thousand). The annual salary is determined by the
selected earnings times the number of pay periods in a
year. A minimum and a maximum annual salary can be
entered to limit the range of the calculation.
21
% of Selected
Earnings less
CPP/QPP paid
Ded. Percent
Ben. % of Ded.
A calculation based on a percentage of selected
pensionable earnings less CPP and QPP paid. The
benefit is a percentage of the deduction.
22
% of selected
Earnings less
(CPP + QPP
paid CPP Rate)
Ded. Percent
% of CPP+QPP
paid/CPP Rate
Ben. % of Ded.
A calculation based on a percentage of selected
earnings less a percentage of CPP + QPP paid divided
by CPP rate. The benefit is a percentage of the
deduction.
24
% of Selected
Earnings (Tax,
CPP, QPP UIC
QUE Tax) (Ded.
only)
Ded. Percent
Ded. Max, YTD
A calculation based on a percentage of selected
earnings then subtracts tax, CPP, UIC, QPP, QUE tax to
a year to date deduction maximum. The deduction can
not be a negative amount. It may have employee
parameters.
25
% <YMPE +
% >YMPE on
selected
earnings and
FTE (Ded. only)
% <YMPE %>
YMPE
Deduction code developed for Saskatchewan Teachers
Superannuation plan. A calculation is performed on a
per day basis on a percentage of full time equivalent
selected earnings less than YMPE + a percentage
greater than YMPE for the deduction only. The number
of days worked in a year are 197. The YMPE amount
and the number of pay periods are used in the
calculation.
26
% <YMPE +
%>YMPE on
selected hours
(Ded. Only)
% <YMPE%>
YMPE
Deduction code developed for Sask Teachers
Superannuation Plan. A calculation is performed on a
per day basis on a percentage of the hourly rate
(selected earnings divided by hours) less than YMPE +
a percentage above YMPE. The number of days
worked in a year are 197. The YMPE amount and the
number of pay periods are used in the calculation.
27
% of Net Pay to
a YTD Maximum
(Ded. only)
% of net pay
Ded. Maximum
A calculation based on a percentage (not more than
100%) of the employee's net payroll to a YTD maximum
deduction value. Normally used for garnishee orders.
The deduction can not be negative. It may have
employee parameters.
28
CPP/UIC
company cost
charge back
(Ded. only)
None
A calculation to charge the company's cost of CPP and
QPP paid as well as UIC paid times the UIC rate back to
the employee.
29
% <YMPE +
% >YMPE on
selected
earnings
% <YMPE %>
YMPE Ben.
% of deduction.
Deduction code developed for Ontario hospital pension
plan. A calculation is performed on an annual basis on a
percentage of selected earnings less than YMPE + a
percentage greater than YMPE. The benefit is a percent
of the deduction. The YMPE amount and the number of
pay periods are used in the calculations.
30
% <YMPE +
% >YMPE on
selected
Ded % <YMPE
Ded. % >YMPE
Ben % <YMPE
Deduction code developed for Alberta LAP municipal
employees. A calculation is performed on a per pay
period basis on a percentage of selected earnings less
76 GrandMaster II for Windows
earnings
Ben % >YMPE
than YMPE + a percentage greater than YMPE. The
benefit has separate percentages for above and below
YMPE. The YMPE amount and the number of pay
periods are used in the calculation.
31
% <YMPE +
% >YMPE on
selected
Earnings and
FTE
% of <YMPE
% of >YMPE
Ben. rate of
deduction.
Deduction code developed for Alberta Teachers
Retirement. A calculation is performed on a per pay
period basis on a percentage of full time equivalent
selected earnings less than YMPE + a percentage
greater than YMPE. The benefit is a rate times the
deduction. The YMPE amount and the number of pay
periods are used in the calculation.
32
Indemnity
Calculation
default earnings
Ded. Rate
Ded. Percent
Weekly Maximum
Ben. % of Ded
Deduction code developed for custom use. A
calculation is performed on a percentage of the weekly
salary to a weekly maximum amount. The weekly salary
is calculated as the default earnings times the number of
pay periods divided by 52. The deduction rate is
calculated on 1/10th of the weekly salary. The benefit is
up to 100% of the deduction. If a benefit has been
calculated reduce the deduction by the amount of the
benefit.
33
Life Insurance
on base
earnings
Ded. Rate
Ben. Rate
Ded. Multiplier
Ben. Multiplier
Ded. Maximum
per 1000
Deduction code is used for custom use only. The
premium is calculated as a rate per thousand on the
annual salary times the multiplier at a separate
deduction and benefit multiplier (rounded up to the next
thousand) The annual salary is determined by the
selected earnings times the number of pay periods in a
year. A deduction maximum annual salary can be
entered to limit the range of the deduction only. If the
earning is a multiple then only use base rate times hours
for earning amounts.
34
% of selected
base earnings
Ded. Percent
Ben.Percent
Deduction code developed for custom use. A deduction
and or benefit calculation based on a percentage of
selected base earnings. If the earning is a multiple then
only use base rate times hours for earning amounts.
35
% < YMPE +
% > YMPE - (on
base earnings)
% <YMPE
%>YMPE
Ben. rate of
deduction.
Deduction code developed for custom use. A performed
on a pay period basis on a percentage of selected base
earnings less than YMPE + a percentage greater than
YMPE. The benefit is taken as a rate times the
deduction. The YMPE amount and the number of pay
periods are used in the calculation. If earning is a
multiple the only use base rate times hours for earning
amounts.
36
% of previous,
deductions and
benefits (Sales
tax)
Ded. Percent
Ben. Percent
Deduction code is developed for custom use. A
deduction and or benefit calculation based on a
percentage of previously calculated deductions and
benefits excluding statutory deductions. Normally used
for Ontario/Quebec sales tax.
37
Pay Back of
5/12 UIC Rebate
Rebate Factor
Deduction code developed for custom use. A benefit
calculation based on a rebate factor times (UIC paid
times 1.4 less UIC paid times UIC rate). Then the
deduction is the benefit times -1.
38
Weekly
Indemnity on
Pay frequency
Weekly maximum
Deduction code developed for custom use. A
calculation that takes the hourly base rate of selected
User Guide 77
selected hourly
rate
earnings
Premium Ben %
of deduction
earnings times the hours worked to get a weekly salary
up to a weekly maximum, then multiples it by the pay
periods to get the annual salary. The calculation takes
2/3 of the annual salary divided by the pay frequency to
get the weekly salary. The deduction is then taken on
1/10th of the weekly salary times the deduction rate.
The benefit is a percent of the deduction.
39
Monthly
Indemnity on
selected
earnings
Maximum
monthly earnings
Ded. Percent
Ben % of Ded
Deduction code developed for custom use. A
calculation that takes the selected earnings up to the
monthly maximum then multiplies it by the pay periods to
get the annual salary. The calculation takes 2/3 of the
annual salary divided by 12 to get the monthly salary.
The deduction is then taken as a percent of the monthly
salary. The benefit is a percent of the deduction.
40
Rate * Selected
Hours to
Maximum hours
Ded. Rate
Ben. Rate
Maximum hours
A calculation based on the deduction or benefit rate
times the hours of selected earnings to maximum hours
for the deduction and benefits. It may have employee
parameters.
41
(Factor *
Selected Hourly
Rate) + Fixed
Amount
Factor
Fixed amount
Rounding
parameter
Ben % of
deduction
A calculation based on a factor times the base hourly
rate of selected earnings rounded up if specified, plus a
fixed amount. The benefit is a percent of the deduction.
The rounding is up to the nearest dollar if the rounding
parameter is 1 and no rounding if the parameter is 0.
42
Life Insurance
Plan on selected
hourly rate
Ded. Rate
Ben. Rate
Multiple
Maximum per
1000
Minimum per
1000
Deduction code developed for custom use. The
premium is calculated as a rate per thousand on the
annual salary times the multiplier. The annual salary is
determined by the hourly rate times hours worked times
the number of pay periods in a year. A minimum and a
maximum annual salary can be entered to limit the
calculation. It may have employee parameters.
43
% of Monthly
Salary on
selected hourly
rate
Ded. Percent
Ben. Percent
Deduction code developed for custom use. A
calculation is performed on a monthly basis done as a
percentage of the hourly rate of selected earnings for the
deduction and benefit. The monthly earnings are
calculated as the hourly rate times the pay periods
divided by 12. It may have employee parameters.
44
% <YMPE +
% >YMPE on
selected hourly
rate
% <YMPE % >
YMPE Ben % of
deduction
Deduction code developed for Ontario Hospital. This
calculation is performed on a yearly basis on a
percentage of selected earnings less than YMPE + a
percentage greater than YMPE. The benefit is a
percentage of the deduction. The earnings are
calculated by the hourly rate times hours worked times
the pay periods. The YMPE amount and the number of
pay periods are used in the calculation. It may have
employee parameters.
45
Life Insurance
Plan on selected
earnings
Ded. Rate
Ben. Rate
Multiplier
Maximum per
1000 Minimum
per 1000
Deduction code developed for custom use. The
premium is calculated as a rate per thousand on the
annual salary times the multiplier (rounded up to the
next thousand). The annual salary is determined by the
selected earnings times the number of pay periods in a
year. A minimum and a maximum annual salary can be
entered to limit the range of the calculation.
78 GrandMaster II for Windows
46
Fixed Deduction
(Benefit = % of
deduction)
Fixed Ded.
Ben. % of
deduction
Deduction code developed for custom use. This
calculation has the deduction as a fixed amount and the
benefit as a percent of the deduction. Note: You may
enter custom parameters. e.g. Employee stock
purchase employees can buy a fixed amount of stock in
the company and the employer will split 45, 55% of the
purchase as a benefit. If the employee purchases $200
worth of stock, the company's benefit would be
calculated as $90 (45% of $200). The employee's
deduction would be entered as a fixed $110 amount. It
may have employee parameters.
47
% <YMPE +
% >YMPE on
YTD
pensionable
earnings +
pensionable
benefits
% <YMPE
% >YMPE
Ben % of
deduction
This calculation is performed on a yearly basis on a
percentage of pensionable earnings plus any
pensionable benefits at a percentage less than YMPE +
a percentage greater than YMPE. The benefit is a
percent of the deduction.
48
Life Insurance
(on default
annual salary)
Rate Maximum
per 1000
Deduction code developed for custom use. The
premium is calculated as a rate per 4000 on the default
annual salary from optional numeric field 1 times a
multipler of 5 (rounded up to the next thousand). A
maximum annual salary can be entered to limit the
range of the calculation. The benefit is equal to the
deduction. It may have employee parameters.
49
Long Term
Disability on
default annual
salary (Ded.
only)
Ded. Rate
Deduction code developed for custom use. A
calculation that takes the default annual salary from
optional numeric field 1, divided by 12 for the monthly
salary. The calculation takes 2/3 of the monthly salary
up to 3000 then only 1/2 of the amount above 3000.
This amount is then rounded up to the next dollar and
then multiplied by the deduction rate divided by 200. It
may have employee parameters.
50
Short Term
Disability on
default annual
salary
Ded. Rate
Weekly Maximum
Deduction code developed for custom use. A
calculation that takes the default annual salary for the
optional numeric field 1, divided by 52 for the weekly
salary. The calculation takes 3/4 of the weekly salary
rounded up to the next dollar, taken only to the weekly
maximum amount entered then multiplied by the
deduction rate divided by 40 for both the deduction and
benefit.. It may employee parameters.
51
Rate * Selected
hours (rounded
up)
Ded. Rate
Ben. Rate
Similar to calculation code 3 except that total hours from
selected earnings are rounded up to next highest hour
before multipling it by the deduction an benefit rate. It
may have employee parameters.
52
Union Deduction
on selected
hours
% Gross
% Avg. Hours
Ben rate of
deduction.
Min. Ded.
A calculation that is done if total gross pay is greater
than zero. The lesser of a percentage of total gross pay
or total gross pay/selected hours times avg hours
percentage. A benefit can be calculated as a rate times
the deduction. The deduction has a minimum deduction
to limit the range of the calculation.
53
Rate * FTE
Ded. Rate
Ben. Rate
A calculation of a deduction and/or benefit rate times
Full Time Equivalency for the deduction and benefit.
User Guide 79
54
Fixed Amount
on selected
earnings (over
minimum)
Ded. Amount
Ben. Amount
Min. Earnings
A calculation that takes a fixed amount for the deduction
and the benefit, if selected earnings are greater than the
minimum earning.
55
Life Insurance
on selected
earnings
Ded. Rate
Ben. Rate
Multiplier
Maximum per
1000
Minimum per
1000
A premium is calculated as a rate per thousand on the
annual salary times the multiplier. The annual salary is
determined by the selected earnings times the number
of pay periods in a year. A minimum and maximum
annual salary can be entered to limit the range of the
calculation.
56
% <YMPE
% >YMPE on
selected
earnings
entered YMPE
amount + FTE)
% <YMPE
% >YMPE
Ben. rate of
deduction.
YMPE Amount
A performed on a pay period basis on a percentage of
full time equivalent selected earnings less than YMPE +
a percentage of greater than YMPE. YMPE can be
entered as a parameter. The benefit is taken as rate
times the deduction. Note: Used for Filmon Fridays. If
YMPE is not entered then it uses the standard YMPE.
57
Rate * number
of units
Ded. Rate
Ben. Rate
Unit Pointer (1,2)
The calculation takes the unit pointer and uses numeric
field 1 or 2 which is multiplied by the rate for the
deduction and/or benefit.
58
% of selected
earnings (to a
YTD Max.)
Ded. Percent
Ded. YTD Max
Ben. Percent
Ben. YTD Max
A percentage of selected earnings for the deduction
and/or benefit to a maximum deduction and/or benefit. It
may have employee parameters.
59
% of selected
earnings (to pay
period max)
Ded. Percent
Ded. Max per PP
Ben. Percent
Ben. Max per PP
A percentage of selected earnings for the deduction
and/or benefit to a maximum deduction and/or benefit
per pay period. It may have employee parameters.
60
% <YMPE +
% >YMPE (on
selected YTD
earnings)
% <YMPE
% >YMPE
Ben. % of Ded
Deduction code developed for custom use. This
calculation is performed on an annual basis and takes
the selected year to date earnings + current earnings to
determine the annual salary. The deduction is based on
a percentage less than YMPE + percentage greater
than YMPE. The benefit is entered as a percentage of
the deduction.
61
Life Insurance
on selected
earnings
Ded. Rate
Ben. Rate
Multiplier
Maximum per
1000
The premium is calculated as a rate per thousand on the
annual salary times the multiplier (rounded up to the
next thousand). The annual salary is determined by the
selected earnings times the number of pay periods in a
year. The deduction is taken at the deduction rate on
the amount above the maximum salary and the benefit is
taken on the benefit rate on the amount below the
maximum salary. If the annual salary is below the
maximum the deduction will be zero.
62
% <YMPE +
% >YMPE (on
selected
earnings and
selected hourly
rates)
% <YMPE
% >YMPE
Ben. % of Ded.
Vac. Percent
Deduction code is used for Ontario Hospital. This
calculation is performed on an hourly basis using the
selected earning rate and hours from the selected
earnings to do an hourly calculation when available or
else it is done on a yearly basis on earnings from the
selected earnings. If the calculation is hourly you
multiply the hourly rate by the vacation percent, adding it
to the hourly rate. The deduction is based on a
percentage less than YMPE + a percentage greater than
80 GrandMaster II for Windows
YMPE. The benefit is a percentage of the deduction.
63
Long Term
Disability on
default annual
salary
Numeric Pointer
Ded. Percent
Ben. Percent
Factor
This calculation gets the default annual salary from an
optional numeric fields and calculates the deduction
and/or benefit as a percent of the annual salary divided
by the factor.
64
% of average
rate to a max
per pay (on
selected nonzero hours)
Ded. Percent
Ded. Maximum
Ben. Percent
Ben. Maximum
This calculation takes the total of all the rates from the
selected earnings and divides it by the number of rates
to get the average rate. The deduction and/or benefit is
a percentage of the average rate to a maximum
deduction and/or benefit .
65
Life Insurance
on default
annual salary
Ded. Rate
Ben. Rate
Multiplier
Maximum per
1000 Numeric
Pointer
The premium is calculated as a rate per thousand on the
annual salary times the multipler (rounded up to the next
thousand). The annual salary is from the optional
numeric fields. If the annual salary is <100 and the
hours of pay are not zero, then calculate the annual
salary times the hours worked times the pay periods. A
maximum annual salary can be entered to limit the
range of the calculation. The deduction and benefit are
then divided by 2.
66
Long Term
Disability on
default annual
salary
Ded. Rate
Ben. Rate
Weekly Maximum
Numeric Pointer
This calculation gets the default annual salary from the
optional numeric fields. If the annual salary is <100 and
the hours of pay are not zero, then calculate annual
salary times the hours of pay times the pay periods. The
annual salary is divided by 52 for a weekly salary then
taken at 2/3 to the weekly max. (that should already be
at 2/3). The deduction and benefit are calculated as the
rate times the weekly salary then taken at 1/10 and
divided by 4.
67
Long Term
Disability on
default annual
salary
Ded. Percent
Ben. Percent
Monthly
Maximum
Numeric Pointer
The default annual salary is taken from the optional
numeric fields. If the annual amount is <100 and the
hours of pay are not zero, then calculate annual salary
times the hours of pay times the pay periods. The
annual salary is divided by 12 for a monthly salary up to
the monthly maximum then taken at 2/3. The deduction
and benefit are calculated as a percent of the monthly
amount divided by 4.
68
% of Net Pay to
YTD Max (Ded.
Only)
Ded. Percent
Ded. YTD Max
Min Net Pay
This calculation takes the deduction percent up to 100%
and calculates the percentage of the net pay for a
positive deduction only. If a minimum amount of net pay
is required the deduction can only reduce the net pay to
this amount. The deduction must not exceed the
maximum YTD deduction. It may have employee
parameters.
69
% <YMPE +
% >YMPE on
selected hours
(Ded. Only)
% <YMPE
% >YMPE
Deduction code is developed for Saskatchewan
teachers substitutes. A calculation is performed on a
daily basis on a percentage of selected earnings below
YMPE + a percentage above YMPE . The daily rate is
calculated as earning divided by hours worked. The
number of days worked in a year are 197.
70
Fixed Union
Deduction on
selected hours
(Ded. Only)
Fixed Amount
Below
Fixed Amount
Above Threshold
This calculation is a fixed amount deduction for hours
below or equal to the threshold and another fixed
amount deduction for hours above. The deduction is
zero if there are no hours. It may have employee
User Guide 81
Hours
parameters.
71
Life Insurance
on hourly rate
Ded. Rate
Ben. Rate
Multiplier
Maximum per
1000 Minimum
per 1000
The premium is calculated as a rate per thousand on the
annual salary times a multiplier (round up to the next
thousand). The annual salary is determined by the
hourly rate of the selected earnings times the hours
worked times the pay periods. A minimum and
maximum annual salary can be entered to limit the
range of the calculation. It may have employee
parameters.
72
% <YMPE +
% >YMPE on
selected
earnings (and
FTE)
% CPP Earnings
% CPP Exempt
Earnings Ben.
% of Ded
Deduction code is developed for Sask Teachers. This
calculation is performed on a daily basis on a
percentage of full time equivalent selected earnings that
are pensionable + a percentage that are not
pensionable. The benefit is a percentage of the
deduction. The earnings are taken at full time
equivalency. The YMPE amount and the number of pay
periods are used in the calculation. The number of days
worked in a year are 197.
73
% <YMPE +
% >YMPE on
selected hours
% CPP Earnings
% CPP Exempt
earnings Ben
% of Ded
Deduction code is developed for Saskatchewan
Teachers. This calculation is performed on a daily basis
on a percentage of selected earnings that are
pensionable + a percentage that are not pensionable.
The earnings are divided by the hours to get the average
daily rate. The benefit is a percent of the deduction. The
YMPE amount and the number of pay period are used in
the calculation. The number of days worked in a year
are 197.
74
Long Term
Disability on
default annual
salary
Ded. Percent
Ben. Percent
Annual Maximum
Numeric Pointer
Deduction code is developed for custom use. This
calculation uses the default annual salary from the
optional numeric fields. If the annual salary is <100 and
the hours of pay are not zero, then calculate annual
salary times the hours of pay times the pay periods
taken to the maximum annual earnings. This amount is
divided by 12 to a monthly salary then taken at 2/3. The
deduction and benefit are taken as a percentage on that
amount.
75
Life Insurance
on default
annual salary
Ded. Rate
Ben. Rate
Multiplier
Maximum per
1000
Numeric Pointer
The premium is calculated as a rate per thousand of the
annual salary times the multiplier (rounded up to the
next thousand). The annual salary is from the optional
numeric fields. If the annual salary is <100 and the
hours of pay are not zero, then calculate the annual
salary times hours worked times the pay periods. A
maximum annual salary can be entered to limit the
range of the calculation.
76
Life Insurance
on selected
earnings
Ded. Rate
Ben. Rate
Multiplier
Maximum per
1000
Minimum per
1000
The premium is calculated as a rate per thousand of
the annual salary times the multiplier (rounded up to the
next thousand).The rounding is on earnings greater than
750 are rounded up to the next thousand and greater
than 250 to the next five hundred. The annual salary is
determined by the selected earnings times the number
of pay periods in a year. A minimum and maximum
annual salary can be entered to limit the range of the
calculation.
82 GrandMaster II for Windows
77
% <YMPE +
% >YMPE (on
selected hours)
(prorated
YMPE)
% <YMPE
% >YMPE
Ben % of Ded
Deduction code is developed for custom use. This
calculation is performed on a pay period basis as a
percentage of selected earning below prorated YMPE +
a percentage above the prorated YMPE. The benefit is
a percent of the deduction. The YMPE amount and the
number of pay periods are used in the calculation. The
prorated YMPE is taken as the hours worked divided by
the hours of pay hours multiplied by the YMPE divided
by the pay periods.
78
% of Net Pay to
a max per pay
period (Ded.
Only)
Ded. Percent
Ded. Max per pay
Min. Net Pay
This calculation takes the deduction percent up to 100%
and calculates the percentage on the net pay for a
positive deduction only. If a minimum amount of net pay
is required the deduction can only reduce the net pay to
this amount. The deduction must not exceed the
maximum deduction per pay.
79
Rate * selected
rate of selected
hours if over
minimum hours
Ded. Rate Ben.
Rate Min. Hours
This calculation takes the deduction and/or benefit rate
times the earning rate from the selected rates if the
hours from the selected earnings are greater than or
equal to minimum hours.
80
% of (selected
earnings less
CPP/QPP/Tax
/QUE Tax/UIC)
(Ded. Only)
Ded. Percent
Ded. Maximum
A calculation based on a percentage of selected
earnings less Income Tax, CPP, UIC, QPP, Quebec Tax
to a deduction maximum. It may have employee
parameters.
81
Rate * (selected
deductions +
QPP/Quebec
Tax, CPP
/UIC/Tax) (Ded.
Only)
Ded. Rate
A calculation based on a deduction rate of previously
calculated deductions plus CPP, QPP, Tax, Quebec Tax
and UIC paid for the deduction only. It may have
employee parameters.
82
Fixed Amount
To a YTD max)
Ded. Amount
Ded. YTD Max
Ben. Amount
Ben. YTD Max
A calculation that uses a fixed amount for the deduction
and/or benefit to the maximum YTD deduction and/or
benefit amount. If no maximums are specified it uses
YMPE. The deduction and/or benefit can not be zero. It
may have employee parameters.
83
% <YMPE +
% >YMPE (Ben
only) On YTD
pensionable
earnings +
pensionable
benefits
% <YMPE
% >YMPE
This calculation is done on a yearly basis of pensionable
earnings plus any pensionable benefits at a percentage
less than YMPE + a percent are greater than YMPE.
For the benefit only.
84
% <YMPE +
% >YMPE On
selected
earnings (Ben.
only)
% <YMPE
% >YMPE
This calculation is performed on a per pay period basis
on a percentage of selected earnings less than YMPE +
a percentage greater than YMPE for the benefit only.
The YMPE amount and the number of pay periods are
used in the calculation.
85
Rate * Selected
Earnings divided
by UIC Hours
Ded. Rate Ben.
Rate
This calculation takes a rate times the selected earning
divided by the selected UIC hours.
86
Steel Workers
Union on
Ded. Percent
Ded. Rate Non
Deduction code is developed for custom use. If selected
earnings or non selected hourly earnings are greater
User Guide 83
selected
earnings and
UIC hours
Selected % Ben.
rate of Ded
then zero the calculation takes the lessor of a
percentage of selected earnings or a deduction rate of
selected earning divided by UIC hours. The calculation
adds a percentage of non-selected hourly earnings. The
benefit is a rate of the deduction make the first sentence.
87
% of selected
earnings (to a
minimum)
Ded. Percent
Ded. Minimum
Ben. Percent
Ben. Minimum
This calculates a deduction and/or benefit percent on
selected earnings and will use the minimum deduction
and/or benefit if specified.
88
Fixed Amount
on selected
hours (table of
hours)
Min. Hours (8)
Ded. Amount (8)
Ben. Amount (8)
The calculation searches the table for when the selected
hours are less than the minimum hours in that table row,
the deduction and/or benefit are the table item fixed
amounts for that row.
89
% of taxable
income and
taxable benefit
Ded. Percent
Ben. Percent
Deduction code developed for Northwest Territory
special tax. This calculation takes a percentage of the
total taxable income and taxable benefits for the
deduction and benefit.
90
% <YMPE +
% >YMPE (on
selected
earning)
% CPP Earnings
% CPP Exempt
Earnings Ben.
Rate * Ded
A calculation done on a pay period basis on a
percentage of selected earnings that are pensionable +
a percent that are not pensionable. The benefit is rate
times the deduction. The YMPE amount, the basic CPP
exempt amount and the number of pay periods are used
in the calculation.
91
Group Insurance
on selected
earnings
Ben. Percent
Ben. Maximum
Deduction code is developed for custom use. This
calculation takes the benefit percent times the selected
earnings to a maximum benefit. If the benefit is less
than the benefit maximum the deduction will be the
benefit maximum less the benefit calculated. It may have
employee parameters.
92
Group Insurance
on selected
earnings
Ben. Percent
Ben. Minimum
Deduction code is developed for custom use. This
calculation takes the benefit percent times the selected
earnings. If the benefit is less than the benefit minimum
the deduction will be the benefit minimum less the
benefit calculated. It may have employee parameters.
Note: Other Codes - Codes not appearing in the preceding table are currently disabled. If you
require an additional deduction calculation code, please contact CanPay Technical Support.
• Pension deduction /benefit codes: 14, 25, 26, 29, 20, 31, 35, 44, 47, 56, 60, 62, 69, 72,
73, 77, 83, 84, 90.
• Life insurance deduction /benefit codes: 20, 33, 42, 45, 48, 55, 61, 71, 75, 76
• Indemnity deduction /benefit codes: 32, 38, 39
• Disability deduction /benefit codes: 49, 50, 63, 66, 67, 74, 91, 92
Accumulator Calculation Codes
No.
Option Code
Description
1
% of Earnings
Calculation will be performed based on selected earnings X the
employee's rate, and the resulting answer will be added to the
84 GrandMaster II for Windows
accumulating balance.
2
% of Earnings (Taxed)
Calculation will be performed based on selected earnings X the
employee's rate, and the resulting answer is taxed in the current pay
period, then added to the accumulating balance.
3
% of Hours
Calculation will be performed based on selected hours X the
employee's rate, and the resulting answer will be added to the
accumulating balance.
4
Fixed Amount
A fixed amount (the employee's rate) will be added to the accumulating
balance each pay calculation.
5
No Calculation
The accumulator will not perform any calculation.
6
Fixed Hours
A fixed amount based on a fixed number of hours is added to the
accumulating balance each pay calculation.
7
Rate * Hrs/Norm Hrs.
Calculation will be performed based on selected rate X the total hours
divided by normal hours, and the resulting answer will be added to the
accumulating balance.
8
% of Earnings (Taxed,
WCB)
Calculation will be performed based on selected earnings X the
employee's rate, and the resulting answer is taxed in the current pay
period, subject to WCB, then added to the accumulating balance.
Accumulators
Accumulators are used to keep a running total of selected information or automatically generate
earnings or hours for the current pay. A maximum of 9 accumulators can be defined.
EXAMPLE - The accumulators would be used to track vacation pay, holiday pay, sick
entitlement, banked overtime, etc.
When you select the Accumulator command, the following dialog box will appear:
Fig. 7-11
The Select Accumulator Dialog Box
Once you select an unassigned accumulator or an existing one, the following dialog box will
appear:
User Guide 85
Fig. 7-12
The Payroll Setup Accumulators Setup Dialog Box
The following table describes the fields found in this dialog box:
Field
Description
Description
A 10 character description of the accumulator.
Accounts
Expense
Indicates the default general ledger account number for the expense portion of the
journal entry. The employee's wage expense department will be used to complete the
journal account.
Liability
Indicates the general ledger liability account number.
Calculation Code
Is a code that identifies how the accumulator calculation will be performed. Any invalid
code (including 0) will present a selection list of available codes. See table in next
section for a description of available codes.
Default Rate
The default rate for new employees that may be changed for each individual.
Pay Out as
Identifies the earning type under which the accumulations are to be paid. Any invalid
code (including 0) will display a selection list of available earnings. Highlight the
desired earnings type and choose OK. Enter 99 if the accumulator is not to be paid
out.
Maximum
Will allow the accumulator to reach only a maximum value. Set this amount to to zero
(0) to indicate no limit.
Journalize
Specifies whether or not the amounts from the accumulators will be included on a
journal entry.
Allow Negative
Allow a negative accumulator value. If set to No, the accumulator will not pay out any
more than is currently in the accumulator (i.e. will not allow a negative accumulator
condition).
Change Earnings <F2>
When this button is selected, the following dialog box will appear:
86 GrandMaster II for Windows
Fig. 7-13
The Accumulated Earning Dialog Box
Select the earnings to be accumulated then click OK.
When paying out an accumulator amount, you may choose to pay either the entire balance of the
accumulator, or a fixed amount.
To Pay out the Entire Balance of an Accumulator
Choose the Accumulators command from the Employees dialog box. When the Accumulators
dialog box appears, select the desired accumulator and change the N to a T (to pay the entire
balance for this pay period only) or A (to always pay the balance every pay period).
To Pay out a Fixed Amount of an Accumulator
Ensure that the earning displayed in the Pay Out as field has been added to the desired employee's
list of earnings. Also, any account or rate information (if using an Hourly earning type) has been
set up correctly.
When an amount is calculated for the earning displayed the Pay Out as field, it is credited to
(subtracted from) the accumulator. If the Allow Negative checkbox has not been activated, then
only an amount which will not create a negative balance in the accumulator will be credited to
(subtracted from) the accumulator. It is recommended that the PAY flag not be changed, as the
transfer is performed automatically when an amount (or hours) is entered for the earning displayed
in the Pay Out as field.
Note: Earning Setup - It is important to note that that the earning you set up in the Pay Out as
field is only used to transfer amounts out of this accumulator.
Base Rate
This button appears when you choose Calculation Code "10" (Percentage of Earnings / Base
Rate). Enter your earning base rate and click OK.
Fig. 7-14
The Base Rate Dialog Box
User Guide 87
Workers Compensation
The Workers Compensation feature allows you to set up general ledger account numbers and up to
9 WCB rates on a per province basis. Different employment types warrant different WCB rates.
GrandMaster II for Windows supports all provinces and territories.
When you select the Workers Compensation command, the following dialog box appears:
Fig. 7-15
The Select Province Dialog Box
When you select a province and choose the Setup button, the following dialog box appears:
Fig. 7-16
The Payroll WCB Setup Dialog Box
The following table describes the fields found in this dialog box:
Field
Description
Maximum Assessable
The maximum assessable earnings per employee. (e.g. earnings
flagged as WCB assessable). See your provincial WCB
documentation.
Accounts Journalize
Indicates whether or not to journalize WCB accounts.
88 GrandMaster II for Windows
GL Accounts
Expense
The account and sub-account where the expense portion of WCB
will be charged. Of the form AAAAAA-SSSSSS (employee's
department appended when journal entry is created).
Liability
The department, account and sub-account, where the liability
portion of WCB will be charged. The format is DDDDDD-AAAAAASSSSSS.
Rates
Description
The rates which the employee is assessed.
Rate
Use the Description and Rate fields to alter the descriptions/rates to
suit the type of employment (e.g. plumbers = rate 1, electricians =
rate 2, carpenters = rate 3).
Provincial Health
The Provincial Health feature allows you to set up a rate for each province as applied to Provincial
Health and the corresponding general ledger account numbers for each of the provinces. One rate
may be entered for each province. The program supports all provinces and territories.
When you select the Provincial Health command, the following selection list appears:
Fig. 7-17
The Select Province Dialog Box
When you select a province and choose the Setup button, the following dialog box appears:
Fig. 7-18
The Payroll Health Setup Dialog Box
The following table describes the fields found in this dialog box:
User Guide 89
Field
Description
Rate
The rate that at which an employee's provincial health will be
charged. Please see your provincial health documentation for this
rate.
GL Accounts
Expense
The account and sub-account where the expense portion of this
benefit will be charged. The format is AAAAAA-SSSSSS (the
employee's department appended when journal entry is created).
Liability
The department, account and sub-account where the liability
portion of this benefit will be charged. The format is DDDDDDAAAAAA-SSSSSS.
Note: Provincial Requirements - Not every province/territory requires Provincial Health settings.
Check with your provincial requirements before setting up this feature.
Earnings
This is a 26 X 26 matrix in which standard or union rates are entered. These rates can be either
salary type earnings or hourly type rates. When you choose the Earnings Table command, the
following dialog box appears.
Fig. 7-19
The Payroll Earnings Table Dialog Box
Employee earnings may be linked to a location on the table. Thus, when the table is changed, all
employee earnings associated with the table will automatically change.
90 GrandMaster II for Windows
Change Row Description <F7>
This button allows you to add/modify the descriptions for rows in the earnings table. Choosing
this button opens a series of dialog boxes that allow you to enter the row label text.
Fig. 7-20
The Change Row Description and Update Current Row Dialog Boxes
Change Column Description <F8>
This button allows you to add/modify the descriptions for rows in the earnings table. Choosing
this button opens a series of dialog boxes that allow you to enter the column label text.
Fig. 7-21
The Change Column Description and Update Current Column Dialog Boxes
Defaults (Global)
Global defaults allow you to define a program-wide starting configuration for certain employee
types. This allows you to quickly add new employees without having to set up each detail.
When you select the Defaults command, the following dialog box appears:
User Guide 91
Fig. 7-22
The Select Default Class Dialog Box
Double-click on an existing class to view the details or choose an Undefined class to create a new
one. In either case, the following dialog box will appear:
Fig. 7-23
The Payroll Default Class Setup Dialog Box
This dialog box allows you to specify a name for the class of employee and set up earnings,
deductions and accumulators.
Earnings <F4>
This button allows you to select the earnings to be applied to the employee class. Choosing the
button displays a dialog box where you can select the desired earrings.
Deductions <F5>
This button allows you to select the deductions to be applied to the employee class. Choosing the
button displays a dialog box where you can select the desired deductions.
Accumulators <F6>
This button allows you to select the accumulators to be applied to the employee class. Choosing
the button displays a dialog box where you can select the desired accumulator.
92 GrandMaster II for Windows
Job Costing
The Job Costing Information feature allows you to enter the description and burden for the job
costing jobs. The job costing information is set up in three levels:
• Job Code
• Phase Code
• Sub-phase Code
A job may have multiple phases and a phase may have multiple sub-phases. You may choose to
breakdown the job costing information by job only, by job and phase, or use the full breakdown of
job, phase, and sub-phase.
When you choose the Job Costing Information command, the following dialog box appears:
Fig. 7-24
The Payroll Jobcost Dialog Box
Job Cost Description Report <F2>
When you choose the Job Cost Description Report button you have the option of sending the
report to the printer, viewing it onscreen or saving it to a file on disk. The report will show the
job, phase, sub-phase numbers with the description and burden percent.
Edit Description
To enter job cost information, select the appropriate description module and choose this button. A
dialog box similar to the following will appear, depending on which option has been selected. In
this example, the Job , Phase and Sub-phase descriptions option was selected.
Fig. 7-25
The Job Costing Information Dialog Box
List <F6>
When you are entering the job costing information you can list the previously defined jobs,
phases, or sub-phases by choosing the List button. The following dialog box will appear:
User Guide 93
Fig. 7-26
The Valid Jobs Dialog Box
When you request a list from the job, phase, or sub-phase fields, the list will begin from whatever
information is already in the field. If the field is blank, it will start from the beginning of the file.
The list will display 10 items at a time and show the description.
If there is no information on file, the title will read No Valid Jobs / No Valid Phases / No Valid
Sub-phases, depending on the list requested.
If you have entered information in the field from where the list should begin and no further valid
matches are found starting with that information, the title will read No Job Matches/ No Phase
Matches/ No Sub-phase Matches (depending on the list requested). This screen will also appear
when entering new job, phase, or sub-phase codes.
OK <F3>
Selects the highlighted item. The list must contain at least one valid item in order in order to use
this button.
Restart List <F4>
This button allows you to restart the list from the first entry.
Insert Code <F2>
This button allows you to insert a new code into the list. When you choose this button, the item
you wish to insert must not be a blank (in the entry screen). If it is a blank, you will be returned to
the entry screen where the new code must be entered. At this point, you can define the code and
click OK to proceed.
After selecting the Insert Code button, a dialog box will appear in which the description of the
code and the burden rate can be defined.
94 GrandMaster II for Windows
Fig. 7-27
The Job Costing Description and Burden Dialog Box
This dialog box allows you to add, change or delete job costing information. The description can
be up to 30 characters long and cannot be blank. The burden must not be greater than 99.99. The
burden may be entered on any of the three levels.
When the burden amount is calculated in the job costing hours report, it will attempt to choose the
burden percent at the sub level, then the phase level, then the job level to find an entered burden.
Add <Enter>
If the description and burden have been entered correctly, select Add to verify the data, then press
it a second time to update the list and save the changes.
Delete <F4>
If the description or burden is incorrect, choose this button to remove the current record and exit
the dialog box.
The number of jobs, phases per job or sub-phases per phase that can be defined is limited only by
the amount of available disk space.
User Guide 95
Chapter 8: Process
The Process menu contains options for performing payroll calculations using the data you have
entered under the Employee and Company menus. The menu appears as follows:
Fig. 8-01
The Process Menu
The options in the top section of the menu (from Select Earnings through to Payroll
Calculation) should be performed in the order listed each time the payroll is processed. As
each option in the top section is performed, a check mark will appear beside the option to
indicate that it has been carried out. When the payroll is cleared, the check marks will be
removed.
Fig. 8-02
The Process Menu with three Completed Items
Select Earnings
The Select Earnings command allows you to globally select which previously defined earning
types are to be paid on the current payroll. Normally, these would all be selected, however, in
some cases such as car allowance, this may only be paid at the end of each month.
96 GrandMaster II for Windows
Any earning entered using the Salary Override or Hourly Override commands will be paid,
regardless of whether the earning is selected. When you choose the Select Earnings command,
the following dialog box appears:
Fig. 8-03
The Select Earnings for this Payroll Dialog Box
Upon entering this dialog box, the original settings (as they were on the last payroll) will be
displayed. Select one or more earnings types to be paid and choose the Save button.
Once you exit this dialog box, the program will place a checkmark beside the Select Earnings
menu command to indicate that earnings have been selected for the current pay calculation.
Select Deductions
The Select Deductions command allows you to globally select which previously defined
deduction types are to be deducted on the current payroll. Some deductions may be deducted midmonth, and others may be deducted at the end of the month.
Any deductions entered using the Deduction Override command will be deducted, regardless of
whether the deduction is selected. When you choose the Select Deductions command, the
following dialog box appears:
Fig. 8-04
The Select Deduction for this Payroll Dialog Box
Upon entering this dialog box, the original settings (as they were on the last payroll) will be
displayed. Select one or more deduction types that apply to the current pay calculation then
choose the Save button.
Once you exit this dialog box, the program will place a check mark beside the Select Deductions
menu command to indicate that deductions have been selected for the current pay calculation.
User Guide 97
Select Accumulators
The Select Accumulators command allows you to globally select which previously defined
accumulators to activate on the current payroll. Accumulators that are de-selected will not allow
accumulation of additional amounts, but may be paid out as normal. See the Accumulators section
of the Company Information chapter for more information.
When you choose this command, the following dialog box will appear:
Fig. 8-05
The Select Accumulators for this Payroll Dialog Box
Upon entering this dialog box, the original settings (as they were on the last payroll) will be
displayed. Select one or more accumulators that apply to the current pay calculation then choose
the Save button.
Once you exit this dialog box, the program will place a check mark beside the Select
Accumulators menu command to indicate that accumulators have been selected for the current
pay calculation.
Setup Next Payroll
The Setup Next Payroll command allows you to specify parameters to be applied to the next
payroll calculation. When you select this command, the following dialog box appears:
Fig. 8-06
The Select Deduction for this Payroll Dialog Box
98 GrandMaster II for Windows
The following table describes the fields in this dialog box:
Field
Description
Start Date
Indicates the starting date of the current pay period using dd/mm/yy format.
End Date
Indicates the ending date of the current pay period using dd/mm/yy format.
Cheque Date
Indicates the date that is to appear on printed cheques or the due date for
direct deposits.
Generate Cheques
For all (cancels Direct
Deposit)
Indicates whether or not to cancel bank transactions (i.e. issue cheques) for
employees that are set up for direct deposits.
Pay Type
Indicates the type of calculation to be performed when the payroll is
calculated. An invalid entry will display a selection list from which you may
select NORMAL PAY, REVERSAL, ADDITIONAL and EXTRA PAY. These
options are described below.
Adjust Pay
This edit field appears when you choose the REVERSAL option in the Pay
Type list. Use it to specify the Reversal's pay period.
Once you exit this dialog box, the program will place a check mark beside the Setup Next Payroll
menu command to indicate that important information, such as payroll dates, have been set up for
the current pay calculation.
Process Pay Group <F4>
Depending on the pay type you have selected, this button will perform a different function:
NORMAL PAY
This option will attempt to pay all active employees that have been set up in the program. If an
employee has either earnings or deductions that apply to the current pay period, the required
calculations will be performed, and a pay stub/cheque will be issued.
ADDITIONAL
This option will pay only those employees with special status (X) and will take into account the
previous normal pay run when it calculates the current pay. To indicate the employees to be paid,
the employees status (Personal, Miscellaneous Information) must be set to X. The statutory
deductions will take into consideration the previous amounts deducted. If U.I.C. reached the
maximum on the previous payroll, no U.I.C. will be deducted from the additional run.
EXAMPLE - In error, an employee was not paid his/her overtime on the normal pay run. To
correct this, you would run an ADDITIONAL pay to reimburse the employee.
Note: Clear Payroll - During the Clear Payroll process, these employees will be reset to Active
status.
User Guide 99
EXTRA
This option will pay those employees that will not be present on the next payroll. For example,
employees being terminated or taking leave would be classified as Extra. To indicate the
employees to be paid, the employees status (Personal, Miscellaneous Information) must be set to
X. An extra payroll will calculate all statutory deductions as a NORMAL PAY, and as such will
create an extra insured week period.
EXAMPLE - An employee will be on vacation when the next payroll is due, and would like to be
paid in advance.
Note: Clear Payroll - During the Clear Payroll process, these employees will be set to Leave
status.
REVERSAL
This option will cancel a previously issued cheque for an employee. To indicate the employees to
have their pay reversed, the employee's status (Personal, Miscellaneous Information) must be set
to X.
EXAMPLE - An employee was paid in error. To cancel the cheque issued, and correct the yearto-date balances, use the REVERSAL option.
When you specify REVERSAL, the program prompts for the pay run number to be reversed.
Note: Clear Payroll - During the Clear Payroll process, these employees will be reset to Active
status.
When an Additional, Extra, or Reversal pay is performed, changes made to employees which were
not included on these runs (e.g. status not set to special) will be carried forward to the next payroll
run during the Clear Payroll process.
CAUTION - DO NOT change the employee status until the Clear Payroll process has been
performed.
Temporary Backup/Restore
The Temporary Backup/Restore command allows you to make a temporary backup, or restore,
the payroll master file of the current payroll. The temporary backup is saved to the same hard
drive containing the GrandMaster II for Windows program. To restore a payroll master file, it
must first have been backed up. When a payroll master file is restored, any changes made to the
payroll since the payroll was backed up are discarded.
Note: Backup the Master File - To create a permanent backup of a payroll use the Backup
Master File command.
When you select the Temporary Backup/Restore command, the following dialog box appears.
100 GrandMaster II for Windows
Fig. 8-07
The Temporary Master Backup/Restore Dialog Box
Backup Master <F7>
This button creates a temporary backup of the currently loaded payroll's master file and saves it to
your hard drive.
Restore Master <F8>
This button restores a temporary backup of the payroll master file. This procedure will discard
any changes to the payroll made since the master file was last backed up.
Note: Backup - A master file may not be restored if it has not been previously backed up.
Change Backup Path
This button allows you to define the location where you would like the temporary backup file to
be created. If you define a path other than the default (which is your payroll directory), you must
ensure that the new path exists prior to closing this dialog box.
Choosing this button opens the following dialog box.
Fig. 8-09
The Backup/Restore Master File Dialog Box
Payroll Calculation
The Payroll Calculation command initiates the payroll calculation process, depending on the type
of payroll selected. When you select this command, the following dialog box appears:
User Guide 101
Fig. 8-10
The Payroll Calculation Dialog Box
Begin Calculation <F7>
Commences calculation of the payroll. When performing the calculation, settings taken into
account include:
• Company/employee information
• Selected earnings and deductions
• Period ending and cheque date
Calculation time
The length of time required for the calculation of the payroll depends on:
• The number of employees on the payroll (including terminated and on leave)
• The average number of earnings, deductions, and accumulators set up for each employee
• The speed of the computer's CPU
• The speed of the hard disk drive
• The amount of free memory in the computer
Multi-user Environments
To perform a payroll calculation in a multi-user environment, all other users must exit the payroll
to be calculated, and you must have a security level of 1 or 2.
Once the payroll has been calculated, the program will place a check mark beside the Payroll
Calculation menu command to indicate that the current payroll has been calculated.
Calculating More than Once
This operation can be performed more than once to facilitate recalculation of the payroll due to
errors or omissions, but cannot be performed again after the Clear Payroll command has been
selected. Repeating the Payroll Calculation procedure will not affect the integrity of the year-todate balances.
Note: Calculation Results - Results of the payroll calculation for each employee will be displayed
when you select an employee in the Employees dialog box.
102 GrandMaster II for Windows
Clear Payroll
The Clear Payroll command closes the current payroll, making it inaccessible for further changes
or payroll calculations. When this command is chosen, the program will do the following:
• Reset any employees with special status (X)
• Increase the payroll run number by one
• Carry forward any transactions not applied to the current pay run
• Fix the balances from this payroll
EXAMPLE - After entering hours for employees to be included in payroll run number 2, you find
it necessary to calculate an extra pay for an individual employee. The hours previously entered for
the other employees that were to be included in pay run number 2 will be carried forward to
payroll run number 3.
Note: Backup the Master File - We recommend you perform the Backup Master File procedure
and leave the payroll uncleared until the next payroll is ready to be processed. This will allow you
to reprint reports/cheques without having to restore a backup of the master file.
To clear a payroll in a multi-user environment, all other users must exit the payroll to be cleared,
and you must have a security level of 1 or 2.
This operation must be performed after all payroll calculation types (e.g. normal, reversal, extra,
additional) have been run. The next payroll calculation may not be performed until the current
payroll is cleared.
When you select the Clear Payroll command, the following message box appears:
Fig. 8-11
The Clear Payroll Run Message Box
The program will prompt you to confirm the Clear Payroll operation. Choose Yes to confirm or
choose No to cancel the operation.
Once the program has cleared the current payroll, the check marks will be removed from all items
in the Process menu and the run number will be increased by one.
WARNING - Identical run numbers on consecutive payroll runs indicates that you failed to clear the
previous payroll before entering current payroll information. In such a case, the previous payroll
will not have been included in each employee's year-to-date totals.
User Guide 103
Backup Master File
It is highly recommended that the current payroll be backed up after each payroll calculation. We
have provided the Backup Master File command to perform this process, although you can use
any method you prefer to back up your payroll data. A proper backup ensures that the payroll may
be restored on another computer should your computer malfunction for any reason.
When you select this command, the following dialog box appears:
Fig. 8-12
The Backup Master File Dialog Box
Enter a path and filename for the backup file and choose OK to complete the backup procedure.
Note: No Compression - The program does not compress the payroll information when the
backup file is created. If the payroll backup file becomes unmanageably large, it may be advisable
to use third party backup software that utilizes compression. This will help to reduce the size of the
payroll backup file.
The files that should be backed up are:
• MASTER.DAT
• MASTER.IDX
These files will be located in the sub directory of the location where you installed the program
(e.g. \gm2win). The files will have the same name as your payroll.
Restore Master File
The Restore Master File command places a backed-up payroll on your computer for use in
GrandMaster II for Windows. To employ this feature, the payroll must have been backed-up
originally using the Backup Master File command. Any current changes that have been made
since the payroll was backed up will be discarded.
When you select this command, the following dialog box appears:
104 GrandMaster II for Windows
Fig. 8-13
The Restore Master File Dialog Box
Enter the path and filename of the backup file to be restored. Choose Restore to complete the
procedure.
Note: Restoring a Password Protected Backup - If a master file is restored from a payroll which
has the passwords active, you will be prompted to enter the SUPERVISOR password (the
SUPERVISOR password that was active when the payroll was backed up) before the payroll is
restored.
Advance Cheque Run
The Advance Cheque Run command is used by companies paying a mid-month advance to all
active employees on the payroll. A deduction must have been previously set up at the Employee
level with an amount entered for each employee. No calculation code is used.
When an advance cheque run is performed, you are required to specify which deduction from
which the amount is to be taken. This amount is paid as the negative of the amount entered and
cheques will be generated (or EFT records).
When a normal run is calculated, the deduction will be taken as is (subtracted from the actual
gross to cover the previous advance).
WARNING - DO NOT change the amount of the advance payment after the Advance Cheque Run
procedure has been performed.
EXAMPLE - An employee is to be paid a $500.00 advance payment before the actual pay date.
You would enter $500.00 for the deduction amount using the Permanent/Override Deductions
command in the Employees dialog box. When the advance run is performed, a cheque will be
generated with a deduction of -$500.00 (i.e. a positive earning). When the payroll is calculated,
this $500.00 will be deducted as normal to cover the advance already received.
When you select the Advance Cheque Run command, the following dialog box will appear:
User Guide 105
Fig. 8-14
The Advance Deduction Dialog Box
Select the desired to deduction on which to perform the advance, then choose the Run Settings
button to proceed.
Run Settings <F7>
Opens the Advance Payments dialog box where you can edit the details for the deduction advance.
This dialog box appears as follows:
Fig. 8-15
The Advance Payments... Dialog Box
Run <F7>
Starts the advance payment calculation process. This process calculates the net and gross amounts
and creates bank and/or cheque transactions (if required). Choosing this button opens the Advance
Payments dialog box where you can edit the details for the deduction advance.
Change Deduction <F8>
Allows you to change which deduction contains the advance payment amounts. Selecting the
button displays the Advance Deduction dialog box so you can choose from the list of available
deductions.
Set Dates <F9>
Allows you to enter period ending and the cheque date for the advance pay calculation. When you
choose the Set Dates button, the following dialog box will appear:
106 GrandMaster II for Windows
Fig. 8-16
The Set Up Advance Cheque Information Dialog Box
After the advance payments calculation has been performed, the payroll register cheques/stubs and
bank reconciliation reports can be created as normal.
If you are using EFT, checking the Void Direct Deposit check box will print the word VOID on all
direct deposit cheques.
Also, if EFT is used, you should perform the Create Transmission procedure prior to calculation
of further payrolls.
Note: The Clear Process - The clear process should not be performed after an advance payment
calculation as this is not a separate payroll run.
Once the next payroll has been calculated, advance payments cannot be issued.
User Guide 107
Chapter 9 - Creating Reports
For all reports in this section (except for Custom Reports and the Report Generator), setting up
page layouts (physical printer port, etc.) is accomplished using the Set Page Layout command
under the Utilities menu.
Fig. 9-01
The Reports Menu
Payroll Register
The Pay Register command provides a complete description of all calculations performed for each
employee, showing:
• Employee Name and Address
• Current and Year-to-Date values for Gross Wages, Deductions, Benefits, Current Net
Pay, Insurable Earnings
• Transfers to bank accounts
• Accumulators
When you select the Pay Register command, the following dialog box appears:
108 GrandMaster II for Windows
Fig. 9-02
The Payroll Register Dialog Box
The following sort criteria may be used when printing the payroll register:
• Employee Number
• Employee Surname, Given Name
• Home Department (prints a totals page for each department found)
• Home Province, City
• Tax Province
• Optional Field A, Optional Field B - custom fields defined by the user
• Field A, Name
• Field B, Name
• Home Department, Surname
This report will be kept as a permanent record of the payroll and should be filed in run number
sequence.
Print Test Page <F6>
Print a test page to verify form alignment.
Print <F7>
Choose this button to print the report. You are presented with the option of printing the report to
the screen, to a printer or to a file (where you will be prompted for the file name).
The printed payroll register will appear similar to the following:
User Guide 109
Fig. 9-03
A Sample Payroll Register Report
Final Totals
The last page of the Payroll Register provides the accumulated totals for the current payroll,
including Earnings, Hours, Deductions, Benefits, Net Payroll Value, and other statistical
information.
The printed payroll register final totals will appear similar to the following:
110 GrandMaster II for Windows
Fig. 9-04
The Payroll Register Final Totals
Cheques/Stubs
GrandMaster II will print cheques and/or pay stubs as two separate operations. The print format
of the cheques/pay stubs is entered using the Setup Cheques command under the Utilities menu.
When you select the Cheques/Stubs command, the following dialog box appears:
Fig. 9-05
The Pay Statement Dialog Box
You may specify:
• Information to be printed
• Page setup information
User Guide 111
• Printing order
The following table describes the options available in this dialog box:
Field
Description
Sort Order
Specify the order in which the cheques/stubs are to be printed. Select a
radio button that corresponds to the sort order you wish to use.
Print Cheques
Check this box if you want to print both cheques and stubs. Remove the
check from the box if you only want to print the pay stubs.
Print Direct Deposits
Check this box of you would like to print pay stubs for employees who are
paid using EFT instead of cheques. If this option is enabled, the cheques
for employees using EFT will have the word VOID printed on them.
Remove the check from this box if you do not want to print cheques for
employees who use EFT.
Non Direct Deposits
Check this box of you would like to print pay stubs for employees who are
paid with cheques.
Remove the check from this box if you do not want to print pay stubs.
Starting Cheque #
Enter the number at which the cheque run will begin. Cheque numbers are
assigned during the printing process. All cheques printed will be numbered
sequentially beginning with the specified number.
Message <F5>
Allows you to enter a message that will be printed on the bottom of all pay stubs.
Print Test <F6>
Choose this button to send a test page to the printer.
Print <F7>
Choose this button to print the report. You are presented with the option of printing the report to
the screen, to a printer or to a file (where you will be prompted for the file name).
Single Cheque <F8>
Once all cheques have been printed, and the Print Cheques/Stubs command is selected a second
time, the Single Cheque button will appear at the bottom of the dialog box. If this button is
selected, an employee number may be entered for the reprinting of a single cheque. You have the
option of changing the cheque number previously assigned. Choose Print to produce this cheque
only.
Values for sort order and print cheques can be changed permanently (see Setup Cheques in the
Utilities chapter).
Printed cheques/stubs will appear similar to the following:
112 GrandMaster II for Windows
Fig. 9-06
A Sample Printed Cheque with Stub
Audit Trail
This is a report of all changes made to the payroll, or all changes made to a specific employee for
a payroll or a number of payrolls. The report will identify the changes and the user responsible for
the changes.
This is an example of the Audit Trail printout.
Fig. 9-07
A Sample Audit Trail Report
User Guide 113
When you select the Audit Trail command, the following dialog box appears:
Fig. 9-08
The Print Audit Trail Dialog Box
The audit is embedded in the database and remains until the database is purged. For audit changes
to be recorded, the Enable Audit field must be set to Y using the Control Information command
under the Company menu.
The following table describes the options available in this dialog box:
Field
Description
Select Sort Order
Select whether the audit trail will be printed in order of payroll run number or
by employee number.
Starting Run Number
The run number of the payroll marking the beginning of the audit trail.
Test <F6>
Prints a test page to verify form alignment.
Print <F7>
Choose this button to print the report. You are presented with the option of printing the report to
the screen, to a printer or to a file (where you will be prompted for the file name).
Select Information <F8>
This button opens the Select Information to Print dialog box that allows you to choose specific
types of information to include in your report.
Fig. 9-09
The Select Information to Print Dialog Box
114 GrandMaster II for Windows
Choose one or more items then click OK to confirm your selection. You can quickly select all of
the items by choosing the Select All button.
Select User IDs
This button opens a dialog box that allows you to include data from the user(s) who made changes
to the payroll file.
Fig. 9-10
The Select User ID for Printing Dialog Box
Name and Address
This is a report containing employee names and addresses. There are two formats available. The
standard information common to both reports includes Employee Number, Name, Address, City,
Province, and Postal Code.
When you select this command, the following dialog box appears:
Fig. 9-11
The Name and Address Report Dialog Box
The following table describes the options available in this dialog box:
Field
Sort Order
Description
User Guide 115
Sort Order
Choose the order in which information will appear in the report.
Status
Active Employee
Check this box if you wish to include employees with an ACTIVE
status in the report.
Employees on Leave
Determines if employees with a ON LEAVE status are printed.
Terminated Employee
Determines if employees with a TERMINATED status are printed.
CCRA Account
Full Time
Determines determine if employees with a FULL TIME Revenue
Canada (CCRA) account are printed.
Part Time
Determines if employees with a PART TIME Revenue Canada
(CCRA) account are printed.
Other
Determines if employees with any OTHER Revenue Canada (CCRA)
account are printed.
Print <F7>
Choose this button to print the report. You are presented with the option of printing the report to
the screen, to a printer or to a file (where you will be prompted for the file name).
The printed name and address report will appear similar to the following:
Fig. 9-03
A Sample Name and Address Report
Range <F5>
This button opens a dialog box that allows you to specify a range of employee numbers that will
control which employees appear in the report. When you select this button, the following dialog
box appears:
Fig. 9-12
The Employee Number Range Dialog Box
Print Test Page <F6>
Allows you to print a test page to verify form alignment. For information on form size and
format, refer to the Set Page Layout section of the Utilities chapter.
116 GrandMaster II for Windows
Labels
This command allows the printing of mailing labels or timecard labels, with the employee's name
and employee number or address. Form size and format are defined using the Set Page Layouts
command under the Utilities menu.
When you select this command, the following dialog box appears:
Fig. 9-13
The Print Labels Dialog Box
The following table describes the options available in this dialog box:
Field
Description
Sort Order
Order in which information will appear on report.
Print Fields
Check a box to include the corresponding information in the report.
Status
Active Employee
Determines if employees with an ACTIVE status are printed.
Employee on Leave
Determines if employees with a ON LEAVE status are printed.
Terminated Employee
Determines if employees with a TERMINATED status are printed.
CCRA Account
Full Time
Determines if employees with a FULL TIME Revenue Canada (CCRA)
account are printed.
Other
Determines if employees with any OTHER Revenue Canada (CCRA)
account are printed.
Part Time
Determines if employees with a PART TIME Revenue Canada (CCRA)
account are printed.
Print <F7>
Choose this button to print the labels. You are presented with the option of printing the labels to
the screen, to a printer or to a file (where you will be prompted for the file name).
The following is a sample of how printed labels may appear:
User Guide 117
Fig. 9-14
Sample Printed Labels
Range
This button opens a dialog box that allows you to specify the range of the data to be included in
the report. When you select this button, the following dialog box appears:
Fig. 9-03
The Enter Number Range(s) Dialog Box
Enter either the starting and ending employee number or starting and ending surname plus the
department and province. Leave the fields blank to choose all employees.
Configure <F5>
This option allows you to modify the default setup of each individual label. To set the actual page
size and port to send the labels to, use the Set Page Layout command under the Utilities menu.
When you choose this button, the following dialog box appears:
118 GrandMaster II for Windows
Fig. 9-15
The Configure Layout Dialog Box
The settings in this dialog box will allow you to accurately produce labels for variety of sizes and
page layouts.
To be able to print on these different types of forms, the following parameters are required.
Field
Description
Labels Across
Determines the number of labels across the page.
Labels/Page
Determines the number of labels down the page. The page length must correspond
will the page layout. See Utilities, Page Layouts.
Lines/Label
Determines the printable lines (vertical) for each label. Measure from the top of one
label to the top of the next label. Multiply the measurement in inches by the lines
printed per inch. See Utilities, Page Layouts. For example, 1 and 1/2 inches times 6
lines/inch = 9 lines.
Printable Lines
Enter the number of lines to be printed on the label.
Labels Width
Determines the width of the label in print characters. Measure from the left side of
one label to the left side of the label to the right of it. Multiply this value by the
characters printed per inch. Normal printing is 10 characters per inch. Condensed
printing is 17 characters per inch.
Print Width
Enter the number of characters to be printed per inch. This value must be less than
the Label Width.
Margins
Indent First Label
Enter the number of characters that the first label will be indented.
Top of Page Margin
Enter the number of lines down from the top of the page.
Print Test <F6>
Prints a test label to verify horizontal and vertical label alignment.
Message <F8>
This allows you to enter a message that will appear on each label. You can enter up to a 30character message (e.g. Bulk Mail Permit No. 12345).
When you choose this button, the following dialog box appears:
User Guide 119
Fig. 9-16
The Message Entry Dialog Box
Record of Employment
This option allows you to create an employee's EI Record of Employment form as of the last
payroll. The screen appears similar to the E.I. form, making it easy to edit or change the fields.
Refer to your guide "How to Complete a Record of Employment" for an explanation of all the
fields. When printing multiple forms, information that is not employee specific will remain on the
form.
When you select this command, the following dialog box will appear:
Fig. 9-17
The Enter Issuer Information Dialog Box
The following table describes the options available in this dialog box:
Field
Description
Name of Issuer
Enter the issuing company name.
Phone Number
Enter the issuing company's phone number (separated by Area Code, prefix
and suffix.
Export to a file
Check this box if you wish to produce an exported file containing the ROE
information. Selecting this checkbox will activate the File Name edit field so
you can enter a name for the file.
Append to a File
Check this box if you wish to add to the employees' ROE information to an
existing file. Selecting this checkbox will activate the File Name edit field so
you can enter a name for the file.
File Name
Specify a name and location for the ROE information file. This field is
activated if you choose either of two the options immediately above it in the
dialog box.
Select New Employee <F4>
Choose this button to select the employee for whom you will produce the ROE. Choosing the
button opens the Select Employee dialog box.
120 GrandMaster II for Windows
Fig. 9-18
The Select Employee Dialog Box
Highlight the desired employee in the list, then choose the Select button. This opens the Employee
ROE Update dialog box.
Fig. 9-19
The Employee ROE Update Dialog Box
The fields in this dialog box will be filled in with applicable information that was found in the
payroll master file. However, these values should be checked for accuracy.
Choose the Print button from this dialog box to produce the final report.
Note: Employee ROE Update Dialog Box Changes - Changes made in this dialog box will not
be reflected in the payroll. Use the commands under the Employee menu if you need to update the
payroll.
User Guide 121
Journal Entry
This command allows you to create a report containing all general ledger transactions pertaining to
a payroll (or group of payrolls). The information on the report can also be exported to a file for
direct interface with an accounting software package.
This option will produce a Payroll Journal Entry based on the payroll run numbers specified.
Form size and format are discussed in the Set Page Layout section of the Utilities chapter.
When you select this command, the following dialog box will appear:
Fig. 9-20
The Journal Entry Dialog Box
The following table describes the options available in this dialog box:
Field
Description
Journal Range
Starting Run Number
The Payroll run number at which the report will start.
Ending run Number
The Payroll run number at which the report will end.
Print Sub Totals
By Sub Account
Determines if subtotals should be printed in sub account sort order.
By Account
Determines if subtotals should be printed in account sort order.
By Department
Determines if subtotals should be printed in department sort order.
Print Options
Split Benefits by
Department
Determines if employees of more than one department are to have benefits
split.
Page Break
Determines if the report should start a new page for each entry.
Print Account Summary
Determines if the report should include an account summary.
Export File
Determine if a disk file of the journal entry should be created. If this
checkbox is selected, has been entered, the Export button in the right
bottom of the screen will be activated so you can specify the output files
information.
Transaction Code
Enter a transaction code to be inserted into the export file. The transaction
code is not used by GrandMaster II for Window but may be required for
122 GrandMaster II for Windows
importing into certain General Ledger systems.
Fiscal Period
Enter a fiscal period code to insert into the export file. This field is not used
by GrandMaster II for Windows but may be required for importing into
certain General Ledger systems.
Print <F7>
Choose this button to print the report. You are presented with the option of printing the report to
the screen, to a printer or to a file (where you will be prompted for the file name).
The printed journal entry will appear similar to the following:
Fig. 9-21
A Sample Journal Entry Report
Print Test Page <F6>
Choose this button to print a test page to verify form alignment.
User Guide 123
Export <F2>
This button is accessible only if the Export File checkbox is selected in the Print Options section
of this dialog box. This option allows you to change the format of the export file and the file
name. Depending on which format you use, the transaction code and fiscal period may not be
required.
When this button is selected, the following dialog box appears:
Fig. 9-22
The Export Format Dialog Box
Select Format <F2>
This button allows you to select the export format for the journal transactions. Most popular
export formats are available and predefined in the PAYROLL.INI file for each payroll. You can
modify these settings and add new formats as required.
A cross-referenced list of available formats is stored in the GRNDMAST.INI file (under the jeform section of the file). New formats need to be added to this section in order to function.
When this button is selected, the following dialog box appears:
Fig. 9-23
The Select Format Dialog Box
G/L Transaction <F4>
This button allows you to set up a translation table for Codes of Accounts. This is useful for
accounting systems that have a non-standard account structure. For example, the payroll could
have DEPT-A, WAGE. This could be translated into 1,2067,88238.
When this button is selected, the following dialog box appears:
124 GrandMaster II for Windows
Fig. 9-24
The Account Transformation Module Dialog Box
Job Cost Translation <F5>
This button allows you to set up a translation table for Job and Phase number, similar to the G/L
Transaction button. When this button is selected, the following dialog box appears:
Fig. 9-25
The Job Cost Account Transformation Module Dialog Box
Data Dictionary (Journal Entry Report)
The data dictionary for Export Formats is as follows. All data fields must begin with "fielddesc=" in lower case characters. All fields listed below must be in upper case characters. The
starting position and the length of the field to be exported can also follow each field name.
For example, if you want to export the last 4 positions of the employee number (total field length
= 9), the line would appear as follows:
field-desc=EE-NUMBER:6:4;
This will export the 6,7,8 and 9th position of the employee number.
This table provides a description of valid field names and their descriptions:
Field NAME
Description
EE-NUMBER
Employee number.
TYPE-ALP
Defines the field type as alphabetic
TYPE-NUM
Defines the field type as being numeric.
DEPARTMENT
Six-character department code.
ACCOUNT
Six-character account code.
SUB-ACCOUNT
Six-character sub-account code.
NEW-ACCOUNT
The department, account and sub-account will be used to search the
User Guide 125
translation table for the new account code. The department, account
and sub-account will print on the report but the Export file will have the
translated code.
NEW-JC-ACCOUNT
The Job, Phase and Sub-phase codes will be used to search the Job
translation table for the new job code.
Field-A
The optional field-a will be include in the output string. It will not print on
the report. This field must be qualified by also using field-a="Y" in the
definition block.
Field-B
The optional field-b will be include in the output string. It will not print on
the report. This field must be qualified by also using field-b="Y" in the
definition block.
ACCT-DESC
Twenty character account description.
PAY-NAME
Eight character payroll name.
AMOUNT
The amount field
AMOUNT-HOURS
This will create two records out, first will contain the dollar amount and
the second record will contain the hours.
ERN-HOURS
The total earning hours for the account.
DEBIT-AMOUNT
The amount if debit else zero.
CREDIT-AMOUNT
The amount if credit else zero.
PAY-PERIOD
The Journal Ending pay period.
CURR-PERIOD
The most current pay period.
PAY-YEAR
The payroll year.
TRANSACTION
The transaction code that was entered on the previous screen.
FISCAL-PERIOD
The Fiscal Period that was entered on the previous screen.
END-DD
The period ending day
END-MM
The period ending month
END-YY
The period ending year
CHEQ-DD
The cheque ending day
CHEQ-MM
The cheque ending month
CHEQ-YY
The cheque ending year
COUNTER
A sequential number generator (5 digits). Always starts at 1.
DEBIT\CREDIT
Output a zero for debits or a 1 for credits.
D/C
Output a "D" for debits or a "C" for credits.
FILLER
Insert spaces.
CONSTANT
Constants can be entered without a definition. Enclose the value in
quotation marks. If more than one space is require, use the symbol #
for each space.
The following definitions can be used to further define the data fields. These would be entered on
a separate line following the data.
The line would begin with "field-type=".
ZERO-FILL
Replace spaces in with zeros.
ZERO-LEADING
Replace leading spaces with zeros.
126 GrandMaster II for Windows
ZERO-PREVIOUS
Will zero out previous field if spaces.
SPACE-FILL
Maintains spaces within a field.
NUMERIC
Defines field as numeric, no quotes around data.
REMOVE-LEADING
Removes any leading zeros.
LEFT-JUSTIFY
Aligns the field to the left most position.
RIGHT-JUSTIFY
Aligns the field to the right most position.
DECIMAL-PT
A decimal point (.) will be insert in the amount.
SIGN-LEADING
The sign position will appear to left of the amount.
SIGN-TRAILING
The sign position will appear to right of the amount.
REMOVE-LEADING
Removes leading zeros in amount fields.
The following is a sample data definition for a journal entry export.
[SAMPLE-FORMAT]
Section Header, must be defined in the Grndmast.ini file.
* use for Sample Accounting
System.
Field starting with an "*" are treated as comments.
Delimiter=COMMA;
Defines the export field structure to be comma separated values (csv)
file-name="c:\payroll\export.csv";
Indentifies the path and file name of the export file.
field-a="Y";
Indicates the you will include optional field-a in the structure
rec-length=80";
Defines the record length to be 80 characters.
Fielddesc=ACCOUNT:1:4,DEPARTM
ENT:3:4;
Exports the the first four position of the account and the last four
position of the department number as one field.
field-desc=Field-A:1:8;
Exports the first 8 positions of optinal field-a (employee, personal,
miscellanious information).
field-desc=TRANSACTION:2:1;
Exports the last digit of the Transaction Code (export field on Reports,
Journal Entry screen).
field-type=NUMERIC;
Tells the system to treat the previous field (tranaction) as numeric (no
quotes around it).
field-desc="PR",PAY-PERIOD;
Exports a constant (PR) followed by the pay period number.
field-desc=FISCAL-PERIOD;
Exports the Fiscal Period (export field as indicated on the Reports,
Journal Entry screen).
field-desc=END-YY,ENDMM,END-DD;
Exports the period ending date in YYMMDD format.
field-desc=ACCT-DESC;
Exports the Account Description as printed on the report.
field-desc=AMOUNT;
Exports the amount field.
field-type=NUMERIC,SIGNLEADING,DECIMALPT,REMOVE-LEADIN;
Treats the previous field (amount) as numeric, negative sign leading,
inserts a decimal point and remove any leading zeros.
Other options available in the export format:
export=type=JC;
Identifies the export as Job Costing type. No Liability accounts will be
exported.
field-a="Y";
Signal that optional Field A will be used in this export.
User Guide 127
field-b="Y";
Signals that optional Field B will be used in this export.
file-name="20characters";
Defines the file name.
export-path="20characters";
Defines the path for the file-name.
export-prefix="PAYROLL";
Will cause the export file name to be "export-directory\export-payrollname.export-extension".
export-ext="TXT";
Will define the export extension as the "TXT".
header-section="HEADER-1";
Will insert a header record on the file as define in a section call
[HEADER-1].
header2-section="HEADER-2";
Will insert a second header record on the file as define in a section call
[HEADER-2].
header3-section="HEADER-3";
Will insert a third header record on the file as define in a section call
[HEADER-3].
convert-file="ACCT-TAB";
Identifies the conversion (translation) file.
segment-section="NEWSEGMENT";
When definition items exceeds limitation (30), the definition can be
continued in a new section [new-segment].
segment-je-section="JCSECTION";
Continuation for job cost section.
Cheque Register
The Cheque Register is a list of all cheques issued during the last pay calculation. This list may
also include all employees with direct deposit information (bank account number), showing bank
name, address and the employees' bank account number.
Form size and format are discussed in the Set Page Layout section of the Utilities chapter.
When you select this command, the following dialog box will appear:
Fig. 9-26
The Cheque Register Report Dialog Box
The following table describes the options available in this dialog box:
Field
Description
Pay Period
The Payroll run number on which the report will be based.
Sort Order
Sequence Number
Sorts the order by payroll sequence number.
Transit Cheque Number
Sorts the order by transit cheque number.
128 GrandMaster II for Windows
Totals For Bank Branch
Determines if the bank branch totals are to be printed.
New Page for Bank Branch
Determines if a new page should be started for each new bank branch.
The Totals and New Page for Bank Branch options are only available if the sort order "2" is
specified. Some companies may wish to forward this list to the bank for direct deposit to
employees' accounts.
Print <F7>
Choose this button to print the report. You are presented with the option of printing the report to
the screen, to a printer or to a file (where you will be prompted for the file name).
The printed cheque register will appear similar to the following:
Fig. 9-27
A Sample Cheque Register Report
Note: Cheque Numbers - Cheque numbers will not appear on the cheque register unless
cheques have previously been printed.
Print Test Page <F6>
Choose this button to print a test page to verify form alignment.
Employee Profile
This option allows you to print personal information and a summary of all pay cheques issued to
an individual employee for the current year. The number of employees printed per page can be
specified. Companies that maintain paper files on each employee may print Employee Profiles at
the end of the year for insertion into employee files.
Form size and format are discussed in the Set Page Layout section of the Utilities chapter.
When you select this command, the following dialog box will appear:
User Guide 129
Fig. 9-28
The Employee Profile Dialog Box
The following table describes the options available in this dialog box:
Field
Description
Sort Order
Order in which to print the employee profile information.
Run Range
Starting Run
Enter the starting run number to begin printing at.
Ending Run
Enter the ending run number to end the printing at.
Employee Status
Active
Determines if employees with ACTIVE status should print.
On Leave
Determines if employees with ON LEAVE status should print.
Terminated
Determines if employees with TERMINATED status should print.
Details
Determines if employee details should appear on the printout.
Employees / Page
Determines the number of employees per page that should appear on the
printout.
Print <F7>
Choose this button to print the report. You are presented with the option of printing the report to
the screen, to a printer or to a file (where you will be prompted for the file name).
The report will appear similar to the following:
130 GrandMaster II for Windows
Fig. 9-29
A Sample Employee Profile Report
Print Test Page <F6>
Choose this button to print a test page to verify form alignment.
Range <F5>
This button opens a dialog box that allows you to specify the range of the data to be included in
the report. When you select this button, the following dialog box appears:
Fig. 9-30
The Enter Range(s) Dialog Box
Enter either the starting and ending employee number or starting and ending surname plus the
department and province. Leave the fields blank to choose all employees.
Select Provinces <F4>
This button allows you to choose one or more provinces to include in the report. When you select
this button, the following dialog box appears:
User Guide 131
Fig. 9-31
The Select Provinces Dialog Box
Input Work Sheet
An input work sheet displays data for the next payroll. This is used mainly for companies
processing payroll in a service bureau environment, such as accounting firms preparing payrolls
for their clients.
The work sheet displays the company name at the top and lists the employees by number. Other
basic information about each employee also appears such as their full name, SIN number,
complete address, gender, vacation rate, earning descriptions/rates and standard deduction
descriptions.
Form size and format are discussed in the Set Page Layout section of the Utilities chapter.
When you select this command, the following dialog box will appear:
Fig. 9-32
The Input Worksheet Dialog Box
The following table describes the options available in this dialog box:
Field
Description
Sort Order
Order in which to print the employee profile information.
Employee Status
Active
Determines if employees with ACTIVE status should print.
On Leave
Determines if employees with ON LEAVE status should print.
Terminated
Determines if employees with TERMINATED status should print.
Employees / Page
Determines the number of employees per page that should appear on the
printout.
132 GrandMaster II for Windows
Print <F7>
Choose this button to print the report. You are presented with the option of printing the report to
the screen, to a printer or to a file (where you will be prompted for the file name).
The report will appear similar to the following:
Fig. 9-33
A Sample Input Worksheet Report
Print Test Page <F6>
Choose this button to print a test page to verify form alignment.
Range <F5>
This button opens a dialog box that allows you to specify the range of the data to be included in
the report. When you select this button, the following dialog box appears:
Fig. 9-34
The Enter Range(s) Dialog Box
Enter either the starting and ending employee number or starting and ending surname plus the
department and province. Leave the fields blank to choose all employees.
User Guide 133
Select Provinces <F4>
This button allows you to choose one or more provinces to include in the report. When you select
this button, the following dialog box appears:
Fig. 9-35
The Select Provinces Dialog Box
Statistics Canada Report
Statistics Canada requests that some employers complete a monthly "Survey of Employment,
Payrolls and Hours" report. These reports are used by Statistics Canada to measure economic
conditions.
When this option is selected, the system will provide statistical information on the last payroll and
on all payrolls for the month, broken down into three categories (salaries, hourly, others). If the
payroll contains employees in more than one recording zone, a further breakdown will be given.
See the WCB & Stats. Can. option under the Employee dialog box's Personal menu for entering a
Statistics Canada code and region.
Print <F7>
Choose this button to print the report. You are presented with the option of printing the report to
the screen, to a printer or to a file (where you will be prompted for the file name).
The report will appear similar to the following:
Fig. 9-36
A Sample Survey of Employment Report
Print Test Page <F6>
Choose this button to print a test page to verify form alignment.
134 GrandMaster II for Windows
New Hires Report <F8>
This button allows you to specify a date range that will control the employees to be included in the
report. When you select this button, the following dialog box appears:
Fig. 9-37
The Hiring Report Dialog Box
Choose the Print button to produce the New Hires report. The report will appear similar to the
following:
Fig. 9-38
A Sample New Hires Report
Print Settings <F5>
This button opens a dialog box that allows you to set up the report page and printer connection
specifications. When you select this button, the following dialog box appears:
User Guide 135
Fig. 9-39
The Set Page Layouts Dialog Box
The following table describes the options available in this dialog box:
Field
Description
Assign to Port
Enter the port where the output will be directed.
Lines/Inch
Enter the number of lines to print per inch.
Lines/Page (Page
Size)
Enter the number of lines to print per page.
Print Lines (Max
Printable)
Enter the maximum amount of lines to print on the page without exceeding the page
length.
Condensed
Determines if the output should be printed in a condensed format.
Emphasized
Determines if the output should be highlighted slightly.
Landscape Mode
(Laser Only)
Determines if the output should be printed in landscape mode. Use this feature only
for laser printers.
Workers Compensation
General Information
Workers Compensation Legislation has been enacted by each Province and Territory to provide
income for employees who are absent from work because of a work-related accident or
industrially caused disease. Employers are assessed annually and the funds collected create the
accident fund from which the injured employees are paid.
The annual assessment of employers is based on a rate per $100.00 of the total assessable payroll.
This rate is determined by the amount of assessment payments required to meet the projected
accident costs of that particular industry. Each province establishes a maximum assessable
amount for employees.
Employers are required to keep accurate records showing such information as names of all
employees, periods of employment, hours worked and earnings. The Workers Compensation
Board (WCB) sends each employer an employer statement at the end of the calendar year. This
statement must be completed and returned to the WCB for each province of operation, on or
before the end of February.
136 GrandMaster II for Windows
The WCB Report
GrandMaster II for Windows allows you to create a report that shows each employee's assessable
earnings (earnings and taxable benefits marked with the WCB flag), maximum assessable
earnings, WCB rates and costs. The WCB report is a report sorted by province, with the start and
end period included. These dates are controlled by the employee's start and termination date (if
they fall within the period). The program distributes WCB costs to the departments in which an
employee works.
The WCB report can be run on a single or multi-pay period basis and is designed for submission
to WCB Commissions in each province. Each province has specific requirements as to which
earnings and benefits are subject to the WCB assessment. Generally, any amount that would
appear in Box 14 of the T4 would be included in this report. Some provinces ask that a monthly
report be prepared and submitted with the monthly payment.
You require a starting and ending pay period to produce this report. To obtain an annual report,
enter "1" in the Starting Payroll Period field and the most recent period in the Ending Payroll
Period field.
When you select the Workers Compensation command, the following dialog box appears:
Fig. 9-40
The Workers Compensation Report Dialog Box
Enter the starting payroll date in DD-MM-YY format and choose the Print button to proceed. The
program will generate a report of earnings and costs to the maximum assessable amount by
employee. The report is sorted using employee S.I.N. numbers, segregated by province.
Most provinces require this report to be produced on an annual basis only, prior to T4 processing.
The provinces of Ontario and Quebec require a monthly WCB report with the maximum
assessable earnings prorated over the period worked.
Print <F5>
Choose this button to print the report. You are presented with the option of printing the report to
the screen, to a printer or to a file (where you will be prompted for the file name).
Following is a sample Workers Compensation report:
Fig. 9-41
A Sample Workers Compensation Report
User Guide 137
Print Test Page <F6>
Choose this button to print a test page to verify form alignment.
Select Provinces <F4>
This button allows you to choose one or more provinces to include in the report. When you select
this button, the following dialog box appears:
Fig. 9-42
The Select Province Dialog Box
Report Generator
The Report Generator command allows you to create customized reports that contain information
from your payroll's master database. This data can be arranged in any sequence you choose.
Please refer to the Report Generator chapter of this guide to learn more about this powerful
feature.
Data Entry Reports
The Data Entry Reports command is used to create reports that display earnings entered using the
Employee menu's Hours Entry command.
Note: Sort Fields - You may specify up to 3 sort fields (from a list of choices) and put in range
criteria for these fields. This report can be printed before a calculation is performed.
When you select this command, the following dialog box appears:
138 GrandMaster II for Windows
Fig. 9-43
The Data Entry Details Report Dialog Box
Options are available to the choice of the sort sequence. Major Sort is the highest order, followed
by Intermediate Sort and Minor Sort.
You may select subtotals for each sort level by choosing the Sub Total checkbox beside each list.
Choose the Page Break checkbox to begin a new page after each record.
The following is a list of the type of sorting fields available:
Sorting Fields
Description
<<EE NUMBER>>
Sort by Employee number
<<EE NAME>>
Sort by Employee name
<<PERIOD>>
Sort by Pay period number
<<EARN -DATE>>
Sort by Earning date
<<DEPARTMENT>>
Sort by Department
<<ACCOUNT>>
Sort by Account number
<<SUB-ACCT>>
Sort by Sub-Account number
<<SEQ-NO>>
Sort by Sequence number
Print <F7>
Choose this button to print the report. You are presented with the option of printing the report to
the screen, to a printer or to a file (where you will be prompted for the file name).
Configure <F4>
This button allows you to specify certain fields to be included in the report. Choosing the button
opens the following dialog box:
Fig. 9-44
The Configure Data Entry Report Dialog Box
Choose the Sequence Number checkbox to include pay sequence information in the report.
Choose the Pay Period checkbox to include pay period information in the report.
User Guide 139
Print Test Page <F6>
Choose this button to print a test page to verify form alignment.
Range <F5>
This button allows you specify ranges for the report based on different criteria (e.g. pay period,
employee number, earnings dates, etc.). When you select this button, the following dialog box
appears:
Fig. 9-45
The Enter Valid Range(s) Dialog Box
Enter a value in the corresponding sort field. Any ranges left blank will display all of the possible
values for that field.
Take care that you do not specify contradictory ranges such as a Pay Period range with an Earn
Date range outside the Pay Period range.
Select Earnings
This button allows you to specify the earnings types on which the report will be based. Choosing
the button opens the following dialog box:
Fig. 9-46
The Select Earning Dialog Box
Highlight one or more earnings to include them in the report. Use the Select All button to quickly
highlight every earning in the list.
140 GrandMaster II for Windows
Department Distribution
This report is used to show earnings and benefit information for each employee. This report is
useful when you need to obtain details about the standard Journal Entry.
When you select this command, the following dialog box appears:
Fig. 9-47
The Department Distribution Report Dialog Box
Options are available to the choice of the sort sequence. Major Sort is the highest order, followed
by Intermediate Sort.
You may select subtotals for each sort level by choosing the Sub Total checkbox beside each list.
Choose the Page Break checkbox to begin a new page after each record.
The following is a list of the type of sorting fields available:
Sorting Fields
Description
<<DEPARTMENT>>
Sort by Department
<<EE NUMBER>>
Sort by Employee number
<<EE NAME>>
Sort by Employee name
<<PERIOD>>
Sort by Pay period number
<<EARN -TYPE>>
Sort by Earning type
<<ACCOUNT>>
Sort by Account number
<<SUB-ACCT>>
Sort by Sub-Account number
<<NONE>>
No sort order
Print Configuration Options - Choose a checkbox from this section to include the corresponding
item in the report.
Range - Use the Pay Period or Department fields to specify your range preference for the report.
User Guide 141
Print Test Page <F6>
Choose this button to print a test page to verify form alignment.
Job Costing Reports
The Job Costing Reports will print the information entered using the Employee menu's Hours
Entry command. When the Job Costing Reports command is chosen the following screen will
appear:
Fig. 9-48
The Print Job Costing Hours Report Dialog Box
Options are available to the choice of the sort sequence. Major Sort is the highest order, followed
by Intermediate Sort and Minor Sort.
You may select subtotals for each sort level by choosing the Sub Total checkbox beside each list.
Choose the Page Break checkbox to begin a new page after each record. Choose the Summary
Totals Only checkbox to produce the report with summarized totals only.
The following is a list of the type of sorting fields available:
Sorting Fields
Description
<<EE NUMBER>>
Sort by Employee number
<<EE NAME>>
Sort by Employee name
<<PERIOD>>
Sort by Pay period number
<<JOB NUMBER>>
Sort by Job number
<<PHASE>>
Sort by Job phase
<<SUB-PHASE>>
Sort by Job sub-phase
<<SUB-ACCT>>
Sort by Sub-account number
<<SEQ-NO>>
Sort by Sequence number
Setup
Choose this button to use the Job Costing method of creating the report (i.e. by Job Number, Phase
and Sub-Phase). Selecting the button activates all three lists so you can define the Job Number,
Phase and Sub-Phase information.
After choosing this button, its label will change to read "Default Setup". Choosing this button will
reset the dialog box options back to their original state when you opened the dialog box.
142 GrandMaster II for Windows
Print <F7>
Choose this button to print the report. You are presented with the option of printing the report to
the screen, to a printer or to a file (where you will be prompted for the file name).
Print Test Page <F6>
Choose this button to print a test page to verify form alignment.
Range <F5>
This button allows you specify ranges for the report based on different criteria (e.g. pay period,
employee number, earnings dates, etc.). When you select this button, the following dialog box
appears:
Fig. 9-49
The Pay Range Settings Dialog Box
Enter a value in the corresponding sort field. Any ranges left blank will display all of the possible
values for that field.
Take care that you do not specify contradictory ranges such as a Pay Period range with an Earn
Date range outside the Pay Period range.
Select Earnings
This button allows you to specify the earnings types on which the report will be based. Choosing
the button opens the following dialog box:
User Guide 143
Fig. 9-50
The Select Earning Dialog Box
Highlight one or more earnings to include them in the report. Use the Select All button to quickly
highlight every earning in the list.
Pay Period Summary
This option allows you to print the Employee Profile report which lists an employee's personal
information and a summary of all pay cheques that have been issued for the current year. Each
employee profile report is printed on a separate page.
When you select this command, the following dialog box will appear:
Fig. 9-51
The Employee Payroll Summary Dialog Box
The following table describes the options available in this dialog box:
Field
Description
Sort Order
Order in which to print the employee payroll information.
Run Range
Starting Run
Enter the starting run number to begin printing at.
Ending Run
Enter the ending run number to end the printing at.
144 GrandMaster II for Windows
Print Benefits
Determines if employee benefits should appear on the printout.
Employee Status
Active
Determines if employees with ACTIVE status should print.
On Leave
Determines if employees with ON LEAVE status should print.
Terminated
Determines if employees with TERMINATED status should print.
Details
Determines if employee details should appear on the printout.
Employees / Page
Determines the number of employees per page that should appear on the
printout.
Print <F7>
Choose this button to print the report. You are presented with the option of printing the report to
the screen, to a printer or to a file (where you will be prompted for the file name).
Print Test Page <F6>
Choose this button to print a test page to verify form alignment.
Range <F5>
This button opens a dialog box that allows you to specify the range of the data to be included in
the report. When you select this button, the following dialog box appears:
Fig. 9-52
The Enter Range(s) Dialog Box
Enter either the starting and ending employee number or starting and ending surname plus the
department and province. Leave the fields blank to choose all employees.
Custom Reports
This option allows GrandMaster II to provide additional modules designed specifically for certain
industries (such as hospital, education, hospitality, etc.), or provide custom applications for
specific customers.
These modules are available from Can-Pay at extra cost. If you are interested or have any
questions please call our Toll-Free number at (800) 665-5129. If you live in Winnipeg, please call
987-8520.
User Guide 145
Chapter 10: Report Generator
This feature allows you to create custom reports containing user-defined information from the
payroll's master database. This data can be arranged in a selected sequence to suit your specific
reporting requirements.
The Report Generator Dialog Box
The report generator gives you the flexibility to generate special management reports on a regular
or one-time basis. The report generator can generate up to 100 reports.
EXAMPLE - The report generator can be used to generate Union, Dental, Seniority, and other
types of reports.
When the Report Generator command is selected, the following dialog box appears:
Fig. 10-01
The Report Generator Dialog Box
Note: File Locations - Report files can be copied to other payroll directories. Ensure, however,
that fields such as earnings have the same type number in both payrolls. (e.g. 01 Regular Hours
must have 01 for its type number in the other payroll as well.).
File Menu
The File menu contains commands that relate to how your reports are handled on disk. For
example, you can use the commands to load a file from your hard disk or save one to your hard
disk, etc. The File menu appears as follows:
146 GrandMaster II for Windows
Fig. 8-01
The File Menu
File Menu - New
This option is used to create a new report. When selected, the command clears the previous
report's data and initializes the program for the creation of a new report. You will then be
prompted to enter a report title.
Fig. 10-02
The Enter Report Title Dialog Box
If modifications have been made to a current report, and you select the New command, the
program will prompt to save the report before starting the new one.
Enter an alpha-numeric name for the report and click OK to complete the process.
File Menu - Open
This option allows you to load a report file from disk into the report generator. When you select
the Open command, a selection list appears displaying the previously saved report files.
If modifications have been made to a current report, and you select the Open command, the
program will prompt to save the report before opening an existing one.
When you select the Open command, the following dialog box appears:
Fig. 10-03
The Select Report File Dialog Box
User Guide 147
Select a report from the list and click OK to load it for use.
File Menu - Save
When the Save command is selected, the program will prompt you to provide a name for the
report. The file name must be 8 characters or less and can not contain spaces or special characters
(e.g. $, %, #, etc). Each report is saved separately in a file with an extension of .RPT in the
\payroll folder where you installed the program.
When you choose Save command, the following dialog box appears:
Fig. 10-04
The Save Report As Dialog Box
Enter a valid name for the report and click OK to save it to disk.
File Menu - Delete
This command allows you to remove previously saved reports from your hard disk. When you
choose the command, the following dialog box appears:
Fig. 10-05
The Select Report File Dialog Box
Select a report from the list and click OK to remove it from the \payroll sub directory.
Setup Menu
The Setup menu contains commands that control the format of your report. For example, you can
use the commands to modify the report title and subtitle or to control the range of data that appears
in the report. The Setup menu appears as follows:
148 GrandMaster II for Windows
Fig. 10-06
The Setup Menu
Setup Menu - Report Title
This command allows you to define a title for the report. This title will appear centered at the top
all report pages. The title will also appear on the bottom left of the Report Generator dialog box
for reference.
When you select this command, the following dialog box appears:
Fig. 10-07
The Enter Report Title Dialog Box
Enter a title for the report, then click OK to complete the procedure.
Setup Menu - Report Subtitle
This command allows you to define a subtitle for the report. Subtitles are generally used to further
describe a report. The subtitle will appear centered near the top all report pages, just below the
report title.
When you select this command, the following dialog box appears:
Fig. 10-08
The Enter Report Subtitle Dialog Box
Enter a subtitle for the report, then click OK to complete the procedure.
User Guide 149
Setup Menu - Report Footer
This command allows you to define a line of information that will appear at the bottom of every
report page. When you select this command, the following dialog box appears:
Fig. 10-09
The Enter Report Footer Dialog Box
Enter a footnote for the report and click OK to complete the procedure.
Setup Menu - Pay Period Range
Certain payroll information is stored by pay period, such as earnings and deductions information.
This command allows you to select the starting and ending range to be included in this report.
When you select this command, the following dialog box appears:
Fig. 10-10
The Enter Pay Period(s) Range Dialog Box
Use the Starting Pay Period field to specify the beginning pay run and use the Ending Pay Period
field to specify the run at which the report should cease. Enter 999 into the either field to instruct
the program to use the current pay period (i.e. the default).
Use the Print Pay Periods checkbox to include the run number, from which the data was taken, at
the beginning of each line of the report. Use the Print Summary Only checkbox to summarize all
pay period information (without a breakdown) for each employee.
Setup Menu - Page Settings
This command allows you to set the page width in number of characters as well as the line
spacing. These values affect the formatting of the report when printed. When you choose this
command, the following dialog box appears:
150 GrandMaster II for Windows
Fig. 10-11
The Page Settings Dialog Box
Use the Page Width options to control the report width (in characters). Ensure that your printer
supports your chosen width before printing a large, multi-page job.
Use the Line Spacing options to control the report length.
Setup Menu - Notes
This feature allows you to attach a message or comment to the report. This text will be displayed
on the screen when the report is opened but will not be printed on the report.
When you select this command, the following dialog box appears:
Fig. 10-12
The Report Notes Dialog Box
Enter a note, then click OK to complete the procedure. The note will near the top of the Report
Generator dialog box for reference.
Layout Menu
The Layout menu contains commands that control column placement and formula settings in your
report. The Layout menu appears as follows:
Fig. 10-13
The Layout Menu
User Guide 151
Layout Menu - Add Column
This option allows you to add a new column to the current report. If you have no columns defined
in the report (i.e. a new one), the following dialog box will appear when you choose this
command:
Fig. 10-14
The Select Column to Insert Before Dialog Box
To define a new column:
1.
Click OK to in the Select Column to Insert Before dialog box. This opens the Select Field
Type dialog box so you can specify the type of data the new column should display.
Fig. 10-15
The Select Field Type Dialog Box (Accumulators selected for example)
2.
Choose the desired field type from the options provided, then click OK to continue. This
opens the Select Field dialog box where you must specify the item to be calculated for the
selected field.
152 GrandMaster II for Windows
Fig. 10-16
The Select Field Dialog Box (Current Balance selected for example)
3.
Choose the desired item, then click OK to continue. Depending on the item you select, a
different dialog box may appear offering further options. In our example, we selected an
Accumulator with Current Balance as the field item. The resulting dialog box prompts us to
specify which Accumulator to use in the calculation.
Fig. 10-17
The Select Accumulator Dialog Box (Vacation selected for example)
4.
Choose the desired item from the available list, then click OK to continue. This opens the
Update Column Entry dialog box where you must set up the column specifications.
Fig. 10-18
The Update Column Entry Dialog Box
Instructions: Refer to the following section of this guide (Update Column) for detailed
explanations of the fields and options in this dialog box.
5.
Choose OK once these settings are complete. Your column settings now appear in the Report
Generator dialog box.
User Guide 153
Fig. 10-19
The Updated Report Generator Dialog Box
Fig. 10-20
A Sample Custom Report Showing Data for Two Accumulators
Layout Menu - Update Column
Once a column has been defined, it may be modified using the Update Column command.
154 GrandMaster II for Windows
To Update Column Settings:
1.
Choose the Update Column command then select the column to be updated and click OK.
This opens the Update Column Entry dialog box for the selected column.
Fig. 10-21
The Update Column Entry Dialog Box
Note: Blank Column Name - If you added a column without providing a name, it will appear in the
Select Column dialog box as --undefined--. You can always add the name later (as long as you
know which "undefined" column you are working with).
2.
Change the column settings as required then click OK to accept the changes. The Report
Generator dialog box will update to reflect your changes.
The following table describes the options available in this dialog box:
Field
Description
Column
Displays the column number that was set when you added the column.
Field Name
Displays the program's internal field name that is applied to the column. If a SUM or
FORMULA is applied to the column, a non-editable description will appear (e.g. SUM-01
or FORMULA-01).
Heading
Displays the user-defined heading name that has been given to the column. This name,
rather than the Field name, will appear in all selection lists, as a descriptor for the column.
Size
The number of digits to be shown, followed by a comma (,), followed by the number of
decimal places to be shown. This applies to numeric fields only. The size will default to
the maximum as defined in the payroll master file. DO NOT increase the field size larger
than the original value. For decimal numbers, the actual printed field size is: (#<n>digits)
+ (# decimal places) + (1 space for the decimal point) + (1 space for the sign +/-).
Totals
Check the box if you wish to display calculated totals at the bottom of the column. This
applies to numerical fields only.
Spacing
Enter the amount of space to be left between this column and the next column (in lines).
This setting is optional.
Next <F4>
Select this button to display the settings for the next column in the report. If you are already
viewing the last column in the list, you will receive an End of Columns message.
Previous <F5>
Select this button to display the settings for the previous column in the report. If you are already
viewing the first column in the list, you will receive a First Columns message.
User Guide 155
Change Field <F6>
Select this button to change the field type. The button opens the Select Field Type dialog box so
you can make your selection.
Range <F7>
This button allows you to specify a selection range to be displayed in the current column.
Choosing the button opens the following dialog box:
Fig. 10-22
The Enter Date Range Dialog Box
Use the From and To fields to enter the starting and ending rates respectively. Use the Include and
Exclude radio buttons to specify whether the report records should display records that result in a
zero calculation.
Note: Selection Range - Use care when specifying a selection range since conflicting criteria will
result in an empty report. If the field does not satisfy a given range, but the line satisfies another
field range, the field will still be printed. If two ranges are set up, a record must satisfy one range
OR the other (not necessarily both).
Layout Menu - Remove Column
This command allows you to remove a column from your report. Once a column is removed, it
can not be retrieved. So you should ensure that the column is no longer needed before completing
the procedure.
To Remove a Column:
1.
Choose the Remove Column command then select the column to be deleted and click OK.
This action removes the column and the Report Generator dialog box updates to reflect your
changes.
Layout Menu - Edit Formulas
This command allows you to edit formulas on which you can base your column field calculations.
You can edit the formulas based on several items:
• Values contained in the payroll master file
• Existing SUMS
• Existing FORMULAS
156 GrandMaster II for Windows
To Create a Simple Formula
1.
Choose the Edit Formula command. This opens the Select Formula dialog box that displays
the available formula positions (slots) entitled FORMULA-01 through FORMULA-20.
Fig. 10-23
The Select Formula Dialog Box
Note: Formula Name - Once you define a name for your formula, that given name will appear in
selection lists and columns (e.g. FORMULA-01 may be renamed to SALARY).
2.
Choose a formula position and click OK. This opens the Edit Formula dialog box that allows
you to define the formulas used in your report columns. It allows you to specify two
operands (values from the payroll) that are affected by an arithmetic operator.
Fig. 10-24
The Edit Formula Dialog Box
Field 1 and Field 2 display the results of the settings defined via the Edit Field 1 and Edit
Field 2 buttons, respectively. The Operator drop down list is used to specify the arithmetic
operator that will control the interaction of the two operands.
3.
Choose the Edit Field 1 button. This opens the Select Field Type dialog box so you can
specify which field type to include for the first operand.
4.
Select the desired item then click OK to continue. Depending on the item you choose, a
different dialog box may appear offering further options. In our example, we selected an
Earning, then an Earning Amount as the field item. The resulting dialog box prompts us to
specify which earning to use in the calculation.
User Guide 157
Fig. 10-25
The Select Earning Dialog Box (Salary selected for example)
5.
Choose the desired item from the available list, then click OK to continue. This updates the
Edit Formula dialog box to display the calculation information for the first operand.
Fig. 10-26
The Resulting Edit Formula Dialog Box (with Field 1 and 2 Defined)
To Create a Complex Formula
1.
Create a formula as discussed in the previous section. Remember the formula's position name
because you will be applying this name later (for example, FORMULA-01).
2.
Choose the Edit Formula command again and select your second formula position (e.g.
FORMULA-02) and click OK. This opens the Edit Formula dialog box.
3.
Select the Edit Field 1 button to open the Select Field Type dialog box, then scroll down near
the bottom of the list and choose the Formulas option.
Fig. 10-27
The Select Field Type Dialog Box with "Formulas" Selected
158 GrandMaster II for Windows
This opens the Select Field dialog box once again, but this time it only displays Formulas that
have been previously created by you. (in our example, we have already created FORMULA-01).
Fig. 10-28
The Select Field Dialog Box with our Previously Created Formulas
4.
Choose the desired formula then click OK. This closes the dialog box and returns you to the
Edit Formula dialog box where your first operand is displayed.
Fig. 10-29
The Edit Formula Dialog Box with a Formula Operand Defined
5.
Repeat these steps as required to create multi-level formulas.
Edit Field 1 <F4>
This button allows you to view or edit the first operand. The first operand can be any existing
numeric field in the payroll master file, a previously defined FORMULA (with a lower formula
number), an existing SUM or a fixed value.
Note: Complex Calculations - If you need to create a formula that requires a complex calculation
(i.e. more than two operands), you can base one formula on another.
Operator <F5>
Use the options from this drop down list to change the operator that will be used in the formula.
Valid operators are + (addition), - (subtraction), x (multiplication), or / (division).
User Guide 159
Edit Field 2 <F6>
Use this button to view or edit the second operand. The second operand can be any existing
numeric field in the payroll master file, a previously defined FORMULA (with a lower formula
number), an existing SUM, or a fixed value.
Once a formula has been defined, it may be applied to a column in the same manner as a field
would be, or the result of the formula can be used as an operand in another formula.
Layout Menu - Edit Sums
The Edit Sums command allows you to calculate the sum of similar field types containing
earnings, deduction or accumulator values.
EXAMPLE - Let's say you need to calculate the number of hours an employee works under
regular hours and overtime hours, but not double-time hours. In such a case, the total gross hours
could not be used. You would set up a SUM of EARNING with EARNING HOURS then select
the earnings to be included in the sum.
To Create a Sum
1.
Choose the Edit Sums command. This opens the Select Sum dialog box that displays the
available Sum positions (slots) entitled SUM-01 through SUM-10.
Fig. 10-30
The Select Sum Dialog Box
2.
Choose a sum position and click OK. This opens the Edit Sum dialog box that allows you to
specify the payroll item to which the sum will apply.
Fig. 10-31
The Edit Sum Dialog Box (with an undefined payroll item)
Edit Sum displays the name of the current sum. Sum of displays a payroll item that you
choose (via the Change button).
3.
Select the Change button. This opens the Select Field Type dialog box so you can specify
which field type to include for the sum.
160 GrandMaster II for Windows
4.
Select the desired item then click OK to continue. Depending on the item you choose, a
different dialog box may appear offering further options. In our example, we selected an
Earning, then an Earning Amount as the field item. The resulting dialog box prompts us to
specify which earnings to use in the sum.
Fig. 10-32
The Select Earning Dialog Box (with three Earnings selected)
5.
Choose the desired item (or items) from the available list, then click OK to continue. This
updates the Edit Formula dialog box to display the calculation information for the first
operand.
Fig. 10-33
The Resulting Edit Sum Dialog Box (with Earning Amount as the payroll item)
Change <F4>
This button allows you to view or edit the payroll master file field that will be summed. Choosing
the button opens a variety of dialog boxes with lists of items for field type, field, and specific
values to be summed.
Note: SUMS as Operands - Once a SUM has been defined, in can be used as an operand in a
FORMULA, or be applied to a column in a report, in the same manner as FORMULAS and fields in
the payroll master file.
Options Menu
The Options menu contains commands for sorting your reports, controlling the sub-total display
and CCRA account numbers. The Options menu appears as follows:
User Guide 161
Fig. 10-34
The Options Menu
Options Menu - Sort By
This command allows you specify the sort order for columns in the current report. Choosing this
command opens the following dialog box:
Fig. 10-35
The Select Sort Columns Dialog Box
The sort order defines the sorting hierarchy. The numbers 1, 2 and 3 are used to define the fields
that will be designated as primary, secondary, etc. Number 1 represents the items to be the
primary sort field, number 2 the secondary sort field, etc.
To set the sort order or change the existing order, highlight an item in the list and select the Major,
Intermediate, or Minor button (Major sorts takes precedence over Intermediate results Intermediate sorts takes precedence over Minor results).
Repeat this as required for the next item if there is more than one sort field.
Here is an example of a three-level sorting hierarchy:
Major Sort
(e.g. Department #)
Intermediate Sort
(e.g. Account #)
Minor Sort
(e.g. Sub account #)
001
102503
102132
001
102503
202132
001
202503
102132
001
202503
202132
002
102503
102132
002
102503
202132
002
202503
102132
162 GrandMaster II for Windows
Options Menu - Sub Totals
After you define how the report will be sorted using the Sort by command, you may apply
subtotals to specific columns. For each unique value in the specified sort field, a subtotal will be
calculated for all columns where the corresponding Total checkbox is activated.
When you select this command, the following dialog box appears:
Fig. 10-36
The Print Subtotals Dialog Box
EXAMPLE - If subtotals are required for a column defined as the Major sort, you would activate
the Major Sort (1) - Sub Total checkbox in this dialog box.
Options Menu - Status/Revenue Canada
The Status/Rev Canada command allows you to specify employees to be included in the report
based on:
• Assigned CCRA account number
• Employee status
• Employee number
When you select this command, the following dialog box appears:
User Guide 163
Fig. 10-37
The Select Employees to be Included Dialog Box
The following table describes the options available in this dialog box:
Status
Active
Check this box to include employees with the ACTIVE status.
On Leave
Check this box to include employees with the ON LEAVE status.
Terminated
Check this box to include employees with the TERMINATED status.
Revenue Canada Account (CCRA)
Full Time
Check this box to include FULL TIME employees in the report.
Part Time
Check this box to include PART TIME employees in the report.
Other
Check this box to include employees that are designated as something other
than Full Time or Part Time (e.g. those with multiple numbers assigned).
Employee Must Meet all
Ranges
Check this box to include employees only if they meet all of the defined
criteria in this dialog box.
Employee Number
From
Enter the Employee Number at which the report will begin.
To
Enter the Employee Number at which the report will end.
EXAMPLE - To include only the employees that are terminated from the Part Time CCRA
account, you would check the Terminated and Part Time checkboxes and remove the checks from
the other boxes.
Print Menu
The Print menu contains commands for printing your reports. The menu appears as follows:
164 GrandMaster II for Windows
Fig. 10-38
The Print Menu
Print Menu - Print
This command allows you to specify the pay periods to be included in the report. Choosing the
command opens the following dialog box:
Fig. 10-39
The Print Report for the Following Periods Dialog Box
Specify your pay period range (using the From and To fields) then select the OK button to
proceed. This opens the Print Report To dialog box where you can choose how to produce your
report.
Fig. 10-40
The Print Report To Dialog Box
• Printer - Choose this option to send the report to your printing device.
• Screen - Choose this option to display the report on-screen in a special report window.
The report window is re-sizeable and is useful for previewing data before creating a hard
copy.
• File - Choose this option to create a document on disk that can be viewed using any
standard word processing program. When you choose this option, a dialog box appears
prompting you for the name and location of the file.
What Happens When You Print a Report?
Regardless of which option you choose when producing your report (Printer, Screen or File), the
following actions will occur in the order shown:
• All required values are read from the payroll master file.
• SUMS and FORMULAS are calculated (if they exist).
• All sorting is performed.
User Guide 165
• The report is sent to the printer, screen or file (depending on your selection).
• An ASCII delimited text file is created. Also referred as a CSV file - Comma Separated
Values, the file is saved in the payroll sub directory and given the same name the report
on which it was based. This file is given a .TXT extension and is created in a format that
can be read by spreadsheet, database, and other similar program. Column Header and
Total information is included.
WARNING - It is advisable to Save the report settings before printing. Should any problems occur
(power failure, system crash, etc.) while printing, the report settings can be recovered easily
(instead of having to recreate them again).
Set Printer
This option allows you to set page layout and printer connection information. When you select the
command, the following dialog box appears:
Fig. 10-41
The Setup Page Layouts Dialog Box
The current settings for the form size and format are displayed. You may modify any of the
options shown to suit your specific printer requirements. If necessary, refer to your printer's User
Manual when specifying these settings.
The following table describes the options available in this dialog box:
Field
Description
Assign to Port
Choose the printer port to which the printer is connected.
Lines/Inch
Enter the number of lines to print per inch.
Lines/Page
(Page Size)
Enter the number of lines to print per page.
Print Lines (Max
Printable)
Enter the maximum amount of lines to print on the page without exceeding the page
length.
Condensed
Check this box if the output should be printed in a condensed format (takes less width
on the page).
Emphasized
Check this box if the output should be emphasized for readability (results in bolder text).
Landscape
Check this box if the output should be printed in landscape mode. This option should
166 GrandMaster II for Windows
Mode
be used only for laser printers.
Print Test <F6>
Use this button to print a test page using the settings in the dialog box.
User Guide 167
Chapter 11: Year-End Processing
The year end process will extract T4, T4A, and Releve1 information from the payroll database,
and allow you to clear YTD amounts. This year-end information is kept in a separate file for
additional editing and processing.
During the year-end process, you will be prompted to confirm the decisions made by the program
regarding placement of earnings, deductions, and benefits. Please check your Employer's Guide
To Source Deductions when verifying year-end processing decisions.
Note: Year-End Updates - The Year-End functions integrated into GrandMaster II for Windows
reflect the current specifications as outlined by the CCRA. When the CCRA updates information
pertaining to year-end calculations, these changes will be integrated into the program's January
update.
Completing Your Final Payroll
Once you have followed the normal steps to complete your payroll cycle for a given year, you
must give special consideration to year-end requirements. For example, in most provinces, a
Workers' Compensation report is required at year-end. Refer to the Workers Compensation
section in the Reports chapter, for information on generating a Workers' Compensation report.
(e.g. WCB Reports).
Many payroll users choose this time of the year to print a Profile Report for each employee that
can be placed in their employee file. Year-end is also a good time to review the reports you have
set up under the Report Generator -- you may have some year-end reports that have to be
processed.
When you are sure you have completed all of the necessary steps, you can select the Process menu
and choose the Clear Payroll command.
The Year-End Menu
The Year-End menu contains options for carrying out your year-end processing. The menu
appears as follows:
Fig. 11-01
The Year-End Menu
168 GrandMaster II for Windows
Create T4/T4As
The Create T4/T4As command allows you to set up and generate a T4/T4A file that contains each
employee's year-end information. This information is required when printing T4, T4A and Relevé
1 forms.
The file will be automatically sorted prior to printing your T4 Summary or T4 slips. The Create
T4/T4As command can be repeated until the desired results are produced.
When you select the command, the following dialog box appears:
Fig. 11-02
The Create T4/T4A Dialog Box
Setup Earnings <F4>
This button allows you to assign the earnings that you used during the year to the appropriate
T4/T4A box. By default, all taxable earnings are set to Box 14. When you choose this button, the
following dialog box appears:
Fig. 11-03
The Year-End Processing - Earnings Dialog Box
User Guide 169
Earnings in this payroll are displayed in the table on the left side of the dialog box. The Earning
column lists the name and number of each earning. The T4 Box column shows the box assignment
for each earning. An "A" appearing after the box number indicates the amount will be placed on a
T4A form. When a T4A box number is chosen, the program will place an "A" beside the box
number automatically.
The table on the right side of the dialog box shows a list of valid T4/T4A boxes to which you can
assign these earnings.
To assign an earning to a specific box - Choose an earning from the list on the left, choose a box
from the list on the right, then choose the Select button. You can perform this same action by
double-clicking a Box option from the list on the right.
Setup Deductions <F6>
This button allows you to specify in which T4 box your deductions will appear. Optionally, you
may enter a registration number for each deduction, which will be printed on the T4. When you
choose this button, the following dialog box appears:
Fig. 11-04
The Year-End Processing - Deductions Dialog Box
Deductions in this payroll are displayed in the table on the left side of the dialog box. The
Deduction column lists the name and number of each deduction. The T4 Box column shows the
box assignment for each deduction.
Registered pension plan deductions will default to T4 Box 20. Union deductions will default to
Box 44. Union, registered pension plan, or charity deductions require a registration number.
The table on the right side of the dialog box shows a list of valid T4/T4A boxes to which you can
assign these deductions.
To assign an deduction to a specific box - Choose a deduction from the list on the left, choose a
box from the list on the right, then choose the Select button. You can perform this same action by
double-clicking a Box option from the list on the right.
170 GrandMaster II for Windows
Note: Pension Adjustments - All Registered Pension deductions must have a Pension
Adjustment amount. Contact the company that administers your pension fund or your actuaries for
the required calculation method. GrandMaster II for Windows will calculate Defined Benefit - Fixed
Monthly, Defined Benefit - Fixed Percentage, Defined Benefit - Integrated with CPP and Money
Purchase plans.
If you have a Pension Adjustment, change the T4 box number from 20 to 52. This will display a
Change Pension Adjustment dialog box where you can choose the method of determining the
employee’s annual salary (if they have not worked a full year).
Refer to the Pension Adjustments section later in this chapter for more information on this dialog
box.
Setup Benefits <F5>
This button allows you to specify in which T4 box each taxable benefit will appear. By default,
all benefits are sent to box (40) of the T4. When you choose this button, the following dialog box
appears:
Fig. 11-05
The Year-End Processing - Benefits Dialog Box
Benefits in this payroll are displayed in the table on the left side of the dialog box. The Benefit
column lists the name and number of each benefit. The T4 Box column shows the box assignment
for each benefit. Taxable benefits will default to box 40 on the T4 form.
The table on the right side of the dialog box shows a list of valid T4/T4A boxes to which you can
assign these benefits.
To assign a benefit to a specific box - Choose a benefit from the list on the left, choose a box
from the list on the right, then choose the Select button. You can perform this same action by
double-clicking a Box option from the list on the right.
Setup Accumulators <F8>
This button allows you to assign the accumulated earnings that you used during the year to the
appropriate T4/T4A box. When you choose this button, the following dialog box appears:
User Guide 171
Fig. 11-06
The Year-End Processing - Benefits Dialog Box
Accumulated earnings in this payroll are displayed in the table on the left side of the dialog box.
The Accumulator column lists the name and number of each accumulator. The T4 Box column
shows the box assignment for each accumulator. An "A" appearing after the box number indicates
the amount will be placed on a T4A form.
The table on the right side of the dialog box shows a list of valid T4/T4A boxes to which you can
assign these accumulators.
To assign an accumulator to a specific box - Choose an accumulator from the list on the left,
choose a box from the list on the right, then choose the Select button. You can perform this same
action by double-clicking a Box option from the list on the right.
Create T4 File <F7>
This button creates the year-end T4/T4A file and saves it to disk. This file differs from that of
your payroll master and will remain on your computer until the following year's T4s are created.
Generally, the next step you would perform is to create a T4 Summary report so you could balance
your results.
Pension Adjustments
Option 52 (Pension Adjustment) allows you to specify the types of pension plan and method of
pension adjustment calculation. The CCRA changes these calculations annually, and may define
special calculations for certain industries. When you assign a deduction to Box 52 (from the YearEnd Processing - Deductions dialog box), the following dialog box will appear:
172 GrandMaster II for Windows
Fig. 11-07
The Year-End Processing - Pension Adjustment Dialog Box
Pension Adjustment Method
• M - Monthly - This method will use the employee’s start and termination dates to
determine months of employment. The pensionable income is then divided by
employment months and multiplied by 12. This is the normal option as described in your
pension adjustment manual.
• F - Factor - This method divides the employee's pensionable hours by a user-defined
factor. Choosing this option displays the Enter Factor button which when chosen, will
allow you to enter a factor amount.
• H - Hourly - This method divides the employee's pensionable earnings by the employee's
pensionable hours, and then is multiplied by a user-defined factor. The factor would be
the full-time equivalent number of hours per year (normal hours per week times 52). For
example, 40 x 52 = 2080 -- for Teachers it may be Days Taught (e.g. 197). Contract
employees, such as schoolteachers would use this option. Choosing this option displays
the Enter Factor button which when chosen, will allow you to enter an amount by which
the earnings will be factored.
• N - Not - This method will not annualize the earnings (usually for money purchase
plans).
Once you have selected a Pension Adjustment Method you must choose a Type of Pension
Adjustment as listed in the following section.
Pension Adjustment Type
Choose a Pension Adjustment type and enter the appropriate percentages or rates that you have
received from your pension administrator. The Integrated plan will have two percentages, one
below YMPE (e.g. 1.2%) and one above YMPE (e.g. 2.0%). The Money Purchase option has no
factors (the Pension Adjustment is equal to pension deduction plus company contribution).
• A - Fixed Annual Benefit - This calculation is based on a set benefit amount times the
months of employment during the year (12).
User Guide 173
• F - Fixed Monthly Benefit - This calculation is based on the months of employment
during the current year times the user-defined benefit amount. For example, an employee
could be credited $25.00 per month for each completed month of service.
• P - Percent of Contributions - This calculation uses the employee's year-to-date pension
contribution (deduction plus company benefit) times a user-defined percentage. For
example, an employee could be credited with 2.00% of the total contributions to his
pension plan.
• I - Integrated with CPP/QPP - This calculation uses pensionable earnings times a userdefined percentage for earnings below Yearly Maximum Pensionable Earnings (YMPE)
and a second user-defined percentage for earnings above YMPE. Any earning between
$75,000 and $86,111 are excluded from the calculation. For example, an employee could
be credited with 1.4% below YMPE and 2.0% above YMPE.
• M - Money Purchase Plan - This calculation is the combined total of the employee
deduction and the company's contribution to the employee's pension plan.
Note: PA Calculations - We strongly recommend that you thoroughly review the GrandMaster II
for Windows Pension Adjustment calculation. Especially in special situations such as rehires
during the year, adjustments for prior year's service, sabbatical leave, etc. We also strongly
recommend that you contact your actuaries in all matters regarding Pension Adjustment.
Print T4 Summary
This command allows you to print a T4 Summary report that will help you balance your last
payroll register and confirm that all of the information required for the T4s appears in the correct
boxes. You can also use it to balance your T4 slips to your Receiver General remittances or as a
worksheet for making changes.
If you are not satisfied with the results, you can recreate your T4 file once again and adjust the
values as required. You should print a T4 Summary report any time you have created T4s.
When you are satisfied that everything is in order and it balances to your last payroll, retain a copy
of this report for your files. Though changes may occur before the T4s can be printed, this report
will provide a record of the starting point.
Choosing this command opens the following dialog box:
Fig. 11-08
The T4 Summary Report Dialog Box
Print <F7>
Choose this button to print the report. You are presented with the option of printing the report to
the screen, to a printer or to a file (where you will be prompted for the file name).
174 GrandMaster II for Windows
Print Settings <F5>
This button opens a dialog box that allows you to set up the report page and printer connection
specifications. When you select this button, the following dialog box appears:
Fig. 11-09
The Set Page Layouts Dialog Box
The following table describes the options available in this dialog box:
Field
Description
Assign to Port
Enter the port where the output will be directed.
Lines/Inch
Enter the number of lines to print per inch.
Lines/Page (Page
Size)
Enter the number of lines to print per page.
Print Lines (Max
Printable)
Enter the maximum amount of lines to print on the page without exceeding the page
length.
Condensed
Determines if the output should be printed in a condensed format.
Emphasized
Determines if the output should be highlighted slightly.
Landscape Mode
(Laser Only)
Determines if the output should be printed in landscape mode. Use this feature only
for laser printers.
Print Test <F6>
Choose this button to print a test page to verify form alignment.
Print T4A Summary
This command allows you to print a T4A Summary report that will help you balance your last
payroll register with each employee's pension, retirement, annuity and other Income. You can use
it to confirm that all of the information required for the T4As appears in the correct boxes.
If you are not satisfied with the results, you can recreate your T4A file once again and adjust the
values as required. You should print a T4A Summary report any time you have created T4As.
When you are satisfied that everything is in order and it balances to your last payroll, retain a copy
of this report for your files. Though changes may occur before the T4As can be printed, this
report will provide a record of the starting point.
Choosing this command opens the following dialog box:
User Guide 175
Fig. 11-10
The T4A Summary Report Dialog Box
Print <F7>
Choose this button to print the report. You are presented with the option of printing the report to
the screen, to a printer or to a file (where you will be prompted for the file name).
Printer Settings <F5>
This button opens a dialog box that allows you to set up the report page and printer connection
specifications.
Print Test <F6>
Choose this button to print a test page to verify form alignment.
Year-End WCB
This command allows you to create a report that shows each employee's assessable earnings
(earnings and taxable benefits marked with the WCB flag), maximum assessable earnings, WCB
rates and costs for the entire year. This is useful at year end for balancing your WCB figures to
the payroll. Once the year has been cleared, you must use this function to print the WCB Report
(because it uses the figures from the previous year).
The WCB report is designed for submission to WCB Commissions in each province. Each
province has specific requirements as to which earnings and benefits are subject to the WCB
assessment. Generally, any amount that would appear in Box 14 of the T4 would be included in
this report. Some provinces ask that a monthly report be prepared and submitted with the monthly
payment.
Choosing this command opens the following dialog box:
Fig. 11-11
The Workers' Compensation Report Dialog Box
Enter the Start Date for the report along with the date of the final pay period. The resulting report
will is sorted by province, with the start and end period included. These dates are controlled by
the employee's start and termination date (if they fall within the period). The program distributes
WCB costs to the departments in which an employee works.
176 GrandMaster II for Windows
Print <F7>
Choose this button to print the report. You are presented with the option of printing the report to
the screen, to a printer or to a file (where you will be prompted for the file name).
Backup/Restore File
This command allows you to create a disk backup of your T4/T4A data file. You can also use it to
restore a disk backup you created earlier.
Each time you make a change to the T4/T4A information (using the Edit T4 or Edit T4A
commands), you should create another backup copy for your records.
Choosing this command opens the following dialog box:
Fig. 11-12
The Year-End Backup/Restore Dialog Box
Backup
Choose this button to create a disk backup of your T4/T4A data. The files will be stored in the
same folder as your payroll unless you specify a different folder using the Path field. Two files
are created when you choose this button: T4-SAVE.DAT and T4-SAVE.IDX. These files can be
copied to a secure location for later retrieval in the event of a computer problem.
Restore
Choose this button to retrieve (restore) a backup that was created via the Backup button in this
dialog box. This button will only restore backup files that were created using this dialog box's
Backup feature.
Enter the path where the backup files are stored then chose the Restore button to load your old
data. The backup files are stored in the same folder as your payroll unless you specified a
different folder at the time of the backup. The two files that are required for restoration purposes
are T4-SAVE.DAT and T4-SAVE.IDX.
Edit T4s
This command allows you to view and edit the T4 amounts for an individual employee. It is quite
common to make final adjustments to your payroll information prior to actually printing the T4s.
You may wish to add special items (e.g. auto allowances for executives not set up in payroll,
special bonuses paid, etc.).
User Guide 177
On your original printed T4 Summary reports, you should note any error messages that appear
below some employee names. These messages will read similar to the following: CPP S/B, EI
S/B. This indicates that there is a discrepancy (mismatch) between the Year-to-Date CPP and/or
EI totals as compared to the employee's Gross Income. This may be caused when the payroll was
calculated as an Extra run instead of an Additional or vice versa. It may also occur when a bonus
is paid with no deductions taken or when taxable benefits are entered at end of year.
If you overlook these messages, you will receive a Pier report from the CCRA, indicating the
mismatched amounts and asking you to remit the difference. Many companies choose to adjust
these mismatched totals by altering the employee’s tax amount to recover any differences. The
CCRA has indicated that this is not an acceptable solution and suggests that you pay or recover
any differences directly with the employee. Keep in mind that any amount less than $1.00 will not
appear on the Pier report.
Employees that have turned age 18 or age 70 during the year or have started receiving CPP
benefits will need to have a pensionable earning amount entered. This figure is not maintained by
GrandMaster II for Windows and will need to be entered manually. Pensionable earnings are
monies earned between the ages of 18 and 70 and only need to be entered if not equal to gross
income.
Note: Create T4/T4A First - In order to use the Edit T4s command, a year-end T4/T4A file must
have been created using the Create T4/T4As command.
Choosing this command opens the following dialog box:
Fig. 11-13
The Edit T4s Dialog Box
The top section of the dialog box displays general employee information. The fields below
represent the same fields that will be found on the employee's T4 form when printed.
178 GrandMaster II for Windows
Save
This button saves the changes and closes the dialog box. Note that your changes are saved
automatically each time you view a different employee's information.
Previous <F5>
This button saves the current T4 data and displays to previous employee's T4 data in order of
employee number.
Next <F4>
This button saves the current T4 data and displays to following employee's T4 data in order of
employee number.
Select <F2>
This button allows you to select an employee's T4 information based on their employee number.
Selecting this button opens the Enter Employee's Number to Edit dialog box.
Fig. 11-14
The Enter Employee's Number to Edit Dialog Box
Enter a valid employee number in the Employee's Number field and press OK to load the T4
information for the employee.
Add <F8>
This button adds a new employee T4 to the T4/T4A file based on the current information in the
dialog box. The correct usage of this feature is to enter your data first, then choose the Add button.
You must enter a unique number in the Employee field to add a new employee record.
Delete <F9>
This button removes the current T4 record from the T4/T4A file. You are not prompted before the
record is removed, so you should ensure that you want it removed before choosing the button. If
you choose this button by mistake, you will need to use the Restore feature (if you have created a
backup).
Company Info <F3>
This button opens the Company Information dialog box so you can edit general company
information, CCRA numbers or EI rates.
User Guide 179
Fig. 11-15
The Company Information Dialog Box
WCB Info <F10>
This button opens the Workers' Compensation Information dialog box so you can edit the
employee's WCB codes and effective dates. These codes have been extracted from the payroll
information (employer information, workers compensation).
Fig. 11-16
The Workers' Compensation Information Dialog Box
Print All T4s
This command allows you to print all T4s or Releve1s. The T4 forms will be printed in alphabetic
sequence by CCRA number (Full time and Part time) and subtotals will be provided in groups of
300 employees, as required by the CCRA.
Note: Create T4/T4A First - In order to print these reports, a year-end T4/T4A file must have been
created using the Create T4/T4As command.
Choosing the command opens the following dialog box:
180 GrandMaster II for Windows
Fig. 11-17
The Print All T4s Dialog Box
This dialog box allows you to choose the type of printer you will use to output the T4/Releve1s.
Choose your desired output device, then click OK to proceed. This opens a further dialog box
depending on the output device chosen. The following example shows the dialog box that appears
if you choose the Laser Printer T4 option.
Fig. 11-18
The Print T4s (Laser Printer Forms) Dialog Box
Adjust the settings as required for your specific printer, then choose the Print button to create your
printed copies.
Magnetic Media Filing
Effective with the 1999 filing year (i.e., forms to be filed in 2000 and later), the CCRA requires
employers to file their returns on computer tape, diskette or cartridge rather than paper (if they file
a combined total of 500 or more slips for which magnetic media filing computer specifications are
provided). This is called magnetic media filing.
When you file returns this way, you do not have to send the CCRA paper copies of either the slips
or summary forms. Instead, you attach a transmittal sheet to the tape, diskette, or cartridge and
send the package to the CCRA Magnetic Media Processing Team or drop it off at the local tax
services office or centre. However, you must include the paper copies of any slips that are not
being sent via magnetic media, as well as their related summary. You should provide separate
tapes, diskettes or cartridges for each type of return you file.
If you use the Continuos Feed T4 and Laser Printer T4 options, you have the added ability to
create a Magnetic Media File that you can submit to the CCRA. This feature is activated when
you choose the Magnetic Media Filing checkbox.
Checking this box activates enables the File Name field so you can enter the location and name of
the file that you will create and submit to the CCRA.
User Guide 181
Note: File Name - The name of the file cannot be changed from the displayed default -- the CCRA
states that you may only change the three-digit extension to specify a series of diskettes. You may,
however, change the destination drive as required.
Checking this box also causes the Magnetic File Settings button to appear. Choosing this button
opens the Magnetic Media Filing - Settings dialog box so you can verify the data that will be
included in the magnetic file. This dialog appears as follows:
Fig. 11-19
The Magnetic Media Filing - Settings Dialog Box
Use the following definitions as reference when setting up the details for your file:
Field
Description
File Name
This text label shows the name and location for the magnetic data file that you entered
in the previous dialog box. The name of the file cannot be changed from the
displayed default -- the CCRA states that you may only change the three-digit
extension to specify a series of diskettes. You may, however, change the destination
drive as required.
Please review the CCRA’s Computer Specifications for Data Filed on Magnetic Media
T4, T4A, and T4A-NR document for additional information.
Transmitter
Number
Enter the Transmitter Number as assigned by the CCRA. If you do not have a
Transmitter Number, you may still submit an electronic file. In such a case, the CCRA
requires that you replace the “MM”portion with spaces and the remaining 6 numeric
characters with zeros.
Transmitter Info
Use the options in this section of the dialog box to enter the details of the company
who will be submitting the electronic file. This is useful if you employ a third party to
assist in your year-end proceedings.
Company Info
Use the options in this section of the dialog box to enter the details of the company for
which the electronic file is being submitted.
Data Type
Actual - Select this option to generate the final production file for submission to the
CCRA.
182 GrandMaster II for Windows
Test - Select this option to generate a test file for submission to the CCRA.
Service Bureau
Company - Select this button if you are a service bureau acting on behalf of the
company for which the magnetic file is being created.
Other - Select this button if you are a service bureau acting on behalf of the company
for which the magnetic file is being created.
Contact
Name - Enter the name of the individual who the CCRA may contact if there are
questions regarding your magnetic data file.
Phone - Enter the phone number where the Contact person can be reached.
Reprint
If you use the Continuos Feed T4 and Laser Printer T4 options, you also have the added ability to
reprint your T4s again, if required. This can be useful if you have a specified range of T4s to
reproduce. This feature is activated when you choose the Reprint button.
Selecting this button opens the Reprint T4s dialog box so you can specify a range of employee
numbers or surnames. This saves you from having to reprint your entire list of T4s.
Fig. 11-20
The Reprint T4s Dialog Box (for the Laser Printer Form Type)
Use the CCRA, Company or Employee buttons at the bottom of the dialog box to specify for whom
the copies are being created.
Edit T4As
This command allows you to view and edit the T4A amounts for an individual employee. It is
quite common to make final adjustments to your payroll information prior to actually printing the
T4As.
On your original printed T4A Summary reports, you should note any error messages that appear
below some employee names. These messages will read similar to the following: CPP S/B, EI
S/B. This indicates that there is a discrepancy (mismatch) between the Year-to-Date CPP and/or
EI totals as compared to the employee's Gross Income. This may be caused when the payroll was
calculated as an Extra run instead of an Additional or vice versa. It may also occur when a bonus
is paid with no deductions taken or when taxable benefits are entered at end of year.
If you overlook these messages, you will receive a Pier report from the CCRA, indicating the
mismatched amounts and asking you to remit the difference. Many companies choose to adjust
these mismatched totals by altering the employee’s tax amount to recover any differences. The
CCRA has indicated that this is not an acceptable solution and suggests that you pay or recover
any differences directly with the employee. Keep in mind that any amount less than $1.00 will not
appear on the Pier report.
User Guide 183
Employees that have turned age 18 or age 70 during the year or have started receiving CPP
benefits will need to have a pensionable earning amount entered. This figure is not maintained by
GrandMaster II for Windows and will need to be entered manually. Pensionable earnings are
monies earned between the ages of 18 and 70 and only need to be entered if not equal to gross
income.
Note: Create T4/T4A First - In order to use the Edit T4As command, a year-end T4/T4A file must
have been created using the Create T4/T4As command.
Choosing this command opens the following dialog box:
Fig. 11-21
The Edit T4As Dialog Box
The top section of the dialog box displays general employee information. The fields below
represent the same fields that will be found on the employee's T4A form when printed.
OK
This button saves the changes and closes the dialog box. Note that your changes are saved
automatically each time you view a different employee's information.
Previous <F5>
This button saves the current T4A data and displays to previous employee's T4 data in order of
employee number.
Next <F4>
This button saves the current T4A data and displays to following employee's T4 data in order of
employee number.
184 GrandMaster II for Windows
Select <F2>
This button allows you to select an employee's T4A information based on employee number.
Selecting this button opens the Enter Employee's Number to Edit dialog box.
Fig. 11-22
The Enter Employee's Number to Edit Dialog Box
Enter a valid employee number in the Employee's Number field and press OK to load the T4A
information for the employee.
Add <F8>
This button adds a new employee T4A to the T4/T4A file based on the current information in the
dialog box. The correct usage of this feature is to enter your data first, then choose the Add button.
You must enter a unique number in the Employee field to add a new employee record.
Delete <F9>
This button removes the current T4A record from the T4/T4A file. You are not prompted before
the record is removed, so you should ensure that you want it removed before choosing the button.
If you choose this button by mistake, you will need to use the Restore feature (if you have created
a backup).
Print All T4As
This command allows you to print T4A forms for all of your employees. The T4 forms will be
printed in alphabetic sequence by CCRA number (Full time and Part time) and subtotals will be
provided in groups of 300 employees, as required by the CCRA.
The T4A summary may be used to balance your T4A slips to your remittances to the Receiver
General and also serves as a work sheet for making changes. This report may be printed as many
times as necessary.
Note: Create T4/T4A First - In order to print these reports, a year-end T4/T4A file must have been
created using the Create T4/T4As command.
Choosing the command opens the following dialog box:
User Guide 185
Fig. 11-23
The Print All T4As Dialog Box
This dialog box allows you to choose the type of printer you will use to output the T4As. Choose
your desired output device, then click OK to proceed. This opens a further dialog box depending
on the output device chosen. The following example shows the dialog box that appears if you
choose the Laser Printer T4A option.
Fig. 11-24
The Print T4As (Laser Printer Forms) Dialog Box
Adjust the settings as required for your specific printer, then choose the Print button to create your
printed copies.
Reprint
Selecting this button opens the Reprint T4s dialog box so you can reprint your T4As again, if
required. When the dialog box appears, specify a range of employee numbers or surnames, then
choose the CCRA, Company or Employee button to specify whom the copies are being created for.
Serial Number
Selecting this button opens the Starting Serial Number for T4A Forms dialog box so you can
specify the serial number at which the T4A file will begin.
Clear YTDs
The Clear YTDs command allows you to clear your year-to-date amounts in preparation for the
first payroll of the following year. You also use it to specify the items (e.g. deductions,
accumulators) that will be carried forward to the new pay year.
186 GrandMaster II for Windows
At this time, special consideration should be given for terminated employees as well as any
earnings, deductions and accumulators that you are no longer using. Also YTD, deduction and
accumulator balances that are to be carried over into the following year must be indicated. For
example, a Bond deduction that runs to end of October or employee vacation pay.
The following dialog box appears when this command is chosen.
Fig. 11-25
The Clear YTDs Dialog Box
Configuring the Clear YTD Dialog Box
Before you proceed with the Clear procedure, the program needs to know if you are performing
the operation because you are entering a new payroll year. Choose the Configure button to
proceed.
Fig. 11-26
The Configure Clear Program Dialog Box
If you are entering a new payroll year (i.e. your next pay run will be after Dec. 31st), place a check
in the box. This will allow the EI information and selective deduction and accumulator
information to be carried forward to the next payroll year.
If you do not activate this checkbox, it indicates that the payroll is being cleared in the middle of
the year (perhaps the company has changed ownership or bankruptcy has occured). In such a case,
no EI information or balances would be carried forward.
Retaining Items (Carrying Forward to the Following Pay Year)
Use the Retain Deductions and Retain Accumulators buttons to select the deduction and
accumulator amounts that are to be carried forward. All amounts that you check will be carried
forward to the following pay year.
User Guide 187
Removing Items
The Delete Earnings, Delete Deductions, Delete Accumulators and Delete Employees buttons
allow you to remove the corresponding items/people from the payroll for the new year.
Clearing the YTD Amounts
When you have finished the specifying the items to be carried forward and/or removed you can
proceed with the Clear procedure by choosing the Purge Year to Dates button. This will remove
the selected YTD amounts, earning, deduction, accumulators and employees from the payroll.
During the Clear procedure, the original payroll information is copied into two files called OLDMAST.DAT and OLD-MAST.IDX. A payroll master for the new payroll year is then created.
Some users copy these OLD-MAST files (both .dat and .idx) to a new payroll directory (e.g.
PAY2002) so that they will have 2002 information at their fingertips.
188 GrandMaster II for Windows
Chapter 12: Utilities
The Utilities menu allows you to define settings for security, printing, and import/export of data.
Certain program features need to be setup using the commands under this menu before they will
function.
The Utilities Menu
Most of the commands under this menu are used to adjust the way a particular feature operates.
The menu appears as follows:
Fig. 12-01
The Utilities Menu
Setup Password
This command allows you to setup new and existing users, passwords and security levels. The
program employs User ID's to identify who makes changes within the payroll system.
The Supervisor ID is a fixed user -- up to 9 additional users can be added. Only the Supervisor
may have access to and change the system passwords. Each time a new payroll is created, the
password feature is disabled for the payroll and the SUPERVISOR password defaults to NEW.
Multiple users with the same User ID may not be logged onto the system at the same time.
The following dialog box appears when this command is chosen.
Fig. 12-02
The Setup Passwords Dialog Box
The following table describes the options available in this dialog box:
User Guide 189
Field
Description
Enable Passwords
Check this box if you wish to enable the Passwords features for use with this
payroll.
Supervisor Password
Enter the 10-character supervisor password.
Additional Users
User ID
Displays the name of the existing user ID's.
Password
Displays the password for the user ID associated with it.
Security Level
Displays the users security level with level 1 beginning at the supervisor level.
Valid levels are 1 through 9.
Security Levels
1
Supervisor
The Supervisor has access to every program function.
2
User-defined
Level 2 users have access to all payroll options except the Setup Passwords
command and the ability to turn the Audit feature on and off.
3
User-defined
Level 3 users have access to the same payroll options as level 2 users, except
the ability to delete employees.
4
User-defined
Level 4 users have access to the same payroll options as level 3 users, except
the ability to add employees.
5
User-defined
Level 5 users have access to the same payroll options as level 4 users, with the
exception of access to the Process Menu options.
6, 7
User-defined
Level 6 and 7 users have access to the same payroll options as level 5 users,
with the exception of access to the Company Menu options.
8
User-defined
Level 8 users may view only payroll calculation results.
9
User-defined
Level 9 users have access to Hours Entry dialog box only. Rates can not be
viewed.
Add <F8>
This button is used to add a new User ID and password. Each time a new User ID is created, the
Security Level defaults to 9.
Delete <F9>
This button is used to remove the currently selected User ID and password. The Supervisor ID as
well as the first User ID in the list may not be deleted.
Set Page Layouts
This feature allows you to change the physical page size, layout and orientation of certain reports.
It also allows the selection of a printer port for each report in the program.
These settings are used in conjunction with global system setup. These settings are saved in your
program configuration file (PAYROLL.INI).
When you select this command, the following dialog box appears:
190 GrandMaster II for Windows
Fig. 12-03
The Select Report Dialog Box
This dialog box contains multiple report types of which you can control the settings. Highlight a
report, then choose the Select button. This opens the Set Page Layouts dialog box for the specific
report type.
Fig. 12-04
The Select Report Dialog Box (Pay Register Report)
Initially, the current settings for the form size and format are displayed. You may modify any of
the options shown to suit your specific printer requirements. If necessary, refer to your printer's
User Manual when specifying these settings.
The following table describes the options available in this dialog box:
Field
Description
Assign to Port
Enter the port where the output will be directed.
Lines/Inch
Enter the number of lines to print per inch.
Lines/Page (Page
Size)
Enter the number of lines to print per page.
Print Lines (Max
Printable)
Enter the maximum amount of lines to print on the page without exceeding the page
length.
Condensed
Check this box if the output should be printed in a condensed format (takes less width
on the page).
Emphasized
Check this box if the output should be emphasized for readability (results in bolder
text).
User Guide 191
Landscape Mode
Check this box if the output should be printed in landscape mode. This option should
be used only for laser printers.
Optional Printer
Settings
Check the box that corresponds to the optional printer setting you have defined in your
Payroll.ini file.
Print Test Page <F6>
Choose this button to print a test page to verify form alignment.
Setup Cheques
This command allows you to specify which information will print on cheques and pay stubs.
When you select this command, the following dialog box appears:
Fig. 12-05
The Statements/Cheques Setup Dialog Box
The following table describes the options available in this dialog box:
Field
Description
Cheques
Indicates whether cheques are to be printed along with stubs.
Cheque Number
Indicates whether a cheque number (sequence number) is to be printed on the
cheque.
Company Name
Indicates whether the company name is to be printed on stubs (and cheques).
Do not check this box if the company name is pre-printed on cheques/stubs.
Text "Period Ending"
Indicates whether the words "Period Ending" will be printed on the top righthand corner of the stub.
Titles
Indicates whether to print page headings and field descriptions. Do not check
this box if you use pre-printed pay stubs.
Column Headers
Indicates whether to print descriptions at the top of each column of the earning
and deduction table.
Employee Number
Indicates whether to print the employee number on the pay stub.
Social Insurance
Indicates whether to print the employee social insurance number on the pay
192 GrandMaster II for Windows
Number
stub. Note: This should only be done if required, as SIN numbers should remain
confidential.
Default Account
Indicates whether to print the employee's home account.
Birthday
Indicates whether to print the employee's birth date.
Credit To Bank
Check this box if you want the cheque to be made out to the employee's bank
c/o the employee. Use this option for direct deposits that are mailed or deliver
to the bank.
Optional Fields
Check the box that corresponds to the optional printer setting you have defined
in your Payroll.ini file.
Accumulators
Indicates whether to print the current banked accumulator amount on the pay
stub. The first column corresponds to accumulator type 1, etc.
Cheques/Page
Enter the number of cheques that will appear on each printed page. This option
can be used for cheques printed on a laser printer. This default for this option is
"1".
Default Sort Order
Allows you to specify the sort order for the printing of the cheques/stubs.
Lines/Stub
Enter the number of lines that will appear on the stub portion only. The default
value for this field is 21. DO NOT change this value for stubs that are 3.5
inches in length.
Top of Form Lines
Enter the number of blank lines that will be printed from the top margin of the
page before the stub. This option is used only when printing cheques/stubs with
a laser printer.
Import Data
This feature allows you to import various fields of information such as name and address, hours
from electronic time clocks from other systems. Default record formats have been set up for you.
When you select the Import Data command, the following dialog box appears:
Fig. 12-06
The Import Employee Information Dialog Box
Choose a format from the list and click the Import button. This will open Import Employee
Information dialog box for the chosen format. This dialog box will have different options based
on the format you choose.
User Guide 193
Fig. 12-07
The Import Employee Information Dialog Box (for the Name and Address format)
Verify the settings in the dialog box then click Begin Import to complete the operation.
Backup Master File <F6>
This button opens the Backup Master File dialog box so you can create a copy of your payroll
data, prior to performing the import process. This step is recommended to preserve the state of
your existing payroll data in the event of a problem during of the import process.
Fig. 12-08
The Import Employee Information Dialog Box (for the Name and Address format)
Creating Import Formats
If you are familiar with how to edit a text file (using a text editor such as Notepad), you may alter
the import formats through the Payroll.ini file (located in the same directory as your payroll data).
Up to 30 import formats (lines) may be defined. The following is a sample of an input format:
[IMPORT-FORM-01]
delimiter=FIXED;
form-name="HR Systems Import";
file-name="C:\GRNDMAST\IMPORT.TXT"; field-desc=EE-NUMBER:9;
field-desc=SURNAME:40;
field-desc=GIVEN-NAME:40;
field-desc=ADDRESS:40;
field-desc=ADDRESS2:40;
field-desc=CITY:40;
field-desc=PROVINCE:2;
field-desc=POST-CODE:10;
194 GrandMaster II for Windows
Import Tags
The following tags can be used to describe the import file:
TAG NAME
DESCRIPTION
delimiter=
Describes the format of the file for input. Options available are: COMMA, TAB, or
FIXED.
form-name=
Describes the nature of the import filter (origin of the information).
file-name=
The DOS drive, path and filename of the file to be imported.
field-desc=
Describes to GrandMaster II the type of information being imported. Length of the
field is required for fixed length fields. See the next table for the possible values
that may be used with this tag.
import-type=
Describes the type of import. Enter either HOURLY or DATA-ENTRY. HOURLY will
replace or add to existing fields. DATA-ENTRY will create a new record for each
transaction (e.g. entering hours by date and account).
add-perm-earning
(Y/N) default is Y. If "Y" earnings will be added as Permanent else will be added as
Overrides
alias-table
Assigns an alias table to the import form in order to translate data. (e.g. province
code is "ONT" should be "ON").
field-data-num
Indicates the field number on fields that have multiple occurrences such as earnings
- earning 1 is regular, earning 2 is overtime etc.
Import Fields
The following table describes each of the available import fields. These fields must follow exact
spelling as outlined below:
FIELD NAME
DESCRIPTION
MAX. CHAR.
EE-NUMBER
Employee Id number.
9
SURNAME
Employees' surname.
40
GIVEN-NAME
Employees' given name.
40
ADDRESS
Employees' street address.
40
ADDRESS2
Employees' additional address information.
40
CITY
Employees' city of residence.
40
PROVINCE
Employees' province of residence (if not same as tax province.
2
PROVINCE2
Employees' tax province.
2
POST-CODE
Employees' postal code.
10
SIN-NO
Employees' Social Insurance Number.
9
SEX
Employees' sex.
1
PHONE
Employees' phone number.
10
TAX-OVER
Override code for federal tax.
1
ADD-TAX
Optional extra federal tax contribution.
9 (incl. 2 dec.)
REMOTE-ALLOW
Remote (northern) allowance.
9 (incl. 2 dec.)
OTHER-ALLOW
Other exemptions from income tax as granted by Revenue
Canada.
9 (incl. 2 dec.)
User Guide 195
NET-CLAIM
The TD1 personal exemption claim amount.
9 (incl. 2 dec.)
LCP
Labour-sponsored funds tax credit.
9 (incl. 2 dec.)
DEPENDANTS
Number of dependents under 19 and/or infirm.
2
QUE-TAX-OVER
The provincial tax override for the province of Quebec.
1
QUE-ADD-TAX
Optional extra Quebec tax contribution.
9 (incl. 2 dec.)
QUE-OTHER-ALLOW
Other exemptions from Quebec income tax as granted by
Revenue Canada.
9 (incl. 2 dec.)
QUE-NET-CLAIM
The MR-19-V personal exemption claim amount.
9 (incl. 2 dec.)
EXEMPT-CPP
CPP exempt flag.
1
EXEMPT-UIC
UIC exempt flag.
1
START-DATE
Date employee is hired.
6 (dd/mm/yy)
BIRTH-DATE
Employees' birth date.
6 (dd/mm/yy)
ANNIV-DATE
Any date as defined by the employer.
6 (dd/mm/yy)
TERM-DATE
Date of employment termination.
6 (dd/mm/yy)
REHIRE-DATE
Date of employee rehiring.
6 (dd/mm/yy)
DATE-1
Optional date 1.
6 (dd/mm/yy)
DATE-2
Optional date 2.
6 (dd/mm/yy)
DATE-3
Optional date 3.
6 (dd/mm/yy)
WCB-CODE
Workers Compensation code used for specifying a WCB rate.
1
STC-SAL
Statistics Canada salary/wage/other code.
1
STC-ZONE
Statistics Canada reporting zone.
2
HOURS-PAY
Normal hours worked per pay period.
5 (incl. 2 dec.)
HOURS-WEEK
Normal hours worked per week.
5 (incl. 2 dec.)
MESSAGE
A message to the employee that appears on the pay stub.
30
NOTES
Miscellaneous notes about an employee for the payroll staff.
35
STATUS
The employees' employment status.
1
REVCAN-ACCT
The Revenue Canada account number.
9
POSITION
Employment position in the company.
20
FIELD-A
User-defined information field.
20
FIELD-B
User-defined information field.
20
NUMERIC-1
User-defined numeric information field.
9 (incl. 2 dec.)
NUMERIC-2
User-defined numeric information field.
9 (incl. 2 dec.)
DFLT-DEPT
The default department code of employment.
6
DFLT-ACCT
The default wage/salary account code.
6
DFLT-SUB
The default wage/salary sub-account code.
6
FTE
Full time equivalent value.
2 (0-99%)
BANK-NAME-1
First EFT bank name.
25
BANK-ADDRESS-1
Address of the first EFT bank.
20
BANK-CITY-1
City of the first EFT bank.
20
BANK-PROVINCE-1
Province of the first EFT bank.
2
196 GrandMaster II for Windows
BANK-POST-1
Postal code of the first EFT bank.
6
BANK-TRANSIT-1
Transit number of the first EFT bank. (5 digit transit, 3 digit bank
and up to 12 digit account number.
25
BANK-AMOUNT-1
The amount of EFT deposit for the first bank.
9 (incl. 2 dec.)
BANK-NAME-2
Second EFT bank name.
25
BANK-ADDRESS-2
Address of the second EFT bank.
20
BANK-CITY-2
City of the second EFT bank.
20
BANK-PROVINCE-2
Province of the second EFT bank.
2
BANK-POST-2
Postal code of the second EFT bank.
6
BANK-TRANSIT-2
Transit number of the second EFT bank. (5 digit transit, 3 digit
bank, and up to 12 digit account number.
25
BANK-AMOUNT-2
The amount of EFT deposit for the second bank.
9 (incl. 2 dec.)
BANK-NAME-3
Third EFT bank name.
25
BANK-ADDRESS-3
Address of the third EFT bank.
20
BANK-CITY-3
City of the third EFT bank.
20
BANK-PROVINCE-3
Province of the third EFT bank.
2
BANK-POST-3
Postal code of the third EFT bank.
6
BANK-TRANSIT-3
Transit number of the third EFT bank. (5 digit transit, 3 digit
bank, and up to 12 digit account number.
25
BANK-AMOUNT-3
The amount of EFT deposit for the third bank.
9 (incl. 2 dec.)
ANNUAL-SALARY
The annual salary earned by the employee.
9 (incl. 2 dec.)
HOURLY-RATE
The hourly rate earned by the employee.
9 (incl. 4 dec.)
EARN-NUM
The number used to identify the previous earnings type.
2
ERN-RATE
Hourly earning rate.
9 (incl. 4 dec.)
ERN-AMOUNT
Earning amount.
9 (incl. 2 dec.)
ERN-DEPT
Department earned in.
6
ERN-ACCT
Account earning charged to.
6
ERN-SUB
Sub account earning charged to.
6
ERN-DATE
Date earned in day, month and year format.
6 (dd/mm/yy)
ERN-DD
Earning day.
2
ERN-MM
Earning month.
2
ERN-YY
Earning year.
2
ERN-HOURS
Hours worked (replaces earnings already entered).
9 (incl. 2 dec.)
HOURS
Hours worked (replaces earnings already entered).
9 (incl. 2 dec.)
HOURS+
Hours worked by the employee (to be added to previous hours
worked).
9 (incl. 2 dec.)
ERN-AMOUNT-YTD
Year-to-date earning amounts (replaces YTD value)
9 (incl. 2 dec.)
ERN-AMOUNT-YTD+
Year-to-date earning amounts (added to previous YTD value)
9 (incl. 2 dec.)
ERN-HOURS-YTD
Year-to-date earning hours (replaces YTD value)
7 (incl. 2 dec.)
ERN-HOURS-YTD+
Year-to-date earning hours (added to previous YTD value)
7 (incl. 2 dec.)
DED-NUM
The number used to identify the previous deduction type.
2
User Guide 197
DED-AMOUNT
Amount of deduction.
9 (incl. 2 dec.)
BEN-AMOUNT
Amount of benefit.
9 (incl. 2 dec.)
DED-GROUP
Group/class used for deduction.
2
BEN-EXP-ACCT
Expense account number for benefit.
6
BEN-EXP-SUB
Expense sub account number for benefit.
6
DED-AMOUNT-YTD
Year-to-date deduction amounts (replaces YTD value).
9 (incl. 2 dec.)
DED-AMOUNT-YTD+
Year-to-date deduction amounts (added to previous YTD
value).
9 (incl. 2 dec.)
BEN-AMOUNT-YTD
Year-to-date benefit amounts (replaces YTD value).
9 (incl. 2 dec.)
BEN-AMOUNT-YTD+
Year-to-date benefit amounts (added to previous YTD value).
9 (incl. 2 dec.)
FED-TAX-YTD
Year-to-date federal tax amount.(replaces YTD value).
9 (incl. 2 dec.)
FED-TAX-YTD+
Year-to-date federal tax amount (added to previous YTD value).
9 (incl. 2 dec.)
QUE-TAX-YTD
Year-to-date Quebec tax amount.(replaces YTD value).
9 (incl. 2 dec.)
QUE-TAX-YTD+
Year-to-date Quebec tax amount (added to previous YTD
value).
9 (incl. 2 dec.)
CPP-YTD
Year-to-date CPP amount.(replaces YTD value).
9 (incl. 2 dec.)
CPP-YTD+
Year-to-date CPP amount (added to previous YTD value).
9 (incl. 2 dec.)
QPP-YTD
Year-to-date QPP amount.(replaces YTD value).
9 (incl. 2 dec.)
QPP-YTD+
Year-to-date QPP amount (added to previous YTD value).
9 (incl. 2 dec.)
UIC-YTD
Year-to-date UIC amount.(replaces YTD value).
9 (incl. 2 dec.)
UIC-YTD+
Year-to-date UIC amount (added to previous YTD value).
9 (incl. 2 dec.)
DFLT-CLASS
Loads the DEFAULT earnings, deductions and accumulator
information when adding employees
n/a
FILLER
Specifies non-used position on input file
DED-ADD
When deduction is not present for an employee, this option will
cause the deduction to be added.
n/a
ERN-ADD
When earning is not present for an employee, this option will
cause the earning to be added.
n/a
ACCUM-ADD
When accumulator is not present for an employee, this option
will cause the accumulator to be added.
n/a
OVER-AMOUNT
Load to override earning amount
OVER-AMOUNT+
Adds to override earning amount
ERN-OVR-AMOUNT
Loads to override earning amount
ERN-OVR-AMOUNT+
Adds to override earning amount
ERN-ROW
Earning table row
ERN-COL
Earning table column
DED-OVR-AMOUNT
Loads to deduction override amount
DED-OVR-AMOUNT+
Adds to deduction override amount
BEN-OVR-AMOUNT
Loads to benefit override amount
BEN-OVR-AMOUNT+
Adds to benefit override amount
OPTION-A-3
Alpha optional field 3
20
OPTION-A-4
Alpha optional field 4
20
198 GrandMaster II for Windows
OPTION-A-5
Alpha optional field 5
20
OPTION-A-6
Alpha optional field 6
20
OPTION-A-7
Alpha optional field 7
20
OPTION-A-8
Alpha optional field 8
20
OPTION-A-9
Alpha optional field 9
20
OPTION-A-10
Alpha optional field 10
20
OPTION-A-11
Alpha optional field 11
20
OPTION-A-12
Alpha optional field 12
20
OPTION-N-3
Numeric optional field 3
9(incl. 2 dec.)
OPTION-N-4
Numeric optional field 4
9(incl. 2 dec.)
OPTION-N-5
Numeric optional field 5
9(incl. 2 dec.)
OPTION-N-6
Numeric optional field 6
9(incl. 2 dec.)
OPTION-N-7
Numeric optional field 7
9(incl. 2 dec.)
OPTION-N-8
Numeric optional field 8
9(incl. 2 dec.)
OPTION-N-9
Numeric optional field 9
9(incl. 2 dec.)
OPTION-N-10
Numeric optional field 10
9(incl. 2 dec.)
OPTION-N-11
Numeric optional field 11
9(incl. 2 dec.)
OPTION-N-12
Numeric optional field 12
9(incl. 2 dec.)
ACCUM-AMOUNT
Loads to Accumulator amount
9(incl. 2 dec.)
ACCUM-AMOUNT+
Adds to accumulator amount
9(incl. 2 dec.)
ACCUM-RATE
Loads to accumulator rate
9(incl. 2 dec.)
ACCUM-PAY-FLAG
Loads accumulator pay indicator - N=not pay, A=always pay,
T=this pay only
1
CPP-DEPT
Load employee's CPP department
6
CPP-ACCT
Load employee's CPP account
6
CPP-SUB
Load employee's CPP sub-account
6
QPP-DEPT
Loads employee's QPP department code
6
QPP-ACCT
Loads employee's QPP account code
6
QPP-SUB
Loads employee's QPP sub-account code
6
UIC-DEPT
Loads employee's UIC department code
6
UIC-ACCT
Loads employee's UIC account code
6
UIC-SUB
Loads employee's UIC sub-account code
6
WCB-DEPT
Loads employee's WCB department code
6
WCB-ACCT
Loads employee's WCB account code
6
WCB-SUB
Loads employee's WCB sub account code
6
HLT-DEPT
Loads employee's provincial health department code
6
HLT-ACCT
Loads employee's provincial health account code
6
HLT-SUB
Loads employee's provincial health sub account code
6
ALIAS
Direct search to Alias Table for input field
12
ACC-NUM
Defines accumulator occurrence number
1
User Guide 199
Import Format
If delimiter=COMMA; is used, all alphanumeric fields must be surrounded by double quotation
marks (") and fields must be separated by commas (,). This format is known as Comma Separated
Values (CSV) and is compatible with most spreadsheet and database export functions.
If delimiter=FIXED; is used, the size of the field must be given after the description in the
PAYROLL.INI section. In the case of decimal amounts, if the decimal point is included in the data
file then it is included in the size of the field along with 1 position for the sign (if present). If the
decimal point is not included (i.e., if it is implied) then you must also specify the number of
decimal places present in the number.
EXAMPLE - If the employees' surname is imported followed by the given name in the following
format.
1
10
20
30
36
|
|
|
|
12SMITH
JOHN
645600
...then the section in the import would look like:
[IMPORT-FORM-01]
file-name="IMPORT.FIX";
form-name="Fixed Field IMPORT";
delimiter=FIXED;
field-desc=EE-NUMBER:9;
field-desc=SURNAME:10;
field-desc=GIVEN-NAME:10;
field-desc=NET-CLAIM:6:2;
Importing Normal
The normal or standard input type should be entered as follows:
import-type="HOURLY";
This import type will add to or change existing data on the employees' database.
For fields that have multiple occurs like earnings, deductions and accumulators must have an
identifier to indicate the appropriate occurrence of the field. In the example below the incoming
data must have a earnings number following the hours field (e.g. hours for earning type 05).
EXAMPLE - In GM2 Regular Hours has been set up as type 1, Overtime Hours has been set up
as type 2, and Double-time Hours has been set up as type 3.
The section in the PAYROLL.INI would be setup as follows:
[IMPORT-FORM-02]
file-name="hrs-imp.dat";
form-name="GM II Hourly Import (Ascii Delim)";
import-type="HOURLY";
delimiter=COMMA;
200 GrandMaster II for Windows
field-desc=EE-NUMBER;
field-desc=HOURS;
field-desc=EARN-NUM;
* note add other fields here
The data file HRS-IMP.DAT would appear as follows:
"1",40.0,1
"1",10.5,2
"1",2.00,3
"2",37.5,1
The import results for employee #1 would be:
40 regular hours
10.5 overtime hours
2 double-time hours
The import results for employee #2 would be:
37.5 regular hours
Importing Data-Entry (one earning per line)
When importing earning information with multi-entries per earning type, use the following
import-type:
import-type="DATA-ENTRY";
This will create a entry for each import record and would be used if recording hours by date or
department (e.g. 8 hours reg. on day 1, 8 hours reg. on day 2, etc.). One employee can have 200
entries on any one pay period.
EXAMPLE - In GrandMaster II for Windows, Regular Hours has been set up as type 1, Overtime
Hours has been set up as type 2.
The section in the PAYROLL.INI file would be setup as follows:
[IMPORT-FORM-04]
form-name="Hourly Field Import";
file-name="HOURLY.DAT";
import-type="DATA-ENTRY";
delimiter=COMMA;
field-desc=EE-NUMBER;
field-desc=EARN-NUM;
field-desc=ERN-DEPT;
field-desc=ERN-ACCT;
field-desc=ERN-RATE;
field-desc=ERN-HOURS;
The data file HOURLY.DAT would appear as follows:
User Guide 201
"1",1," 2000"," 2100",11.50,40.0
"1",2," 2000"," 2200",17.25,4.5
This would import to employee #1:
40 regular hours at $11.50 /hour to account 2000-2100
4.5 overtime hours at $17.25 /hour to account 2000-2200
[IMPORT-FORM-03]
file-name="c:\grndmast\payroll\table.dat";
form-name="table entry";
delimiter=COMMA;
field-desc=EE-NUMBER;
field-desc=ERN-ROW;
field-data-num=1;
[IMPORT-FORM-04]
file-name="c:\grndmast\payroll\accum.txt";
form-name="Update Accumulators";
delimiter=COMMA;
field-desc=EE-NUMBER;
field-desc=ACCUM-ADD;
field-desc=ACCUM-AMOUNT;
field-data-num=3;
field-desc=ACCUM-RATE;
field-data-num=3;
field-desc=ACCUM-PAY-FLAG;
field-data-num=3;
[IMPORT-FORM-05]
file-name="c:\grndmast\payroll\splits.dat";
form-name="Update Percentage Splits";
delimiter=COMMA;
field-desc=EE-NUMBER;
field-desc=SPLIT-ACCT;
[IMPORT-FORM-06]
file-name="\grndmast\PAY.BTH";
form-name="Import Hours (GM1 Format)";
alias-table=CODE-TYPE;
202 GrandMaster II for Windows
import-type=DATA-ENTRY;
delimiter=FIXED;
field-desc=FILLER:1;
field-desc=EE-NUMBER:6;
field-desc=ALIAS:2;
field-desc=ERN-RATE:5:2;
field-desc=ERN-HOURS:5:2;
field-desc=ERN-AMOUNT:8:2;
[CODE-TYPE]
alias="H1",01;
alias="H2",02;
alias="H3",03;
alias="H4",04;
alias="H5",05;
alias="H6",06;
alias="H7",07;
alias="H8",08;
alias="H9",09;
Export Data
The export feature allows you to extract certain information from the program's data dictionary for
use with other programs. This file may be exported as ASCII delimited or flat ASCII format.
When you select the Export Data command, the following dialog box appears:
Fig. 12-09
The Import Employee Information Dialog Box
Choose a format from the list and click the Import button. This will open Import Employee
Information dialog box for the chosen format. This dialog box will have different options based
on the format you choose.
User Guide 203
Fig. 12-10
The Export Employee Information Dialog Box
Export Data <F7>
This button invokes the export process. Once complete, the file can be accessed from the location
defined in the Export File field.
Creating Export Formats
If you are familiar with how to edit a text file (using a text editor such as Notepad), you may alter
the export formats through the Payroll.ini file (located in the same directory as your payroll data).
Up to 30 export lines may be defined in any one form. Following is an example of a export form:
[EXPORT-FORM-01]
delimiter=fixed
form-name='HR
Systems Export";
file-name="C:\GRNDMAST\EXPORT.TXT";
field-desc=EE-NUMBER:9;
field-desc=SURNAME:40;
field-desc=GIVEN-NAME:40;
field-desc=ADDRESS:40;
field-desc=ADDRESS2:40;
Export Tags
The following tags can be used to describe the export file:
TAG NAME
DESCRIPTION
delimiter=
Describes the format of the file for input. Options available are: COMMA, TAB, or
FIXED.
form-name=
Describes the nature of the import filter (origin of the information).
file-name=
The DOS drive, path and filename of the file to be imported.
field-desc=
Describes to GrandMaster II the type of information being imported. Length of the field is
required for fixed length fields. See the following table for the possible values that may
be used with this tag.
add-section=
field-typenum=
204 GrandMaster II for Windows
field-period
(CURRENT,, PROMPT)
field-type
Export Fields
The following table describes the available export fields. These fields must follow exact spelling
as outlined below:
FIELD NAME
DESCRIPTION
MAX. CHAR.
EE-NUMBER
Employee number
9
SURNAME
Employees' surname
40
GIVEN-NAME
Employees' given name
40
ADDRESS
Employees' street address
40
ADDRESS2
Employees' additional address information
40
CITY
Employees' city of residence
40
PROVINCE
Employees' province of residence (if not same as tax province
2
PROVINCE2
Employees' tax province
2
POST-CODE
Employees' postal code
10
SIN-NO
Employees' Social Insurance Number
9
SEX
Employees' sex
1
PHONE
Employees' phone number
10
TAX-OVER
Override code for federal tax
1
ADD-TAX
Optional extra federal tax contribution.
9 (incl. 2 dec.)
REMOTE-ALLOW
Remote (northern) allowance.
9 (incl. 2 dec.)
OTHER-ALLOW
Other exemptions from income tax as granted by the CCRA.
9 (incl. 2 dec.)
NET-CLAIM
The TD1 personal exemption claim amount.
9 (incl. 2 dec.)
LCP
Labour-sponsored funds tax credit.
9 (incl. 2 dec.)
DEPENDANTS
Number of dependents under 19 and/or infirm.
2
QUE-TAX-OVER
The provincial tax override for the province of Quebec.
1
QUE-ADD-TAX
Optional extra Quebec tax contribution.
9 (incl. 2 dec.)
QUE-OTHER-ALLOW
Other exemptions from Quebec income tax as granted by the
CCRA
9 (incl. 2 dec.)
QUE-NET-CLAIM
The MR-19-V personal exemption claim amount.
9 (incl. 2 dec.)
WCB-CODE
Workers Compensation code used for specifying a WCB rate.
1
STC-SAL
Statistics Canada salary/wage/other code.
1
STC-ZONE
Statistics Canada reporting zone.
2
HOURS-PAY
Normal hours worked per pay period.
5 (incl. 2 dec.)
HOURS-WEEK
Normal hours worked per week.
5 (incl. 2 dec.)
MESSAGE
A message to the employee that appears on the pay stub.
30
NOTES
Miscellaneous notes about an employee for the payroll staff.
35
STATUS
The employees' employment status.
1
REVCAN-ACCT
The Revenue Canada account number.
9
User Guide 205
POSITION
Employment position in the company.
20
FIELD-A
User-defined information field.
20
FIELD-B
User-defined information field.
20
DFLT-DEPT
The default department code of employment.
6
DFLT-ACCT
The default wage/salary account code.
6
DFLT-SUB
The default wage/salary sub-account code.
6
BANK-NAME-1
First EFT bank name.
25
BANK-ADDRESS-1
Address of the first EFT bank.
20
BANK-CITY-1
City of the first EFT bank.
20
BANK-POST-1
Postal code of the first EFT bank.
6
BANK-TRANSIT-1
Transit number of the first EFT bank. (5 digit transit, 3 digit
bank, and up to 12 digit account number.
25
BANK-AMOUNT-1
The amount of EFT deposit for the first bank.
9 (incl. 2 dec.)
BANK-NAME-2
Second EFT bank name.
25
BANK-ADDRESS-2
Address of the second EFT bank.
20
BANK-CITY-2
City of the second EFT bank.
20
BANK-POST-2
Postal code of the second EFT bank.
6
BANK-TRANSIT-2
Transit number of the second EFT bank. (5 digit transit, 3 digit
bank, and up to 12 digit account number.
25
BANK-AMOUNT-2
The amount of EFT deposit for the second bank.
9 (incl. 2 dec.)
BANK-NAME-3
Third EFT bank name.
25
BANK-ADDRESS-3
Address of the third EFT bank.
20
BANK-CITY-3
City of the third EFT bank.
20
BANK-POST-3
Postal code of the third EFT bank.
6
BANK-TRANSIT-3
Transit number of the third EFT bank. (5 digit transit, 3 digit
bank, and up to 12 digit account number.
25
BANK-AMOUNT-3
The amount of EFT deposit for the third bank.
9 (incl. 2 dec.)
BANK-PROVINCE-1
Employee's bank province 1
2 (e.g. MB)
BANK-PROVINCE-2
Employee's bank province 2
2 (e.g. MB)
BANK-PROVINCE-3
Employee's bank province 3
2 (e.g. MB)
PERM-RATE
The normal hourly rate.
9 (incl. 2 dec.)
PERM-AMOUNT
The normal salary amount.
9 (incl. 2 dec.)
HOURS
Hours worked (replaces earnings already entered).
9 (incl. 2 dec.)
ERN-RATE
Hourly earning rate.
9 (incl. 4 dec.)
HOURLY-RATE
The hourly rate earned by the employee.
9 (incl. 4 dec.)
ERN-AMOUNT
Earning amount.
9 (incl. 2 dec.)
ERN-AMOUNT-YTD
Earning amount year-to-date
9 (incl. 2 dec.)
DED-AMOUNT
Amount of deduction.
9 (incl. 2 dec.)
DED-AMOUNT-YTD
Amount of deduction year-to-date.
9 (incl. 2 dec.)
BEN-AMOUNT
Amount of benefit.
9 (incl. 2 dec.)
BEN-AMOUNT-YTD
Amount of benefit year-to-date.
9 (incl. 2 dec.)
206 GrandMaster II for Windows
GROSS-PAY
Gross pay.
9 (incl. 2 dec.)
NET-PAY
Net pay.
9 (incl. 2 dec.)
CHEQ-AMOUNT
Amount of cheque.
9 (incl. 2 dec.)
CHEQ-NUMBER
Cheque number.
6
SEQ-NUMBER
Internal sequence number.
6
PAY-PERIOD
Pay Period Run number
3
PAY-YEAR
Pay Period Year
2
FILLER
Inserts spaces in output file
6
NUMERIC-1 to
NUMERIC-12
Optional numeric field 1 to 12
9 (incl. 2 dec)
ANNUAL-SALARY
Not used at present
PERM-ERN-DEPT
Permanent earning department Personal, Misc. Information
6
PERM-ERN-ACCT
Permanent earning account Personal, Misc. Information
6
PERM-ERN-SUB
Permanent earning sub account Personal, Misc. Information
6
FIELD-C to FIELD-L
Optional alpha field C through L
20
CHEQ-DATE
Cheque date.
6 (ddmmyy)
CHEQ-DD
Cheque day.
2
CHEQ-MM
Cheque month.
2
CHEQ-YY
Cheque year.
2
START-DATE
Date employee is hired.
6 (ddmmyy)
START-DD
Start day.
2
START-MM
Start month.
2
START-YY
Start year.
2
BIRTH-DATE
Employees' birth date.
6 (ddmmyy)
BIRTH-DD
Birth day.
2
BIRTH-MM
Birth month.
2
BIRTH-YY
Birth year.
2
TERM-DATE
Date of employment termination.
6 (ddmmyy)
TERM-DD
Termination day.
2
TERM-MM
Termination month.
2
TERM-YY
Termination year.
2
REHIRE-DATE
Date of employee rehiring.
6 (ddmmyy)
REHIRE-DD
Rehire day.
2
REHIRE-MM
Rehire month.
2
REHIRE-YY
Rehire year.
2
ANNIV-DATE
Any date as defined by the employer.
6 (ddmmyy)
ANNIV-DD
Anniversary day.
2
ANNIV-MM
Anniversary month.
2
ANNIV-YY
Anniversary year.
2
DATE-1
Optional date 1.
6 (ddmmyy)
User Guide 207
DATE-1-DD
Optional date 1 day.
2
DATE-1-MM
Optional date 1 month.
2
DATE-1-YY
Optional date 1 year.
2
DATE-2
Optional date 2.
6 (ddmmyy)
DATE-2-DD
Optional date 2 day.
2
DATE-2-MM
Optional date 2 month.
2
DATE-2-YY
Optional date 2 year.
2
DATE-3
Optional date 3.
6 (ddmmyy)
DATE-3-DD
Optional date 3 day.
2
DATE-3-MM
Optional date 3 month.
2
DATE-3-YY
Optional date 3 year.
2
END-DATE
Pay Period Ending date
6 (ddmmyy)
END-DD
Pay Period Ending day
2
END-MM
Pay Period Ending month
2
END-YY
Pay Period Ending year
2
START-DATE
Starting pay period date
6 (ddmmyy)
START-DD
Starting pay period day
2
START-MM
Starting pay period month
2
START-YY
Starting pay period year
2
Sample Export Formats:
[EXPORT-FORM-02]
form-name="Rates of Pay";
file-name="\grndmast\Rates.txt";
delimiter=COMMA;
field-desc=EE-NUMBER;
field-desc=SURNAME;
field-desc=GIVEN-NAME;
field-desc=PERM-RATE;
field-type-num=01;
field-type=DECIMAL-PT,SIGN-LEADING;
field-period=PROMPT;
field-desc=ERN-AMOUNT-YTD;
field-type-num=01;
[EXPORT-FORM-03]
form-name="Earning Amount 1";
file-name=“\grndmast\test.txt”;
delimiter=COMMA;
208 GrandMaster II for Windows
field-desc=EE-NUMBER;
field-desc=SURNAME;
field-desc=ERN-AMOUNT;
field-type-num=01;
field-type=DECIMAL-PT,SIGN-LEADING;
field-period=PROMPT;
User Guide 209
Chapter 13: Electronic Funds Transfer (EFT)
The Electronic Funds Transfer (EFT) feature allows an organization to electronically transfer net
payroll amounts directly into individual employee's bank accounts, rather than issuing cheques.
Note: As of February 2002, this feature is not yet available for GrandMaster II for Windows.
Please contact CanPay Technical Support for availability information.
Computer Requirements
The EFT process requires that both a modem and communication software be present on the
computer. The EFT process usually allows the entire payroll be transmitted to the company's
bank. This bank will then disperse the payroll amounts to other banks as required.
Any company considering using EFT must first make arrangements with their bank. The bank
will supply necessary information about the EFT process, including parameters required by the
GrandMaster II for Windows EFT feature.
Fig. 13-01
The EFT Button Options
Select Format
The Select Format command allows you to specify the format that your bank will use when they
process the EFT transmission. Each bank requires a specific transmission record format. When
you select a bank for transmission, the program will automatically use the appropriate record
format.
When you choose the Select Format command, the following dialog box appears:
210 GrandMaster II for Windows
Fig. 13-02
The Select Format Dialog Box
Basic use of the EFT requires only one transmission format. A maximum of 10 EFT formats may
be defined to accommodate special requirements.
Add Format
This button allows you to define new transmission format for the EFT process. When this button
is chosen, the following dialog box appears:
Fig. 13-03
The Enter New Format Name Dialog Box
Enter a unique name for the new transmission format and click OK. This opens the Select Bank
Transmission Format dialog box so you can choose from a pre-defined list of available bank
settings.
Fig. 13-04
The Select Bank Transmission Format Dialog Box
Select a pre-defined bank setting and click OK to add it to your list of formats. The next time you
choose the Select Format command, your new format will appear in the list.
User Guide 211
Edit Format Information
This command allows you to view or edit information for the selected transmission format. The
bank will supply most of the required information for you. When this command is chosen, the
following dialog box will appear:
Fig. 13-05
The Edit EFT Transmission Format Dialog Box (with sample data)
The following table describes the fields in this dialog box:
Field
Description
File Name
Enter the name of the transmission file that will be created by EFT. This name must
conform to DOS file naming conventions.
Destination
The path (destination) to where the transmission file will be created. This path must
conform to DOS directory naming conventions.
File Creation No.
The sequential number assigned to the transmission file each time it is created.
The bank monitors this number to ensure security for EFT transmissions.
Customer Number
The number assigned to the company by the bank for identification purposes.
Some banks will assign a Customer Number, a Originator ID, or both.
Originator ID
The number assigned to the company by the bank for identification purposes.
Some banks will assign a Customer Number, an Originator ID, or both.
Company Name
(Short)
The abbreviated company name (usually under 15 characters).
Company Name
(Long)
The full legal name of the company.
Return Bank ID
In the event that an employee's deposit is rejected, the funds will be returned to this
bank account.
Data Centre ID
A number used to identify the bank's data centre.
E-mail/Fax Indicator
Undefined
212 GrandMaster II for Windows
E-mail/Fax Address
Undefined
Note: Transmission Formats - Depending on which transmission format is being used, some of
these fields will not be required. Unneeded fields will not be displayed when you open this dialog
box once again.
Select Payrolls
This command allows you to specify the payroll(s) to be included in the EFT transmission. When
you choose the Select Payrolls command, the following dialog box appears:
Fig. 13-06
The Select Payroll(s) Dialog Box
Click on a payroll to select it (or click again to remove the selection). When you have chosen your
payrolls, click the Save button to save your selections.
Create Transmission File
This command allows you to create the magnetic file using the specified bank's format. The file
will contain payment information for all employees set up for EFT in the selected payroll(s).
Once created, this file may be either transmitted to the bank via modem or delivered to the bank
on diskette, CD-ROM or other media.
The following dialog box appears when this command is chosen:
Fig. 13-07
The EFT File Creation Dialog Box
User Guide 213
Once the EFT transmission file has been created, the following transaction summary will be
displayed for verification.
Fig. 13-08
The Transaction Summary
This summary displays:
• The total number of credit deposits
• The total amount of credit deposits
• The total number of debit deposits
• The total amount of debit deposits
Note: Including Debit Deposits - Special arrangements must be made with the bank if you wish
to include debit deposits in the EFT transmission.
214 GrandMaster II for Windows
Chapter 14: Bank Reconciliation
The Bank Reconciliation module allows you reconcile your bank statement to your cheques issued.
Cheques can be imported directly from the program or entered manually. You can even create
reports for outstanding and returned cheques and view them on the screen, prior to printing.
Returned cheques can be kept on record indefinitely or purged after a given date. You can also
exported cheques to a spreadsheet program or import them into other bank reconciliation
programs.
Note: As of April 2003, this feature is not yet available for GrandMaster II for Windows. Please
contact CanPay Technical Support for availability information.
Features of the Bank Reconciliation Module:
• You can configure up to 10 completely separate Bank Reconciliation files.
• Up to 10 Users can access each Bank Reconciliation file (with or without passwords,
depending on the setup).
• Cheques are imported directly from the Payroll System or manually entered within the
Bank Reconciliation module.
• Reports can be printed on Outstanding and Returned Cheques.
• All reports can be printed to a disk file, the screen, or directly to any accessible printer.
• Returned cheques can be kept on record indefinitely or purged after a given date.
• Cheques can be exported to an ASCII file so they can be accessed with a spreadsheet
program or imported into other bank reconciliation programs.
Basic Steps to Follow
1.
Process a payroll as you would normally and print any pay cheques that have a unique cheque
number assigned to them. Cheque numbers must be unique within the Bank Reconciliation
System -- duplicates will be rejected.
Note: Cheque Numbers - The cheque numbers are only assigned in the payroll system once the
cheques have been printed. DO NOT import before they have been printed.
2.
Perform a backup of the Bank Reconciliation file each time a large amount of information is
changed within the system. (e.g. If you are importing payrolls or have just finished canceling
a large number of cheques).
3.
Each time a payroll is complete, select the payroll that you would like to import into this file
and select the Begin Import command to import the cheque information for any employees on
that payroll.
4.
When bank statements have been received from the bank with your returned cheques, use the
Return Cheques command to cancel the cheques out of the Bank Reconciliation file.
5.
Run an Outstanding Cheque Report to verify which cheques have not been returned from the
bank.
User Guide 215
6.
Run a Returned Cheque Report to verify that all returned cheques were correctly entered.
7.
Purge any returned cheques that no longer need to be stored in the database.
8.
Perform a backup of the Bank Reconciliation file, if it has not been performed for an extended
period of time or after a large amount of information has been entered.
Installing the Module
The Bank Reconciliation module is an optional feature of GrandMaster II for Windows. To
acquire this additional module please call our toll free number (800-665-5129).
Note: Module Availability - This module was not available at the time this guide was produced.
Please contact CanPay Technical Support for more information on its availability
To Install the Bank Reconciliation module:
1.
Insert the Bank Reconciliation diskette into drive A (substitute drive "B" if required)
2.
Open a DOS prompt and change to the C:\GM2WIN folder (or the folder where you installed
GrandMaster II for Windows).
2.
From the C:\GM2WIN prompt type:
COPY A:\*.* C:\GM2WIN
3.
Press <Enter>.
4.
From the C:\GM2WIN prompt type:
PRINT READ.ME
5.
Press <Enter>. This file contains information that may not have been included in the
documentation.
6.
Edit the file GRNDMAST.CFG file (located in the folder where you installed the program)
and add the following line under the [GRNDMAST-PROGRAMS] section heading:
$cobdir\BANK-REC.LBR
EXAMPLE:
[GRNDMAST-PROGRAMS]
$cobdir\program1.lbr\grndmast.gnt
$cobdir\program1.lbr
.
.
$cobdir\screen1.lbr
$cobdir\bank-rec.lbr
[GRNDMAST-SWITCHES]
216 GrandMaster II for Windows
Running the Module
When you first access the Bank Reconciliation Module you will be prompted to enter a name for a
new Bank Reconciliation File.
You can create up to 10 separate Bank Reconciliation Files. Normally you would use a Bank
Reconciliation File to keep all payroll cheques that are written from the same company account.
You can have all payrolls in one Bank Reconciliation or each payroll in a separate Bank
Reconciliation or any combination of payrolls for each.
Note: Cheque Numbers - A cheque number must be unique within a given Bank Reconciliation
file.
Assigning Names
It is best if the name(s) assigned to the Bank Reconciliation files(s) are descriptive of the type of
information that will be contained within the file(s). However, the file(s) can be made without a
name/description in which case only the computer-generated number(s) will appear in the file list.
Once a name has been entered click OK to accept it and create the new Bank Reconciliation file.
When a new file is created, the UserIds SUPERVISOR and CLERK are automatically added to
the file and passwords are disabled. If you wish to use passwords with the file, please refer to the
Setting Up Passwords and UserIds section of this chapter.
To Select a Bank Reconciliation File
1.
Select the Bank Reconciliation button then choose the desired file from the list provided.
2.
Select a UserId (and optionally a password) and click OK to access the Bank Reconciliation
menu.
Adding and Deleting Bank Reconciliation Files
Choose the Add button to create a new Bank Reconciliation. You will be prompted to enter a new
name for this file. You should assign it a unique name that distinguishes it from any other Bank
Reconciliation Files.
Choose the Delete button to remove a previously defined Bank Reconciliation file. Click OK
when prompted to remove it from the list.
WARNING - The deletion removes the entire file, so you should be absolutely certain that this file is
no longer required before deleting it.
To Change the Name of a Bank Reconciliation File
1.
Select the Bank Reconciliation file whose name you wish to change.
2.
Select the Rename button and enter a new name in the field provided.
3.
Click OK to accept the change.
User Guide 217
File Menu
The File menu offers options to open or create bank reconciliation files:
• Select Payrolls - Select which payrolls from which the cheques will be imported.
• Begin Import - Import the payroll cheques information from the payrolls you have select
above.
• Export Cheques - Will export a range cheque number in a comma delimited file format
for use by a spreadsheet or to import into other account systems.
Selecting Payrolls
The Selecting Payrolls command is used to select the payroll for importing the cheque
information into the Bank Reconciliation files.
To select a payroll for import:
1.
Select the desired payroll.
2.
Click OK to select it.
Note: Password Protection - If this payroll is password protected you will be prompted to enter
the Supervisor's password -- that is the Supervisor Password for that particular payroll, not the
password for the Bank Reconciliation file. You must enter this payroll's password, or have the
payroll supervisor enter it for you before the selection will be accepted.
Begin Import
Cheques must be printed and have a cheque number assigned within the program so that the Bank
Reconciliation file can store the information for any cheques issued. Afterwards, you must import
it (copy it) to the Bank Reconciliation file.
Note: Importing Cheques - Do not import the cheques before they have been printed.
The Begin Import command is used to import all payroll cheques from the most previous payroll
run that have not already been entered in the Bank Reconciliation module. Previous payrolls (after
the Clear command has been issued) will have to be manually entered using the Manual Cheques
command under the Process menu.
Begin Import
Choosing this button instructs the program to search for and import all payroll cheques from the
selected payrolls (current pay run) which have not previously been entered.
218 GrandMaster II for Windows
Export Cheques
This command will export a range of cheque numbers to a comma-delimited file for import into
spreadsheet software. Settings for this operation are setup in the BANK-REC.INI file. This
information can be changed or added by using any text editor (e.g. Notepad).
[BANK-ACCOUNT],
account="123-456-789123";
<< enter the GL bank account number
sub-account="123-456-8888";
<< enter the GL bank sub acct number
path="c:\platinum";
<< path for export files
file-name="cheq-exp.csv";
<< name of file to be exported (CSV)
Begin Export
When this command is chosen, you will be asked to enter a starting and ending cheque number for
the export. Choose the OK button to begin the export operation. The file that is created will
replace (write over) an existing file with the same name.
Process Menu
The Process menu offers all the options necessary to actually do the bank reconciliation. These
options are as follows:
• Manual Cheques - Allows you to input any manual cheques which are not already in
this Bank Reconciliation File.
• Return Cheques - Cancels cheques that have been previously entered into the system.
• Print Outstanding Cheques - Print all cheques in the file that have been cancelled.
• Print Returned Cheques - Print all cheques that have been cancelled, but have not been
purged from the system.
• Purge Returned Cheques - Purge (delete from the file) all cheques that have a date less
than the purge date entered.
Manual Cheques
When a cheque has not been imported from a payroll or an import was not performed for the
current payroll run, the Manual Cheques command allows you to manually enter the information
required by the Bank Reconciliation module.
Note: Manual Cheques - To enter a manual cheque you must assign it a cheque number which
has not already been assigned within the Bank Reconciliation System.
This option can also be used to enter deposits to the bank account by entering a negative amount
for the cheque amount (Use Surname and Given Name for reference fields, if required).
EXAMPLE:
Cheque No.
Surname
Given Name
Date
Amount
999001
Roger
Roy
01/03/95
$245,040.40-
User Guide 219
To Manually Enter Cheques:
1.
Enter a valid cheque number in the first field. An error message will appear if that cheque
number has previously been entered in the program.
2.
Enter a Surname in the second field (optional).
3.
Enter a Given Name in the third field (optional).
4.
Enter the date the cheque was issued (or date funds were available). Remember to use the
DD/MM/YY format.
5.
Enter the amount for which the cheque was issued.
6.
Click OK after the amount to insert this entry into the Bank Reconciliation file.
7.
The cursor will return to the Cheque Number field so that subsequent cheques may be entered,
as in the previous fashion.
A running total is kept on any cheques that have been entered since the window was opened.
The last 5 cheques entered are shown below the current edit line.
Returned Cheques
Cheques that have been returned by your bank along with your bank statement can be entered
using the Returned Cheques dialog box.
Note: Returned Cheques - This will only flag previously issued cheques as returned. A purge is
performed to remove the issued and returned cheques from the file.
To Entering Returned Cheques (i.e. To Cancel a Cheque)
1.
Enter the cheque number that was assigned to this cheque. If the cheque is found, the name of
the person the cheque was issued to, the date issued and the amount of the cheque will appear.
2.
Verify that the displayed information is correct for the cheque.
3.
Enter the date the cheque was returned (or the end date of the month) using the DD/MM/YY
format. The default date is the current date.
4.
Enter the amount that the cheque was paid and click OK.
Note: Mismatched Amounts - If this does not match the amount issued, you will be prompted to
verify the cheque amount ('N') or accept it if it is correct ('Y').
5.
Choose the Exit button when all cheques in this batch have been entered.
A running total is kept on all cheques that have been entered since this window was opened
and the last 5 entries are shown below the current edit line.
Print Outstanding Cheques
Once all cheques have been entered, or after they have been successfully imported, a report
showing any cheques that are still outstanding (i.e. have not been returned) can be printed. This
report can be printed at any point to view the list of outstanding cheques.
220 GrandMaster II for Windows
A number of different sort orders can be specified to order the list in the way that best suits your
requirements.
Note: Sort Order - This report can be printed numerous times with a different sort order specified
for each copy.
EXAMPLE: You can print the report by Issue Date to group all cheques that were issued on the
same date, from the oldest to the newest cheques still in the system. Alternately, you could print
the list by payroll name, to verify if all the pay cheques within a given payroll have been cashed.
Test Page
Choose this button to print a test page and check the printer connection.
Print
Choose this button to print a list of outstanding cheques. You will be prompted to select a
destination; a printing device, the screen or a text file.
Print Returned Cheques
The Print Returned Cheques option is used to print a list of all cheques which have been returned
(cancelled) in the Bank Reconciliation System, but have not yet been purged. This report is useful
for verifying that a batch was entered correctly and for a permanent printed copy of a batch entry.
The report allows you to choose from a number of sort order which suit your individual needs.
Note: Sort Order - This report can be printed numerous times with a different sort order specified
for each copy.
Test Page
Choose this button to print a test page and check the printer connection.
Print
Choose this button to print a list of cheques that have been returned (cancelled) from the program.
You will be prompted to select a destination; a printing device, the screen or a text file.
Purge Returned Cheques
Use this command when a batch has been completed, or you wish to remove any cheques which
have been cancelled and are no longer required to reside in the Bank Reconciliation module.
Note: Backups - You should always perform a backup of the Bank Reconciliation File, as the
purge removes these records completed, and without a backup there is no way to retrieve them.
User Guide 221
The Purge Returned Cheques command can remove all cheques that have been returned
(cancelled) on or before a specified date (which defaults to the current date, but can be changed to
an earlier date).
Purge
Choose this button to remove all cheques with a return date less than or equal to the purge date.
Setup Menu
The Setup menu allows you to setup the Bank Reconciliation module to meet your specific
company requirements:
• Setup Users - Set up UserIds and enable/disable passwords within the Bank
Reconciliation System . Only the Supervisor can use this option.
• Report Layout - Allows you to set the page layout specifications for the printing of each
individual report.
• Backup Bank Reconciliation File - Copy the entire Bank Reconciliation File to another
file for safe keeping.
• Restore Bank Reconciliation File - Copy a previous backup of the Bank Reconciliation
File back into the program.
Setup - Ids and Passwords
Only the Supervisor can use the Setup command. If any other user selects this option an error
message will appear.
This Bank Reconciliation System has been designed as a multi-user system. Up to ten users can
access the same Bank Reconciliation File at the same time. The program must be able to identify
each user so that a log can be kept with the name and current status/location of each user within
the system can be tracked. For sensitive Bank Reconciliation Files, an optional password can be
assigned to prevent unauthorized access.
UserIds, Passwords, and the Security Level can all be entered using the Setup command.
Adding a New UserId
At least one UserId must be setup within the system. As such, the SUPERVISOR Id is
automatically added to the system and can not be removed.
Up to 10 UserIds (not including the Supervisor) can be assigned to each Bank Reconciliation file.
To Add a new UserId
1.
Chose the Add New UserId command and enter the new UserId.
This UserId will only appear in the bank reconciliation file in which it was set up. The
UserIds are defaulted to uppercase. The UserIds must be unique within each Bank
Reconciliation file. Two people can not enter the system with the same UserId at the same
time.
2.
Enter a password for the new UserId (required even if Passwords are not enabled).
222 GrandMaster II for Windows
The passwords are defaulted to uppercase. Passwords do not have to be unique -- the same
password can be used for all the UserIds within the system.
The use of passwords is optional they can be enabled or disabled.
Note: Keep track of Your Password - If you are not using passwords you should still keep track
of the Supervisor password in case the passwords are accidentally enabled.
3.
Set the security level. The security level will automatically be set to 2.
Note: Security Level - At the current time the security level is only set up to distinguish between
the Supervisor and any other UserIds added to the system. In the future the program will be
changed so that the levels will extend between 2 and 9, with more and more limitations being
added as the level increases.
The Supervisor id has security level 1 access, which cannot be modified and no other UserIds can
be set to level 1 access. Any other UserIds added will be of level 2 security. The only limitation
of security level 2 is you cannot set or change passwords, this can only be done by the Supervisor.
To Delete a UserId:
1.
Choose the Delete button. A list containing all the UserIds for that particular bank
reconciliation file will appear.
2.
Select the UserId to be removed, and click OK.
Note: Deleting a UserId will only delete the UserId from the current bank reconciliation file.
Enabling/Disabling Passwords
The use of passwords is optional. If you would like the added security, passwords can be enabled
by the supervisor.
To enable/disable passwords:
1.
Select the Enable Passwords button.
2.
Click Yes to confirm the selection.
Note: This action will enable/disable the use of passwords in the current bank reconciliation file
only.
Report Layout
The Report Layout command allows you to set the printer page layout for the report to be printed.
When this command is chosen, a list of available reports will be displayed. Choose a report and
click OK to proceed.
User Guide 223
Backup Bank Reconciliation File
Even under normal circumstances when a computer is working properly, problems may arise
which may cause a computer file to become corrupt. As such, it is good idea to keep a backup
copy of the information stored within the Bank Reconciliation file.
If such a problem occurs, it is then only necessary to restore (copy back) the most recent copy of
the Bank Reconciliation File and re-enter any changes that took place since that time. If a large
amount of information has been added to the file since the last time backup copy was made, that
same amount of information will need to be re-entered to bring the file back to the same status
(before the error occurred).
To Create a Backup Copy of the Bank Reconciliation File:
1.
Select the Backup command from the Setup menu.
2.
Enter a valid DOS filename -- it can include a valid path.
EXAMPLE: C:\BACKUP\BK-BANK1.DAT
Backup
Choose this button to begin the backup process. You should assign a name to the backup file,
which indicates from which Bank Reconciliation this file was created.
EXAMPLE: If a backup was made from the Executive Bank Reconciliation File, you may want
to give it a name of BK-EXEC.DAT
Note: File Date - The file will be written with the current date attached, so that you don't need to
include the date (unless you want to specify a date different than the current one).
Restore Bank Reconciliation File
If you encounter a problem with the Bank Reconciliation File, or if you need to restore the file to a
previous state, you can use this command (if you have a previously created backup of the Bank
Reconciliation File).
If the file has become corrupt, so that you can not access the Bank Reconciliation menu for this
file, you will first need to add a new Bank Reconciliation file (e.g. create a file for test purposes
only). Once created, you can choose Restore from the Setup menu to restore the file.
Restoring a Backup Copy of the Bank Reconciliation File:
1.
Select the Restore command from the Setup menu.
2.
Enter a valid DOS filename (include the path to the file, if it is not located in the
\GRNDMAST directory i.e. "C:\BACKUP\BK-BANK1.DAT" or "A:\BANK.BAK") This is
the name of the file you used when the backup file was created.
3.
Choose the Restore button to begin the restore process.
When the Restore Bank Reconciliation is complete, the Bank Reconciliation File will appear
in the same state that it was just before the backup file was created.