1
Rapise User Manual
Version 3.0
Inflectra Corporation
Friday, April 17, 2015
© 2015 Inflectra Corporation
2
Rapise User Manual
Table of Contents
Foreword
0
Part I Company & Copyright
5
Part II Rapise User's Guide
6
1 About ...................................................................................................................................
this Guide
6
2 Glossary
................................................................................................................................... 7
3 Getting...................................................................................................................................
Started
7
Overview
.......................................................................................................................................................... 8
Sam ples Index.......................................................................................................................................................... 9
Tutorial: Web ..........................................................................................................................................................
Testing
12
Tutorial: Window
..........................................................................................................................................................
s Testing
21
Tutorial: Testing
..........................................................................................................................................................
Adobe Flex Applications
31
Tutorial: Testing
..........................................................................................................................................................
REST Web Services
40
Tutorial: Mobile
..........................................................................................................................................................
Testing
51
Tutorial: Exploratory
..........................................................................................................................................................
Testing
64
4 Features
................................................................................................................................... 75
Recording and
..........................................................................................................................................................
Learning
76
Recording ......................................................................................................................................................... 77
Learning ......................................................................................................................................................... 79
Analog Recording
......................................................................................................................................................... 81
Absolute Analog.........................................................................................................................................
Recording
83
Relative Analog Recording
......................................................................................................................................... 84
Simulated Objects
......................................................................................................................................................... 85
Object Libraries
......................................................................................................................................................... 86
Custom Libraries......................................................................................................................................... 88
Actions
................................................................................................................................... 89
Multiple Recordings
......................................................................................................................................................... 90
Object Spy......................................................................................................................................................... 91
Accessible (MSAA)
.........................................................................................................................................
Spy
93
Java Spy
......................................................................................................................................... 93
Mobile Spy
......................................................................................................................................... 94
Managed (.NET) .........................................................................................................................................
Spy
96
UI Automation Spy
......................................................................................................................................... 96
Object Manager
......................................................................................................................................................... 97
Playback
.......................................................................................................................................................... 99
Command.........................................................................................................................................................
Line
100
Object Locator
......................................................................................................................................................... 102
Autom ated Reporting
.......................................................................................................................................................... 103
Writing to.........................................................................................................................................................
the Report
104
Report Filtering
......................................................................................................................................................... 105
Scripting
.......................................................................................................................................................... 107
Understanding
.........................................................................................................................................................
the Script
108
Naming Conventions
......................................................................................................................................................... 109
Defining Functions
......................................................................................................................................................... 109
Global Variables
......................................................................................................................................................... 111
Including .........................................................................................................................................................
other Files
112
Regular Expressions
......................................................................................................................................................... 112
© 2015 Inflectra Corporation
Contents
3
......................................................................................................................................................... 113
Assert Statements
Data Driven
.........................................................................................................................................................
Testing
114
Customizable
.........................................................................................................................................................
Engine
118
Scenarios......................................................................................................................................................... 118
Javascript IDE
.......................................................................................................................................................... 120
Internal Debugger
......................................................................................................................................................... 121
Tooltips
......................................................................................................................................... 122
Control Execution
......................................................................................................................................... 122
Breakpoints
......................................................................................................................................... 123
External Debugger
......................................................................................................................................................... 124
Verbosity.........................................................................................................................................................
Levels
125
Syntax Highlighting
......................................................................................................................................................... 126
Code Folding
......................................................................................................................................................... 126
Syntax Checking
......................................................................................................................................................... 127
Code Completion
......................................................................................................................................................... 128
Unit Testing .......................................................................................................................................................... 131
DLL Testing
......................................................................................................................................................... 131
COM Testing
.........................................................................................................................................................
Support
132
Integration
.........................................................................................................................................................
w ith Third Party Tools
132
Custom Strings ......................................................................................................................................... 132
MbUnit
......................................................................................................................................... 133
NUnit
......................................................................................................................................... 134
TAP Results ......................................................................................................................................... 135
Web Service..........................................................................................................................................................
Testing
136
Testing REST
.........................................................................................................................................................
Web Services
137
Testing SOAP
.........................................................................................................................................................
Web Services
141
Mobile Testing
.......................................................................................................................................................... 141
Apple iOS......................................................................................................................................................... 142
Android ......................................................................................................................................................... 150
Manual Testing
.......................................................................................................................................................... 160
Manual Recording
......................................................................................................................................................... 161
Manual Playback
......................................................................................................................................................... 166
Semi-Manual
.........................................................................................................................................................
Testing
173
SpiraTest Integration
.......................................................................................................................................................... 174
Checkpoints.......................................................................................................................................................... 187
Tests and Sub-Tests
.......................................................................................................................................................... 188
5 Dialogs,
...................................................................................................................................
Views, and Menus
192
Accessible Events
..........................................................................................................................................................
Dialog
192
Add Web Service
..........................................................................................................................................................
Dialog
193
Create New Test
..........................................................................................................................................................
Dialog
193
Create Sub-Test
..........................................................................................................................................................
Dialog
198
Content View
.......................................................................................................................................................... 199
Enter filter criteria
..........................................................................................................................................................
for... Dialog
199
Errors View .......................................................................................................................................................... 201
Find and Replace
..........................................................................................................................................................
Dialog
202
Find Results..........................................................................................................................................................
View
203
Find Text dialog
.......................................................................................................................................................... 204
Im age Capture
.......................................................................................................................................................... 205
Incident Logging
.......................................................................................................................................................... 207
Manual Playback
.......................................................................................................................................................... 210
Manual Test ..........................................................................................................................................................
Editor
212
Mobile Settings
..........................................................................................................................................................
Dialog
214
Mobile Test ..........................................................................................................................................................
Locator Dialog
218
Nam eValue Collection
..........................................................................................................................................................
Editor Dialog
220
© 2015 Inflectra Corporation
3
4
Rapise User Manual
.......................................................................................................................................................... 222
Object Tree Dialog
Options Dialog
.......................................................................................................................................................... 223
Output View .......................................................................................................................................................... 226
Properties Dialog
.......................................................................................................................................................... 227
Recording Activity
..........................................................................................................................................................
Dialog
228
Replace Text..........................................................................................................................................................
Dialog
231
Report View ..........................................................................................................................................................
er
232
REST Definition
..........................................................................................................................................................
Editor
233
Ribbon: Test.......................................................................................................................................................... 236
Ribbon: Report
.......................................................................................................................................................... 239
Ribbon: Spreadsheet
.......................................................................................................................................................... 240
Ribbon: Edit .......................................................................................................................................................... 241
Ribbon: Debugger
.......................................................................................................................................................... 242
Ribbon: Manual
.......................................................................................................................................................... 243
Ribbon: REST.......................................................................................................................................................... 245
Select an Application
..........................................................................................................................................................
to Record... Dialog
247
Settings Dialog
.......................................................................................................................................................... 250
Source Editor
.......................................................................................................................................................... 254
Spreadsheet..........................................................................................................................................................
View er
255
Start Page .......................................................................................................................................................... 255
Spira Dashboard
.......................................................................................................................................................... 256
Spy Dialog .......................................................................................................................................................... 261
Test Files Dialog
.......................................................................................................................................................... 268
Variable/Call..........................................................................................................................................................
Stack View
270
Verify Object..........................................................................................................................................................
Properties Dialog
271
Warning View
.......................................................................................................................................................... 273
Watch View .......................................................................................................................................................... 273
File Menu .......................................................................................................................................................... 275
6 HowTos
................................................................................................................................... 275
Open a Test .......................................................................................................................................................... 276
Create a New..........................................................................................................................................................
Test
276
Restoring the
..........................................................................................................................................................
Default Layout
278
Change Test..........................................................................................................................................................
Entry Point
278
Do Absolute ..........................................................................................................................................................
Analog Recording
279
Do Relative Analog
..........................................................................................................................................................
Recording
281
Learn an Object
.......................................................................................................................................................... 283
Deal w ith a Sim
..........................................................................................................................................................
ulated Object
289
7 Technologies
................................................................................................................................... 292
Adobe Flex .......................................................................................................................................................... 292
Cross Brow ser
..........................................................................................................................................................
Testing
294
Qt Fram ew ork
.......................................................................................................................................................... 296
Java AWT/Sw..........................................................................................................................................................
ing
297
Mobile Testing
.......................................................................................................................................................... 298
Mobile Testing:
.........................................................................................................................................................
iOS Setup
307
8 Extensibility
................................................................................................................................... 315
Tutorial: Custom
..........................................................................................................................................................
Library
315
Index
325
© 2015 Inflectra Corporation
Company & Copyright
1
Company & Copyright
This documentation and the software it describes is the proprietary and copyrighted intellectual
property of Inflectra Corporation,
© All Rights Reserved.
© 2015 Inflectra Corporation
5
6
Rapise User Manual
2
Rapise User's Guide
2.1
About this Guide
The Rapise User's Guide is divided into four sections: Getting Started; Features; Dialogs, Views, and
Menus; HowTos.
Getting Started
The Getting Started section is for new Rapise users. It has the following subsections:
1. An Overview of Rapise: what it's for and how to use it.
2. Samples Index, where the sample projects included with Rapise are described.
3. Tutorial: Windows Testing, a step-by-step tutorial for creating your first test with Rapise using a
Windows desktop application.
4. Tutorial: Web Testing, a slightly more advanced tutorial in using Rapise to test a web page.
5. Tutorial: Testing REST Web Services, a tutorial in using Rapise to test a RESTful web service API.
6. Tutorial: Testing Adobe Flex Application - a tutorial explaining how to use Rapise to test an Adobe
Flex application
7. Tutorial: Mobile Testing - a tutorial explaining how to use Rapise to test a mobile application (in this
case using Android)
8. Tutorial: Exploratory Testing - a tutorial explaining how to use Rapise to do exploratory manual
testing.
Features
The features of Rapise are many. The features have been designed to make all aspects of test
automation as easy as possible.
Most of the features of Rapise fall into one of five categories:
1. Building test scripts with little or no manual scripting.
2. Reading and interpreting results and reports.
3. Additional features and capabilities for sophisticated testing.
4. Writing more involved or complicated tests using scripting.
5. Extending Rapise to learn new or extended libraries of capabilities.
Depending on the application set being tested, not all of these features are necessarily needed for
every situation.
For each feature, this document attempts to present:
1. The reason you might use a given feature.
© 2015 Inflectra Corporation
Rapise User's Guide
7
2. A summary of the basic value of the feature.
3. An overview of how the feature works from the perspective of using it.
4. At least one useful sample that demonstrates how to use the feature.
Dialogs, Views, and Menus
This section details the Rapise GUI. Each subsection describes the function of a particular Dialog,
View, or Menu. The purpose and consequences of all buttons, options, lists, and check boxes are
listed.
How-Tos
This section focuses on specific tasks that a Rapise user might want to accomplish.
2.2
Glossary
This glossary presents a list of terms and their definitions as they are used in this guide.
API - Application Programming Interface
AUT - Application Under Test
DOM - Document Object Model
GUI - Graphical User Interface
GWT - Google Web Toolkit
IDE - Integrated Development Environment
JSON - JavaScript Object Notation
REST - REpresentation State Transfer
SOAP - Simple Object Access Protocol
UI - User Interface
XML - eXtensible Markup Language
YUI - Yahoo! User Interface (library)
2.3
Getting Started
The Getting Started section is for new Rapise users. It has the following subsections:
1. An Overview of Rapise: what it's for and how to use it.
2. Samples Index, where the sample projects included with Rapise are described.
3. Tutorial: Windows Testing, a step-by-step tutorial for creating your first test with Rapise using a
Windows desktop application.
4. Tutorial: Web Testing, a slightly more advanced tutorial in using Rapise to test a web page.
5. Tutorial: Testing REST Web Services, a tutorial in using Rapise to test a RESTful web service API.
© 2015 Inflectra Corporation
8
Rapise User Manual
6. Tutorial: Testing Adobe Flex Application - a tutorial explaining how to use Rapise to test an Adobe
Flex application
7. Tutorial: Mobile Testing - a tutorial explaining how to use Rapise to test a mobile application (in this
case using Android)
8. Tutorial: Exploratory Testing - a tutorial explaining how to use Rapise to do exploratory manual
testing.
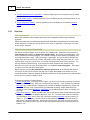
2.3.1
Overview
Why Use Rapise?
Rapise was created to make software testing easy and manageable without being prohibitively
expensive.
Rapise was made easy for software test professionals, developers and professionals concerned with
quality assurance to simply and quickly write a test to cover an application, a web page, or a single
bug to prevent regression.
Make Testing Fast and Repeatable
Consider for a moment what it is you do to test your software today. Most likely it has some for of
user interface (UI), probably a graphic user interface (GUI). So you will run the application , click
around, perhaps in some way that gives you complete coverage of all the features (but probably not if
it's a large application or web). Then you will login, if appropriate, and you will fetch some data and
modify some data, test some more controls - edit boxes, buttons, drop-down lists, links, etc. If you
have just fixed a bug then you will focus on the area of the application where the bug occurred. You
will enter data that causes the bug, or go through the control sequence that causes the bug.
Next time you come to fix a bug in this application, you will do the same thing again.. Once again,
you will focus on the area where the bug was.
Rapise presents you with two methods for capturing specific tests, and it will keep the test as a
solo test or as part of a suite of tests that help you to qualify the application for release or a more
formal QA process. Rapise is designed to allow the developer or the test professional to add new tests
quickly and so to build up a library of tests.
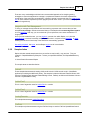
There are two methods for capturing tests:
Record and playback. In this type of test creation, you turn on the recorder and perform the actions
needed to execute the test. Each test is saved to its own directory. A test consists of a javascript
test script (.js), a meta-data file (*.sstest), and any number of additional supplementary scripts and
data files. The test script is automatically generated after recording; simple modifications are
required to make the test data driven. Checkpoints can be added during recording, or manually into
the script.
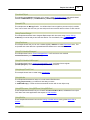
Object-driven learning. Rapise considers each item on the page or within the application window to
be an object. Examples are buttons, edit boxes, links, etc. To create a test using this technique,
you have Rapise "learn" each control, and it will keep a miniature database of all the controls you
"teach" it. To create a test, you write a script to instruct Rapise to perform a particular action on
each object in the prescribed order. As any point along the way, the script you write can instruct
Rapise to look inside an object and read its data and compare that value or content with what you
expect it o be.
© 2015 Inflectra Corporation
Rapise User's Guide
9
There are many methodologies with their own recommended approaches for designing testing
strategies to ensure that application coverage is complete and meets the business requirements
specification of the work being accomplished. Inflectra in general, recommends that you create a new
test for each software requirement (to track progress) and for each issue in your issue tracking system
(to test for regressions).
Integration with Test Management
To help you manage the requirements and issue tracking processes and to ensure that you have
adequate test coverage, Inflectra recommend that you use Rapise with a test management system
such as SpiraTest. That way you can maintain all your requirements, test cases and defects in a
single place.
Once you have created the test, you can playback your test from within Rapise, run it from the
command-line or execute it remotely using RapiseLauncher in conjunction with SpiraTest. A report
detailing the outcome of each step of the test will be automatically generated.
Recording, playback, the report, and the Rapise engine are all customizable.
2.3.2
Samples Index
Rapise includes several sample tests that you are free to read, modify, copy and use. They are
located in: RapiseDataDirectory\Samples. Unless you specified otherwise, the RapiseDataDirectory
will be:
C:\Users\Public\Documents\Rapise.
The sample tests are described below.
ActiveX
These samples demonstrate the testing of Microsoft ActiveX / COM controls used in Visual Basic
applications including the MSComCtl library. The samples include the Microsoft FlexGrid Control, MS
Common Toolbar Control, Microsoft Tabbed Dialog Control, TabStrip, and Microsoft Windows Common
Controls 6.0 [MSCOMCTL.OCX].
AdobeFlex3
This is a set of regression tests for Adobe Flex 3.x controls.
AdobeFlex4
This is a set of regression tests for Adobe Flex 4.x controls.
AnalogRecorder
This sample demonstrates Analog Recording.
FarPoint
This sample script demonstrates using the FarPoint library to test the FarPoint SpreadSheet Control.
© 2015 Inflectra Corporation
10
Rapise User Manual
HTML5
This sample tests a HTML5 application. This sample demonstrates the capabilities of the HTML5 DOM
browser library. The application under test contains various HTML5 specific controls, such as: color,
date, datetime, email, range, progress, etc.
The sample is also available online at http://www.libraryinformationsystem.org/Html5/AUTHTML5.htm
Java
This sample tests a Java AWT/SWING application. This sample demonstrates the capabilities of the
Java library. The application under test contains various standard GUI controls, such as: button, edit,
tree, combo box, menu, etc.
Java SWT
This sample tests a Java SWT/RCP application. This sample demonstrates the capabilities of the SWT
and UIAutomation libraries. The application under test contains various standard GUI controls, such
as: button, edit, tree, combo box, menu, etc.
jQuery-UI
This sample illustrates using the jQuery HTML DOM extension library that allows you to record/
playback test scripts against web applications using widgets from the jQuery Javascript library
framework.
Library Information System
These tests can be used to test the sample library information system web application hosted at http://
www.libraryinformationsystem.net. This is the same sample application used by SpiraTest and
illustrates how you can use SpiraTest to manage and execute automated Rapise tests. A copy of
these tests is also available in new installations of SpiraTest v3.2+.
Managed
This sample tests a .NET 2.0 application. This sample demonstrates the capabilities of the Managed
library. The application under test contains various standard GUI controls, such as: button, edit, tree,
combo box, grid, listbox, listview, menu, etc.
QtFramework
TThis sample tests a sample QT Framework cross-platform application. This sample demonstrates the
capabilities of the QtFramework library. The application under test contains various standard Qt
widgets, such as: button, edit, tree, combo box, etc.
Silverlight
This sample tests a Silverlight web application. This sample demonstrates the capabilities of the
UIAutomation library. The application under test contains various standard GUI controls, such as:
button, edit, tree, combo box, menu, etc.
© 2015 Inflectra Corporation
Rapise User's Guide
11
SimulatedObject
This sample opens MS Paint and draws on its canvas. It uses Simulated Objects and several related
methods: DoMouseMove(X,Y), DoLButtonDown(), DoLButtonUp(), and DoSendKeys(text).
SampleATM
This sample tests an MFC application. You will also learn how to organize your test script in modular
form, how to launch the AUT from your test script and how to execute various actions on GUI controls.
UsingCustomStrings
This sample demonstrates how to integrate Rapise tests with other tools using Custom Strings.
TestFinish() is used to analyze and save test results. For more details, see: Custom Strings.
UsingDatabase
This example shows how you can use a relational (SQL) database to create Data-Driven tests. This
script reads test case data from a spreadsheet ADO datasource to test Calculator.
UsingDLLHandlerManaged
This sample shows how to unit test managed DLLs. You'll see how to use methods
CreateClassInstance () and InvokeMember ().
UsingDLLHandlerUnManaged
This sample shows how to unit test unmanaged DLL code. You'll learn how to register
(UserWrap.Register) and execute (UserWrap.ShellExecute) a function.
UsingImageCheckPoint
This example shows how to create image checkpoints.
UsingInclude
This sample demonstrates two ways to include external files/functions:
1. eval(g_helper.Include(...)): include a file with utility functions.
2. SeSRunJSScript(...): include and execute external function with its own object map.
UsingMSAccess, UsingMSExcel, UsingMSWord
These samples demonstrate how you can work with Microsoft Word, Excel, and Access from scripts.
You'll learn how to test applications that expose a COM interface.
UsingMobile
These samples demonstrate how to do the testing of mobile devices running either Apple iOS or
Android.
UsingOCR
© 2015 Inflectra Corporation
12
Rapise User Manual
This sample demonstrates usage of the Optical Character Recognition (OCR) functionality.
UsingRegistry
This sample demonstrates usage of the windows registry. The registry is queried to determine the OS
(XP/2003/Vista, etc) and owner.
UsingReporting
This sample illustrates various reporting features:
1. Regular reporting (Tester.Assert, Tester.Message )
2. Custom attributes (Tester.SetReportAttribute, Tester.ResetReportAttribute )
3. Stacked attributes (Tester.PushReportAttribute, Tester.PopReportAttribute )
4. Nested Tests (Tester.BeginTest, Tester.EndTest)
5. Inserting Links, Text and Images into the report (tags parameter, SeSReportText, SeSReportLink,
SeSReportImage)
UsingSpreadSheet
This example shows how you can use Excel spreadsheets to create Data-Driven tests. This script
reads test case data from an XLS spreadsheet to test Calculator.
UsingXML
This sample demonstrates how to read, modify and write XML files.
WebServicesREST
This sample demonstrates how you can use the Rapise Web-Services module to write and execute
automated web service tests against an HTTP RESTful web service.
2.3.3
Tutorial: Web Testing
In this section, you will learn how to record and execute a Rapise script against a web application. We
will be using a demo application called Library Information System. Our test will be simple. It will log
on to the library catalog, navigate to the main menu, and click on all of the menu options to make sure
the links are working.
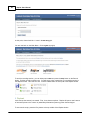
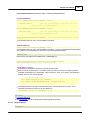
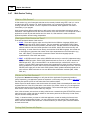
1. Open Rapise
Go to Start > All Programs > Inflectra > Rapise. The following window should appear.
© 2015 Inflectra Corporation
Rapise User's Guide
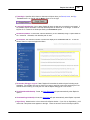
2. Open the AUT (Application Under Test)
Open up Internet Explorer. You will find it in Start > All Programs > Internet Explorer. In Internet
Explorer, navigate to: http://www.libraryinformationsystem.org:
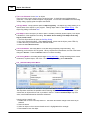
3. The Select an Application to Record Dialog
In the Rapise window, press the Record/Learn button on the Ribbon.
© 2015 Inflectra Corporation
13
14
Rapise User Manual
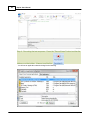
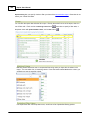
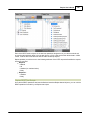
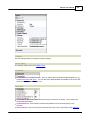
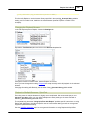
The Select an Application to Record... Dialog (SAR dialog) will open.
There are two sections to the SAR dialog. In the bottom section, you select which Rapise library will be
used during the recording session. Because we will be recording our interactions with Internet
Explorer, make sure that the Internet Explorer HTML library is checked. No other libraries should be
selected. See below:
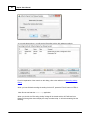
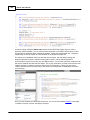
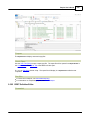
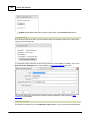
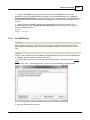
In the top section of the SAR dialog, we choose which application to record. Scroll down the available
© 2015 Inflectra Corporation
Rapise User's Guide
15
applications and click once on Inflectra | Library Information System, so that it is highlighted. Now,
press the Select button near the bottom right of the dialog.
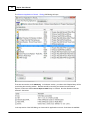
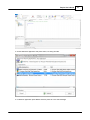
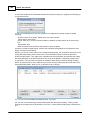
The Recording Activity Dialog (RA dialog) will appear:
The RA dialog has a grid. As you interact with the sample Library Information System program, the grid
will automatically populate with your actions.
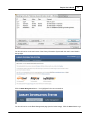
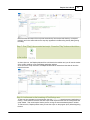
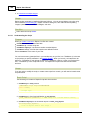
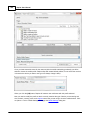
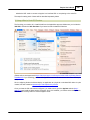
4. Recording
Let's begin creating the test. On the library information system login page, click on the Log In link in
the top-right of the screen.
© 2015 Inflectra Corporation
16
Rapise User Manual
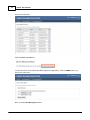
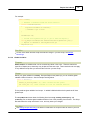
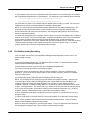
In the username text box, type librarian
Press the tab key. You'll notice that the RA dialog has changed. Your actions, clicking Log-In and
entering a username, are listed in the grid:
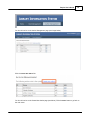
The password for user librarian is also librarian. Type the password in and then press the Log-In
button.
Two more rows should appear in the RA dialog: one to represent the password entry, and one to
represent the button click:
© 2015 Inflectra Corporation
Rapise User's Guide
17
You should now be on the main menu of the Library Information System with the user's name listed in
the top-right:
Click the Book Management button. It is highlighted in the next screenshot:
You should now be on the Book Management page (see the below image). Click the Home button to go
© 2015 Inflectra Corporation
18
Rapise User Manual
back to the main menu.
Click the Create new book link:
You should now be on the Create New Book page (see image below). Click the HOME button to go
back to the main menu.
Now, click the Author Management button:
© 2015 Inflectra Corporation
Rapise User's Guide
19
You should now be on the Author Management page (see image below):
Click the Create New Author link:
You should now be on the Create New Author page (see below). Click the Home button to go back to
the main menu.
© 2015 Inflectra Corporation
20
Rapise User Manual
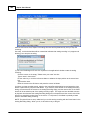
At this point, there should be 11 rows in the RA dialog grid.
You are now back on the Main Menu. Click Log Out (top-right).
To end the recording session, you can either press CTRL+3 or press the Stop button on the Record
dialog. End the recording session now. You will see a script created from your recording session in
the Rapise window. Let's save our test. Press the Save button at the top left of the Rapise window.
5. Playback
Let's execute the test we just created. First, close Internet explorer. Rapise will open a new instance
of Internet Explorer to the correct url (www.libraryinformationsystem.org) when the test begins.
To execute the script, press the Play button at the top middle of the Rapise window.
© 2015 Inflectra Corporation
Rapise User's Guide
21
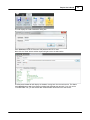
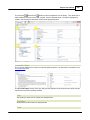
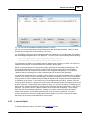
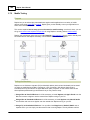
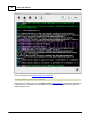
After execution, a screen like the one below will appear. Each row represents a step in the test. The
rows with green text are steps which passed, whereas the rows with red text are the steps which
failed.
For more information on the report, see Automated Reporting.
2.3.4
Tutorial: Windows Testing
This section outlines the usage of Rapise for testing a simple Windows Desktop Application Under
Test (AUT).
Please run the application now. You will find it in the samples directory where you installed Rapise.
By default, that will be C:\Users\Public\Documents\Rapise\Samples\TwoDialogs
\TwoDialogs.exe .
You will see the following:
© 2015 Inflectra Corporation
22
Rapise User Manual
Please run the application a few times and observe its behaviour. If you press the OK button with the
first edit box empty, the application will complain and return you to the dialog box.
If you put text in the first edit box but not the second, you will be shown a single line of text in a readonly edit box..
If you enter text in the second edit box as well as the first, pressing OK will put two lines of summary
information in the read-only edit box.
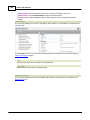
An adequate testing strategy for this over-simple application might be to:
1. Put data in the first text box but not the second, and verify that the summary information is correct.
2. Press the OK button with no data in either text box, and verify that a message box is displayed.
3. Verify that if the success "Thank You" message is displayed the edit box input fields are cleared
(but not the summary information).
If at this point you do not understand what the application is supposed to do, or the application is not
behaving as described here, please contact support and clarify the details before proceeding.
Now, let's use Rapise to implement the first of these tests.
Step 1. Run the TwoDialogs application and leave it in its default start state.
Step 2. Start Rapise and make the window a conveniently large size. Click on the
button (top left). Choose the first option there, "New Test."
© 2015 Inflectra Corporation
Rapise User's Guide
23
Step 3. Navigate to the desired path using the "..." button on the "Create New Test"
dialog.
Leave the "Use Methodology" as "Basic" for now.
Press the "Create" button.
You will now see the following:
© 2015 Inflectra Corporation
24
Rapise User Manual
Step 4. Recording the test sequence. Press the "Record/Learn" button in either the
ribbon or on the toolbar. It has an icon like this:
You will see an application selection dialog like the following.
© 2015 Inflectra Corporation
Rapise User's Guide
25
Select the "Inflectra Rapise Two Dialogs Sample" entry.
Leave the library selection as "Auto."
Press the "Select" button at the bottom right.
Step 5. Record the activity in the application.
Rapise will pause while it starts the necessary background processes and hooks into the running
AUT.
Once those tasks are complete, you will see the following "Recording Activity" for "Inflectra Rapise
Two Dialogs Sample" dialog:
The AUT will be brought to the foreground and Rapise will be minimized.
You will achieve best results in recording if you observe the following guidelines:
(1) Work slowly while recording. Perform one action and wait for the results to be recorded in the
Recording Activity dialog as a new grid line-item before going to the next item.
(2) Use the mouse to select controls and operate them. Avoid using keyboard shortcuts and
keyboard commands.
Step 6. Click in the first edit box in the TwoDialogs application. Type a name in
there.
Watch the Recording activity dialog as you operate the AUT interface. As you press a button or fill
a field, notice that the grid in the Recording activity has entries added to it.
© 2015 Inflectra Corporation
26
Rapise User Manual
As you take these actions, you will see the Recording Activity grid update accordingly:
For a full explanation of the controls on this dialog, refer to the reference for Recording Activity
Dialog
When you have finished recording the activity for the AUT, press the "Finish" button or CTRL+3.
Note: Do not terminate the TwoDialogs application.
When you do this, the "Recording Activity" dialog will be closed and the AUT will lose focus.
Rapise will change the view to display the newly recorded script. It will look something like the
following:
© 2015 Inflectra Corporation
Rapise User's Guide
27
Notice that the two steps of the script are automatically documented and that they correspond
precisely and in the same order as the way they appeared in the Recording Activity dialog during
recording.
Step 7: Run ("Play") the recorded test script. Press the "Play" button on the ribbon
or the toolbar.
As the script runs, the Rapise window will be minimized to the taskbar and you will see the results
of the script's activities on the TwoDialogs application window.
At the end of the script execution, the Rapise window will be restored and the view will be of the
report for the test:
Step 8: A refinement on the launching of TwoDialogs.exe.
To date, we have operated on the assumption that the TwoDialogs sample program (application) is
running. If this situation remained, the test script would require that the AUT be running before the
script started. That would require that the person running the test remembered where it resided.
To overcome this, Rapise provides a way to have the script run the program (AUT) before beginning
the test.
© 2015 Inflectra Corporation
28
Rapise User Manual
Rapise has an underlying scripting language based on JavaScript (see Scripting). This help
system covers available scripting objects in detail from a practical perspective. For the moment,
we want to simply take the shortest path to starting the application before attempting to run the
test.
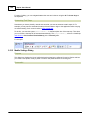
There are at least 3 ways of adding application launch code to your test.
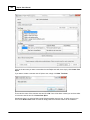
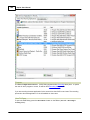
Way 1: Drag The File from the Test Files view
First, switch to Test Files view. Right-click on "Test" folder and choose "Add File(s)..." menu
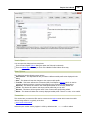
item:
And select the location of the TwoDialogs.exe (normally, it is C:\Program Files\Inflectra
\Rapise\Samples\TwoDialogs\TwoDialogs.exe ),
© 2015 Inflectra Corporation
Rapise User's Guide
29
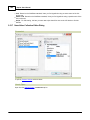
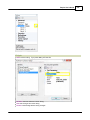
Now you have the executable as a part of your test files set:
If you wish to launch TwoDialogs.exe once then just double-click on it in the tree. If you wish it
to be launched every time the test starts then simply drag it from the tree into the source code:
© 2015 Inflectra Corporation
30
Rapise User Manual
The proper launch statement will be inserted:
Way 2: Type the Code
The Global object contains methods that are available to all scripts.
Select the TwoDialogs.js file in the Test Files view of the Rapise main page.
Double-click the file name to open it in the main (editing) window of Rapise. You will see the
generated script from the recording session from earlier steps in this sample.
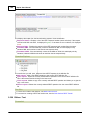
Place the cursor in the main editing window and click on the first line after
function Test()
{
Now type
Global.
As soon as you type the ".", Rapise will give you a drop down list of all the available methods
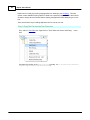
available in the Global object:
Select the DoLaunch(cmdLine, wrkD) member and hit the Enter key.
Now your script contains the line:
Global.DoLaunch('')
You need to correct the references to the command line:
Global.DoLaunch('"C:\\Program Files\\Inflectra\\Rapise\\Samples\\TwoDialogs\
\TwoDialogs.exe"');
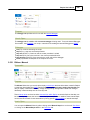
Way 3: Drag the Action from the Objects Tree
You may drag the method template from the Object Tree view. Expand the "Global" node and
select the "DoLaunch" action in it. Drag the node into the proper position inside the script
source:
© 2015 Inflectra Corporation
Rapise User's Guide
31
Template call is inserted:
Now you need to correct the references to the command line:
Global.DoLaunch('"C:\\Program Files\\Inflectra\\Rapise\\Samples\\TwoDialogs\
\TwoDialogs.exe"');
2.3.5
Tutorial: Testing Adobe Flex Applications
Contents
Introduction
Prerequisites
Create a Simple Flex Application: Hello Flex
Enable HelloFlex Application for Testing
Link HelloFlex with Necessary Libraries
Add HelloFlex to FlashPlayerTrust
Record a Simple Test
Execute the Test
Using FlexLoader
See Also
Introduction
© 2015 Inflectra Corporation
32
Rapise User Manual
After going through this tutorial you?ll get a basic idea of how to test browser-based Flex applications
with Rapise.
Prerequisites
This tutorial assumes that you have installed:
1. Rapise
2. Adobe Flex Builder 3 (http://www.adobe.com/products/flash-builder-family.html)
OR
Adobe Flash Builder 4 (http://www.adobe.com/products/flash-builder-family.html)
Create a Simple Flex Application: HelloFlex
Let's start from creation of a very simple Flex application.
1. Create home directory for the application: C:\HelloFlex. You may create any other directory that is
more suitable for you, just do not forget to change corresponding paths used in this tutorial.
2. Create main file of the application: C:\HelloFlex\HelloFlex.mxml. Place the following code in it:
<?xml version="1.0" encoding="utf-8"?>
<mx:Application
xmlns:mx="http://www.adobe.com/2006/mxml"
viewSourceURL="src/HelloFlex/index.html"
horizontalAlign="center" verticalAlign="middle"
width="640" height="480"
>
<mx:Script>
<![CDATA[
import mx.controls.Alert;
]]>
</mx:Script>
<mx:Panel
paddingTop="10" paddingBottom="10" paddingLeft="10" paddingRight="10"
title="My Application"
>
<mx:Label text="Hello Flex!" fontWeight="bold" fontSize="24"/>
<mx:Button id="button" label="Button" click="{Alert.show('Button
Pressed');}"/>
</mx:Panel>
</mx:Application>
3. Create wrapper HTML for the application: C:\HelloFlex\HelloFlex.html. Place the following code in it:
<html lang="en">
<head>
<meta http-equiv="Content-Type" content="text/html; charset=utf-8" />
<title>HelloFlex</title>
</head>
<body scroll="no">
<object classid="clsid:D27CDB6E-AE6D-11cf-96B8-444553540000"
id="HelloFlex" width="100%" height="100%"
codebase="http://fpdownload.macromedia.com/get/flashplayer/current/
swflash.cab">
© 2015 Inflectra Corporation
Rapise User's Guide
33
<param name="movie" value="HelloFlex.swf" />
<param name="quality" value="high" />
<param name="bgcolor" value="#869ca7" />
<param name="allowScriptAccess" value="sameDomain" />
<embed src="HelloFlex.swf" quality="high" bgcolor="#869ca7"
width="100%" height="100%" name="HelloFlex" align="middle"
play="true"
loop="false"
quality="high"
allowScriptAccess="sameDomain"
type="application/x-shockwave-flash"
pluginspage="http://www.adobe.com/go/getflashplayer">
</embed>
</object>
</noscript>
</body>
</html
4. Compile the application (make sure that mxmlc.exe is available in command line window. If Flex
Builder 3 is installed then it is available at: "c:\Program Files\Adobe\Flex Builder 3.x\sdks\<SDK
Version>\bin\mxmlc.exe").
If Flash Builder 4 is installed then it is available at: "c:\Program Files\Adobe\Flash Builder 4.x\sdks
\<SDK Version>\bin\mxmlc.exe")
a) Open CMD window in C:\HelloFlex directory
b) Run command: mxmlc HelloFlex.mxml
5. Test the application by opening C:\HelloFlex\HelloFlex.html in Internet Explorer.
© 2015 Inflectra Corporation
34
Rapise User Manual
Enable HelloFlex Application for Testing
To make HelloFlex application testable by Rapise you need to link it with automation libraries.
Link HelloFlex with Necessary Libraries
For Flex Builder 3.x, recompile the HelloFlex application using the following command line that links
automation.swc and automation_agent.swc from Flex Builder 3 and FlexAdapter.swc from Rapise:
mxmlc HelloFlex.mxml -locale en_US -include-libraries="c:/Program Files/Adobe/
Flex Builder 3/sdks/<Version>/frameworks/libs/automation_agent.swc","c:/Program
Files/Adobe/Flex Builder 3/sdks/<Version>/frameworks/libs/automation.swc","c:/
Program Files/Inflectra/Rapise/Extensions/Flex/FlexAdapter/bin/FlexAdapter.swc"
For Flash Builder 4.x, recompile the HelloFlex application using the following command line that links
automation.swc and automation_agent.swc from Flash Builder 4.x and FlexAdapter.swc from Rapise:
mxmlc HelloFlex.mxml -locale en_US -include-libraries="c:/Program Files/Adobe/
Flash Builder 4/sdks/<Version>/frameworks/libs/automation_agent.swc","c:/Program
© 2015 Inflectra Corporation
Rapise User's Guide
35
Files/Adobe/Flash Builder 4/sdks/<Version>/frameworks/libs/automation.swc","c:/
Program Files/Inflectra/Rapise/Extensions/Flex/FlexAdapter/bin/FlexAdapter.swc"
Add HelloFlex to FlashPlayerTrust
Adobe Flash Player has restricted security settings for SWFs opened from file system. To enable
testing of such SWFs their corresponding folders must be listed in FlashPlayerTrust directory.
Path to FlashPlayerTrust directory:
to enable testing for all users:
<system>\Macromed\Flash\FlashPlayerTrust
to enable testing just for current user:
<ApplicationData>\Macromedia\Flash Player\#Security\FlashPlayerTrust
(on Vista this path looks like:
c:\Users\<User Name>\AppData\Roaming\Macromedia\Flash Player\#Security\FlashPlayerTrust
)
To register your SWF just create a file with the name "<name of your SWF>.cfg" and put it in this
directory. In the file write a path to SWF folder.
© 2015 Inflectra Corporation
36
Rapise User Manual
Note: If you do not have FlashPlayerTrust directory in one of locations listed above then you will have to
create missing directories yourself.
To register c:\HelloFlex\HelloFlex.swf
a) create file <ApplicationData>\Macromedia\Flash Player\#Security\FlashPlayerTrust\HelloFlex.cfg
b) add this to the file: c:\HelloFlex
Record a Simple Test
1. Open C:\HelloFlex\HelloFlex.html in Internet Explorer.
2. Start Rapise and press Record/Learn button
© 2015 Inflectra Corporation
Rapise User's Guide
3. Choose HelloFlex application and press Select, recording will start.
4. In HelloFlex application press Button and then press Ok in the alert message.
© 2015 Inflectra Corporation
37
38
Rapise User Manual
5. Then press Verify button on Recording activity dialog and click on "Hello Flex!" label. In Verify Object
Properties dialog check Enabled property.
6. You have recorded three basic steps of your test.
© 2015 Inflectra Corporation
Rapise User's Guide
39
7. Press Finish button on Recording activity dialog. You now have recorded the test.
Execute the Test
Execute the test by pressing the Play button in Rapise.
Congratulations! You have successfully completed this tutorial and now know basics of testing Flex
applications with Rapise.
Using FlexLoader for Flex 3 Applications
If you do not want to compile your Flex 3 application with automation libraries you have an option to
use FlexLoader.
FlexLoader is a Flex 3 application compiled with the required automation libraries and capable of
© 2015 Inflectra Corporation
40
Rapise User Manual
loading any given SWF application. With FlexLoader you do not need to modify your application to
make it testable by Rapise.
(You will need to choose between FlexLoader 3 and FlexLoader 4 according to which Flex SDK version
your application uses.)
To use FlexLoader 3 just copy FlexLoader.html and FlexLoader.swf from c:/Program Files/Inflectra/
Rapise/Extensions/Flex/FlexLoader/bin to your web server near your application. Then type in browser
URL to FlexLoader.html and supply additional query parameter with the name of your SWF file, e.g.:
http://localhost/FlexLoader.html?automationswfurl=Sample.swf
You can find sample application for testing here: c:/Program Files/Inflectra/Rapise/Extensions/Flex/
FlexLoader/bin/Sample.swf
Using FlexLoader for Flex 4 Applications
If you do not want to compile your Flex 4 application with automation libraries you have an option to
use FlexLoader4.
FlexLoader4 is a Flex 4 application compiled with the required automation libraries and capable of
loading any given SWF application. With FlexLoader4 you do not need to modify your application to
make it testable by Rapise.
(You will need to choose between FlexLoader 3 and FlexLoader 4 according to which Flex SDK version
your application uses.)
To use FlexLoader 4 just copy FlexLoader4.html and FlexLoader.swf from c:/Program Files/Inflectra/
Rapise/Extensions/Flex/FlexLoader4/bin to your web server near your application. Then type in browser
URL to FlexLoader4.html and supply additional query parameter with the name of your SWF file, e.g.:
http://localhost/FlexLoader4.html?automationswfurl=Sample.swf
You can find sample application for testing here: C:\Users\Public\Documents\Rapise\Samples
\AdobeFlex4\AUTFLexFP4\bin-debug\assets
See Also
Adobe Flex
2.3.6
Tutorial: Testing REST Web Services
In this section you shall learn how to test a RESTful web services API using Rapise. We shall be using
a demo application called Library Information System that has a dummy RESTful web service API
available for learning purposes. You can access this sample application at http://
www.libraryinformationsystem.org, and its RESTful web service API can be found at:
www.libraryinformationsystem.org/Services/RestService.aspx.
What is REST and what is a RESTful web service?
REpresentational State Transfer (REST) is a style of software architecture for distributed systems such
as the World Wide Web. REST has emerged as a web API design model that offers greater simplicity
over other web service protocols such as SOAP and XML-RPC.
A RESTful web API (also called a RESTful web service) is a web API implemented using HTTP and
REST principles. Unlike SOAP-based web services, there is no "official" standard for RESTful web
APIs. This is because REST is an architectural style, unlike SOAP, which is a protocol.
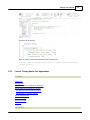
Overview
Creating a REST web service test in Rapise consists of the following steps:
© 2015 Inflectra Corporation
Rapise User's Guide
41
1. Using the REST query builder to create the various REST web service requests and verify that
they return the expected data in the expected format.
2. Parameterizing these REST web service requests into reusable templates and saving as Rapise
learned objects.
3. Writing the test script in Javascript that uses the learned Rapise web service objects.
We shall discuss each of these steps in turn.
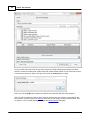
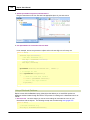
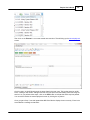
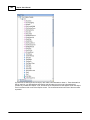
1. Using the REST Query Builder
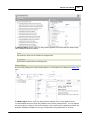
Create a new test in Rapise called MyRestTest1.sstest. Once you have created it, click on the "Web
Services" icon in the Test ribbon to add a new web service definintion to your test project:
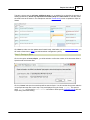
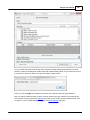
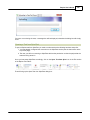
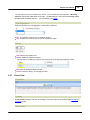
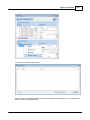
This will display the Add New Web Service dialog box:
Enter the name of the web service that you're going to add, in this case enter
"LibraryInformationSystem.rest" and click "Create". This will add the REST web services definition
file to your test project:
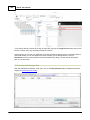
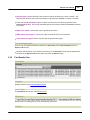
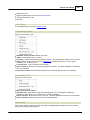
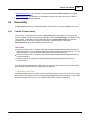
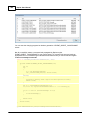
You will see on the right hand side, there is a new document editor for the .rest file. This is the REST
web services query form. It lets you send test HTTP requests to the web service under test and inspect
the output being returned.
If you open up API documentation for our sample application (www.libraryinformationsystem.org/
Services/RestService.aspx) you will see that it exposes several operations for retrieving, adding,
updating and deleting books and authors in the system. For this tutorial we shall perform the following
operations:
© 2015 Inflectra Corporation
42
Rapise User Manual
1. Get the special SessionID to identify our test session
2. Get a list of books in the system
3. Add a new book to the system and verify that it was added
According to the documentation that means we will need to send the following requests:
(i) Get a Unique Session
URL:
http://www.libraryinformationsystem.org/
Services/RestService.svc/session
Method:
GET
Returns:
Unique session ID that is passed to other
requests to keep data separate for different
demo users
(ii) Get this list of books
URL:
http://www.libraryinformationsystem.org/
Services/RestService.svc/book?
session_id={session_id}
Method:
GET
Returns:
Array of book objects
(iii) Add a new book to the list
URL:
http://www.libraryinformationsystem.org/Services/RestService.svc/book?
session_id={session_id}
Method:
POST
Pass a populated book object:
{
"Name": "Book Name",
"AuthorId": 1,
"GenreId": 1,
Body:
}
Returns:
Single book object that has its BookId populated
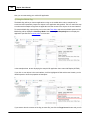
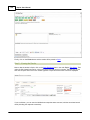
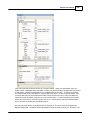
The first request will be to get the unique session ID that we will need to pass to the other requests.
This is needed by our sample application to prevent testing by different users interfering with each
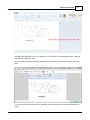
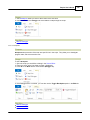
other. To create this request, simply enter the following information on the REST Request form:
Name: Get_Session
Method: GET
URL: http://www.libraryinformationsystem.org/Services/RestService.svc/session
You should now have it populated as illustrated below:
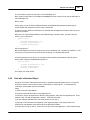
This web service request requires that we pass credentials by means of HTTP Basic authentication. So
click on the "REST" tab in the Rapise ribbon and click on the "Add Credentials" button.
© 2015 Inflectra Corporation
Rapise User's Guide
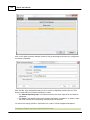
This will display the "Add Credentials" dialog box:
Enter librarian as both the username and password and click "Add".
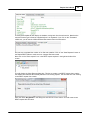
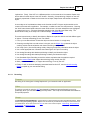
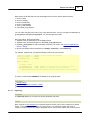
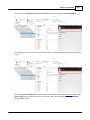
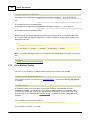
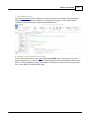
Now click the "Send" button and the request will get sent to the web service:
The Response Header tab will display the headers coming back from the web service. The Status
Code 200 OK means that the request succeeded and that data was returned. If you click on the
"Formatted XML" tab, you will see the XML serialized data returned from the web service:
© 2015 Inflectra Corporation
43
44
Rapise User Manual
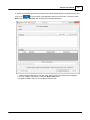
Since Rapise uses JavaScript as its scripting language, it is usually easier to work with JSON
(JavaScript Object Notation) serialized data rather than XML. In the case of the sample Library
Information System web service, you can change the format that it accepts and retrieves by sending
two special HTTP headers:
Content-Type: application/json
Accept: application/json
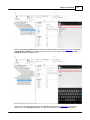
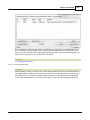
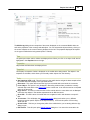
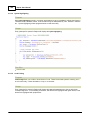
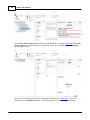
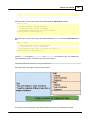
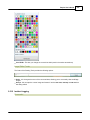
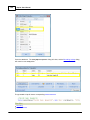
To add these headers to the request, simply click on the "Add Header" button in the REST ribbon tab.
This will display the following dialog box:
Choose the HTTP Header "Accept" from the list and enter "application/json" as the value. Repeat for
the "Content-Type" header. You should now have the following populated request:
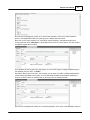
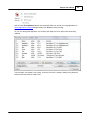
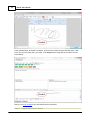
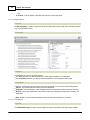
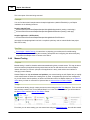
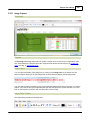
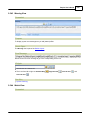
Now click the "Send" button and the request will get sent to the web service:
© 2015 Inflectra Corporation
Rapise User's Guide
45
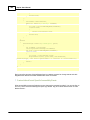
The Response Header tab will display the headers coming back from the web service. Note that the
returned Content-Type is listed as "application/json" as requested. If you click on the "Formatted
JSON" tab, you will see the JSON serialized data returned from the web service:
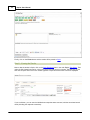
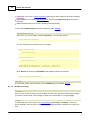
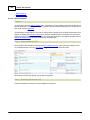
We have now completed the creation of our first test operation. Click on the "Save Requests" button in
the Rapise REST Ribbon to make sure our changes have been saved.
Now click on the "Clone request" icon in the REST request explorer in the right-hand side of the
screen:
This will display the Clone Request dialog box. This lets us create a new REST request that contains
the headers and authentication already defined on our existing request. This will save time over creating
a new REST request from scratch:
Enter the name "Get_Books" in the dialog box and click the "Clone" button. This will create a new
REST request with this name:
© 2015 Inflectra Corporation
46
Rapise User Manual
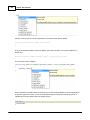
For this request we need to pass through the SessionID in the querystring. Rather than hardcoding it in
the URL, we can make use of the parameterization feature of Rapise. Click on the "Add Parameter"
button in the Rapise REST Ribbon. This will display the "Add Request Parameter" dialog box:
Click the "Add" button and the parameter will be added to the request. Now change the URL to:
URL: http://www.libraryinformationsystem.org/Services/RestService
Then position the caret at the end of this URL and click the "Insert in URL" button. This will insert the
parameter token in the URL at the specified point:
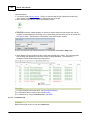
Now click the "Send" button and the request will get sent to the web service. This will return the list of
books serialized as a JSON array of objects:
© 2015 Inflectra Corporation
Rapise User's Guide
47
We have now completed the creation of our second test operation. Click on the "Save Requests"
button in the Rapise REST Ribbon to make sure our changes have been saved.
Now click on the "Clone request" icon in the REST request explorer in the right-hand side of the
screen. Enter the name "Add_Book" in the dialog box and click the "Clone" button. This will create a
new REST request with this name:
This operation will add a new book to the system, so it's a POST request. Change the Method type in
the dropdown list from "GET" to "POST".
Expand the "Body" field on the form. This is where you can enter in an XML or JSON serialized Book
record that will get added to the system. For now we'll leave this blank and let Rapise serialize the
body for us later on when we actually write our test script. So we should now have:
We have now completed the creation of our third test operation. Click on the "Save Requests" button in
© 2015 Inflectra Corporation
48
Rapise User Manual
the Rapise REST Ribbon to make sure our changes have been saved.
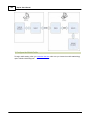
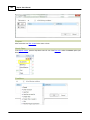
2. Saving the REST Requests as Objects
Now that we have created our three REST requests, the next step is to actually create the Rapise
objects that we can use in our JavaScript test scripts. Click on the "Update Object Tree" button in the
Rapise REST Ribbon to tell Rapise to update the Object Tree with our new requests:
Rapise will open a command prompt window in the background and then display a confirmation
message once the Object Tree has been updated. Click on the "Object Tree" tab of the main Rapise
explorer, click the Refresh icon and you will see the "LibraryInformationSystem" heading displayed,
with the three saved REST request listed underneath:
If you expand one of the REST requests (e.g. Add_Book), you'll see that it has a single operation
"DoExecute" that executes the web services and a series of properties available for inspecting or
updating any part of the REST request prior to it being sent to the server.
In the next section we shall illustrate how you can write a test script using these learned objects.
3. Writing REST Test Scripts
Open up the main MyRestTest1.js file in the Rapise editor. It will initially consist of a single empty
function Test():
© 2015 Inflectra Corporation
Rapise User's Guide
49
The first task is to get a new SessionId from the server using the Get_Session operation. To do this,
drag the "DoExecute" operation from under the "Get_Session" object into the script editor, in
between the opening and closing braces of the Test() function:
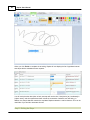
This will execute the web serviced and return the SessionId. To actually access the retrieved value, you
need to drag the "GetResponseBodyObject" property to the script editor, under the previous line.
Then add the JavaScript code var sessionId = to actually store the value. We will also add a
Tester.Message(sessionId); line afterwards to write out the value of the sessionId to the test
report. This will help us make sure we are getting back a valid response from the web service. You
should now have the following code:
Save this test and click "Play" to execute the test. You should now see a report similar to the
following:
© 2015 Inflectra Corporation
50
Rapise User Manual
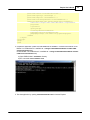
Now we need to add the code to get the list of books. To do that, simply drag the "DoExecute"
operation from under the "Get_Books" object into the script editor. Then change the (null) argument
to instead provide the session id as a Javascript dictionary:
SeS('LibraryInformationSystem_Get_Books').DoExecute({"session_i
To get the list of books as a JavaScript array, drag the "GetResponseBodyObject" property to the
script editor, under the previous line. Then assign the value of this property to a variable such as
"books":
var books = SeS('LibraryInformationSystem_Get_Books').GetRespon
Now we can add code to test that the number of books returned matches the expected value. Type in
the following code:
Tester.AssertEqual('Book count matches', 14, books.length);
You should now have the following code:
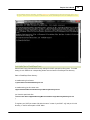
Finally we need to add the code to add a new book to the system. To do that, simply drag the
"DoExecute" operation from under the "Add_Book" object into the script editor. Then change the
(null) argument to instead provide the session id as a Javascript dictionary:
SeS('LibraryInformationSystem_Add_Book').DoExecute({"session_id
To provide the data for a new book, we will need to drag the "SetRequestBodyObject" property of the
"Add_Book" object to the line above the DoExecute and pass in a populated JavaScript object:
var newBook = {};
newBook.Name = 'A Christmas Carol';
newBook.AuthorId = 2;
newBook.GenreId = 3;
SeS('LibraryInformationSystem_Add_Book').SetRequestBodyObject(n
Finally Add code to test that our new book was added correctly and the count has increased by one:
SeS('LibraryInformationSystem_Get_Books').DoExecute({"session_id":
books = SeS('LibraryInformationSystem_Get_Books').GetResponseBodyO
Tester.AssertEqual('Book count matches', 15, books.length);
You should now have the following code:
© 2015 Inflectra Corporation
Rapise User's Guide
51
Save this test and click "Play" to execute the test. You should now see a report similar to the
following:
Congratulations! You have just created your first test script that tests a RESTful web service.
2.3.7
Tutorial: Mobile Testing
Purpose
Rapise lets you record and play automated tests against native applications on a variety of mobile
devices using either Apple iOS or Android. Rapise gives you the flexibility to test your applications on
either real or simulated devices.
This tutorial is a simple example of using Rapise to record and playback a simple test against a
sample Android application running on the Android Simulator on your local PC. It does not require
any physical mobile devices and only uses the PC that you have already installed Rapise on. (There is
other documentation that describes the full range of mobile testing options)
© 2015 Inflectra Corporation
52
Rapise User Manual
1) Setting up Appium and the Android SDK
The first thing you need to do is go to the Appium website (http://appium.io) and install the latest version
of Appium. Once it is installed, you can start it up and click the Play button to start the Appium server:
Once that is installed, you will then need to install the Android SDK (you may already have it installed if
you are doing Android development). You can download it from: https://developer.android.com/sdk.
Once it has installed, you will use the Android SDK Manager to download and install the necessary
packages:
© 2015 Inflectra Corporation
Rapise User's Guide
53
Make sure you have installed the Android ARM images using the SDK manager. Then you can launch
(from the Windows Start Menu) the Android Virtual Device (AVD) Manager:
© 2015 Inflectra Corporation
54
Rapise User Manual
Use the Create button to create the following Virtual Device:
© 2015 Inflectra Corporation
Rapise User's Guide
55
You may need to modify the RAM / Heap parameters to match that which is supported by the physical
PC that you are using. Once the device has been created:
you can then click Start to start the device and then connect to it using Rapise.
2) Configure the Mobile Profile
To begin the actual mobile testing, create a new test, using the File > New Test option in Rapise. Make
sure you choose the mobile methodology option "Mobile: Mobile Support":
© 2015 Inflectra Corporation
56
Rapise User Manual
Once you have entered the name for the new test (with the mobile methodology selected) you will be
asked to choose the mobile profile. Rapise ships with several default profiles, for now select the one that
is closed to the device you want to test (we recommend the android generic profile):
When you click the [OK] button, Rapise will create a new mobile test with this profile selected.
Now you need to modify the profile so that it correctly matches the type of device you are testing and
also so that it correctly points to the Appium server that you are using to host the mobile devices. Click
on Options > Tools > Mobile Settings to bring up the Mobile Settings dialog box:
© 2015 Inflectra Corporation
Rapise User's Guide
57
In the mobile profile screen, make sure you change the following:
app - this needs to the path to the Application being tested on the device (e.g. C:\Users\Public
\Documents\Rapise\Samples\UsingMobile\AUT\AUTAndroid\bin\AUTAndroid.apk ). This path
should be already correct, but it is worth double-checking
deviceName - this needs to match the name of the device being connected
platformName - this needs to be set to 'Android'
platformVersion - this needs to be set to the same version of Android that the virtual device is running
(the one specified in the Android Virtual Device screen earlier)
Once you have entered in the information and saved the profile, make sure that Appium is running on the
PC and then click the [Test URL] button to verify the connection with Appium:
Now when you try and connect to the device using the Rapise mobile spy, you may get the following
message:
© 2015 Inflectra Corporation
58
Rapise User Manual
This means you need to use the Windows control panel to add a System environment variable called
ANDROID_HOME and set it to the path of the installed Android SDK (typically C:\Program Files
(x86)\Android\android-sdk ).
Once you have configured the ANDROID_HOME and it connects, you can start testing your mobile
Android application.
3) Using the Mobile Spy
The Mobile Spy will let you view an application running on the mobile device, take a snapshot of its
screen and then interactively inspect the objects in the application being tested. This is a useful first step
to make sure that Rapise recognizes the application and has access to the objects in the user interface.
To start the Mobile Spy, open the Spy icon on the main Test ribbon and select the Mobile option and the
Mobile Spy will be displayed in Discovery Mode. Now click the [Get Snapshot] button to display the
application specified in the mobile profile on the screen:
In the example above, we are displaying the sample Android application that comes with Rapise
(AUTAndroid).
If you click on one objects in the user interface, it will be highlighted in Red and the tree hierarchy on the
© 2015 Inflectra Corporation
Rapise User's Guide
59
left will expand to show the properties of that object:
If you want to view the contents of the Spy as a text file, just click the 'Page Source' button and you will
see the contents of the Spy properties window as a text file.
Assuming that you can see your application in the Spy and that the objects can be inspected (similar to
that shown above) you can now begin the process of testing your mobile application. Click on
Disconnect to end your Spy session and close the Rapise Spy dialog. You will now will be returned
back to your test script.
4) Recording and Playing a Test
With the new Rapise mobile test script open, click on the Record/Learn button in Rapise and that will
display the recording activity dialog:
© 2015 Inflectra Corporation
60
Rapise User Manual
Now click on the [Pick Object] button and the Rapise Spy will be displayed in Recording Mode:
We now want to record a click on one of the menu options, simply highlight one of the menu entries (e.g.
"Login"):
© 2015 Inflectra Corporation
Rapise User's Guide
61
Now click the [Learn Object] button and the object will be added to the Rapise object tree. Now on the
virtual device window click on the menu entry to go to the next screen, then in Rapise click Get
Snapshot to get the updated screen:
Now click on some of the objects and choose Learn to add them to the object tree. Once you are
finished, click on the Disconnect button. You will see the events in the recording activity dialog:
© 2015 Inflectra Corporation
62
Rapise User Manual
Now click on the Finish button and you will be taken back to the test script with the Android objects
listed:
Now that we have the objects, we can drag them into the test script editor and write the following script:
//########## Script Steps ##############
function Test()
{
SeSConnectMobile();
SeS('text1').DoClick();
SeS('edit_username').DoSetText('test user');
SeS('edit_password').DoSetText('test pwd');
© 2015 Inflectra Corporation
Rapise User's Guide
63
SeS('android_widget_Button').DoClick();
SeS('home').DoAction();
}
g_load_libraries=["Mobile"];
This will click on the first menu entry, then enter a username and password and then finally return back
to the main menu.
Now to playback the test simply click Play in the Rapise test ribbon and the test will play back in the
mobile device:
This is the report of the test being executed.
Example
You can find the Android sample tests and sample Application (called AUTAndroid) in your Rapise
installation at the following locations:
Sample Android Tests:
C:\Users\Public\Documents\Rapise\Samples\UsingMobile\AppAndroid (testing a native App)
C:\Users\Public\Documents\Rapise\Samples\UsingMobile\WebAndroid (testing a web app)
Sample Application (AUTAndroid)
C:\Users\Public\Documents\Rapise\Samples\UsingMobile\AUT\AUTAndroid
(we supply the sample application as both a compiled .apk binary and an Android Studio Java project
with source code)
See Also
Mobile Testing, for an overview of mobile testing with sub-sections on testing:
o using iOS
o using Android.
Mobile Settings Dialog - for information on setting up the different mobile profiles for the mobile
devices you will be testing
Mobile Object Spy - for information on how Rapise connects to the device and lets you view the
objects in the application being tested
Technologies - Mobile Testing, for instructions on preparing your environment for mobile testing,
including instructions for installing the necessary prerequisites and configuring the various third-party
© 2015 Inflectra Corporation
64
Rapise User Manual
components that Rapise uses to connect to the device.
o Mobile Testing: iOS Setup - the steps for setting up Xcode and the iOS SDK for testing iOS devices
2.3.8
Tutorial: Exploratory Testing
Purpose
Exploratory manual testing is used for situations where you have a new or changing application
and the user interface is still evolving. Traditional manual testing, where you create a test case ahead of
time, define the prescriptive test steps and then assign it to the tester does not make sense in such
cases. The solution is to perform exploratory testing, where you explore using the application at the
same time as creating the test script. The created test script can then be published to your test
management system (i.e. SpiraTest) for future regression testing.
Rapise can help accelerate and optimize exploratory manual testing. Rapise lets you walk through the
application, capturing your interactions as you use it, recording screenshots of the objects and screens
you interact with. From this, Rapise will create a fully formed test script ready to use.
Step 1 - Creating a New Test
To start manual testing, simply create your test as normal using the New Test dialog box. Then once the
test has been created, click on the "Manual Steps" icon in the Test ribbon and then you will be taken to
the Manual Editor with the Manual Test Ribbon Visible:
The test step list will initially be empty:
Step 2 - Recording Some Steps
Now you should open up the application you want to record from. In this example we shall be testing the
built-in Microsoft Paint application. This is a good candidate for manual testing as a lot of the
functionality is hard to test automatically since there is a simple drawing canvas rather than discrete
buttons and data elements to test.
To make sure that we have screenshots recorded, whilst keeping the size of the screenshots
reasonable, use the following recording options:
© 2015 Inflectra Corporation
Rapise User's Guide
65
Now click the 'Record Manual' button and choose MS-Paint from the list of running applications in
Select Application to Record dialog and then click 'Select' to start recording.
As you click through the application, the recording will display the list of steps and actions being
captured:
In this example, we created a new canvas, chose the Pencil tool, created a drawing using the pencil,
entered some text and then made it bold:
© 2015 Inflectra Corporation
66
Rapise User Manual
When you click Finish to complete the recording, Rapise will now display the list of populated manual
test steps with the embedded screen captures:
You will notice that the description of each test step will use the form "User [action] at [coordinates] in
'[object name]'" and the expected result will include the screenshot of what the user was doing. In
addition, the sample data will contains the equivalent Rapise automation code for reference. This can be
useful later if you decide to automate this test.
Step 3 - Editing the Steps
© 2015 Inflectra Corporation
Rapise User's Guide
67
Typically you may want to add some additional steps (e.g. we added a line to describe the process of
starting up MS Paint), delete any duplicate/unnecessary steps and reword them so that they make
the most sense to the tester. In our example we used the manual editing screen to update the steps as
follows:
Click Save to make sure the updates are all saved locally. Now before you can execute these tests, you
will need to Save them to Spira (our web-based test management system).
Step 4 - Saving to Spira
Click on the option to Save to Spira, you will be asked to confirm the creation of the document folder in
Spira that will hold the test files:
Click on 'Create' and then the manual test will be saved to Spira. You will see that this process adds the
unique Spira test step IDs to each step. They are displayed using the format [TS:xxx] . This special
token [TS:xxx] can be used in Tester.Assert commands to relate specific verification points with test
steps during automated testing.
© 2015 Inflectra Corporation
68
Rapise User Manual
Now that the test has been saved in Spira, you can click on the 'View in Browser' option to see how
the test steps look inside Spira.
Now that we have finished the recording, we can now play back this manual test.
Step 5 - Executing the Manual Test
Choose the Release from the list of those available in the project:
© 2015 Inflectra Corporation
Rapise User's Guide
69
Then click on the 'Execute' icon to start manual test execution. That will bring up the manual playback
screen:
On this screen, we shall follow through the steps listed in the test case. This involves opening up MS
Paint, creating a new canvas, adding some lines using the pencil and then adding some text using the
text tool. As you perform these steps, click on the Pass button to indicate that each step has passed.
You can also minimize the manual playback screen by clicking the >| button.
Once you get to Step 7, we shall pretend that MS Paint failed to display the text correctly. Enter in the
Actual Result a message to that effect:
© 2015 Inflectra Corporation
70
Rapise User Manual
Next we shall attach a screenshot of what actually happened and log a test failure and associated
incident / defect.
Step 6 - Capturing and Annotating a Screenshot
Click on the Image icon in the rich text editor associated with the Actual Result text box. That will
bring up the Drawing Tools screen that asks you to draw a rectangle to select a portion of the current
screen to capture:
© 2015 Inflectra Corporation
Rapise User's Guide
71
If the MS Paint application is not in the foreground, just click ESC on your keyboard to abort, rearrange
your windows and then try again.
Once you have selected the rectangle, the drawing tools will display your selected image in the image
editor:
You can now use the annotation tools to add labels, text and other items to explain the issue that you
found:
© 2015 Inflectra Corporation
72
Rapise User Manual
In the example above, we added a red ellipse, arrow and text to mark the issue that was seen in MSPaint. Once you are happy with your image, click Accept and the image will be included in the test
Actual Result:
Now we can log an incident that is associated with this test failure.
Step 7 - Logging the Incident / Defect
© 2015 Inflectra Corporation
Rapise User's Guide
73
Click on the 'Log Incident' button to display the new incident entry screen:
Choose the type of incident, enter the name, description, priority, detected release and any other
required fields as defined by the workflow in the project that you are connected to. Once you have
entered in the various fields, click the 'Save' icon in the top left.
This will return you to the manual execution screen with the Incident ID [IN:xxx] and name displayed
at the bottom. Now click on the 'Fail' button and the test case will be marked as failed:
© 2015 Inflectra Corporation
74
Rapise User Manual
Finally, click on the Finish button and the results will be posted to Spira.
Step 8 - Viewing the Results
Now to view the results in Spira, click on the Spira Dashboard item in the main Rapise Test ribbon. Then
under the 'My Created' test cases, click on the link for the test case you execute. That will bring up the
test case in Spira. Now click on the 'Failed' hyperlink in Spira and the new test run will be displayed:
If you scroll down, you can see the individual test steps that were executed, with the associated actual
result (including the captured screenshot):
© 2015 Inflectra Corporation
Rapise User's Guide
75
If you click on the Incidents tab, you can also see the new incident that was logged, linked to this test
run:
Congratulations! You have now successfully executed a manual test using Rapise.
See Also
Manual Testing
Manual Recording
Manual Playback
2.4
Features
Rapise is a feature-rich test automation system, however all the features have been designed to make
test automation as easy as possible.
Most of the features of Rapise fall into one of five categories:
1. Building test scripts with little or no manual scripting.
2. Reading and interpreting results and reports.
3. Additional features and capabilities for sophisticated testing.
4. Writing more involved or complicated tests using scripting.
5. Extending Rapise to learn new or extended libraries of capabilities.
Depending on the application set being tested, not all of these features are necessarily needed for
every situation.
© 2015 Inflectra Corporation
76
Rapise User Manual
For each feature, this document describes:
1. The reason you might use a given feature.
2. A summary of the basic value of the feature.
3. An overview of how the feature works from the perspective of using it.
4. At least one useful sample that demonstrates how to use the feature.
2.4.1
Recording and Learning
Purpose
To understand what different objects might be found on a UI screen, and how to recognize them, record
their characteristics and interact with them using Rapise.
Value
A UI screen entity (object) may consist of many different parts and components. Actions on these
objects, and usage of these controls, must be captured in different ways, depending on the properties
of the object. Rapise provides five fundamental methods for capturing objects and corresponding user
actions:
1. Recording - Rapise is able to track user interactions with AUT and automatically capture affected
objects and corresponding user actions. See Recording for more information.
2. Learning - there are cases when it is not necessary or is not possible to track user interactions
with AUT. In this case user can manually point to an object that should be captured by Rapise. See
Learning for more information.
3. Analog Recording (Absolute/Relative) - this is for objects that are not standard in some important
way, and so activity on them cannot be captured using recording or cannot be specified after
learning. Absolute Analog Recording is used to track mouse usage (movement and clicks) and
keyboard events. For absolute analog recording, the positions these events are recorded relative to
the top-left corner of the system screen. (In contrast, in Relative Analog Recording, the events are
recorded relative to the upper-left corner of the selected objecs.) The events are recorded in a file of
type arf (Analog Recording File).
4. Simulated Object Recording - a Rapise user can use simulated objects when some objects are
not natively supported by Rapise (e.g. their internal structure, properties and actions are unknown).
In this case, what is recorded are mouse clicks and keyboard activity. Compare to Analog
Recording when all mouse and keyboard actions are recorded, including mouse up/down, mouse
move events. See Simulated Objects for more information.
5. Manual Recording - In addition to providing automated testing functionality, Rapise enables you to
create manual tests (ones that will be carried out by a human tester) rapidly without having to
laboriously enter in test steps and screenshots by hand. It does this by using the same recording
mechanism used for automated testing to create a manual test case that contains a list of the
tester's interactions and screenshots of what was performed. This is useful for exploratory testing
and is a huge time saver.
Usage
Before an operation (press, enter text, select, click, etc.) can be performed on an object automatically,
Rapise must be able to identify the object. That identification must be able to locate the object
definitively, and it must be able to duplicate the action or operation precisely. This carries several
© 2015 Inflectra Corporation
Rapise User's Guide
77
implications. Firstly, if the AUT is in a different position on the screen when it is started, Rapise must
still be able to find the objects in the AUT window. Secondly, if the positioning of objects on the AUT
window is proportional or relative to the screen size of shape, Rapise must still be able to locate the
object.
A secondary set of considerations relates to the fact that the AUT UI layout maybe sensitive to the
context of the state of the application. For example, consider the case of a word processor. Pressing
the "bold" button doesn't predict what the result will be unless it is known whether the text highlighted
is currently bold or not. A far more illustrative example is that of the Microsoft Paint utility. The
Microsoft Paint utility is the subject of a Inflectra sample, Simulated Object.
The most instructive way to identify the objects to Rapise is to practice with the tool and different types
of objects. The best methodology to use is as follows:
1. First, try to use Record/Learn to learn the object and record actions in a single step.
2. If learning.recording fails to record actions in the grid, use the Object Spy to observe the object
carefully and discover what libraries and classes are being used by the AUT.
3. Use Verify (Ctrl+1) from the Recording Activity dialog to get summary information about the object.
4. Use a more appropriate set of libraries when selecting the AUT prior to recording.
5. Use Analog Recording with absolute positioning to identify and locate the object.
6. Use Analog Recording with relative positioning to identify and locate the object.
7. Use Simulated Object Recording to track the actions required and at the positions required.
8. Look for custom libraries that support the technology being used by the AUT.
9. Build your own custom library to support the technology in use by the AUT.
10.Finally if it will not be worth developing automated tests for this AUT, use the manual recording
feature to speed up your manual test writing.
2.4.1.1
Recording
Purpose
Recording is the name given to having Rapise track your interactions with an application.
Value
The actions you take in using the AUT are observed by Rapise and are transformed into a script
(javascript), which you can execute using the Play button. The script can be extended and modified to
suit special purposes.
Usage
The Recording Activity (RA) Dialog is opened when you start recording using the Record/Learn button. When
the Recording Activity dialog appears, Rapise has connected to your AUT and is ready to monitor and record
your interactions. You'll find instructions here or look at one of the examples - TwoDialogs, Sample Record
and Playback, or Mobile Sample
© 2015 Inflectra Corporation
78
Rapise User Manual
You'll notice that the RA dialog has a grid. As you interact with the AUT, your actions will be listed in
the grid.
If you record an incorrect action, you can right-click on the action and delete it.
To ensure you successfully record your interaction with the AUT, navigate slowly through the AUT.
Wait a second or two between each action to make sure Rapise has time to interpret and record your
action. Once your interaction is updated in the RA dialog grid, you are free to continue with the next
action.
When you are done recording, press the [Finish] button on the RA dialog or type Ctrl+3. The RA
dialog will disappear, and you will see an automatically generated script opened in Rapise.
For Mobile Testing, you will need to use the [Pick Object] button which then allows you to pick a
specific object from the Mobile Spy:
© 2015 Inflectra Corporation
Rapise User's Guide
79
See also
If you have already recorded a script and want to record additional interactions in the same test, be
sure to read Making Multiple Recordings.
The RA dialog is described more thoroughly in Recording Activity Dialog.
To learn how to run the script, see Playback. To learn how to modify the script, see Scripting.
For a detailed tutorial, see Tutorial: Record and Playback in the Getting Started section.
For more information on the Spy (ObjectSpy) capability, see Object Spy.
2.4.1.2
Learning
Purpose
Objects are the controls and items on the screen of the AUT. "Learning" an object refers to the
process of Rapise collecting enough information about the on-screen item to be able to reference the
item when the test script is run without ambiguity and regardless of its location on the UI.
Value
When Rapise "learns" an object, it records the object's type, its name and how to find the object again
(locator). It saves everything it learns to the script so that the object can be identified when the test is
run. Rapise gives the object a simple name so that you can easily refer to it later if you decide to
modify the script.
Usage
Objects are learned in two ways: (1) during recording or (2) explicitly.
Recording
During a Recording session, Rapise learns about each object with which you interact. For details,
see Recording.
© 2015 Inflectra Corporation
80
Rapise User Manual
Explicitly
1.
2.
3.
4.
Open the Recording Activity Dialog. Instructions are HERE.
Place your mouse over the object you wish to learn. It should become surrounded by a purple box.
Press CTRL+2.
You will see a new entry in the Recording Activity Dialog, signifying that the object was learned.
Everything Rapise learns about an object is saved in saved_script_objects. You can see this variable
defined in the <project-name> objects.js file that will be listed in the Test Files tab of the Rapise. The
following shows what Rapise saved about the "Please enter your name" text box in the TwoDialogs
example:
Please_enter_your_name_:{
"locations": [
{
"locator_name": "Location",
"location": {
"location": "4.4",
"window_name": "param:window_text",
"window_class": "param:window_class"
}
},
{
"locator_name": "LocationPath",
"location": {
"window_name": "param:window_text",
"window_class": "param:window_class",
"path": [
{
"object_name": "param:object_name",
"object_class": "param:object_class",
"object_role": "param:object_role"
},
{
"object_name": "param:window_text",
"object_class": "param:window_class",
"object_role": "ROLE_SYSTEM_DIALOG"
}
]
}
},
{
© 2015 Inflectra Corporation
Rapise User's Guide
81
"locator_name": "LocationRect",
"location": {
"window_name": "param:window_text",
"window_class": "param:window_class",
"rect": {
"object_name": "param:object_name",
"object_class": "param:object_class",
"object_role": "param:object_role",
"x": 222,
"y": 40,
"w": 140,
"h": 23
}
}
}
],
"window_text": "Inflectra Rapise Two Dialogs Sample",
"window_class": "#32770",
"object_text": "Chris",
"object_role": "ROLE_SYSTEM_WINDOW",
"object_class": "Edit",
"object_name": "Please enter your name:",
"version": 0,
"object_type": "Win32Text",
"object_flavor": "Text",
"object_library": "Generic"
},
...
See Also
Recording
Learning invisible and Simulated Objects is slightly more complicated. You can find information on both
in the Recording Activity Dialog section. Look for descriptions of the Pick Object button and the
_Simulated drop-down menu.
Learn Object
2.4.1.3
Analog Recording
Concept
Sometimes you have to automate the testing of an application that contains some controls or elements
that are not standard objects that can be recognized by Rapise. For example you may have a drawing
canvas inside an application that allows you to annotate a diagram. You can use the standard Rapise
© 2015 Inflectra Corporation
82
Rapise User Manual
libraries for the rest of the controls but the actual drawing events cannot be captured that way. Analog
recording is available to ‘fill in the gaps’ in such scenarios.
During Analog Recording, Rapise records mouse movements, keyboard inputs, and clicks and stores
them in a special .ARF (Analog Recording File) format file:
There are two types of Analog Recording: Absolute and Relative.
Absolute: Mouse coordinates are recorded relative to the top left corner of the screen.
Relative: Mouse coordinates are recorded relative to the top left corner of the object beneath the
mouse cursor.
Usage
When you are recording your test using the application you may come to a point where there are user
actions that you need to record that don’t have any identifiable objects (for example drawing a
signature). You can click on the ‘Analog’ button on the recorder to engage Analog mode:
Now when you use the mouse and keyboard to test the application, Rapise is storing the coordinates
of your mouse clicks and keyboard events and storing them in a separate .ARF file that is part of your
test project.
© 2015 Inflectra Corporation
Rapise User's Guide
83
Once completed, the entire analog section is included as one step within the complete test script so
you can include an analog sequence within a test script that contains other non-analog events. This
lets you have the robustness of true object-based recording for 95% of your test and analog when you
need it for the remaining 5%. This is the best of both worlds.
See Also
Recording Activity Dialog
2.4.1.3.1 Absolute Analog Recording
Purpose
Absolute analog recording is used to track mouse usage (movement and clicks) and keyboard events.
For absolute analog recording, the positions these events are recorded relative to the top-left corner of
the system screen. (In contrast, in relative analog, the events are recorded relative to the upper-left
corner of the selected objects.) The events are recorded in a file of type arf (Analog Recording File).
© 2015 Inflectra Corporation
84
Rapise User Manual
Value
Not all applications can be recorded by locating and learning objects being used. A very good example
of this is free-hand drawing in an application such as Microsoft Paint (Start Menu -> Accessories ->
Paint). There are several reasons why this application cannot be recorded using object tracking,
learning and recording. The most important is that when the mouse is moved free-hand, it is operating
on the same object the whole time - the blank "canvas." Another reason is that the application
changes behaviour and the positions of the canvas change depending on the size of the canvas and the
positions of floating toolbars.
Absolute analog recording is provided by Rapise to make it possible to make it possible to design and
implement tests for these types of applications.
See Also
Do Absolute Analog Recording
Relative Analog Recording
2.4.1.3.2 Relative Analog Recording
Purpose
Relative analog recording is used to track mouse usage (movement and clicks) and keyboard events.
For relative analog recording, events are recorded in relation to the top-left corner of the application's
window. The events are recorded in a file of type arf (Analog Recording File).
© 2015 Inflectra Corporation
Rapise User's Guide
85
Value
Not all applications can be recorded by locating and learning objects being used. A very good example
of this is free-hand drawing in an application such as Microsoft Paint (Start Menu -> Accessories ->
Paint). There are several reasons why this application cannot be recorded using object tracking,
learning and recording. The most important is that when the mouse is moved free-hand, it is operating
on the same object the whole time - the blank "canvas." Another reason is that the application
changes behaviour and the positions of the canvas change depending on the size of the canvas and the
positions of floating toolbars.
Relative analog recording is provided by Rapise to make it possible to make it possible to design and
implement tests for these types of applications.
See Also
Do Relative Analog Recording
Absolute Analog Recording
2.4.1.4
Simulated Objects
Purpose
During normal recording, Rapise Learns about the Objects you interact with. If, for some reason,
Rapise cannot learn an object, you can create a Simulated Object. Rapise identifies a simulated object
by its location in the Window or Dialog and can perform certain generic actions on it, such as Click and
Fill In. This works in the reverse sense also. That is, if Rapise cannot identify an object, or, for
example, you click outside any defined object in the AUT's UI, Rapise will create a simulated object to
represent the action.
Value
Not all objects on a screen are "standard" or can be recognized by the libraries loaded. Some are
compound objects, consisting of two or more individual objects that work together to deliver a UI effect
© 2015 Inflectra Corporation
86
Rapise User Manual
or behaviour. Simulated objects "fill in the blanks" to allow Rapise to cause an event outside the
normal set of objects.
See Also
Recording Activity Dialog
Sample Tests: The SimulatedObject sample.
Deal with a Simulated Object
2.4.1.5
Object Libraries
Purpose
Object libraries define what objects and interactions Rapise understands during Recording and
Learning. Most Object Libraries are specific to an application or a set of applications.
Usage
Rapise comes with several different object libraries:
1. Auto
2. Core Technologies
o Generic*
o Internet Explorer HTML
o Firefox HTML
o Java*
o Java SWT*
o Managed*
o UI Automation*
o Qt Framework*
o Adobe Flex AIR
o ActiveX*
o Web Services
o User
o Advanced Accessibility*
o Console
3. Mobile Libraries*
o Android (via. Appium)*
o iOS (via. Applium)*
4. Widget Toolkits
o DOM GWT
o DOM GWT-Ext
o DOM SmartGWT
o DOM YUI
o DOM jQuery UI
o HTML 5
o DevExpress*
o Infragistics*
© 2015 Inflectra Corporation
Rapise User's Guide
o
o
o
o
87
Telerik*
ActiveX ComponentOne*
SyncFusion*
FarPoint*
*These libraries are not included in the free Rapise Express edition.
You can add your own Recording library--one that understands the objects in your application.
Selecting Auto as the application recording library will cause Rapise to select the one that it deems
is most appropriate.
UIAutomation: Use this library with .NET, WPF, and Silverlight applications. When used with .NET
2.0+ applications you should also include the Managed library as well. When used with older .NET
applications, you should use the Generic library instead.
Internet Explorer HTML , Chrome HTML and Firefox HTML are used with Internet Explorer,
Google Chrome and Firefox respectively. They understand only the DOM (document object model)
and therefore capture interactions with the web application, not the browser. They also have access
to passwords. Tests recorded with either of the libraries can be run in any of the three browsers.
See Cross Browser Testing for more details.
User refers to Custom Libraries.
The DOM GWT library uses the Document Object Model to learn or record objects found in the
Google Web Toolkit.
The DOM GWT-Ext library uses the Document Object Model to learn or record objects found in the
Google GWT-Ext library.
The DOM SmartGWT library uses the Document Object Model to learn or record objects found in
the Google SmartGWT library.
The DOM jQuery UI library uses the Document Object Model to learn or record objects found in the
jQuery UI widget library.
TheHTML5 library uses the Document Object Model to learn or record objects found in the HTML 5
extensions library.
The DOM YUI library uses the Document Object Model to learn or record objects found in the Yahoo!
User Interface library.
The Generic library uses Microsoft's MSAA event model to capture user actions. The Generic library
should be used if there is no library more specific to the AUT available. The Generic library will
record a large set of applications, but it has drawbacks; it may skip some actions and/or record
unintended actions. Passwords are not visible to the Generic library, and must be manually entered
into the test after recording.
The Advanced Accessibility library is for recording with Internet Explorer. In general, you will want
to use the Internet Explorer HTML library. However, there is some information available through
Advanced Accessibility that is unavailable when looking solely at the DOM. For example: the
absolute screen position of an object. Advanced Accessibility is not precise, as Internet Explorer
HTML is, and may miss actions or record unintended actions.
The Java SWT library is for use with the Eclipse Java Standard Widget Toolkit (SWT) applications.
The Console library is for use with Windows Console Applications that run in the command-line.
The Java library is for use with Java GUI applications that are written using either AWT or SWING.
Use the SWT library instead if your application was written using SWT.
The Managed library is for use with Microsoft .NET 2.0 + applications. It adds some additional .NET
2.0+ specific-controls to the list supported in the Generic and UIAutomation libraries.
The DevExpress library allows you to record and learn using the various controls provided in the
DevExpress DXperience v1.0 component library. This allows you to save time by having the system
recognize the various controls directly.
The Infragistics library allows you to record and learn using the various controls provided in the
Infragistics component library. This allows you to save time by having the system recognize the
© 2015 Inflectra Corporation
88
Rapise User Manual
various controls directly.
The Telerik library allows you to record and learn using the various controls provided in the Telerik
RadControls for Winforms component library. This allows you to save time by having the system
recognize the various controls directly.
The Adobe Flex AIR library is for use with applications that are written using Adobe Flash, Flex or
AIR.
The Qt Framework library is for use with applications that are written using the cross-platform Qt
Framework.
The Web Services library is for use with API tests that connect to either REST or SOAP web
services. See the web service testing topic for more information.
See Also
Recording
To write an Object library specific to your application, see Custom Libraries.
Cross Browser Testing
If you interact with an object that is not defined in your chosen recording library, it will be treated as
a Simulated Object.
2.4.1.5.1 Custom Libraries
Purpose
If your application doesn't work with the predefined Recording Libraries, you can create your own.
Usage
Your library can provide Basic or Full support for your application. Basic support allows you to
manually Learn objects, write test scripts, and Playback your scripts. Full support allows you to
Record as well. Create your library in the LibUser directory. Unless you specified otherwise, you will
find it at:
C:\Program Files\Inflectra\Rapise\Engine\Lib\LibUser.
Basic Support
Add a Matcher Rule to the library for every window type in your application. The SeSMatcherRule
includes information to identify your application, and a set of behaviors.
var yourApplicationRule = new SeSMatcherRule(
{
object_type: "yourAppObject",
classname: "yourAppFrame", //You can use a regular expression here
behavior: [yourAppBehavior]
})
Override Actions: Override actions in yourAppBehavior (above). The action definitions you provides
will be used during Playback. Overriding actions does not affect recording.
var HTMLFirefoxBehavior =
{
actions: [{
actionName: "Click",
DoAction: function(){}
},
{
actionName: "SetText",
DoAction: function(/**String*/txt){}
© 2015 Inflectra Corporation
Rapise User's Guide
89
}]
}
Full Support
Enable Recording: You can enable recording in two ways. If your application notifies the
Accessibility Events interface about application events, you can override events in the behavior
section of SeSMatcherRules:
var newBehavior={
actions: [{/*section deleted for brevity*/}],
events:
{
OnSelect: function(/**SeSObject*/ param, /**Boolean*/ badd)
{ /*...*/
},
OnSelectAdd: function(/**SeSObject*/ param, /**Boolean*/ badd)
{ /*...*/
}
}}
var newRule = new SeSMatcherRule({
object_type: "someType",
role: "someRole",
behavior: [newBehavior],
})
Otherwise, you will have to implement Custom Recording.
Custom Recording: With custom recording, it is the library's responsibility to:
detect user actions in the application, and
call RegisterAction() (which writes the action to the script).
See Also
To see what actions and events can be overridden, see SeSBehavior.js (in the Rapise Engine).
Check the Engine/Lib directory for examples.
You can alter the behavior of an action without creating an entire library. See the Actions section for
more details.
2.4.1.5.1.1 Actions
Purpose
Actions are anything the user can do to a GUI control, such as click, select, fill with text, etc. You can
override the behavior of an action, without creating or altering a Recording Library, using
SeSExtendAction(). Overriding an action affects Playback, but not Recording.
Usage
SeSExtendAction() is used to override an action handler or add a new DoAction handler:
function SeSExtendAction(objectType, doActionName, replacementFunction)
where:
© 2015 Inflectra Corporation
90
Rapise User Manual
objectType is the name or regular expression specifying the object type(s) for which this extension
should apply.
doActionName is the name or regular expression specifying the DoAction handler that should be
overridden.
replacementFunction is the function containing overriding behavior.
In most cases SeSExtendAction() should be called from within TestInit().
Calling Base Actions
The function you are overriding is called the BaseAction. You can call it like this:
this.BaseAction(arguments);
You may override actions several times. For example:
function DoActionB()
{
this.BaseAction();
}
function DoActionC()
{
this.BaseAction();
}
SeSExtendAction("Win32Button", "DoAction", DoActionB);
SeSExtendAction("Win32Button", "DoAction", DoActionC);
When DoAction is called for the Win32Button, the following sequence is executed:
DoActionC->DoActionB->DoAction
See Also
To see what actions can be extended, look in SeSBehavior.js (in the Rapise Engine).
2.4.1.6
Multiple Recordings
Purpose
Every time you record, the script recorder updates your test script. Be cautious about what changes
you make to the test script; some changes could be lost if the recorder is re-run (see Usage).
Usage
The test script path can be found in the Settings Dialog under Settings > ScriptPath. Unless you
specify otherwise, the test script is named testname.js (where testname is whatever you named your
test).
© 2015 Inflectra Corporation
Rapise User's Guide
91
Note that the Script Recorder only has knowledge of four functions and two data structures:
1. function Test()
2. function TestInit()
3. function TestFinish()
4. function TestPrepare()
5. array “g_load_libraries”
6. map “saved_script_objects”
You can make changes to the body of any of the above functions, and you can alter the initialization of
g_load_libraries and saved_script_objects . All other changes are unsafe.
During Recording, the Script Recorder:
1. Appends newly recorded actions to the Test() function
2. Appends newly encountered objects to the saved_script_objects array
3. Updates g_load_libraries to reflect the library selections you made in the Select an Application to
Record... Dialog
4. Ignores (and leaves intact) the definitions of TestInit(), TestFinish(), and TestPrepare()
For example, suppose that you have the following code inside your script file:
//External comment // UNSAFE: will be removed by recorder
/*Another comment*/ // UNSAFE
var external_var;
// UNSAFE
function Test()
{
//comment --SAFE
var external_var; //SAFE: defines a local variable for function “Test”
global_var=value; //SAFE: updates (or defines) a global variable
//SAFE everything inside this function will be kept intact after recording
}
The parts of code marked UNSAFE will be deleted by the script recorder.
See Also
Settings Dialog
Select an Application to Record... Dialog
Recording
2.4.1.7
Object Spy
Purpose
The Object Spy allows you to inspect an object's properties and state.
Value
Many controls on User Interfaces are compound objects or there may be many instances of a similar
object. To be sure to select precisely the correct object, or to select the correct object from a
collection of similar objects, the object's properties can be used to further identify the correct instance.
© 2015 Inflectra Corporation
92
Rapise User Manual
Usage
To spy on an Object:
1. Choose the type of Object Spy that you want to use. This can be done by clicking the down-arrow
next to the Spy icon in the Tools ribbon:
There are five types of Spy available:
1. Accessible - This is used to inspect applications that expose their properties using the
Microsoft Active Accessibility (MSAA) technology. This is typically used by applications
written in MFC, ATL, Qt, C++ and Visual Basic.
2. Java Object - This is used to inspect applications written using the Java AWT and Swing UI
frameworks.
3. Managed Object - This is used to inspect applications written in .NET 1.1, .NET 2.0, .NET
4.0 using Microsoft Windows Forms.
4. Mobile Object - This is used to inspect mobile applications running on iOS or Android
devices as well as the iOS or Android simulator
5. UIAutomation Object - This is used to inspect applications that expose their properties
using the Microsoft's newer UIAutomation technology. This is typically used by applications
written in WPF, Silverlight and Java SWT.
For more details on each Spy type, refer to specific topic above or view the Spy Dialog help topic.
2.
Open the Object Spy Dialog. This can be done directly using the Spy button
in the main
Rapise window's toolbar, or by pressing the
button in the Recording Activity
dialog during recording or learning.
3. Press the Start Tracking button (or type CTRL+G).
4. As you mouse over different objects, you will see the contents of the Object Spy dialog change as it
collects information about the object.
5. Mouse over the object you wish to spy on and press CTRL+G. The reduced-size tracking dialog will
be expanded into the the larger Object Spy Diaog dialog, presenting all the available information for
the object.
See Also
See the Object Spy Dialog for more details.
© 2015 Inflectra Corporation
Rapise User's Guide
93
2.4.1.7.1 Accessible (MSAA) Spy
Purpose
The Accessible Spy is used to inspect applications that contain Microsoft Active Accessible (MSAA)
objects.
Screenshot
Features
The Accessible Spy has the following features:
The Tree pane lets you view the hierarchy of MSAA objects available in the application
The Properties pane lets you view the exposed properties of the highlighted MSAA object
Commands
In addition to viewing the object hierarchy and object properties, you can perform the following tasks:
Parent - This selects the parent object of the one displayed
Highlight - This will attempt to Flash (highlight with a red rectangle) the object selected in the Spy.
Refresh - this simply refreshes the Spy view to reflect any changes that might have occurred in the
application.
Default Action - this will perform the default action on the selected object in the Spy
Mouse Click - this will perform a simple mouse click on the selected object in the Spy
Save to File - this will save the properties of the currently selected object to a text file.
2.4.1.7.2 Java Spy
Purpose
The Java Spy is used to inspect applications that contain Java (Swing / AWT) objects.
Screenshot
© 2015 Inflectra Corporation
94
Rapise User Manual
Features
The Java Spy has the following features:
The Tree pane lets you view the hierarchy of Java objects available in the application
The Properties pane lets you view the exposed properties of the highlighted Java object
Commands
In addition to viewing the object hierarchy and object properties, you can perform the following tasks:
Parent - This selects the parent object of the one displayed
Highlight - This will attempt to Flash (highlight with a red rectangle) the object selected in the Spy.
Refresh - this simply refreshes the Spy view to reflect any changes that might have occurred in the
application.
Save to File - this will save the properties of the currently selected object to a text file.
2.4.1.7.3 Mobile Spy
Purpose
The Mobile Spy is used to inspect applications running on connected Mobile Devices (e.g. Apple iOS
and Android devices).
Screenshot
© 2015 Inflectra Corporation
Rapise User's Guide
95
The Mobile Spy dialog shows a snapshot of the screen displayed on the connected Mobile device as
well as the properties of the currently selected object. You can selected the object either by clicking on
the screen snapshot or the control hierarchy displayed to the left. The properties displayed will depend
on the type of mobile device being tested (iOS vs. Android).
Tree
The spied upon object and its children are displayed here. When you click on an object it will also be
highlighted in the snapshot view to the right.
Properties
Object fields and field values are displayed here.
Snapshot
This displays a snapshot of what is displayed on the mobile device being tested. The objects in the
snapshot are clickable, which allows you to visually select objects from the hierarchy.
Tools
Get Snapshot (CTRL + G) - This will connect to the mobile device and get the latest snapshot from
the mobile device and display in the right-hand window.
Disconnect - This option disconnects the Spy from the mobile device and ends the connection.
Learn Object - This option is only displayed in Recording mode and lets you take the currently
selected object and add it to the Object Tree for the current test. It can then be used as a scriptable
object in the test script.
Page Source - This lets you view the source of the mobile device in a text editor such as Notepad.
It will show the objects in the treeview represented as an XML document.
Go to URL - This will instruct the mobile device to navigate its built in web browser to a specific
URL.
Test Locator - This will display the Mobile Test Locator dialog box that lets you try different
locators to resolve specific objects in the object hierarchy. It will include options such as using
XPath and IDs.
Select Profile - This lets you change the profile of the mobile device you are testing while the Spy
dialog is open.
Edit Profiles - This will open up the Mobile Settings dialog box. You cannot be connected to do
© 2015 Inflectra Corporation
96
Rapise User Manual
this.
Context - This will display either 'Discovery Mode' or 'Recording Mode'.
2.4.1.7.4 Managed (.NET) Spy
Purpose
The Managed Spy is used to inspect Microsoft .NET applications that contain .NET framework objects
(e.g. using Windows Forms).
Screenshot
Features
The Managed Spy has the following features:
The Tree pane lets you view the hierarchy of .NET objects available in the application
The Properties pane lets you view the exposed properties of the highlighted .NET object
Commands
In addition to viewing the object hierarchy and object properties, you can perform the following tasks:
Parent - This selects the parent object of the one displayed
Highlight - This will attempt to Flash (highlight with a red rectangle) the object selected in the Spy.
Refresh - this simply refreshes the Spy view to reflect any changes that might have occurred in the
application.
Save to File - this will save the properties of the currently selected object to a text file.
2.4.1.7.5 UI Automation Spy
Purpose
The UIAutomation Spy is used to inspect applications that contain Microsoft UIAutomation objects
© 2015 Inflectra Corporation
Rapise User's Guide
97
(e.g. Windows Presentation Framework, Silverlight or Java's Standard Widget Toolkit running on
Windows).
Screenshot
Features
The UIAutomation Spy has the following features:
The Tree pane lets you view the hierarchy of UIAutomation objects available in the application
The Properties pane lets you view the exposed properties of the highlighted UIAutomation object
Commands
In addition to viewing the object hierarchy and object properties, you can perform the following tasks:
Parent - This selects the parent object of the one displayed
Highlight - This will attempt to Flash (highlight with a red rectangle) the object selected in the Spy.
Refresh - this simply refreshes the Spy view to reflect any changes that might have occurred in the
application.
Save to File - this will save the properties of the currently selected object to a text file.
2.4.1.8
Object Manager
Screenshot
© 2015 Inflectra Corporation
98
Rapise User Manual
Purpose
The Object Manager allows you to merge the object trees of two different Rapise tests. This can be
useful when you have a new test that needs some of the objects from a test that you have already
written.
How to Open
Click on the Object Mgr icon in the main Rapise Test Ribbon.
Choosing Files to Merge
© 2015 Inflectra Corporation
Rapise User's Guide
99
If you click on the [...] button in left hand side of the dialog box, marked Source, you will be able to
select the Rapise test object file (*.objects.js) that you want to copy the objects from.
Once you have selected the source test, repeat the procedure for the destination test. In this case
click the [...] on the right-hand side, marked Destination and choose the destination (*.objects.js) file.
Selecting the Objects to Merge
Once you have selected both the source and destination object files, the system will display the dialog
that lets you see all the objects defined the source and destination tests. You can now choose which
objects to add/delete to/from the destination test:
For each object in the source test you will see an [+] expand icon in the left-hand side and for each
object in the destination test you will see an [+] expand icon in the right-hand side.
To add an object from the source > destination test, simply click on the
icon and
choose the equals option (=). To remove an object from the destination, simply click on the noticon and choose the remove (X) icon.
Warning: All of the changes you make to the objects file are committed immediately, so only
delete objects in the destination test that you no longer want to be part of the test.
2.4.2
Playback
Purpose
When you record a test, Rapise translates your actions into a script. When you playback the test, the
script is executed.
Usage
You can either run your script from the Command Line, or you can play it back while Rapise is open
© 2015 Inflectra Corporation
100
Rapise User Manual
(described below):
1. You will first need to open your test. There is no need to have the AUT (Application Under Test)
open. Rapise will open the AUT before it begins execution of the test.
2. Now, press the play button at the top of the Rapise window.
3. During test execution, Rapise displays an execution monitor dialog box that lets the user see the
progress of testing playback. The dialog is only shown during test execution and can be turned off in
the Options dialog. The following is a screenshot of the test execution monitor.
The user can pause or stop the test execution by clicking either the Pause or Stop button.
4. When Rapise is done executing the test, results will be displayed in a table. The rows with green
text are steps that passed; the rows with red text are steps that failed. The following is a
screenshot of test results where every step passed:
See Also
For more information about the report, see Automated Reporting..
For information about recording a test, see Recording.
For instructions on using the Command Line, look HERE.
2.4.2.1
Command Line
Purpose
Rapise test scripts can be run from the command line.
© 2015 Inflectra Corporation
Rapise User's Guide
101
Usage
The form of the command is:
cscript SeSExecutor.js path_to_sstest_file [evals]
where
path_to_sstest_file is a path to sstest file, e.g. "C:\Program Files\Inflectra\Rapise\Samples
\SmarteATM\SmarteATM.sstest"
evals (optional) is a statement like this:
-eval:varname1=value1;varname2=value2;...
varname is a global variable associated with an option in the Settings Dialog. Global variables are
prefixed with a g_. The global variables under the Execution and Recording headings can be found by
clicking on the corresponding option in the Settings Dialog (see below):
Other variables include:
g_scriptPath
g_reportPath
g_objectsPath
g_configPath
Exit Code
0 indicates a pass
1 indicates failure
See Also
Settings Dialog
© 2015 Inflectra Corporation
102
2.4.2.2
Rapise User Manual
Object Locator
Purpose
Object locators are created during Recording/Learning and used during Playback to identify learned
objects and simulated objects. There are four types of locators:
Location: This locator uses the object's index relative to encapsulating objects for identification. The
location is stored as a period separated list of indexes. For instance, 1.2.3 would be "the third object
in the second object in the first object." The name, class, and role of the object are also stored.
LocationPath: This locator remembers name, class, and role property information for the object and
all of its encapsulating objects.
LocationRect: This locator stores screen coordinates.
Ordinal: This locator creates an array of object name/object class combinations. Each object is
assigned an index in the array.
Usage
The locator for each object is specified in saved_script_objects in <scriptname>.objects.js your test
script. Locator information is highlighted in the simulated object example below:
Obj10:{"version":0,"object_type":"SeSSimulated","object_name":"regex:.* Paint",
"object_class":"MSPaintApp","object_role":"ROLE_SYSTEM_WINDOW",
"object_text":"regex:.* - Paint",
"locations":[{"locator_name":"Location","location":{"location":"",
"window_name":"regex:.* - Paint","window_class":"MSPaintApp"}}]}
Locator Parameters
If a piece of information in the locator matches a piece of object info (object_name, object_class,
object_role, object_text) then it is stored in the locator as "param:<object_info>". For example:
"object_name": "param:object_name",
"object_class": "param:object_class",
"object_role": "param:object_role",
Over-riding Locator Parameters
You can over-ride the information used to locate your object at runtime. Normally, to refer to an
object, you use the SeS function:
SeS('Obj9')
To override locator parameters, specify the new value in the function call. In the following example,
we over-ride the object_name parameter for object 9:
SeS('Obj9', {object_name:"regex:.*"})
You may want to change a parameter value for every locator/object in the program. For instance,
perhaps the url of the webpage has changed. Use the global variable g_locatorparams as in the
following example:
function Test()
© 2015 Inflectra Corporation
Rapise User's Guide
103
{
// Here we use direct parameter overriding
SeS('Obj1', {url:"http://newaddr/"}).DoAction();
SeS('Obj2', {url:"http://newaddr/"}).DoAction();
// And this is equivalent to above
g_locatorparams["url"]="http://newaddr/";
SeS("Obj1").DoAction();
SeS("Obj2").DoAction();
...
}
See Also
Object Learning
Playback
2.4.3
Automated Reporting
Purpose
Each time you playback a test, Rapise automatically generates a report detailing the steps of the test,
the data values used, and the outcome of each step.
Usage
Execute your test using the instructions here. When the test is complete, the Report Tab will appear
in the Ribbon, and a report file (ending in .trp) will open in the Content View. It will look like this:
The first row (with a white background) is used for Report Filtering. The rows below that each represent
a step in the test. The rows with green text represent success; the rows with red text represent failure.
You can reposition the columns by dragging and dropping the column names.
The Columns
#: For displaying icons.
Name: The test name.
Start: The time the test step began executing.
Type: Can be one of the following values: Test; Assert; Message.
© 2015 Inflectra Corporation
104
Rapise User Manual
Comment: Assertions and messages have associated comments. They are displayed here.
Status: Whether the step passed, failed, or was merely informational.
Drag a column header here...
Use to order by the values in the chosen column. The result of dragging the Status column over
looks like this:
You can expand each item to see the corresponding report rows:
Drag the Status icon back to undo the sort:
See Also
Report Filtering
The report output file is specified in the Settings Dialog (Settings > ReportPath).
The Report tab of the Ribbon is used to alter the report layout.
2.4.3.1
Writing to the Report
Purpose
You can write to individual columns, create columns, and add data to the report.
Usage
Writing to and Creating a Column
Use Tester.PushReportAttribute or Tester.SetReportAttribute to set values in specific rows.
© 2015 Inflectra Corporation
Rapise User's Guide
105
Tester.PopReportAttribute reverses the effect of Tester.PushReportAttribute:
PushReportAttribute
Tester.PushReportAttribute(columnName, value);
...some test steps...
//the rows corresponding to these steps will have
//value in their columnName column
Tester.PushReportAttribute(columnName, value2);
...some test steps...
//the rows corresponding to these steps will have
//value2 in their columnName column
Tester.PopReportAttribute(columnName); //test steps proceeding this will be back
to value
If columnName does not exist, it will be added to the report.
SetReportAttribute
Tester.SetReportAttribute(columnName, value);
If columnName does not exist, it will be added to the report. Column columnName will be populated
with value for rows created after this function call (unless specified otherwise).
Adding Data
Data must be associated with an Assert row or a Message row.
Tester.Assert(description, expression, data, columnValuePairs)
Tester.Message(description, data, columnValuePairs)
description is a string.
expression is the Boolean expression that the assertion tests.
data is an array of data objects. Each data element is written to its own row below the assert/
message row with which it is associated. Data can be text, a link, or an image. The following is
an array with text, link, and image data.
[
new SeSReportText(text),
new SeSReportLink(urlString, linkText),
new SeSReportImage(ImageWrapperObject, imageDescription)
]
columnValuePairs is an object with key/value pairs. Column names are the keys. If the
specified column does not exist, it will be created. Ex:
{requirement: "Req1.2.3", paragraph: "12.5"}
See Also
Automated Reporting
The test samples include a sample about reporting (Reporting.sstest)
2.4.3.2
Report Filtering
Purpose
© 2015 Inflectra Corporation
106
Rapise User Manual
Report Filtering lets you specify criteria to filter your view of the test execution report. Rows that do not
match your criteria are hidden.
Usage
You can filter the report view while the file is open. Directly above the first row of the report, there is a
row of filter cells. Each one has a matching criteria button
, a text-box to specify a filter value, a
drop-down menu with predefined filter values, and a clear button
:
Matching Criteria
Matching criteria determine how to compare the filter string value you input with the values in the
report. You can select from 16 matching criteria. Press the button marked A above the column you
are filtering to see the possible criteria:
Predefined Filter Values
If we expand the filter cell's drop-down menu, we will see a list of predefined filtering options:
© 2015 Inflectra Corporation
Rapise User's Guide
107
(Custom): This option has to do with the next section Custom Filter Options.
(Blanks): Matches all rows where the value for this column is blank.
(NonBlanks): Matches all rows there the value for this column is not blank.
All other predefined values are copied from cells in the column you are filtering.
Custom Filter Option
To create a filter with multiple matching criteria and filter values, select (Custom) from the filter cell's
drop-down menu. The Enter filter criteria for... Dialog will open. Instructions for how to use it are
here.
Undo Filtering
To undo filtering for a particular column, press the clear button for that column:
See Also
Automated Reporting
Enter filter criteria for... Dialog
2.4.4
Scripting
Purpose
There are three reasons to script with Rapise:
1. To modify a recorded test to increase coverage, add assert statements, or make the test datadriven.
2. To extend recording functionality by defining your own objects, actions, and libraries.
© 2015 Inflectra Corporation
108
Rapise User Manual
3. To customize the Rapise Engine.
Usage
Rapise scripts are written in JavaScript (Microsoft JScript). You can run and debug your script using
the full featured Internal Debugger. Rapise includes a testing API, with methods for manipulating
images, spreadsheets, common GUI widgets, and more.
See Also
Learn about MS JScript HERE.
2.4.4.1
Understanding the Script
Purpose
When you create a new test in Rapise, four files are created:
<TestName>.sstest ? the test meta-data
<TestName>.js ? the test script file
<TestName>.objects.js ? the file that contains recorded objects.
<TestName>.user.js ? the file that contains user defined functions.
where <TestName> is the name of your Test.
You can have as many javascript files in your test directory as you like, but <TestName>.js is the test
script (unless you specify otherwise in the Settings Dialog). When you record, your interactions are
written to <TestName>.js and objects are written to <TestName>.objects.js; when you Playback the
test, <TestName>.js is the script that will run. All Rapise test scripts must have the same basic
structure.
Usage
If you are going to modify the script, or create a test script from scratch, you will need to know the test
script structure:
Basic Script
The Recording tool creates a Rapise Script with three sections:
1. <TestName>.js: A Test() function
//########## Script Steps ##############
function Test()
{
//script logic
}
2. <TestName>.js: A list of required libraries: g_load_libraries
g_load_libraries=["Generic"]; // This script will load the Generic library
3. <TestName>.objects.js A list of learned objects in saved_script_objects.
var saved_script_objects={
//list of objects used in this script ?
};
© 2015 Inflectra Corporation
Rapise User's Guide
109
All Scripts must have the above three sections.
Full script
The following functions are also recognized by Rapise and may be present in the test script. Put
these functions either in <TestName>.js or <TestName>.user.js.
TestInit() : This function is called once before script playback. It should be used to initialize scriptwide data (counters, open datasets, etc).
TestFinish() : This function is called once after test execution. It should be used to release
resources (data sets, spreadsheets). TestFinish() is a good place to post-process Reports. It
may also be used as an integration point with external test management or bug tracking systems.
TestPrepare() : For advanced users; TestPrepare() is called before recording and before
playback. It may be used to properly initialize libraries.
See Also
To specify a different test script, see the Settings Dialog. The test script is specified by Settings >
ScriptPath.
2.4.4.2
Naming Conventions
Purpose
The Rapise engine and API follow some simple naming conventions.
Usage
You will find descriptions of the naming conventions below. Note: italicized text represents
placeholders.
SeS<xxx> ? public functions for user
Do<Action> ? action implementations
_<somevar> and _<somename> ? private functions and objects
g_<varname> ? system global data.
2.4.4.3
Defining Functions
Purpose
The Rapise test script is in Javascript. You may define as many Javascript functions as you would like
to call from your test script.
Usage
There are two ways to maintain additional functions: (1) Inside your test script and (2) in an external
file.
© 2015 Inflectra Corporation
110
Rapise User Manual
Inside your Test Script
Define the function inside of one of the following functions: Test(), TestInit(), TestFinish(), or
TestPrepare(). The Script Recorder will erase code placed outside of these functions.
Inside *.user.js File
It is recommended to put all user functions into <testname>.user.js file available in any test from its
creation.
This file is automatically attached into every script. All variables and functions defined in it may be used
in the test. User-defined functions are also available under the "User Functions" node in the Object
Tree:
In an External File
You can define your function in another file and include it.
© 2015 Inflectra Corporation
Rapise User's Guide
111
For example:
function Test()
{
// Withdraw is defined inside the "Test" function
function Withdraw(amount)
{
Log("Start Withdraw of:"+amount);
// Withdraw logic is here
}
Withdraw(12.34);
// Include "UtilityFunctions.js" to get at function Deposit()
eval(g_helper.Include(Global.GetFullPath("UtilityFunctions.js")));
// Deposit is defined in "UtilityFunctions.js"
Deposit(56.78);
}
See Also
To learn more about what the Script Recorder will change in your test script, see Multiple
Recordings.
2.4.4.4
Global Variables
Purpose
Global variables are variables that can be accessed anywhere in the script. There are restrictions
(specific to Rapise) as to where they may be placed in the test script. These restrictions do not apply
to any additional script files you write and then call from your test script.
Usage
Define your global variables in TestInit(). Because Rapise uses javascript, you can initialize global
variables inside of functions. See the sample TestInit() below.
function TestInit()
{
number_of_visited_links = 0; //This variable becomes global
var local_var = 5; //This variable is local for TestInit function
}
The keyword var gives variables local scope. A variable initialized without the keyword var will have
global scope.
The Script Recorder knows about the following functions: Test(), TestInit(), TestPrepare(), and
TestFinish(). Do not declare global variables outside of one of the preceding four functions. The Script
Recorder alters the script each time it is run, and may erase your changes.
See Also
See Making Multiple Recordings for details on what effect the script recorder will have on your test
© 2015 Inflectra Corporation
112
Rapise User Manual
script.
For details on the structure of the test script, see Understanding the Script.
2.4.4.5
Including other Files
Purpose
The eval keyword lets you use external functions and data structures in your test script; eval is a
javascript reserved word.
Usage
See the example below:
function Test()
{
eval(g_helper.Include(Global.GetFullPath("myfunctions.js")));
}
See Also
Understanding the Script
2.4.4.6
Regular Expressions
Purpose
A regular expression is a sequence of characters that describes how to construct a set of strings. It is
composed of character literals and special characters. Each character literal represents one single
character (such as "a", "b", "C", "1"). The special characters can represent a character, many
characters, or a choice about how to select characters.
Special Characters:
Char Description
?
*
+
.
Examples
Combines with whatever character/subexpression precedes it to represent 0 or 1
occurrences of that character/subexpression.
a? describes the set:
Combines with whatever character/subexpression precedes it to represent 0 or
more occurrences of that character/subexpression.
a* describes the set:
Combines with whatever character/subexpression precedes it to represent 1 or
more occurrences of that character/subexpression.
a+ describes the set:
Any arbitrary character.
.* describes the set of all possible strings.
{"", "a"}
{"", "a", "aa", "aaa", "aaaa", "aaaaa",
"aaaaa", ...}
{"a", "aa", "aaa", "aaaa", "aaaaa", "aaaaa", ...}
© 2015 Inflectra Corporation
Rapise User's Guide
|
Denotes a choice between two strings
113
ab|ba describes the set:
{"ab", "ba"}
()
Denotes a sub-expression.
(abc)?d describes the set :
{"abcd" , "d"}
[]
Denotes one character chosen from all the [abcde] describes the set:
characters with the brackets. You can use {"a", "b", "c", "d", "e"]
a hyphen to denote a range.
[A-Z] describes the set of all one-character,
alphabetic, capitalized, strings. {"A", "B",
"C", ... , "Z"}
{n,m} Quantifier expression. Meaning: "Between
n and m occurrences of whatever subexpression or character precedes."
(abc){1,2} describes the set:
{"abc", "abcabc"}
^
The beginning of a string.
^a.* matches all strings that begin with an a.
$
The end of a string.
.*a$ matches all strings that end with an a.
\
Precedes a special character to take away
any special meaning.
[\\\$\-\+\*] represents the set:
{"\", "$", "-", "+", "*"]
A string and regular expression match if the string is an element of the set described by the regular
expression.
Usage
In Rapise, you must prepend regular expressions with the string "regex:". So the regular expression
describing all strings would be: regex: .*
There are three uses for regular expressions in Rapise: (1) in Object Locators, (2) in action overriding
code, (3) in Custom Libraries.
2.4.4.7
Assert Statements
Purpose
An assert statement is a special Boolean condition that represents an assumption about program state
at a particular point in test execution. When an assert is encountered, the condition is evaluated. A
value of False indicates a program error. In some languages, execution will halt if an assertion
evaluates to False. In Rapise, the result is logged to the report with failed status, and execution
continues.
Create a Checkpoint
To create a checkpoint using an assertion, you will have to manually alter the test script (another way
is to use the Verify Object Properties dialog during Recording):
© 2015 Inflectra Corporation
114
Rapise User Manual
1. Select a location in your script and a subset of application state to check.
2. Query for the application state. For images, use the ImageWrapper class provided with Rapise.
For object properties, Get<..> methods. For example:
var xx = SeS(?OkButton?).GetX(); // X position of the object
3. Save the state. If you are creating an image checkpoint, you will want to save the image to a file.
If you are looking at text data, you could use a database, spreadsheet or text file. The
SeSSpreadSheet class gives you access to excel spreadsheets.
4. Compare. Use the ImageWrapper class to compare images; use Spreadsheet to read and compare
spreadsheet data.
5. Write an Assert Statement. Make an appropriate call to Tester.Assert method. Besides a Boolean
condition, pass additional data to be placed in the Report.
Read about Tester.Assert syntax in the Rapise Objects documentation part.
See Also
The test samples include a UsingImageCheckpoint.sstest
Verifying Object Properties
Writing to the Report
2.4.4.8
Data Driven Testing
Purpose
Data Driven Testing is an automated testing technique in which test case data is separated from test
case logic. Each set of test case data consists of input values and a set of expected output values.
The actual output values are compared to the expected output values to determine whether the test
passed.
You can perform data-driven testing either using an MS-Excel spreadsheet as the datasource or a
relational database.
Using an MS-Excel Spreadsheet
The Spreadsheet object is useful for implementing data-driven tests. It allows you to connect to,
query, and read an excel spreadsheet from your test script. To create a data-driven test, you will:
1. Record a test. The exact inputs you use for the recording will not matter as much as your
interactions with the objects. The following excerpt was recorded using www.google.com:
function Test()
{
//Set Text Inflectra in q
SeS('Obj1').DoSetText("Inflectra");
//Click on btnG
SeS('Obj2').DoClick();
}
The actions recorded were: (1) Type Inflectra into the search box. (2) Press the Google Search
© 2015 Inflectra Corporation
Rapise User's Guide
115
button.
2. Parameterize the Test() function. The Test() function has all of the procedural logic for the test.
Replace input values with variables. Encapsulate the logic in a nested function with one parameter
for each variable you created. As an example, we will parameterize the Test() function we created
in step one:
function Test()
{
function Logic(searchterm){ //our new function encapsulates the test logic
//Set Text using searchterm
SeS('Obj1').DoSetText(searchterm) //here we changed a hard-coded value
into a variable
//Click on btnG
SeS('Obj2').DoClick()
}
Logic("Inflectra") //don't forget to call your new function
}
3. Create the test case data. In an excel spreadsheet, create a column for every variable in step two.
Add columns for any expected output values you wish to verify. Each row is a test case.
In our google example, we only have one input value (searchterm ) and we're not comparing any
expected output values, so we will only need one column in our spreadsheet. Save the spreadsheet
in the test folder as searchterms.xls:
4. Add spreadsheet to the test
Use "Add File(s)..." to add a spreadsheet to the test files:
© 2015 Inflectra Corporation
116
Rapise User Manual
5. Attach Spreadsheet object to searchterms.xls
Drag the 'searchterms.xls' from files tree into appropriate place in your test source:
6. Use Spreadsheet to access the test case data.
In our example, we use a Spreadsheet object and run the test logic once for every row.
function Test()
{
function Logic(searchterm){
//Set Text searchterm in q
SeS('Obj1').DoSetText(searchterm)
//Click on btnG
SeS('Obj2').DoClick()
}
Spreadsheet.DoAttach('searchterms.xls', 'Sheet1');
// Go through all rows
while(Spreadsheet.DoSequential())
{
// Read cell value from column 0
var term = Spreadsheet.GetCell(0);
// Pass it into Logic function
Logic(term);
}
}
Using a Relational Database
Rapise comes with the Database query global object that allows you to send SQL queries to a
database and then iterate through the results. The process for creating such a data-driven test is as
follows:
1. Record a test. The exact inputs you use for the recording will not matter as much as your
interactions with the objects. The following excerpt was recorded using www.google.com:
function Test()
{
//Set Text Inflectra in q
SeS('Obj1').DoSetText("Inflectra");
© 2015 Inflectra Corporation
Rapise User's Guide
117
//Click on btnG
SeS('Obj2').DoClick();
}
The actions recorded were: (1) Type Inflectra into the search box. (2) Press the Google Search
button.
2. Parameterize the Test() function. The Test() function has all of the procedural logic for the test.
Replace input values with variables. Encapsulate the logic in a nested function with one parameter
for each variable you created. As an example, we will parameterize the Test() function we created
in step one:
function Test()
{
function Logic(searchterm){ //our new function encapsulates the test logic
//Set Text using searchterm
SeS('Obj1').DoSetText(searchterm) //here we changed a hard-coded value
into a variable
//Click on btnG
SeS('Obj2').DoClick()
}
Logic("Inflectra") //don't forget to call your new function
}
3. Use Database to connect the test case data.. This assumes that you already have an ODBC or
OLE DB compatible relational database that contains the necessary test data.
You drag the 'Database' global object into the script editor:
and then use:
Database.DoAttach() - to make the database connection and specify the SQL query
Database.GetRowCount() - to verify that there is data
Database.DoSequential() - to loop through the dataset row by row
Database.GetValue() - to get that row's data
Here is an example of the code needed to loop through a list of records (taken from the SpiraTest
database as an example) and call our Logic() parameterized function with the appropriate test data:
var success = Database.DoAttach('Provider=SQLOLEDB.1;Integrated
Security=SSPI;Persist Security Info=False;Initial
Catalog=SpiraTest;Data Source=.' , 'SELECT * FROM TST_PROJECT' );
Tester .Assert('Successfully Connected', success );
© 2015 Inflectra Corporation
118
Rapise User Manual
var count = Database.GetRowCount();
Tester.Message(count);
//Loop through the rows
while( Database.DoSequential())
{
var projectId = Database.GetValue("PROJECT_ID" );
var name = Database.GetValue( "NAME");
var description = Database.GetValue("DESCRIPTION" );
Logic(name);
}
2.4.4.9
Customizable Engine
Purpose
The source for most of the Rapise implementation is available for you to read and modify. You may
find it useful to look at if you decide to create a library customized for your application.
Usage
Unless you specified otherwise, Rapise will be installed at
C:\Program Files\Inflectra\Rapise\
The source code is in the Engine directory. You'll find the recording/learning libraries in Engine\Lib. The
core logic is in four files: SeSAction.js; SeSBehavior.js; SeSCommon.js; SeSConfig.js.
If you plan to make changes to the Rapise Engine, we recommend you use a version control system
capable of reconciling code conflicts, as we do not support user customizations. However, let us know
if you feel that your customizations are generally useful; if we decide to integrate them into Rapise, we
will support them.
See Also
Custom Libraries
Scripting
2.4.4.10 Scenarios
Purpose
Scenarios are a way to create reusable building blocks that can be incorporated into your test scripts.
These scenarios can be either included as part of a purely automated test script, or they can be included
into a predominantly manual test script.
Usage in Automated Tests
When you create a new test in Rapise it will contain a MyTest.js file that contains the main test code
and a MyTest.user.js file that contains any user-defined functions (called Scenarios). For example in the
following test:
function Test()
{
© 2015 Inflectra Corporation
Rapise User's Guide
119
Login();
CreateBook(g_book_name, g_book_author, g_book_genre);
Logout();
}
The test function calls three scenarios that comprise the main test.
The scenarios themselves are JavaScript functions:
function Login()
{
//Click on Log In
//SeS('Log_In').DoClick();
//Set Text librarian in Username:
SeS('Username_').DoSetText("librarian");
//Set Text librarian in Password:
SeS('Password_').DoSetText("librarian");
//Click on ctl00$MainContent$LoginUser$LoginButton
SeS('ctl00$MainContent$LoginUser$Logi').DoClick();
}
function Logout()
{
//Click on Log Out
SeS('Log_Out').DoClick();
}
function CreateBook(name, author, genre)
{
//Click on Book Management
SeS('Book_Management').DoClick();
//Click on (Create new book)
SeS('_Create_new_book__').DoClick();
//Set Name:
SeS('Name_').DoSetText(name);
//Select Author:
SeS('Author_').DoSelect(author);
//Select Genre:
SeS('Genre_').DoSelect(genre);
//Click on ctl00$MainContent$btnSubmit
SeS('ctl00$MainContent$btnSubmit').DoClick();
//Verify that the Book is added to the grid
//We need to xpath query the grid to see if any
//added rows match the item added
var tr = FindRowByName(name);
Tester.Assert('Book was added successfully [TS:5]', tr.length != 0);
}
If you go to the Object Tree you will see these user functions / scenarios displayed:
© 2015 Inflectra Corporation
120
Rapise User Manual
You can then drag and drop those into the test script editor to include in the main test script.
Usage in Manual Tests
When you create a new test in Rapise it will contain a MyTest.js file that contains the main test code
and a MyTest.user.js file that contains any user-defined functions (called Scenarios). For example you
may have the following scenario defined in the MyTest.user.js file:
function Login()
{
//Click on Log In
//SeS('Log_In').DoClick();
//Set Text librarian in Username:
SeS('Username_').DoSetText("librarian");
//Set Text librarian in Password:
SeS('Password_').DoSetText("librarian");
//Click on ctl00$MainContent$LoginUser$LoginButton
SeS('ctl00$MainContent$LoginUser$Logi').DoClick();
}
You can now include that in a manual test step, by simply making the test step description start with an
"@" symbol to denote that it is a scenario:
@Login();
Then when the manual test is executed, that one step will be passed to the scripting engine for
automated execution.
Example
If you open the CreateNewBook sample (located in C:\Users\Public\Documents\Rapise\Samples
\CreateNewBook ) you will see a test that has multiple scenarios.
See Also
Semi-Manual Testing
Object Tree
2.4.5
Javascript IDE
Purpose
The Javascript IDE includes an editor and a debugger.
© 2015 Inflectra Corporation
Rapise User's Guide
121
Usage
Simply open a script to view the editing features; create a breakpoint and play the script to view the
debugging features.
See Also
Learn about MS Jscript HERE.
2.4.5.1
Internal Debugger
Purpose
The Internal Debugger provides Persistent Breakpoints, Control Execution, a Watch View, a Variable/
Call Stack View, and Tooltips.
Usage
To use the internal debugger, you must first install Microsoft Script Debugger .
You can choose the Internal Debugger on the Rapise Ribbon (Test tab > Debugging menu).
The top drop-down menu has four options. Choose the Run with Internal Debugger option.
When you Playback your test script with a breakpoint, the debugging related menus and views will
appear:
The Debugging tab of the Ribbon
The Watch View and Variable/Call Stack View
The following screenshot shows the placement of Debugging related functionality in Rapise:
© 2015 Inflectra Corporation
122
Rapise User Manual
In the screenshot above, you can see the Debugger buttons available in the ribbon at the top of the
screen as well as the Variables and Watch sections in the lower pane.
See Also
You can use the External Debugger to debug your scripts as well.
2.4.5.1.1 Tooltips
Purpose
Tooltips let you view a variable's value during debugging.
Usage
1. Put a breakpoint in the script at or near where you wish to investigate
2. Mouse over variables as you advance through the script. A small box will popup, displaying the
variables' values:
See Also
Breakpoints
Internal Debugger
2.4.5.1.2 Control Execution
Purpose
Control Execution allows you to manually direct the execution of the script.
© 2015 Inflectra Corporation
Rapise User's Guide
123
Usage
1. Set a Breakpoint where you want to take control of the execution
2. Use the buttons on the Debugger tab of the Ribbon to step through the script.
See Also
Ribbon: Debugger
2.4.5.1.3 Breakpoints
Purpose
Breakpoints stop execution of the test at a specific line in the script. They allow you to investigate
program state, and trace execution flow.
Usage
To set a Breakpoint:
1. Open the script you would like to debug in the Source Editor.
2. Place the cursor at the line where you want a breakpoint.
3. Press F9 or the Break button on the Ribbon (Debugger tab).
4. If the Debugger tab is not visible, you can also use the Toggle Breakpoint option in the Edit tab:
See Also
Ribbon: Debugger
Control Execution
© 2015 Inflectra Corporation
124
2.4.5.2
Rapise User Manual
External Debugger
Purpose
When you enable the External Debugger, the Microsoft Script Debugger is used to debug your script.
Rapise provides an Internal Debugger as well.
Usage
You can enable the External Debugger on the Rapise Ribbon (Test tab > Debugging menu).
The top drop-down menu has four options:
No Debugging
Run with Internal Debugger : See Internal Debugger for more info.
Run with External Debugger : Open the Microsoft Debugger to run the script.
Run External Debugger on Error : Open the Microsoft Debugger only if an error occurs.
When you choose the Run with External Debugger option, Microsoft Script Debugger will open as soon
as you begin Playback of your script. The debugger will pause on the line
WScript.Echo("SeS Player Starting...")
and display an error message. There is no actual error; you can begin debugging. Note, however, that
Rapise is mostly written in javascript, and the Debugger will step through Rapise implementation as
well as your test script.
© 2015 Inflectra Corporation
Rapise User's Guide
125
See Also
Internal Debugger
For instructions on using the Microsoft Script Debugger, try this link: http://msdn.microsoft.com/enus/library/ms532989.aspx
2.4.5.3
Verbosity Levels
Purpose
The Verbosity Level affects the amount of information written to the Output View.
Usage
The Verbosity Level is set on the Ribbon (Test tab > Debugging menu). See below:
See Also
Ribbon: Test Tab
© 2015 Inflectra Corporation
126
2.4.5.4
Rapise User Manual
Syntax Highlighting
Purpose
With Syntax Highlighting, words in a program are displayed so as to immediately indicate their function.
Reserved words, variables, literals, and comments may be differentiated by color, boldness, underline
etc. Syntax Highlighting makes programs easier to read and modify.
Usage
Every javascript file opened in Rapise will display with Syntax Highlighting:
See Also
Source Editor
2.4.5.5
Code Folding
Purpose
Code Folding allows you to hide or show blocks of code. These blocks have syntactic meaning, such
as a function body, a class declaration, a loop, or a comment.
Usage
Every javascript file opened in Rapise will display with hide and show buttons to the top left of their
corresponding block. In the following screenshot, hide buttons are highlighted with green boxes; show
buttons are highlighted with purple boxes:
© 2015 Inflectra Corporation
Rapise User's Guide
127
See Also
Source Editor
2.4.5.6
Syntax Checking
Purpose
An editor performs Syntax Checking if it notifies the user of syntax errors in their program/script.
Usage
Rapise performs Syntax Checking as you type into the Source Editor. Messages regarding syntax
errors can be found in the Warning View.
For example, you begin writing a function:
We have a typo here. We used ?}? instead of ?)?. Once the error is corrected, the warning view clears
automatically:
© 2015 Inflectra Corporation
128
Rapise User Manual
See Also
Source Editor
2.4.5.7
Code Completion
Purpose
Rapise provides Code Completion for class, method and field names.
Usage
Begin typing a class, method, or field name. Press CTRL+space to open a list of possible
completions.
Advanced
Rapise has built-in code completion logic that lets it suggest the available list of functions for a specific
object. However since JavaScript is fundamentally an un-typed language, for the code completion to
work, there are some tips and tricks that you can use.
One may define a variable as simple as:
var p;
In this example p is just a variable with undefined type. It may be used as number, string or object. So
Rapise has no idea of how to deal with it. So if you type a dot after “p.” no code-completion window
appears.
Rapise scans for variable definitions when one saves the .js source file. So if anything goes wrong then
first thing is to save the file.
There are several ways of giving Rapise a "hint" about the variable type:
© 2015 Inflectra Corporation
Rapise User's Guide
129
Static Assignement
First, is static assignment. Suppose you specify some constant value when defining a variable:
var p="some string";
In this case Rapise knows the type of p. So it would assist you when you type a dot “.” after p:
Using Comments to Suggest the Type
In some cases variable type is not clear from its definition or assignments is not static:
var v1 = input;
var v2;
To deal with such cases the code should be instrumented. For example, if we know that input is string
and v2 will be used as number then we may explain it to Rapise by placing variable type using special
comment: /**<var_type*/ right together with var definition. It should be placed right either between
var keyword and variable name or right after an assignment operation (=), if any. I.e.:
var v1 = /**string*/input;
var /**number*/v2;
So now Rapise will be able to display the list of available methods and properties:
© 2015 Inflectra Corporation
130
Rapise User Manual
Another common case is a function parameter. If you have function that is defined:
function my_func(patient_index, patient_name)
{
}
The type of parameters patient_index and patient_name are not known, but may be explained in a
similar way:
function my_func(/**number*/patient_index, /**string*/patient_name)
So it becomes known to Rapise:
Code completion for variable names is useful when you have multiple variables or function parameters
and need to type them quickly. In this case Alt+Space keyword combination will bring up a list of
variables and functions starting with just typed keyword.
See Also
Source Editor
© 2015 Inflectra Corporation
Rapise User's Guide
2.4.6
131
Unit Testing
Purpose
Unit Testing involves testing individual units of a piece of software to make sure they act as intended.
The units tested are usually functions or class methods.
Usage
There are five ways that Rapise can help you Unit Test:
1. Rapise methods support testing objects and methods in DLLs.
2. Rapise can test ActiveX objects and their methods through their COM Interface.
3. If you choose to write your Unit tests in a third-party tool, Rapise has a Command Line interface
where you can access its functionality.
4. Test results are written to a TAP file, which allows integration with Unit Testing frameworks.
5. Rapise tests can be invoked from MbUnit and NUnit tests.
2.4.6.1
DLL Testing
Purpose
You can create objects and invoke methods from both managed and unmanaged dlls.
Usage
Rapise provides API calls to work with managed DLLs. The Windows object WScript can be used with
unmanaged DLLs.
Managed DLLs
Util.InvokeMember : Invoke a class method in a managed DLL.
Util.CreateClassInstance : Creates an instance of a class in a managed DLL.
Util.SetFieldValue: Sets a field value in an object created with CreateClassInstance.
Unmanaged DLLs
WScript.CreateObject("DynamicWrapper"): Create a DynamicWrapper object. The Register and
ShellExecute methods of the DynamicWrapper object can be used to invoke DLL methods as in
the following example:
var UserWrap = WScript.CreateObject("DynamicWrapper");
UserWrap.Register("shell32.dll", "ShellExecute", "I=hssssl", "f=s", "r=l");
UserWrap.Register("USER32.DLL", "MessageBoxA", "I=HsSu", "f=s", "R=l");
UserWrap.MessageBoxA( null, "" + elapsed, "Time Elapsed:", 0x30 );
Test Samples
There is a Samples folder in your Rapise directory. There are two test samples that illustrate
working with DLLs:
UsingDLLHandlerManaged
UsingDLLHandlerUnManaged
See Also
© 2015 Inflectra Corporation
132
Rapise User Manual
For more information on the WScript object, see: http://msdn.microsoft.com/en-us/library/
at5ydy31(VS.85).aspx
2.4.6.2
COM Testing Support
Purpose
Microsoft's Component Object Model (COM) is a standard for communication between separately
engineered software components (source). Any object with a COM interface can be created and used
remotely.
Usage
Creating a COM Object
You can create a COM object using Windows' ActiveXObject class. Once the object is created,
method invocation is the same as with any other object in your program. The methods available will
depend on the object's COM interface. The following example shows how to create an instance of
the Word application and open a file.
var doc = new ActiveXObject("Word.Application");
doc.Documents.Open(wordFileName);
Test Samples
There are several test samples that show how to Unit Test application modules via COM interface:
UsingMSWord
UsingMSExcel
UsingMSAccess
See Also
Learn more about COM HERE.
Learn more about ActiveXObject HERE.
2.4.6.3
Integration with Third Party Tools
2.4.6.3.1 Custom Strings
Purpose
Custom Strings allow you to associate meta data with your test. Each custom string has a name and
a value. The value can be retrieved using the name.
Usage
Adding a Custom String
1.
2.
3.
4.
Open the NameValue Collection Editor dialog. Instructions are HERE.
Press the Add button.
Fill in a name and value for the custom string.
Press OK. The dialog will close.
Retrieving a Custom String value
© 2015 Inflectra Corporation
Rapise User's Guide
133
Use the GetCustomString() method to retrieve a custom string's value. See the example below:
var factory = new ActiveXObject("Rapise.Test.Test");
var test =
factory.LoadFromFile( Global.GetFullPath("UsingCustomStrings.sstest"));
var BugID = test.GetCustomString("BugID");
var TestID = test.GetCustomString("TestID");
See Also
NameValue Collection Editor Dialog
There is a sample test called UsingCustomStrings.
2.4.6.3.2 MbUnit
Purpose
SeSMbUnit.vsi is a visual studio installer packaged with Rapise. It facilitates calling Rapise tests from
MbUnit tests.
Usage
Installation
You will need Visual Studio, MbUnit 3, and Gallio to use SeSMbUnit. MbUnit is bundled with
Gallio, which is available at www.gallio.org.
To install SeSMbUnit, open the following directory:
C:\Program Files\Inflectra\Rapise\Extensions\UnitTesting\MBUnit\SeSMbUnit
Double-click SeSMbUnit.vsi. The Visual Studio Content Installer will appear. Select the
components for the language you will use and then click Next.
Syntax
Use both the MbUnit.Framework and the SeSMbUnit namespaces:
using MbUnit.Framework;
using SeSMbUnit;
MbUnit uses the class attribute [Test] to identify test methods. The corresponding attribute for
SeSMbUnit is [SeSMbUnitTest(@"<path to .sstest>")]. Note that the SeSMbUnitTest attribute has a
parameter, the file-path to the test that will be invoked.
The following example uses a test method simply as a wrapper for calling an .sstest:
[SeSMbUnitTest(@"T:\Samples\Cross Browser\CrossBrowser.sstest")]
public void TestIEandFirefox()
{
int exitCode = SeSMbUnitHelper.TestExecute();
Assert.AreEqual(0, exitCode);
}
Templates
SeSMbUnit.vsi will install a template for Visual Studio called SeSMbUnitTests. The template
includes the appropriate using statements and a blank test method. You can insert additional
© 2015 Inflectra Corporation
134
Rapise User Manual
SeSMbUnitTest methods by right-clicking in the editor in Visual Studio, and selecting Insert Snippet
> SeSMbUnitTest. The following code will be added:
[SeSMbUnitTest(/*Insert path to .sstest file which must be run.*/)]
public void TestSeS()
{
int exitCode = SeSMbUnitHelper.TestExecute();
Assert.AreEqual(0, exitCode);
}
You'll need to specify the file-path.
Samples
There is a sample dll you can run in MbUnit. From the Rapise directory, you'll find it at: Extensions
\UnitTesting\MBUnit\SeSMbUnit\SeSSamplesMbUnit\bin\Debug\SeSSamplesMbUnit.dll
See Also
MbUnit and related documentation can be found at www.mbunit.com
2.4.6.3.3 NUnit
Purpose
SeSNUnit.vsi is a visual studio installer packaged with Rapise. It facilitates calling Rapise tests from
NUnit tests.
Usage
Installation
You will need Visual Studio and NUnit to use SeSNUnit. NUnit is available at http://www.nunit.org/
index.php?p=download.
To install SeSNUnit, open the following directory:
C:\Program Files\Inflectra\Rapise\Extensions\UnitTesting\NUnit\SeSNUnit
Double-click SeSNUnit.vsi. The Visual Studio Content Installer will appear. Select the
components for the language you will use and then click Next.
Syntax
Use both the NUnit.Framework and the SeSNUnit namespaces:
using NUnit.Framework;
using SeSNUnit;
NUnit uses the class attribute [Test] to identify test methods. The corresponding attribute for
SeSNUnit is [SeSNUnitTest(@"<path to .sstest>")]. Note that the SeSNUnitTest attribute has a
parameter, the file-path to the test that will be invoked.
The following example uses a test method simply as a wrapper for calling an .sstest:
© 2015 Inflectra Corporation
Rapise User's Guide
135
[SeSNUnitTest(@"T:\Samples\Cross Browser\CrossBrowser.sstest")]
public void TestIEandFirefox()
{
int exitCode = SeSNUnitHelper.TestExecute();
Assert.AreEqual(0, exitCode);
}
Templates
SeSNUnit.vsi will install a template for Visual Studio called SeSNUnitTests. The template includes
the appropriate using statements and a blank test method. You can insert additional SeSNUnitTest
methods by right-clicking in the editor in Visual Studio, and selecting Insert Snippet > SeSNUnitTest.
The following code will be added:
[SeSNUnitTest(/*Insert path to .sstest file which must be run.*/)]
public void TestSeS()
{
int exitCode = SeSNUnitHelper.TestExecute();
Assert.AreEqual(0, exitCode);
}
You'll need to specify the file-path.
Samples
There is a sample dll you can run in NUnit. From the Rapise directory, you'll find it at: Extensions
\UnitTesting\NUnit\SeSNUnit\SeSSamplesNUnit\bin\Debug\SeSSamplesNUnit.dll
See Also
NUnit and related documentation can be found at www.nunit.org
2.4.6.3.4 TAP Results
Purpose
Rapise supports the Test Anything Protocol (TAP). TAP specifies communication between unit tests
and testing frameworks, such as MbUnit or NUnit.
Usage
The results of a Rapise test are saved to a TAP file in the same directory as the test. Tap files have a
.tap extension.
See Also
More information about tap is available at the TAP wiki: www.testanything.org
MbUnit
NUnit
© 2015 Inflectra Corporation
136
2.4.7
Rapise User Manual
Web Service Testing
What is a Web Service?
A Web service is a unit of managed code that can be remotely invoked using HTTP, that is, it can be
activated using HTTP requests. So, Web Services allows you to expose the functionality of your
existing code over the network. Once it is exposed on the network, other application can use the
functionality of your program.
Web Services allows different applications to talk to each other and share data and services among
themselves. Other applications can also use the services of the web services. For example VB or .NET
application can talk to java web services and vice versa. So, Web services is used to make the
application platform and technology independent.
What types of Web Service are There?
There are two broad classes of web service:
1. SOAP - These web services make use of the Web Service Definition Language (WDSL) and
communicate using HTTP POST requests. They are essentially a serialization of RPC object
calls into XML that can then be passed to the web service. The XML passed to the SOAP web
services needs to match the format specified in the WSDL. SOAP web services are fully selfdescripting, so most clients do not directly work with the SOAP XML language, but instead use
a client-side proxy generator that creates client object representations of the web service (e.g.
Java, .NET objects). The web service consumers interact with these language-specific
representations of the SOAP web service.
2. REST - A RESTful web API (also called a RESTful web service) is a web API implemented using
HTTP and REST principles. Unlike SOAP-based web services, there is no "official" standard for
RESTful web APIs. This is because REST is an architectural style, unlike SOAP, which is a
protocol. Typically REST web services expose their operations as a series of unique "resources"
which correspond to a specific URL. Each of the standard HTTP methods (POST, GET, PUT and
DELETE) then maps into the four basic CRUD (Create, Read, Update and Delete) operations on
each resource. REST web services can use different data serialization methods (XML, JSON,
RSS, etc.).
Why do we Test Web Services?
The purpose of Web Service Testing is to verify that all of the Application Programming Interfaces
(APIs) exposed by your application operate as expected. In some ways they are similar to unit tests in
that they test specific pieces of code rather than user interface objects.
Unlike simple unit tests however, web services tests will normally need to be developed for each of the
supported versions of the API so that when a new version of a product comes out, you can regression
test the latest version of the API and all previous versions. This ensures that legacy clients using the
older version of the API don't need to make any changes.
Also, unlike unit tests, web services are being called across a network using the HTTP/HTTPS protocol
rather than simply calling code that is resident on the same system as the test script. In that sense,
they are similar to testing web sites.
Finally, in situations where you have an AJAX web application, as well as testing the front-end user
interface using the appropriate UI library, you may need to test the web service that is providing the
data to the user interface at the same time. In these situations you have a hybrid, web user interface
and web service test.
Testing Web Services with Rapise
© 2015 Inflectra Corporation
Rapise User's Guide
137
Rapise contains a built-in web service module that can currently test the following types of web service:
1. REST Web Services - Rapise contains a built-in REST definition builder and object library that
allows you to prototype out your REST web service requests, inspect the returned HTTP headers
and HTTP response body and then covert into a parameterized set of Rapise objects that can be
scripted against in the main Rapise JavaScript editor.
2. SOAP Web Services - We are planning on adding SOAP web service testing functionality to
Rapise in the near future.
2.4.7.1
Testing REST Web Services
What is REST and what is a RESTful web service?
REpresentational State Transfer (REST) is a style of software architecture for distributed systems such
as the World Wide Web. REST has emerged as a web API design model that offers greater simplicity
over other web service protocols such as SOAP and XML-RPC.
A RESTful web API (also called a RESTful web service) is a web API implemented using HTTP and
REST principles. Unlike SOAP-based web services, there is no "official" standard for RESTful web
APIs. This is because REST is an architectural style, unlike SOAP, which is a protocol.
How does Rapise test REST web services?
Creating a REST web service test in Rapise consists of the following steps:
1. Using the REST definition builder to create the various REST web service requests and verify that
they return the expected data in the expected format.
2. Parameterizing these REST web service requests into reusable templates and saving as Rapise
learned objects.
3. Writing the test script in Javascript that uses the learned Rapise web service objects.
Rapise REST Definition Builder
When you add a web service to your Rapise test project, you get a new REST definition file (.rest) that
will store all of your prototyped requests against a specific REST web service. The various REST
requests are then created in the REST definition builder:
© 2015 Inflectra Corporation
138
Rapise User Manual
Each REST request can then include the following items:
Method - the type of HTTP request being made (GET, POST, PUT, DELETE, etc.)
URL - the URL of the web service request with any parameter tokens included (e.g. {session_id}
in our example above)
Credentials - Any HTTP Basic Authentication Headers
Headers - Any other HTTP headers (both standard and custom)
Parameters - Any parameters that have been defined in the URL that will be called from the
Rapise test script.
Body - The body of the request (for POST and PUT requests). This can be in any text-serialized
format such as XML or JSON.
When you execute the request, it will return back the HTTP response headers and if it recognizes the
MIME content-type as either XML or JSON, it will format it to make it more readable by the tester:
Once you have finished with your prototyping of the web service test operations, you can then save the
request definitions and use the 'Update Object Tree' option to populate the main Rapise Object Tree.
Web Service Object Recognition
Each of the REST web service requests that has been prototyped in the REST definition editor is
converted by Rapise into a scriptable object:
© 2015 Inflectra Corporation
Rapise User's Guide
139
Each of the REST service objects in the tree has operations designed to let you call the method and
access the returned body either in its raw text format, or if it's a web service that returns data in JSON
format, it will be able to send/receive data as native JavaScript objects.
Rapise provides you with access to the following attributes of the HTTP request before/after the request
has been executed:
Request:
o Method
o Url
o Headers (inc. authentication)
o Body
Response:
o Headers
o Body
Rapise REST Test Scripts
Once all the REST operations have been defined and saved as Rapise learned objects, you can call the
REST operations from within your Rapise test scripts:
© 2015 Inflectra Corporation
140
Rapise User Manual
As well as simply calling the DoExecute() method of each REST web service object to call the
previously defined operation, you can use the various properties on the REST service object to send
through specific parameter values, add/remove headers, change the authenticated user, change the
request body as well as inspect all of the attributes in the request and response.
This allows you unparalleled control over the web service request, with the ability to debug and
diagnose web service issues in addition to being able to quickly call the learned operations.
Since the REST objects are just like any other Rapise object, you can have hybrid test scripts that call
web service methods and also test GUI objects. This is very useful when you want to test how the user
interface changes in response to specific web service API interactions, or when you have a user
interface that connects to the sever using a web service (for example with a JSON-based AJAX web
user interface).
Once you have created your REST web service test, you can use the standard Playback functionality
in Rapise to execute your test and display the report:
© 2015 Inflectra Corporation
Rapise User's Guide
2.4.7.2
141
Testing SOAP Web Services
This is planned future functionality for Rapise.
2.4.8
Mobile Testing
Purpose
Rapise lets you record and play automated tests against native applications on a variety of mobile
devices using either Apple iOS or Android. Rapise gives you the flexibility to test your applications on
either real or simulated devices.
Usage
Since the process for testing mobile devices depends heavily on the platform being used, we have split
the guide into two separate sections:
Mobile Testing using Apple iOS
Mobile Testing using Android
Examples
You can find the mobile sample tests and sample Applications (called AUTAndroid for Android and
AUTiOS for Apple iOS) in your Rapise installation at the following locations:
Sample Mobile Tests:
C:\Users\Public\Documents\Rapise\Samples\UsingMobile\AppAndroid (testing a native Android App)
C:\Users\Public\Documents\Rapise\Samples\UsingMobile\WebAndroid (testing a Chrome web app)
C:\Users\Public\Documents\Rapise\Samples\UsingMobile\AppiOS (testing a native iOS App)
C:\Users\Public\Documents\Rapise\Samples\UsingMobile\WebiOS (testing a Safari web app)
Sample Applications
C:\Users\Public\Documents\Rapise\Samples\UsingMobile\AUT\AUTAndroid (for iOS)
C:\Users\Public\Documents\Rapise\Samples\UsingMobile\AUT\AUTiOS (for Android)
(we supply the sample applications as both a compiled binaries and an projects with appropriate source
code)
© 2015 Inflectra Corporation
142
Rapise User Manual
See Also
Technologies - Mobile Testing, for instructions on preparing your environment for mobile testing,
including instructions for installing the necessary prerequisites and configuring the various third-party
components that Rapise uses to connect to the device.
Mobile Testing Tutorial - for a simple introduction to mobile device testing.
Mobile Settings Dialog - for information on setting up the different mobile profiles for the mobile
devices you will be testing
Mobile Object Spy - for information on how Rapise connects to the device and lets you view the
objects in the application being tested
2.4.8.1
Apple iOS
Purpose
Rapise lets you record and play automated tests on real iOS devices (iPad and iPhone) as well as test
applications using the iOS simulator that ships with XCode. No jailbreaking needed! With Rapise you can
record on one device and playback on multiple.
Prerequisites
This section assumes that you have already installed and configured all of the necessary components.
For details on this, please refer to the Technologies - Mobile Testing and Mobile Testing - iOS Setup
sections that describes the necessary steps for both physical and simulated devices.
Since Rapise runs on Windows computers (PC) and iOS devices (both real and simulated) can only be
tested on an Apple Macintosh (Mac) computer, it is necessary that you install Appium and Apple
Xcode onto the Mac and connect to Appium over the network from Rapise running on your PC.
For Physical iOS devices the architecture looks like:
© 2015 Inflectra Corporation
Rapise User's Guide
143
For simulated iOS devices (using the Xcode iOS Simulator) the architecture looks like:
1) Configure the Mobile Profile
To begin mobile testing, when you create the new test, make sure you choose the mobile methodology
option "Mobile: Mobile Support":
© 2015 Inflectra Corporation
144
Rapise User Manual
Once you have entered the name for the new test (with the mobile methodology selected) you will be
asked to choose the mobile profile. Rapise ships with several default profiles, for now select the one that
is closed to the device you want to test (you can always change it later):
When you click the [OK] button, Rapise will create a new mobile test with this profile selected.
Now you need to modify the profile so that it correctly matches the type of device you are testing and
also so that it correctly points to the Appium server that you are using to host the mobile devices. Click
on Options > Tools > Mobile Settings to bring up the Mobile Settings dialog box:
© 2015 Inflectra Corporation
Rapise User's Guide
145
The example screeenshot above is for an iPhone 4 physical device running iOS 7.1.1. For any iOS
device (real or simulated) you will need to provide the following:
Uri - this is the URL to your Appium server. We shall discuss this shortly
app - this needs to the path (on the Mac running Appium) to the Application being tested on the
device (e.g. /Users/user.name/Library/Developer/Xcode/DerivedData/AUTiOSgvdyymxgyzrfgqdfvfylapawjoyd/Build/Products/Debug-iphonesimulator/AUTiOS.app)
deviceName - this needs to match the name of the device being connected
platformName - this needs to be set to 'iOS'
platformVersion - this needs to be set to the correct version of iOS that the device is running
In addition, for physical devices only, you need to specify:
udid - The unique device identifier of the connected physical device (leave blank for simulated devices)
Once you have entered in the information and saved the profile, make sure that Appium is running on the
Mac (see the Technologies - Mobile Testing topic for details) and then click the [Test URL] button to
verify the connection with Appium:
© 2015 Inflectra Corporation
146
Rapise User Manual
Now you can start testing your mobile iOS application.
2) Using the Mobile Spy
The Mobile Spy will let you view an application running on the mobile device, take a snapshot of its
screen and then interactively inspect the objects in the application being tested. This is a useful first step
to make sure that Rapise recognizes the application and has access to the objects in the user interface.
To start the Mobile Spy, open the Spy icon on the main Test ribbon and select the Mobile option and the
Mobile Spy will be displayed in Discovery Mode. Now click the [Get Snapshot] button to display the
application specified in the mobile profile on the screen:
In the example above, we are displaying the sample iOS application that comes with Rapise (AUTiOS).
If you click on one objects in the user interface, it will be highlighted in Red and the tree hierarchy on the
left will expand to show the properties of that object:
If you want to view the contents of the Spy as a text file, just click the 'Page Source' button and you will
© 2015 Inflectra Corporation
Rapise User's Guide
147
see the contents of the Spy properties window as a text file.
Assuming that you can see your application in the Spy and that the objects can be inspected (similar to
that shown above) you can now begin the process of testing your mobile application. Click on
Disconnect to end your Spy session and close the Rapise Spy dialog. You will now will be returned
back to your test script.
3) Recording and Playing a Test
With the new Rapise mobile test script open, click on the Record/Learn button in Rapise and that will
display the recording activity dialog:
Now click on the [Pick Object] button and the Rapise Spy will be displayed in Recording Mode:
We now want to record a click on one of the menu options, simply highlight one of the menu entries:
© 2015 Inflectra Corporation
148
Rapise User Manual
Now click the [Learn Object] button and the object will be added to the Rapise object tree. Now on the
device itself click on the menu entry to go to the next screen, then in Rapise click Get Snapshot to
get the updated screen:
Now click on some of the objects and choose Learn to add them to the object tree. Once you are
finished, click on the Disconnect button. You will see the events in the recording activity dialog:
© 2015 Inflectra Corporation
Rapise User's Guide
149
Now click on the Finish button and you will be taken back to the test script with the iOS objects listed:
Now that we have the objects, we can drag them into the test script editor and write the following script:
//########## Script Steps ##############
function Test()
{
SeSConnectMobile();
SeS('Basic_Controls__Button__TextFiel').DoClick();
SeS('Username').DoSetText('test user');
SeS('Password').DoSetText('test pwd');
SeS('AUTiOS').DoClick();
}
g_load_libraries=["Mobile"];
© 2015 Inflectra Corporation
150
Rapise User Manual
This will click on the first menu entry, then enter a username and password and then finally return back
to the main menu.
Now to playback the test simply click Play in the Rapise test ribbon and the test will play back in the
mobile device:
This is the report of the test being executed.
Example
You can find the iOS sample tests and sample Application (called AUTiOS) in your Rapise installation at
the following locations:
Sample iOS Tests:
C:\Users\Public\Documents\Rapise\Samples\UsingMobile\AppiOS (testing a native App)
C:\Users\Public\Documents\Rapise\Samples\UsingMobile\WebiOS (testing a web app)
Sample Application (AUTiOS)
C:\Users\Public\Documents\Rapise\Samples\UsingMobile\AUT\AUTiOS
(we supply the sample application as both a compiled binary and an Xcode project with Objective C
source code)
See Also
Technologies - Mobile Testing, for instructions on preparing your environment for mobile testing,
including instructions for installing the necessary prerequisites and configuring the various third-party
components that Rapise uses to connect to the device.
Mobile Testing - iOS Setup - the steps for setting up XCode for developing and deploying iOS
applications
2.4.8.2
Android
Purpose
Rapise lets you record and play automated tests on real Android devices (e.g. Nexus, Galaxy) as well as
test applications using the Android simulator. With Rapise you have the powerful interactive Object Spy
that makes it easy to record on one device and playback on multiple.
Prerequisites
This section assumes that you have already installed and configured all of the necessary components.
© 2015 Inflectra Corporation
Rapise User's Guide
151
For details on this, please refer to the Technologies - Mobile Testing section that describes the
necessary steps for both physical and simulated devices.
Rapise runs on Windows computers (PC) and Android devices (both real and simulated) can be tested
on either an Apple Macintosh (Mac) computer or a PC:
If using a Mac, it is necessary that you install Appium and Android Studio onto the Mac and
connect to Appium over the network from Rapise running on your PC.
If using a PC, you can either install Appium and Android Studio onto a separate PC or you can
simply use the same PC that is running Rapise. The only difference will be whether the URL used to
connect to Appium is a localhost URL or one pointing to the other PC.
For Physical iOS devices the architecture looks like:
For simulated iOS devices (using the Xcode iOS Simulator) the architecture looks like:
© 2015 Inflectra Corporation
152
Rapise User Manual
1) Configure the Mobile Profile
To begin mobile testing, when you create the new test, make sure you choose the mobile methodology
option "Mobile: Mobile Support":
© 2015 Inflectra Corporation
Rapise User's Guide
153
Once you have entered the name for the new test (with the mobile methodology selected) you will be
asked to choose the mobile profile. Rapise ships with several default profiles, for now select the one that
is closed to the device you want to test (you can always change it later):
When you click the [OK] button, Rapise will create a new mobile test with this profile selected.
Now you need to modify the profile so that it correctly matches the type of device you are testing and
also so that it correctly points to the Appium server that you are using to host the mobile devices. Click
on Options > Tools > Mobile Settings to bring up the Mobile Settings dialog box:
© 2015 Inflectra Corporation
154
Rapise User Manual
The example screeenshot above is for an Android Nexus7 physical device running Android 4.4.2. For any
Android device (real or simulated) you will need to provide the following:
Uri - this is the URL to your Appium server. We shall discuss this shortly
app - this needs to the path (on the Mac/PC running Appium) to the Application being tested on the
device (e.g. C:\Users\Public\Documents\Rapise\Samples\UsingMobile\AUT\AUTAndroid\bin
\AUTAndroid.apk ). If running on the same PC as Rapise, then this path should be already correct.
deviceName - this needs to match the name of the device being connected
platformName - this needs to be set to 'Android'
platformVersion - this needs to be set to the correct version of Android that the device is running
In addition, for physical devices only, you need to specify:
udid - The unique device identifier of the connected physical device (leave blank for simulated devices)
Once you have entered in the information and saved the profile, make sure that Appium is running on the
Mac/PC (see the Technologies - Mobile Testing topic for details) and then click the [Test URL] button to
verify the connection with Appium:
© 2015 Inflectra Corporation
Rapise User's Guide
155
Now you can start testing your mobile Android application.
2) Using the Mobile Spy
The Mobile Spy will let you view an application running on the mobile device, take a snapshot of its
screen and then interactively inspect the objects in the application being tested. This is a useful first step
to make sure that Rapise recognizes the application and has access to the objects in the user interface.
To start the Mobile Spy, open the Spy icon on the main Test ribbon and select the Mobile option and the
Mobile Spy will be displayed in Discovery Mode. Now click the [Get Snapshot] button to display the
application specified in the mobile profile on the screen:
In the example above, we are displaying the sample Android application that comes with Rapise
(AUTAndroid).
If you click on one objects in the user interface, it will be highlighted in Red and the tree hierarchy on the
left will expand to show the properties of that object:
© 2015 Inflectra Corporation
156
Rapise User Manual
If you want to view the contents of the Spy as a text file, just click the 'Page Source' button and you will
see the contents of the Spy properties window as a text file.
Assuming that you can see your application in the Spy and that the objects can be inspected (similar to
that shown above) you can now begin the process of testing your mobile application. Click on
Disconnect to end your Spy session and close the Rapise Spy dialog. You will now will be returned
back to your test script.
3) Recording and Playing a Test
With the new Rapise mobile test script open, click on the Record/Learn button in Rapise and that will
display the recording activity dialog:
© 2015 Inflectra Corporation
Rapise User's Guide
157
Now click on the [Pick Object] button and the Rapise Spy will be displayed in Recording Mode:
We now want to record a click on one of the menu options, simply highlight one of the menu entries (e.g.
"Login"):
Now click the [Learn Object] button and the object will be added to the Rapise object tree. Now on the
device itself click on the menu entry to go to the next screen, then in Rapise click Get Snapshot to
get the updated screen:
© 2015 Inflectra Corporation
158
Rapise User Manual
Now click on some of the objects and choose Learn to add them to the object tree. Once you are
finished, click on the Disconnect button. You will see the events in the recording activity dialog:
Now click on the Finish button and you will be taken back to the test script with the Android objects
listed:
© 2015 Inflectra Corporation
Rapise User's Guide
159
Now that we have the objects, we can drag them into the test script editor and write the following script:
//########## Script Steps ##############
function Test()
{
SeSConnectMobile();
SeS('text1').DoClick();
SeS('edit_username').DoSetText('test user');
SeS('edit_password').DoSetText('test pwd');
SeS('android_widget_Button').DoClick();
SeS('home').DoAction();
}
g_load_libraries=["Mobile"];
This will click on the first menu entry, then enter a username and password and then finally return back
to the main menu.
Now to playback the test simply click Play in the Rapise test ribbon and the test will play back in the
mobile device:
© 2015 Inflectra Corporation
160
Rapise User Manual
This is the report of the test being executed.
Example
You can find the Android sample tests and sample Application (called AUTAndroid) in your Rapise
installation at the following locations:
Sample Android Tests:
C:\Users\Public\Documents\Rapise\Samples\UsingMobile\AppAndroid (testing a native App)
C:\Users\Public\Documents\Rapise\Samples\UsingMobile\WebAndroid (testing a web app)
Sample Application (AUTAndroid)
C:\Users\Public\Documents\Rapise\Samples\UsingMobile\AUT\AUTAndroid
(we supply the sample application as both a compiled .apk binary and an Android Studio Java project
with source code)
See Also
Technologies - Mobile Testing, for instructions on preparing your environment for mobile testing,
including instructions for installing the necessary prerequisites and configuring the various third-party
components that Rapise uses to connect to the device.
2.4.9
Manual Testing
Purpose
Manual testing is used for situations where automated testing does not make sense. This may be due to
technical reasons (the application being tested does not have an API that lets tools such as Rapise
interact with them) or economic (this part of the application is rarely used and the user interface is
changing in each release).
However Rapise can help accelerate and optimize your manual testing as well. Rapise lets you rapidly
create manual tests 5x faster than creating them by hand. It integrates with Spira for test management,
so you still have a central repository of version-controlled test cases, but Rapise allows you to edit them
offline when you have no connection to Spira and also to execute them from within Rapise.
Usage
To start manual testing, simply create your test as normal using the New Test dialog box. Then once the
test has been created, click on the "Manual Steps" icon in the Test ribbon and then you will be taken to
the Manual Editor with the Manual Test Ribbon Visible:
From here you can start creating your new manual test using the Manual Recorder, then edit the created
© 2015 Inflectra Corporation
Rapise User's Guide
161
test steps in the Manual Editor. Finally you can save the test to Spira and then play it back using the
Manual Playback and Incident Logging screens.
In addition to being used for manual testing, the test step editor lets you view the test steps that define
the test scenario so that when you automate the test case, you can easily tie back specific verification
points with test steps in Spira.
Finally you can also have the best of manual and automated testing in the same test script, using semimanual testing. That allows you to automate some of the repetitive tasks in a primarily manual test case.
Example
For a full tutorial using the manual playback, refer to the Exploratory Testing tutorial.
In addition, a working sample of manual testing is available from Spira, simply connect to the sample
"Library Information System" project and open the 'Ability to Create New Book (TC2)' test case in
the "Functional Tests" folder of the project. That will then display the sample manual test within Rapise:
See Also
Manual Recording
Manual Playback
Exploratory Testing Tutorial
Dialogs, Views and Menus
o Manual Ribbon
o Manual Test Editor
o Manual Playback
o Incident Logging
2.4.9.1
Manual Recording
Purpose
As described in the main Manual Testing topic, sometimes it is not possible to automate the testing of a
specific application, however Rapise is also a powerful manual test generation system that can help you
create test cases 5x faster than simply creating test cases by hand step by step.
This section describes how you can record a set of steps automatically by simply using the
application being tested. Unlike an automated test however, Rapise will store a human-readable
description of what was performed along with a screenshot, rather than actual computer code that can be
played back by a computer.
© 2015 Inflectra Corporation
162
Rapise User Manual
Step 1 - Creating a New Test
To start manual testing, simply create your test as normal using the New Test dialog box. Then once the
test has been created, click on the "Manual Steps" icon in the Test ribbon and then you will be taken to
the Manual Editor with the Manual Test Ribbon Visible:
The test step list will initially be empty:
Step 2 - Recording Some Steps
Now you should open up the application you want to record from. In this example we shall be testing the
built-in Microsoft Paint application. This is a good candidate for manual testing as a lot of the
functionality is hard to test automatically since there is a simple drawing canvas rather than discrete
buttons and data elements to test.
To make sure that we have screenshots recorded, whilst keeping the size of the screenshots
reasonable, use the following recording options:
Now click the 'Record Manual' button and choose MS-Paint from the list of running applications in
Select Application to Record dialog and then click 'Select' to start recording.
As you click through the application, the recording will display the list of steps and actions being
captured:
© 2015 Inflectra Corporation
Rapise User's Guide
163
In this example, we created a new canvas, chose the Pencil tool, created a drawing using the pencil,
entered some text and then made it bold:
When you click Finish to complete the recording, Rapise will now display the list of populated manual
© 2015 Inflectra Corporation
164
Rapise User Manual
test steps with the embedded screen captures:
You will notice that the description of each test step will use the form "User [action] at [coordinates] in
'[object name]'" and the expected result will include the screenshot of what the user was doing. In
addition, the sample data will contains the equivalent Rapise automation code for reference. This can be
useful later if you decide to automate this test.
Step 3 - Editing the Steps
Typically you may want to add some additional steps (e.g. we added a line to describe the process of
starting up MS Paint), delete any duplicate/unnecessary steps and reword them so that they make
the most sense to the tester. In our example we used the manual editing screen to update the steps as
follows:
Click Save to make sure the updates are all saved locally. Now before you can execute these tests, you
will need to Save them to Spira (our web-based test management system).
Step 4 - Saving to Spira
Click on the option to Save to Spira, you will be asked to confirm the creation of the document folder in
Spira that will hold the test files:
© 2015 Inflectra Corporation
Rapise User's Guide
165
Click on 'Create' and then the manual test will be saved to Spira. You will see that this process adds the
unique Spira test step IDs to each step. They are displayed using the format [TS:xxx] . This special
token [TS:xxx] can be used in Tester.Assert commands to relate specific verification points with test
steps during automated testing.
Now that the test has been saved in Spira, you can click on the 'View in Browser' option to see how
the test steps look inside Spira.
Now this test case is ready for manual playback.
See Also
© 2015 Inflectra Corporation
166
Rapise User Manual
Manual Testing
Manual Playback
2.4.9.2
Manual Playback
Purpose
As described in the main Manual Testing topic, sometimes it is not possible to automate the testing of a
specific application, however Rapise is also a powerful manual testing tool that lets you execute manual
test cases stored in SpiraTest.
The advantage of using Rapise to execute the manual tests (instead of just using SpiraTest itself) is that
Rapise can display the execution window as a small minimizable dialog box that gets rid of the need to
have two screens (one to display the test and one to test the application). Also Rapise provides superior
image manipulation tools over those available in a web application.
Step 1 - Open the Manual Test
Using the MS-Paint example manual test that we created previously, open up the test in Rapise. Click
on the 'Manual Steps' icon in the Test ribbon and you should see the list of test steps:
Now that we have the test opened, we can start the playback
Step 2 - Executing the Manual Test
Choose the Release from the list of those available in the project:
© 2015 Inflectra Corporation
Rapise User's Guide
167
Then click on the 'Execute' icon to start manual test execution. That will bring up the manual playback
screen:
On this screen, we shall follow through the steps listed in the test case. This involves opening up MS
Paint, creating a new canvas, adding some lines using the pencil and then adding some text using the
text tool. As you perform these steps, click on the Pass button to indicate that each step has passed.
You can also minimize the manual playback screen by clicking the >| button.
Once you get to Step 7, we shall pretend that MS Paint failed to display the text correctly. Enter in the
Actual Result a message to that effect:
© 2015 Inflectra Corporation
168
Rapise User Manual
Next we shall attach a screenshot of what actually happened and log a test failure and associated
incident / defect.
Step 3 - Capturing and Annotating a Screenshot
Click on the Image icon in the rich text editor associated with the Actual Result text box. That will
bring up the Drawing Tools screen that asks you to draw a rectangle to select a portion of the current
screen to capture:
© 2015 Inflectra Corporation
Rapise User's Guide
169
If the MS Paint application is not in the foreground, just click ESC on your keyboard to abort, rearrange
your windows and then try again.
Once you have selected the rectangle, the drawing tools will display your selected image in the image
editor:
You can now use the annotation tools to add labels, text and other items to explain the issue that you
found:
© 2015 Inflectra Corporation
170
Rapise User Manual
In the example above, we added a red ellipse, arrow and text to mark the issue that was seen in MSPaint. Once you are happy with your image, click Accept and the image will be included in the test
Actual Result:
Now we can log an incident that is associated with this test failure.
Step 4 - Logging the Incident / Defect
© 2015 Inflectra Corporation
Rapise User's Guide
171
Click on the 'Log Incident' button to display the new incident entry screen:
Choose the type of incident, enter the name, description, priority, detected release and any other
required fields as defined by the workflow in the project that you are connected to. Once you have
entered in the various fields, click the 'Save' icon in the top left.
This will return you to the manual execution screen with the Incident ID [IN:xxx] and name displayed
at the bottom. Now click on the 'Fail' button and the test case will be marked as failed:
© 2015 Inflectra Corporation
172
Rapise User Manual
Finally, click on the Finish button and the results will be posted to Spira.
Step 5 - Viewing the Results
Now to view the results in Spira, click on the Spira Dashboard item in the main Rapise Test ribbon. Then
under the 'My Created' test cases, click on the link for the test case you execute. That will bring up the
test case in Spira. Now click on the 'Failed' hyperlink in Spira and the new test run will be displayed:
If you scroll down, you can see the individual test steps that were executed, with the associated actual
result (including the captured screenshot):
© 2015 Inflectra Corporation
Rapise User's Guide
173
If you click on the Incidents tab, you can also see the new incident that was logged, linked to this test
run:
Congratulations! You have now successfully executed a manual test using Rapise.
See Also
Manual Testing
Manual Recording
2.4.9.3
Semi-Manual Testing
Purpose
This is a useful technique when you want to have a predominantly manual test (executed by a tester)
that has some steps that are automated by Rapise. These could be some of the initial setup tasks (e.g.
logging in, starting the application) or just tasks that are well suited to automation.
Usage
Create your manual test either using the recorder or the manual test editor. You can also just open up a
test already created in Spira.
Next, inside Rapise, create a test scenario (function) that contains the necessary login. In this example
we shall simply automate the launching of MS-Paint.
Create a function in the MyTest.user.js file with the following code:
function LaunchMsPaint()
© 2015 Inflectra Corporation
174
Rapise User Manual
{
Global.DoLaunch('C:\\Windows\\system32\\mspaint.exe');
}
Now go to the Manual Steps section of Rapise by clicking on the Manual Steps icon in the test ribbon:
Inside the first test step (for example), change the Description to the following:
@LaunchMsPaint();
//User starts up the MS-Paint Application
This will be contained within the actual test step itself:
Now, when you execute the test (using the normal Execute button on the main Test ribbon (not the
Execute Manual icon on the Manual Steps ribbon) what happens is that Rapise will execute the main
Test() function that contains:
//########## Script Steps ##############
function Test()
{
Global.DoPlayManual();
}
g_load_libraries=["Generic"];
this instructs Rapise to use the manual playback system. However when it gets to the first step, it will
see the ampersand symbol (@) that denotes that this is actually an automated scenario and then call
the following code:
//User starts up the MS-Paint Application
LaunchMsPaint();
Once the scenario has completed, Rapise will then return back to the manual test playback.
See Also
Manual Playback
Test Scenarios
2.4.10 SpiraTest Integration
For more details on using SpiraTest with Rapise, please refer to the separate "Using SpiraTest with
Rapise" guide.
© 2015 Inflectra Corporation
Rapise User's Guide
175
Overview
SpiraTest is a web-based quality assurance and test management system with integrated release
scheduling and defect tracking. SpiraTest includes the ability to execute manual tests, record the
results and log any associated defects. Note: SpiraTeam is an integrated ALM Suite that includes
SpiraTest as part of its functionality, so wherever you see references to SpiraTest in this section, it
applies equally to SpiraTeam.
When you use SpiraTest with Rapise you get the ability to store your Rapise automated tests inside the
central SpiraTest repository with full version control and test scheduling capabilities:
You can record and create your test cases using Rapise, upload them to SpiraTest and then schedule
the tests to be executed on multiple remote computers to execute the tests immediately or according
to a predefined schedule. The results are then reported back to SpiraTest where they are archived as
part of the project. Also the test results can be used to update requirements' test coverage and other
key metrics in real-time.
Connecting to SpiraTest
The first thing you need to do is to configure the connection to SpiraTest. To do this, click on the
Options button in the Tools section of the Rapise Test ribbon:
This will bring up the Options dialog box. Click on the Tools tab to bring up the settings related to the
various Tools:
© 2015 Inflectra Corporation
176
Rapise User Manual
Click on the "Spira Connection Settings" button to bring up the dialog box that lets you configure the
connection to SpiraTest:
Enter the URL, login and password that you use to connect to SpiraTest and then click the "Test"
button to verify that the connection information is correct.
The "Default Repository Path" is a folder that used to store local copies of the non-absolute
repositories.
The Token is the identifier of the current machine that Rapise is installed on. It needs to match
the 'Token' name of the corresponding 'Automation Host' in SpiraTest.
You need to be running SpiraTest / SpiraTeam v4.0 or later to use the integration with Rapise.
Creating a Rapise test from a SpiraTest test case
© 2015 Inflectra Corporation
Rapise User's Guide
177
To create a new Rapise test based on the manual test steps already defined in a SpiraTest test case,
click on the
tab in the top left of the application and from the File menu, choose the option
New Test - Create a New Test. This will bring up the following dialog box:
1. Select the project that has our new test case. The list of test case folders will be displayed.
2. You can create a new folder by clicking the New Folder button
3. Expand the folders until you can see the desired test case:
© 2015 Inflectra Corporation
178
Rapise User Manual
Now either create a new test case by using the New Test Case button or simply click on a test case
that you previously created in Spira. In either case you will see its test steps displayed underneath (if
there are any):
© 2015 Inflectra Corporation
Rapise User's Guide
179
Once you are satisfied that this is the correct test case, choose the desired methodology (Mobile or
Standard Manual Scripting) and then click the Create from Spira button. Rapise will now create a local
test folder and files based on this Spira test case.
Saving a Test to SpiraTest
To save the a Rapise test into SpiraTest you need to make sure that the following has been setup first:
1. You have a project created in SpiraTest to store the Rapise tests in. The Rapise tests will be
stored in a repository located inside the Planning > Documents section of the project.
2. The user you will be connecting to SpiraTest with has the permissions to create new document
folders.
3. You have created the Test Case in SpiraTest that the Rapise test will be associated with. This is
important because without being associated to a SpiraTest Test Case, you will not be able to
schedule and execute the tests using SpiraTest and RapiseLauncher.
4. You have created an AutomationEngine in SpiraTest that has the token name "Rapise". This will
be used to identify Rapise automation scripts inside SpiraTest.
Once you have setup SpiraTest accordingly, click on the Save to Spira icon in the File section of the
Rapise Test ribbon:
© 2015 Inflectra Corporation
180
Rapise User Manual
That will bring up the Save to SpiraTest dialog box:
The first thing you will need to do is choose the SpiraTest project from the dropdown list. This will then
update the list of test case folders displayed in the top pane of the dialog box.
Once you have chosen the desired project, you need to expand the test case folders in SpiraTest and
choose the existing Test Case that you want to attach the Rapise test to:
© 2015 Inflectra Corporation
Rapise User's Guide
181
When you expand the folders to display the list of contained test cases, it will display the name and ID
of the test case together with an icon that indicates the type of test case:
1.
- Manual test case that has no automation script attached. (Repository Path will also be
blank)
2.
- Test case that has an existing Rapise test attached.
3.
- Test case that has a non-Rapise automation script attached.
If you are adding a new Rapise test, choose a test case that has icon (1) and doeesn't have an
associated Repository path. If you are updating an existing test, choose a test case that has icon (2)
and the matching Repository path.
Note: test cases with icon type (3) cannot be used with Rapise for adding or updating scripts.
Once you have chosen the appropriate test case, click the [Save/Synchronize] button. That will bring up
the Create New Repository dialog box:
© 2015 Inflectra Corporation
182
Rapise User Manual
This dialog box will let you know where the Rapise script will be stored in SpiraTest and also the
location of the repository local directory used to store the 'working copy' of the Rapise test. Click
[Create] to confirm.
A dialog box will be displayed that lists all the files in the local working directory and shows which ones
will be checked-in to SpiraTest. The system will filter out result and report files that shouldn't be
uploaded. You can change which files are filtered out and also selectively include/exclude files. Once
you are happy with the list of files being checked-in, click the [OK] button:
The system will display the message that it's saving the files to the server:
© 2015 Inflectra Corporation
Rapise User's Guide
183
If an error occurs during the save, a message box will be displayed, otherwise the dialog box will simply
close.
Opening a Test from SpiraTest
To open a Rapise test from SpiraTest you need to make sure that the following has been setup first:
1. You have already configured the connection to the SpiraTest service (see the instructions at the
top of this page).
2. The user you will be connecting to SpiraTest with has the permission to view the project that the
tests are being stored in.
Once you have setup SpiraTest accordingly, click on the Open Test from Spira icon in the File section
of the Rapise Test ribbon:
That will bring up the Open Test from SpiraTest dialog box:
© 2015 Inflectra Corporation
184
Rapise User Manual
The first thing you will need to do is choose the SpiraTest project from the dropdown list. Once you have
done that, the system will display the list of test case folders in this project.
Once you have chosen the project, you need to expand the test case folders in SpiraTest and choose
the existing Test Case that you want to open:
© 2015 Inflectra Corporation
Rapise User's Guide
185
When you expand the folders to display the list of contained test cases, it will display the name of the
associated Rapise test script associated with it (to the right). Choose a test case that has the matching
Rapise test case listed to the right of it (in the Repository Path column).
Note: Only test cases that have an attached Rapise test script will be displayed in this view.
Once you have chosen the appropriate test case, click the [Load/Synchronize] button to load the test
case:
© 2015 Inflectra Corporation
186
Rapise User Manual
A dialog box will be displayed that lists all the files on the server which will be downloaded from
SpiraTest. You can change which files are to be downloaded. Once you are happy with the list of files
being checked-out, click the [OK] button:
The system will display the message that it's downloading the files from the server. If an error occurs
during the download, a message box will be displayed, otherwise the dialog box will simply close.
Viewing the SpiraTest Properties of a Test
To see which SpiraTest project and test case the current Rapise test is associated with, click on the
Spira Properties icon in the Tools section of the Rapise Test ribbon. This will bring up the Spira
Properties dialog box:
© 2015 Inflectra Corporation
Rapise User's Guide
187
This will display the name of the current Rapise test together with the name of the SpiraTest project,
test folder and test case that this test is associated with.
If you would to save the current Rapise test into a new SpiraTest project or if you want to save it against
a new test case in the same project, you must first unlink the test. To do this click on the Unlink from
Test Case button. This will tell Rapise to remove the stored SpiraTest information from the .sstest file
so that it can be associated with a new project and/or test case in SpiraTest.
Warning: This operation cannot be undone so please mak e sure you really want to unlink the current
test.
Using the Spira Dashboard
In addition to using the ribbon options described in this page, you can interact with SpiraTest using the
Spira Dashboard that is available from the Start Page. This provides a convenient way of interacting with
SpiraTest, allowing you to quickly create, save and open test cases from SpiraTest.
Using RapiseLauncher
RapiseLauncher is a separate application that installs with Rapise. It allows you to remotely schedule
the automated tests in SpiraTest and have RapiseLauncher automatically invoke the tests according to
the schedule. Details on using SpiraTest with RapiseLauncher to remotely schedule and execute tests
is described in the separate "Using SpiraTest with Rapise" guide. This guide can be found in the
Rapise program files folder. Click on Start > Programs > Inflectra > Rapise in Windows and you will see
the shortcut for the guide.
2.4.11 Checkpoints
Purpose
A Checkpoint is defined by two things: (1) a location in the test execution path and (2) a subset of AUT
state. Each time the checkpoint executes, the AUT state is compared to a predefined value.
Discrepancies are noted, and may show a regression in program behavior.
© 2015 Inflectra Corporation
188
Rapise User Manual
Usage
A checkpoint can be added in two ways:
(1) during recording, with the Verify Object Properties dialog, or
(2) by manually adding an Assertion to the test script.
See Also
Recording
2.4.12 Tests and Sub-Tests
The concept of Sub-Test is an organic way to organize the whole work with Tests in organic way. By
having sub-tests one may meet one of the following goals:
1. Create multiple test scenarios working with same set of Objects and Functions.
2. Organize different test scenarios into a single workspace.
3. Use Sub-test to make cross-browser tests
We will consider each of described goals separately. The test containing the sub-test(s) we will call
base or parent test.
Make Multiple Test Scenarios with the Same Set of Objects
In this case 'parent' test contains all learned objects and user-defined functions.
For example, the parent test may have objects "User Name", "Password", "Sign On". And function
function Login(username, password)
© 2015 Inflectra Corporation
Rapise User's Guide
189
{
...
}
SubTest1 may be used to check login with valid Credentials, SubTest1.js looks like:
function Test()
{
Login("validuser", "validpassword");
// Now check that login is successfull
Tester.Assert("Login leads to welcome message: ",
Global.DoWaitFor('Welcome_User'));
}
SubTest2 may be used to check login with invalid Credentials (i.e. it is a fail-test). SubTest2.js looks
like:
function Test()
{
Login("invaliduser", "invvalidpassword");
// Now check that login is successfull
Tester.Assert("Login leads to invalid user object: ",
Global.DoWaitFor('Invalid_User'));
}
Function Login and objects Welcome_User and Invalid_User are defined in Test. The subtests are
just implementing various scenarios for the same set of objects.
Organize different tests into a single workspace.
Each test has its own objects, functions and scenarios.
The usage of such an approach is well demonstrated by example. We created a test called
© 2015 Inflectra Corporation
190
Rapise User Manual
'SampleMaster ' and put all Rapise samples into it by using Add File context menu in the the Test Tree
dialog. Finally the Files tree looks like:
All tests in this tree are independent. We use the Sample Master to manage all the tests from a single
environment.
Using Sub-Tests for a Cross-browser testing
See 'Cross Browser'.
Sub-Test Features
Sub-test may have its own nested sub-tests. For example, in the parent test contains reference to
'CrossBrowser' subtest having 'IE' and 'Firefox' subtests inside:
© 2015 Inflectra Corporation
Rapise User's Guide
Sub-test options are available from the 'Tag' property in the 'Properties window:
The following options are available in the context menu fore each of the sub-tests:
© 2015 Inflectra Corporation
191
192
Rapise User Manual
Play: Execute selected sub-test
Record: Start recording into selected sub-test
Save: Save options of a sub-test
Show Objects: Show objects form a sub-test in the Object Tree
Delete: Remove reference to a sub-test from its parent test
2.5
Dialogs, Views, and Menus
This section details the Rapise GUI. Each subsection describes the function of a particular Dialog,
View, or Menu. The purpose and consequences of all buttons, options, lists, and check boxes are
listed.
2.5.1
Accessible Events Dialog
This dialog was available in an older version of Rapise and has now been depreciated.
Screenshot
Purpose
To display Microsoft Active Accessibility event notifications.
How to Open
Press the Monitor Events button in the SeS Spy Dialog.
Widgets
Skip: While the Skip option is selected, the Accessible Events Dialog stops printing event
© 2015 Inflectra Corporation
Rapise User's Guide
193
notifications. The number of notifications skipped is printed to the right of the word Skip:
Ignore Mouse Move: Do not print notifications of mouse movement.
Clear: Clear the Accessible Events dialog.
See Also
Microsoft Active Accessibility is described here http://msdn.microsoft.com/en-us/magazine/
cc301312.aspx
2.5.2
Add Web Service Dialog
Screenshot
Purpose
Adds a new REST web service to your Rapise test. It adds the web service as a .rest file that is added
to the "Services" folder of the "Test Files" section:
How to Open
Click on the "Web Services" icon in the Rapise Test ribbon tab.
2.5.3
Create New Test Dialog
Purpose
Create a new Rapise test. You have the option of either connecting to Spira and storing the new test in
our central test management system or simply saving the new test locally.
How to Open
Simply click on the File tab of Rapise and click New Test (Create New Test) on the File menu.
(a) Creating in Spira
By default Rapise will ask you to save the new test into the Spira test management system:
© 2015 Inflectra Corporation
194
Rapise User Manual
Assuming that you have already configured the connection to Spira, first you need to select the project
in Spira. That will then display the test case folders and test cases in Spira:
© 2015 Inflectra Corporation
Rapise User's Guide
195
If there is already a test case in Spira that has not already been linked to Rapise then you can simply
select that test case, which will display any existing manual test steps that exist:
© 2015 Inflectra Corporation
196
Rapise User Manual
If this is the test case you want to associate the new Rapise test with, then simply click Create from
Spira.
If you want to create a new test case in Spira to use, simply click New Test Case:
Then enter the name of the new test case and click OK. Once it has been created you can then select
it in the test case list and click Create from Spira.
Sometimes there is no existing folder inside Spira that makes sense to use. In which case you can
first use the New Folder button to create an empty folder that new test cases can be created in:
© 2015 Inflectra Corporation
Rapise User's Guide
197
Regardless of which option you choose, before you click Create from Spira, you have the choice of
test methodology to use.
Currently there are two methodologies available in Rapise:
Mobile: Mobile Support - this should only be selected for mobile device testing
Basic: Manual Scripting Mode - this should be used for all non-mobile testing (e.g. Web, Desktop,
Web Services)
If you do not plan on using Spira for managing your test scripts (or you are not able to connect when
you want to create the test), you can click on the Create Locally... to just create the test case locally
(see next section). You can always save to Spira later on.
(b) Creating Locally
If you choose the option to Create Locally the following dialog box is displayed:
You need to enter the following information and click Create:
The name of the new test - please enter the name of the new test that you wish to create.
Folder - please choose the folder on your local computer that you wish to store the Rapise test in.
Specify methodology - there are currently two methodologies available in Rapise:
© 2015 Inflectra Corporation
198
Rapise User Manual
o Mobile: Mobile Support - this should only be selected for mobile device testing
o Basic: Manual Scripting Mode - this should be used for all non-mobile testing (e.g. Web,
Desktop, Web Services)
Once you click Create, the new test will be created and saved locally.
2.5.4
Create Sub-Test Dialog
Screenshot
Purpose
Create a sub-test.
New test should have own set of Objects: Uncheck it if you want to create a scenario re-using
objects from parent test.
New test should have own User-defined functions: Uncheck it if you want to create a scenario
re-using utility functions from its parent test.
The Sub-Test is always created inside the folder of its parent test. If parent test is saved to a new
location then sub-test is also saved as a sub-folder of a new location.
© 2015 Inflectra Corporation
Rapise User's Guide
How to Open
Choose Create Sub-Test... in the context menu of a folder in Test Files dialog.
2.5.5
Content View
Screenshot
Purpose
To view and edit files. This includes the following file types:
JavaScript (.js) automated test script files
Report (.trp) files that open in the Report Viewer.
Excel (.xls) files that can be displayed in the Spreadsheet Editor
REST (.rest) web service definition files that open in the REST Editor.
Analog Recording Files (.arf) that contain analog testing mouse clicks and coordinates.
Manual test steps (.rmt) that open in the Manual Test Editor.
How to Open
Open a file using the Test Files Dialog. The file will open inside of the Content View .
2.5.6
Enter filter criteria for... Dialog
Screenshot
© 2015 Inflectra Corporation
199
200
Rapise User Manual
Purpose
Allow more than one filter criteria for the same column.
How to Open
In the Report Viewer, open the drop-down menu for one of the filter cells; select the Custom option (see
below):
Conditions
© 2015 Inflectra Corporation
Rapise User's Guide
201
You may specify as many conditions as you like. Each condition has two properties, a Matching
Criteria on the left and a filter value on the right. The filter value is a string, and the matching criteria
specifies what constitutes a match. For more details, look HERE.
Filter Aggregation
There are two ways you can aggregate / combine filter conditions:
All: All conditions must be true to constitute a match.
Any: At least one condition must be true to constitute a match.
Buttons
Add: Add a extra condition row.
Delete: Delete the selected condition.
You can select a condition by clicking on the field name to the left of the matching criteria:
OK: Close the dialog and apply the filter.
Cancel: Close the dialog. Do not apply the filter.
2.5.7
Errors View
Screenshot
Purpose
The Errors View displays execution error details. Execution errors are those that cause Recording or
Playback to stop.
How to Open
© 2015 Inflectra Corporation
202
Rapise User Manual
The Errors View is part of the Default Layout.
Error Message
Double click on an error message to go to the corresponding source line.
Widgets
The text box is a search box.
The icons from left to right are Find Next Entry
Select All Text
2.5.8
, Copy Selected
, Clear All Text
, and
.
Find and Replace Dialog
Screenshot
Purpose
To find and replace text in files displayed in the Rapise Content View.
How to Open
Select the Find in Files button on the Ribbon (Test tab > Tools menu).
Find in Files Tab
Find what: Place the string you would like to search for in the Find what text box.
Look In: this option specifies where the search will take place. You can limit the search to: current
document, current selection, current test, the entire test and subtests, or a specific folder.
© 2015 Inflectra Corporation
Rapise User's Guide
203
Directory path: Use the Directory Path text-box to specify the directory in which to search. The
Directory path text-box cannot be accessed (and is ignored) if the Test files checkbox is checked.
Check the Include sub-folders option to search recursively from the directory specified in the
Directory Path text-box. The Include sub-folders option cannot be accessed if the Test files checkbox
is checked.
Match case option: If unselected, case is ignored in the search.
Match whole word option: If set to true, parts of words will not count as matches.
Look at these file types: Search only files with the specified file type(s).
Find and Replace Tab
There is only one significant difference between the Find in Files Tab and Find and Replace Tab: the
Replace with text-box.
Replace with text-box: All occurrences of the string in the Find what text-box will be replaced with
the string in the Replace with text-box when you press the Replace button.
2.5.9
Find Results View
Screenshot
Purpose
Displays results for the Find and Replace Dialog.
How to Open
The Find Results view is part of the Default Layout.
Messages
Double click on a message to go to the corresponding source line.
Widgets
© 2015 Inflectra Corporation
204
Rapise User Manual
The text box is a search box.
The icons from left to right are Find Next Entry
Select All Text
, Copy Selected
, Clear All Text
, and
.
2.5.10 Find Text dialog
Screenshot
Purpose
Find occurrences of the Search Term text in the currently visible Source Editor.
How to Open
Ribbon > Edit Tab > Search menu > Find button
Or type CTRL+F on the keyboard when the source editor is option.
Find Tab
Find what: Place the string you would like to search for in the Find what text box.
Look In: this option specifies where the search will take place. You can limit the search to: current
document, current selection, current test, the entire test and subtests, or a specific folder.
Match case option: If unselected, case is ignored in the search.
Match whole word option: If set to true, parts of words will not count as matches.
© 2015 Inflectra Corporation
Rapise User's Guide
205
2.5.11 Image Capture
Screenshot
Purpose
The Drawing Tools image editor lets you capture a section of the current screen or application under
test, add annotations to help document the image and then attach the final result to the current test
case, test step, or manual test result.
How to Open
You can open the Drawing Tools dialog box by clicking on the Image icon on the various rich text
editors in Rapise. When you do that, Rapise will minimize itself and display the following screen:
You now need to draw a rectangle on your screen that tells Rapise which part of the screen you want to
capture. Once that is done, the image editor will open with that part of the screen selected. If you click
ESC on the keyboard, it will just open the editor with no initial image.
Image Editor Toolbar
The image editor provides the following tools:
© 2015 Inflectra Corporation
206
Rapise User Manual
Image Capture - this lets you discard the current image and capture a new screenshot instead
Paste From Clipboard - this lets you paste in an image from the Windows clipboard
Open - this lets you open an existing image saved on your local computer
Save - this lets you save the current image to your local computer
Pointer - this lets you select an annotation to edit (arrow, rectangle, ellipse, line, text, etc.)
Arrow - this lets you draw an arrow in the current color on top of the current image
Rectangle - this lets you draw square / rectangle in the current color on top of the current image
Ellipse - this lets you draw a circle / ellipse in the current color on top of the current image
Line - this lets you draw a straight line in the current color on top of the current image
Pencil - this lets you draw freehand in the current color on top of the current image
Text - this lets you add text in the current color and current font on top of the current image. You will
need to draw a rectangle to mark the size of the text box before entering in the text.
Undo - this will undo the last operation
Redo - this will redo the last operation
Font Name - this will let you change the font family and size:
Color - This lets you change the current color (used in the various annotations):
© 2015 Inflectra Corporation
Rapise User's Guide
207
Line Width - This lets you change the current line width (used in the various annotations)
Image Editor Footer
The footer of the Drawing Tools provides the following options:
Scale - this changes the zoom of the current window, allowing you to more easily view small/large
images
Accept - this accepts the current image and inserts it into the test case, test step or test run that
was being edited.
2.5.12 Incident Logging
Screenshot
© 2015 Inflectra Corporation
208
Rapise User Manual
Purpose
The New Incident logging dialog box lets you log a new incident (also known as a bug or defect) into a
connected SpiraTest instance. If you logged the new incident during a manual test execution, it will be
linked to the current test run.
How to Open
You can open the New Incident dialog box by either clicking 'New Incident' in the Manual Ribbon, or by
clicking the 'Log Incident' button on the Manual Playback dialog box.
Details / Description
The Details/Description section lets you enter the short name and long description of the new incident
as well as the following fields:
© 2015 Inflectra Corporation
Rapise User's Guide
209
Type - the type of the incident (e.g. bug)
Detected By - who found the bug (typically your user)
Priority - how important the bug is
Severity - how critical the bug is
Owned By - who the bug should be assigned to (or left unassigned)
Detected Release - which version of the system was the bug found in
Resolved Release - which version of the system should the bug be fixed in
Verified Release - which version of the system was the bug retested in
Custom Fields - in addition any custom fields created in your Spira instance will be displayed
Comments
The Comments section lets you enter a comment that will be logged with the new incident. The field is a
rich text field that can contain formatted text.
Schedule
The Schedule section lets you enter in schedule/effort related information for the new incident:
Start Date - This is the planned start date of the new incident
End Date - This is the planned completion date of the new incident
Estimated Effort - This is the number of hours the incident is expected to take
Actual Effort - This is the number of hours that were actually expended
Remaining Effort - This is the number of hours remaining to fix the incident
In addition, the following calculated fields will be displayed:
Percent Complete - This is the measure of much of the incident has been completed. It is calculated
from 100% - (Remaining Effort / Estimated Effort)
Projected Effort - This the current measure of how long the incident is expected to take based on
current information. It is calculated from (Actual Effort + Remaining Effort)
Attachments
This section displays the list of attachments associated with the new incident. Since Rapise already has
a screenshot capture utility built-in, this section is typically not used.
© 2015 Inflectra Corporation
210
Rapise User Manual
2.5.13 Manual Playback
Screenshot
Purpose
The Manual Playback dialog box lets you execute a series of manual test cases (including those part
of a test set) from within Rapise. The results from the manual test result will be reported back into your
connected Spira instance. During the executing of the manual test, you can attach screeenshots, files
and log incidents related to the test result
How to Open
You can open the Manual Playback dialog box by either clicking 'Execute Manual' icon in the Manual
Ribbon.
Test Case Details & Test Step Selector
The top part of the manual playback screen lets you view the name and description of the test case,
© 2015 Inflectra Corporation
Rapise User's Guide
211
navigate between the test steps and click one of the result buttons to indicate how the application
being tested behaved:
Pass - The current test step was completed successfully and the expected result was observed
Pass All - All of the steps in the test case could be completed successfully and the expected results
were observed in all steps
Blocked - The current test step could not be performed because something else prevented its
completion
Caution - The current test step could be performed but the actual result only partially matched the
expected result (there were minor differences)
Fail - Either the current test step could not be performed successfully or the observed actual result did
not match the expected result
Test Step Expected & Actual Result
This section displays the details of the current test step and lets you enter in the observed actual result:
Description - This displays the description of the action that the tester should carry out on the
application being tested.
Expected Result - This contains a description of the expected result if the application performs as
expected
Sample Data - This (optional) field contains any sample data that should be used during testing
Actual Result - This is a formatted text box where the tester should enter in what actually happened
during testing. It is required if you Fail, Block or Caution the test step, but is optional for steps that
Pass.
In addition, you can click on the picture icon to add a screenshot, or use one of the two buttons
underneath:
Add Attachment - this lets you choose a file from your local system and attach to the test result.
Log Incident - this lets you log a bug/incident that is connected to the test step (e.g. if it failed) and
will display the New Incident dialog box.
© 2015 Inflectra Corporation
212
Rapise User Manual
Minimized Playback Dialog
Sometimes you want to be able to reduce the amount of space taken up by the testing dialog box so
that you can view the application and the test steps on the same screen at the same time. To make this
easier, if you click on the Minimize ( >| ) icon in the top-right of the dialog box it will change the manual
playback dialog to the mini version show above. You can click on the icon again to switch back to the
standard player.
2.5.14 Manual Test Editor
Screenshot
Purpose
The Manual Test Editor lets you create and edit manual test cases that are stored in Spira. These
manual test cases contain a high level description of the test case as well a detailed set of steps and
associated expected results that make up the manual test script. These manual tests can be executed
manually in Rapise (or in Spira) as well as used as the basis for creating a related automated test script.
© 2015 Inflectra Corporation
Rapise User's Guide
213
Such automated test scripts may be linked to individual test steps by means of the test scenario
approach.
How to Open
You can open the Manual ribbon by either clicking on the Manual Steps icon on the main Test ribbon
or clicking on the ManualSteps.rmt file in the Test Files tab. The Manual Ribbon will be displayed
whenever you have the Manual Test Editor open.
Test Case Name/Description
This section lets you edit the name and long formatted description of the test case. The rich text editor
lets you choose the font name, font size, text color, highlight color, style (bold, underline, italic) as well
as provides easy ability to add links, bullets and numbered lists.
In addition there is a button that lets you add screenshots.
Test Step Editor
This section lets you add, edit and delete test steps from the manual test case. Each of the test steps
contains four fields:
Step ID - this contains the position number of the test step (e.g. step 1) as well as the ID of the test
step as it exists in Spira. If you click on the [TS:xxx] label it will automatically copy this into the
Windows clipboard. This allows you to easily paste the ID of the test step into your automated test
scripts which allows Rapise to report back test results to Spira against specific test steps.
Description - this is a description of the test procedure that the tester should perform
Expected Result - This is a description of the expected result that should be observed if the system
being tested performs correctly
Sample Data - This is an optional field that contains any sample data that should be used in the test
Each of the fields provides a rich text editor lets you choose the font name, font size, text color, highlight
color, style (bold, underline, italic) as well as provides easy ability to add links, bullets and numbered
lists. In addition there is a button that lets you add screenshots to the test step.
© 2015 Inflectra Corporation
214
Rapise User Manual
For ease of editing, you can navigate between the rows and columns using the ALT + Arrow keys on
the keyboard.
Automating Test Steps
Sometimes you have a primarily manual test case that you want to automate certain steps of. For
example you may want to automate the setup of the test data or login to the application before carrying
out manual testing. Such a test is called a semi-manual test.
To do this, you enter the syntax @FunctionName(); in the Description box of the test step. Then when
you run the test, that step will be executed automatically. The @FunctionName(); refers to a JavaScript
user function called function FunctionName() in the Test.user.js file.
For example:
2.5.15 Mobile Settings Dialog
Purpose
This dialog box displays the list of mobile devices that have been configured for use by Rapise and lets
you create a new profile, modify a profile or make a new profile based on an existing one.
Screenshot
© 2015 Inflectra Corporation
Rapise User's Guide
215
How to Open
You can open this dialog box from two places:
From the main Rapise Options dialog box (when the Tools tab is selected).
From the Mobile Spy tool when you click on the 'Mobile Profiles' ribbon menu entry.
Menu Options
This dialog box has the following menu options:
Select Profile - This dropdown list lets you select a different mobile profile to be displayed in the
dialog.
Save - This button will save the changes to the current mobile profile.
Test URL - This button will test the Connection (URL) from Rapise to Appium (which is used to
manage the devices) and the connection from Appium to the physical (or simulated) device.
Duplicate - This button will create a new mobile profile based on the currently viewed one.
Create - This button will create a new empty mobile profile that you can edit.
Rename - This button will change the name of the current mobile profile being edited.
Delete - This button will delete the currently displayed mobile profile. There is no undo, so be careful!
Connection
This section lets you enter the URL used to connect to the Appium server which hosts the mobile
devices being tested. It is typically of the form:
http://server:4723/wd/hub
Where the port number used by Appium is 4723 by default and the /ed/hub suffix is added.
© 2015 Inflectra Corporation
216
Rapise User Manual
Details
This section has various settings, some of which are used by all mobile devices, some only by simulated
devices, some only by physical devices and some are specific to the type of device (iOS vs. Android):
Primary Capabilities
o app - The absolute local path or remote http URL to an .ipa or .apk file, or a .zip containing one of
these. Appium will attempt to install this app binary on the appropriate device first. Note that this
capability is not required for Android if you specify appPackage and appActivity capabilities (see
below). Incompatible with browserName. - Values: /abs/path/to/my.apk or http://myapp.com/app.ipa
o browserName - Name of mobile web browser to automate. Should be an empty string if automating
an app instead. - Values: Safari for iOS and Chrome, Chromium, or Browser for Android
o platformName - Which mobile OS platform to use - Values: iOS, Android, or FirefoxOS
o platformVersion - Mobile OS version - Values: e.g., 7.1, 4.4
o deviceName - The kind of mobile device or emulator to use - Values: iPhone Simulator, iPad
Simulator, iPhone Retina 4-inch, Android Emulator, Galaxy S4, etc. On iOS, this should be one of
the valid devices returned by instruments with instruments -s devices. On Android this capability is
currently ignored.
o udid - Unique device identifier of the connected physical device - Values: e.g. 1ae203187fc012g
Common Capabilities
o automationName - Which automation engine to use - Values: Appium (default) or Selendroid
o newCommandTimeout - How long (in seconds) Appium will wait for a new command from the
client before assuming the client quit and ending the session - Values: e.g. 60
o autoLaunch - Whether to have Appium install and launch the app automatically. Default true Values: true, false
o language - (Sim/Emu-only) Language to set for the simulator / emulator - Values: e.g. fr
o locale - (Sim/Emu-only) Locale to set for the simulator / emulator - Values: e.g. fr_CA
o orientation - (Sim/Emu-only) start in a certain orientation - Values: LANDSCAPE or PORTRAIT
o autoWebview - Move directly into Webview context. Default false - Values: true, false
o noReset - Don"t reset app state before this session. Default false - Values: true, false
o fullReset - (iOS) Delete the entire simulator folder. (Android) Reset app state by uninstalling app
instead of clearing app data. On Android, this will also remove the app after the session is complete.
Default false - Values: true, false
For Android Only
o appActivity - Activity name for the Android activity you want to launch from your package. This
often needs to be preceded by a . (e.g., .MainActivity instead of MainActivity) - Values: MainActivity,
.Settings
o appPackage - Java package of the Android app you want to run - Values:
com.example.android.myApp, com.android.settings
o appWaitActivity - Activity name for the Android activity you want to wait for - Values: SplashActivity
o appWaitPackage - Java package of the Android app you want to wait for - Values:
com.example.android.myApp, com.android.settings
o deviceReadyTimeout - Timeout in seconds while waiting for device to become ready - Values: 5
o androidCoverage - Fully qualified instrumentation class. Passed to -w in adb shell am instrument e coverage true -w - Values: com.my.Pkg/com.my.Pkg.instrumentation.MyInstrumentation
o enablePerformanceLogging - (Chrome and webview only) Enable Chromedriver"s performance
logging (default false) - Values: true, false
o androidDeviceReadyTimeout - Timeout in seconds used to wait for a device to become ready
after booting - Values: e.g., 30
o androidDeviceSocket - Devtools socket name. Needed only when tested app is a Chromium
© 2015 Inflectra Corporation
Rapise User's Guide
o
o
o
o
o
o
o
o
o
o
o
o
o
o
o
o
o
o
o
217
embedding browser. The socket is open by the browser and Chromedriver connects to it as a
devtools client. - Values: e.g., chrome_devtools_remote
avd - Name of avd to launch - Values: e.g., api19
avdLaunchTimeout - How long to wait in milliseconds for an avd to launch and connect to ADB
(default 120000) - Values: 300000
avdReadyTimeout - How long to wait in milliseconds for an avd to finish its boot animations
(default 120000) - Values: 300000
avdArgs - Additional emulator arguments used when launching an avd - Values: e.g., -netfast
useKeystore - Use a custom keystore to sign apks, default false - Values: true or false
keystorePath - Path to custom keystore, default ~/.android/debug.keystore - Values: e.g., /path/
to.keystore
keystorePassword - Password for custom keystore - Values: e.g., foo
keyAlias - Alias for key - Values: e.g., androiddebugkey
keyPassword - Password for key - Values: e.g., foo
chromedriverExecutable - The absolute local path to webdriver executable (if Chromium embedder
provides its own webdriver, it should be used instead of original chromedriver bundled with Appium) Values: /abs/path/to/webdriver
autoWebviewTimeout - Amount of time to wait for Webview context to become active, in ms.
Defaults to 2000 - Values: e.g. 4
intentAction - Intent action which will be used to start activity (default android.intent.action.MAIN) Values: e.g.android.intent.action.MAIN, android.intent.action.VIEW
intentCategory - Intent category which will be used to start activity (default
android.intent.category.LAUNCHER) - Values: e.g. android.intent.category.LAUNCHER,
android.intent.category.APP_CONTACTS
intentFlags - Flags that will be used to start activity (default 0x10200000) - Values: e.g.
0x10200000
optionalIntentArguments - Additional intent arguments that will be used to start activity. See
Intent arguments - Values: e.g. --esn <EXTRA_KEY>, --ez <EXTRA_KEY>
<EXTRA_BOOLEAN_VALUE>, etc.
unicodeKeyboard - Enable Unicode input, default false - Values: true or false
resetKeyboard - Reset keyboard to its original state, after running Unicode tests with
unicodeKeyboard capability. Ignored if used alone. Default false - Values: true or false
noSign - Skip checking and signing of app with debug keys, will work only with UiAutomator and
not with selendroid, default false - Values: true or false
ignoreUnimportantViews - Calls the setCompressedLayoutHierarchy() uiautomator function. This
capability can speed up test execution, since Accessibility commands will run faster ignoring some
elements. The ignored elements will not be findable, which is why this capability has also been
implemented as a toggle-able setting as well as a capability. Defaults to false - Values: true or false
For iOS Only
o calendarFormat - (Sim-only) Calendar format to set for the iOS Simulator - Values: e.g. gregorian
o bundleId - Bundle ID of the app under test. Useful for starting an app on a real device or for using
other caps which require the bundle ID during test startup. To run a test on a real device using the
bundle ID, you may omit the "app" capability, but you must provide "udid". - Values: e.g.
io.appium.TestApp
o udid - Unique device identifier of the connected physical device - Values: e.g. 1ae203187fc012g
o launchTimeout - Amount of time in ms to wait for instruments before assuming it hung and failing
the session - Values: e.g. 20000
o locationServicesEnabled - (Sim-only) Force location services to be either on or off. Default is to
keep current sim setting. - Values: true or false
o locationServicesAuthorized - (Sim-only) Set location services to be authorized or not authorized
© 2015 Inflectra Corporation
218
Rapise User Manual
o
o
o
o
o
o
o
o
o
o
o
o
o
o
for app via plist, so that location services alert doesn"t pop up. Default is to keep current sim setting.
Note that if you use this setting you MUST also use the bundleId capability to send in your app"s
bundle ID. - Values: true or false
autoAcceptAlerts - Accept iOS privacy access permission alerts (e.g., location, contacts, photos)
automatically if they pop up. Default is false. - Values: true or false
nativeInstrumentsLib - Use native intruments lib (ie disable instruments-without-delay). - Values:
true or false
nativeWebTap - (Sim-only) Enable "real", non-javascript-based web taps in Safari. Default: false.
Warning: depending on viewport size/ratio this might not accurately tap an element - Values: true or
false
safariAllowPopups - (Sim-only) Allow javascript to open new windows in Safari. Default keeps
current sim setting - Values: true or false
safariIgnoreFraudWarning - (Sim-only) Prevent Safari from showing a fraudulent website warning.
Default keeps current sim setting. - Values: true or false
safariOpenLinksInBackground - (Sim-only) Whether Safari should allow links to open in new
windows. Default keeps current sim setting. - Values: true or false
keepKeyChains - (Sim-only) Whether to keep keychains (Library/Keychains) when appium session
is started/finished - Values: true or false
localizableStringsDir - Where to look for localizable strings. Default en.lproj - Values: en.lproj
processArguments - Arguments to pass to the AUT using instruments - Values: e.g., -myflag
interKeyDelay - The delay, in ms, between keystrokes sent to an element when typing. - Values:
e.g., 100
showIOSLog - Whether to show any logs captured from a device in the appium logs. Default false Values: true or false
sendKeyStrategy - strategy to use to type test into a test field. Simulator default: oneByOne. Real
device default: "grouped - Values: oneByOne, grouped or setValue
screenshotWaitTimeout - Max timeout in sec to wait for a screenshot to be generated. default: 10
- Values: e.g., 5
waitForAppScript - The ios automation script used to determined if the app has been launched, by
default the system wait for the page source not to be empty. The result must be a boolean - Values:
e.g. true;, target.elements().length > 0;, "$.delay(5000); true;
2.5.16 Mobile Test Locator Dialog
Purpose
This dialog box lets you create a test locator for mobile applications using one of the supported methods
(XPath, ID, etc.) and display the results of using that locator interactively.
Screenshot
© 2015 Inflectra Corporation
Rapise User's Guide
219
How to Open
You open this dialog from the Mobile Spy by clicking the Test Locator button on that dialog.
How to Use
To use this dialog, you simply choose which type of locator you wish to test (in the example above we
are using XPath on an iOS device) and click the button. The properties discovered from using this locator
on the device in question will be displayed in the right panel.
The following locator types are available:
XPath - This allows you to enter an XPath selector that uniquely locates a specific element in the
mobile object hierarchy
Id - This allows you to enter the ID of a specific object and test to see if it can be found.
CSS - For mobile website testing only, this lets you enter a CSS selector that can uniquely locate an
object
Tag Name - This lets you find elements by their Tag Name field. For web testing this is the name of
the DOM element.
Class Name - This lets you find elements by their UI Component Type
Name - This lets you find elements by their Name field
Android - This lets you enter a string corresponding to a recursive element search using the
UiAutomator Api (Android-only)
iOS - This allows you to enter a string corresponding to a recursive element search using the
UIAutomation library (iOS-only)
Accessibility - This lets you enter a string corresponding to a recursive element search using the Id/
Name that the native Accessibility options utilize.
© 2015 Inflectra Corporation
220
Rapise User Manual
Link - Based on the WebDriver standard, it lets you find hyperlinks using an exact match of the link
anchor text
Partial Link - Based on the WebDriver standard, it lets you find hyperlinks using a partial match of the
link anchor text
Script - For iOS testing, this lets you enter raw script that will be sent to the iOS device to find the
element
2.5.17 NameValue Collection Editor Dialog
Screenshot
Purpose
To specify Custom Strings and their values.
How to Open
Open from the Settings Dialog, TestParams option:
© 2015 Inflectra Corporation
Rapise User's Guide
Widgets
Add a custom string. If you press Add, you'll see this:
Remove: removes selected custom string.
OK: Save changes and close dialog.
Cancel: Close dialog without saving changes.
© 2015 Inflectra Corporation
221
222
Rapise User Manual
2.5.18 Object Tree Dialog
Screenshot
Purpose
Display learned objects.
How to Open
The Object Tree dialog is part of the Default Layout.
Context Menu (root node)
Right click the Object Tree node to see:
Refresh checks for new objects to display.
Collapse all collapses the entire object tree.
Expand all expands the entire object tree.
Filter... filters the object tree.
Context Menu (object)
Right click on an object in the Object Tree dialog to see:
© 2015 Inflectra Corporation
Rapise User's Guide
223
Flash opens the application/url where the object is located. A frame will blink around the object to
show you where it is on the page.
Re-Learn will open up the Recorder, allowing you to re-learn the object. This is useful if the AUT has
changed and the object definition will no longer correctly locate the object.
Remove simply removes the selected object from the tree.
Clone makes a copy of the object definition and adds the cloned version into the tree. You can then
make changes to the cloned copy.
Add Parameter opens up a dialog box that lets you add a custom parameter to the learned object
definition (stored in the Test.objects.js file).
2.5.19 Options Dialog
Screenshot
Purpose
Use the Options dialog to change Rapise settings. Your changes will apply to all tests.
How to Open
Press the Options button on the Ribbon (Test tab > Tools menu).
© 2015 Inflectra Corporation
224
Rapise User Manual
Misc
SplashScreen: A splash screen is the image that appears while a program initializes. The Rapise
splash screen looks like this:
Set SplashScreen to False to prevent the splash screen from appearing.
Settings
AutoReloadModifiedFiles: If set to True, any files you modify outside of Rapise are automatically
reloaded in Rapise.
DefaultFolder specifies where new tests are kept before you explicitly save them. The location is
relative to the Rapise executable.
DefaultSpy specifies which of the various types of Object Spy will be displayed by default.
Enable Execution Monitor - specifies whether the execution monitor dialog box will be displayed
during playback.
© 2015 Inflectra Corporation
Rapise User's Guide
225
FrameStyle: Specifies which frame to draw around objects when you Record, Learn, and Spy.
The Basic frame is on the left and the Modern frame is on the right:
LoadLastTestOnStartup: If set to True, Rapise will open the last test you worked on and saved. If
set to False, Rapise will create a new test named MyTest<#> where <#> is an integer. A folder for
MyTest<#> is created in the folder specified by the DefaultFolder option.
NormalizeFileName: If set to True, files are referred to (in the *.sstest file) using a a path relative to
the *.sstest file. Otherwise, their absolute path is used.
RecentTests: The maximum number of recent files displayed in the Recent Tests list. To see the
Recent Tests list, open the Application Menu:
Remember Debugger Layout: If True, Rapise will remember the window layout for debug mode
separately. For example, this may be useful if you want to work full screen while authoring the Test
and half-screen to debug. This way the AUT and the Rapise debugger fit on the screen.
ShowDashboardOnStartUp: If True, the Spira Dashboard will open automatically when Rapise is
opened.
ShowStartPageOnStartUp: If True, the Start Page will open automatically when Rapise is opened.
StyleLibrary: determines the color scheme of the Rapise window. If you click on StyleLibrary, you'll
notice that a drop down arrow appears to the right. Press the arrow to see all of the Style options:
© 2015 Inflectra Corporation
226
Rapise User Manual
Tools Tab
Build OCR Font Database: Pressing the Build OCR Font Database button updates the list of screen
fonts that Rapise recognizes when using an OCR object. Whenever you install new Fonts onto the
computer you should click this button to have then added to the Rapise font database.
Reset Layout: Pressing the Reset Layout button restores the default layout. Rapise will restart.
Java Settings: Pressing the Java Settings button displays the Install Java Access Bridge dialog
box. Installing the Java Access Bridge lets Rapise connect to Java AWT/Swing applications so that
they can be tested.
Mobile Settings: Pressing the Mobile Settings button displays the Mobile Settings dialog box.
This lets you configure the different mobile devices that are available for testing by Rapise.
Spira Connection Settings: Pressing the Spira Connection Settings button takes you to a dialog
box that lets you change how Rapise is integrated with the SpiraTest test management system. It
will let you change the URL, username and password used to connect.
2.5.20 Output View
Screenshot
© 2015 Inflectra Corporation
Rapise User's Guide
227
Purpose
The Output View displays Rapise output. The amount of output depends on the Verbosity Level.
How to Open
The Output view is part of the Default Layout.
Writing to the Output View
Use the global Log() function to write to the Output View .
Widgets
The text box is a search box.
The icons from left to right are Find Next Entry
Select All Text
, Copy Selected
, Clear All Text
, and
.
2.5.21 Properties Dialog
Screenshot
Purpose
To display the properties of the object, file, or folder you last clicked on. Objects are in the Object Tree
Dialog and files/folders are in the Test Files Dialog.
© 2015 Inflectra Corporation
228
Rapise User Manual
How to Open
The Properties Dialog is part of the Default Layout.
2.5.22 Recording Activity Dialog
Screenshot
Purpose
The Recording Activity Dialog is used for Recording, Analog recording (absolute and relative), Object
Learning, and creating Simulated Objects.
How to Open
1. Open the Select an Application to Record Dialog. Instructions are HERE.
2. You must select two things: (1) which recording library to use during the recording session and (2)
which process/program to record. Look HERE for more information on using the Select Application
to Record Dialog.
3. Press either Select or Run on the Select Application to Record dialog to open the Recording Activity
Dialog.
The Grid
As you interact with the AUT (Application Under Test), your actions are recorded in the grid of the
Recording Activity dialog. The following screenshot shows the Recording Activity dialog after two
interactions with www.google.com: (1) first, Inflectra was entered into the query text box and (2) the
Google Search button was then pressed.
© 2015 Inflectra Corporation
Rapise User's Guide
Context Menu
If you right click in the grid, you'll see a context menu with three options:
Delete Action removes the selected row.
Edit Action opens the Action Editor Dialog. This is also opened by double-clicking a grid entry.
Press Try Action and Rapise will execute the action.
Widgets
Verify: Press to open the Verify Object Properties dialog.
© 2015 Inflectra Corporation
229
230
Rapise User Manual
The Learn Shortcut: Use to learn an object.
Place the mouse cursor over the object you wish to learn. It should become highlighted with a
purple box. Press Ctrl+2 while the object is highlighted. You will see a line added to the Recording
Activity dialog, signifying that the object was learned.
The Spy Button: The Spy Button opens the Object Spy dialog. The Object Spy dialog allows you to
view the state of the objects in your program. Viewing object state is called Object Spying. The
Object Spy dialog is described here.
Pick Object: Use If the object you wish to learn is invisible (covered by another object). Pick Object
is disabled for Web Application recording. For mobile device testing, Pick Object is the only
way to record events.
1. The Pick Object button will open the SeS Spy Dialog.
2. Spy on the obstructing object. (Press Start Tracking, mouse over the object, press CTRL+G)
3. Select the item you wish to learn from the Tree section.
4. Press the Learn Selected button.
The Pause Button: The Pause Button on the RA dialog temporarily stops Recording. Any
interacting you do with the AUT is ignored. When you press the Pause Button, the title of the button
changes to Resume. Press the Resume button to continue recording.
The Analog Button: The Analog button begins Analog Recording. Analog Recording tracks mouse
movements, keyboard inputs, and clicks. To end Analog Recording, press CTRL+Break.
The _Simulated Drop-down Menu:
An object can be learned if it matches a rule specified in the Recording/Learning libraries available.
The drop-down menu lists the possible rules for learning objects in the current application. If you
cannot learn an object with one rule, try another in the list. Create a Simulated Object only if the
other, more flexible alternatives have been exhausted.
Learning using a specific rule:
1. Double click on a rule in the drop down list. The button text should change to the text that you
selected
2. Press the button
2. Select an object on the screen and make sure it is highlighted with a rectangle
3. Press Ctrl+2 to learn the object
© 2015 Inflectra Corporation
Rapise User's Guide
231
The Cancel Button: The Cancel button stops Recording, closes the RA dialog, and discards any
actions recorded or objects learned during the Recording session.
The Finish Button: The Finish button ends the Recording session. The RA dialog is closed, and
the information collected during Recording is used to create a script. The script is displayed.
Transparent Option: While the RA dialog is open, it is always on top. The Transparent checkbox
makes the RA Dialog transparent so that you can interact with objects behind it. The image below
illustrates the difference:
2.5.23 Replace Text Dialog
Screenshot
© 2015 Inflectra Corporation
232
Rapise User Manual
Purpose
Replace occurrences of the Search Term text with the Replacement Text in the currently visible Source
Editor.
How to Open
Ribbon > Edit Tab > Search menu > Replace button.
Replace Tab
Find what: Place the string you would like to search for in the Find what text box.
Look In: this option specifies where the search will take place. You can limit the search to: current
document, current selection, current test, the entire test and subtests, or a specific folder.
Match case option: If unselected, case is ignored in the search.
Match whole word option: If set to true, parts of words will not count as matches.
Replace with text-box: All occurrences of the string in the Find what text-box will be replaced with
the string in the Replace with text-box when you press the Replace button.
2.5.24 Report Viewer
Screenshot
© 2015 Inflectra Corporation
Rapise User's Guide
233
Purpose
The Report Viewer displays test result (trp) files.
How to Open
Use the Test Files Dialog to open a report (trp) file. The report file will be opened in a Report Viewer in
the Content View. The Report Tab of the Ribbon will also open.
Or, you can Playback the test script. The report file will display in a Report Viewer after the test
completes.
See Also
For more info on Reports, see Automated Reporting.
For information on manipulating reports, see Ribbon: Report.
2.5.25 REST Definition Editor
Screenshot
© 2015 Inflectra Corporation
234
Rapise User Manual
Purpose
The REST Definition Editor allows you to edit REST web service definition files (.rest).
How to Open
Use the Add Web Service Dialog to create a new REST definition (.rest) file. The definition file will be
opened in a REST Editor in the Content View. The REST Tab of the Ribbon will also open.
Or, you can double-click on an existing .rest file in the Test Files View explorer window. The definition
file will be opened in a REST Editor in the Content View. The REST Tab of the Ribbon will also open.
Request
© 2015 Inflectra Corporation
Rapise User's Guide
235
The request form has several sections that you need to populate:
Method - the type of HTTP request being made (GET, POST, PUT, DELETE, etc.)
URL - the URL of the web service request with any parameter tokens included (e.g. {session_id} in
our example above)
Credentials - Any HTTP Basic Authentication Headers
Headers - Any other HTTP headers (both standard and custom)
Parameters - Any parameters that have been defined in the URL that will be called from the Rapise
test script.
Body - The body of the request (for POST and PUT requests). This can be in any text-serialized
format such as XML or JSON.
Response
© 2015 Inflectra Corporation
236
Rapise User Manual
This displays the output from the last web service request. It has several tabs:
Response Header - Displays a list of the HTTP response headers (name and value). If the request
received a 200 OK code back, it's displayed in green, if it receives an error code back, it's displayed
in red.
Response Body - Displays the raw text of the HTTP response body received from the server.
Formatted XML - If the received body content is identified as XML, this tab displays nicely
formatted XML that is easier to read than the raw response body.
Formatted JSON - If the received body content is identified as JSON, this tab displays nicely
formatted, indented JSON that is easier to read than the raw response body.
Operation Explorer
This section lets you add, open, delete and clone REST requests in the definition file.
Add request - Adds a new REST operation to the current .REST definition file
Open request - Opens the currently selected REST operation in the current .REST definition file.
This is the same as double-clicking on the item name.
Clone request - Makes a copy of the currently selected REST operation and allows you to give the
copy a new name.
Delete request - Deletes the currently selected REST operation from the current REST definition
file.
See Also
For more info on REST Web Services, see REST Web Services.
For a tutorial on creating a REST web service test, see the Web Services REST Tutorial.
2.5.26 Ribbon: Test
Screenshot
© 2015 Inflectra Corporation
Rapise User's Guide
237
Purpose
The Test tab provides tools to help with creating and executing tests. It also provides the options to add
web services and/or manual test steps to the current test.
How to Open
The Test tab is always available.
File
The File section provides the following options:
Save - saves the current test locally
Save As - allows you to create a new, differently named copy of the test you are editing
Save to Spira - allows you to save the Rapise test so that it updates the version in your Spira test
management repository
Open Test from Spira - allows you to open a Rapise test that is stored in a SpiraTest test
management repository
Manual Steps - displays the Manual Test Steps Ribbon that lets you view and edit the manual tests
associated with this test.
Web Services - allows you to add a new web service definition to your Rapise test. Clicking on this
displays the Add Web Service dialog box.
Recording and Learning
Press the Record/Learn button to open the Recording Activity Dialog.
Debugging
© 2015 Inflectra Corporation
238
Rapise User Manual
The top drop-down list specifies if you would like to use an External Debugger. If so, you can either
connect on execution (the Run with External Debugger option) or only connect if an error occurs (the
Run External Debugger on Error option).
The lower drop-down list controls the Verbosity Level.
Executing
Press Play to execute the test script (*.js) file associated with the open test. You can change
which test script to open in the Settings Dialog. The test script is specified by Settings >
ScriptPath.
Tools
The Tools section provides the following options:
The Spy button opens the Spy Dialog.
Press the Options button to open the Options Dialog.
The Find in Files button opens the Find and Replace Dialog.
The Object Mgr button opens the Object Manager add-in.
Spira Properties allows you to see the name of the SpiraTest project and test case that the current
Rapise test is linked to.
Help
The Help button opens the Rapise user's manual and makes the Contents tab visible.
The Search Help button opens the Rapise user's manual and makes the Search tab visible.
The Help Index button opens the Rapise user's manual and makes the Index tab visible.
The Start Page button opens the Rapise Start Page.
The Spira Dashboard button opens the Rapise Spira Dashboard.
The Activation button opens the Rapise license activation screen. This can be used to deactivate
the current license so that it can be used on a different machine.
© 2015 Inflectra Corporation
Rapise User's Guide
239
2.5.27 Ribbon: Report
Screenshot
Purpose
The Report tab is for use with report (trp) files.
How to Open
The Report tab is available anytime you have a report (trp) file visible in the Content View.
File
The drop-down menu contains a history of previously opened reports.
Press Plain to view test steps, assertions, and messages aligned in a table.
Press Hierarchical to more clearly see what assertions, messages, and data are associated with
which test steps.
Export
Press Export to Excel to save the report as an excel file.
Press Export to PDF to save the report as an Acrobat PDF file.
Layout
The drop-down menu lets you choose between previously saved layouts.
You must press Save Layout to keep your layout changes after closing Rapise.
Press Reset Layout to undo any changes you've made.
© 2015 Inflectra Corporation
240
Rapise User Manual
Data
Press Choose Columns to hide or reveal report columns.
Merge Cells: Merge identical consecutive cells.
Display
Images: Toggle between hiding and revealing images.
Collapse: Collapse the report to show only the top level. What is visible will depend on how the
report is sorted.
Expand: Expand all report rows.
See Also
Automated Reporting
2.5.28 Ribbon: Spreadsheet
Screenshot
Purpose
The Spreadsheet tab is for use with excel (xls) files.
How to Open
The Spreadsheet tab is available anytime you have an excel (xls) file visible in the Content View.
File
© 2015 Inflectra Corporation
Rapise User's Guide
241
The Reload button reloads the excel file from disk. Use it if the excel spreadsheet was modified by
an external application after you opened it in Rapise.
2.5.29 Ribbon: Edit
Screenshot
Purpose
The Edit tab of the Ribbon provides tools for editing script files.
How to Open
The Edit tab is available anytime you have a javascript file visible in the Content View.
File
The Save button (Shortcut: CTRL+S) saves the script file you are editing.
The Save As button allows you to create a new, differently named copy of the script file you are
editing.
Clipboard
The Paste button (Shortcut: CTRL+V) pastes from the clipboard.
The Cut button (Shortcut: CTRL+X) erases whatever text you have highlighted, and copies it to the
© 2015 Inflectra Corporation
242
Rapise User Manual
clipboard.
The Copy button (Shortcut: CTRL+C) copies whatever text you have highlighted to the clipboard.
History
The Undo button (CTRL+Z) reverses the last deletion or insertion made in the Source Editor.
The Redo button (CTRL+Y) reverses the last undo action.
Search
The above text box is a search box.
Pressing the find button
opens the Find Text dialog.
The Replace button opens the Replace Text Dialog.
Font
Use the above font and size drop-down menus to change the text appearance. The entire file will be
affected.
Debug
Press the Toggle Breakpoint button (Shortcut: F9) to insert or remove a breakpoint at the current
cursor position.
2.5.30 Ribbon: Debugger
Screenshot
© 2015 Inflectra Corporation
Rapise User's Guide
243
Purpose
The Debugger Tab provides tools for use with the Internal Debugger.
How to Open
The Debugger Tab is available while the Internal Debugger is being used. To use the Internal Debugger,
first enable it, then Playback your script. Instructions for enabling the Internal Debugger are HERE.
Debugger
Run (F5): Continue executing the script.
Step In (F11): Step into a function/procedure.
Step Out (Shift+F11): Continue until the current procedure is exited.
Step Over (F10): Go to the next line in the current procedure/function.
Stop Debugger (Shift+F5): Stop executing the script and exit the debugger.
Break (F9): Create a breakpoint in the script at the cursor.
2.5.31 Ribbon: Manual
Screenshot
Purpose
The Manual ribbon lets you record, edit and play manual tests that have either been created in Rapise
or have been downloaded from Spira. Rapise provides powerful exploratory testing functionality that
lets you rapidly create manual tests by simply clicking through the application rather than having to
laboriously create test steps one at a time by hand.
These manual tests can then be either executed from within Rapise or saved to Spira so that they can
be executed by any tester that has access to the Spira web interface. In addition, these manual steps
can be used as the basis for test automation by linking specific test scenarios to manual test steps.
How to Open
You can open the Manual ribbon by either clicking on the Manual Steps icon on the main Test ribbon
or clicking on the ManualSteps.rmt file in the Test Files tab.
© 2015 Inflectra Corporation
244
Rapise User Manual
Spira
The main Save icon will save the current test to Spira, both the manual test steps and any automated
testing files.
The Reload icon will refresh the current test from the copy helds in Spira.
The Save Local will save the manual test steps and any open automation files locally. You can use
this to save files before doing a batch upload to Spira.
Editor
The Add Step icon will add a new test step to the current manual test case displayed in the manual
test editor.
The Remove Step icon will remove the highlighted test step from the current manual test
The icon will move the highlighted test step one position higher in the current manual test
The icon will move the highlighted test step one position lower in the current manual test
External Tools
The View in Browser icon will display the current manual test inside the Spira web interface
The New Incident icon will open the Incident Logging dialog box so that you can log a new incident in
Spira.
Playback
© 2015 Inflectra Corporation
Rapise User's Guide
245
The Execute Manual icon will execute the current manual test. When you click the Execute Manual
icon, you will be asked to save the test case to Spira, then the latest version from Spira will be
downloaded into the Rapise manual test execution wizard so that you can start manual testing.
The Release dropdown list displays the list of releases in the current Spira project:
You can then choose the appropriate release that the current test is being executed against.
Recording
The Record Manual icon will start the Select Application to Record dialog box. This dialog box is the
same one that you'll use for automated testing, however when you click through the application under
test it will record manual test steps instead of automated script code.
The Record Screenshots option will tell Rapise to capture the current screenshot when performing
manual recording and include the screenshot with the recorded test step. These are two sub-options:
o Record Whole Window - When checked, this will record the entire window. Warning, this may
take up large amounts of disk space. Otherwise it will record just the object underneath the current
cursor.
o Record Cursor - This will record the location of the mouse pointer/cursor inside the image.
2.5.32 Ribbon: REST
Screenshot
© 2015 Inflectra Corporation
246
Rapise User Manual
Purpose
The REST tab is for use with editing REST web service definition files.
How to Open
The REST tab is available anytime you have a REST definition file (.rest) file visible in the Content View.
File
Save Requests - Saves the current request request definitions to the .rest file.
Update Object Tree - Updates the main Rapise Object Tree with the current REST definitions.
This turns each of your REST requests into Rapise learned objects that can be scripted against.
Edit
Add Header - Allows you to add a standard or custom HTTP header to the current REST request:
Add Parameter - Allows you to add a parameter name/value to the current REST request. This is
useful when you want your test script to be able to pass through different values (e.g. get book #1
vs. book #2):
© 2015 Inflectra Corporation
Rapise User's Guide
247
Add Credentials - Allows you to add an HTTP basic authentication credential (username and
password) to the request. Saves you having to add the header manually (which would require
base64 encoding the username and password):
2.5.33 Select an Application to Record... Dialog
Screenshot
© 2015 Inflectra Corporation
248
Rapise User Manual
Purpose
The Select an Application to Record... (SAR) Dialog appears before Recording takes place. It queries
the user for which program to record, as well as what Recording Library to use.
If you are recording the same application for the second time then SAR is not shown. The recording
proceeds to last used application if it is still available on the screen.
How To Open
To open the SAR Dialog, press the Record/Learn button on the Ribbon (Test tab > Recording &
Learning menu):
© 2015 Inflectra Corporation
Rapise User's Guide
249
Libraries
The Library table lists the available Recording Libraries. Select the one appropriate to the process/
program you will record. If you select Auto, Rapise will attempt to choose the correct recording library
for you. See the Recording Library section for more information.
Available Applications
The Available Applications table lists all of the processes running at the time you open the SAR
dialog. If the process you would like to record is already open, you can select if from the table. Pick
the appropriate recording library (above) first before you pick an application to record; your application
choice will become unselected if you do not do it last.
Widgets
The Cancel button closes the dialog.
Show All: While unchecked only top level application windows reflected in the Windows Task Bar
are shown in the 'Available Applications' list. Check this and press Refresh to see all top level
windows available on the screen.
Refresh List: Press to refresh the Available Applications table. After refreshing, you will see
processes that began after the SAR dialog was opened.
Select button: To record a process from the Available Applications table, select the process and
then press the Select button.
Run Application Tab
© 2015 Inflectra Corporation
250
Rapise User Manual
Path drop down list: If the program you would like to record is not already open, you can specify its
path here. If the program is already running, you can select it from the Available Applications table.
Browse button: Browse for an application to open and record.
Use working directory: To set a specific working directory when launching the application, check
the box and enter in a value for the working directory.
Run button: To record a program that is not currently open, fill in the Path text-box and press the
Run button.
The Cancel button closes the dialog.
2.5.34 Settings Dialog
Screenshot
© 2015 Inflectra Corporation
Rapise User's Guide
251
Purpose
Use the Settings Dialog to change test specific settings.
How to Open
The Settings dialog is part of the Default Layout.
Advanced
CommandLine is a freeform text box. Use it to specify values for global variables (beginning in g_)
to pass the recorder and player. You can view which global variables are available in the source files
(such as Player.js, SeSCommon.js, etc).
Execution
CacheObjects: Remember object locations and try to reuse them for speed. This is helpful with
dialog based applications.
CommandInterval: Time interval (in milliseconds) between script commands during script
execution.
IterationsCount: Your test script will be executed this many times consecutively during Playback.
© 2015 Inflectra Corporation
252
Rapise User Manual
ObjectLookupAttemptInterval: This is the time Rapise will wait between attempts to locate an
object.
ObjectLookupAttempts: This is the number of times Rapise will attempt to locate an object.
Recording
BeautifySavedObjects affects how the Script Recorder writes object information to your test script.
If False, the object definition will be written as a single line:
var saved_script_objects={
Balance:{"version":0,"object_type":"SeSSimulated","object_name":"Transaction
Completed Successfully\n\nAccount 00000005
Balance:1046.00","object_class":"Static","object_role":"ROLE_SYSTEM_STATICTEXT",
"object_text":"Transaction Completed Successfully\n\nAccount 00000005
Balance:1046.00","locations":[{"locator_name":"Location","location":
{"location":"4.4.4","window_name":"SmarteATM","window_class":"#32770"}},
{"locator_name":"LocationPath","location":
{"window_name":"SmarteATM","window_class":"#32770","path":
[{"object_name":"Transaction Completed Successfully\n\nAccount 00000005
Balance:1046.00","object_class":"Static","object_role":"ROLE_SYSTEM_STATICTEXT"}
,{"object_name":"Transaction Completed Successfully\n\nAccount 00000005
Balance:1046.00","object_class":"Static","object_role":"ROLE_SYSTEM_WINDOW"},
{"object_name":"SmarteATM","object_class":"#32770","object_role":"ROLE_SYSTEM_DI
ALOG"}]}}]}
};
If True, the object definition will be written in a manner that takes more space, but is easier to read
and change:
var saved_script_objects={
Balance:{
"version": 0,
"object_type": "SeSSimulated",
"object_name": "Transaction Completed Successfully\n\nAccount
00000005 Balance:1046.00",
"object_class": "Static",
"object_role": "ROLE_SYSTEM_STATICTEXT",
"object_text": "Transaction Completed Successfully\n\nAccount
00000005 Balance:1046.00",
"locations": [
{
"locator_name": "Location",
"location": {
"location": "4.4.4",
"window_name": "SmarteATM",
"window_class": "#32770"
}
},
{
//section omitted for brevity
}
]
}
};
© 2015 Inflectra Corporation
Rapise User's Guide
253
Objects that were learned in previous recordings are affected by the value of BeautifySavedObjects.
Screen Capture
Capture Execution: Set this to True if you want to save screen images for each recognized
object during playback.
Capture Recording: Set this to True if you want to save screen images for each action during
recording.
Include in Report: Set this to True to include the saved images in the execution report during
playback.
Widget Only: Set this to True to only save the widget area in the screenshot, as opposed to the
whole window.
TestParams
The TestParams section includes various custom test parameters:
Click to open the TestParams Collection Editor Dialog.
There is a build-in set of test parameters for cross-browser testing. When you open up a test that uses
one of the HTML libraries it will display the following built-in test parameter that you can use to change
the playback browser:
Settings
© 2015 Inflectra Corporation
254
Rapise User Manual
UserFunctionsPath: Path (relative to the test directory) to the file with user-defined functions utilized
in this test. Normally this file has name in form *.user.js.
ObjectsPath: Path (relative to the test directory) to file containing object tree information. This file
contains saved_script_objects structure with all object locators gathered during recording and
learning. Normally this file has name in form *.objects.js.
ReportPath: Path (relative to the test directory) to the test's report file. Normally this file has
extension form .trp which stands for Test Report.
ScriptPath: Path (relative to the test directory) to the test script.
TestPath: Path to the test definition file (*.sstest).
2.5.35 Source Editor
Screenshot
Purpose
To display and edit javascript files. The editor supports Syntax Highlighting, Syntax Checking, Code
Folding and Code Completion.
How to Open
Use the Test Files Dialog to open a javascript file. The javascript file will be opened in a Source Editor,
in the Content View. The Edit Tab of the Ribbon will also open.
© 2015 Inflectra Corporation
Rapise User's Guide
255
2.5.36 Spreadsheet Viewer
Screenshot
Purpose
To display excel (xls) files.
How to Open
Use the Test Files Dialog to open an excel file. The excel file will be opened in a Spreadsheet Viewer,
in the Content View. The Spreadsheet tab of the Ribbon will also open.
2.5.37 Start Page
Screenshot
Purpose
© 2015 Inflectra Corporation
256
Rapise User Manual
To display the latest news and information regarding Rapise and the currently open test.
The Start Page is intended to be a convenient entry point for most common tasks related to test design
and execution. The Start Page provides:
1. A link to the Spira Dashboard: This will open the Spira Dashboard that provides a convenient
way to interact with Inflectra's SpiraTest test management system or Inflectra's SpiraTeam
application lifecycle management system.
2. Current Test information block, including:
o 3. Test Name and available scenarios
o 4. Test Parameters including the Spira Properties for the test. These include the IDs of the
project and test case in SpiraTest. In addition, for web-based tests there will be the special
Browser selection property. All tests will include any custom properties set by user.
o 5. Test Description. This information is taken from a Readme.htm file (if it exists in the test
folder of the current test). If this file does not exist then the first /** ... */ comment inside
the Test function is displayed instead.
6. Quick Start Guide This is an interactive tutorial for beginners who are using the system for
the first time. It may be hidden by unchecking the Show checkbox.
7. Recent Tests. This displays a clickable list of recently used tests
8. Browser Samples. This displays a list of available Rapise samples. Some samples are
shipped with Rapise while others are provided from the online public repository.
9. The Fetch Samples button is used to download/update additional samples from online public
repository.
How to Open
The Start Page opens automatically with Rapise. This behavior can be modified in the Options dialog
using the ShowStartPageOnStartup setting.
2.5.38 Spira Dashboard
Purpose
This page displays information from the SpiraTest or SpiraTeam server that this instance of Rapise is
connected to. More details on using Rapise with either SpiraTest or SpiraTeam can be found in the
separate Using Rapise with SpiraTest Guide. A copy of this guide should be in the Start >
Programs menu created by the Rapise installer.
The dashboard displays information about the current Spira project, including the associated test
cases, test sets and automation hosts:
Screenshot
A typical Spira dashboard will look like the following:
© 2015 Inflectra Corporation
Rapise User's Guide
257
Each of the sections is explained separately below:
Spira Login/Sign-Up
This section will display the name of the currently configured Spira user (if there is one) together with
the option to either login to an existing Spira instance or to sign-up for a new one:
Login: this will log you into the instance of Spira listed in the Connection Info section
Sign Up: this link will take you to the Inflectra website where you can sign up for a Spira
account.
Auto Login: if you select this option, Rapise will automatically login to Spira when it first starts
up.
Once you login to the instance of Spira, the widget will change to the following:
© 2015 Inflectra Corporation
258
Rapise User Manual
Logout: this will log you out of the instance of Spira listed in the Connection Info section
Connection Info
This section will display the URL, login and corresponding local repository folder for the current Spira
instance (if one has been set).
To change the current connection (or to set one up if this is a new installation of Rapise), click on the
[Edit Connection Settings] button. That will display the Connection Settings dialog box:
You can then change the current Spira connection using this dialog box. See the topic on Spira
Integration for more details.
Automation Hosts
This section will display a list of the automation hosts available in the currently selected Spira project:
© 2015 Inflectra Corporation
Rapise User's Guide
259
An automation host is a notional computer that Spira uses to assign specific test sets to specific
computers running Rapise. This allows you to schedule tests to run on different computers remotely.
When you first connect to Spira, it will not know which automation host the current machine matches.
Using the dropdown list you can select one of the displayed automation hosts:
That will tell Rapise that this local computer is in fact this Spira automation host. Any test sets
scheduled in Spira for this automation host will now be executed on this computer running Rapise.
If you don't see the current automation host listed, you can click on the [Create Host for this
Machine] button to create a new automation host entry for the current computer:
This screen lets you enter a display name (Name), system name (Token) and long description for a
new automation host that Rapise will create in the current Spira project. Click [OK] to confirm the new
automation host.
© 2015 Inflectra Corporation
260
Rapise User Manual
Test Cases
This section displays a list of test cases that are either created by the current Spira user or are
assigned to the current Spira user:
Each test cases will be displayed with the ID, name and long description of the test case together with
an icon that indicates the type of test case:
1.
- Manual test case that has no automation script attached.
2.
- Test case that has an existing Rapise test attached.
3.
- Test case that has a non-Rapise automation script attached.
Clicking on the hyperlink ID will open up the test case inside Spira in your web browser. For test cases
that have a linked Rapise test, there will be an [Open] button available. Clicking on this button will
open the test in Rapise.
In addition there are two other options available:
Create Test Set: Clicking on this button will allow you to create a new test set inside Spira. It
will display the following dialog box when you select at least one test case and click the button:
Enter in the name of the test set you want to create and click [OK].
Add to Test Set: When you select at least one test case and one test set, then click this button
it will add the selected test cases to a specific test set.
Test Sets
© 2015 Inflectra Corporation
Rapise User's Guide
261
This section displays a list of test set that are either created by the current Spira user, are assigned to
the current Spira user, or are assigned to the automation host that this instance of Rapise is installed
on:
Each test set will be displayed with the ID, name and long description of the test set.
Clicking on the hyperlink ID will open up the test set inside Spira in your web browser. For test sets
that are marked as automated, there will be an [Execute] button available. Clicking on this button will
execute the test in RapiseLauncher. This is described in more detail in the SpiraTest Integration
topic.
2.5.39 Spy Dialog
Screenshot
Purpose
The Spy dialog is used to Object Spy.
© 2015 Inflectra Corporation
262
Rapise User Manual
How to Open
There are three ways to open the Spy dialog:
1. Press the Spy Button on the Ribbon (Test tab > Tools menu)
2. Press the Spy Button on the Recording Activity Dialog
3. Press the Pick Object button on the Recording Activity Dialog. Note: If you use this method, the
dialog has an extra Learn Selected button.
Choosing the type of Spy
You can change the type of Spy that will be launched by clicking on the down arrow to the right of the
Spy icon in the main application Ribbon:
There are five types of Spy available:
1. Accessible - This is used to inspect applications that expose their properties using the
Microsoft Active Accessibility (MSAA) technology. This is typically used by applications written
in MFC, ATL, Qt, C++ and Visual Basic.
2. Java Object - This is used to inspect applications written using the Java AWT and Swing UI
frameworks.
3. Managed Object - This is used to inspect applications written in .NET 1.1, .NET 2.0, .NET 4.0
using Microsoft Windows Forms.
4. Mobile Object - This is used to inspect mobile applications running on iOS or Android devices
as well as the iOS or Android simulator
5. UIAutomation Object - This is used to inspect applications that expose their properties using
the Microsoft's newer UIAutomation technology. This is typically used by applications written in
WPF, Silverlight and Java SWT.
Start Tracking
The Start Tracking button (or CTRL+G) causes Rapise to enter Tracking Mode. In Tracking Mode,
Rapise investigates the object under your mouse. It identifies the object's type and learns the object's
properties. As you move your mouse, the objects you point to are highlighted (a box is drawn around
them).
Stop Tracking
The Stop Tracking button is only visible in Tracking Mode. Press Stop Tracking (or CTRL+G) to exit
Tracking Mode. The Spy dialog will display information for the last object highlighted.
Maximize/Minimize buttons
© 2015 Inflectra Corporation
Rapise User's Guide
263
The maximize
and minimize
buttons control the appearance of the dialog. They either hide or
make visible the sections to their right or below. See the example below. The button highlighted in
yellow in the left image is pressed to show/hide the appropriate pane.
Accessible Object
This is the Spy dialog that is used for Accessible (MSAA) objects. It is described in more detail in the
Accessible Spy topic.
The Accessible Object section of the Spy dialog shows properties of the object that are visible through
the Microsoft Active Accessibility interface.
Tree
The spied upon object and its children are displayed here.
Properties
Object fields and field values are displayed here.
Tools
© 2015 Inflectra Corporation
264
Rapise User Manual
Mouse Button Click: Emulate Left mouse click for the item selected in Spy tree.
Default Action: Execute DoDefaultAction for given accessible object.
Set Selection: Perform accSelect using the option flags set in the corresponding checklist
(above).
Java Object
This is the Spy dialog that is used for Java (Swing / AWT) objects. It is described in more detail in the
Java Spy topic.
The Java Object section of the Spy dialog shows properties of the object that are visible through the
Java Access Bridge interface.
Tree
The spied upon object and its children are displayed here.
Properties
Object fields and field values are displayed here.
Managed Object
This is the Spy dialog that is used for Managed (.NET) objects. It is described in more detail in the
Managed Spy topic.
© 2015 Inflectra Corporation
Rapise User's Guide
265
The Managed Object section of the Spy dialog shows properties of the object that are visible through
.NET Framework reflection interface.
Tree
The spied upon object and its children are displayed here.
Properties
Object fields and field values are displayed here.
Mobile Object
This is the Spy dialog that is used for Mobile objects. It is described in more detail in the Mobile Spy
topic.
The Mobile Object section of the Spy dialog shows a snapshot of the screen displayed on the
connected Mobile device as well as the properties of the currently selected object. You can selected
the object either by clicking on the screen snapshot or the control hierarchy displayed to the left. The
properties displayed will depend on the type of mobile device being tested (iOS vs. Android).
© 2015 Inflectra Corporation
266
Rapise User Manual
Tree
The spied upon object and its children are displayed here. When you click on an object it will also
be highlighted in the snapshot view to the right.
Properties
Object fields and field values are displayed here.
Snapshot
This displays a snapshot of what is displayed on the mobile device being tested. The objects in the
snapshot are clickable, which allows you to visually select objects from the hierarchy.
Tools
Get Snapshot (CTRL + G) - This will connect to the mobile device and get the latest snapshot
from the mobile device and display in the right-hand window.
Disconnect - This option disconnects the Spy from the mobile device and ends the connection.
Learn Object - This option is only displayed in Recording mode and lets you take the currently
selected object and add it to the Object Tree for the current test. It can then be used as a
scriptable object in the test script.
Page Source - This lets you view the source of the mobile device in a text editor such as
Notepad. It will show the objects in the treeview represented as an XML document.
Go to URL - This will instruct the mobile device to navigate its built in web browser to a specific
URL.
Test Locator - This will display the Mobile Test Locator dialog box that lets you try different
locators to resolve specific objects in the object hierarchy. It will include options such as using
XPath and IDs.
Select Profile - This lets you change the profile of the mobile device you are testing while the
Spy dialog is open.
Edit Profiles - This will open up the Mobile Settings dialog box. You cannot be connected to do
this.
Context - This will display either 'Discovery Mode' or 'Recording Mode'.
UIAutomation Object
This is the Spy dialog that is used for UI Automation (WPF, Silverlight) objects. It is described in more
detail in the UIAutomation Spy topic.
© 2015 Inflectra Corporation
Rapise User's Guide
The UIAutomation Object section of the Spy dialog shows properties of the object that are visible
through the UIAutomation interface.
Tree
The spied upon object and its children are displayed here.
Properties
Object fields and field values are displayed here.
HWND Object
The HWND Object section of the Spy dialog shows properties of the object that are visible with its
HWND handle.
Tree
The spied upon object and its children are displayed here.
Properties
Object fields and field values are displayed here.
© 2015 Inflectra Corporation
267
268
Rapise User Manual
Tools
Mouse Button Click: Emulate Left mouse click for the item selected in Spy tree.
Highlight: Draw rectangle surrounding selected object (HWND or Accessible).
These tools can be accessed from the right-click Spy context menu:
See Also
Microsoft Active Accessibility is described here http://msdn.microsoft.com/en-us/magazine/
cc301312.aspx
HWND is described HERE.
Microsoft UIAutomation is described here http://support.microsoft.com/kb/971513/
2.5.40 Test Files Dialog
Screenshot
Purpose
The Test Files dialog allows you to navigate and alter the Test hierarchy, including the following:
the script
© 2015 Inflectra Corporation
Rapise User's Guide
269
Report files (*.trp)
Images captured during execution using Checkpoints
Analog recording files (*.arf)
data files
How to Open
The Test Files dialog is part of the Default Layout.
Context Menu (Folder)
Right click on a folder to see:
Create File: Create and add a new file to the test.
Add File: Add an existing file to the test.
New Group: Create a logical grouping of files in the test. This will not add a folder to the file system.
Reload: Refresh group contents. Use it for filter groups ('IsFilterGroup' is set to 'True' in group
properties), e.g. for Report group.
Create Sub-Test...: Launch Create Sub-Test dialog.
Remove from Test: Remove the selected grouping from the test. This does not delete included files
from your hard disk.
Remove All from Disk: Remove all files included into the selected grouping from your hard disk.
Context Menu (File)
Right click on a file to see:
Open: Open the file in Rapise.
Open Externally...: Open the file using associated program. E.g. if a Notepad is registered in
Windows to open TXT files, then TXT file will be opened by Notepad.
Remove from Test: Remove the file from your test. This does not delete the file from your hard disk.
Remove from Disk: Remove the file from your test and hard drive.
Filter Groups
Filter groups read its contents from disk according to specified path and wildcard. You may setup a
filter group by editing group properties:
© 2015 Inflectra Corporation
270
Rapise User Manual
FilterPath: Root path to find files via wildcard (valid only if 'IsFilterGorup' is 'True').
FilterWildcard: Filter wildcard (valid only if 'IsFilterGorup' is 'True').
IsFilterGroupt: 'True' if directory should show the list of all files matching 'FilterWildcard' belonging to
'FilterPath'.
Name: Group name.
2.5.41 Variable/Call Stack View
Screenshot
Purpose
Lists the functions in the current call stack. Beneath each function, variables/objects local to that
function are listed with their value and type.
How to Open
Begin debugging a script. The Variable/Call Stack View will open automatically.
Go to a function definition
Double click on a function to go to its definition.
© 2015 Inflectra Corporation
Rapise User's Guide
271
2.5.42 Verify Object Properties Dialog
Screenshot
Purpose
Use the Verify Object Properties dialog during recording to add checkpoints.
How to Open
1. First, open the Recording Activity Dialog.
2. Position the mouse over an object and press Ctrl+1, or
3. Press the Verify button and then click the target object with the mouse cursor.
Create a Checkpoint
Your checkpoint will be associated with a particular object. That object's properties will be listed in
the Verify Object Properties dialog. Check those properties that you wish to verify during playback.
Enter expected values for the selected properties in the Value column. Note: The Bitmap and
BWBitmap properties are images of the object.
© 2015 Inflectra Corporation
272
Rapise User Manual
Press the OK button. The Verify Object Properties dialog will close, and the Recording Activity dialog
will contain a new Verify action:
The generated script will have a corresponding assert statement:
See Also
Recording
Assert Statements
© 2015 Inflectra Corporation
Rapise User's Guide
273
2.5.43 Warning View
Screenshot
Purpose
To display syntax error messages as you edit javascript files.
How to Open
The Warning view is part of the Default Layout.
Error Message
Double click on an error message to go to the corresponding source line.
Widgets
The text box is a search box.
The icons from left to right are Find Next Entry
Select All Text
See Also
Syntax Checking
2.5.44 Watch View
Screenshot
© 2015 Inflectra Corporation
.
, Copy Selected
, Clear All Text
, and
274
Rapise User Manual
Purpose
To input expressions and view their values as the script executes.
How to Open
Begin debugging a script. The Watch View will open automatically.
Inputting an Expression
1. Click the first blank line:
2. Double click on the highlighted line, under the Expression column. A text box will appear.
3. Input the expression you wish to investigate. Press Enter.
© 2015 Inflectra Corporation
Rapise User's Guide
275
Widgets
From left to right: Copy (an entire row)
, Copy Watch Value
, Delete
.
2.5.45 File Menu
Purpose
The File menu provides quick access to all the File management functions in Rapise. Many of these are
also available on the main Test ribbon.
Screenshot
Options
The File menu has the following options:
Create a new Test - creates a new Rapise test, it can be saved either to Spira or locally.
Open an existing Test - opens an existing test that is already available locally.
Open File - opens a single file and adds to the current test project
Save the current Test - saves the current test locally
Open Test from Spira - opens a test from Spira and downloads to the local repository
Save to Spira - saves the current test to the Spira test management system
Save As - saves the current test locally with a different file name
Exit - exits Rapise.
2.6
HowTos
This section focuses on specific tasks that a Rapise user might want to accomplish.
© 2015 Inflectra Corporation
276
2.6.1
Rapise User Manual
Open a Test
You can open a test in two ways: (1) From the Ribbon, and (2) From the Application menu.
Ribbon
Select the Open option from the File menu on the Test Tab of the Ribbon:
You can also open a test that is stored in SpiraTest (our web-based test management system)
instead of the local filesystem. This is done by clicking on the Open Test from Spira option instead.
More details on using Rapise with SpiraTest can be found in the SpiraTest Integration section.
Application Menu
Open the Application Menu by clicking on the
Tab at the top left of the Rapise window.
The Application menu has an Open Test option, and a list of Recent Test from which you may choose:
You can also open a test that is stored in SpiraTest (our web-based test management system)
instead of the local filesystem. This is done by clicking on the Open Test from Spira option instead.
More details on using Rapise with SpiraTest can be found in the SpiraTest Integration section.
2.6.2
Create a New Test
There are two ways to Create a New Test in Rapise:
1. From the main Application menu
2. From the Start Page
© 2015 Inflectra Corporation
Rapise User's Guide
277
From the Application Menu
Open the Application Menu by clicking on the
Tab at the top left of the Rapise window.
Select the New Test option. The Create New Test dialog will appear. Follow the instructions on this
dialog.
From the Start Page
Open up the Rapise Start Page:
In the Shortcuts section, click on the 'Create New Test' option:
The Create New Test dialog will appear. Follow the instructions on this dialog.
© 2015 Inflectra Corporation
278
2.6.3
Rapise User Manual
Restoring the Default Layout
There are two ways to the restore the default layout: (1) On Startup, and (2) In the Options Menu.
On Startup
Press the Shift key while you open Rapise. Keep the Shift key down until Rapise is done initializing.
Options Menu
In Rapise, select the Options button. It is on the Ribbon in the Tools section:
The Options dialog will appear. Go to the Tools tab:
Select the Reset Layout button. Rapise will restart.
2.6.4
Change Test Entry Point
Rapise assumes that the entry point of a test - Test() function is defined in a file specified in ScriptPath
property of the Settings dialog. If you want to place Test() function in another file then do not forget to
update ScriptPath property of the test.
© 2015 Inflectra Corporation
Rapise User's Guide
2.6.5
279
Do Absolute Analog Recording
Let's once again use our trusty over-simplified TwoDialogs sample application to learn how to use
absolute analog recording and use it to discover the value as well as the dangers associated with
absolute analog recording.
Steps:
(1) Run the TwoDialogs sample AUT. By default this will be located in the C:\Users\Public\Documents
\Rapise\Samples\TwoDialogs\TwoDialogs.exe location
(2) Start Rapise and create a new test and call it TwoDialogsAnalogAbsolute.
(3) Press the Record/Learn button in the toolbar of Rapise.
(4) When the "Select an Application to Record" dialog is displayed, choose the TwoDialogs.exe
application and ignore the library list - we will not be using any library for analog recording. Press the
Select button.
(5) The Recording Activity dialog will be displayed with an empty grid.
NOTE: this recording session is going o be a little different from previous sessions. Previously we
could interrupt our object-related recording/learning with other activities and because Rapise was
recording activity related only to the target application, our recording or object learning would be
unaffected. However, in analog recording, Rapise is monitoring the mouse and keyboard for the entire
system - for all applications. This means that if you answer an email in the middle of analog recording,
or log in to a secure system, all the steps including mouse movement, keystrokes, etc., will all be
recorded. However, note also that screen contents are not recorded by Rapise.
(6) If the TwoDialogs UI has been occluded, bring it back to the front so you don't have to hunt for it
when you start recording.
(7) When you're ready to record the session, hit Ctrl+4 on the Recording Activity dialog.
NOTE: Pressing the Analog button on the Recording Activity dialog starts a relative analog recording
session. Use the Ctrl+4 key sequence to start the absolute analog recording session.
Rapise will begin recording all mouse and keyboard activity until you stop the recording.
Note also that the prompt in the notification/status area of the Recording Activity dialog is different from
that for relative analog. It tells you that "Your mouse and keyboard activity is now being recorded."
© 2015 Inflectra Corporation
280
Rapise User Manual
A minimized window will be created that indicates that analog recording is in progress and allowing you
to stop the recording.
(7) Go to the TwoDialogs AUT and click anywhere in the application's window to start the analog
recording.
Click the mouse on the empty "Please enter your name" text box.
Type a name in the text box.
Hit the <tab> key or click the left mouse button to advance the input position to the second text
box.
Type another name.
Move the mouse to the OK button and press the mouse left button.
(8) When you have recorded enough, switch to the Analog Recording dialog box and press the close
button or hit the keys Ctrl+Break.
NOTE: If you use the "close" button on the Analog Recording dialog, the movement of the mouse to the
Analog Recording dialog, and the mouse-click on the Close button will be recorded as part of the
analog recording output. This might not be a desirable outcome at playback time because the Analog
Recording dialog will not be present and the mouse click will be played in a potentially random place
on the screen. For this reason, Ctrl+Break is probably a better option to terminate analog recording.
NOTE: The grid will have no entry added until you end the analog recording with the Close button in the
Analog Recording dialog. When you do, it will add an entry to the grid.
(9) You can now record additional analog sessions, if you wish.
(10) You can record normal object activity before and/or after the analog recording. When you have
finished all recording press the Finish button or hit Ctrl+3. Notice that the Analog entry is added to the
grid.
© 2015 Inflectra Corporation
Rapise User's Guide
281
(11) The Rapise screen will now be restored and will have placed focus in the editor pane of the Rapise
with TwoDialogsAnalogAbsolute.js script displayed. You should see code something like the following:
//Plays recorded events from "Analog\Analog0003.arf" file
SeS('Simulated').DoAnalogPlay("Analog\\Analog0003.arf");
(12) Press the Play button on the Rapise toolbar to playback the recording you made. Be sure not to
interfere with the mouse or keyboard whilst the recording is playing back.
NOTE: You will see all mouse and keyboard activity reproduced as the analog recording plays. The
recording will start from the point where you left-clicked the mouse to begin the recording (step 7
above) and will end with clicking the close button in the Analog Recording dialog or at the last action
before you pressed Ctrl+Break.
(13) When the analog playback is complete, use the mouse to move the Two Dialogs AUT to a different
location on the screen. Play the recording again, and watch the operation unfold. The most important
thing to realize is that the absolute analog recording will playback the recording wherever the
application is positioned on the screen wherever the AUT was positioned when you made the recording.
Absolute analog recording records relative to the top-left corner of the system screen. Try this for
yourself, but be sure to minimize all applications before starting.
2.6.6
Do Relative Analog Recording
Let's once again use our trusty over-simplified TwoDialogs sample application to learn how to use
relative analog recording.
Steps:
(1) Run the TwoDialogs sample AUT. By default this will be located in C:\Users\Public\Documents
\Rapise\Samples\TwoDialogs\TwoDialogs.exe
(2) Start Rapise and create a new test and call it TwoDialogsAnalogRelative.
(3) Press the Record/Learn button in the toolbar of Rapise.
(4) When the "Select an Application to Record" dialog is displayed, choose the TwoDialogs.exe
application. Since we will not be using a library for this recording, the library selection is irrelevant.
Press the Select button.
(5) The Recording Activity dialog will again be displayed with an empty grid.
NOTE: this recording session is going o be a little different from previous sessions. Previously we
could interrupt our object-related recording/learning with other activities and because Rapise was
recording activity only related the target application, our recording or object learning would be
unaffected. However, in analog recording, Rapise is monitoring the mouse and keyboard for the entire
system - for all applications. This means that if you answer an email in the middle of analog recording,
or log in to a secure system, all the steps including mouse movement, keystrokes, etc., will all be
recorded. However, note also that screen contents are not recorded by Rapise.
(6) If the TwoDialogs UI has been occluded, bring it back to the front so you don't have to hunt for it
during recording.
(7) When you're ready to record the session, hit the Analog button on the Recording Activity dialog.
NOTE: The key sequence Ctrl+4 starts an absolute analog recording session. Press the Analog
button to start the relative analog recording session.
When you press the Analog button, two things will happen. Firstly, the status bar of the Recording
Activity dialog will change to read, "Click on object to start analog recording."
© 2015 Inflectra Corporation
282
Rapise User Manual
After the next mouse click, Rapise is recording all mouse and keyboard activity until you stop the
recording.
Secondly, a minimized window will be created that indicates that analog recording is in progress and
allowing you to stop the recording.
(7) Go to the TwoDialogs AUT and click anywhere in the application's window to start the analog
recording.
Click the mouse on the empty "Please enter your name" text box.
Type a name in the text box.
Hit the <tab> key or click the left mouse button to advance the input position to the second text
box.
Type another name.
Move the mouse to the OK button and press the mouse left button.
(8) When you have recorded enough, switch to the Analog Recording dialog box and press the close
button or press the key sequence Ctrl+Break. If you use the "close" button on the Analog Recording
dialog, the movement of the mouse to the Analog Recording dialog, and the mouse-click on the Close
button will be recorded as part of the analog recording output. This might not be a desirable outcome
at playback time because the Analog Recording dialog will not be present and the mouse click will be
played in a potentially random place on the screen. For thjis rason, Ctrl+Break is probably a better
option to terminate analog recording.
NOTE: The grid will have no entry added until you end the analog recording with the Close button in the
Analog Recording dialog. When you do, it will add an entry to the grid.
© 2015 Inflectra Corporation
Rapise User's Guide
283
(9) You can now record additional analog sessions if you wish.
(10) You can record normal object activity before and/or after the analog recording. When you have
finished all recording press the Finish button or hit Ctrl+3.
(11) The Rapise screen will now be restored and will have placed focus in the editor pane of the Rapise
with TwoDialogsAnalogAbsolute.js scrip displayed. You should see code something like the following:
//Plays recorded events from "Analog\Analog0003.arf" file
SeS('Simulated').DoAnalogPlay("Analog\\Analog0003.arf");
(12) Press the Play button on the Rapise toolbar to playback the recording you made. Be sure not to
interfere with the mouse or keyboard whilst the recording is playing back.
NOTE: You will see all mouse and keyboard activity reproduced as the analog recording plays. The
recording will start from the point where you left-clicked the mouse to begin the recording (step 7
above) and will end with clicking the close button in the Analog Recording dialog. If you used Ctrl
+Break to end the recording then the last recorded activity will be the one that keystroke.
(13) When the analog playback is complete, use the mouse to move the Two Dialogs AUT to a different
location on the screen. Play the recording again, and watch the operation unfold. The most important
thing to realize is that the relative analog recording will playback the recording wherever the application
is positioned on the screen. This is because you used relative analog recording. However, once the
recording within the AUT is complete, all mouse motion and keyboard strokes are relative to the current
position of the AUT. Suppose that during analog recording, you click the OK button in TwoDialogs.exe,
then move the mouse to terminate the recording using the analog recording Close button. Now, prior to
playback, you move the AUT to a different location on the screen and hit playback. All the activity
within the AUT will be faithfully reproduced. However, the mouse motion outside the AUT will be
relative to the position, so the following activities will not be accurately reproduced. Try this for
yourself, but be sure to minimize all applications before starting so you don't cause mouse events
where they will do harm to other applications on the screen.
2.6.7
Learn an Object
To illustrate learning an object, we return to the TwoDialogs sample.
© 2015 Inflectra Corporation
284
Rapise User Manual
First, let's learn the OK button using recording. We have done this before in the TwoDialogs sample.
Steps:
(1) Run TwoDialogs sample AUT. By default this will be located in C:\Program Files\Inflectra\Rapise
\Samples\TwoDialogs\TwoDialogs.exe
(2) Start Rapise and create a new test and call it TwoDialogsRecording.
(3) Press the Record/Learn button in the toolbar of Rapise.
(4) When the "Select an Application to Record" dialog is displayed, choose the TwoDialogs.exe
application and in the library list, select only the top library on the list - "Auto." Press the Select
button.
(5) In the TwoDialogs AUT, use the mouse to press the OK button. Dismiss the alert message box
complaining about the empty name.
(6) Notice that two things will happen. Firstly, the OK button will be surrounded with a red marker,
indicating that the OK button has been learned. Secondly, the action of clicking the OK button is
recorded in the Recording Activity dialog. That recording has a single entry.:
(7) Press the Finish button (or press Ctrl+3) to end the recording.
(8) Rapise will return to be the foreground application, and it will have selected the
TwoDialogsRecording.js (or whatever name you gave the test when you created it).
(9) Notice that there is a single line or script that has been added to the script file:
SeS('OK').DoAction();
This line of script has two interesting parts.
The "SeS('OK') is the identity (not the locator or location) of the OK button. This is the object that was
learned during recording.
The "DoAction()" is the instruction to the running script to take the action associated with a button. A
normal button has only a single possible action - to be pressed.
The Record/Learn process has taken both steps for you, and joined them together.
Now, let's use (normal) object learning to learn the same OK button and to call a method for the object.
Steps:
© 2015 Inflectra Corporation
Rapise User's Guide
285
(1) Run TwoDialogs sample AUT. By default this will be located in C:\Program Files\Inflectra\Rapise
\Samples\TwoDialogs\TwoDialogs.exe
(2) Start Rapise and create a new test and call it TwoDialogsLearn.
(3) Press the Record/Learn button in the toolbar.
(4) When the "Select an Application to Record" dialog is displayed, choose the TwoDialogs.exe
application. Leave the library selection in its default state - we will not be using it this time. Press
Select. Wait for the Recording Activity dialog to appear in the lower-right corner of the screen.
(5) Hover the mouse over the OK button of the TwoDialogs AUT but do not press the button.
(6) With the mouse positioned over the OK button, press Ctrl+2 ( the "Learn" command). You will see
the OK button surrounded with a red highlight. You will also see that the Recording Activity dialog has
been updated with a Learn event.
(7) Press the Finish button or Ctrl+3 to end the recording session. You will now see that Rapise has
"learned" about the OK button, and the Object Tree in the upper left-hand pane of the Rapise has a new
entry called "OK" (shown here expanded). The list of items contained under the OK button entry in the
Object Tree is the set of methods and properties available for the OK object. Methods are listed with
purple icons, read properties are listed with blue icons, and write properties are listed with blue and
purple icons. Notice that the DoAction property is listed and recall in the previous section when we
recorded pressing the button, the DoAction method was chosen for the button-press action.
© 2015 Inflectra Corporation
286
Rapise User Manual
(8) While we are looking at this OK object, let's make a few observations about it. These observations
will be useful for your later dealings with Rapise and will make the script more informational and
relevant as you delve into Rapise. First, look down at the Properties box that appears under the Object
Tree in the bottom left corner of the Rapise screen. The screenshot below has some of the tree nodes
expanded.
© 2015 Inflectra Corporation
Rapise User's Guide
287
First, notice that the OK button has four (4) "locators" defined. When you have Rapise "learn" an
object. it must collect data about that object so that it can relocate it even if the application has moved
on the screen, and even if the application is in a different state of execution. In order to accomplish
this, Rapise looks for all useful ways to uniquely identify the object. As bad, or perhaps worse, than
not being able to find an object would be to find the wrong object on the AUT. Every time Rapise is
required to locate this object, it will first try to use the first locator. If it fails to positively and uniquely
match with that locator, it will try the second, and so on. Rapise will not give up and declare failure
until it has failed to identify with all available locators.
Second, notice the ID entry in the Object section of the pane. This is the name of the object from
Rapise's perspective. All Rapise names are available through the SeS() function call. Therefore, if we
© 2015 Inflectra Corporation
288
Rapise User Manual
want to refer to the "OK" object, we will use SeS("OK") to refer to it. Once we have correctly identified
the object, all valid methods and properties can be accessed by using that object as the basis.
Thirdly, notice in the main editor window of the Rapise, that no code has been added. When you
identified the OK button, all Rapise did was add the new object to the Object Tree. It did not write any
code in the javascript file.
(9) In the automated (recorded) section above, you saw that when you pressed the OK button on the
dialog, Rapise recorded a function like this:
SeS("OK").DoAction();
This time, you will use the established name of the OK button object, but do something a little more
interesting than its default action to demonstrate how to use Rapise.
(10) Move the cursor into the editor part of the Rapise and make sure you are editing the file called
TwoDialogsLearn.js. At the moment, this file still looks something like this:
//########## Script Steps ##############
function Test()
{
}
g_load_libraries=["Generic"];
Between the open and close brace, add the following command:
SeS("OK").DoClick();
Hit the Play button and watch what happens.
The click will register as a command to the object and it will perform the action on the object.
While we have the context of this situation, let's complicate it just a little more to illustrate the intricacy
as well as the flexibility of Rapise and SeS.
There is a method whose names looks interesting: DoLButtonDown().
If we were to invoke DoLButtonDown() on the "OK" object, we would expect this would be the same as
DoClick().
However, go back to the AUT for a moment. Using the mouse, press the left mouse button over the
OK button but don't take your finger off the left mouse button.
What happens is that the button takes its pressed state in appearance, but the button is not clicked.
The reason for this is that the DoClick() (or DoAction()) events cause the mouse button top be clicked
as well as released.
Therefore, we would need to have a pair of events:
SeS("OK").DoLButtonDown();
SeS("OK").DoLButtonUp();
in order to make the "click" happen.
Try this in the test script you have created by adding those two lines of code in place of the DoClick()
line.
It doesn't work!
Let's play a little with this problem.
When you press the Play button, leave the mouse alone. Just press the left mouse button on the
Rapise Play button and take your hand away from the mouse.
© 2015 Inflectra Corporation
Rapise User's Guide
289
The script does not press the OK button in the TwoDialogs AUT.
Now, press the Play button on the Rapise and quickly move the mouse to hover over the OK button in
the TwoDialogs AUT.
Now it works!
What's going on here is that the DoLButtonDown() and DoLButtonUp() methods are pressing the
mouse irrespective of where the mouse cursor is positioned.
The other functions, DoClick and DoAction are methods that are applied to the button and so they are
applied to the button.
Before we can expect DoLButtonDown() and DoLButtonUp() methods to work, we have to first the
mouse cursor to the button.
function Test()
{
SeS("OK").DoMouseMove(25, 15);
SeS("OK").DoLButtonDown();
SeS("OK").DoLButtonUp();
}
will accomplish that.
Notice that Rapise will actually move the mouse to the coordinates (25, 15) within the OK button. Also
notice that if you move the mouse while the test is playing, you will make the test fail.
As a last experiment in this arena, try moving the mouse outside the boundaries of the OK button
object before calling the DoLButtonDown() function.
function Test()
{
SeS("OK").DoMouseMove(250, 150);
SeS("OK").DoLButtonDown();
SeS("OK").DoLButtonUp();
}
Once again, the script will fail.
2.6.8
Deal with a Simulated Object
Example: The toolbox of Microsoft's Paint utility (c:\windows\system32\mspaint.exe) is a compound
object that contains custom buttons and is surrounded by a containing box. To understand this
completely, start mspaint.exe from the Rapise.
Steps:
(1) Open a new test under Rapise.
(2) Press the Record/Learn button on the application bar.
(3) When the "Select an Application to Record" dialog appears, select the Run Application tab. Enter
mspaint in the "Full path to application" edit box. Press the Run button.
If you are unfamiliar with MS Paint, take a few minutes to play with it.
In particular, notice the toolbox that appears in the upper-left margin of the utility and the color
selection box that appears on the bottom-left of the application window.
(4) Press Ctrl+5 to spy on the UI. Press Ctrl+G to spy on the Paint application. Notice several things
© 2015 Inflectra Corporation
290
Rapise User Manual
about the behavior of the MS Paint application under the Object Spy.
(i) As you move the mouse inside the tools box, the entire surrounding box will show a red highlight
but the individual tool buttons will not.
(ii) The same is true of the color palette and the bottom-left of the screen.
(iii) As you move the mouse over the apparent buttons and controls, the information in the spy
dialog is more sparse than for other applications. The tool buttons do not have default actions, and
they are not identified as buttons. Rather they are identified only as "child" objects.
This combination makes it impossible for Rapise to identify and learn the objects as integral objects.
Furthermore, notice that as you change the size of the Paint window, the relative positions of the color
palette and the tool box change.
The only way in which Rapise can be 'taught' these controls (and others we will discover later) is by
"simulating" them as though they were buttons that can accept commands such as the press event.
In fact, Rapise will recognize these non-objects without you having to take particular action. Let's
discover this and what it means:
(1) Open a new test under Rapise; call it MSPaint.
(2) Press the Record/Learn button on the application bar.
(3) When the "Select an Application to Record" dialog appears, clear all selection boxes in the library
list box. You will have to scroll that section of the dialog box to make sure all selections are clear.
We are choosing no loaded libraries so that Rapise will not be able to "cheat" and know about any
objects on the screen.
(4) select the Run Application tab. Enter mspaint in the "Full path to application" edit box. Press the
Run button.
(Applications that reside in C:\windows\system32 can be started by their names because C:\windows
\system32 must be in the system path.)
(5) When the Recording Activity dialog is displayed, press Learn (Ctrl+2)
(6) Do a small amount of things in Paint. For example:
(i) Click on the light-grey color in the palette.
(ii) Click on the tipping paint-can (Fill with color).
(iii) Click on the empty canvas.
(iv) Click on the red color in the palette.
(v) Click on the "A" tool (Text).
(vi) Click in the canvas and type a few characters, such as "Hello."
(vii) Click in a blank place under the tool button.
(7) Look at the Recording Activity dialog grid. It will be something like this:
© 2015 Inflectra Corporation
Rapise User's Guide
291
Notice that the two clicks in the canvas were recorded as "simulated" objects.
Notice also that the two pairs of clicks in the tools and colors sections were recorded as LClick (left
click) in "Tools" and "Colors". However, there are no objects by these names. To find out where these
pseudo objects came from, we need to look in the file MSPaint.objects.js (the name will be the name
you gave the test project). The following excerpt from the MSPaint.object.js shows the start of the
definition of the "Colors" object:
© 2015 Inflectra Corporation
292
Rapise User Manual
(8) Press Ctrl+3 to end the recording.
2.7
Technologies
This section focuses on specific technologies supported by Rapise.
2.7.1
Adobe Flex
Purpose
Rapise includes support for Adobe Flex applications executed
inside Adobe Flash Player in Internet Explorer or Firefox
and Adobe Integrated Runtime (AIR).
Flex versions 3 and 4 are supported.
Usage
To test Flex applications, you must have Flex Builder installed. Link your application with
© 2015 Inflectra Corporation
Rapise User's Guide
293
FlexAdapter.swc (part of Rapise) and automation_agent.swc and automation.swc (part of Flex Builder).
The compiler arguments for FlexBuilder 3 should look like:
-include-libraries "C:/Program Files/Adobe/Flex Builder 3/sdks/3.2.0/frameworks/
libs/
automation_agent.swc" "C:/Program Files/Adobe/Flex Builder 3/sdks/3.2.0/
frameworks/libs/
automation.swc" "C:/Program Files/Inflectra/Rapise/Extensions/Flex/FlexAdapter/
bin/FlexAdapter.swc"
The compiler arguments for FlashBuilder 4 should look like:
-include-libraries "C:/Program Files/Adobe/Flash Builder 4/sdks/4.0.0/
frameworks/libs/
automation_agent.swc" "C:/Program Files/Adobe/Flash Builder 4/sdks/4.0.0/
frameworks/libs/
automation.swc" "C:/Program Files/Inflectra/Rapise/Extensions/Flex/FlexAdapter/
bin/FlexAdapter.swc"
Note: You can avoid linking with third-party libraries if your application is browser-based and you will
use FlexLoader.
Adobe Flash Player
Adobe Flash Player has restricted security settings for SWFs opened from the file system. To enable
testing of such SWFs, their corresponding folders must be listed in the FlashPlayerTrust directory.
You can find the FlashPlayerTrust directory here:
<system>\Macromed\Flash\FlashPlayerTrust
to enable testing just for the current user, use this FlashPlayerTrust directory:
<ApplicationData>\Macromedia\Flash Player\#Security\FlashPlayerTrust
To register your SWF just create a file with the name "<name of your SWF>.cfg" and put it in this
directory. In the file, write a path to the SWF folder.
Note: If you do not have FlashPlayerTrust directory in one of locations listed above then you will have to
create missing directories yourself.
Adobe AIR
To record and playback tests for Adobe AIR application you need to run the application manually. E.g.:
"C:\Program Files\Adobe\Flex Builder 3\sdk s\3.2.0\bin\adl.exe" C:\Program Files\Inflectra\Rapise
\Samples\AdobeFlex3\AUTFlexAIR\bin-debug\AUTFlexAIR-app.xml
© 2015 Inflectra Corporation
294
Rapise User Manual
Sample Applications and Test
Two sample Flex 3 applications are available with the Rapise installation. They can be found at:
<Rapise install dir>/Samples/AdobeFlex3/AUTFlexFP/bin-debug/A
and
<Rapise install dir>/Samples/AdobeFlex3/AUTFlexAIR/bin-debug/
The binaries and source are both provided.
One sample Flex 4 applications is available with the Rapise installation. It can be found at:
<Rapise install dir>/Samples/AdobeFlex4/AUTFlexFP4/bin-debug/
The binaries and source are both provided.
Sample tests for the sample applications can be found in <Rapise install dir>/Samples/AdobeFlex3
and <Rapise install dir>/Samples/AdobeFlex4. To select the target for testing edit the following line in
AdobeFlex.user.js file:
/**
* Select flex target for testing.
*/
var testTarget = "FlexIE"; //"FlexAIR", "FlexFirefox", "FlexIE"
Note: If you choose AIR target, please, do not forget to run the sample application before executing the
test.
See Also
Tutorial: Testing Adobe Flex Applications
2.7.2
Cross Browser Testing
You can run your recording in a different browser than the one in which it was recorded.
Selecting a new Playback Browser
First, open the script for your test using the Test Files Dialog. Locate the line where g_load_libraries
is initialized.
Under the Hood
It is possible to have more control about cross browser execution using available APIs and
configuration variables You can also run the recording in multiple browsers in succession. Both
options require modification of the script. The necessary modifications are described below. First,
open the script for your test using the Test Files Dialog. Locate the line where g_load_libraries is
initialized.
If you recorded your script in IE you will see:
g_load_libraries=["%g_browserLibrary:Internet Explorer HTML%"];
If you recorded it in Firefox, you will see:
© 2015 Inflectra Corporation
Rapise User's Guide
295
g_load_libraries=["%g_browserLibrary:Firefox HTML"];
This line tells Rapise to use the browser library specified in the special g_browserLibrary variable
setting, and if no value is set, default to the named browser (Internet Explorer or Firefox in this
example).
Changing the Playback Browser
In the File explorer pane of Rapise, choose the Settings tab:
Expand the Test Params option and click on the Browser dropdown list:
Change the browser to either Firefox, Internet Explorer or Chrome.
Once you have changed this setting, Playback the script normally and it will playback in the selected
browser.
Changing this setting will effectively set the value of the g_browserLibrary global variable.
Playback in Multiple Browsers - SpiraTest
Executing a test in multiple browsers is slightly more complicated. We recommend that you use
SpiraTest 'Test Sets' where you may define multiple test cases pointing to the same Test with a
different g_browserLibrary parameter value.
The separate help document "Using SpiraTest with Rapise" provides specific instructions on using
Rapise with SpiraTest to handle the specific case of cross-browser testing as well as more general
support for parameterized testing.
See the SpiraTest Integration topic for more general information on using Rapise with SpiraTest.
© 2015 Inflectra Corporation
296
Rapise User Manual
Playback in Multiple Browsers - SubTests
As another option, it is also possible to use sub-tests to organize multi-browser testing where a single
test executes itself in different browsers one after another.
1. Record base test. Put all the recorded actions into a User-defined function and place it into
<testname>user.js file. For example, function Login() inside file MyTest.user.js.
2. Create Sub-Test for IE re-using objects and functions from the base test
3. Modify script file in sub-test as follows:
function Test()
{
// Re-use 'Login()' scenario from parent test
Login();
}
g_load_libraries=["Internet Explorer HTML"];
4. Create Sub-Test for Firefox re-using objects and functions from parent test
5. Modify script file in subtest as follows:
function Test()
{
// Re-use 'Login()' scenario from parent test
Login();
}
g_load_libraries=["Firefox HTML"];
As a result you have a test for 2 browsers: IE an Firefox. Each browser is defined by a library in a
corresponding sub-test. Rapise contains the Cross Browser sample using this approach.
2.7.3
Qt Framework
Purpose
Rapise includes support for testing applications written using the Qt Framework written using QWidget
controls.
Usage
Rapise fully supports the test automation of Qt based applications. To ensure that Rapise can access
the UI elements and properties in the Qt application, MSAA (Microsoft Active Accessibility) support for
your Qt application must be enabled. This provides additional information on Qt UI elements to
automation software like Rapise and can be accomplished by shipping and loading the "Accessible
Plug-in" included in the Qt SDK (Software Development Kit) with the Qt application under test (see
below).
Loading Accessible Plug-in for your Qt application:
© 2015 Inflectra Corporation
Rapise User's Guide
297
1. Copy the "accessible" directory (and all its contents) from the Qt SDK (used to build the
application under test) installation folder to the folder of the automated application (e.g. “Program
Files/Your-Application/plugins”). If you do not have access to the Qt SDK which the Qt application is
developed with, please contact the developer of the application and request the "accessible" directory
from him.
2. Create a file called "qt.conf" (or append if the file already exists) in the root directory of the
automated application (e.g. "Program Files/Your-Application") with following content (copy and
paste the following two lines):
[Paths]
Plugins = plugins
2.7.4
Java AWT/Swing
Purpose
Rapise supports the testing of Java applications using either the Abstract Window Toolkit (AWT) or
Swing graphic user interface toolkits. For maximum flexibility, Rapise can connect to your choice of
JVM.
Usage
In order to use a particular Java Virtual Machine (JVM) with Rapise you need to install Java Bridge into
it. Installation process consists of several simple steps:
1. Click the Options icon in the Tools group of the main Rapise ribbon. That will bring up the Options
dialog.
2. Click on the Tools > Java Settings button. This will launch the Java Bridge installation dialog:
3. Choose target JVM in the list of available Java machines and press Install button
4. Verify that installation is successful
© 2015 Inflectra Corporation
298
2.7.5
Rapise User Manual
Mobile Testing
Purpose
Rapise lets you record and play automated tests against native applications on a variety of mobile
devices using either Apple iOS or Android. Rapise gives you the flexibility to test your applications on
either real or simulated devices.
This section explains how to setup your environment for mobile testing, once that is done, you can
the go to the section that explains the process for using Rapise to actually perform mobile testing.
Rapise uses a third-party open-source tool called Appium (http://appium.io) that is used to actually host
the mobile devices and Rapise essentially communicates to the device via. Appium:
Testing Architectures
Rapise runs on Windows computers (PC) and Android devices (both real and simulated) can be tested
on either an Apple Macintosh (Mac) computer or a PC. Conversely, iOS devices (both real and
simulated) can only be tested on an Apple Macintosh (Mac) computer. So this means that there are
three separate possible testing environments that you may need to setup:
Using a Mac to Host iOS Devices. It will be necessary to install Appium and Apple Xcode onto the
Mac and connect to Appium over the network from Rapise running on your PC.
Using a Mac to Host Android Devices. It will be necessary to install Appium and Android Studio
onto the Mac and connect to Appium over the network from Rapise running on your PC.
Using a PC to Host Android Devices. You can either install Appium and Android Studio onto a
separate PC or you can simply use the same PC that is running Rapise. The only difference will be
© 2015 Inflectra Corporation
Rapise User's Guide
299
whether the URL used to connect to Appium is a localhost URL or one pointing to the other PC.
The steps for setting each of these will be described separately below:
1) Using a Mac to Host iOS Devices
The first thing you need to do is install Xcode from the Apple Mac app store. Make sure you include the
iOS SDK, and also the iOS Simulator if you intend to test simulated iOS devices.
(Please refer to the Apple tutorial https://developer.apple.com/library/ios/referencelibrary/GettingStarted/
RoadMapiOS/ if you are writing your first iOS application and need an introduction into how to develop for
iOS).
Since configuring Xcode to build and deploy an application to a physical or simulated iOS device is quite
involved, we have created a separate topic that explains the process.
Once you have the iOS environment configured, you need to do is go to the Appium website (http://
appium.io) and install the latest version of Appium. Once it is installed, you need to select the option for
iOS and click the Play button to start the Appium server:
© 2015 Inflectra Corporation
300
Rapise User Manual
You are now ready to start mobile testing of your iOS device.
2) Using a Mac to Host Android Devices
The first thing you need to do is go to the Appium website (http://appium.io) and install the latest version
of Appium. Once it is installed, you need to select the option for Android and click the Play button to
start the Appium server:
© 2015 Inflectra Corporation
Rapise User's Guide
301
Once that is installed, you will then need to install the Android SDK (you may already have it installed if
you are doing Android development). You can download it from: https://developer.android.com/sdk.
Once it has installed, you will use the Android SDK Manager to download and install the necessary
packages:
© 2015 Inflectra Corporation
302
Rapise User Manual
If you are going to be testing a physical Android device, you will need to do the following:
1. Make sure you have enabled Developer mode in the Android device itself:
a. Open Settings> About on your Android phone or tablet.
b. If you have a Samsung Galaxy S4, Note 8.0, Tab 3 or any other Galaxy device with Android 4.2,
open Settings> More tab> About and tap it.
c. If you have Galaxy Note 3 or any Galaxy device with Android 4.3, go to Galaxy Note 3 from
Settings> General> About and tap the Build version 7 times.
d. Now scroll to Build number and tap it 7 times.
e. After tapping the Build Number 7 times, you will see a message “You are now a developer!” If you
have a Galaxy S4 or any other Samsung Galaxy device with Android 4.2, the message reads as
follows- “Developer mode has been enabled”.
Now when you try and connect to the device using the Rapise mobile spy, you may get the following
message:
© 2015 Inflectra Corporation
Rapise User's Guide
303
This means you need to use a MacOS X Shell window to add a environment variable called
ANDROID_HOME and set it to the path of the installed Android SDK (typically something like /Users/
my.user/Downloads/android-sdk-macosx ).
If you want to test using the Android simulator,make sure you have installed it using the SDK manager.
Then you can launch (from the main menu of the Android SDK Manager) the Android Virtual Device
(AVD) Manager:
In this case you can just create the Android Virtual Device, Start it and then connect to it using Rapise.
You are now ready to start mobile testing of your Android device.
3) Using a PC to Host Android Devices
The first thing you need to do is go to the Appium website (http://appium.io) and install the latest version
of Appium. Once it is installed, you can start it up and click the Play button to start the Appium server:
© 2015 Inflectra Corporation
304
Rapise User Manual
Once that is installed, you will then need to install the Android SDK (you may already have it installed if
you are doing Android development). You can download it from: https://developer.android.com/sdk.
Once it has installed, you will use the Android SDK Manager to download and install the necessary
packages:
© 2015 Inflectra Corporation
Rapise User's Guide
305
If you are going to be testing a physical Android device, you will need to do the following:
2. Locate the Google Android USB drivers that came with the Android SDK (C:\Program Files
(x86)\Android\android-sdk\extras\google\usb_driver ) and when you connect your Android
device to the PC, choose to install these drivers rather than the standard ones.
3. Make sure you have enabled Developer mode in the Android device itself:
a. Open Settings> About on your Android phone or tablet.
b. If you have a Samsung Galaxy S4, Note 8.0, Tab 3 or any other Galaxy device with Android 4.2,
open Settings> More tab> About and tap it.
c. If you have Galaxy Note 3 or any Galaxy device with Android 4.3, go to Galaxy Note 3 from
Settings> General> About and tap the Build version 7 times.
d. Now scroll to Build number and tap it 7 times.
e. After tapping the Build Number 7 times, you will see a message “You are now a developer!” If you
have a Galaxy S4 or any other Samsung Galaxy device with Android 4.2, the message reads as
follows- “Developer mode has been enabled”.
Now when you try and connect to the device using the Rapise mobile spy, you may get the following
message:
© 2015 Inflectra Corporation
306
Rapise User Manual
This means you need to use the Windows control panel to add a System environment variable called
ANDROID_HOME and set it to the path of the installed Android SDK (typically C:\Program Files
(x86)\Android\android-sdk ).
If you want to test using the Android simulator,make sure you have installed it using the SDK manager.
Then you can launch (from the Windows Start Menu) the Android Virtual Device (AVD) Manager:
In this case you can just create the Android Virtual Device, Start it and then connect to it using Rapise.
You are now ready to start mobile testing of your Android device.
See Also
© 2015 Inflectra Corporation
Rapise User's Guide
307
Mobile Testing, for an overview of mobile testing with sub-sections on testing using iOS and Android.
Mobile Testing Tutorial - for a simple introduction to mobile device testing.
Mobile Settings Dialog - for information on setting up the different mobile profiles for the mobile
devices you will be testing
Mobile Object Spy - for information on how Rapise connects to the device and lets you view the
objects in the application being tested
Mobile Testing: iOS Setup - the steps for setting up Xcode and the iOS SDK for testing iOS devices
2.7.5.1
Mobile Testing: iOS Setup
Purpose
This section describes how to setup Apple Xcode for developing and deploying iOS applications to a real
or simulated device so that they can be tested by Rapise.
Make sure you have already installed XCode and the iOS SDK onto your Apple Mac as described in the
Mobile Testing parent topic.
This topic describes the process for building and deploying the sample AUTiOS application that comes
with Rapise, however it can be used equally well with your in-house application.
1) Get the AUTiOS Source Code
When you install Rapise, the sample AUT for iOS (AUTiOS) is placed in the following folder on your PC:
C:\Users\Public\Documents\Rapise\Samples\UsingMobile\AUT\AUTiOS
You will need to copy this folder across onto your Mac so that you can open it in Xcode.
Once you have done that, launch Xcode on the Mac:
© 2015 Inflectra Corporation
308
Rapise User Manual
Open the AUTiOS project and select the root node:
Before you can actually build and deploy this project, you will need to register for an Apple ID and setup
an Apple Developer account. You should check with your company to see if they have already joined the
Apple iOS Developer Program, if not, you will need to join yourself and become a member. You can
learn more about this at the Apple developer website: https://developer.apple.com.
2) Join Your iOS Development Team
Assuming that either you or your company already has signed up for the iOS Developer Program, you
will need to ask the administrator of your account (it might be you) to send an invitation to you if you are
not already a member. The link for accepting such an invitation is typically:
https://developer.apple.com/programs/start/jointeam/index.php?success=%2Fios%2Finvitation%
2Faccept.action
Click on this link and accept the invitation.
© 2015 Inflectra Corporation
Rapise User's Guide
309
Meanwhile, back in XCode Use the ‘Add an Account…’ to login with your Apple ID:
3) Building and Deploying on a Simulated Device
Now that you have signed into Xcode using your developer account, you can select a simulated device
and run the project on it:
© 2015 Inflectra Corporation
310
Rapise User Manual
Once you have selected the simulated iOS device you want to use, click the Product > Build option to
build the app for the targeted device. You can use the Run option to make sure that the app actually
launches on this device before testing it with Rapise.
Assuming that this is successful, you will see the AUTiOS running in the iOS Simulator:
© 2015 Inflectra Corporation
Rapise User's Guide
311
If you are only going to use Simulated devices (not recommended) then you can skip the next section
and just continue with setting up Appium, as described in the main Mobile Testing topic.
4) Building and Deploying on a Physical Device
Login with your Apple ID to http://developer.apple.com
Choose Certificates, Identifiers & Profiles:
© 2015 Inflectra Corporation
312
Rapise User Manual
Select Devices:
© 2015 Inflectra Corporation
Rapise User's Guide
Add your device's UDID to the list of registered iOS devices in the developer account:
You can find out the UDID by connecting it to the Mac and viewing the device inside Xcode.
© 2015 Inflectra Corporation
313
314
Rapise User Manual
Then, back in Xcode choose your physical device, and use the Product > Build and Run option to test
that the app launches on the device:
Example
You can find the iOS sample tests and sample Application (called AUTiOS) in your Rapise installation at
the following locations:
Sample iOS Tests:
C:\Users\Public\Documents\Rapise\Samples\UsingMobile\AppiOS (testing a native App)
C:\Users\Public\Documents\Rapise\Samples\UsingMobile\WebiOS (testing a web app)
Sample Application (AUTiOS)
C:\Users\Public\Documents\Rapise\Samples\UsingMobile\AUT\AUTiOS
See Also
Mobile Testing, for an overview of mobile testing with sub-sections on testing using iOS and Android.
Mobile Testing Tutorial - for a simple introduction to mobile device testing.
© 2015 Inflectra Corporation
Rapise User's Guide
315
Mobile Settings Dialog - for information on setting up the different mobile profiles for the mobile
devices you will be testing
Mobile Object Spy - for information on how Rapise connects to the device and lets you view the
objects in the application being tested
2.8
Extensibility
The Extensibility section is for experienced Rapise users who want to extend capabilities of the tool.
2.8.1
Tutorial: Custom Library
In this section, you will learn how to create a Custom Library and add support for a third-party GUI
control to Rapise. We will be using a demo application called CustomControlApp. Our Custom Library
will be simple. It will allow to Record and Learn objects of CustomListboxControl type and also
Playback actions for this type of objects. This tutorial is complemented by a ready test
CustomControlTest which you'll be able to examine and run.
Tutorial Data
CustomControlApp folder: C:\Program Files\Inflectra\Rapise\Samples\Extensibility\CustomLibrary
\CustomControlApp. You may build this application yourself in Microsoft Visual Studio (C++) or use
ready executable: <CustomControlApp folder>\Release\CustomControlApp.exe
CustomControlTest folder: C:\Program Files\Inflectra\Rapise\Samples\Extensibility\CustomLibrary
\CustomControlTest
CustomLibrary file: C:\Program Files\Inflectra\Rapise\Samples\Extensibility\CustomLibrary
\CustomLibrary.js
If you prefer active experimentation learning style you may first skip to subsection 9 and after playing
with the ready test and library start reading from the beginning.
1. Application Under Test
CustomControlApp contains an object of type CustomListboxControl. The control is similar to a singleselect listbox, but each line item has a corresponding progress bar indicator indicating a current value.
Using the left/right cursor keys you can change the value of the currently focused item.
© 2015 Inflectra Corporation
316
Rapise User Manual
If you will try to record a test for CustomControlApp using just Generic library you'll see that
CustomListboxControl is treated as Simulated Object and all interactions with it are recorded as
mouse clicks and key presses. For some tests such functionality is sufficient, but if you want to be
able to recognize CustomListboxControl as a list, get its items, select an item by name, set value for a
particular item you need to create a Custom Library.
2. LibUser
A good place to start implementing a Custom Library is empty LibUser library included into Rapise. All
Rapise libraries live in C:\Program Files\Inflectra\Rapise\Engine\Lib folder and LibUser is not an
exception. LibUser library consists of two files:
1. C:\Program Files\Inflectra\Rapise\Engine\Lib\LibUser.jslib which is a library declaration file.
2. C:\Program Files\Inflectra\Rapise\Engine\Lib\LibUser\LibUser.js which is a library definition file.
© 2015 Inflectra Corporation
Rapise User's Guide
317
3. Open Engine.sstest
Open the Engine.sstest project in Rapise (it is usually located in the C:\Program Files (x86)\Inflectra
\Rapise\Engine folder). Then find LibUser.js in the project tree and open it. You are about to start
implementing a Custom Library to support CustomListboxControl.
4. Analyze CustomListboxControl in Spy
Launch CustomControlApp and open Spy. Using the Accessible option in the Spy tool, spy on the
CustomListboxControl. It is easy to see that CustomListboxControl has the following accessibility tree:
ROLE_SYSTEM_WINDOW top node contains ROLE_SYSTEM_LIST child that in its turn may contain
zero to many ROLE_SYSTEM_SLIDER nodes.
© 2015 Inflectra Corporation
318
Rapise User Manual
5. Create Matcher Rule for CustomListboxControl
With knowledge of CustomListboxControl accessibility tree we can create a matcher rule that will
make CustomListboxControl recognizable by Rapise. Write the following code into LibUser.js:
new SeSMatcherRule(
{
object_type: "CustomListboxControl",
object_flavor: "List",
behavior: [Win32ItemSelectable, Win32CustomListboxControl],
role: "ROLE_SYSTEM_WINDOW",
or_rules: [
{
role: "regex:ROLE_SYSTEM_LIST",
save_to: "list",
or_rules: [
{
role: "ROLE_SYSTEM_SLIDER",
zero_to_many: true,
save_to: "items"
}
]
}
]
});
Each matcher rule (instance of SeSMatcherRule) is a tree like structure that describes a particular GUI
control type. Each node in this tree is a rule object that is defined by the following simplified grammar:
or_rules: (rule)+
© 2015 Inflectra Corporation
Rapise User's Guide
319
and_rules: (rule)+
rule:
role
[save_to]
[zero_to_many]
[or_rules]
[and_rules]
object_type: the string that uniquely identifies this matcher rule and designates type of the control
object_flavor: visual type of the control, it is used to show an appropriate icon in the Object Tree
and to filter actions and properties in composite behavior patterns (like in Adobe Flex, see
FlexActions.js)
behavior: array of behavior patterns that define object actions, properties and events.
role: accessibility role of the corresponding node in the accessibility tree of the control. The role
equals to a Role of the accessible element as displayed in the Spy.
or_rules: array of rules (defining child nodes) joined with logical OR. Any OR rule can be satisfied to
consider child nodes matched.
and_rules: array of rules (defining child nodes) joined with logical AND. All AND rules must be
satisfied to consider child nodes matched.
save_to: SeSObject created for accessibility tree node corresponding to this rule is assigned to the
field with "save_to" name of the top level SeSObject. I.e. if rule has save_to: "items" element then
you can access learned element using SeS('ObjID').items. In many cases such named fields are
used in behavior patterns.
zero_to_many: if this property is present in the rule and set to 'true' then it means that parent rule
may contain from zero to many of child nodes that match this rule.
6. CustomListboxControl Behavior
After defining the matcher rule we can proceed to behavior patterns. Behavior patterns operate with
SeSObject contents, so they should not be aware about accessibility tree of the underlying GUI control
and thus the same behavior pattern can be assigned to different matcher rules. There are a plenty of
behavior patterns defined in SeSBahavior.js. After looking at those patterns it is possible to notice that
Win32ItemSelectable pattern is the one that perfectly suites for capturing selection accessibility events
and for selecting list items. This pattern contains OnSelect event that is called during recording when
an item is selected in list and DoSelectItem action used to select desired item during playback.
But using just Win32ItemSelectable behavior pattern is not sufficient. It does not support recording of
progress bar value change events and it does not support setting progress bar value during playback.
That is why we need to define new behavior pattern: Win32CustomListboxControl. Look at its code:
var Win32CustomListboxControl =
{
actions: [
{
actionName: "SetItemValue",
DoAction: function(/**String*/ itemName, /**Number*/ value)
{
var item = this.findItemByName(itemName);
if(null!=item)
{
item.getTopObject().instance.HWND.SetForegroundWindow();
item.instance.Value = value;
return true;
© 2015 Inflectra Corporation
320
Rapise User Manual
}
return false;
}
},
{
actionName: "GetItemValue",
DoAction: function(/**String*/ itemName)
{
var item = this.findItemByName(itemName);
if(null!=item)
{
return item.instance.Value
}
return null;
}
}
],
events:
{
OnValueChange: function(/**SeSObject*/ param)
{
var itemName = param.name;
if(l2)Log2("OnValueChange:"+itemName);
var item = this.findItemByName(itemName);
if(null!=item)
{
var value = item.instance.Value;
RegisterAction(this, param.name, "SetItemValue",
parseInt(value), "Set item:'"+param.name+"' to "+value+" in '"+this.name+"'");
}
return;
}
}
};
During recording process OnValueChange function captures progress bar change events and calls
RegisterAction function that adds SetItemValue action to the test.
7. CustomListboxControl Specific Accessibility Events
What accessibility events are fired when a user changes the progress bar value? You can use Spy to
find out. Launch CustomControlApp and open Spy window. Spy on CustomListboxControl. Choose
Monitor Events...
© 2015 Inflectra Corporation
Rapise User's Guide
321
You will see Accessible Events dialog:
Select an item in CustomControlApp and advance its progress bar using right key. Accessible Events
dialog will show you captured events:
© 2015 Inflectra Corporation
322
Rapise User Manual
You can see that changing progress bar leads to generation of EVENT_OBJECT_VALUECHANGE
events.
Not all accessibility events a processed and propagated by Rapise engine.
EVENT_OBJECT_VALUECHANGE is one of such events. To consume this event and make an
appropriate call to OnValueChange of Win32CustomListboxControl you need to add and register
custom accessibility event handler :
function CustomRegisterAccessibleEvent(evt, etxt)
{
if(etxt.indexOf("EVENT_OBJECT_VALUECHANGE")>=0)
{
var ao;
try
{
ao = evt.AccessibleObject;
if(!_SeSisValidObject(ao)) return false;
}
catch(e)
{
Log("Error getting event object:"+e.Description+"/"+etxt);
return false;
}
var ro = SeSCacheAccessibleObject(ao);
if (l3 && ro) Log3("CustomListboxControl: " + ro.toString());
if (ro != null && ("OnValueChange" in ro))
{
ro.OnValueChange();
}
return true;
}
return false;
}
g_customEventHandlers.push(CustomRegisterAccessibleEvent);
© 2015 Inflectra Corporation
Rapise User's Guide
323
8. Record and Playback
Now you are ready to record and playback a test. Just remember that in Select an Application to
Record dialog you need to uncheck Auto library and select User and Generic libraries.
9. CustomControlTest
This tutorial is complemented by a ready test CustomControlTest which you can examine and run.
Open CustomControlTest in Rapise and place contents of CustomLibrary file into LibUser.js file (C:
\Program Files\Inflectra\Rapise\Engine\Lib\LibUser\LibUser.js). LibUser.js is added to
CustomControlTest, so you can populate it with CustomLibrary code right in Rapise.
Tip: It is possible to launch CustomControlApp right from Rapise, just double click on
CustomControlApp.exe in the project tree.
10. Wrap-up: Implementation Sequence
Full support for a custom object requires support for Record, Learn and Playback. Let's go over created
library and specify the purpose of each component in it.
Matcher Rule:- it is used to recognize the object inside an application, required for Record, Learn
and Playback.
Events in Behavior Patterns: handling events is required for Record.
Actions in Behavior Patterns: actions are used to examine or change state of the control, required
for Playback.
Custom Accessibility Event Handler: required for Record if some important events are not
© 2015 Inflectra Corporation
324
Rapise User Manual
processed by Rapise engine as needed.
© 2015 Inflectra Corporation
Index
Index
-D-
About this Guide
6
Accessible Events Dialog
192
Accessing Functions
109
Action
89
Active Accessibility
192
Add File
268
Add Web Service
193
Adobe Flex
31
Analog Recording
81
Assert
113
Automated Reporting
103
Data
External
114
Data-Driven Testing
114
Debugger
External
124
Internal
121
Default Layout
278
Defining Functions
109
Dialogs
6, 192
DLL functions
invoking
131
DLL objects
creating and using
131
DLL Testing
131
-B-
-E-
-A-
Breakpoints
123
-CCall Stack
270
Checkpoint
187
Create
113
Checkpoints
271
Code Completion
128
Code Folding
126
COM Testing
132
Command Line
100
Component Object Model
132
Content View
199
Control Execution
122
Create a new Recording Library
88
Create a New Test
276
Create File
268
Create New Test
193
Create Sub-Test
198
Cross-Browser Testing
294
Custom Library
88
Custom Recording Library
88
Custom Strings
132, 220
© 2015 Inflectra Corporation
Engine
118
Enter Filter Criteria
199
Entry Point
278
Errors View
201
Events Dialog
192
Examples
9
Execution
99, 100
Execution flow
122
Exeuction
Pause
123
External Data
114
External Debugger
124
External Files
112
-FFeatures
6, 75
Filter Group
269
Filter Report View
105
Find
202, 203, 204
Find and Replace Dialog
Find Results View
203
Find Text Dialog
204
Functions
109
202
325
326
Rapise User Manual
Object Properties
227
Object Recognition
102
Object Spy
91, 261
Object Tree
222
Objects File
108
Open
276
Open a Test
276
Open File
268
Options Dialog
223
Output Verbosity
125
Output View
226
Override Action
89
Overview
8
-GGetting Started
Global Variables
Guide Overview
6, 7
111
6
-IIDE
120
Include External Files
112
Including Functions
109
Internal Debugger
121
-P-
-JJava Testing
297
Javascript IDE
120
Pause Execution
Playback
99
Properties Dialog
-L-
-Q-
Learning
79
Library
86
Qt Framework
294
-NNameValue Collection Editor
Naming Conventions
109
New Group
268
New Test
193, 276
NUnit
134
-OObject Learning
79
Object Locator
102
Object Manager
97
227
296
-R-
-MMbUnit
133
Menus
6, 192
Meta Data
132
Multiple Recordings
90
Multiple-Browser Testing
123
220
Rapise Overview
8
Recording
77
Recording Activity Dialog
228
Recording Library
86
Regex
112
Regression Testing
187
Regular Expressions
112
Replace
202, 231
Replace Text Dialog
231
Report
103, 239
Filtering
105, 199
Writing
104
Report Viewer
232
Re-record
90
REST Web Services
137
REST Definition Editor
233
Tutorial: REST Web Services
Restore Default Layout
278
Restore Layout
278
Ribbon
Debugger
242
40
© 2015 Inflectra Corporation
Index
Ribbon
Edit
241
Report
239
REST 245
Spreadsheet
Test
236
-UUnit Testing
131
User File
108
240
-V-
-SSample Projects
9
Sample Tests
9
Screen Capture
253
Scripting
107
ScriptPath
254
Select an Application to Record Dialog
SeS Spy Dialog
261
Settings View
250
Simulated Object
85
Source Editor
254
Spira Dashboard
256
SpiraTest Integration
174
Spreadsheet Viewer
255
Spy
91, 261
Start Page
255
Sub-Test
198
Syntax Checking
127
Syntax Errors
273
Syntax Highlighting
126
-TTAP
135
Test Anything Protocol
135
Test Entry Point
278
Test Files View
268
Test Function
108, 278
Test Script
108
TestFinish Function
108
Testing DLLs
131
TestInit Function
108
TestPrepare Function
108
Text Editor
254
The Test Script
108
Tooltips
122
Tutorial
12, 31
© 2015 Inflectra Corporation
247
Variable View
270
variables
query value
122
view values
270
Verbosity
125
Verify Object Properties Dialog
Views
6, 192
-WWarning View
273
Watch View
273
Web Service Testing
136
REST Web Services
137
271
327