1
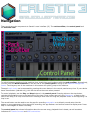
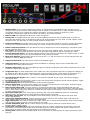
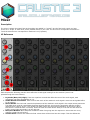
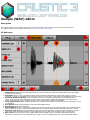
10. Selection end cursor: This determines the start point of the selection for future sample operations. To place
this cursor touch anywhere inside the lower light gray area (9) below the waveform view (11) and drag.
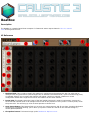
11. Waveform view: Displays the sample data for the loaded waveform. Touch and drag inside this area to pan
the sample, pinch to zoom in or out and double-tap to reset zoom and cursors to their defaults. Once zoomed in
far enough, orange boxes will appear, allowing the user to directly manipulate individual sample points.
12. Snap buttons: In each corner of the Waveform view (11), there are arrows.
❍
Touching the top-left arrow will move the Start cursor to the previous zero-crossing in the signal.
❍
Touching the top-right arrow will move the Start cursor to the next zero-crossing in the signal.
❍
Touching the top-left arrow will move the End cursor to the previous zero-crossing in the signal.
❍
Touching the top-right arrow will move the End cursor to the next zero-crossing in the signal.
13. Amplitude ruler: Shows how signal amplitude relates vertically.
14. Cancel button: Exits the sample editor without using any of the modifications made within the sample editor session.
15. Done (confirm) button: Exits the sample editor and tell the launching machine to update its sample data to
the result of the edited sample.
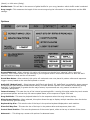
Menus
File
Load: Brings up a file browser which you can use to select a WAV file to load into your sample editor.
Rename: This lets you change the name or label associated with this sample in the machine that launched it.
Save As: Lets you save out this sample as a new WAV file or overwrite an existing WAV file.
Save Sel.: Lets you save only the selected portion of the sample out to a WAV file.
Info: Displays information about the sample. (file name, duration, bit depth and sampling rate)
Edit
Undo (redo): Reverts (or re-does) the last action performed in the sample editor.
Remove: Deletes the selection portion of the sample and joins up the remaining sample on both sides.
Cut: Same as remove (above) but places the deleted portion into the clipboard for pasting later.
Copy: Place the selected portion of sample into the clipboard without affecting the existing sample.
Paste: Inserts the content of the editor clipboard at the point marked by the edit (orange) cursor. This moves
any sample content following the edit cursor to after the inserted sample data.
Paste Mix: Mixes the content of the editor clipboard with the waveform at the point marked by the edit
(orange) cursor. This doesn't move the existing sample content but rather combines it with the clipboard content.
Crop: Trims the sample to only include the portion which is selected (deletes everything before and after
the selection).
Mute: Replaces the selected sample portion with silence.
Process