1
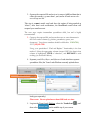
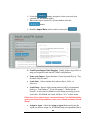
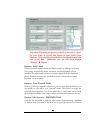
customize them any way you wish, the more detailed statuses the better you
can filter and sort your leads.
Status titles can range from a location, an import name, a price point, etc.
You will be able to filter these statuses to view all leads with a specific status.
Please note: You are able to drag and drop all statuses in any
order you choose - the order of which adjusts on the manage
leads page as well for easier, more convenient navigation.
Filters Overview
Filters: Sort by:
By selecting any of the filters listed you will be able to view specifically the
criteria you selected. The page will refresh once selected and the leads will
appear based on that sort option. This is beneficial for your mass calls or
emails. By clicking on the check all you can easily mass email all leads, start
a dial session with all leads, share, trash or transfer by selecting the buttons
at the bottom of the page. You will notice you can filter the amount of leads
viewable per page, which will allow you to email or call more than the
defaulted 20 that appear.
Filters: Show by Status:
This will display only leads that have a specific status. You can display
more than one status at a time by clicking on multiple statuses. This
allows you to drill down on specific leads based on their status.
Filters: Search by:
This search bar allows you to type in the email, name and phone number
of any lead you are searching. As you type this information the lead data
will auto populate. Notice you can filter by active, trashed or all leads here.
By default the search bar is set to active leads only.
Icons: Statuses
This icon appears as a colored dot, and appears to the right of the leads
name on the manage leads page.
When hovering over it will display the name of the status. These statuses
are reflected on the lead profile page as well once the page is refreshed
Icons: Add a call log
11