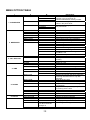
1
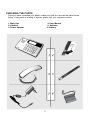
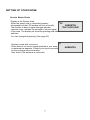
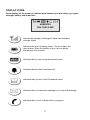
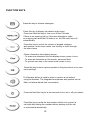
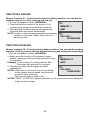
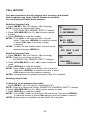
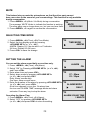
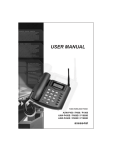
1
INTRODUCTION
The Fixed Wireless phone operates through a wireless connection instead of a landline
phone cable, enabling the subscriber to set up the phone anywhere wireless service
is available.
Axesstel CDMA 2000 Fixed Wireless Phone provides high quality and
superior performance with many features such as excellent voice quality, World clock,
Calculator, speaker phone, one-touch dialing and short message service.
A large 3-line liquid crystal display provides a user-friendly interface for quick and easyto-understand information display.
FEATURES
1. Speaker Phone with Hands-Free Dialing
2. Signal Strength Indicator
3. Redial
4. Volume Control
5. Rubber Keypad with Backlit
6. Battery Power Backup
7. LCD Screen with Backlit
8. One-touch
9. Automatic Sending
10. Phone Book
11. Short Message Service
12. FM Radio with Programmable Preset (Optional, PX110F.PX120F.PX130F Only)
13. World Clock and Calculator
2
TABLES OF CONTENTS
Advanced Features
Changing Greeting Message……….. 32
System Reset ………………………... 32
Restricting Use of the Phone ………. 33
Locking / Unlocking the Phone …….. 33
Changing the Lock Code…………… 34
World Clock ………………………… 34
Calculator…………………………… 34
Safety Precautions……………………… 4
Checking the Parts ………………………5
Setting up Your Phone ……….……….. 6
Getting to Know Your Phone ……….… 8
Display Icons ……………………………. 9
Function Keys…………………………... 10
Basic Operation
Making Calls ....………………………… 12
Redial……………………………………. 12
Receiving Calls ………………………… 13
Adjusting Volumes …………………….. 14
Choosing the Ring Tone ……………… 14
Message Service ..……………………. 15
FM Radio(Optional) ……………………. 18
Phone Book
Internal Phone Book……………………
Storing in phonebook ………………….
Searching for Entries in Phonebook….
Erasing an Entry in Phonebook ….…..
Erasing All Entries in Phonebook ....…
One-Touch Dialing ………………….…
Two-Touch Dialing ………………….…
20
20
21
23
23
24
24
Useful Features
Call History..........................................
Displaying Your Phone Number..........
Setting up Your LCD…………….…….
Mute……………………………….…….
Selecting Time Mode………………….
Setting the Alarm………………………
Checking and Clearing Call Times…..
Setting Warning Alerts………………...
26
27
27
28
28
28
29
30
Optional Features
Call Forwarding …………………….... 36
Call Waiting ………………………….. 36
Three-Way Calling…………………… 36
Miscellaneous
Menu Table …………………………… 38
Specification ………………………….. 39
3
SAFETY PRECAUTIONS
1. Avoid placing the phone in a dusty location, or near a source of gas or fire.
2. Don't Shake, hit or drop the phone.
3. To clean the outside of the phone, use only a soft, dry cloth. The chemicals
in alcohol, benzene or acetone can damage the surface of the phone.
4. Do not twist or pull the cord out of the phone.
5. Do not disassemble the phone.
6. Do NOT use the power adaptor if:
- The power cord is damaged.
- The phone has been dropped or damaged in any way.
7. Use only the AXESSTEL provided adaptor for the phone. Do not use the AXESSTEL
adaptor for any other purpose.
8. Use only the AXESSTEL provided antenna. Do not use the antenna for any
other purpose.
9. Frequency and length of use can affect the life of the self-charging battery.
Contact your customer service if the battery is not operating properly.
10. Use only the designated self-charging battery. Dispose of exhausted batteries
properly. Never discard a battery in or near fire or flame.
11. Do not place the telephone near water, for example, near a bathtub, sink, wet
basement, or swimming pool.
NOTE 1: The input and output voltages are indicated on the adapter.
(Input: AC 100~240V, 50~60 Hz, Output: DC 5.5V, 1A)
4
CHECKING THE PARTS
Once you have unpacked your phone, make sure that you have all the parts shown
below. If any piece is missing or broken, please call your customer service.
1. Main Unit
2. Handset
3. Power Adaptor
4. User Manual
5. Antenna
6. Battery
5
SETTING UP YOUR PHONE
Installing the phone
This phone operates by receiving DC power from the AXESSTEL power adaptor
that connects to an electrical outlet. The phone is equipped with a rechargeable
battery as a back up in case of an AC power failure.
Desktop installation
Attach the handset
Connect the antenna
Plug the Power adaptor into an
appropriate Wall outlet
ON/OFF power switch is located
on the bottom side of the phone.
Please turn on the power switch to
"ON" for operation
And Press and Hold Power key
on the front side of the phone.
6
SETTING UP YOUR PHONE
Service Status Check
Display in the Service Area
When the power cord is connected properly,
all segments of the LCD window will turn on briefly.
The number of bars of signal strength indicator
(antenna icon) indicates the strength of service signal
of the area. The display will show the greeting with date
and time.
You can change the greeting. (See page 32)
Display in area with no service
When there is no service signal detected in your area,
no antenna bar appears. Contact your service provider
for the coverage area information.
Also check if the antenna is connected
7
AXESSTEL
THU 10/09 5:24P
AXESSTEL
GETTING TO KNOW YOUR PHONE
1. Antenna: Adjusting the position of antenna improves the sound quality of the call.
2. Menu/FM: Press to access the phone's menus.
Press and hold the key for a few seconds to start FM Radio.
(FM is optional. PX110F/PX120F/PX130F only)
3. Message: Press to retrieve messages.
4. Volume Key(-, +): Let you adjust sound levels and scroll through the menu options
and displays.
5. OK: Stores phone numbers, and any settings you select in the menu within the
phone's memory
6. Clear: Lets you clear your last entry.
7. Redial: Allows you to redial the last number
8. Power On/Off: Press and hold the key for a few seconds to turn on or off your phone
9. Speaker Phone: Turn on or off the speaker phone feature
8
DISPLAY ICONS
Icons display on the screen to indicate what features you are using, e.g. signal
strength, battery status and etc...
AXESSTEL
THU 10/09 5:24P
Indicate the strength of the signal. More bars indicates
stronger signal.
Indicates the level of battery power. The more bars, the
more power. When the battery is low, the icon blinks,
and an alert tone sounds.
Indicates that you are using the phone's menu.
Indicates that the alarm has been set.
Indicates that you are in the Phonebook menu.
Indicates that you have text message or a voice mail message.
Indicates that a voice or data call is in progress.
9
FUNCTION KEYS
Press this key to retrieve messages.
Press this key to display the phone's main menu.
Press and Hold this key to turn on or off the FM radio.
If there is an incoming call or if the user attempts to make
an outgoing call while the FM radio is on, the FM radio turns off
automatically
Press this key to control the volume of keypad, earpiece
and speaker. In the menu mode, use this key to scroll through
the menu items.
Clears information from display screen.
- To erase one character from the display screen, press it once.
- To erase all characters on the screen, press and hold.
- To go back one step in the menu mode, press it once
Press this key to store a phone number in the phone book or to save
menu settings.
The Speaker button is used to place or receive a call without
using the handset. The integrated microphone and speaker on the
Main unit allows hands free conversation.
Press and hold this key for a few seconds to turn on or off your phone
Press this key to redial the last number called or to connect a
call right after dialing the number without waiting until the call
is connected automatically.
10
Basic Operation
Making Calls
Redial
Receiving Calls
Adjusting Volumes
Choosing the Ring Tones
Message Service
FM Radio(Optional)
11
MAKING CALLS
1. Make sure your phone is turned on.
PLEASE
2. Pick up the handset to hear a dial tone.
DIAL
When the phone fails to acquire service signal, you will
hear "No Service" tone (intermittent tone).
3. Dial the number to call. The LCD window displays
the number.
CALLING....
4. Wait for a moment for auto calling or press <REDIAL>.
02255558282
5. When the other person answers, begin conversation.
6. To end the call, replace the handset on the main unit.
NOTE1: Modifying a phone number while dialing.
- To erase the last digit entered: Press <CLEAR>.
- To erase the entire number: Press <CLEAR> and hold.
- To input symbol “+” : Press <0> and hold
NOTE2: Automatic calling
The phone was programmed to place a call automatically 4~10 seconds after last
digit entry. To disable automatic calling or change the delay time.
1. Press <MENU> , <0> , <1>.
2. Press <VOLUME KEY>(or <*>, <#>) to select different time or 'OFF',
then press <OK> to save. Once automatic calling is disabled, you have to
dial the number and press <REDIAL> to place a call.
REDIAL
Redial the last number you dialed.
1. Pick up the handset or press <SPEAKER>.
2. Press <REDIAL>.
NOTE: You may not redial when there is no last number dialed stored
in the memory. "NO LAST CALL!" message is displayed on the LCD.
12
RECEIVING CALLS
When there is an incoming call, the phone rings blinks
"Incoming Call" message on the display.
1. Simply pick up the handset or press <SPEAKER> to answer
the call.
2. To disconnect, replace the handset or press <SPEAKER>.
NOTE: When the ringer volume is set to 'Silent', the
phone does not ring. Only the "Incoming Call“
message blinks.
When the Caller ID service is activated.
Call ID Display
The Caller ID feature displays the caller's number when the
phone receives a call. If the caller's name and number are
linked together in the phone book, the caller's name is
displayed. Contact your service provider to activate this
feature.
NOTE: If the call is not answered, the phone displays the
“Missed Call" message with the call arrival date and
time.
13
INCOMING CALL
123-456-7890
INCOMING CALL
AMIT
MISSED 1CALL
THU 10/09 2:56P
ADJUSTING VOLUMES
You can control the sound volumes including the key tone,
Earpiece, speaker and the ringer
Adjusting key tone volume
Press <VOLUME KEY> repeatedly until it reaches proper volume.
KEY VOLUME
Adjusting external speaker volume
Press <VOLUME KEY> repeatedly during hands free call to
adjust external speaker volume.
Adjusting earpiece volume
Pick up the handset and press <VOLUME KEY> repeatedly
during a phone call to adjust earpiece volume.
Adjusting ring volume
1. Press <MENU> , <5> , <3>.
2. Press <VOLUME KEY>(or <*> , <#>) to adjust ringer volume.
3. Press <OK> to save.
NOTE: If 'Silent' is selected, the phone does not ring
when an incoming call comes in. Only the
"INCOMING CALL" message blinks on the display.
SPEAKER VOLUME
EARPIECE VOLUME
RING VOLUME
CHOOSING THE RING TONES
You can choose from twenty different ring tones.
1. Press <MENU> , <5> , <2>.
2. Press <VOLUME KEY> (or <*>, <#> ) to select ring type.
3. Press <OK> to save.
14
RING TONE
▶ TONE # 1
MESSAGE SERVICE
Message service is a network dependent feature and is available only when your
service provider supports it. Check with your service provider to ensure it is
providing message service before using this function.
Sending New Text Messages
1. Press <MESSAGE> . Press <1>(New Message).
2. Write message using the keypad. Toggle between uppercase,
Lowercase, and numeric by pressing <MESSAGE> button.
3. Press <OK>. Press <2> (Send).
4. Enter destination number and press <OK>.
5. Once the destination number has been entered, the message
will be sent.
NOTE: To change default message options, access Message
option menu.
1: NEW MESSAGE
2: INBOX
PHONE NUMBER
123_
HELLO_
Sending Saved Text Messages
1. Press <MESSAGE> , <5>(Saved MSG).
2. Select message to resend with <VOLUME KEY> (or <*>, <#>)
and press <OK>.
3. To edit the message press <MESSAGE>.
SENDING...
PLEASE WAIT...
Sending New Text Messages using Templates
1. Press <MESSAGE>. Press <4> (Templates).
2. Press <VOLUME KEY>(or <*>, <#>) to view and select the desired template.
3. Press <OK> to insert that template into the message body.
4. Continue to type in the rest of the message.
5. Press <OK>. Press <2> (Send).
6. Enter destination number and press <OK>.
15
Received Text Message
1. When text message arrives, e.g. 'MESSAGE! 10/12 4:04PM'
displays shortly and appears in the icon line.
2. Press <MESSAGE> ,<2>(Inbox).
3. Press <VOLUME KEY> (or <*>, <#>) to select message you
want to see and press <OK>.
4. The message, arrival time and call back number (if available)
Is displayed. If the message is long, it will be scrolled down
in 3 seconds automatically.
To scroll up and down manually,
press <VOLUME KEY> (or <*>, <#>).
5. If the message contains call back number and you want to
make a call to that number.
press <REDIAL> if you want to call back.
NOTE: If the call back number is stored in the phonebook
with a name, the name will display instead of the
phone number.
6. To forward the received message to another number,
press <MENU>.
7. To write a reply to the sender, press <MESSAGE>.
Delete Text Message
1. After reading the <MESSAGE>, Press <VOLUME KEY>
to erase the message.
2. Press <OK> to confirm erase.
MESSAGE!
10/12 4:04 P
1: NEW MESSAGE
2: INBOX
▶ 1: SUNNY
2: 0123456789
10/12 4 : 04 PM
FROM:0123456789
ERASE MSG?
▶
YES
THE MESSAGE
IS ERASED
Retrieving Voice Messages
1. When voice messages arrive, e.g. "VOICE MSG“
10/12 4:04 PM" shortly appears and <SMS ICON> appears
in the icon line.
2. Press <MESSAGE> ,<3>(Voice MSG) or press <OK>
to view message directly.
3. Press <REDIAL> to dial voice mail service center.
16
VOICE MSG
10/12 4:05A
3: VOICE MSG ▼
4: TEMPLATES
Erasing All Messages
1. Press <MESSAGE> , <7>(Erase MSG).
2. Select 'YES' with <VOLUME KEY> (or <*>, <#>).
3. Press <OK>.
Setting/Releasing Message Alert
1. Press <MESSAGE>, <8>(MSG Option), <1>(MSG Alert).
2. Select ON or OFF with <VOLUME KEY>(or <*>, <#>).
3. Press <OK>.
NOTE: While the message alert is set, the phone will alert
user when messages arrive.
ERASE ALL?
▶
YES
MESSAGE ALERT
▶
ON
Saving Sent Message
1. Press <MESSAGE>, <8> (MSG Option), <5> (Save Sent MSG).
2. Select "ON" or "OFF" with <VOLUME KEY> (or <*>, <#>).
3. Press <OK>.
While this option is turned on, outgoing new messages will be automatically
saved. Retrieve the saved messages by accessing Saved Message Menu.
Setting Message Priority Type
1. Press <MESSAGE> , <8> (MSG Option), <4> (MSG Priority).
2. Select "NORMAL" or "URGENT” with <VOLUME KEY> (or <*>, <#>).
3. Press <OK>.
Setting Message Auto Delete
1. Press <MESSAGE> , <8> (MSG Option), <6> (Auto Delete).
2. Select "ON" or "OFF“ with <VOLUME KEY> (or <*>, <#>).
3. Press <OK>.
When Auto Delete is enabled, the phone will automatically delete oldest received
messages in INBOX in case of full memory.
17
FM Radio (Optional, PX110F/PX120F/PX130F only)
Using FM Radio
1. Press and hold <MENU/FM> to turn on the Radio.
2. Entering Radio Mode, Preset Channel and Frequency
display
Ch 0
107.1 MHz
on the screen.
3. Press <*> or <#> lightly to move the preset channel.
4. Press<VOLUME KEY> to change the volume.
5. To stop FM Radio, Press <MENU/FM>.
NOTE 1: If the phone FM radio is ON and you lift the phone handset or there is an
incoming call, the FM Radio stops automatically, switching to the phone mode.
Also pressing <SPEAKER> to use Speaker phone stops the FM Radio.
NOTE 2: Power cord acts as FM Radio Antenna. For best reception, plug in the power
Cord to the phone while listening to FM Radio.
PROGRAMMING and USING PRESET
10 programmable presets are available.
1. Press<MENU/FM> to toggle between normal and preset modes.
2. In ”Preset Mode” the preset channel number and frequency
appear.
3. In “Preset Mode”, press <*> or <#> to change from
107.1 MHz
one preset channel to another
4. In “Normal Mode”, only the channel frequency appears.
Press<*> or <#> to increase or decrease the frequency.
Press and hold <*> or <#> to scan the next channel frequency.
5. In “Normal Mode”, press and hold Number key to store the radio channel
at the Number position.
Auto Preset
Press <REDIAL> button for automatic scan of available stations. Once the scan is
Performed, the phone will automatically store detected stations to 10 presets.
18
Phone book
Internal phone Book
Storing in phonebook
Searching for Entries in Phonebook
Erasing an Entry in Phonebook
Erasing all Entries in Phonebook
One-Touch Dialing
Two-Touch Dialing
19
INTERNAL PHONE BOOK
Your phone has an internal "Phone Book" in which you can store
up to 150 frequently used names and numbers.
STORING IN THE MEMORY PHONEBOOK
1. Press <MENU>, <1>.
2. Enter the name by pressing the alphanumeric keypad
and pressing <OK> after completed.
NOTE1: If you do not want to enter a name. just press
<OK> here. The number will be saved as
"No Name".
NOTE2: Name entry is limited to maximum of 16 letters.
NAME ?
_
PHONE NUMBER ?
_
How to Enter &Edit Texts
You can enter letters using the alphanumeric keypad.
Each button has 3 to 4 letters assigned. Each stroke on the button scrolls the assigned
alphabet letters and the numeric value. Stop pressing when the letter you want appears.
You can switch between uppercase, lowercase, and numeric characters by pressing
<MESSAGE>.
To enter special characters. Press <1> repeatedly.
For space, press <#>. To go back, press <*>.
A single stoke on <CLEAR> will erase the last letter in line.
3. Enter the telephone number and press <OK>.
MEMORY LOCATION
Up to 32 digits can be saved.
4. An empty location displays automatically.
SPEED DIAL : [01]
Press <OK> to save the number in the location.
5. To assign a different location, enter 2 digit location number and press <OK>.
NOTE:
If you select the location in which a number
has already been stored, “OVERWRITE?” will be
OVERWRITE ?
displayed. Press <OK> to overwrite or press
01 : SUNNY
to go back to automatic location.
6. “CONFIDENTIAL?” will be displays. Press <OK>
if no secret feature is necessary. To store the number in
secret, select ’YES’ by pressing <VOLUME KEY>
CONFIDENTIAL ?
(or <*>, <#>) and press <OK> .
NO
NOTE: Secretly saved number will not be displayed unless
the lock code is entered. One or two touch-dialing
secretly saved number will prompt lock code entry.
20
SEARCHING FOR ENTRIES IN PHONEBOOK
You can search information stored in the phone book in various
way and make a call directly from the phonebook.
Searching by Name
1. Press <MENU>, <1>(Phone book), <1> (Search),
<1> (Name).
NAME ?
_
2. Enter all or part of the name and press <OK>.
Example) Enter A and press <OK> to find all names
▶ 01 : LATA
02 : VISHAL
3. The phone displays the memory location numbers along
with the name of the first match.
LATA
022255558282
NOTE: “NO NAME MATCHES” appears when there is no
name matching with your entry.
4. Press <VOLUME KEY> (or <*>, <#>) to search for the name
you’re looking for and press <OK> to display the
number.
NOTE: “ENTER LOCK CODE” appears when you try to
Access secretly saved number. Enter lock code and
press <OK>.
ENTER LOCK CODE
____
5. Press <REDIAL> to dial the number displayed to make
a call.
CALLING....
02255558282
21
Searching by Phone Number
1. Press <MENU> (Phone book), <1>(Search),
<2>(Number).
2. Enter all or part of the number you remember and
PHONE NUMBER ?
press <OK>.
_
3. The phone displays the memory location and names
which contain your entry.
NOTE: “NO NAME MATCHES” appears when there is no number
matching your entry.
4. Press <VOLUME KEY> (or <*>, <#>) to search for the name
you’re looking for and press <OK> to display the number.
NOTE: “ENTER LOCK CODE” appears when you try to
access secretly saved number. Enter lock code and press <OK>.
5. Press <REDIAL> to dial the number displayed.
Searching by Memory Location
1. Press <MENU> , <1> (Phonebook), <1> (Search),
<3> (Location)
2. Enter the three-digit memory location. The phone
LOOK UP
displays the information of the memory location.
LOCATION
NOTE: “INVALID LOCATION!” displays when you enter
location number that is empty.
3. Press <OK> to display the number.
NOTE: “ENTER LOCK CODE” appears when you try to
access secretly saved number. Enter lock code and press <OK> .
4. Press <REDIAL> to dial the number displayed.
22
??
ERASING AN ENTRY IN PHONEBOOK
To Erase a Specific Number
1. Press <MENU>, <1> (Phonebook) and <3> (Erase).
2. Press one of search options, <1> (Name),
<2> (Number) or <3> (Location).
3. Enter name, address, or phone number according to
search option.
4. Select an item to erase by pressing <VOLUME KEY>
(or <*>, <#>) and pressing <OK>.
NOTE: “ENTER LOCK CODE” appears when you try to
access a secretly saved number.
Enter the lock code and press <OK>.
5. Press <OK>. again to erase.
6. Press <OK>. again to confirm.
To cancel, press <CLEAR>.
NAME ?
_
▶ 01 : AMIT
03 : SUNNY
AMIT
02255558282
ERASE?
#01
02255558282
- ERASED -
ERASING ALL ENTRIES IN PHONEBOOK
To Erase All Numbers in Phonebook
1. Press <MENU>, <8> (Security)
2. Enter lock code.
NOTE: Lock code is set as 0000 from the factory.
To change lock code see page 34.
3. Press <7>(Erase Names).
4. Press <OK> to confirm.
23
ENTER LOCK CODE
____
ERASE ALL NAMES
YES
ONE-TOUCH DIALING
Memory locations 01 ~ 09 are special one-touch dialing locations. You can dial the
numbers stored in 01~09 by pressing just one key.
1. Pick up the handset or press <SPEAKER>.
2. Press and hold the number of the location (1~9)
MEMORY 1
containing the number to be called for a moment.
3. The name and the phone number will appear and
AMIT
the phone dials the number automatically.
NOTE: Location 1 may be preprogrammed as emergency
number or voice mail. Please check with your
CALLING....
service provider.
02255558282
TWO-TOUCH DIALING
Memory locations 10 ~ 99 are two-touch dialing locations. You can dial the numbers
stored in 10~99 by pressing the first digit and pressing and holding the second digit.
1. Pick up the handset or press <SPEAKER>.
2. Briefly press the first digit of the memory location
number, then press the second digit and hold it down
MEMORY 23
for a moment.
AMIT
Example) To dial location 23, briefly press the <2>,
Then press <3> and hold for a moment.
3. The phone number stored displays and dials
automatically.
CALLING....
NOTE1: When you try one-touch or two-touch dialing
02255558282
for the number secretly saved, the phone will
prompt for Lock code entry.
Enter the lock code to make a call.
NOTE2: “EMPTY LOCATION” displays when you try one-touch or two-touch dialing with
empty location number.
24
Useful Features
Call History
Displaying Your phone Number
Setting up Your LCD
Mute
Selecting Time Mode
Setting Time Mode
Checking and Clearing Call Times
Setting Warning Alerts
25
CALL HISTORY
Your phone stores the last 30 outgoing calls, incoming, and missed
Calls combined (only when Caller ID function is activated).
You can display and redial these numbers.
Redialing Outgoing Calls
1. Press <MENU>, <3> (Call History), <3> (Outgoing)
NOTE: If there’s no outgoing call history.
“OUTGOING CALL MEMORY EMPTY!” displays.
2. Press <VOLUME KEY>(or <*>, <#>) to select number
to redial.
3. Press <REDIAL> to redial the number.
NOTE1: Press <OK> to see time and date of the call
made. Then press <REDIAL> to redial the number
or press <OK> again to save the number
in memory
NOTE2: To redial the last number called. Just pick up the
handset and press <REDIAL>.
1 : MISSED CALL
2 : INCOMING
▶ 01 : AMIT
02 : SUNNY
FRI 10/09 9: 45P
AMIT
Redialing Incoming Calls
1. Press <MENU>, <3> (Call History), <2> (Incoming).
NOTE: If there’s no incoming call record.
“INCOMING CALL MEMORY EMPTY!” displays.
CALLING....
2. Press <VOLUME KEY> or <*>, <#> to select number to
02255558282
redial.
3. Press <REDIAL> to redial the number.
NOTE1: Press <OK> to see time and date of the call arrival.
Then press <REDIAL> to redial the number or press
<OK> again to save the number in memory.
NOTE2: Incoming history is available only when caller ID is activated.
Redialing missed Calls
To display a list of missed received calls.
1. Press <MENU>, <3> (Call History), <1>(Missed Call).
NOTE: If there’s no missed call record, ‘MISSED CALL MEMORY EMPTY!” displays.
2. Press <VOLUME KEY>(or <*>, <#>) to select number to redial.
3. Press <REDIAL> to redial the number.
NOTE1: Press <OK> to see time and date of the call arrival. Then press <REDIAL>
to redial the number or press <OK> again to save the number in memory.
NOTE2: Missed history is available only when caller ID is activated.
26
Erasing Call History
1. Press <MENU>, <8> (Security).
2. Enter lock code.
NOTE: Lock code is set as 0000 from the factory.
To change lock code see page 34
3. Press <6> (Erase Logs).
4. Press <1> (Outgoing Clear).
5. Press <OK> to confirm.
Erasing missed and all logs use the same steps.
ENTER LOCK CODE
____
ERASE OUTGOING
YES
Call Timer Display
1. Toggle Call Timer Display.
2. Press <MENU>. Press <7> (Configuration).
3. Press <1> (Call Timer).
4. Scroll to select ON or OFF.
5. Press <OK> to confirm.
DISPLAYING YOUR PHONE NUMBER
Displaying Your Phone Number
1. Press <MENU>, <7> (configuration).
2. Press <6> (My phone Number).
MY PHONE NUMBER
02255558282
SETTING UP YOUR LCD
Set Timing for your LCD Back Light
1. Press <MENU>, <7> (configuration).
2. Press <3> (Back Light).
3. Press <VOLUME KEY>(or <*>, <#>) to set how long
your phone waits before the backlight turns off.
Setting your LCD Contrast
1. Press <MENU>, <7> (configuration).
2. Press <4> (Contrast).
3. Press <VOLUME KEY> or <*>, <#> to select contrast.
27
►
BACK LIGHT
10 SECONDS
CONTRAST
MUTE
This feature lets you mute the microphone, so that the other party cannot
hear your voice or the sound of your surroundings. This function is only available
during conversation.
1. Press <MENU>, <1>(Mute / Un-Mute) during conversation.
The message ‘MUTE’ blinks to indicate the function is working.
MUTE
The other party can no longer hear you, but you can hear them.
02255558282
2. Press <MENU>, <1> again to resume the conversation.
SELECTING TIME MODE
1. Press <MENU>, <4>(Time), <5>(Time Mode).
2. Select the time display mode by pressing
<VOLUME KEY> (or <*> , <#> ).
AM/PM: Display 0~12 hours with A or P indicator
24 Hour: Display 00~24 hours
3. Press <OK> to save the change.
▶
TIME MODE
AM/PM
SETTING THE ALARM
You can set the alarm sound daily or one time only.
1. Press <MENU>, <4>(Time), <1>(Alarm).
2. Select “ON” by Pressing <VOLUME KEY> (or <*>, <#>)
and Press <OK>.
3. Enter alarm time and press <OK>.
4. Select alarm mode by pressing <VOLUME KEY>
(or <*>, <#>) and press <OK>.
Daily: Alarm sounds daily.
One time: Alarm sounds once.
5. Enter the duration of the alarm by pressing <VOLUME KEY>
(or <*>, <#>) and press <OK>.
A bell icon appears in icon line. On alarm time,
the icon and “ALARM TIME” message blinks and alarm
activates. Press any key to stop the alarm.
Canceling the Alarm Time
1. Press <MENU>, <4>(Time), <1>(Alarm).
2. Select “OFF” by pressing <VOLUME KEY>
(or <*>, <#>) and press <OK> to store the setting.
28
ALARM
ON
▶
07 : 00am
22 : 32pm
ALARM MODE
▶
DAILY
ALARM SOUND TIME
1 MINUTE
CHECKING AND CLEARING CALL TIMES
Checking the Last call Time
1. Press <MENU>, <4> (Time), <2>(Last Call).
2. Press <CLEAR> to exit the display.
LAST CALL TIME
3:25
Checking Accumulated Incoming Call Time
1. Press <MENU>, <4> (Time), <3>(Total Time),
<1> (Incoming).
2. Press <CLEAR> to exit the display.
INCOMING CALL
3:25
Checking Accumulated Outgoing Call Air Time
1. Press <MENU>, <4> (Time), <3>(Total Time),
<2> (Outgoing).
2. Press <CLEAR> to exit the display.
OUTGOING CALL
12:26:32
Reset Accumulated Call Time
1. Press <MENU>, <4> (Time), <4> (Clear Call Time).
2. Press <STORE>.
29
CLEAR CALL TIME
YES?
SETTING WARNING ALERTS
You can set your phone to sound warning beeps that indicate:
- Each minute you are on a phone call
- When you are out of the service area
Setting/Releasing 1 Minute Alert
1. Press <MENU>, <5> (Sound), <4> (1 Min Alert).
2. Select ON or OFF by pressing <VOLUME KEY>(or <*>,<#>).
3. Press <OK>.
NOTE: When 1 minute alert is set, the phone gives alert sound
each minute while you are on a phone call.
Setting/Releasing Service Alert
1. Press <MENU>, <5> (Sound), <5>(Service Alert).
2. Select ON or OFF by pressing <VOLUME KEY>
(or <*>, <#>).
3. Press <OK>.
NOTE: When service alert is set, the phone gives alert sound
when the phone is acquiring or loses the service signal.
Setting/Releasing Connection Alert
1. Press <MENU>, <5> (Sound), <7> (Connect Alert).
2. Select ON or OFF by pressing <VOLUME KEY>
(or <*>, <#>).
3. Press <OK>.
NOTE: When service alert is set, the phone gives alert sound
When the call has been connected to the number dialed.
Setting/Releasing Voice Privacy Alert
1. Press <MENU>, <5> (Sound), <8>(VP Alert).
2. Select ON or OFF by pressing <VOLUME KEY>
(or <*>, <#>).
3. Press <OK>.
NOTE: When Voice privacy alert is set, the phone gives alert
sound when the voice privacy is on.
30
1 MINUTE ALERT
▶
OFF
SERVICE ALERT
▶
OFF
CONNECT ALERT
▶
ON
VOICE PRIV ALERT
▶
ON
Advanced Features
Changing Greeting Message
System Reset
Restricting Use of the Phone
Locking / Unlocking the Phone
Changing the Lock Code
World Clock
Calculator
31
CHANGING GREETING MESSAGE
This feature lets you change the greeting message that the
phone displays during standby mode.
1. Press <MENU>, <7> (Configuration).
2. Press <2>(Greeting). Current greeting displays.
3. Press <OK> to change greeting.
4. Enter your new greeting message with alphanumeric keys
NOTE: Press <MESSAGE> to switch between capital and
lower case
Example) to enter “My Phone”
Press <6>, <9>, <9>, <9>, <#>, <7>, <MESSAGE>,
<4>, <4>, <6>, <6>, <6>, <6>, <6>, <3>, <3>.
5. Press <OK> to save change.
1: CALL TIMER
2: GREETING
▼
MY Phon_
FRI
MY Phone
10/10
1:24A
SYSTEM RESET
To reset your phone settings to manufacture’s defaults, follow these steps:
1. Press <MENU>, <8> (Security).
2. Enter lock code.
NOTE: Lock code is set as 0000 from the factory.
FACTORY RESET
To change lock code see page 34.
YES
3. Press <8> (Factory Reset).
4. Select “YES” by pressing <VOLUME KEY> (or <*>, <#>).
5. Press <OK>.
6. “PHONE INTIALIZATION” blinks while the phone is
PHONE
resetting.
INTIALIZATION
To reset your phone settings to manufacture’s defaults and clear all user data,
follow these steps:
1. Press <MENU>, <8> (Security).
2. Enter lock code.
NOTE: Lock code is set as 0000 from the factory.
To change lock code, see page 34.
3. Press <9> (Phone Reset).
4. Select “YES” by pressing <VOLUME KEY> (or <*>, <#>).
5. Press <OK>.
6. “PHONE INTIALIZATION” blinks while the phone is resetting.
32
RESTRICTING USE OF THE PHONE
You can restrict the use of the phone by unauthorized persons
Restricting Outgoing Calls
1. Press <MENU>, <8> (Security).
2. Enter lock code.
NOTE: Lock code is set as 0000 from the factory.
To change lock code, see page 34.
3. Press <3> (Restrict), <1> (Outgoing).
4. Select ‘ON’ by pressing <VOLUME KEY> (or <*>, <#>).
5. Press <OK> to save change.
In this mode, when you try to call, “OUTGOING
CALL RESTRICTED” displays and no outgoing call
goes through.
1: OUTGOING ▼
2: INTERNATIONAL
OUTGOING CALL
▶
ON
OUTGOING CALL
RESTRICTED
Restricting International Calls
1. Press <MENU>, <8> (Security).
2. Enter lock code.
3. Press <3> (Restrict), <2> (International).
4. Select ‘ON’ by pressing <VOLUME KEY> (or <*>, <#>).
5. Press <OK> to save change.
In this mode, when you try to make an international
call (headed by 00), “INTERNATIONAL RESTRICTED”
displays and no outgoing goes through.
INTENATIONAL
▶
ON
INTERNATIONAL
RESTRICTED
LOCKING / UNLOCKING THE PHONE
You can lock your phone so that calls cannot be made by unauthorized
Persons. You can still receive incoming calls. Turning the phone off does
not unlock the phone; the phone stays in locked mode until you change it.
1. Press <MENU>, <8> (Security).
2. Enter lock code.
3. Press <4> (Auto Lock).
- LOCKED 4. Select ‘ON’ or ‘OFF’ by pressing
FRI 10/11 2:44P
<VOLUME KEY> (or <*>, <#>).
5. Press <OK> to save the change.
NOTE1: When locked, the phone displays “LOCKED”.
NOTE2: When locked, you have to enter the lock code to make a call.
NOTE3: You can still receive incoming calls.
33
CHANGING THE LOCK CODE
The lock code is preset to 0000 from the factory.
You can Change the lock code to any 4 digit number.
1. Press <MENU>, <8> (Security).
2. Enter lock code.
3. Press <1> (Change Code).
4. Enter your new lock code.
NOTE: The lock must be four numeric digits.
5. Press <OK>.
6. Re-enter new lock code for verification.
7. Press <OK> to confirm.
NOTE: CODE NOT MATCHED TRY AGAIN!” displays
if the second entry does not match the first entry.
ENTER NEW CODE
____
CONFIRM NEW CODE
____
WORLD CLOCK
Allows you to check the current major cities around
the world.
The screen shows the city name, current date and time.
1. Press <MENU>, <6> (Utility), <1> (World Clock).
2. Select the city corresponding to your time zone by
pressing <VOLUME KEY>(or <*>, <#>).
3. The local date and time are displayed.
1: WORLD CLOCK
2: CALCULATOR
FRI
San Diego
10/10
1:24A
CALCULATOR
Using this feature, you can use the phone as a
calculator. The calculator provides the basic
arithmetic functions: addition, subtraction,
multiplication and division.
1. Press <MENU>, <6> (Utility), <2> (Calculator).
2. Enter the first number using the numeric keys.
3. Use <*>, <#> to select a sign for calculation.
4. To calculate the result, press the <OK>.
34
1: WORLD CLOCK
2: CALCULATOR
253+35
=288
Optional Features
Call Forwarding
Call Waiting
Three-way Calling
35
Call Forwarding
Call Forwarding is a feature that lets you forward your incoming calls to another phone
number, even if your phone is turned off or is in no service area. Contact your service
provider to activate Call Forwarding.
Call Waiting
Call Waiting alerts you to a second incoming call while you are on the conversation.
When there’s another incoming call, you will hear warning beep. To respond to
the call waiting, press <REDIAL> or hit shortly the hook switch once.
Pressing <REDIAL> again or hitting the hook again will let you go back to the first call.
Contact your service provider to activate Call Waiting.
Three-Way Calling
Three-Way Calling is a feature that lets you set up a three-way conversation
with two different parties. While you’re in conversation with a party, hit the hook
switch and place another call with the third party. Then press <REDIAL> or hit the hook
switch again to connect the three parties together.
Contact your service provider to activate Three-Way Calling.
36
Miscellaneous
Menu Table
Specification
37
MENU OPTION TABLE
I
1. PHONEBOOK
II
SEARCH
STORE
ERASE
2. MESSAGES
III
NAME
NUMBER
LOCATION
NEW MESSAGE
INBOX
VOICE MSG
TEMPLATES
SAVED MSG
DRAFT MSG
ERASE MSG
MSG OPTION
NAME
NUMBER
LOCATION
MSG ALERT
MSG ALERT TYPE
SET REMINDER
MSG PRIORITY
SAVE SENT MSG
AUTO DELETE
EDIT TEMPLATE
3. CALL HISTORY
MISSED CALL
INCOMING
OUTGOING
ALARM
LAST CALL
TOTAL TIME
4. TIME
CLR CALL TIME
TIME MODE
INCOMING
OUTGOING
AM / PM
24 HOURS
RING TYPE
5. SOUND
6. UTILITY
7. CONFIGURATION
RING TONE
RING VOLUME
1 MIN ALERT
ON / OFF
SERVICE ALERT
ON / OFF
ALARM TONE
CONNECT ALERT
VP ALERT
WORLD CLOCK
CALCULATOR
CALL TIMER
GREETING
BACK LIGHT
ALARM TONE
ON / OFF
ON / OFF
ON/OFF
Always off/
10,30,60 seconds/
Always on
CONTRAST
Explanation
Used when searching for a phone
number in the phone book by
name/number/stored memory number
Used when storing a phone number and
name in the phone book
Used when erasing a phone number in
the phone book
Send a new message
Received SMS messages
SMS Services
Open pre-saved templates
Shows sent and failed messages
Shows stored new typed messages
Erase received messages
Set message alert
Set message alert type
Set message reminder
Set default message priority
Auto-save sent messages
Auto-Delete received messages
If INBOX is full
Edit default templates
Stores missed incoming calls
Stores phone numbers of calls received
recently
Stores phone numbers called recently
Alarm On / Off
Shows time duration of last call
Shows accumulated incoming call time
Shows accumulated outgoing call time
Resets accumulated call time
Time: AM/PM display mode
Time: 24 Hours display mode
Determines whether the phone alerts the
incoming call with sound or only with
message
Selects the ring type
Adjust ring volume
Beeps at one minute interval during
conversation
Beeps when the phone is getting out of
or entering service area
Selects alarm sound
Beeps when the call is connected
Shows time around the world
Use the phone as Calculator
Toggles call timer display
Change greeting
Set timing for back light
Set LCD Contrast
38
LANGUAGE
MY PHONE #
CHANGE CODE
EMERGENCY #
RESTRICT
8. SECURITY
AUTO LOCK
VERSION
ERASE LOGS
OUTGOING
INTERNATIONAL
LONG DISTANCE
ON / OFF
OUTGOING
INCOMING
MISSED
ALL CALL
ERASE NAMES
FACTORY RESET
PHONE RESET
Select your language
Show your phone number
Change Lock code
Show your emergency #
Restrict outgoing calls
Restrict international calls
Restrict long distance calls
Lock the phone
Show phone information
Erase outgoing calls history
Erase incoming calls history
Erase missed calls history
Erase all calls history
Erase all phonebook entries
Reset to default settings
Reset to default settings and clears user
data
SPECIFICATIONS
Frequency Range
PX110
PX110F
Rx: 462 ~ 468 MHz
Tx: 452 ~ 458 MHz
PX120
PX120F
Rx: 869 ~ 894 MHz
Tx: 824 ~ 849 MHz
PX130
PX130F
Rx: 1930 ~ 1989 MHz
Tx: 1850 ~ 1909 MHz
Channel Bandwidth
Stability of frequency
CDMA 1.25 MHz
0.4 ppm
External appearance (mm)
Weight
Sending output
Temperature of operation
Relative humidity
205 x 115 x 37 mm
500 g (with battery)
maximum 0.23W E.R.P
-20 ~ +50 degrees Celsius
5% ~ 90%
Input: AC 100~240V 50~60Hz
Output: DC 5.5V/1A
Standby
16mA (Slot Cycle Index: 2)
72 hours
Talk
2.5 Hours
Adapter
Battery
39