1
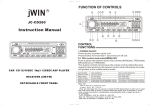
USER GUIGE
Characteristic
Catalog
◆Use the SD Card to store Message/Record/Music
Characteristic.................. ......................................................................... 1
INSTALLATION INSTRUCTION............................................................... 2
◆Voice Mail(leave message)/Extension Call Record/Scene(Live) Record/Music
Player
◆1 Group 30 Seconds OGM recorded message/play.
Parts' Function Instruction...................................................................... 3
LCD Screen Display Instruction.............................................................. 4
◆Extra long time conversation REC of basic phone and extension(about 120 hours
Setup before Using the Logger............................................................... 5
◆All REC could be stored into PC, and can be played.
Concise Function List................................................................................... 5
Date and Time Setting................................................................................ 6
AUTO REC TURN ON/OFF SETUP(must be with SD card).................. 6
CONVERSATION REC/PLAY(with SD card)............................................ 7
OGM(with SD card)....................................................................................... 7
REC for one 4G SD card)
◆Outer line remote to inquire message via password.
◆The calendar, date, temperature display in LCD.
◆Dual Caller ID Display: FSK/DTMF.
◆Support WAV form music play(MP3 files should change into WAV form bythe
software supplied)
◆Incoming Call Music Ring can be selected from “WAV music list”.
◆3 Alarm Clock Setup
Ringer times setup....................................................................................... 8
◆Contrast color of LCD can be adjusted.
Family Memo(with SD card)...................................................................... 8
◆8-level volume of ring and music can be adjusted.
Playback the Message(with SD card)....................................................... 8
S.REC/PLAY/PAUSE(with SD Card)............................................................ 9
Setting outside phone remote control password................................. 9
Remote Control Operation(with SD card).............................................. 10
Setting ring..................................................................................................... 10
Setting up the alarm clock.......................................................................... 11
Setting LCD brightness............................................................................... 12
VOL/SET.......................................................................................................... 12
MUSIC/DEL(with SD card)........................................................................ 12
LCD display..................................................................................................... 13
Earphone Function....................................................................................... 13
1
INSTALLATION INSTRUCTION
Parts' Function
Instruction
Power
1、Connect the line from the local Telecom Bureau with one port in our device.
2、Insert the SD card.
3、Connect the other port of our device with the Telephone Set.
4、Connect the DC Jack in our bottom part of telephone recorder with the Power
Adapter.
4、Setup the Time/Date.
Notice:
1. The 10th page: “Ring Times” setup for “On/Off about the Answering Mode”.
2. The 8th page: “Automatic Record” means “Coercive Telephone Record”.
3. Pls pull-off the power plug if you don't have the plan to use the embedded logger.
5
3 1
If you need add the Extension Phone, no more than 4 extensions, in
order to avoid the bad communication quality.
USE Instruction
1. Without the SD card, our device can not RECORD, nor music play. So pls don't
take out the SD card random.
2.After the power supply, if you need use the Answering Function, pls setup the
“Ring Times(pls refer the 10th page)”. For example, after Ring 10 times, no
body answer the call during this time(ring 10 times), then the device will go to the
“Automatic Answering mode” with the host message(OGM). 3.If the “Ring
Times” is【00】, means “close the answering function”.
4.You can set the “Ring Times” be from【03】to【12】, means “trigger the
answering function”.
Pls make the setting according to the following process before use:
1、Insert the SD Card, the device will automatically read the data in the SD card
before it being turned on.
will be displayed in the LCD. (Don't make
any operation before the SD card reading finished) After the reading finished, the
SPARE SPACE will be displayed in the LCD.
2、Pls set the “Host Message(OGM)” before use, if not the device will choose
the factory setting as the default one(as to the details, pls refer the 9th page.)
3、Set the "Ring Times"for the answering, you can trigger or close the answering
module. If you don't set the “Ring Times”, the default is with the “Answering
Function Opened” and need 12 Times Ring(after 12 times ring, it will go to the
“Automatic Answering Mode”). As to the details, pls refer the 10th page
.
2
2
4
15
6
7
8
9
14
10
11
13
12
Packing List:Answering and Telephone Recorder, 1pcs
Accessories:Telephone Cable, 1 pcs; User Manual, 1pcs.
Power Adapter, 1pcs; SD card, 1pcs(optional); Guarantee Card, 1pcs.
1
2
3
4
5
6
7
8
9
10
11
12
13
14
15
Extension Socket
Telecom Socket
Power Jack
Earphone Jack
Connect the extension line
Connect the line from Telecom Bureau
Connect the power
For music enjoy and to leave message
SD Card Socket
Insert the SD Memory Card(don't support SDHC)
Automatic REC/ Page Up Coercive Telephone Record / Page Up to inquire
Volume/ Setup
Adjust the volume size/Set function key
Play the music/Delete the info
Music Enjoy/ Delete
Record with Host Message
Host Message( OGM)
Message/ Exit
Play the Message & Exit
Manual Record/Play
Telephone Communication Record & Play
Scene Record/Play/ Pause Scene Live Record/Play the record/Pause
Page Down
Message Light
Display LCD
Page Down to inquire
Message Indicator Light
To display the info
3
LCD Screen Display Instruction
6
5
4
3
Setup before Using the Logger
1
15
Concise Function List:
All the settings must be made under the device's stand
by status(no call in nor call out)
LCD Display Function
2
P8
Alarm clock
setup
Press VOL/SET key over 3 sec+ press
A.REC/UP key once+ press VOL/SET key
P13
Press VOL/SET key over 3 sec+ press
A.REC/UP key twice+ press VOL/SET key
LCD Brightness Press VOL/SET key over 3 sec+ press
setup
8
9
10
11
12
13
14
2
3
4
5
6
7
8
9
10
SD Card Capacity
Display the capacity status in SD card. Tidy the info in time.
Caller Id Display
Alarm
Record
Play
Display the incoming caller id.
This icon will twinkle after your alarm setting.
This icon will twinkle when recording.
The icon for “Play”.
The icon will twinkle when press “Pause” during play
REC or Message.
1 1 Pause
1 2 Play ICM Message
The icon will twinkle when play the incoming message.
Icon will twinkle when play the family memo(notepad
message).
1 4 Host Message(OGM) Icon will twinkle when play the host message(OGM).
1 5 Temperature
Display the current Temperature.
1 3 Family Memo
4
A.REC/UP key three times+ press VOL/SET key
Remote pass Press VOL/SET key over 3 sec+ press
A.REC/UP key four times+ press VOL/SET key
word setup
Ringer times Press VOL/SET key over 3 sec+ press
setup
A.REC/UP key five times+ press VOL/SET key
Auto REC
on/off setup
REC & ICM Quantity Display REC & ICM(message) quantity? Is there NEW
or not?
Display what day is today.
Week Dispay
SD Card Reading
Display the status for SD Card reading
Time Display
Display the current Time
Date Display
Display the current Date
Page
Press VOL/SET key over 3 sec+ press
VOL/SET key
Ringer setup
7
1
Setup Operation
Time,date
setup
Press A.REC/UP key over 3 sec
P13
P14
P12
P12
P8
Press MSG/EXIT Key to exit the setup menu
SD Memory Card Use Instruction:
1. For the best performance, before use pls insert the SD card in the right direction(SD card
should be at unlock stataus), then plug in the special power adapter(DC 6-12V 500mA).
2. After the SD card and the power adapter finished, the logger will read the SD card data
automatically, the LCD will display
(don't make any operation during the reading
process, pls be patient). After the reading finished, LCD will
display the spare space and
3. If without the outer power supply, the device can not be used.
4. If there is no SD card inside, the device can not be used to REC or to play music.
5. The device just supports the SD card in FAT32 format. If not, pls change it to be FAT32
format via PC before use.
6. If the device doesn't work, pls pull off the power adapter and the outer power connection.
After 10 minutes, pls reconnect the power adapter and have a try.
7. 34 hours call can be recorded in the 1GB SD card via this device. It max support 4GB SD
card with 130-hour call recording. It does not support the SDHC memory card.
8. If you use your own new SD card(not ours), pls make sure its format is FAT32. And copy all
the files in our SD card(the ex-factory attached) to your new SD card. Don't change the files
name, to avoid the risk that the logger can not read the new SD card.
9. There is one Inquire Software “wavefile” in the ex-factory attached SD card. This
software can be used to enquire the REC files in the PC.
5
CONVERSATION REC/PLAY(with SD card)
Date and Time Setting
1.When standby,
press VOL/SET key
2.PressVOL/SET
3. Press A.REC/UP
4.Press
key again to enter
the time setting,
the LCD display:
or DOWN key to set
VOL/SET key to
year, month, day,
hour and minute.
confirm and enter
the next step(exit).
2010
over 3 seconds to
enter the setup menu.
Notice:
10 blink
1. The “standby” status means the telephone is hung up.
2. The signal from the local Telecom Bureau have two systems: FSK
and DTMY. If it's FSK in your area, the device's date and time will be
updated automatically when call in. If it's DTMF in your area, you
need set the date and time by yourself.
1.When the shunt-wound phone is at
off-hook status, press “REC/PLAY”
2.The shunt-wound phone enter
on-hook status or press “REC/PLAY”
key to start to record, and record icon
in LCD will appear, and LCD will
display recorded time.
key to exit and store the recorded
message, including the conversed
telephone number.
3.When the shunt-wound
phone is at on-hook status, press
“REC/PLAY” key once, it will
4.Press A.REC/UP or DOWN key to
play recorded forward or backward
conversation message.
play recorded message, LCD will
display recorded time, and play
icon in LCD will appear.
5.While playing, press
S.REC/PLAY/PAUSE key to pause,
AUTO REC TURN ON/OFF SETUP(must be with SD card)
6.Press MSG/EXIT key to exit.
and pause icon in LCD will appear.
Press MUSIC/DEL key twice to
delete this recorded message.
2. Press A.REC/UP or DOWN key to select On or OFF.
1.When standby,
press A.REC/UP for
LCD Display
: means “AUTO REC” and
“Extension Call REC” function are both opened.
3 seconds to enter
the switch setup, LCD
will display
it means “Auto REC”
functions is closed.
LCD Display
: means “AUTO REC” closed.
The default setting of “AUTO REC” when ex-factory
is “ON”.
The top left of the screen will display “A.REC” when
this function is opened.
3.When “A.REC” status, as long as there is conversation in the telephone,
the device will be in the record status automatically.
When “Record” status, press “REC/PLAY” key to exit the “Record”
status and store the recording file.
When the telephone is on-hook(hang up), the device will stop the recording and
store the recording automatically.
Screen Display: SRUNG , means the recording file is being stored.
Screen Display: DEL…, means the recording file is being deleted.
Screen Display: DEL FINISH, means that deleting file is finished.
6
OGM(with SD card)
1.When on-hook status, press OGM
2.While recording, press OGM key
key for 3 seconds, the device make a
sound “bee”, LCD display “00-00-30”,
the host should begin to record the OGM.
The LCD “00-00-30” will count down,
OGM icon in LCD will flight.
to exit and store this message.
3.Press OGM key once to play
OGM, at this time, press this key
again to exit, press MUSIC/DEL key
twice to delete this OGM. Torecord
an new OGM will replace the old one.
7
The fixed OGM in SD card
can't be deleted, it is a
default OGM. But it can be
replaced by new OGM.
注 意 : New OGM is deleted, the
default OGM in SD card
come back.
Ringer times setup
S.REC/PLAY/PAUSE(with SD Card)
1.When standby status, press
VOL/SET key for 3 seconds,
2.Then press A.REC/UP key 5 times,
till LCD display
enter into the setting.
3. Press VOL/SET key again to the
times setting. Press A.REC/UP or
DOWN key to select the ringer times.
The ringer times can be “00” or
“03-12” times.
Ringer times “0” means “close
the answering function.”
The default factory ringer times is
“00”(close).
Family Memo(with SD card)
1. When the shunt-wound phone is at
on-hook status, press MSG/EXIT key
2. While recording, press
MSG/EXIT key or the
for 3 seconds, then the device can record
the family memo. Both the record icon and
family memo icon will appear in screen.
And LCD will display recorded time.
shunt-wound phone enter
on-hook status will exit and
store the recording file.
1. When the shunt-wound phone is at on-hook
status, press S.REC/PLAY/PAUSE key for 3
seconds(long press), it will start to record the
scene voice. Record icon in LCD will appear
and LCD will display recording time.
3.At on-hook status, press this key
once to playback the scene recorded
message, LCD will display scene
recorded time and play icon in LCD
will appear.
5.While playing, press this key to pause
and pause icon in LCD will appear;
press MUSIC/DEL key twice to delete
2.While recording, the
shunt-wound phone enter
off-hook status or press
S.REC/PLAY/PAUSE key
exit and store the recorded
message.
4. Press A.REC/UP or DOWN
key to play forward or
backward scene recorded
message.
6. Press MSG/EXIT key to exit.
this recorded message.
Setting outside phone remote control password
Playback the Message(with SD card)
1. When the shunt-wound phone is at on-hook
status, press MSG/EXIT key, then the device will
2.Press A.REC/UP or
1.When standby status, press VOL/SET
2.Then press A.REC/UP key four
key over 3 seconds, for the setting.
times, LCD will display:
DOWN key to play the
playback the Message(both the outer line message
and home memo). The outer line message's
telephone No. or the home memo's recorded time
will be displayed in LCD. Both the play icon and
message icon will appear in the screen.
previous or the next
message.
3.And press VOL/SET key to enter the password setup mode. LCD will
3. While playing, press S.REC/PLAY/PAUSE
4.Press MSG/EXIT key
key to pause, the pause icon will appear in
the screen. Press MUSIC/DEL key two times
to exit the playback.
display: PCDE 888(the default password is 888) and first “8” blinks, press
A.REC/UP or DOWN key to revise password. After finished the first digit, press
VOL/SET key to revise the next digit. It will be the same way to revise the second
and third password. After finished three numbers, press VOL/SET key to exit this
setup mode.
to delete the message.
8
9
3. Then press VOL/SET key to enter the setup, LCD will display “RING OFF”,
Remote Control Operation(with SD card)
Remote control function open: when OGM is stored and ringer times isn't “0”,
ICM icon in LCD will appear, means this function open. If not, this function close.
Ⅰ. Outside Line Message Function.
When the phone rings times reach the setted ringer time(the default is 12 times:
the user can amend the ringer times), it will enter off-hook status automatically
and play OGM(if OGM isn't stored, the phone will not enter off-hook state and will
not auto-answer). After finished playing OGM, it will send “Di…” sound to
auto-enter outside line message record. During recording, if the phone receive
no voice for 10 seconds continuously or busy voice, the device will stop the
message recording and enter on-hook status automatically. When it recorded an
new message from outside line and this message wasn't been palyed, message
light will blink. NEW icon in LCD will blink, and display new message quantities in
LCD.
Ⅱ. Outside Line Remote to Check the Message Function.
When the outside line calls in our device, during playing OGM, the outside line
caller press “*” key, the phone will exit OGM and send"Di"sound, and remind
the caller to input password(within 20 seconds, it will auto-enter on-hook status
without any input). If the password isn't correct, the phone will send 2 "Di"sounds.
After the password is correct, the phone will play operation cue sound. During this
procedure, the phone receive “*” signal from the caller to stop the sound cue
and play the messages. While playing messages, please do operation according
to sound cue as follow:
1--Check message upwardly.
2--Check message backwardly.
#-- Quit remote control status.
While playing message, if the device doesn't receive any operation commands, it
will play messages from front to back automatically; press “*” to enter next
message automatically. It will auto-enter on-hook status on receiving a busy sound.
press A.REC/UP or DOWN key to select the relevant rings. (the default
setting is RING OFF)
Notice:
Rings include a fixed ringer and other music rings in SD card).
"RING OFF"on LCD means ring close(no ring); “RING 1” means
the inner fixed ring; “RING X” means other music rings in SD card.
Setting up the alarm clock
1. When standby status, press VOL/SET
2. Press A.REC/UP key, the
key over 3 seconds, for the setting.
LCD will display:
3. Then press VOL/SET key to enter
4. Then press VOL/SET key again
alarm setup(3 groups alarm can
to enter, LCD display: Rl1 OFF
"OFF" will blink. Press A.REC/UP
be set). LCD will display:
key to select OFF or ON.
6.After finished, press VOL/SET
5. After select ON, press VOL/SET
key, LCD will display “AL 1 12-00”,
press A.REC/UP key to set alarm
Setting ring:
key, LCD will display: RlNG
1
time(24 hours format).
2.Press A.REC/UP key two tiems,
1. When standby status, press
VOL/SET key over 3 seconds,
the LCD will display:
for the setting.
10
1. The setup modes of the second and third group clock are the same as the
first group setup.
2. To select “RING 1”, it is a default fixed alarm ring; select other alarm ring
with the effective SD card in it. This alarm ring is a kind of recorded voice.
If it is without recording voice, LCD will display “00-00-10”, it will enter
voice recorder timer for 10 seconds and start to record alarm ring voice.
注 意 : If recorded voice is stored inside SD card, LCD will display “RING REC”
and play this recorded voice.
11
LCD display:
Setting LCD brightness
030
1. When standby status, press VOL/SET
key over 3 seconds, for the setting.
2. Press A.REC/UP key three times.
Means there are 30 music songs
in SD card.
00-00-00
Display the music playing time.
LCD will display:
3. Then press VOL/SET key to enter the setup, LCD will display “LCD-3-”,
Earphone Function
and “3” blinks, press A.REC/UP or DOWN key to adjust LCD brightnes
rd
level(four LCD brightness levels for your selection, the factory defaut is the 3 ).
1.While playing music or playing record, insert earphone tie-in into earphone hole,
transfer voice into earphone, and use earphone to listen.
2.Earphone specification: 2.5mm.
VOL/SET
1.When standby status,
1.When it's in PLAY
status(including the
message play, the
recording play and
the music play),
2. Press VOL/SET key,
3. Press VOL/SET key
LCD will display:,
it means six volume
levels for your selection.
again, adjust the
appropriate ring volume,
there is eight levels for
your selection.
2. Press VOL/SET key,
3. Press VOL/SET key
LCD will display:, it
means six volume l
evels for your selection.
again, adjust the
appropriate ring volume,
there is eight levels for
your selection.
MUSIC/DEL(with SD card)
1)While playing message or playing record, press MUSIC/DEL key twice to delete it.
2)At normal(standby) status, press MUSIC/DEL key to play music. While playing
music, press S.REC/PLAY/PAUSE key to pause, press A.REC/UP or DOWN key
to select the favorite music.
12
13