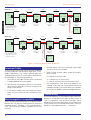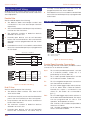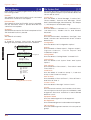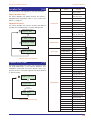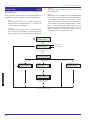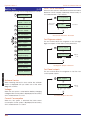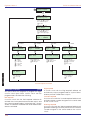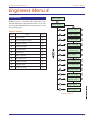
1
TS2500 1040 Zone Intruder Alarm Control System SYSTEM OPEN 17:30 01 Jan _ ~ A 1 2 B 4 5 3 6 C 7 8 9 D ENT 0 ESC Sett ing the Syst em E n t er y ou r pa s s c o de X X X X th en l ea v e th e p r o tec t e d a re a. Unsetting the System G o di r e ct ly to t h e k e yp ad an d en te r y ou r p as s c o d e X X X X . Resetting E n t er y ou r pa s s c o de X X X X f o ll ow e d by E N T the n 3 . Te l eph o n e y o u r a l ar m c o m pan y a nd fo ll o w th ei r i ns tr uc t io ns . ! OPEN _ ~ Se e U se r Ma n ua l A Part Set B 1 B ELL TES T 4 2 W ALK TEST 5 3 RE SET 6 Part Set NE W CODE CHIME 24 Hr OMIT C 7 8 9 0 ESC Part Set ZONE OM IT D ENT SILENT FULL S ET _ OPEN ~ Engineers menu 2 Select option :- Engineers menu 2 Select option :- _ ~ Installation & Programming Manual Contents System Overview System Architecture . . . . . . . . . . . . . . . . . . . . . . . . 1 Introduction. . . . . . . . . . . . . . . . . . . . . . . . . . . . . . . 2 Control Panel . . . . . . . . . . . . . . . . . . . . . . . . . . . . . 2 Remote Keypads . . . . . . . . . . . . . . . . . . . . . . . . . . 2 32 Character LCD (NETLCD) . . . . . . . . . . . . . . . . 2 8 Character Starburst (NETSTAR) . . . . . . . . . . . . . 2 4 Character LED (NETLED) . . . . . . . . . . . . . . . . . . 2 Remote Arming Station (NETARM) . . . . . . . . . . . . 2 Expansion Devices . . . . . . . . . . . . . . . . . . . . . . . . . 2 TS700 LEC . . . . . . . . . . . . . . . . . . . . . . . . . . . . . . 2 TS900 Node . . . . . . . . . . . . . . . . . . . . . . . . . . . . 2 XNode . . . . . . . . . . . . . . . . . . . . . . . . . . . . . . . . 3 TSLEC8 . . . . . . . . . . . . . . . . . . . . . . . . . . . . . . . . 3 TS900 ID Node . . . . . . . . . . . . . . . . . . . . . . . . . . 3 Other Devices . . . . . . . . . . . . . . . . . . . . . . . . . . . . . 3 Printer . . . . . . . . . . . . . . . . . . . . . . . . . . . . . . . . . 3 CPA6.OM Output Module. . . . . . . . . . . . . . . . . . 3 DC54/58/58M Digicom and Digi-modem . . . . . 3 TSNIB Networker Interface Board . . . . . . . . . . . . 3 Technical Specifications . . . . . . . . . . . . . . . . . . . . . 3 Control Panel . . . . . . . . . . . . . . . . . . . . . . . . . . . 3 LCD Remote Keypad . . . . . . . . . . . . . . . . . . . . . 3 Starburst Remote Keypad. . . . . . . . . . . . . . . . . . 3 LED Remote Keypad . . . . . . . . . . . . . . . . . . . . . 4 Arming Station . . . . . . . . . . . . . . . . . . . . . . . . . . 4 TS700 LEC . . . . . . . . . . . . . . . . . . . . . . . . . . . . . . 4 TSXNode . . . . . . . . . . . . . . . . . . . . . . . . . . . . . . . 4 TS900 Node . . . . . . . . . . . . . . . . . . . . . . . . . . . . 4 TS900 ID Node . . . . . . . . . . . . . . . . . . . . . . . . . . 4 TSLEC8 . . . . . . . . . . . . . . . . . . . . . . . . . . . . . . . . 4 System Design System Wiring . . . . . . . . . . . . . . . . . . . . . . . . . . . . . 5 Cable Segregation . . . . . . . . . . . . . . . . . . . . . . . 5 Calculating Voltage Drop. . . . . . . . . . . . . . . . . . 5 Voltage Drop Example 1 . . . . . . . . . . . . . . . . . . 6 Voltage Drop Example 2 . . . . . . . . . . . . . . . . . . 6 Reducing Voltage Drop - Method 1 . . . . . . . . . . 7 Reducing Voltage Drop - Method 2 . . . . . . . . . . 7 Remote Power Supplies . . . . . . . . . . . . . . . . . . . . . 7 Screened Cable . . . . . . . . . . . . . . . . . . . . . . . . . . . 8 Electromagnetic Compatibility . . . . . . . . . . . . . . . . 8 XNode Wiring . . . . . . . . . . . . . . . . . . . . . . . . . . . . . 8 Wiring Remote keypads to an XNode. . . . . . . . . 9 Wiring a Loudspeaker to an XNode . . . . . . . . . . 10 Wiring an Output Module to an XNode . . . . . . . 10 Programmable Outputs on the XNode. . . . . . . . 10 TS900 Node Wiring . . . . . . . . . . . . . . . . . . . . . . . . . 10 Wiring Nodes and Remote Keypads . . . . . . . . . . . . 10 Remote Keypads and TS700.LECs . . . . . . . . . . . . . 11 TSLEC8 . . . . . . . . . . . . . . . . . . . . . . . . . . . . . . . . . . 12 Detection Circuits . . . . . . . . . . . . . . . . . . . . . . . . . . 12 Battery. . . . . . . . . . . . . . . . . . . . . . . . . . . . . . . . . . . 12 Mains Supply. . . . . . . . . . . . . . . . . . . . . . . . . . . . . . 12 Panel Outputs . . . . . . . . . . . . . . . . . . . . . . . . . . . . . 12 Extension loudspeakers . . . . . . . . . . . . . . . . . . . . . . 12 External Sounders . . . . . . . . . . . . . . . . . . . . . . . . . . 13 Plug-on Digital Communicator . . . . . . . . . . . . . . . . 13 Plug-on Digi-modem . . . . . . . . . . . . . . . . . . . . . . . 13 RedCARE or Stand-alone Digicom . . . . . . . . . . . . . 13 Printer . . . . . . . . . . . . . . . . . . . . . . . . . . . . . . . . . . . 13 Output Modules . . . . . . . . . . . . . . . . . . . . . . . . . . . 13 Networker Interface Boards . . . . . . . . . . . . . . . . . . . 13 System Installation TS2500 Control Panel . . . . . . . . . . . . . . . . . . . . . . . 14 Installation Procedure . . . . . . . . . . . . . . . . . . . . . 14 Mains Connection . . . . . . . . . . . . . . . . . . . . . . . 15 Battery Connections . . . . . . . . . . . . . . . . . . . . . . 15 Main PCB Layout. . . . . . . . . . . . . . . . . . . . . . . . . 16 Connection Terminals, Plugs & Indicators . . . . . . 17 Remote Keypads . . . . . . . . . . . . . . . . . . . . . . . . . . 19 NETLCD Remote Keypad . . . . . . . . . . . . . . . . . . 19 NETSTAR Remote Keypad . . . . . . . . . . . . . . . . . . 19 NETLED Remote Keypad . . . . . . . . . . . . . . . . . . . 19 NETARM Remote Arming Station . . . . . . . . . . . . . 19 PCB Layouts & Connections . . . . . . . . . . . . . . . . 19 Installing a Remote Keypad on the XNode . . . . 20 Installing a Keypad on to the Network . . . . . . . . 20 XNode . . . . . . . . . . . . . . . . . . . . . . . . . . . . . . . . . . 20 Installing an XNode. . . . . . . . . . . . . . . . . . . . . . . 22 TS900 Node . . . . . . . . . . . . . . . . . . . . . . . . . . . . . . 22 Installing a TS900 Node. . . . . . . . . . . . . . . . . . . . 22 TS900ID NODE . . . . . . . . . . . . . . . . . . . . . . . . . . . . . 24 Installing a TS900IDNODE . . . . . . . . . . . . . . . . . . 24 TS700 LEC . . . . . . . . . . . . . . . . . . . . . . . . . . . . . . . . 25 Installing a TS700 LEC . . . . . . . . . . . . . . . . . . . . . 25 TSLEC8 . . . . . . . . . . . . . . . . . . . . . . . . . . . . . . . . . . 25 Installing the TSLEC8 . . . . . . . . . . . . . . . . . . . . . . 25 Detection Circuit Wiring. . . . . . . . . . . . . . . . . . . . . . 26 Double Pole . . . . . . . . . . . . . . . . . . . . . . . . . . . . 26 End Of Line . . . . . . . . . . . . . . . . . . . . . . . . . . . . . 26 External Sounders . . . . . . . . . . . . . . . . . . . . . . . . . . 26 Control Panel Sounder Connections. . . . . . . . . . 26 Installing an External Sounder from a Node . . . . 27 Extension Loudspeakers . . . . . . . . . . . . . . . . . . . . . 27 Control Panel Connections. . . . . . . . . . . . . . . . . 27 XNode Connections . . . . . . . . . . . . . . . . . . . . . . 27 RedCARE or Stand-alone Digicom . . . . . . . . . . . . . 27 DC54/DC58 Plug-on Digicoms . . . . . . . . . . . . . . . . 28 DC58M Plug-on Digi-modem . . . . . . . . . . . . . . . . . 28 Output Modules . . . . . . . . . . . . . . . . . . . . . . . . . . . 28 Control Panel Connections. . . . . . . . . . . . . . . . . 28 XNode Connections . . . . . . . . . . . . . . . . . . . . . . 28 Connecting a Printer . . . . . . . . . . . . . . . . . . . . . . . . 29 Using the CPA6 Printer . . . . . . . . . . . . . . . . . . . . . 29 Using the DATAC / RS232 Printer . . . . . . . . . . . . . 29 Programmable Outputs . . . . . . . . . . . . . . . . . . . . . 29 Control Panel Outputs. . . . . . . . . . . . . . . . . . . . . 29 Node Outputs . . . . . . . . . . . . . . . . . . . . . . . . . . . 29 Remote Keypads & TS700.LECs . . . . . . . . . . . . . 29 Monitoring a Remote Power Supply . . . . . . . . . . . . 30 Pre Power-Up Checks . . . . . . . . . . . . . . . . . . . . . . . 31 Initial Power-Up . . . . . . . . . . . . . . . . . . . . . . . . . . . . 31 Power-Up Checks . . . . . . . . . . . . . . . . . . . . . . . . . . 31 Relearn Required Message. . . . . . . . . . . . . . . . . . . 31 Engineer’s Menu 1 Introduction. . . . . . . . . . . . . . . . . . . . . . . . . . . . . . . 33 Menu contents . . . . . . . . . . . . . . . . . . . . . . . . . . 33 Panel Outputs . . . . . . . . . . . . . . . . . . . . . . . . . . . . . 34 Digicom Outputs. . . . . . . . . . . . . . . . . . . . . . . . . . . 34 Digicom Channels . . . . . . . . . . . . . . . . . . . . . . . . . 34 Programmable Output Types . . . . . . . . . . . . . . . . . 35 Circuit Output Types . . . . . . . . . . . . . . . . . . . . . . 35 System Output Types . . . . . . . . . . . . . . . . . . . . . 35 User Output Types . . . . . . . . . . . . . . . . . . . . . . . . 38 Ward Output Types . . . . . . . . . . . . . . . . . . . . . . . 38 Program Circuits . . . . . . . . . . . . . . . . . . . . . . . . . . . 40 Circuit Numbering . . . . . . . . . . . . . . . . . . . . . . . 40 Circuit Types . . . . . . . . . . . . . . . . . . . . . . . . . . . . 40 Circuit Attributes . . . . . . . . . . . . . . . . . . . . . . . . . 40 Circuit Wards. . . . . . . . . . . . . . . . . . . . . . . . . . . . 41 System Timers . . . . . . . . . . . . . . . . . . . . . . . . . . . . . 42 Setting Modes . . . . . . . . . . . . . . . . . . . . . . . . . . . . . 44 Do System Print . . . . . . . . . . . . . . . . . . . . . . . . . . . . 44 System Options . . . . . . . . . . . . . . . . . . . . . . . . . . . . 45 Number of rearms . . . . . . . . . . . . . . . . . . . . . . . 45 Modem rings . . . . . . . . . . . . . . . . . . . . . . . . . . . 45 Keys until tamp . . . . . . . . . . . . . . . . . . . . . . . . . . 45 Remote resets . . . . . . . . . . . . . . . . . . . . . . . . . . 45 Reset algorithm . . . . . . . . . . . . . . . . . . . . . . . . . 45 Double Knocks . . . . . . . . . . . . . . . . . . . . . . . . . . 45 Configuration . . . . . . . . . . . . . . . . . . . . . . . . . . . . . 46 Location Text. . . . . . . . . . . . . . . . . . . . . . . . . . . . . . 49 Panel Location Text. . . . . . . . . . . . . . . . . . . . . . . 49 Keypad Location . . . . . . . . . . . . . . . . . . . . . . . . 49 Default NVM Data . . . . . . . . . . . . . . . . . . . . . . . . . . 49 Goto User Menu 1. . . . . . . . . . . . . . . . . . . . . . . . . . 51 Log Off Engineer . . . . . . . . . . . . . . . . . . . . . . . . . . . 51 Engineer’s Menu 2 Introduction. . . . . . . . . . . . . . . . . . . . . . . . . . . . . . . 53 Menu contents . . . . . . . . . . . . . . . . . . . . . . . . . . 53 View Circuits . . . . . . . . . . . . . . . . . . . . . . . . . . . . . . 54 Set System Time . . . . . . . . . . . . . . . . . . . . . . . . . . . 54 Set System Date . . . . . . . . . . . . . . . . . . . . . . . . . . . 54 Change Passcode . . . . . . . . . . . . . . . . . . . . . . . . . 54 Alter Chime Circuits. . . . . . . . . . . . . . . . . . . . . . . . . 55 Alter 24Hr Group . . . . . . . . . . . . . . . . . . . . . . . . . . . 55 Print System Log . . . . . . . . . . . . . . . . . . . . . . . . . . . 55 Alter Circuit Wards . . . . . . . . . . . . . . . . . . . . . . . . . . 56 View System Log . . . . . . . . . . . . . . . . . . . . . . . . . . . 56 Log Event Codes . . . . . . . . . . . . . . . . . . . . . . . . . . 57 Start Call Back. . . . . . . . . . . . . . . . . . . . . . . . . . . . . 60 Reset User Code 1 . . . . . . . . . . . . . . . . . . . . . . . . . 60 Set BST/GMT Date . . . . . . . . . . . . . . . . . . . . . . . . . . 60 Rem Service Option . . . . . . . . . . . . . . . . . . . . . . . . 60 Engineers Menu 3 Introduction. . . . . . . . . . . . . . . . . . . . . . . . . . . . . . . 61 Menu Contents. . . . . . . . . . . . . . . . . . . . . . . . . . 61 Time Switches . . . . . . . . . . . . . . . . . . . . . . . . . . . . . 62 Part Set Groups . . . . . . . . . . . . . . . . . . . . . . . . . . . . 62 Use On-line Pad . . . . . . . . . . . . . . . . . . . . . . . . . . . 63 Edit User Names . . . . . . . . . . . . . . . . . . . . . . . . . . . 63 Part Set Text. . . . . . . . . . . . . . . . . . . . . . . . . . . . . . . 63 Circuit Text. . . . . . . . . . . . . . . . . . . . . . . . . . . . . . . . 64 Circuit Text Library . . . . . . . . . . . . . . . . . . . . . . . . . . 65 Custom Text Menu . . . . . . . . . . . . . . . . . . . . . . . . . 66 Reset Message . . . . . . . . . . . . . . . . . . . . . . . . . . 66 Location Text . . . . . . . . . . . . . . . . . . . . . . . . . . . 66 Printer Header . . . . . . . . . . . . . . . . . . . . . . . . . . . 66 Remote Reset Message . . . . . . . . . . . . . . . . . . . 66 Printer Prefix . . . . . . . . . . . . . . . . . . . . . . . . . . . . . 66 Banner Message. . . . . . . . . . . . . . . . . . . . . . . . . 66 Part Set Banner . . . . . . . . . . . . . . . . . . . . . . . . . . 66 Aux. Tamper 1/2 . . . . . . . . . . . . . . . . . . . . . . . . . 66 Modem String . . . . . . . . . . . . . . . . . . . . . . . . . . . 66 Equipment O/P’s . . . . . . . . . . . . . . . . . . . . . . . . . . . 67 Built In Tests . . . . . . . . . . . . . . . . . . . . . . . . . . . . . . . 68 Software Version . . . . . . . . . . . . . . . . . . . . . . . . . 68 Voltage. . . . . . . . . . . . . . . . . . . . . . . . . . . . . . . . 68 Current Consumption . . . . . . . . . . . . . . . . . . . . . 68 View Circuit Resistance . . . . . . . . . . . . . . . . . . . . 68 Test Digicom outputs . . . . . . . . . . . . . . . . . . . . . 68 Test Panel outputs. . . . . . . . . . . . . . . . . . . . . . . . 68 Test Node outputs. . . . . . . . . . . . . . . . . . . . . . . . 69 Confirm Network devices . . . . . . . . . . . . . . . . . . 69 Test Keypad display . . . . . . . . . . . . . . . . . . . . . . 69 View Network devices . . . . . . . . . . . . . . . . . . . . . 69 View Network errors . . . . . . . . . . . . . . . . . . . . . . . 70 False Setting Routine. . . . . . . . . . . . . . . . . . . . . . 70 Test Digicom channels . . . . . . . . . . . . . . . . . . . 70 Custom Outputs . . . . . . . . . . . . . . . . . . . . . . . . . . . 71 Custom Output - Example 1. . . . . . . . . . . . . . . . 71 Custom Output - Example 2. . . . . . . . . . . . . . . . 71 Custom Output - Example 3. . . . . . . . . . . . . . . . 71 Custom Circuits. . . . . . . . . . . . . . . . . . . . . . . . . . . . 72 Digi/Modem Options. . . . . . . . . . . . . . . . . . . . . . . . 73 Call Back No.1 . . . . . . . . . . . . . . . . . . . . . . . . . . 73 Call Back No.2 . . . . . . . . . . . . . . . . . . . . . . . . . . 73 Call Back No.3 . . . . . . . . . . . . . . . . . . . . . . . . . . 73 Modem Password. . . . . . . . . . . . . . . . . . . . . . . . 74 Modem Site No. . . . . . . . . . . . . . . . . . . . . . . . . . 74 Program Digicom . . . . . . . . . . . . . . . . . . . . . . . . 74 Digi Baud rate. . . . . . . . . . . . . . . . . . . . . . . . . . . 76 COM1 Baud rate . . . . . . . . . . . . . . . . . . . . . . . . 76 Internal digi. . . . . . . . . . . . . . . . . . . . . . . . . . . . . 76 Reset Digicom . . . . . . . . . . . . . . . . . . . . . . . . . . 76 Activity Count . . . . . . . . . . . . . . . . . . . . . . . . . . . . . 76 Engineers Menu 4 Introduction. . . . . . . . . . . . . . . . . . . . . . . . . . . . . . . 77 Menu Contents. . . . . . . . . . . . . . . . . . . . . . . . . . 77 Auto-set Timers . . . . . . . . . . . . . . . . . . . . . . . . . . . . 78 Network Equipment Wards . . . . . . . . . . . . . . . . . . . 79 XNodes. . . . . . . . . . . . . . . . . . . . . . . . . . . . . . . . 79 Remote Keypads . . . . . . . . . . . . . . . . . . . . . . . . 79 Keypad Sounder. . . . . . . . . . . . . . . . . . . . . . . . . 79 Extension loudspeakers. . . . . . . . . . . . . . . . . . . . 79 Equipment Wards . . . . . . . . . . . . . . . . . . . . . . . . . . 80 Panel tamper . . . . . . . . . . . . . . . . . . . . . . . . . . . 80 Bell Box Tamper . . . . . . . . . . . . . . . . . . . . . . . . . 80 Aux 1 Tamper . . . . . . . . . . . . . . . . . . . . . . . . . . . 80 Aux 2 Tamper . . . . . . . . . . . . . . . . . . . . . . . . . . . 80 Phone Line Fault . . . . . . . . . . . . . . . . . . . . . . . . . 80 Mains Power Off . . . . . . . . . . . . . . . . . . . . . . . . . 80 Payment Timer . . . . . . . . . . . . . . . . . . . . . . . . . . 80 Alarms Engineer Reset . . . . . . . . . . . . . . . . . . . . 80 Tamper Engineer Reset. . . . . . . . . . . . . . . . . . . . 80 Remote Reset. . . . . . . . . . . . . . . . . . . . . . . . . . . 80 Panel Speaker. . . . . . . . . . . . . . . . . . . . . . . . . . . 80 Relearn Required . . . . . . . . . . . . . . . . . . . . . . . . 80 Re-arms applies to . . . . . . . . . . . . . . . . . . . . . . . 80 Hi Security ward . . . . . . . . . . . . . . . . . . . . . . . . . 81 Digi in Part Set . . . . . . . . . . . . . . . . . . . . . . . . . . . 81 System Bell/STB . . . . . . . . . . . . . . . . . . . . . . . . . . 81 Ward A Foyer Mode . . . . . . . . . . . . . . . . . . . . . . 81 Unset fire Signals . . . . . . . . . . . . . . . . . . . . . . . . . 81 Double Knock Wards . . . . . . . . . . . . . . . . . . . . . 81 Unset Circuit Types . . . . . . . . . . . . . . . . . . . . . . . . . 81 Log Search Keys . . . . . . . . . . . . . . . . . . . . . . . . . . . 82 Shunt Groups . . . . . . . . . . . . . . . . . . . . . . . . . . . . . 82 Operation . . . . . . . . . . . . . . . . . . . . . . . . . . . . . . 82 OM Configuration . . . . . . . . . . . . . . . . . . . . . . . . . . 83 Mimic options . . . . . . . . . . . . . . . . . . . . . . . . . . 83 CCT options . . . . . . . . . . . . . . . . . . . . . . . . . . . . 83 Set Volume Level . . . . . . . . . . . . . . . . . . . . . . . . . . 83 Edit Quick Keys . . . . . . . . . . . . . . . . . . . . . . . . . . . . 83 Engineers Wards . . . . . . . . . . . . . . . . . . . . . . . . . . . 83 Code Lock Times . . . . . . . . . . . . . . . . . . . . . . . . . . 84 Operation . . . . . . . . . . . . . . . . . . . . . . . . . . . . . . 84 Appendices Text Editing Keys . . . . . . . . . . . . . . . . . . . . . . . . . . . 85 Cursor Types . . . . . . . . . . . . . . . . . . . . . . . . . . . . 85 Common Key Sequences . . . . . . . . . . . . . . . . . 85 Setup New Users . . . . . . . . . . . . . . . . . . . . . . . . . . . 85 User Types . . . . . . . . . . . . . . . . . . . . . . . . . . . . . . 85 User Wards . . . . . . . . . . . . . . . . . . . . . . . . . . . . . 86 Auto Sets wards. . . . . . . . . . . . . . . . . . . . . . . . . . 86 Auto Unset Wards . . . . . . . . . . . . . . . . . . . . . . . . 86 Customising Users . . . . . . . . . . . . . . . . . . . . . . . . 86 Engineer's Quick Reference . . . . . . . . . . . . . . . . . . 88 TS2500 Installation Manual System Overview System Overview System Overview System Architecture Printer Data Networks Speaker Plug-on Digicom / Modem 2 Outputs 2 Outputs 2 Outputs XNode 1 XNode 2 XNode 16 2 Remote 3 CPA6.OM Aux 12V 1 Wiring Option 1 XNode TS2500 CONTROL PANEL 4 5 Bell Output 6 Strobe Output 7 Digi Outputs 1 - 8 8 Remote 8 Zones Remote 8 Zones 8 Zones The XNode is capable of driving 4 Remote Keypads and a Loudspeaker Outputs 1 - 4 Aux Tamps 1 & 2 Network Wiring = 4 Core TSLEC8 TSLEC8 8 Zones 8 Zones Wiring Option 2 Remote Keypads or LEC's 1 Output 1 Output 1 Output 1 Output 1 Output 2 Zones 2 Zones 2 Zones 2 Zones 2 Zones Network Wiring = 6 Core (Remotes) or 4 Core (LECs) NOTE: Only one wiring method can be used on any one Network Wiring Option 3 Using TS900 Node 2 Outputs 2 Outputs 2 Outputs 2 Outputs 2 Outputs TS900 Node 1 TS900 Node 2 TS900 Node 3 TS900 Node 4 TS900 Node 5 8 Zones 8 Zones 8 Zones 8 Zones 8 Zones 1 Output 1 Output 2 Outputs 2 Outputs TS900 Node 4 TS900 Node 5 8 Zones 8 Zones Network Wiring = 4 Core Wiring Option 4 2 Outputs TS900 Node 1 8 Zones 2 Zones 2 Zones TS900 Nodes and Keypads can be connected on the same Network BUT NO 2 DEVICES SHOULD HAVE THE SAME ADDRESS. Network Wiring = 6 Core Wiring Option 5 Network Wiring = 4 Core 8 Outputs 2 Outputs TS900 ID Node TS900 Node 5 30 ID Zones 8 Zones 1 System Overview TS2500 Installation Manual Introduction System Overview Remote Keypads The TS2500 intruder alarm control system has been designed to suit medium to large installation sites. The TS2500 system can be expanded up to 1040 zones. The system is capable of “up” and “down” line loading, allowing remote programming and interrogation via the telephone line and a P.C. Up to 5 remote keypads can be connected when directly wired to the network. The XNode also provides the facility to connect up to 4 remote keypads giving a system total of 512 remote keypads. Each remote keypad has two detection circuits and a single switched -ve output. The four types are: Complex site requirements such as multi-ward setting can be achieved, as the system is capable of being broken down into 16 separately controlled areas (Wards) so that the premises or parts of the premises can be controlled independently. 32 Character LCD (NETLCD) The TS2500 system is a true multi-tasking system, which allows up to maximum of eight users operating the system simultaneously. Control Panel The control panel is the controlling unit for the system, it has a power supply and connections for a standby battery. It has the following facilities: The NETLCD remote keypad has a back-lit 32 character super-twist Liquid Crystal Display (LCD) and a back-lit tactile rubber keypad. All system programming must be carried out from a NETLCD remote keypad. 8 Character Starburst (NETSTAR) The NETSTAR remote keypad has a back-lit 8 character starburst display (LCD) and a back-lit tactile rubber keypad. This type of remote keypad is limited to setting and unsetting only, and cannot be used to program the system. + The display will always show the system time. 4 Character LED (NETLED) l 8 networks for connecting remote keypads and Nodes l Connections for two 8 zone local expansion cards (TSLEC8) l Two auxiliary tamper zones l Bell and strobe outputs l 4 programmable outputs (1 x Voltage free contacts and 3 high current transistorised) l 8 programmable digicom/RedCARE outputs l A connector for a Menvier plug-on digicom or digi-modem l A connector for a printer via the MPA or DCI printer adaptor l A connector for mimic modules (CPA6.OM) l Extension loudspeaker output There are several options for expanding the system: l All system program information and the 4000 event log is stored in two removable non-volatile memory (NVM) devices TS700 LEC The NETLED remote keypad has a 4 character 7-segment LED display and back-lit tactile rubber keypad. This type of remote keypad is limited to setting and unsetting, and cannot be used to program the system. + The display will always show the system time. Remote Arming Station (NETARM) The Remote Arming Station only allows setting and unsetting of the system. The unit has two indicator LED’s, the “Power LED” and a programmable “Function LED” (the “Function LED” may be programmed as “Fault” or “Area Set” etc.). Expansion Devices The Local Expansion Card (LEC) provides two programmable detection circuits and one programmable switched -ve output. Up to 5 TS700 LECs can be connected on any one network. TS900 Node The TS900 Node provides eight programmable detection circuits and two programmable outputs (one switched +ve and one switched -ve). Up to 5 TS900 Nodes can be connected on any one network. 2 TS2500 Installation Manual The XNode provides eight programmable detection circuits, two programmable outputs (one switched +ve and one switched -ve) and a loudspeaker output for driving a 16 Ohm loudspeaker. Each XNode can also drive up to 4 remote keypads. Up to 16 XNodes can be connected on any one network. TSLEC8 The TSLEC8 Local Expansion Card (LEC) is designed to be fitted inside the control panel it provides 8 programmable detection circuits. The control panel will accept two TSLEC8s. Technical Specifications Control Panel Part No: TS2500 Input Supply: Current: Speaker Output: Bell Trigger: Strobe Trigger: Dimensions: Material: Weight: 230V ±10% 50Hz 220mA (normal) 300mA (alarm) with speaker 1.5A 2 x 7.0Ah or 1 x 17Ah 2 to 1040 1 = voltage free changeover 2 = Switched -ve @500mA 3 = Switched +ve @500mA 4 = Switched +ve @500mA +ve removed Source 5mA in 12V condition Sink 100mA in 0V condition 16 Ohms Switched -ve @500mA Switched -ve @500mA 384(W) x 312(H) x 95(D) mm 1.2mm mild steel 4.9 Kg Environment: -10 to 55°C Power Supply: Standby Battery: Zones Panel Outputs: TS900 ID Node The TS900 ID Node can be used as an alternative to the standard TS900 Node. It provides a single ID Detector Loop for connection to 30 ID devices and 8 programmable outputs. Several configuration options allow it to be used on its own or with existing TS900 Nodes. Other Devices Printer A DATAC printer or any standard RS232 printer can be connected to the control panel to obtain system and log print-outs. CPA6.OM Output Module Each output module provides eight switched -ve outputs, the output modules can be daisy-chained together to provide multiples of eight outputs. The outputs can be used to indicate ward status information and/or circuit alarm/mimic indications. DC54/58/58M Digicom and Digi-modem A 4-channel DC54 or 8-channel DC58 digital communicator can be plugged onto the control panel to allow alarm status information to be transferred to a dedicated Alarm Receiving Centre. The 8 channel DC58M digi-modem can be plugged onto the control panel, which functions as a digital communicator and V21 modem. The modem facility is required when using the up/down loading feature. TSNIB Networker Interface Board A driver and receiver board that allows Nodes or remotes to be driven up to 3 Km. System Overview XNode System Overview Digi Outputs 1-8: LCD Remote Keypad Part No: Display: Current: Zones: Output: Dimensions: Material: Weight: NETLCD 32 Character Liquid Crystal 50mA (normal) 60mA (alarm) 2 Switched -ve @100mA 150(W) x 104(H) x 30(D) mm 3mm Polycarbonate 282g Environment: -10 to 55°C Starburst Remote Keypad Part No: Display: Current: Zones: Output: Dimensions: Material: Weight: NETSTAR 8 Character Liquid Crystal 50mA (normal) 60mA (alarm) 2 Switched -ve @100mA 150(W) x 104(H) x 30(D) mm 3mm Polycarbonate 263g Environment: -10 to 55°C 3 System Overview TS2500 Installation Manual System Overview LED Remote Keypad TS900 Node Part No: Display: Current: Zones: Output: Dimensions: Material: Weight: NETLED 4 character seven segment 60mA (normal) 70mA (alarm) 2 Switched -ve @100mA 150(W) x 104(H) x 30(D) mm 3mm Polycarbonate 254g Part No: Current: Zones: Outputs: Dimensions: Material: Weight: TS900.NODE 60mA (normal) 60mA (alarm) 8 A = Switched +ve @100mA B = Switched -ve @100mA 128(W) x 182(H) x 34(D) mm 3mm Polycarbonate 370g Environment: -10 to 55°C Environment: -10 to 55°C TS900 ID Node Arming Station Part No: Display: Current: Zones: Output: Dimensions: Material: Weight: NETARM Power LED Programmable function LED 30mA (normal) 40mA (alarm) 2 Switched -ve @100mA 150(W) x 104(H) x 30(D) mm 3mm Polycarbonate 254g Environment: -10 to 55°C TS700 LEC Part No: Current: Zones: Output: Dimensions: Material: Weight: TS700.LEC 30mA (normal) 40mA (alarm) 2 Switched -ve @100mA 142(W) x 82(H) x 36(D) mm 3mm Polycarbonate 213g Environment: -10 to 55°C TSXNode Part No: Current: Zones: Outputs: Speaker Output: Dimensions: Material: Weight: TSXNODE 60mA (normal) 60mA (alarm) 8 A = Switched +ve @100mA B = Switched -ve @100mA 16Ohms 128(W) x 182(H) x 34(D) mm 3mm Polycarbonate 370g Environment: -10 to 55°C 4 Part No: Current: Dimensions: Material: Weight: TS900.IDNODE 80mA (with 1 device) 160mA (with 30 devices) 30 (ID) A = Switched +ve @100mA B = Switched +ve @100mA C = Switched +ve @100mA D = Switched +ve @100mA E = Switched -ve @100mA F = Switched -ve @100mA G = Switched -ve @100mA H = Switched -ve @100mA 128(W) x 182(H) x 34(D) mm 3mm Polycarbonate 370g Environment: -10 to 55°C Zones: Outputs: TSLEC8 Part No: Current: Zones: Dimensions: Weight: TSLEC8 20mA (normal) 20mA (alarm) 8 89(W) x 71(H) x 15(D) mm 69g Environment: -10 to 55°C TS2500 Installation Manual System Design System Design System Wiring Cable Segregation All cables for the alarm system should be segregated from any other cables and wiring services like mains supply cables, telephone cables, computer network cables and R.F. cables. In addition to this the network and detection circuit cables should be kept clear of cables supplying sounders or extension loudspeakers. It is also advisable to avoid running more than one network down a single multi-core cable. Current Drawn In order for the system work correctly the voltage at each device must NOT drop below 10.5V even when running on the standby battery. Standard 7/0.2 alarm cable has a resistance of 8 Ohms per 100 metres per core. The voltage drop is calculated using the following formula: V Drop = Current drawn x cable length x 0.08 x 2 The table below shows the expected voltage drop against the current drawn and cable length: Cable Length (Standard 7/0.2 alarm cable) 10m 20m 30m 40m 50m 60m 70m 80m 90m 100m 60mA 0.10V 0.19V 0.29V 0.38V 0.48V 0.58V 0.67V 0.77V 0.86V 0.96V 80mA 0.13V 0.26V 0.38V 0.51V 0.64V 0.79V 0.90V 1.02V 1.15V 1.28V 100mA 0.16V 0.32V 0.48V 0.64V 0.80V 0.96V 1.12V 1.28V 1.44V 1.60V 120mA 0.19V 0.38V 0.58V 0.79V 0.96V 1.15V 1.34V 1.54V 1.74V 1.92V 140mA 0.22V 0.45V 0.67V 0.90V 1.12V 1.34V 1.57V 1.79V 2.02V 2.24V 160mA 0.26V 0.51V 0.77V 1.02V 1.28V 1.54V 1.79V 2.05V 2.30V 2.56V 180mA 0.29V 0.58V 0.86V 1.15V 1.44V 1.73V 2.02V 2.30V 2.59V 2.88V 200mA 0.32V 0.64V 0.96V 1.28V 1.60V 1.92V 2.24V 2.56V 2.88V 3.20V 220mA 0.35V 0.70V 1.06V 1.41V 1.76V 2.11V 2.46V 2.82V 3.17V 3.52V 240mA 0.38V 0.79V 1.15V 1.54V 1.92V 2.30V 2.69V 3.07V 3.46V 3.84V 260mA 0.42V 0.83V 1.25V 1.66V 2.08V 2.50V 2.91V 3.33V 3.74V 4.16V 280mA 0.45V 0.90V 1.34V 1.79V 2.24V 2.69V 3.14V 3.58V 4.03V 4.48V 300mA 0.48V 0.96V 1.44V 1.92V 2.40V 2.88V 3.36V 3.84V 4.32V 4.80V 320mA 0.51V 1.02V 1.55V 2.05V 2.56V 3.07V 3.58V 4.10V 4.61V 5.12V 340mA 0.54V 1.09V 1.63V 2.18V 2.72V 3.26V 3.81V 4.35V 4.90V 5.44V 360mA 0.58V 1.15V 1.73V 2.30V 2.88V 3.46V 4.03V 4.61V 5.18V 5.76V 380mA 0.61V 1.22V 1.82V 2.43V 3.04V 3.65V 4.26V 4.86V 5.47V 6.08V 400mA 0.64V 1.28V 1.92V 2.56V 3.20V 3.84V 4.48V 5.12V 5.76V 6.40V 420mA 0.67V 1.34V 2.02V 2.69V 3.36V 4.03V 4.70V 5.38V 6.05V 6.72V 440mA 0.70V 1.41V 2.11V 2.82V 3.52V 4.22V 4.93V 5.63V 6.34V 7.04V 460mA 0.74V 1.47V 2.21V 2.94V 3.68V 4.42V 5.15V 5.89V 6.62V 7.36V 480mA 0.79V 1.54V 2.30V 3.07V 3.84V 4.61V 5.38V 6.14V 6.91V 7.68V 500mA 0.80V 1.60V 2.40V 3.20V 4.00V 4.80V 5.60V 6.40V 7.20V 8.00V 520mA 0.83V 1.66V 2.50V 3.33V 4.16V 4.99V 5.82V 6.66V 7.49V 8.32V 540mA 0.86V 1.73V 2.59V 3.46V 4.32V 5.18V 6.05V 6.92V 7.78V 8.64V 560mA 0.90V 1.79V 2.69V 3.58V 4.48V 5.38V 6.27V 7.17V 8.06V 8.96V 580mA 0.93V 1.86V 2.78V 3.71V 4.64V 5.57V 6.50V 7.42V 8.35V 9.28V 600mA 0.96V 1.92V 2.88V 3.84V 4.80V 5.76V 6.72V 7.68V 8.64V 9.60V Voltage Drop Table 5 System Design Calculating Voltage Drop The TS2500 system uses standard 7/0.2 un-screened alarm cable to inter-connect devices within the system. The number of cores will vary depending on the device being connected. System Design TS2500 Installation Manual The voltage at each Node is calculated as follows: Voltage Drop Example 1 System Design Example 1 in the figure below shows two Nodes connected to the control panel, the first Node is 20 metres from the panel and has 120mA being taken from its auxiliary supply to power detectors. The second Node is 20 metres from the first and also has 120mA being taken from its auxiliary supply to power detectors. The voltage at each Node is calculated as follows: 1. The total current being drawn at the first Node = 180mA + 180mA +180mA = 540mA. 2. Voltage drop to the first Node = 540mA @ 20m = 1.73V (see table). 3. Voltage at first Node = control panel voltage voltage drop = 13.60 -1.73 = 11.87V. 1. The total current being drawn at the first Node = 180mA + 180mA = 360mA. 4. The total current being drawn at the second Node = 180mA + 180mA = 360mA. 2. Voltage drop to the first Node = 360mA @ 20m = 1.15V (see table). 5. Voltage drop to the second Node = 360mA @ 20m = 1.15V (see table). 3. Voltage at first Node = control panel voltage voltage drop = 13.60 -1.15 = 12.45V. 6. Voltage at second Node = first Node voltage voltage drop = 11.87 - 1.15 = 10.77V. 4. The total current being drawn at the second Node = 180mA. 7. The total current being drawn at the third Node = 180mA. 5. Voltage drop to the second Node = 180mA @ 20m = 0.58 (see table). 8. Voltage drop to the third Node = 180mA @ 20m = 0.58V (see table 1). 6. Voltage at second Node = first Node voltage voltage drop = 12.45 - 0.58 = 11.87V. 9. Voltage at third Node = second Node voltage voltage drop = 10.77 - 0.58 = 10.19V. The example clearly demonstrates that the voltage levels at both Nodes is acceptable. The second example demonstrates that when the third Node is added to the network the current drawn at each device is increased and therefore the voltage drop at each device is increased. The voltage level at the third Node is now below the 10.5V threshold and may cause problems. Voltage Drop Example 2 The second example shows what happens when a third Node is connected 20 metres from the second Node. Example 1 Control Panel A(+) B(-) Network I = 360 mA Voltage at panel 13.60 V Example 2 Voltage at panel 13.60 V Node 1 I = 180 mA Node = 60mA Total = 180mA Total = 180mA AUX AUX 120mA taken by detectors 120mA taken by detectors Voltage at Node Voltage at Node 11.87 V 20m 20m I = 540 mA Node 2 Node = 60mA 12.45 V Control Panel A (+) B (-) Network 20m 20m Node 1 I = 360 mA 20m Node 2 Node 3 Node = 60mA Node = 60mA Total = 180mA Total = 180mA Total = 180mA AUX AUX AUX 120mA taken by detectors 120mA taken by detectors 120mA taken by detectors Voltage at Node Voltage at Node Voltage at Node 11.87 V 10.77 V Figure 1. Voltage Drop Examples 1 & 2 6 I = 180 mA Node = 60mA 10.19 V TS2500 Installation Manual System Design Control Panel A (+) B (-) Network I = 540 mA Voltage at panel 13.60 V Node 1 +Ve -Ve Aux Voltage at panel 13.60 V I = 180 mA I = 360 mA Node 2 I = 180 mA Node 3 Node = 60mA Node = 60mA Total = 180mA Total = 180mA Total = 180mA AUX AUX AUX 120mA taken by detectors 120mA taken by detectors 120mA taken by detectors Voltage at Node Voltage at Node Voltage at Node 12.16 V 12.74 V Control Panel A (+) B (-) Network I = 360 mA Node = 60mA 20m Method 2 20m 20m Node 1 11.87 V 20m I = 120 mA Node 2 I = 60 mA Node 3 Node = 60mA Node = 60mA Node = 60mA Total = 60mA Total = 60mA Total = 60mA Voltage at Node Voltage at Node Voltage at Node 13.02 V I = 240 mA 12.64 V I = 120 mA 12.45 V 120mA taken by detectors 120mA taken by detectors 120mA taken by detectors Voltage at detectors Voltage at detectors Voltage at detectors 12.45 V 11.66 V 11.28 V Figure 2. Reducing Voltage Drop - Methods 1 & 2 Reducing Voltage Drop - Method 1 The simplest way to reduce voltage drop is to double up the supply connections (A & B), this will half the resistance on each core, which will half the voltage drop. When using the voltage drop table to calculate the expected voltage drop, simply divide the voltage drop by two. Figure 2 above shows the same 3 Nodes used in the previous example. The A and B network connections have been doubled up, in order to do so the network cable must have 2 spare cores. This method clearly shows that voltage levels at all Nodes is at a sufficient level. Reducing Voltage Drop - Method 2 The second way to reduce voltage drop is to supply the detection devices from separate cores. This is the preferred method of reducing voltage drop as detectors generally operate at lower voltages (9.5V). When using this method the network cable must have 2 spare cores. This method clearly shows that voltage levels at all Nodes is at a sufficient level. Remote Power Supplies When voltage drops cannot be overcome by using the two methods previously described or the demand on the control panel power supply is going to be exceeded (1.5A max.), one or more remote power supplies will need to be installed. It is recommended that the Menvier 519XB is used in these instances as it can be monitored using the 519FM. When installing a remote power supply it should be installed close to the equipment it is powering. Figure 3 shows two methods of installing a remote power supply. When connected as shown in method 1, only the last two Nodes have sufficient voltage levels. If the power supply is repositioned so that it is next to Node 3 the voltage levels at each Node is increased because the current being drawn is split into two separate paths and therefore the voltage drop in each path is reduced. Method 2 is the preferred connection method. 7 System Design 20m 20m Method 1 System Design 20m Control Panel Node 1 A (+) B(-) Note: The +ve supply from the panel must remain isolated from the +ve of the Remote PSU. I = 360 mA Node 3 Node 4 I = 540 mA Node 5 I = 720 mA Node = 60mA Node = 60mA Node = 60mA Node = 60mA Node = 60mA Total = 180mA Total = 180mA Total = 180mA Total = 180mA Total = 180mA AUX AUX AUX AUX AUX 120mA taken by detectors 120mA taken by detectors 120mA taken by detectors 120mA taken by detectors Voltage at Node Voltage at Node Voltage at Node Supply voltage at the Node 11.30 V 9.57 V 8.42 V 7.84 V 120mA taken by detectors Voltage at Node 13.60 V 519 XB 1A PSU + Method 2 20m Control Panel A (+) B(-) Network Note: The +ve supply from the panel must remain isolated from the +ve of the Remote PSU. Node 1 Node 2 I = 180 mA 20m 20m 20m 20m I = 360 mA Node 3 I = 360 mA Node 4 I = 180 mA Node 5 Node = 60mA Node = 60mA Node = 60mA Node = 60mA Node = 60mA Total = 180mA Total = 180mA Total = 180mA Total = 180mA Total = 180mA AUX AUX AUX AUX AUX 120mA taken by detectors 120mA taken by detectors 120mA taken by detectors 120mA taken by detectors 120mA taken by detectors Voltage at Node Voltage at Node Voltage at Node Voltage at Node Voltage at Node 11.87 V 12.45 V I = 900 mA System Design Network Node 2 I = 180 mA 20m 20m 20m 20m I = 900 mA Method 1 TS2500 Installation Manual 13.60 V 12.45 V 11.87 V 519 XB 1A PSU 0V 12V Figure 3. Connecting Remote Power Supply Units Screened Cable Screened cable may prove necessary if the installation site has equipment that produces high levels of R.F. (Radio Frequencies), e.g. heavy industrial plant like welding equipment etc. If screen cable is required you should adhere to the following guidelines: 1. The screen on the cable should only be connected to mains earth at the control panel. 2. The continuity of the cable screen is most important and screening MUST be continuous along the full length of the network. 3. If the network cable enters any metal enclosures, make sure the screen remains isolated from the case. Electromagnetic Compatibility When used as intended this product complies with EMC Directive (89 /336 /EEC) by meeting the limits set by the standards BS4737, EN50082-1 1992 and EN50130-4 1993. The following installation guidelines must be followed. 8 1. External cables must be connected using cable entries or knockouts provided. 2. When routing external cables inside the product they must be: (a) Kept as short as possible. (b) Routed close to the housing. (c) Kept as far as possible from the electronics. 3. Any modifications other than those stated in this manual, or any other use of this product may cause interference and it is the responsibility of the installer to comply with the EMC and Low Voltage Directives. XNode Wiring The XNode requires a 4 core cable for interconnection, and up to 16 may be connected in a “daisy-chain” or “star” configuration. The distance between each XNode must not exceed 100 metres. The total distance to last XNode must not exceed 1000 metres. Power for detectors is provided by the Aux. +/- terminals. TS2500 Installation Manual System Design 1 Km (Max.) Control Panel Data Network XNode 4-Core 100 metres 100 metres XNode I/D=1 XNode I/D=2 Out In In 100 metres XNode I/D=3 Out In I/D=4 Out Out In XNode I/D=16 XNodes 5 to 16 In Out System Design 100 metres Daisy-chained Connections 1 Km (Max.) 100 metres Control Panel Data Network 4-Core 100 metres 100 metres 100 metres 100 metres XNode XNode XNode XNode XNode I/D=1 I/D=3 I/D=6 I/D=7 I/D=8 In Out In XNode In Out XNode I/D=2 In Out XNode I/D=4 In Out NOTE: The maximum number of devices that can be "Star" connected from the output of the Node or control panel is 4. Out In I/D=9 Out In XNode Out XNode I/D=10 In Out XNode I/D=5 In Out In I/D=11 Out In Out Star and Daisy-chained Connections Figure 4. XNode Connection Methods Wiring Remote keypads to an XNode Up to four remote keypads can be connected to each XNode, they can be connected in either a “star” or “daisy-chain” configuration. The distance to the furthest remote keypad from the XNode must not exceed 100 metres. Power for detectors are provided by the A(+) and B(-) terminals. The detection circuits in the XNode can either be mapped to the XNode or to the remote keypads by setting the 4-way “Remote Zone Enable” switch as shown in the table below: Switch OFF ON 1 XNode circuits A & B enabled Remote keypad 1 circuits A & B enabled 2 XNode circuits C & D enabled Remote keypad 2 circuits A & B enabled 3 XNode circuits E & F enabled Remote keypad 3 circuits A & B enabled 4 XNode circuits G & H enabled Remote keypad 4 circuits A & B enabled + + + + Remote keypads cannot be multi-tasked between each other when connected to the XNode, i.e. if remote keypad 1 is in operation, remote keypads 2, 3 and 4 are locked-out and will show “SYSTEM IS BUSY PLEASE WAIT.”. The remote keypads follow the ward assignment of the XNode, i.e. if the XNode is assigned to ward A then remote keypads 1-4 connected to that XNode are also assigned to ward A. The loudspeaker and remote keypad sounders will follow the ward assignment of the XNode. The programmable output on the remote keypads are mapped as follows: Remote keypads 1 and 3 follow XNode output A and remote keypads 2 and 4 follow XNode output B. 9 System Design TS2500 Installation Manual TS900 Node Wiring XNode In A B F G From control panel System Design Out Remote Keypad Network ABCDE G F B A To next XNode 6 Core Alarm Cable 100 metres (Max.) I/D=1 A Remote B Keypad C D E +12V 0V Power for detectors Spare core used to double up "B" to reduce voltage drop. +12V 0V I/D=2 A Remote B Keypad C D E Power for detectors +12V 0V I/D=3 A Remote B Keypad C D E Power for detectors The TS900 Node has two programmable outputs, each rated at 100mA, output [A+] is a switched +ve output and output [B-] is a switched -ve. The outputs can be used to drive sounders or relays etc. + + + No two devices should have the same address (I/D). The maximum number of devices is five. TS900 Nodes and XNodes cannot be connected on the same network. Wiring Nodes and Remote Keypads I/D=4 A Remote B Keypad C D E +12V 0V Power for detectors Fiigure 5. Wiring Remote Keypads to an XNode Wiring a Loudspeaker to an XNode The XNode has set of terminals for connecting up to two 16Ω extension loudspeakers. It is recommended that a remote power supply is connected to the XNode to provide the additional power for the loudspeaker. Wiring an Output Module to an XNode The XNode has a connector for a CPA6 Output Module, this can be used to provide eight switched -ve outputs to drive LED's, relays etc. The outputs will mimic the operation of the detection circuits, i.e. circuit [A] active = output 1 active, circuit [A] healthy = output 1 inactive. Programmable Outputs on the XNode The XNode has two programmable outputs, each rated at 100mA, output [A+] is a switched +ve output and output [B-] is a switched -ve. The outputs can be used to drive sounders or relays etc. 10 TS900 Nodes require a 4 core cable for interconnection, and up to 5 may be connected in a “daisy-chain” or “star” configuration to any one network. The distance between each Node must not exceed 100 metres and the total distance to last Node must not exceed 500 metres. Power for detectors is provided by the Aux. +/terminals. The TS900 Node and remote keypads can be connected on the same network. The network must be wired in 6-core cable to allow the remote keypad internal sounders to operate. + + + + + No two devices should have the same address (I/D). This method of connection is designed for networks 1 and 2. Although it can be used on other networks, the “D” connection for the remote keypads will have to be taken from networks 1 or 2. The sounder on the remote keypads will follow the control panel sounder. Remote keypads cannot be multi-tasked between each other on the same network when using this method of connection. The maximum number of devices is five. TS2500 Installation Manual System Design 500 meters (Max.) 100 metres I/D=1 Control Panel TS900 Node A B F G 4 Core A B F G I/D=2 I/D=3 I/D=4 TS900 Node TS900 Node TS900 Node Out In Out In A B F G A B F G 4 Core 100 metres 100 metres 100 metres Out In A B F G A B F G 4 Core A B F G TS900 Node Out In A B F G 4 Core I/D=5 A B F G Out In 4 Core A B F G A B F G Data Network TS900 Node Connections 100 metres 100 metres Control Panel Networks 1 or 2 100 metres I/D=1 I/D=3 I/D=5 TS900 Node TS900 Node TS900 Node In Out In A B C/F E/G D 100 metres A B F G Out A B F G A B F G A B F G In Out A B F G A B F G Terminal strip 100 metres I/D=2 I/D=4 Remote Keypad Remote Keypad A B C D E 100 metres A B C D E TS900 Nodes and Remotes Connected on the same Network Figure 6. TS900 Node Wiring Options Remote Keypads and TS700.LECs Up to 5 remote keypads or TS700.LECs can be connected on any one network. The devices may be wired in a “daisy-chain” or “star” configuration. When using remote keypads the network must be wired in 6-core cable. If all devices on the network are TS700.LECs the network can be wired in 4-core as the “D” connection is not required. + + No two devices should have the same address (I/D). + + The sounder on the remote keypads will follow the control panel sounder. This method of connection is designed for networks 1 and 2. Although it can be used on other networks, the “D” connection for the remote keypads will have to be taken from networks 1 or 2. Remote keypads cannot be multi-tasked between each other on the same network when using this method of connection. 11 System Design 100 metres System Design TS2500 Installation Manual 100 Metres (Max.) Spare Core System Design I/D=2 I/D=3 I/D=4 Remote Keypad or LEC Remote Keypad or LEC Remote Keypad or LEC A B CD E Control Panel Data Network I/D=1 Remote Keypad or LEC A B CD E A B CD E A B CD E I/D=ENG Remote Keypad or LEC A B CD E A B C/F D E/G Power For Detectors Power For Detectors Power For Detectors Power For Detectors Power For Detectors Figure 7. Wiring Remote Keypads or TS700.LECs TSLEC8 Up to two TSLEC8s can be installed inside the control panel. Each LEC provides an additional 8 detection circuits. The LEC is supplied with its own connector lead which simply plugs onto the control panel PCB. Detection Circuits All detection circuits can be wired either in “Double Pole” or “End of Line”. When using the “Double Pole” method, 4-core cable is required for non powered devices such as magnetic contacts and 6-core is required for powered devices such as movement sensors. When using the “End of Line” method, 4-core cable can be used for both non powered and powered devices. Battery The control panel must be fitted with an adequate battery in order for the system to function for eight hours in the event of a mains failure. 17Ah capacity can be provided from one single 17Ah battery or 14Ah capacity can be provided by fitting two 7Ah batteries connected in parallel. If the mains power to the control panel fails, the standby battery will take over and maintain the system. In order to safeguard the battery from full discharge the control panel automatically isolates the standby battery when its voltage falls below 9.5V. When the mains power is restored the system will power-up and reconnect the battery, then continue to recharge. 12 Mains Supply The mains supply is connected to a 3 way “Euro Type” fused terminal block, which is fitted with a 315mA fuse. To comply with BS4737 the supply should be fed from an un-switched fused spur fitted with a 3A fuse. All mains electrical connections should be carried out by a qualified electrician and must comply with the current IEE regulations. Panel Outputs The control panel has four programmable outputs, output [1] is a set of voltage free changeover contacts, output [2-] is a switched -ve @500mA and outputs [3+] & [4+] are switched +ve @500mA. The outputs can be used to drive relays etc. Extension loudspeakers Extension loudspeakers can be connected to the control panel or any XNode (not TS900 Node). The speaker output is designed to drive up to two 16Ω loudspeakers, however it is recommended that when using two speakers that they are wired in series to reduce current draw. Each loudspeaker output can also be programmed to one or more wards so that the sounder only operates under the relevant conditions. + Extension loudspeaker MUST NOT be wired in the same multi-core as network or detection circuit cabling. TS2500 Installation Manual The control panel has one external sounder output to drive standard SAB or SCB modules, additional external sounders can be driven from Nodes using a relay interface RM3A. When using a Node to drive an external sounder it is recommended that a remote power supply is fitted next to the Node to provide the power for the external sounder. The tamper for the external sounder can be monitored using one of the Node detection circuits. Plug-on Digital Communicator The DC54 (4 channel) or DC58 (8 channel) can be plugged onto the control panel so that alarm status information can be transferred to an Alarm Receiving Centre (ARC). The DC58 also offers the additional facility of reporting separate account numbers per ward. All data for the digital communicator can be programmed via the control panel. Plug-on Digi-modem Output Modules An output module (CPA6.OM) provides eight switched -ve outputs @ 100mA, which can be used to drive LED’s or relays. The control panel has a connector which allows one or more output modules to be daisy-chained together. The output modules can then be programmed to give ward status information and/or circuit alarm/mimic indications. The XNode also has a connector for a single output module, but the outputs will only mimic the eight detection circuits of the XNode. Networker Interface Boards The Networker Interface Boards (NIBs) can be used when cable runs between Nodes or remote keypads exceed 100 metres. The NIBs are supplied as a driver unit and receiver unit. The driver unit connects to the output of the control panel or Node and the receiver unit can be connected up to 3 kilometres away. A separate remote power supply unit will be required to power the receiver unit and the remainder of equipment on the network. The DC58M is a combined 8 channel digital communicator and V21 modem. The digital communicator also offers the additional facility of reporting separate account numbers per ward. If required the digicom can be disabled so that only the modem facilities are provided. The V21 modem is required to allow uploading and downloading of system data via a PC using Menvier Lineload software. RedCARE or Stand-alone Digicom Eight programmable switched -ve @100mA outputs are provided on the control panel to allow connection to a stand-alone RedCARE unit such as the Versus 3GSTU or DA BlueSTU. The STU can be mounted inside the control panel underneath the main PCB. Printer A DATAC printer or any serial RS232 printer can be connected to the control panel via a MPA or DCI (printer adaptor). The printer can be used to obtain a full printout of the system programming or event log. It can also be left connected and used as an on-line printer, i.e., all system events are printed as and when they occur. 13 System Design External Sounders System Design System Installation TS2500 Installation Manual System Installation TS2500 Control Panel Installation Procedure 1. Open the control panel by removing three screws from the front cover. Remove the cover and disconnect the earth bonding cable from the spade connection on on the transformer. Installation 2. Note the position of the cable entries as follows: (a) Ten 20mm cable entries for detection, alarm and remote keypad cables. (b) A 20mm cable entry for mains (230V) below the mains input terminal block. + The mains cable must enter the control panel through its own cable entry and must not be mixed with other cables. 3. Hold the control panel back box in the required position and mark the centre of the middle fixing position. Remove the back box, drill and plug the hole. 5. Re-position the back box and pass all cables into the base via the appropriate cable entries, remembering to fit grommeyts where necessary. 6. Secure the back box using not less than 30mm x No 10 screws through the three securing holes. 7. If required install and connect the following: (a) Stand alone digicom or RedCARE STU or other signalling device. (b) Plug-on digicom type DC54, DC58 or DC58M. (c) Output modules type CPA6.OM. (d) Printer type DATAC or serial RS232 via a printer adaptor (DCI/MPA). (e) Relay module type RM3A. + When replacing the cover, always ensure that the earth bonding lead is connected to the spade connection on the transformer. 4. Screw a No 10 screw into the plugged hole. Re-position the back box and mark the remaining two securing holes. Remove the back box, drill and plug the holes. Fused Terminal Block 200mA Mains Transformer Spade connection for earth lead to front cover Mains Cable Entry Printed Circuit Board (PCB) Battery Position Figure 8. TS2500 Control Panel Layout 14 TS2500 Installation Manual System Installation The mains supply is connected to a 3 way “Euro Type” fused terminal block,which is fitted with a 315mA fuse. + + + All electrical connections should be carried out by a qualified electrician and must comply with the current IEE regulations. To comply with European regulations the supply should be fed from a readily accessible disconnect device, e.g. un-switched fused spur. Battery Connections A single 17Ah battery or two 7Ah batteries can be installed inside the control panel to provide continuous system operation in the event of a mains failure. A set of battery leads are provided in the spares pack to allow connection between the battery and control panel. + _ Battery + 12V 17Ah Battery When making mains connections it should be ensured that if the cable slips in such a way as to place a strain on the conductors, the protective earthing conductor will be the last to take the strain. OR + 12V 7Ah Battery + _ Battery Installation Mains Connection - FUSE 315mA + L E To transformer N Figure 9. Mains Supply Connections 12V 7Ah Battery - Figure 10. Battery Connections If the mains power to the control panel fails, the standby battery will take over and maintain the system. In order to safeguard the battery from full discharge the control panel automatically isolates the standby battery when its voltage falls below 9.5V. When the mains power is restored the system will power-up and the reconnect the battery, then continue to recharge. If the system is to be tested using only the battery (no mains supply available) then the “Kick Start” pins must be momentarily shorted to enable the battery. 15 - TRG STB TR- H/O H/O + + SPEAKER BELL 6 NETWORK 6 (1 AMP) KICK START BATT FAULT NETWORK 7 (1 AMP) B C/F E/G NETWORK 8 B C/F E/G A NETWORK 7 A AUX AUX AUX TAMP 2 TAMP 1 EPROM LOWER REM LINE RESET FLT + NETWORK 5 (1 AMP) B C/F E/G NETWORK 6 0V 12V 8 B C/F E/G A + - 0V 12V BATTERY AUX NETWORK 8 (1 AMP) EARTH A. C. 9 NETWORK 5 7 BELL 12V (1 AMP) +DC POWER 2 3 4 5 6 7 8 DIGITAL COMMUNICATOR 1 NVM LOWER NETWORK 4 (1 AMP) NVM UPPER NETWORK 3 (1 AMP) 10 A 32 2 AUX 12V (1 AMP) EPROM UPPER JP7 AUX +4 +3 OUTPUT 1 -2 N/O N/C COM 0V 12V -- OUTPUTS -LEC 2 JP4 LEC 1 JP3 NETWORK 2 (1 AMP) B C/F E/G V 11 NETWORK 4 B C/F E/G A NETWORK 3 A Figure 11. Main PCB Layout 19 B C/F D E/G 27 12 DIGI-MODEM COMMS PORT NETWORK 2 16 2 Installation JP9 ENGINEERS REMOTE NETWORK 1 B C/F D E/G A NETWORK 1 (1 AMP) A 16 26 31 22 25 28 JP8 20 4 3 JP6 5 2 27 13 HEARTBEAT LED 3 POWER LED 1 SYSTEM LEARN JP5 FACTORY RESTART 24 JP2 JP1 29 OUTPUT MODULE PRINTER 23 15 18 14 17 21 30 26 1 TS2500 Installation Manual System Installation Main PCB Layout TS2500 Installation Manual System Installation Connection Terminals, Plugs & Indicators The main PCB has the following connectors etc. 1 Networks 1-8 Data networks for connecting nodes, remote keypads and LECs. Each network is protected by its respective fuse (30), the fuse is in-line with the [A] connection of the network 2 Auxiliary 12V Three sets of auxiliary 12V terminals are provided on the main PCB, each set provides dc power for detectors etc. These outputs are protected by a 1A fuse (32). 3 Battery Terminals Connection terminals for the red and black battery leads supplied inside the spares pack. 4 Earth Terminal Connection to mains earth. 5 AC Input Terminals The output from the mains transformer is connected into these two terminals. 6 External Sounder Terminals This group of terminals are used for connection to an external sounder, for full details of their function see page 26. 7 Speaker Terminals Up to two 16Ω extension loudspeakers can be connected across these two terminals. The volume is controlled via a programming option, see “Set Volume Level” on page 83. 8 Auxiliary Tampers 1 & 2 These terminals provide tamper protection to auxiliary devices such as remote power supplies, extension loudspeakers etc. If they are not used they must be linked out. 9 10 11 Remote Reset Input After a full alarm the system will require resetting, normally this is done by the engineer or via coded remote reset. By applying a -ve to this input terminal it will cause the system to reset after a full alarm. This input could be connected to the “Control” output on a RedCARE STU so that the central station can provide a “Remote Reset” facility. Line Fault Input When this input is applied with a +ve signal the system will generate a “Line Fault” condition. In the unset condition the system will generate a “Chime” tone every minute. In the set condition any programmed bell delay is cancelled. +DC Power This terminal provides the +12V power to the stand-alone digital communicator or RedCARE STU. This output is un-fused and therefore must only 12 Digicom Outputs 1 to 8 These are programmable outputs and are normally connected to the input channels on a stand-alone digital communicator or RedCARE STU. The outputs are normally at +12V and switch to 0V when active. The outputs can be inverted so that they switch from 0V to +12V when active, see “Configuration” on page 46. Each output will source 5mA in the +12V condition and sink 100mA in the 0V condition. 13 Panel Outputs 1 to 4 These are programmable outputs that can be used to drive relays and auxiliary equipment. Output [1] is a set of voltage free change over contact rated at 1Amp. Output [-2] is a switched negative output rated at 500mA. Outputs [+3] and [+4] are switched positive outputs rated at 500mA. 14 Printer Output Port (JP1) This 6-pin plug is used for connecting to either a CPA6 printer or a standard RS232 printer via the DCI/MPA printer adaptor. 15 Output Module (JP2) Output modules type CPA6.OM can be connected to this 5-pin plug, and are used to provide switched -ve outputs to LED's/relays etc. The outputs can be programmed such that they give ward status information and/or circuit mimic/alarm indications. 16 LEC 1 (JP3) / LEC 2 (JP4) Two TSLEC8 PCBs can be connected via an interface lead to these connectors. The interface lead is provided with the TSLEC8. 17 Factory Restart (JP5) If these pins are shorted during power-up all system parameters are reset to their factory default settings. If the engineer’s passcode is lost or forgotten it can be reset to 1234 without losing any other program data as follows: (a) Ensure that the system is fully unset and a master user passcode is available. (b) Remove the cover from the control panel, this will cause a panel lid tamper alarm. (c) Enter the master user passcode to silence the alarm. (d) Place the blade of a small screwdriver between the “FACTORY RESTART” pins. A multi-tone sound indicates that the engineer’s passcode has been reset. This action will be recorded in the system log. 17 Installation be used if the device is fitted inside the control panel housing. System Installation 18 Installation 19 20 System Learn (JP6) If these pins are shorted whilst the system is powered, the control panel will re-learn all devices on all eight networks. If after a system learn the number of devices or device types have changed the display will show "RELEARN REQUIRED". In order to clear this message you must confirm the number of network device using the "Confirm Network Devices" option, see page 69. Digi-Modem Plug (JP7) A plug-on digicom or digi-Modem may be connected to this 7-pin plug to allow panel alarm information to be transferred to an alarm receiving centre. The digi-Modem is used for remote communication and programming via a P.C. A PCI/DCI lead also is also available which connects to this plug when using a P.C. with Lineload software for direct communication with the control panel. Comms Port (JP8) High speed serial communications port COM1 (for future use). 21 Engineer’s Remote Keypad Plug (JP9) Normally all system programming will be carried out from one of the installed remote keypads. However, an engineers remote keypad can be temporarily connected to this 6-pin plug to allow programming and testing to be carried out at the control panel. This feature can only be used if Network 1 does not have any XNodes connected to it, any keypads addressed as 'ENG' or LECs addressed as 'NULL'. 22 Kick Start (JP10) If the system is to be powered only from the battery (no mains supply available) then the “Kick Start” pins must be momentarily shorted to enable the battery. 23 Power LED This LED indicates that the system power (mains or battery) is healthy. 24 Heartbeat LED When the system is functioning correctly this LED will continually flash on and off. If a fault occurs on the main PCB this LED will stop flashing. 25 Battery Fault If the system battery is incorrectly connected to the control panel the “Battery Fault” LED will illuminate. The fault LED will only extinguish when the battery has been correctly connected or replaced. 26 NVM Upper & Lower Two removable non-volatile memory (NVM) devices that store all system program parameters and the 4000 log events. 18 TS2500 Installation Manual 27 EPROM Upper & Lower Two removable memory devices that store the operating software for the TS2500 system. 28 System Current Measurement (V) The system current consumption can be calculated by measuring the voltage across this test point on the main PCB. Using a Voltmeter set to a low Voltage range measure the Voltage across the test point and multiply the reading by 10 to give the Total system current consumption i.e., a reading of 70mV = 700mA. 29 Tamper Switch The lid tamper protection for the control panel. 30 Network Fuses 1 to 8 The supply voltage across [A] and [B] terminals each network is protected by its own fuse (1Amp). 31 Bell Fuse The supply voltage across the [H/O+] and [H/O-] terminals that supply the external sounder is protected by this 1 Amp fuse. 32 Aux 12V Fuse The supply voltage across the auxiliary 12V terminals are protected by this 1 Amp fuse. TS2500 Installation Manual System Installation Loudspeaker Output. This terminal can be connected to a single 16 Ω Loudspeaker (NETLCD only). NETLCD Remote Keypad Network Connections & O/P. Terminals A to E are used to connect the remote keypad to the control panel network. The O/P terminal is the programmable output. Tamper Switch. Remote Keypad case tamper ENT Key Disable. If the “ENT” key is enabled the remote keypad can be used to set/unset and access all user menus. If the “ENT” key is disabled the remote keypad can only be used to set and unset the system. Four types of remote keypads are available: The NETLCD remote keypad has a 32 character back-lit Liquid Crystal Display (LCD). The system must have at least one NETLCD remote keypad fitted in order for system programming to be carried out. NETSTAR Remote Keypad The NETSTAR remote keypad has a 8 character back-lit starburst Liquid Crystal Display (LCD). + The NETSTAR remote keypad is limited to setting, unsetting and part-setting, and cannot be used for system programming. The display will always show the system time. 1 Installation Remote Keypads 2 NETLED Remote Keypad The NETLED remote keypad has a 4 character LED display. LED MIMIC The NETLED remote keypad is limited to setting, unsetting and part-setting, and cannot be used for system programming. The display will always show the system time. I/D Selector NETARM Remote Arming Station The NETARM remote arming station only has two indicator LED's, a power LED and a programmable function LED which follows the programmable output. + 3 1 2 3 4 ENG REMOTE I/D 4 WARD SOUNDER CONTROL + Display Module 5 A B C D E O/P - SPK + ENT KEY DISABLED The NETARM remote arming station is limited to setting, unsetting and part-setting, and cannot be used for system programming. 9 8 7 6 Figure 12. NETLCD, NETLED & NETARM PCB Layout PCB Layouts & Connections Detection Circuits. Each remote keypad has two programmable detection circuits. Loudspeaker Volume. For adjusting the volume of a speaker wired to the remote keypad (NETLCD only). 1 LED MIMIC Display Module LED Mimic. If this jumper link is set to the “enabled” position, the red () LED on the keypad will be “ON” when the keypad output is active. Remote I/D. Used to select the remote keypads address. (ENG = Engineer). Ward Sounder Control. If this jumper link is set to the “disabled” position, the remote keypad sounder will follow the control panel speaker output. If this link is set to “enabled”, the remote keypad sounder will only activate when the panel speaker and the output on the remote keypad are active at the same time. 1 2 3 4 ENG I/D Selector WARD SOUNDER CONTROL 3 4 REMOTE I/D 5 A B C D E O/P ENT KEY DISABLED 9 8 7 Figure 13. NETSTAR PCB Layout 19 Installation System Installation TS2500 Installation Manual Installing a Remote Keypad on the XNode Installing a Keypad on to the Network 1. Separate the cover and base by using a flat blade screwdriver to gently prise the two halves apart. Then lift the cover assembly away from the base, noting that the PCB is connected to the under side of the cover. 1. Separate the cover and base by using a flat blade screwdriver to gently prise the two halves apart. Then lift the cover assembly away from the base, noting that the PCB is connected to the under side of the cover. 2. Hold the base in position (keyhole to the top) and mark the appropriate securing holes, drill and plug the wall as required. Pass all cables into the base via the cable entry points as appropriate and secure the base to the wall. 2. Hold the base in position (keyhole to the top) and mark the appropriate securing holes, drill and plug the wall as required. Pass all cables into the base via the cable entry points as appropriate and secure the base to the wall. 3. Connect the network cables to the appropriate terminals. 3. Connect the cables to the appropriate terminals. 4. Set the I/D jumper link to the required position, see table below, ensuring no two remote keypads on the same Node have the same I/D. 5. Set the “Remote Zone Enable” switch on the XNode to enable zones in the remote keypads as required. 6. If installing the NETSTAR, NETLED or NETARM it is recommended that the “ENT Key Disable” jumper is set to the disabled position. This will ensure that the keypad functions are limited to setting and unsetting. 7. Finally clip the remote keypad cover onto the base being careful not to trap any cables or to obstruct the tamper switch. Remote Keypads connected to XNodes I/D Circuit A Circuit B Output 1 Node Circuit A Node Circuit B Node Output A 2 Node Circuit C Node Circuit D Node Output B 3 Node Circuit E Node Circuit F Node Output A 4 Node Circuit G Node Circuit H Node Output B ENG N/A N/A N/A 20 4. Set the I/D selector jumper link to the required position, see table below, ensuring no two remote keypads, LECs or nodes have the same I/D. 5. Finally clip the remote keypad cover onto the base being careful not to trap any cables or to obstruct the tamper switch. Remote Keypads connected to the Network I/D Circuit A Circuit B Output 1 N001 N002 N01A 2 N009 N010 N02A 3 N017 N018 N03A 4 N025 N026 N04A ENG N033 N034 N05A N = Network Number (1 - 8) XNode The XNode is very similar to that of TS900 Node in that it provides the facility to add an extra eight programmable detection circuits and two programmable outputs. However, the XNode can also drive extension loudspeakers, up to 4 remote keypads and an output module. The maximum number of XNodes that can be connected to any one network is 16. TS2500 Installation Manual System Installation Extension speaker Zone enable selector Output module connector Auxiliary 12V (for detectors) TS900 1 2 3 4 5 6 7 8 9 10 11 12 13 14 15 16 TH ZH CIRCUIT H 3 4 TS2500 TS2500 ZD TD CIRCUIT D JP4 - + A B O/P ABFG ABCDE AUX 12V REMOTE KEYPAD NETWORK Programmable outputs: [A+] = switched +ve @100mA [B -] = switched -ve @100mA Auxiliary 12V output (for powering detectors) Auxiliary 12V fuse (500mA) NODE NETWORK OUT NETWORK IN + Fit jumper-link to disable tamper switch Remote keypad fuse (500mA) AUX 12V 500mA REMOTE 500mA Control panel mains power indicator On = mains on Flashing = mains off Tamper switch JP5 JP5 FITTED = NO TAMPER NODE I/D A BNODE FG From previous XNode REMOTE ZONE ENABLE Programmable detection circuits E - H TG ZG CIRCUIT G TS900 ZC TC CIRCUIT C Programmable detection circuits A - D OUTPUT MODULE 1 2 ZB TB CIRCUIT B XNode type TS900 or TS2500 + SPEAKER VOLUME TA ZA CIRCUIT A I/D selector - TF ZF CIRCUIT F Speaker volume control TE ZE CIRCUIT E + - Installation SPEAKER AUX 12V To next XNode Connections to remote keypads Figure 14. XNode Layout I/D Detection Circuits Node Outputs A B C D E F G H A+ B- 1 N001 N002 N003 N004 N005 N006 N007 N008 N01A N01B 2 N009 N010 N011 N012 N013 N014 N015 N016 N02A N02B 3 N017 N018 N019 N020 N021 N022 N023 N024 N03A N03B 4 N025 N026 N027 N028 N029 N030 N031 N032 N04A N04B 5 N033 N034 N035 N036 N037 N038 N039 N040 N05A N05B 6 N041 N042 N043 N044 N045 N046 N047 N048 N06A N06B 7 N049 N050 N051 N052 N053 N054 N055 N056 N07A N07B 8 N057 N058 N059 N060 N061 N062 N063 N064 N08A N08B 9 N065 N066 N067 N068 N069 N070 N071 N072 N09A N09B 10 N073 N074 N075 N076 N077 N078 N079 N080 N10A N10B 11 N081 N082 N083 N084 N085 N086 N087 N088 N11A N11B 12 N089 N090 N091 N092 N093 N094 N095 N096 N12A N12B 13 N097 N098 N099 N100 N101 N102 N103 N104 N13A N13B 14 N105 N106 N107 N108 N109 N110 N111 N112 N14A N14B 15 N113 N114 N115 N116 N117 N118 N119 N120 N15A N15B 16 N121 N122 N123 N124 N125 N126 N127 N128 N16A N16B N = Network number (1 - 8) 21 System Installation Installing an XNode 1. Separate the cover and base by using a screwdriver to push 2 of the clips (left or right) inward from the base indents, then lift the cover clear. Installation 2. If the XNode is being fitted inside the control panel you may remove the XNode PCB from its base and secure it to the base of the control panel using self adhesive feet. If required, the tamper switch can be disabled by fitting the jumper link across JP5, see Figure 14. 3. If the XNode is being fitted outside the control panel, hold the base in position and mark the four securing holes. Drill and plug the wall as required, then pass all cables into the base via the cable entry points as appropriate. Secure the base to the wall using the appropriate fixing screws. 4. Connect the network data cables to the appropriate terminals. 5. If required, connect the remote keypad network cables to the appropriate terminals. 6. If required, connect the extension loudspeaker to the appropriate terminals. The volume of the speaker is controlled by the speaker volume control, see Figure 14. 7. Set the I/D selector jumper link to the required position, see the table below, ensuring no two XNodes on the same network have the same I/D. 8. Set the “Remote Zone Enable” switch on the XNode to enable or disable the zones in the remote keypads as required. 9. Set JP4 to the TS2500 position. 10. Finally clip the XNode cover onto the base being careful not to trap any cables or to obstruct the tamper switch. 22 TS2500 Installation Manual TS900 Node The TS900 Node allows the facility to add an extra eight programmable detection circuits and two programmable outputs. Up to five can be connected to any one network. + TS900 Nodes and XNodes cannot be connected on the same network. Installing a TS900 Node 1. Separate the cover and base of the Node by using a screwdriver to push 2 of the clips (left or right) inward from the base indents, then lift the cover clear. 2. If the Node is being fitted inside the control panel you may remove the Node PCB from its base and secure it to base of the control panel using self adhesive feet. If required, the tamper switch can be disabled by fitting the jumper link across JP2, see Figure 15. 3. If the Node is being fitted outside the control panel, hold the base in position and mark the four securing holes. Drill and plug the wall as required, then pass all cables into the base via the cable entry points as appropriate. Secure the base to the wall using the appropriate fixing screws. 4. Connect the network data cables to the appropriate terminals. 5. Set the I/D selector jumper link to the required position, see the table below, ensuring no two nodes, remote keypads or LEC’s on the same network have the same I/D. 6. Finally clip the Node cover onto the base being careful not to trap any cables or to obstruct the tamper switch. TS2500 Installation Manual System Installation Fit jumper-link to disable tamper switch Tamper switch JP2 FITTED = NO TAMPER ZD TD CIRCUIT D TE ZE CIRCUIT E ZC TC CIRCUIT C Programmable detection circuits A - D AUX 12V 500mA + + From previous Node ABFG - - + Mains power indicator On = mains on Flashing = mains off Auxiliary 12V fuse (500mA) - AUX 12V A B O/P NETWORK IN Programmable detection circuits E - H Installation NODE I/D TF ZF CIRCUIT F ZB TB CIRCUIT B 1 2 3 4 5 TH ZH CIRCUIT H I/D selector TG ZG CIRCUIT G TA ZA CIRCUIT A JP2 To next Node ABFG NETWORK OUT Auxiliary 12V output (for powering detectors) Programmable outputs: [A+] = switched +ve @100mA [B -] = switched -ve @100mA Figure 15. TS900 Node Layout I/D Detection Circuits Node Outputs A B C D E F G H A+ B- 1 N001 N002 N003 N004 N005 N006 N007 N008 N01A N01B 2 N009 N010 N011 N012 N013 N014 N015 N016 N02A N02B 3 N017 N018 N019 N020 N021 N022 N023 N024 N03A N03B 4 N025 N026 N027 N028 N029 N030 N031 N032 N04A N04B 5 N033 N034 N035 N036 N037 N038 N039 N040 N05A N05B N = Network number (1 - 8) 23 System Installation TS2500 Installation Manual Installing a TS900 ID NODE TS900 ID NODE The TS900 ID Node can be used as an alternative to the standard TS900 or XNODE. The ID Node provides a single ID Detector Loop that allows you to connect up to 30 ID devices. Several configuration options allow you to use the TS900 ID Node on its own or with existing TS900 Nodes or XNodes. You can connect a maximum of two ID Nodes to one network. 1. Separate the cover. Use a screwdriver to push two of the clips (left or right) inwards from the base indents and lift the cover clear. Fit jumper link to disable tamper switch Tamper switch 2. To fit an ID Node inside the control panel remove the ID Node PCB from its base and secure it inside the control panel using self-adhesive feet. Disable the ID Node tamper switch, if necessary, by fitting the jumper link across JP2 (see Figure 6). Cable Entry JP2 OFF ON Address Bit-Switch JP2 FITTED NO TAMPER TS900 I.D. NODE 1 2 3 4 Output Module Connector Cable Entry 1 Amp Auxilliary Fuse OUTPUTS A+ OUTPUT MODULE B+ C+ D+ - 1 AMP AUX 12V Cable Entry Switched +ve Outputs + EFG- Switched -ve Outputs H- Node Network 'IN' connections A B F G NETWORK IN + AUX 12V + - C D E DTR REMOTE LOOPNETWORK A B F G NETWORK OUT Node Network 'OUT' connections Cable Entry Mains power indicator (flashes when mains power is off) Auxilliary 12V output for Detector powering detectors Loop Loop-in connections for the Remote Network Figure 16. TS900 ID NODE PCB Layout 1 ON off ON off 2 off ON off ON 3 off off off off You can site the ID Node either inside the control panel or remotely. If you site the ID Node remotely the maximum cable length is 100m. Note that the supply voltage at the ID Node MUST be capable of supplying power for all the detection devices connected to the node. If there is not enough power then you will need to fit a remote power supply to the node. 4 off off ON ON Nodes Simulated 1, 2, 3 & 4 5 1, 2 & 3 4&5 3. To fit an ID Node remotely, hold the base in position and mark the four securing holes. Drill and plug the wall as required. Pass all cables into the base through the cable entry points as necessary. Secure the base to the wall using the appropriate fixing screws. 4. Connect “Node Network” cables to the appropriate terminals (see Figure 6). 5. Connect the ID Detection Loop to the + and - DTR Loop terminals. Take power for the detectors from the + and - AUX 12V terminals (see Figure 6). Set the Address Bit-Switch to the required position (see table below). For more information see “TS900 ID Node Installation Instructions” part number 18981. Biscuits Addressed 1 to 30 1 to 8 1 to 24 1 to 16 Address Bit Switch Options 24 Node Outputs 1-8 (A-H) 9-10 (A-B) 1-6 (A-F) 7-10 (A-D) TS2500 Installation Manual System Installation TS700 LEC TS700 LECs connected to the Network Box mounting holes(2) PCB mounting holes (4) CABLE ENTRY O/P CCT A ZA TA Programmable output switched -ve @100mA LEC I/D 12 34 NULL E D C B A CCT B ZB TB Programmable detection circuits Network connections I/D Circuit A Circuit B Output 1 N001 N002 N01A 2 N009 N010 N02A 3 N017 N018 N03A 4 N025 N026 N04A Null N033 N034 N05A N = Network Number (1 - 8) TSLEC8 The TSLEC8s are designed to fit inside the control panel, each LEC allows the facility to add an extra eight programmable detection circuits to the system. Mounting space and holes have been provided inside the control panel to allow two TSLEC8s to be fitted. The TSLEC8s are assigned to “Network 0". TH ZH CIRCUIT H TG ZG CIRCUIT G Installing a TS700 LEC TF ZF CIRCUIT F Figure 17. TS700 LEC Layout Programmable detection circuits ZD TD CIRCUIT D Fit jumper-link to disable tamper switch ZC TC CIRCUIT C CABLE ENTRY ZB TB CIRCUIT B Tamper switch TA ZA CIRCUIT A JP2 TAMPER = JP2 NOT FITTED NO TAMPER = JP2 FITTED TE ZE CIRCUIT E I/D selector 1. Separate the cover and base of the LEC by using a screwdriver to push 2 of the clips (left or right) inward from the base indents, then lift the cover clear. 2. If the LEC is being fitted inside the control panel remove the LEC PCB from its base and secure it to the base of the control panel using self adhesive feet. If required, the tamper switch can be disabled by fitting the jumper link across JP2, see Figure 17. 3. If the LEC is being fitted outside the control panel, hold the base in position and mark the two securing holes. Drill and plug the wall, then pass all cables into the base via the cable entry points. Secure the base to the wall using the appropriate fixing screws. 4. Connect network data cables to the appropriate terminals. 5. Connect detection circuit cables to the appropriate terminals. Programmable detection circuits To control panel plug LEC1 / LEC2 Figure 18. TSLEC8 Layout Installing the TSLEC8 1. Insert the four mounting pillars provided into the four holes in the TSLEC8 and secure in the base of the control panel. 2. Connect one end of the interface lead into the TSLEC8 and the other into the control panel connector LEC 1 (detection circuits 0001 to 0008) or LEC 2 (detection circuits 0009 to 0016). 3. Connect detection circuit wiring to the appropriate terminals. 6. Set the I/D selector jumper link to the required position, see the table below, ensuring no two nodes, remote keypads or LEC’s on the same network have the same I/D. 7. Fit the PCB into the base being careful not to trap cables or to obstruct the tamper switch. 25 Installation The TS700 LEC allows the facility to add an extra two programmable detection circuits and one programmable output. Up to five can be connected to a network. The TS700 LEC would normally be used when upgrading existing systems that have two zone expansion devices, such as the CPA6 MKII. System Installation TS2500 Installation Manual normally closed devices and then must be programmed with the “Invert” attribute. Detection Circuit Wiring All detection circuits may be wired as “End Of Line” (EOL) or ”Double Pole" (DP). Both methods can be used on the same equipment. l Double Pole l The maximum number of detection devices allowed in a circuit is ten. l Normally open devices such as exit terminator buttons are connected across the zone terminals and then must be programmed with the “Invert” attribute. Alarm Tamper 2K2 4K7 CIRCUIT B If the detection circuit is not used links can be fitted across the zone and tamper loops or programmed as “Not Used”. 4K7 Alarm Alarm Tamper Tamper 2K2 TB l 4K7 ZB The combined alarm and tamper loop resistance must be less than 100 Ohms. 500 meters or 100 Ohms CIRCUIT B l External Sounders TB The detector alarm and tamper contacts are connected to the zone and tamper terminals respectively. ZB l Max. 10 devices per circuit 500 meters or 100 Ohms ZA 4K7 = Yellow, Violet, Red 2K2 = Red, Red, Red CIRCUIT A Alarm TA Tamper Figure 20. End Of Line Wiring Control Panel Sounder Connections Alarm Alarm Tamper Tamper CIRCUIT A ZA The following terminals have been provided to allow connections to an external sounder: TA Installation The DP method requires the following: If the detection circuit is not used links can be fitted across the zone and tamper loops or programmed as Not Used. Max. 10 devices per circuit Figure 19. Double Pole Wiring End Of Line H/O+ This is used to provide a permanent +ve hold off to external sounders, strobes etc. It is protected by a 1A fuse (Bell 12V). H/O - This is used to provide a permanent -ve hold off to external sounders, strobes etc. TR - This is the negative tamper return connection from the external sounder unit. STB - This is the strobe trigger output which switches to 0V on alarm and is rated at 500mA. Normally this output is connected to the strobe -ve , the strobe +ve is connected to [H/O+]. TRG - This is the bell trigger output which switches to 0V on alarm and is rated at 500mA. This output can be programmed for SAB or SCB operation, and operates as follows: SAB - Switches to 0V on alarm and provides a maximum of 500mA. SCB - Provides a negative hold off (500mA), which is removed on alarm. The EOL method requires the following: l The detector alarm contacts must have a 4K7 shunt resistor fitted. l A 2K2 End of Line (EOL) resistor must be fitted at the point in the circuit furthest from the control panel. l Loop resistance with the EOL resistor shorted must be less than 100 Ohms. l The maximum number of detection devices allowed in a circuit is ten. l Normally open devices such as exit terminator buttons are connected in the same way as 26 TS2500 Installation Manual System Installation Control Panel SPEAKER Typical External Sounder + 1 x 16 Ohm Loudspeaker 12V + 0V Tamper In Tamper Out Strobe +ve Strobe -ve Trigger -ve SPEAKER H/O + H/O TR STB TRG - + - Figure 21. External Sounder Connections Both the TS900 Node and XNode have two programmable outputs, these can be utilised to drive an external sounder. However, it is recommended that a remote power supply is fitted next to the Node in order to provide sufficient power for the external sounder. A relay module such as the Menvier RM3A is also required to drive the external sounder. The figure below shows the connection details. COIL + + - Aux 12V COIL COIL + COIL - A+ B- RLY 2 RLY 1 SPARE 2 N/C COM RLY 1 TAMPER TAMPER NODE RM3A N/O N/C SPARE 3 SPARE 4 TX Aux 0V SAB MODULE STROBE- ZX STROBE + CIRCUIT X Program circuit as: TAMPER with the INVERT attribute TAMPER OUT TAMPER IN REMOTE POWER SUPPLY TRIGGER 12V 0V Figure 23. Loudspeaker Connections RedCARE or Stand-alone Digicom A stand-alone digital communicator, RedCARE STU or Paknet interface card can be connected to the system to transfer panel status information to a dedicated Alarm Receiving Centre. The control panel has the following outputs for connection to a digicom/RedCARE: COM RLY 2 N/O SPARE 1 2 x 16 Ohm Loudspeakers +12V 0V Figure 22. External Sounder Connections - Node Extension Loudspeakers Control Panel Connections Up to two extension loudspeakers can be connected across the [+] and [-] SPEAKER terminals on the control panel PCB. The volume for the loudspeaker is controlled via a programming option, see "Set Volume Level" on page 83. The control panel loudspeaker can also be assigned to one or more wards so that it only operates under relevant conditions. Digicom Outputs 1 to 8 These are the programmable digicom/RedCARE output connections. They are normally at +12V and switch to 0V when active. The outputs can be inverted so that they switch from 0V to +12V when active, see “Configuration” on page 46. Each output will source 5mA in the +12V condition and sink 100mA in the 0V condition. +DC POWER This provides the +12V power to the digicom/RedCARE. This output is un-fused and therefore must only be used if the device is fitted inside the control panel. The 0V supply for the digicom/STU can be picked up from any of the auxiliary 0V terminals. LINE FLT When this input is switched to +12V, a “Line Fault” condition is generated. A “Line Fault” condition in the unset mode will cause a “Chime” type tone to be generated every minute, which can be silenced by entering any valid passcode. A “Line Fault” condition in the set mode will cancel the “Bell Delay”. XNode Connections Up to two extension loudspeakers can be connected across the [+] and [-] SPEAKER terminals on the XNode PCB. The volume for the loudspeaker is controlled via the “SPEAKER VOLUME.” control. The XNode loudspeaker can also be assigned to one or more wards so that it only operates under relevant conditions. 27 Installation Installing an External Sounder from a Node System Installation TS2500 Installation Manual 8 7 6 Program As:5 Open (60) 4 Alarm (05) 3 PA (06) 2 Fire (07) 1 +DC POWER LINE FLT REM RESET Channel Inputs are Programmed as Positive Removed A plug-on digi-modem DC58M can be fitted inside the control panel to allow remote interrogation and programming via a personal computer (PC). It will also function as a standard digicom (if required). The unit should be fitted in accordance with the installation instructions supplied with it and connected to the control panel plug DIGI-MODEM using the lead provided with the DC58M. The NVM within the digi-modem can be programmed via the control panel, see “Digi/Modem options” on page 73. The modem data is also programmed via the control panel. TS2500 Control Panel RPS Installation AUX 0V 3GSTU Line Control Fault 1 2 3 4 5 6 7 8 A+ A+ A+ A+ V+ 0V NO C NC NO C NC NO C NC CONTROL PANEL DC58M Plug-on Digi-modem DC58M Figure 24. 3GSTU RedCARE Connections Telephone Network DC54/DC58 Plug-on Digicoms A plug-on digital communicator DC54 or DC58 can be fitted inside the control panel to allow alarm status information to be transferred to a dedicated Alarm Receiving Centre. The unit should be fitted in accordance with the installation instructions supplied with it and connected to the control panel plug DIGI-MODEM (JP7) using the lead provided with the unit. The NVM within the digicom can be programmed via the control panel, see “Digi/Modem options” on page Alarm Receiving Centre V21. Modem Figure 26. DC58M Digi-modem Schematic Plug-on digicom / digi-modem Output Modules A B BC Connect to JP7 DIGI-MODEM Telephone cable (Type 1/0.5mm CW1308) 6 5 4 White / Blue ring 3 2 1 Blue / White ring Orange / White ring B.T. master jack ( Type NTE5 user accessible connections ) Figure 25. DC54/DC58 Connections 73. 28 The Output Module provides eight switched -ve outputs each rated at 100mA. They can be used to drive LED's or relays etc. Each module is supplied with an interface lead which allows it to be connected to the control panel or XNode. Output modules are normally fitted inside the equipment they are controlling and can be positioned up to 100 metres away. Control Panel Connections When connected to the control panel the output modules can be programmed to give ward status indications and/or circuit mimic/alarm indications. XNode Connections When connected to the XNode, the output module will provide circuit mimic indications for the eight detection circuits of the XNode. TS2500 Installation Manual System Installation 100m PL2 PL1 1 2 3 4 +12V OUT +12V OUT IN DATA +12V IN Connect to plug labelled OUTPUT MODULE 5 6 7 8 Connect to JP1 PRINTER R POWE PAPER FEED CPA6 P CPA6 Printer 1k Resistors LED's Figure 27. Output Module Connections MPA or DCI Connect to JP1 PRINTER Using the CPA6 Printer 1. Plug the CPA6 printer directly on to the PRINTER plug (JP1) on the main control panel PCB. 2. The printer will printout a header, when finished the system program details and event log can be printed. 3. When finished unplug the printer. If the printer is left connected and the on-line printer option is enabled (see “Configuration” on page 46) events will be printed as and when they occur. Using the DATAC / RS232 Printer 1. Plug the DCI/MPA on to the PRINTER plug (JP1) on the main control panel PCB. 2. Plug the other end of the DCI/MPA into the DATAC or RS232 printer. 3. In order for the printer to work correctly ensure the printer is set to the following: Baud rate Parity Start bits Stop bits Data bits DTR =4800 = None =1 =2 =8 = Normal 4. When set-up correctly the system program details and event log can be printed. Installation The TS2500 supports two type of printers, the CPA6 printer (no longer available) and any standard RS232 printer. When using an RS232 printer a DCI/MPA printer adaptor will be required. Menvier Security supply a DATAC printer kit which consists of a portable RS232 printer, charger unit and DCI/MPA adaptor. 1 Connecting a Printer RS232 Data DATAC or RS232 printer Figure 28. Printer Connections Programmable Outputs The TS2500 system has many programmable outputs which can be used to drive relays, LED’s etc. Each output can be programmed for a different function, see “Programmable Output Types” on pages 35 - 39. Control Panel Outputs The control panel has four programmable outputs: [1] Set of voltage free change-over contacts rated at 1 Amp. [-2-] Switched -ve output rated at 500mA. [+3] Switched +ve output rated at 500mA. [+4] Switched +ve output rated at 500mA. Node Outputs Each XNode and TS900 Node has two programmable outputs: [+A] Switched +ve output rated at 100mA. [-B ] Switched -ve output rated at 100mA. Remote Keypads & TS700.LECs Each remote keypad and TS700 LEC has one programmable output: [O/P] Switched -ve output rated at 100mA. 5. When finished unplug the MPA/DCI. If the printer is left connected and the on-line printer option is enabled (see “Configuration” on page 46) events will be printed as and when they occur. 29 System Installation TS2500 Installation Manual +ve O/P Diode (IN418) (Programmed as Alarm / Bell / etc) Relay Aux 0V + 12 V Relay available from RS components P/No. 346-946. Capable of switching mains voltages Aux 12 V Diode (IN418) Relay -ve O/P (Programmed as Alarm / Bell / etc) + 12 V 0V +ve O/P Relay available from RS components P/No. 346-946. Capable of switching mains voltages 0V Aux 12V (Programmed as Detector Reset) Smoke Detector Aux 0V Smoke Detector -Ve O/P (Programmed as Detector Reset) Installation +ve O/P Aux 12V 1K0 Ohm Resistor 1K0 Ohm Resistor LED (Light Emiting Diode) LED (Light Emiting Diode) Aux 0V -Ve O/P +ve O/P Aux 12V 12V Buzzer RS Part No. 245-051 Aux 0V 12V Buzzer RS Part No. 245-051 -Ve O/P +ve Outputs -ve Outputs Figure 29. Output Examples The 519FM PCB monitors any combination of: l Supply Failure (mains) Low Battery Voltage 12V Failure (fuse failure) In order to monitor all the above fault conditions, the outputs on the 519FM must be connected to three detection circuits. It is recommended that the circuits are programmed as custom circuits as shown in Figure 30. For details on configuring "Custom Circuits", see page 72. l If required, the PSU battery can be “load tested” periodically by connecting a switched +ve output to the 519FM BATT TEST terminal. The battery test occurs at pre-programmed intervals and every time the engineer logs off the system. NODE Custom Circuit 3 CIRCUIT C l Custom Circuit 2 CIRCUIT B The TS2500 can be configured to monitor a 519XB power supply unit using a 519FM fault monitor PCB. The 519FM plugs directly onto the 519XB PCB plug labelled JP1. Program As:Custom Circuit 1 CIRCUIT A Monitoring a Remote Power Supply Battery Test (045) O/P Supply Fail Battery Low 12V Fail Batt Test 0V ZA TA ZB TB 519 FM ZC TC A+ Aux 0V Custom Circuit Programming Custom Circuit 1 Custom Circuit 2 Custom Circuit 3 Bell Digi Sounder Warning Custom o/p Yes Yes Yes Circuit Text In Unset In Part Set In Full Set In Unset In Part Set In Full Set In Unset In Part Set In Full Set PSU A.C. Fail PSU Batt. Fault PSU Fuse Fail Figure 30. Monitored Power Supply Connections 30 TS2500 Installation Manual Power-Up Checks Once the system is installed, but prior to powering-up give the system one final check to ensure that: When the initial power-up checks have been completed, check the following: 1. The wiring conforms to the requirements detailed in this manual and that all connections are correct (A to A, B to B etc.). 1. Switch off the 240V mains supply and ensure that the DC voltage at each device on each network is greater than 11V whilst the system is powered from its standby battery. 2. All system cables are kept clear of mains supply cables, telephone cables and R.F. cables. It is recommended that cable ties are used to keep cables separated. 3. Verify that maximum cable lengths and resistance’s are not exceeded. 4. Mains power supply cables to the system are connected to an un-switched fused spur. 2. Switch on the 240V mains supply and measure the DC voltage between the mains earth connection and AUX +12V. Then measure the DC voltage between the mains earth connection and AUX 0V. In both cases the measurement should be 1V or less. If the voltage is greater than 1V, the system has an “Earth Fault” and all cables should be checked for isolation to Earth. 5. Grommets are used where cables enter metal housings to ensure that the cable insulation is not compromised. 3. Using a voltmeter measure the DC voltage across the control panel PCB test points (V) and calculate the system current consumption. Ensure that the reading is not greater than 1.5A. Initial Power-Up 4. Repeat test (3) with the system in an alarm condition and ensure that the reading is not greater than 1.5A. To power the system for the first time: 1. Place a small screwdriver blade between the pins on the control panel PCB, marked “FACTORY RESTART". This will ensure the factory default parameters are set, see page 49 for a list of defaults. 2. Switch on the 230V mains supply and remove the screwdriver blade after 5 seconds. 3. Check that the power LED on the control panel PCB is illuminated. 4. Check that the remote keypads display “Panel Lid tamper”. The remote keypad sounders and extension loudspeakers will operate. 5. Enter the engineers passcode (default 1234) to silence the sounders. 6. Connect the standby battery. + The TS2500 has an overload protection circuit. If the power supply is overloaded, the display will show: “PSU OVERLOAD ! ! !” and sounder will sound. Relearn Required Message When the system is powered up after a factory restart, the remote keypads will display "RELEARN REQUIRED". On entering your engineer's passcode the system will automatically select the "Confirm Network Devices" option, see "Confirm Network Devices" on page 69. After confirming the correct number of devices the "RELEARN REQUIRED" message will be cleared. Once cleared, entering your engineer's passcode will select "Engineers menu 1". 31 Installation Pre Power-Up Checks System Installation Installation System Installation 32 TS2500 Installation Manual TS2500 Installation Manual Engineer’s Menu 1 Engineer’s Menu 1 Introduction Engineers menu 1 is the first of four engineers menus, which is selected when the engineer’s passcode is entered. The Engineer may leave “Engineer menu 1" by pressing the [ESC] key. The system will return to the unset condition but the remote keypads will show ”Engineer-on- site". This message will be cleared the next time a valid user passcode is entered or by selecting the log off engineer option in engineer's menu 1. Enter Engineer's Passcode 1 2 3 4 Engineers menu 1 Select Option :ESC 1 Engineers menu 1 Panel outputs ENT 2 Engineers menu 1 Digi outputs ENT 3 Engineers menu 1 Digi channels ENT 4 Engineers menu 1 Program circuits ENT 5 Engineers menu 1 System timers ENT 6 Engineers menu 1 Setting modes ENT 7 Engineers menu 1 Do system print ENT 8 Engineers menu 1 System options ENT 9 Engineers menu 1 Configuration ENT A Engineers menu 1 Location text ENT B Engineers menu 1 Default NVM data ENT C Engineers menu 1 Log off engineer ENT 0 Engineers Menu 1 Goto User menu 1 ENT ENT Engineers menu 2 Select option :- ESC Engineer on Site 12:19 Wed 22 AUG Hotkey Option Page 1 Program Panel Outputs 34 2 Program Digicom Outputs 34 3 Program Digicom Channels 34 4 Program Circuits, Attributes & Wards 40 5 Program System Timers 42 6 Program Setting Modes 44 7 System Print-out 44 8 Program System Options 45 9 Program Configuration 46 A View Location Text 49 B Default NVM data 49 C Log Off Engineer 51 0 Goto User Menu 1 51 C A Engineers Menu 1 33 Engineers Menu 1 Menu contents Engineer’s Menu 1 TS2500 Installation Manual Panel Outputs [1-1] Digicom Outputs [1-2] Digicom Channels Outputs 1 - 4 on the control panel PCB can be programmed to any of the output types shown on pages 35 - 39. The relay output [Output 1] can also be Inverted, see “Configuration option 11” on page 46. [1-3] The 8 plug-on digicom channels can be programmed to any of the output types shown on pages 35 - 39. The 8 digicom outputs on the control panel PCB can be programmed to any of the output types shown on pages 35 - 39. In addition, all outputs can be inverted, see “Configuration option 12” on page 46. 1 Engineers menu 1 Panel outputs 2 [ Engineers Menu 1 [ 2=SYSTEM Select output Type :- SYSTEM System type >04 Walk Test Enter system type No. or A / C to scroll [ to accept 1= Mimic 2 = Alarm 3 = Tamper 4 = Test Fail 5 = Omit [ to accept Select cct no. 0001 Mimic Enter circuit No. [ to accept Digi channel 1 Fire Alarm Press 1 - 8 to select Digicom output number [ to edit [ Select CCT type 0001 Mimic [ Digi output 1 Fire Alarm Press 1 - 4 to select Panel output number [ to edit Select output Type :- CIRCUIT Engineers menu 1 Digi channels [ Panel output 1 System Strobe 1=CIRCUIT 3 Engineers menu 1 Digi outputs Press 1 - 8 to select digicom channel number [ to edit 3=USER Select output Type :- USER 4=WARD Select output Type :- WARD [ [ Enter user No. 001 Code entered Select WARD Req. Ward A Strobe Enter user No. or A / C to scroll [ to accept Enter ward. 1 - 9 = wards A-I A / C to scroll I-P [ to accept Ward type >01 Ward A Strobe Enter ward type. [ to accept Panel Outputs, Digicom Outputs and Digicom Channels Flowchart 34 Programmable Output Types The TS2500 output types are broken down in to four specific groups: Circuit Output types related to the status of detection circuits 0001 to 8128. System Output types related to the status of the alarm system in general. User Output types related to the user codes 001 to 199 being used. Ward Output types related to the status of wards A to P. Engineer’s Menu 1 05 Alarm Activates when any ward is in alarm, deactivates when all ward alarms have been reset. 06 Panic Alarm (PA) Activates when any PA alarm is detected, deactivates when all PA alarms have been reset. 07 Fire Alarm Activates when any fire alarm is detected, deactivates when all fire alarms have been reset. 08 System Set Activates when any ward is set, deactivates when all wards are unset. 09 Code Accepted Activates for the duration of the “Access Code Time” after any valid passcode has been entered. 10 24hr Alarm Activates when any 24Hr alarm is detected, deactivates when all 24Hr alarms have been reset. 11 2nd Alarm Activates for the duration of the “2nd Alarm Time” when any ward has a second detector causing an alarm (alarm confirmation). 12 Courtesy Light Activates for the duration of the “Courtesy Time” when any ward is in entry or if any keypad is operated. 13 Engineer on site Activates when the engineer’s code is entered, deactivates when the engineer is logged off. 14 Circuits Omitted Activates when any circuit is omitted , deactivates when all circuits are reinstated. Circuit Output Types 1 Mimic Activates when the selected circuit is active, deactivates when the selected circuit is healthy. 2 Alarm Activates when the selected circuit causes an alarm, deactivates when alarm is reset. 3 Tamper Activates when the selected circuit is in tamper, deactivates when tamper is reset. 4 Test Fail Activates when the selected circuit is triggered whilst on test, deactivates when the engineer clears the test failures. 5 Omit Activates when the selected circuit is omitted, deactivates when the selected circuit is reinstated. System Output Types 00 Bell (SAB) Activates when the control panel bell output is on, deactivates when the control panel bell output is off. 15 Auxiliary Alarm Activates when any ward auxiliary alarm is activated, deactivates when all ward auxiliary alarms are reset. 01 System Strobe Activate when the control panel strobe output is on, deactivates when the control panel strobe output is off. 16 Always on Active at all times. 17 Bell (SCB) This is output type 00 inverted. Switch 12 Volts Activates when any ward is set, deactivates when any ward goes into alarm or entry mode. This output is normally used for latching detectors 18 Auxiliary Fuse Activates when the auxiliary fuse blows. 19 Auto-Setting Activates for 1 minute prior to any ward being set automatically. 20 Tamper Alarm Activates when a tamper alarm is triggered, deactivates when all tamper alarms have been reset. 02 03 04 Detector Reset Active all the time to power latching detectors (smoke detectors, shock sensors etc.), deactivates for 2 seconds when a code is entered to set the first ward. Walk Test Activates when the walk test option is selected, deactivates when the walk test is exited. 35 Engineers Menu 1 TS2500 Installation Manual Engineer’s Menu 1 Engineers Menu 1 36 Custom o/p 5 on Activates when a combination of output conditions occur, see “Custom Outputs” on page 71. 37 Custom o/p 6 on Activates when a combination of output conditions occur, see “Custom Outputs” on page 71. 38 Custom o/p 7 on Activates when a combination of output conditions occur, see “Custom Outputs” on page 71. 39 Custom o/p 8 on Activates when a combination of output conditions occur, see “Custom Outputs” on page 71. 40 Digi Failed Activates for 5 seconds when the digicom fails to communicate (plug-on only). Time Switch 1 On This output is controlled by the settings of “Time Switch 1" , see "Time Switches" on page 62. 41 Digi Successful Activates for 5 seconds when the digicom communicates successfully (plug-on only). Time Switch 2 On This output is controlled by the settings of “Time Switch 2" , see "Time Switches" on page 62. 42 Time Switch 3 On This output is controlled by the settings of “Time Switch 3" , see "Time Switches" on page 62. 43 Access Code If configuration option 29 is set to "Access code only" this output will only activate when an "Access" type passcode is entered and will remain active for the duration of the "Access Code Time". If configuration option 29 is set to "Access all codes" this output will activate when any valid passcode is entered and will remain active for the duration of the "Access Code Time". 44 Payment Required Activates when the “Payment Time” has expired, deactivates when engineer resets the system. 45 Battery Test On Activates during the battery test and for the duration of the “Battery Test” duration. 46 Rem Service Call Activates when the system is on-line with a remote PC and the Lineload software. 47 System Full Set Activates when all defined wards are set, deactivates when any ward is unset. 48 24hr Omit Active Activates when the 24Hr omit group is omitted, deactivates when the 24Hr group is reinstated. 49 PC Output 1 On This output is controlled by a PC with Lineload software. 21 Phone Line Fault Activates when a line fault is detected, deactivates when the telephone line is restored. 22 Mains Power Off Activates when the mains power is removed from the control panel, deactivates when the mains power is restored. 23 Exit / Entry Activates when any ward is in entry or exit mode. 24 Test CCTS Failed Activates when any circuit fails test, deactivates when reset by the engineer. 25 1st Knock Activates when any double knock circuit activates for the first time, deactivates when the circuit is activated for the second time or when the system is reset. 26 27 28 Digi Active Activates when the digicom is activated, deactivates when the digicom has finished communicating (plug-on only). 29 2nd entry only Activates when any ward starts the second entry timer, deactivates when the second entry time expires. 30 Entry Only Activates when any ward starts its entry mode, deactivates when the ward is unset. 31 Exit Only Activates when any ward starts its exit mode, deactivates when the ward is set. 32 Custom o/p 1 on Activates when a combination of output conditions occur, see “Custom Outputs” on page 71. 33 Custom o/p 2 on Activates when a combination of output conditions occur, see “Custom Outputs” on page 71. 34 Custom o/p 3 on Activates when a combination of output conditions occur, see “Custom Outputs” on page 71. 35 Custom o/p 4 on Activates when a combination of output conditions occur, see “Custom Outputs” on page 71. 36 TS2500 Installation Manual Engineer’s Menu 1 50 PC Output 2 On This output is controlled by a PC with Lineload software. 66 Bell box tamper Activates when the bell tamper is triggered, deactivates when the alarm is reset. 51 PC Output 3 On This output is controlled by a PC with Lineload software. 67 Panel lid tamper Activates when the panel lid tamper is activated, deactivates when the alarm is reset. 52 PC Output 4 On This output is controlled by a PC with Lineload software. 68 Chime Mimic Activates for 2 seconds when any chime circuit is activated. 53 Service Required Activates when the “Service Time” has expired, deactivates when the engineer passcode is entered. 69 24hr CCT Omitted Activates when any 24Hr circuit is manually omitted, deactivates when all omitted circuits are reinstated. 54 Reset Required Activates when the system requires an “Engineer Reset”, deactivates when the system is reset either by the engineer or Remote Reset. 70 Monitored O/P On Activates when a monitored circuit is triggered and stays active for the duration of the “Monitor Cct Time”. 55 Always Off This output never activates 71 56 Duress Alarm Activates when a duress code is entered, deactivates when the duress alarm is reset. Alarm Abort Activates for the duration of the "Abort duration" timer when the alarm has been aborted by the user . 72 Code Lock 1 on Activates when “Code lock timer 1" is on, deactivates when the timer is off. 73 Code Lock 2 on Activates when “Code lock timer 2" is on, deactivates when the timer is off. 57 System Part Set Activates when any part of the system is set, deactivates when all wards are unset or the system is fully set. 58 Battery Fault Activates when a battery fault occurs, deactivates when the fault is cleared. 74 59 Set Failed Activates when any ward fails to set, deactivates when the set fail condition is reset. Code Lock 3 on Activates when “Code lock timer 3" is on, deactivates when the timer is off. 75 60 System Open Activates when the system is unset, deactivates when any part of the system is set. Rem call enabled Activates when a user enables remote service call, deactivates when a user disables remote service call or after four hours. 76 Shunt code Activates for 5 seconds when a shunt code is entered. Auto-set timer 1 Activates when the “Auto-set timer 1" is on, deactivates when timer is off. 77 Auto-set timer 2 Activates when the “Auto-set timer 2" is on, deactivates when timer is off. 78 Auto-set timer 3 Activates when the “Auto-set timer 3" is on, deactivates when timer is off. 79 Relearn Required Activates when the system requires a relearn, deactivates when the relearn has been performed. 80 Custom cct 1 Activates when the custom circuit 1 is triggered, deactivates when custom circuit 1 is reset. 81 Custom cct 2 Activates when the custom circuit 2 is triggered, deactivates when custom circuit 2 is reset. 61 62 Random Output On Activates randomly (between 5 and 60 minutes). 63 Modem Lockout Activates when the modem is locked-out (four failed attempts), deactivates when a master code is entered or after 4 hours. 64 Auxiliary 1 tamp Activates when auxiliary tamper 1 is activated, deactivates when the alarm is reset. 65 Auxiliary 2 tamp Activates when auxiliary tamper 2 is activated, deactivates when the alarm is reset. 37 Engineers Menu 1 TS2500 Installation Manual Engineer’s Menu 1 82 Custom cct 3 Activates when the custom circuit 3 is triggered, deactivates when custom circuit 3 is reset. 05 Ward Alarm Activates when the selected ward is in alarm, deactivates when the selected ward is reset. 83 Custom cct 4 Activates when the custom circuit 4 is triggered, deactivates when custom circuit 4 is reset. 06 84 Custom cct 5 Activates when the custom circuit 5 is triggered, deactivates when custom circuit 5 is reset. Ward P.A. Alarm Activates when the selected ward PA alarm is detected, deactivates when the selected ward PA alarm is reset. 07 85 Custom cct 6 Activates when the custom circuit 6 is triggered, deactivates when custom circuit 6 is reset. Ward Fire Alm. Activates when the selected ward Fire alarm is detected, deactivates when the selected ward Fire alarm is reset. 08 Custom cct 7 Activates when the custom circuit 7 is triggered, deactivates when custom circuit 7 is reset. Ward Set Activates when the selected ward is set, deactivates when the selected ward is unset. 09 Custom cct 8 Activates when the custom circuit 8 is triggered, deactivates when custom circuit 8 is reset. Ward 2nd Entry Activates when the selected ward second entry timer is running. 10 Ward 24hr alm. Activates when the selected ward 24Hr alarm is detected, deactivates when the selected ward 24Hr alarm is reset. 11 Ward 2nd Alarm Activates for the duration of the “2nd Alarm Time” when the selected ward has a second detector causing an alarm. 12 Ward Entry Activates when the selected ward is in entry mode, deactivates when the selected ward is unset. 13 Ward Exit Activates when the selected ward is in exit mode, deactivates when the selected ward is set. 14 Ward CCTS Omit Activates when the selected ward has any circuits omitted, deactivates when all circuits in the selected ward are reinstated. 15 Ward Access If configuration option 29 is set to "Access code only" this output will only activate when an "Access" type passcode assigned to the selected ward is entered and will remain active for the duration of the "Access Code Time". If configuration option 29 is set to "Access all codes" this output will activate when any valid passcode assigned to the selected ward is entered and will remain active for the duration of the "Access Code Time". 16 Ward Set Fail Activates when the selected ward fails to set, deactivate when the selected ward is reset. 17 Ward Bell-SCB Activates when the selected ward is not in alarm, deactivates when the selected ward bell triggers. Re-activates when ward bell duration timer expires. 86 87 88 Engineers Menu 1 TS2500 Installation Manual Exit Fault Activates when a circuit is in a fault condition during exit, deactivates when the fault is reset. User Output Types 1 Code entered If configuration option 26 is set as “Timed Code Output” the output will activate when the selected user passcode is entered and deactivate when the “Access Code Time” has expired. If configuration option 26 is set as “Latched Code Output” the output will activate when the selected user passcode is entered and deactivate when the selected user passcode is re-entered. Ward Output Types 00 Ward Bell-SAB Activates when the selected ward is in alarm, deactivates when the selected ward bell duration timer expires. 01 Ward Strobe Activate when the selected ward is in alarm, deactivates when the selected ward is reset. 02 Ward Switch 12 Activates when the selected ward is set, deactivates when the selected ward is in alarm or entry. This output is normally used for latching detectors. 03 Ward Det. Reset Active all the time to power latching detectors (smoke detectors, shock sensors etc.), deactivates for 2 seconds when a code is entered to set the selected ward. 04 38 Ward Walk Test Activates when the selected ward is walk tested, deactivates when the walk test is exited. 18 Ward Settling Activates when the selected ward settling timer is running. 19 Ward Clear Activates when the selected ward is clear of faults when setting, deactivates when the selected ward has a fault during setting or when ward is unset. 20 Ward Tamper Activates when the selected ward detects a tamper alarm, deactivates when the selected ward tamper alarm is reset. 21 Ward Reset Req Activates when the selected ward requires a “Reset”, deactivates when the ward has been reset. 22 Ward Lock-Out Activates when a security key is active in the selected ward, deactivates when the security key is healthy. 23 Ward Chime On Activates when any circuit in the selected ward causes a chime tone. 24 Ward 24hr Omit Activates when the selected ward has one or more 24hr circuits omitted, deactivates when the selected ward has all its 24hr circuits reinstated. 25 Ward Monitor Activates when a monitored circuit is triggered in the selected ward and stays active for the duration of the “Monitor Cct Time”. 26 Ward Alm Abort Activates for the "Abort Duration" when the alarm in the selected ward has been aborted by the user. 27 Ward Exit Flt Activates when the selected ward has a fault during the setting procedure, deactivates when the fault is cleared. 28 Ward Exit/Ent. Activates when the selected ward is in entry or exit. 29 Ward Sndr ctl. Activates when the selected ward is in exit, entry or alarm. 30 Ward Perimeter Activates when the selected ward has a Night Perimeter circuit in alarm, deactivates when the alarm is reset. 31 Ward Shunted Activates when the selected ward has one or more circuit shunted, deactivates when the circuits are reinstated. Engineer’s Menu 1 32 Ward Auto set Activates when the selected high security ward is unset, deactivates when the high security ward is set. Engineers Menu 1 TS2500 Installation Manual 39 Engineer’s Menu 1 Program Circuits TS2500 Installation Manual [1-4] The TS2500 can monitor up to 1040 detection circuits, each circuit must be programmed in order for the system to respond correctly. Circuit Numbering The circuit number is always a 4 digit number, the first digit refers to the network number and can be 0 to 8 (0 is used for the TSLEC8s at the control panel). The next three digits refer to the circuits numbers and can be 001 to 128 (except when using network 0 which only has a range of 001 to 016). For example to select the first circuit on network 4 you would enter 4001. Circuit Types Engineers Menu 1 The circuit type defines how the circuit will respond when it is triggered. The circuit can also be programmed to respond differently when unset, see "Unset Circuit Types" on page 81. The following circuit types are available: Not Used A circuit that will never generate any alarm. Night A circuit that will generate a full alarm when the selected ward is set. 24hr A circuit which is monitored at all times. When triggered in the unset condition a local alarm is generated and when triggered in the set condition a full alarm is generated. PA Silent A circuit which is monitored at all times. When triggered it will activate any outputs programmed as P.A. PA Audible A circuit which is monitored at all times. When triggered it will activate any outputs programmed as P.A. and generate a full alarm condition. Fire A circuit that is normally connected to a smoke detector. When triggered it will generate a fire tone on the internal sounders, the external sounders are pulsed for the bell duration and any outputs programmed as fire will be activated. Auxiliary A circuit which is monitored at all times. When triggered it will activate any outputs programmed as Auxiliary. Final Exit This must be the first detector or door contact that is triggered when entering the protected area. When the setting mode for the area is programmed for Final Exit setting, opening and closing of this circuit during the exit procedure will cause the ward to set. Once set, activation of this circuit will start the entry timer for that ward. 40 Exit Term A circuit that is normally connected to a push button outside the protected area, which can be used to finally set the area. Ward Key A circuit normally connected to a shunt-lock or keyswitch, which is used to set and unset one or more wards. Shunt Key A circuit normally connected to a shunt-lock or keyswitch, which is used to shunt (isolate) one or more shuntable circuits for the selected wards. If the shunt key circuit is not assigned to any wards the shuntable circuits of the device its connected to are shunted when the shunt key operated. Tamper A circuit monitored at all times. When triggered in the unset condition a local alarm is generated and when triggered in the set condition a full alarm is generated. This circuit type can be used for a negative tamper return for monitoring SABs etc. When using the circuit for this type of monitoring the circuit MUST have the "Invert" attribute selected. Security A circuit used to lock-out keypad operation. 24hr Silent As 24hr but remains silent in the unset and set condition. Night Perimeter A circuit that is used for perimeter protection. When triggered the internal and external sounders are activated but no digicom output. If any other circuit is triggered the digicom is activated. Custom Circuits There are eight customisable circuit types, see page 72 for details. Circuit Attributes Each circuit type can have one or more attributes assigned to it to alter its operation. The following circuit attributes can be programmed: Access Circuits programmed with this attribute are automatically isolated during the entry procedure to allow a “walk through” route for the user to access the remote keypad. Double Knock Circuits programmed with this attribute will only cause an alarm condition if: a) The circuit is activated twice within the Double Knock timer, see System Timers. b) The circuit remains active for the whole duration of the Double Knock timer. TS2500 Installation Manual Omittable Circuits with this attribute can be omitted by the users. Reset This attribute is normally assigned to a circuit that is connected to a vibration or smoke detector, so that during the “Detector Reset” period the circuit is not monitored. Activity Circuits with this attribute are monitored so that when they activate the circuit activation is stored. When the user attempts to set the system, any circuits not activated during the “Activity Delay” period are reported, indicating that the detector may be obstructed. An example of this feature would be to assign movement detectors within a warehouse area with this attribute. This would report to the user at the time of setting any detectors that have become obstructed by pallets etc. Entry Circuits with this attribute will initiate the entry procedure when the system is part-set and respond as normal when full set. This attribute must be assigned to all circuits that are required to initiate the entry procedure in the part set condition. Chime Tone 1 Circuits with this attribute will cause the internal sounders and remote keypad sounders to generate a single two-tone “chime” sound if the circuit is activated. Chime Tone 2 Circuits with this attribute will cause the internal sounders and remote keypad sounders to generate a double two-tone “chime” sound if the circuit is activated. Chime Tone 3 Circuits with this attribute will cause the internal sounders and remote keypad sounders to generate a triple two-tone “chime” sound if the circuit is activated. Inverted Circuits with this attribute are inverted so that a healthy circuit is seen as active and an active circuit is seen as healthy. This attribute should be used when monitoring normally open devices such as exit terminator buttons and pressure pads etc. Shuntable Circuits with this attribute are shunted (Isolated) when a “Shunt Key” circuit is operated or when a “Shunt code” is entered. Beam Pair Circuits with this attribute will only cause an alarm if two or more circuits with the beam pair attribute are in alarm in the same ward within the “Beam Pair” timer. Eng. Test Circuits with this attribute are enabled during the engineer false setting routine. Monitored Circuits with this attribute activate the “Monitored" output type when triggered. Non Latching This attribute is used to make the "Ward Key", "Shunt Key" or "Security Key" non latching. Circuit Wards The TS2500 has sixteen wards which are labelled A to P, each circuit can be assigned into one or more wards. Circuits assigned to more than one ward will only be armed when all the wards they are in are set. 4 Engineers menu 1 Program circuits [ TS800 LEC 1 0001 Not used Circuit No. Location Circuit Type Enter circuit No. or A / C to scroll B=next network [ to edit B to paste last programmed circuit details Circuit Text - NO TEXT 0001>Night A / C to scroll through circuit types [ Circuit No. Attribute Type 0001 Night ACCESS NO Circuit type YES or NO A / C to scroll through attributes B to toggle YES / NO [ 0001 is in wards *,*,*,*,*,*,*,* 1-8 = to toggle wards A / C to toggle between wards A - H & wards I - P [ Program Circuits Flowchart 41 Engineers Menu 1 On Test Circuits with this attribute will be disabled from the system for the period set by the “Test Time”, see System Timers. If the circuit is activated during this period the activation will be logged and the user is informed of the circuit failure when operating the system. The test fail message can only be cleared with the Engineers passcode. If at the end of the test period no activation’s have occurred the test attribute is automatically removed. The test period is initiated by entering the Engineers passcode. Engineer’s Menu 1 Engineer’s Menu 1 System Timers TS2500 Installation Manual [1-5] There are 103 programmable system timers which are listed below. Exit time wards A to P When using timed exit this timer sets the delay between the user initiating the exit procedure and the ward actually setting. If during the exit time an “Exit Terminator” circuit is activated the any remaining exit time is cancelled and the ward sets immediately. (Default = 030 Seconds). Engineers Menu 1 Entry dly wards A to P When the ward is set and the entry procedure is initiated, the entry timer starts to count down. If a valid user passcode has not been entered when the timer reaches zero, the internal sounders are activated and the “2nd entry delay” timer is started. (Default = 015 Seconds). Digi dly wards A to P When an alarm is triggered the communication of an alarm signal to the central station for the selected ward can be delayed by the value of this timer. (Default = 000 Seconds). Bell dly wards A to P When an alarm is triggered the activation of the external sounder for the selected ward can be delayed by the value of this timer. (Default = 000 Minutes). Bell dur wards A to P When the “Bell Delay” for the selected ward has expired the duration of the external sounder can be controlled by the value of this timer. (Default = 020 Minutes). Exit settle time When a ward is set by “Final Exit” or “Exit Terminator”, detectors that are on the exit route sometimes take several seconds to settle after activation. The delay programmed in this timer is used to ensure that these detectors are not active before the ward is set. (Default = 005 Seconds). 2nd Entry delay When the ward “Entry Dly” has expired the “2nd entry delay” timer starts to count down. If at the end of this time the ward has not been unset then an alarm will be generated for the relevant ward. (Default = 015 Seconds). Double knock dly This is the “Double Knock” time window in which either two circuit activations must occur to generate an alarm condition, or the circuit must remain active for the whole duration of this time to generate an alarm condition. This will only apply to circuits with the “Double Knock” attribute. (Default = 010 Seconds). Abort duration This timer controls the duration of the “Abort” output. (Default = 010 Seconds). 42 Abort delay This timer sets the period in which the alarm signal may be aborted following an alarm condition. When an alarm occurs, the “Abort Output” is only activated if the system is unset within this period. If the system is unset after this period the abort output is NOT activated. (Default =180 Seconds). 2nd alarm time This timer controls the duration of the “Second Alarm” (Confirmation) output. (Default = 060 Seconds). Courtesy time This timer is used to control the duration of the output type “Courtesy Light”. (Default = 120 Seconds). Access code time This timer is used to control the duration of the output types “Code Accepted”, “User code entered” and “Ward Access”. (Default = 005 Seconds). Menu time-out This timer controls how long a user menu can be selected before timing out and returning the system to the unset condition. (Default = 180 Seconds). Line fault delay This timer delays the “audible” line fault indication when a telephone line fault occurs. The display and any outputs programmed as “Phone Line Fault” are not affected. (Default = 030 Seconds). AC off delay This timer delays the “audible” mains off indication when the mains power is removed. The display and any outputs programmed as “Mains Power Off” are not affected. (Default = 030 Seconds). Monitor cct time This timer affects the duration of the output types “System Monitored” and “Ward Monitor”. (Default = 060 Seconds). Beam Pair time This is the time window in which two “Beam Pair” circuit activations must occur in order for the system to generate an alarm condition. (Default = 010 Seconds). Battery test dur This timer controls the duration of the battery test. (Default = 030 Seconds). Answer ring time This timer is used to allow modems and faxes/answer machines to be used on the same telephone line. For example if the timer is set to 30 seconds, the PC will dial into the alarm system and allow the line to ring for 3 or 4 seconds then hang up. The PC will then dial in again and providing this has occurred within 30 seconds of the first time it rang in, the panel modem will answer the call. (Default = 030 Seconds). TS2500 Installation Manual Global bell dur. If the system is fully set and the Global /Ward Bell configuration option (23) is set to “Global” the system will apply this timer to all alarms for all wards, otherwise it will use the relevant ward bell duration timer. (Default = 020 Minutes). Activity delay This timer sets the duration within which all “Activity Monitored” circuits must be activated to ensure that the system may be set without displaying inactive circuits. Once the timer expires it is restarted and all “Activity Monitored” circuits must once again be re-activated. (Default = 060 Minutes). Defer setting by When using the auto-set feature users may defer setting of the ward(s) by the amount set in this timer. (Default = 010 Minutes). Battery test The timer controls the frequency of the system battery test. (Default = 060 Minutes). Hi Security time This timer sets the duration in which a “High Security” ward can remain unset before it automatically attempts to set itself. When a “High Security” ward is unset activation of any circuit with that ward will reset this timer. (Default = 000 Minutes). Cct test time This timer varies the number of days that the “Test” attribute may be applied to a circuit. If the timer is set to 000 then circuits will remain on test until the “Test” attribute is removed. (Default = 014 Days). Service time The installation company may use this timer to periodically generate “SERVICE REQUIRED” message so that the user is reminded that a service call is required. The users may continue to set and unset the system. When the engineer attends the site and enters their passcode the message is cleared. The service timer is re-started when the engineer re-selects this timer option. To disable this feature set the timer to 000. (Default = 000 Days). Payment time The installation company may use this timer to prevent the users from setting the system. When the timer expires the selected ward will lock into “Engineer Reset” and the users are unable to set the selected ward until the engineer has reset the system or the user has been provided with a “Remote Reset” code. To disable this feature set the timer to 000. The payment timer can be selectively applied to wards A to P, see “Equipment Wards” on page 80. (Default = 000 Days). Test call every If the system is fitted with a plug-on digicom (DC54, DC58 or DC58M) it is possible for the control panel to make the digicom send a timed test call to the central station. The “Test Call” timer sets the frequency of activation in days. Once programmed the digicom will send the test call at 3.00AM. (Default = 000 Days). Select menu time This timer determines how long the "Set/Unset" menu is displayed after a user passcode is entered. (Default = 010 Seconds). Custom o/p 2 tmr This timer determines how long "Custom Output 2" will remain active after it is triggered. (Default = 000 Seconds). 5 Engineers menu 1 System timers [ Exit time ward A 030 Second(s) Timer Current Time A / C to scroll timers B=next timer group Entry dly ward B 015 Second(s) Timer Current Time To edit enter 3 digit number Entry dly ward A > 030 Second(s) [ System Timers Flowchart 43 Engineers Menu 1 Global bell dly. If the system is fully set and the Global/Ward Bell configuration option (23) is set to “Global” the system will apply this timer to all alarms for all wards, otherwise it will use the relevant ward bell delay timer. (Default = 000 Minutes). Engineer’s Menu 1 Engineer’s Menu 1 TS2500 Installation Manual Setting Modes [1-6] Each ward A to P can be programmed to set by one of the following modes: Final Exit The ward will set when the “Final Exit” circuit is activated and after the “Settle Time” has expired. Exit Terminator The ward will set when the “Final Exit” circuit is activated, the “Exit Terminator” button is pressed and after the “Settle Time” has expired. Timed Exit The ward will set when the “Exit Time” has expired or if the “Exit terminator” button is pressed. Instant The ward will set instantly. Deferred As Timed Exit, however, if any circuits are activated during the exit procedure the exit timer is restarted. Engineers Menu 1 6 Engineers menu 1 Setting modes A / C to Scroll through the Wards Setting mode for Ward A Timed ext 1 = Final ext 2 = Exit term 3 = Timed ext 4 = Instant 5 = Deferred [ Setting Modes Flowchart [1-7] The system print option is broken down into sections so that the engineer may print only the relevant details. The sections are as follows: Custom Text Prints the details of “Reset Message”, “Location Text”, “Printer Header”, "Remote reset Message", “Printer Prefix”, Banner Message", Part Set Banner", “Aux Tamper 1", ”Aux Tamper 2" and “Modem String”. Modem Data Prints the details of “Call back No.1", ”Call back No.2", “Call back No.3", ”Modem Site No" and “Modem Password” User codes Prints the “User Number”, "User Name", “User Type”, “User Wards”, User Auto Sets" and “User Auto Unsets” for each defined user. Configuration Prints the details of all “Configuration Options”. Outputs Prints the details of “Panel Outputs”, “Digicom Outputs”, “Digicom Channels”, “Custom Outputs” and “Node/Rem Outputs” [ Setting mode for Ward A Timed Ext Do System Print Setting Mode Setting Modes Prints the details of “Setting Modes” for wards A to P. System Timers Prints the details of all “System Timers” and “System Options”. Time Switches Prints the details of “Time Switch 1", ”Time Switch 2" and “Time Switch 3". Code Locks Prints the details of “Code lock Group 1", ”Code lock Group 2" and “Code lock Group 1" Auto-set times Prints the details of “Auto-set Timer 1", ”Auto-set Timer 2" and “Auto-set Timer 3". Custom Circuits Prints the details of the eight “Custom Circuits”. Circuits Prints the network number, circuit number, circuit status, set circuit type, unset circuit type, circuit attributes, ward assignment and circuit resistance for each defined detection circuit. Equipment Wards Prints the ward assignment for all equipment. Net Equipment Prints the ward assignment nodes and remote keypads. Part set groups Prints the ward assignment and text of the ten part set groups. 44 TS2500 Installation Manual Engineer’s Menu 1 Reset algorithm Engineers menu 1 Do system print When a ward is programmed for “Engineer Reset” the requirement to send an engineer to site can be overridden by the user by using the “Remote Reset” facility. If an alarm is generated the system will respond with a four digit “seed” code which the user quotes to the Alarm Receiving Centre or alarm company. The “seed” code is then entered into a decoder and a unique “Remote Reset” code is generated. This is passed back to the user and on entering the “Remote Reset” code, the system is reset. The remote reset feature can be selectively applied to wards A to P, see page 80. [ Press B to Print Custom text? A / C to scroll through the print options B to tag for printing Press B to Print Configuration? [ To send tagged options to the printer System Print Flowchart System Options The system options are as follows: [1-8] Number of rearms At the end of the bell duration time the system re-arms all circuits that are healthy. Circuits that are still in an alarm are isolated until they change to a healthy condition. This counter controls the number of times that a “circuit” will re-arm before it is locked out of the system. The rearm feature can be selectively applied to wards A to P, see page 80. (Default = 003). Modem rings This counter is for use with the DC58M, it allows the engineer to specify how many rings are required before the DC58M answers the call. If the counter is set to 000 it will answer the call immediately. (Default = 000) Keys until tamp The value of this counter determines how many illegal key presses can be entered before the a code tamper occurs. A code tamper locks out the remote keypad for 5 minutes. (Default = 017) Remote resets This counter determines how many “Remote Resets” can occur before the system locks into engineer reset only. When the engineer attends site and enters their passcode the counter is restored to its original value.The Remote Reset feature can be selectively applied to wards A to P, see page 80. (Default = 032) The “Remote Reset” code is generated using an algorithm identified by a 3 digit number. Alternative algorithms can be selected but these must correspond to that used by the ARC (or alarm company) otherwise the “Remote Reset” code will be incorrect. (Default = 004). Double Knocks This counter determines how many “Knocks” must occur on a double knock circuit before the control panel responds with an alarm condition. This counter can then be selectively applied to wards A to P, see page 80. If a ward is not selected to use this counter all double knock circuits within the ward will behave as normal double knock circuits, i.e they must activate twice within the double knock time delay or remain active for the duration of the double knock delay before causing an alarm. (Default = 002). 8 Engineers menu 1 System options [ Number of rearms 003 Option Value A / C to scroll options B=Edit Modem rings 000 To edit enter 3 digit number Modem rings 002 [ System Options Flowchart 45 Engineers Menu 1 7 Engineer’s Menu 1 Configuration Engineers Menu 1 There are 35 configuration options as follows: TS2500 Installation Manual [1-9] 00 Bell Is an SAB (Default) The control panel bell output applies 0V when active. Bell is an SCB The control panel bell output removes 0V when active. 01 View alms P.set (Default) When the system is part set and alarm occurs in a set ward the alarm information is displayed on all remote keypads immediately. View alms unset When the system is part set and alarm occurs in a set ward the alarm information is only displayed when the ward that the alarm occurred in is unset. 02 Duress Disabled (Default) When entering a passcode with the first two digits reversed a duress alarm will NOT be generated. Duress Enabled When entering a passcode with the first two digits reversed a duress alarm will be generated. 03 Engr Authorised (Default) When using Menvier Lineload software data in the control panel can be overwritten without the users knowledge. User Authorised When using Menvier Lineload software data in the control panel can only be overwritten with authorsation by the user. 04 05 06 46 On-Line Enabled (Default) When using Menvier Lineload software the On-Line Keypad feature is enabled. On-Line Disabled When using Menvier Lineload software the On-Line Keypad feature is disabled. Lo-sec Engineer (Default) The engineer can access the engineers programming menus by entering his engineer’s passcode. Hi-sec Engineer The engineer can only access the engineers programming menus after entering his engineer’s passcode and obtaining a “Remote Reset” code. Normal answer (Default) When using a DC58M digi-modem the modem will answer the call after a pre-programmed number of rings, see “System Options” on page 45. Timed answer When using the DC58M digi-modem the digi-modem will used the “answer ring timer”, see “System Timer” on page 45. 07 Unset ward first (Default) When the system is part set and a passcode is entered the “0=UNSET WARDS” option will be displayed first. Set ward first When the system is part set and a passcode is entered the “0=SET WARDS” option will be displayed first. 08 Can set with L.F (Default) The selected wards can be set with a telephone line fault, however the user will be asked to confirm this at the time of setting. Line fault can be assigned to any ward , see “Equipment Wards” on page 80. No set with L.F The selected wards cannot be set with a telephone line fault. 09 Can set - AC off (Default) The selected wards can be set with no mains power. Mains power off can be assigned to any ward , see “Equipment Wards” on page 80. No set - AC off The selected wards cannot be set when the mains power is off. 10 Quiet chimes (Default) The level of the chime tones is determined by the volume control of the device driving the loudspeaker. If the device is a XNode the volume level set by the volume control pot on the XNode PCB. If the device is the control panel the volume level is set via the “Set Volume Level” option, see “Set Volume Level” on page 83. Loud chimes The level of the chime tones is always full volume. 11 O/P 1 normal (Default) Panel output 1 (Relay) is normally de-energised. O/P 1 inverted Panel output 1 (Relay) is normally energised. 12 Digi normal (Default) The eight digicom outputs on the switch from +12V to 0V when removed). Digi inverted The eight digicom outputs on the switch from 0V to +12V when applied). 13 control panel active (+ve control panel active (+ve 4 digit codes (Default) All system passcodes are 4 digits. 6 digit codes All system passcodes are 6 digits. When using 6 digit passcode the last 2 digits of the passcode are the user number, e.g. the engineer’s passcode is 123400 and the master user’s passcode is 567801. 14 Modem on Com1 (Default) The panel comms port (JP8) is used for the modem. Printer on Com1 The panel comms port (JP8) is used for the printer. 15 Chime Audible (Default) Circuits that are programmed as chime will only generate a chime tone. Chime Visible Circuits that are programmed as chime will generate a chime tone and the remote keypads will display the circuit that was triggered. 16 Manual Omits (Default) Circuits with the omit attribute can only be omitted via the user omit routine. Automatic Omits Circuits with the omit attribute are automatically omitted if they are still active when the system is being set. 17 Omit Tampers No (Default) Tamper faults cannot be omitted by the user. Omit Tampers Yes Tamper faults can be omitted by the user. 18 O/M’s mimic cct (Default) The output modules connected to the control panel indicate circuit mimic activations. O/M’s mimic alms The output modules connected to the control panel indicate circuit alarm activations. 19 20 21 Log Time & Date (Default) The system log will show the time and date in the following format: “17:10.57 25/12" where 25/12 is the 25 December. Log Time & Day The system log will show the time and day in the following format: “17:10.57 Wed 25" where Wed is Wednesday and 25 is the date. Global Setting (Default) The user can set their allocated wards from any remote keypad. Local Setting The user can only set their allocated wards from a remote keypad assigned to their wards. Global Unsetting (Default) The user can unset their allocated wards from any remote keypad. Local Unsetting The user can only unset their allocated wards from a remote keypad assigned to their wards. Engineer’s Menu 1 22 24hr Omit Global (Default) Any 24hr circuit or group can be omitted from any remote keypad. 24hr Omit Local Only 24hr circuits or group that are assigned to the same wards as the remote keypad can be omitted. 23 Ward bell time (Default) The system uses the respective “ward bell delay” and “ward bell duration” timers when the system is full or part set. Global bell time When the system is part-set the respective “ward bell delay” and “ward bell duration” timers are used. When the system is full set the system uses the “global bell delay” and “global bell duration” timers. 24 Latching Fire (Default) Fire detection circuits will cause an alarm when triggered and will only be re-armed after a full reset, i.e. Enter passcode to silence alarm, then enter passcode followed by [ESC] to reset the alarm. Nonlatching Fire Fire detection circuits will cause an alarm when triggered. On entering a passcode the alarm is silenced, if the same circuit is activated before carrying out a reset, the alarm re-triggered. 25 Online Printing (Default) Events recorded in the system log are also sent to the printer port. Offline Printing Events recorded in the system log are not sent to the printer port. 26 Timed code o/p (Default) The "User Code Accepted" output types are timed for the duration of the “Access code time”. Latched code o/p The "User Code Accepted" output types are activated when user passcode is entered and de-activated when the passcode is re-entered. 27 Activity flt ok (Default) Users can set their wards with circuits flagged as inactive. Acitivity flt Bar Users cannot set the system whilst circuits are flagged as inactive (forced walk test). 47 Engineers Menu 1 TS2500 Installation Manual Engineer’s Menu 1 28 29 Engineers Menu 1 30 31 Latching 24hr (Default) 24 hour detection circuits will cause an alarm when triggered and will only be re-armed after a full reset, i.e. Enter passcode to silence alarm, then enter passcode followed by [ESC] to reset the alarm. Nonlatching 24hr 24 hour detection circuits will cause an alarm when triggered. On entering a passcode the alarm is silenced, if the same circuit is activated before carrying out a reset, the alarm re-triggered. Access code only (Default) The "System Access" and "Ward Access" output types are triggered only when a "Access" type passcode is entered. Access all codes The "System Access" and "Ward Access" output types are triggered when any passcode is entered. Answer anytime (Default) When using a DC58M digi-modem, the digi-modem will always attempt to answer incoming calls. Answer o/p 1 on The digi-modem will only attempt to answer incoming calls when "Custom Output 1" is on. NVM is Unlocked (Default) The NVM can be reset to the factory defaults by shorting the FACTORY RESTART pins during power-up. NVM is Locked The NVM cannot be reset by shorting the FACTORY RESTART. + If the "NVM is LOCKED" option is selected it is imperative that the engineer code is not lost or forgotten. If this is the case then the only way of returning the system to its factory default setting is by returning the control panel PCB to Menvier Security. 32 Unshunt. no exit (Default) The use of a shunt code to reinstated a selected group of circuits will not initiate the exit procedure. Unshunt & exit The use of a shunt code to reinstated a selected group of circuits will initiate the exit procedure. 33 Ignore errors (Default) When attempting to set with one or more circuits in fault the system will continue with the exit procedure but will display the circuits that are in fault. If the circuits are not cleared at the end of the exit procedure a set fail condition will occur. View exit errors When attempting to set with one or more circuits in a fault the system will prompt the user that a fault exists and the display will scroll through the circuits 48 TS2500 Installation Manual that are in fault. Once the faulty circuits are cleared the user will be prompted to press [ENT] to continue with the exit procedure. 34 Mimic. All times (Default) When using output modules or outputs that are programmed as circuit mimic, the outputs will mimic the circuit at all times. Mimic. Set only When using output modules or outputs that are programmed as circuit mimic, the outputs will only mimic the circuit if the circuit is in a set ward. 9 Engineers menu 1 Configuration [ Configuration 00 Bell is an SAB Enter 00 - 34 or use A / C to scroll. B to toggle setting Configuration Bell is an SCB Configuration Flowchart No. Setting TS2500 Installation Manual Engineer’s Menu 1 [1-A] Section Option Default This option allows the engineer to view the following:- Reset Message Panel Location Text CALL ENGINEER TO RESET SYSTEM Location Text PANEL LOCATION TEXT NOT SETUP Printer Header MENVIER SECURITY TS2500 SYSTEM Printer Prefix Blank Banner Message Blank This option displays the panel location text which is programmed in “Engineers menu 3", see “Custom Text Menu” on page 66. Keypad Location Custom Text This option displays the network number and device number of the keypad that is currently being used. A Engineers menu 1 Location text Location of :1,Panel 2,Keypad PANEL IS IN RECEPTION CLOSET Modem Data ] 2 Blank Aux Tamper 2 Blank Modem String Blank Call Back No.1 Blank Call Back No.1 Blank Call Back No.1 Blank Modem Password Blank Modem Site No. Blank User 000 Engineer 1234 User 001 Master 5678 User 002 - 199 Not used 00 Bell is an SAB 01 View alms P.Set 02 Duress Disabled 03 Engr Authorised 04 On-Line Enabled 05 Lo-sec Engineer 06 Normal answer 07 Unset ward first 08 Can set with L.F 09 Can set - AC off 10 Quiet chimes 11 O/P 1 normal 12 Digi normal 13 4 digit codes 14 Modem on Com1 15 Chime Audible 16 Manual Omits [ENT] to DEFAULT Modem data? 17 Omit Tampers No 18 O/M's mimic cct ] 19 Log Time & Date 20 Global Setting 21 Global Unsetting 22 24hr Omit Global 23 Ward bell time 24 Latching Fire 25 Online Printing 26 Timed code o/p Keypad address:Net 1 Device 03 User Codes ] View Location Text Flowchart Default NVM Data [1-B] The default NVM data option allow the engineer to reset the NVM data back to the factory defaults. The initialisation procedure has been broken down into specific sections so that the engineer can reset all data or specific areas. B Blank Aux Tamper 1 Remote Reset Msg RING A.R.C FOR REM. RESET CODE [ 1 Part Set Banner Engineers menu 1 Default NVM data [ [ENT] to DEFAULT Custom text? A / C to scroll through options. [ to DEFAULT. Default NVM Data Flowchart Configuration 49 Engineers Menu 1 Location Text Engineer’s Menu 1 Section Engineers Menu 1 Configuration Outputs Setting Modes TS2500 Installation Manual Option Default 50 Option Default 27 Activity flt ok Monitor cct time 28 Latching 24hr Beam pair time 010 Seconds 29 Access code only Battery test dur 030 Seconds 30 Answer anytime Answer ring time 030 Seconds 31 NVM is Unlocked Global bell dly 000 Minutes 32 Unshunt & No exit Global bell dur 020 Minutes 33 Ignore errors Activity delay 060 Minutes 34 Mimic. All times Defer setting by 010 Minutes Panel Output 1 Walk Test Battery test 060 Minutes Panel Output 2 Courtesy Light Hi Security time 000 minutes Panel Output 3 Switch 12 Volts Cct test time 014 Days Panel Output 4 Detector Reset Service time 000 Days Digicom Output 1 Fire Alarm Payment time 000 Days Digicom Output 2 Panic Alarm (PA) Test call every 000 Days Digicom Output 3 Alarm Select menu time 010 Seconds Digicom Output 4 System Set Custom o/p 2 Tmr 000 Seconds Digicom Output 5 Engineer on site Number of rearms 003 Digicom Output 6 Bell (SAB) Modem rings 000 Digicom Output 7 Tamper Alarm keys until tamp 017 Digicom Output 8 2nd Alarm Remote resets 032 Digi Channel 1 Fire Alarm Reset algorithm 004 Digi Channel 2 Panic Alarm (PA) Double Knocks 002 Digi Channel 3 Alarm On times 1, 2 & 3 00:00 Digi Channel 4 System Set Off times 1, 2 & 3 00:00 Digi Channel 5 Engineer on site Timers operate on No days Digi Channel 6 Bell (SAB) Time switch output Off Digi Channel 7 Tamper Alarm On times 1, 2 & 3 00:00 Digi Channel 8 2nd Alarm Off times 1, 2 & 3 00:00 All Node Outputs Circuit 0001 Alarm Timers operate on No days System Timers Time Switches Code Locks 060 Seconds All Remote Outputs Circuit 0001 Alarm Time lock output Off Custom outputs 1-8 Circuit 0001 Alarm User assigned None All Wards Set times 1, 2 & 3 00:00 Timed Exit Exit time wards A-P 030 Seconds System Timers Section Auto-set Times Unset times 1, 2 & 3 00:00 Timers operate on No days Wards assigned None Entry dly wards A-P 015 Seconds Digi dly wards A-P 000 Seconds Bell dly wards A-P 000 Minutes Bell dur wards A-P 020 Minutes Exit settle time 005 Seconds Panel tamper Ward A 2nd Entry delay 015 Seconds Bell box tamper Ward A Double Knock dly 010 Seconds Aux 1 tamper Ward A Abort duration 010 Seconds Aux 2 tamper Ward A Abort delay 180 Seconds Phone line fault Ward A 2nd alarm time 060 Seconds Mains power off Ward A Courtesy time 120 Seconds Custom Circuits Circuits 1 - 8 Circuits Equipment Wards Not defined Circuits 0001 - 8128 Not Used Payment timer Not assigned Access code time 005 Seconds Alarms Eng Reset Not assigned Menu time-out 180 Seconds Tamper Eng Reset Ward A Line fault delay 030 Seconds Remote reset Ward A AC off delay 030 Seconds Panel speaker Ward A TS2500 Installation Manual Section Engineer’s Menu 1 Option Equipment Wards Log Off Engineer Default Relearn required Not assigned Re-arms apply to Ward A Hi Security ward Not assigned Digi in Part Set Wards A - P System Bell/STB Wards A - P Selecting this option will log off all engineers and return the system to the “SYSTEM OPEN” condition. C Engineers menu 1 Log off engineer [ Ward A foyer Mode Not assigned Unset fire sig. Not assigned Dble Knock wards Not assigned Net Equipment All new devices [1-C] SYSTEM OPEN 18:10 Sun 01 JAN Log Off Engineer Flowchart Ward A Part set groups Part set groups 0 - 9 Not defined Log All 4000 Events No Event Goto User Menu 1 [1-0] This option allows the engineer to access “User menu 1", the flowchart below shows the options within ”User menu 1", for full details refer to the "Operators Manual". Engineers menu 1 Goto User menu 1 Engineers Menu 1 0 ENT User menu 1 Select Option :ESC C A 1 User menu 1 Do Bell test ENT 2 User menu 1 Do Walk test ENT 3 User menu 1 Use remote reset ENT 4 User menu 1 Change passcode ENT 5 User menu 1 Select chime ENT 6 User menu 1 24hr omit/unomit ENT 7 User menu 1 Omit circuits ENT 8 User menu 1 Silent set wards ENT 0 User Menu 1 Set/Unset menu ENT ENT Engineers menu 2 Select option :- ESC ENGINEER ON SITE 12:19 Wed 22 AUG User Menu 1 Flowchart 51 Engineers Menu 1 Engineer’s Menu 1 52 TS2500 Installation Manual TS2500 Installation Manual Engineer’s Menu 2 Engineer’s Menu 2 Engineers menu 2 is selected by pressing the [ENT] whilst Engineers menu 1 is selected. Each menu option can be selected by pressing the relevant “hot-key” or you can scroll forwards and backwards through the options using the [A] and [C] keys. Engineers menu 1 Select Option :ENT Engineers menu 2 Select Option :ESC Menu contents Hotkey Option Page 1 View Circuits 54 2 Set System Time 54 3 Set System Date 54 4 Change Passcode (Engineers) 54 5 Alter Chime Circuits 55 6 Alter 24hr Group 55 7 Print System Log 55 8 Alter Circuit Wards 56 9 View System Log 56 A Start Call Back Sequence 60 B Reset User Code 1 60 C Set BST/GMT Dates 60 0 Remote Service Options 60 C A 1 Engineers menu 2 View circuits ENT 2 Engineers menu 2 Set system time ENT 3 Engineers menu 2 Set system date ENT 4 Engineers menu 2 Change passcode ENT 5 Engineers menu 2 Chime circuits ENT 6 Engineers menu 2 Alter 24hr group ENT 7 Engineers menu 2 Print system log ENT 8 Engineers menu 2 Alter cct wards ENT 9 Engineers menu 2 View system log ENT A Engineers menu 2 Start call back ENT B Engineers menu 2 Reset user code1 ENT C Engineers menu 2 Set BST/GMT date ENT 0 Engineers Menu 2 Rem service opt. ENT ENT Engineers menu 3 Select option :- ESC Engineers menu 1 Select option :- Engineer's Menu 2 53 Engineers Menu 2 Introduction Engineer’s Menu 2 TS2500 Installation Manual View Circuits [2-1] Each detection circuit may be viewed to ascertain its status. The circuit status conditions and resistance are shown below: Status Response Normal Min. Max. Healthy None 2.2 KΩ 54 Ω 4.1KΩ Active Alarm 6.9 KΩ 4.1 KΩ 54 KΩ Tamper Tamper ∞ 54 KΩ ∞ Shorted Alarm 0Ω 0Ω 53 Ω 1 Set System Date The system date is displayed in a day/date/month format on LCD remote keypads. it is also used to provide date stamps for events in the system log. 3 Enter new date:01/01 Enter the date as a 4 digit number e.g. 1709 Engineers menu 2 View circuits Loading bay door 0001 Healthy Enter new date:17/09 New date [ A / C to scroll through the circuits or enter the circuit number Today is :> Su............ Current day Select the day 1-7. 1=Sunday, 7=Saturday e.g. 3 for Tuesday Circuit text Status Loading bay door 0001 Active [ alternates between the circuit text & circuit location TSLEC8 0001 Active Circuit No. Location Today is :> ....Tu........ New day [ AOS Shunted Omitted No Activity ] Engineers Menu 2 Engineers menu 2 Set system date [ [ Circuit No. [2-3] Set System Date Flowchart View Circuits Flowchart Set System Time [2-2] The system time is displayed in a 24hr format on all remote keypads and is also used to time stamp events in the system event log. The BST/GMT changeover can be programmed to automatically occur on specific dates, see page 60. 2 Change Passcode 4 Engineers menu 2 Set system time Enter new code.. ---- Enter new time:12:23 GMT Enter new passcode e.g. 2580 Enter time e.g. 1605 New time [ New code GMT or BST B to toggle Set System Time Flowchart 54 Engineers menu 2 Change passcode [ [ Enter new time:16:05 GMT [2-4] This option allows the engineer to change their passcode. The default passcode is 1234 if 4-digit passcode are enabled and 123400 if 6-digit passcodes are enabled. Enter new code.. 2580 [ Change Passcode Flowchart TS2500 Installation Manual Engineer’s Menu 2 [2-5] This option allows an alternative method of programming circuits as “chime”. Three types of chime tones are available: Engineers menu 2 Alter 24hr group 6 [ Wards 24hr group A,B,*,*,.,.,.,. Chime 1 Generates a single two-tone chime sound. 1 - 8 toggle wards. A / C to scroll wards A-H and wards I-P Chime 2 Generates a double two-tone chime sound. [ Chime 3 Generates a triple two-tone chime sound. When a circuit is programmed as chime it will only generates the relevant chime tone from remote keypad sounders and extension loudspeakers assigned to the same ward(s) as the detection circuit. If configuration option 15 is programmed as “Chime Visible”, the display will show the circuit that caused the chime. 5 0001 Disabled Enter the circuit number A / C to scroll FRONT DOOR 0002 Disabled Circuit text [ Alter 24hr Group Flowchart [2-7] The system log stores 4000 events, if a printer is connected to the system it is possible to print a selected number of events. By specifying an offset you can print the selected number of events from the offset point rather than the last event, e.g. if you specify 100 events with an offset of 1000, you will get a printout of events 2900 - 3000. Once the print-out has been started it can only be stopped by selecting this option again and entering “0000" for the number of events. 7 FRONT DOOR 0001>Disabled Engineers menu 2 Print system log [ How many events 0030 1 = Chime 1 2 = Chmie 2 3 = Chime 3 0 = Disabled Enter number of events. [ [ With offset of:0000 Enter offset. Press [ to start printing. Chime Circuits Flowchart Alter 24Hr Group Ward Status Key * = Ward not selected. . = Ward not available. A-P = Wards selected. Print System Log Engineers menu 2 Chime circuits [ Circuit No. Wards [2-6] Print System Log Flowchart Any combination of wards can be assigned to the 24hr group. Circuit types “24hr” and “Auxiliary” with the "Omittable" attribute within the selected ward will be isolated when the selected ward is omitted using user menu 1 option 6 (24hr omit/unomit). Only the wards that are assigned to the 24hr group can be selected by the user. 55 Engineers Menu 2 Alter Chime Circuits Engineer’s Menu 2 TS2500 Installation Manual Alter Circuit Wards [2-8] Normally the engineer will assign circuits to wards when using the “Program circuits” option in Engineers menu 1, this option allows an alternative method of configuring wards. 8 Engineers menu 2 Alter cct wards View System Log [2-9] The engineer can use this option to view the system log. The [A] and [C] keys allow you to scroll backwards and forwards through the log events. Keys [1] to [9] can be set-up as search keys so that when pressed they take you to specific events within the log. To set-up the search keys see “Engineers menu 4". [ Circuit No. Ciruit type Wards 1001 F.Exit .B............. 9 Engineers menu 2 View system log [ Enter cct No. or A / C to scroll B=Next network [ to edit 1001 F.Exit *,B,*,*,*,*,*,* Event type Time & Date Event type Time & Date Engineers Menu 2 Alter Circuit Wards Flowchart 56 SET WARDS:16:00.01 02/01 B to toggle event/ward A = Scroll backwards C = Scroll forwards [ Ward Status Key * = Ward not selected. . = Ward not available. A-P = Wards selected. B to toggle Name/No. A = Scroll backwards C = Scroll forwards Wards 1 - 8 toggle wards. A / C to scroll wards A-H and wards I-P PASSCODE 000 17:00.55 02/01 Event type Time & Date ALARM 8002 15:00.55 02/01 B to toggle circuit No./Text ] View System Log Flowchart TS2500 Installation Manual Engineer’s Menu 2 Log Event Codes Event Description —- NO EVENT —- No event #### ACTIVATED Monitored circuit activated #,## LEC LOST Network #, device No. ## is a LEC that has been removed ### LEC or REM’S The number of LEC or REM’s logged on to system after a re-learn #,## NODE ADDED Network #, device No. ## is a TS900 Node that has been added to the system #,## NODE LOST Network #, device No. ## is a TS900 Node that has been removed ### NODE’S The number of TS900 Nodes logged on to the system after a re-learn ### XNODE’S The number of XNodes logged on to the system after a re-learn #### OFF TEST Circuit number #### taken off test #### OMITTED Circuit number #### omitted #### REINSTATED Circuit number #### reinstated #,## REM ADDED Network #, device No. ## is a remote keypad that has been added to the system #,## REM LOST Network #, device No. ## is a remote keypad that has been removed #### SHUNTED Circuit number #### shunted #,## XNODE LOST Network #, device No. ## is a XNode that has been removed 24Hr ALARM #### 24hr alarm from circuit number #### 24Hr OMITTED: 24Hr group omitted in wards:- A - P 24Hr REINSTATED: 24Hr group reinstated in wards:- A - P 24Hr WARDS:- 24hr Alarm on wards:- A - P ABORT ON WARDS:- Alarm aborted on wards:- A - P ABORTED ERRORS Remote service errors ACCESS ### Access passcode ### entered. ACCESS FAILED Access failed due to code lock in operation ALARM #### Alarm from circuit number #### ALARM WARDS:- Alarm in wards:- A - P AUTOSET # OFF Autoset timer 1-3 off AUTOSET # ON Autoset timer 1-3 on AUXILIARY #### Auxiliary alarm from circuit number #### AUXILIARY # TAMP Auxiliary 1 or 2 tamper AUXILIARY FUSE Auxiliary Fuse failed BATTERY FAULT Battery disconnected or voltage level below 9.5V BATTERY RESTORE Battery restored to healthy condition BEAM PAIR #### First activation of a beam pair circuit number #### BELL BOX TAMPER External sounder/bell tamper BELL TESTED:- Bell tested for wards:- A - P BELLS ACTIVE:- Bell active for wards:- A - P CALL ABORTED Remote service call aborted CALLED No. # Remote service call initiated via panel to remote PC 1, 2 or 3 Engineers Menu 2 #,## XNODE ADDED Network #, device No. ## is a XNode that has been added to the system CALLING BACK No. # Remote service call requested via PC to “Call back No” 1, 2 or 3 CCT ON TEST #### Circuit number #### put on test CCT TESTED #### Circuit number #### tested during walk test routine CCTS REINSTATED Circuits reinstated with a shunt code CIRCUITS SHUNTED Circuits shunted with a shunt code CODE LOCK # OFF Code lock number # is off CODE LOCK # ON Code lock number # is on CODE LOCKED ### User number ### attempted to use their passcode whilst locked-out 57 Engineer’s Menu 2 TS2500 Installation Manual Event Description CODE TAMPER Keypad locked out for 5 minutes due to invalid entry of passcode COMMS FAILED Plug-on digicom failed to communicate with ARC COMMS SUCCESSFUL Plug-on digicom communicated successfully with the ARC DATE CHANGED System date changed DEFAULT USER ### User 001 defaulted to 5678 DEFERRED SET:- Deferred set on wards:- A - P DIGI-COM FITTED Plug-on digicom fitted DIGI/MODEM LOST Plug-on digicom or modem removed DIGI/MODEM RESET Plug-on digi-modem reset DURESS CODE ### Duress alarm from user number ### ENGINEER ARRIVES Engineer is logged on the system ENGINEER DEPARTS Engineer is logged off the system ENTRY #### Entry mode started from circuit number #### ENTRY TIME-OUT:- Entry mode timed out for wards:- A - P ENTRY WARDS:- Entry on wards:- A - P EXIT CANCELLED:- Exit mode cancelled for wards:- A - P EXIT STARTED:- Exit mode started for wards:- A - P FACTORY RESTART Factory default loaded FIRE ALARM #### Fire alarm from circuit number #### FIRE WARDS:- Fire alarm on wards:- A - P FIRST KNOCK #### First activation of circuit number #### (circuit with Double-Knock attribute) From Remote #,## Quick set perform from remote keypad (# = Network, ## =device No) Engineers Menu 2 Hi Security SET: Wards A - P set using “High Security” feature LEC #,## TAMPER Network #, LEC number ## lid tamper alarm LINE RESTORE Telephone line restored to healthy LINK ESTABLISHED Remote link via PC established MAINS POWER OFF Mains power removed from control panel MAINS POWER ON Mains power applied to control panel MENU TIMEOUT ### User number ### entered their passcode and did not selected any functions MODEM FITTED Plug-on digi-modem fitted MODEM LOCK-OUT Modem locked-out (4 failed attempts made via Lineload) NODE ### R# ADD Remote keypad added to XNode NODE ### R# LOST Remote keypad removed from XNode NODE ### R# TAMP Remote keypad lid tamper from remote on XNode NODE #,## FUSE TS900 Node fuse failed NODE #,## TAMPER TS900 Node lid tamper NODE SHUNT #### Circuits shunted on a Node ON-LINE ENDED Remote service call ended (PC and Lineload) ON-LINE TO No.# On-line to remote PC ON-SITE RESTART On-site restart PA ALARM #### PA Alarm from circuit number #### P.A CODE ### PA code from user number ### PA WARDS:- PA alarm on wards:- A - P PANEL LID TAMPER Control panel lid tamper PASSCODE ### User number ### entered their passcode PAYMENT EXPIRED System payment timer has expired PC CONNECTED PC connected to control panel (PCI/DCI) PC DISCONNECTED PC disconnected from control panel (PCI/DCI) 58 TS2500 Installation Manual Event Engineer’s Menu 2 Description PHONE LINE FAULT Telephone line fault detected QUICK SET KEY # Quick set key A, B or C activated Q.SET ABORTED Quick set key aborted REINSTATED WARDS Wards A - P reinstated REM #,## TAMPER Remote keypad lid tamper REM RESET ACTIVE Remote reset via the REM RESET input terminal (RedCARE) REM RESET FAILED Remote Reset failed REM SERVICE CALL Remote service call in progress RESET WARDS:- User or engineer has reset wards:- A - P SEC. KEY #### Security key operated on circuit number #### SERVICE CALL END Remote service finished SERVICE REQUIRED System requires a service visit (Service Timer expired) SET FAIL WARDS:- Set fail for wards:- A - P SET FAIL #### Set fail caused by circuit #### SET NO ACTIVITY System was set with inactive circuits (circuits with the activity attribute) SET WARDS:- Wards set:- A - P SET WITH L.FLT:- Wards A - P set with a line fault present SETTING DEFERRED Setting deferred SHUNT CODE ### Shunt code number ### enter their passcode SHUNT KEY #### Shunt key circuit #### operated SYSTEM RELEARN A system relearn has been performed T.SWITCH # OFF Time switch number # off T.SWITCH # ON Time switch number # on TAMPER #### Tamper alarm from circuit number #### TAMPER WARDS:- Tamper alarm on wards:- A - P TEST FAIL #### Circuit number #### failed whist on test TEST TOTAL #### Total number of circuit tested during walk test TIME CHANGED System time changed UNSET WARDS:- Wards:- A - P unset USER ### DELETED User number ### deleted WALK TESTED:- Wards:- A -P walk tested WARD KEY #### Ward key circuit #### operated WARDS LOCKED:- Wards:- A - P locked via security key circuit WARDS UNLOCKED:- Wards:- A - P unlocked via security key circuit XNODE #,## FUSE XNode fuse failed XNODE #,## TAMP XNode lid tamper Engineers Menu 2 REARM ON WARDS:- Wards:- A - P re-armed 59 Engineer’s Menu 2 TS2500 Installation Manual Start Call Back [2-A] If the the system is fitted with a DC58M digi-modem, it is possible for the installation engineer to initiate an upload sequence to a remote site (normally the alarm company). Once the communication link is established with the remote site, data can be sent and received from the control panel. This feature is only compatible with Menvier Lineload software version 2.2 or above. Set BST/GMT Date This option allows the engineer to specify the dates at which BST starts and ends. The system will then add an hour at 2:00 am on the BST date and subtract an hour at 2:00 am on the GMT date. C Enter BST date:30/03 [ 01275870078 Call No.1 Office Enter BST date e.g. 30/03 [ Tel No. Call back No. Enter GMT date:26/10 1 = Call back No.1 2 = Call back No.2 3 = Call back No.3 B = Dial this number [ = Start call back Enter GMT date e.g. 26/10 [ Set BST/GMT Dates Flowchart Engineer on Site 10:20 Wed 04 JAN Rem Service Option Start Call Back Flowchart Engineers Menu 2 Reset User Code 1 [2-B] This option allows the installation engineer to reset the master user (user 001) back to the factory default code of “5678". This feature is useful when the master user has forgotten their passcode or has accidentally changed it without realising. This operation is logged. B Engineers menu 2 Reset user code1 [ [ENT] to DEFAULT user code 1. [ = Reset code Reset User Code Flowchart 60 Engineers menu 2 Set BST/GMT date [ Engineers menu 2 Start call back A [2-C] [2-0] This option allows the engineer to enable or disable the remote service option. 0 Engineers menu 2 Rem service opt. [ Rem service call is DISABLED B to toggle [ Remote Service Options Flowchart TS2500 Installation Manual Engineers Menu 3 Engineers Menu 3 Engineers menu 3 is selected by pressing the [ENT] whilst Engineers menu 2 is selected. Each menu option can be selected by pressing the relevant “Hotkey” or you can scroll forwards and backwards through the options using the [A] and [C] keys. Engineers menu 2 Select Option :ENT Engineers menu 3 Select Option :ESC Menu Contents Hotkey Option Page 1 Program Time Switches 62 2 Part Set Groups 62 3 Use On-Line Keypad 63 4 Edit User Names 63 5 Part Set Text 63 6 Circuit Text 64 7 Custom Text Menu 66 8 Equipment Outputs 67 9 Built In Tests 68 A Custom Outputs 71 B Custom Circuits 72 C Digi-modem Options 73 0 Activity Count 76 C A 1 Engineers menu 3 Time switches ENT 2 Engineers menu 3 Part set groups ENT 3 Engineers menu 3 Use on-line pad ENT 4 Engineers menu 3 Edit User Names ENT 5 Engineers menu 3 Part set text ENT 6 Engineers menu 3 Circuit text ENT 7 Engineers menu 3 Custom text menu ENT 8 Engineers menu 3 Equipment O/P's ENT 9 Engineers menu 3 Built in tests ENT A Engineers menu 3 Custom outputs ENT B Engineers menu 3 Custom circuits ENT C Engineers menu 3 Digi/Modem opt. ENT 0 Engineers Menu 3 Activity count ENT ENT Engineers menu 4 Select option :- ESC Engineers menu 2 Select option :- Engineer's Menu 3 61 Engineers Menu 3 Introduction Engineers Menu 3 TS2500 Installation Manual 1 Engineers menu 3 Time switches [ Time switch 1 Select option :A = Time switch 1 B = Time switch 2 C = Time switch 3 1 = On-time 1 2 = On-time 2 3 = On-time 3 4 = Off-time 1 5 = Off-time 2 6 = Off-time 3 7 = 1st operates on 8 = 2nd operates on 9 = 3rd operates on Time switch 1 On-time 1 00:00 Time swicth 1 Off-time 1 00:00 1 Operates on :> SunMo.......... Enter On-time Enter Off-time [ [ Enter days of operation 1=Sunday, 7=Saturday 0 = Manually switch output Time switch 1 > output is OFF B = Toggle ON/OFF [ [ Time Switches Flowchart Time Switches [3-1] The TS2500 has three programmable time switches. Each time switch can be programmed with up to three separate on/off times and made to operate on any day of the week. The time switches can be assigned to outputs which in turn can be used to control internal or external lighting via a relay etc. Part Set Groups [3-2] This option allows the engineer to define up to 10 part-set groups. Each group can be programmed so that it sets any combination of wards. For example "PART SET GROUP 1" could be allocated wards A and C, whereas "PART SET GROUP 2" could be allocated wards A and B. 2 Engineers menu 3 Part set groups [ PART SET GROUP 0 ................ Engineers Menu 3 Press 1 - 0 or A / C to select part set group [ PART SET GROUP 0 *,*,*,*,.,.,.,. Wards 1 - 8 toggle wards. A / C to scroll wards A-H and wards I-P [ Ward Status Key * = Ward not selected. . = Ward not available. A-P = Wards selected. Part Set Groups Flowchart 62 TS2500 Installation Manual Engineers Menu 3 Use On-line Pad [3-3] If the system is fitted with a DC58M digi-modem, you can use this option to connect to another TS2500 or TS790/900 (providing the remote system also has a modem fitted). Once a connection has been established the remote keypad will behave as if it were connected to the remote site. For example you could use this option to connect to another TS2500 alarm system and once on-line you can use your own keypad to set the remote site. This option allows the engineer to assign a name (8 characters) to each user. When using the view log option you can press the [B] key to alternate between displaying the user number and user name. 4 Engineers menu 3 Edit User Names [ Enter user number or use A / C to scroll [ Engineers menu 3 Use on-line pad ^ser 000 [ 01275870078 Call back no.1 User name User number User 000 The modem passcode on the TS2500 must match the modem passcode on the remote site in order for the feature to work. 3 [3-4] Use keys to edit text [ Tel No. Call back No. 1 = Call back No.1 2 = Call back No.2 3 = Call back No.3 B = Dial this number [ = Start call back sequence Please wait..... Dialing Nimber 1 Please wait..... Waiting connect. Please wait..... Syncronising lnk Edit User Names Flowchart Part Set Text [3-5] This option allows the engineer to assign 16 characters of text to each of the part set groups. When the user selects the part set options during setting, the top line of the display will show the text and the bottom line will show the wards assigned to the part set group. 5 Engineers menu 3 Part set text Please wait..... Password check [ Please wait..... * ON-LINE * PART SET GROUP 0 Select part set group: 0 - 9 or use A / C to scroll SYSTEM OPEN 18:10 Sun 01 JAN [ This is the display of the remote site. Press [ESC] six times to close the link with the remote site. Please wait..... Closing link.... Part Set Text Part Set group Engineers Menu 3 + Edit User Names Cursor ^=Text | = Number += Insert - = Delete ^ART SET GROUP 0 Use keys to edit text [ Edit User Names Flowchart Use On-line Keypad Flowchart 63 Engineers Menu 3 TS2500 Installation Manual Circuit Text [3-6] Each detection circuit can have up to 16 characters of text assigned to it. When you have selected the circuit that you require to program, the system will give you the following options: 1 Edit The edit option allows you to edit text that has been previously programmed or to create new text using the text editing keys. 2 Library The library option allows you to choose a phrase from the circuit text library, once the phrase has been selected you can further edit it, if required. 6 3 Delete The delete option erases the circuit text for the selected circuit. 4 Paste The paste option will paste the last programmed circuit text into the selected circuit. For example if you program circuit 0001 to "Roller Door 1", then select circuit 0002 and choose the paste option, circuit 0002 will also be programmed as "Roller Door 1". After selecting the paste option you are giving the option to edit the pasted text, so in the above example it would be simple case of changing the "1" to a number "2" etc. Engineers menu 3 Circuit text [ Loading Bay Door Circuit 0001 Circuit Text Circuit number Enter circuit number or use A / C to scroll [ 1,Edit 2,Library 3,Delete 4,Paste 1 =Edit text Cursor Loading Bay Door ^ircuit 0001 Use keys to edit circuit text 2 = Library Access Phrase 001 Enter library phrase or use A / C to scroll 3 = Delete 4 = Paste Loading Bay Door ^ircuit 0001 Use keys to edit circuit text Engineers Menu 3 [ Admin office ^ircuit 0001 If required, use keys to edit circuit text [ [ Circuit text Flowchart 64 [ TS2500 Installation Manual Engineers Menu 3 Circuit Text Library Phrase No. Phrase No. Phrase No. Phrase 000 Above 044 Church 088 Loading bay PIR 132 Refectory 001 Access 045 Classroom 089 Lobby 133 Research 002 Accountant 046 Cleaners 090 Lounge 134 Restaurant 003 Accounts 047 Collection 091 Lounge PIR 135 Roller 004 Admin office 048 Communicator 092 Lounge window 136 Room 005 Animal 049 Computer 093 Magnetic 137 Safe 006 Annexe 050 Computer room 094 Managers 138 Sales door 007 Arch 051 Conservatory 095 Master 139 Sales office 008 Area 052 Contact 096 Medical 140 Sales PIR 009 Assembly 053 Dark-room 097 Mezzanine 141 Secretaries 010 Assistant 054 Detector 098 Microwave 142 Secretary 011 Attack 055 Dining room PIR 099 Middle 143 Security 012 Attic 056 Director 100 Monitor 144 Sensor 013 Automatic 057 Dispatch 101 Movement 145 Service door 014 Auxiliary 058 Door 102 Nursery 146 Service PIR 015 Back 059 Double doors 103 North 147 Showroom 016 Baggage 060 Entrance 104 Office 148 Shutter 017 Bakery 061 Factory floor 105 Outside 149 Side 018 Balcony 062 Fire door 106 P.A. Button 150 Sliding 019 Ballroom 063 Floor 107 Panel 151 Squash court 020 Bank 064 Front 108 Panic 152 Stairwell 021 Banking 065 Garage 109 Partition 153 Station 022 Bar 066 Geography 110 Passive 154 Store room 023 Barn 067 Grocery 111 Patio 155 Stores 024 Basement 068 Ground 112 Penthouse 156 Surgery 025 Bathroom 069 Guard 113 Perimeter 157 Swimming pool 026 Bay 070 Hall passive 114 Personal 158 Technical 027 Beam 071 Heater 115 Personnel 159 Technician 028 Bedroom 072 History 116 Physics lab 160 Theatre 029 Bedroom PIR 073 House 117 Passive in 161 Toilet 030 Bell 074 Industrial 118 PIR in 162 Transport 031 Biology Lab 075 Information 119 Plumbers 163 Ultrasonic 032 Board room 076 Infra-red 120 Porch 164 Upstairs PIR 033 Bottom 077 interior 121 Power 165 Upstairs Window 034 Break glass 078 Isolation 122 Power supply 166 Ventilator 035 Cabinet 079 Junior 123 Pressure 167 Warehouse 036 Cafe 080 Kitchen PIR 124 Processing lab 168 Window 037 Canteen door 081 Kitchen window 125 Production 169 Woodwork Shop 038 Canteen PIR (1) 082 Landing PIR 126 PSU Battery Fail 170 Workshop door 039 Cashier 083 Landing window 127 PSU Fuse Blown 171 Workshop PIR 040 Ceiling 084 Laundry 128 PSU Mains Fail 172 Workshop Window 041 Cellar 085 Lavatory 129 Public 173 X-Ray department 042 Changing room 086 Library 130 Purchasing 043 Chemistry lab 087 Loading bay door 131 Reception Engineers Menu 3 No. 65 Engineers Menu 3 Custom Text Menu TS2500 Installation Manual [3-7] This menu option allows the installation engineer to edit the following text messages: Reset Message The default reset message “CALL ENGINEER TO RESET SYSTEM” can be personalised by the engineer, e.g. the message may be programmed to read “CALL XYZ ALARMS ON 0181-1234567". Aux. Tamper 1/2 The control panel has two auxiliary tamper inputs, this option allows the engineer to program a 16 character text description for each input. Modem String For future use. 7 [ Location Text This option allows the engineer to program a 32 character location message. When “Engineers menu 1" is selected the engineer can view this message. This can be used to provide the location details for the control panel, e.g., ”C P located in reception area", thus assisting service engineers unfamiliar with the site. [ENT] to edit :Reset message A / C to scroll 0 = Reset message 1 = Location text 2 = Printer header 3 = Remote reset msg 4 = Printer prefix 5 = Banner message 6 = Part set banner 7 = Aux. tamper 1 8 = Aux. tamper 2 9 = Modem string Printer Header This option allows the installation engineer to program a 32 character printer header message. This is printed whenever a system or log printout is taken from the system. This can be used as a site reference, e.g., “ABC Company Job No123456". Remote Reset Message The default remote reset message “CALL A.R.C FOR REM.RESET CODE” can be personalised by the engineer, e.g. the message can be programmed to read “CALL 0181 121212 FOR RESET CODE". Printer Prefix Engineers Menu 3 This option allows the engineer to specify a 16 character message which is prefixed to every event sent to the printer. Banner Message Normally when the system is unset the bottom line of the display shows the time and date, and the top line is left blank. This menu option allows the engineer to program or edit a 16 character “Banner” message which is displayed on the top line. This may be used to display the company’s name, e.g., “Blogg Alarms”, “ABC Security” etc. Part Set Banner The part set banner is a 16 character message displayed on the top line of the display whenever the system is part set. If the message is left blank the top line of the display will show the wards that are set. If the message is programmed the top line of the display will show the message, e.g., “System Part-Set”. 66 Engineers menu 3 Custom text menu [ to edit Cursor MENVIER SECURITY ^anner message Use keys to edit circuit text [ Custom Text Menu Flowchart TS2500 Installation Manual Engineers Menu 3 Equipment O/P’s [3-8] This option allows the engineer to program the two outputs on each node and the single output on each remote keypad or LEC. Engineers menu 3 Equipment O/P's 8 [ Output Device No. Network No. Device type Current output type 1,01A XNode System Alarm Enter network and device No. e.g. 216 = Network 2 device 16 B to toggle output [A] or [B] [ to edit output type Select output Type :- CIRCUIT [ Select CCT type 0001 Mimic 1= Mimic 2 = Alarm 3 = Tamper 4 = Test Fail 5 = Omit [ To accept 2=SYSTEM Select output Type :- SYSTEM [ System type >04 Walk Test Enter Output No. or A / C to Scroll [ To accept 3=USER Select output Type :- USER 4=WARD Select output Type :- WARD [ [ Enter user no. 001 Code entered Select WARD Req. Ward A Strobe Enter User No. or A / C to scroll [ to accept Select cct no. 0001 Mimic Enter Ward No. 1 - 9 = wards A-I A / C to scroll I-P [ to accept Ward type >01 Ward A Strobe Enter Circuit No. [ To accept Enter Output No. [ To accept Engineers Menu 3 1=CIRCUIT Equipment Outputs Flowchart 67 Engineers Menu 3 TS2500 Installation Manual Built In Tests [3-9] The TS2500 system has the following diagnostic routines: 9 Engineers menu 3 Built in tests [ View Circuit Resistance When this test routine is selected the resistance for each detection circuit may be measured, the accuracy of this measurement is ± 0.1 KOhms. 3 [ENT] to view :Cct resistance [ Panel version is TS2500 - Ver 2.0 1 C A Device type Circuit No. TSLEC8 0001 2K2 Resistance Voltage 13.60V A = Next circuit C = Previous circuit 2 Current 1084mA 3 [ENT] to view :Cct resistance 4 [ENT] to test :digicom outputs 5 [ENT] to test :Panel outputs 6 [ENT] to test :Node outputs 7 [ENT] to CONFIRM Network devices [ 8 [ENT] to test :Keypad display Digi outputs on 1 * 3 * * * * * 9 [ENT] to view :Network devices ] View Circuit Resistance Flowchart Test Digicom outputs This test routine allows the engineer to test all eight digicom outputs on the main control panel PCB. 4 [ENT] to test :Digicom outputs Outputs *=off 1 - 8 to toggle outputs ] [ENT] to view :Network errors Test Digicom Outputs Flowchart [ENT] to do False setting Engineers Menu 3 [ENT] to test :digicom channels Test Panel outputs This test routine allows the engineer to test the four control panel outputs. Built In test Menu Flowchart 5 Software Version When selecting the built in tests routine the software version is displayed until you select one of the other diagnostic routines. Voltage When this test option is selected the battery charging voltage at the control panel is displayed, the accuracy of this measurement is ± 0.2V. Current Consumption When this test option is selected the total current consumption for the system is displayed, the accuracy of this measurement is ± 50mA. 68 [ENT] to test :Panel outputs [ Panel outputs on 1 * 3 4 1 - 4 to toggle outputs ] Test Panel Outputs Flowchart Outputs *=off TS2500 Installation Manual Engineers Menu 3 Test Node outputs This test routine allows the engineer to test all Node outputs. This test routine allows the engineer to test the LCD on all TS900 remote keypads. 8 [ENT] to test :Node outputs [ [ Network & device No. 2,16A XNode is turned on 888888888888888 888888888888888 Output state ] Enter network & device No. e.g. 216 = Network 2 device 16 B to toggle output on or off Test Keypad Display Flowchart ] Test Node Outputs Flowchart Confirm Network devices This option allows the engineer to confirm the correct number of devices are connected to the system. After confirmation any changes in the system hardware will cause the “RELEARN REQUIRED” message to be displayed on all remote keypads. 7 View Network devices This test routine allows the engineer to view the status of each device connected to the network. The information displayed will depend on the device type. 9 [ENT] to view :Network devices [ Remote Keypad [ENT] to CONFIRM Network devices 1,01 Remote A-H B-H T-H Circuit Status [ENT] to CONFIRM 002 LEC2 on sys Nodes 2,01 XNode 13.50 FH TH HH** Number of TS700LECs [ to confirm No. of devices [ENT] to CONFIRM 012 REMS on sys B to veiw circuits 2,01 XNode 1H2H3H4H5H6H7H8H [ENT] to CONFIRM 000 NODE on sys FH = Fuse healthy FB = Fuse blown TH = Tamper Healthy TA = Tamper active [ENT] to CONFIRM 016 XNODE on sys Number of XNodes [ to confirm ] Confirm Network Devices Flowchart Circuit status ] Number of TS900Nodes [ to confirm No. of devices Rems 1 - 4 tamper status Tamper status Fuse status XNode voltage Number of Remotes [ to confirm No. of devices Tamper Status 1 - 8 to select network A / C to scroll device [ No. of devices [ENT] to test :Keypad display + View Network Devices Flowchart When selecting this option the remote keypad that you are using is the first device to be displayed. 69 Engineers Menu 3 6 Test Keypad display Engineers Menu 3 TS2500 Installation Manual View Network errors This test routine allows the engineer to view the number of data transmission errors for each network. 0 [ENT] to view :Network errors [ False set wards: A,B,C,D,*,*,*,* [ Network 1 0000 Last error 2,05 [ENT] to do False setting Error count Last error 1 - 8 to select network 0 to reset error counter ] Setting wards 1 - 8 to toggle wards A / C to scroll wards A-H & I-P [ Select test ccts 0001 Excluded B to toggle A / C to scroll through circuits [ View Network Errors Flowchart False Setting Routine This option allows the engineer to set the system whilst the premises are occupied. When selecting this option the engineer can choose the following: 1. The wards that will false set. 2. The circuits that will remain active once the system has been false set. Included circuits will remain active during the false set and excluded circuits will remain isolated during a false set. Normally all circuit default to excluded. 3. All outputs (digicom, bell, strobe etc.) can be enable or disabled during the false set routine. All outputs will remain active B to toggle [ 0=SET WARDS A=Next option 0 EXIT FOR WARDS:ABCD............ WARDS SET :ABCD............ Activate included circuits etc. 0 to end test TESTING COMPLETE [ESC] to quit. ] Engineers Menu 3 False Setting Flowchart Test Digicom channels This test routine allows the engineer to test all eight channels for the plug-on digicom. [ENT] to test :Digicom channels [ Channels active 1 * * * * * * * 1 - 8 to toggle channels ] Test Digicom Channels Flowchart 70 Channel *=off TS2500 Installation Manual Engineers Menu 3 Custom Outputs [3-A] This option allows the engineer to program the eight custom outputs type. The diagram below represent the logic circuit for the custom output. 1 Custom Output - Example 3 This example shows how to use both the “AND” and “OR” functions so that the “Custom Output” activates when ward A is set and time switch 1 is active or when the courtesy light output is active. The table below shows how each switch is programmed to achieve this. 2 OR 3 Input Custom Output 4 5 6 8 7 1 System Courtesy Light 5 Ward A Set 2 System Always Off 6 Time Switch 1 On 3 System Always Off 7 System Always On System Always Off 8 System Always On + 4 Each switch in the diagram represents a programmable output type, therefore the custom output will only activate when the correct combination of output types are active. AND When using the “Custom Output” for “AND” and “OR” logic, any of the unused “OR” switches must be programmed to the type “Always Off” and any of the unused “AND” switches (5-8) must be programmed to the type “Always On”. Switches 1 - 4 perform a logical “OR” function and switches 5 - 8 perform a logical “AND” function. Custom Output - Example 1 This example shows how the “OR” function can be used so that the “Custom Output” activates when circuit 0001 or 0005 or 0016 causes an alarm condition. The table below shows how each switch is programmed to achieve this. OR AND 1 Circuit 0001 Alarm 5 System Always Off 2 Circuit 0005 Alarm 6 System Always Off 3 Circuit 0016 Alarm 7 System Always Off System Always Off 8 System Always Off When using the “Custom Output” for “OR” logic only, all unused switches must be programmed to the type “Always Off”. Engineers Menu 3 + 4 Custom Output - Example 2 This example shows how the “AND” function can be used so that the “Custom Output” only activates when the system is ward A is set and time switch 1 is active. The table below shows how each switch is programmed to achieve this. OR AND 1 System Always Off 5 Ward A Set 2 System Always Off 6 Time Switch 1 On 3 System Always Off 7 System Always On System Always Off 8 System Always On + 4 When using the “Custom Output” for “AND” logic only, switches 1-4 must be programmed to the type “Always Off” and any of the unused “AND” switches must be programmed to the type “Always On”. 71 Engineers Menu 3 TS2500 Installation Manual Engineers menu 3 Custom outputs A [ [ENT] to edit :Custom o/p 1,x Press 1 - 8 to select the custom output [ to edit Custom o/p 3,1 0001 Alarm Press 1 - 8 to select the switch number [ to edit output type Select output Type :- CIRCUIT 1=CIRCUIT Select output Type :- CIRCUIT [ Select CCT type 0001 Mimic 1= Mimic 2 = Alarm 3 = Tamper 4 = Test Fail 5 = Omit [ To accept 2=SYSTEM Select output Type :- SYSTEM [ System type >04 Walk Test Enter Output No. or A / C to Scroll [ To accept 3=USER Select output Type :- USER Select output Type :- WARD [ [ Enter user no. 001 Code entered Select WARD Req. Ward A Strobe Enter User No. or A / C to Scroll [ To accept Select cct no. 0001 Mimic Engineers Menu 3 4=WARD Enter Ward No. 1 - 9 = Wards A-I A / C to Scroll I-P [ To accept Ward type >01 Ward A Strobe Enter Circuit No. [ To accept Enter Output No. [ To accept Custom Outputs Flowchart Custom Circuits [3-B] This option allows the engineer to program the eight custom circuit types. Each custom circuit can be programmed to activate the following: Bell required A custom circuit with the “Bell required” attribute will activate the control panel bell and strobe output, and any outputs programmed as “System Bell-SAB”, “System Strobe”. The relevant “Ward Bell-SAB” and “Ward Strobe” are also activated. 72 Digi required A custom circuit with the “Digi required” attribute will activate any outputs programmed as “System Alarm” and any relevant “Ward Alarm” outputs. Sounder required A custom circuit with the “Sounder required” attribute will activate internal sounders assigned to the same ward as the custom circuit. Warning required A custom circuit with the “Warning required” attribute will generate a warning tone every minute from the internal sounder assigned to the same ward as the custom circuit. TS2500 Installation Manual Engineers Menu 3 Digi/Modem Options This option allows the engineer to program the plug-on digicom or digi-modem. Engineers menu 3 Digi/Modem opt. Each attribute can be assigned to the custom circuit so that they are only activated for the following conditions: [ Unset Attributes assigned to the custom circuit for the unset mode will only operate when the ward that the circuit is assigned to is in an unset state. 1 [ENT] to edit :Call back no.1 2 [ENT] to edit :Call back no.2 Part Attributes assigned to the custom circuit for the part set mode will only operate when the ward that the circuit is assigned to is set and one or more wards are unset, i.e. the system is in a part set state. 3 [ENT] to edit :Call back no.3 4 [ENT] to edit :Modem password 5 [ENT] to edit :Modem site no. 6 [ENT] to edit :Digi program 7 [ENT] to edit :Digi BAUD rate 8 [ENT] to edit :COM1 BAUD rate 9 [ENT] to edit :Internal digi 0 [ENT] to Reset Digicom Full Attributes assigned to the custom circuit for the full set mode will only operate when the system is fully set, i.e. all defined wards set. Custom Circuit Text Up to 11 characters can be assigned to each custom circuit. This text is displayed when programming circuits. B Engineers menu 3 Custom circuits [ [ENT] to edit :custom circuit 1 1 - 8 or A / C to scroll custom circuits [ to edit Bell required >Unset,Part,Full Digi required > , , C A [3-C] C A Digi/Modem Options Flowchart Call Back No.1 This option allows the first call back telephone number to be programmed. Call Back No.2 Sounder required > , , This option allows the second call back telephone number to be programmed. Warning required > , , Call Back No.3 Trig Custom o/p > , , This option allows the third call back telephone number to be programmed. 1 = Toggle Unset 2 = Toggle Part 3 = Toggle Full Custom Cct1 [B] to edit text B to edit text [ to accept Custom Circuits Flowchart 73 Engineers Menu 3 Trig Custom o/p A custom circuit with the “Trig Custom o/p” attribute will activate the relevant “Custom Circuit” output type, e.g. If custom circuit 3 is programmed to trigger its custom output, it will activate “Custom cct 3” output (system output No 82). Engineers Menu 3 TS2500 Installation Manual 1 [ENT] to edit :Call back no.1 2 [ENT] to edit :Call back no.2 3 [ENT] to edit :Call back no.3 5 [ to edit Cursor Cursor 2500 |Modem site no. Site No. Enter site No (max. 4 characters). [ to edit 0181 12345678 |all No.1 Office [ENT] to edit :Modem site no. [ Tel No. Modem Site No. Flowchart Enter Tel No. [ Modem Call Back Numbers Flowchart Modem Password This option allows the modem password to be programmed. The “Modem Password” can be up to 16 character long and provides a means of security for remote communications. When using the “Lineload” software the “Modem Password” in the site profile must match the “Modem Password” that is stored in the control panel. 4 [ENT] to edit :Modem password [ to edit Cursor 1234 |Modem password Password Enter password (max. 16 characters). Engineers Menu 3 [ Modem Password Flowchart Modem Site No. This option allows the Modem site number to be programmed. The “Modem Site No.” is a 4 digit number that is used as a site reference. When using the “Lineload” software the “Site Reference” number in the site profile must match the “Modem Site No.” that is stored in the control panel. 74 Program Digicom This option allows the plug-on digicoms DC54, DC58 and DC58M to be programmed via the control panel. + + When prompted to “press the [0] key to end programming”, it will take approximately 25 - 30 seconds to download the new data to the digicom. When using the control panel to program a DC54, the program options that are not applicable can be ignored, e.g. telephone number 3 and channels 5 - 8 are not used by the DC54 and therefore do not require programming. TS2500 Installation Manual Engineers menu 3 Digi/Modem opt. ENT [ENT] to edit :Call back no.1 SET/DAY CHANNELS * * * 4 * * * * 6 Select Set/Day (Open/Close) channels by pressing [1] - [8] TELEPHONE NO.1 018112345678 Enter Telephone No. 1 A = Clear number B = Pulse Dial (P) or Pause (-) C = Tone Dial (T) ENT RESTORE CHANNELS * * 3 4 * * * * Select Restore channels by pressing [1] - [8] ENT ENT TELEPHONE NO.2 018112345687 Enter Telephone No. 2 ENT INVERT CHANNELS * * * * * * * * Select Invert channels by pressing [1] - [8] ENT TELEPHONE NO.3 018112345679 Dialling Mode is Consecutive Enter Telephone No.3 Select dialling mode: ENT ACCOUNT NO.1 0001 1 = Consecutive 2 = Alternative 3 = All Enter account No.1 ENT ENT TEST CALL PERIOD Disabled ACCOUNT NO.2 0001 Enter account No. 2 ENT ACCOUNT NO.3 0001 Select test call period: 1 = Disabled 2 = Daily 3 = Weekly 4 = Fortnightly ENT Enter account No. 3 ENT REPORTS TO NO.1 * * 3 4 * * * 8 Select channels that report to tel No.1 by pressing [1] - [8] ENT REPORTS TO NO.2 * 2 3 4 * * * 8 Select channels that report to tel No.2 by pressing [1] - [8] ENT REPORTS TO NO.3 * 2 3 4 * * * 8 Select channels that report to tel No.3 by pressing [1] - [8] ENT Digi Output 1 is Line Fault Select output type: 1 = Line Fault 2 = Digi Successful 3 = Digi Failed 4 = Digi Active 5 = Serial Coms Fault Extended Format Will NOT Report Select point ID reporting mode: 1 = Will NOT Report 2 = Limited Report 3 = Full Report ENT T.O.S Calls are Disabled Select Temporary Out of Service monitoring period: 1 = Disabled 2 = Daily 3 = Weekly 4 = Fortnightly ENT Ring Count is Instant Select Ring Count (DC58M Only): 1 = Instant 2 = Delayed ENT Press '0' to Protect Numbers Press [0] to protect telephone numbers ENT Press '0' to end programming Press [0] to end programming & download new data to digicom Engineers Menu 3 C Engineers Menu 3 NOTE: This will take approximately 25 - 30 seconds ENT Digi Output 1 is Line Fault Select output type: 1 = Line Fault 2 = Digi Successful 3 = Digi Failed 4 = Digi Active 5 = Serial Coms Fault ENT Program Digicom Flowchart 75 Engineers Menu 3 TS2500 Installation Manual Digi Baud rate This option allows the engineer to set the baud rate for the plug-on digicom. For the DC54/58/58M this MUST be set at 300 baud. 9 [ENT] to edit :Internal digi [ to edit Ward channel 1 is 07 Fire Alm. COM1 Baud rate This option allows the engineer to set the baud rate for the general communication port (For future use). 7 [ENT] to edit :Digi BAUD rate 8 [ENT] to edit :COM1 BAUD rate [ to edit ward type Ward channel 1 is 07 > Fire Alm. A / C to scroll ward types [ to accept Ward channel 1 is 07 Fire Alm. [ to edit DC58(M)BAUD rate 300 A / C to scroll channels 1-8 and account No. Baud rate Account No. for ward A is 0000 Select rate by pressing: 1 = 300 5 = 4800 2 = 600 6 = 9600 3 = 1200 7 = 19200 4 = 2400 8 = 38400 [ [ to edit account No. Account No. for ward A is >0000 Enter account No. [ to accept Digi & Com1 Bauld Rate Flowchart Internal digi Engineers Menu 3 This option allows the engineer to use the DC58/58M as a multi account digicom. This in effect gives you 16 digicoms in one unit. The feature can only be used with DC58/DC58M's fitted with version 2.8 software. Each channel can be assigned a ward output type, e.g. channel 3 ward alarm. Each ward can then be assigned a four digit account number (if the ward account is set to '0000' then all channels for that ward are disabled). This option resets the plug-on digicom and uploads the digicom NVM data to the control panel. The upload will take approximately 25 - 30 seconds. Once uploaded the data can be edited using the "Program Digicom" option and then sent back to the digicom. [ENT] to Reset DigiCom [ Acceptance tone indicates reset performed Reset Digicom Flowchart 76 Internal Digicom Flowchart Activity Count [3-0] Circuits with the “Activity Monitor” attribute that have been activated whilst the system was unset cause the “Activity Counter” to be increased by one. This option allows the engineer to view the counter value. 0 Engineers menu 3 Activity Count [ Reset Digicom 0 Channel No. Ward Type Ward A activity: 0000 A = Next ward C = Previous ward B = Reset counter Ward P activity: 0000 ] Activity Count Flowchart Activity count TS2500 Installation Manual Engineers Menu 4 Engineers Menu 4 Engineers menu 4 is selected by pressing the [ENT] whilst Engineers menu 3 is selected. Each menu option can be selected by pressing the relevant “hotkey” or you can scroll forwards and backwards through the options using the [A] and [C] keys. Engineers menu 3 Select Option :ENT Engineers menu 4 Select Option :ESC Menu Contents Hotkey Option Page 1 Auto-set Timers 78 2 Network Equipment Wards 79 3 Equipment Wards 80 4 Unset Circuit Types 81 5 Log Search Keys 82 6 Shunt Groups 82 7 OM Configuration 83 8 Set Volume Level 83 9 Edit Quick Set Keys 83 A Engineer wards 83 0 Code Lock Timers 84 C A 1 Engineers menu 4 Auto-set timers ENT 2 Engineers menu 4 Net Equ. wards ENT 3 Engineers menu 4 Equipment Wards ENT 4 Engineers menu 4 Unset cct types ENT 5 Engineers menu 4 Log search keys ENT 6 Engineers menu 4 Shunt groups ENT 7 Engineers menu 4 OM Configuration ENT 8 Engineers menu 4 Set volume level ENT 9 Engineers menu 4 Edit quick keys ENT 0 Engineers menu 4 Code lock times ENT A Engineers menu 4 Engineer wards ENT ENT Engineers menu 1 Select option :- ESC Engineers menu 3 Select option :- Engineers Menu 4 Introduction Engineer's Menu 4 77 Engineers Menu 4 TS2500 Installation Manual Auto-set Timers [4-1] The TS2500 has three auto-set timers, each timer has the following options: Set times 1, 2 & 3 Each timer has three Independent setting times. Unset time 1, 2 & 3 Each timer has three Independent unsetting times. Days of operation 1, 2 & 3 Each of the individual set/unset timers can be programmed to operate on different days of the week. Set/Unset Wards Each timer can set and unset any combination of wards A-P. 1 Engineers menu 4 Auto-set timers [ Auto-set timer 1 Select option :A = Auto-set timer 1 B = Auto-set timer 2 C = Auto-set timer 3 4 = Unset time 1 5 = Unset time 2 6 = Unset time 3 7 = 1st operates on 8 = 2nd operates on 9 = 3rd operates on 0 = Manually switch output [ = Set wards Auto-set timer 1 Set 1 at 00:00 Auto-set timer 1 Unset 1 at 00:00 1 Operates on :> SunMo.......... Auto-set timer 1 > output is OFF Auto-set timer 1 AB.D............ Enter Set time Enter Unset time B = Toggle ON/OFF [ [ [ Enter days of operation 1=Sunday, 7=Saturday [ Auto-set timer 1 A,B,*,D,.,.,.,. 1 = Set time 1 2 = Set time 2 3 = Set time 3 [ 1 -8 = Select wards [ Engineers Menu 4 Auto-set Timers Flowchart 78 TS2500 Installation Manual Network Equipment Wards Engineers Menu 4 [4-2] This option allows the engineer to assign remote keypads, XNodes and Nodes to wards.This will ensure that lid tamper alarms from devices on the network have the correct response, e.g. if a Node is assigned to ward A and ward A is unset, an internal alarm is generated when the Node lid is removed. However if ward A is set then a full alarm is generated. XNodes The assignment of XNodes to wards will also ensure that the correct operation of remote keypads and extension loudspeaker connected to the XNode. If an XNode is assigned to ward A, the remote keypads and the extension loudspeakers connected to the XNode are also assigned to ward A. 2 Engineers menu 4 Net Equ. wards [ 1,01 XNode A............... Enter network and device No, e.g. 216 = Network 2 device 16 [ to edit 2,16 XNode A,*,.,.,.,.,.,. Wards 1-8 Toggle wards. A-C To scroll wards A-H and wards I-P. [ 2,16 XNode AB............. Remote Keypads The assignment of remote keypads to wards also ensures the correct operation of user passcodes, e.g, if a user is assigned as a “Standard Ward” user type to ward A, the user will only be able to set and unset ward A from a remote keypad that is assigned to ward A. Ward Status Key * = Ward not selected. . = Ward not available. A-P = Wards selected. Network Equipment Wards Flowchart Keypad Sounder The internal sounder inside each remote keypad will operate as follows: 1. If the remote keypad is connected to an XNode the sounder will follow the assignment of the XNode. For example, if the XNode is assigned to ward B the remote keypad sounder will operate when ward B is in entry, exit or alarm. 2. If the remote keypad is connected directly to a network, the sounder will follow the assignment of the panel speaker (see “Equipment Wards” on page 80). For example, if the panel speaker is assigned to wards A & B the remote keypad sounder will operate when wards A or B are in entry, exit or alarm. Extension loudspeakers Engineers Menu 4 Extension loudspeakers will operate as follows: 1. If the extension loudspeaker is connected to an XNode the loudspeaker will follow the assignment of the XNode. For example, if the XNode is assigned to ward B the loudspeaker will operate when ward B is in entry, exit or alarm. 2. If the extension loudspeaker is connected to the control panel, the loudspeaker will follow the assignment of the panel speaker (see “Equipment Wards” on page 80). For example, if the panel speaker is assigned to wards A & B the loudspeaker will operate when wards A or B are in entry, exit or alarm. 79 Engineers Menu 4 Equipment Wards TS2500 Installation Manual [4-3] This option allows the engineer to assign the following options to wards. Panel tamper The control panel lid tamper can be assigned to any combinations of wards, this will ensure the correct tamper response from a lid tamper alarm. Bell Box Tamper The bell box tamper can be assigned to any combination of wards, this will ensure that tamper alarms from external bell have the correct response. If “No Set-AC Off” is enabled (see configuration) users assigned to the same wards as the “Mains Power Off” cannot set their wards until the mains power is restored. Payment Timer The payment timer can be assigned to any combination of wards, when the payment timer expires the selected wards will then be locked into engineer reset/remote reset. Alarms Engineer Reset Aux 1 Tamper Auxiliary tamper 1 can be assigned to any combination of wards, this will ensure that tamper alarms from this input have the correct response. Alarms can be assigned as engineer or user reset for each ward. If a ward is assigned as engineer reset, the ward can only be reset by the engineer or remote reset (if remote reset is enabled for that ward). If a ward is not assigned as engineer reset it becomes user reset and can be reset by any user that has access for that ward. Aux 2 Tamper Tamper Engineer Reset Auxiliary tamper 2 can be assigned to any combination of wards, this will ensure that tamper alarms from this input have the correct response. Phone Line Fault Engineers Menu 4 (d) The phone line fault input can be assigned to any combination of wards. When a phone line fault occurs the system will respond as follows: (a) All remote keypads will display “PHONE LINE FAULT”. (b) All internal sounders assigned to the same wards as the “Phone Line Fault” will generate a chime tone every minute on the minute and after the line fault delay timer has expired. (c) If “Can Set With L.F” is enabled (see configuration) users assigned to the same wards as the “Phone Line Fault” can set their wards but will be asked to confirm that they are setting with a phone line fault present. (d) If “No Set With L.F” is enabled (see configuration) users assigned to the same wards as the “Phone Line Fault” cannot set their wards until the phone line fault is cleared. Mains Power Off The mains power off condition can be assigned to any combinations of wards. When the loss of mains power occurs the system will respond as follows: (a) All remote keypads display “AC OFF”. (b) All internal sounders assigned to the same wards as the “Mains Power Off” will generate a chime tone every minute on the minute and after the mains off delay timer has expired. (c) If “Can Set-AC Off” is enabled (see configuration) users assigned to the same wards as the “Mains Power Off” can set their wards. 80 Daytime tamper alarms can be assigned as engineer or user reset for each ward. If a ward is assigned as engineer reset, a daytime tamper alarm can only be reset by the engineer or remote reset (if remote reset is enabled for that ward). If a ward is not assigned as engineer reset it becomes user reset and can reset by any user that has access for that ward. Remote Reset Remote reset can be enabled or disabled for each ward. If a ward has remote reset enabled users have access to the remote reset feature. If a ward does not have remote reset enabled, only the engineer can reset after alarm. Panel Speaker The control panel speaker can be assigned to any combination of wards, this will ensure that the sounders only operate when the relevant ward(s) are in alarm, entry & exit etc. Relearn Required When the system hardware configuration changes the system requires a relearn. This option allows you to select which wards require a relearn before the ward can be set. Re-arms applies to The rearm facility can be applied to any combination of wards. If rearm is applied to a ward the ward will rearm according to the "Number of rearms'" specified in the "System Options", see page 45. If rearm is not applied to a ward, the ward will not auto rearm after an alarm, i.e., one activation of the bell. TS2500 Installation Manual Engineers Menu 4 Hi Security ward 3 If a ward is selected as “High Security” the ward will always attempt to stay in a set condition. If the ward is unset by a user the remote keypads display "HI SECURE UNSET" and the "Hi Security" timer is started. Every time a detector is triggered in the unset ward(s) the "Hi Security" timer is reset. When the timer expires the system will attempt to automatically set the "High Security" ward(s). Engineers menu 4 Equipment wards [ Panel tamper A............... A / C to scroll options [ to edit Panel tamper *,*,.,.,.,.,.,. Digi in Part Set When the system is full set (all defined wards set), an alarm in any ward will trigger the digicom. This option allows you to select which wards will trigger the digicom when the system is in a part set state. Wards 1-8 Toggle wards. A-C To Scroll wards A-H and wards I-P. [ Panel tamper AB............. System Bell/STB This option allows you to select which wards will trigger the main bell and strobe outputs on the control panel. Ward Status Key * = Ward not selected. . = Ward not available. A-P = Wards selected. Ward A Foyer Mode Unset fire Signals This option allows you to designate which wards will trigger the “System Fire” output and “Ward Fire” output when a fire alarm circuit is trigger within an unset ward. If a ward is assigned to this option, a fire alarm from the selected ward will activate the “System Fire” output and the respective “Ward Fire” output when the ward is set or unset. If a ward is not assigned to this option, a fire alarm from the selected ward will only activate the “System Fire” output and the respective “Ward Fire” output when the ward is set. Double Knock Wards This option allows you to designate which wards will use the double knock counter (see “System Options” on page 45). If the double knock counter is assigned to a ward, all circuits with the double knock attribute within the selected ward will use the value defined by the double knock counter (1-999). If the double knock counter is not assigned to a ward, all circuits with the double knock attribute within the selected ward will use a default value of 002. Equipment Wards Flowchart Unset Circuit Types [4-4] This option allows the engineer to change the circuit type when the circuit is unset, e.g. detection circuit 1001 can be programmed for night operation whilst the ward is set and then change to PA operation when the ward is unset. + You must program detection circuits in “Engineers menu 1" before programming the unset circuit types. Initially the unset circuit type automatically follows the type programmed in ”Engineers menu 1" and must be altered using this option. 4 Engineers menu 4 Unset cct types [ Engineers Menu 4 The “Ward A Foyer Mode” allows you to create a common area that is automatically set when all the wards that are assigned to it are set. Ward A will also automatically unset when any one of the assigned wards is unset. For example if wards B, C and D are assigned to the “Ward A Foyer Mode” the system will automatically set ward A when the last ward (B, C or D) is set. The system will automatically unset ward A when the first ward (B, C or D) is unset. 0001 Night Enter circuit No. or A / C to scroll [ to edit Enter unset type 0001 Night A / C to scroll throughcircuit types [ to accept Unset Circuit Types Flowchart 81 Engineers Menu 4 TS2500 Installation Manual Log Search Keys [4-5] This option allows the engineer to configure the nine log search keys. When viewing the event log you would normally use the [A] and [C] keys to scroll backwards and forwards through the event log. The log search keys allow you to scroll backwards through the log, but will only display events that meet the search key criteria. Each search key can have up to 5 search events assigned to it. For example, log search key [1] could be set-up to search for alarms, set wards and unset wards. When viewing the log and pressing [1] the display would show the next event that met the search key criteria, i.e. it would display the next logged alarm, set or unset wards. If you only want to search for a single event type, then assign all 5 events as the same type. The table below shows the default log search key settings: Key Event 1 Event 2 Event 3 Event 4 Event 5 1 ALARM ALARM ALARM ALARM ALARM 2 24hr ALARM 24hr ALARM 24hr ALARM 24hr ALARM 24hr ALARM 3 FIRE ALARM FIRE ALARM FIRE ALARM FIRE ALARM FIRE ALARM 4 PA ALARM PA ALARM PA ALARM PA ALARM PA ALARM 5 TAMPER TAMPER TAMPER TAMPER TAMPER 6 ENTRY ENTRY ENTRY ENTRY ENTRY 7 PASS CODE PASS CODE PASS CODE PASS CODE PASS CODE 8 SET WARDS SET WARDS SET WARDS SET WARDS SET WARDS 9 UNSET WARDS UNSET WARDS UNSET WARDS UNSET WARDS UNSET WARDS 5 Engineers menu 4 Log search keys Shunt Groups [4-6] The TS2500 alarm system has 50 shunt groups each group can have up to 4 circuits assigned to it. Each circuit must have the “Shuntable” attribute assigned in order for it to be shunted. Each group can then be allocated to a user passcode (type "Shunt"). Operation When a shunt passcode is entered the selected group of circuits are shunted (isolated), this is confirmed by the remote keypads showing “Your circuits are now shunted”. When the shunt passcode is re-entered, the selected group of circuits are reinstated and the remote keypad shows “Your circuit are reinstated”. If the system configuration is programmed as “Unshunt, no exit”, the shunted circuits are reinstated as soon as the passcode is entered. If the system configuration is programmed as “Unshunt & exit”, the exit procedure is started when the passcode is entered and the shunted circuits are reinstated on completion of the exit procedure. 6 Engineers menu 4 Shunt groups [ Group 00< 0001 0001 0001 0001 Enter group No. [ to edit Group 02 >2002 0001 0001 0001 Enter circuit No. then [ to move to next circuit Group 02 2002 2003 2004>2009 [ to accept [ Key 1,Event 1 :ALARM XXXX Engineers Menu 4 1 - 8 = search Key A / C to scroll event No. [ to edit Select new event ALARM XXXX A / C to scroll event types [ to accept Key 1,Event 1:ABORT ON WARDS:- Log Search Keys Flowchart 82 Shunt Groups Flowchart TS2500 Installation Manual Engineers Menu 4 OM Configuration [4-7] This option allows the engineer to define which ward and circuit status information is sent to the control panel output module port. Mimic options The mimic options allow you to define which ward related data is sent to the output module port. CCT options The circuit options allows you to define which circuit related data is sent to the output module port. 7 Engineers menu 4 OM Configuration Edit Quick Keys This options allows the engineer to configure the [A], [B] and [C] keys on the remote keypads to perform set functions. For example, key [A] could be programmed to follow part set group 1, whereas key [B] could be programmed to follow part set group 8. Once defined the quick keys do NOT require the user to enter their passcode, they simply press the relevant "Quick Set Key" and the system will perform the function assigned to that key. Engineers menu 4 Edit quick keys 9 [ [ Quick set key A is DISABLED 1, Mimic options 2, CCT options 1 00 Mimic Wrd A-H Bell-SAB YES A / C to scroll 2 [4-9] A,B,C to select Quick Key 1-9 to select Part Set Group 0 = Disabled B To toggle YES/NO Quick set key A will use group 4 Mimic option 1 Start at 0001 Enter circuit No. [ Edit Quick Keys Flowchart Engineers Wards Enter circuit No. [ Repeat for remaining options ] OM Configuration Flowchart Set Volume Level [4-8] This option allows the engineer to adjust the volume level of the control panel speaker output. 8 Engineers menu 4 Set volume level [4-A] This option allows the engineer to select wards as “Engineer Wards”. When a ward is selected as an “Engineer Ward” all circuits within that ward are NOT monitored whilst the engineer is logged on. If the ward is subsequently set whilst the engineer is still logged on the monitoring of circuits within that ward is resumed. The engineer cannot select a ward that is currently set. This feature allows parts of the system to be disabled and other parts to be kept live when an engineer is logged on. A Engineers menu 4 Engineer wards [ [ Volume level >16 >>>>>>>> A / C to increase & decrease sound level or enter value. [ Set Volume Level Flowchart Ignore alarms in *,*,.,.,.,.,.,. Wards 1-8 Toggle wards. A-C To Scroll wards A-H and wards I-P. [ Ward Status Key * = Ward not selected. . = Ward not available. A-P = Wards selected. Engineer wards Flowchart 83 Engineers Menu 4 Mimic option 1 & End at 1008 Engineers Menu 4 TS2500 Installation Manual 0 Engineers menu 4 Code lock times [ Codelock group 1 Select option :A = Codelock group 1 B = Codelock group 2 C = Codelock group 3 [ = Users 1 = On time 1 2 = On time 2 3 = On time 3 4 = Off time 1 5 = Off time 2 6 = Off time 3 7 = 1st operates on 8 = 2nd operates on 9 = 3rd operates on 0 = Manually switch output Codelock group 1 On-time 1 00:00 Codelock group 1 Off-time 1 00:00 1 Operates on :> SunMo.......... Codelock group 1 > output is OFF 01, 999 Not Used Enter On-time Enter Off-time B = Toggle ON/OFF A / C = to scroll 01-10 [ [ Enter days of operation 1=Sunday, 7=Saturday [ [ [ Enter user No. 01, 002 Enter user No. 001 -199 [ Code Lock Times Flowchart Code Lock Times [4-0] This options allows the engineer to define up to three code lock time groups, each group has the following options: On- times 1, 2 & 3 Each group has three Independent on times. Off- time 1, 2 & 3 Each group has three Independent off times. Days of operation 1, 2 & 3 Each group can be programmed to operate on different days of the week. Engineers Menu 4 Users Up to 10 users can be assigned to each code lock group. Operation Once a user is assigned to a code lock group their passcode is only valid when the code lock group timer is off. If the user attempts to use their passcode whilst the timer is on the display will show "Sorry. Your code is locked out" 84 TS2500 Installation Manual Appendices Appendices Text Editing Keys When programming any text the keys on the keypad function as shown below: 1 =A 2 =E 3 =I 3 =O 5 =U 4 = 0 (zero) 7 = Move cursor left 8 = Change case ENT = Accept text 0 = Space 9 = Move cursor right ESC = Abandon text editing A = Up the alphabet B = Change cursor C = Down the alphabet Text Editing Keys Cursor Types Setup New Users The TS2500 allows up to 199 users to operate the alarm system, each user is assigned a user type, passcode and ward access. User 001 is the master user which has a default setting of 5678. User Types The following user types are available: Master This user type has access to all fours our user menus and options. A master user is also a global user which allows the user to set and unset their assigned wards from any remote keypad. [^] This is the normal text editing cursor. Use the text editing keys as shown above. [|] This is the number cursor. Use the numbered keys 0 - 9 to enter numeric data. [+] This is the insert cursor. Use text editing keys as shown above to insert text at the cursor. [-] This is the delete cursor. Use key [7] to delete from the left of the cursor and key [9] to delete from the right of the cursor. Manager This user type has access to "User menu 1"and "User menu 2". A manager user is also a global user which allows the user to set and unset their assigned wards from any remote keypad. Common Key Sequences Standard Ward This user type has access to "User menu 1". A standard ward user can only set and unset their assigned wards from a remote keypad that is assigned to the same ward(s) that they are trying to set/unset, For example if the user is assigned to wards A and B, then operates the system from a keypad assigned only to ward B, the user would only have the option to set/unset ward B. Key Sequence Character Key Sequence A 1 U 5 B 1A V 5A C 1AA W 5AA D 2C X 5AAA E 2 Y 5AAAA F 2A Z 5AAAAA G 2AA : 1CCCCCCC H 3C ; 1CCCCCC I 3 < 1CCCCC J 3A = 1CCCC K 3AA > 1CCC L 3AAA ? 1CC M 4CC @ 1C N 4C ! 0A O 4 " 0AA P 4A # 0AAA Q 4AA $ 0AAAA R 4AAA % 0AAAAA S 5CC & 0AAAAAA T 5C Reset Only This user type allows 24hr alarms to be reset and access to "User menu 1" options 1 to 9. A reset only user is also a global user type which allows the user to reset 24hr alarms from any remote keypad. Panic Code This user type does not have access to any user menus nor can it be used to set and unset the system. When this user code is entered a "Panic Alarm"' is transmitted to the alarm receiving centre and the external sounder(s) and strobe light(s) are also activated. Appendices Character Standard Global This user type has access to "User menu 1". A standard global user is also a global user which allows the user to set and unset their assigned wards from any remote keypad. 85 Appendices Duress Code This user type operates in the same way as a standard global user, but when the passcode is used a silent "Panic Alarm" is transmitted to the alarm receiving centre. + If "Configuration option 02" is set to enabled, all users can generate a "Duress" alarm by entering their passcode with the first two digits reversed (e.g. for a passcode of 2580 enter 5280 to generate a "Duress" alarm). Access This user type does not have access to any user menus nor can it be used to set and unset the system. When this user code is entered it will operate specific outputs which in turn can be used to operate an electric door strike or similar. TS2500 Installation Manual Customising Users Access to user menus is initially defined by the user type, e.g. the manager user has access to user menus 1 and 2, and a standard global user has access to user menu 1 only. However, each user can be customised so that individual options within user menus are available or restricted, e.g. user 002 could be given the initial type of standard ward, then customised to allow the user to access all user menus and options. The table below shows all four user menus and the options available: Key User Menu 1 User Menu 2 User Menu 3 User Menu 4 1 Bell Test View circuits Time Switches Auto-set Timers Shunt This user type does not have access to any user menus nor can it be used to set and unset the system. When this user code is entered it will isolate a pre-defined group of detection circuits. When the code is re-entered it will reinstate the group. 2 Walk Test Set System Time Part Set Groups 3 Remote Reset Set System date Use On-line Pad 4 Change passcode Setup new users Edit User Names Set Only This user type operates in the same way as a standard global user, except that it only allows setting of wards. 5 Enable Chime Chime Circuits 6 24hr Omit 24hr Group Not in use This user type does not perform any operation. Select this user type to delete an existing user. User Wards 7 8 Each user must be assigned to wards. Once assigned to wards the user can then set, unset and reset the wards they have been given access to. 9 Auto Sets wards A Wards that are assigned as auto set will automatically be selected for setting when choosing the "SET WARDS" option. If a ward is not assigned as auto set the user is given the choice to select the ward at the time of setting. Auto Unset Wards Appendices Wards that are assigned as auto unset will automatically be selected for unsetting when choosing the "UNSET WARDS" option. If a ward is not assigned as auto unset the user is given the choice to select the ward at the time of unsetting. 86 0 Circuit Text Shunt Groups Omit Zones Print System Log Silent Set Set/Unset Alter Wards Set Volume Level View System Log Edit Quick Keys Rem. Serv. Options Start Call Back B C Part Set Text Log Search Keys Set BST/GMT Dates Activity Count Code Lock Times TS2500 Installation Manual Appendices Enter master user (5678) then [ User menu 1 Select option :- [ User menu 2 Select option :- 4 User menu 2 Setup new users [ Define new users User no. 002 Enter user No. Next available user B to view total number of users [ Enter new code.. ---Enter new passcode [ User 002 is type Not in use User Types Master Manager Standard Global Standard Ward Reset only Panic code Durress code Access Shunt Set only Not in use User type A / C to scroll user types [ to accept User 002 wards A,*,*,*,.,.,.,. User wards 1 - 8 to toggle wards A / C to scroll wards A-H & wards I-P. [ to accept 002 Auto sets:A,*,*,*,.,.,.,. Auto set wards 1 - 8 to toggle wards A / C to scroll wards A-H & wards I-P. [ to accept 002 Auto unsets:A,*,*,*,.,.,.,. Ward Status Key * = Ward not selected. . = Ward not available. A-P = Wards selected. Auto unset wards 1 - 8 to toggle wards A / C to scroll wards A-H & wards I-P. [ to accept [ENT] to customise user Menu 1 options:> 0123456789... Menu 2 options:> 0123*567*9A.C Use keys to toggle menu options [ to accept Menu 3 options:> 0123456...... Appendices ] [ Menu 4 options:> 01...56.89... [ Setup New Users Flowchart 87 Appendices TS2500 Installation Manual Engineer's Quick Reference Engineers Menu 1 Hotkey Options Page 1 Program Panel Outputs 34 2 Program Digicom Outputs 34 3 4 1 = Panel Output 1 (relay) 2 = Panel Output 2 (-ve) 3 = Panel Output 3 (+ve) 4 = Panel Output 4 (+ve) 1 = Channel 1 2 = Channel 2 3 = Channel 3 4 = Channel 4 5 = Channel 5 6 = Channel 6 7 = Channel 7 8 = Channel 8 Program Digicom Channels 1 = Channel 1 2 = Channel 2 3 = Channel 3 4 = Channel 4 5 = Channel 5 6 = Channel 6 7 = Channel 7 8 = Channel 8 Program Circuits, Attributes & Wards Circuit Types 0 = Not Used 1 = Night 2 = 24 Hour 3 = PA Silent 4 = PA Audiible 5 = Fire 6 = Auxiliary 7 = Final Exit 8 = Exit Terminator 9 = Ward Key A/C = Shunt Key A/C = Tamper A/C = Security A/C = 24hr Silent A/C = Night Perimeter A/C = Custom circuits Circuit Attributes 1 = Access 2 = Double Knock 3 = On Test 4 = Omittable 5 = Reset 6 = Activity 7 = Entry 8 = Chime 1 9 = Chime 2 A/C = Chime 3 A/C = Inverted A/C = Shuntable A/C = Beam Pair A/C = Eng. Test A/C = Monitored A/C = Non Latching Hotkey System Print-out 8 Program System Options 45 9 Program Configuration 46 A View Location Text 49 B Default NVM data C Log Off Engineer 34 40 Wards 1 - 8 = Select/deselect wards displayed A/C = Toggle wards A-H or I-P B = Select/deselect all wards Appendices 6 88 Program System Timers Exit time wards A-P Entry dly wards A-P Digi dly wards A-P Bell dly wards A-P Bell dur wards A-P Exit settle time 2nd Entry delay Double Knock dly Abort duration Abort delay 2nd alarm time Courtesy time Access code time Menu time-out Line fault delay AC off delay Monitor cct time Beam pair time Battery test dur Answer ring time Global bell dly Global bell dur Activity delay Defer setting by Battery test Hi Security time Cct test time Service time Payment time Test call every Select menu time Custom o/p 2 Tmr Program Setting Modes A/C =Select ward 1 = Final Exit 2 = Exit Terminator 3 = Timed Exit 4 = Instant 5 = Deferred Page 7 B = Toggle attribute between YES/NO 5 Options 42 44 0 = Custom text 1 = Modem data 2 = User codes 3 = Configuration 4 = Outputs 5 = Setting modes 6 = System timers 7 = Time switches Number of rearms Modem rings Keys until tamp 8 = Code locks 9 = Auto-set times A/C = Custom Circuits A/C = Circuits A/C = Equipment wards A/C = Net equipment A/C = Part set groups Remote resets Reset algorithm Double Knocks 00 = Bell is an SAB / Bell is an SCB 01 = View alms P.Set / View alms unset 02 = Duress Disabled / Duress Enabled 03 = Engr Authorised / User Authorised 04 = On-Line Enabled / On-Line Disabled 05 = Lo-sec Engineer / Hi-sec Engineer 06 = Normal answer / Timed answer 07 = Unset ward first / Set ward first 08 = Can set with L.F / No set with L.F 09 = Can set - AC off / No set - AC off 10 = Quiet chimes / Loud chimes 11 = O/P 1 normal / O/P1 inverted 12 = Digi normal / digi inverted 13 = 4 digit codes / 6 digit codes 14 = Modem on Com1 / Printer on COM1 15 = Chime Audible / Chime Visible 16 = Manual Omits / Automatic Omits 17 = Omit Tampers No / Omit Tampers Yes 18 = O/M's mimic cct / O/M’s mimic alms 19 = Log Time & Date / Log Time & Day 20 = Global Setting / Local Setting 21 = Global Unsetting / Local Unsetting 22 = 24hr Omit Global / 24hr Omit Local 23 = Ward bell time / Global bell time 24 = Latching Fire / Nonlatching Fire 25 = Online Printing / Offline Printing 26 = Timed code o/p / Latched code o/p 27 = Activity flt ok/ Activity flt Bar 28 = Latching 24hr / Nonlatching 24hr 29 = Access code only / Access all codes 30 = Answer anytime / Answer o/p 1 on 31 = NVM is Unlocked / NVM is Locked 32 = Unshunt & No exit / Unshunt & exit 33 = Ignore errors / View exit errors 34 = Mimic, All times / Mimic, set only B = Toggle between two options 1 = Panel Location 0 = Custom text 1 = Modem data 2 = User codes 3 = Configuration 4 = Outputs 5 = Setting modes 6 = System timers 7 = Time switches 2 = Remote Location 8 = Code locks 9 = Auto-set times A/C = Custom Circuits A/C = Circuits A/C = Equipment wards A/C = Net equipment A/C = Part set groups A/C = Log 44 49 51 TS2500 Installation Manual Appendices 0 Goto User Menu 1 1 = Bell Test 2 = Walk Test 3 = Remote Reset 4 = Change code 5 = Select Chime Hotkey 1 6 = 24hr Omit 7 = Omit Circuits 8 = Silent Set Wards 0 = Set/Unset Menu Option View Circuits A/C = Scroll up and down ENT = Toggle text / location Engineers Menu 3 51 Hotkey Page 1 Program Time Switches 62 2 Part Set Groups 62 Page 54 Option A = Time switch 1 1 = On Time 1 B = Time switch 2 2 = On Time 2 C = Time switch 3 3 = On Time 3 4 = Off Time 1 7 = 1st operates on 5 = Off Time 2 8 = 2nd operates on 6 = Off Time 3 9 = 3rd operates on 0 = Manually switch output 1 - 9/0 = Select part set group ENT = Edit 2 Set System Time 54 3 Use On-Line Keypad 63 3 Set System Date 54 4 Edit User Names 63 4 Change Passcode (Engineers) 54 Alter Chime Circuits 55 5 Part Set Text 63 5 6 Circuit Text 64 7 Custom Text Menu 8 Equipment Outputs 67 9 Built In Tests 68 A Custom Outputs 71 B Custom Circuits 72 C Digi-modem Options 73 0 Activity Count 76 B = Toggle BST / GMT A/C = Scroll up and down ENT = To edit 1 = Chime tone 1 2 = Chime tone 2 3 = Chime tone 3 0 = Disabled 6 Alter 24hr Group 55 7 Print System Log 55 8 Alter Circuit Wards 56 1 - 8 = Select/deselect wards displayed A/C = Toggle wards A-H or I-P B = Select/deselect all wards A/C = Scroll up and down ENT = To edit 1 - 8 = Select/deselect wards displayed A/C = Toggle wards A-H or I-P B = Select/deselect all wards 9 View System Log 56 A Start Call Back Sequence 60 A/C = Scroll up and down B = Toggle user name / No B = Toggle event / ward B = Toggle circuit No / circuit text 1 = Call Back No 1 2 = Call Back No 2 3 = Call Back No 3 B = Enter number required ENT = Start call back sequence B Reset User Code 1 60 C Set BST/GMT Dates 60 0 Remote Service Options 60 ENT = Reset user 1 to 5678 B = Toggle Enabled / Disabled A/C = Scroll up and down ENT = Edit text 1 - 9/0 = Select part set group ENT = Edit text A/C = Scroll up and down ENT = Edit text 0 = Reset message 1 = Location text 2 = Printer header 3 = Rem reset msg 4 = Printer prefix 5 = Banner message 6 = Part set banner 7 = Aux. Tamper 1 8 = Aux. Tamper 2 9 = Modem string A/C = Scroll up and down B = Toggle output A / B Software Version 1 = Voltage 2 = Current 3 = Circuit Resistance 4 = Digicom Outputs (Panel) 5 = Test panel outputs 6 = Test Node outputs 7 = Confirm Network devices 8 = Test Keypad display 9 = View Network devices A/C = Network errors A/C = False setting routine A/C = Test digicom channels (Plug-on) 1 - 8 = Select custom output 1 - 8 ENT = Edit 1 = Toggle unset A/C = Bell required 2 = Toggle part set A/C = Digi required 3 = Toggle set A/C = Sounder required A/C = Warning required A/C = Trig Custom o/p 1 = Call back No 1 2 = Call back No 2 3 = Call back No 3 4 = Modem password 5 = Modem site No A/C = Scroll wards B = Reset counter 6 = Program digicom 7 = Digi Baud rate 8 = COM1 Baud rate 9 = Internal digicom 0 = Reset digicom 66 89 Appendices Engineers Menu 2 Appendices TS2500 Installation Manual Engineers Menu 4 Hotkey Option A Page 1 Auto-set Timers 78 2 Network Equipment Wards 79 3 Equipment Wards 80 4 Unset Circuit Types 81 A = Timer 1 1 = Set Time 1 B = Timer 2 2 = Set Time 2 C = Timer 3 3 = Set Time 3 4 = Unset Time 1 7 = 1st operates on 5 = Unset Time 2 8 = 2nd operates on 6 = Unset Time 3 9 = 3rd operates on ENT = Select wards 0 = Manually switch output A/C = Scroll up and down ENT = Edit wards 1 - 8 = Select/deselect wards displayed A/C = Toggle wards A-H or I-P B = Select/deselect all wards 1 = Panel tamper 2 = Bell box tamper 3 = Aux 1 tamper 4 = Aux 2 tamper 5 = Phone line fault 6 = Mains power off 7 = Payment timer 8 = Alarms Eng Reset 9 =Tamper Eng Reset A/C = Remote reset A/C = Panel speaker A/C = Relearn required A/C = Re-arms apply to A/C = Hi Security ward A/C = Digi in Part Set A/C = System Bell/STB A/C = Ward A foyer Mode A/C = Unset fire sig. A/C = Dble Knock wards Circuit Types 0 = Not Used 1 = Night 2 = 24 Hour 3 = PA Silent 4 = PA Audiible 5 = Fire 6 = Auxiliary 7 = Final Exit 8 = Exit Terminator 9 = Ward Key A/C = Shunt Key A/C = Tamper A/C = Security A/C = 24hr Silent A/C = Night Perimeter A/C = Custom circuits Log Search Keys 82 6 Shunt Groups 82 7 OM Configuration 83 8 Set Volume Level 83 9 Edit Quick Set Keys 83 0 Code Lock Timers 84 Appendices 5 90 1 = Mimic options 2 = CCT options A/C = Increase / Decrease A/B/C = Quick set key A/B/C 1 - 9 = Select part set group 0 = Disabled A = Codelock 1 1 = On Time 1 B = Codelock 2 2 = On Time 2 C = Codelock 3 3 = On Time 3 4 = Off Time 1 7 = 1st operates on 5 = Off Time 2 8 = 2nd operates on 6 = Off Time 3 9 = 3rd operates on ENT = Select users 0 = Manually switch output Engineers Wards 83 TS2500 Installation Manual Index ! 24hr Circuits Audible 40 Latching option 48 Silent 40 24hr Omit Alter 24hr omit group 55 Global / local option 47 A Abort Delay timer 42 Duration timer 42 AC Off Assigning to wards 80 Can set without option 46 Off delay timer 42 Access Attribute 40 Code timer 42 Output options 48 User type 86 Activity Attribute 41 Delay timer 43 Setting option 47 Viewing count 76 Alarms Making engineer reset 80 Viewing options 46 Answer ring timer 42 Attributes 40 Auto-set Timers 78 Auxiliary 12V connections 17 12V Fuse 18 Circuit type 40 Tamper Assigning text 66 Assigning to wards 80 Connections 17 B Banner Message 66 Battery Connections 15,17 Fault LED 18 General 12 Kick start pins 18 Test timer 42,43 Index Beam Pair Attribute 41 Delay timer 42 Bell Assigning to wards 81 Fuse 18 Global / ward option 47 Global delay timer 43 Global duration timer 43 SAB/SCB option 46 Ward delay timer 42 Ward duration timer 42 Bell Box Tamper Assigning to wards 80 Connections 26 C Chime Alter Chime Circuits 55 Attribute 41 Audible / Visual option 47 Quiet / Loud option 46 Circuit Text Library 65 Circuit Types 40 Code accepted Latched / timed option 47 Code Lock Timers 84 Configuration options 46 Confirmation Network devices 69 Second alarm time 42 Control Panel Assigning tamper to wards 80 Features 2 Installation 14 PCB Layout 16 Specifications 3 Tamper 18 Courtesy timer 42 Current Measuring with control panel 68 Measuring with DVM 18 Custom Circuits Circuit type 40 Programming 72 Custom Outputs Programming 71 Timer 43 D Date BST/GMT change over 60 Setting 54 DC54/58 Digicom General 13 Programming via panel 74 Resetting 76 Wiring details 28 DC58M Digi modem Answer call options 48 General 13 Normal / timed answer 46 Wiring details 28 Defer setting timer 43 Deferred setting mode 44 Detection Circuits Assigning text 64 Changing type when unset 81 Numbering format 40 Programming 40 Viewing resistance of 68 Viewing status of 54 Wiring double pole 26 Wiring End of Line 26 Diagnostics Routines 68 Digi Baud Rate 76 Digi Modem Call back numbers 73 Modem password 74 Modem site number 74 Options 73 Resetting 76 Digicom Active when part set 81 Delay timer 42 Outputs 17 Plug-on connections 18 Power terminal 17 Testing outputs 68 Types 3 Digicom Channels Programming 34 Testing 70 Digicom Outputs Inverting option 46 Programming 34 Double Knock Assigning to wards 81 Attribute 40 Counter 45 Delay timer 42 Duress Disable / Enable option 46 User type 86 E EMC Compatibility 8 Engineer access Hi / Lo security option 46 Passcode - Changing 54 Engineer Reset 91 Index Alarms 80 Tampers 80 Engineer Tests Engineer test attribute 41 Test routines 68 Engineers Menus Menu 1 33 Menu 2 53 Menu 3 61 Menu 4 77 Engineers Remote Keypad 18 Engineers Wards 83 Entry Attribute 41 Second entry timer 42 Timer 42 EPROM Upper & Lower 18 Viewing version 68 Equipment Outputs 67 Equipment Wards 80 Event Log Assigning search keys 82 Codes 57 Log date / day option 47 Viewing 56 Exit settle timer 42 Exit terminator Circuit type 40 Setting mode 44 Exit timer 42 Expansion Devices ID Node 3 TS LEC8 3 TS700 LEC 2 TS900 Node 2 XNode 3 External Sounder Connections 17 General 13 Wiring to a Node 27 Wiring to control panel 26 F Factory Restart During power up 31 Pins 17 False Setting Routine 70 Final Exit Circuit type 40 Setting mode 44 Fire Circuit type 40 Latching option 47 Signalling when unset 81 Foyer Mode 81 92 TS2500 Installation Manual G Goto user menu 1 51 H Heartbeat LED 18 Hi Security Assigning to wards 81 Timer 43 I ID Node Specifications 4 Instant setting mode 44 Internal Digi 76 Introduction 2 Invert Attribute 41 K Keys until tamper 45 L LEC 8 Connectors 17 Installation 25 Specifications 4 Line Drivers General 3,13 Line Fault Assigning to wards 80 Can set with option 46 Delay timer 42 Terminal 17 Lineload Online keypad options 46 User / Engineer option 46 Location Text Programming 66 Viewing 49 Log off engineer 51 Loudspeakers Assigning to wards 79,80 Connections 17 General 12 Wiring to an XNode 27 Wiring to control panel 27 M Mains connection 15 Manager user type 85 Master user type 85 Menu time out 42 Modem ring counter 45 Monitor time 42 Monitored Attribute 41 N Network Equipment Wards 79 Networks Connections 17 Fuses 18 Viewing devices 69 Viewing error count 70 Night Circuit 40 Night Perimeter Circuit 40 Non Latching Attribute 41 Not Used Circuit 40 NVM Default values 49 Defaulting data 49 Locking option 48 Upper & Lower 18 O Omit Attribute 41 Omitting Circuits Manual / Auto option 47 Omit tampers option 47 On-Line Keypad 63 Output Modules Connector 17 General 3,13 Mimic / alarms option 47 Mimic when set option 48 Programming options 83 Wiring to an XNode 28 Wiring to control panel 28 Output Types 35 P PA Audible circuit type 40 Silent circuit type 40 Panel Outputs Connections 17 General 12 Inverting O/P 1 option 46 Programming 34 Testing Outputs 68 Wiring examples 29 Panic code 85 Part Set Banner message 66 Groups 62 Text 63 Payment Assigning to wards 80 Timer 43 Power LED 18 TS2500 Installation Manual Power-Up Checks 31 Sequence 31 Printer CPA6 29 DATAC 29 General 3,13 Header text 66 Output Port 17 Prefix message 66 Printing Online / offline option 47 Print system log 55 System printout 44 Q Quick Set Keys 83 R Re-arm Assigning to wards 80 Counter 45 RedCARE General 13 Wiring details 27 Relearn Required Assigning to wards 80 Clearing message 69 Message 31 Remote Keypads Assigning to wards 79 Installation 19 Outputs 29 Programming Outputs 67 Specifications 3 Testing display 69 Types 2 Viewing location address 49 Remote PSU Monitoring 30 Remote Reset Algorithm 45 Assigning to wards 80 Counter 45 Message 66 Terminal 17 Remote service options 60 Reset Attribute 41 Message 66 User type 85 S Index Service Timer 43 Setting Global / local option 47 Modes 44 Shunt Groups 82 Key 40 User type 86 Shuntable Attribute 41 Software version 68 Standard global user 85 Standard ward user 85 Start Call Back 60 Strobe Assigning to wards 81 Connections 26 System Architecture 1 System Learn Pins 18 System Timers 42 T Tamper Circuit 40 Tamper Engineer Reset 80 Test Attribute 41 Timed test call 43 Timer 43 Text Editing Keys 85 Time - Setting 54 Time Switches 62 Timed Exit setting 44 TS700 LEC Installation 25 Specifications 4 TS900 Node Installation 22 Specifications 4 U Unset / set wards option 46 Unsetting Global / local option 47 Unshunt & Exit option 48 User Codes 4 / 6 digits option 46 Assigning to wards 86 Customising 86 Resetting the master user 60 Setting up 85 Time locking 84 User types 85 User names 63 Users mode - selecting 51 V View exit errors option 48 Voltage Measuring at control panel 68 Measuring at XNode 69 Voltage Drop Calculating 5 Examples 6 Reducing 7 Volume Level Panel speaker 83 XNode speaker 22 W Ward Key Circuit 40 Wards Alter Circuit Wards 56 Assigning circuits 41 Wiring Detection circuits 12 General 5 Mains supply 12 OMs to XNodes 10 Remote keypads 11 Remote PSUs 7 Remote to XNodes 9 Remotes with Nodes 10 Screen Cable 8 Speakers to XNodes 10 TS900 Nodes 10 TSLEC8 12 XNodes 8 X XNode Assigning to wards 79 Installation 20 Outputs 29 Programming Outputs 67 Specifications 4 Testing Outputs 69 Security Circuit 40 Select menu timer 43 93 Cooper Security Ltd. Security House, Xerox Business Park, Mitcheldean, Gloucestershire, GL17 0SZ. England Product Support Tel: +44 (0)1594 545556 Between 09:00 and 17:00, Monday to Friday. Product Support Fax: +44 (0)1594 545401. www.coopersecurity.co.uk Part No. 496497 Issue 1