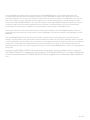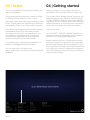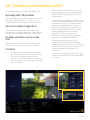
1
Phantom Photo Match
3 D
P E R S P E CT I V E
Software user manual
M ATCH I N G
T E C H N O LO GY
Author / owner
Company
Manual version
Software version
Publication date
Copyright
Guus Thissen
Phantom Technology
1.3
1.3
18-10-2015
©2015
Table of contents
Introduction
An introduction to Phantom Photo Match.
Page 8
01
02
03
1 of 27
Support
Information about system requirements, OBJ model support and
troubleshooting.
Page 7
Licensing
Information about obtaining a license, the End-User License Agreement
(EULA) and activating the Phantom Photo Match software.
Page 8-10
Setup
Short tutorial on the Phantom Photo Match setup.
Page 11
Table of contents
Gettings started
Information about the panels in the GUI and the individual functions.
Page 11
Graphical user interface (GUI)
Information about the panels in the GUI and the individual functions.
Page 12
Functions
Information about the available functions.
Page 13-14
Perspective setup
Dragging the red/green nodes to determine the perspective.
Page 15
04
05
06
07
2 of 27
Table of contents
08
09
10
Reference mesh
Importing a OBJ reference mesh to match up to the photo.
Page 16
Scene scale
Accurately scaling the scene to fit correctly in the photo.
Page 17
Getting the data into Octane
Render
Copying over the exact camera properties.
Page 17
11
3 of 27
Save/load
Saving or loading your setup.
Page 18
Table of contents
Octane setup
Setting up the scene in Octane (includes example file).
Page 18
Exporting into other tools
Tutorial on how to get the camera perspective data into other tools.
Page 19-22
Software changelog
A list that contains the changes to the software, seperated per major update.
Page 23-24
12
13
14
Final word
A word about the software in general and the development team.
Page 25
4 of 27
5 of 27
6 of 27
7 of 27
Introduction
If you work in architectural visualization, chances
are you will work in projects where existing
architecture will be modified or expanded.
Octane Render can be very useful for this. It can
import a reference photo in the background,
allow you to set that transparent, and render a 3D
scene.
However, Octane Render itself falls short when
you want to create seamless intergration
between photo and 3D. That is where Phantom
Photo Match comes into play. Instead of clueless
guessing of what the various camera properties
should be (and never getting it right), Phantom
Photo Match can calculate this for you, based on
the axis lines that you place on geometry in your
photo. The camera data can then be entered in
Octane Render standalone to create a 3D
perspective that matches your photo.
Guus Thissen
Phantom Photo Match lead developer
8 of 27
01 | Support
System requirements
Troubleshooting
Phantom Photo Match has the following system
requirements:
Should you run into any problems, please
contact me at [email protected].
•
The software is designed for the Microsoft
Windows platform. It's tested and working
on Windows Vista, Windows 7, Windows 8
and Windows 8.1. It will probably also run
on Windows XP should you want to.
•
A problem in the ArchiCAD OBJ exporter
can cause it to export incorrect normals in
the OBJ. When this happens, try
exporting your model into Google
SketchUp first. Then export it as OBJ
using TIG’s plugin.
•
An active internet connection is required
so the software can validate your
registration. This only happens when the
program is launched.
•
In case of a DirectX compile error, you are
probably missing the DirectX9.0c runtime.
This will install alongside any existing
versions of DirectX you might have
already:
•
The software is designed to cooperate
with Octane Render. This software is
obviously required to make usage of
Phantom Photo Match. It might be
possible to use the same camera data in
other rendering tools aswell.
link:
http://www.microsoft.com/engb/download/details.aspx?id=35
•
OBJ model support
OBJ models should work flawlessly as long as
the faces that make up the model are triangles (3
vertices/face) and/or quads (4 vertices/face).
Faces with 5 vertices or more are not supported.
If your OBJ models have 5 vertices or more, try
triangulating them.
I am trying to deliver broad OBJ support. If your
modeling package creates OBJs that are not
compatible, please contact me. Users have
tested and tried with the following modeling
packages:
ArchiCAD, Blender, SketchUp, Rhino, Maya,
Lightwave, DAZ, Artlantis, 3DS Max, Revit,
Softimage and ZBrush.
9 of 27
In case you get an error about missing
MSVCP120.dll, that is because you need a
newer visual C++ runtime. Select the
option vcredist_x86.exe, regardless if your
machine is 32-bit or 64-bit.
link:
http://www.microsoft.com/enus/download/details.aspx?id=40784
•
I've received a report where the software
did not get data loading/writing
permissions from Windows. I suspect
Microsoft UAC (User Account Control) was
blocking it. I recommend to run the
software as administrator when this
happens, that should solve it.
02 | Licensing
Obtaining a license
A license is valid for a single PC. Once you've
activated the software, the software will be
locked to that PC. As long as you have a valid
license, you will always get the latest version of
the software.
To request a license, please contact me at the
following e-mail address:
Activating the Phantom Photo
Match software
When first running the Phantom Photo Match
software, you will be asked to enter your
username. This will be the e-mail address you
requested the license with, unless I specifically
give you another username (this can be
requested).
Enter your username and press OK.
[email protected]
You will be given a link to PayPal, where you can
make the transaction. As soon as I see the
transaction has been completed, I will send you
a reply to your e-mail with your personal
username, registration key and download link to
the software.
A new window pops up, requesting your
registration key.
Enter your registration key (I recommend copypasting it) and press OK.
The software should now be registered and
ready for use!
By downloading and/or using the software, you
agree to the End-User License Agreement
(EULA). The EULA can be read on the next two
pages of this manual.
Should you upgrade your PC, then you can
contact me for a new license key. Your old key
will be deactivated.
Please check the system requirements before
buying.
10 of 27
End-User License Agreement (EULA)
Please read the following terms and conditions carefully before using this SOFTWARE PRODUCT. Your use,
distribution or installation of this copy of "PHANTOM PHOTO MATCH" indicates your acceptance of this License.
SOFTWARE PRODUCT here means Software, image files, all accompanying files, data and materials received
with your order of "PHANTOM PHOTO MATCH".
If you do not agree to any of the terms of this License, then do not install or use the SOFTWARE PRODUCT. If you
have purchased a single copy from GUUS THISSEN, you may return it within thirty (30) days after purchase, for a
refund of your payment less any incidental charges. The 30-day warrantee is applicable only to products bought
within YOUR COUNTRY. Products downloaded to or shipped out of YOUR COUNTRY are strictly non-refundable.
Warrantee covers defects in the software, which prevents successfully installing the software in the buyer's PC.
Warrantee does not cover fitness of purpose, not meeting of expectations or needs in the mind of the buyer.
This SOFTWARE PRODUCT is for personal use only and may be installed and used by on only one computer. Its
component parts may not be separated for use on more than one computer. All components accompanying the
software are copyrighted by GUUS THISSEN and may not be taken apart, modified, used or published with other
software or means except with the SOFTWARE PRODUCT software and may not be distributed or copied in any
manner.
This SOFTWARE PRODUCT, all accompanying files, data and materials, are distributed "AS IS" and with no
warranties of any kind, whether express or implied. The user must assume all risk of using the program. This
disclaimer of warranty constitutes an essential part of the agreement.
Any liability of GUUS THISSEN will be limited exclusively to refund of purchase price. In addition, in no event shall
GUUS THISSEN, or his principals, shareholders, officers, employees, affiliates, contractors, subsidiaries, or parent
organizations, be liable for any incidental, consequential, punitive or any other damages whatsoever relating to
the use of SOFTWARE PRODUCT.
In addition, in no event does GUUS THISSEN authorize you to use this SOFTWARE PRODUCT in applications or
systems where SOFTWARE PRODUCT's failure to perform can reasonably be expected to result in a physical
injury, or in loss of life. Any such use by you is entirely at your own risk, and you agree to hold GUUS THISSEN
harmless from any claims or losses relating to such unauthorized use.
This Agreement constitutes the entire statement of the Agreement between the parties on the subject matter,
and merges and supersedes all other or prior understandings, purchase orders, agreements and arrangements.
This Agreement shall be governed by the laws of THE NETHERLANDS.
11 of 27
GUUS THISSEN, the owner of the copyright of this SOFTWARE PRODUCT, all of its derivatives, title and
accompanying materials are the exclusive property of GUUS THISSEN. All rights of any kind, which are not
expressly granted in this License, are entirely and exclusively reserved to and by GUUS THISSEN. You may not
rent, lease, transfer, modify, translate, reverse engineer, de-compile, disassemble or create derivative works
based on this SOFTWARE PRODUCT. You may not make access to SOFTWARE PRODUCT available to others in
connection with a service bureau, application service provider, or similar business. There are no third party
beneficiaries of any promises, obligations or representations made by GUUS THISSEN herein.
You may not disclose to other persons the data or techniques relating to this SOFTWARE PRODUCT that you
know or should know that it is a trade secret of GUUS THISSEN in any manner that will cause damage to GUUS
THISSEN.
This SOFTWARE PRODUCT and all services provided may be used for lawful purposes only. Transmission,
storage, or presentation of any information, data or material in violation of any YOUR COUNTRY, State or City law
is strictly prohibited. This includes, but is not limited to: copyrighted material, material we judge to be threatening
or obscene, or material protected by trade secret and other statute. You agree to indemnify and hold GUUS
THISSEN harmless from any claims resulting from the use of this SOFTWARE PRODUCT, which may damage any
other party.
If you own a LIFETIME LICENSE, this means that you are able to use the software for as long as this
SOFTWARE PRODUCT is available for licensing. If this SOFTWARE PRODUCT is no longer hostable due
to financial problems, this SOFTWARE PRODUCT will be stripped from it's DRM and made available to
you.
12 of 27
03 | Setup
04 | Getting started
There is no mandatory setup required when you
launch the program.
When you start up the program, you will be
presented with the screen shown in figure 04.1.
The program will automatically create the folder
C:/Phantom Photo Match on your C: drive.
The screen will be divided up into 2 sections: the
main view (which says: 'SELECT IMPORT IMAGE
TO GET STARTED') and the bottom part with the
software's function buttons, which are sorted into
different modules. As soon as you've imported a
photo, the main view will change accordingly.
It will also create a file called ppm.settings in said
folder. This file stores the options set in Phantom
Photo Match. There is no need to edit it yourself.
It would be a good idea to store the files that you
downloaded in the ZIP in this folder, so they
won't get lost. But that is not requirement, you
can put them somewhere else if you wish. It
would also be a good idea to download this
manual and store it in that folder aswell.
If you need help or have feature suggestions, email me at [email protected].
You can also post in the topic here:
http://render.otoy.com/forum/viewtopic.php?f=9
&t=48403
figure 04.1 (image taken in 1.2)
13 of 27
Let's do this now.
Go to IMPORT / EXPORT › IMPORT IMAGE and
browse to tutorial_backyard.jpg, for the sake of
the tutorial. It's among the tutorial files.
When importing photos, it is important to know
that not all types of compression are supported
by the image importer. So if your particular *.JPG
file is rejected, try saving it as a *.PNG instead and
try to import it. Incase it is rejected, the program
will crash. Nothing to worry about, just relaunch it
and try another image.
05 | Graphical user interface (GUI)
Your window should now look like figure 05.1.
•
Use the left mouse button to click and
hold to drag the axis nodes (the red and
green dots) or the origin point to move
them around.
•
Use the left mouse button to click on any
of the final result variables in the top-right
corner of the GUI (2). The value of that
particular variable will then be copied
over to the clipboard. The variable can
then be pasted (CTRL+V) inside Octane
Render standalone in the camera's
settings. The value copied to the
clipboard has a much higher precision
than the one displayed in the GUI.
•
Use the left mouse button to click
on any of the upwards or downwards
pointing arrows of the scene scale tool (3).
Use these to finetune your scene's scale
in the photo with a high degree of
precision.
•
Use the left mouse button to access any
of the function buttons in the lower half of
the screen.
(1) Image with 3D preview
This essentially your photo workspace. On top of
the image are perspective line indicators, an
origin indicator and a 1x1x1m transparent cube.
(2) Final results of algorithm
These variables show the final results of the
perspective calculation algorithm. These values
are updated in realtime when you make edits.
(3) High-precision scene scale
tool
This tools allows you to scale your OBJ scene
very precisely so it matches up in your photo.
Controls
•
•
To move around your image (1), simply
click and hold the right mouse button in
the main view and drag the mouse.
Use the mousewheel to zoom in and out.
You can also use the page up/page down
keys to do this.
1
2
3
figure 05.1 (image taken in 1.2)
14 of 27
06 | Functions
MAIN
TOOL (Previously called RENDERED)
This function changes the buttons in the topright of the GUI to accommodate the render tool
you are using.
ANTI ALIASING
Determines the use of anti-aliasing in the 3D
view. Makes 3D geometry very smooth to look at.
Performance will take a hit.
VERTICAL SYNC
Determines the use of vertical synchronisation.
GPUs do not run at the same speed as monitors.
Enabling this makes the GPU wait for the next
monitor update. Prevents screen tearing.
Performance will take a hit.
INTERPOLATE IMAGE
When zooming in on a photo, the quality will
degrade very fast and will become very pixely. By
turning on this function the image will be
smoothed. Useful when placing down nodes.
TRANSPARENCY
Determines the transparency of the *.OBJ
reference mesh. Useful when trying to match it
up to the photo.
UI BACKGROUND
This function allows you to choose from 3
background UI options that affect the graphics of
the modules. The options NONE, PARTLY and
SOLID.
IMPORT / EXPORT
IMPORT IMAGE
Imports a reference photo. Not that not all types
of compression ar supported. So for example if
your particular *.JPG photo is rejected, try
converting it to *.PNG (using GIMP or Photoshop
and try again).
IMPORT SCALE
Determines the factor that scales an *.OBJ when
it is imported in Phantom Scatter. Being a factor, it
means a value of 1 means the *.OBJ would be
imported at 100 % of its size. A factor of 0.001
means the *.OBJ is imported at 0.1 % of its size.
Important:
unit
15 of 27
Phantom Scatter is designed to
work with meters. That means 1
equals 1 meter.
IMPORT OBJ
This allows you to browse to your *.OBJ file of
choice and import it.
EXPORT SCALE
This scale influences the export values that are
copied to the clipboard. Possible export scales
are millimeters (MM), centimeters (CM),
decimeters (DM) and meters (M). Octane Render
standalone works in meters by default.
EXPORT OCT CAMERA
When pressing this button, Phantom Photo
Match will put XML code in your clipboard. You
can then use CTRL+V in the Graph Editor in
Octane Render standalone and a camera node
will be created with the correct data. You can
then rig this camera node up to a render target
node.
EXPORT OCT RESOLUTION
When pressing this button, Phantom Photo
Match will put XML code in your clipboard. You
can then use CTRL+V in the Graph Editor in
Octane Render standalone and an image
resolution node will be created with the correct
data. You can then rig this image resolution node
up to a render target node.
EXPORT ENVIRONMENT MAP
Export the current environment map image as a
*.PNG file.
SETUP
LOADS SETUP
Loads a previously defined setup.
SAVE SETUP
Saves the current setup. The following properties
will be saved:
•
•
•
•
•
•
•
Locations of the red/green axis nodes
that determine the perspective
Location of the origin node
Scene rotation
Scene scale
Color indicators
Environment map
Scene offset
SCENE ROTATION
Angle that corrects the rotation of the scene.
Common values are 0°, 90°, 180° and 270°. At 360°
it comes at full circle, in other words 0° is the
same as 360°.
SCENE ROTATION
Angle that corrects the rotation of the scene.
SCENE ORIGIN OFFSET
Allows you to fly around the imported *.OBJ
model in 3D space. You can then pinpoint a
location with the left mouse button to determine
the position that should be used for the ORIGIN
node inside the interface. It makes dealing with
models that are far away from the absolute origin
(0,0,0) a lot easier. No need to change your
model inside the render tool, the offset is taken
into account in the exported data automatically.
RESET AXIS LINES
Resets the red/green nodes.
RESET ORIGIN
Resets the origin node.
RESET OFFSET
Resets the offset, meaning the ORIGIN node in
the interface will be at position (0,0,0) in your
scene again.
SAMPLE ON IMAGE
This function lets you change the currently active
color to the color of a pixel you pinpoint on the
imported image.
SAMPLE ON IMAGE (BLUR)
Same as function SAMPLE ON IMAGE, but this
time Phantom Photo Match temporarily blurs the
imported image. That way you can get the
average color tint of regions in your image, which
is more suitable for drawing on the environment
map.
PAINT ENVIRONMENT MAP
This function allows you to paint on the
environment map, located below the imported
image in the GUI. Use the left mouse button to
paint where you want. When painting on the left
or right edge on the screen, a clone brush will
appear on the other side. That way the
environment map will be perfectly seamless all
the way around. While the tool is activated, you
can use SHIFT+MOUSEWHEEL to change the
brush radius. You can also use
CTRL+MOUSEWHEEL to change the painting
intensity. The environment map will be saved
inside your setup, so you don't have to be afraid
of losing it.
INTERFACE
RESET VIEW
Reset the view.
RESET MODEL TO DEFAULT
Reverts to the default cube models instead of
showing the model you imported.
ENVIRONMENT MAP
CURRENT INDEX
Controls the currently active color. You can also
click inside the little boxes next to the colors in
the GUI to achieve the same effect.
SAMPLE ON SHEET
This function pops up a color sheet and
grayscale sheet, allowing you to change the
currently active color.
16 of 27
07 | Perspective setup
Now it's time to setup the perspective. It is
important that you have good reference points in
your photo. You will want the angle between the
red-node lines and green-node lines to amount
for a difference of 90° in real life. That way
Phantom Photo Match will be able to work out
the vanish points and work everything out from
there.
figure 07.1
figure 07.2
17 of 27
Zoom in and out to accurately place down the
nodes. This is essential if you want good results.
The controls are described in the previous
chapter of this manual. When you're happy,
continue to the next chapter of this manual. Don't
worry, you can always change the nodes
whenever you want. In most cases you'll want to
finetune it later.
08 | Reference mesh
The next step is to import a reference mesh.
Simply go to IMPORT / EXPORT › IMPORT OBJ
and for the sake of this tutorial, browse to
tutorial_bulborb.obj. (copyright Nintendo)
Importing an *.OBJ means the wireframe cube
will be replaced by your own mesh, displayed
with solid triangles.
If you wish to adjust the transparency of
imported OBJ meshes, go to MAIN › OBJ MESH
TRANSPARENCY and pick a value you like. This is
a global setting so it will carry through when you
restart the program.
Drag the origin node around to place the mesh
origin where you want it to be. The view will
refresh when you let go of the node.
Zoom in and out to be able to precisely position
the mesh.
The mesh is rendered at the same resolution as
the photo you imported.
If you set it up like I did, you will see that the
camera is oriented in a way that you are looking
to the right side of the imported *.OBJ mesh. Let's
correct it so the camera is oriented as if Bulborb
is looking towards the front of the photo. Go to
SETUP › SCENE ROTATION and enter a value of
270 (degrees). As you can see, this function is
used to make sure the camera is looking at your
*.OBJ mesh from the right angle. Common values
are 0°, 90°, 180° and 270°. At 360° the rotation will
have come full circle, in other words 360° is the
same as 0°.
figure 08.1
18 of 27
9 | Scene scale
Next up is accurately scaling the scene in order
to fit the photo. To make this process intuitive, I
made a special tool for it in the right-bottom
corner of the screen. Then you can tweak it
intuively as well as accurately.
For some reason, Octane uses a horizontal FOV,
instead of a vertical FOV which is common in
almost all 3D applications. Be careful not to mix
them up.
You can click any of the arrows to edit the scene
scale variable.
Essentially this is the scaling factor from the
*.OBJ mesh to the position of the camera. What
this means is that if the scene scaling factor
increases, the camera will be placed further
away from the *.OBJ mesh, which means the
*.OBJ mesh will be displayed smaller inside your
photo.
For the sake of the tutorial, set the scene scale to
a value of 3.25. The value of 3.25 is smaller than
the default value of 5, which means the *.OBJ
mesh will be displayed bigger inside the photo.
10 | Getting the data
into Octane Render
To get the correct camera data into Octane
Render (standalone), I've created a display of
variables in the top-right corner of the screen.
When you click on one of these variables, the
value will be copied to your clipboard (with a
high decimal precision). You can then paste the
value into the Octane camera's properties. There
is no support in Octane to load camera
properties from a file, so this will have to do. Go
back an forth between Phantom Photo Match
and Octane to copy over all 10 relevant variables.
It helps if you briefly put the programs alongside
each other.
These are the relevant variables:
•
•
•
•
•
•
•
•
•
•
19 of 27
FIELD OF VIEW
POSITION X
POSITION Y
POSITION Z
TARGET X
TARGET Y
TARGET Z
UP-VECTOR X
UP-VECTOR Y
UP-VECTOR Z
figure 10.1
Attention! In Phantom Photo Match 1.1, new
functionality has come to make this process a
lot easier.
You can now go to IMPORT / EXPORT › EXPORT
OCT CAMERA and special XML data will be
placed onto your clipboard. All you have to do
now is go to Octane Render standalone's graph
editor and press CTRL+V. A camera node will be
created for you with the correct data!
You can also go to IMPORT / EXPORT › EXPORT
OCT RESOLUTION to retrieve XML data on your
clipboard that can create an Image resolution
node with your photo's resolution inside Octane
Render's graph editor, for your convenience.
11 | Save/load
Now the camera data is inside Octane, it would
be a good idea to save your setup. Go to SETUP ›
SAVE SETUP and choose a good name. This will
create a *.PPMD file that can be loaded later on
incase you want to edit the perspective.
The following properties will be saved:
•
Locations of the red/green axis nodes
that determine the perspective
•
Location of the origin node
•
Scene rotation
•
Scene scale
The imported photo and *.OBJ mesh will not be
saved. So when the locations of those files
change, or break completely, that means you will
still be able to load in the data. It's a safety
precaution.
Kernel
In the rendering kernel, you should enable the
property alpha channel. What this does is render
your image as you would expect it to, except the
sky. The sky will be a bunch of pixels with a
transparency of 100%, which means the image
will be suitable to overlay on your photo. See
figure 10.2.
figure 12.2
12 | Octane setup
Shadow catcher
Photo background
Open up tutorial_octane.ocs in Octane. In this
file you will see how the models
tutorial_bulborb.obj and tutorial_plane.obj are
combined using a Geometry Group. In this scene
I'm using tutorial_plane.obj (which is scaled up
using a Placement node) to catch the shadows
coming from tutorial_bulborb.obj. The plane has
a special material: a shadow catcher. It's basically
an invisible material that can catch (or cast)
shadows from (or in) the scene. Use it to make
your 3D objects cast shadows onto the surfaces
in the photo, or create geometry in the scene
that will cast shadow onto your 3D objects.
In Octane Render it's possible to diplay your
photo as the background image. See figure 10.1.
When doing so, the image is going to scale
along with your viewport, but it does not take the
aspect ratio into account. So be sure to manually
set the correct resolution of the render.
Personally I set the rendering resolution to the
exact same as the resolution as the photo.
When exporting your render, Octane does not
bake the photo image into the render. You will
have to do this manually in a tool like GIMP or
Photoshop. Simply open up your photo, and then
put the exported render on top of it in a new
layer.
The shadow catcher material is included in
tutorial_octane.ocs. It's a diffuse material with a
solid black diffuse color. It has matte enabled. I
gave it an opacity value of 0.85, to make it
somewhat fit the shadows in the photo. If you are
using a shadow catcher material in your own
project, you should play around with this value to
tweak the shadow intensity.
figure 12.1
20 of 27
13 | Exporting into other tools
Octane Render for Rhinoceros 3D
Octane Render for Revit
Go to MAIN › TOOL and choose RHINOCEROS.
The buttons in the top-right corner of the GUI
should now have changed. Enter the data in
Rhinoceros in the following variables:
To get the data in Revit, go to IMPORT / EXPORT
› EXPORT OCT CAMERA.
figure 13.1
21 of 27
You can paste that data into the Octane for Revit
plugin using a special function. Please contact
the Octane for Revit developer to learn more.
Blender and
Octane Render for Blender
Go to MAIN › TOOL and choose BLENDER.
The buttons in the top-right corner of the GUI
should now have changed to accomodate the
Blender camera.
To start from a clean slate, go to Blender and add
in a new camera. In the main 3D view, press the N
key to make the menu on the right side of it pop
up. The 'Transform' section is what we need.
Go back to Phantom Photo Match and click the
value that belongs to POSITION X in the top-right
corner of the GUI. This value is now copied to the
clipboard. Go back to Blender and click in the 'X: '
field under 'Location' in the 'Transform' section.
Then press CTRL+V to enter the value and hit the
Enter key. Do the same for Y and Z. The position
should now be set up correctly.
The next step is to determine the orientation of
the camera. Under 'Rotation', set the camera to
use 'Quaternion (WXYZ)'. Now go back to
Phantom Photo Match and start entering the
correct variables for W, X, Y and Z. Again, this can
be done easily by clicking inside the Phantom
Photo Match interface to quickly get the values
onto your clipboard.
Now go to the 'Camera' tab in Blender (Not the
'Render' tab!). Under the section 'Camera', set the
Sensor to 36.
Now go to the 'Lens' section and turn the setting
'Millimeters' into 'Field of View'. Now go to
Phantom Photo Match to get the final variable,
the field of view. Paste it into the 'Field of View'
setting in Blender.
All done!
figure 13.2
22 of 27
23 of 27
24 of 27
14 | Software changelog
Phantom Photo Match 1.1
Phantom Photo Match 1.2
•
Interface refinement to establish a
coherent and understandable function
setup between various Phantom
Technology software products.
There are now interface 4 modules:
MAIN, IMPORT/EXPORT, SETUP
and INTERFACE.
•
Added function UI BACKGROUND under
the MAIN module. This function allows
you to choose from 3 background UI
options that affect the graphics of the
modules. The options NONE, PARTLY and
SOLID.
•
Improved curve quality of the GUI.
•
Added the feature EXPORT SCALE, found
in the IMPORT/EXPORT menu module.
This scale influences the export values
that are copied to the clipboard. Possible
export scales are millimeters (MM),
centimeters (CM), decimeters (DM) and
meters (M). Octane Render standalone
works in meters by default.
•
Software icon has a transparent
background now instead of the gray
block.
•
Renamed the function RENDERER to
TOOL. The options have been
renamed aswell. They are now:
OCTANE RENDER and RHINOCEROS.
•
Added option BLENDER to function
RENDERER, giving the ability to export
the camera data to Blender standalone
and Octane Render for Blender. Check
out the tutorial in the manual.
•
•
25 of 27
Added feature EXPORT OCT CAMERA,
found in the IMPORT/EXPORT menu
module. When pressing this button,
Phantom Photo Match will put XML code
in your clipboard. You can then use
CTRL+V in the Graph Editor in Octane
Render standalone and a camera node
will be created with the correct data.
You can then rig this camera node up to a
render target node.
Added feature EXPORT OCT
RESOLUTION, found in the
IMPORT/EXPORT menu module. When
pressing this button, Phantom Photo
Match will put XML code in your
clipboard. You can then use CTRL+V in
the Graph Editor in Octane Render
standalone and an image resolution node
will be created with the correct data.
You can then rig this image resolution
node up to a render target node.
Phantom Photo Match 1.3
•
Added function CURRENT INDEX.
Controls the currently active color. You
can also click inside the little boxes next
to the colors in the GUI to achieve the
same effect.
•
Added function SAMPLE ON SHEET. This
function pops up a color sheet and
grayscale sheet, allowing you to change
the currently active color.
•
Added function SAMPLE ON IMAGE. This
function lets you change the currently
active color to the color of a pixel you
pinpoint on the imported image.
•
Added function SAMPLE ON IMAGE
(BLUR). Same as function SAMPLE ON
IMAGE, but this time Phantom Photo
Match temporarily blurs the imported
image. That way you can get the average
color tint of regions in your image, which
is more suitable for drawing on the
environment map.
•
Added function PAINT ENVIRONMENT
MAP. This function allows you to paint on
the environment map, located below the
imported image in the GUI. Use the left
mouse button to paint where you want.
When painting on the left or right edge on
the screen, a clone brush will appear on
the other side. That way the environment
map will be perfectly seamless all the way
around. While the tool is activated, you
can use SHIFT+MOUSEWHEEL to change
the brush radius. You can also use
CTRL+MOUSEWHEEL to change the
painting intensity. The environment map
will be saved inside your setup, so you
don't have to be afraid of losing it.
(Most recent)
•
Fixed problem where the UI didn't update
variables when importing a setup.
•
Added function EXPORT ENVIRONMENT
MAP. Allows you to export the
environment map image as a *.PNG file.
•
Added function SCENE ORIGIN OFFSET.
Allows you to fly around the imported
*.OBJ model in 3D space. You can then
pinpoint a location with the left mouse
button to determine the position that
should be used for the ORIGIN node
inside the interface. It makes dealing with
models that are far away from the
absolute origin (0,0,0) a lot easier. No
need to change your model inside the
render tool, the offset is taken into
account in the exported data
automatically.
•
Added function RESET OFFSET. Resets
the offset, meaning the ORIGIN node in
the interface will be at position (0,0,0) in
your scene again.
•
Added new module called
ENVIRONMENT MAP, targeted towards
painting an environment map for your
scene. An environment map is an image
used for the lighting in your scene. It
allows you to bring in tints of color from
the environment. That way the scene is
blended in much better with the
background image behind it. Using the
paint tools, you can smoothly paint
around colors as you like. The image can
be exported as *.PNG and used in your
rendering tool as-is.
•
Added color indicators to the left side of
the interface. They allow you to save
some colors in the current setup for quick
access. Click on the little boxes next to the
colors in the GUI to set the currently
active color. When setting the color or
painting, it always applies to the currently
active color.
26 of 27
Final word
I hope that Phantom Photo Match technology
provides a quick & easy instancing solution in
your rendering workflow. My aim is to provide a
high quality product. The software is designed to
exceed in areas where Octane Render and
modeling tools fall short. To fill in a gap in the
workflow. To work smart.
The development team consists of three people:
Guus Thissen (lead developer), Jack McCallum
(DLL support) and Zachary Reedy (DRM support).
If you have any suggestions or feature requests,
please contact me at [email protected].
Guus Thissen
Phantom Photo Match lead developer
27 of 27