1
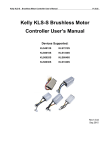
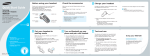
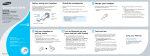
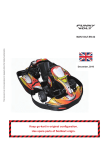
QUICK START
GUIDE
TABLE OF CONTENT
SAFETY ADVICE
2
GENERAL INSTRUCTIONS AND GUIDELINES FOR USE
2
REQUIRED EQUIPMENT
2
FINAL ASSEMBLY
1 SECURING THE ARMS ONTO THE FRAME
3
2 ATTACHING THE LANDING SKIDS TO THE LOWER FRAME
3
3. FIX THE GPS ANTENNA
3
4: ATTACHING THE CANOPY
4
SETTING UP THE RADIO
5
RADIO NAVIGATION SYSTEM
6
CHANGE THE MODEL TYPE
6
ADJUST YOUR ATTITUDE MENU
6
SET YOUR FAIL SAFE
7
ADJUST YOUR THROTLE CURVE
7
SETTING FOR YOUR NAZA FLIGHT CONTROLLER
7
CONTROL YOUR NAZA SETTINGS USING THE FOLLOWING SCREENSHOTS
8
HOW TO BIND
11
INSTALLING THE BATTERY
12
CALIBRATING COMPASS
13
STARTING SEQUENCE
ATTACHING THE PROP ADAPTER AND PROPELLER ON THE MOTOR
14
14
BEFORE TAKE OFF 15
1
INTRODUCTION
CONGRATULATIONS on your purchase of a SKY-HERO Little 6, we hope that it will provide you with many years of fun and enter- tainment.
SKY-HERO products are designed and developed in Belgium (Europe), but distributed and supported across the globe through a network of dealers and
outlets that can provide assistance and advice.
The SKY-HERO ethos is simple; provide cool, flexible, high quality aircraft, and back all products with a fair and reasonable support service.
SAFETY ADVICE
THIS AIRCRAFT IS NOT A TOY!
All SKY-HERO aircraft can be considered as sophisticated leisure products, which require handling with care and caution in order to avoid injury to
yourself or others. Ensure that you fully review all of the information in this instruction manual and familiarise yourself with the characteristics of this
SKY-HERO aircraft before attempting to fly it.This instruction manual has been designed with safety in mind and is provided to help you assemble your
aircraft and to prepare it for use. Assembly of this aircraft requires basic mechanical and electrical skills and flying this type of aircraft requires basic
coordination skills and some practice.
GENERAL INSTRUCTIONS AND GUIDELINES FOR USE
The aircraft should not be flown by children and definitely not anyone under the age of 14
Failure to follow and comply with the safety advice and recommendations in this manual, can result in serious injury to you, others or property.
You should always check the local laws and regulations of the country where you will operate the aircraft, to ensure you are in com- pliance with them.
In particular you should avoid any sensitive areas such as Military establishments, Airports, Power stations and populated areas.
Always keep an adequate safe distance around the aircraft, ensuring that you avoid proximity to buildings, people and anything which is outside of your
control.
The aircraft is controlled by radio signal which can be subject to interference outside of your control, a loss of radio contact with the aircraft puts it out
of your control and could cause unpredictable results.
Never fly the aircraft in confined or built up areas, where you might lose visibility of the aircraft.
Never fly the aircraft in bad weather or strong winds, doing so could cause you to lose control with unpredictable results.
Never approach the aircraft until the propellers have stopped turning and never try to touch it whilst it is in flight.
Keep your batteries away from children, young children could attempt to put them in their mouth with dangerous consequences.
Do not expose the aircraft to water, moisture or liquids.
Do not attempt to fly the aircraft when battery power is low (including transmitter battery).
Before each flight, make sure that all propellers are securely attached, that there is no damage to the aircraft or its electronics and wiring.
Always disconnect the battery power to the aircraft before turning off the transmitter and always turn the transmitter on (checking the position of all
controls) before connecting the battery
Always following the instructions provided with your Flight Controller and any accessory equipment such as transmitter, battery chargers etc.
REQUIRED EQUIPMENT
At least one Lipo 4S Battery (3700 MAH or greater is recommended) 7mm Drill bit (suitable for drilling through plastic/steel/wood)
CA Glue to secure the mast of the GPS receiver
A Hex screwdriver
Access to the internet to download/access the Little Six user manual
2
FINAL ASSEMBLY
1 SECURING THE ARMS ONTO THE FRAME
Finish assembly of the arms by using the M4 knurl button long nuts (17) and the M4 Hex Nut Nylstop (22) to secure the frame (using M4 washers (21))
as indicated in the adjacent diagram.
18
1
2 ATTACHING THE LANDING SKIDS TO THE LOWER FRAME
If you plan to use a Camera or install a Gimbal, below the aircraft, you will need to install the landing skids. Otherwise if you prefer a sleeker look, you
can leave the landing skids off.
Secure the landing skids using 4 x Button Head Screws M4 x 12MM and 4 x Knurl Button Long M4.
62
81
71
52
42
3. FIX THE GPS ANTENNA
1: Find the bag with the DJI GPS / COMPASS & locate the gps antenna holder on the chassis.
2: Simply push the mast in the antenna holder and glue it with CA glue. THE ARROW ON THE DJI GPS / COMPASS MUST POINT PERFECTLY
FORWARD !!
3: Push the plug in the GPS input of the PMU and route the cable.
GPS input
Arrow pointing Perfectly forward
4 Warning! Arrow must be pointing towards nose of aircraft! (Do not move it until the glue has set!)
3
4: ATTACHING THE CANOPY
You must drill the canopy in the middle with 7mm hole. The insert the rubber grommit. Secure the canopy with the green circlip.
4
SETTING UP
THE RADIO
Flight mode:
Fail safe
Back -> Normal
( Front = RTH )
Mid -> Stabilise
Return to home
Front -> GPS
Nose down
Nose up
T
ilt right
Dial
N
ose turn right
Signal power level:
LowM
id
High
5
for
Link9 Radio
RADIO NAVIGATION SYSTEM
Push 2 sec to unlock screen
Push to enter or validate choice
Scroll to navigate - change values
Push to enter menu
Basic menu > advance menu > basic menu > etc...
Push to exit
CHANGE THE MODEL TYPE
- Enter basic menu
- Enter Model type
- Select -type- and change to
- Push 2x to validade
3
ADJUST YOUR ATTITUDE MENU
- Enter advance menu
- Enter
- Change all values as follow
CH: CH7
SW3: SwE S
W2: SwF
- rate NORMAL
14%
ATTI
52%
GPS
8
9%
F/S
35%
F/S
35%
F/S
35%
6
4
SET YOUR FAIL SAFE
1
2
Set your fail safe switch to pulled
n SwF
- Enter basic menu
- Enter F/S
- Select 5: ATTI
- Change NOR to F/S
ext to 5: ATTI
5
ADJUST YOUR THROTLE CURVE
1
2
Push your E switch on pushed
n
- Enter advance menu
- Enter THR - CURVE
- Select SW and change to SWF (up)
- Select 7 > OUT value and adjust to 90%
6
SETTING FOR YOUR NAZA FLIGHT CONTROLLER
- Download the latest assistant on DJI Website
- Install the assistant on your computer
- Remove your propellers!
- Turn your Link9 on
- Install the DJI wind driver installer
( the Link9 must be turnned on, the USB must be conncted
7
7
CONTROL YOUR NAZA SETTINGS USING THE FOLLOWING SCREENSHOTS
- General control screen
8
- Be carefull, manual mode is for expert, you
assistant for maximum security
9
- Adjust your gains
those values are for beginners or video
type
10
- please refer to your Naza user manual to
switch on your link9 radio (ch6 )to be able
to use it...
8
HOW TO BIND
- Turn Your Link9 on
- Plug your lipo in your model
- Now you can see your signal power level on your Link9 radio
Signal power level:
LowM
id
High
11
INSTALLING THE BATTERY
Insert battery here
38
CALIBRATING COMPASS
Without GPS module, please skip this step.
(1) DO NOT calibrate your compass
under the ground.
(2) DO NOT
(3) Compass module CANNOT work in the polar circle.
(4)
(1)
(2) Quickly switch the control mode switch from GPS Mode to Manual Mode and back to GPS Mode ( or from GPS Mode
to ATTI. Mode
(3) (Fig.1)
to constant green, and then go to the next step.
(4) (Fig.2)
(5)
Fig.1F
ig.2
12
(5)
- When the GPS is abnormal, the Main controller will tell you by the LED blinking Red and Yellow alternately (
), disable the GPS Module, and
STARTING SEQUENCE
STARTING AND STOPPING MOTORS
( PUSH BOTH CONTROLS TO CORNER POSITION )
IN ATTI - GPS MODE
Throttle stick. high position -> increase altitude
Throttle stick. Mid position -> altitude hold
Throttle stick. low position -> decrease altitude
13
ATTACHING THE PROP ADAPTER AND PROPELLER
ON THE MOTOR
Always place the convex side of
the propeller to the top
Leading edge (front of the propeller)
Trailing edge
(back of the propeller)
32
33
36
34
AND
35
4
37
14
BEFORE TAKE OFF
OPERATE YOUR AIRCRAFT SAFELY
Refer to and follow all safety precautions mentioned in the “General Instructions and Guidelines for use” section of this manual.
Ensure that you always turn on your transmitter before connecting the aircraft battery power. After flying, make sure that you always
disconnect the aircraft battery before turning off the transmitter.
On the transmitter, ensure switches are to neutral position and the throttle control is at the lowest position.
Check that your aircraft is ready for flight with no loose screws or fittings (pay special attention to the propellers) insert a battery into the
battery bay and use the provided strap to secure the battery in place.
Connect the battery cable to the connector on the aircraft. (Important: make sure you keep the aircraft level and still while connecting the
battery)
Wait for the LED lamp (located on the underneath of the aircraft) to flash green rapidly – it should do this twice (without a short interval
between each set of flashes).
You should wait until the LED is only flashing Green without any Red flashes – this indicates that you have sufficient Satellites located for
safe GPS mode flying. Beginners are strongly recommended to fly in GPS mode and become fully confident and capable with the aircraft
before flying in ATTI or Manual modes
NAZA FLIGHT CONTROLLER
If you are using the NAZA Flight Controller, follow the Naza Flight Controller pre flight checks (pay attention to indications that you may
need to Calibrate your Flight Controller before flight). Full instructions for the NAZA Flight Controller can be found on the DJI website
(www.dji.com) under NAZA-M (http://www.dji.com/product/naza-m-v2).
You should make sure you have access to the manual and necessary software, in order to configure the flight controller.
FLIGHT TEST YOUR LITTLE SIX
Fly 5 minutes in hover and then land your aircraft.
Disconnect the battery and check the temperature of the motors and tubes: they may be warm, but must not be hot. Recharge the battery
and check the capacity (mAh) that your charger puts back into the battery. This mAh value will cor- respond to the power consumption of
your Little6 during the 5 minute flight.
CALCULATING YOUR IDEAL FLIGHT TIME
If for example: you use a 5000 mAh battery and after 5 minutes of hovering, you put it on charge and 2000 mAh of power is put back into
the battery.
To translate this into your ideal flight time, you need to divide the capacity of the battery (5000mAh) by recharged mAh amount
(2000mAh) and multi- ply the result by the duration of your flight in minutes (5 min).
Example: 5000/2000 = 2.5 x 5 min = 12 min 30. This is your approximate maximum flight time.
For safety reasons, we would advise that you do not fly beyond more than 80% of the maximum flight time.
In our example, if you fly for about 10 minutes, you should have enough power to return and land without risking damage to your battery.
If your transmitter has a countdown or a timer function, it is advisable to use it! Windy conditions and cold temperatures can adversely
affect your max flight time.
Note: You need to calculate the flight time individually for each type/specification of battery that you have.
15