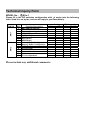
1
USER MANUAL EOe-1 10/100Base Ethernet over G.703 Unframed E1 CTC Union Technologies Co., Ltd. Far Eastern Vienna Building Neihu Technology Park 8F, No. 60 ZhouZi St. Neihu, Taipei, 114 Taiwan EOe-1 Ethernet over E1, User Manual Version 1.0 October 2003 First Printing Version 1.01 October 2004 Second Printing This manual supports the following models: EOe-1 Ethernet over E1 Specifications subject to change without notice. Table of Contents Chapter 1. Introduction ……………….................. 1 1.1 General ……………………...………………………...… 1 1.2 Technical Specifications ………………………………… 2 1.3 E1 Signal Structure ……………………………………… 6 1.4 EOe-1 Capabilities ………………………………………. 7 1.5 System Timing Considerations …………………………. 8 1.6 Functional Description ………………………………….. 10 1.7 Typical System Applications …………………………… 11 Chapter 2. Installation …………………...…. 13 2.1 General ………………………………………………….. 13 2.2 Site Preparations …………………………….................... 13 2.3 Mechanical Assembly ……………………..……………. 13 2.4 Electrical Installation ……………………………………. 13 2.5 DIP Switches and Jumper Settings .……….…………… 16 2.6 Rack Mount Installation ………………………………… 18 Chapter 3. Operation ……………………..…. 21 3.1 General ………………………………………………….. 21 3.2 Controls and Indicators …………………………………. 21 3.3 Operating Procedure ……………………………………. 23 Chapter 4. Test & Diagnostics ………..…..... 25 4.1 General ………………………………………………….. 25 4.2 Loop Back Tests ………………………………………… 25 4.3 Bit Error Rate Tester ……………………………………. 25 4.4 Local Loop Back ………….…………………………….. 27 4.5 Remote Loop Back ……………………………………… 28 i Table of Contents Appendix A. DIP SW Setting EOe-1 ....……… 31 A.1 DIP SW1 Bridge, Ethernet and WAN Speed …..……… 31 A.2 DIP SW2 Memory Config and E1 Settings ..………….. 32 Appendix B. Interface Connections .……..… 33 B.1 E1 Line Connectors ……………………………………. 33 B.2 E1 Line Frame Ground ………………………………… 34 B.3 Ethernet RJ-45 Connector ……………………………… 34 Technical Inquiry Form ii Chapter 1. Introduction 1.1 General Thank you for choosing the EOe-1 Ethernet Bridge over E1. The EOe-1 is a Channel Service Unit for unframed ITU-T G.703 E1 that features a built-in Ethernet bridge. The CSU has a built-in Network Terminating Unit (NTU) and may connect to either 75 Ohm unbalanced, unframed E1 via coaxial cable and BNC connectors or to 120 Ohm balanced, unframed E1 via twisted pairs and a shielded RJ-48 connector. The EOe-1 Ethernet Bridge uses HDLC encapsulation to transport Ethernet packets across the WAN and supports 10/100 auto-negotiation or manual settings for 10M, 100M, Full or Half Duplex Ethernet. The Ethernet port also supports a standard auto-MDIX feature that will completely eliminate Ethernet cross-over cables or the guessing that is sometimes involved in choosing a cable when connecting to a HUB or a PC. The EOe-1 is very easy to configure by using simple DIP switch settings. Both the E1 and Ethernet Bridge configuration settings require only two 8-pole DIP switches. Once configured and set, the EOe-1 requires no further adjustments. To skip the rest of the product introduction for the EOe-1 , please go directly to Chapter 2, "Installation". 1 Chapter 1. Introduction 1.2 Technical Specifications E1 link Framing Unframed Bit Rate 2,048 Kbps Line Code AMI HDB3 Line Impedance 75 Ohms (BNC coaxial) 120 Ohms (RJ-48 twisted pair) Relative Receive Level 0 to -43dB "Pulse" Amplitude Nominal 2.37V+/-10% for 75 ohms Nominal 3.00V+/-10% for 120 ohms "Zero" Amplitude +/-0.1V Transmit Frequency Tracking Internal Timing +/-30 ppm Loopback Timing +/-50 ppm Jitter Performance According to ITU-T G.823 Complies With ITU-T G.703 Interface Connectors BNC (unbalanced) RJ-48 (balanced) 2 Chapter 1. Introduction Ethernet Bridge Features 10BASE-T/100BASE-TX, Full Duplex or Half Duplex HP Auto-MDI/MDIX detects and corrects crossed cable IEEE 802.3x flow control Real-time filtering with 256 address tables Automatic address learning, aging and deletion after 5 minutes Up to 340 packet-buffering capacity Forwarding and filtering rate at WAN speed with throughput latency of 1 frame. Auto padding of undersized packets to meet the minimum Ethernet packet size requirement Buffering modes can be selected according to the setting of WAN and LAN line speeds Ethernet interface has automatic Twisted Pair polarity correction Specifications LAN Standard Connector Speeds Frames WAN Protocol Data Rates Fully compliant with IEEE 802.3/802.3u Shielded RJ-45 10BASE-T/100BASE-TX, Full or Half Duplex Supports 64 to 1522 byte packet lengths, standard and extended length frames for VLAN tagging, etc. Synchronous HDLC 16K, 32K, 64K, 128K, 256K, 512K,1024K or 2048Kbps (DIP Switch selected) 3 Chapter 1. Introduction Diagnostics Test Switches/Diagnostics Local loop back Remote loop back Test pattern / generator LED indicators Power Green Power Signal Loss Red E1 link signal loss Alarm E1 link alarm, includes: BPV error / All Red ones(AIS) Link Green Ethernet link is good TD Green Transmit data on Ethernet RD Green Receive data on Ethernet 100 Green Ethernet is 100Base Full Green Ethernet is Full Duplex Error Red Ethernet Bridge Error (overflow) Error Red Bit Errors received during BERT Test Test Red Loop back and/or BERT Test active Physical Height: 45 mm (1-3/4") Width: 195 mm (7-11/16") Depth: 248 mm (9-25/32") Weight: 850 g (1lb 14oz) 4 Chapter 1. Introduction Power supply Voltage 90~250VAC (universal AC model) 18~72VDC (universal DC model) Frequency 47 to 63 Hz for AC Power consumption 10 Watts Fuse 0.5A slow blow for AC model no fuse in DC model Environment Temperature 0-50C / 32-122F (operation) Humidity 0 to 90% non-condensing 5 Chapter 1. Introduction 1.3 E1 signal structure The E1 line operates at a nominal rate of 2.048Mbps. The data transferred over the E1 line is transmitted transparently as a bit stream in Unframed E1 mode. E1 line signal The basic E1 line signal is coded using the Alternate Mark Inversion (AMI) or HDB3 rule. In the AMI format, "ones" are alternately transmitted as positive and negative pulse, whereas "zeros" are transmitted as a zero voltage level. AMI is not used in most 2.048Mbps transmissions because synchronization loss occurs during long strings of data zeros." In the HDB3 format, a string of four consecutive zeros is replaced with a substitute string of pulses containing an intentional bipolar violation. The HDB3 code substitutions provide high pulse density so that the receiving equipment is able to maintain synchronization with the received signal. 6 Chapter 1. Introduction 1.4 EOe-1 Capabilities E1 link line coding The EOe-1 supports two E1 line codes: AMI coding. HDB3 coding. E1 framing formats The EOe-1 supports only Unframed E1 format. WAN data rates The EOe-1 supports WAN channel rates of 2.048M, 1.024M, 512K, 256K, 128K, 64K, 32K, and 16Kbps and is hardwired to a synchronous Ethernet Bridge. 7 Chapter 1. Introduction 1.5 System Timing Considerations E1 link timing The EOe-1 E1 link receive path always operates on the receive clock. The EOe-1 recovers the receive clock from the received E1 link data signal. The source of the EOe-1 E1 link transmit clock can be selected by the user. E1 Link Transmit Timing Settings • Recovery (loop back) timing: The EOe-1 E1 link transmit clock is locked to the recovered receive clock. This is usually the timing mode selected for network operation. Clock Mode 0: Recovery Ethernet Bridge 10/100Base DSU TX E1 RX E1 transceiver Figure 1.1: Recovery timing 8 Chapter 1. Introduction • Internal timing: The EOe-1 E1 link transmit clock is derived from the internal clock oscillator. This timing mode is necessary in pointto-point applications over leased line. In this case, one EOe-1 must use the internal oscillator while the other must operate from the recovered clock. Clock Mode 1: Internal Ethernet Bridge 10/100Base DSU TX E1 RX OSC E1 transceiver Figure 1.2: Internal Timing 9 Chapter 1. Introduction 1.6 Functional Description The EOe-1 is a single port access unit for Unframed E1 only. The EOe-1 AC model has a universal, auto-switching power supply (90~250VAC) while the DC model's internal DCDC module accepts DC voltages from 18 to 72 volts. The EOe-1 WAN supports user-selectable speeds, which halves the main E1 rate of 2.048Mbps, down to a minimum of 16Kbps. The E1 line is fully compliant with the ITU-T G.703 standard and has a receive sensitivity of up to -43 dB on twisted pair or coax cable. This provides an approximate operating range up to 2km (using 22AWG twisted pairs). The EOe-1 also fully meets other E1 specifications including ITU-T G.823 for jitter. The EOe-1 is capable of performing local and remote loop back. The operator at either end of the line may test both the EOe-1 and the line in the loop back mode. The loop back is controlled by a manual push-button switch. A front panel switch generates an internal 511 bit pseudo random test pattern, according to ITU-T, for direct end-to-end integrity testing. The Err indicator flashes for each bit error detected. The EOe-1 unit is built in a compact case that can be placed on desktops or shelves or installed, by means of an appropriate adapter, in a 19" rack. (please see Chapter 2) 10 Chapter 1. Introduction 1.7 Typical System Applications General The EOe-1 is not capable of fractional E1 operation and should be used where only an unframed, transparent 2.048Kbps transmission is available or required. In the following application, the EOe-1 is connected in a point-to-point application. In this case one EOe-1's timing should be set to "Internal Oscillator", while the other should be set to "Recovery". Figure 1.3 LAN to LAN with EOe-1 Ethernet over E1 In the following application, the EOe-1 is connected in an E1 network application. In this case both EOe-1's timing should be set to "Recover" their timing from the E1 network. Figure 1.4 LAN to LAN with EOe-1 Ethernet over E1 11 Chapter 1. Introduction This page left blank intentionally. 12 Chapter 2. Installation 2.1 General This chapter provides detailed instructions for mechanical installation of the EOe-1. Following the completion of installation, please refer to Chapter 3 for operating information. 2.2 Site Preparation Install the EOe-1 within reach of an easily accessible grounded AC outlet. The outlet should be capable of furnishing 90~250VAC. DC power capable units connect via terminal block connection. Allow at least 10 cm (4 inch) clearance at the rear of the EOe-1 for signal lines and interface cables. 2.3 Mechanical Assembly The EOe-1 is designed for tabletop or bench installation, and is delivered completely assembled. No provisions are made for bolting the EOe-1 to the tabletop. 2.4 Electrical Installation Power connection AC power is supplied to the EOe-1 through a standard 3prong IEC receptacle. (Refer to Figure 2.1) The EOe-1 should always be grounded through the protective earth lead of the power cable or via Frame Ground connection. 13 Chapter 2. Installation The AC line fuse is located in an integral-type fuse holder on the rear panel. Make sure that only fuses of the required rating are used for replacement. Do not use repaired fuses or shortcircuit the fuse holder. The power cable must be disconnected before removing or replacing fuses. Rear panel connectors The interface connectors, located on the rear panel of the EOe-1 (Refer to Figure 2.1), incorporate two BNC Coax and two RJ-45 connectors. (Appendix B provides detailed information on the interface connectors). Figure 2.1 EOe-1 rear panel AC & DC 14 Chapter 2. Installation E1 Line BNC coax connectors The pin assignment for BNC connector is as follows: Pin: Function: Tx Center TTIP (Transmit data out) Tx Sleeve TRING (Transmit data out) Rx Center RTIP (Receive data in) Rx Sleeve RRING (Receive data in) RJ-45 E1 Connector The pin assignment for the RJ-45 connector is as follows: Pin: Function: 4 TTIP (Transmit data out) 5 TRING (Transmit data out) 1 RTIP (Receive data in) 2 RRING (Receive data in) RJ-45 Ethernet Connector MDI MDI-X 1. Tx + 1. Rx + 2. Tx - 2. Rx - 3. Rx + 3. Tx + 6. Rx - 6. Tx - 15 Chapter 2. Installation 2.5 DIP Switches & Jumper Settings Caution To avoid accidental electric shock, disconnect the EOe-1 power cord before opening the cover. Access inside the equipment is only permitted by authorized and qualified service personnel. Procedure a. b. c. d. e. Turn power OFF, Disconnect the power cord from the AC outlet. Loosen the screws at the left/right of the rear panel. Remove the PCB. Adjust the DIP switches and jumpers as required, according to table 2.1. (Appendix A describes the DIP switches function in detail). Replace the PCB and tighten the screw. 16 Chapter 2. Installation Table 2.1 Item Function Possible Settings Set Place 1 Sets Ethernet MAC filtering On=filtered or Off=repeater DIPSW1-1 Factory Setting repeater 2 Sets 802.3x Flow Control On=enabled or Off=disabled DIPSW1-2 disabled 3 Sets Auto negotiation On=manual or Off=auto DIPSW1-3 auto 4 Sets Ethernet Full/Half Duplex On=half or Off=Full DIPSW1-4 Full 5 Sets Ethernet speed On=10M or Off=100M DIPSW1-5 100M 6 Sets WAN speed 16Kbps to 2048Kbps DIPSW1-6~8 2048Kbps 7 Sets Memory configuration equal, favor WAN or favor LAN DIPSW2-1~2 LAN 8 Sets E1 Transmit Timing On=Internal or Off=recovery DIPSW2-3 Recovery 9 Sets E1 Line Coder On=AMI or Off=HDB3 DIPSW2-4 HDB3 10 Reserved Reserved DIPSW2-5 Reserved 11 Reserved Reserved DIPSW2-6 Reserved 11 Sets E1 Line Termination On=75 Ohms or Off=120 Ohms DIPSW2-7~8 120 Ohms Note 1: When MAC filtering is disabled, the Bridge becomes an Ethernet repeater. Filtering enabled is the default mode for Bridging. However, the units are shipped with their configuration switch set for "repeater" mode. Note 2: When the Ethernet negotiation is set to "auto", the settings for speed and duplex are ignored. For legacy equipment which does not support auto-negotiation, it is highly recommended to place SW1-3 in the ON position and manually set the speed (10 or 100) and duplex mode to match the connected Ethernet equipment. Note 3: There is a 340 byte buffer that may be set in one of three operation modes: equal division (170 bytes each) between the LAN and WAN ports; large portion (308 bytes) allocated to the WAN port; or large portion allocated to the LAN port. When the WAN speed is set slow, efficiency may be increased by allocating a larger buffer on the WAN side. 17 Chapter 2. Installation 2.6 Rack Mount Installation All Standalone/Rack Series units have the option of adding standard EIA 19" rack mount capability. Two rack mount options provide for either mounting a single unit (half space) in a rack or for mounting two units in tandem (full space). In either situation, one standard rack unit space is required. Each rack mount kit provides all the necessary hardware for a complete installation. Figure 2.2: Rack Mount Installation, ETU01-SS. In single unit installations, the unit may be placed in the left or right side position simply by reversing the rack mounting brackets. The kit includes, one (1) short and one (1) long rack adapter, four (4) 3x8mm self-tapping screws, and four (4) #12-24x0.5" screws. 18 Chapter 2. Installation In order to save rack mount space, units may be mounted in tandem. Please refer to the following drawing examples for this application. Figure 2.3: Tandem Units Mounting (Exploded) Figure 2.4: Tandem Units Mounting Detail The tandem kit includes two (2) rack mount brackets, one (1) each of inner and outer central mounting brackets, twenty (20) 3x8mm self-tapping screws, and four (4) #12-24x0.5" screws. 19 Chapter 2. Installation This page left blank intentionally. 20 Chapter 3. Operation 3.1 General This chapter describes the EOe-1 controls and indicators, explains operating procedures, and supplies instructions for field strapping changes. Installation procedures (in chapters 2) must be completed and checked before attempting to operate the EOe-1. 3.2 Controls and Indicators All controls (push-button switches) and LED indicators are located on the EOe-1 front panel. Depress a push-button to activate (turn ON) the corresponding control. Release the pushbutton to deactivate (turn OFF) the control. The function of each push-button and indicator is described in Table 3.1 and Table 3.2. Figure 3.1 EOe-1 Front Panel 21 Chapter 3. Operation Table 3.1 Control Functions Item 1 Control Switch Local Loopbk Function The local loop back switch causes the local EOe-1 to loop received E1 data to its transmitter. 3 Remote Loopbk The remote loop back switch causes the remote EOe-1 to loop received E1 data to its transmitter. 4 The pattern switch causes the EOe-1 to Pattern send and receive a 511 test pattern. If errors are encountered, the Error LED indicator lights for each received error. Table 3.2 LED indicators Power Green Power Signal Loss Red E1 link signal loss Alarm Red E1 link alarms: BPV / All ones(AIS) Link Green Ethernet link is good TD Green Transmit data on Ethernet RD Green Receive data on Ethernet 100 Green Ethernet is 100Base Full Green Ethernet is Full Duplex Error Red Ethernet Bridge Error (overflow) Error Red Bit Errors received during BERT test Test Red Loop back and/or BERT test active 22 Chapter 3. Operation 3.3 Operating Procedure The EOe-1 requires no operator attention once installed, except for occasional monitoring of the front panel indicators. Intervention is only required when: • The EOe-1 has to be adapted to new operational requirements. • Diagnostic loops are required. The EOe-1 is turned on when its AC power cord (or central office DC power) is connected to an AC power outlet (or the DC input connections) and the power switch is turned to the ON position. The Power LED indicator will light, indicating that the EOe-1 is on. Verify the EOe-1 is in operation by checking that the front panel LED's match the following indicator conditions: • Power: ON • Signal Loss: OFF • Alarm: OFF • Link: ON • TD: ON, OFF or Flashing • RD: ON, OFF or Flashing • 100: ON (for 100Base-TX) • Full: ON (for Full Duplex Ethernet) • Error: OFF • Error: OFF • Test: OFF 23 Chapter 3. Operation Refer to Chapter 4 for the operation of the front panel pushbutton switches. Their usage is explained under the "Loop Back Tests" on page 25. The rest of this page was left blank intentionally. 24 Chapter 4. Test & Diagnostics 4.1 General This chapter contains procedures for performing system diagnostic tests. 4.2 Loop Back Tests The loop back test buttons (Local Loopbk and Remote Loopbk) and the LED indicators built into the EOe-1 allow for rapid checking of the EOe-1 and the E1 line. Before testing the operation of the data system equipment and their line circuits, ensure that all units are turned on, connected properly and are configured correctly. 4.3 Bit Error Rate Tester When depressing the Pattern push-button switch, the Bit Error Rate Tester (BERT) can be activated in which the test pattern transmitted is received by another EOe-1 (see Figure 4.1). When used opposite another EOe-1, with the Pattern pushbutton switch depressed and transmitting the same pattern (V.52 511-bit), the complete link can be tested. If errors are encountered, the Error indicator LED will blink (for intermittent errors) or remain on continuously (for continuous errors). 25 Chapter 4. Test & Diagnostics In this example, both units at the ends of the E1 link have their pattern generators enabled. Figure 4.1 BERT operation 26 Chapter 4. Test & Diagnostics 4.4 Local Loop Back This test is activated by depressing the "Local Loopbk" button. This test checks the performance of the EOe-1 and the connections between them. This test consists of looping the receive E1 signal back to the remote EOe-1 . (see Figure 4.2): Figure 4.2 Local loop back 27 Chapter 4. Test & Diagnostics 4.5 Remote Loop Back This test is activated by depressing the "Remote Loopbk" push button. The test checks the performance both of the local and the remote EOe-1 units, as well as their interconnecting lines. The remote digital loop back test consists of providing a loop back at the remote EOe-1 (see Figure 4.3). A system test may be performed by first depressing the remote loop back switch, then depressing the pattern switch. The test pattern will be generated, sent out the E1 link and looped back by the remote unit. If no errors are indicated by the error LED, the link test has been successful. E1 Figure 4.3 Remote loop back 28 Chapter 4. Test & Diagnostics Loop back test notes: Use this method to quick test a standalone unit; With the E1 timing source set to internal oscillator, connect the E1 Tx to E1 Rx with a single coaxial cable. Press the Pattern switch. The E1 Tx and Rx circuits will be tested. The E1 signal loss and alarm LEDs should be off and no test errors should result on the error LED. Disconnect the Coax cable momentarily. The signal loss, alarm and error LEDs should all light. Reconnect the cable and they should all go out. This test may also be performed on the RJ-48 by making a loop back plug. Figure 4.4 Standalone BERT Test 29 Chapter 4. Test & Diagnostics Most Ethernet link problems occur when trying to connect to older, legacy Ethernet equipment. Unless it can be confirmed that the connecting equipment supports auto-negotiation or what is sometimes referred to as "n-way" connections, it is recommended to disable the auto-negotiation feature and manually set the speed and duplex settings. Almost all old 10Base-T equipment does not support Full Duplex Ethernet, so it is quite safe to set all 10Base-T equipment settings to Half Duplex. A wrong setting will result in extremely poor performance on the LAN connection. Here it should be noted that a good "link" indication does not necessarily mean the duplex setting is correct. Additionally, there is 100Base-TX equipment which also does not support Full Duplex Ethernet. Equipment may not link or the performance could be poor if the Ethernet is improperly configured. Auto MDIX may also cause some compatibility problems. Some Ethernet chips will "fall asleep" or shutdown if they are expecting an MDI device to connect with a crossover cable. If this problem should arise, please try connecting the Ethernet with a crossover cable. 30 Appendix A. DIP SW. Setting EOe-1 A.1 DIP SW1 Bridge, Ethernet and WAN Speed DIP State 1 0 Disable filtering (repeater mode) 1 Enable MAC filtering (Bridge mode) 0 Disable 802.3x flow control 1 Enable 802.3x flow control 0 Ethernet Auto Negotiation 1 Ethernet manual setting 0 Ethernet Full Duplex 1 Ethernet Half Duplex 0 100Base-TX speed 1 10Base-T speed 2 3 4 5 6-7-8 Function Description 6 7 8 0 0 0 WAN Speed 2048Kbps 1 0 0 WAN Speed 1024Kbps 0 1 0 WAN Speed 512Kbps 1 1 0 WAN Speed 256Kbps 0 0 1 WAN Speed 128Kbps 1 0 1 WAN Speed 64Kbps 0 1 1 WAN Speed 32Kbps 1 1 1 WAN Speed 16Kbps Remarks ignored in auto WAN Speed Table A.1 DIP SW1 Bridge, Ethernet and WAN Speed Settings Note 1: "0" is equal to a switch setting of OFF while "1" is equal to a switch setting of ON. Note 2: When auto negotiation is enabled (SW1-3 ON) the settings of SW1-4 & 5 are ignored. 31 Appendix A. DIP SW. Setting EOe-1 A.2 DIP SW2 Memory Configuration and E1 Settings DIP State Function Description 1 2 Memory Configuration 0 0 Memory Buffer: LAN to WAN 308 packets Remark WAN to LAN 32 packets 1 0 1-2 Memory Buffer: LAN to WAN 170 packets WAN to LAN 170 packets 0 1 Memory Buffer: LAN to WAN 32 packets WAN to LAN 308 packets 1 3 4 5 6 7-8 1 Reserved 0 E1 Tx Timing: Recovery 1 E1 Tx Timing: Int. Osc. 0 E1 Line Code: HDB3 1 E1 Line Code: AMI 0 Reserved 1 Reserved 0 Reserved 1 Reserved 7 8 E1 Line Impedance 0 0 120 Ohms 1 1 75 Ohms Table A.2 DIP SW2 Memory Configuration and E1 Settings Note 1: "0" is equal to a switch setting of OFF while "1" is equal to a switch setting of ON. 32 Appendix B. Interface Connections B.1 E1 Line Connectors BNC connector definition Conn. TX RX Pin Center Sleeve Center Sleeve Designation TTIP TRING RTIP RRING Direction From EOe-1 ↔ To EOe-1 ↔ Function Description Transmit data Signal return Receive data Signal return Table B.1 E1 BNC connector pin allocation RJ-45 connector definition Designation TTIP TRING FG RTIP RRING FG Pin 4 5 7 1 2 8 Direction From EOe-1 From EOe-1 To EOe-1 To EOe-1 Function Description Transmit data + Transmit data Frame ground2 Receive data + Receive data Frame ground2 Table B.2 E1 RJ-45 connector pin allocation 2 Frame Ground is connected by default. To disable, see special instructions on page 34. 33 Appendix B. Interface Connections B.2 E1 Line Frame Ground To disable Frame Ground (Chassis) connections from the E1 signal carrying lines, remove the jumper on the JP1 header, located close to the RJ-45 E1 connector. Signal line frame ground should only be connected at one end of the E1 line to avoid ground loops and ground potential differences between the each end of the line. DIP Switches Frame GND jumper Figure B.1 Frame Ground Connection B.3 Ethernet RJ-45 Connector MDI MDI-X 1. Tx + 1. Rx + 2. Tx - 2. Rx - 3. Rx + 3. Tx + 6. Rx - 6. Tx - Note: Ethernet does not use pins 4,5,7,8. 34 Technical Inquiry Form CTC Union Technologies Inc Fax:(886)2 27991355 Tel:(886)2 26591021 Attn : Customer Support Department E-mail:[email protected] From Company: Name: Tel: ( ) Fax:( ) MODEL: EOe-1 ACTIVITY: As attached in DIP switch setting table (next page) System Configuration Drawing: Question: Technical Inquiry Form MODEL No.: EOe-1 Please fill in the DIP switches configuration with '9' marks into the following table. Send it to us by fax, and we will reply to you immediately. SW2 SW1 SW NO. DIP 1 2 3 4 5 6 7 8 1 2 3 4 5 6 7 8 Function Description MAC address filtering 802.3x Flow Control Ethernet Auto-negotiation 10M/100M Speed Half/Full Duplex WAN Speed WAN Speed WAN Speed Memory Buffer Configuration Memory Buffer Configuration E1 Tx Timing source E1 Line Code Reserved Reserved E1 Line Impedance E1 Line Impedance Your Setting ON OFF Please include any additional comments: CTC Suggestion ON OFF CTC Union Technologies Co., Ltd. Far Eastern Vienna Building (Neihu Technology Park) 8F, No. 60 ZhouZi St. Neihu, Taipei, Taiwan Phone:(886) 2.2659.1021 Fax:(886) 2.2799.1355 E-mail: [email protected] http://www.ctcu.com