1
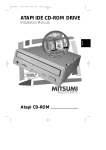
CD-ROM DRIVE UNIT
INSTRUCTION MANUAL
REV. 1.0
Interface: IDE/ATAPI
FCC
DECLARATION OF CONFORMITY
PRODUCT NAME: CD-ROM DRIVE
MODEL NUMBER: 120D, 160D, 200SD, 240SD, 240D, 320JD, 320D
FCC RULES: TESTED TO COMPLY WITH FCC PART 15, CLASS B
OPERATING ENVIRONMENT: FOR HOME OR OFFICE USE
FCC COMPLIANCE STA TEMENT:
This device complies with part 15 of the FCC Rules. Operation is subject to the
following two conditions: (1) This device may not cause harmful interference, and (2) this
device must accept any interference received, including interference that may cause
undesired operation.
INFORMATION TO USER:
This equipment has been tested and found to comply with the limits of a Class digital
device, pursuant to Part 15 of the FCC Rules. These limits are designed to provide
reasonable protection against harmful interference in a residential installation. This
equipment generates, uses and can radiate radio frequency energy and, if not installed and
used in accordance with the instructions, may cause harmful interference to radio
communications. However, there is no guarantee that interference will not occurred a
particular installation, if this equipment does cause harmful interference to radio or
television reception, which can be determined by turning the equipment off and on, the
user is encouraged to try to correct the interference by one or more of the following
measures:
1.
Reorient / Relocate the receiving antenna.
2.
Increase the separation between the equipment and receiver.
3.
Connect the equipment into an outlet on a circuit difference from that
to
which the receiver is connected.
4.
Consult the dealer or an experience video/TV technician for help.
CAUTION: Changes or modifications not expressly approved by the manufacturer
responsible for compliance could void the users anthority to operate the equipment.
CONTENTS
1. INTRODUCTION
1.1 FEATURES
1.2 POWER SAVE MODE
1.3 SAFETY NOTICE
2.PRECAUTIONS FOR INSTALLATION, OPERATION AND HANDLING
2.1 INSTALLATION PRECAUTIONS
2.2 OPERATION PRECAUTIONS
2.3 HANDLING PRECAUTIONS
3. PARTS AND FUNCTIONS
3.1 FRONT PANEL
3.2 FUNCTION KEY DESCRIPTION
3.3 REAR PANEL
4. SPECIFICATIONS
4.1 PERFORMANCE
4.2 ERROR RATES
4.3 AUDIO PERFORMANCE
4.4 GENERAL SPECIFICATIONS
4.5 ENVIRONMENTAL CONDITIONS
5. HARDWARE INSTALLATION
5.1 CD-ROM DRIVE INSTALLATION
5.2 CABLE INSTALLATION
6. GUIDE TO OPERATION
6.1 PREREQUISITE FOR INSTALLATION
6.2 CD-ROM DEVICE DRIVER INSTALLATION
6.3 DEVICE DRIVER (ATAPICD.SYS) PARAMETER LIST
6.4 MICROSOFT CD-ROM EXTENSIONS PARAMETERS
6.5 WINDOWS 95' NT & OS2 WARP
7. MAINTENANCE & TROUBLE SHOOTING
7.1 COMMONLY ENCOUNTERED PROBLEMS AND THEIR SOLUTIONS
1. INTRODUCTION
1.1 FEATURES
. 1.8MBytes/s (120D), 2.4Mbytes/s (160D), 3.0Mbytes/s (200SD), 3.6Mbytes/s
(240SD,240D), 4.8Mbyters/s (320JD, 320D) data transfer rate.
. Half height, 5.25 inch form factor.
. Motorized tray loading, Open/Close is controlled by the EJECT button or by a software command or
mechanical eject.
. CD-DA, CD-ROM/XA, Photo-CD(Multi-Session), CD-I/VIDEO CD,CD Plus
Compatible.
. Audio playback capability -- controlled by a software utility or front panel key.
. MPC level 3 compliant.
. Head phone connector on front panel with volume control.
1.2 POWER SAVE MODE
. When the drive unit waits for a command from the host for more than five minutes, it enters the power
save mode. The spindle motor and laser stop.
. The drive unit restarts automatically when a host command is received.
1.3 SAFETY NOTICE
. The CD-ROM drive should not be exposed to water or other liquids in order to avoid the danger of
electric shock.
. The cover of the CD-ROM drive protects the user from electric shock and the invisible laser radiation.
Do not attempt to remove this cover. There are no user serviceable parts inside.
2.PRECAUTIONS FOR INSTALLATION, OPERATION AND HANDLING
2.1 INSTALLATION PRECAUTIONS
1. Do not install the CD-ROM drive in a place where the temperature may exceed the maximum
specified operating temperature.
2. Avoid excessively dusty or polluted environments which would tend to make the pickup head lens
dirty.
2.2 OPERATION PRECAUTIONS
1. To avoid error, do not move the CD-ROM drive during operation.
2. Do not operate the CD-ROM drive in a high temperature, high humidity environment.
3. When placing a disc in the tray, be careful not to touch or scratch its surface.
2.3 HANDLING PRECAUTIONS
1. Before moving the CD-ROM drive, make sure that the disc has been removed and the
tray is closed.
2. To avoid contamination of disc surfaces, always handle discs by their edges.
3. Never bend a disc or expose it to direct sunlight.
3. PARTS AND FUNCTIONS
3.1 FRONT PANEL
(1)
(2) (7) (3)
(4)
(5)
(6)
(1) EARPHONE JACK - Accepts a 3.5mm stereo mini plug.
(2) VOLUME - Adjusts the audio output level.
(3) BUSY INDICATOR - Lights up when data is being accessed from a disc, or when the drive is
playing audio.
(4) TRAY - Opens and closes for disc loading and unloading.
(5) PLAY/NEXT TRACK BUTTON - Plays a audio CD or skips to the next track of a audio CD.
(6) STOP/EJECT BUTTON - Stops playing a audio CD or eject the tray in/out.
(7) MECHANICAL EJECT - support a 3rd way to eject the tray, such as during power off.
3.2 FUNCTION KEY DESCRIPTION
(1) PLAY / NEXT TRACK BUTTON
The PLAY/NEXT TRACK BUTTON can play a CD audio disc or skip to the next
audio track.
When the drive is ready and a CD audio disc is inserted, pressing the button to play a
CD audio .
When the drive is playing a CD audio, pressing the button to skip to the next audio
track.
(2) STOP / EJECT BUTTON
The STOP/EJECT BUTTON can stop playing CD audio or make the tray open or close.
When a CD audio disc is playing, pressing the button to stop the audio playing.
When the drive is in stop mode, pressing the button to open or close the tray.
* Note: If the playing CD audio is initial by application program (Windows media play utility ), pressing
STOP/EJECT BUTTON will eject the tray immediately.
3.3 REAR PANEL
AUDIO
DIGITAL
ANALOG
CS M
SL A
DG
RGGL
..
. . . . .. .. ..
(1)
(2)
39
40
1
2
ATAPI
.. .. .. .. .. .. .. .. .. .. .. .. .. .. .. .. .. .. .. ..
(3)
(4)
DC INPUT
+5 G G +12
....
(5)
(1) AUDIO LINE - DIGITAL OUT CONNECTOR - Digital output format of audio data for
low noise transmission.
(2) AUDIO LINE - ANALOG OUT CONNECTOR - Two channels, left and right audio
outputs.
. . . .
R
G
G
L
(3) DRIVE MODE SELECT JUMPERS - To determine the drive mode (Master or Slave)
C
S
S
L
M
A
3
2
1
MASTER
C
S
S
L
3
2
SLAVE
M
A
1
C
S
S
L
M
A
3
2
1
CABLE SELECT
Note : The factory default is the Slave mode.
(4) INTERFACE CONNECTOR - For connecting to host adapter card with 40-conductor
data cable.
(5) DC(IN) CONNECTOR - To be connected to a standard power supply.
4. SPECIFICATIONS
4.1 PERFORMANCE
(1) Disc diameter
12cm, 8cm
(2) Disc capacity
660MBytes ( mode 1, 12cm discs )
(3) Data transfer Rate
1.8MBytes/s (120D), 2.4mbytes/s (160D)
3.0MBytes/s (200SD), 3.6MBytes/s(240SD,240D)
4.8MBytes/s (320JD,320D)
(4) Access time
1/3 stroke average
150ms* (120D), 130ms*(160D),
110ms* (200SD, 240SD, 240D)
100ms* (320JD, 320D)
Random
180ms* (120D), 150ms* (160D),
130ms* (200SD, 240SD, 240D)
120ms* (320JD, 320D)
(5) Buffer size
128KBytes
* Average of 200 access in both directions between 15-min 00-sec 00-block and 35-min 00-sec 00-block
with latency and layer error correction time.
4.2 ERROR RATES
Soft read errors
Less than 10
Hard read errors
Less than 10
-9
-12
4.3 AUDIO PERFORMANCE
(1) Number of channels
2
(2) Frequence response
20Hz ~ 20Khz
(3) S/N ratio
80dB
(4) distortion
< 0.2% ( 1 Khz )
(5) Output level
Line out
0.6Vrms ( 1Khz )
Head phone
0.8Vrms ( 32 ohms headphone connected )
4.4 GENERAL SPECIFICATIONS
(1) Power requirements
Voltage
DC + 5V ± 5%
DC + 12V ± 10%
Current
0.35A (max.)
1.7A (max.)
(2) Dimensions
( WxHxD )
(3) Weight
146mm x 41.3mm x 203mm
1000g
2.2 lb.
4.5 ENVIRONMENTAL CONDITIONS
MTBF
100,000 POH
OPERATING
NON-OPERATING
Temperature
+5°C ~ +45°C
-20°C ~ +60°C
Humidity
20% ~ 85%
( No condensation )
8% ~ 90%
( No condensation )
Shock
2G
30G
Vibration
0.2G ( 5 ~ 50Hz )
1.25G ( 10 ~ 50Hz)
Specifications subject to change without notice.
5. HARDWARE INSTALLATION
Before beginning installation, please check to make sure that all of the following items are included with
your CD-ROM package.
1. CD-ROM drive unit
2. Installation diskette
3.Audio cable
4. Screws
5.1 CD-ROM DRIVE INSTALLATION
1. Remove the cover from an unused 5.25" half-height drive bay on the computer and remove the screws
and brackets from both sides of the drive bay.
2. Slide the CD-ROM drive into the slot and secure the drive in place either with the screws and
brackets from your computer or the mounting screws provided with this drive.
5.2 CABLE INSTALLATION
1. Connect the 40-conductor data cable to the CD-ROM drive and IDE/ATAPI interface
card.
2. Plug the power supply cable into the CD-ROM drive 4-pin white connector.
6. GUIDE TO OPERATION
This CD-ROM device driver software is compatible with MS-DOS versions 3.1 or later. The installation
diskette contains the software needed to install and operate the CD-ROM drive.
INSTALL.EXE Auto installation software for CD-ROM drive setup.
ATAPICD.SYS CD-ROM device driver.
*.WRI
Window's Write file for detail information.
6.1 PREREQUISITE FOR INSTALLATION
For user with MS-DOS version under 6.0
1. Contact local proper representative to obtain a copy of MSCDEX.EXE file (version 2.22 or above).
2. Copy the MSCDEX.EXE file onto the DOS directory (ex: C:\DOS)
6.2 CD-ROM DEVICE DRIVER INSTALLATION
1. Insert the installation diskette in drive A or B.
2. Change the prompt to A:\> or B:\>.
3. Type INSTALL and press ENTER.
4. The following display will be shown.
MSCDEX.EXE is the Microsoft CD-ROM Extensions utility. You must have
this file if you are going to install the CD-ROM drive. If you do not have
MSCDEX.EXE, please contact your local proper representative to obtain a copy
of MSCDEX.EXE file (version 2.22 or above).
Note: If your MS-DOS version is equal or above 6.0, this file will be in your DOS
directory. If you have MSCDEXE.ECE in your hard disk now, please input the
directory name which contains the file.
Otherwise, please press F3 to exit.
C:\DOS
5. Input the directory name which contains MSCDEX.EXE. Then the following display will be shown.
The uesr must choose a disk drive and directory for the device driver software. To choose your hard
disk drive C and the directory name as shown below, simply press ENTER.
Otherwise, type the desired drive and directory name, then press ENTER.
The INSTALL program will copy all software except INSTALL.EXE into the directory.
C:\CDROMDRV
6. Follow the instructions and complete the directory choice by pressing ENTER. At this point, the
installation procedure has been prepared and you will see the following display.
Do you want the INSTALL program to automatically modify the CONFIG.SYS and
AUTOEXEC.BAT files?
If you select ‘YES”, an extra command line
DEVICE = C:\CDROMDRV\ATAPICD.SYS /D:CD003 will be added to your
CONFIG.SYS file.
The INSTALL program will also add a new command line
C:\CDROMDRV\MSCDEX /V /D:CD003 /M:10 to your AUTOEXEC.BAT file.
If you select ‘NO’, no changes will be made. The user should perform a custom
installation manually.
YES
NO
If you select YES then press ENTER, the INSTALL program will add an extra command line
DEVICE=C:\CDROMDRV\ATAPICD.SYS /D:CD003 to your CONFIG.SYS file and a new command
line C:\CDROMDRV\MSCDEX /V /D:CD003 /M:10 to your AUTOEXEC.BAT file. After the
modification
procedure is completed, the final display below will be shown.
The installation is successful. You must reboot your
computer to activate the modifications that were performed.
Do you want to reboot now?
Yes
No
If, instead, you select NO, this display will be shown.
For manual installation, please add this command line to your CONFIG.SYS file:
DEVICE = C:\CDROMDRV \ATAPICD.SYS
And also add this command line to your AUTOEXEC.BAT file:
C:\CDROMDRV \MSCDEX /V /D:CD003 /M:10
The /V and /M are the parameters of MSCDEX.EXE
Please refer to the user’s manual for information on ways to customize your
installation.
Press ENTER to exit.
Press ENTER to exit. After this modification procedure, it is necessary to reboot your computer.
6.3 DEVICE DRIVER (ATAPICD.SYS) PARAMETER LIST
The device driver is installed with an entry in CONFIG.SYS. The syntax of this entry is:
DEVICE=ATAPICD.SYS[ /D:<device_names>][ /P:<port address>] [ /I:<IRQ number>][ / W:16|32]
where the arguments are:
/D:<device_names> The character device names that will be used by MSCDEX.EXE to find and
communicate with the device driver (default is "CD003").
/P:<port address> The port address to be used to communicate with the card. If this parameter is omitted,
the device driver will scan port address automatically during initialize process.
/I:<IRQ number> The IRQ number to be used by the IDE card. If this parameter is omitted, the device
driver will set the IRQ number to default value according the port address. If the port address is 1F0h
(primary IDE), the default IRQ number is 14. If the port address is 170h (secondary IDE), the default
IRQ number is 15.
/W:16|32 Select bus width as 16 or 32 bits. Default will auto detect IDE-Card ability.
6.4 MICROSOFT CD-ROM EXTENSIONS PARAMETERS
Microsoft CD-ROM Extension (MSCDEX.EXE) is an executable program for MS-DOS (version 3.1 or
higher) that works in conjunction with the device driver to allow your computer to access CD-ROM discs
in the CD-ROM drive as if they were MS-DOS formatted disks. This program is written by Microsoft and
is specifically designed to work with the Microsoft designed operating system commonly called MS-DOS.
Computers with MS-DOS 'compatible' operating systems may experience unpredictable results unless the
operating system manufacturer provides an alternative to the MSCDEX program.
The setup program automatically modifies the autoexec.bat file so that your computer can access the CDROM drive. However, there are some parameters that can be changed if you wish. This section explains
the function of each parameter. Use a text editor, such as MS-DOS 'EDLIN' or 'EDIT', to modify the
appropriate line in your AUTOEXEC.BAT file.
The syntax of the MSCDEX.EXE entry in AUTOEXEC.BAT is :
[drive:][path] MSCDEX.EXE /D:device name[/M:n][/E][/V] [/L:drive letter]
Note : The actual MSCDEX.EXE command line in the AUTOEXEC.BAT file is not truncated and should
be placed entirely on one line.
[drive:] [path] MSCDEX.EXE
Specifies the location (drive and directory) of the MSCDEX.EXE file.
The default setting is the CDROMDRV directory of the boot drive.
/D: device name
Specifies the name of the CD-ROM drive (8 characters maximum).
This must be identical to the device name specified in the device driver in the CONFIG.SYS file. For
example :
C:\CDROMDRV\MSCDEX.EXE /D:CD003
[/M:n]
Specifies the number of sector buffers for temporary storage of the most recent disc data. For example to
specify four sector buffers you would use:
C:\CDROMDRV\MSCDEX.EXE /D:CD003 /M:4
The installation program will set this value to 10. The default value is 4.
Note :The greater this value, the better the CD-ROM drive will perform. However, each buffer uses about
2k of memory and specifying too many buffers may slow down computer operation or interface with other
programs which have large memory usage requirements. Using expanded memory (see the /E option in
this section) or loading MSCDEX.EXE into high memory (refer to your MS-DOS User's Manual or
Memory Manager User's Manual) may allow you to specify a larger number of buffers to enhance CDROM performance and operate programs with large memory usage requirements simultaneously.
[/E]
Instructs the computer to use expanded memory, if available. For example :
C:\CDROMDRV\MSCDEX.EXE /D:CD003 /E
Note:That you must first load an expanded memory driver before using this option. If no expanded
memory driver is loaded, the following error message appears:
Expanded memory not present or not usable
6.5 WINDOWS 95' NT & OS2 WARP
Please refer to Windows 95, NT & OS2 WARP installation guide.
Note: During installation of OS2 operating system, please select "Non-listed IDE CD-ROM" to install the
ATAPI IDE interface CD-ROM. Otherwise, the drive can't be detected by the operating system.
7. MAINTENANCE & TROUBLE SHOOTING
7.1 COMMONLY ENCOUNTERED PROBLEMS AND THEIR SOLUTIONS
If the CD-ROM drive does not operate properly, check to see:
1. Are both ends of all the cables securely attached? Are any of the cables frayed or damaged?
2. Is the disc inserted correctly? The label must be facing up.
3. If any other hardware add-on cards are installed in the computer, are they using the same address port
as the CD-ROM drive? If so, there will be a hardware conflict which you can solve by reconfiguring
the address port of the CD-ROM drive.
If no sound comes from the speakers:
1. Have the connections between the LINE OUT jacks and the input terminals of the amplifier and/or
speakers been properly made?
2. Is power to the amplifier and/or speakers turned on?
If no sound comes form headphones:
1. Are the headphones properly connected to the headphone jack? Is the headphone cord frayed or
damaged?
2. Is the volume adjustment (on the front panel) set properly?