1
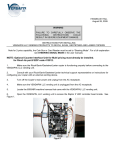
INSTRUCTIONS FOR INSTALLING VENDAPIN VENDING PRODUCTS TO XEROX/SAMSUNG COPIERS 1. Start with a functional copier and foreign interface, set to factory specifications and completely test in all modes of operation. 2. Xerox/Samsung copier must have the Foreign Interface Device Option 3. Ensure the Vendapin LLC unit and the copier is unplugged from the AC power receptacle. 4. Mount the VENDAPIN LLC Access Control Product at a convenient location on the copier console; refer to the installation instructions in the Operator/Installation Instructions Manual. If the Control Unit is to be mounted on a pedestal stand, refer to the instructions supplied with the pedestal stand. 5. Find the Xerox/Samsung fifteen-position foreign interface receptacle located on the rear, right cover panel. Connect the 15 pin D-Sub male connector of the Machine harness (Gray Cable) to the Foreign Device Interface port. 6. Connect the VENDAPIN LLC machine harness to J2 of the Raptor II VMC board. Route the cable as shown in the following photos. NOTE: There are jumpers that need to be installed on the Raptor II VMC Board. JMP 1 – Pins 2 and 3 connected. JMP 2 – Pins 1 and 2 connected. 7. Secure the nine-foot Vendapin LLC. Machine harness/cable to the copier frame. Make sure the interface cable is clear of all moving parts. NOTE: VENDAPIN LLC HAS ALREADY CONFIGURED YOUR MACHINE TO FUNCTION CORRECTLY WITH YOUR XEROX/SAMSUNG COPIER. PLEASE ADJUST THE PRICES ACCORDINGLY, BUT DO NOT ADJUST ANY OTHER SETTINGS 8. Must be done by a Xerox/Samsung Technician: This may vary based on model of Xerox/Samsung Copier. Go into the Service Mode and Enable the Foreign Interface Adaptor. Set Paper Feed for Start. 9. The installation is now complete. It is recommended that the system be tested before replacing any of the cover panels. Refer to the Operator/Installation Instruction Manual for proper set up and test procedures. Once the systems test has been completed and verified, replace all the cover panels and plug the copier and Vendapin LLC power supply into the proper AC receptacles. TIMING HELP Please refer to your VENDAPIN user manual for the proper procedure to change the timing settings described below. DEFINITIONS Sense Time – The length of pulse the VENDAPIN unit will recognize. Sense time MUST be set shorter than the pulse length. Example: The pulse length is 120ms, the sense time is set to 130ms. The VENDAPIN unit will not recognize the pulse because the sense time is longer than the pulse. Blind time – The length of time the VENDAPIN unit will ignore any input pulses AFTER it is finished sensing the debit pulse. Reset delay time – The amount of time from the end of the blind time to reset, or disable, the copier. Problem Multiple debits occur on a single vend Free copies being dispensed No debits occur No debit on last vend Paper jams (first copy) Paper jams (one copy selected, tries to make another copy) Card is ejected while vending device is still running, resulting in free copies. Card takes too long to eject after job is done Skipped debits (debits every other copy) Cause Sense time too short Blind time too short Sense time too long Bypass keyswitch on Reset delay too long Sense time too long Blind time too long Reset delay time too short Reset delay time too long Leading edge not selected Eject delay time too short Eject delay time too long Sense time too long Blind time too long Solution Increase sense time value Increase blind time value Reduce sense time value Turn off bypass mode Decrease reset time Decrease sense time Decrease blind time Increase reset delay time Decrease reset delay time. Select leading edge debit Increase eject delay time Decrease eject delay time Decrease sense time Decrease blind time IF THE VENDAPIN LLC MACHINE HARNESS OR INSTRUCTIONS DO NOT MATCH THE COPIER ELECTRICAL WIRING, IN WIRE COLOR, PIN LOCATION OR TYPE OF MATING PLUGS, PLEASE CONTACT OUR TECHNICAL SUPPORT VIA EMAIL, along with your model, serial number and customer name/location: [email protected] Revision Date: 14 June 2014