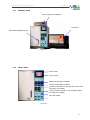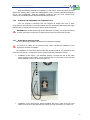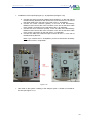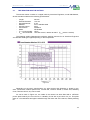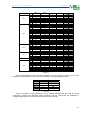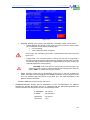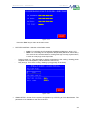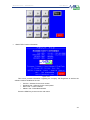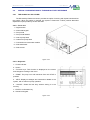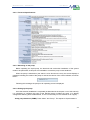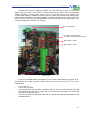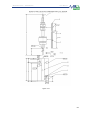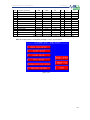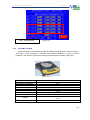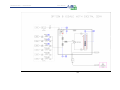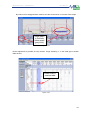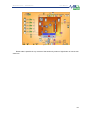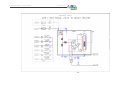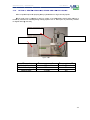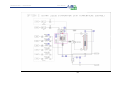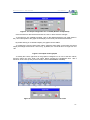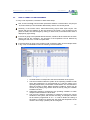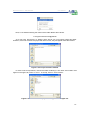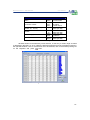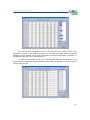
1
MICROACTIVITY REFERENCE USER´S MANUAL - V8.2 - MICROACTIVITY – REFERENCE User Manual MICROACTIVITY – REFERENCE USER MANUAL CONTENTS 1. INTRODUCTION 1 1.1 USING THIS MANUAL 1 1.2 SAFETY INFORMATION 2 1.2.1 SAFETY INFORMATION .......................................................................... 2 1.2.2 SAFETY SYMBOLS .................................................................................. 2 1.2.3 WARNING AND CAUTION CALLS........................................................... 2 1.2.4 ELECTROMAGNETIC COMPATIBILITY .................................................. 3 2. DESCRIPTION OF THE EQUIPMENT 2.1 2.2 2.3 2.4 4 GENERAL DESCRIPTION ........................................................................................... 4 SPECIFICATIONS ........................................................................................................ 6 OPERATING CONDITIONS ......................................................................................... 6 EQUIPMENT APPEARANCE ....................................................................................... 6 2.4.1 GENERAL VIEW ....................................................................................... 7 2.4.2 FRONT VIEW ............................................................................................ 7 2.4.3 INSIDE VIEW ............................................................................................ 8 2.4.4 REAR VIEW .............................................................................................. 8 2.4.5 INSIDE VIEW – ELECTRONICS .............................................................. 9 3. INITIAL INSTALLATION 10 3.1 BEFORE STARTING ...................................................................................................10 3.1.1 TEMPERATURE AND HUMIDITY RANGES ........................................... 10 3.1.2 VENTILATION REQUIREMENTS............................................................ 11 3.1.3 BENCHTOP SPACE REQUIREMENTS .................................................. 11 3.1.4 ELECTRICAL REQUIREMENTS ............................................................. 11 3.1.4.1 GROUNDING .............................................................................. 11 3.1.4.2 LINE VOLTAGE .......................................................................... 11 3.1.5 GAS REQUIREMENTS ............................................................................ 12 3.2 EQUIPMENT INSTALLATION ..................................................................................... 12 3.2.1 UNPACKING THE EQUIPMENT ............................................................. 12 3.2.2 PLACING THE EQUIPMENT ON THE BENCHTOP ............................... 12 3.2.3 ELECTRICAL INSTALLATION ................................................................ 12 3.2.4 GAS INSTALLATION ............................................................................... 16 3.2.5 TURNING THE POWER ON .................................................................... 16 4. COMPONENTS OF THE MICROACTIVITY-REFERENCE UNIT 17 4.1 THE REACTOR AND THE HOT BOX ......................................................................... 18 4.2 THE CONTROLLERS .................................................................................................. 20 4.2.1 THE REGULATION PARAMETERS ........................................................ 20 4.2.2 CONTROL STABILITY CRITERIA ........................................................... 23 MICROACTIVITY – REFERENCE User Manual 4.2.3 4.3 4.4 4.5 4.6 4.7 4.8 4.9 CONTROLLERS TUNING ....................................................................... 23 4.2.3.1 Ziegler & Nichols Method 4.2.3.2 Method of trial and error 4.2.3.3 Method proposed by PID Eng&Tech THE LIQUID – GAS SEPARATOR .............................................................................. 28 THE PRESSURE SENSOR (FOR ATMOSPHERIC PRESSURE REACTORS) ........ 29 THE TOUCH SCREEN ................................................................................................ 31 4.5.1 MAIN-SCREEN FUNCTIONS .................................................................. 31 4.5.2 MAIN MENU ............................................................................................. 33 4.5.3 OTHER FUNCTIONS ............................................................................... 41 SPECIAL CONFIGURATIONS OF THE MICROACTIVITY-REFERENCE ................. 42 4.6.1 THE GILSON 307 HPLC PUMP .............................................................. 42 4.6.1.1 Frontal view ................................................................................ 42 4.6.1.2 Keyboard ..................................................................................... 42 4.6.1.3 Technical Specifications .............................................................. 43 4.6.1.4 Switching on the pump ................................................................ 43 4.6.1.5 Pump operation ........................................................................... 44 4.6.2 PRESSURE CONTROL ........................................................................... 47 4.6.2.1 Introduction to pressure control systems in microactivity reactors 4.6.2.2 The micrometric valve ................................................................. 47 4.6.2.3 Configuration of the Servo Digital V4.0 unit (microstep positioner) 4.6.3 LEVEL CONTROL IN THE LIQUID – GAS SEPARATOR....................... 53 4.6.3.1 Introduction to level control in microactivity reactors .................. 53 4.6.3.2 The capacitive level sensor ......................................................... 53 SPECIAL OPTIONS FOR THE MICROACTIVITY-REFERENCE UNIT ..................... 56 4.7.1 OPTION A. Each other mass flow controllers (up to 6) .......................... 56 4.7.2 OPTION B. Scale with digital communications. ...................................... 62 4.7.3 OPTION C. Mass flow meter & coalescing filter in gases outlet. ............ 66 4.7.4 OPTION D. Additional 6 port valve. ........................................................ 69 4.7.5 OPTION D1. Additional 4 port manual valve. ......................................... 72 4.7.6 OPTION E TO J. Different types, sizes and materials for spare reactors with thermocouple and accessories. ....................................................... 75 4.7.7 OPTION K. No standard furnace. ........................................................... 78 4.7.8 OPTION Q. Heated head pump, vessel and line for liquids. ................... 79 4.7.9 OPTION S. Extra liquid evaporator with temperature control. ................ 82 4.7.10 OPTION T. Temperature control in L/G separator. ................................. 84 OTHER COMPONENTS OF THE MICROACTIVITY-REFERENCE ......................... 87 4.8.1 PIPING ..................................................................................................... 87 4.8.2 JOINTS AND VALVES ............................................................................. 87 4.8.3 INSTRUMENTATION ............................................................................... 89 PROCESS CONTROL AND AUTOMATION ............................................................... 91 4.9.1 CONTROL LOOPS IN THE MICROACTIVITY-REFERENCE................. 91 4.9.2 AUTOMATION ......................................................................................... 91 4.9.3 SYSTEM SAFETY MANAGEMENT......................................................... 92 5. PROCESS@ CONTROL SOFTWARE 95 5.1 INTRODUCTION .........................................................................................................95 5.2 INSTALLATION ...........................................................................................................95 5.2.1 HOW TO INSTALL PROCESS@ ...............................................................95 5.2.2. HOW TO INSTALL A PROJECT OR MICROACTIVITY CONFIGURATION 5.2.3 HOW TO LINK THE PC AND MICROACTIVITY-REFERENCE ................99 5.3 DATA ACQUISITION ..................................................................................................101 5.3.1 THE MENU BAR .........................................................................................102 5.3.2 THE CONTROL PANEL ..............................................................................104 MICROACTIVITY – REFERENCE User Manual 5.3.3 THE CONTROL GRAPHS ..........................................................................111 5.3.4 THE SESSION’S TABLE ............................................................................114 5.3.4.1 How to configure a session’s table ..............................................114 5.3.4.2 How to save a session’s table .....................................................117 5.3.4.3 How to open a saved session’s table ..........................................118 5.3.4.4 How to print a session’s table ......................................................118 5.3 HOW TO CARRY OUT AN EXPERIMENT .................................................................119 5.4 DATA PROCESSING ..................................................................................................120 5.5 EXPERIMENT VIEWER ..............................................................................................122 5.6 HOW TO EXIT PROCESS@ ..................................................................................... 131 5.7 CONNECTION TO A GAS CHROMATOGRAPH .................................................... .131 6. PERFORMING CATALYTIC TESTS 132 6.1 INTRODUCING THE CATALYTIC BED INTO THE REACTOR ............................... 132 6.2 PROGRAMMING A SEQUENCE OF EXPERIMENTS ............................................. 132 7. MAINTENANCE OF THE EQUIPMENT 133 7.1 WEEKLY MAINTENANCE......................................................................................... 133 7.1.1 LEAK DETECTION ................................................................................ 133 7.1.2 CLEANING THE UNIT ........................................................................... 133 7.2 MONTHLY – QUARTERLY MAINTENANCE ............................................................ 133 7.2.1 REPLACING THE FILTERS .................................................................. 133 7.3 ANNUAL OR LATER MAINTENANCE ...................................................................... 134 7.3.1 REPLACING THE FUSE ........................................................................ 134 7.3.2 REPLACING THE KALRETZ SEALS IN THE GAS MIXER .................. 134 7.3.3 REPLACING THE REACTOR POROUS PLATE .................................. 134 7.3.4 REPLACING A MASS FLOW CONTROLLER ....................................... 135 8. EUROPEAN DIRECTIVES 138 9. ENVIRONMENTAL POLICY 140 10. REACTOR TROUBLESHOOTING 141 MICROACTIVITY – REFERENCE User Manual MICROACTIVITY – REFERENCE USER MANUAL 1. INTRODUCTION The Microactivity-Reference unit is an automated and computer-controlled laboratory reactor for catalytic microactivity tests. Possible unit configurations: BASIC UNIT (ATMOSPHERIC PRESSURE) - Tubular reactor by Autoclave Engineers with 2 μm porous plate. Tmax.= 700 ºC. Thermocouple in catalytic bed, without thermowell. - Reactive system integrated within hot box. Tmax.= 170 ºC. - 6-port VICI valve for reactor bypass. - 3 Hi-Tec Bronkhorst mass flow controllers. - Liquid – gas condenser/separator tank cooled with Peltier cell. - Safety system integrated within microprocessor. - 2 temperature control loops. - 6 control devices for mass flow controllers. - Pressure sensor (0 – 1 bar). - Operating pressure in basic unit: 1 bar. - Equipment design pressure: 100 bar. - Piping, valves and other devices in 316 stainless steel with low dead volume. - Software Process@ for monitoring and data acquisition with distributed control. Remote control via Ethernet. - Heater on gas output line for up to 250 ºC. PRESSURE CONTROL - Pressure control system, consisting of a servocontrolled micrometric regulating valve º with stepper motor of 1 accuracy . - Pmax.= 100 bar. Accuracy ± 0.2 bar. - Control loop and 100 bar pressure transducer. - Digital communications. 1.1 LEVEL CONTROL - Liquid/gas separator with level control, consisting of a micrometric regulating valve and capacitive level sensor of low dead volume (0.3 ml). - Control loop and capacitive sensor. - Digital communications. EXTRAS - HPLC Gilson liquid pump, 400 bar, 0.01 – 5 ml/min. - Space for up to 6 MFC. - Balance at liquid output. - Mass flow meter at gas output. - Special dimensions and materials of reactor. - Extra VICI-VALCO valve for special purposes. USING THIS MANUAL To ensure the correct use and operation of the Microactivity-Reference unit, it is advisable to proceed as follows: - Read the general description of the equipment in chapter 2. - Install the instrument as shown in chapter 3. - Read the description of the equipment’s components in chapters 4 and 5. - Following the operating instructions outlined in chapter 6. 1.2 SAFETY INFORMATION 1.2.1 SAFETY INFORMATION This unit meets the following EN 61010-1:2001, and it has been designed and tested in accordance with recognized safety standards and designed for use indoors. If the 1 MICROACTIVITY – REFERENCE User Manual instrument is used in a manner not specified by the manufacturer, the protection provided by the instrument may be impaired. Whenever the safety protection of the Microactivity-Reference unit has been compromised, disconnect the unit from all power sources and secure the unit against unintended operation. Refer servicing to qualified servile personnel. Substituting parts or performing any unauthorized modification to the instrument may result in a safety hazard. Disconnect the AC power cord before removing covers. 1.2.2 SAFETY SYMBOLS Warnings in the manual or on the instrument must be observed during all phases of operation, service and repair of this instrument. Failure to comply with these precautions violates safety standards of design and the intended use of the instrument. Process Integral Development Eng & Tech assumes no liability for the customer’s failure to comply with these requirements. 1.2.3 WARNING AND CAUTION CALLS WARNING: A warning calls attention to a condition or possible situation that could cause injury to tha user. CAUTION: A caution calls attention to a condition or possible situation that could damage or destroy the product or the user’s work. See accompanying instructions for more information Indicates hazardous voltages Indicates a hot surface Indicates earth (ground) terminal 1.2.4 ELECTROMAGNETIC COMPATIBILITY This device complies with the electromagnetic compatibility requirements subject to the EN 61326:1997 regulation. Operation is subject to the following two conditions: 1. This device may not cause harmful interference. 2. This device must accept any interference received, including interference that may cause undesired operation. If this equipment does cause harmful interference to 2 MICROACTIVITY – REFERENCE User Manual radio or television reception, which can be determined by turning the equipment off and on, the user is encouraged to try one or more of the following measures: a. Relocate the radio or antenna. b. Move the device away from the radio or television. c. Plug the device into a different electrical outlet, so that the device and the radio or television are on separate. d. Make sure that all peripheral devices are also certified. e. Make sure that appropriate cables are used to connect the device to peripheral equipment. f. Consult your equipment dealer, Process Integral Development Eng & Tech, or an experienced technician for assistance. g. Changes or modifications not expressly approved by Process Integral Development Eng & Tech could void the user’s authority to operate the equipment. 2. DESCRIPTION OF THE EQUIPMENT 2.1 GENERAL DESCRIPTION As may be observed in the P&I diagram shown in Figure 2-1, the system consists of a fixed-bed tubular reactor, with the catalyst bed placed inside upon a porous plate. The flow inside the reactor is up-down, whereby the reactant mixture is fed through the upper part of the reactor and the reaction products are obtained through the lower part. º Figure 2-1 3 MICROACTIVITY – REFERENCE User Manual After passing through a line shut-off valve, the reactant gas streams are fed into the reactor by means of a system of mass flow controllers that provide a known and controlled flow of gases. In order to stop the products flowing back through the lines, the controllers are protected with check-valves fitted with Kalretz elastomer seals (elastomeric Teflon). When operation involves liquids, these are dosed by means of a HPLC alternative positive displacement pump, made by GILSON, in streams ranging between 0.01 and 5 ml/min and pressures of up to 600 bar. The liquids are introduced into the system through a low dead volume check-valve. Liquid and gaseous flows are introduced into the hot box system that includes an electric forced convection heater that allows the process route to be kept at temperatures of 160ºC, and even 180 ºC, to avoid possible condensation in the system. The liquids evaporator is under the heater’s forced flow, at temperatures of around 15 to 20 ºC above the rest of the hot box, and the pre-heater for the gases is also under the direct flow of the heater, at temperatures of 10 to 15ºC above the rest of the system. Once the gases have been preheated and liquids evaporated, these streams merge and flow to a 6-port valve. This valve is operated by remote pneumatic control through the computer or by means of the touch screen and allows for selecting from two possible alternatives for the flow path: either towards the reactor or rerouting it towards the system’s gas outlet (by-passing the reactor). When the flow of reactants is directed towards the reactor, it passes through 10 μm sintered filters made of 316 stainless steel, at both the inlet and outlet of the reactor, thereby protecting the arrangement of valves from possible finely-separated catalyst particles. At the reactor outlet, and after passing through the 6-port valve, the reaction products pass out of the hot box to the liquid-gas separator, that may be fitted with a high-resolution capacitive level sensor. This system allows the condensation of liquids at low temperature. In the standard series unit, the liquids accumulate inside the condenser and need to be removed manually by the user. If the option has been chosen that includes the level control system in the separator, this removal is performed automatically, providing samples of reaction liquids within extremely short periods of time without accumulation or dilution over time. The upper part of the separator features the outlet for gases, which are reintroduced into the hot box and are directed to the pressure control system, consisting of a servo positioned micrometric regulating valve that registers the same temperature as the hot box and which provides a continuous and constant flow of gases at the outlet. In those systems that are not fitted with the optional pressure control, this flow goes straight to the outlet. Once pressure control has been performed, the flow of reaction gases is directed out of the hot box for subsequent measurement and/or analysis by means of a system of, for example, chromatography in gaseous phase. The Microactivity-Reference unit is fitted with a system of local control and remote control based on communications via Ethernet by means of the Process@ control application. The equipment’s safety system is integrated within a microprocessor that is separate from the computer. Accordingly, the alarm signals from the various control loops are centralised in the microprocessor, which operates as programmed to do so with respect to the system’s different alarm situations. These actions are triggered on a self-contained and immediate basis, independently of the communications with the computer, thereby upholding the system’s safety, as it not only continues operating in the event of failure in the computer system but, in addition, its safety system remains operative. The operation and configuration of the safety system are described later on in this manual. 4 MICROACTIVITY – REFERENCE 2.2 User Manual SPECIFICATIONS 2.3 Equipment Microactivity - Reference Voltage 110-230 VAC (±5%) Frequency 60-50 Hz (±1%) Maximum power consumption 2000 W Protection 10 A circuit breaker Maximum power consumption of Furnace 550 W (basic unit) Maximum power consumption of Hot Box heaters 4 heaters of 165 W Remote control interface Ethernet EMC B class Ambient temperature range for operating 5 – 40ºC Ambient temperature range for storing -20 – 70ºC Recommended humidity range 5 – 80% Refrigeration Forced ventilation or convective ventilation Dimensions, cm (Height × Width × Depth) 70 × 60 × 55 (Basic Unit) EN 61326:1997 EN 61010-1:2001 OPERATING CONDITIONS The optimum operating conditions for the Microactivity-Reference Unit are as follows: • • • • • 2.4 Pressure: Atmospheric - 100 bar (if the high pressure option is included) Temperature: Ambient - 700 ºC. Feed: Liquids and gases. Flow of reactants: 0.01 – 100 VPH (volume of load per unit of catalyst and per hour) for liquids and 10 – 100,000 for gases. Solid catalyst (spheres, pellets, extruded items, etc.) EQUIPMENT APPEARANCE The Microactivity-Reference consists of (see Figure 2-2): • • • An integrated unit, whose interior houses the hot box and the reaction system, as well as all the system’s control elements and valves. A Gilson HPLC pump (optional) for feeding liquids into the reactor. A PC with a remote control system involving communications via Ethernet. At the outlet for reaction gases, the user may incorporate an in-line gas analysis system, which will permit accurate monitoring of the reaction. 5 MICROACTIVITY – REFERENCE 2.4.1 User Manual GENERAL VIEW HPLC liquid pump (optional) Control PC Microactivity-Reference unit Figure 2-2 2.4.2 FRONT VIEW Hot box door Touch screen Reactor temperature controller Hot box temperature controller Pressure controller (for high pressure units, when this option is included) Level of liquid controller in L/G separator (when this option is included) ON / OFF switch Gases shut-off valves Figure 2-3 6 MICROACTIVITY – REFERENCE 2.4.3 User Manual INSIDE VIEW Electric forced convection heater Reactor thermocouple 15 μm filter Liquid evaporator Autoclave Engineers tubular reactor 6 port VICI-VALCO valve (for reactor by-passing) Reactor furnace Micrometric servo-controlled valve for pressure control (optional) 15 μm filter Figure 2-4 2.4.4 REAR VIEW Liquid-gas separator with level sensor and micrometric servocontrolled valve (optional) Ethernet remote control General protection 220 VAC Power supply Figure 2-5 7 MICROACTIVITY – REFERENCE 2.4.5 User Manual INSIDE VIEW - ELECTRONICS + 12 V Power Supply +15/-15/+5V Power Supply + 24 V Power Supply Digital servo V4.0 for level control (opt) Digital Seervo V4.0 for pressure control (opt) Relay Pump heating Relay Peltier 6 Port Valve SSR -Furnace SSR -Hot Box Heaters SSR -GC Heater SSR-Evaporator Micrometric valve for pressure control (opt) Electrovalves Gas Mixer Pressure sensor (opt) Mass Flow Controllers Figure 2-6 3. INITIAL INSTALLATION 3.1 BEFORE STARTING Before the equipment arrives, make sure your laboratory meets the following environmental, weight, power, and gas requirements. You can find more site preparation information in this chapter. Site Preparation Checklist: 8 MICROACTIVITY – REFERENCE User Manual ❐The site is well ventilated and free of corrosive materials and overhanging obstacles. ❐Site temperature is within the recommended range. ❐Site humidity is within the recommended range. ❐Bench space is adequate for the equipment. ❐Bench can support the weight of the equipment. ❐Power receptacle is earth grounded. ❐Electrical supply meets all equipment’s power requirements. ❐Voltage supply is adequate for oven type. ❐Gas supplies meet the requirements of the equipment. ❐Gases and air supply meet the pressure requirements and have two-stage pressure regulators installed. 3.1.1 TEMPERATURE AND HUMIDITY RANGES Operating the unit within the recommended ranges insures optimum instrument performance and lifetime. Recommended temperature range Temperature range Recommended humidity range Humidity range Recommended altitude range 18 – 25 ºC 5 – 40 ºC 50 – 60 % 5 – 80 % Up to 2000 m After exposing the unit to extremes of temperature or humidity, allow 15 minutes for it to return to the recommended ranges. 3.1.2 VENTILATION REQUIREMENTS Do not obstruct air flow around the instrument. 3.1.3 BENCHTOP SPACE REQUIREMENTS The equipment dimensions are the following: Height: 100 cm Width: 85 cm Depth: 75 cm Height Depth Width 9 MICROACTIVITY – REFERENCE 3.1.4 User Manual ELECTRICAL REQUIREMENTS 3.1.4.1 Grounding CAUTION: A proper earth ground is required for MA-Ref operations. To protect users, the metal instrument panels and cabinet are grounded through the three-conductor power line cord in accordance with International Electrotechnical Commission (IEC) requirements. The three-conductor power line cord, when plugged into a properly grounded receptacle, grounds the instrument and minimizes shock hazard. A properly grounded receptacle is one that is connected to a suitable earth ground. Proper receptacle grounding should be verified. Make sure the unit is connected to a dedicated receptacle. The use of a dedicator receptacle reduces interference. CAUTION: Any interruption of the grounding conductor or disconnection of the power cord cause a shock that could result in personal injury. 3.1.4.2 Line Voltage The unit is designed to work with a specific voltage; make sure your lab has the appropriate voltage option for the unit. The voltage requirements for the equipment are printed near the power cord attachment: - Voltage: - Frequency: - Max. power consumption: 3.1.5 110-230 VAC (± 5%) 60-50 Hz (± 1%) 2000 W GAS REQUIREMENTS Make sure your lab has the appropriate gas installation for working with the unit: 3.2 - Air supply: 5 bar - Gases: Depending on the unit configuration. The pressure of each reactant gas in the installation must be higher than the working pressure on the unit, and corresponding to the mass flow controllers that the unit incorporates. EQUIPMENT INSTALLATION Before starting, be sure to have available all the necessary tools and pieces for the installation. 3.2.1 UNPACKING THE EQUIPMENT Unpack the unit carefully and inspect the shipping containers for damage. If a container is damaged or shows signs of stress, notify both the carrier and Process Integral Development Eng & Tech. 10 MICROACTIVITY – REFERENCE User Manual Keep all shipping materials for inspection by the carrier. Check the items received against the packing lists. If there are discrepancies, notify Process Integral Development Eng & Tech immediately. Keep the shipping containers until you have checked their contents for completeness and verified instrument performance. 3.2.2 PLACING THE EQUIPMENT ON THE BENCHTOP The unit requires a benchtop that can support its weight plus that of other equipment you will use with it. The area must be free of overhanging obstructions that might interfere with cooling and limit access to the top of the instrument. WARNING: Be careful when lifting the unit. Because it is heavy, two people should lift it. When moving the equipment, be aware that the back is heavier than the front. 3.2.3 ELECTRICAL INSTALLATION The unit’s electrical installation is performed as described forthwith: For reasons of safety, do not connect to the mains until the full installation of the equipment has been completed. The installation of the external devices that are described will be only possible if they have been chosen as a configuration option of the Microactivity-Reference reactor. • Installation of the liquid – gas separator (Peltier): Connect the end of the cable (power supply) to the “Peltier” round connector that is to be found on the rear side of the reactors’ hot box, as shown in Figure 3-1: Figure 3-1 • Installation of the liquid pump: Before installing the pump, make sure the on/off switch to be found on the rear side of the pump is in the off position (o), Figure 3-2: 11 MICROACTIVITY – REFERENCE User Manual Figure 3-2 The following connections are to be made (see Figure 3-3, 3-4): a. Connect the power cable to one of the two 220 VAC power sockets on the rear side of the unit. These power sockets will cease to supply power when the equipment is switched off by means of the switch on the front, so it is not advisable to connect analysis equipment or other devices that need to operate separately from the Microactivity-Reference unit. (Figure 3-3). b. Connect the connection terminal (stop for system alarm), as well as the 9 pin sub-D connector (digital communications), on the rear side of the pump. (Figure 3-3). c. Connect the round connector on the end of this same cable to the “Pump Control” on the rear of the Microactivity-Reference. (Figure 3-3) d. Connect the round connector (AUX 1) to the “AUX 1” on the rear side of the Microactivity-Reference and the end of this same cable (power cable) to the black electric strip (Figure 3-4). e. Connect the vessel cable to the black electric strip (Figure 3-4). The following connections are to be made in the case of the dumper and head Gilson pump calefaction: f. Connect the pump head cable (on the front of the pump) to the black electric strip (Figure 3-5 “d”). g. Connect the pump dumper cable (in the rear of the pump) to the black electric strip (Figure 3-5 “e”). Figure 3-3 12 MICROACTIVITY – REFERENCE User Manual Figure 3-4 Figure 3-5 • Installation of the liquid scale (see Figure 3-6): a. Connect the sub-D type connector (digital communications) to the rear side of the scale. b. Connect the JACK type plug (power supply), on the left of the sub-D connector, c. These two connectors are joined in a single round connector that has to be plugged into the corresponding socket on the rear of the hot box (“Scale Control”). Figure 3-6 13 MICROACTIVITY – REFERENCE • User Manual Installation of the MFM (see figure 3-7): a. Connect the sub-D type connector (digital communications) to the rear side of the MFM. b. Connect the round connector on the end of this same cable to the “MFM” on the rear side of the Microactivity-Reference. Figure 3-7 • Installation of the level of liquids in the condenser “level sensor” (see figure 3-8): a. Connect the round connector (level sensor) to the rear side of the level sensor. b. Connect the round connector on the end of this same cable to the “level sensor” on the rear of the Microactivity-Reference. 14 MICR ROACTIVITY – REFERENC CE User M Manual Figure 3-8 • mponents: On O the rear side s of the MicroactivityM Reference’s hot box there Other com is a circu ular type con nnector for each one of the t devices that may be e connected to the unit, such s as: o • V Valve for reg gulating the level of liquid ds in the cond denser (“Liquid Valve”). ons of the the ermocouple for f the liquid-gas separattor: Installatio Connect the thermocoup ple connector to the “TI 2” in the rear side of th he a. C M Microactivity (see figure 3-9). 3 Figure 3-9 15 MICROACTIVITY – REFERENCE • User Manual Installations of the liquid-liquid-gas (L-L-G) separator (see figure 3-10) a. Connect the sub-D connector (digital communications), on the rear side of the Microactivity Reference and connect the round connector on the end of this same cable to the “RS-485” on the rear of the L-L-G separator. b. Connect the round connector (peltier), on the rear of the Microactivity Reference and connect the round connector on the end of this same cable to the “Peltier” connection on the rear side of the L-L-G separator. c. Connect the round connector (AUX2), on the rear side of the Microactivity Reference and connect the round connector on the end of this same cable to the “Alarm” connection on the rear of the L-L-G separator. d. Connect the cable with a thermocouple connector to the TI 1 in the rear of the Microactivity-Ref unit. Note: If you connect the L-L-G separator you have to disconnect necessary connections of the L-G separator. Figure 3-10 • Gas outlet on the system: Leading to the analysis system. A heater is included for this line (see Figure 3-11): 16 MICR ROACTIVITY – REFERENC CE User M Manual Ga as outlet Heater co onnector He eater F Figure 3-11 • Connectio on to Ethern net: The direcct connection n between th he Microactivvity-Referenc ce and the control c PC iss performed by means of o the crosse ed cable sup pplied with th he equipmen nt, connectin ng it on the rear of the re eactor box (“E Ethernet Rem mote Contro ol”, Figure 3-12). When th he connectio on is made via v Ethernet, it is made w with a catego ory 5 UTP co onnection cable for Etherrnet networks s with a RJ45 connector.. The Ethernet connectio on between the t PC and the Microacttivity-Referen nce is reduced to 10 Mb bts base-T. F Figure 3-12 • s is on the t lower rea ar of the reacctor (Figure 3 3-13). The reacttor’s power socket WARNIN NG: Before connecting c th he equipmen nt’s power su upply, make e sure that th he main circcuit breaker iss in the “OFF F” position (F Figure 3-14). Figure 3--13 Figurre 3-14 17 MICROACTIVITY – REFERENCE 3.2.4 User Manual GAS INSTALLATION Once the electrical installation has been performed, the next step is to install the gases that the Microactivity-Reference unit is going to work with. To do so, all that is required is to connect a 1/8´´ line, preferably of 316 stainless steel, between the pressure reducers on the gas cylinders and the system’s gas inlet, which is to be found on the upper part of the equipment ( Figure 3-1). The connection is to be made as follows: - - Synthetic air: o Inlet pipe: Polyethylene 6×4 mm pipe, supplied with the equipment (3 m). o Connection: Quick-fit connection, pressing the pipe against the adapter. o Inlet pressure: 5 bar o It operates on the pneumatic systems for door and oven opening, 6-port valves, etc. Air supply Gases 1, 2,.. etc.: Reaction gases. o Inlet pipe: 1/8´´ pipe in 316 stainless steel. Reaction o Connection: Gyrolok 1/8´´ adapter. gases o Inlet pressure: 5/10 bar above the operating pressure. The inlet pressure for each one of the gases depends on the mass flow controller installed, whereby its specifications should be consulted before making the gas connection. o The gas inlet position (1, 2, etc) depends on the arrangement of the mass flow controllers on the equipment Figure 3-15 Once the installation has been made, the following steps are to be performed in order to introduce gases into the system: 1. Open the pressurised gas cylinders. 2. Adjust the inlet pressure for each one of the gases by means of the pressure reducers. 3. Open the on/off valves for each gas on the lower part of the front panel. At this point, the system is ready to operate. Inversely, upon concluding operations with the Microactivity-Reference, proceed as follows: 1. 2. 3. 4. 3.2.5 Reduce the inlet flows to zero for each one of the reactant gases. Preferably flush the installation with inert gas for 5 min. Close the on/off valves on the front panel. Whenever possible, close the reactant gas cylinders and reduce the pressure of the pressure reducers to zero (if the system is leak-free, the inlet lines to the system will register the inlet pressure). In the case of compressed air, the installation is to remain permanently pressurised in order to permit the pneumatic operation of the valves and the door on the hot box. TURNING THE POWER ON Verify that the power switch is in the OFF position (o). Plug the power cord into the power receptacle. Put the circuit breaker in ON position and turn the power on with the frontal switch (position I). 18 MICROACTIVITY – REFERENCE User Manual 4. COMPONENTS OF THE MICROACTIVITY-REFERENCE UNIT Figure 4-1 shows a diagram of the items that constitute the Microactivity-Reference reactor’s arrangement of lines and instrumentation, including 3 mass flow controllers for the gas inlets, as well as the pressure control options in the reactor and liquid level control in the liquid – gas separator. Figure 4-1 17 MICROACTIVITY – REFERENCE 4.1. User Manual THE REACTOR AND THE HOT BOX The tubular reactor consists of a nipple made by Autoclave Engineers, model CNLX99012, whose standard model has the following specifications: - Length: External diameter: Internal diameter: Material: Internal volume: Connections: Seals: Tmax. recommended: Pmax. recommended: 305 mm 14.5 mm 9 mm 316-L Stainless steel 20 ml SF562CX AE-6F2986 700ºC 1350 bar at 25ºC; 400 bar at 482ºC (Pmax reactor: 100 bar) The following graphic illustrates the maximum working pressure for an Autoclave Engineers 316 stainless steel type nipple depending on the temperature. Figure 4-2 Depending on the user’s requirements, any other reactor size (diameter or length) or any other construction material (Monel 400, Inconel 600, Titanium Grade 2, Nickel 200, Hastelloy C276, Titanium 6AL4V, etc) can be used. As can be seen in Figure 4-3, the inside of the reactor has been fitted with a 10FR4HC porous plate made by the firm VALCO, in Hastelloy C-276 with a pore size of 2 µm. This plate rests on a 316 stainless steel pipe inserted through the lower end of the reactor, thereby allowing for: 18 MICROACTIVITY – REFERENCE - User Manual Reduction to a minimum the dead volume at the outlet Replacing the plate whenever so required, without the need to replace the reactor nipple. Thermocouple Tubular reactor Porous plate Porous plate support Figure 4-3 Figure 4-4 The thermocouple, type K (encased in a 1.5 mm diameter Inconel sheath), is inserted through the upper end and is in contact with the catalyst bed without thermowell. This allows for reading reaction temperatures with response times in milliseconds. The reactor is housed in an oven built without insulation, consisting of a 304 stainless steel chassis, the inside houses the resistance together with a refractory material: - 550 W / 230 VAC Maximum operating temperature: 800ºC. Low thermal inertia. Automatic opening system with temperature warning system. The entire system is contained within a hot box made of 304 stainless steel which interior holds an electric convection heater. Its maximum recommended operating temperature is 190ºC. 19 MICROACTIVITY – REFERENCE 4.2. User Manual THE CONTROLLERS 4.2.1. THE REGULATION PARAMETERS The Microactivity-Reference unit uses P-I-D controllers for the following control loops: - Reaction temperature: The signal from the thermocouple located in the catalyst bed is analysed by the controller, whose output signal is relayed to a solid-state zero-switching relay that regulates the power supplied to the oven proportionally to the control signal. The power the oven receives corresponds to a signal between 0 and 200 VAC, typically between 0 and 140 VAC, proportional to the control signal. - Hot box temperature: The signal from the thermocouple located inside the hot box is analysed by the controller, whose output signal is sent to a relay that regulates the power supplied to the box’s heater proportionally. - Pressure control: The signal from the pressure transmitter installed upstream of the reactor is analysed by the controller, whereby its output signal determines the position of the pressure control valve. - Level control: The signal from the capacitive level sensor installed in the liquid – gas separator is analysed by the controller, whereby its output signal determines the position of the level control valve located in the base of the separator. The controllers used are made by the firm TOHO, model TTM-005, catering for RS-485 digital communications, and are shown in Figure 4-5: Output 1 - 2 Process value Alarm leds 1 and 2 Set point / control output (%) Cursor displacement by the digits (in each function) Digital signals Access level selector Increase button Decrease button Figure 4-5 The process value of the controlled variable is displayed in the upper window on the controller (green), whereas the set-point or the % control output (depending on whether operation is in automatic or manual mode) is displayed in the lower window (red). This set-point may be changed by pressing the “Func” key, which allows for selecting each one of the different digits and, subsequently, changing the value of each digit using the ▲and▼ keys. The “Mode” button is used to access the different control parameters configured in the controller: • • • • • - : Process value. _ P: Proportional band. _ I: Integral action (s). _ d: Derivative action (s). _ nd: Control mode. Select with the ▲and▼ keys: 20 MICROACTIVITY – REFERENCE User Manual Run: Automatic mode. The user is to set the desired value or set-point of the variable controlled on the lower screen of the controller, which will automatically act on the variable’s control output. o Rdy: Control start at a given moment. When this mode is activated, the red LED “RDY” on the front of the controller is lit up. o Man: Manual mode. The user is to set the variable’s control output (e.g. heating power: 0 – 100%) on the lower screen of the controller. As a general rule, the user has to operate under RUN mode (when the variable’s set-point is set) or MAN (when the control output is set), but never under RDY mode (the LED “RDY” on the front is to remain off). _ nu1: The variable’s control output (%). This parameter will be modified by the user whenever operating under manual mode (never under automatic). o Regarding the temperature control, this parameter indicates the % of heating of the heater. o Regarding the pressure and level controls, this parameter indicates the % of opening of the control valve (fully closed at 0% and fully open at 100%). The parameter “_ AH1” on the SET 2 set-up menu represents the maximum control output for the controller (access this menu by depressing the “Mode” key for 2 sec., press the “Func” key and enter a 2 in the cursor using the ▲ key. Move through the different menu parameters by pressing “Mode” until the desired parameter is reached). _ E1H: Upper alarm limit. Value of the variable above which the system’s alarm is to be triggered. o • • Although these parameters have already been set with their optimum control values for operation of the Microactivity-Reference unit, they may be modified whenever necessary by using the “Func” button to go to each one of the digits and then use the ▲ and ▼ keys to increase or decrease the value. The standard set-up for the Microactivity-Reference reactor is detailed in Table 4-1: Table 4-1 Control parameter Reactor temperature Hot box temperature _P _I _d _ nd _ nu1 _ EH1 24.0 180 20 run 700 9.0 120 20 run 40 (do not modify) Pressure Level 25.0 90 0 run - 110.0 50 0 run - Other parameters of major importance that configure this type of controller are those that are shown below in Table 4-2, with their standard values for operation with the Microactivity-Reference unit (these parameters may vary from one unit to another. For verification of a reactor’s specific set-up, consult the technical documentation that is supplied with the equipment): 21 MICROACTIVITY – REFERENCE User Manual Reactor Temperature 0 1.00 0 1 0 1 0 Hot Box Temperature 0 1.00 0 1 0 1 0 Pressure Level 22 1.00 0,9 1 0.0 1 0 22 1.00 0.00 1 0.00 1 0 SET1 LnP PuG PuS PdF DP Fu LoC 800 0 run 110 0 1 1.0 2 45 550 20 200 0 run 110 0 1 1.0 2 16.0 120 20 250 0.0 run 110 1 1 1.0 2 25.0 50 0 10.00 0.00 run 110 1 SET2 SLH SLL Nd Cnt Dlr Nul TUn AtG AtC P1 I D T1 ArW MH1 ML1 Pbb 100.0 80 0.0 0.0 100.0 95.0 0.0 0.0 100.0 85 0.0 0.0 100.0 85.0 0.0 0.0 SET3 E1F E1H E1C E1t E1b E1P 6 700 0 0 0 0 6 40 0 0 0 0 6 100.0 0.0 0 0 0 6 2.00 0.00 0 0 0 SET6 Con bPS Adr AWt nod b8n1 19.2 1 0 ry b8n1 19.2 2 0 ry b8n1 19.2 4 0 ry b8n1 19.2 5 0 ry SET7 tno rP1 0 0.0 0 0.0 0 0.0 0 0.0 SET0 Pr11 Pr12 Pr13 Pr14 Pr15 Pr16 Pr17 Pr18 Pr19 P1 I d Nd Mu1 E1H rP1 OFF OFF P1 I d Nd Mu1 OFF OFF OFF OFF P1 I d Nd Mu1 E1H OFF OFF OFF P1 I d Nd Mu1 E1H OFF OFF OFF Aux 1 Aux 2 1 1.0 2.00 110 50 0 Table 4-1 P-I-D values depend on the operation conditions. As an example, in Table 4-3 the PID parameters for the reactor oven are shown, depending on the working temperature: Reactor Temperature 600ºC 300ºC 40 40 P1 460 350 I 65 100 D 30% 30% MH1 Table 4-3 There now follows a brief introduction to the different methods that are used for tuning proportional, integral and derivative (PID) controllers and the criteria that are followed for considering that optimum control of the process has been achieved. 22 MICROACTIVITY – REFERENCE User Manual 4.2.2. CONTROL STABILITY CRITERIA Stability is the control system feature that makes the variable return to the set-point following a disturbance. The most commonly used criteria for determining control stability are the following: A) Criterion of minimum area or of damping ratio This is the criterion of widest application, especially regarding processes in which the duration of the deviation is as important as the value of the same. According to this criterion, the control is to ensure that the area of each oscillation in the control output signal following a disturbance is minimum (experience shows that stability criteria should be applied onto this signal and not on the process variable). In other words, to achieve a minimum error in the shortest time possible. Experience in industrial control processes indicates that this area will be minimal when the proportion between the peak-to-peak amplitudes of the first two consecutive cycles, immediately following the disturbance, is 1/4. In other words, the damping ratio between these consecutive peaks must be 25%. It is a compromise criterion between stability in the controller’s response and the speed or rapidity with which the manipulated variable returns to a stable value: - Proportions percentage higher than 25% gives greater stability, but they lengthen the time required for attaining stationary state. Proportions percentage lower than 25% may reduce the time it takes to reach stationary state, but they cause instability in the system. B) Criterion of minimum amplitude The control system is to keep the amplitude of the deviation to a minimum. It is used in processes in which the equipment may be damaged by sudden large-scale deviations. For example, in reactions with thermal self-ignition, equipment featuring rupture discs, etc. C) Criterion of minimum disturbance The control system is to provide a non-cyclic recovery curve, precisely to ensure that the cyclic variants do not disturb or influence other system processes. This situation is forthcoming in concatenated processes, in which the oscillations in one subsystem are the result of oscillations in others. In a case like this, the decision must be taken to overdamp the control systems or perform the start-ups as per manual procedures. 4.2.3. CONTROLLERS TUNING The values of the proportional band (inverse to the gain), integral action time (seconds / repetition) and derivative action time (seconds of advance) need to be conveniently dovetailed with all the other elements in the control loop so that, in the event of a disturbance in the system, the latter’s response fulfils the control stability criterion. The adjustment systems are classified into two categories: - Experimental methods: applied when the process model is unknown. They determine the process’s static and dynamic characteristics on the basis of one of several measurements obtained from the real process. The two most frequently used for closed control loops are: the trial and error method (test-error-test) and the ultimate gain method, developed by Ziegler & Nichols. 23 MICROACTIVITY – REFERENCE - User Manual Analytical methods: applied when the process model or the equation relative to the system’s dynamics are known. They are difficult to apply in pilot plant control systems, given the absence of reliable processes data, and they are only applied when sufficient information is available for the perfect identification of the process model (transfer function), usually in industrial environments. It is worth noting here that the procedures referred to as auto-tuning are based on empiric experiences and results obtained in industrial environments, which have nothing to do with the processes taking place in a laboratory pilot plant. 4.2.3.1. Ziegler & Nichols method It is the most widespread experimental method for tuning the regulation parameters of a PID controller, although it is not recommended when the tuning is carried out mainly with a view to stable transition between different process states (variations in reaction temperature for the screening of catalyst activity at different temperatures) instead of seeking the long-term stability of the same. The method allows for calculating the three values of the PID actions on the basis of the data obtained in a quick test of the characteristics of the closed control loop. In short, it consists in gradually narrowing the proportional band from an initial value (e.g. 15 %) with I=0 and D=0 whilst small disturbances are created, until the process begins to oscillate continuously. This value of P receives the name of "ultimate proportional band" or "critical proportional band", Pc. Measurement is now made of the period of these oscillations (Tc, in seconds), that is, the time that elapses between two consecutive oscillations when the system is at its critical proportional band. The controller parameters that will produce a response with the 25% damping ratio are calculated as per: Proportional band (%)= 1.5 ⋅ Pc Integral action (s)=0.5 ⋅Tc Derivative action (s)= 0.1 ⋅ Tc The optimum selection of the controller parameters is always a compromise solution and one that depends on the skill of the operator. Thus, for a process in which there is a considerable transport delay, it will be advisable to use high values of the proportional band. On the other hand, high values of P imply considerable sluggishness in the system’s response to external disturbances or those of the system itself. Typical values in semi-industrial processes for the P, I and D control parameters are: Fast systems (pressure, flow): P = 0 – 25% I = 1 – 120 s D = 0 – 10 s Slow systems (temperature): P = 0 – 50% I = 60 – 600 s D = 2 – 60 s 4.2.3.2. Method of trial and error This is carried out with the controller and the process operating in standard mode. The general procedure basically involves starting up the process and performing repetitive tests on each control action (beginning with the proportional band), introducing disturbances by changing 24 MICROACTIVITY – REFERENCE User Manual the set-point and returning to its initial value. The adjustment is gradually fine-tuned by observing the control output signal and its response to the disturbance created (not too severe, so as to avoid damage in the process). Begin by observing the system’s behaviour in on-off status. A proportional action is then generated whereby the oscillations are suitably attenuated. Begin with a wide proportional band (small gain), which is then gradually narrowed, in line with the system’s evolution, until the required stability is attained (damping ratio of 25% between two successive waves). Once a suitable value of parameter P has been achieved (compromise between stability and error offset), the elimination of the offset will be achieved by means of the addition of an integral control action, also by trial and error. As integral action compromises control, the proportional band is to be raised slightly (lower gain) and, beginning with a high value for the integral action (in seconds), slowly decrease it, whilst at the same time creating disturbances in the process by means of changes to the set-point. Once the proportional and integral action parameters have been tuned, the derivative action is increased in small jumps, from D=0, whilst at the same time creating disturbances in the process by means of changes to the set-point, until the process obtains its characteristic cyclic behaviour. A suitable value for the derivative action should lead to the stabilisation of the controlled variable a few cycles after a disturbance. 4.2.3.3. Method proposed by PID Eng & Tech Based on the accumulated experience of PID Eng & Tech in the tuning of pilot plant or laboratory processes, where the system gains are high (transport delays are lower than normal in industrial environments) and where the system’s readiness to respond to changes in the set-points is especially prevalent, a new method has been designed for tuning said parameters, based on the experience acquired in the control of processes. It is relatively easy to predict the value of the proportional band that is suitable for a process if one bears in mind the physical interpretation of this concept. If the proportional band located around the set-point is understood to be the area within which the controller goes from providing a control output of 0 to 100%, and if manual manipulation has been made beforehand of the final control element in the process conditions, the operator may know, for example, that in a pressure control system, the valve must remain closed until a pressure of 86 bar is achieved when the aim is to reach 90 bar, and as of that moment, the control action may be performed to regulate the setpoint. This indicates that the proportional band should have a value of 8 bar (4 above and 4 below the set-point). If it is taken into account that the operating interval is 100 bar, this 8 bar proportional band corresponds to a value of P = 8% (% F.S.). If this is the first time this process is initiated, precautions may be taken such as increasing this value with a view to overdamping the system and, in addition, carrying out the system’s first start-up below a hazardous position, remembering that the offset in this system is unknown, and may equally be positive or negative. The application of this procedure to any kind of system may allow for foreseeing the suitable value of P by simply sensing when the controller should begin to change its control outlet so as not to overrun the order. An interesting possibility for advanced operators is to perform this initial trial and error on the value of P with a high value of integral action, which will avoid the offset phenomenon without affecting the stability of the solely proportional action. This high value of integral action should correspond to, for example, 2 or 3 values of the oscillation period, which for rapid systems (pressure, flow, level, etc.) will correspond to 20 - 60 s, and for slow systems (temperature, pH in 25 MICROACTIVITY – REFERENCE User Manual buffered solution, etc.) to 200 - 600 s. It tends to be relatively easy to deduce a system’s period of oscillation by bearing in mind the characteristics of the same. Once the system has been started up with this estimated value of P, in all probability following one or two trial runs around the set-point, the value of Pc is found, whereupon the critical oscillation period will also be known. As has been noted on several occasions, pilot plant operation involves the scanning of different conditions around the operating variables. Given that this is the case, it is bad practice to select a value of P similar to that of Pc, given that a modification in the set-point, or a modification involving another operating variable, may suddenly change the system’s gain and destabilise it (if the value of P remains below the value of Pc). Accordingly, as with what is recommended in other empirical methods, an appropriate value for P in these systems may be: P = 1.6 ⋅ Pc Concerning the appropriate value of I, the procedure in which this control action operates may be understood as follows: the control algorithm assesses the area comprised between the variable’s oscillation curve and the straight line delimited by the set-point. Accordingly, if the time in which the totalling of this area coincides with the period of oscillation, its positive part is cancelled out by the negative and the result, for the action that is superimposed onto the proportional action, is zero. If this operation is performed in a short period of time, the result will not reflect the true situation and the resulting control action will destabilise the control system. On the other hand, if this assessment is performed over the course of two or three cycles, the result will continue to be zero, with the eventuality that too long will have been spent waiting to undertake an action that would have corrected the error earlier, a situation that is clearly never desirable. Therefore, low values of I are damaging and high values of I, albeit not damaging, are not convenient. But if the value of I in these pilot plant systems is adjusted to the period of oscillation, the situation resulting from a significant change in a process variable or set-point in which the system’s gain becomes more pronounced and, therefore, a change occurs in the system’s period of oscillation, could lead to process instability, as the time spent in calculating the area of this new situation has not been sufficient to allow for the compensation of the positive and negative areas of this oscillation. Thus, for this type of systems, it is advisable to select a value for parameter I that is higher than the critical oscillation period (Tc): I = 1.2 ⋅ Tc Concerning the derivative action, and always bearing in mind how problematic its use is for non-advanced operators, the option should be taken not to use it in rapid systems (the gains on pilot systems are very high due to the immediate response to a disturbance, as a result of their low damping capacity). For systems that evolve slowly, and due to their nature of “overtaking” the process’s evolution, relatively narrow values improve systems’ response to overshoot phenomena during start-up procedures. Thus, for systems in which these phenomena are frequently repeated during the operating procedure, desirable values may be: D = 0.07 ⋅ Tc 26 MICROACTIVITY – REFERENCE User Manual Clearly, experience will determine the optimum values for the tuning of a control loop, with these recommendations being nothing more than an approximate departure value. It is important to stress that by making use of these parameters, an advanced operator will be able to “draw” a variable’s approach curve to its situation of stability following a disturbance. 27 MICROACTIVITY – REFERENCE 4.3. User Manual THE LIQUID – GAS SEPARATOR The Microactivity – Reference unit includes a liquid – gas separator of low dead volume consisting of a stainless steel tank on whose walls liquids condense at high pressure and low temperature. Once they have passed through the reactor, the reaction gases are drawn outside through the rear of the hot box, where the separator is located (see Figure 4-6) and where liquid condensation takes place. Upon leaving the separator, the gases are again introduced into the hot box, flowing to the pressure control system (provided that the unit has this set-up option). Figure 4-6 The separator consists of a solid piece of 316 stainless steel in which a perforation of 65 mm in depth and 8.5 mm in diameter has been drilled, as well as other machining corresponding to the system’s inlet and outlet, and which acts as a condenser by means of a Peltier cell. A Peltier cell consists of two facing ceramic panels between which there are hundreds of thermoelectric couples. Just as a thermoelectric couple generates a difference of potential when its connections register different temperatures (Siebeck effect), when a difference of potential is applied to the thermoelectric couple, a difference of temperature is generated between the connections (Peltier effect). The application of a 15 VDC difference of potential and a 3 A current in the Peltier cell generates a temperature difference between the panels of approximately 30ºC. If a forced convection heat sink is used to bring the temperature of the hot panel to 25ºC, then, and to uphold this temperature difference of 30ºC, the temperature of the cold panel must fall below –5ºC, and when placed in contact with a metallic block, temperatures of around 0ºC will be achieved in that block. The cooling of said container may be activated in two ways: - Via the main screen of the touch screen (see section 4.5.1 of this manual). Via the process@ control software (see section 5.5.3 of this manual). Regarding equipment that is not fitted with a level control in the separator, the removal of the condensed liquid is to be performed manually. 28 MICR ROACTIVITY – REFERENC CE 4.4. User Man nual THE PRE ESSURE SENSOR (FOR R EQUIPMEN NT AT ATMO OSPHERIC P PRESSURE) T This device is only ava ailable in those pieces of equipme ent that operate at atmo ospheric presssure, which do not inclu ude the pressure control option in th he reactor (cchapter 4.6.2 2 in this manu ual). Its purpo ose is to register the presssure drop in nside the rea actor. APPE EARANCE OF O THE DEV VICE - 1): Displa ay. It shows the value off the pressure measurem ment, adjustme ents, error messages and d the keypad blocking sta atus. 2): Indica ator that ligh hts up when the operatio on of comparrative action of output 1 hass been activa ated. 3): Indica ator that ligh hts up when the operatio on of comparrative action of output 2 hass been activa ated. 4): Increa ase button. 5): Decre ease button. 6): Key fo or selection of o operating mode. Figure 4-7 4 SPEC CIFICATION NS OF MODE EL DP2-21 - Range of o read-out: 0 – 100 kPa (0 – 1 ba ar). The app plication of p pressures ab bove the maximum m read-out pressure could damage th he device. Maximum m pressure admissible: a 490 kPa (4.9 bar). Units of measuremen nt: bar (by default in the Microactivityy-Reference unit, althoug gh these may be modified m by the t user). Fluids ap pplicable: No on-corrosive. Responsse time: ≤ 2 ms. m HOD OF OP PERATION METH O Once the Miicroactivity-R Reference un nit has been switched on n, the pressu ure sensor will w at all timess display the pressure dro op in the sysstem. SYST TEM ALARM MS B pressing twice the “M By Mode” button, the device’’s screen dissplays the up pper pressure e limit. If this iss exceeded,, the system m’s pressure alarm is trig ggered. The actions to b be performed d by the syste em in the eve ent of such an a alarm are as defined by b the user on o the presssure alarm sc creen on the Microactivity-R M Reference’s touch screen n (see sectio on 4.5.2 of th his manual). B pressing once the “M By Mode” button n, the device e’s screen dissplays the pressure valu ue below which h the system m’s pressure alarm will be e shut off, on nce the situa ation that triggered the alarm has been resolved. 29 MICR ROACTIVITY – REFERENC CE User Man nual OR MESSAG GES ERRO ssage Mes Cause Cu urrent surge due to a sho ort circuit. Correctiv ve action Re eboot the de evice. ed to the device Prressure is being applie du uring the adju ustment of th he zero-settin ng. arry out the adjustment of the zeroCa se etting at atmo ospheric pres ssure. he pressure applied a exce eeds the upp per limit Th of the pressure e range that can be show wn. he pressure applied exce eeds the low wer limit Th of the pressure e range that can be show wn. he pressure applied mus st be within Th the range that can be shown on the sccreen. Table 4-4 4 F more in For nformation on the differe ent operating g modes, ass well as th he different possible config gurations forr the device, consult the manual m for th he series DP P2 pressure ssensor. 30 MICROACTIVITY – REFERENCE 4.5. User Manual THE TOUCH SCREEN The Microactivity-Reference unit has a touch screen, which allows for adjusting the various process parameters, it displays the following: o A main screen, which shows a P&I diagram of the process o Different set-up screens, which are accessed from the main menu. 4.5.1 MAIN-SCREEN FUNCTIONS The main screen presents the process flow, and has the appearance shown in Figure 4-8. Pressing on the different icons and buttons grants access to the different functions: 2 1 3 4 5 6 7 8 9 10 Figure 4-8 The buttons can be in two different states: o o Green background: Activated Grey background: Deactivated 1. Control of gas inlet streams: The screen depicts each one of the mass flow controllers integrated within the system, showing: o Set-point (yellow background): set by the user. Pressing on the value calls up a numerical keyboard for entering the desired set-point, which is stored in the system by pressing the “Enter” key. o Current process value (on the lower part): This cannot be modified by the user. 2. HEAT: Heating of the system’s gas outlet line. It is possible to incorporate a thermocouple in this line (opt.), checking the line temperature on the touch screen, over the button. If the unit does not incorporate this option, this temperature reading appears as a line of points. The configuration of this control loop can be set in the screen “MISC SETUP” in the main menu of the touch screen. 31 MICROACTIVITY – REFERENCE User Manual 3. Read-out of the gas flow at the reactor outlet, provided by a mass flow meter (MFM) situated on the gas outlet line (if this set-up option has been installed). This value can not be modified manually by the user. 4. S1: Additional control options for special configurations of the unit. 5. S2: Actuator for an additional loop control (opt). Both sensor and final control element (heaters) have to be connected to the “AUX 2” connector of the unit. Its P-I-D´s parameters and mode control (auto or manual) can be set in the “MISC SETUP” screen. If the unit incorporates the thermocouple for this option, the temperature loop control is shown over the “S2” button. 6. S3: Additional control options for special configurations of the unit. 7. PELTIER: Cooling / heating of the liquid-gas separator. The peltier configuration can be done in the “PELTIER CONTROL” menu of the touch screen, where the user selects the action (cooling / heating) and the desired output control for regulating the separator temperature. If this function is deactivated, the separator will be at ambient temperature. A display on the upper part of the tank shows the read-out for the liquid level in the liquid – gas separator, expressed as a percentage of the total volume of the tank (if the level sensor has been installed in the equipment). This value cannot be modified manually by the user. 8. ALARM: Consultation and deactivation of the system’s alarm. When an alarm is triggered in the system, the icon “Alarm” will begin to flash, accompanied by a buzzer. By pressing on this icon, the alarm panel will be displayed (see Figure 4-9) where the cause of the alarm may be consulted (the icon that is flashing) and deactivated: o o RESET BUZZER button, for deactivating the buzzer. RESET ALARM button, for deactivating the alarm, provided that the situation of risk that triggered the alarm has been corrected in the system. Figure 4-9 o Temperature Reactor: The reactor temperature exceeds the maximum limit specified in its controller. 32 MICROACTIVITY – REFERENCE User Manual Temperature Hot Box: The hot box temperature exceeds the maximum limit specified in its controller. By default, this limit is set at 40ºC, when this temperature is exceeded the forced convection is activated in the hot box. Accordingly, this alarm will normally be triggered, although this does not mean that the system is operating out of control. o Pressure: The pressure in the system exceeds the maximum limit specified in its controller. o Level (only for old Microactivity units): The level in the liquid - gas separator exceeds the maximum limit specified in its controller. o Mass Flows: Alarm for deviation of the flow of any one of the system’s mass flow controllers regarding its set-point (consult the screen Mass Flow Set-up). o Inhibition Session: Whenever an alarm is triggered in the system, an inhibition session will be activated, interrupting the sequence of sessions programmed in the control software and so avoiding situations of risk in the system. o External: External alarm, additional to the reactor. o Open Reactor: Detection of open oven. o Pressure Servo: Alarm in the Digital Servo of the micrometric valve for pressure regulation in the system. o Level Servo: Alarm in the Digital Servo of the micrometric valve for regulating the liquid level in the liquid – gas separator. Press the “Exit” key to return to the main menu. o 9. BYPASS: Operating the reactor’s by-pass valve. Access is provided by means of the “Bypass” key. When this icon is depressed, the valve is in by-pass mode, isolating the reactor. 10. DOOR: Opening / closing of the hot box door. It is operated by pressing the “Door” key. 4.5.2 MAIN MENU Press the “F1” key on the touch menu to access the main menu, from where the following set-up screens can be accessed: Figure 4-10 MASS FLOW SETUP: Set-up menu for the mass flow controllers (MFC). The following is displayed for each one of the system’s MFC’s: 33 MICROACTIVITY – REFERENCE o o o o User Manual Maximum flow: These values are determined in accordance with the number of controllers of the equipment. Units in which the gas flow is expressed. Name of the gas. % of alarm: Deviation alarm. This alarm is inhibited during the time specified in the Delay Time Alarm (in sec.), being triggered if the specified deviation persists during this time with respect to the set value All these parameters may be modified by the user by pressing on their corresponding yellow boxes and entering the new values by means of the keys that are displayed on screen. Before beginning to work with the equipment, it is important to ensure that each reactant gas MFC installed has been properly set up, and that all the other MFC’s not installed have their fields set to zero. If the unit incorporates a mass flow meter (MFM), the user has to set its maximum flow in this screen, in ml/min. If the unit does not incorporate this option, this field must be set to 0 ml/min. Figure 4-11 Press the “Exit” key to return to the main menu. ALARMS SETUP: This screen allows the user to select the actions the system is to carry out in case an alarm goes off. The alarms that can be configured are four: temperature, pressure, level and external alarm. 34 MICROACTIVITY – REFERENCE User Manual Figure 4-12 ⇒ TEMPERATURE ALARMS: Set-up menu for the temperature alarm. This screen allows the user to select the actions the system is to carry out in the event of a temperature alarm. Pressing on the keys selects one of the following options for each: o o OFF: Gases that will be shut down during the alarm (fuels, inflammables, reactants, etc.). FREE: Gases that will maintain the same status they had prior to the alarm (Inerts, for diluting the concentration of reactants inside the reactor). Press the “Exit” key to return to the main menu. Figure 4-13 ⇒ PRESSURE ALARMS: Set-up menu for the pressure alarm. 35 MICROACTIVITY – REFERENCE User Manual Figure 4-14 As in the previous menu, this screen allows the user to select the actions the system is to carry out in the event of a pressure alarm. In this case, it is advisable to close off all gas and liquid inlets to the system in order to reduce the pressure within it (set them to OFF). This alarm will remain locked and has to be reset manually on the alarm panel pressing the key “Reset Alarm”. Press the “Exit” key to return to the main menu. ⇒ LEVEL ALARM (only for old Microactivity units): Set-up menu for the level alarm. In this screen, the user can configure the unit in order to stop the liquids and the gasses when the alarm in the liquid/gas separator goes off. Figure 4-15 36 MICROACTIVITY – REFERENCE User Manual ⇒ EXTERNAL ALARM: Set-up menu for external alarm. In this screen, the user can configure the unit in order to stop the liquids and the gasses when the alarm in the liquid/gas separator goes off. Figure 4-16 LEVEL SETUP (only for old Microactivity units): Set-up screen for the level sensor (for equipment with this option).The description of this screen and the procedure for making the level sensor calibration is described in the section 4.6.3.3 of this manual. Figure 4-17 Press the “Exit” key to return to the main menu. MISCELLANEOUS SETUP: For setting up the following parameters: 37 MICROACTIVITY – REFERENCE User Manual Figure 4-18 HEATER: Heating of the system’s gas outlet line. The heater control can be set as: o “Heater Manual”: By default. In this mode, the user can set the control output (%) of the heater in the “Output (manual)” field: 0%: No heating 100%: Maximum power of heating. In this mode, the controller ignores the P-I parameters and the set point fixed by the user. o “Heater Auto”: For using this mode of control, the unit has to incorporate a thermocouple in the system’s gas outlet line. Working with this mode, the user can set the desired set point and the P-I parameters for the loop control (The controller adjusts the control output). CAUTION: If the unit does not incorporate this thermocouple, the selection of “Auto” mode of control inhibits the line heating (even when the button “HEAT” is activated in the main screen). AUX2: Auxiliary control loop for temperature control (opt). If the unit includes this option, the heater must be plugged to the “AUX2” connector on the rear panel of the unit. The operation with this device is the same as it has been described in the previous section “HEATER”. Press the “Exit” key to return to the main menu. COMMUNICATIONS SETUP: Set-up parameters for the communications via Ethernet between the devices. By default, the unit is configured with the appropriate parameters to connect it directly with the control PC with a crossed serial cable: IP ADDRESS: 192.168.0.5 IP MASK: 255.255.255.0 GATEWAY: 192.168.0.1 TCP PORT: 1234 38 MICROACTIVITY – REFERENCE User Manual Figure 4-19 Press the “Exit” key to return to the main menu. PELTIER CONTROL: Selection of the Peltier mode: o o - COOL: For reducing the L/G separator temperature (Minimum: about -1ºC) HEAT: For increasing the L/G separator temperature (Maximum about 60ºC). This mode is the recommended for working with high viscosity hydrocarbons, in order to avoid plugs in the liquid lines. Peltier Control (%): This parameter is directly proportional to the cooling / heating power supplied to the L/G separator (values between 0 and 100 %) Duty time (s): Time of the cooling / heating cycle (typically 10 seconds). Figure 4-20 ADMIN SETUP: Screen for the system configuration by a PID Eng & Tech administrator. The password is not available for the user of the unit. 39 MICROACTIVITY – REFERENCE User Manual Figure 4-21 ABOUT PID: Product information Figure 4-22 This screen provides information regarding the company PID Eng&Tech as well as the software versions installed in the unit: o o o o Pod Ver.: Software for the touch screen Hardware Ver.: Software for the control panel Micro3 Ver.: Control software Adkserv Ver.: Embedded software Press the “Exit” key to return to the main menu. 40 MICROACTIVITY – REFERENCE 4.5.3 - User Manual OTHER FUNCTIONS Adjustment of contrast of the touch screen: This function is accessed by means of the “System” key on the touch screen, and may be increased or decreased using the “F3” and “F4” keys. 41 MICROACTIVITY – REFERENCE User Manual 4.6. SPECIAL CONFIGURATIONS OF THE MICROACTIVITY-REFERENCE 4.6.1 THE GILSON 307 HPLC PUMP The Microactivity-Reference reactor provides the option of working with liquids introduced into the system. When this option is required, the system is fitted with a HPLC positive alternative displacement pump made by the firm GILSON. 4.6.1.1 Front view 1 – Digital screen 2 – Numerical keypad 3 – Pump head 4 – Pump head fastener 5 – Inlet to pump head 6 – Outlet from pump head 7 – Connections to manometer module 8 – Side attachment 9 – Side screws Figure 4-23 4.6.1.2 Keyboard 1 – Power indicator 2 - Screen 3 – Function keys: Their function is displayed on the screen and changes according to the menu. 4 - PRIME: The pump runs with maximum flow until STOP is pressed. 5 - HELP: Displays messages and instructions related to the system, with no effect on pump operation. 6 - CANCEL: Clears the last entry without storing it in the memory. 7 - ENTER: Confirmation key 8 – Numerical keypad. Figure 4-24 42 MICROACTIVITY – REFERENCE User Manual 4.6.1.3 Technical Specifications 4.6.1.4 Switching on the pump Before operating the liquid pump, the electrical and mechanical installation of the system needs to be performed, at this point it is advisable to consult the pump’s user handbook. When the pump is switched on (the switch is to be found on the rear), the screen displays a message indicating the model of the pump as well as the version of the control software, as shown below. Following this message, the pump’s main operating screen is displayed. 4.6.1.5 Setting up the pump Once the electrical installation is completed (as described in the chapter 3.2.3 of this manual), it is necessary to configure the pump (if the MA-Ref reactor includes the pump, it is already configured at PID Eng & Tech laboratories, so it is not necessary for the customer to do it again): Setup pump hardware (PUMP): Press “Menu” and “Pump”. The sequence of parameters is: 43 MICROACTIVITY – REFERENCE • User Manual Refill time: It is the time required for the piston return stroke. Normally it is set at the lowest value (125 ms). If cavitation from degassing occurs, then a higher value must be used. The minimum value is 125 ms and the maximum value is 1000 ms. The maximum flow rate depends on the refill time. If the refill time is too long, a message “Invalid settings” flashes when you run the program. The refill time or flow rate must be lowered. • Pump Compressibility: This data is used to calculate the flow rate compensation for the compressibility of the solvent. The minimum value is 0 and the maximum is 2000 Mbar-1. The default value is 46 (compressibility value for the water). Compressibility values for the common solvents at atmospheric pressure are listed: Solvent Carbon Dioxide Water Methanol Acetonitrile Xo (Mbar-1) 1150 46 123 99 • Pump Head Size: This parameter is the size of the pump head. Possible values are 5, 10, 25, 50, 100 and 200. It is possible to use any head size with the Gilson 307 pump. However, to ensure accuracy, reproducibility and efficient pulse dampening, the flow rate should not exceed 5 ml/min. • Inlet pressure: This is the pressure at the inlet of the pump head. This allows the accurate pumping of liquefied gas. It must be set to the same as the pressure of the aspirated liquid, that is the saturating vapour pressure at the ambient temperature for the liquefied gas delivered from a pressurized cylinder. When using carbon dioxide at a temperature of 22ºC, the value of the inlet pressure should be defined as 6 MPa. A table of inlet pressures is shown below: Ambient temperature (ºC) Pressure Po (Mpa) 15 5.1 20 5.8 22 6.0 25 6.5 30 7.2 31 7.4 (Tc) (Pc) The default value is 0 Mpa. - Input / Output parameter setup (I/O): Press “Menu” and “I/O”. The sequence of parameters is: • High pressure limit: If the pressure reading from the manometric module rises above this limit, the pump will stop. The sequence following a high pressure error is described later in this chapter. The pressure can be displayed in three different units, bar, MPa or kpsi. Change the units by pressing the soft key below the units display, bar, MPa or kpsi. The maximum value is 600 bars. The default value is 600. • Low pressure limit: If the pressure reading from the manometric module drops below this limit, the pump will stop. The minimum value is 0. Default value is 0. • Alarm: The alarm is a buzzer which sounds every time there is an error or an invalid setting. It can be programmed to be either On or Off. This function only controls the operation of the buzzer, it does not affect the operation of the pump when there is an error. If the alarm is On, the warning buzzer will sound every time there is an error. An error can be a pressure limit, or an invalid setting. This parameter can be changed from On to Off and vice versa by pressing the soft key Change. 44 MICROACTIVITY – REFERENCE User Manual • GSIOC Unit identification number: A Gilson system can be controlled from a computer using a GSIOC interface and GSIOC cables. Each instrument in a system must have a unique identification number to distinguish it from other equipment connected to the GSIOC communications channel. The GSIOC identification number in the 307 can be set between 0 and 63. The default value is 1. • Output XX is open/Closed: There are four relay outputs in the 307 pump numbered 1, 2, 3 and 4. These outputs are used to control other instruments. They can be programmed to open and close during a method run. They can also be opened and closed manually. The default state is open. • Zero pressure reading: The Zero soft key is used to set the pressure reading to zero when there is zero pressure in the system. This ensures accurate pressure readings when the pump is running. Before pressing Zero, make sure that the pump has stopped and the pressure has dropped to zero, otherwise further pressure indications will be incorrect. If the operation is successful, the message ‘Pressure reading is zero‘ is displayed. If the operation is not successful due to pressure in the system, the message ‘Not done, check pressure‘ is displayed. 4.6.1.6 Venting the pump The system needs to be vented before the liquids pump is operated. This involves filling the inlet tank with the liquid that is going to be used and following these steps: - - Remove the threaded plug back pressure (Figure 4-25) and press the “Prime” key. The pump will start pumping liquid at its maximum capacity (5 ml/min) until the liquid drops in continuous mode that means all the bubbles has been removed. Press “Stop” key to finish venting the pump and connect the threaded plug back pressure. Putting the 3-port valve in the position “a”(Figure 4-25) then press the “Prime” key. The liquid will drops in continuous mode and the pressure value at pump´s screen will be around 30 bar. Press the “Stop” function key to finish venting the pump and set the valve to its normal operating position (Figure 4-25, position “b”). Figure 4-25 45 MICROACTIVITY – REFERENCE User Manual 4.6.1.7 Pump operation After entering the data about the pumping system, the pump is ready to run. The 307 pump can operate in 3 different modes. These modes are: - Flow: The 307 pump provides a constant flow rate. The pump starts when the “Run” key is pressed and stops when the “Stop” key is pressed. - Dispense: The 307 dispenses a specified volume. The pump starts when the “Start” key is pressed and stops when the specified volume has been dispensed. - Program: The 307 controls a complete system. In this mode, the 307 pump can create gradients of flow rate, open and close outputs to control other instruments and wait for signals from other instruments. By default, the pump is programmed to operate in Flow mode, meaning that it will always provide a constant flow, determined beforehand by the user. This means that operating the pump is perfectly straightforward: 1- Enter the desired flow in ml/min using the numerical keypad and press “Enter”. Any flowrate may be set that ranges between 0.01% and 100% of the size of the pump head (5SC head = 5 ml/min). If the flow introduced exceeds this value, the message “Invalid settings” is displayed on the screen after pressing “Run”. In such a case, the value has to be modified. During pump operation, the flow may be modified as often as required without having to stop it. 2- Press “Run” to start up the pump. 3- Press “Stop” to stop the pump. This is the normal operating mode. For further information regarding all the other operating modes, as well as the different set-up options for the pump and troubleshooting, consult the Gilson 307 pump’s handbook. Attention!! It should be noted that the system is usually controlled by the Process@ acquisition software. Therefore, the pump operates on a remote basis by means of digital communications. Control of the pump ceases to be manual, as described above, and all modifications in its operating mode are to be made through the control PC. If it is required to use the pump’s keyboard and functions, it will be necessary to reboot the pump. When the pump is to operate at atmospheric pressure (outlet pressure = atm.), it is necessary to install at the liquid outlet a Back Pressure Regulator, that generates an outlet pressure of 34- 35 bar. 46 MICROACTIVITY – REFERENCE 4.6.2 User Manual PRESSURE CONTROL 4.6.2.1 Introduction to pressure control systems in microactivity reactors The use of a reactor, such as the Microactivity-Reference, for catalytic microactivity studies involves the use of extremely low flow streams and usually high pressures. This implies extremely low values for the flow or stream coefficient (Cv) that characterises the regulating valve, of around 10-7 to 10-4 (with this coefficient being defined as the flow of water in US gallons per minute that passes through a valve in a fully open position and with a loss of load of 1 psi). To ensure high accuracy in the pressure control of the system in the Microactivity-Reference unit, as well as a non-pulsatile gas flow inside the reactor, there exists several different alternatives that are used commercially in systems such as the following: - Tescom type backpressure: Control is only proportional, which means it is affected by an offset error. These systems are not suitable for microflow systems and they present high dead volumes. They generate a pulsatile gas-flow through the reactor. - Electronic back-pressure, with MFC type valve: Despite providing an extraordinarily stable gas-flow in the system’s pressure control, its main drawback appears when the system contains products in the vapour phase in the shape of microdroplets that may accumulate on the control valve’s orifice. These systems can not be heated, given their electronic nature. - Control loop with control valve: The problem of control in previous systems was resolved by configuring a control loop for pressure, whereby the signal from a pressure transmitter is received by a PID controller that produces a control signal that is relayed to a control valve that acts upon the system’s output current, modulating the circulation flow and thus regulating the pressure. The problem posed by this control system is the availability of commercial microvalves that are suitable for microflow systems, basically consisting of a cylindrical orifice through which a round rod is inserted whose purpose is to vary the fluid’s length of passage through the microvalve. These systems feature very low rangeability, of around 10 (difference of flow that passes through the valve between the minimum and maximum aperture for a specific pressure), whereby they are not suitable for a system such as the Microactivity-Reference, in which widely differing operating conditions are to be studied and whose regulating valve should have rangeabilities of around 160. 4.6.2.2 The micrometric regulating valve The Microactivity-Reference includes a micrometric regulating valve for pressure control in the reactor (as well as for level control in the liquid–gas separator in those systems that include this option) of very high rangeability, consisting of a needle whose displacement creates an increasingly tighter fit within an orifice, generating a variable section passage that depends on the distance the needle has been moved (Figure 4-26). 47 MICROACTIVITY – REFERENCE User Manual Plug Rod Figure 4-26 This kind of valve furthermore improves rangeability, control precision, as displacement is not performed linearly, but rather by means of the turning action of the rod caused by a micrometric screw. If the shaft of the screw allows for 10 turns from the fully open position through to the fully closed position and each turn is a full 360º, fitted with an actuation system which has been designed for this unit and which distinguishes the position with an accuracy of 1 degree of circumference, there is a total of 3600 possible states for the relative orifice/needle position, which means a precision for the system’s pressure control of ± 0.1 bar without permitting sudden variations in the gas-flow at the reactor outlet of more than 5% of the total flow passing through the reactor bed. In a study carried out with 8 commercial micrometric regulating valves, the one providing the best results in the Microactivity-Reference reactor operating with flows below 50 ml/min and pressures higher than 50 bar is one made by Hoke, model 1315G2Y, which has the following specifications: - - Maximum operating pressure: 345 bar at 21ºC. Range of operating temperatures: from –54ºC to 232ºC (it may be found fitted inside the hot box, so avoiding the formation of condensates in the orifice). Dyna-Pak gasket, which ensures the tight sealing of the rod without excessive compression of the same. Construction material: 316 Stainless steel. Dead volume: ≤ 0.2 ml. Connections 1/8”. Original orifice: Replaceable, in 316 stainless steel. The need to operate in the proximity of the close contact between the orifice and the needle inevitably leads to wear on the needle caused by rubbing. Consequently, the disc containing the orifice on these valves (5 mm diameter, 1.8 mm thickness and orifice 1.19 mm) has been replaced by a replica made of PEEK (polyetheretherketone), a chemically inert material that has an excellent mechanical performance, withstanding high operating temperatures and featuring self-lubricating properties with great hardness and resistance to distortion properties. The disc may be replaced as often as necessary if it has been distorted by continuous use of the valve. The manufacturer’s original CV curve may be seen in Figure 4-27. Modification of the orifice on the valve and its replacement with another made of PEEK alters its CV curve near to the closed position. Experimentally, an excellent regulating performance is achieved in CV scenarios of 10-5, that is, the modified valve accurately regulates flows of even 40 or 20 ml/min with pressures of 60 to 90 bar. 48 MICR ROACTIVITY – REFERENC CE User Man nual Figure 4-2 27 T The system that has be een designe ed for operating the valvve consists of a high-re esolution micro ostep motor. These moto ors consist of o electroma agnets that are a connecte ed and disco onnected altern nately so tha at a rotor (pe ermanent ma agnet) moves s in small stteps in the re equired direc ction. By multip plying the nu umber of coils on the mo otor or creating complex systems forr the switchin ng of the coils regulated byy a microprocessor, use can be made with stepp ping motors o of 200 steps per turn in sett-ups with 51,200 steps in n one rotatio on. T motor’s shaft is coup The pled to the micrometric m valve v and to a potentiometer, allowing for the positiion of the valve with 1d degree resollution to be read at anyy given mom ment. The position’s p contrrol system operates on a digital bassis by succes ssive approxximation, com mparing the present positiion (relayed by the potentiometer) to that specified by the e demand, tthen calcula ating the numb ber of positio ons that rem main to be advanced a an nd all within an infinite loop that co onstantly corre ects the moto or’s position with the syystem’s extre emely rapid response time. To imprrove the poten ntiometer’s re eading of the position, a current gen nerator and an instrumentation ampllifier has been used, elimin nating errors and noise sttemming from m the cabling g. T The pressurre control va alve is locate ed downstream of the re eactor, once e the reactio on gases have passed thro ough the sepa arator / cond denser. T following The g are the cha aracteristics of the pressu ure control system: - Range off operating pressures: p atmospheric – 100 bar. Control accuracy: a ± 0.1 0 bar. Variation ns in gas-flow w at the reacttor outlet ≤ 5%. 5 Maximum m heating te emperature of o the valve: 200ºC (the valve is insside the hot box: see Figure 2--4). P Pressure con ntrol is carrie ed out by me eans of the TOHO T TTM-0 005 controlle er that is to be b found on th he front of th he reactor (ssee Figure 2-3), and its operation is described in section 4.2 2 of this manu ual. 49 MICROACTIVITY – REFERENCE User Manual 4.6.2.3 Configuration of the Servo Digital V4.0 unit (microstep positioner) The Servo Digital V4.0 microstep positioner that is a part of the pressure and level control systems on the Microactivity-Reference units is factory set with the optimum parameters for the equipment correct operation, which means that the end user should not need to configure this unit. In case that the customer needs to modify these parameters, here we include a detailed description of the printed circuit in the microstep servo digital unit. Access to it involves unscrewing the metal plate on the right-hand side of the reactor, as shown in Figure 4-28: OPEN CLOSE S6: ADDRESS J6: ANALOG INPUTS S1: ZERO J4: ZERO SENSOR (POTENCIOMETER) LED'S J7: RS-485 S2,S3,S4: ANALOG INPUTS CONFIGURATION J3: MOTOR S7: TERMINAL RESISTOR J2: 15VDC AUX J1: 15 VDC INPUT R17: MOTOR CURRENT LIMIT COMMON N.O. N.C. TURNS SETTING ALARM RELAY Servo Digital V4.0 unit for the positioning of the micrometric valve for pressure regulation. In those units that include the level control system for liquids in the condenser, their corresponding Servo Digital unit is to be found to the right of this system. Figure 4-28 • Zero calibration (S1): The valve’s “zero” setting, or the point at which it is fully closed, is factory set, but frequent and constant use of the equipment may alter that point as a result of minor distortion of the PEEK disc that contains the valve orifice. This effect is verified as follows: - Set the pressure and level controllers to manual mode and fully close the valve (0%). Bring the system up to operating pressure. Submerge the system’s gas outlet into a water-filled container and check that there is no bubbling. If gas is observed to be escaping, the values of the valve’s zero point will have to be lowered (more closed). 50 MICROACTIVITY – REFERENCE User Manual To adjust the valve’s zero-setting, set switch “Z” on the dip-switch to “On”. (S1: zero, see Figure 4-29). The motor is now free for manual positioning (by means of the corresponding TOHO controller in manual mode, acting on the % of control output) or by pressing the microswitches “Open” or “Close” the valve’s new zero-setting (point at which the system’s gas outlet ceases to bubble). If the buttons “Open” or “Close” are pressed, the motor moves the shaft in 5º jumps. Once this has been performed, return the “Z” switch to the “Off” position. The new zero-setting will be saved in the memory. S8: Nº turns selector 2. “Z” switch: Valve zero point 1. “P” switch: Potentiometer zero point Micro-switch: “Close” Micro-switch: “Open” Figure 4-29 To return to the initial default zero-setting (2nd turn of the potentiometer) turn switch “P” on the dip-switch S1 to ”On” and then to “Off”. The new zero will be set on the 2nd turn of the potentiometer. - Turn off the unit Turn on the unit again Once the previous step has been completed, open the valve 5% and check that the there are bubbles at the gas outlet. If there are not, the values for the valve’s zero setting will have to be raised (more open). To set the zero point for the liquid valve, the user has to follow the same procedure as the described before. 51 MICROACTIVITY – REFERENCE • User Manual Selecting the number of turns (S8): This parameter represents the number of turns that the valve will perform from 0% to 100 % of the control output (from “fully closed” to “fully opened”). By default, the pressure and level control valves on the Microactivity-Reference are set with the number of turns that ensures optimum performance under the unit’s normal operating conditions. However, if the user changes the operating conditions (modifying the total gas flow), it would be necessary to change the maximum number of turns: - If the gas flow increases, and the valve has to open up to 70-75 % for controlling the desired pressure, it would be advisable to increase the number of turns. - If the gas flow decreases and the valve opens just 5-15 % for controlling the desired pressure, it would be advisable to decrease the number of turns. It is recommended that the valve opens from between 20 to 65 % for controlling the desired pressure. For changing the number of turns, proceed as following: - Locate dip-switch S8 of the driver (see Figure 4-29) - Check that the switch 4 on dip-switch S8 is in the “Off” position (see Figure 4-29) - The number of turns is determined with switches 1, 2 on 3 on dip-switch S8: ON OFF No. OF TURNS 1 2 3 4 5 6 7 8 1 2 3 4 SWITCH POSITION (S8) 1 2 3 off off off on off off off on off on on off off off on on off on off on on on on on - Turn off the unit - With the help of a screwdriver, change the position of the switches 1, 2 and 3, according to the table above. - Turn the unit on again - The valve is now configured with the new number of turns. 52 MICROACTIVITY – REFERENCE 4.6.3 User Manual LEVEL CONTROL IN THE LIQUID – GAS SEPARATOR 4.6.3.1 Introduction to level control in microactivity reactors In those systems in which the aim is to monitor the reaction in real time, continuous collection has to be made of the condenser liquid in the liquid – gas separator for its subsequent analysis. In the reactor operating at atmospheric pressure, the removal of condensed liquids in the separator has to be performed manually by an operator, but this procedure is not possible in equipment that is operating at pressure higher than atmospheric, because the loss of the hydraulic seal on the liquid products at the bottom of the separator would lead to a major leakage of gasses into the atmosphere, and possibly cause an accident. In this case, the liquid-gas separator has to have a control loop at a specific liquid level. A control valve is operated to maintain the liquid level constant, continuously removing each new drop that is formed in the separator. Other commercial systems applied in pilot plant situations base this level reading on systems that record the differential pressure between the ends of the separator. Thus, the pressure at the base of the separator is that corresponding to the pressure in the installation plus the pressure corresponding to the height of the liquid column present in the separator. Yet this technique presents serious problems when it is used in the measurement of a microvolume: the errors inherent to this technique when measuring the level of a tank that collects the condensates in a system that increases at the rate of, for example, 0.05 ml/min, renders this technique unviable for use in a reactor for studying catalytic microactivity. 4.6.3.2 The capacitive level sensor With a view to resolving the problems posed in systems of this kind, a liquid-gas separator has been designed with a capacitive type level sensor with a very low dead volume. With this system, when liquid is present between the isolated probe and the chassis on a metal tank, this liquid behaves as a dielectric, altering the electrical capacity of a condenser system. An RC oscillating circuit, such as the one shown in Figure 4-30, will then provide a frequency signal proportional to the system’s capacity and which is, therefore, proportional to the amount of liquid in the tank. Without considering geometric issues in the design of the tank, this circuit’s output signal will be directly proportional to the height of the liquid in the tank. q Umbr al 1 Umbr al 0 t RC Oscillating Circuit Oscillating Circuit behaviour Figure 4-30 This system’s output signal is also proportional to the dielectric constant of the substance that acts as the dielectric. Accordingly, the greater the difference of dielectric constant between the process liquid and the air (or gas that occupies the space not taken up by the liquid) the greater the output signal the system will generate. The capacitive level sensor used is inserted through the upper part of the liquid – gas separator described in section 4.3 of this manual, and consists of a 3 mm diameter probe that is 53 MICROACTIVITY – REFERENCE User Manual electrically isolated from the rest of the system by means of elastomer-type seals, chemically compatible and withstanding pressures of up to 400 bar. The design of the liquid – gas separator with level sensor incorporated is featured in Figure 431, where the parallelepiped piece may be observed, as well as the electrical insulator and the probe that, electrically insulated in this tank, becomes the condenser’s second plate. The photograph of the assembly (Figure 4-32) provides a detailed view of the piece that constitutes the system’s electrical insulator and other parts, in Teflon, which besides guiding the assembly, serve to eliminate the system’s dead volumes. The separator – level sensor assembly is connected to a micrometric regulating valve that is connected to a microstep motor, like the one used in the system’s pressure control (see section 4.6.2 of this manual), which means that recording the level inside the tank and operating said valve allow for the removal and collection of liquids on an automatic and continuous basis in real time, with a control accuracy of ± 0.01 ml. As in the case of the system’s pressure control system, the Servo Digital V4.0 microstep positioner unit that includes the level control system in the separator on Microactivity-Reference units is factory set with the optimum parameters for the correct operation of the equipment, which means that the end user should not, in principle, configure this unit. However, frequent and continued use of the sensor may in time make it necessary to carry out the zero calibration of the valve or select the number of turns of the same. In these cases, the user is to proceed in the same way as outlined in section 4.6.2.3 of this manual, but acting on the V4.0 servo digital unit corresponding to the level control valve, which is accessed by unscrewing the metal plate on the right-hand side of the reactor. Level control in the separator is carried out by means of the TOHO TTM-005 controller that is located on the front of the reactor (see Figure 2-3), whose operation is described in section 4.2 of this manual. 54 MICROACTIVITY – REFERENCE User Manual Figure 4-31 55 MICROACTIVITY – REFERENCE User Manual Capacitive level sensor C Condenser B Regulating micrometric valve A Condenser & level sensor Figure 4-32 4.7. SPECIAL OPTIONS FOR THE MICROACTIVITY-REFERENCE UNIT Different options can be added to the Microactivity Basic unit depending on the customer process requirements. Any of the options described below can be added to the most common configurations and most of them can be configured simultaneously. 4.7.1. OPTION A - EACH OTHER MASS FLOW CONTROLLERS (UP TO 6) Microactivity Reference basic unit contains 3 Mass Flow Controllers, including valves and installations. Using this option you can add up to 6 Mass Flow Controllers in a wide range of pressure and flows. Figure 4-33 Measuring principle is based on a stainless stell capillary tube with resistance thermometer elements. A part of the gas flows through this bypass sensor, and is warmed up by heater Rh. 56 MICROACTIVITY – REFERENCE User Manual Consequently the measured temperatures T1 and T2 drift apart. The temperature difference is directly proportional to mass flow through sensor. Figure 4-34 57 MICROACTIVITY – REFERENCE User Manual 58 MICROACTIVITY – REFERENCE User Manual Internal seals for mass flow controllers are chosen depending on the used substance. Next list shows recommended seals. Nr. Name Symbol 1 2 3 4 5 6 7 8 9 10 11 12 13 14 15 16 17 18 19 20 21 22 23 24 25 26 27 28 29 30 31 32 33 34 35 36 37 38 39 40 41 42 43 Acetylene (Ethyne) Air Allene (Propadiene) Ammonia Argon Arsine Boron trichloride Boron trifluoride Bromine pentaflurine Butadiene (1,3‐) Butane Butene (1‐) Butene (2‐) (cis) Butene (2‐) (trans) Carbonylfluoride Carbonylsulfide Carbon dioxide Carbon disulfide Carbon monoxide Chlorine Chlorine trifluoride Cyanogen Cyanogen chloride Cyclopropane Deuterium Diborane Dibromo difluromethane Dichlorosilane Dimethylamine Dimethylpropane (2,2‐) Dimethylether Disilane Ethane Ethylene (Ethene) Ethylene oxide Ethylacetylene (1‐Butyne) Ethylchloride Fluorine Freon‐11 Freon‐113 Freon‐1132A Freon‐114 Freon‐115 C2H2 Air C3H4 NH3 Ar AsH3 BCL3 BF3 BrF5 C4H6 C4H10 C4H8 C4H8 C4H8 COF2 COS CO2 CS2 CO CL2 ClF3 C2N2 ClCN C3H6 D2 B2H6 Br2CF2 SiH2Cl2 C2H6NH C5H12 C2H6O Si2H6 C2H6 C2H4 C2H4O C4H6 C2H5Cl F2 CCl3F C2Cl3F3 C2H2F2 C2Cl2F4 C2ClF5 Density (g/l) 0ºC, 1atm 1,172 1,293 1,832 0,7693 1,784 3,524 5,227 3,044 7,803 2,504 2,705 2,581 2,503 2,503 2,983 2,724 1,977 3,397 1,25 3,218 4,125 2,376 2,743 1,919 0,1798 1,248 9,361 4,506 2,011 3,219 2,105 2,857 1,355 1,261 1,965 2,413 2,878 1,696 6,129 8,36 2,887 7,626 7,088 Recommended seals Conversion factor O‐ Plunger Capillary 20ºC, 1atm ring 0,61 E E E 1 V V V 0,43 V V V 0,77 E E E 1,4 V V V 0,66 V P V 0,44 P P P 0,54 P P P 0,26 P P P 0,31 V V V 0,25 V V V 0,29 V V V 0,32 V V V 0,3 V V V 0,54 V P V 0,65 E E E 0,74 V E V 0,6 V V V 1 V V V 0,82 V V V 0,4 P P P 0,48 P P P 0,61 P P P 0,43 N(P) N(P) N(P) 1 V V V 0,43 P P P 0,2 V P V 0,41 V P V 0,37 P P P 0,21 V V V 0,39 P P P 0,31 V P V 0,49 V V V 0,6 V E V 0,52 P P P 0,32 V V V 0,41 V V V 0,91 P P P 0,35 V U V 0,21 N(P) N(U) N(P) 0,44 T T T 0,23 E E E 0,24 E E E 59 MICROACTIVITY – REFERENCE 44 45 46 47 48 49 50 51 52 53 54 55 56 57 58 59 60 61 62 63 64 65 66 67 68 69 70 71 72 73 74 75 76 77 78 79 80 81 82 83 84 85 86 87 88 89 90 91 Freon‐116 C2F6 Freon‐12 C2Cl2F2 Freon‐13 CClF3 Freon‐13B1 CBrF3 Freon‐14 CF4 Freon‐21 CHCl2F Freon‐22 CHClF2 Freon‐23 CHF3 Freon‐C318 C4F8 Germane GeH4 Helium He Helium (3‐) 3He Hydrogen H2 Hydrogen bromide HBr Hydrogen chloride HCl Hydrogen cyanide HCN Hydrogen fluoride HF Hydrogen iodide HI Hydrogen selenide H2Se Hydrogen sulfide H2S Isobutane C4H10 Isobutylene (Isobutene) C4H8 Krypton Kr Methane CH4 Methylacetylene C3H4 Methylbromide CH3Br Methylchloride CH3Cl Methylfluoride CH3F Methylmercaplan CH3SH Molybdenum hexafluoride MoF6 Mono‐ethylamide C2H3NH2 Monomethylamine CH3NH2 Neon Ne Nitric oxide NO Nitrogen N2 Nitrogen dioxide NO2 Nitrogen trifluoride NF3 Nitrous oxide NOCl Nitrosyl chloride N2O Oxygen O2 Oxygen difluoride OF2 Ozone O3 Pentane C5H12 Perchlorylfluoride ClO3F Perfluoropropane C2F8 Performa‐ethylene C2F4 Phosgene COCl2 Phosphine PH3 Phosphorous 92 pentafluoride PF5 93 Propane C3H8 User Manual 6,157 5,543 4,72 6,768 3,946 4,592 3,936 3,156 9,372 3,45 0,1785 0,1346 0,08991 3,646 1,639 1,206 0,8926 5,799 3,663 1,536 2,693 2,6 3,749 0,7175 1,831 4,35 2,301 1,594 2,146 9,366 2,011 1,419 0,9002 1,34 1,25 2,053 3,182 2,984 1,978 1,429 2,417 2,154 3,219 4,653 8,662 4,523 4,413 1,59 0,25 0,37 0,4 0,38 0,44 0,44 0,47 0,52 0,15 0,56 1,41 1,44 1,01 0,98 0,99 0,75 0,96 0,97 0,78 0,82 0,25 0,28 1,43 0,76 0,43 0,61 0,64 0,7 0,53 0,21 0,36 0,52 1,41 0,97 1 0,74 0,5 0,61 0,71 0,98 0,64 0,7 0,21 0,41 0,16 0,33 0,47 0,73 E V V V E N(P) E T E V V V V P V P P P E E V V V V V V V V P P P P V V V P P P V V P V V ‐ N(V) V P V E U V V E N(T) E T E V V V V P H P P P E E V V V V V V V P P P P P V P V P P P V V P V V ‐ N(V) P P P E V V V E N(P) E T E V V V V P V P P P E E V V V V V V V V P P P P V V V P P P V V P V V ‐ N(V) V P V 5,694 2,012 0,3 0,34 P V P V P V 60 MICROACTIVITY – REFERENCE 94 95 96 97 98 99 100 101 102 103 104 105 106 107 Propylene (Propene) Silane Silicon tetrafluoride Sulfurylfluoride Sulfur dioxide Sulfur hexafluoride Sulfur tetrafluoride Trichlorosilane Trimethylamine Tungslen hexafluoride Vinylbromide Vinilchloride Vynilfluoride Xenon User Manual C3H6 SiH4 SiF4 SO2F2 SO2 SF6 SF4 SiHCl3 C3H9N WF6 C2H3Br C2H3Cl C2H3F Xe 1,915 1,443 4,683 4,631 2,922 6,626 4,821 6,044 2,637 13,29 4,772 2,865 2,08 5,899 0,4 0,62 0,37 0,38 0,68 0,27 0,34 0,33 0,28 0,25 0,46 0,47 0,49 1,38 V V ‐ ‐ E E P ‐ P P V V V V V P ‐ ‐ E E P ‐ P P V V V V V V ‐ ‐ E E P ‐ P P V V V V E=EPDM, N=Neoprene, H=Hypalon, T=Teflon, P= PTFE elastomer, V=Viton. Mass flow setup menú is configured pressing F1 key in touch screen. Figure 4-35 61 MICROACTIVITY – REFERENCE MFC configuration 4.7.2. User Manual Figure 4-36 OPTION B - SCALE Scale with digital communications is used for weighing the liquid stream outlet in real time. This option is very interesting to calculate mass balance. Besides, it is easy to detect problems in the reaction system when existing inconsistencies in software graph panel. Figure 4-37 Weight capacity Min. display “d” Repeatibility (Std deviation) Linearity Sensitivity drift No. of samples Min. unit weight Min. % display Min. 100 % weight Display Display update 610g 0.01g 0.01 ± 0.02g ±20 ppm / °C (10°C-30°C / 50°F-86°F) 5, 10, 25, 50 or 100 pieces 0.01 g 0.1 % 1g 7 segment LCD display with backlight (Character height 16 mm) 10 times per second 62 MICROACTIVITY – REFERENCE User Manual 63 MICROACTIVITY – REFERENCE User Manual By means of Process@ software measure of scale can be shown in Process Value Graph Scale graph in Process Value graph (grey color) Figure 4-38 Rezero adjustment is possible in every session simply indicating “1” in the scale gap in session table window Reset scale in session table Figure 4-39 64 MICROACTIVITY – REFERENCE User Manual Figure 4-40 Reset scale is possible in any moment of the session by means of right button of mouse over scale icon. 65 MICROACTIVITY – REFERENCE 4.7.3. User Manual OPTION C - MASS FLOW METER IN GASES OUTLET Gases flow is counted at the exit of gases through the installation of a mass flow meter. A coalescing filter condenses the liquid before passing through the meter. Liquids condensed are removed via the bottom of the filter. Measuring principle is the same as described in option A. When chossing this option it is possible to include a calculating device (TOTALIZER) in monitoring Process@ software. TOTALIZER Figure 4-41 Gas outlet Mass flow meter Coalescing filter Figure 4-42 66 MICROACTIVITY – REFERENCE User Manual As in option B (scale), mass flow meter option makes easier calculating mass balance. Coalescing filter prevent moisture at the mass flow meter inlet. Maximum flow of mass flow meter have to be introduced in mass flow setup menu. Mass flow meter Figure 4-43 MFM value is shown in PVgraph and touch screen as shown below MFM instant read Figure 4-44 67 MICROACTIVITY – REFERENCE User Manual 68 MICROACTIVITY – REFERENCE 4.7.4. User Manual OPTION D - ADDITIONAL 6 PORT VALVE Six port valve Additional six port valve Figure 4-45 One 6 port valve is installed in the Basic Unit. Additional 6 port valve is installed with one of these purposes, chosen by the user: • By-passing the L/G separator: This option can be useful when there is no need to pass the reactor products through the L/G separator. For example, liquids are not pumped to the reactor, only gases. • Selecting the reactor flow (UP/DOWN) Figure 4-46 69 MICROACTIVITY – REFERENCE User Manual 70 MICROACTIVITY – REFERENCE User Manual 71 MICROACTIVITY – REFERENCE User Manual 2nd six port valve activation Figure 4-47 4.7.5. OPTION D1 - 4 PORT MANUAL VALVE 4 port manual valve Figure 4-48 72 MICROACTIVITY – REFERENCE User Manual 4 port valve option is useful to isolate the reactor and prevent contamination inside when necessary to remove the reactor inside the unit. This valve has two positions. One for normal operation and one when removing the reactor 73 MICROACTIVITY – REFERENCE User Manual 74 MICROACTIVITY – REFERENCE 4.7.6. User Manual OPTIONS E TO J – DIFFERENT TYPES, SIZES AND MATERIALS FOR SPARE REACTORS, WITH TERMOCOUPLE AND ACCESSORIES. OPTION E F G H H I I I I J REACTOR Quartz SS316 Hastelloy C No Standard SS316 Reactor 13,1 mm ID No Standard SS316 Reactor 17,5 mm ID No Standard Hastelloy C Reactor 13,1 mm ID No Standard Hastelloy C Reactor 17,5 mm ID No Standard Inconel 625 Reactor 13,1 mm ID No Standard Inconel 625 Reactor 17,5 mm ID Hastelloy X Reactor. 75 MICROACTIVITY – REFERENCE User Manual When choosing a reactor its composition is a critical factor, since the presence of some elements may affect or catalyze reactions. Also, the reaction itself can attack reactor walls due to corrosion phenomena. The working temperature and pressure are also a determinant factor. For this reason, depending on the application and operation conditions, reactor materials other than standard SS316 can be recommended for some specific applications. The three charts below summarize the characteristics of the different materials used in Microactivity reactors: SS316 Ni 10.5-13.5% Mo 2.5% Cr 16.5-18.5% Fe BAL W Hast X 47% 9% 22% 18% Hast C276 Inconel 600 55% 72 15-17% 14.5-16.5% 14-17% 4-7% 6-10% Inconel 625 58 % min 8-10 % 20-23 % 5% max SS310 19-22% 24-26% BAL Nb+Ta Mn Co 1.5% 3-4.5% 3.2-4.2% 2% Table 2 Composition of metal alloys (Source: www.alloywire.com) (Inside x Outside Diam.) 9.1 x 14.3 13.1 x 19.1 17.5 x 25.4 SS316 HAST C276 HAST X INCONEL 600 INCONEL 625 SS310 MAX. TEMPERATURE (ºC) 800 1093 1200 1212 980 1100 MAX. PRESSURE (BAR) 690 418 617 356 827 441 P(BAR)@500ºC 214 364 525 243 728 262 P(BAR)@650ºC 104 155 308 36 414 P(BAR)@790ºC 100 Table 3 Pressure – temperature rating (Source: Autoclave Engineers) 76 241 MICROACTIVITY – REFERENCE User Manual PRESSURE vs. TEMPERATURE RATING CURVES Figure 4-49 PIDEng&Tech can also install different types of synterized materials for the reactor 20 μm porous plate: SS316, Hastelloy C276, Hastelloy X, Inconel 600, Inconel 625 and SS310 are available. Also, when coke formation is possible, no porous plate is recommended. Selection of the appropriate material for the reactor will be user’s responsibility, never responsibility of PIDEng&Tech 77 MICROACTIVITY – REFERENCE 4.7.7. User Manual OPTION K – NO STANDARD FURNACE. When using a no standard dimensions reactor a no standard furnace is required. Standard furnace for standar 9,1 mm ID reactor Figure 4-50 No standard furnace for no standard 17,5 mm ID reactor Special furnace for special customer aplication Figure 4-51 Max power consumption, W Figure 4-52 Standard furnace 800W No standard furnace It depends on the application 78 MICR ROACTIVITY – REFERENC CE 4.7.8. User Man nual OPTION Q - HEATED D HEAD PUM MP, VESSEL L AND LINE E FOR LIQUIIDS. T This is a spe ecial option fo or pumping heavy h hydroc carbons or high viscosityy liquids. H HPLC head pump is he eated to 70ººC by means of a therm mostatic swittch while the e line is heate ed by meanss of an autorrregulating heating tape to t 100 ºC. This T option iss particularly suitable for liq quids with hig gh viscosity. Heate ed vessel Heated he ead pump Hea ating tape Figure 4-5 53 Element Heate ed Vessel Heated Head pum mp Heating tape Pow wer consu umption 125 W 125 W 13 W/m m Temperature, ºC 70 70 1 100 79 MICROACTIVITY – REFERENCE User Manual Liquid pump heating system Figure 4-54 80 MICROACTIVITY – REFERENCE User Manual 81 MICROACTIVITY – REFERENCE 4.7.9. User Manual OPTION S – EXTRA LIQUID EVAPORATOR WITH TEMPERATURE CONTROL. When a vaporisation of liquid/s is required upstream of the reactor an extra evaporator/s can be added to the unit. EXTRA LIQUID EVAPORATOR (1 or 2) Figure 4-55 Figure 4-56 If two HPLC pump are installed and vaporisation of both liquids is required then two liquid evaporators can be installed. • • • Extra SS316 evaporator with temperature control (50ºC to 450ºC) Maximum power consumption: 600 W. Maximum liquid flow: 8 ml/min The precise temperature adjustment is achieved by selection of this variable in the controller. Output 1 - 2 Process value Alarm leds 1 and 2 Set point / control output (%) Cursor displacement by the digits (in each function) Digital signals Access level selector Increase button Decrease button Figure 4-57 82 MICROACTIVITY – REFERENCE User Manual 83 MICROACTIVITY – REFERENCE User Manual 4.7.10. OPTION T - TEMPERATURE CONTROL IN L/G SEPARATOR Liquid/gas separator (included in the basic unit) can incorporate a precise temperature control system in a range from 0ºC to 65ºC when necessary. Control system is based on a Peltier cell described in chapter 4.3 Thermocouple for temperature control in /L/G separator Peltier cell Figure 4-58 Peltier button in touch screen Figure 4-59 As described in liquid evaporator control, temperature control in L/G separator is made by means of a controller, but Peltier button must be “ON” in touch screen to let Peltier cell heating and cooling. 84 MICROACTIVITY – REFERENCE User Manual Peltier control setup in screen menu must be configured previously Figure 4-60 Peltier button in touch screen Figure 4-61 Peltier control is usually established in 95% and duty time in 10 s. 85 MICROACTIVITY – REFERENCE User Manual 86 MICROACTIVITY – REFERENCE 4.8. User Manual OTHER COMPONENTS OF THE MICROACTIVITY-REFERENCE UNIT Connecting pieces, valves, instrumentation and other system components have been carefully selected. There follows a description of the more important ones, or those items that have undergone some form of modification in order to improve the system’s performance. 4.8.1 PIPING The selection of piping has taken several factors into account, such as temperature, pressure and type of compounds that are going to flow through it. The most widely used material is 316L stainless steel, with the maximum operating temperature for the pipe being that determined on the basis of the values for external diameter and thickness, using the ASME table for 316L stainless steel pipes for different temperatures. For 316 type stainless steel without welding and at 316ºC, the maximum stress value permitted is 17000 psi. The geometry factor for a 1/8” pipe, with a wall thickness of 0.02”, is 0.367. By applying the expression: Maximum operating pressure = Maximum stress permitted x Geometry factor A maximum operating pressure is obtained of 6239 psi (430 bar) for 1/8” pipes made of 316 stainless steel, with a thickness of 0.02” and at a temperature of 316 ºC. The pipes selected that constitute the reactor are: * Pipe: TSS285. 1/8” pipe with internal diameter of 2.1 mm (0.085”). Declared standards: EN–10204/3.1B – DIN50049/2.2. - * P TSS120. 1/16” pipe with internal diameter of 0.50 mm (0.020”). Declared standards: EN-10204/3.1B – DIN50049/2.2. 4.8.2 JOINTS AND VALVES * Check valve for liquid feeding: SG-SS-2C4-KZ-25. - Located on the liquid inlet line to the reactor. 316 stainless steel valve with Kalrez sealing material. Maximum operating pressure and backpressure at 21ºC of 206 bar (3000 psig). Trigger pressure of 25 psi. Operating temperature of –23ºC to 191ºC. CV = 0.10. For a valve with a rated pressure trigger spring of 25 psig, true trigger pressure ranges between 21 and 29 psig. The minimum closing pressure is 17 psig. A series of Teflon pieces have been designed to reduce the flow section to the equivalent of a 1/16” pipe, as well as the dead volumes in the NPT type joints (see Figure 4-66). 87 MICROACTIVITY – REFERENCE User Manual Figure 4-62 * 3-port (“T”) connection: VV-ZT2. - 316 stainless steel. 1/8” pipe thread connection and orifice of 0.75 mm. Operating pressure of 400 bar. In order to avoid standard wear and tear on the connecting pieces on a reactor (phenomenon that mainly occurs with T-shaped connections given the difficulty in using a “counterspanner”), selection has been made of VICI-VALCO connecting pieces mounted onto the structure of the hot box, thereby enabling them to be manipulated with a single spanner. * Bushing: SG-SS-200-61-PID - 316 type stainless steel. 1/8” extra-long threaded connection pipe. As per Standards ASTM A-182, ASTM A-479 and CMTR certificate. Operating temperatures ranging between –200ºC and 426ºC. Swagelok has custom-made extra-long bushing pieces for the Microactivity-Reference unit. They permit the inlet and outlet of process lines passing through the insulation separating the hot box and the thermal separation chamber from the rest of the mechanical assembly. These pieces are not commercially available. *Reduction element : VV-IZR21L. - 1/8” VICI pipe thread reduction connection to 1/16” pipe thread. 316 type stainless steel. * Non-return valve: SG-SS-2C2-1 Kalrez. - 316 stainless steel. Joint in chemically compatible Kalrez (Teflon elastomer). As per Standards ASTM A-182, ASTM A-479 and CMTR certificate. Maximum operating pressure of 2185 psig (150bar) at 190ºC CV = 0.1 In order to avoid the multiple connections required for the feed arrangement of various gases and so as to favour the mixture of the same, a distributor has been designed in 316 stainless steel that reduces the number of joints and whose interior is fitted with a helicoidal feature that forces the gas stream through the strands on this propeller, encouraging their mixing (see Figures 4-67 and 4-68). 88 MICROACTIVITY – REFERENCE User Manual Figure 4-63 GAS MIXER 170 SS-2C2-1 NPT 1/8 10 NPT 1/8 30 20 11,75 10 NPT 1/8 Figure 4-64 * Reactor filters: SG-SS-2F-15 Located on the reactor’s gas inlet and outlet lines. 316 type stainless steel. 1/8” pipe connections. Porous panel of 15 μm SS316 4.8.3 INSTRUMENTATION * Pressure transducer: SWT A08. 89 MICROACTIVITY – REFERENCE Measurement range Overpressure admissible Linearity Hysteresis and repeatability Thermal effect on zero Thermal effect on the span Operating temperature Excitation potential Output signal Power connection Pressure connection Class of protection EMC User Manual 0 -100 bar 200 bar < 0.5% FS < 0.1% FS 0.4% FS/10K 0.2% FS/10K (- 40) - 110ºC 12 - 30 VDC 4 – 20 mA M-12 connector, short-circuit protection G BSP 1/4” 316 stainless steel IP65 (connector), IP67 (cable) EN 50 081-1 and EN 50 082-2 Table 4-6 * Mass flow meters and controllers:. F201C – FAC– 11- X A study has been performed on the features of different mass flow controllers, in terms of their reliability, accuracy, control valve design, operation in the lower run of the operating range and performance at high pressure, with the instruments made by the firm Hi-Tec Bronkhorst being selected as those best suited to a Microactivity reactor. Each controller is calibrated to perform the measurement of a specific compound, although the option exists to use them with compounds of a different factor to the unit’s original calibration. When using another gas, special attention is to be paid to the elastomer’s compatibility with the new process gas. Calibration at source is undertaken by means of equipment with NMI certification. The specifications of these instruments are as follows: - AISI 316L stainless steel, 1/8” connections. 1% F.S. accuracy. 0.1% F.S. repeatability Operating range between 5% and 100%. Operating temperature between –10ºC and 70ºC. Input and output signal: 0-5 vdc. * Temperature signal: TC-KIA-ID-0600-H0. - K-type thermocouple, Inconel, 600 mm in length, mini-male high-temperature (220ºC) plug, 1.5 mm diameter, with temperature range between –200ºC and 1250ºC. Presents derivation and hysteresis as of 900ºC. Class 1 tolerance as per standards IEC 584.2: ±1.5ºC or ± (0.4%xT)ºC. * Bypass valve: VV- AT36UWTY. - 6 Ports with 2 positions, 1/8”. Maximum operating pressure: 1500 psig. Maximum operating temperature 230ºC. Standard port diameter 0.75 mm. 316 stainless steel. Valcon T rotor material. 3” actuator–valve separation, with AT60 high temperature actuator. 90 MICROACTIVITY – REFERENCE User Manual 4.9. CONTROL OF PROCESSES AND AUTOMATION 4.9.1 CONTROL LOOPS FOR THE MICROACTIVITY-REFERENCE The Microactivity-Reference reactor uses closed loop controllers with proportional, integral and derivative type re-feed of the signal for the following control loops: Ö Reaction temperature control: The signal from the thermocouple located in the catalyst bed is assessed by the controller, whereby its 4-20 mA output signal is sent to a solid state “zero passage” type relay that regulates the power supplied to the oven in a proportional manner. Ö Temperature control of the hot box: The signal from the thermocouple located in the hot box is assessed by the controller, whereby its 4-20 mA output signal is sent to a solid state “zero passage” type relay that regulates the power supplied to the box’s heater in a proportional manner. Ö Level temperature control: The signal from the thermocouple located in the deposit is assessed by the controller, whereby its 4-20 mA output signal is sent to a solid state “zero passage” type relay that regulates the power supplied to the cartridge in a proportional manner. Ö There is a fourth zero passage relay for the possible temperature control of a heating pad for heating a gas outlet line, an evaporator, etc. Ö Pressure control: The signal from the pressure transmitter located upstream of the reactor is assessed by the controller, whereby its 4-20 mA output signal determines the position of the pressure control valve. Ö Level control: The signal from the capacitive signal installed in the liquid – gas separator is assessed by the controller, whereby its 4-20 mA output signal determines the position of the level control valve positioned at the base of the separator. Ö Flow control: The instruments used for dosing the gases into the reactor are in themselves flow controllers. Accordingly, the reactor’s control system simply relays the 0-5 VDC control signals to the MFC. The signal recognises the 0-5 VDC output signal from the MFC and compares it to the order, triggering an alarm signal if they do not coincide. Use has been made of controllers made by the firm TOHO, model TTM-005, for the control of temperature, pressure and level (4-20 mA input and output). These controllers cater for RS-485 digital communications for communicating with the computerised control system. 4.9.2 AUTOMATION Before proceeding to the design of the printed circuit that contains the microprocessor that manages the system for the control and monitoring of the reactor, and which is what will manage the Microactivity-Reference reaction unit, a simulation was made of each one of the systems operating in the microactivity reactor. 91 MICROACTIVITY – REFERENCE 4.9.3 User Manual SYSTEM SAFETY MANAGEMENT Ö Safety status in the event of a power failure. As an initial safety measure, the controllers use a non-volatile memory to store the latest parameters introduced manually from the keyboard. After a power failure, the plant returns to these “safety” parameters or values, irrespective of what the latest values were that were sent to the computer. As a precaution, the system’s “safety” values have to be re-entered after any manual modification of the set-point in operations performed by the operator, independently of the computerised control system. Ö Temperature alarm. The controller’s upper limit absolute temperature alarm shuts down the control signal on the reactor oven and on the hot box heater and halts the operation of the MFC that the user has selected on the alarm set-up panel on the system’s touch screen. It also shuts down the operation of the HPLC pump, setting off an audible alarm as a warning signal for the operator, and triggers the safety system’s INH (inhibition) function, impeding the software from changing the session automatically. Ö Operation of the hot box The hot box is fitted with a forced convection heater that consists of a turbine and a heater. Its proper operation requires the turbine to be running when the heater is on, dissipating the heat and avoiding damage. This involves two systems working in parallel: provided that the controller sends a control signal higher than 5 mA to the “zero passage” solid state relay that regulates the heater’s power, the turbine starts operating, and even when this signal is not given, whenever the temperature in the hot box exceeds 40ºC the turbine will be running (The hot box controller’s upper limit absolute temperature alarm _E1H is set at 40 ºC). Accordingly, as the temperature drops, the turbine cools the hot heating cartridges. Ö Door closed detector on hot box So as to disconnect the current supplied to the hot box heater when its door is open, there is an inductive sensor that detects whether it is open or closed. This function does not interrupt the operation of the turbine or act upon any other part of the system. Ö Oven closed detector So as to disconnect the current supplied to the hot box heater and the reactor oven when the latter is open, there is a magnetic detector on the oven’s closing device that detects the position of the reactor’s moving section. The detection of an open oven interrupts the operation of the hot box heater, the supply of power to the oven and triggers the safety system’s INH (inhibition) function, impeding the software from changing the session. If it becomes necessary to open the hot box door during a reaction procedure, this is to be done manually, without using the door opening button. Manual opening of the door will only interrupt the power supply to the box heater. 92 MICROACTIVITY – REFERENCE User Manual Ö Flow alarm This alarm is by percentage deviation over the set-point. If, for more than 10 s (or time set in the Time Delay Alarm) the set flow deviates by more than 10% from its value (percentage set on the MFC set-up panel on the touch screen), the system interrupts the operation of the reactor oven, sets off an audible alarm (buzzer) to alert the operator and triggers the safety system’s INH (inhibition) function, impeding changes in the operating session. Ö Pressure alarm Absolute alarm, configured by parameter _E1H on the pressure controller. It acts upon the liquids pump and the MFC, halting the operation of those the user has selected on the pressure alarm set-up panel on the system’s touch screen. It is self-locking, in order to avoid a repetitive cycle of the system in the event that its activity ceases even when the problem that triggered it has not been resolved. For example, in the event of a blockage in the porous plate, pressure will increase and the alarm will act upon the feed to the system, halting it. But this will bring the pressure below the alarm value, whereby the system will again start operating in a situation that will again produce the circumstances that will once again trigger the alarm. This is why once the pressure alarm has been triggered, the system will remain in stand-by until the operator proceeds manually to release this locking, an action that is to be performed after checking over the system and correcting the anomalous situation. The safety system locks this situation until the system operator presses RESET on the pressure alarm, once the source of the problem has been located. The MFC will not operate until this RESET is pressed, even though the pressure value in the system has dropped below the value _E1H. Ö Level alarm Alarm configured by the parameter _E1H on the level controller. It is absolute type and it acts upon the liquids pump and the MFC, halting the operation of those the user has selected on the level alarm set-up panel on the system’s touch screen. It also triggers the audible alarm and the INH (inhibition) function as the upper limit set has been exceeded. This alarm is only available on equipment with liquid feed systems and a liquid – gas separator with level control. Ö Control valve failure The final elements of pressure and level control are servo-positioned micro-regulating valves. A failure in the control system of these valves triggers an alarm of the same type as that triggered by their master control loops. A failure in the position of the pressure control valve generates a procedure similar to that generated by a pressure alarm, and a failure in the level control valve generates a procedure similar to that caused by an alarm in the separator’s level controller. Ö INH Inhibition function Whenever the INH function is activated by any one of the system’s alarms, the Process@ control application automatically interrupts the performance of interconnected sessions. The system’s control program will remain in stand-by until the operator manually implements the change of session once the cause of the alarm has been resolved. Ö External alarm A signal coming from an outside system for detecting gases, fire or such like may trigger a general alarm in the system that involves disconnecting the hot box heater, the reaction oven, the liquids pump and the MFC, halting the operation of those the user has selected on the external 93 MICROACTIVITY – REFERENCE User Manual alarm set-up panel on the system’s touch screen, triggering the audible alarm (buzzer) and generating the system’s inhibition signal. INH BUZZER LIQUIDS PUMP INERTS MFC´s OFF REACTANTS MFC´s OFF HOT BOX CONVECTOR ABS ABS ABS ABS ABS DEV Relay Relay Relay Relay Relay HOT BOX HEATER TYPE REACTION TEMPERATURE HOT BOX TEMPERATURE PRESSURE CONTROL LOSS OF LOAD LEVEL CONTROL MASS FLOW CONTROLLERS DOOR-OPEN DETECTOR OVEN-OPEN DETECTOR EXTERNAL ALARM PRESSURE SERVO-CONTROL LEVEL SERVO-CONTROL REACTOR OVEN ALARM SUMMARY TABLE OF THE ALARM FUNCTIONS (1) ON ON (1) (1) (1) ON (2) ON (2) ON ON ON ON ON ON ON ON ON ON ON ON ON ON OFF OFF OFF OFF OFF OFF OFF (1) OFF OFF OFF Table 4-7 (1) Actions defined by the user in the set-up menu for the reaction pressure and temperature alarms on the touch screen of the Microactivity-Reference. (2) The inhibition session is activated in the event of a pressure alarm, with this status persisting until the user resets the alarm on the alarm panel on the touch screen. (In all other alarm scenarios, the inhibition function is deactivated automatically once the system’s parameters return within the established control limits). 94 MICROACTIVITY – REFERENCE 5. User Manual PROCCESS@ CONTROL SOFTWARE 5.1. INTRODUCTION Process@ control software is an application for data supervision and acquisition designed for systems based on digital communications between process hardware and a personal computer. The use of this application allows data acquisition and the remote control of one or several Microactivity-Reference units via Ethernet type communications. This software has been developed with National Instruments LabVIEW, which has the flexibility of a programming language combined with built-in tools designed specifically for testing, measurement, and control. Therefore, Process@ software includes all the advantages of LabVIEW: Easy-to-use graphical development environment Tight integration with a wide range of measurement hardware Rapid user interface development for displaying live data Extensive signal processing, analysis and math functionality Multiple communication options (TCP/IP, UDP, serial, and more) Support for Windows Vista/XP/2000 5.2. INSTALLATION The PC supplied with the unit is provided with: 1. Process@ software 2. A “custom made” PROJECT or Microactivity configuration. This project includes the specific devices each Microactivity is equipped with (controllers, pump, MFC’s, etc) and its flow diagram. For each unit there will only be one PROJECT, although the user, as will be seen later, will be able to save it with different names if needed. For this reason, the software installation is performed in two steps: first, install the Process@, and then, the Microactivity configuration or “project”. 5.2.1.HOW TO INSTALL PROCESS@ The installation of Process@ involves the following steps: When the Process@ CD is introduced in the computer, the installation software automatically opens. It is recommended to close all running programs before beginning the installation. 95 MICROACTIVITY – REFERENCE User Manual Figure 5- 1. Process@ installer A window asking which directory Process@ is to be installed in will pop up next. To ensure the right installation, it is recommended to choose the default locations: -C:\Program Files\Process@\ -C:\Program Files\National Instruments\ Click Next>> to continue the installation. Figure 5- 2 Installation directories Next, if accept the software license agreement is accepted: first, the National Instruments license will appear. After selecting “I accept the License Agreement”, the installation process in NEXT can be continued. 96 MICROACTIVITY – REFERENCE User Manual Figure 5- 3 National Instruments licence agreement In the next window, agreement is asked for on two new requirements (MS XML4 e IVI). Both must be accepted in order to continue by pressing Next>>. Figure 5- 4 Microsoft Licence Agreement Once the license conditions are accepted, Process@ installation will begin in the next screen (Start Installation). Once completed, a message will appear in the next window. (Figure 5- 6). 97 MICROACTIVITY – REFERENCE User Manual Figure 5- 5 Beginning of Process@ installation Figure 5- 6 Installation complete 5.2.2.HOW TO INSTALL A PROJECT OR MICROACTIVITY CONFIGURATION Before finishing the installation of Process@, the program allows for the option to install a PROJECT (see Figure 5- 7). Figure 5- 7 Project Installation Option If the project is installed, the directory where our project is must be selected: the name of the folder containing our project must appear next to “Search in” (see Figure 5- 8). Once done, accept by clicking in “Current Folder”, on the right bottom corner. 98 MICROACTIVITY – REFERENCE User Manual The name of the Project folder must appear here Click on current folder to accept Figure 5- 8 Project’s folder selection The Project is saved inside the Plants folder: C:\Program files\Process@\Plants By default, there will be only one project inside Plants but, if the user saves the plant with a different name, a new folder with the new name will also be created in this directory. The other possible option consists on installing the project after Process@ has been installed by means of an executable file which will copy the project’s folder inside “Plants”. 5.2.3.HOW LINK THE PC AND THE MICROACTIVITY-REFERENCE The Microactivity-Reference and the control PC can be linked by Ethernet directly using a cross cable. In addition, they can be connected to a switch by using a straight cable, which will allow having one or multiple pieces of equipment connected to the network. In any case, the right communication parameters must be introduced in the Microactivity and the PC so that they be linked. 5.2.3.1. MA-REF COMMUNICATION PARAMETERS These parameters must be set in the touch screen’s F1 menu under Communication Setup. The default parameters are: These parameters must be the same in the PC an in the MA MA-Ref COMMUNICATIONS SETUP 192 168 0 5 IP ADDRESS 255 255 255 0 IP MASK 192 168 0 1 GATEWAY 1234 TCP PORT Table 5-1 Microactivity-Reference Communication Parameters 99 MICR ROACTIVITY – REFERENC CE User Man nual In case of u using other communicatio c on paramete ers or connecting it to a local networrk, make sure e the GATEW WAY and IP MASK M are th he same in th he Microactivvity and in the e PC. 5.2.3.2. PC PAR RAMETERS The PC com mmunication parameters are configurred at the ne etwork conne ection windo ow under c pane el. To do so, follow f these steps: the control - Right Clickk on “Local Network N Conn nection” and select Prope erties. - Choose Intternet Protoccol (TCP/IP), click on Pro operties and press OK. otocol (TCP P/IP) Figure 5- 9 Internet Pro Introduce the communication parame eters: 100 MICROACTIVITY – REFERENCE User Manual Figure 5- 10 Control PC Communication Parameters These parameters must be the same in the PC an in the MA PARAMETROS DE COMUNICACIONES DEL PC 192 168 0 1 IP ADRESS 255 255 255 0 IP MASK 192 168 0 1 GATEWAY Table 5-2. Control PC communication Parameter values 5.3. DATA ACQUISITION WITH PROCESS@ To open the application, double click on the Process@ icon. Figure 5- 11 The menu or application manager is the first thing to appear when opening Process@. In the menu bar contains all the tools to manage the application, to control the data acquisition and to manage the other application functions (project, acquisition, panel, Sessions’ table, graphs and experiment viewer). 101 MICR ROACTIVITY – REFERENC CE New project O Open project User Man nual Acquisition A indicator Start S Stop Acquisition Acquisition A Exit @ Process@ Fig gure 5- 12. Process@ P Main Function Menu New pro oject: This fu unction is nott available for the user. hoose among g saved proje ects. Open prroject: To ch cquisition. Play: To start data ac Stop: To o stop data acquisition. W When it is stopped, the da atabase is generate ed. T exit the so oftware. Close: To Data Ac cquisition In ndicator (ne ext to close)): Displayed in a light green wh hen acquiring g data and in a dark gre een when nott acquiring data. Table 5-3 Process@ Main M Functio on Menu Ico on Descriptiion HE MENU BA AR 5.3.1.TH The name of o the Projecct that is bein ng executed is shown in the screen’ss upper secttion. The erent software functions are a shown in the main fun nction menu: diffe Project oosing a Projject or Microa activity configuration. By default, therre is only one e Project It allows cho c save this project un nder differen nt names, as s will be for a Microactivity. However, the user can show wn later on, and accesss them at a later time. This T way, for example, if the Microa activity is goin ng to be used d to test diffferent catalyssts, a differe ent project ca an be saved for each ca atalyst so that the experiments made with w each one e are organizzed in differe ent projects. In this men nu, the Com mmunication function ca an also be found. This function allows for checcking the co onnectivity between b the PC and the e Microactivvity Referencce. To run this t test, intro oduce the M Microactivity Reference’ss IP and click on Testt. If there iss communic cation, a “Com mmunication n OK” messa age will appea ar. 102 MICROACTIVITY – REFERENCE User Manual Figure 5- 13. Communication test Acquisition When Acquisition is selected, a new menu will appear. Select Start or Stop or click on the PLAY or STOP icons that appear under the tools bar to plot a graph with the acquired data. Figure 5- 14. Data acquisition From this menu, the Sample Time can be set. The Sample Time determines how often (in seconds) Process@ is to acquire data. The minimum value is 5 seconds. Once the new value is introduced, click OK. The size of the data files will depend on the sample time: the shorter the time, the bigger the size of the files will be. Figure 5- 15 Sample time setting Panels The next function, Panels, allows the opening of the Microactivity-Reference diagram, in which the flow diagram can be seen, as well as the different devices: controllers, alarms, indicators, etc. From this menu, the user will also be allowed to change the name of the panel. 103 MICROACTIVITY – REFERENCE User Manual Sessions In this setting, a session table for the experiment can be configured so that each session is a step of the experiment. In this table the times for each session and the devices’ parameter values must be specified. Graphs In this function, the Process Value Graphic and the Output Control Graphic, which show the progress of the experiment, can be opened. Experiment Viewer Through the experiment viewer the graphs of previous or current experiments can be seen and configured. 5.3.2.THE CONTROL PANEL The control panel appears in the screen every time a project is opened. If it is closed or hidden, it can be reopened or taken to the front by selecting Open Panel in the tools bar. The variable values can be viewed and modified from the control panel. These different choices can be selected by right clicking the mouse on the different devices. The message bar, at the bottom of the screen, shows messages related to the panel state and its operating mode: Edit or Normal. The Edit mode allows for modifying the panel: moving the icons that represent the different devices, Rename and Show/Hide Parameter Labels. In normal mode, all these editing options are disabled. Message bar Figure 5- 16 Project panel 104 MICROACTIVITY – REFERENCE User Manual NORMAL MODE In normal mode, data acquisition and visualization in real time is possible. When data acquisition starts, the red bar situated on the upper part of the icons that represent each device turns from red to green. The design of each device in normal mode is allowed by right-clicking on a device. To go to Edit Mode, right-click on the screen and choose Edit Mode. EDIT MODE In Edit Mode, the message bar is shown in yellow and displays a message indicating that it is in Edit Mode. The Edit Mode is also indicated in the panel’s upper section next to the name. Figure 5- 17. Control panel in Edit Mode When the program is in Edit Mode, the acquisition of data stops. Each device will show the last read value. To refresh a value in Edit Mode, click twice on the bar situated on the top of each icon. The acquisition of data is disabled until the program is returned to the Normal Mode. This mode allows for moving the device’s icons. To do so, place the mouse on top of an icon and drag it while left-clicking. The names move together with the icons as they are dragged. Also, the name of the icon can be moved around the icons. When an icon is moved, an asterisk appears on the upper bar of the panel and the message bar, on the bottom of the control panel, turns to light red, indicating that a change has been made and needs to be changed (See Figure 5-18). 105 MICROACTIVITY – REFERENCE User Manual Figure 5- 18 In the menu screen displayed after right-clicking on the mouse, any changes made on the panel (Save Panel) can be saved. It also allows to exit the Edit Mode (Finish Edit Mode). By right-clicking over one of the devices, a menu will appear with the following options: Config: By clicking on Config, a submenu which allows for the possibility to modify values or to configure the device is accessed (controller parameters, turn on or turn off devices, etc). The device will turn green after the value has been changed. The new value is automatically sent to the Microactivity-Reference unit. To see the device’s parameters names (process value, set value, output control) by choosing Show/Hide Parameters. Rename the device. If the Edit Mode while the equipment is acquiring data is activated, the variable values will not be actualized any longer and the values from the last reading in normal mode are kept. These values will not change until exiting the Edit Mode and press START acquiring again. It is possible to see the current value of a variable even when Process@ is not acquiring data: to do so, double click on the red bar of a device’s icon. The icon will turn green and the value of the variable will be actualized once. DESCRIPTION OF THE CONTROL PANEL’S DEVICES The different devices are represented by different displays depending of whether is a MFC, a TOHO controller, an alarm, an ON-OFF device (bypass, door, Peltier cell, auxiliary buttons for the touch screen: S1, S2, S3), a heated line (HEAT), a pump, etc. 106 MICROACTIVITY – REFERENCE User Manual All devices are displayed with their names, by default, above the drawing. The user can modify the name of the device as explained before (Edit Mode). By right-clicking one of the devices, a submenu appears with the choices to show the variables’ names or to design the device. The devices can be designed in either the Normal Mode or the Edit Mode. In both cases, the value that is input in the device is sent to the machine. a) MASS FLOW CONTROLLERS The controllers have a bar in the upper section that fluctuates between green and red, indicating whether the machine is acquiring new data or not. This also works as an alarm indicator: when the alarm goes off, the indicator starts to flash. Device name Acquisition/alarm indicator Set point Process value Figure 5- 19. MFC’s icon The upper window shows the set point assigned to that variable and, underneath this value, the real value or process value is displayed. By right-clicking over the device, the Design function which allows for the modification of the gas flow is accessed (in ml/min). Figure 5- 20 MFC Design window b) CONTROLLLERS The display representing the TOHO controllers, placed in the unit’s front panel (Reactor TEMPERATURE, HOT BOX TEMPERATURE, PRESSURE, LEVEL and auxiliary controllers: AUX1, AUX2, if they have been installed), has three cells: one where the set point is shown, a second one for the process value and a third cell for control output. Device name Acquisition/alarm indicator Set point Process value Output control signal Figura 1. Controller’s icon In order to modify the controller’s parameters from the panel, right-click on the icon. The controller parameters that can be modified are the following: 107 MICROACTIVITY – REFERENCE User Manual To operate in manual mode, tick on Manual and introduce an output control (MV1) Figure 5- 21 Design of a controller window The set value and the controller ramp can be modified in the upper part of the display. Under these values, some additional parameters are shown: CONTROLLER’S PARAMETERS SV1 Set value RP1 Ramping time P1 Proportional Band I1 Integral time D1 Derivative time Pbb Manual reset MH1 Upper limit of the output control ML1 Lower limit of the output control SLH High limit set value SLL Low limit set value MV1 Output signal AlHi High alarm Table 5-1. Design parameters of the controllers The controller can operate in automatic mode or in manual mode. In order to work in manual mode, activate the option in the Design window of the controller (see Fig 5-20) or “1” in the parameter MD in the session’s table (see 5.3.4.1). In manual mode, an output control always must be introduced in the cell MV1 of the Design window or in the session’s table. The upper limit of the alarm (AlHi, which is the same as the controller’s E1H) can also be introduced from the Design window. This value will trigger the configured alarms (see 4.5.2). c) ON-OFF DEVICES These displays are associated to the unit’s ON-OFF devices. These are devices which only have two options: either ON or OFF. This is the case for the door, the bypass, the Peltier cell for the liquid-gas separator and the auxiliary buttons S1, S2 and S3 on the touch screen. 108 MICR ROACTIVITY – REFERENC CE User Man nual ON-OFF DEVICES D ON Open OFF Close ON Activate Bypass OFF Deactivate ON Activate 1 Peltier OFF Deactivate ON Activate S1, S2, S3 3 OFF Deactivate Ta able 5-2 Configuration o of ON-OFF devices d PAR RÁMETROS DEL CONTROLADOR When config guring these parameters at the sessio ons’ table, ON O is equal to o 1 and OFF F is equal to 0. Door ays look like e a clear gre een button w when they are e ON and a darker gree en button These displa whe en they are OFF. O Figure 5- 22 w for th hese displayys allows for choosing c bettween both o options. The design window Bypass s Fig gure 5- 23 ON-OFF O device design window w d) INDICAT TORS In this type o of displays, a value is sho own but it ca annot be designed by the e software, since they are just j indicatorrs. By right-cclicking over the display, it can be ren named. Figure 5- 24 e) HEAT (G GC LINE) e control outp put on the up pper window w and seeing its state This device allows for visualizing the (On with a light g green and OFF with a da arker green) on o the lowerr part. Figure 5- 25 1 The e output contrrol and the HE EAT-COOL mo ode must be configured in th he touch scree en 109 MICROACTIVITY – REFERENCE User Manual As explained in 4.5.2, Main Menu, HEAT is configured in the touch screen, in MISCELLANEOUS SETUP. The operation mode can only be selected in this menu, by pressing the button HEATER MANUAL, and change it to HEATER AUTO. If it is in manual mode, it will be necessary to introduce an output control in the design window or in the sessions’ table (parameter M1C) whereas, to operate in automatic mode, a set point must be introduced in the touch screen of the Microactivity-Reference (see 4.5.2). To configure this device, proceed as follows: Select the operation mode in the menu MISCELLANEOUS SETUP of the TOUCH SCREEN. If HEATER MANUAL has been selected, it is possible to activate or deactivate it from the sessions’ table (introducing 1 or 0, respectively, in the parameter M1O) or from the control panel (ON or OFF). The output control (0-100%) can also be introduced from the table (parameter M1C) or from the control panel. If an automatic control is preferred, select HEATER AUTO in the menu MISCELLANEOUS SETUP and introduce a set point in the touch screen (the output control is not required now). To use this mode it is necessary to connect a thermocouple in the TI1 of the back panel. In this case, HEAT can only be activated and deactivated from the software. The set point must be introduced in the touch screen. b Figure 5- 26 Heat design window f) ALARM They are circular displays that inform about the system alarm state. When the alarm is activated, the display changes from green to red. g) PUMP Under pump, the liquid flow and activation (RUN) and deactivation (STOP) of the pump is allowed. Figure 5- 27 Pump design control window h) SCALE 110 MICROACTIVITY – REFERENCE User Manual The Scale Design option allows resetting the scale to zero by pressing on the red button of the window. Figure 5- 28 Scale rezero window i) CHROMATOGRAPH The Microactivity Reference unit is prepared to be connected to a gas chromatograph by actuating the sampling injection valve to start the analysis (see point 5.7 CONNECTION TO A GAS CHROMATOGRAPH). With Process@ it is possible to activate a cycle to close, every given time, the electrical circuit that connects to GC during one second. The user can configure the cycle time (how often the circuit is closed) in the chromatograph design window. Figure 5- 29 Chromatograph design window 5.3.3.CONTROL GRAPHS The graphs created in real time by Process@ show the measured values (Process Value Graph), and the output control signal (Output Control Graph). To see the graphs, choose Graphs in the tool bar and select either Process Value Graph or Control Value Graph. During an experiment execution, they can be closed and reopened again by using this menu. 111 MICROACTIVITY – REFERENCE User Manual Figure 5- 30 Process value graph The displays representing the devices that are in the panel can be seen in the screen’s lower section. In each display the following characteristics of each variable are shown: device’s name, its color in the graphic, two values indicating the device’s range, two alarm gauges or indicators (high and low) and a tick that hides or shows the graph when clicked on. In the lower section, the last real value read is shown in a white cell. VARIABLE NAME GRAPH COLOR HIGH AND LOW LIMITS OF THE SCALE HIGH AND LOW ALARM LIMITS PROCESS VALUE Figure 5- 31. Variable’s Configuration To configure the scale, the color and the alarm values, right-click over the desired control and select the Config option. A window will open with the device name in which the following parameters can be selected: Graph’s scale: to set the higher and lower value of the variable’s graph. High and low alarm value: These values don’t affect the process. They just lit a red indicator in the graphic control panel to indicate that a certain value has been surpassed. Graph’s color: By clicking on the colored window, a color palette is opened. Graph’s display: Click on the tick to hide or show the graph. 112 MICROACTIVITY – REFERENCE User Manual Figure 5- 32. Graph configuration for a variable (Reactor Temperature) Once the values for this device have been set, click on OK to save the changes. To change from one variable to another, click on the different displays. The scale shown in the y-axis corresponds to the graph whose display on the lower part shows a black border. By double clicking on a variable’s display, the graphs can be hidden. To configure the Control Value Graph values, follow the same steps. In that case, the control output percentage will be shown. This is why, by default, the Y-axis will show a range from 0 to 100. Figure 5- 33 Output control graphic To modify the X-axle, right-click on the graphic’s background or on one of the time values, and then select Set Time Scale. This option allows choosing the visualization time with a maximum of 24 hours (to see previous values, use the EXPERIMENT VIEWER). Figure 5- 34 Time scale setting Figure 5- 35 Selection of hours or minutes on the time scale 113 MICROACTIVITY – REFERENCE User Manual 5.3.4.SESSIONS’ TABLES DESCRIPTION By clicking on ‘Sessions’’, ‘Config Sessions’…’, a window with a sessions’ table for our experiment will appear. All parameters and the experiment’s time must be introduced in this window. The Sessions Table tool bar consists of the following options: • Load Table: to load a session table that has been created previously. • Save Table: to save a session table. • Print: to print the session table • Clean Table: to clear all the values in the table. • Exit: to exit the session table menu. 5.3.4.1. How to configure a sessions’ table This table is divided into five zones: 3 1 2 4 5 Name of the experiment Figure 5- 36. Sessions’ table 1. Time: In this area, the total experiment time, the consumed session time and the session time remaining can be set. In the upper section, there is an indicator whose normal mode is OFF and that will turn red when the door is opened or when the inhibition, which is activated in case of alarm, goes off. When the inhibition is activated, the PC will stop sending values to the Microactivity and the session time will stop at that point. 114 MICROACTIVITY – REFERENCE User Manual 2. Sessions’ Control: In this area the buttons that manage the session are displayed: Show All: to display all the device parameters. The previously hidden parameters can be chosen from the whole list by clicking on them so that they remain in the shorter list. Choose among all the parameters the ones to work with: to do this, it is necessary to dropdown the whole list. The icon next to them will turn from red to green. When pressing SHOW ALL again, only the parameters with the green icon will remain. The rest will be hidden. Run/Stop: to start/stop the session. When clicking on Run, the application starts sending sessions from session number one. The number of the experiment will appear then on the left bottom corner of the window. To stop data acquisition, click on the STOP icon in the tools bar or in the Acquisition menu. Every time the acquisition stops, a file named after the experiment will be saved. View: By introducing the number of a session in VIEW, the scroll bar will move in order to bring it to the middle of the table. Launch: It launches the session entered in the cell above the button. 3. Sessions’ Table: The session name and time can be introduced in this area. The following options can be configured: Alias: Session name. Description: Short session description (start, stop, etc) Session Duration: In seconds. Next Session #: Number of the session with which the actual session wants to be linked. In order to connect two sessions’, both sessions’ need to have a time value. 4. Device Table: In this area, the parameters of the Microactivity-Reference devices are displayed. When opened, only the main parameters for each device are shown but all the parameters can be displayed by pressing on Show All. By clicking on Show All, all the designable parameters are displayed. The ones with a red cross (8) don’t appear in the short display (when Show all is deactivated). Select any parameter by clicking on its name so that they are activated in the table. The cross will turn into a green tick (9), which indicates that the parameter will be shown even after the Show All has been turned off. 5. Data Table: In this area, introduce the data that is going to be written on the devices for each session. Data can only be input in a session in the session time has been filled out. To move from one parameter to another, use the arrow keys of the keyboard. When the session execution has been launched, the current session can be identified because its column will be displayed in blue. If there aren’t any blue columns, it means there is not any session being executed. 115 MICROACTIVITY – REFERENCE User Manual The input data must be among the ranges allowed by the devices parameters. For example, the ON-OFF devices only accept either a 1 or a 0 for ON or OFF. In the same manner, for the controller’s output exit, enter values between 0 and 100. In the following table, the different parameters that can be configured are resumed: PARAMETERS ON/OFF Door Open/close the door Bypass Activate/deactivate bypass Peltier Activate/deactivate bypass S1,S2,S3 Activate/deactivate bypass 1 Open 0 Close 1 Activated 0 Deactivated 1 Activated 0 Deactivated 1 Activated 0 Deactivated CONTROLLERS REACTOR TEMPERATURE SV1 RP1 P1 I1 D1 Pbb Set value Set value ramping time Proportional Band Integral time Derivative time Manual reset MD Control mode MH1 ML1 SLH SLL MV1 E1H Upper limit of the output control Lower limit of the output control Set value’s upper limit Set value’s lower limit Output control % (in manual mode) Alarm high limit SV1 RP1 P1 I1 D1 Pbb Set value Set value ramping time Proportional Band Integral time Derivative time Manual reset MD Control mode MH1 ML1 SLH SLL MV1 E1H Upper limit of the output control Lower limit of the output control Set value’s upper limit Set value’s lower limit Output control % (in manual mode) Alarm high limit SV1 RP1 P1 I1 D1 Pbb Set value Set value ramping time Proportional Band Integral time Derivative time Manual reset MD Control mode MH1 ML1 SLH SLL MV1 E1H Upper limit of the output control Lower limit of the output control Set value’s upper limit Set value’s lower limit Output control % (in manual mode) Alarm high limit SV1 RP1 Set value Set value ramping time Set Value (ºC) Slope for the set point (ºC/min) Proportional Band Integral time Derivative time 0-100% 0 Automatic 1 Manual 0-100% 0-100% Set value’s upper limit Set value’s lower limit 0-100% Alarm high limit (ºC) HOT BOX Set Value (ºC) Slope for the set point (ºC/min) Proportional Band Integral time Derivative time 0-100% 0 Automatic 1 Manual 0-100% 0-100% Set value’s upper limit Set value’s lower limit 0-100% Alarm high limit (ºC) PRESSURE Set Value (bar) Slope for the set point (bar/min) Proportional Band Integral time Derivative time 0-100% 0 Automatic 1 Manual 0-100% 0-100% Set value’s upper limit Set value’s lower limit 0-100% Alarm high limit (bar) LEVEL Set Value (ml) Slope for the set point (ml/min) 116 MICROACTIVITY – REFERENCE User Manual P1 I1 D1 Pbb Proportional Band Integral time Derivative time Manual reset MD Control mode MH1 ML1 SLH SLL MV1 E1H Upper limit of the output control Lower limit of the output control Set value’s upper limit Set value’s lower limit Output control % (in manual mode) Alarm higher limit M1C Output control M1O Activate/Deactivate Heat Proportional Band Integral time Derivative time 0-100% 0 Automatic 1 Manual 0-100% 0-100% Set value’s upper limit Set value’s lower limit 0-100% Alarm higher limit (ºC) HEAT 0-100% 1 Activate 0 Deactivate MASS FLOW CONTROLLERS MF# Set point for gas nº # Gas flow in ml/min PUMP R Turn on or off the pump C Set point for the pump Z “Rezero” 1 Turn on 0 Turn off Liquids flow, in ml/min SCALE 1 Set zero in the scale CHROMATOGRAPH XON Chromatography cycle XT0 Time for chromatograpy cycle 1 Activated 0 Deactivated Time between two analysis Table 5-6. Values of the parameters 5.3.4.2. How to Save a Session The session menu table provides the option to save sessions (Save Table), to open saved sessions (Load Table) and to delete all data (Clean Table.) To save an experiment’s session table in order to use it later on, open the Sessions’ Table menu and click on Save Table. A new window will pop up with the name of other previously saved sessions’. To choose a name for a new session, click on New File and choose Accept. A new window will then appear where the new name can be introduced . Figure 5- 36 Session table menu 117 MICROACTIVITY – REFERENCE User Manual Figure 5- 37 Saving a sessions’ table 5.3.4.3. How to open a saved sessions’ table When a sessions’ table is opened, the field for the different values appear empty. If preferred, open sessions’ table that have been saved previously. To do so, click on Session Table and then select Load Table. When doing this, a list of previously saved sessions’ appears. Figure 5- 38 Loading a sessions’ table 5.3.4.4. How to print a Sessions’ table Print a sessions’ table by clicking on Print in the sessions’ table menu. Printing is allowed in two different ways: to print on a configured printer (Print to printer) or to a file in .htlm format (Print to File.) 118 MICROACTIVITY – REFERENCE 5.3. User Manual HOW TO CARRY OUT AN EXPERIMENT To carry out an experiment, remember to follow these steps: First, check Process@ communication parameters. Make a Communication test (Project Æ Communication) to check whether Microactivity and PC are correctly linked. Secondly, in the function menu, select Microactivity project under Open Project. The window with the flow diagram of the unit shows on the screen. If any changes on the panel are made, save the changes by clicking on Save Panel, in the same menu which is displayed by right-clicking. If the unit is going to be operated without sessions, introduce all the values into the touch screen and into the controllers. The progress of the experiment can be followed by pressing the start icon, in order to acquire data. If the experiment is going to be carried out with a sessions’ table, as the example shown in Fig. 5-36, it is advisable to follow the following recommendations: Figure 5- 39b Experiment file i. An initial session corresponds to the secure shutdown of the system. ii. The second session takes the system to the operating conditions under which the experiment is to be performed (e.g.: heat the reactor up to operating temperature). The duration of this session is to be sufficient to allow the system to attain stable operating conditions, which may be carried out by setting long session times or else by using the condition evaluation function. iii. Subsequent sessions correspond to the operating conditions in which catalytic measurements are to be taken. iv. The final two sessions correspond to sessions involving the secure shutdown of the system, with the last one being, for example, the same as the session programmed as no. 1. In order to fasten the cooling of the system, a session for opening the door when the temperature of the reactor is low enough (<250ºC) can be configured. 119 MICR ROACTIVITY – REFERENC CE User Man nual Configurre the graphics (colors, scales, s etc). Launch sessions’: Click C on RUN N in the sessions’ table to o begin the ffirst session. To start other session n, introduce the number o of the sessio on and click o on Launch. from ano When th he last sessio on is finished d, Process@ will stop acq quiring data. 5.4. DATA PROCESSIN P G When data acquisition is stopped d (by clicking g on the STO OP icon ) or the last session e is generatted. The nam me of this file e is the same e that appea ars on the lefft bottom ends, a data file ner of the sesssion table (ssee figure 5-36). corn The experim ment data ca an be accesssed in two d different ways: either thro ough the exp periment view wer (see poin nt 5.5 of this chapter) or by b accessing g the data fo older of each project as explained e nextt. ous experime ents, go to the t project’s folder which h can be To access the data saved on previo foun nd in the follo owing directo ory: am Files\Proccess@\Plantts\ C:\Progra In this directtory, find the Microactivityy project’s fo older. e the Project’s folder. In n this folder, new subfolders are Find the experiment’s results inside ated with the e experimentss. An experriment file is s generated every time data acquisition is crea stop pped. The experim ments are savved with the date, in a un niversal forma at, when they were perfo ormed: YYYMMDDhh hmmss’ ‘YY where: Y when th he experimen nt was perforrmed YYYY: Year MM: Mo onth DD: Dayy hh: The experiment’ss starting hour mm: Min nutes ss: Seco onds In this way, the t experime ents are orga anized with th he oldest experiments att the top. older, the following files ccan be found d: Inside an exxperiment’s fo 120 MICR ROACTIVITY – REFERENC CE User Man nual Figure e 5- 40 Expe eriment file In the image e above, an example fro om the experriment folderr content is shown: s there e are two folde ers containin ng the graph hics data, txtt files in ASC CII format with w the data acquired du uring the expe eriment, the alarms that have h gone off, and an htm ml file where e the session ns’ tables are e kept. CII format with w columnss separated by tabs. Files with a ‘.txt’ extenssion are filess in the ASC d with any te ext editor an nd with mosst spreadshe eet programs, which These files can be opened allow ws designing g graphics with w the data a recorded. T These type of o programs because th hey allow easyy data processing. There is also o a file (Alarrm File.txt) in n which all alarms a are re egistered in ccase they ha ave gone off during d the exxperiment. The first txt ffile is named d after the exxperiment na ame (the sam me as the folder’s name). As files ed, these filles are nam med with the same name e plus an a added numbe er which are being create der in which they were created. c Thiss way, as wiith the experriments, the files are indiccates the ord bein ng placed in order o as they y are created d. To change the name of o an experim ment, it is ad dvisable to do d it through h the experim ment viewerr, whose me enu allows for f it. Finally, if a sessions’ table in the exxperiment is saved, a HT TML file is ccreated with the data from m the table. T This file can be opened with any Intternet browser. It can be e also opene ed with a text file or a spre eadsheet pro ogram that su upports HTM ML files. 121 MICROACTIVITY – REFERENCE 5.5. User Manual EXPERIMENT VIEWER The experiment viewer is the last menu in the tools bar. It allows for recovering data and graphs from prior or current experiments. From here, visualizing, renaming and configuring the graphs are possible as well as making a filter of all the acquired data. When opening the experiment viewer, a window with the process value and output control graphs pops up (see figure 5-40). The data of each experiment is organized in three different sheets: GRAPHS, DATA and ERRORS. There is also a ZOOM bar by means of which varying the size of the graphs or obtaining the exact value of a variable is allowed. Figure 5- 41 Initial window of the experiment viewer 5.5.1.How to open an experiment To open an experiment, enter the File menu and select Open Experiment (Ctrl+O). 122 MICROACTIVITY – REFERENCE User Manual Figure 5- 42 File menu Next, a new window showing the content of the folder Plants will be shown. C:\Program Files\Process@\Plants\ As it has been said before, by default, there will be only one Project inside this folder. However, if the user renames the project with other names, they will appear inside this window. Figure 5- 43. Project selection window In order to see an experiment, choose the folder containing it. The name of this folder must appear in the upper cell, next to “Look in”. To accept, click on “Current folder”. Figure 5- 44 The name of the project must appear on the upper cell 123 MICROACTIVITY – REFERENCE User Manual A new window showing all the experiments contained in the Data folder pops up. Select the one and accept. Figure 5- 45 Experiment selection Click on the icon in order to delete the highlighted experiments. The graphs of the selected experiment will appear automatically. Next to the graph, on the right side, a key with the variable’s colors is displayed. Figure 5- 46 Experiment’s graph 124 MICROACTIVITY – REFERENCE User Manual The time scale shows the time of the experiment. It can be changed by right clicking on the background of the graphs or in the X axis. 5.5.2.How to rename an experiment The option Rename Experiment, inside the File menu, allows giving different names to the experiment opened. Figure 5- 47 Rename an experiment 5.5.3.How to resize a graph The zoom bar allows modifying the appearance of the graphs and, also, knowing the exact value of a variable through to the tool CURSOR. Figure 5- 48. Zoom bar The different options are described bellow: ACTIVE ZOOM The first icon allows zooming between two time values. To do this, click on the icon and drag the cursor between them. ZOOM IN By clicking on ZOOM IN, the graphs will be enlarged by hiding the first and the last five minutes on the scale. ZOOM OUT This is used to increase the time seen on the X axis. The time scale will add 10 minutes every time this function is clicked. ZOOM TO FIT 125 MICROACTIVITY – REFERENCE User Manual This function allows for returning to the graphs’ initial configuration. The time scale can also be modified by right clicking with the mouse on the graph background or on the X axis. It is possible to choose between hours and minutes. Figure 5- 49 Time scale setting Besides, the scroll bar makes it possible to move forward or backwards on the graphs. CURSOR The cursor tool shows the exact value of a variable at a certain time. When clicking on the icon and moving the mouse over the graph, a cross-shaped cursor appears. This cursor will jump from one variable to another the mouse is moved. On the upper part, next to the icon, the name of the variable and its value at a time will be shown both for the process value graph and for the output graph. Figure 5- 50 Cursor function 126 MICROACTIVITY – REFERENCE User Manual To exit CURSOR, click again on the icon. 5.5.4.How to change the color and scale of the graphs By double clicking on each line, a window named PLOT DATA, will appear on the right upper corner of the graphs. In this window, Y-axis scale and the colour for each variable can be changed. Also, hide or show a variable. Go from one variable to another clicking on the arrows situated below this window. The Y axis scale will be that of the one whose name appears on the cell NAME of this window. Hide/show graph Variable name Limits of the scale Arrows for changing from one variable to another Figure 5- 51 Graph configuration window To hide or show a graph, activate the tick situated on the cell situated on the right upper corner. The colour of the graph can be changed clicking on the coloured square. This action will pop up a color palette. Figure 5- 52 Colour palette 5.5.5.How to filter the experiment data When clicking on the window Data, a table with all the values acquired during the experiment is displayed. 127 MICROACTIVITY – REFERENCE User Manual VALUES DISPLAYED IN DATA TABLE MFn Set vale MFC MVn Process Value PV1 Process Value Controller TOHO SV1 Set Value MV1 Control output On-Off devices (Door, Bypass, Status (On-Off) Peltier, S1, S2, S3) F Flow PUMP R Status (On-Off) XON Status (On-Off) Chromatograph XT0 Cycle time M1C Control output Heat M1O Status (On-Off) Table 5-7. Values of the parameters All these values can be filtered by name and time, so that only a certain range of values is displayed in the table. To do so, select the desired parameters from the complete list shown in the right side window. If two or more devices are to be selected, click on them while pressing Ctrl on the keyboard and press Filter. Figure 5- 532 Data table 128 MICROACTIVITY – REFERENCE User Manual Figure 5- 53 Data filtering by parameter The data can also be filtered by time. On the left side of the table, the time of the experiment is shown. In the example of figure 5-53, the data is acquired every five seconds although this time depends on the value introduced in the sample time window: Acquisition Æ Sample time of the main menu (see figure 5-15). To select a certain period of time, click on the windows Initial time and Final time. A list showing the times when each data acquisition has been done, will dropdown. Choose a range of time and click on Filter. Figure 5- 54 Data filtering by time 129 MICROACTIVITY – REFERENCE User Manual 5.5.6.Errors report If an error has occurred during the experiment, it will be registered in the experiment file. The last window of the Experiment Viewer allows for viewing all the error messages, if any. Figure 5- 54 Errors window 5.5.7.How to export the data to an Excel file The icon Export Excel , allows saving the data table in Excel (xls) format. By clicking on the icon Export Excel, choosing the path for saving the file is allowed. Figure 5- 56 Exit window 130 MICROACTIVITY – REFERENCE User Manual 5.5.8.How to “capture” a graphs image The last menu of the menu bar, TOOLS (Get Snapshot o Crtl+S), allows obtaining a snapshot of the graphs and saving them in an image format. 5.6 HOW TO EXIT PROCESS@ To exit Process@, click on the cross of the main menu: Figure 5- 57 Exit window A message asking “Do you really want to exit Process@?” will appear. This operation is not immediate. Process@ may need some time, especially if the experiment has taken a long time. Figure 5- 58 5.7 CONNECTION TO A GAS CHROMATOGRAPH The Microactivity Reference unit is prepared for connecting to a gas chromatograph, actuating the sampling injection valve to start the analysis. Both devices (external alarm and chromatograph) will be connected to the MicroactivityReference using the wire “External Control”, provided by PID Eng & Tech with the unit: ¾ Connector "EXTERNAL CONTROL": BINDER 680 female 6 pin o o o o o o PIN 1 : Chromatograph contact: PIN 2 : Chromatograph contact: PIN 3 : Emergency contact: PIN 4 : Emergency contact: PIN 5 : Without cable PIN 6 : Without cable BROWN WHITE YELLOW GREEN 131 MICROACTIVITY – REFERENCE 5.7.1 User Manual CONNECTION TO AN EXTERNAL ALARM The connection to an external alarm (gas detectors, etc.) has to be made with the yellow and green wires. The contact is normally open: The two wires have to be connected to a relay that is normally open and closes when the alarm activates. The actions that the unit makes when an external alarm appears are the following: - Reactor Furnace: OFF - Hot box Heaters: OFF - Inhibition Session: ON - Buzzer: ON The actions of the external alarm on the MFC and the liquids pump are the same ones as configured by the user on the touch screen for the external alarm When the external alarm disappears, the unit returns to the operation conditions. 5.7.2 CONNECTION TO A GAS CHROMATOGRAPH The connection to the chromatograph is to be made with the brown and white cables. The MA-Ref unit has to be connected to the “Remote Control” connector of the GC. The contact is normally open, closing itself for 1 second when a pulse is sent to the chromatograph. Operation: It is possible to activate a cycle to actuate upon a gas chromatograph in the Sessions Setting Panel of Process@ software. This cycle actuates the closing of the electrical circuit that connects with the GC for a duration of 1 second. The user can configure the cycle time (period between 2 closings) in the parameter “XT0” (Figure 5-28). Visualization: In this process screen the device for checking the status of the chromatography cycle is configured (Figure 5-28). 132 MICROACTIVITY – REFERENCE User Manual 6. PERFORMING CATALYTIC TESTS 6.1. LOADING A CATALYTIC BED IN THE REACTOR Insert the catalytic bed inside the reactor by proceeding as follows: 1. Open the reactor hot box by pressing the “Door” key on the touch screen. 2. Disconnect the reactor’s thermocouple (red pin). This will trigger the system’s temperature alarm, which can be deactivated on the touch screen’s alarm panel (see section 4.5.1 in this manual). 3. Using a spanner, loose the “A” connections (see Figure 6-1). 4. Hold the reactor with a clamp on the upper part “B” and loose that connection by exerting pressure on “C”. 5. Place the reactor in a vertical position, unscrew “B” and remove the thermocouple from the reactor. 6. Empty the reactor and flush with compressed air through the lower end, in the opposite direction to the gas flow inlet. 7. Insert the catalyst through the upper end of the reactor, with a particle size greater than 10 μm (a small quantity of quartz wool may be inserted beforehand, to avoid access of fine particles through the porous plate) and, if considered necessary, pack the reactor with carborundum up to 23 cm below the upper end in order to avoid the dead volume. A B C A Figure 6-1 8. Clean threads “B” and “C”, insert the thermocouple inside the bed, close the reactor and reconnect the gas inlet and outlet lines by means of connections “A”. 9. To avoid a heating peak in the reactor oven, switch off the Microactivity-Reference before plugging the thermocouple into the hot box. Then switch the equipment on again. 10. Perform a Leak test: See section 7.1.1 of this manual. 6.2. PROGRAMMING A SEQUENCE OF EXPERIMENTS For programming a sequence of experiments, proceed as outlined in section 5.4 of this manual: “How to carry out an experiment”. In general terms, the sessions that constitute the experiment should be configured as follows: - - An initial session corresponds to the secure shutdown of the system. The second session takes the system to the operating conditions under which the experiment is to be performed (e.g.: heat the reactor up to operating temperature). The duration of this session is to be sufficient to allow the system to attain stable operating conditions, which may be carried out by setting long session times or else by using the condition evaluation function. Subsequent sessions correspond to the operating conditions in which catalytic measurements are to be taken. The final two sessions correspond to sessions involving the secure shutdown of the system, with the last one being the same as the session programmed as no. 1 133 MICROACTIVITY – REFERENCE User Manual 7. MAINTENANCE OF THE EQUIPMENT 7.1. WEEKLY MAINTENANCE 7.1.1 LEAK DETECTION It is necessary to perform a leak test when: - The user opens the reactor for replacing the catalyst bed The user detects a problem in pressure control To check the unit for leak, proceed as follows: - - - 7.1.2 Put the pressure controller in manual mode, totally opened (100%). Put the level controller in manual mode, totally closed (0%). Once the system is at working pressure, it would be necessary to check if this valve is totally closed or if it is necessary to recalibrate the zero point. Put a tap in the gas outlet on the hot box and introduce an inert gas flow in the system (He, N2, etc.). Put the unit at habitual working pressure. Close the gas inlet, as well as the system on/off stopcock for gas and verify that the pressure in the system remains constant over a period of time. If this is not the case, use a soapy solution to locate possible leaks (subsequently dry the entire system). When the leaks has been detected and eliminated, clean the equipment, removing the soapy solution. CLEANING THE UNIT For clearing the external of the unit, use a wet-cloth with water for preventing dust accumulation. For internal cleaning, it can be used water or any solvent (alcohol, acetone, etc.) for eliminate soapy solution rest. In case of cleaning with any solvent, the user has to manage properly the generated residues, attending to its nature. 7.2. MONTHLY – QUARTERLY MAINTENANCE Depending on the use of the reactor and the reaction products the user should make a monthly or quarterly maintenance, consisting on: 7.2.1 REPLACING THE FILTERS The reactor is provided with two 15 microns filters that could get blocked as a consequence of the continuous use. If that occurs, replace the filter by another one (Ref: Swagelok SG_SS-2F-15) The replaced porous plate could be contaminated with hydrocarbons or other kind of residues. The user of the unit must manage these residues, asking to an authorized manager and attending to the environmental policy of the laboratory where it is being used. 134 MICR ROACTIVITY – REFERENC CE User M Manual 7.3. ANNUAL L OR LATER R MAINTENA ANCE 7.3.1 REPLAC CING THE FU USE T Microactivity-Referen The nce has incorrporated a 3 A fuse at the e rear of the reactor for protecting p the power socketts. For replacce it (Figure 7-1), turn the equipmentt off (put the circuit break ker in the “OFF F” position) and replace itt by another one o with the same chara acteristics: 3 A – 250 V. 3 A FUSE Figure 7-1 7.3.2 CING THE KA ALRETZ SEA ALS IN THE E GAS MIXER R REPLAC If the unit woks with high-corrosivve gases, it should be convenient c to o replace an nnually or later the kalretz seals s of the check c valves, before the gas mixer: Open O the valvves body and d replace the elastomeric e s seal by anotther one (sa ame model and materia al): contact w with Process s Integral Deve elopment Eng g & Tech Tecchnical Serviice. aced o-ring could c be conttaminated by y any corrosiive gas. The user of the unit must The repla mana age these re esidues, askking to an authorized a manager m and d attending tto the enviro onmental policyy of the laborratory where e it is being used. 7.3.3 REPLAC CING THE RE EACTOR PO OROUS PLA ATE D to a continued use of Due o the unit with high visco osity liquids or o substance es that generate solid deposits, the porous plate off the reactor could get bllocked, identifying this fa act by an inc crease of the pressure p of the system. In this case, c the us ser must co ontact with tthe Process s Integral 135 MICROACTIVITY – REFERENCE User Manual Development Eng & Tech Technical Service to substitute it by another plate of the same characteristics, or of higher porosity. The replaced porous plate could be contaminated with hydrocarbons. The user of the unit must manage these residues, asking to an authorized manager and attending to the environmental policy of the laboratory where it is being used. 7.3.4 REPLACING A MASS FLOW CONTROLLER The replacement of one or more MFC may be caused by: - - Their faulty operation: in this case, the user is to verify that this performance is not due to an unsuitable gas inlet pressure (consult the specifications of the MFC that are included in the equipment’s documentation) or to an incorrect configuration of the MFC on the touch screen (see section 4.5.2 in this manual). Changes in the user’s requirements, insofar as the type of inlet gas or the flow supplied is concerned. The steps to be followed for replacing a MFC are as follows: 1. Switch off the Microactivity-Reference unit and switch the main circuit breaker to OFF. 2. Unscrew and remove the right-hand side panel on the Microactivity-Reference 3. Locate the MFC that is to be replaced (see Figure 7-2), disconnect the control cable, unscrewing the unit’s lower panel and releasing the end connections. GAS 6 GAS 5 GAS 4 GAS 3 GAS 2 GAS 1 Figure 7-2 4. The MFC installed in the equipment has to have the same characteristics as the one being replaced (check enclosed MFC specifications): - Mass Flow Controllers, HI-TEC by BRONKHORST, model EL-FLOW. - IDENTIFICATION No.: F_211C_FAC_11V (Figure 7-3): 136 MICROACTIVITY – REFERENCE User Manual Figure 7-3 - Gas: Determined by the user Maximum flow: Determined by the user Inlet pressure: Determined by the user 5. Place the new MFC in the distributor, screwing it in from the lower panel and attaching the end connectors (it is advisable to attach a label indicating the gas it contains and its operating flow). Place it in such a way that the arrow is pointing to the right (indicating the direction of gas flow). 6. Connect the control cable to the MFC. 7. Screw the right-hand side panel back onto the Microactivity-Reference unit. 8. Switch on the unit. 9. Configure the MFC installed on the touch screen of the Microactivity-Reference unit: - Pressing “F1” on the touch screen grants access to the main menu (CONFIG SETUP). 137 MICROACTIVITY – REFERENCE User Manual Figure 7-4 - Press on the field “MASS FLOW SETUP”: The configuration menu for the mass flow controllers will be displayed: Figure 7-5 - Configure the fields of the new MFC: • • • • Maximum flow. Units in which the gas flow is expressed. Name of the gas. % of alarm: Deviation alarm. This alarm is inhibited during the time specified in the Delay Time Alarm (in sec.), operating if during this time the specified deviation is maintained with respect to the set value. These parameters are modified by pressing on their corresponding yellow boxes and entering the new values by means of the keys that are displayed on screen. Before beginning to work with the equipment, it is important to ensure that each reactant gas MFC installed has been properly set up, and that all the other MFC’s not installed have their fields set to zero. Press the “Exit” key to return to the main menu. 138 MICROACTIVITY – REFERENCE User Manual 8. EUROPEAN DIRECTIVES 1. Directive 97/23/EC: Pressure Equipment The plant complies with European Directive 97/23/EC and Spain’s Royal Decree 769/1999 that lays down the provisions for the application, in Spain, of said directive, regarding the design, manufacture and evaluation of compliance of pressure equipment and equipment subject to a maximum allowable pressure PS exceeding 0.5 bar. The plant is supplied with Markings and Statement of Compliance as per article 3, section 3 of European Directive 97/23/EC and Spain’s RD 769/1999. 2. Directive 94/9/EC: Equipment and protective systems intended for use in potentially explosive atmospheres The plant is not to be used in potentially explosive atmospheres. Directive 94/9/EC (on the approximation of the laws of the member states concerning equipment and protective systems intended for use in potentially explosive atmospheres) in its chapter I, Article 1, section 4, lays down that: “The following are excluded from the scope of this Directive: (…) Equipment intended for use in domestic and non-commercial environments where potentially explosive atmospheres may rarely be created, solely as a result of the accidental leakage of fuel gas…” The guidelines on the application of Directive 94/9/EC, of May 2000, state in their section 4.1.2. a) that: “Equipment is only considered to be within the scope of the directive if it is intended (either in whole or in part) to be used in a potentially explosive atmosphere; the fact that an intended potentially explosive atmosphere might be present inside the equipment is not relevant...” Furthermore indicating: “Products that are not designed for use under atmospheric conditions (1) do not fall within the sphere of application of Directive 94/9/EC, even when an explosive atmosphere may form under atmospheric conditions during start-up, disconnection or maintenance. This would form part of risk assessment on the part of the user and could lead to the specification of ATEX apparatuses for installation of a near-by container”. (1) Directive 94/9/EC does not define atmospheric conditions. The relevant standards indicate a temperature range of –20 °C to 60 °C and a range of pressure between 0.8 bar and 1.1 bar as a basis for design and intended use of products. Consequently, the Microactivity-Reference unit is not designed for operating under potentially explosive atmospheres, but as a result of improper use of the unit or a lack of maintenance of the same, the unit could generate a potentially explosive atmosphere. It is the responsibility of the end user to assess the risks, implement suitable safety and protective measures, as well as locate the equipment in special laboratories with inflammable gas 139 MICROACTIVITY – REFERENCE User Manual detectors in order to reduce to a minimum the risks stemming from operation of the equipment. The Microactivity-Reference unit caters for connection to an external alarm that would trigger the unit’s secure shutdown. 3. Directive 2004/108/EC Electromagnetic Compatibility Directive (EMC The Microactivity-Reference unit, as per Directive 98/336/EEC of 3 May 1989, is considered to be equipment that may cause electromagnetic disturbances or whose operation may be affected by said disturbances, given that it is a piece of equipment or installation that contains electrical and/or electronic components. It is therefore to be constructed in such a manner that: The electromagnetic disturbances generated are limited to a level that enables the apparatus to operate in accordance with the purpose for which it was designed. The apparatus has a suitable level of intrinsic immunity (ability to operate without detriment to quality in the presence of a magnetic disturbance) that enables it to operate in accordance with the purpose for which it was designed. Figure 8-1 The Microactivity-Reference unit complies with Directive 98/336/EEC, having passed all electromagnetic compatibility tests required by the same (Figure 8-1 shows pictures of the Microactivity-Reference unit in the anechoic chamber, where part of said tests were carried out). 4.Directive 2006/95/EC: Low Voltage (LVD) - Electrical Safety (former 73/23/EEC) This declaration is based on the full compliance of the equipment with the Harmonized Standard EN 61010-1:2001 for “Safety requeriments for electrical equipment for measurement, control, and laboratory use - Part 1: General requeriments”, approved by the approved by the European Committee for Electrotechnical Standardization (CENELEC). 140 MICROACTIVITY – REFERENCE User Manual 9. ENVIRONMENTAL POLICY Process Integral Development Eng & tech bakcs the environment, focusing its activities towards the minimization of the impacts to surroundings, with the commitment from management to follow the principles included inside the policy. The different devices and operations with relevant environmental injuries have been described in this manual (porous plates, filters, o-rings, solvents and main board battery). PID Eng & tech ask the final user to be responsible with the environment, following the actions specified in the chapter 8 “Maintenance of the equipment” for the disposal of toxic or dangerous wastes, and attending to the environmental policy in force in the laboratory or company where the equipment is working. If the user wishes to get rid off of the unit, he must hand it in to an authorized manager or ship it to Process Integral Development Eng & tech, where it will receive the proper treatment. 141 MICROACTIVITY – REFERENCE User Manual 10. REACTOR TROUBLESHOOTING SYMPTOM The equipment does not switch on POSSIBLE CAUSES The switch on the front is in the off position. Press the switch on the front. The main circuit breaker on the rear is off. Switch the main circuit breaker to “ON”. The power supply to the equipment has not been properly connected. The system’s fuse has blown. No communication is established between the reactor and the control PC The Ethernet connection has not been properly installed (wrong network cable, incorrect operation of the switch, wrong IP address). There is no communication between the reactor and the touch screen Blocking of the microprocessor. There is no air pressure in the system. The door on the reactor does not open and/on the by-pass valve does not operate Leaks in the compressed air lines or poor coupling of the pneumatic connections. No gas pressure reaches the equipment. The on/off stopcocks on the front panel are off. No gases are entering the equipment A system alarm has been triggered that has shutdown the gas inlet. The pressure in the system is close to the pressure in the gas cylinders. The flow of one of the gases varies without keeping to the setpoint. A reading is recorded on one of the MFC that has not been installed (noise). The gas flow does not reach the set–point established, remaining stable at a lower value. SOLUTION The cable that connects the MFC to the board has been badly connected (loose). A maximum flow has been set on the MFC configuration panel on the touch screen for one of the gases that has not been installed. There is no communication between the touch screen, the control PC and the equipment hardware. Insufficient gas pressure is reaching the equipment. The set-point established is below 10% of the maximum flow of the mass flow controller. Modification has been made of the maximum gas flow established on the touch screen for the configuration of the mass flow controllers. Verify the correct connection of the power supply that is on the rear of the equipment. Open the right-hand side of the equipment and replace the fuse on the board (contact the distributor). Check that the Ethernet connection is working properly and verify the system’s IP address (“MISC” Menu on the touch screen). Verify the configuration of the PC’s local area network. Reboot both systems. Reboot the equipment. If the problem persists, please contact the distributor. Check the gas installation and make sure the system’s air inlet pressure is 5 bar. Disconnect the equipment (switch the circuit breaker to OFF), unscrew the right and lefthand side panels on the equipment and check the orange polyurethane pipes. Check the gas installation and make sure the gas cylinders are open. Open the on/off stopcocks. Check the alarm and reset it (providing the situation that triggered it has been resolved). Increase the pressure on the gas inlet (see the specifications of the MFC) or lower the operating pressure. Disconnect the equipment (switch the circuit breaker to OFF), unscrew the right-hand side panel on the equipment and check the connection of the MFC cables. Zero set all the fields for those MFC that have not been installed on the equipment. Reboot the equipment. Verify that the gas inlet pressure on the equipment exceeds the operating pressure It is not advisable to operate below 10% of the maximum flow of the MFC: Replace the controller with another that is suited to the process requirements. Reset the maximum flow value for each one of the controllers (see the specific documentation for each MFC). 142 MICROACTIVITY – REFERENCE The Gilson liquid pump does not switch on, with the Microactivity switched off. The Gilson liquid pump does not switch on, with the Microactivity switched on. The pump is connected to the 220V sockets on the rear of the equipment. The 3A-250V fuse in the fuse-box on the rear panel has blown (or is missing). The pump’s electrical installation has not been performed correctly. The on/off switch is in the (0) position. The Gilson pump does not register the information or the setpoints relayed to it from the Process@ software. The Gilson pump does not respond to the parameters that are manually entered into the display. If a prior manual control has been made on the pump’s display, it is not possible to establish digital communication with the PC, and vice-versa. If a prior digital communications control has been made between the PC and the equipment, it is not possible to perform manual control on the display, and viceversa. No backpressure has been installed and operation is at atmospheric pressure. No liquid is entering the reactor or the flow is unstable (Pressure of the head below operating pressure) The pump has not been properly vented. There is a leak in the system’s liquid inlet. An alarm has been triggered in the system that has shutdown the system’s liquid inlet. No backpressure has been installed and operation is at atmospheric pressure. No liquid is entering the reactor (Pressure of the head close to operating pressure) No liquid is entering the reactor (Pressure of the head significantly above operating pressure) There is no liquid in the pump tank. The 3-port valve on the pump is not in the normal operating position (injection from the tank). An alarm has been triggered in the system that has shutdown the system’s liquid inlet. User Manual These sockets are not energised when the equipment is switched off: plug the pump into another socket (separate from the unit) or switch on the equipment. Change the fuse. See the section “Electrical installation” in this manual. Turn the switch on the rear of the pump to the (I) position. Reboot the pump. If this is not possible, control of the same is to be maintained in manual mode. Reboot the pump. If this is not possible, control of the same is to be maintained by digital communications, through the Process@ software. Pressure must range 10-15 bar in the pump head: - Install a backpressure prior to the inlet on the liquid non-return valve. - Only feed liquids when the operating pressure is above 10-15 bar. Vent the pump, releasing the liquid inlet line on the reactor. Verify all the liquid inlet lines on the system. Check the alarm and reset it (providing the situation that triggered it has been resolved). Pressure must range 10-15 bar in the pump head: - Install a backpressure prior to the inlet on the liquid non-return valve. - Only feed liquids when the operating pressure is above 10-15 bar. Fill the tank with the reactant liquid. Set the valve to the suitable position (see the section “Venting the pump” in this manual or in the pump manual). Check the alarm and reset it (providing the situation that triggered it has been resolved). A blockage of solid deposits has formed in the evaporator. Replace the evaporator. Faulty operation of the liquid non-return valve. Verify the status of the non-return valves and, if necessary, replace. An alarm has been triggered in the system that has shutdown the system’s liquid inlet. Check the alarm and reset it (providing the situation that triggered it has been resolved). 143 MICROACTIVITY – REFERENCE There is no temperature reading in the reactor bed. The reactor’s temperature reading is incorrect The reactor’s thermocouple has not been connected properly. The reactor’s thermocouple is not working properly. Poor connection of the thermocouple’s damping cable on the 18-pole wire housing. The TOHO reaction temperature controller has been configured incorrectly. The controller’s PID parameters have been modified. The reactor’s temperature controller is not working properly. The electric heater on the hot box does not operate. The turbine does not operate correctly (it does not turn properly or it makes an odd noise) The hot box’s temperature controller is not working properly. There is no reading of the system’s pressure in the controller. The pressure in the system rises uncontrollably without responding Control mode has been set to “manual” or “Rdy”, instead of to “automatic”. An alarm has been triggered in the system that has shutdown the reactor oven (oven not fully closed, door open on hot box). The parameter _EH1 on its controller has been modified. (Temperature above which it starts operating). The hot box’s temperature controller has been set to “manual”, at 0%. An alarm has been triggered in the system that has shutdown the heating on the hot box The heater is not working properly The forward blades on the turbine are rubbing against the ceramic cable housing or the heating cartridges. User Manual Verify the thermocouple’s connector inside the hot box. Replace the reactors’ thermocouple with another of identical characteristics. Disconnect the equipment (switch the circuit breaker to OFF), unscrew the lefthand side panel on the equipment and check the connections to the 18-pole wire housing. Introduce the factory-set default parameters in the controller. If these are not known, please contact the distributor. Restore the optimum control parameters (see the section “The controllers” in this manual). Set to automatic (Run) in the controller’s _nd parameter. Check the alarm and reset it (providing the situation that triggered it has been resolved). Re-set the value of parameter _EH1 to 40 ºC on the hot box’s temperature controller (SET 2 menu on the controller). Set the control mode to automatic (Run) on the controller’s _nd parameter. Check the alarm and reset it (providing the situation that triggered it has been resolved). Replace the heater (contact the supplier). With the equipment disconnected, remove the front cover on the turbine inside the hot box (it clips off) and remove the cabling. Disconnect the equipment (switch the circuit The rear blades on the turbine for breaker to OFF), unscrew the left-hand side cooling the motor are rubbing against the panel (or the upper one, if necessary) and turbine mount. adjust the motor’s cooling blades. Restore the optimum control parameters for The controller’s PID parameters have this controller (see the section “The been modified. controllers” in this manual). An alarm has been triggered in the Check the alarm and reset it (providing the system that has impeded the heating of situation that triggered it has been the hot box (door open on the hot box) resolved). Control mode has been set to “manual” Set the controller’s _nd parameter to or “Rdy”, instead of to “automatic”. automatic (Run). Disconnect the equipment (switch the circuit The pressure sensor is not connected to breaker to OFF), unscrew the right-hand the board. side panel and verify the sensor’s connection. Disconnect the equipment (switch the circuit The TOHO pressure controller is not breaker to OFF), unscrew the right-hand connected to the board. side panel and verify the TOHO pressure connection. Verify the status of the source by The power source +15/-15/+5 is shortunscrewing the right-hand side (equipment circuiting (power LED blinking) or is disconnected and without power supply) faulted (LED off). If this occurs, there will and observe the LED. If it is blinking, be no level reading, if the equipment is disconnect the controllers on the rear panel fitted with this option. one by one, until the one causing the shortcircuit is located (the LED will stop blinking). The pressure controller is set to Set to automatic (Run) in the controller’s “manual”, fully closed (0%). _nd parameter. 144 MICROACTIVITY – REFERENCE to the set-point, with the 3-port valve in the “by-pass” position. User Manual Release the joint between the system’s gas outlet line and the reactor box (external lefthand side of the reactor) and see whether the pressure decreases. If it does, clean or replace the blocked section. If it does not, continue by verifying the next cause. Release the joint between the gas line and The needle on the micrometric pressure the regulating valve and see whether the regulation valve has become stuck at pressure decreases. If it does, replace the zero. regulating valve (notify the distributor). Check and adjust the zero-setting on the The valve’s zero-setting has been pressure control valve (see the section modified “Configuration of the V4.0 Servo Digital Unit” in the manual). Release the inlet line to the separator and see whether the pressure decreases. Clean A blockage has formed on the liquid – the inlet and outlet lines and the condenser gas separator inlet and/or outlet lines. tank with ethanol + compressed air. Otherwise, continue by assessing the next possible cause. Release each one of the sections of pipe Blockage in the by-pass valve or in the and see whether the pressure falls. Clean gas preheating and/or mixer lines and/or replace the blocked section. Check the symptom “No gases are entering No gases are entering the system the equipment”. No rise in pressure in the system Perform a leak test on the equipment (See Leak in the reaction system the section “Performing catalytic tests” in this manual). Set the 3-port valve to the by-pass position. If the system pressure does not decrease, check all possible causes of the prior symptom: “The pressure in the system rises uncontrollably without responding to the set-point, with the 3-port valve in the “by-pass” position.” Release the gas outlet line where it joins the filter and see whether the pressure The filter on the reactor outlet is blocked. decreases. If it does, replace the filter. If it does not, continue by verifying the next cause. The pressure in the system rises Release the connecting joint between the uncontrollably without responding gas inlet line and the reactor and see to the set-point, with the 3-port whether the pressure decreases. If it does, valve in the reaction position. empty the reactor and clean the plate by The reactor’s porous plate is blocked. flushing it with compressed air countercurrent to the gas flow. If this is not the solution, replace the porous plate (inform the distributor). Release the gas outlet line before it passes The filter on the reactor gas inlet is through the filter and see whether the blocked. pressure decreases. If it does, replace the filter. Restore the optimum control parameters for The controller’s PID parameters have this controller (see the section “The been modified. controllers” in this manual). Incorrect operation of the level control Stop feeding liquids into the system and system in the separator (if operating with close the level control valve. See whether this option). the pressure stabilises. The pressure in the system varies, Perform a leak test on the equipment (See without stabilising at the set-point. Leak in the reaction system the section “Performing catalytic tests” in this manual). Check and adjust the zero-setting on the The valve’s zero-setting has been pressure control valve (see the section modified “Configuration of the Servo Digital V4.0 unit” in the manual). Insufficient gas pressure is reaching the Make sure the gas inlet pressure on the equipment. equipment exceeds the operating pressure. The pressure in the system does not reach the set-point, stabilising Perform a leak test on the equipment (See at a lower value. Leak in the reaction system the section “Performing catalytic tests” in this manual). A blockage has formed in the gas outlet line, outside the reactor box (on the way to the analysis system). 145 MICROACTIVITY – REFERENCE The sensor’s reading exceeds 2 ml or is above zero with the tank empty. There is no reading from the level sensor in the separator, with liquid in the condenser. The sensor’s reading exceeds 2 ml or is above zero with the tank empty. The level reading in the sensor does not remain stable at the setpoint. No liquids are evacuated from the system (pressurised system in which the liquid level rises continuously without responding to its set-point) User Manual On the level sensor’s touch screen, restore the values obtained in calibration. If these are not available, re-calibrate the sensor (see the section “Calibrating the level sensor” in this manual). Dismantle the condenser and the sensor The sensor is dirty. and clean them with ethanol + compressed air. The sensor has not been properly Check and properly adjust the sensor connected. connection on the rear of the equipment. Restore the controller to its original Incorrect controller configuration parameters. Replace the level sensor (contact the The sensor is not working properly distributor). Disconnect the equipment (switch the circuit The level sensor is not connected to the breaker to OFF), unscrew the right-hand board. side panel and verify the sensor’s connection. Disconnect the equipment (switch the circuit The TOHO level controller is not breaker to OFF), unscrew the right-hand connected to the board. side panel and verify the TOHO level connection. Verify the status of the source by The power source +15/-15/+5 is shortunscrewing the right-hand side (equipment circuiting (power LED blinking) or is disconnected and without power supply) faulted (LED off). If this occurs, there will and observe the LED. If it is blinking, be no level reading, if the equipment is disconnect the controllers on the rear panel fitted with this option. one by one, until the one causing the shortcircuit is located (the LED will stop blinking). On the level sensor’s touch screen, restore The maximum and minimum levels of the values obtained in calibration. If these oscillation set in the calibration of the are not available, re-calibrate the sensor sensor have been modified. (see the section “Calibrating the level sensor” in this manual). Dismantle the condenser and the sensor The sensor is dirty. and clean them with ethanol + compressed air. Restore the optimum control parameters for The controller’s PID parameters have this controller (see the section “The been modified. controllers” in this manual). Control mode has been set to “manual” Set the controller’s _nd parameter to or “Rdy”, instead of to “automatic”. automatic (Run). Dismantle the condenser and the sensor The sensor is dirty. and clean them with ethanol + compressed air. Check and adjust the zero-setting on the The valve’s zero-setting has been level control valve (see the section modified “Configuration of the Servo Digital V4.0 unit” in the manual). Check that the pump is working properly, The liquids pump is not working properly. providing the system with a constant stream of liquid. The level controller is set to “manual”, Set the controller’s _nd parameter to fully closed (0%). automatic (Run). Release the liquid outlet line just after it A blockage has formed in the liquid passes through the micrometric valve and outlet line, prior to its collection in the see whether any liquid is coming out of the balance. system. If it is, replace the liquid outlet line. Release the liquid outlet line on the The needle on the micrometric level separator and see whether liquid is coming regulation valve has become stuck at out of the tank. If it is, replace the regulating zero. valve (inform the distributor). Check and adjust the zero-setting on the The valve’s zero-setting has been level control valve (see the section modified “Configuration of the Servo Digital V4.0 unit” in the manual). The maximum and minimum levels of oscillation set in the calibration of the sensor have been modified. 146 MICROACTIVITY – REFERENCE The change in programmed session does not occur. The inhibition function has been triggered, as a safety measure in response to a system alarm. The communication parameters are not correct. PC and Microactivity are not communicating The cable is not connected. User Manual This function is automatically shutdown when the situation triggering the alarm has been resolved, except in the case of pressure alarms. In this case, check the alarm and reset it (if the situation that triggered it has been resolved). Check the communication parameters in your PC (Network Connections) and in the Microactivity Reference. Check the IP address Process@ is reading in “Project” menu. Check the cross cable is connected. If the unit and the PC are connected through a local network, the cable must be straight, not crossed. 147