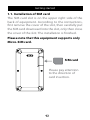
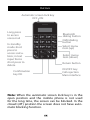
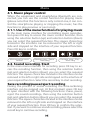
1
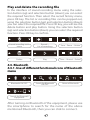
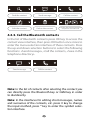
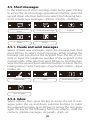
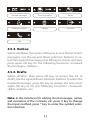
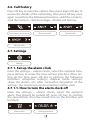
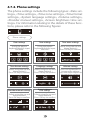
Content
1. Getting started
1.1. Installation of SIM card
1.2. Charging method
2.Buttons
3.Introduction
3.1. Standby interface
3.2. Use of dialing function
4.Menu
4.1. Music player control
4.2. Sound recording
4.3.Bluetooth
4.4.Contacts
4.5. Short Messages
4.6. Call history
4.7.Settings
4.8.Calculator
4.9. Anti-lost function
4.10.Shortkeys
Getting started
1.1. Installation of SIM card
The SIM card slot is on the upper right side of the
back of equipment. According to the instructions,
first remove the cover of the slot, then carefully put
the SIM card downward into the slot, only then close
the cover of the slot. The installation is finished.
Please note that this equipment supports only
Micro-SIM card.
SIM card
Please pay attention
to the direction of
card insertion.
1.2. Charging method
The four hard contacts of the charging clip should correspond to the four hard contacts of the equipment.
Press the charging clip to ensure that it is closely attached to the back part of equipment, and then use the
USB cable to connect the charging clip to the computer
or adapter for charging. When the clip is not charging,
take out the clip in the vertical direction. Please avoid
the sliding method, because you can easily cause damage to the four hard contacts located on the clip.
Wrong way of installing charging clip
Right way of installing
charging clip
Sliding up and down
is not allowed
Installation in the
vertical direction
Buttons
Automatic screen lock key
OFF ON
Long press
to access
voice mail
In standby
mode short
press to
access calculator, in text
input forms
short press to
delete
Confirmation
key OK
Bluetooth
dialing button
GSM dialing
button
Select menu
item (up)
Select menu
item (down)
Return button
ON/OFF key
Call rejection
Main interface
Note: When the automatic screen lock key is in the
open position and the mobile phone is not used
for the long time, the screen can be blocked. In the
closed (off ) position the screen does not have automatic blocking function.
Introduction
3.1. Standby interface
In the stop mode of the equipment, long press of ON/
OFF key can turn the phone on, then you can enter the
standby mode. Status bar of the standby interface shows
the Internet signal, battery capacity, message notification icon if your short message is not read. In the case of
turning Bluetooth on a Bluetooth icon will be shown on
the screen. In the middle part of the standby interface
there is current time. If you press the up or down buttons
to select menu item in the standby interface , you can select the menu functions.
3.2. Unlock the screen
When the screen is in the locked mode, press ON/OFF key
and # key simultaneously to unlock. If it is necessary to
lock the screen, also press ON/OFF key and # key simultaneously.
3.3 Use of dialing function Direct dialing
For direct dialing in the standby interface, please use the
digital input of the desired telephone number for outgoing call, if the device is equipped with SIM card, it is
possible to use GSM dialing button for the outgoing call.
If the smartphone Bluetooth is connected, it is possible
to use Bluetooth dialing button for the outgoing call (the
smartphone should be equipped with SIM card, for connecting Bluetooth please refer to section 4.3. Bluetooth).
If there is an error in the input number, it is possible to use
the delete key located in the upper part of the keyboard
to delete the incorrect number.
Menu
4.1. Music player control
When the equipment and smartphone Bluetooth are connected, you can use the control function for playing music
(please note that this function is only control one, it can control the smartphone playing or stopping the music, has the
function to play previous or next song).
4.1.1. Use of the menu functions for playing music
In the main menu interface for controlling music reproduction press OK key to access the music control function, then
using the selection button (up) and selection button (down)
you can select the required function. The square choice box
located in the interface can be removed in the left or right
side and stopped on the interface of your required function.
Press OK key to confirm.
Main menu for music
control
Previous song – Pause –
Next song
4.2. Sound recording. Start
Previous song – Play –
Next song
In the main menu interface for recording press OK key to access the recording function, then using the selection button
(up) and selection button (down) you can select the required
function. The square choice box located in the interface can be
removed in the left or right side and stopped on the interface of
your required function. Select the record key to start recording.
Save recording/pause/reject recording
During the process of sound recording the time-reckoning
interface can be popped out. At that moment press OK key
to open interface with the following functions: «Save, pause,
reject the sound recording», then using the selection button
(up) and selection button (down) you can select the required
function. The square choice box located in the interface can be
removed in the left or right side and stopped on the interface
of your required function. Press OK key to confirm the selection. If you want to continue sound recording, please select the
record key to continue recording.
Play and delete the recording file
In the interface of sound recording menu using the selection button (up) and selection button (down) you can select
the required function. Then select the record history menu,
press OK key. The list or recording files can be popped out,
using the selection button (up) and selection button (down)
you can select the required file. Press OK key, you will see the
delete button and play button. Using the selection button
(up) and selection button (down) you can select the required
function. Press OK key to confirm.
Sound recording main
menu
Record –
List of recordings
Save – Pause – Delete
Delete
Play
Save – Record – Delete
4.3. Bluetooth
4.3.1. Use of different functional icons of Bluetooth
menu
Bluetooth ON/OFF
Search for Bluetooth
ON/OFF
Name of Buetooth
Search for Bluetooth
equipment
After turning on Bluetooth of the equipment, please use
the smartphone to search for the name of the above
mentioned Bluetooth, then you can click to connect.
4.4. Contacts
In the main interface of contacts menu press OK key to access
the list of contacts, using the selection button (up) and selection button (down) you can select the contacts from this phone,
synchronize the contacts via Bluetooth and add the contacts.
Contacts main menu
Bluetooth contacts
Contacts from the
smartphone
Add the contact
4.4.1. Create new contact on the smartphone
In the contact add interface press OK key, then you will see the
input box for name and surname and input box for telephone
number, press the up and down selection buttons to input name,
surname and telephone number, then again press OK key to save
the contact or cancel. Press # key to select the input mode.
Name and surname
input box
Telephone number
input box
Save
Cancel
4.4.2. Call the contacts
In the list of contacts from this device press the up and down
selection buttons to select the contact, then press OK key to
open the following menus: «Find the contact», «Send message», «Call the contact», «Edit the contact», «Delete the contact», «Select the storage site», etc. Press the up and down selection buttons to select «Call the contact», then press OK key.
Find the contact
Send message
Call the contact
Edit the contact
Delete the contact
Transfer the contacts between
the phone and SIM card
4.4.3. Call the Bluetooth contacts
In the list of Bluetooth contacts press OK key to access the
contact view interface, then press OK button once more to
enter the menu selection interface of these contacts. Press
the up and down selection buttons to select the following
functions: «Send message», «Call the contact», «Save in the
telephone directory».
Send message
Call the contact
Note: In the list of contacts after selecting the contact you
can directly press the Bluetooth key or GSM key in order
to dial directly.
Note: In the interfaces for editing short messages, names
and surnames of the contacts, etc. press # key to change
the input method, press * key to enter the symbol selection interface.
4.5. Short messages
In the interface of short message main menu press OK key
to access the short message operational interface, press the
up and down selection buttons to select the following functions: «Create new message», «Inbox», «Drafts», «Outbox».
Short message main
menu
Create new message
Inbox
Drafts
Outbox
4.5.1. Create and send messages
Select «Create new message», input the message text, then
press OK key to select «Send message». While sending the
message you can choose the recipient from the list of contacts or input the telephone number of the recipient in the
manual mode. After selection press OK key to send the message. Use the up and down selection buttons to select the following menus: «Save message», «Punctuation marks», «Input
mode», etc.
Input mode
Send
Punctuation marks
Save as drafts
4.5.2. Inbox
Select «Inbox», then press OK key to access the list of messages, press the up and down selection buttons to select
the required message, press OK key to review the text, press
again OK key for the following functions: «Reply», «Add the
contact», «Delete message», «Forward», «Call», etc.
Unread messages
Read messages
Reply
Add the contact
Delete
Forward
Call
4.5.3. Outbox
Select «Outbox», then press OK key to access the list of sent
messages, use the up and down selection buttons to select the required message, press OK key to review sent text,
press again OK key for the following functions: «Forward
the message», «Delete».
4.5.4. Drafts
Select «Drafts», then press OK key to access the list of
drafts, use the up and down selection buttons to select the
required message, press OK key to review the text, press
again OK key to for the following functions: «Forward»,
«Edit», «Delete», etc.
Note: In the interfaces for editing short messages, names
and surnames of the contacts, etc. press # key to change
the input method, press * key to enter the symbol selection interface.
4.6. Call history
Press OK key to enter the call list, then press again OK key to
review the details of the call history, then press OK key once
again to perform the following functions: «Add the contact»,
«Call the contact», «Send message», «Delete call history».
Call history main menu
Received calls
Dialed calls
Missed calls
4.7. Settings
Settings
4.7.1. Set up the alarm clock
Enter the settings – «Alarm clock», select the optional time,
press OK key to enter the time setting interface. After setting up the time press OK key to perform the following
functions: «Ringtone setting», «Repeat mode setting»,
«Save the alarm», etc. After successful completion of the
settings, the round icon on the interface will be solid.
4.7.1.1. How to turn the alarm clock off
Enter the settings – «Alarm clock», select the optional
alarm that should be turned off, press OK key to confirm
the cancellation, then the round icon on the interface will
be blank.
Alarm clock
Setting interface
4.7.2. Phone settings
The phone settings include the following types: «Date settings», «Time settings», «Time zone settings», «Time format
settings», «System language settings», «Volume settings»,
«Provider manual settings», «Screen brightness time settings». For information relating to the details of these functions, please refer to the following figures:
Phone settings
Date settings
Time settings
Time zone settings
Using the phone
keyboard directly input
the date
Using the phone
keyboard directly input
the time
Select using the up and
down buttons
Press OK key to confirm
Time format settings
Language settings
Volume settings
Select using the up and
down buttons
Press OK key to confirm
Select using the up and
down buttons
Press OK key to confirm
Press the up button to
increase the volume
Press the down button to
decrease the volume
Provider manual settings
Screen brightness
time settings
Select using the up and
down buttons
Press OK key to confirm
Select using the up and
down buttons
Press OK key to confirm
4.7.3. Profiles
There are the following profiles: «Standard mode», «Silent
mode», «Conference mode», «Outdoors mode», «Airplane
mode». Select the required used mode, press OK key to
confirm the settings.
Profiles
Standard mode
Silent mode
Outdoors mode
Airplane mode
Conference mode
4.7.4. Restore the factory settings
Enter the settings – «Restore the factory settings», press OK
key to review the notification, then press again OK key to
restore the factory settings. Press the return key to cancel.
When you restore the factory settings, you return all the
settings of the equipment to the factory level.
Restore the factory
settings
4.8. Calculator
In the standby interface press long the calculator button
to access the calculator interface, CardPhone will be transferred to the calculator, input the numbers directly to perform the calculation.
CE zero clearing
Calculator button
Press long to enter or exit the
calculator operation mode
Return to the main menu
4.9. Anti-lost function
Press OK key to access the «Anti-lost function» function,
press again OK key to switch on and switch off «Anti-lost
function». (The «Anti-lost function» function is effective
only during the connection with the phone Bluetooth).
Anti-lost function
Switch on and switch off
4.10. Shortkeys
1. In the interfaces for editing short messages, names
and surnames of the contacts, etc. press # key to
change the input method, press * key to enter the symbol selection interface.
2. In the conversation mode press OK key to activate or
deactivate hands-free mode.