1
Table of Contents
Introduction . . . . . . . . . . . . . . . . . . . . . . . . . . . . . . . . . . . . . . . . . . . . . . . . . . . . . . . .v
How to Use this Manual . . . . . . . . . . . . . . . . . . . . . . . . . . . . . . . . . . . . . . . . . . . . . .vi
1. Hardware Setup . . . . . . . . . . . . . . . . . . . . . . . . . . . . . . . . . . . . . . . . . . . . . . . . .1-1
Check Package Contents . . . . . . . . . . . . . . . . . . . . . . . . . . . . . . . . . . . . . . .1-2
Prepare Printer Location . . . . . . . . . . . . . . . . . . . . . . . . . . . . . . . . . . . . . . . .1-3
Locate Printer Parts . . . . . . . . . . . . . . . . . . . . . . . . . . . . . . . . . . . . . . . . . . .1-4
Remove Tape . . . . . . . . . . . . . . . . . . . . . . . . . . . . . . . . . . . . . . . . . . . . . . . .1-6
Install the Toner Cartridge . . . . . . . . . . . . . . . . . . . . . . . . . . . . . . . . . . . . . . . .1-7
Load the Paper Tray . . . . . . . . . . . . . . . . . . . . . . . . . . . . . . . . . . . . . . . . . . . .1-10
Connect Printer Cables . . . . . . . . . . . . . . . . . . . . . . . . . . . . . . . . . . . . . . . . .1-14
Attach the Power Cord . . . . . . . . . . . . . . . . . . . . . . . . . . . . . . . . . . . . . . . . . .1-16
Install Printer Software . . . . . . . . . . . . . . . . . . . . . . . . . . . . . . . . . . . . . . . . . .1-17
Install Accessories . . . . . . . . . . . . . . . . . . . . . . . . . . . . . . . . . . . . . . . . . . . . .1-18
Install Additional Paper Feeders . . . . . . . . . . . . . . . . . . . . . . . . . . . . . . . .1-19
Install the Duplex Unit . . . . . . . . . . . . . . . . . . . . . . . . . . . . . . . . . . . . . . .1-26
Install the Upper Output Bin . . . . . . . . . . . . . . . . . . . . . . . . . . . . . . . . . . .1-29
Install the Envelope Feeder . . . . . . . . . . . . . . . . . . . . . . . . . . . . . . . . . . .1-33
Install Additional Memory . . . . . . . . . . . . . . . . . . . . . . . . . . . . . . . . . . . . .1-35
Verify Printer Setup . . . . . . . . . . . . . . . . . . . . . . . . . . . . . . . . . . . . . . . . . . . .1-40
Additional Installation Notes . . . . . . . . . . . . . . . . . . . . . . . . . . . . . . . . . . . . . .1-41
Configuring Startup Page . . . . . . . . . . . . . . . . . . . . . . . . . . . . . . . . . . . . .1-41
Memory Configuration (Elite 21 DN and SE) . . . . . . . . . . . . . . . . . . . . . .1-41
Hard Disk Configuration (Elite 21 SE) . . . . . . . . . . . . . . . . . . . . . . . . . . .1-42
2. Using the Elite 21 with a Macintosh . . . . . . . . . . . . . . . . . . . . . . . . . . . . . . . . . .2-1
Software Installation . . . . . . . . . . . . . . . . . . . . . . . . . . . . . . . . . . . . . . . . . . .2-2
Creating a Desktop Printer . . . . . . . . . . . . . . . . . . . . . . . . . . . . . . . . . . . . . .2-7
Via USB . . . . . . . . . . . . . . . . . . . . . . . . . . . . . . . . . . . . . . . . . . . . . . . . . . .2-7
Via EtherTalk . . . . . . . . . . . . . . . . . . . . . . . . . . . . . . . . . . . . . . . . . . . . . .2-10
Via LPR . . . . . . . . . . . . . . . . . . . . . . . . . . . . . . . . . . . . . . . . . . . . . . . . . .2-14
Printing from a Macintosh . . . . . . . . . . . . . . . . . . . . . . . . . . . . . . . . . . . . . . . .2-18
Setting Page Setup Options . . . . . . . . . . . . . . . . . . . . . . . . . . . . . . . . . . .2-18
The Print Dialog Box . . . . . . . . . . . . . . . . . . . . . . . . . . . . . . . . . . . . . . . .2-23
Additional Macintosh Information . . . . . . . . . . . . . . . . . . . . . . . . . . . . . . . . . .2-28
The NIManage Utility . . . . . . . . . . . . . . . . . . . . . . . . . . . . . . . . . . . . . . . .2-28
Online Driver Updates . . . . . . . . . . . . . . . . . . . . . . . . . . . . . . . . . . . . . . .2-29
Printing Binary Data (USB or LPR) . . . . . . . . . . . . . . . . . . . . . . . . . . . . . .2-30
i
3. Using the Elite 21 with Windows 95/98 . . . . . . . . . . . . . . . . . . . . . . . . . . . . . . . .3-1
Software Installation . . . . . . . . . . . . . . . . . . . . . . . . . . . . . . . . . . . . . . . . . . .3-2
Windows 98 USB Installation . . . . . . . . . . . . . . . . . . . . . . . . . . . . . . . . . . .3-3
Using Plug and Play . . . . . . . . . . . . . . . . . . . . . . . . . . . . . . . . . . . . . . . . .3-4
Using the Add Printer Wizard . . . . . . . . . . . . . . . . . . . . . . . . . . . . . . . . . . .3-6
Printing from Windows 95/98 . . . . . . . . . . . . . . . . . . . . . . . . . . . . . . . . . . . . .3-11
Setting Page Setup Options . . . . . . . . . . . . . . . . . . . . . . . . . . . . . . . . . . .3-11
The Print Dialog Box . . . . . . . . . . . . . . . . . . . . . . . . . . . . . . . . . . . . . . . .3-13
Setting Defaults using Driver Properties . . . . . . . . . . . . . . . . . . . . . . . . . .3-19
Additional Windows 95/98 Information . . . . . . . . . . . . . . . . . . . . . . . . . . . . . .3-24
Printing Binary Data (USB/LPR Connection) . . . . . . . . . . . . . . . . . . . . . .3-24
4. Using the Elite 21 with Windows 2000 . . . . . . . . . . . . . . . . . . . . . . . . . . . . . . . .4-1
Software Installation . . . . . . . . . . . . . . . . . . . . . . . . . . . . . . . . . . . . . . . . . . .4-2
Printing from Windows 2000 . . . . . . . . . . . . . . . . . . . . . . . . . . . . . . . . . . . . . . .4-8
Setting Page Setup Options . . . . . . . . . . . . . . . . . . . . . . . . . . . . . . . . . . . .4-8
The Print Dialog Box . . . . . . . . . . . . . . . . . . . . . . . . . . . . . . . . . . . . . . . .4-10
Setting Defaults using Driver Properties . . . . . . . . . . . . . . . . . . . . . . . . . .4-15
Additional Windows 2000 Information . . . . . . . . . . . . . . . . . . . . . . . . . . . . . . .4-22
Printing Binary Data (USB/LPR Connection) . . . . . . . . . . . . . . . . . . . . . .4-22
5. Using the Elite 21 with Windows NT 4.0 . . . . . . . . . . . . . . . . . . . . . . . . . . . . . . .5-1
Software Installation . . . . . . . . . . . . . . . . . . . . . . . . . . . . . . . . . . . . . . . . . . .5-2
Printing from Windows NT 4.0 . . . . . . . . . . . . . . . . . . . . . . . . . . . . . . . . . . . . .5-8
Setting Page Setup Options . . . . . . . . . . . . . . . . . . . . . . . . . . . . . . . . . . . .5-8
The Print Dialog Box . . . . . . . . . . . . . . . . . . . . . . . . . . . . . . . . . . . . . . . .5-10
Setting Defaults using Driver Properties . . . . . . . . . . . . . . . . . . . . . . . . . .5-15
6. The Elite 21 Control Panel . . . . . . . . . . . . . . . . . . . . . . . . . . . . . . . . . . . . . . . . .6-1
The LCD Display Window . . . . . . . . . . . . . . . . . . . . . . . . . . . . . . . . . . . . . . .6-2
Status Lights . . . . . . . . . . . . . . . . . . . . . . . . . . . . . . . . . . . . . . . . . . . . . . . . . .6-2
Function Keys . . . . . . . . . . . . . . . . . . . . . . . . . . . . . . . . . . . . . . . . . . . . . . . . .6-3
The Elite 21 Menu System . . . . . . . . . . . . . . . . . . . . . . . . . . . . . . . . . . . . . . . .6-4
Main Menu Items . . . . . . . . . . . . . . . . . . . . . . . . . . . . . . . . . . . . . . . . . . . . . . .6-5
Held Job . . . . . . . . . . . . . . . . . . . . . . . . . . . . . . . . . . . . . . . . . . . . . . . . . .6-5
Information . . . . . . . . . . . . . . . . . . . . . . . . . . . . . . . . . . . . . . . . . . . . . . . . .6-5
Paper Handling . . . . . . . . . . . . . . . . . . . . . . . . . . . . . . . . . . . . . . . . . . . . .6-6
Print Quality . . . . . . . . . . . . . . . . . . . . . . . . . . . . . . . . . . . . . . . . . . . . . . . .6-7
Printing . . . . . . . . . . . . . . . . . . . . . . . . . . . . . . . . . . . . . . . . . . . . . . . . . . .6-8
Configuration . . . . . . . . . . . . . . . . . . . . . . . . . . . . . . . . . . . . . . . . . . . . . . .6-8
Input/Output . . . . . . . . . . . . . . . . . . . . . . . . . . . . . . . . . . . . . . . . . . . . . . . .6-9
Resets . . . . . . . . . . . . . . . . . . . . . . . . . . . . . . . . . . . . . . . . . . . . . . . . . . .6-10
ii
7. Networking the Elite 21 Printer . . . . . . . . . . . . . . . . . . . . . . . . . . . . . . . . . . . . . .7-1
Assigning an IP Address . . . . . . . . . . . . . . . . . . . . . . . . . . . . . . . . . . . . . . . . .7-2
Via the Front Panel . . . . . . . . . . . . . . . . . . . . . . . . . . . . . . . . . . . . . . . . . .7-2
Via DHCP . . . . . . . . . . . . . . . . . . . . . . . . . . . . . . . . . . . . . . . . . . . . . . . . .7-3
Macintosh Configuration . . . . . . . . . . . . . . . . . . . . . . . . . . . . . . . . . . . . . . . . . .7-4
Windows 95/98 Configuration . . . . . . . . . . . . . . . . . . . . . . . . . . . . . . . . . . . . . .7-5
Windows 2000 Configuration . . . . . . . . . . . . . . . . . . . . . . . . . . . . . . . . . . . . .7-12
Windows NT 4.0 Configuration . . . . . . . . . . . . . . . . . . . . . . . . . . . . . . . . . . . .7-14
Novell NetWare 2.x/3.x Configuration . . . . . . . . . . . . . . . . . . . . . . . . . . . . . . .7-17
Novell NetWare 4.x Configuration . . . . . . . . . . . . . . . . . . . . . . . . . . . . . . . . . .7-19
Unix Configuration . . . . . . . . . . . . . . . . . . . . . . . . . . . . . . . . . . . . . . . . . . . . .7-27
Setting IP Parameters using Telnet . . . . . . . . . . . . . . . . . . . . . . . . . . . . . . . . .7-34
8. Using WebAdmin . . . . . . . . . . . . . . . . . . . . . . . . . . . . . . . . . . . . . . . . . . . . . . . .8-1
Accessing WebAdmin . . . . . . . . . . . . . . . . . . . . . . . . . . . . . . . . . . . . . . . . . .8-2
Using WebAdmin to Control Printer Functions . . . . . . . . . . . . . . . . . . . . . . . . .8-5
9. Using the Printing Features of the Elite 21 . . . . . . . . . . . . . . . . . . . . . . . . . . . . .9-1
Printing Double-Sided (Duplex) Copies . . . . . . . . . . . . . . . . . . . . . . . . . . . . .9-2
Sending Jobs and Setting Fuser Temperature using Paper Type . . . . . . . . . . .9-4
Using the Multi-Purpose Feeder (Tray 1) . . . . . . . . . . . . . . . . . . . . . . . . . . . . .9-7
Printing Envelopes . . . . . . . . . . . . . . . . . . . . . . . . . . . . . . . . . . . . . . . . . . . . .9-10
Sending Jobs to the Rear (Face Up) Output . . . . . . . . . . . . . . . . . . . . . . . . . .9-12
Printing Held Jobs . . . . . . . . . . . . . . . . . . . . . . . . . . . . . . . . . . . . . . . . . . . . .9-13
Selecting Transmit Once Collation Mode . . . . . . . . . . . . . . . . . . . . . . . . . . . .9-15
Offsetting Printed Copies . . . . . . . . . . . . . . . . . . . . . . . . . . . . . . . . . . . . . . . .9-17
10. Maintenance and Troubleshooting . . . . . . . . . . . . . . . . . . . . . . . . . . . . . . . . .10-1
Cleaning the Printer . . . . . . . . . . . . . . . . . . . . . . . . . . . . . . . . . . . . . . . . . . . .10-2
Transporting the Printer . . . . . . . . . . . . . . . . . . . . . . . . . . . . . . . . . . . . . . . . .10-2
Replacing the Toner Cartridge . . . . . . . . . . . . . . . . . . . . . . . . . . . . . . . . . . . .10-3
Replacing the Backup Transfer Roller (BTR) . . . . . . . . . . . . . . . . . . . . . . . . .10-6
Replacing the Fuser . . . . . . . . . . . . . . . . . . . . . . . . . . . . . . . . . . . . . . . . .10-10
Error/Status Messages . . . . . . . . . . . . . . . . . . . . . . . . . . . . . . . . . . . . . . . . .10-13
Clearing Paper Jams . . . . . . . . . . . . . . . . . . . . . . . . . . . . . . . . . . . . . . . . .10-16
Paper Feed Jams . . . . . . . . . . . . . . . . . . . . . . . . . . . . . . . . . . . . . . . . .10-16
Paper Path Jams . . . . . . . . . . . . . . . . . . . . . . . . . . . . . . . . . . . . . . . . . .10-18
Paper Exit Jams . . . . . . . . . . . . . . . . . . . . . . . . . . . . . . . . . . . . . . . . . . .10-21
Duplex Unit Jams . . . . . . . . . . . . . . . . . . . . . . . . . . . . . . . . . . . . . . . . . .10-23
Upper Bin Jams . . . . . . . . . . . . . . . . . . . . . . . . . . . . . . . . . . . . . . . . . . .10-26
Print Quality Problems . . . . . . . . . . . . . . . . . . . . . . . . . . . . . . . . . . . . . . . . .10-28
iii
Appendices:
Appendix A: Specifications . . . . . . . . . . . . . . . . . . . . . . . . . . . . . . . . . . . . . . . .A-1
Appendix B: Paper Specifications . . . . . . . . . . . . . . . . . . . . . . . . . . . . . . . . . .B-1
Appendix C: Pinouts . . . . . . . . . . . . . . . . . . . . . . . . . . . . . . . . . . . . . . . . . . . .C-1
Appendix D: Radio and TV Interference . . . . . . . . . . . . . . . . . . . . . . . . . . . . . .D-1
Appendix E: PCL . . . . . . . . . . . . . . . . . . . . . . . . . . . . . . . . . . . . . . . . . . . . . . .E-1
Appendix F: Fonts . . . . . . . . . . . . . . . . . . . . . . . . . . . . . . . . . . . . . . . . . . . . . .F-1
Appendix G: Service and Support . . . . . . . . . . . . . . . . . . . . . . . . . . . . . . . . . .G-1
Appendix H: Ordering Accessories and Consumables . . . . . . . . . . . . . . . . . . .H-1
Appendix I: Contacting GCC Worldwide . . . . . . . . . . . . . . . . . . . . . . . . . . . . . .I-1
Appendix J: Warranties and Licenses . . . . . . . . . . . . . . . . . . . . . . . . . . . . . . . .J-1
iv
Introduction
Thank you for your purchase of a GCC Technologies Elite 21 Laser Printer. You
now have a high-quality, versatile solution to all of your printing needs. The
purpose of this manual is to show you how to set up and use your new printer.
Configurations
The Elite 21 printer is available in three configurations, as described below:
Elite 21 N
A high-resolution, networkable 1200 dpi laser printer with USB,
Parallel and Ethernet ports. Comes with 16MB of RAM.
Elite 21 DN
All the features of the Elite 21 N, plus the optional Duplex Unit
and 32MB of standard RAM.
Elite 21 SE
All the features of the Elite 21 DN, plus a 4GB hard drive for
font storage and 64MB of standard RAM.
Features and Benefits
The Elite 21 printer is GCC’s most feature-packed to date, offering these
features and more:
- Fast 80MHz PowerPC processor.
- 16MB of RAM minimum, upgradable to 256MB using standard SIMMs.
- 136 standard PS Level 3 compatible resident fonts.
- 550-sheet universal paper tray capacity, enough to hold an entire ream.
- External paper level indicators.
- Motorized paper lifts in each universal tray.
- Double-sided printing capabilities (optional on Elite 21 N).
- Transmit Once collation mode. Multiple copies generated at printer.
- Hold and print last job from front panel.
- Optional motorized envelope feeder.
- Optional upper output bin.
v
Using this Manual
This manual is presented as an Adobe Acrobat portable document format (.pdf)
file. If you are reading this page, you have successfully installed Acrobat or
Acrobat Reader on your computer and opened this document.
The Acrobat Screen
The Acrobat screen is divided into two parts, with bookmarks on the left and
pages on the right. The bookmarks act as a Table of Contents for the manual.
Clicking on any bookmark will bring you to that portion of the manual. If a
bookmark has a triangle or plus sign to its left, this indicates that there are subtopics located under that bookmark. Click the triangle or plus sign to view the
sub-topics, click again to hide them.
Depending on the size of your computer’s screen, you may need to magnify the
page. You can choose the magnification you want by clicking on the
magnification box in the status bar at the bottom center of the screen.
•
Fit Page shows the entire height of the page.
•
Fit Width shows the entire width of the page. You won’t be able to see some of the top
or bottom of the page.
•
Fit Visible is similar to Fit Width, but shows the width of the page between margins.
You can also choose percentage views from the list, or choose Other to create
a specific percentage view. You can also use the magnifying glass button in the
tool bar to drag over an area of the page you want to enlarge.
When you change the magnification it remains at that setting for all pages until
you change it again.
Moving Through Pages
You can move forward and backward through the sections of the Elite 21
User’s Manual by dragging the vertical scroll bar. When you do this, a window
will appear showing which page you are selecting.
If you click in the background area of the vertical scroll bar, you’ll move one
page at a time. If the magnification you’ve chosen shows less than a full page,
you’ll see the top part of each page followed by the bottom part.
vi
You can also use the tool bar buttons to move from page to page.
The GCC manual also contains hyperlinks, marked by the use of Blue text
within the manual. Click on any of these links to go to that location.
Finding Text
To find specific information in the manual, use the Find command within
Acrobat. This command takes the place of a traditional index. To use Find,
follows these steps:
•
•
•
•
Click on the Find button in the tool bar, or go to the Edit menu and select Find.
The Find dialog box will appear. Enter the word(s) you want to find.
Click OK. The program takes you to the next place the word appears.
If you don’t find the information you’re looking for, press Command-G (Macintosh) or
Control-G (Windows) to Find Again. This will bring you to the next place the word appears.
vii
1. Hardware Setup
This chapter of the user’s manual covers setting up the Elite 21 printer. This
information is also available in the printed Elite 21 Installation Guide which
shipped with your printer.
Installation Checklist
For proper installation, please complete each section in order:
Step 1
Check Package Contents
Step 2
Prepare Printer Location
Step 3
Locate Printer Parts
Step 4
Remove Tape
Step 5
Install the Toner Cartridge
Step 6
Load the Paper Tray
Step 7
Connect Printer Cables
Step 8
Attach Power Cord
Step 9
Install Printing Software
Step 10
Install Accessories
Step 11
Verify Printer Setup
1-1
Step 1. Check Package Contents
Elite 21 Laser Printer
550-sheet Universal Paper Cassette
Toner Cartridge
Power Cord
Customer Kit:
Elite 21 Series CD-ROM
Elite 21 Installation Guide
Elite 21 Installation Poster
Elite 21 Users Manual (On CD-ROM)
Note:
No printer cables are included with the printer. For information on ordering cables, contact GCC
Direct Sales at 800 422-7777 (North America only, outside of North America refer to the back
cover) or visit our web site at:
http://www.gccprinters.com
1-2
Step 2. Prepare Printer Location
Place the printer on a flat, level surface in a well-ventilated area away from
direct sunlight or areas where the air temperature and humidity can vary widely.
Do not obstruct the fan vent on the right side of the printer.
Minimum Recommended Clearances:
Top View
7.87” (200mm)
23.62” (600mm)
23.62” (600mm)
11.81” (300mm)
Side View
19.68” (500mm)
(with all options
installed)
23.62” (600mm)
23.62” (600mm)
1-3
Step 3. Locate Printer Parts
Front View
Control Panel
Paper Output Tray
Paper Exit Slot
Front Cover
Multipurpose Feeder
(Tray 1)
Tray Extension
Power Switch
550-sheet Universal
Cassette (Tray 2)
Rear View
Rear Cover
Top Cover
Connectivity Ports
(see next page for
details)
Power Cord
Receptacle
Ventilation Slots
1-4
Connectivity ports
Ethernet 10/100BaseT
Bi-directional Parallel
With the printer’s
all ports active feature,
all the interfaces are
simultaneously active.
This means you can
connect more than one
interface at a time. You
don’t have to select a
port; this feature works
automatically.
Universal Serial Bus (USB)
RS-232 Serial
1-5
Step 4. Remove Tape
1. Remove packaging tape from the front and
rear covers of the printer.
1-6
Step 5. Install the Toner Cartridge
1. Press down on the release button at the
top of the printer to open the front cover.
2. Remove the two orange plastic spacers
inserted in the printer by pulling them out of
the printer as shown.
Note:
The toner cartridge contains a microfine plastic powder that is fused to the paper during
the printing process. If toner spills onto your skin or clothing during installation, wipe off with a
dry cloth and rinse with cold water. Hot water can fuse the toner and cause staining.
1-7
3. Unwrap the toner cartridge and remove the
protective sheet of paper from under the
front flap of the cartridge. Shake the
cartridge from side to side several times as
shown to distribute the toner.
4. Place the toner cartridge on a flat surface
and hold the cartridge securely with one
hand. Grasp and pull the sealing tape
straight out from the side of the cartridge,
as shown. Pulling the tape out at an angle
may cause it to break.
Do not shake the cartridge or subject it to
shocks once the tape is removed, as this
may result in toner leakage.
5. Position the toner cartridge as shown.
Match up the tabs on the left and right of
the cartridge with the channels within the
printer. Gently slide the cartridge into the
printer as far as it will go.
1-8
6. Close the front cover. Press on the center
part of the front cover until the cover locks
securely.
1-9
Step 6. Load the Paper Tray
The standard paper tray holds up to 550 sheets of 20 lb. copier-type paper. It
can handle the following sizes of paper:
•Letter
•Executive
•Legal 13”
•Legal 14”
•A4
•B5
•A5
Smaller sizes can be fed through the Multipurpose feeder (Tray 1). The
standard paper tray will also handle up to 100 transparency or label sheets in
Letter or A4 size.
1. Place the paper tray on a desk or other
flat surface.
2. Squeeze the rear length guide tab as
shown and slide the tab all the way to
the back of the paper tray.
1-10
3. For sizes larger than Letter/A4, press
down on the grey square at the bottom of
the tray. This will release the rear section
of the tray and the section can be adjusted
outward to extend the tray’s length.
The rear section of the tray adjusts to
three different positions. Choose the
position that most closely matches the
paper size being loaded.
4. Squeeze the right side paper guide as
shown. Lift the guide slightly and slide it all
the way to the side of the tray.
5. Place the paper in the center of the paper
tray, being sure not to overfill the tray. The
paper should be placed in the tray with the
side to be printed on facing down.
1-11
6. Squeeze the right side paper guide as
shown. Lift the guide slightly and slide it
towards the paper stack until it touches the
paper. Do not set the guide too tightly
against the paper stack, as this could
cause paper feed jams.
7. Squeeze the paper length guide at the
rear of the tray as shown. Lift the guide
slightly and slide it towards the paper stack
until the guide matches up with the
indentation in the bottom of the paper tray
which corresponds with the paper size
being used.
8. Grasp the paper tray with both hands at
the left and right, as shown.
1-12
9. Gently slide the paper tray all the way into
the printer.
10. The paper level indicator on the front of
the tray will rise to show the remaining
level of paper in the tray. Replenish paper
as necessary.
1-13
Step 7. Connect Printer Cables
Connecting Cables Correctly
Most cables come with some kind of locking device to insure that the connection
is made. Be sure to use these locking devices, otherwise you may experience
intermittent errors or the printer will fail to operate altogether.
•
USB cables are keyed and can only be inserted one way.
•
When you have inserted a Parallel port connector, lock the connector by lifting up the
wire clips at either end of the socket so that they fit into the slots on the sides of the
connector.
•
Ethernet 10/100 BaseT connectors have a locking tab similar to connectors on
telephone cords. When the plug is fully inserted, the tab clicks into place.
•
RS-232 Serial connectors have screws on either side that should be used to secure the
cable to the printer.
Improperly inserted cables are the cause of many networking and printer-related
problems.
Universal Serial Bus (USB) Connection
USB connection ports can be found on nearly all new computers. USB
technology allows faster communication than traditional serial connections and
is easily expandable through interconnected hubs. All USB cables are the same.
One end of the cable fits into the computer or hub only and the other end fits
into the printer only. You cannot connect the cable incorrectly.
Bi-directional Parallel Connection
The bi-directional parallel connection between the printer and a PC requires a
standard 36-pin bi-directional cable (to IEEE 1284 standards). The length of this
cable can be up to 6.5 feet (2 meters).
1-14
RS-232 Serial Connection
The RS-232 Serial connection between the printer and a PC requires a
standard 9-pin RS-232 cable. The length of this cable can be up to 50 feet
(15.4 meters). Serial connections are slower than parallel or Ethernet
connections, therefore the RS-232 connection is only recommended for users
who require a cable connection greater than 6.5 feet and do not have access to
an Ethernet network.
Ethernet Network Connection
The Ethernet interface on your printer lets you connect to an Ethernet network
via standard 10 BaseT or 100 BaseT cabling.
1-15
Step 8. Attach Power Cord
1. Insert the power cord into the AC power
connector on the back of the printer as
shown.
2. Check the power switch at the front of the
printer to confirm that it is in the Off (O)
position.
3. Plug the power cord into a grounded wall
outlet or power strip.
4. Switch the power switch to the On (I)
position. After the printer warms up, the
“Ready” message should be visible on the
control panel’s LCD display and the Ready
light will remain on.
1-16
Step 9. Install Printing Software
Driver software for the printer must be installed on every computer that will print
to the unit. This section includes installation instructions for Macintosh,
Windows 95/98, Windows 2000 and Windows NT 4.0.
Please refer to the chapter of this manual relating to the operating system
being used on your computer(s) for detailed software installation instructions,
as follows:
Macintosh . . . . .
Windows 95/98 .
Windows 2000 . .
Windows NT 4.0
.
.
.
.
.
.
.
.
.
.
.
.
.
.
.
.
.
.
.
.
.
.
.
.
.
.
.
.
.
.
.
.
.
.
.
.
.
.
.
.
.
.
.
.
.
.
.
.
.
.
.
.
.
.
.
.
.
.
.
.
.
.
.
.
.
.
.
.
.
.
.
.
.
.
.
.
.
.
.
.
.
.
.
.
.
.
.
.
.
.
.
.
.
.
.
.
.Chapter
.Chapter
.Chapter
.Chapter
2
3
4
5
1-17
Step 10. Install Accessories
This section covers installation of any additional accessories that you may have
purchased with the printer. Accessories include:
• Additional Lower Paper Feeder(s)
• Duplex Unit (Elite 21 N only)
• Upper Output Bin
• Envelope Feeder
• Additional Memory (RAM)
• Internal Hard Disk
Accessories can be ordered through GCC Technologies via our web site at:
http://www.gccprinters.com
You can also contact GCC Sales at 800 422-7777 (North America Only, outside
North America, refer to the back cover) or your local GCC authorized dealer.
1-18
Step 10a. Paper Feeder Installation
Part One - Instructions for installing one additional paper feeder and tray
1. Place the paper feeder on a sturdy, level
surface.
2. Switch off the power to the printer and
disconnect the power cord from the AC
outlet and the printer.
3. Close the Multi-Purpose Feeder and
remove any printouts left in the paper
output tray.
1-19
4. Remove the paper tray from the printer.
5. Lift the printer up vertically and lower it onto
the optional paper feeder. Align the five
posts on the feeder with the corresponding
holes on the bottom of the printer.
Be sure to lower the printer gently, as
lowering it too quickly may damage the
printer or feeder.
6. Insert the three supplied screws into the
holes inside of the paper feeder as shown
to secure the feeder to the printer.
1-20
7. Load paper into the tray, then insert both
trays into the printer.
Reconnect the AC power cord to the printer
and outlet, then restart the printer.
1-21
Part Two - Instructions for installing two additional paper feeders and trays
1. Place the second paper feeder on a sturdy,
level surface.
2. Align the five posts on the second paper
feeder with the holes on the bottom of the
first feeder and stack the two feeders up
together.
3. Insert the supplied screws into the three
holes on the inside of the top feeder as
shown to secure the two feeders together.
1-22
4. Switch off the power to the printer and
disconnect the power cord from the AC
outlet and the printer.
5. Close the Multi-Purpose Feeder and
remove any printouts left in the paper
output tray.
6. Remove the cassette from the printer.
1-23
7. Lift the printer up vertically and lower it onto
the optional paper feeders. Align the five
posts on the first feeder with the
corresponding holes on the bottom of the
printer.
Be sure to lower the printer gently, as
lowering it too quickly may damage the
printer or feeders.
8. Insert the three supplied screws into the
holes inside of the printer as shown to
secure the feeders to the printer.
9. Load paper into the cassettes, then insert
all three cassettes into the printer.
Reconnect the AC power cord to the printer
and outlet, then restart the printer.
1-24
Configuring Printer Drivers for use of the Additional Paper Feeder(s)
Once one or more additional feeders are installed, you will need to change settings within the
driver software on all the computers that use the printer. This will allow Tray 3 and/or Tray 4 to
show up as options when selecting a paper source for your print jobs. The drivers can be
configured as follows:
Macintosh:
•
•
•
•
Click once on the desktop printer icon for your printer to highlight it.
Go to the Printing menu at the top of the screen, then down to “Change Setup...”
In the Setup window, click on the “Change” pull-down menu and go down to “Additional Trays.”
Change the setting in the “To:” pull-down menu to either “Tray 3” (for one tray) or “Tray 3 and
4” (for two trays).
• Click OK to accept the change.
Windows 95/98:
•
•
•
•
•
Go to the Start menu, then to Settings and Printers.
Right-click the printer icon for your Elite 21 printer and select Properties.
Click on the Device Options tab.
Under Installable Options, click on “Additional Trays.”
Under “Change Setting for:,” change the selection to either “Tray 3” (for one tray) or “Tray 3
and 4” (for two trays).
• Click Apply and OK to accept the change.
Windows 2000:
•
•
•
•
Go to the Start menu, then to Settings and Printers.
Right-click the printer icon for your Elite 21 printer and select Properties.
Click on the Device Settings tab, then scroll down to Installable Options.
Click on the link next to Additional Trays that says “Not Installed.” This link will become a pulldown menu.
• Change the selection to either “Tray 3” (for one tray) or “Tray 3 and 4” (for two trays).
• Click Apply and OK to accept the change.
Windows NT 4.0:
•
•
•
•
•
Go to the Start menu, then to Settings and Printers.
Right-click the printer icon for your Elite 21 printer and select Properties.
Click on the Device Settings tab, then scroll down to Installable Options.
Click on “Additional Trays” from the list of options.
Under the “Change Setting to:” box, change the selection to either “Tray 3” (for one tray) or
“Tray 3 and 4” (for two trays).
• Click Apply and OK to accept the change.
1-25
Step 10b. Duplex Unit Installation
Note: These instructions apply to users of the Elite 21 N model who are adding the Duplex Unit
as an option. The Elite 21 DN and Elite 21 SE models ship with the Duplex Unit pre-installed.
1. Remove the paper cassette from the printer
(if installed).
2. Squeeze the latch at the upper left of the
rear cover and pull towards you to open the
rear cover.
3. Line the Duplex Unit up with the left and
right channels inside the printer (as shown)
and slide the unit firmly all the way into the
printer.
1-26
4. Slide the green tabs on the left and right of
the Duplex Unit outward to secure the unit
to the printer.
5. Close the rear cover, making sure it latches
completely.
1-27
Configuring Printer Drivers for use of the Duplex Unit
Once the Duplex Unit is installed, you will need to change settings within the driver software on
all of the computers that use the printer. This will allow the Duplex Unit to show up as an option
when sending your print jobs. The drivers can be configured as follows:
Macintosh:
•
•
•
•
•
Click once on the desktop printer icon for your printer to highlight it.
Go to the Printing menu at the top of the screen, then down to “Change Setup...”
In the Setup window, click on the “Change” pull-down menu and go down to “Duplex Unit.”
Change the setting in the “To:” pull-down menu to “Installed.”
Click OK to accept the change.
Windows 95/98:
•
•
•
•
•
•
Go to the Start menu, then to Settings and Printers.
Right-click the printer icon for your Elite 21 printer and select Properties.
Click on the Device Options tab.
Under Installable Options, click on “Duplex Unit.”
Under “Change Setting for:,” change the selection to “Installed.”
Click Apply and OK to accept the change.
Windows 2000:
•
•
•
•
Go to the Start menu, then to Settings and Printers.
Right-click the printer icon for your Elite 21 printer and select Properties.
Click on the Device Settings tab, then scroll down to Installable Options.
Click on the link next to “Duplex Unit” that says “Not Installed.” This link will become a pulldown menu.
• Change the selection to “Installed.”
• Click Apply and OK to accept the change.
Windows NT 4.0:
•
•
•
•
•
•
1-28
Go to the Start menu, then to Settings and Printers.
Right-click the printer icon for your Elite 21 printer and select Properties.
Click on the Device Settings tab, then scroll down to Installable Options.
Click on “Duplex Unit” from the list of options.
Under the “Change Setting to:” box, change the selection to “Installed.”
Click Apply and OK to accept the change.
Step 10c. Upper Output Bin Installation
1. Remove the paper cassette from the printer
(if installed).
2. Squeeze the latch at the upper left of the
rear cover and pull towards you to open the
rear cover.
3. Locate the two plastic tabs which hold the
top cover in place, as shown. Gently press
in on these tabs to release the cover and
lift the cover off.
Store the cover in a safe place.
1-29
4. Gently lower the front edge of the Upper
Output Bin into position, inserting the tab at
the front of the tray into the slot on the
printer as shown.
5. Lower the rear of the tray into position,
making sure that the two plastic tabs at the
rear of the tray match up with the slots in
the printer. The tabs should click securely
into place.
6. Close the rear cover, making sure it latches
completely.
1-30
7. Lift up the paper stopper arm and open the
tray, as shown.
8. Extend the paper tray all the way out and
lift up the paper stopper.
9. Adjust the tray to match the paper size
being output.
1-31
Configuring Printer Drivers for use of the Upper Output Bin
Once the upper output bin is installed, you will need to change settings within the driver
software on all of the computers that use the printer. This will allow the Upper Output Bin to
show up as an option when selecting an output location for your print jobs. The drivers can be
configured as follows:
Macintosh:
•
•
•
•
•
Click once on the desktop printer icon for your printer to highlight it.
Go to the Printing menu at the top of the screen, then down to “Change Setup...”
In the Setup window, click on the “Change” pull-down menu and go down to “Upper Bin.”
Change the setting in the “To:” pull-down menu to “Installed.”
Click OK to accept the change.
Windows 95/98:
•
•
•
•
•
•
Go to the Start menu, then to Settings and Printers.
Right-click the printer icon for your Elite 21 printer and select Properties.
Click on the Device Options tab.
Under Installable Options, click on “Upper Bin.”
Under “Change Setting for:,” change the selection to “Installed.”
Click Apply and OK to accept the change.
Windows 2000:
•
•
•
•
Go to the Start menu, then to Settings and Printers.
Right-click the printer icon for your Elite 21 printer and select Properties.
Click on the Device Settings tab, then scroll down to Installable Options.
Click on the link next to “Upper Bin” that says “Not Installed.” This link will become a pull-down
menu.
• Change the selection to “Installed.”
• Click Apply and OK to accept the change.
Windows NT 4.0:
•
•
•
•
•
•
1-32
Go to the Start menu, then to Settings and Printers.
Right-click the printer icon for your Elite 21 printer and select Properties.
Click on the Device Settings tab, then scroll down to Installable Options.
Click on “Upper Bin” from the list of options.
Under the “Change Setting to:” box, change the selection to “Installed.”
Click Apply and OK to accept the change.
Step 10d. Envelope Feeder Installation
1. Open the Multi-Purpose Feeder at the front
of the printer.
2. Remove the gear cover at the left rear of
the feeder opening by pushing it inward
while lifting up on its front edge with your
finger, as shown.
Store the gear cover in a safe place.
3. Push the Envelope Feeder into the feeder
opening as far as it will go. Make sure the
feeder is seated securely in place.
1-33
Configuring Printer Drivers for use of the Envelope Feeder
Once the envelope feeder is installed, you will need to change settings within the driver software
on all of the computers that use the printer. This will allow the Envelope Feeder to show up as
an option when selecting a paper source for your print jobs. The drivers can be configured as
follows:
Macintosh:
• Click once on the desktop printer icon for your printer to highlight it.
• Go to the Printing menu at the top of the screen, then down to “Change Setup...”
• In the Setup window, click on the “Change” pull-down menu and go down to “Envelope
Feeder.”
• Change the setting in the “To:” pull-down menu to “Installed.”
• Click OK to accept the change.
Windows 95/98:
•
•
•
•
•
•
Go to the Start menu, then to Settings and Printers.
Right-click the printer icon for your Elite 21 printer and select Properties.
Click on the Device Options tab.
Under Installable Options, click on “Envelope Feeder.”
Under “Change Setting for:,” change the selection to “Installed.”
Click Apply and OK to accept the change.
Windows 2000:
•
•
•
•
Go to the Start menu, then to Settings and Printers.
Right-click the printer icon for your Elite 21 printer and select Properties.
Click on the Device Settings tab, then scroll down to Installable Options.
Click on the link next to “Envelope Feeder” that says “Not Installed.” This link will become a
pull-down menu.
• Change the selection to “Installed.”
• Click Apply and OK to accept the change.
Windows NT 4.0:
•
•
•
•
•
•
1-34
Go to the Start menu, then to Settings and Printers.
Right-click the printer icon for your Elite 21 printer and select Properties.
Click on the Device Settings tab, then scroll down to Installable Options.
Click on “Envelope Feeder” from the list of options.
Under the “Change Setting to:” box, change the selection to “Installed.”
Click Apply and OK to accept the change.
Step 10e. Installing Additional Memory
Introduction
You can print more documents and download more fonts to your printer if you add RAM. To do
this, you have to open up the printer and insert a SIMM (Single Inline Memory Module). The
printer can hold up to 256 MB of RAM, in two SIMM sockets. There is already at least one
SIMM installed in the printer.
Specifications
You can add SIMMs of any size from 2 MB to 128 MB. SIMMs must be non-parity 72-pin, 70
nanoseconds or faster, non-composite, symmetrical, low-profile, 5-volt, and tin leaded. This kind
of memory is readily available from many sources, or you can order upgrade kits direct from
GCC. Use only EDO (extended data out) or FPM (fast page mode). You cannot use DIMMs,
SDRAM, or other special RAM technologies. Do not use gold plated connectors. SIMMs do not
have to be installed in pairs, nor do you have to add a SIMM of the same size as that already
installed. You can install any capacity SIMM in either socket.
Why would I need to add memory to the printer?
GCC printers ship with enough standard RAM to handle most print jobs at the largest page size
and resolution supported by the printer. Some print jobs, however, may be more complex than
the standard RAM is able to handle and therefore require additional RAM. Jobs with heavy
graphical content and/or many font faces will typically require the most memory.
In addition, you’ll need printer RAM for any fonts you download. These require as much RAM as
the space they occupy on the hard drive of your computer. In general, each font occupies 50 100k of RAM.
You will continue to obtain minor performance improvements as you add additional memory up
to a maximum of 256 MB of RAM.
Required tools and safety precautions
You should not need any tools to add memory to your printer. However, you should guard
against static discharges. Your body can easily accumulate a static charge; if you touch a
sensitive piece of circuitry, you can destroy it without realizing.
GCC strongly recommends that you use a grounding wrist strap. You can buy one from any
computer parts outlet. If you do not have a grounding wrist strap, touch the perforated metal
chassis of the printer to discharge any static electric charge your body may have.
1-35
RAM Installation Steps
1. Set the printer’s power switch to the Off (O)
position and unplug the power cord from
the wall. Removing the side cover of the
printer while the unit is turned on may
result in damage to the printer.
2. Loosen the two thumbscrews at the top
and bottom of the left side cover.
3. Pull the cover towards the back of the
printer and down to remove it.
1-36
4. This will expose the main controller board
of the printer. The two RAM SIMM slots are
to the right of the board. There are three
slots in this area of the board, the two slots
to the left are the RAM SIMM slots.
At least one of the SIMM slots should have
a RAM SIMM pre-installed. Depending on
the existing RAM configuration of the
printer, the other slot may or may not be
open.
SIMM Slots
5. If replacing existing memory with larger
capacity SIMMs, remove the existing
SIMM(s) as shown.
Install the new SIMM(s) by positioning the
SIMM into the slot at approximately a 45
degree angle with its notched end at the
top of the slot. Gently rotate the SIMM to
the right until it clicks into place under the
metal guide clips.
1-37
6. Replace the side cover by matching up the
top of the cover with the slot at the top of
the printer (1) and the small tab at the
bottom of the cover with the slot in the
printer (2).
7. Slide the cover forward to lock it into place,
as shown.
8. Secure the screws at the top and bottom of
the side cover. Reconnect the power cord
and restart the printer.
1-38
Configuring Printer Drivers for use of Additional Memory
Once the additional memory is installed, you will need to change settings within the driver
software on all of the computers that use the printer. This will allow the drivers to properly
account for the amount of installed RAM in the printer when sending print jobs. The drivers can
be configured as follows:
Macintosh:
• Click once on the desktop printer icon for your printer to highlight it.
• Go to the Printing menu at the top of the screen, then down to “Change Setup...”
• In the Setup window, click on the “Change” pull-down menu and go down to “Memory
Configuration.”
• Change the setting in the “To:” pull-down menu to the correct memory range for your printer
(i.e. - “48-55 MB” for a printer that has been upgraded to between 48 and 55 MB).
• Click OK to accept the change.
Windows 95/98:
•
•
•
•
•
Go to the Start menu, then to Settings and Printers.
Right-click the printer icon for your Elite 21 printer and select Properties.
Click on the Device Options tab.
Under Installable Options, click on “VM Option.”
Under “Change Setting for:,” change the selection to the correct memory range for your
printer.
• Click Apply and OK to accept the change.
Windows 2000:
•
•
•
•
•
•
Go to the Start menu, then to Settings and Printers.
Right-click the printer icon for your Elite 21 printer and select Properties.
Click on the Device Settings tab, then scroll down to “Installable Options.”
Click on the link next to “Memory Configuration.” This link will become a pull-down menu.
Change the selection to the correct memory range for your printer.
Click Apply and OK to accept the change.
Windows NT 4.0:
•
•
•
•
•
Go to the Start menu, then to Settings and Printers.
Right-click the printer icon for your Elite 21 printer and select Properties.
Click on the Device Settings tab, then scroll down to Installable Options.
Click on “Memory Configuration” from the list of options.
Under the “Change Setting to:” box, change the selection to the correct memory range for
your printer.
• Click Apply and OK to accept the change.
1-39
Step 11. Verify Printer Setup
In order to verify that the printer has been set up properly, we recommend
sending a simple print job from the computer to the printer. To do this, make
sure that the Elite 21 printer is selected as the default printer on your computer,
as follows:
Macintosh: Single-click the printer’s icon on the Desktop. Go to the Printing
menu, then down to “Set Default Printer.”
Windows (all versions): Go to Start, then Settings, then Printers. Right-click the
icon for the printer. Select “Set as Default” from the list.
Once the printer is selected, open an application on the computer (such as
SimpleText on the Mac or NotePad in Windows) and create a simple file. Go to
File and then to Print to print the job.
If the job prints, installation is complete. If the job fails to print, confirm that
Steps 1-10 in this manual have been performed correctly. If the printer still will
not print, repeat steps 1 -10. If you still have difficulty getting a document to
print, contact GCC Technical Support by phone at (781) 276-8620 (North
America only; outside North America, refer to the back cover) or
http://www.gccprinters.com/support or contact your authorized GCC dealer.
1-40
Additional Installation Notes
Configuring Startup Page
The Elite 21 printer will print a Configuration Page each time that the printer is
started up. This page serves as a hardware test at startup, to make sure that
all printer systems are working properly and that the printer is able to print a
page successfully. This page also provides a listing of all user-configurable
printer parameters and their current settings, which can be useful in printer
troubleshooting.
Some users, especially those who restart their printer often, may wish to
disable this page. The steps for disabling the Startup Page are as follows:
•
•
•
•
•
•
Make sure the printer’s display is reading “Ready.”
Press Menu up or down until “Configuration” appears.
Press Item up or down until “Startup Page” appears.
Press Value up or down until “Disabled” appears.
Press Select to accept the new setting.
Press Menu up or down until the display returns to “Ready.”
The Startup Page will not print out the next time the printer is started.
Note: The factory default for the Startup Page is Enabled, so if the printer is
reset to defaults using the “Restore Defaults” feature in the Resets menu, the
page will be re-enabled. Follow the steps above to disable to page again in this
case.
Memory Configuration (Elite 21 DN and Elite 21 SE only)
The GCC Elite 21 Series uses a single PostScript Printer Description (PPD) file
for all three Elite 21 models. As a result, the default memory setting for the
printer is set to 16MB (the minimum amount of shipping RAM for the series)
within the PPD file. Users of the Elite 21 DN and Elite 21 SE models should
follow the instructions found on Page 78 to assure that the printer driver is set
to use the appropriate amount of memory. The Elite 21 DN ships with 32MB of
1-41
standard RAM; the Elite 21 SE ships with 64MB standard.
Hard Drive Configuration (Elite 21 SE only)
The Elite 21 SE ships with a standard 4GB hard drive pre-installed. The PPD
file for the Elite 21 Series, however, defaults to “Not Installed” for the hard drive
option. Users of the Elite 21 SE model will therefore need to change the driver
configuration to reflect the presence of the hard drive, as follows:
Macintosh:
• Click once on the desktop printer icon for your printer to highlight it.
• Go to the Printing menu at the top of the screen, then down to “Change Setup...”
• In the Setup window, click on the “Change” pull-down menu and go down to “Internal Hard
Disk.”
• Change the setting in the “To:” pull-down menu to “Installed.”
• Click OK to accept the change.
Windows 95/98:
•
•
•
•
•
•
Go to the Start menu, then to Settings and Printers.
Right-click the printer icon for your Elite 21 printer and select Properties.
Click on the Device Options tab.
Under Installable Options, click on “Internal Hard Disk.”
Under “Change Setting for:,” change the selection to “Installed.”
Click Apply and OK to accept the change.
Windows 2000:
•
•
•
•
•
•
Go to the Start menu, then to Settings and Printers.
Right-click the printer icon for your Elite 21 printer and select Properties.
Click on the Device Settings tab, then scroll down to “Installable Options.”
Click on the link next to “Internal Hard Disk.” This link will become a pull-down menu.
Change the selection to “Installed.”
Click Apply and OK to accept the change.
Windows NT 4.0:
•
•
•
•
•
•
1-42
Go to the Start menu, then to Settings and Printers.
Right-click the printer icon for your Elite 21 printer and select Properties.
Click on the Device Settings tab, then scroll down to Installable Options.
Click on “Internal Hard Disk” from the list of options.
Under the “Change Setting to:” box, change the selection to “Installed.”
Click Apply and OK to accept the change.
2. Using the Elite 21 with a Macintosh
This Chapter will cover the installation, configuration and use of the Elite 21
Series printer with a Macintosh. This includes:
• Software Installation
• Setting up a Desktop Printer
• Printing from a Macintosh
• Additional Macintosh Information
2-1
Software Installation
You will need to set up your Macintosh computer to use the Elite 21 Series by
installing the Elite 21 software for Macintosh. This software is on the Elite 21
Series CD-ROM. The CD-ROM includes Apple Laserwriter software version
8.6, customized PostScript Printer Description (PPD) files for the Elite 21
Series and screen fonts for each of the resident PostScript printer fonts.
This section details installation instructions for installing drivers for Macintosh.
Important: Read the release notes contained in the Read Me file before
installing the printer software. This file includes important last-minute feature
and compatibility information about the Elite 21. This file is located on the Elite
21 Series CD-ROM.
2-2
Step 1- Installing the GCC Printing Software and Fonts
1. Insert the Elite 21 Series CD-ROM into the
computer and double-click the CD icon to
open the disk. Double-click the “Elite 21
Installer” icon within the disk window
2. An introduction screen marked “Elite 21
Series Installer” will appear. Click OK.
3. The software license agreement will
appear. Read the agreement and click
Accept to accept its terms.
2-3
4. A window will appear listing the
components that will be installed and
asking for an Install Location. Choose the
disk that you wish to install the software
onto (the startup disk of the Mac in most
cases) and click Continue.
5. A Custom Install option is also available. If
you only wish to install certain components
of the printing software, click on the Elite 21
Software pull-down menu and select
Custom Install. Select the items you wish to
install by clicking on the check boxes next
to them, and click Continue.
6. A dialog box may appear informing you that
no other applications can be running during
the software installation. Click Continue to
quit any other applications and continue
with the installation.
2-4
7. Installation of the files will begin. A status
window will appear showing the progress of
the installation.
8. When the installation is complete, a dialog
box will appear asking if you want to setup
a Desktop Printer. Click Yes to setup the
printer.
9. A dialog box asking how the printer is connected will appear. Make sure the printer is
turned on and connected properly. Select
the connection method being used for the
printer (AppleTalk, USB or LPR) and click
Setup Printer.
2-5
10.
Clicking the “Setup Printer” button will open either Apple’s Desktop Printer Utility (USB or
LPR connections) or the Chooser (AppleTalk connections) in order to setup the printer.
Refer to the instructions for Creating a Desktop Printer, covered in Step 2 of the Macintosh
installation instructions in this guide as follows:
Connecting via USB:
Connecting via EtherTalk:
Connecting via LPR:
Step 2a, Page 2-7
Step 2b, Page 2-10
Step 2c, Page 2-14
11. When the printer is setup, a Product
Registration screen will appear. You can
choose to register the printer over the internet, which will access a registration form
via your web browser. You can also select
Other Registration Method, which will allow
for registration via e-mail, fax or mail.
12. When the registration process is complete,
the installation will finish. Click Restart to
restart the Mac.
2-6
Step 2a - Creating a Desktop Printer (via USB)
(Note: USB connection requires Mac OS 8.6 or higher)
1. Make sure that all steps in the Hardware
Setup section of this manual have been followed. Follow the Macintosh installation
steps in Part 1 of this section. In Step 9,
select “USB” as the connection method and
click “Setup Printer.”
2. This will open up Apple’s Desktop Printer
Utility and the “New Desktop Printer” dialog
box will appear.
Highlight “Printer (USB)” from this list and
click OK.
3. A dialog box called “Untitled 1” opens,
containing two printer icons. Double-click
the bottom icon, in the “USB Printer
Selection” box.
2-7
4. The “USB Printer” dialog box will appear.
Click on your printer model from the list,
then click OK.
5. The “Untitled 1” dialog box will return. Click
on the Auto Setup button at the top right of
the box.
6. A status window appears, showing the
progress of the installation.
2-8
7. The “Untitled 1” dialog box returns again.
The icon in the “PostScript Printer
Description (PPD) File” box now shows
your printer.
Click Create to create the new desktop
printer.
8. A Save dialog box opens, asking you to
save the desktop printer. Type in a name
for the desktop printer, or leave the default
name. Click Save.
A new Desktop Printer icon will appear on
the desktop with the name that you
assigned.
9. Go to File and Quit to exit the Desktop
Printer Utility. The printer is selected and
ready to print.
The GCC Product Registration utility will
run after the printer is setup. Please follow
the registration instructions to register your
printer.
2-9
Part 2b - Creating a Desktop Printer (via EtherTalk)
Due to potential incompatibilities between Apple’s Desktop Printer Utility and certain AppleTalk
networks, GCC does not recommend using the Apple Desktop Printer Utility to set up the Elite
21 series printer over EtherTalk. As a result, the Elite 21 Series software uses the Chooser to
set up the printer over EtherTalk rather than the Desktop Printer Utility. Follow these steps to
setup your printer over an EtherTalk connection.
1. Confirm that the Macintosh is properly
configured to communicate over EtherTalk.
Go to the Apple menu, then to Control
Panels and to AppleTalk. In the AppleTalk
window, confirm that the “Connect via:”
selection is set to Ethernet. Close the
control panel. Click Save if prompted to
save settings.
2. Make sure that all steps in the Hardware
Setup section of this manual have been followed. Follow the Macintosh installation
steps in Part 1 of this section. In Step 9,
select “AppleTalk” as the connection
method and click “Setup Printer.”
2-10
3. This will open up the Chooser window.
Click on the LaserWriter 8 icon in the lefthand Chooser window. A list of AppleTalk
compatible printers will appear on the right.
Click on the name of your printer from the
list. The default printer name will be the
same as the model name of the printer
(i.e., “Elite 21 N”.) Click “Create.”
4. The Chooser will open a connection to the
printer and attempt to select the proper
PPD file for the printer.
5. A “Select a PostScript Printer Description
File” dialog may appear. Click on “Elite 21
Series” from this list and click “Select.”
2-11
6. The Setup process will continue. A
statusbar will show the progress of the
setup.
7. A window will appear asking for any options
on the printer to be configured. The first
page of options sets the Memory
Configuration, Additional Trays, Envelope
Feeder and Upper Bin status. Set these
items using the pull-down menus and then
click on the “Options Installed 1” pull-down
menu. Pull down to “Options Installed 2.”
8. The second window of options contains
settings for Duplex Unit, Collation Mode
and Paper Sizes. Set these items using the
pull-down menus, then click OK to
continue.
2-12
9. The setup will finish. A status window will
indicate that a Desktop Printer is being
built.
10. When complete, a Desktop Printer icon for
the Elite 21 will appear on the Mac’s
desktop. The setup is now complete.
If this is the only printer installed on the
Mac, it will appear with a bold outline
around it, indicating that this is the default
printer for the computer. You can set the
printer as the default by clicking once on
the Desktop Printer icon to highlight it, then
going up to the Printing menu at the top of
the screen and selecting “Set Default
Printer.”
The GCC Product Registration utility will
run after the printer is setup. Please follow
the registration instructions to register your
printer.
2-13
Part 2c - Creating a Desktop Printer (via LPR)
(Note: LPR connection requires a PowerPC-based Mac and LaserWriter 8.5.1 or higher)
1. Make sure that all steps in the Hardware
Setup section of this manual have been followed. Follow the Macintosh installation
steps in Part 1 of this section. In Step 9,
select “LPR” as the connection method and
click “Setup Printer.”
2. This will open up Apple’s Desktop Printer
Utility and the “New Desktop Printer” dialog
will appear.
Highlight “Printer (LPR)” from this list and
click OK.
2-14
3. A dialog box called “Untitled 1” opens,
containing two printer icons. Double-click
the bottom icon, in the “LPR Printer
Selection” box.
4. A dialog box called “Internet Printer”
appears. Enter the printer’s IP address in
the “Printer Address” field. If the printer has
not been assigned an IP address, assign
one following the directions in Chapter 7 of
the Elite 21 User’s Manual (Networking the
Elite 21 Printer) on the printer’s CD-ROM.
If a Queue name is being used, enter it in
the “Queue” field.
5. After entering the IP address and Queue (if
needed), click Verify. If the printer is
configured and the IP Address is correct, a
message will appear that the printer is
located at the IP address you specified. If
not, a message will appear that the printer
cannot be verified. In this case, check the
connection and the IP address entered and
try again. Click OK when the printer is
successfully verified.
2-15
6. The “Untitled 1” dialog box will return. Click
on the Change button at the top right of the
box.
7. The “Select a PostScript Printer Description
File” box will open. Choose your printer
model from the list of printers and click
Select.
8. The “Untitled 1” dialog box returns again.
The icon in the “PostScript Printer
Description (PPD) File” box now shows
your printer.
Click Create to create the new desktop
printer.
2-16
9. A Save dialog box opens, asking you to
save the desktop printer. Type in a name
for the desktop printer, or leave the default
name. Click Save.
A new Desktop Printer icon will appear on
the desktop with the name that you
assigned.
10. Go to File and Quit to exit the Desktop
Printer Utility. The printer is selected and
ready to print.
The GCC Product Registration utility will
run after the printer is setup. Please follow
the registration instructions to register your
printer.
2-17
Printing from a Macintosh
This section of the manual will cover the basics of printing from a Macintosh to
the GCC Elite 21 series printer. Most printing options within a Macintosh
application are found within the Page Setup or Print dialog boxes, under the
application’s File menu. Options found within each of these categories are
covered in the following sections.
Page Setup
Page Setup options are accessed by going to the File menu of the Macintosh application and
selecting Page Setup. This option may be referred to by another name (such as Document
Setup) in some applications. Also, some applications may bring up custom Page Setup dialog
boxes or list additional functions not shown here. Consult your application’s user’s
documentation for more specific information.
Accessing Page Setup will bring up the following window:
The Page Attributes section of Page Setup comes up as the first window.
2-18
The Page Attributes section contains the following options for selection:
Format for:
Selects the printer being printed to. If more than one printer has been set up
using the Desktop Printer Utility or the Chooser, each printer will be listed on
this pull-down menu. Make sure that the Elite 21 printer is selected.
Paper:
Selects the Paper Size being printed to. This pull-down menu brings up a list of
paper sizes supported by the Elite 21 printer. Selecting a paper size and
clicking on the ‘cow-dog’ icon to the left will bring up a listing of the paper size’s
dimensions and default margins.
Orientation:
Selects the page orientation, Portrait or Landscape, by clicking on the
appropriate icon.
Scale:
Selects page scaling for the document. This value can be set to between 25%
and 400%.
Clicking on the Page Attributes pull-down menu will allow you to select from other categories
from within Page Setup. The standard categories are PostScript Options and Custom Page
Sizes. Some applications may provide additional options, check your user’s documentation for
more details.
The PostScript Options section of Page Setup brings up the following window:
2-19
The PostScript Options section contains the following options for selection:
Visual Effects:
Allows the following selections to be made:
Flip Horizontal:
Flips the document horizontally.
Flip Vertical:
Flips the document vertically.
Invert Image:
Reverses the black and white areas in the document.
Image and Text:
Allows the following selections to be made:
Substitute Fonts:
Substitutes high-quality resident printer fonts for certain
screen fonts.
Smooth Text:
Smooths the edges of text derived from screen fonts.
Smooth Graphics:
Smooths the edges of bitmapped graphics.
Precision Bitmap Alignment:
Prints bitmaps with less distortion, but will print the
document at a slightly smaller size (4% smaller).
Unlimited Downloadable Fonts: Allows the use of an unlimited number of downloaded fonts
in a document. This may result in slower printing.
Changes made to these options will be reflected by the ‘cow-dog’ icon to the left.
2-20
The Custom Page Sizes section of Page Setup brings up the following window:
This section allows the definition of custom page sizes for the document. Note that all nonstandard paper sizes must be fed through the Multi-Purpose Feeder (Tray 1) of the printer.
To define a new paper size, click the New button. The following window will appear:
2-21
Type in the dimensions and default margins for the paper size to be created, then type a name
for the paper size and click OK. The new paper size will show up on the list of sizes in the
Custom Paper Sizes window, and will also appear as an option on the Paper pull-down menu
in the Page Attributes section of Page Setup.
To edit or remove custom paper sizes, return to the custom paper sizes window, highlight the
paper size from the list, and click Edit to change settings, or Delete to remove the custom size.
Note: The minimum and maximum paper sizes that can be selected are as follows:
Minimum: 3.88”x5.83” (98.4x148.2mm)
Maximum: 8.5”x14.0” (215.9x355.6mm)
2-22
The Print dialog box
The Print command is used to send the print jobs to the printer and to set certain options for
the print job. Going to the File menu and selecting Print will bring up the following dialog box:
This dialog allows the following to be selected:
Printer:
Selects the printer that the job is to be sent to. If more than one printer has
been set up using the Desktop Printer Utility or the Chooser, each printer will
be listed on this pull-down menu. Make sure that the Elite 21 printer is
selected.
Destination:
Selects whether the job is to be sent to the Printer or to a File. If File is
selected, a PostScript file will be generated instead of sending the job to the
printer. The “Print” button at the bottom of the window will change to “Save,”
and a dialog box will appear prompting for a file name and location to save the
PostScript file to.
Copies:
Selects the number of copies of the document to be printed.
Pages:
Selects either “All” to print the whole document, or “From” to specify a range of
pages to print.
2-23
Paper Source: Specifies which paper tray the paper is to be drawn from. The options on the
pull-down menu are as follows:
Auto Select - Sends job to the tray on the printer
holding the paper size specified in the document.
Tray 1 - Sends the job to the Multi-Purpose
Feeder (Tray 1) of the printer
Tray 2-4 - Sends the job to the standard lower
paper tray of the printer (Tray 2) or an additional
lower paper tray (Tray 3-4), if present. Trays that
are not installed are greyed out.
Envelope Feeder - Sends the job to the envelope feeder. Greyed out unless the feeder is
installed.
Manual Feed - Sends the job to the MultiPurpose Feeder (Tray 1). You will be prompted to
press the Select button on the front panel before
the job is printed.
This pull-down menu also contains selections for
Paper Type (Plain Paper, Preprinted, Letterhead,
Transparency, Prepunched, Labels, Bond,
Recycled, Color, Card Stock, Rough, Normal 1, 2
and 3 and Thick 1 and 2). Select the appropriate
type for each source, or use Auto Select to
automatically select the paper type.
These settings are used to automatically direct
output to the correct tray. For example, if the Tray
1 Type on the printer’s front panel has been set to
“Letterhead,” selecting “Letterhead” from this
menu will automatically send the job to Tray 1.
The Paper Source options also allow a different source to be specified for the first page of a
document than for the remaining pages. This is useful when printing correspondence with the
first page on letterhead and remaining pages on plain paper, for example. To print the first page
from a different source, select a Paper Source for both the “First Page From” and “Remaining
From” categories. Otherwise, select “All From” to print all pages from the same tray.
2-24
Clicking on the General pull-down menu will bring up a list of menu categories, as follows:
These menus control the following settings:
Background Printing allows you to enable or disable Background Printing. This is the feature
that allows the print job to be sent in the background while you continue to use the computer
for other tasks. This section also allows you to set the priority of print jobs, or specify a later
time and/or date for the job to be sent.
Color Matching determines the way that colors are handled within a print job. For the Elite 21
printer, the appropriate settings would be Color/Greyscale (prints colors as greyscales) or Black
and White (all images are converted to black or white).
Cover Page allows you to specify whether or not a cover page is printed with the document.
This page provides information on who sent the print job, which application produced the
document, what the name of the document is and the date that the job was sent. This is useful
in identifying jobs sent to a network printer used by many different users. This section also
allows you to specify whether the cover page is printed before or after the job, and which paper
source the cover page should be printed from.
Font Settings allows you to set the preferred font format (Type 1 or TrueType) and whether or
not the fonts should always be downloaded with a print job.
2-25
Job Logging determines how the Macintosh should report printer errors (no reporting,
summarize on screen or print detailed error report). This section also allows you to enable or
disable Job Copy (a copy of the printer file for each job is saved on the computer) and/or Job
Log (a log of all print jobs is generated and saved on the computer).
Layout allows you to set the number of pages per sheet (1, 2 or 4, scaled to fit accordingly)
and any default border for the page. This section also controls double-sided (duplex) printing if
your printer is equipped with the optional Duplex Unit. To enable duplexing, click “Print on Both
Sides” and select the appropriate binding method (left and right, or top and bottom). The printer
will automatically print the double-sided pages accordingly.
Paper Handling determines what the printer does in the event that it runs out of paper. The
options are “Use printer’s default” (defaults to the selection on the printer’s Paper Handling
menu), “Switch to another cassette with the same paper size,” or “Display alert.”
Save as File controls the settings for jobs saved as PostScript output files rather than sent to
the printer. These settings include file format, PostScript compatibility, encoding and font
inclusion. If saving PostScript files for submission to a service bureau, etc., check to see their
preferred output settings.
2-26
Elite 21 Options is the last menu item. This section contains selections for Print Resolution for
the job (600 or 1200 dpi) and Output Bin. The selections for Output Bin are:
Use Current Printer Setting - Uses the default output bin specified in the printer’s Paper
Handling submenu.
Standard Bin - Uses the standard output bin at the top of the printer.
Upper Bin - Offset - Uses the optional Upper Output Bin, with collated copies offset.
Upper Bin - No offset - Uses the optional Upper Output Bin, without any offset.
Each menu item in the Print dialog box also has three buttons at the bottom of the window.
These are “Save Settings,” “Cancel” or “Print.” The “Save Settings” button will save the current
set of selections as the default for the printer selected in the “Printer” pull-down menu at the top
of the window. The “Cancel” button will leave the Print dialog and return you to the application
without sending a print job. The “Print” button will send the job to the printer. If “File” is selected
as the “Destination” at the top of the window, the “Print” button will change to “Save” and will
prompt you to enter a file name and location to save the PostScript output file to.
When all the settings are correctly selected in all the Print dialog windows, click on the Print
button at the bottom of the window to send the job to the printer.
2-27
Additional Macintosh Information
The NIManage Utility
The Elite 21 Series Macintosh software includes a utility program called
NIManage, which can be used to control certain network settings for the printer.
This utility will only work with printers connected to the Macintosh network via
EtherTalk, however.
Installing NIManage
NIManage is automatically installed onto the Macintosh as part of the initial
Mac software installation.The installer will place the NIManage utility in a folder
called GCC Elite 21 Folder on your hard drive.
Using NIManage
To start the NIManage utility, open the GCC Elite 21 Folder on your hard drive
and double-click the NIManage icon. This will bring up the “Select Printer”
window. Click your printer name from the list of available printers, then click
Select.
This will select the printer and allow configuration changes to be made to the
unit. Clicking on the Printer Networking menu at the top of the screen will bring
up the following options:
2-28
The greyed out options are not available with this printer. The available options
are as follows:
• Setup AppleTalk... - Allows the printer’s AppleTalk network name and
zone to be set. Selecting a new AppleTalk name will allow users of
multiple printers to give each printer a distinctive name on the network.
• View Error Log - Shows a log of any PostScript errors experienced by the
printer.
• Setup TCP/IP & NetWare... - Allows TCP/IP and NetWare settings to be
made for the printer. This allows another configuration option for these
settings besides the printer’s front panel or WebAdmin.
• Configure Status Page... - Turns the printer’s automatic Network Status
Page on or off.
Online Driver Software Updates
The Elite 21 Series Macintosh software includes also installs a file called Elite
21 Updater into the Elite 21 Folder on your hard drive. This Updater is a utility
which automatically checks GCC’s web site for newer driver software and
installs the new software onto your system as needed. You should not need to
run this Updater during or immediately following the initial software installation
onto your Macintosh. You may wish to run the Updater periodically to check for
software updates for the printer. This updater requires an Internet connection,
so be sure that your Macintosh is setup for Internet access before running the
Elite 21 Updater utility.
2-29
Printing Binary Data (USB or LPR connection)
Users may experience problems printing files with binary data to the Elite 21
printer using a USB or LPR-based connection due to the way that binary
information is processed via these protocols. GCC has developed a printing
plug-in called a TBCP (Tagged Binary Communications Protocol) Filter which
resolves this problem, however users must be using MacOS 9.0 or higher with
LaserWriter driver version 8.7 or higher for this file to work.
Options for users of Mac OS 8.x (using LaserWriter 8.6.5 or below)
• Try disabling Binary printing, as follows:
• From the Desktop, go to File and Print Desktop.
• In the Print window, hold down the Option key on the keyboard and click
on the General pull-down menu.
• An item marked “Preferences” should appear at the bottom of the list. Pull
down to this item.
• A list of printing preferences will appear. Check the list item marked “Never
Send Binary Data.” Do not make any other changes to the options.
Click “Save Changes” to accept.
This will keep the driver from generating binary data when sending jobs to the
printer. It will not, however, resolve issues with embedded binary data within
print jobs (binary EPS graphic files embedded in a document, for example). If
problems with binary files continue, you may need to pursue one of the other
options.
• Switch from USB or LPR to a standard EtherTalk connection. The
AppleTalk/EtherTalk protocol does not have this issue with binary data.
• Make sure that all elements (graphics, etc.) are saved in ASCII format within
the applications that produced them.
• Upgrade from MacOS 8.x to MacOS 9.x and use the TBCP Filter as outlined
on the next page.
2-30
Options for users of Mac OS 9.x (using LaserWriter 8.7 or higher)
Enable the TBCP Filter software, as follows:
• Make sure the Elite 21 printer is set as the default printer for the Mac.
• From the Desktop, go to File and Print Desktop.
• Click on the General pull-down menu and pull down to Plug-In
Preferences.
• The window pictured below should open. Click on the box next to “Print
Time Filters.” Click on the triangle icon next to “Print Time Filters” to show
the item(s) below it.
• Click on the box next to “TBCP” to enable the filter.
• Click on “Save Settings” to save the settings for the printer.
This setting will allow binary data to be properly handled by USB or LPR
protocols on the Mac.
2-31
3. Using the Elite 21 with Windows 95/98
This Chapter will cover the installation, configuration and use of the Elite 21
Series printer with a Windows 95/98 computer. This includes:
• Software Installation
• Printing from Windows 95/98
• Setting Defaults Using Driver Properties
3-1
Software Installation
The software required to set up your Windows 95/98 computer is located on the
Elite 21 Series CD-ROM.
You can install the Elite 21 software on your computer using Plug and Play. This
will work if you are installing the software on a computer which is connected to
the printer through the parallel or USB (Win98 only) port.
If the printer is not connected to the computer through the parallel or USB port,
go to the “Using Add Printer” section immediately following Plug and Play
instructions.
USB connection of the printer is not supported under Windows 95. If installing
the printer over USB using Windows 98, follow the USB Monitor Installation
instructions on the next page before attaching the USB cable and proceeding to
either the Plug and Play or Add Printer Wizard installation steps.
Windows 95/98 uses a Wizard to help you install printer software. A Wizard is a
series of dialog boxes. In each dialog box you make configuration choices then
click the Next button to move to the next dialog box.
Part of the software you will need is contained on the Windows 95/98 CD-ROM
or floppy disks. Please have this software available when doing the installation.
Note: These instructions cover installing the Elite 21 as a local printer
(connected via a parallel or serial port) on a Windows 95/98 PC.
If installing the printer as a stand-alone Ethernet device on a Windows network,
we recommend following these instructions as if the printer were being installed
as a local device on LPT1:. Once the installation is complete, proceed to the
Windows 95/98 section of Chapter 7 of this manual (Networking the Elite 21
Printer) for instructions for setting up the printer as an Ethernet network device.
3-2
USB Monitor Installation (Windows 98 only)
1. Insert the GCC Elite 21 Series CD-ROM
into the Windows 98 PC. Click on My
Computer, then double-click the CD-ROM
icon to open the CD window. Double-click
the “Win98 USB” folder, then double-click
the “Install.exe” icon within this folder.
2. This will bring up the “USB Driver Installer”
window. Click Install.
3. A status window will appear telling you that
the USB Monitor software was installed.
Click OK.
You may now proceed to the Plug and Play
or Add Printer Wizard installation process
for your USB printer.
3-3
Windows 95/98 Software Installation - Plug and Play
1. If the computer is running, shut it down.
2. With the computer and printer both
powered off, attach the printer cable to the
computer and printer. Make sure that there
is paper in the printer’s tray.
3. Turn on the printer and wait for the LCD
display to read “Ready.” Turn on the
computer. A dialog box showing “Building
Printer Database” may appear.
4. The Add New Hardware Wizard will appear
automatically, telling you that Windows has
found new hardware. Insert the Elite 21
CD-ROM and click Next.
Windows 95 users: go to Step 7.
Windows 98 users: proceed to Step 5.
5. The next window will ask what you want
Windows to do. Choose “Search for the
best driver for your device” and click Next.
3-4
6. The system will then ask where to look for
new drivers. Make sure that the Elite 21
Series CD-ROM is in the drive. Check off
“Specify a Location.” Use the Browse
button to select your Elite 21 Series CDROM. Open the folder on the CD that
corresponds to the language being used
(English, French, German, Italian or
Spanish.) Open the WIN9x folder within
this folder. Select the GCCE21.INF item in
this folder. Click OK. Click Next.
7. The Wizard will display the driver that it
found.
Windows 95 users: click Finish.
Windows 98 users: click Next.
8. Proceed to Step 7 of the “Using Add
Printer” section for Windows 95/98 which
follows.
3-5
Windows 95/98 Software Installation - Using the Add Printer Wizard
1. Go to the Start menu of Windows 95/98,
then up to Settings and select Printers. In
the Printers window, double-click the Add
Printer icon to start the Add Printer Wizard.
Click Next to start the Wizard
2. The first window of the Add Printer Wizard
will ask if the printer is connected to the
local computer or to a Network.
Select “Local Printer” unless the printer that
you are selecting is attached to another PC
or accessed via an NT or Win2000 server.
Click Next.
Note: If setting up the printer as a standalone Ethernet network device, select
“Local Printer” at this point and install the
driver as if the printer were connected to
the parallel (LPT1:) port of the PC. After the
installation, refer to the Windows 95/98
instructions in Section 7 of this manual
(Networking the Elite 21 Printer) for
instructions on configuring the printer as a
network device.
3-6
3. A list of manufacturers and printer models
will appear. Insert the Elite 21 Series CDROM in the CD drive of your computer and
click Have Disk.
4. This will bring up the Install From Disk
window. Use the Browse button to select
your Elite 21 Series CD-ROM. Open the
folder on the CD that corresponds to the
language being used (English, French,
German, Italian or Spanish.) Open the
WIN9x folder within this folder. Select the
GCCE21.INF item in this folder. Click OK.
You will be returned to the Install From Disk
window, click OK again.
5. The next window will display options to
install either the PostScript (PS) or PCL
driver for the Elite 21 Series. Most users
will want to use the PostScript driver
exclusively under Windows. Choose “GCC
Elite 21 Series PS” unless you have a
specific reason to use the PCL driver.
3-7
6. A list of ports will appear. Select the
appropriate local parallel or serial port for
the printer and click Next.
7. The next window will ask for a name for the
printer. You can type in a new name, or
keep the default name. Click Next.
If more than one printer is installed on this
computer, this window will also ask if you
wish to make this printer the default printer
for your Windows applications. Click Yes or
No. Click Next.
8. A window will appear asking if you wish to
print a test page. Click Yes if you are
installing a local printer, click No if you are
installing the driver and will be setting up
the printer as a network device later. Click
Finish.
3-8
9. A dialog box may appear asking you to
insert the Windows 95 or 98 CD. Insert the
CD and click OK.
10. A dialog box may appear telling you that
necessary files on the CD cannot be found.
Make sure the Windows CD is inserted,
then use the Browse button to access the
Windows CD. Select the folder called
‘WIN95’ on the Windows 95 CD, or ‘WIN98’
on the Windows 98 CD. Click OK.
11. A status window will appear, showing the
progress of the installation.
3-9
12. When finished, the test page will be
generated (if you chose to print a test page
in Step 8). If the page prints, click Yes in
this window. If not, click No and follow the
Windows troubleshooting steps that
appear.
13. When the installation is complete, you will
be returned to the Printers window and a
new icon for the printer will appear.
If installing a local printer, you are now
ready to print to the Elite 21 printer. If
installing as a stand-alone Ethernet
network device, proceed to the Windows
95/98 section of Chapter 7 of this manual,
Networking the Elite 21 Series Printer.
3-10
Printing from Windows 95/98
This section of the manual will cover the basics of printing from Windows 95/98
to the GCC Elite 21 series printer. Most printing options within a Windows
application are found within the Page Setup or Print dialog boxes, under the
application’s File menu. Options found within each of these categories are
covered in the following sections.
Page Setup
Page Setup options are accessed by going to the File menu of the Windows application and
selecting Page Setup. This option may be referred to by another name (such as Document
Setup) in some applications. Also, some applications may bring up custom Page Setup dialog
boxes or list additional functions not shown here. Consult your application’s user’s
documentation for more specific information.
Accessing Page Setup will bring up the following window:
3-11
The Page Setup Window contains the following options for selection:
Paper Size:
Selects the Paper Size being printed to. This pull-down menu brings up a list of
paper sizes supported by the Elite 21 printer
Paper Source: Specifies which paper tray the paper is to be drawn from. The options on the
pull-down menu are as follows:
Auto Select - Sends job to the tray on the printer
holding the paper size specified in the document.
Envelope Feeder - Sends the job to the
envelope feeder. Greyed out unless the feeder is
installed.
Manual Feed - Sends the job to the MultiPurpose Feeder (Tray 1). When sent, the job will
prompt for paper before printing.
Tray 1 - Sends the job to the Multi-Purpose
Feeder (Tray 1) of the printer
Tray 2-4 - Sends the job to the standard lower
paper tray of the printer (Tray 2) or an additional
lower paper tray (Tray 3-4), if present.
Orientation:
Selects the page orientation, Portrait or Landscape, by clicking on the
appropriate radio button.
Margins:
Selects left, right, top and bottom margins for the document.
After making all necessary selections in this window, click Finish to accept the settings and
apply them to the document.
3-12
The Print dialog box
The Print command is used to send the print jobs to the printer and to set certain options for
the print job. Going to the File menu and selecting Print will bring up the following dialog box:
This dialog allows the following to be selected:
Name:
Selects the printer that the job is to be sent to. If more than one printer has
been set up in the Printers window of Windows 95/98, each printer will be listed
on this pull-down menu. Make sure that the Elite 21 printer is selected.
Print to File:
Selects whether the job is to be sent to the Printer or to a File. If selected, a
PostScript file will be generated instead of sending the job to the printer. When
OK is clicked, a dialog box will appear prompting for a file name and location to
save the PostScript file to.
Print Range:
Selects either “All” to print the whole document, or “From” to specify a range of
pages to print.
Copies:
Selects the number of copies of the document to be printed.
3-13
Clicking on the Properties button in the Print window will bring up additional printer options.
Changes made within this section will apply only to the current document.
The Paper window within the Print Properties section allows the following options to be set:
Paper Size:
Selects the Paper Size being printed to. This pull-down menu brings up a list of
paper sizes supported by the Elite 21 printer.
Layout
Allows you to set the number of pages per sheet (1, 2 or 4, scaled to fit
accordingly).
Orientation:
Selects the page orientation, Portrait or Landscape, by clicking on the
appropriate radio button.
Paper Source: Specifies which paper tray the paper is to be drawn from. The options on the
pull-down menu are as follows:
3-14
Auto Select - Sends job to the tray on the printer holding the paper size specified in the
document.
Envelope Feeder - Sends the job to the envelope feeder. Greyed out unless the feeder is
installed.
Manual Feed - Sends the job to the Multi-Purpose Feeder (Tray 1).
Tray 1 - Sends the job to the Multi-Purpose Feeder (Tray 1) of the printer
Tray 2-4 - Sends the job to the standard lower paper tray of the printer (Tray 2) or an
additional lower paper tray (Tray 3-4), if present.
Copies:
Selects the number of copies of the document to be printed.
Note that some of these options are duplicated from the Page Setup window. Changing these
settings in the Properties window will make the new settings the default for the printer until they
are changed again.
Clicking on More Options brings up additional printer options, as follows:
Print on Both Sides controls double-sided (duplex) printing if your printer is equipped with the
optional Duplex Printing Unit. To enable duplexing, click “Print on Both Sides” and select the
appropriate binding method (long edge or short edge). The printer will automatically print the
double-sided pages accordingly.
Paper Type defines the type of paper being used. Options include plain, letterhead,
prepunched, bond, color, rough, preprinted, transparency, labels, recycled, card stock, normal
1, 2 and 3 and thick 1 and 2. If you have assigned a particular paper type to a tray through the
printer’s Paper Handling menu, selecting that type from this window will automatically direct
output to the correct tray.
3-15
Output Bin determines where the paper will be output from the printer. The selections for
Output Bin are:
Use Current Printer Setting - Uses the default output bin specified in the printer’s Paper
handling submenu.
Standard Bin - Uses the standard output bin at the top of the printer.
Upper Bin - Offset - Uses the optional Offset Catch Tray, with collated copies offset.
Upper Bin - No offset - Uses the optional Offset Catch Tray, without any offset.
Once all the settings in this section have been made, click OK to return to the Properties
window.
Clicking on the Graphics tab of the Properties window brings up the following window:
3-16
The following items can be selected in this window:
Resolution sets the print resolution for the document, 600 or 1200dpi.
Halftoning allows you to use custom halftone values, or use the printer’s defaults.
Print as Negative Image reverses the black and white areas in the document.
Print as Mirror Image switches the output to a mirror image of the original.
Scaling selects page scaling for the document. This value can be set to between 25% and
400%.
Click OK to accept any changes to these settings.
Clicking on the Device Options tab of the Properties window brings up the following window:
3-17
The following items can be selected in this window:
Paper Reserve: Sets Paper Reserve to Enabled or Disabled. Paper Reserve allows the printer
to automatically switch from one paper tray to the next if the first tray runs out
of paper.
Collation in
Printer:
Sets whether job collation is handled by the printer or by the computer.
This setting should match the Collation Mode setting on the printer’s
Configuration menu.
To change these settings, click on the item you wish to change on the list at the top of the
window. The lower window will then allow you to change the options for the particular feature
you have selected. Click Apply and OK when making any changes.
The fourth tab in the Properties window brings up the PostScript window. This window allows
the PostScript Output Format to be changed. We recommend using the “PostScript (Optimized
for Speed)” setting. If errors occur with your documents, try switching to “PostScript (Optimize
for Portability - ADSC)” setting.
Once all Properties options are properly set, click OK to return to the Print dialog window. Click
OK to send the job to the printer.
3-18
Setting Defaults Using Driver Properties
Typically, changes made within the Page Setup, Print or Print Properties dialog windows will
only take effect for the particular document that you are printing. Changes to the default
settings used by the driver are made from the Driver Properties section of Windows 95/98.
To access these settings, go to the Start menu in Windows 95/98, go up to Settings and select
Printers. Locate the icon for the Elite 21 printer, then right-click the icon and go to Properties.
The following window will appear:
The tabs at the top of the Properties window allow different categories of settings to be
accessed. The General tab identifies the printer name and allows Comment information about
the printer to be entered. This information is helpful in locating the printer over a network. This
window also allows a test page to be sent to the printer.
3-19
Clicking on the Details tab will bring up the following window:
This window allows the printer port to be changed, or a new port to be added for the printer. It
also allows for a new driver to be selected, and for Job Timeout settings to be made.
3-20
Clicking on the Paper tab will bring up the following window:
This window allows the default settings for Paper Size, Layout, Orientation, Paper Source and
Number of Copies to be set. Clicking on Restore Defaults will reverse any changes made to
this section and restore the settings to their original defaults.
Clicking on the Graphics tab allows defaults for Resolution, Halftones, Negative/Mirror Image
and Scaling to be made.
Clicking on the Fonts tab allows defaults for font handling to be made. The driver can be
configured to always send TrueType fonts with print jobs, or to always use resident printer
fonts. Font Substitution can also be enabled and configured from this window.
3-21
Clicking on the Device Options tab will bring up the following window:
This window configures various printer options, as follows:
Available Printer Memory controls the memory setting used by the printer driver. This
value should be adjusted automatically when the VM Option setting is changed in the
Printer Features section below.
Printer Features controls the following settings:
Paper Reserve: Sets whether Paper Reserve is enabled or disabled. Paper Reserve
allows the printer to automatically switch from one paper tray to the next if the first tray
runs out of paper.
3-22
Collation in Printer: Sets whether job collation is handled by the printer or by the
computer.This setting should match the Collation Mode setting on the printer’s
Configuration menu.
Installable Options controls the following settings:
Additional Trays: Sets whether additional trays are present or not.
Envelope Feeder: Sets whether the envelope feeder is present or not.
Offset Bin: Sets whether the upper output bin is present or not.
Duplex Unit: Sets whether the duplex unit is present or not.
Internal Hard Disk: Sets whether an internal hard disk is present or not.
Collation Mode: Sets ‘collation in printer’ mode (i.e. - whether the printer handles job
collation, or if each copy is sent individually by the print driver). This setting should
match the “Collation” setting on the printer’s front panel Configuration menu.
Paper Sizes: Sets whether US and International sizes are made available, or just US or
International.
VM Option: Sets the amount of memory installed in the printer.
To change any option in Device Options, click on the option on the list. The “Change
Setting” section at the bottom of the page will display the option you chose. You can then
change the setting from the pull-down menu. The new setting should then appear on the
list in the upper window. Click Apply and OK to accept when all changes are made.
The final tab in the Properties windows is PostScript. This section contains settings for
PostScript output format, PostScript headers, error information and timeout values. The default
settings in this category should suit the needs of most users.
Changes made within the Driver Properties window will be set as printer defaults unless
changed by returning to Properties.
3-23
Additional Windows 95/98 Information
Printing Binary Data (USB or LPR connection)
Users may experience problems printing files with binary data to the Elite 21
printer using a USB or LPR-based connection due to the way that binary
information is processed via these protocols. Using a protocol called TBCP
(Tagged Binary Communications Protocol) will avoid problems of this sort.
Windows 95/98’s standard PostScript drivers contain settings that can be
selected to allow jobs to be sent correctly to the printer using TBCP. If you
experience problems sending jobs to the printer containing binary data, check
the data format setting for files being sent to the printer as follows:
•
•
•
•
•
Go to the Start menu in Windows, then up to Settings and to Printers.
Right-click the icon for your Elite 21 printer and select Properties.
Click on the PostScript tab in the Properties window.
Click on the Advanced... button in the PostScript window.
In the Advanced Settings window, set the Data Format to “Tagged Binary
Communications Protocol.”
• Select “Send Ctrl+D After Job.”
• Click OK and Apply to accept the settings.
This should eliminate any PostScript errors generated by the sending of binary
data over USB or LPR from Windows 95/98.
3-24
4. Using the Elite 21 with Windows 2000
This Chapter will cover the installation, configuration and use of the Elite 21
Series printer with a Windows 2000 computer. This includes:
• Software Installation
• Printing from Windows 2000
• Setting Defaults Using Driver Properties
4-1
Software Installation
The software required to set up your Windows 2000 computer is located on the
Elite 21 Series CD-ROM.
You can install the Elite 21 software on your computer using Plug and Play.
This will work if you are installing the software on a computer which is
connected to the printer through the parallel or USB port.
If the printer is not connected to the computer through the parallel or USB port,
go to the “Using Add Printer” section immediately following Plug and Play
instructions.
Windows 2000 uses a Wizard to help you install printer software. A Wizard is a
series of dialog boxes. In each dialog box you make configuration choices then
click the Next button to move to the next dialog box.
Note: These instructions cover installing the Elite 21 as a local printer
(connected via a parallel or serial port) on a Windows 2000 workstation or
server.
If installing the printer as a stand-alone Ethernet device on a Windows network,
we recommend following these instructions as if the printer were being installed
as a local device on LPT1:. Once the installation is complete, proceed to the
Windows 2000 section of Chapter 7 of this manual (Networking the Elite 21
Printer) for instructions for setting up the printer as an Ethernet network device.
4-2
Windows 2000 Software Installation - Plug and Play
1. If the computer is running, shut it down.
2. With the computer and printer both
powered off, attach the parallel or USB
cable to the computer and printer. Make
sure that there is paper in the printer’s tray.
3. Turn on the printer and wait for the LCD
display to read “Ready.” Turn on the
computer.
4. The “Found New Hardware” window will
appear, indicating that the PC has
recognized the printer.
5. The Found New Hardware wizard will start
up. Click Next to continue.
4-3
6. The next window will ask what you want
the Wizard to do. Check “Search for a
suitable driver for my device” and click Next
to continue.
7. The system will then ask where to look for
new drivers. Make sure that the Elite 21
Series CD-ROM is in the drive. Check off
“Specify a Location.” Use the Browse
button to select your Elite 21 Series CDROM. Open the folder on the CD that
corresponds to the language being used
(English, French, German, Italian or
Spanish.) Open the WIN9x folder within
this folder. Select the GCCE21.INF item in
this folder. Click OK. Click Next.
8. A window will appear showing the driver
that the Wizard found for the printer. Click
Next to continue the installation.
A dialog may follow stating that a Digital
Signature was not found for the printer.
Click Yes to continue the installation.
4-4
9. The Wizard will automatically copy the
driver files to their correct locations. A
status window will show the progress of the
installation.
If a “Files Needed” dialog box appears, use
the Browse button to select your Elite 21
Series CD-ROM. Open the folder on the
CD that corresponds to the language being
used (English, French, German, Italian or
Spanish.) Open the WIN2000 folder within
this folder. Select the GCCE21.INF item in
this folder. Click OK
10. The “Completing The Found New
Hardware Wizard” window will appear
when the installation is complete. Click
Finish to exit the Wizard.
11. After installation, a new icon for the printer
will appear in the Printers window. You are
now ready to print to the Elite 21 printer.
4-5
Windows 2000 Software Installation
1. Go to the Start menu of Windows 2000,
then up to Settings and select Printers. In
the Printers window, double-click the Add
Printer icon to start the Add Printer Wizard.
Click “Next” at the Add Printer Wizard
welcome screen.
2. The next window of the Add Printer Wizard
will ask if the printer is connected to the
local computer or to a Network Printer
Server.
Select “Local Printer” unless the printer that
you are selecting is attached to another PC
or accessed via an NT or 2000 server. Deselect the box marked “Automatically detect
and install my Plug and Play printer.” Click
Next.
Note: If setting up the printer as a standalone Ethernet network device, select
“Local Printer” at this point and install the
driver as if the printer were connected to
the parallel (LPT1:) port of the PC. After the
installation, refer to the Windows 2000
section of Chapter 7 of this manual
(Networking the Elite 21 Series Printer) for
instructions on configuring the printer as a
network device.
4-6
3. A list of ports will appear. Select the
appropriate local parallel or serial port for
the printer and click Next.
4. A list of manufacturers and printer models
will appear. Insert the Elite 21 Series CDROM in the CD drive of your computer and
click Have Disk.
5. This will bring up the Install From Disk
window. Use the Browse button to select
your Elite 21 Series CD-ROM. Open the
folder on the CD that corresponds to the
language being used (English, French,
German, Italian or Spanish.) Open the
WIN2000 folder within this folder. Select the
GCCE21.INF item in this folder. Click
Open, then click OK.
4-7
6. The next window will display options to
install either the PostScript (PS) or PCL
driver for the Elite 21 Series. Most users
will want to use the PostScript driver
exclusively under Windows. Choose “GCC
Elite 21 Series PS” unless you have a
specific reason to use the PCL driver. Click
Next.
7. The next window will ask for a printer
name. You can type in a new name, or
keep the default name.
If more than one printer is installed on the
system, this window will also ask if you
want to use this printer as the Default
Printer. Click Yes or No.
Click Next.
8. The printer sharing window will appear.
Select if the printer is to be shared (other
PCs will access it via this workstation or
server) or Not Shared. If selecting “Do not
share this printer,” click Next and skip to
Step 10.
If selecting Shared, type in a Share Name
for the printer. This will allow users to
identify the printer over the Windows
network. Click Next.
4-8
9. The next window allows you to specify the
location of the printer. This will allow users
to more easily identify the printer on a large
network. You can also enter comments to
specify the printer’s capabilities, etc. to
users (i.e. “Duplex” to identify a printer that
can handle double-sided printing).
Enter information into these fields if
desired, then click Next.
10. A window will appear asking if you wish to
print a test page. Click Yes if you are
installing a local printer. Click No if you are
installing the driver and will be setting up
the printer as a network device later. Click
Next.
11. A final window will appear showing a
summary of the installation. Check over all
the information listed. If anything is
incorrect, click Back to go back and change
it. Otherwise, click Finish.
A window may appear informing you that a
Digital Signature cannot be found for the
printer and asking if you wish to continue.
Click Yes to continue and complete the
installation.
4-9
12. When the installation is complete, you will
be returned to the Printers window and a
new icon for the printer will appear.
If installing a local printer, you are now
ready to print to the Elite 21 printer. If
installing as a stand-alone Ethernet
network device, proceed to the Windows
2000 section in Chapter 7 of this manual,
Networking the Elite 21 Series Printer.
4-10
Printing from Windows 2000
This section of the manual will cover the basics of printing from Windows 2000
to the GCC Elite 21 series printer. Most printing options within a Windows
application are found within the Page Setup or Print dialog boxes, under the
application’s File menu. Options found within each of these categories are
covered in the following sections.
Page Setup
Page Setup options are accessed by going to the File menu of the Windows application and
selecting Page Setup. This option may be referred to by another name (such as Document
Setup) in some applications. Also, some applications may bring up custom Page Setup dialog
boxes or list additional functions not shown here. Consult your application’s user’s
documentation for more specific information.
Accessing Page Setup will bring up the following window:
4-11
The Page Setup Window contains the following options for selection:
Paper Size:
Selects the Paper Size being printed to. This pull-down menu brings up a list of
paper sizes supported by the Elite 21 printer
Paper Source: Specifies which paper tray the paper is to be drawn from. The options on the
pull-down menu are as follows:
Auto Select - Sends job to the tray on the printer
holding the paper size specified in the document.
Envelope Feeder - Sends the job to the
envelope feeder. Greyed out unless the feeder is
installed.
Manual Feed - Sends the job to the MultiPurpose Feeder (Tray 1).
Tray 1 - Sends the job to the Multi-Purpose
Feeder (Tray 1) of the printer
Tray 2-4 - Sends the job to the standard lower
paper tray of the printer (Tray 2) or an additional
lower paper tray (Tray 3-4), if present.
Orientation:
Selects the page orientation, Portrait or Landscape, by clicking on the
appropriate radio button.
Margins:
Selects left, right, top and bottom margins for the document.
After making all necessary selections in this window, click Finish to accept the settings and
apply them to the document.
4-12
The Print dialog box
The Print command is used to send the print jobs to the printer and to set certain options for
the print job. Going to the File menu and selecting Print will bring up the following dialog box:
The General tab of the Print dialog allows the following to be selected:
Select Printer: Selects the printer that the job is to be sent to. If more than one printer has
been set up in the Printers window of Windows 2000, each printer will be listed
in this window. Make sure that the Elite 21 printer is selected, or use Add
Printer to add it if necessary.
Print to File:
Selects whether the job is to be sent to the Printer or to a File. If selected, a
PostScript file will be generated instead of sending the job to the printer. When
OK is clicked, a dialog box will appear prompting for a file name and location to
save the PostScript file to.
4-13
Find Printer:
Allows the network to be browsed for printers.
Page Range:
Selects either “All” to print the whole document, or “From” to specify a range of
pages to print.
Copies:
Selects the number of copies of the document to be printed.
Clicking on the Layout tab in the Print window will bring up additional printer options, as
follows:
Orientation selects the page orientation, Portrait or Landscape, by clicking on the appropriate
radio button.
Print on Both Sides controls double-sided (duplex) printing if your printer is equipped with the
optional Duplex Printing Unit. To enable duplexing, click “Print on Both Sides” and select the
appropriate binding method (long edge or short edge). The printer will automatically print the
double-sided pages accordingly.
4-14
Page Order determines the order that the pages are printed in. “Front to Back” will print the
first page first, “Back to Front” will print the last page first.
Clicking on the Advanced button in the Layout window will bring up additional paper options,
as follows:
Paper Size:
Selects the Paper Size being printed to. This pull-down menu brings up a list of
paper sizes supported by the Elite 21 printer.
Print Quality: Allows you to set the print resolution for the document, 600 or 1200dpi.
Scaling:
Selects page scaling for the document. This value can be set to between 25%
and 400%.
TrueType Font:Sets whether TrueType fonts are substituted with equivalent resident fonts in
the printer, or downloaded with the print job.
4-15
Output Bin:
Determines where the paper will be output from the printer. The selections for
Output Bin are:
Use Current Printer Setting - Uses the default output bin specified in the printer’s Paper
handling submenu.
Standard Bin - Uses the standard output bin at the top of the printer.
Upper Bin - Offset - Uses the optional Upper Output Bin, with collated copies offset.
Upper Bin - No offset - Uses the optional Upper Output Bin, without any offset.
Paper Reserve: Sets Paper Reserve to Enabled or Disabled. Paper Reserve allows the printer
to automatically switch from one paper tray to the next if the first tray runs out
of paper.
Clicking on the Paper/Quality tab in the Print window will bring up additional printer options, as
follows:
4-16
Paper Source: Specifies which paper tray the paper is to be drawn from. The options on the
pull-down menu are as follows:
Auto Select - Sends job to the tray on the printer holding the paper size specified in the
document.
Envelope Feeder - Sends the job to the envelope feeder. Greyed out unless the feeder is
installed.
Manual Feed - Sends the job to the Multi-Purpose Feeder (Tray 1).
Tray 1 - Sends the job to the Multi-Purpose Feeder (Tray 1) of the printer
Tray 2-4 - Sends the job to the standard lower paper tray of the printer (Tray 2) or an additional lower paper tray (Tray 3-4), if present.
Media
Defines the type of paper being used. Options include plain paper, prepunched,
letterhead, transparencies and labels. If a Paper Type has been defined for one
or more of the printer’s trays (using the front panel of the printer), this selection
can be used to send the job to the appropriate tray. For example, if Tray 2 has
been specified as “Letterhead,” selecting “Letterhead” from this list will direct
output to Tray 2 automatically.
4-17
Setting Defaults Using Driver Properties
Typically, changes made within the Page Setup, Print or Print Properties dialog windows will
only take effect for the particular document that you are printing. Changes to the default
settings used by the driver are made from the Driver Properties section of Windows 2000.
To access these settings, go to the Start menu in Windows 2000, go up to Settings and select
Printers. Locate the icon for the Elite 21 printer, then right-click the icon and go to Properties.
The following window will appear:
The tabs at the top of the Properties window allow different categories of settings to be
accessed. The General tab identifies the printer name and allows Comment and Location
information about the printer to be entered. This information is helpful in locating the printer
over a network. This window also allows a new printer driver to be selected, or a test page to
be sent to the printer.
4-18
Clicking on the Printing Preferences button in the General window will allow you to set defaults
for the Layout and Paper Quality windows under the Print window (see previous section).
The Sharing tab controls sharing settings for the printer. Sharing can be enabled or disabled
from here, and the printer can be assigned a Share Name to identify it to the client PCs
accessing the printer over the Windows 2000 server.
Clicking on the Ports tab will bring up the following window:
This window allows the printer port to be selected or changed. You can also add a new port or
configure an existing port.
The Advanced tab allows a network administrator to control scheduling of the printer. This
includes when the printer is available, and the priority that is given to individual print jobs.
The Security tab allows a network administrator to control access to the printer.
4-19
Clicking on Device Settings brings up the following window:
4-20
The Device Settings window controls most of the specific printing options for the printer, as
follows:
Form to Tray Assignment allows a specific paper size to be assigned as default for each of
the various paper sources on the printer.
Font Substitution determines whether high-quality printer fonts are substituted for screen fonts
on the PC or not. The Font Substitution Table allows the user to define which printer fonts
should be substituted for which screen fonts.
Available PostScript Memory controls the memory setting used by the printer driver. See the
“Installing Additional RAM” section of Chapter 1 of this manual for details.
Job and Wait Timeout Values set the timeout values when the job is sent to the printer. These
values determine how long the computer will wait for response from the printer before giving up
on a print job.
Installable Options sets the status of GCC’s options for the Elite 21 printer, as follows:
Memory Configuration: Sets the amount of memory installed in the printer.
Additional Trays: Sets whether additional trays are present or not.
Envelope Feeder: Sets whether the envelope feeder is present or not.
Offset Bin: Sets whether the upper output bin is present or not.
Duplex Unit: Sets whether the duplex unit is present or not.
Internal Hard Disk: Sets whether an internal hard disk is present or not.
Collation Mode: Sets ‘collation in printer’ mode (i.e. - whether the printer handles job
collation, or if each copy is sent individually by the print driver). This setting should
match the “Collation” setting on the printer’s front panel Configuration menu.
Paper Sizes: Sets whether US and International sizes are made available, or just US or
International.
To change any option in Device Settings, click on the option on the list. The “Change Setting”
section at the bottom of the page will display the option you chose. You can then change the
setting from the pull-down menu. The new setting should then appear on the list in the upper
window. Click OK to accept when all changes are made.
Changes made within the Driver Properties window will be set as printer defaults unless
changed by returning to Properties.
4-21
Additional Windows 2000 Information
Printing Binary Data (USB or LPR connection)
Users may experience problems printing files with binary data to the Elite 21
printer using a USB or LPR-based connection due to the way that binary
information is processed via these protocols. Using a protocol called TBCP
(Tagged Binary Communications Protocol) will avoid problems of this sort.
Windows 2000’s standard PostScript drivers contain settings that can be
selected to allow jobs to be sent correctly to the printer using TBCP. If you
experience problems sending jobs to the printer containing binary data, check
the data format setting for files being sent to the printer as follows:
•
•
•
•
•
•
•
•
Go to the Start menu in Windows, then up to Settings and to Printers.
Right-click the icon for your Elite 21 printer and select Properties.
Click on the Device Settings tab in the Properties window.
Click on the setting to the right of “Output Protocol.” This setting should
become a pull-down menu.
Pull down to “TBCP” from the list of protocols.
Click on the setting to the right of “Send Ctrl+D After Job.”
Pull down to “Yes” from the list of options.
Click OK and Apply to accept the settings.
This should eliminate any PostScript errors generated by the sending of binary
data over USB or LPR from Windows 2000.
4-22
5. Using the Elite 21 with Windows NT 4.0
This Chapter will cover the installation, configuration and use of the Elite 21
Series printer with a Windows NT 4.0 computer. This includes:
• Software Installation
• Printing from Windows NT 4.0
• Setting Defaults Using Driver Properties
5-1
Software Installation
The software required to set up your Windows NT 4.0 computer is located on
the Elite 21 Series CD-ROM.
Windows NT 4.0 uses a Wizard to help you install printer software. A Wizard is
a series of dialog boxes. In each dialog box you make configuration choices
then click the Next button to move to the next dialog box.
Part of the software you will need is contained on the Windows NT 4.0 CDROM. Please have this software available when doing the installation.
Note: These instructions cover installing the Elite 21 as a local printer
(connected via a parallel or serial port) on a Windows NT 4.0 workstation or
server.
If installing the printer as a stand-alone Ethernet device on a Windows NT
network, we recommend following these instructions as if the printer were being
installed as a local device on LPT1:. Once the installation is complete, proceed
to the Windows NT 4.0 section of Chapter 7 of this manual (Networking the Elite
21 Printer) for instructions on setting up the printer as a TCP/IP network device.
5-2
Windows NT 4.0 Software Installation
1. Go to the Start menu of Windows NT 4.0,
then up to Settings and select Printers. In
the Printers window, double-click the Add
Printer icon to start the Add Printer Wizard.
2. The first window of the Add Printer Wizard
will ask if the printer is connected to the
local computer (“My Computer”) or to a
Network Printer Server.
Select “My Computer” unless the printer
that you are selecting is attached to
another PC or accessed via an NT or
Win2000 server.
Note: If setting up the printer as a standalone Ethernet network device, select “My
Computer” at this point and install the
driver as if the printer were connected to
the parallel (LPT1:) port of the PC. After the
installation, refer to the NT 4.0 section in
Chapter 7 of this manual (Networking the
Elite 21 Series Printer) for instructions on
configuring the printer as a network device.
Click Next.
5-3
3. A list of ports will appear. Select the
appropriate local parallel or serial port for
the printer and click Next.
4. A list of manufacturers and printer models
will appear. Insert the Elite 21 Series CDROM in the CD drive of your computer and
click Have Disk.
5. This will bring up the Install From Disk
window. Use the Browse button to select
your Elite 21 Series CD-ROM. Open the
folder on the CD that corresponds to the
language being used (English, French,
German, Italian or Spanish.) Open the
WINNT4 folder within this folder. Select the
GCCE21.INF item in this folder. Click OK.
5-4
6. The next window will display options to
install either the PostScript (PS) or PCL
driver for the Elite 21 Series. Most users
will want to use the PostScript driver
exclusively under Windows. Choose “GCC
Elite 21 Series PS” unless you have a
specific reason to use the PCL driver.
7. The next window will ask for a name for the
printer. You can type in a new name, or
keep the default name. Click Next.
8. The printer sharing window will appear.
Select if the printer is to be shared (other
PCs will access it via this workstation or
server) or Not Shared.
If selecting Shared, type in a Share Name
for the printer. This will allow users to
identify the printer over the Windows
network.
Click Next.
5-5
9. A window will appear asking if you wish to
print a test page. Click Yes if you are
installing a local printer. Click No if you are
installing the driver and will be setting up
the printer as a network device later. Click
Finish.
10. A dialog box may appear informing you that
some of the files needed for the installation
are located on the Windows NT 4.0 CDROM. Eject the GCC Elite 21 CD and
install the Windows NT 4.0 CD. If the blue
Windows NT CD window appears, close
this window. Use the Browse button to
access the NT CD. Select the folder called
‘i386’ on the NT CD, then click OK.
A progress bar will appear, showing the
progress of the installation.
11. When finished, the test page will be
generated (if you chose to print a test page
in Step 9). If the page prints, click Yes in
this window. If not, click No and follow the
Windows troubleshooting steps that
appear.
5-6
12. When the installation is complete, you will
be returned to the Printers window and a
new icon for the printer will appear.
If installing a local printer, you are now
ready to print to the Elite 21 printer. If
installing as a stand-alone Ethernet
network device, proceed to the Windows
NT 4.0 section in Chapter 7 of this manual,
Networking the Elite 21 Series Printer.
5-7
Printing from Windows NT 4.0
This section of the manual will cover the basics of printing from Windows NT 4.0
to the GCC Elite 21 series printer. Most printing options within a Windows
application are found within the Page Setup or Print dialog boxes, under the
application’s File menu. Options found within each of these categories are
covered in the following sections.
Page Setup
Page Setup options are accessed by going to the File menu of the Windows application and
selecting Page Setup. This option may be referred to by another name (such as Document
Setup) in some applications. Also, some applications may bring up custom Page Setup dialog
boxes or list additional functions not shown here. Consult your application’s user’s
documentation for more specific information.
Accessing Page Setup will bring up the following window:
5-8
The Page Setup Window contains the following options for selection:
Paper Size:
Selects the Paper Size being printed to. This pull-down menu brings up a list of
paper sizes supported by the Elite 21 printer
Paper Source: Specifies which paper tray the paper is to be drawn from. The options on the
pull-down menu are as follows:
Auto Select - Sends job to the tray on the printer
holding the paper size specified in the document.
Envelope Feeder - Sends the job to the
envelope feeder. Greyed out unless the feeder is
installed.
Manual Feed - Sends the job to the MultiPurpose Feeder (Tray 1).
Tray 1 - Sends the job to the Multi-Purpose
Feeder (Tray 1) of the printer
Tray 2-4 - Sends the job to the standard lower
paper tray of the printer (Tray 2) or an additional
lower paper tray (Tray 3-4), if present.
Orientation:
Selects the page orientation, Portrait or Landscape, by clicking on the
appropriate radio button.
Margins:
Selects left, right, top and bottom margins for the document.
After making all necessary selections in this window, click Finish to accept the settings and
apply them to the document.
5-9
The Print dialog box
The Print command is used to send the print jobs to the printer and to set certain options for
the print job. Going to the File menu and selecting Print will bring up the following dialog box:
This dialog allows the following to be selected:
Name:
Selects the printer that the job is to be sent to. If more than one printer has
been set up in the Printers window of Windows NT 4.0, each printer will be
listed on this pull-down menu. Make sure that the Elite 21 printer is selected.
Print to File:
Selects whether the job is to be sent to the Printer or to a File. If selected, a
PostScript file will be generated instead of sending the job to the printer. When
OK is clicked, a dialog box will appear prompting for a file name and location to
save the PostScript file to.
Print Range:
Selects either “All” to print the whole document, or “From” to specify a range of
pages to print.
Copies:
Selects the number of copies of the document to be printed.
5-10
Clicking on the Properties button in the Print window will bring up additional printer options.
The Page Setup window within the printer’s Properties section allows the following options to
be set:
Paper Size:
Selects the Paper Size being printed to. This pull-down menu brings up a list of
paper sizes supported by the Elite 21 printer.
Paper Source: Specifies which paper tray the paper is to be drawn from. The options on the
pull-down menu are as follows:
5-11
Auto Select - Sends job to the tray on the printer holding the paper size specified in the document.
Envelope Feeder - Sends the job to the envelope feeder. Greyed out unless the feeder is
installed.
Manual Feed - Sends the job to the Multi-Purpose Feeder (Tray 1).
Tray 1 - Sends the job to the Multi-Purpose Feeder (Tray 1) of the printer
Tray 2-4 - Sends the job to the standard lower paper tray of the printer (Tray 2) or an additional lower paper tray (Tray 3-4), if present.
Copy Count:
Selects the number of copies of the document to be printed.
Orientation:
Selects the page orientation, Portrait, Landscape or Rotated, by clicking on the
appropriate radio button.
Print on Both Controls double-sided (duplex) printing if your printer is equipped with the
Sides:
optional Duplex Printing Unit. To enable duplexing, click the appropriate binding
method (Short Side or Long Side). The printer will automatically print the
double-sided pages accordingly.
Clicking on the Advanced tab brings up additional printer options, shown on the next page.
Many of these options are duplicated from the Page Setup and/or Print windows and can be set
here, or in those windows. Options which can only be set from this section include the following:
Resolution:
Selects the resolution of the print job, 600 or 1200dpi.
Scaling:
Selects page scaling for the document. This value can be set to between 25%
and 400%.
TrueType Font:Sets whether TrueType fonts are substituted with equivalent resident fonts in the
printer, or downloaded with the print job.
Mirrored
Output:
Prints job as mirror image
Negative
Output:
Reverses black and white in the document.
Media Type:
Defines the type of paper being used. Options include plain paper, prepunched,
letterhead, transparencies and labels. If a Paper Type has been defined for one
or more of the printer’s trays (using the front panel of the printer), this selection
can be used to send the job to the appropriate tray. For example, if Tray 2 has
been specified as “Letterhead,” selecting “Letterhead” from this list will direct
output to Tray 2 automatically.
5-12
5-13
Output Bin:
Determines where the paper will be output from the printer. The selections for
Output Bin are:
Use Current Printer Setting - Uses the default output bin specified in the printer’s Paper
handling submenu.
Standard Bin - Uses the standard output bin at the top of the printer.
Upper Bin - Offset - Uses the optional Upper Output Bin, with collated copies offset.
Upper Bin - No offset - Uses the optional Upper Output Bin, without any offset.
Paper Reserve: Sets Paper Reserve to Enabled or Disabled. Paper Reserve allows the printer
to automatically switch from one paper tray to the next if the first tray runs out
of paper.
5-14
Setting Defaults Using Driver Properties
Typically, changes made within the Page Setup, Print or Print Properties dialog windows will
only take effect for the particular document that you are printing. Changes to the default
settings used by the driver are made from the Driver Properties section of Windows NT 4.0.
To access these settings, go to the Start menu in Windows NT 4.0, go up to Settings and select
Printers. Locate the icon for the Elite 21 printer, then right-click the icon and go to Properties.
The following window will appear:
The tabs at the top of the Properties window allow different categories of settings to be
accessed. The General tab identifies the printer name and allows Comment and Location
information about the printer to be entered. This information is helpful in locating the printer
over a network. This window also allows a new printer driver to be selected, or a test page to
be sent to the printer.
5-15
Clicking on the Ports tab will bring up the following window:
This window allows the printer port to be selected or changed. You can also add a new port or
configure an existing port.
The Scheduling tab allows a network administrator to control scheduling of the printer. This
includes when the printer is available, and the priority that is given to individual print jobs.
The Sharing tab controls sharing settings for the printer. Sharing can be enabled or disabled
from here, and the printer can be assigned a Share Name to identify it to the client PCs
accessing the printer over the NT server.
The Security tab allows a network administrator to control access to the printer.
Clicking on Device Settings brings up the window on the following page:
5-16
5-17
The Device Settings window controls most of the specific printing options for the printer, as
follows:
Available Printer Memory controls the memory setting used by the printer driver. See the
“Adding Additional RAM” section of Chapter 1 of this manual for details.
Halftone determines whether the printer’s default halftone settings will be used, or if userdefined settings are used. Halftone Setup will allow settings to be defined if the printer default
settings are to be overridden.
Form to Tray Assignment allows a specific paper size to be assigned as default for each of
the various paper sources on the printer.
Font Substitution determines whether high-quality printer fonts are substituted for screen fonts
on the PC or not. The Font Substitution Table allows the user to define which printer fonts
should be substituted for which screen fonts.
PostScript Timeout Values set the timeout values when the job is sent to the printer. These
values determine how long the computer will wait for response from the printer before giving up
on a print job.
Installable Options sets the status of GCC’s options for the Elite 21 printer, as follows:
Memory Configuration: Sets the amount of memory installed in the printer.
Additional Trays: Sets whether additional trays are present or not.
Envelope Feeder: Sets whether the envelope feeder is present or not.
Offset Bin: Sets whether the upper output bin is present or not.
Duplex Unit: Sets whether the duplex unit is present or not.
Internal Hard Disk: Sets whether an internal hard disk is present or not.
Collation Mode: Sets ‘collation in printer’ mode (i.e. - whether the printer handles job
collation, or if each copy is sent individually by the print driver). This setting should
match the “Collation” setting on the printer’s front panel Configuration menu.
Paper Sizes: Sets whether US and International sizes are made available, or just US or
International.
To change any option in Device Settings, click on the option on the list. The “Change Setting”
section at the bottom of the page will display the option you chose. You can then change the
setting from the pull-down menu. The new setting should then appear on the list in the upper
window. Click OK to accept when all changes are made.
Changes made within the Driver Properties window will be set as printer defaults unless
changed by returning to Properties.
5-18
6. The Elite 21 Control Panel
This Chapter will cover the various functions of the Elite 21 Series control panel.
This includes the following:
• LCD Display Window
• Status Lights
• Function Keys
• The Elite 21 Menu System
• Menu Items
6-1
Introduction to the Elite 21 control panel
The Elite 21 Control Panel is used to get information about the printer and to
adjust specific printer functions. It includes an LCD display window, three LEDs
that show the status of the printer at all times, and eight pushbuttons.
Control panel (LCD) display window
The LCD display window has several functions. It shows:
• The current status of the printer.
• Error messages.
• Prompts to complete tasks, like “Insert Paper.”
• The Elite 21 menus and submenus.
When the printer is not printing, “Ready” is displayed in the display window.
Status Lights
Function Keys
Control panel status lights
The control panel status lights indicate the following:
When the Ready light is solid (lit and not flashing), the Elite 21 is ready to
receive data and print. When the printer is turned on, this light flashes while
the printer is initializing.
When the Data light flashes, one of the Elite 21’s interface ports is receiving
or transmitting data.
6-2
The Attention light flashes when the printer requires attention. A message
will appear in the LCD display panel explaining what the printer requires.
Control panel function keys
Menu keys
The Menu keys are used to scroll through the printer’s various internal menus.
When the printer is displaying “Ready” on the LCD display, the Menu keys can be
used to scroll through the following menus:
• Held Job (appears only if “Hold Last Job” is enabled under “Configuration.”)
• Information
• Paper Handling
• Print Quality
• Printing
• Configuration
• Input/Output
• Resets
The functions of these menus are explained in the next section.
Item keys
The Item keys are used to access the various items and submenus found under
the eight main menu items listed above. Use the Menu keys to access the proper
main menu heading, then the Item key to scroll through the menu items.
Value keys
The Value keys are used to adjust any front panel-selectable options from the
menus. Use the Value keys to scroll through the options for each item.
Select key
The Select key is used to confirm any changes that are made within the menus.
Cancel Job key
The Cancel Job key is used to cancel a PostScript job that is either processing or
waiting to print. To cancel printing, press the the Cancel Job.
6-3
The Elite 21 menu system
The menu system consists of a number of main menus. Some main menus
contain submenus. Some menus only give you information, while others let you
change settings.
Depending on the printer’s configuration, some menu items may not appear. For
example, if “Hold Last Job” is disabled in the “Configuration” menu, the “Held Job”
menu will not appear. Also, menu items related to optional items that are not
installed on your printer will not appear.
We recommend printing out a Menu Map from the printer to view the menu
structure and the current settings for your printer. This can be done as follows:
• Turn on the printer and wait for “Ready” to appear in the LCD window.
• Press either Menu key until “Information” appears.
• Press either Item key until “Print Menu Map” appears.
• Press the Select key to print the job.
This will print out a page showing the various submenus of the printer and their
current settings. Functions that are not applicable to your printer will be greyed
out. This page is helpful in determining the location of a particular setting that you
may wish to change.
Do I need to change control panel menus?
The factory default menu settings suit most users. If you have specialized printing
or connection needs, you may need to change these settings.
We suggest reading the remainder of this chapter to understand the function(s) of
each menu item.
If you change settings, make a note on the Menu Map page of the setting(s) that
you’ve changed. This provides a record of changes and will help troubleshoot
what needs to be done if your printer behaves incorrectly.
6-4
Main Menu Items
1. Held Job
This menu controls the handling of Held Jobs within the printer. If “Hold Last Job”
is enabled in the Configuration menu of the printer (see #6), the printer will hold
the last job printed. This is useful for proofing a job before sending multiple
copies; as you can check the first copy at the printer and send the remaining
copies through this print menu. This menu contains the following items:
• Held Copies: This item controls the number of copies of the held job to print.
The default is 1 copy, as many as 999 copies can be specified from the front
panel. Press the Value up or down key to set the desired number of copies,
then press Select to accept.
• Print Held Job: Tells the printer to print the held job. The number of copies is
determined by the setting under “Held Copies.” Press Select to print the job.
• Delete Held Job: This setting is used to delete the held job from the printer’s
memory. This should be used if the last job printed contained confidential or
sensitive information, or if the last job was particularly memory intensive and
is taking up excess RAM that could be used to process the next job. Press
Select to delete the job.
2. Information
This menu allows you to print out informational pages from the printer. Use the
Item keys to access the page that you wish to print, then press Select to print the
page. The available pages are as follows:
• Print Menu Map: Prints a listing of menu items and current settings.
• Print Config: Prints a configuration page, displaying information such as Page
Count, Serial Number, Paper Tray Status and a list of current settings for all
user-selectable options.
• Print Net Status: Prints a page showing the status and configuration of the
printer’s network interface.
• Print PCL Fonts: Prints a listing and sample page of all resident and
downloaded PCL fonts that are internal to the printer.
• Print PS Fonts: Prints a listing and sample page of all resident and
downloaded PostScript fonts that are internal to the printer.
6-5
3. Paper Handling
This menu controls all the options related to the paper trays of the printer. The
items in this menu are as follows, with the default settings in bold:
• Default Bin: Sets the default output bin for the paper. This item only appears if
the optional Offset Catch Tray (Upper Bin) is installed. Options are Standard
Bin, Upper Bin (Offset) and Upper Bin (No Offset).
• Envelope Size: Used to specify the default envelope size used in the optional
Envelope Feeder. This item only appears if the Envelope Feeder is installed.
Default is Com #10.
• Envelope Type: Used to specify the type of envelope being used in the
optional Envelope Feeder. This item only appears if the Envelope Feeder is
installed.
• Paper Reserve: Allows Paper Reserve to be set to Enabled or Disabled. This
feature allows the printer to continue to the next available paper tray if one
tray runs out of paper. This feature should only be enabled when all paper
trays contain the same paper size and type.
• Tray 1 in Reserve: Determines if the Multi-Purpose Feeder (Tray 1) can be
used for Paper Reserve if the paper supply in Tray 2, 3 or 4 runs out. The
default setting is Enabled. This option will only appear if Paper Reserve is
set to Enabled.
• Tray 1 Mode: Specifies whether the Multi-Purpose Feeder (Tray 1) should be
checked before or after the paper cassettes when a job is sent to the printer
using AutoSelect as the paper source. If set to First, Tray 1 will be checked
first when a job is sent, if set to Cassette, the cassette(s) will be checked first.
• Tray 1 Size: Specifies the default paper size used in Tray 1. Default is US
Letter (110V models) or A4 (220V models).
• Tray 1 Type: Specifies the default paper type used in Tray 1. Options are
Plain, Letterhead, Prepunched, Bond, Color, Rough, Preprinted,
Transparency, Labels, Recycled, Card Stock, Normal 1, 2 or 3 and Thick1 or
2. This option allows you to specify a paper type in a particular tray, then print
to the tray by specifying the desired paper type rather than the tray name as
the paper source.
6-6
3. Paper Handling (continued)
• Tray 2 Size: Specified the default paper size used in Tray 2. Default is
Autosense, which allows the printer to automatically determine the page size
based on the tray’s sensors.
• Tray 2 Type: Specifies the default paper type used in Tray 2. Same as
options for Tray 1.
• Tray 3 Size/Tray 3 Type: Same as options for Tray 1 and 2. These items only
appear if one optional lower paper feeder (Tray 3) is installed.
• Tray 4 Size/Tray 4 Type: Same as options for Trays 2 and 3. These items
only appear if two optional lower paper feeder (Trays 3 and 4) are installed.
• Manual Feed: Specifies whether manual feed jobs can be sent to the printer
or not. Default is Disabled.
• Duplex: Specifies whether or not jobs are printed double-sided (duplex) by
default. This menu item only appears if the optional Duplexing Unit is installed
(standard on the Elite 21 DN and SE models). Default is Disabled.
• Duplex Binding: Specifies whether duplex jobs should be printed so that the
sheets can be bound at the Long Edge or the Short Edge. This menu item
only appears if the optional Duplexing Unit is installed (standard on the Elite
21 DN and SE models).
• Override A4/Ltr.: Allows the printer to automatically substitute Letter paper
when A4 is specified, and vice versa. Default is Disabled.
4. Print Quality
This menu controls items related to print quality. Items can be changed by using
the Value key and pressing Select to confirm the change. The items are as
follows:
• Resolution: Controls the default resolution (600 or 1200 dpi) unless
otherwise specified in the document.
• Toner Density: Controls the amount of toner put down on the page. The
default value is 3, with options available from 1 (lightest) to 5 (darkest).
6-7
5. Printing
This menu controls items related to print quality. Items can be changed by using
the Value key and pressing Select to confirm the change. The items are as
follows:
• Copies: Controls the default number of copies of a document that are printed
if no number is specified within the print job. Default is 1 copy, this value can
be set from 1 to 999.
• Default Size: Specifies the default paper size used if no paper size is
specified in the print job. Default is US Letter (110V models) or A4 (220V
models).
• Append CR to LF: Appends a carriage return to the end of each line of a
plain-text PCL job to allow the job to print out with proper formatting. Default
is Enabled.
• Print Errors: Specifies whether the printer will automatically generate a
detailed report of any PostScript printer errors. Default is Disabled.
6. Configuration
This menu controls items related to the way that basic functions of the printer are
configured. The items are as follows:
• Energy Save: Controls amount of time that the printer will remain idle before
switching to Energy Save mode. Default is 15 minutes.
• Collation Mode*: Sets whether collation is handled by the printer or by the
computer. If Disabled, the printer driver on the computer will send the job
once for each collated copy. If Enabled, the driver will send the job once and
the printer will hold the job in memory and generate subsequent copies
automatically. This mode is faster, but takes up more memory.
• RAM Disk (MB)*: Allows a portion of the printer’s RAM to be set aside as a
RAM Disk. This area can store often-used fonts, held jobs, etc. to speed up
processing time. This reduces the amount of available processing RAM,
however, and is only recommended in cases where the printer’s RAM has
been upgraded. Default is Disabled.
• Hold Last Job*: Sets the Held Job feature described under the Held Job
menu (see #1) to Enabled or Disabled.
6-8
6. Configuration (continued)
• Language*: Specifies the language used on the printer’s LCD display and
internal pages. Default is English, also available are French, Italian, German
and Spanish.
• Startup Page: Determines whether a startup page is generated when the
printer is powered on. Default is Enabled.
Note: Changes made to items marked with an asterisk (*) will not take effect
until the printer is restarted.
7. Input/Output
• I/O Timeout: Sets the amount of time that the printer will wait for more
information when communicating with the computer or network before
flushing the job and timing out. This value can be set from 1 to 300 seconds
in one second intervals. Default is 15 seconds.
• TCP/IP*: Sets the built-in TCP/IP protocol to Disabled or Enabled.
• Gateway Address*: Sets the printer’s TCP/IP Gateway Address (also called
Default Router). This item only appears if TCP/IP is Enabled. To set this
address, press Value to change each bank of numbers and press Select to
accept the change and move to the next bank of numbers. Press Select
again when all four numbers are set.
• Subnet Mask: Sets the printer’s TCP/IP Subnet Mask. This item only appears
if TCP/IP is Enabled. To set this address, press Value to change each bank of
numbers and press Select to accept the change and move to the next bank
of numbers. Press Select again when all four numbers are set.
• IP Address*: Sets the printer’s TCP/IP Address. This item only appears if
TCP/IP is Enabled. To set this address, press Value to change each bank of
numbers and press Select to accept the change and move to the next bank
of numbers. Press Select again when all four numbers are set.
• EtherTalk*: Sets the built-in EtherTalk (AppleTalk via Ethernet) protocol to
Disabled or Enabled.
• Zone Name 1: Displays the printer’s default AppleTalk zone, if specified. This
item only appears if EtherTalk is enabled.
• Zone Name 2: Displays the printer’s secondary AppleTalk zone, if specified.
This item only appears if EtherTalk is enabled.
6-9
7. Input/Output (continued)
• NetWare*: Sets the built-in Novell NetWare support to Disabled or Enabled.
• RS-232 Baud Rate: Sets the baud rate for the RS-232 Serial interface.
Default is 9600 bps. This setting should match the COM port setting on the
PC.
• RS-232 Data Bits: Sets the data bits for the RS-232 Serial interface. Default
is 8 bits. This setting should match the COM port setting on the PC.
• RS-232 Stop Bits: Sets the stop bits for the RS-232 Serial interface. Default is
1 bit. This setting should match the COM port setting on the PC.
• RS-232 Parity: Sets the parity for the RS-232 Serial interface. Default is
None. This setting should match the COM port setting on the PC.
• RS-232 Flow Control: Sets the flow control for the RS-232 Serial interface.
Default is Hardware. This setting should match the COM port setting on the
PC.
Note: Changes made to items marked with an asterisk (*) will not take effect
until the printer is restarted.
8. Resets
• Restore Defaults: Sets all menu items in all menus back to their factory
defaults. This change requires an immediate restart to take effect.
• Restore Network: Sets all network items back to their factory defaults. This
change will not take effect until the printer is restarted.
• Initialize Disk: Initializes the printer’s internal hard disk. This will remove any
downloaded fonts and/or held jobs from the disk. This change requires an
immediate restart to take effect. This menu item only appears if the printer is
equipped with an internal hard drive.
6-10
7. Networking the Elite 21 Series Printer
Each Elite 21 printer ships with a standard 10/100BaseT Ethernet connection
and supports networking with Macintosh, Windows 95/98, Windows 2000,
Windows NT 4.0, Novell NetWare and Unix networks. This chapter will cover
the steps necessary to access the printer on a network, including:
• Assigning an IP Address
• Macintosh Configuration
• Windows 95/98 Configuration
• Windows 2000 Configuration
• Windows NT 4.0 Configuration
• Novell NetWare 2.x/3.x Configuration
• Novell NetWare 4.x Configuration
• UNIX Configuration
7-1
Assigning an IP address
In order to access the printer over most networks and also to access printer
management controls such as WebAdmin, the printer should be assigned an IP
address. The printer can be assigned an IP address in a number of ways.
Assigning TCP/IP parameters through the printer’s front panel:
• Turn on the printer and press either Menu key until Input/Output appears.
• Press either Item key until TCP/IP appears.
• Press either Value key to set TCP/IP to Enabled. Press Select to confirm.
• Press the Item down key to advance to Gateway Address. Press Value to
set the Gateway Address setting. This is the default router address on the
network. If using a router, enter its IP address here, otherwise leave this
field at its default (0.0.0.0). To change this setting, press Value + or - to
change each bank of numbers, then Select to confirm the selection and go
to the next bank of numbers.
• Press Select once again when the correct Gateway Address is entered. This
change requires a printer restart, so the LCD will prompt to Restart Now or
Restart Later. Press either Item key to select Restart Later, and press
Select. All TCP/IP menu settings should be changed before restarting the
printer.
• Press Item down to proceed to the Subnet Mask setting. Press Value + or to change each bank of numbers in the same way that the Gateway
Address was changed. The Subnet Mask on the printer should match the
setting for all the computers and other devices on the same network. Press
Select when the Subnet Mask is set to the desired value, then select
Restart Later once again.
• Press Item down to proceed to the IP Address setting. Press Value + or - to
change each bank of numbers in the same way that the Gateway Address
and Subnet Mask settings were changed. Press Select when the IP
Address is set to the desired value.
• The LCD window will once again prompt to Restart Now or Restart Later.
Use either Item key to select Restart Now, then press Select. The printer
will reboot and the TCP/IP settings you selected will become active.
7-2
Assigning TCP/IP Parameters Using DHCP:
The Elite 21 printer also supports IP configuration via a Dynamic Host
Configuration Protocol (DHCP) server. DHCP is a protocol which delivers IP
address configuration information to devices on a network. A DHCP server
manages a pool of available IP addresses and grants requests for addresses
from devices on the network.
At power-up, the printer broadcasts a DHCP request for an IP address. If a
DHCP server is present the request will be processed, and an IP address will
be returned to the printer. Upon receipt of the IP address, the printer resets and
prints a network status page. The network status page will list the new IP
address and other IP settings (Subnet Mask, Default Gateway). Once an IP
address has been assigned to the printer, it will no longer broadcast DHCP
requests. Therefore, printer IP address assignment with DHCP will only work
when the printer does not have an existing IP address.
The DHCP server may grant a temporary IP address, called a temporary lease
or temporary reservation, which expires after a period, or may grant a
permanent or unlimited lease or reservation which does not expire.
Devices that are granted a temporary lease will be notified before the lease
expires and asked if they would like to extend the lease. The printer will
continue extending its lease indefinitely (unless prohibited by your DHCP server
configuration) and thus maintain a consistent IP address.
IMPORTANT: If the printer is not turned on or is not connected to the network
during the period when the DHCP server is sending requests to extend the
lease, the lease will not be extended. The DHCP server will cancel the lease
and may assign the IP address to another device. Therefore, it is highly
recommended that you explicitly specify the printer lease as permanent or
unlimited in your DHCP server configuration.
If you prefer not to use DHCP for IP address assignment, it may be disabled
using WebAdmin. The enable/disable DHCP setting may be found by selecting
Network in WebAdmin, then going under Protocols to Setup TCP/IP. See
Chapter 8 for details.
7-3
Macintosh Configuration
The Elite 21 printer can be accessed by a Macintosh network using either the
EtherTalk (AppleTalk via Ethernet) protocol, or directly over TCP/IP by using
Apple’s Desktop Printer Utility to select the printer via LPR.
EtherTalk Configuration:
To access the printer using EtherTalk, make sure that EtherTalk support is
activated on the printer following these steps:
• Turn on the printer and press either Menu key until Input/Output appears.
• Press either Item key until EtherTalk appears.
• Press either Value key to set EtherTalk to Enabled. Press Select to confirm.
• Restart the printer to activate this setting.
This will allow the printer’s Ethernet interface to communicate using EtherTalk.
To set up the printer, consult the “Installation for Printers Connected by
EtherTalk” portion of Chapter 2 of this manual (Using the Elite 21 with a
Macintosh).
Macintosh LPR Configuration:
To access the printer using LPR from a Macintosh, TCP/IP must be activated
on the printer and the printer must be assigned an IP address. Follow the steps
in the previous section (Assigning an IP Address) to enable TCP/IP and set all
the necessary parameters.
This will allow the printer’s Ethernet interface to communicate using TCP/IP
and accept LPR jobs. To set up the printer, consult the “Installation for Printers
Connected by LPR” portion of Chapter 2 of this manual (Using the Elite 21 with
a Macintosh).
7-4
Windows 95/98 Configuration
The Elite 21 CD-ROM contains software to allow the printer to be accessed as
a peer-to-peer device on a Windows 95/98 Ethernet network. This includes
software to allow the printer to be accessed as a peer-to-peer device using
TCP/IP, or using IPX/SPX. We recommend using the TCP/IP option for most
users, if you prefer to use IPX, see instructions on page 7-10.
Configuring a peer-to-peer connection via TCP/IP
First, make sure that TCP/IP is enabled and configured within Windows. To do
this, go to the Start menu, then to Settings, Control Panels, and select Network.
Click on Protocols, and make sure “TCP/IP Protocol” is present on the list of
supported protocols. If not, click on Add to install it. Consult your Windows
documentation for more information. Once installed, click on TCP/IP Protocol
from the list of supported protocols, click Properties and enter all necessary
TCP/IP settings for the PC. Your network administrator may need to assist with
this process.
Once the PC is set up to use TCP/IP, confirm that all the TCP/IP settings are
properly set on the printer. If an IP address has not been assigned to the
printer, assign one following the instructions at the beginning of this chapter.
Make sure that the PC and printer are both properly connected to the network,
then run the IP-P2P software located on the Elite 21 CD-ROM. This software
will create a TCP/IP port for the printer within Windows and allow you to select
the printer using that port.
To install the IP-P2P software on the PC, follow these steps:
• Insert the Elite 21 CD-ROM into the PC.
• Open the “My Computer” icon from the desktop, and double-click the CDROM icon to open the CD window.
• Double-click the Network folder on the Elite 21 CD-ROM, then double-click
the IP-P2P 2.70 folder, then the file called “SETUP.EXE” within this folder.
• This will run the IP-P2P installer. Follow the steps in the installer to install
the software.
7-5
Once the IP-P2P software is installed, you can run the program to create the
TCP/IP port for the printer, as follows:
• Make sure the printer is turned on and is showing “Ready” in its display
window.
• Go to the Windows Start menu, then to Applications and down to “IP-P2P.”
Select the IP-P2P program within that folder.
• The IP-P2P program will run, bringing up the following window:
The “Max Hops for” setting determines how many networks the program will
search for compatible printers. A setting of Zero would search only the
network directly connected to the PC, a setting of 4 would search the
directly connected network and all networks accessible through four routers.
Try to use only as high a number as necessary to access your printer, as
higher numbers can produce increased network traffic.
The “IP Port” setting is the base port number for the print server. This
setting should be set to one number below the desired port setting on the
printer. The printer defaults to a base IP port number of 10001, so the IP7-6
P2P program defaults to a value of 10000. This value would only need to be
changed if the base IP port on the printer was changed. To confirm the IP
port of the printer, you can print out a Network Status page, as follows:
• Press either Menu key until Information appears.
• Press either Item key until Print Net Status appears.
• Press Select to print the page.
At the bottom of the page will be a listing for TCP/IP Connection
Information, Port Number. Note this port number, and enter a value one
below this port number in the “IP Port” field of the IP-P2P window.
The “Printer Names” section determines how the printer name will appear in
the Windows ports list:
• Based on Serial Numbers will list the printer port as the same as the
serial number of the printer.
• Based on IP Address will list the printer port as the same as the serial
number of the printer.
• Based on DNS Name will list the printer port as the same as the printer’s
DNS name, if assigned.
• Based on Unit Name will list the printer port as the same as the Novell
printer name of the printer (also found on the Network Status Page.) The
default Print Server name is ‘GCC_’ followed by a six-digit serial number
(e.g., GCC_123456.)
Select which option you prefer from this list. Once these options are set
in the initial IP-P2P window, you can proceed with the configuration.
• Click on the “Printers...” button. A window like the one on the next page will
appear.
7-7
• Click on “Find Printers” to locate all available printers on the network. A list
of compatible printers will appear at the bottom of the window.
• Click on the name of the printer you wish to access via TCP/IP from the list
and click on “Select.” This will cause an IP port for the printer to be added to
the list of available printer ports in Windows. Click on “Permanent” if you
wish for a particular printer to stay on the list permanently, even if the listing
is cleared using the “Clear” button.
• Click OK to exit the IP-P2P program.
Once this procedure has been followed, the new TCP/IP port can be assigned
to the printer, as follows:
7-8
• If the printer driver has not yet been installed for the printer, install it
according to the instructions in Chapter 3 of this manual, “Using the Elite 21
with Windows 95/98.”
• Click on the Start button. Select Settings and then Printers.
• Locate the icon for the Elite 21 printer that you have installed. Right-click on
the printer icon and select Properties.
• Click on the Details tab at the top of the Properties window. The following
window should appear:
• The new port that was created for the printer should appear at the top of the
list of available ports. Click on this port to select it from the list, then click
OK to accept the new setting. This will allow the PC to send jobs to the
printer over TCP/IP. Repeat this procedure on all PCs that are to use the
7-9
printer over TCP/IP.
Configuring a peer-to-peer connection via IPX
First, make sure that IPX is enabled and configured within Windows. To do this,
go to the Start menu, then to Settings, Control Panels, and select Network.
Click on Protocols, and make sure “IPX/SPX Compatible Protocol” is present
on the list of supported protocols. If not, click on Add to install it. Consult your
Windows documentation for more information.
Once the PC is set up to use IPX, confirm that NetWare support is active on
the printer. Enabling NetWare will allow IPX support to be enabled on the
printer, so Netware must be set to Enabled even if not using a Novell NetWare
network. Follow these steps to enable Netware:
• Start the printer and wait for the LCD display to read Ready.
• Press either Menu key until Input/Output appears.
• Press either Item key until NetWare appears.
• Press either Value key until Enable appears. Press Select.
• The display will read “Restart Printer?” Press either Item key to select
Restart Now, then press Select. The printer will restart, and NetWare will be
enabled.
Make sure that the PC and printer are both properly connected to the network,
then run the IPX-P2P software located on the Elite 21 CD-ROM. This software
will create an IPX port for the printer within Windows and allow you to select
the printer using that port.
To install the IPX-P2P software on the PC, follow these steps:
• Insert the Elite 21 CD-ROM into the PC.
• Open the “My Computer” icon from the desktop, and double-click the CDROM icon to open the CD window.
• Double-click the Network folder on the Elite 21 CD-ROM, then double-click
the IPX-P2P 1.63 folder, then the file called “SETUP.EXE” within this folder.•
This will run the IPX-P2P installer. Follow the steps in the installer to install
the software.
7-10
Once the IPX-P2P software is installed, you can run the program to create the
IPX port for the printer, as follows:
• Make sure the printer is turned on and is showing “Ready” in its display
window.
• Go to the Windows Start menu, then to Applications and down to “IPX-P2P.”
Select the IPX-P2P program within that folder.
• The IPX Setup window will appear. Click “Find Printers” to search for
compatible printers on the network.
• A list of compatible printers will appear. Click on the name of the printer you
wish to access via IPX from the list and click on “Select.” This will cause an
IPX port for the printer to be added to the list of available printer ports in
Windows. Click on “Permanent” if you wish for a particular printer to stay on
the list permanently, even if the listing is cleared using the “Clear” button.
• Click OK to exit the IPX-P2P program.
Once this procedure has been followed, the new TCP/IP port can be assigned
to the printer, as follows:
• If the printer driver has not yet been installed for the printer, install it
according to the instructions in Chapter 3 of this manual, “Using the Elite 21
with Windows 95/98.”
• Click on the Start button. Select Settings and then Printers.
• Locate the icon for the Elite 21 printer that you have installed. Right-click on
the printer icon and select Properties.
• Click on the Details tab at the top of the Properties window. The Details
window should appear, including a list of available printer ports.
• The new port that was created for the printer should appear at the top of the
list of available ports. Click on this port to select it from the list, then click
OK to accept the new setting. This will allow the PC to send jobs to the
printer over IPX. Repeat this procedure on all PCs that are to use the
printer over IPX.
7-11
Windows 2000 Configuration
Setting Up LPR Printing
If the printer driver has not already been installed, please install it before
continuing. Instructions for installing the printer are found in Chapter 4 of this
manual, Using the Elite 21 with Windows 2000. Install the printer as if it were a
local printer connected to the parallel (LPT1) port. The following instructions
will cover setting up the Windows 2000 server to direct output to the printer as
an LPR device.
Please note: In the following instructions, some field or dialog names may vary
depending on the Win2000 release pack in use.
• Click on the Start Button. Select Settings and then Printers.
• Locate the icon for the Elite 21 printer that you have installed. Right-click on
the printer icon and select Properties.
• Click on the Ports tab and click on Add Port.
• Click on “New Port” and select “Standard TCP/IP Port” from the list of
options.
• This will open the Add TCP/IP Port Wizard. Click Next at the introduction
page of the Wizard.
• The next window asks for a Printer Name/IP Address and Port Name. Type
in the IP Address that you entered into the printer. If the printer does not
have an IP address, please follow the instructions at the beginning of this
section under Assigning an IP Address to assign one. The Port Name will
be filled in automatically, but can be changed if desired. Click Next.
• The Device Type window appears. Click on the Standard radio button and
select “Generic Network Card” from the list. Click Next.
• A summary page will appear showing all the settings that were made within
the Add TCP/IP Port Wizard. Double-check these settings and click Finish.
• The Ports window will re-appear, with the newly created TCP/IP port
displayed and selected (listed by its Port Name as entered in the TCP/IP
Port Wizard).
• Make sure the new port is highlighted, then click on “Configure Port.”
• Under “Protocol,” click on the “LPR” radio button.
• Under “Queue Name,” fill in a name for the print queue.
• Click OK and Apply to accept the changes to the port.
7-12
This will allow the Windows 2000 server to print to the Elite 21 using LPR.
Selecting a Shared Printer
This section briefly describes the steps for setting up client access to a shared
printer. This will allow other PCs on the network to print to the printer over the
Windows 2000 server.
Windows 95/98:
In the Printer Properties on the Details tab. Click the Add Port button and
browse the network for the shared printer. Look for the Share Name that was
selected when setting up the printer on the Win2000 server.
Windows 2000/NT 4.0:
Add a new printer (with Add Printer), select “Network Printer Server” rather than
My Computer and choose the shared printer from the shared printers list. Look
for the Share Name that was selected when setting up the printer on the
Win2000 server.
7-13
Windows NT 4.0 Configuration
There are several options for setting up printing in a Windows NT environment.
We recommend using the built-in LPR protocol within Windows NT 4.0 to
access the printer. LPR print services may be used via TCP/IP by following the
instructions in this section.
Peer-to-peer print services may also be used by following the Windows 95/98
instructions in this guide. Peer-to-peer print services use the IPX protocol and
may be preferable when TCP/IP setup is not desired.
Windows NT printing is very flexible.You can configure the individual Windows
NT or Windows 95/98 workstations to print using a different protocol than the
Windows NT server. For example, a Windows NT server could be configured to
print via TCP/IP using the instructions in this section. The printer could then be
designated as shared on the NT server, allowing workstations to print via the
NT server using a different protocol (such as the default NetBEUI). The
optimum Windows NT printing configuration depends upon the particular
environment and user and administrator experience and preferences.
Generally, LPR printing over TCP/IP covered in the following instructions is the
best choice for environments where TCP/IP is already in use.
TCP/IP Required Components
The Windows NT 4.0 system performing the NIC configuration must have the
TCP/IP protocol installed. The following steps describe how to check for and, if
necessary, add the required TCP/IP components.
• Click on the Windows Start button. Select Settings and Control Panel.
• Double click on Network and select the Protocols tab. If TCP/IP Protocol is
not on the list of Network Protocols, click on Add to install it.
• Select the Services tab. If either Microsoft TCP/IP Printing or Simple
TCP/IP Services is not on the list of Network Services, click on Add to install
them.
7-14
• Click on Close when all protocols and services have been added. If the
TCP/IP protocol has just been added, Windows will prompt for the IP
address and other TCP/IP parameters. The new protocols and services will
not be available until the system is restarted.
Setting Up LPR Printing
If the printer driver has not already been installed, please install it before
continuing. Instructions for installing the printer are found in Chapter 5 of this
manual, Using the Elite 21 with Windows NT 4.0. Install the printer as if it were
a local printer connected to the parallel (LPT1) port. The following instructions
will cover setting up the NT server to direct output to the printer as an LPR
device.
Please note: In the following instructions, some field or dialog names may vary
depending on the NT release pack in use.
• Click on the Start Button. Select Settings and then Printers.
• Locate the icon for the Elite 21 printer that you have installed. Right-click on
the printer icon and select Properties.
• Click on the Ports tab and click on Add Port.
• Double click on “LPR Port” from the list of available printer ports.
• In the “Name or address of host providing lpd:” field, enter the IP address of
the printer. If the printer does not have an IP address, please follow the
instructions at the beginning of this section under Assigning an IP Address
to assign one.
• In the “Name of printer or print queue on that server:” field, enter LPR1 and
click OK.
• Click on Close to close the Printer Ports dialog. The printer’s IP address is
now displayed and currently selected on the list of ports.
• If the printer is to be shared, click on the Sharing tab. Select Shared and
enter a Share Name. This name will identify the printer to the client
computers on the network. Click on OK when finished.
This will allow the NT server to print to the Elite 21 using LPR.
7-15
Selecting a Shared Printer
This section briefly describes the steps for setting up client access to a shared
printer. This will allow other PCs on the network to print to the printer over the
Windows NT 4.0 server.
Windows 95/98:
In the Printer Properties on the Details tab. Click the Add Port button and
browse the network for the shared printer. Look for the Share Name that was
selected when setting up the printer on the NT server.
Windows 2000/NT 4.0:
Add a new printer (with Add Printer), select “Network Printer Server” rather than
My Computer and choose the shared printer from the shared printers list. Look
for the Share Name that was selected when setting up the printer on the NT
server.
7-16
Novell NetWare 2.x & 3.x Configuration
The GCC Elite 21 printer includes standard support for NetWare peer-to-peer
networking. Before configuring the NetWare server to access the printer,
however, NetWare support must be enabled on the printer, as follows:
• Start the printer and wait for the LCD display to read Ready.
• Press either Menu key until Input/Output appears.
• Press either Item key until NetWare appears.
• Press either Value key until Enable appears. Press Select.
• The display will read “Restart Printer?” Press either Item key to select
Restart Now, then press Select. The printer will restart, and NetWare will be
enabled.
Also, before starting the NetWare server configuration, you should print out a
Network Status Page from the printer. This page provides information that is
helpful during the configuration. The page is printed as follows:
• Press either Menu key until Information appears.
• Press either item button until Print Net Status appears.
• Press Select to print the page.
The NetWare 2.x or 3.x server can then be configured as follows:
1. Login as Supervisor and start PCONSOLE.
2. Define the Print Queue.
• If a Print Queue already exists for the printer, skip to step 3.
• Select Print Queue Information from the Available Options menu.
• Press INSERT, type a name for the new queue to be serviced by the
NIC and press ENTER. Press ESCAPE to go to the Available Options
Menu.
3. Define the Print Server
• Select Print Server Information from the Available Options menu.
• Press INSERT, type the Print Server name and press ENTER. The
default Print Server name is ‘GCC_’ followed by a six-digit serial number
(e.g., GCC_123456). The Novell Print Server Name can be found on the
network status page under Novell Network Information.
7-17
4. Define the Printer.
• Press ENTER with the new Print Server Highlighted, select Print Server
Configuration, then select Printer Configuration.
• Select Printer 0 and define a more meaningful name for the printer if
desired. The printer name is displayed in various NetWare printing
messages such as when notifying users that their job is completed.
• Set the TYPE field to Remote/Other Unknown.
• Press ESCAPE to exit and select Yes to save the changes. Press
ESCAPE again to return to the Printer Server Configuration menu.
5. Assign the Print Queue.
• Select Queues Serviced By Printer, highlight the desired printer on the
Defined Printers list and press ENTER.
• Press INSERT to display the Available Queues List. Select the desired
queue and assign a Priority level (recommended choice is 1).
• Press ESCAPE when finished and continue pressing ESCAPE to exit
PCONSOLE.
6. Confirm Successful Configuration.
• Turn the printer off and on and wait for a power-up network status page
to print. If the network is large, the power-up status page may take
several minutes to print. (Note: This time may be reduced by setting a
Preferred File Server for the NIC with the Management Access Program.
Refer to the NetWare section of the Owner's Manual for more
information.)
• The Novell Connection Information in the bottom half of the status page
displays the printer name, file server, queue, etc. If it displays Attached:
Yes, this confirms that the NIC Print Server is ready to accept print jobs.
• If the status page does not display Attached: Yes, please verify that the
Novell Print Server Name on the status page under Novell Network
Information matches exactly with the Print Server name that was entered
in PCONSOLE.
7-18
Novell NetWare 4.x Configuration
The GCC Elite 21 printer includes standard support for NetWare 4.x peer-topeer networking. Before configuring the NetWare server to access the printer,
however, NetWare support must be enabled on the printer, as follows:
• Start the printer and wait for the LCD display to read Ready.
• Press either Menu key until Input/Output appears.
• Press either Item key until NetWare appears.
• Press either Value key until Enable appears. Press Select.
• The display will read “Restart Printer?” Press either Item key to select
Restart Now, then press Select. The printer will restart, and NetWare will be
enabled.
Also, before starting the NetWare server configuration, you should print out a
Network Status Page from the printer. This page provides information that is
helpful during the configuration. The page is printed as follows:
• Press either Menu key until Information appears.
• Press either item button until Print Net Status appears.
• Press Select to print the page.
Bindery vs. NDS Setup
Novell's NetWare 4.0x can operate in two modes: NetWare Directory Services
(NDS) and Bindery Services Emulation. These services run simultaneously and
transparently to each other. The printer may be configured to operate with
Bindery Services mode only, or to operate under NDS. When configured under
NDS, the printer will also service older file servers operating in bindery mode.
This section contains instructions for installing the printer in either mode.
7-19
Setting Up the Elite 21 Using Bindery Emulation Mode
1. Confirm Bindery Context
Before installing the printer on a Novell NetWare 4.x server in Bindery
Emulation mode, check that the server has a Bindery Context (name for the
server under Bindery Services mode). If the server does not have Bindery
Context, it may be preferable to install in NDS mode. If the printer must be
used in Bindery Emulation mode, the server must have Bindery Context.
Perform the following steps to confirm the server has Bindery Context:
• Go to the 4.x server and at the system console type: load install
• Select Maintenance/Selective Install from the menu.
• Select NCF Files Options from the menu.
• Select Edit AUTOEXEC.NCF from the menu.
• Search the file to see if you have a statement similar to the following
included:
SET BINDERY CONTEXT=0U=ENG
Where =0U=ENG is an example of a name for the file server context.
Use your own file server context in place of =0U=ENG.
• At the console prompt, type the SET BINDERY CONTEXT statement that
you entered in the AUTOEXEC.NCF file.
Note: The command at the console prompt takes effect immediately. The
definition in the file takes effect when the server is shut down and then
restarted.
2. Configure in Bindery Mode with PCONSOLE
Once you confirm the server has Bindery Context, use the following
procedures to configure the printer:
• Log into the network as ADMIN.
• Type PCONSOLE and press the return key. The Available Options menu
will appear.
• When the Available Options menu appears, press the O key (for the
7-20
Bindery Mode).
Note: If you receive a message asking you to login to a server with
Bindery connections, the server you are attached to does not have
Bindery Mode enabled. Follow the procedures in Step 1 (Confirm
Bindery Context) or log onto a server with Bindery Services activated.
• From the Available Options screen, select Quick Setup and press the
return key. Use Quick Setup to connect your Print Server, Print Queue
and Printer correctly. You can modify these later if you need to.
• Select Print Server and press the N key to modify the entry.
• Enter the name of the print server in the Print Server field and press the
Return key.
Note: The print server name is printed under the Novell Network
Information on the printer’s Network Status Page. The factory default
name consists of GCC, an underscore and a six-digit number (i.e. GCC_123456).
• Press the ESC key to move to the New Printer field. Enter a name and
press the Return key.
• Press the ESC key to move to the New Print Queue field. Enter a name
and press the Return key.
• Press the ESC key to move to the Printer Type field and press the Return
key. From the list of printer types, select Other/Unknown and press the
Return key.
• When you are finished, press the U key to save the configuration. Repeat
these steps for each file server that the printer server services.
• To view, add, delete, or modify print servers or queues after the initial
setup, access PCONSOLE again and select either the Print Queues or
Print Servers option on the Available Options screen.
7-21
Setting up the Elite 21 Using NetWare Directory Services (NDS)
Introduction to NDS
NetWare Directory Services (NDS) offers a different, more advanced approach
to network management than previous NetWare versions. Generally, it stores
and tracks all network objects. As a rule, all 4.x servers must have NDS loaded
in order to function. In this way, every NetWare 4.x server is a Directory Server,
because it services named Directory Objects such as printers, print servers and
print queues. With the appropriate privileges, you can create a print server
object which, once configured in its context (or location) on the network,
eliminates the cumbersome setup of print servers on every network server. NDS
provides true enterprise networking based on a shared network database rather
than a individually defined physical sites. The result is greatly improved print
server setup and management.
The Directory Information Base (DIB) is used to store information about servers
and services, users, printers, gateways, etc. It is a distributed database,
allowing access to data anywhere on the network wherever it is stored. Pre-4.x
NetWare versions provide the same data found in the DIB but the data is stored
in the NetWare Bindery. The DIB was designed with more flexible access, more
specific security, and, since it is distributed, it was designed to be partitioned.
The Directory uses an object-oriented structure rather than the flat-file structure
of the Bindery, and offers network-oriented access, rather than server-oriented
access found in the Bindery.
The Directory is backward-compatible with the NetWare Bindery through
Bindery emulation mode. The previous section describes Print Server operation
with a 4.x NetWare system in Bindery Emulation Mode. When Bindery emulation
is enabled, Directory Services will accept Bindery requests and respond just as
if a Bindery existed on the NetWare server being accessed. Be aware that
information obtained from the Bindery query may not be stored in the server
since the Directory is a partitioned and distributed database. Even though the
NetWare 4.x server is not operating from a Bindery, the applications making
Bindery requests will not know the difference.
You may use NWADMIN to configure the printer in NDS. Prior to printing, NDS
7-22
must be set up as follows and the Print Server Card must be set up with NDS
Context and Tree. The steps below describe the use of NWADMIN configuration
to create printer, print server, and print queue objects. Then you will assign, or
associate, those objects with each other. If you wish to keep Bindery resources
on any server, you can under NetWare 4.x if you declare a SET statement in
your AUTOEXEC.NCF file.
For those who prefer, NetWare does offer PCONSOLE as an alternative to
NWADMIN. PCONSOLE can be used to set up static information about print
servers such as: which queues to service, and whom to notify in the event of a
problem. See Novell NetWare documentation for more information about the
use of PCONSOLE for NDS.
1. Create Printer Object
• Click on the NWADMIN icon in the NetWare Tools group in Windows. The
NetWare Administrator window will appear. To bring up your Directory
Tree, open a Browser window by clicking on the Tools menu item then
the Browse item.
• Highlight the Organizational Unit or Organization where you want to
create the print service in the Directory Tree, select the Object item from
the main menu and choose Create.
Note: If you wish, you can create objects another way in NWADMIN by:
selecting an Organizational Unit, clicking on the right mouse button
(which produces a pop-up menu), and clicking on Create... (use the left
mouse button to bring up the New Object window). From this point, the
procedure continues as described.
• When the New Object window appears, scroll down the Class of New
Object icon list, select the Printer icon and click on the OK button.
• When the Create Printer window appears, type a value in the Printer
Name field and click on the Create button.
2. Create Print Server Object
• Again, highlight the Organizational Unit, select the Object item from the
menu and choose Create.
• At the New Object window, scroll down the Class of New Object icon list,
select the Print Server icon, and click on the OK button.
• At the Create Print Server window, type a value in the Print Server Name
7-23
field and click on the Create button.
3 Create Print Queue Object
• Once again, highlight the Organizational Unit, select the Object item from
the menu and choose Create.
• At the New Object window, scroll down the Class of New Object icon list,
select the Print Queue icon, and click on the OK button.
• At the Create Print Queue screen, click on the Directory Service Queue
button, then type in values for Print Queue Name and Print Queue
Volume and click on the Create button. If you don't know the Print Queue
Volume name (the hard drive you will be accessing), click on the icon to
the right of the volume field. The Select Object window will appear with
the volume listed in Objects. If the volume is not listed, scroll the
Directory Context items until you find the volume where you want the
queue to reside.
• Click on the object (hard drive) of your choice and it will appear in the
Selected Object: field. Click on the OK button. The full volume will now
appear in the Print Queue Volume field. Finally, click on the Create
button.
4. Assign Printer Object
• Go to the Directory Tree. Double click on the printer object just created
and bring up the Printer window. See below. Find the Assignments button
on the right-side of the window and click on the Add button.
• When the Select Object window appears, find the print queue object just
created among the choices listed in the Objects box and select it.
• Click on the OK button and the print queue just created is added to the
Print Queues: box in the Printer: window. Click on the OK button again.
5. Assign Print Server Object
• At the Directory Tree, double click on the print server object you just
created and bring up the Print Server window.
• At the Print Server: window, click on the Assignments button and Add
button to bring up the Select Object window. Select the printer object just
created from the Objects: box and click on the OK button. Now the printer
(with its context) appears in the Printers: box of the Print Server window.
Click on the OK button.
7-24
6. Check Assignments
• At the Directory Tree, double click on the Print Queue object you just
created. At the Print Queue window, click on the Assignments button. If
you configured the print queue and printer correctly they will appear in
the proper boxes on the Print Queue window. Press the Cancel button.
7. Set Up and Reset the Printer
• NWADMIN configuration is complete. Before you can begin printing,
however, follow the steps in the next section (Printer Configuration) and
reset (power cycle) the printer.
Printer Configuration
WebAdmin must used to define the context and tree of the Print Server. It is
also used to change the Print Server name, set a password, modify scan and
frame search parameters, and set bindery-mode specific values.
Use the MAP utility or type the printer’s IP address into your web browser (refer
to Chapter 8) to access the WebAdmin pages of the printer. Once you have
accessed WebAdmin, click on “Network” from the options on the left and do the
following:
1. Select Setup NetWare under Protocols.
2. Select Enable NetWare. If it is not selected, the NetWare protocols will not
come up, the printer will not appear as an advertised device, and the printer
will not be accessible using IPX SNMP.
3. The default name for the NetWare Print Server is GCC and a six-digit
number (i.e. GCC_123456). This is also the default name of the printer in
peer-to-peer mode. If you want to change the default Print Server name,
type this name in the Print Server Name space. Leave the space blank if the
default name is to be used.
4. If you want the printer to login with a password, this password may be
entered in the Print Server Password field, and again in the Password
Retype field. If a password is used, this password must be the same
password for all bindery-based and NDS-based Print Server entries.
5. Enter the name of a preferred bindery-based file server in the Preferred File
Server field. The Preferred File Server entry is significant only for bindery or
7-25
bindery emulation based operations. The Print Server must be configured on
the preferred file server. Incorrect setup of a Preferred File Server can
interfere with NetWare printing.
6. If the Print Server is to be operated under Novell Directory Services, type in
a Context entry and Preferred NDS Tree entry in the appropriate fields. Be
sure to give the whole context, whether typed or typeless, and do not begin
your context path with a trailing period (.). If you don't know your tree, type:
whoami at the DOS command line. A typed context name example is:
ou=standard.ou=organization_1
7. In the default mode, the Print Server scans each queue which it is to service
once per second. If you prefer a longer scan rate, you may enter the time
between scans in seconds in the Print Queue Scan Rate field.
8. The Print Server Card will normally monitor the network to determine which
frame type is being used for Novell. When it recognizes a type, it will
assume the same frame type. Once it selects a frame type, the Print Server
Card will only operate over that Novell frame type. Monitoring normally starts
looking for IEEE 802.3, then Ethernet II, then 802.3 SNAP, etc. If your
network is using multiple frame types for Novell, you should bias the frame
search to the desired type by setting the button next to the designation under
Ethernet Frame Type.
9. You can Disable Bindery mode on the Print Server if the printer is to be used
in NDS mode only. To do so, click on the Disable Bindery Mode box. If you
disable Bindery, the Print Server Card will not support Print Servers on a
Bindery file server.
10. Once you have selected all desired settings and entered the desired
NetWare information, you may cause this information to be entered in the
printer by clicking on Accept Settings. As with all value changes, you must
enter the WebAdmin password in the appropriate space before clicking on
Accept Settings. The default WebAdmin password as shipped is “sysadm.”
11. Entered values do not take effect until the printer is reset or power cycled.
You may reset from WebAdmin by returning to the Network page and
clicking on Reset under System. Now click on Reset Unit. Alternatively, you
may power cycle the printer. The new NetWare values should now be in
effect.
7-26
UNIX Configuration
The Elite 21 printer can support UNIX TCP/IP printing in two modes:
• Host-based lpd where a supplied line printer daemon is run on one or
more workstations and print data is communicated to the printer via a
TCP/IP port, or,
• Printer-based lpd where the printer appears as a host running a line printer
daemon.
In general, printer-based lpd is easiest to use on BSD UNIX systems, requiring
an entry in the printcap file once the printer has its IP information. Some UNIX
System V systems have restrictions on support of remote lpr/lpd printers,
requiring that the host-based lpr/lpd approach be used. For many operating
systems, you have the option of using host-resident printing or print serverresident printing. Each mode has certain advantages.
• The host-resident method can print the username and filename on its
banner page; the print server-resident method prints a banner page with
the host's name.
• The print server-resident method requires you to configure the printer only
one time, when you install the print server. The host-resident method
requires that a printing daemon be installed on every host that you want to
be able to print jobs.
Note: The printer will also operate with other host-resident print
supervisor/spooler programs that present a print image to the printer over a
TCP/IP port. The base TCP/IP port number can be changed via Telnet, or
WebAdmin. Remember, the actual port is always one higher than the base port
number. The Network Status page indicates the actual port number.
Between the host-based and printer-based TCP/IP printing capabilities, the
Elite 21 printer works with:
All UNIX systems that support lpd/lpr
System V Rel. 4 (on 386 platforms)
7-27
DEC ULTRIX RISC Versions 4.3 and 4.4
DEC OSF/1 Versions 2.0 and 3.0
Solaris:
Version 1.1.3 (SunOS 4.1.3),
Version 2.3 (SunOS 5.3),
Version 2.4, and
Version 2.5
HP-UX Series 700 and 800 Version 9.01 and Version 10.0
IBM AIX Version 3.2.5
SCO UNIX Version 3.2
AS400
The TCP/IP directory also includes source code that you can recompile into
host-based code for configuring on other System V platforms.
LPD/LPR Printing
LPD/LPR is an implementation of the standard UNIX line printer daemon which
lets you print across a TCP/IP network without the need to install software on
your workstation with all filtering and banners done by the printer. Remote
printing uses the same commands (lpr, lpq, lpc) as local printing.
The process begins when the lpr call finds a printer on a remote system by
looking at the remote (rm) entry in the /etc/printcap file for that printer. lpr
handles a print job for a remote printer by opening a connection with the lpd/lpr
process on the remote system and sending the data file (followed by the control
file containing control information for this job) to the remote system. The printerbased lpd then filters the data and prints the job according to information
contained in the control file and its own printcap file.
Printer lpd recognizes the format of a certain printer emulations and filters the
data, if possible, so it can be printed on the printer type you specify. You can
indicate to the Printer lpd what type of printer is attached to by either:
• Accepting the default port setting (PCL, PostScript and other), or
• Changing the listed emulations via the Telnet or the HTML pages
accessed by MAP or WebAdmin.
7-28
The following sections give specific lpd/lpr setup instructions for various
systems.
Setting Up a BSD Remote Printer to Use lpd/lpr
To set up a remote printer on the host that sends jobs to the Elite 21 using
printer resident lpd, add an entry to the /etc/printcap file on your host for each
printer you use. The steps are described as follows:
• Open the /etc/printcap file. Make an entry naming the Print Server Card as
the remote host and PORT1 as the remote printer name. A typical printcap
entry is shown below:
<printer_name>\
(for example, lprprinter)
:lp=:\
:rm=<remote_host>:\
(for example, name as entered in /etc/hosts)
:rp=PORT1:\
:sd=/usr/spool/lpd/<printer_name>:
(for example, spool directory on system used to spool data
and control files)
This entry will send jobs spooled at /usr/spool/lpd/<printer_name> to the
printer designated <printer_name> to be printed at port 1 (the internal
connection to the printer) of the printer designated as <remote_host>.
• Create the spooling directory. For example, type:
mkdir /usr/spool/lpd/<printer_name>
• To print via the spooler, use the lpr command. Type:
lpr-P <printer_name>< file_name>
Installation and testing is done. You are now ready to print.
Setting Up an AIX Version 2.5 Remote Printer to Use lpd/lpr
Set up a remote printer on the host that sends jobs to the Elite 21 using the
7-29
printer's lpd. Use the following procedures to do this:
• At the prompt, type:
#smit spooler <cr>
• When a window appears, select Manage Remote Printers.
• When a menu appears, select Client Services.
• Another menu appears, select Remote Printer Queues.
• Another menu appears, select Add a Remote Queue.
• When a window appears, change the values shown to configure the
printer. The values displayed are default values. You must replace the
short and long form filter values with the values shown below.
Input Requested
Name of queue to add
Queue Destination Host
Short Form Filter
Long Form Filter
Name of remote printer queue
Name of device to add
Example
print1
printfast
/usr/lpd/bsdshort
/usr/lpd/bsdlong
PORT1
print1
Description of Inputted Data
Name of local printer
Printer IP hostname
Required value
Required value
Printer
Name of local queue
After you have supplied all values, press Enter. You can now print.
Setting Up an AIX 4.0 System
Use the following procedures to install a printer in an AIX 4.0 system:
• Run SMIT Printer.
• Select Print Spooling.
• Select Add a Print Queue.
• Select Remote.
• Use Standard Processing.
• Assign a queue name.
• Use the host address of the printer for the Remote System.
• Use PORT1 for the queue on the remote system.
• Add a description (optional).
• Press [Enter] to generate.
Installation is complete. Test your printer by executing the following command:
7-30
lp -d<queue_name> <file_name>
Setting Up an HP/UX Remote Printer to Use lpd
Set up a remote printer on the host that sends jobs to a Print Server Card
using the Print Server Card lpd. To do this:
• At the prompt, type: sam
• When a window appears, select Printer/Plotter Manager.
• When the menu appears, select List printer and plotters.
• When a list appears, select Actions in the title bar.
• From the pull-down menu, select Add Remote Printer.
• When a window appears, add values to configure the printer. See the
following example.
Input Requested
Printer Name
Remote System Name
Remote Printer Name
Example
myprinter
fastprint
PORT1
Description of Inputted Data
name to be used in lp command
Printer hostname as in /etc/hosts
lpd queue name
• At the bottom of the screen, select Remote Printer is on BSD system from
the three choices available.
• Click on the OK button.
• Ping the unit to test communications. Type:
ping <Printer IP address>
• Ping should confirm your IP address with the message:
<Printer IP address> is alive
If the connection is confirmed, you can now print.
Setting Up an AS/400 Systems to Use lpd/lpr
When working with the output queue description (WORKOUTQD), there are
several fields that must be defined for the printer to function properly as a
remote printer device. Use the following procedures to do this:
7-31
• When prompted for the remote system, type INTNETADR so the AS/400
recognizes the device as an IP device.
• Type PORT1.
• Connection type must be IP.
• Internet address must be the IP address of the printer.
• Destination type must be OTHER.
• When prompted for transforming SCS to ASCII, type YES to allow the
AS/400 do the character translation.
• Manufacturer type and model must be the print driver that goes with your
printer.
Setting Up a DEC ULTRIX 4.3 RISC or OSF1/ALPHA Remote Printer
Set up a remote printer on the host that sends jobs to a printer.
• At the prompt, type: lprsetup
• Select add.
• Enter a name for your printer and press [Enter].
• “Do you want more information on specific printer types?" Press [Enter].
• A list of ULTRIX-supported printers is listed. Type remote and press
[Enter].
• Enter a printer synonym (alias) and press [Enter].
• Designate a spooler directory and press [Enter], or accept the default
spooler directory displayed and press [Enter].
• Designate a remote system name and press [Enter].
• Designate PORT1 as the remote system printer name and press [Enter].
• You are asked to enter the name of a printcap symbol from a displayed
list. Type Q and press [Enter].
• Your configuration is displayed. You are asked whether these values are
final. Type Y or N and press [Enter]. An example is shown below.
Printer #7 Symbol
lp (line printer)
rm (remote host)
rp (remote printer)
sd (spooler directory)
Type
STR
STR
STR
STR
Representative Value
Printer_host
PORT1
/usr/spool/lpd7
• Add comments to the printcap file. For example, you can type:
7-32
Dick's printer down the hall [Enter]
• Select exit to save your configuration and press [Enter].
You are now prepared to print.
Setting Up a SCO UNIX Remote Printer to Use lpd/lpr
Set up a remote printer on the host that sends jobs to a printer using lpd. Use
the following procedures to do this:
• At the prompt, type: mkdev rlp
Note: You cannot run mkdev rlp twice. If you have additional printers to be
configured, use the rlpconf command.
• You will now be asked a series of questions. Respond as follows. Do you
want to install or remove a remote printer? Type: I
• Do you want to change printer description file /etc/printcap? Type: Y
• Write a printer name. For example, type: lprprinter1
• Is lprprinter1 a remote printer or a local printer? Type: R
• Enter remote host name: type host name entered in printcap for Print
Server Card. For example, type: lprprinter
• Confirm the information you have entered. Type: Y
• Confirm the preceding connection as your system default. Type: Y
• Enter another printer name or quit setup. Type: Q
• Do you want to start the remote daemon now? Type: Y
• Using a line editor of your choice, edit the /etc/printcap file by changing the
:rp= entry to PORT1. For example,
printer1:\
:lp=:\ (used to specify the device name for a local printer; this field must be empty)
:rm=lprprinter:\ (remote machine name or network name of the print server)
:rp=PORT1:\ (remote printer name or the name of the print server)
:sd=/usr/spool/lpd/printer1: (name of the spool directory on the client)
Setting Up System V Release 4 and Solaris 2.X to Use lpd/lpr
If your system recognizes the LPSYSTEM command, you can use lpd/lpr.
Another option is the admintool if your system supports it.
7-33
LPSYSTEM Installation
Use the following procedures to install LPSYSTEM:
Note: The following must be executed from the Bourne Shell. Type: SH e
to enter the Bourne Shell program.
• Type: lpsystem -t bsd <IP_address_of_Printer>
Enter Printer host name in /etc/hosts file. Your system may want its IP
address instead of the remote host name.
• Type lpadmin -p <local printername> -s <remote host
name or IP address>!PORT1
Note: There is no space after the remote host name.
• Enable <local printername>
• Accept <local printername>
Setting IP Parameters using Telnet
The Elite 21 printer contains a Telnet utility which uses the standard remote
terminal protocol to configure the IP address, lpd/lpr printers, and other
parameters for the printer. Use the following guidelines to run Telnet. You have
the same functionality with the HTML pages accessed by MAP or WebAdmin,
as described in Chapter 8.
Most often, you make selections from menus by toggling between one choice
or another, by selecting/deselecting or enabling/disabling an item.
Press Enter when not selecting an item. This will return you to a previous
menu.
If you do not make a menu selection for 2 minutes, you get a "Two Minute
Warning" that within 2 more minutes your Telnet session will end. This ensures
that one user does not leave a session idle for too long.
Making Connection and Main Menu
• At the prompt, type:
telnet
<printer IP address>
• When login: appears, type guest if you are only interested in browsing the
menus or sysadm if you want to change the configuration. Press Enter.
7-34
When password: appears, again type guest or sysadm and press Enter.
The main menu is displayed. This utility lets you change the IP Parameters,
lpd/lpr printers, protocols, restore to factory defaults, and change password.
Press the number for the parameter you wish to check or change and press
Enter.
To end your Telnet session, type E at the Main Menu. If you have made any
changes you are prompted to either Save Changes and Exit or Exit Without
Saving Changes. Choose your option and press Enter.
7-35
8. Using WebAdmin
WebAdmin is GCC’s remote printer management software, which allows a user
to monitor and control printer settings using a standard Web browser.
WebAdmin can be used to access and change many of the same settings from
the printer’s control panel, and can also be used to configure network settings
for the printer.
This chapter will cover accessing and configuring the printer using WebAdmin.
8-1
Accessing WebAdmin
In order to access the printer using WebAdmin, the printer must be attached to
an Ethernet network and running TCP/IP. If the printer has not been assigned
an IP address, consult Chapter 7 of this manual, “Networking the Elite 21
Series Printer.”
WebAdmin can be accessed one of two ways. If you know the IP address of
the printer, you can type the address directly into the Address field of your web
browser. For example, if the printer’s IP address is 1.2.3.4, you would type in
the following in the Address field:
http://1.2.3.4
If the IP address of the printer is not known, or if there are multiple GCC
printers on the network, you can also use the MAP (Management Access
Program) software included with the printer. This software is a Windows-based
utility which locates GCC printers on the network.
To use the MAP utility, run the MAP installer on the Elite 21 CD-ROM by
inserting the CD-ROM in the PC, opening the Network folder on the CD,
opening the MAP 3.72 folder inside this folder and double-clicking the
SETUP.EXE file icon. This will install the MAP program and include it on the
Programs menu of Windows.
Before running MAP, you should run the MAP Setup utility to set whether MAP
should look for printers using TCP/IP, IPX/SPX or both. The default setting is
for the utility to check both, however this can cause error messages to appear
if one or the other of the protocols is not enabled on your PC.
To run MAP, go to the Start button of Windows, then to Programs and down to
MAP. Select the MAP Setup item in the MAP folder. This will open a window as
shown on the next page:
8-2
If using TCP/IP, de-select the option to “Search for IPX-based printers.” If using
IPX (NetWare), de-select the option to “Search for IP-based printers.” Error
messages may appear if both boxes are selected and one of the protocols is
not available on the PC.
The “Max Hops for IP Search” setting determines how many networks the
program will search for compatible printers. A setting of Zero would search only
the network directly connected to the PC, a setting of 4 would search the
directly connected network and all networks accessible through four routers.
Try to use only as high a number as necessary to access your printer, as
higher numbers can produce increased network traffic.A list of printers
supporting TCP/IP will appear. Click on the IP address of any of the printers on
the list to access WebAdmin for that unit.
Once the MAP Setup settings are complete, click OK. Run MAP by going to the
Start button of Windows, then to Programs and down to MAP. Select the MAP
item in the MAP folder. The program will search for network printers and open
your web browser to display a listing of network printers like the one shown on
the next page.
8-3
You can access WebAdmin by clicking on the IP address of the printer as
displayed on this list. If using IPX, you can also click on the printer name on the
“IPX/SPX” list. This will bring you to a limited version of WebAdmin, showing
only the Network settings as outlined on page 8-6. Full WebAdmin access
requires TCP/IP.
Accessing WebAdmin by either the MAP utility or typing in the IP address
directly will bring up the WebAdmin window such as the one shown on the next
page in your browser.
8-4
Using WebAdmin
Each WebAdmin page contains a Printer Status display at the top of the page.
This tells the current status of the printer and whether paper is present in the
printer’s trays. This information is automatically updated every 60 seconds.
Each page also has frames showing a listing of categories to the left and an
area for information to be displayed on the right. Clicking the categories on the
left will bring up different screens on the right, as listed on the next page.
Note: Many WebAdmin settings require that a password be entered to make
changes. The default system password for the printer is “sysadm.” A new
password can be selected by clicking on Network and choosing “Change
Password.”
8-5
Printer Information (shown on previous page) will bring up configuration and
revision information about the printer. This page also allows you to print out
information pages from the printer by clicking the Information Pages link at the
bottom of the page.
Paper Handling accesses the same settings found under the Paper Handling
submenu on the printer’s control panel. See Chapter 6, “The Elite 21 Control
Panel” for details on these settings. Make any desired changes and click
Accept Settings to update the printer.
Print Quality accesses the same settings found under the Print Quality
submenu on the printer’s control panel. See Chapter 6, “The Elite 21 Control
Panel” for details on these settings. Make any desired changes and click
Accept Settings to update the printer.
Printing accesses the same settings found under the Printing submenu on the
printer’s control panel. See Chapter 6, “The Elite 21 Control Panel” for details
on these settings. Make any desired changes and click Accept Settings to
update the printer.
Configuration accesses the same settings found under the Configuration
submenu on the printer’s control panel. See Chapter 6, “The Elite 21 Control
Panel” for details on these settings. Make any desired changes and click
Accept Settings to update the printer.
Input/Output accesses the same settings found under the Input/Output
submenu on the printer’s control panel. See Chapter 6, “The Elite 21 Control
Panel” for details on these settings. This page also has an option for
“WebAdmin Configuration,” which controls the refresh rate of the page.
Changing this setting will cause WebAdmin to update the page more or less
often, depending on the new setting. Make any desired changes and click
Accept Settings to update the printer.
8-6
Network brings up the window above. Several of these functions are only
accessible from WebAdmin.
The System category contains the following items:
•Restart Networking - Restarts the printer’s network card
•Networking Factory Defaults - Restores network settings to factory defaults.
•Networking Status - Displays current network status.
•Network Address - Displays printer’s ID and Ethernet address.
•Change Password - Allows the WebAdmin password to be changed. The
new password must be at least four characters. The default system
password when the printer is first shipped is “sysadm.”
8-7
The Protocols category contains the following items:
•Setup NetWare - Brings up the following window:
This section allows NetWare settings to be selected for the printer. Enter
any applicable settings for your NetWare network and click Accept Settings.
The printer may require a restart for some settings to take effect.
•Setup TCP/IP - Allows the settings found in the TCP/IP section of the
Input/Output menu to be modified. This section also allows for DHCP
support to be enabled or disabled on the printer.
•Setup AppleTalk - Allows AppleTalk to be enabled or disabled and an
AppleTalk Zone to be assigned to the printer (if using logical zones).
8-8
The Others category contains the following items:
•Print Test Page - Prints network test page.
•Configure Status Page - Sets whether a network status page is printed
automatically on startup or not.
•Printer Status - Displays the current printer status.
The remaining main menu items through WebAdmin are as follows:
Resets accesses the same settings found under the Resets submenu on the
printer’s control panel. See Chapter 6, “The Elite 21 Control Panel” for details
on these settings. Type in the password and click the desired Reset button to
reset the printer or network to factory defaults. The printer may require a restart
for the settings to take effect.
Index brings up an alphabetical listing of items covered within WebAdmin. Click
on any item to be automatically brought to the section of WebAdmin that
pertains to that item.
GCC Home Page will bring you directly to GCC’s Web site. This will allow you
to access all of GCC’s on-line resources in the event that you require support
or sales assistance.
8-9
9. Using the Printing Features of the Elite 21
This chapter outlines the procedures for performing some specific printing tasks
with the Elite 21 printer. These tasks include:
•
•
•
•
•
•
•
•
Double-sided (Duplex) Printing
Specifying Paper Source and Fusing Temperature by Paper Type
Using the Multi-Purpose Feeder (Tray 1)
Printing Envelopes
Printing to the Rear (Face Up) Paper Output
Holding and Printing Jobs
Setting Transmit Once Collation Mode
Offsetting Copies of Collated Output
9-1
Double-Sided (Duplex) Printing
The Elite 21 printer has the ability to print on both sides of the page, provided
that the Duplex Unit is installed. The Duplex Unit ships standard with the Elite
21 DN and Elite 21 SE models and can be added as an option to the Elite 21 N
model.
To send a double-sided print job to the printer, follow these steps:
Macintosh:
• Open the document you wish to print. Go to the File menu and then down to Print.
• Click on the General pull-down menu and go down to Layout.
• Click on “Print on Both Sides:” and select the icon for the appropriate binding method (long
edge or short edge).
• Set any other print options for the job to the desired settings, and click Print to send the job.
Windows 95/98:
• Open the document you wish to print. Go to the File menu and then down to Print.
• Click on the Properties button in the Print window.
• Click the “Paper” tab in the Properties window, and click the “More Options...” button at the
lower left of the Paper window.
• Under the More Paper Options window, set “Print on Both Sides” from None to the correct
binding method (long edge or short edge).
• Click OK to accept, then Apply and OK to return to the Print window. Set any other print
options for the job to the desired settings, and click OK to send the job.
Windows 2000:
•
•
•
•
Open the document you wish to print. Go to the File menu and then down to Print.
Click on the Layout tab at the top of the Print window.
Set “Print on Both Sides” from None to the correct binding method (long edge or short edge).
Set any other print options for the job to the desired settings, and click Print to send the job.
Windows NT 4.0:
•
•
•
•
•
9-2
Open the document you wish to print. Go to the File menu and then down to Print.
Click on the Properties button in the Print window.
Click the “Page Setup” tab in the Properties window.
Set “Print on Both Sides” from None to the correct binding method (long edge or short edge).
Click OK to accept and return to the Print window. Set any other print options for the job to
the desired settings, and click OK to send the job.
Note: During the duplex printing process, the edge of the page may briefly
appear from out of the output slot at the top of the printer, then be pulled back
into the printer. This is normal operation. Do not attempt to remove sheets from
the printer until they have been fully ejected from the printer.
9-3
Sending Jobs and Adjusting Fuser Temperature by Paper Type
The Elite 21 printer allows a paper type to be defined for each of the paper
sources, using either the printer’s front control panel or WebAdmin to access
the Paper Handling options on the unit. This feature serves two purposes. First,
it allows users to send jobs to the printer by selecting the paper type they wish
to print on, rather than knowing specifically which tray that type is in. For
example, the Tray 2 Type setting on the printer can be set to Letterhead, then
users can send jobs to the correct tray by selecting “Letterhead” as the paper
type rather than “Tray 2” as the paper source. If the printer operator later
wanted to move the Letterhead to Tray 3, the users could still send jobs to the
correct source by specifying Letterhead as the paper type.
To send a job by specifying its paper source, follow the steps below. These
steps specify how to set the printer up as if Letterhead was inserted in Tray 2:
1. Specify the Paper Type on the printer:
•
•
•
•
•
Press
Press
Press
Press
Press
Menu up or down until “Paper Handling” appears.
Item up or down until “Tray 2 Type” appears.
Value up or down until “Letterhead” appears.
Select to confirm the selection.
Menu until “Ready” appears on the printer’s display window.
2. Send the print job:
Macintosh:
• Open the document you wish to print. Go to the File menu and then down to Print.
• Under “Paper Source,” select “Letterhead” rather than any specific tray selection.
• Set any other print options for the job to the desired settings, and click Print to send the job.
Windows 95/98:
• Open the document you wish to print. Go to the File menu and then down to Print.
• Click on the Properties button in the Print window.
• Click the “Paper” tab in the Properties window, and click the “More Options...” button at the
lower left of the Paper window.
• Under the More Paper Options window, set “Paper Type” to “Letterhead.”
• Click OK to accept, then Apply and OK to return to the Print window. Set any other print
options for the job to the desired settings, and click OK to send the job.
9-4
Windows 2000:
•
•
•
•
Open the document you wish to print. Go to the File menu and then down to Print.
Click on the Paper/Quality tab at the top of the Print window.
Set the “Media” setting to “Letterhead.”
Set any other print options for the job to the desired settings, and click Print to send the job.
Windows NT 4.0:
•
•
•
•
•
Open the document you wish to print. Go to the File menu and then down to Print.
Click on the Properties button in the Print window.
Click the “Advanced” tab in the Properties window.
Under “Printer Features,” set “Media Type” to “Letterhead.”
Click OK to accept and return to the Print window. Set any other print options for the job to
the desired settings, and click OK to send the job.
Sending the job in this way will automatically direct the print job to the tray
defined as containing Letterhead. Any of the other options for Paper Type/
Media Type can be defined and selected in the same way. The full list of
options are as follows:
Plain Paper
Preprinted
Letterhead
Transparency
Prepunched
Labels
Bond
Recycled
Color
Card Stock
Rough
Normal 1
Normal 2
Normal 3
Thick 1
Thick 2
Most of these options are self-explanatory and are used specifically to identify
a certain paper type in the tray. The options at the end of the list (Normal 1, 2
and 3 and Thick 1 and 2) are included as user-definable options. For example,
if there are three different pre-printed forms that get sent to the printer by
9-5
members of a specific group of users, the printer operator can define three
different paper sources for these forms and let the users know that these forms
are now defined on the printer as Normal 1, 2 and 3. Users can then send jobs
accordingly without having to know specifically which tray the form has been
loaded in.
The other function served by the Paper Type settings on the printer is fuser
temperature adjustment. Most of the paper types use the standard fusing
temperature, but some of the selections will not only define the paper type in
the tray, but also set the fusing temperature to an appropriate level for the
media being used.
Selecting Labels, Card Stock, Thick 1 or Thick 2 will set the fuser to a slightly
higher temperature, allowing toner to be more securely bonded to the thicker
stock.
Selecting Transparency from the list will decrease the fusing temperature
slightly, avoiding damage to the transparency stock.
If using transparencies or thicker stock (greater than 28lb.), it is important to set
the Paper Type accordingly for best results.
9-6
Using the Multi-Purpose Feeder (Tray 1)
Loading Paper into the Feeder
1. Open the Multi-Purpose Feeder by pulling
at the latch at the top center of the feeder
cover.
2. Pull outward on the clear plastic tray
extension within the cover to extend the
tray to hold larger paper sizes.
3. Adjust the grey paper size guides so they
match up with the paper size being used.
9-7
4. Load the paper into the tray, with the side
to be printed on facing up and the top of
the page feeding into the printer first.
Setting the Paper Size
There are no paper size sensors on the Multi-Purpose Feeder (Tray 1), so
the printer depends on the user to manually enter the paper size for the tray
using the printer’s front menu. This can be done as follows:
•
•
•
•
Press
Press
Press
Press
the Menu up or down key until Paper Handling appears.
the Item up or down key until Tray 1 Size appears.
the Value up or down key until the desired paper size appears.
Select to accept the value.
This will cause the printer to assume that the specified paper size is loaded
into Tray 1. If a print job is sent to the tray specifying the size selected, it will
print automatically. If not, the printer will pause and request the correct size
be loaded into the tray.
Note: In the event that a print job is sent to Tray 1 (or Manual Feed, see
next section) specifying a size other than what is specified for Tray 1 on the
front panel, the printer will pause and ask for the correct paper size.
Loading the correct paper size and pressing Select will allow the job to print.
This will also change the Tray 1 Size setting in the menu to reflect the new
size. You will therefore need to re-set the Tray 1 Size setting to the original
9-8
size if desired. An example of this follows:
The printer is loaded with Letter sized paper in Tray 1, and the Tray 1 Size
setting is set to “Letter.” John sends a print job to the printer which specifies
Legal sized paper. The printer pauses and the LCD display displays “Load
Tray 1 Legal.” John places a sheet of Legal sized paper on top of the tray
and presses Select. The job prints and the Tray 1 Size setting is
automatically set to Legal.
Mary then prints a job to Tray 1 that requires the original Letter sized paper.
Since the setting has been automatically changed, however, the printer will
again pause and display “Load Tray 1 Letter.” Mary can either re-set the
Tray 1 Size setting to Letter, or load Letter into the tray and press Select to
automatically set it back.
Tray 1 vs. Manual Feed
Jobs can be sent to the Multi-Purpose Feeder of the printer by specifying
either Tray 1 or Manual Feed as the Paper Source when sending the job. If
Tray 1 is specified, the printer will look for paper in the feeder and, if
present, begin printing the job automatically. If Manual Feed is specified, the
printer will wait for paper to be loaded and prompt the user to press the
Select button to feed the page. This is useful if printing a job on special
paper, as the printer will wait for you to confirm that the page is loaded into
the feeder before printing the job.
9-9
Printing Envelopes
Envelopes can be printed on the Elite 21 using either the Multi-Purpose Feeder
(Tray 1) of the printer, or with the optional Envelope Feeder. Supported
envelope sizes are as follows:
•Commercial #10
•Monarch
•DL
•C5
To print an envelope from Tray 1 of the printer, follow these steps:
1. Load the envelope into the tray:
• Open the Multi-Purpose Feeder at the front of the printer.
• Adjust the paper size guides to the correct size for the envelopes being used.
• Place the envelope(s) into the feeder, with the side to be printed on facing up, the flap on the
right and the short edge facing into the printer.
• Up to 10 envelopes can be loaded at one time. Do not overload the feeder.
2. Format and send the print job:
Macintosh:
• Open the application you wish to print from. Go to the File menu and then down to Page
Setup.
• Click on the Paper pull-down menu and set the correct paper size for the envelope you are
using. Click OK.
• Type out the address information into the document. Consult the documentation for the
application being used for specific information on formatting for envelopes.
• Go to the File menu and down to Print.
• Under “Paper Source,” set the source to Tray 1.
• Set any other print options for the job to the desired settings, and click Print to send the job.
Windows (all versions):
• Open the application you wish to print from. Go to the File menu and then down to Page
Setup.
• Click on the Paper pull-down menu and set the correct paper size for the envelope you are
using. Under Paper Source, set the source to Tray 1. Click OK.
• Type out the address information into the document. Consult the documentation for the
application being used for specific information on formatting for envelopes.
• Go to the File menu and down to Print.
• Set any other print options for the job to the desired settings, and click Print or OK to send the
job.
9-10
To print envelopes using the optional envelope feeder, follow these steps:
1. Load the envelope into the envelope feeder:
• Install the envelope feeder according to the instructions in Step 10d of Chapter 1 of this
manual.
• Adjust the paper size guides to the correct size for the envelopes being used.
• Place the envelope(s) into the feeder, with the side to be printed on facing up, the flap on the
right and the short edge facing into the printer.
• Up to 75 envelopes can be loaded at one time. The feeder can also handle 100 sheets of
Postcard sized paper. Do not overload the feeder.
2. Format and send the print job:
Macintosh:
• Open the application you wish to print from. Go to the File menu and then down to Page
Setup.
• Click on the Paper pull-down menu and set the correct paper size for the envelope you are
using. Click OK.
• Type out the address information into the document. Consult the documentation for the
application being used for specific information on formatting for envelopes.
• Go to the File menu and down to Print.
• Under “Paper Source,” set the source to Envelope Feeder.
• Set any other print options for the job to the desired settings, and click Print to send the job.
Windows (all versions):
• Open the application you wish to print from. Go to the File menu and then down to Page
Setup.
• Click on the Paper pull-down menu and set the correct paper size for the envelope you are
using. Under Paper Source, set the source to Envelope Feeder. Click OK.
• Type out the address information into the document. Consult the documentation for the
application being used for specific information on formatting for envelopes.
• Go to the File menu and down to Print.
• Set any other print options for the job to the desired settings, and click Print or OK to send the
job.
Note: If Envelope Feeder does not appear as a paper source option, make sure that all the
steps at the end of Step 10d of Chapter 1 of this manual (Configuring Printer Drivers for Use of
the Envelope Feeder) have been followed.
9-11
Sending Jobs to the Rear (Face Up) Output Tray
When sending thicker stock through the Elite 21 printer, we recommend using
the rear (face up) paper output tray. This allows the paper to follow a more
straight-through path through the printer and avoid potential jams.
There are no specific software settings necessary to send jobs to the rear
output tray. Simply opening up the rear output tray will cause output to be sent
to the rear tray automatically.
To open the rear output tray, pull on the top part of the tray (the curved part
near the top center of the rear of the printer) and gently tilt open the tray cover
until it stops. Extend the tray by flipping the clear plastic tray extension
outward. Reverse these steps to close the tray and re-direct output towards the
top (face down) bin of the printer.
Note: If using the printer with an optional Upper Output Bin, make sure that the
Output Bin selection is set to Standard Bin when sending a job to the rear of
the printer. A printer error may occur if the Upper Bin is selected and the paper
exits through the rear output tray instead.
9-12
Holding and Printing Jobs
The Elite 21 printer has the ability to hold a copy of the last print job sent to the
printer and print additional copies of the job directly from the front panel of the
printer. This feature is useful for job proofing, as a single copy of the job can be
sent to the printer and, assuming the printed copy is correct, more copies can
be generated directly from the menu of the printer.
This feature is entirely controlled through the printer’s menus, there are no
software settings to be made within the drivers to specify that a job is to be
held. To enable this feature on the printer, follow these steps:
•
•
•
•
•
•
Make sure the printer’s display is reading “Ready”.
Press either Menu key until “Configuration” appears.
Press either Item key until “Hold Last Job” appears.
Press either Value key until “Enabled” appears.
Press Select to accept the change.
Restart the printer to enable the new settings.
These settings can also be changed through WebAdmin, see Chapter 8.
After restart, the printer will automatically start holding a copy of the last job
printed in memory. To print additional copies of the last job printed, follow these
steps:
•
•
•
•
•
•
•
Make sure the printer’s display is reading “Ready”.
Press either Menu key until “Held Job” appears.
Press either Item key until “Held Copies” appears.
Press either Value key to select the desired number of copies.
Press Select to accept the number of copies.
Press either Item key until “Print Held Job” appears.
Press Select to print the job.
The “Held Job” menu also contains an option for deleting held jobs. This should
be used if the last job printed contained confidential or sensitive information, or if
the last job was particularly memory intensive and is taking up excess RAM that
could be used to process the next job. Follow these steps to delete a held job:
9-13
• Press either Menu key until “Held Job” appears.
• Press either Item key until “Delete Held Job” appears.
• Press Select to delete the job.
As long as “Hold Last Job” is enabled in the Configuration menu of the printer,
the printer will automatically hold a copy of the last job printed until another
print job is sent to the printer. To disable this feature, change the setting for
“Hold Last Job” in the Configuration menu to Disabled and restart the printer.
9-14
Specifying Transmit Once Collation Mode
The Elite 21 printer can operate in two different collation modes:
• Transmit Once Collation Mode: When multiple copies of a single document
are sent, the print driver on the computer sends the job once, then
subsequent copies are processed directly by the printer.
• Driver Collation Mode: When multiple copies of a single document are
sent, the driver on the computer generates and sends the print job to the
printer once for each copy required
Transmit Once Collation Mode results in faster printing in most cases and frees
up resources on the computer. Printers with less installed RAM, however, may
experience errors when trying to print more complex jobs in this mode. If
PostScript errors occur when using Transmit Once Collation Mode, you may
want to add memory to the printer to increase the space for job storage, or
switch back to Driver Collation Mode.
To enable Transmit Once Collation Mode, follow these steps:
•
•
•
•
•
•
Make sure the printer’s display is reading “Ready”.
Press either Menu key until “Configuration” appears.
Press either Item key until “Collation Mode” appears.
Press either Value key until “Transmit Once” appears.
Press Select to accept the change.
Restart the printer to enable the new settings.
The settings on the computer(s) that are to use the printer will also need to be
modified to reflect this change, as follows:
Macintosh:
•
•
•
•
•
Click once on the desktop printer icon for your printer to highlight it.
Go to the Printing menu at the top of the screen, then down to “Change Setup...”
In the Setup window, click on the “Change” pull-down menu and go down to “Collation Mode.”
Change the setting in the “To:” pull-down menu to “Transmit Once/Image Once.”
Click OK to accept the change.
9-15
Windows 95/98:
•
•
•
•
•
•
Go to the Start menu, then to Settings and Printers.
Right-click the printer icon for your Elite 21 printer and select Properties.
Click on the Device Options tab.
Under Printer Features, click on “Collation in Printer.”
Under “Change Setting for:,” change the selection to “Transmit Once/Image Once.”
Click Apply and OK to accept the change.
Windows 2000:
•
•
•
•
Go to the Start menu, then to Settings and Printers.
Right-click the printer icon for your Elite 21 printer and select Properties.
Click on the Device Settings tab, then scroll down to Installable Options.
Click on the link next to Collation Mode that says “Disabled.” This link will become a pull-down
menu.
• Change the selection to “Transmit Once/Image Once.”
• Click Apply and OK to accept the change.
Windows NT 4.0:
•
•
•
•
•
•
9-16
Go to the Start menu, then to Settings and Printers.
Right-click the printer icon for your Elite 21 printer and select Properties.
Click on the Device Settings tab, then scroll down to Installable Options.
Click on “Collation Mode” from the list of options.
Under the “Change Setting to:” box, change the selection to “Transmit Once/Image Once.”
Click Apply and OK to accept the change.
Offsetting Copies of Collated Output
The Elite 21 printer has the ability to sort collated documents by offsetting
alternating copies of the document as they are output from the printer. This
makes it easier to separate individual copies from each other, as each copy will
be output slightly to the side of the copies above or below it. This feature
requires the use of the optional Upper Output Bin accessory. Consult our web
site at www.gccprinters.com for information on ordering this accessory.
Once the Upper Output Bin is installed on the printer, offset output can be
specified when sending the print job, as follows:
Macintosh:
•
•
•
•
•
Go to the File menu, then down to Print.
In the Print dialog box, click on the “General” pull-down menu.
Pull down to “Elite 21 Options.”
Under “Output Tray,” select “Upper Bin - Offset.”
Send the print job as usual
Windows 95/98:
•
•
•
•
•
•
Go to the File menu, then down to Print.
In the Print dialog box, click on the “Properties” button.
Click on the “Paper” tab in the Properties window.
Click on the “More Options...” button in the Paper window.
Change the selection for”Output Bin” to “Upper Bin - Offset”.
Click OK to accept, then send the print job as usual.
Windows 2000:
•
•
•
•
Go to the File menu, then down to Print.
In the Print dialog box, click on the “Layout” tab.
Click on the “Advanced” button in the Layout window.
Under “Printer Features,” click on the link next to Output Bin. The link will become a pull-down
menu
• Change the selection to “Upper Bin - Offset”.
• Click OK to accept, then send the print job as usual.
9-17
Windows NT 4.0:
•
•
•
•
•
•
9-18
Go to the File menu, then down to Print.
In the Print dialog box, click on the “Properties” button.
Click on the “Advanced” tab in the Properties window.
Under “Printer Features,” click on “Output Bin.”
Change the selection below to “Upper Bin - Offset”.
Click OK to accept, then send the print job as usual.
10. Maintenance and Troubleshooting
This chapter of the manual covers periodic maintenance steps and
troubleshooting information for the Elite 21 printer. The following topics are
covered in this chapter:
• Cleaning the printer
• Transporting the printer
• Replacing the Toner Cartridge
• Replacing the BTR Roller
• Replacing the Fuser
• Error and Status Messages
• Clearing Paper Jams
• Resolving Print Quality Issues
10-1
Cleaning the printer
The exterior of the printer can be cleaned by carefully wiping the outside of the unit with a soft
cloth, lightly moistened with cool water. A mild soap or detergent may be used to clean stains
from the outside of the unit. Do not use ammonia or alcohol-based cleaners, as these may
damage the printer.
After removing a jam or replacing the toner cartridge, check the inside of the printer and wipe
off any paper or toner dust from the inside of the unit using a soft, dry cloth. Do not use any
liquids inside the printer.
Caution: The fusing unit becomes very hot during operation. Power the printer Off and wait 30
minutes for the unit to cool down before attempting any cleaning or maintenance around the
fusing unit.
Transporting the printer
The Elite 21 printer should always be packed in its original shipping carton to minimize the risk
of damage during shipping. Replacement shipping cartons are available through GCC if
needed.
The Elite 21 printer should be prepared for transportation as follows:
• Remove the power cord, interface cable(s) and optional feeders from the unit.
• Remove the toner cartridge. Place the cartridge in a plastic bag and place it in a separate
shipping box. Toner spillage during shipment can cause permanent damage to the printer.
• Replace the orange spacers that hold the BTR into place during shipping (see Chapter 1,
“Hardware Setup” for details).
• Wrap the printer in its original plastic bag.
• Place the printer into the styrofoam cutouts in the bottom of the shipping container.
• Place the power cord and interface cables.into the box next to the printer.
• Place the top styrofoam cutouts on top of the printer.
• Lower the top portion of the box over the printer so that the slots in the side of the top match
up with the slots in the sides of the bottom of the box.
• Place the four plastic tabs that secure the top of the box to the bottom of the box into their
slots.
• Package any accessories separately, in their original shipping cartons.
10-2
Replacing the Toner Cartridge
The toner cartridge contains the image drum and toner supply of the printer. It should be
replaced after approximately 15,000 sheets have been printed (rated at Letter/A4 size, singlesided, 5% black coverage). Depending on operating conditions and the type of print jobs being
output, however, the cartridge may need to be replaced before or after that interval is reached.
Instructions for replacement of the toner cartridge are as follows:
Toner Handling Precautions:
• Do not expose the cartridge to direct sunlight or other strong light sources.
• Do not replace the cartridge under bright lighting conditions. Complete the installation as
quickly as possible (within 5 minutes of opening the protective foil shipping bag).
• Do not open the drum shutter by hand. The drum shutter protects the photosensitive image
drum from external light.
• Never touch the surface of the photosensitive drum. Keep the cartridge level, do not turn it
over or stand it on end.
• If toner comes into contact with your hands or clothing, wash it off with cold water. Exposure to
toner is not harmful, however hot water will melt and set the toner, causing staining.
Drum Shutter
10-3
1. Make sure the printer is in its “Ready”
state.
Open the front cover all the way until it
stops.
Note: Remove any printouts from the top
output tray before opening the cover.
Do not touch any internal components of
the printer.
2. Grasp the old toner cartridge and slowly
pull it out of the printer.
Dispose of the old toner cartridge properly.
Caution: Never dispose of the toner
cartridge in fire. Remaining toner in the
cartridge could explode, causing risk of
injury.
3. Remove the new toner cartridge from its
foil wrapper and pull out the protective
paper from under the drum shutter. Shake
the toner from side to side several times as
shown to distribute the toner.
10-4
6. Place the toner cartridge on a flat surface
and hold the cartridge securely with one
hand. Grasp and pull the sealing tape
straight out from the side of the cartridge,
as shown. Pulling the tape out at an angle
may cause it to break.
Do not shake the cartridge or subject it to
shocks once the tape is removed.
7. Position the toner cartridge as shown.
Match up the tabs on the left and right of
the cartridge with the channels within the
printer. Gently slide the cartridge into the
printer as far as it will go.
8. Close the front cover, making sure it
latches securely.
The display should return to “Ready” and
the printer will be ready to resume printing.
10-5
Replacing the BTR Roller
The Backup Transfer Roller (BTR) is used for transferring toner onto the paper. It should be replaced
after approximately 200,000 sheets have been printed. Depending on operating conditions, however,
the roller may need to be replaced before or after that interval is reached. Instructions for replacement
of the BTR Roller are as follows:
1. Check the printer’s display to make sure
the unit is in the Ready mode.
Switch off the printer’s power switch at the
front of the unit and unplug the printer’s AC
power supply from its outlet.
2. Open the front cover of the printer.
10-6
3. Grasp the toner cartridge and slowly pull it
out of the printer. Set the toner aside.
4. The BTR roller is the black foam-rubber
roller beneath the toner cartridge. Press the
yellow plastic levers on either side of the
plate behind the BTR roller as shown to
raise the roller.
5. Hold both ends of the BTR roller and pull it
up and out of the printer to remove it.
10-7
6. Position the new BTR roller with the gear
on the right side. Insert the left side of the
shaft into the printer first, then the right.
Make sure the shaft is seated securely into
the notches inside the printer.
7. Press down on both ends of the BTR roller
until it locks into place.
8. Reinsert the toner cartridge into the printer,
making sure the tabs on the left and right of
the cartridge match up with the channels
within the printer (as shown).
Make sure the cartridge is inserted all the
way into the printer and is seated properly.
10-8
9. Close the front cover, making sure it
latches securely.
Plug the printer back into the AC power
supply and turn on the printer. The display
should come to “Ready” and the printer will
be ready to resume printing.
10-9
Replacing the Fuser
The Fuser is used for fixing toner onto the paper. It should be replaced after approximately 200,000
sheets have been printed. Depending on operating conditions, however, the fuser may need to be
replaced before or after that interval is reached. Instructions for replacement of the fuser are as
follows:
1. Check the printer’s display to make sure
the unit is in the Ready mode.
Switch off the printer’s power switch at the
front of the unit and unplug the printer’s AC
power supply from its outlet.
Caution: The fusing unit of the printer will
be very hot directly after printing. Wait at
least 30 minutes to let the fuser cool down
before servicing the fuser.
2. Squeeze the latch at the upper left of the
rear panel and pull towards you to open the
rear cover of the printer.
If you are using a paper cassette extended
past the Letter/A4 setting, remove the
cassette before opening the rear cover.
10-10
3. Remove the duplexing unit of the printer (if
equipped) by pushing inward on the green
tabs to the left and right of the unit (as
shown). Grasp and pull the duplexing unit
out of the printer.
4. Remove the two screws that secure the
fusing unit, as shown.
5. Grasp the metal brackets which hold the
fuser in place and slide the fuser out of the
printer as shown.
10-11
6. Slide the new fuser into the printer, making
sure that the unit slides all the way into the
unit and is seated securely.
7. Secure the new fuser in place with the two
screws, as shown.
8. Close the rear cover, making sure it
latches securely.
Plug the printer back into the AC power
supply and turn on the printer. The display
should come to “Ready” and the printer will
be ready to resume printing.
10-12
Error/Status Messages
In the event that a printer error occurs, the Elite 21 printer will display an error message on its
LCD display. The display may also show other status or warning messages alerting you as to
the status of the printer. This section covers the list of potential LCD error or status messages
and describes their meaning in more detail.
Error Message
Description
Error
Duplex unit
The duplex unit has been removed after power on. Restart
printer.
Error
Upper bin unit
The upper bin is not installed and has been selected. Install
upper bin, or send job to standard bin.
Error
Face-up bin
The face-up bin is open while the upper bin is selected. Close
face-up bin, or send job to standard bin.
Error
Envelope Feeder
The envelope feeder is not installed and has been selected.
Install envelope feeder, or choose another paper source.
Service required
Fuser error
The fusing unit is operating outside its normal temperature
range. Restart printer, contact service if error persists.
Service required
ROS motor error
The ROS (laser) unit of the printer is experiencing an error.
Restart printer, contact service if error persists.
Service required
Main motor error
The main motor of the printer is experiencing an error. Restart
printer, contact service if error persists.
Service required
Fan motor error
The fan motor of the printer is experiencing an error. Restart
printer, contact service if error persists.
Service required
NVM error
The NVM (non-volatile memory) of the printer is experiencing an
error. Restart printer, contact service if error persists.
Paper feed jam
Paper has jammed while feeding. See “Paper Jams,” next
section.
Paper path jam
Paper has jammed in the paper path of the printer. See “Paper
Jams,” next section.
10-13
Error/Status Messages (continued)
Error Message
Description
Paper exit jam
Paper has jammed while exiting the printer. See “Paper Jams,”
next section.
Paper duplex jam
Paper has jammed in the duplex unit of the printer. See “Paper
Jams,” next section.
Upper bin jam
Paper has jammed in the upper bin of the printer. See “Paper
Jams,” next section.
Paper size error
The paper in the tray does not match the size specified in the
print job. Replace with the correct paper size.
Install toner
The toner cartridge is not in place. Install toner.
Replace toner
The toner cartridge is exhausted. Replace with a new cartridge.
Top cover open
The top cover of the printer is open. Close the cover.
Rear cover open.
The rear cover of the printer is open. Close the cover.
Load <tray>
<paper size>
The printer requires the specified paper size in the specified tray
to print the job. Load the correct paper size into the tray.
<bin> full
The specified output bin is full. Remove paper from the output
bin and the job will print.
Insert <tray>
The specified tray needs to be inserted to complete the paper
path. Insert the tray and the job will print.
No env. feeder
The Envelope Feeder is not inserted. Re-insert the feeder.
Tray 1 empty
Tray 1 (the Multi-Purpose Feeder) is out of paper.
Tray 2 empty
Tray 2 is out of paper.
Tray 3 empty
Tray 3 is out of paper.
Tray 4 empty
Tray 4 is out of paper
10-14
Error/Status Messages (continued)
Error Message
Description
Env feeder empty
The envelope feeder is out of paper.
Tray 3 blocked
The paper path from Tray 3 is blocked. Usually caused when the
tray above has been removed.
Tray 4 blocked
The paper path from Tray 4 is blocked. Usually caused when
one of the trays above has been removed.
Toner is low
The toner is low and will require replacement soon
(approximately 70 pages).
Toner is empty
The toner cartridge is empty. Replace with a new cartridge.
The following are Status messages which report the current status of the printer. These
messages are informational only and require no user action.
Status Message
Description
Ready
The printer is ready to print.
Warming up...
The printer is warming up after a restart or period in Energy
Save Mode.
Printing...
A page is printing.
Processing
The printer is processing a job and is waiting for additional data
from the computer.
Canceling job...
The print job is being cancelled as a result of the “Cancel Job”
button being pushed.
Energy save mode
The printer is in Energy Save Mode. This is a low-power standby
mode that the printer switches to when inactive for a certain
period of time.
Upgrading
The printer firmware (ROM) is being upgraded.
10-15
Clearing Paper Jams
Paper jams within the Elite 21 printer will be reported using a number of different messages on the
LCD display of the unit, depending on where the paper is jammed. This section covers procedures for
clearing the following jam messages:
• Paper Feed Jam
• Paper Path Jam
• Paper Exit Jam
• Duplex Unit Jam
• Upper Bin Jam
Paper Feed Jam
A “Paper Feed Jam” message indicates that paper has jammed between the paper feed location (MultiPurpose Feeder or cassette) and the toner cartridge. Paper Feed Jams can be cleared as follows:
1. Inspect the Multi-Purpose Feeder and
remove any jammed paper by pulling the
sheets out as shown.
2. Remove the paper cassette from the
printer. Inspect the area inside the printer
for any jammed paper and remove the
paper.
10-16
3. If multiple trays are in use, remove each
tray and inspect each feeder for jammed
pages.
4. Check each cassette and remove any
wrinkled or creased paper.
5. Push each paper cassette back into the
printer, making sure that the cassette(s) are
firmly pushed all the way in.
10-17
6. Close the Multi-Purpose Feeder (if open)
and open and close the front cover of the
printer to reset the printer and remove the
“Paper Feed Jam” message.
The display should return to “Ready” and
the printer will be ready to resume printing.
Paper Path Jam
A “Paper Path Jam” message indicates that paper has jammed between the toner cartridge and the
paper exit area. Paper Path Jams can be cleared as follows:
1. If paper was fed from the Multi-Purpose
Feeder, remove all paper from the feeder.
10-18
2. Open the front cover all the way until it
stops.
Remove any printouts from the top output
tray before opening the cover.
Do not touch any internal components of
the printer.
3. Grasp the toner cartridge and slowly pull it
out of the printer. Set the toner aside.
4. Locate the tab on the inside left of the
printer’s internal compartment (as shown).
Lift up on the lever to release the paper
holder bar. Remove any jammed paper by
pulling it out towards the front of the printer.
10-19
5. Reinsert the toner cartridge into the printer,
making sure the tabs on the left and right of
the cartridge match up with the channels
within the printer (as shown).
Make sure the cartridge is inserted all the
way into the printer and is seated properly.
6. Close the front cover, making sure it
latches securely.
The display should return to “Ready” and
the printer will be ready to resume printing.
10-20
Paper Exit Jam
A “Paper Exit Jam” message indicates that paper has jammed in the paper exit area. Paper Exit
Jams can be cleared as follows:
1. Squeeze the latch at the upper left of the
rear panel and pull towards you to open the
rear cover of the printer.
If you are using a paper cassette extended
past the Letter/A4 setting, remove the
cassette before opening the rear cover.
2. Look for and remove paper jammed in the
space directly behind the rear cover.
Caution: The fusing unit of the printer will
be very hot directly after printing. Be careful
not to touch the fusing unit while clearing
any exit jams.
10-21
3. Remove the duplexing unit of the printer (if
equipped) by pushing inward on the green
tabs to the left and right of the unit (as
shown). Grasp and pull the duplexing unit
out of the printer.
4. If paper is jammed around the fusing unit,
lift up on the fuser release levers (#1 in the
diagram) and remove any jammed paper
from the fuser by pulling up and out of the
printer.
5. Return the fuser release levers to their
original positions and reinsert the duplexing
unit (if equipped). Be sure to latch the
duplexing unit back into place by sliding the
two green tabs outward.
10-22
6. Close the rear cover, making sure that it
latches securely.
The display should return to “Ready” and
the printer will be ready to resume printing.
Duplex Unit Jam
A “Duplex Unit Jam” message indicates that paper has jammed in the optional duplex unit of
the printer. Duplex Unit Jams can be cleared as follows:
1. Squeeze the latch at the upper left of the
rear panel and pull towards you to open the
rear cover of the printer.
If you are using a paper cassette extended
past the Letter/A4 setting, remove the
cassette before opening the rear cover.
10-23
2. Look for and remove paper jammed in the
space directly behind the rear cover.
Caution: The fusing unit of the printer will
be very hot directly after printing. Be careful
not to touch the fusing unit while clearing
any duplex unit jams.
3. Remove the duplexing unit of the printer by
pushing inward on the green tabs to the left
and right of the unit (as shown). Grasp and
pull the duplexing unit out of the
printer.
4. Press outwards on the tabs on the
duplexing unit (#1) to release its cover. Lift
up on the outside tabs (#2) to open the
cover.
10-24
5. Remove any jammed paper from inside the
duplexing unit.
6. Reinsert the duplexing unit into the printer,
as shown. Be sure to latch the duplexing
unit back into place by sliding the two
green tabs outward.
7. Close the rear cover, making sure that it
latches securely.
The display should return to “Ready” and
the printer will be ready to resume printing.
10-25
Upper Bin Jam
An “Upper Bin Jam” message indicates that paper has jammed in the optional upper output bin of the
printer. Upper Bin Jams can be cleared as follows:
1. Pull on the recessed area at the rear of the
upper output bin to open its cover, as
shown.
2. Remove any jammed paper from inside the
upper bin.
10-26
3. Close the rear cover, making sure it latches
securely.
4. Close the Multi-Purpose Feeder (if open)
and open and close the front cover of the
printer to reset the printer and remove the
“Upper Bin Jam” message.
The display should return to “Ready” and
the printer will be ready to resume printing.
10-27
Print Quality Problems
This section of the manual describes possible print quality problems. Consult the list below to
identify the example that most resembles your print quality problem and follow the
recommendation(s) in the Solution column. If the print quality problem persists, contact GCC
Technical Support, your dealer or an authorized GCC service center.
Description
Faded print
Black Dots
Vertical black streaks
10-28
Possible Cause
Solution
The paper is moist.
Remove the moist paper
and load new, dry paper.
The toner cartridge is old or
damaged.
Replace the toner cartridge.
Toner in the toner cartridge
is low.
Replace the toner cartridge.
The paper is out of
specification.
Replace the paper with
recommended media.
The toner cartridge is old or
damaged.
Replace the toner cartridge.
The toner cartridge is old or
damaged.
Replace the toner cartridge.
Description
Possible Cause
Repeating marks
The paper path is dirty.
Print several blank sheets.
The toner cartridge is old or
damaged.
Replace the toner cartridge.
The paper is out of
specification.
Replace the paper with
recommended media.
The toner cartridge is old or
damaged.
Replace the toner cartridge.
The paper is moist.
Remove the moist paper
and load new, dry paper.
The paper is out of
specification.
Replace the paper with
recommended media.
The front cover is not fully
closed.
Close the front cover
properly.
The toner cartridge is old or
damaged.
Replace the toner cartridge.
The high voltage power
supply may be defective.
Contact GCC Technical
Support, your dealer or an
authorized GCC service
center.
White spots
Toner smears when
rubbed
Black page
Solution
10-29
Description
Blank page
Partial blanks
Possible Cause
Solution
The sealing tape of the toner Pull out the sealing tape.
cartridge is not pulled out.
The printer feeds two or
more sheets at a time
Remove paper from the tray
and fan the stack of paper to
avoid pages sticking.
The toner cartridge is old or
damaged.
Replace the toner cartridge.
The toner in the toner
cartridge is low.
Replace the toner cartridge.
The high voltage power
supply may be defective.
Contact GCC Technical
Support, your dealer or an
authorized GCC service
center.
The paper is moist.
Remove the moist paper
and load new, dry paper.
The paper is out of
specification.
Replace the paper with
recommended media.
The sealing tape of the toner Replace the toner cartridge.
cartridge is not fully pulled
out.
Creased paper
10-30
The paper is out of
specification.
Replace the paper with
recommended media.
The paper is moist.
Remove the moist paper
and load new, dry paper.
Description
Plotted print
Possible Cause
Solution
The paper is out of
specification.
Replace the paper with
recommended media.
The paper is moist.
Remove the moist paper
and load new, dry paper.
The toner cartridge is old or
damaged.
Replace the toner cartridge.
The toner cartridge is not
installed correctly.
Remove the toner cartridge
and re-install it.
The toner cartridge is old or
damaged.
Replace the toner cartridge.
Blurred print
The toner cartridge is old or
damaged.
Replace the toner cartridge.
Bold print appears
shaded.
The toner cartridge is old or
damaged.
Replace the toner cartridge.
Vertical blanks
10-31
Appendix A: Printer Specifications
Marking Engine:
Print Engine:
Fuji Xerox P752 (Hakuba)
Print Method:
Dry type laser printing
Engine Resolution:
600/1200dpi (software selectable)
Maximum Printable Area:
8.33”x13.83” (211.6x351.3 mm)
Maximum Print Speed:
Letter: 21 pages per minute (ppm) (Simplex) / 7.5 ppm (Duplex)
A4: 20 ppm (Simplex) / 7 ppm (Duplex)
Legal 13”: 17 ppm (Simplex) / 6.25 ppm (Duplex)
Legal 14”: 17 ppm (Simplex) / 6 ppm (Duplex)
Toner Cartridge:
Single component EP
Starter cartridge: 10,000 impressions at 5% black, letter
Replacement cartridge: 15,000 impressions at 5% black, letter
Paper Input Capacity:
Multi-Purpose Feeder (Tray 1): 100 sheets of 20lb. paper
Universal Cassette (Tray 2/3/4): 550 sheets of 20lb. paper
Envelope Feeder: 75 Comm #10 envelopes
(Maximum input capacity: 1750 sheets at 20lb. and 75 envelopes)
Output Bin Capacity:
Standard bin: 500 sheets of 20lb. paper
Upper bin: 500 sheets of 20lb. paper
Face-up (rear) bin: 100 sheets of 20lb. paper
(Maximum output capacity: 1000 sheets of 20lb. paper)
Typical Life:
Engine: 600,000 impressions or 5 years
Tray 1 (MPF): 60,000 feeds
Paper Tray 2/3/4: Same as engine
Duplex Unit: 300,000 duplexed sheets
Upper Bin: 600,000 impressions
Envelope Feeder: 300,000 sheets
Typical Duty Cycle:
5,000 impressions per month (average)
75,000 impressions per month (maximum)
Periodic Maintenance:
Replace Fuser, BTR and Feed Rollers: 200,000 impressions
Replace Envelope Feeder Retard Roller: 100,000 envelopes
A-1
Controller:
Processor:
80MHz PowerPC 403 GCX
Memory:
16MB minimum, 256MB maximum
Interfaces:
10/100BaseT Ethernet, USB, Bi-directional parallel, RS-232 Serial
Languages:
Xionics PostScript Level 2,
Xionics PCL 6 (PCL 5e + PCL XL) and PJL
Font Renderers:
Bitstream TrueDoc, Adobe Type-1 Compatible, TrueType
Built-in Fonts:
136 PS Level 3 Compatible / 80 PCL
Physical:
Weight:
62 lbs (28 kg)
Size:
Unpackaged: 16.6”x17.3”x16.3” (422x439x413 mm) (WxHxD)
Packaged: 28.3”x23.4”x22.3” (718x595x566 mm) (WxHxD)
Power requirements:
North America:
120 VAC (min. 108 VAC, max. 132 VAC), 50/60 Hz,
maximum 6.66 amp during printing
Europe/Australia:
240 VAC (min. 198 VAC, max. 264 VAC), 50/60 Hz,
maximum 3.33 amp during printing
Environmental specifications:
Temperature (operational): 40 º F - 95 º F (5 º C - 35 º C)
Humidity (operational):
15% - 85% relative humidity, non-condensing
Altitude (operational):
0 - 10,160 feet (0 - 3,100 meters)
Noise level (operational):
Less than 53 db
Noise level in standby:
Less than 35 db
Certifications:
UL/CSA/FCC/VDE, Energy Star
A-2
Appendix B: Paper Specifications
Supported Paper Sizes:
Universal tray/550 sheet capacity (Tray 2/3/4):
•Letter
•Legal 13”
•A4
•Executive
•Legal 14”
•B5
•Transparencies (Letter/A4, 100 sheets maximum)
•Label stock (Letter/A4, 100 sheets maximum)
•A5
Multipurpose feeder (Tray 1):
Sizes as above with 100 sheets of paper, 30 transparencies, postcards or label stock
maximum capacity. The multipurpose tray can also be used with the following envelope
sizes (10 envelopes maximum):
•Commercial #10
•Monarch
•DL
•C5
Envelope Feeder:
Envelope sizes as above, maximum capacity 75 envelopes. Also can be used for up to 100
postcards.
Paper Weight:
Paper trays : 16-80 lb. (60 g/m2 - 300 g/m2)
Multipurpose feeder (Tray 1): 16-80 lb. (60 g/m2 - 300 g/m2)
Paper Dimensions
Letter: 8.5 x 11 in. (215.9 x 279.4 mm)
Legal: 8.5 x 14 in. (215.9 x 355.6 mm)
Legal 13˝: 8.5 x 13 in. (215.9 x 330.2 mm)
Executive: 7.25 x 10.5 in. (184.2 x 266.7 mm)
A4: 210 x 297 mm (8.27 x 11.69 in.)
A5: 148 x 210 mm (5.83 x 8.27 in.)
B5: 182 x 257 mm (7.17 x 10.12 in.)
Postcard: 3.94 x 5.83 in. (100 x 148 mm)
B-1
Envelopes
Commercial #10: 4.125 x 9.5 (104.8 x 241.3 mm)
Monarch: 3.875 x 7.5 (98.4 x 190.5 mm)
DL: 4.33 x 8.66 in. (110 x 220 mm)
C5: 162 x 229 mm (6.38 x 9.02 in.)
Print alignment
Skew: The amount by which a supposedly horizontal printed line may vary from being parallel
with the edge of the paper. This assumes that vertical printed lines are also at an angle, so that
the entire image is printed correctly but slightly rotated on the page. Measured with a 190 mm
(7.48 inch) line.
Within 1.2 mm (0.047 inch) either up or down
Registration: The amount by which images appearing to left or right, or above or below
previously printed images. Images appear on the paper correctly printed and aligned, but not in
the same place. Measured at the mid-point of the side or top of the paper.
Within 2.0 mm (0.079 inch) lead edge
Within 2.5 mm (0.099 inch) side edge
Magnification: The amount by which a line can be greater or smaller than its nominal length.
Measured with a 240 mm (9.45 inch) vertical line and a 190 mm (7.48 inch) horizontal line.
These lines are centered on the page to avoid measuring parallelism errors.
Within 0.8 percent longer or shorter than its nominal length
Horizontal Accuracy (Parallelism): The amount by which the ends of two vertical and two
horizontal lines can be greater or farther apart than the other ends. Measured with vertical lines
of 234 mm (9.21 inch) and horizontal lines 190 mm (7.48 inch). These lines are arranged to form
a rectangle on the page.
Within 1.2 mm (0.047 inch) horizontal or vertical either way
Linearity: The amount that three straight lines (horizontal, vertical, and diagonal) can vary from
being truly straight. One end of each of the horizontal and vertical lines meet at a corner; the
diagonal line is at 45 degrees to the other two lines and passes close to the center of the paper.
The horizontal line is 190 mm (7.48 inch), the vertical line is 234 mm (9.21 inch), and the
diagonal line is 269 mm (10.6 inch). The amount is measured by the distance a line can vary
from the position of a true straight line.
Within 0.5 mm (0.02 inch) either side, horizontal and vertical lines
Within 1.2 mm (0.05 inch) either side, diagonal line
Vertical Accuracy (Verticality): The amount one end of a 114.5 mm (4.51 inch) vertical line can
vary from true perpendicular.
Within 0.8 mm (0.03 inch) either side of true vertical
B-2
Appendix C: Interface connector pinouts
Use the following pinouts and descriptions of the various printer interface connectors for purchase
or assembly of a new cable.
Bi-directional Parallel (nybble mode)
PIN
SIGNAL
DESCRIPTION
DIRECTION
1
/STROBE
Data Strobe
In to Printer
2
D1
Data Bit 1
In
3
D2
Data Bit 2
In
4
D3
Data Bit 3
In
5
D4
Data Bit 4
In
6
D5
Data Bit 5
In
7
D6
Data Bit 6
In
8
D7
Data Bit 7
In
9
D8
Data Bit 8
In
10
/ACK
Acknowledge
Out from Printer
11
BUSY
Busy
Out
12
PERROR
Paper Empty
Out
13
SELECT
Select Out
Out
14
/AUTOFD
Autofeed
In
15
NC
Not Used
16
GND
Signal Ground
17
CGND
Chassis Ground
18
NC
Not Used
19-30
GND
Signal Ground
31
/INIT
Initialize
In
32
/FAULT
Printer Fault
Out
33-35
NC
Not Used
36
/SELECTIN
Select In
In
C-1
RS-232 Serial:
PIN
SIGNAL
DESCRIPTION
DIRECTION
1
FG
Frame Ground
2
TXD
Transmitted Data
Out
3
RXD
Received Data
In
4
RTS
Request to Send
Out
5
CTS
Clear to Send
In
6
DSR
Data Set Ready
In
7
GND
Signal Ground
8
DCD
Data Carrier Detect
In
DTR
Data Terminal Ready
Out
9
Ethernet (UTP):
PIN
SIGNAL
DESCRIPTION
DIRECTION
1
TX+
Transmit+
Out
2
TX-
Transmit-
Out
3
RX+
Receive+
In
4
NC
Not Used
5
NC
Not Used
6
RX-
Receive-
7
NC
Not Used
8
NC
Not Used
C-2
In
Appendix D: Radio and TV interference
This printer generates radio frequency energy and may cause interference to
radio and television communications if not installed and used in accordance with
GCC Technologies’ instructions.
This GCC printer was certified under test conditions that included the use of
shielded cables and connectors between system components. It is mandatory that
you use shielded cables and connectors to reduce the possibility of causing
interference to radio, television, and other electronic devices.
Turning the printer off will help determine whether the printer is causing
interference. If the interference stops, it was probably caused by the printer.
If the printer does cause interference to radio or television reception, try to correct
the interference by using one or more of the following measures:
• Turn the television or radio antenna until the interference stops.
• Move the printer to one side or the other of the television or radio.
• Move the printer farther away from the television or radio.
• Plug the printer into a different outlet so the printer and receiver are on
different circuits.
If necessary, consult your dealer or a radio/television technician for additional
suggestions. You may also find helpful the following booklet prepared by the
Federal Communications Commission: How to Identify and Resolve Radio-TV
Interference Problems. This booklet is available from the US Government Printing
Office, Washington, DC 20402, Stock No. 004-000-00345-4.
D-1
Appendix E - PCL
PCL stands for Printer Control Language, a page description language developed
by Hewlett-Packard for use with their LaserJet series printers. The Elite 21 printer
supports PCL 6 (PCL 5e and PCL XL) , as well as PostScript. This is useful if
sending jobs from older DOS-based applications that do not support PostScript.
Selecting a HP LaserJet series driver from the list of printers in the DOS
application will allow most jobs to be printed to the Elite 21. There are no specific
settings that need to be set on the printer to allow PCL to be used; the printer will
automatically sense PCL jobs and switch to PCL mode accordingly.
GCC has also included a PCL 5e Windows driver with the Elite 21 series
software, which will allow all of the printer’s specific features to be accessed using
PCL from Windows (using a HP LaserJet driver may not offer all paper handling
options available on the Elite 21). Most users will use the standard Elite 21
PostScript drivers through Windows, but these PCL drivers are provided in the
event that PCL emulation is necessary for your specific application(s) or system
configuration.
To install the Elite 21 Series PCL 5e driver, select “Elite 21 Series PCL” when
asked to select a printer model during the Windows driver installation.
Please note: PCL 5e is not the most recent version. PCL 6 (the most recent HP
release) is supported by the Elite 21, however PCL 6 drivers are only available
through Hewlett-Packard at this time.
A list of common PCL escape codes, used by some DOS applications to specify
printing parameters, is found on the next page.
E-1
PCL Escape Codes
The table below shows some frequently-used PCL printer commands (escape
sequences) that can be useful when sending a PCL print job from DOS to your
GCC printer. PCL commands tell the printer which actions to perform or which
fonts to use.
The commands listed below are a subset of the PCL command set. When
entering escape sequences, substitute the # symbol in the escape sequence
referenced in the left column with the appropriate number from the right column.
The character l shown in some examples after the ampersand (&) is a letter l (a
lower-case letter L).
Printer command
Function
# refers to
EC
Escape character
n/a
LF
Line feed
n/a
FF
Form feed
n/a
CR
Carriage return
n/a
ECE
Resets printer
n/a
EC&l#X
Number of copies
1 to 32,767
EC&l0X
Ejects page
n/a
EC&l#H
Selects paper source
1 = tray 1, 2 = manual feed, 3 = manual feed,
4 = tray 2, 6 = MPFeeder
EC&l#A
Selects a paper size
1 = executive, 2 = letter, 3 = legal 14”, 26 = A4,
45 = JIS B5, 62 = legal 13”, 71 = postcard,
80 = monarch, 81 = commercial 10, 90 = DL
EC&l#O
Select orientation
0 = portrait, 1 = landscape
EC&a#L
Sets left margin
Column number
EC&a#M
Sets right margin
Column number
EC&l#E
Sets top margin
Number of lines
EC&l#F
Sets page length
Number of lines from top margin
E-2
Appendix F: Fonts
The Elite 21 printer ships with 136 standard PostScript fonts in 42 font families.
This collection of fonts matches the standard PostScript Level 3 font set. To print
out a listing of the resident PostScript fonts on the printer along with a sample of
each typeface, follow these steps:
•
•
•
•
Start the printer and wait for the LCD display to read Ready.
Press either Menu key until Information appears.
Press either Item key until “Print PS Fonts” appears.
Press Select.
This will print out a page with samples of all the available resident PostScript
fonts on the printer.
The printer also ships with 80 standard resident PCL 6 fonts. A sample of these
fonts can be printed following the steps listed above, but selecting “Print PCL
Fonts” rather than Print PS Fonts.
The printer is also compatible with any downloadable TrueType, Type 1 or PCL
font loaded onto your computer.
Bitstream Screen Fonts
In order to access the resident PostScript fonts on the printer, your computer
must be equipped with a compatible screen font file for each of the resident
printer fonts. The Elite 21 Series CD-ROM includes screen fonts provided by
Bitstream, Inc. These fonts are automatically installed on your computer during
a standard Macintosh installation. Users of Windows systems will need to
install them using the separate Font Installer on the Elite 21 Series CD-ROM,
as follows:
•
•
•
•
Insert the GCC Elite 21 Series CD-ROM into the Windows PC.
Click on My Computer, then double-click the CD icon to open the CD.
Double-click the Fonts folder on the CD-ROM.
Double-click the “Setup.exe” icon within this folder.
F-1
Follow the on-screen installer intructions. This will install all the screen fonts
onto the system.
The Bitstream screen fonts provide equivalent typefaces to traditional
PostScript fonts, however the Bitstream font names are typically different from
traditional PostScript font names. The tables on the following pages provide a
cross-reference of the different font names between the traditional PostScript
font names (“Equivalent font”) and the Bitstream fonts.
Page F-3 and F-4 are cross references of the font families, the first sorted by
Equivalent font, and the second sorted by Bitstream font. These can be used to
determine which screen font corresponds with the desired printer font. More
detailed font equivalency information (covering each of the individual font
typefaces) appears starting on page F-5 for Macintosh, or page F-8 for
Windows.
The Font Installer utility for Windows will also set font mapping on the PC to
automatically make a connection between the Bitstream and equivalent font
names.
Note: All PostScript font names used in the following tables are the trademarks
or registered trademarks of their respective owners.
F-2
Equivalent font family
Bitstream font family
Albertus MT
Antique Olive Roman
Apple Chancery
Arial
AvantGarde
Bodoni
Bodoni Poster
Bodoni PosterCompressed
Bookman
Carta
Chicago
Clarendon
Cooper Black
Copperplate
Coronet
Courier
Eurostile
Geneva
GillSans
Goudy
Helvetica
Hoefler Text
Joanna MT
Letter Gothic
LubalinGraph
Marigold
Mona Lisa Recut
Monaco
New York
NewCenturySchlbk
Optima
Oxford
Palatino
StempelGaramond Roman
Symbol
Tekton
Times
Times New Roman
Univers
Wingdings
ZapfChancery
ZapfDingbats
Flareserif 821
Incised 901
Cataneo
Swiss 721 SWM
Geometric 711 Gothic
Modern 421 Bodoni
Modern 721 Poster Bodoni
Onyx
ITC Bookman
Elemento
Daly Sans 350
Clarendon 701
Freeform 741
Copperplate Gothic
Ribbon 131
New Courier
Square 721
Sans 721
Humanist 521
Venetian 521 Goudy
Swiss 721 SWA
Classical
Sophie
New LetterGothic
ITC Lubalin Graph
Victoria Rose
Jilli Open
Laguna Sans
Westchester
Century 702 Schoolbook
Zapf Humanist 601
Shelford
Zapf Calligraphic 801
Aldine 430 Garamond
Symbol Set SWA
Draftsman Casual
Dutch 801 SWA
Dutch 801 SWM
Swiss 742
More Wingbats SWM
ITC Zapf Chancery
ITC Zapf Dingbats
F-3
F-4
Bitstream font family
Equivalent font family
Aldine 430 Garamond
Cataneo
Century 702 Schoolbook
Clarendon 701
Classical
Copperplate Gothic
Daly Sans 350
Draftsman Casual
Dutch 801 SWA
Dutch 801 SWM
Elemento
Flareserif 821
Freeform 741
Geometric 711 Gothic
Humanist 521
Incised 901
ITC Bookman
ITC Lubalin Graph
ITC Zapf Chancery
ITC Zapf Dingbats
Jilli Open
Laguna Sans
Modern 421 Bodoni
Modern 721 Poster Bodoni
More Wingbats SWM
New Courier
New LetterGothic
Onyx
Ribbon 131
Sans 721
Shelford
Sophie
Square 721
Swiss 721 SWA
Swiss 721 SWM
Swiss 742
Symbol Set SWA
Venetian 521 Goudy
Victoria Rose
Westchester
Zapf Calligraphic 801
Zapf Humanist 601
StempelGaramond Roman
Apple Chancery
NewCenturySchlbk
Clarendon
Hoefler Text
Copperplate
Chicago
Tekton
Times
Times New Roman
Carta
Albertus MT
Cooper Black
AvantGarde
GillSans
Antique Olive
Bookman
LubalinGraph
ZapfChancery
ZapfDingbats
Mona Lisa Recut
Monaco
Bodoni
Bodoni Poster
Wingdings
Courier
Letter Gothic
Bodoni PosterCompressed
Coronet
Geneva
Oxford
Joanna MT
Eurostile
Helvetica
Arial
Univers
Symbol
Goudy
Marigold
New York
Palatino
Optima
Macintosh Font Equivalency Tables
Bitstream font
Aldine 430 Garamond SWA
Aldine 430 Garamond SWA (italic)
Aldine 430 Garamond SWA (bold)
Aldine 430 Garamond SWA (bold, italic)
Cataneo SWA
Century 702 Schoolbook SWA
Century 702 Schoolbook SWA (italic)
Century 702 Schoolbook SWA (bold)
Century 702 Schoolbook SWA (bold, italic)
Clarendon 701 SWA
Clarendon 701 SWA (bold)
Clarendon 701 Lt SWA
Classical SWA
Classical SWA (italic)
Classical SWA (bold)
Classical SWA (bold, italic)
Classical Ornaments SWA
Copperplate Gothic SWA
Copperplate Gothic Hv SWA (bold)
Daly Sans 350 SWA (bold)
Draftsman Casual SWA
Dutch 801 SWA
Dutch 801 SWA (italic)
Dutch 801 SWA (bold)
Dutch 801 SWA (bold, italic)
Dutch 801 SWM
Dutch 801 SWM (italic)
Dutch 801 SWM (bold)
Dutch 801 SWM (bold, italic)
Elemento SWA
Flareserif 821 SWA (bold)
Flareserif 821 SWA (bold, italic)
Flareserif 821 Lt SWA
Freeform 741 SWA (bold)
Freeform 741 SWA (bold, italic)
Geometric 711 Gothic SWA
Geometric 711 Gothic SWA (italic)
Geometric 711 Gothic SWA (bold)
Geometric 711 Gothic SWA (bold, italic)
Humanist 521 SWA
Humanist 521 SWA (italic)
Humanist 521 SWA (bold)
Humanist 521 SWA (bold, italic)
Humanist 521 Cn SWA
Humanist 521 Cn SWA (bold)
Humanist 521 Lt SWA
Humanist 521 Lt SWA (italic)
Humanist 521 XBd SWA (bold)
Incised 901 SWA
Incised 901 SWA (italic)
Macintosh equivalent
StempelGaramond Roman
StempelGaramond Italic
StempelGaramond Bold
StempelGaramond BoldItalic
Apple Chancery
New Century Schlbk
New Century Schlbk Italic
New Century Schlbk Bold
New Century Schlbk BoldItalic
Clarendon
Clarendon Bold
Clarendon Light
Hoefler Text
Hoefler Text (italic)
Hoefler Text (bold)
Hoefler Text (bold, italic)
Hoefler Text Ornaments
Copperplate32bc
Copperplate33bc
Chicago
Tekton
Times
Times (italic)
Times (bold)
Times (bold, italic)
Times New Roman
Times New Roman (italic)
Times New Roman (bold)
Times New Roman (bold, italic)
Carta
Albertus MT
Albertus MT It
Albertus MT Lt
Cooper Black
Cooper Black Italic
AvantGarde
AvantGarde BookOblique
AvantGarde Demi
AvantGarde DemiOblique
GillSans
GillSans Italic
GillSans Bold
GillSans BoldItalic
GillSans Condensed
GillSans BoldCondensed
GillSans Light
GillSans LightItalic
GillSans ExtraBold
Antique Olive Roman
Antique Olive Italic
Printer font
StempelGaramond-Roman
StempelGaramond-Italic
StempelGaramond-Bold
StempelGaramond-BoldItalic
Apple-Chancery
NewCenturySchlbk-Roman
NewCenturySchlbk-Italic
NewCenturySchlbk-Bold
NewCenturySchlbk-BoldItalic
Clarendon
Clarendon-Bold
Clarendon-Light
HoeflerText-Regular
HoeflerText-Italic
HoeflerText-Black
HoeflerText-BlackItalic
HoeflerText-Ornaments
Copperplate-ThirtyTwoBC
Copperplate-ThirtyThreeBC
Chicago
Tekton
Times-Roman
Times-Italic
Times-Bold
Times-BoldItalic
TimesNewRomanPSMT
TimesNewRomanPS-ItalicMT
TimesNewRomanPS-BoldMT
TimesNewRomanPS-BoldItalicMT
Carta
AlbertusMT
AlbertusMT-Italic
AlbertusMT-Light
CooperBlack
CooperBlack-Italic
AvantGarde-Book
AvantGarde-BookOblique
AvantGarde-Demi
AvantGarde-DemiOblique
GillSans
GillSans-Italic
GillSans-Bold
GillSans-BoldItalic
GillSans-Condensed
GillSans-BoldCondensed
GillSans-Light
GillSans-LightItalic
GillSans-ExtraBold
AntiqueOlive-Roman
AntiqueOlive-Italic
F-5
Bitstream font
Incised 901 SWA (bold)
Incised 901 Compact SWA (bold)
ITC Bookman SWA
ITC Bookman SWA (italic)
ITC Bookman SWA (bold)
ITC Bookman SWA (bold, italic)
ITC Lubalin Graph SWA
ITC Lubalin Graph SWA (italic)
ITC Lubalin Graph SWA (bold)
ITC Lubalin Graph SWA (bold, italic)
ITC Zapf Chancery SWA (bold, italic)
ITC Zapf Dingbats SWA
Jilli Open SWA
Laguna Sans SWA
Modern 421 Bodoni SWA
Modern 421 Bodoni SWA (italic)
Mobern 421 Bodoni SWA (bold)
Modern 421 Bodoni SWA (bold, italic)
Modern 721 Poster Bodoni SWA (bold)
More Wingbats SWM
New Courier SWA
New Courier SWA (italic)
New Courier SWA (bold)
New Courier SWA (bold, italic)
New LetterGothic SWA
New LetterGothic SWA (italic)
New LetterGothic SWA (bold)
New LetterGothic SWA (bold, italic)
Onyx SWA (bold)
Ribbon 131 SWA (italic)
Sans 721 SWA
Shelford SWA
Sophie SWA
Sophie SWA (italic)
Sophie SWA (bold)
Sophie SWA (bold, italic)
Square 721 SWA (bold)
Square 721 Bold SWA
Square 721 Ex SWA
Square 721 Ex SWA (bold)
Swiss 721 SWA
Swiss 721 SWA (italic)
Swiss 721 SWA (bold)
Swiss 721 SWA (bold, italic)
Swiss 721 Cn SWA
Swiss 721 Cn SWA (italic)
Swiss 721 Cn SWA (bold)
Swiss 721 Cn SWA (bold, italic)
Swiss 721 Narrow SWA
Swiss 721 Narrow SWA (italic)
Swiss 721 Narrow SWA (bold)
Swiss 721 Narrow SWA (bold, italic)
Swiss 721 SWM
F-6
Macintosh equivalent
Antique Olive Bold
Antique Olive Compact
Bookman
Bookman LightItalic
Bookman Demi
Bookman DemiItalic
LubalinGraph
LubalinGraph BookOblique
LubalinGraph Demi
LubalinGraph DemiOblique
Zapf Chancery
Zapf Dingbats
Mona Lisa Recut
Monaco
Bodoni
Bodoni Italic
Bodoni Bold
Bodoni BoldItalic
Bodoni Poster
Wingdings
Courier
Courier (italic)
Courier (bold)
Courier (bold, italic)
Letter Gothic
Letter Gothic Slanted
Letter Gothic Bold
Letter Gothic BoldSlanted
Bodoni PosterCompressed
Coronet
Geneva
Oxford
Joanna MT
Joanna MT It
Joanna MT Bd
Joanna MT Bd It
Eurostile
Eurostile Bold
Eurostile ExtendedTwo
Eurostile BoldExtendedTwo
Helvetica
Helvetica (italic)
Helvetica (bold)
Helvetica (bold, italic)
Helvetica Condensed
Helvetica CondensedOblique
Helvetica CondensedBold
Helvetica CondensedBoldObl
Helvetica Narrow
Helvetica Narrow Oblique
Helvetica Narrow Bold
Helvetica Narrow BoldObl
Arial
Printer font
AntiqueOlive-Bold
AntiqueOlive-Compact
Bookman-Light
Bookman-LightItalic
Bookman-Demi
Bookman-DemiItalic
LubalinGraph-Book
LubalinGraph-BookOblique
LubalinGraph-Demi
LubalinGraph-DemiOblique
ZapfChancery-MediumItalic
ZapfDingbats
MonaLisa-Recut
Monaco
Bodoni
Bodoni-Italic
Bodoni-Bold
Bodoni-BoldItalic
Bodoni-Poster
Wingdings-Regular
Courier
Courier-Oblique
Courier-Bold
Courier-BoldOblique
LetterGothic
LetterGothic-Slanted
LetterGothic-Bold
LetterGothic-BoldSlanted
Bodoni-PosterCompressed
Coronet-Regular
Geneva
Oxford
JoannaMT
JoannaMT-Italic
JoannaMT-Bold
JoannaMT-BoldItalic
Eurostile
Eurostile-Bold
Eurostile-ExtendedTwo
Eurostile-BoldExtendedTwo
Helvetica
Helvetica-Oblique
Helvetica-Bold
Helvetica-BoldOblique
Helvetica-Condensed
Helvetica-Condensed-Oblique
Helvetica-Condensed-Bold
Helvetica-Condensed-BoldObl
Helvetica-Narrow
Helvetica-Narrow-Oblique
Helvetica-Narrow-Bold
Helvetica-Narrow-BoldOblique
ArialMT
Bitstream font
Swiss 721 SWM (italic)
Swiss 721 SWM (bold)
Swiss 721 SWM (bold, italic)
Swiss 742 SWA
Swiss 742 SWA (italic)
Swiss 742 Cn SWA
Swiss 742 Cn SWA (italic)
Swiss 742 Ex SWA
Swiss 742 Ex SWA (italic)
Swiss 742 Ex SWA (bold)
Swiss 742 Ex SWA (bold, italic)
Swiss 742 Lt SWA
Swiss 742 Lt SWA (italic)
Swiss 742 Lt SWA (bold)
Swiss 742 Lt SWA (bold, italic)
Swiss 742 LtCn SWA (bold)
Swiss 742 LtCn SWA (bold, italic)
Symbol Set SWA
Venetian 521 Goudy SWA
Venetian 521 Goudy SWA (italic)
Venetian 521 Goudy SWA (bold)
Venetian 521 Goudy SWA (bold, italic)
Venetian 521 Goudy XBd SWA (bold)
Victoria Rose SWC (italic)
Westchester SWA
Zapf Calligraphic 801 SWA
Zapf Calligraphic 801 SWA (italic)
Zapf Calligraphic 801 SWA (bold)
Zapf Calligraphic 801 SWA (bold, italic)
Zapf Humanist 601 SWA
Zapf Humanist 601 SWA (italic)
Zapf Humanist 601 SWA (bold)
Zapf Humanist 601 SWA (bold, italic)
Macintosh equivalent
Arial (italic)
Arial (bold)
Arial (bold, italic)
Univers 55
Univers 55 Oblique
Univers 57 Condensed
Univers 57 CondensedOblique
Univers Extended
Univers ExtendedObl
Univers BoldExt
Univers BoldExtObl
Univers 45 Light
Univers 45 LightOblique
Univers 65 Bold
Univers 65 BoldOblique
Univers 67 CondensedBold
Univers 67 CondensedBoldObl
Symbol
Goudy
Goudy Italic
Goudy Bold
Goudy BoldItalic
Goudy ExtraBold
Marigold
New York
Palatino
Palatino (italic)
Palatino (bold)
Palatino (bold, italic)
Optima
Optima Italic
Optima Bold
Optima BoldItalic
Printer font
Arial-ItalicMT
Arial-BoldMT
Arial-BoldItalicMT
Univers
Univers-Oblique
Univers-Condensed
Univers-CondensedOblique
Univers-Extended
Univers-ExtendedObl
Univers-BoldExt
Univers-BoldExtObl
Univers-Light
Univers-LightOblique
Univers-Bold
Univers-BoldOblique
Univers-CondensedBold
Univers-CondensedBoldOblique
Symbol
Goudy
Goudy-Italic
Goudy-Bold
Goudy-BoldItalic
Goudy-ExtraBold
Marigold
NewYork
Palatino-Roman
Palatino-Italic
Palatino-Bold
Palatino-BoldItalic
Optima
Optima-Italic
Optima-Bold
Optima-BoldItalic
F-7
Windows Font Equivalency Tables
Bitstream font
Aldine 430 Garamond SWA
Aldine 430 Garamond SWA (Italic)
Aldine 430 Garamond SWA (Bold)
Aldine 430 Garamond SWA (Bold Italic)
Cataneo SWA
Century 702 Schoolbook SWA
Century 702 Schoolbook SWA (Italic)
Century 702 Schoolbook SWA (Bold)
Century 702 Schoolbook SWA (Bold Italic)
Clarendon 701 SWA
Clarendon 701 SWA (Bold)
Clarendon 701 Lt SWA
Classical SWA
Classical SWA (Italic) Italic
Classical Black SWA
Classical Black SWA (Italic)
Classical Ornaments SWA
Copperplate Gothic SWA
Copperplate Gothic Hv SWA
Daly Sans 350 SWA
Draftsman Casual SWA
Dutch 801 SWA
Dutch 801 SWA (Italic) Italic
Dutch 801 SWA (Bold) Bold
Dutch 801 SWA (Bold Italic)
Dutch 801 SWM
Dutch 801 SWM (Italic)
Dutch 801 SWM (Bold)
Dutch 801 SWM (Bold Italic)
Elemento SWA
Flareserif 821 SWA
Flareserif 821 SWA (Italic)
Flareserif 821 Lt SWA
Freeform 741 SWA (Black)
Freeform 741 SWA (Black Italic)
Geometric 711 Gothic SWA (Book)
Geometric 711 Gothic SWA (Book Oblique)
Geometric 711 Gothic SWA (Demi)
Geometric 711 Gothic SWA (Demi Oblique)
Humanist 521 SWA
Humanist 521 SWA (Italic)
Humanist 521 SWA (Bold)
Humanist 521 SWA (Bold Italic)
Humanist 521 Cn SWA
Humanist 521 Cn SWA (Bold)
Humanist 521 Lt SWA
Humanist 521 Lt SWA (Italic)
Humanist 521 XBd SWA
Incised 901 SWA
Incised 901 SWA (Italic)
Incised 901 SWA (Bold)
Incised 901 Compact SWA
ITC Bookman SWA (Light)
ITC Bookman SWA (Light Italic)
ITC Bookman SWA (Demi)
ITC Bookman SWA (Demi Italic)
ITC Lubalin Graph SWA (Book)
ITC Lubalin Graph SWA (Book Oblique)
ITC Lubalin Graph SWA (Demi) Bold
F-8
Style
Italic
Bold
Bold Italic
Italic
Bold
Bold Italic
Bold
Italic
Bold Italic
Italic
Bold
Bold Italic
Italic
Italic
Italic
Bold
Bold Italic
Italic
Bold
Bold Italic
Bold
Italic
Italic
Bold
Italic
Bold
Bold Italic
Italic
File name
ALDIGSR_.TTF
ALDIGSI_.TTF
ALDIGSB_.TTF
ALDIGSBI.TTF
CATASL__.TTF
CENTSSR_.TTF
CENTSSI_.TTF
CENTSSB_.TTF
CENTSSBI.TTF
CLARS___.TTF
CLARSB__.TTF
CLARSL__.TTF
CLASSRG_.TTF
CLASSI__.TTF
CLASSBL_.TTF
CLASSBLI.TTF
CLASS___.TTF
COPPGS__.TTF
COPPGSH_.TTF
DALYSS__.TTF
DRAFCS__.TTF
DUTCTSR_.TTF
DUTCTSI_.TTF
DUTCTSB_.TTF
DUTCTSBI.TTF
DUTCSR__.TTF
DUTCSI__.TTF
DUTCSB__.TTF
DUTCSBI_.TTF
ELEMS___.TTF
FLARS___.TTF
FLARSI__.TTF
FLARSL__.TTF
FREESBL_.TTF
FREESBLI.TTF
GEOMGSW_.TTF
GEOMGSWO.TTF
GEOMGSD_.TTF
GEOMGSDO.TTF
HUMAS___.TTF
HUMASI__.TTF
HUMASB__.TTF
HUMASBI_.TTF
HUMASC__.TTF
HUMASBC_.TTF
HUMASL__.TTF
HUMASLI_.TTF
HUMASEB_.TTF
INCIS___.TTF
INCISI__.TTF
INCISB__.TTF
INCISC__.TTF
REVIISL_.TTF
REVIISLI.TTF
REVIISD_.TTF
REVIISDI.TTF
ITCLGSW_.TTF
ITCLGSWO.TTF
ITCLGSD_.TTF
Windows equivalent
StempelGaramond Roman
StempelGaramond Roman
StempelGaramond Roman
StempelGaramond Roman
Apple Chancery
NewCenturySchlbk
NewCenturySchlbk
NewCenturySchlbk
NewCenturySchlbk
Clarendon
Clarendon
Clarendon Light
Hoefler Text
Hoefler Text
Hoefler Text Black
Hoefler Text Black
Hoefler Text Ornaments
Copperplate32bc
Copperplate33bc
Chicago
Tekton
Times
Times
Times
Times
Times New Roman
Times New Roman
Times New Roman
Times New Roman
Carta
Albertus MT
Albertus MT
Albertus MT Lt
Cooper Black
Cooper Black
AvantGarde
AvantGarde
AvantGarde
AvantGarde
GillSans
GillSans
GillSans
GillSans
GillSans Condensed
GillSans Condensed
GillSans Light
GillSans Light
GillSans ExtraBold
Antique Olive Roman
Antique Olive Roman
Antique Olive Roman
Antique Olive Compact
Bookman
Bookman
Bookman
Bookman
LubalinGraph
LubalinGraph
LubalinGraph
Printer font
StempelGaramond-Roman
StempelGaramond-Italic
StempelGaramond-Bold
StempelGaramond-BoldItalic
Apple-Chancery
NewCenturySchlbk-Roman
NewCenturySchlbk-Italic
NewCenturySchlbk-Bold
NewCenturySchlbk-BoldItalic
Clarendon
Clarendon-Bold
Clarendon-Light
HoeflerText-Regular
HoeflerText-Italic
HoeflerText-Black
HoeflerText-BlackItalic
HoeflerText-Ornaments
Copperplate-ThirtyTwoBC
Copperplate-ThirtyThreeBC
Chicago
Tekton
Times-Roman
Times-Italic
Times-Bold
Times-BoldItalic
TimesNewRomanPSMT
TimesNewRomanPS-ItalicMT
TimesNewRomanPS-BoldMT
TimesNewRomanPS-BoldItalicMT
Carta
AlbertusMT
AlbertusMT-Italic
AlbertusMT-Light
CooperBlack
CooperBlack-Italic
AvantGarde-Book
AvantGarde-BookOblique
AvantGarde-Demi
AvantGarde-DemiOblique
GillSans
GillSans-Italic
GillSans-Bold
GillSans-BoldItalic
GillSans-Condensed
GillSans-BoldCondensed
GillSans-Light
GillSans-LightItalic
GillSans-ExtraBold
AntiqueOlive-Roman
AntiqueOlive-Italic
AntiqueOlive-Bold
AntiqueOlive-Compact
Bookman-Light
Bookman-LightItalic
Bookman-Demi
Bookman-DemiItalic
LubalinGraph-Book
LubalinGraph-BookOblique
LubalinGraph-Demi
Bitstream font
ITC Lubalin Graph SWA (Demi Oblique)
ITC Zapf Chancery SWA (Medium Italic)
ITC Zapf Dingbats SWA
Jilli Open SWA
Laguna Sans SWA
Modern 421 Bodoni SWA
Modern 421 Bodoni SWA (Italic)
Mobern 421 Bodoni SWA (Bold)
Modern 421 Bodoni SWA (Bold Italic)
Modern 721 Poster Bodoni SWA
More Wingbats SWM
New Courier SWA
New Courier SWA (Oblique)
New Courier SWA (Bold)
New Courier SWA (Bold Oblique)
New LetterGothic SWA
New LetterGothic SWA (Oblique)
New LetterGothic SWA (Bold)
New LetterGothic SWA (Bold Oblique)
Onyx SWA
Ribbon 131 SWA
Sans 721 SWA
Shelford SWA
Sophie SWA
Sophie SWA (Italic)
Sophie SWA (Bold)
Sophie SWA (Bold Italic)
Square 721 SWA
Square 721 Bold SWA
Square 721 Ex SWA
Square 721 Ex SWA (Bold)
Swiss 721 SWA
Swiss 721 SWA (Oblique)
Swiss 721 SWA (Bold) Bold
Swiss 721 SWA (Bold Oblique)
Swiss 721 Cn SWA
Swiss 721 Cn SWA (Oblique)
Swiss 721 Cn SWA (Bold)
Swiss 721 Cn SWA (Bold Oblique)
Swiss 721 Narrow SWA
Swiss 721 Narrow SWA (Oblique)
Swiss 721 Narrow SWA (Bold)
Swiss 721 Narrow SWA (Bold Oblique)
Swiss 721 SWM
Swiss 721 SWM (Italic)
Swiss 721 SWM (Bold)
Swiss 721 SWM (Bold Italic)
Swiss 742 SWA
Swiss 742 SWA (Oblique)
Swiss 742 Cn SWA
Swiss 742 Cn SWA (Oblique)
Swiss 742 Ex SWA
Swiss 742 Ex SWA (Oblique)
Swiss 742 Ex SWA (Bold)
Swiss 742 Ex SWA (Bold Oblique)
Swiss 742 Lt SWA
Swiss 742 Lt SWA (Oblique)
Swiss 742 Lt SWA (Bold)
Swiss 742 Lt SWA (Bold Oblique)
Swiss 742 LtCn SWA (Bold)
Swiss 742 LtCn SWA (Bold Oblique)
Symbol Set SWA
Style
File name
Bold Italic ITCLGSDO.TTF
ITCZCSMI.TTF
ITCZDS__.TTF
JILLOS__.TTF
LAGUSS__.TTF
MODEBS__.TTF
Italic
MODEBSI_.TTF
Bold
MODEBSB_.TTF
Bold Italic MODEBSBI.TTF
MODEPSBS.TTF
MOREWS__.TTF
BITSNCS_.TTF
Italic
BITSNCSO.TTF
Bold
BITSNCSB.TTF
Bold Italic BITSNCBO.TTF
BITSNLGS.TTF
Italic
BITSNLGO.TTF
Bold
BITSNLGB.TTF
Bold Italic BITNLGBO.TTF
ONYXSWA_.TTF
RIBBS___.TTF
SANSS___.TTF
SHELS___.TTF
SOPHS___.TTF
Italic
SOPHSI__.TTF
Bold
SOPHSB__.TTF
Bold Italic SOPHSBI_.TTF
SQUAS___.TTF
SQUASB__.TTF
SQUASE__.TTF
Bold
SQUASBE_.TTF
SWISHS__.TTF
Italic
SWISHSO_.TTF
SWISHSB_.TTF
Bold Italic SWISHBO_.TTF
SWISHSC_.TTF
Italic
SWISHCO_.TTF
Bold
SWISHBC_.TTF
Bold Italic SWISHCBO.TTF
SWISHNS_.TTF
Italic
SWISHNO_.TTF
Bold
SWISHNSB.TTF
Bold Italic SWISHNBO.TTF
SWISS___.TTF
Italic
SWISSI__.TTF
Bold
SWISSB__.TTF
Bold Italic SWISSBI_.TTF
SWISUS__.TTF
Italic
SWISUSO_.TTF
SWISUSC_.TTF
Italic
SWISUCSO.TTF
SWISUSE_.TTF
Italic
SWISUESO.TTF
Bold
SWISUSBE.TTF
Bold Italic SWISUEBO.TTF
SWISUSL_.TTF
Italic
SWISUSLO.TTF
Bold
SWISUSB_.TTF
Bold Italic SWISUSBO.TTF
SWISUSBC.TTF
Italic
SWISUCBO.TTF
SYMBSS__.TTF
Windows equivalent
LubalinGraph
ZapfChancery
ZapfDingbats
Mona Lisa Recut
Monaco
Bodoni
Bodoni
Bodoni
Bodoni
Bodoni Poster
Wingdings
Courier
Courier
Courier
Courier
Letter Gothic
Letter Gothic
Letter Gothic
Letter Gothic
Bodoni PosterCompressed
Coronet
Geneva
Oxford
Joanna MT
Joanna MT
Joanna MT
Joanna MT
Eurostile
Eurostile Bold
Eurostile ExtendedTwo
Eurostile ExtendedTwo
Helvetica
Helvetica
Helvetica
Helvetica
Helvetica Condensed
Helvetica Condensed
Helvetica Condensed
Helvetica Condensed
Helvetica-Narrow
Helvetica-Narrow
Helvetica-Narrow
Helvetica-Narrow
Arial
Arial
Arial
Arial
Univers 55
Univers 55
Univers 57 Condensed
Univers 57 Condensed
Univers Extended
Univers Extended
Univers Extended
Univers Extended
Univers 45 Light
Univers 45 Light
Univers 45 Light
Univers 45 Light
Univers 47 CondensedLight
Univers 47 CondensedLight
Symbol
Printer font
LubalinGraph-DemiOblique
ZapfChancery-MediumItalic
ZapfDingbats
MonaLisa-Recut
Monaco
Bodoni
Bodoni-Italic
Bodoni-Bold
Bodoni-BoldItalic
Bodoni-Poster
Wingdings-Regular
Courier
Courier-Oblique
Courier-Bold
Courier-BoldOblique
LetterGothic
LetterGothic-Slanted
LetterGothic-Bold
LetterGothic-BoldSlanted
Bodoni-PosterCompressed
Coronet-Regular
Geneva
Oxford
JoannaMT
JoannaMT-Italic
JoannaMT-Bold
JoannaMT-BoldItalic
Eurostile
Eurostile-Bold
Eurostile-ExtendedTwo
Eurostile-BoldExtendedTwo
Helvetica
Helvetica-Oblique
Helvetica-Bold
Helvetica-BoldOblique
Helvetica-Condensed
Helvetica-Condensed-Oblique
Helvetica-Condensed-Bold
Helvetica-Condensed-BoldObl
Helvetica-Narrow
Helvetica-Narrow-Oblique
Helvetica-Narrow-Bold
Helvetica-Narrow-BoldOblique
ArialMT
Arial-ItalicMT
Arial-BoldMT
Arial-BoldItalicMT
Univers
Univers-Oblique
Univers-Condensed
Univers-CondensedOblique
Univers-Extended
Univers-ExtendedObl
Univers-BoldExt
Univers-BoldExtObl
Univers-Light
Univers-LightOblique
Univers-Bold
Univers-BoldOblique
Univers-CondensedBold
Univers-CondensedBoldOblique
Symbol
F-9
Bitstream font
Venetian 521 Goudy SWA
Venetian 521 Goudy SWA (Italic)
Venetian 521 Goudy SWA (Bold)
Venetian 521 Goudy SWA (Bold Italic)
Venetian 521 Goudy XBd SWA
Victoria Rose SWC
Westchester SWA
Zapf Calligraphic 801 SWA
Zapf Calligraphic 801 SWA (Italic)
Zapf Calligraphic 801 SWA (Bold)
Zapf Calligraphic 801 SWA (Bold Italic)
Zapf Humanist 601 SWA
Zapf Humanist 601 SWA (Italic)
Zapf Humanist 601 SWA (Bold)
Zapf Humanist 601 SWA (Bold Italic)
F-10
Style
File name
VENEGS__.TTF
Italic
VENEGSI_.TTF
Bold
VENEGSB_.TTF
Bold Italic VENEGSBI.TTF
VENEGSEB.TTF
VICTRS__.TTF
WESTS___.TTF
ZAPFCSR_.TTF
Italic
ZAPFCSI_.TTF
Bold
ZAPFCSB_.TTF
Bold Italic ZAPFCSBI.TTF
ZAPFHS__.TTF
Italic
ZAPFHSI_.TTF
Bold
ZAPFHSB_.TTF
Bold Italic ZAPFHSBI.TTF
Windows equivalent
Goudy
Goudy
Goudy
Goudy
Goudy ExtraBold
Marigold
New York
Palatino
Palatino
Palatino
Palatino
Optima
Optima
Optima
Optima
Printer font
Goudy
Goudy-Italic
Goudy-Bold
Goudy-BoldItalic
Goudy-ExtraBold
Marigold
NewYork
Palatino-Roman
Palatino-Italic
Palatino-Bold
Palatino-BoldItalic
Optima
Optima-Italic
Optima-Bold
Optima-BoldItalic
Appendix G: Service and Support
You can contact GCC for technical assistance in several ways.
•
Technical Support phones: (781) 276-8620.
(North America only; outside North America, refer to back cover)
•
Fax: (781) 275-1115.
•
GCC’s World Wide Web site: http://www.gccprinters.com/support
•
Internet email: [email protected]
GCC’s World Wide Web site
GCC’s Web site offers a wealth of information. The most recently updated
documentation for the Elite 21 Series of printers is here, along with technical
bulletins that deal with any problems that arise over the life of your printer.
Check www.gccprinters.com to see if your problem has a solution.
Dealer and Service Center support
GCC offers worldwide services from its dealers and service centers. They are
supported by training, technical documentation, and technical support.
Extended warranties
GCC offers extended warranty programs for all its products. These extend the
limited warranty and cover all parts of the printer (except consumables, like the
toner cartridge). You can purchase an extended warranty during the limited
warranty period, and renew it year after year.
Software upgrades
You can download software upgrades from GCC’s web site.
Consumables, accessories, and upgrades
You can purchase consumables such as toner cartridges, accessories, and
upgrades direct from GCC by calling 1.800.422.7777 (North America only;
outside North America, refer to back cover) or from our web site at:
http://www.gccprinters.com.
G-1
Appendix H: Consumables and Accessories
The following consumables and optional accessories are available for the GCC Elite 21 printer. To
order, contact GCC Direct Sales at 800 422-7777 or visit our web site at www.gccprinters.com
(North America only). Outside North America, contact your local GCC office, dealer or distributor.
Product
Part Number
Toner Cartridge . . . . . . . . . . . . . . . . . . . . . . . . . . . . . . . . . . . . . . . .AC16940
Additional Paper Feeder and Tray . . . . . . . . . . . . . . . . . . . . . . . . . .AC16942
Replacement Paper Tray . . . . . . . . . . . . . . . . . . . . . . . . . . . . . . . . .AC16944
Upper Output Bin . . . . . . . . . . . . . . . . . . . . . . . . . . . . . . . . . . . . . . .AC16496
Envelope Feeder . . . . . . . . . . . . . . . . . . . . . . . . . . . . . . . . . . . . . . .AC16948
Duplex Unit . . . . . . . . . . . . . . . . . . . . . . . . . . . . . . . . . . . . . . . . . . .AC16950
10Base-T Ethernet Cable (15 feet) . . . . . . . . . . . . . . . . . . . . . . . . . .AC16427
10Base-T Ethernet Cable (10 feet) . . . . . . . . . . . . . . . . . . . . . . . . . .AC16429
10Base-T Ethernet Cable (6 feet) . . . . . . . . . . . . . . . . . . . . . . . . . . .AC16431
Bi-Directional Parallel Cable (15 feet) . . . . . . . . . . . . . . . . . . . . . . . .AC16442
Bi-Directional Parallel Cable (15 feet) . . . . . . . . . . . . . . . . . . . . . . . .AC16444
USB Cable (3 meter) . . . . . . . . . . . . . . . . . . . . . . . . . . . . . . . . . . . .AC16270
H-1
Appendix I: Contacting GCC Worldwide
GCC Technologies can be reached through a number of methods. Customers
in North America should contact GCC’s corporate offices, as follows:
GCC TECHNOLOGIES, INC.
209 Burlington Rd.
Bedford, MA 01730
Tel: (781) 275-5800
Fax: (781) 275-1115
Web: http://www.gccprinters.com
Direct Sales Lines:
Tel: 800 422-7777
Fax: 800 442-2329
Direct Technical Support Lines:
Tel: (781) 276-8620
Fax: (781) 275-1115
Web: http://www.gccprinters.com/support
I-1
Customers outside of North America should contact their local GCC office,
GCC dealer or GCC distributor for Sales or Technical Support assistance.
GCC’s local offices can be reached as follows:
AUSTRALIA
GCC Technologies Australia
Unit 5/585 Blackburn Rd.
Notting Hill, VIC, 3168
Tel: +61 3 9562 1800
Fax: +61 3 9562 1900
Web: http://www.gcctech.com.au
GERMANY
GCC Technologies Germany
Vertriebsbüro Deutschland
Hahnbuschweg 2-4
D-24147 Klausdorf bei Kiel
Germany
Tel: +49 431 7997610
Fax: +49 431 7997666
UNITED KINGDOM
GCC Technologies United Kingdom
729 Hounslow Rd.
Hounslow, Middlesex
England TW3 1SE
Tel: +44 208 754 6000
Fax: +44 208 754 6060
GCC’s International Sales and Support departments can also be reached via email at the following addresses:
Sales: [email protected]
Tech Support: [email protected]
I-2
Appendix J: Warranties and Licenses
Software License Agreement
OPENING THE BAG CONTAINING THE SOFTWARE (the “Software”) WHICH ACCOMPANIES THIS MANUAL INDICATES
YOUR ACCEPTANCE OF THE TERMS AND CONDITIONS CONTAINED IN THIS LICENSE AGREEMENT. THE TERMS OF
THIS LICENSE AGREEMENT APPLY TO YOU AS THE ORIGINAL LICENSEE OF THE SOFTWARE AND THE RELATED
USER DOCUMENTATION (the “Documentation”) AND TO ANY SUBSEQUENT LICENSEE THEREOF.
IF YOU DO NOT ACCEPT OR AGREE TO THE TERMS OF THIS LICENSE AGREEMENT YOU MAY RETURN THE PRODUCT, WITH DATED PROOF-OF-PURCHASE OF THE PRODUCT, TO YOUR DEALER WITHIN 10 DAYS FOR A FULL REFUND
OF PURCHASE PRICE THEREOF. ALL RETURNED SOFTWARE MUST BE UNUSED AND IN THE UNOPENED PLASTIC
BAG.
LICENSE
In return for payment of the purchase price of your GCC Technologies Product (“the Product”), you have been granted a limited,
non-exclusive license (“License”) to use the Software and the Documentation on the terms set forth in this License Agreement.
GCC Technologies, Inc. (“GCC”) retains ownership of these copies of the Software and the Documentation. These copies of the
Software and the Documentation are licensed to you according to the following terms:
PERMITTED USES
YOU MAY:
1. Use the Software with any appropriate GCC product.
2. Copy the Software onto a single hard disk drive.
3. Transfer the Software to another party, if the other party agrees to the terms and conditions of this License Agreement and
completes and returns a Registration Card to GCC. The Registration Card may be obtained by writing to GCC’s Customer
Service department at the address set forth below. If you transfer the Software to any other party, you must transfer all copies
and the Documentation to such party.
4. Make a single copy of the Software on another diskette for backup purposes only.
PROHIBITED USES
THE LICENSE OF THE SOFTWARE AND THE DOCUMENTATION GRANTED TO YOU IS LIMITED, AND YOU MAY NOT:
1. Make copies of any of the Documentation or make copies of the Software other than as expressly set forth above.
2. Alter, modify or adapt the Software or the Documentation, including translating, decompiling, disassembling, creating derivative works, or merging the Software with other software.
3. Use any backup diskette you have made or allow someone else to use any backup diskette unless the Software on the
original diskette is defective.
4. Rent, sublicense, assign or otherwise transfer any interest in any of the Software or the Documentation except as set forth
above.
5. Modify or erase any copyright, trademark or proprietary rights notice on any medium containing the Software or the
Documentation or copy or reproduce any of the Software or the Documentation without all of GCC’s copyright, trademark and
proprietary rights notices.
The License is effective until terminated. You may terminate it at any time by destroying all copies of the Software you have and
mailing your original Software diskettes and the Documentation to GCC. The License and your right to use the Software will automatically terminate upon your failure to comply with any provision of this License Agreement or upon GCC’s election to terminate
the License as set forth below. You agree upon such termination to destroy all copies of the Software which you have and to mail
your original Software diskettes and the Documentation to GCC.
GCC retains all rights and title to the Software and the Documentation except for the limited license contained herein. The
Software and the Documentation are protected by the copyright laws of the United States. There are severe penalties, civil and
criminal, for copyright infringement. Nothing in this License Agreement constitutes a waiver of GCC’s rights under the copyright
laws of the United States or any other law.
J-1
Limited Software Warranty
WARRANTY
If you discover physical defects in the medium on which the Software or the Documentation are distributed, at its option, GCC
will either replace the medium at no charge to you or terminate the License and require the return of your Product, and upon
such return, refund to you the purchase price thereof. To qualify for this warranty, you must return the defective medium with
proof-of-purchase to GCC during the one year period after you acquired the Software.
Except as set forth in the immediately preceding paragraph, GCC PROVIDES THE SOFTWARE AND THE DOCUMENTATION “AS IS” AND WITHOUT WARRANTY OF ANY KIND, EITHER EXPRESS OR IMPLIED, INCLUDING, BUT NOT LIMITED TO, ANY IMPLIED WARRANTIES OF MERCHANTABILITY OR FITNESS FOR A PARTICULAR PURPOSE OR WARRANTIES OF QUALITY OR PERFORMANCE. YOU THE LICENSEE ARE ASSUMING THE ENTIRE RISK AS TO THE
QUALITY OF THE SOFTWARE AND THE DOCUMENTATION AND THE RESULTS OF ITS USE. Your exclusive remedy
with respect to the Software, the Documentation and this License Agreement, shall be limited to the replacement of any
defective medium, or refund of the purchase price of your Product, as set forth above.
APPLE COMPUTER, INC. MAKES NO WARRANTIES, EITHER EXPRESS OR IMPLIED, REGARDING THE ENCLOSED
COMPUTER SOFTWARE PACKAGE, ITS MERCHANTABILITY OR ITS FITNESS FOR ANY PARTICULAR PURPOSE.
THE EXCLUSION OF IMPLIED WARRANTIES IS NOT PERMITTED BY SOME STATES. THE ABOVE EXCLUSION MAY
NOT APPLY TO YOU. THIS WARRANTY PROVIDES YOU WITH SPECIFIC LEGAL RIGHTS. THERE MAY BE OTHER
RIGHTS THAT YOU HAVE WHICH VARY FROM STATE TO STATE.
IN NO EVENT WILL GCC BE LIABLE FOR DIRECT, INDIRECT, SPECIAL, INCIDENTAL, OR CONSEQUENTIAL DAMAGES
ARISING OUT OF THE USE OR INABILITY TO USE THE SOFTWARE OR DOCUMENTATION, even if advised of the possibility of such damages. In particular, GCC shall have no liability for any programs or data stored or used with the Software,
including the costs of recovering such programs or data. In no event shall GCC’s liability with respect to the Software, the
Documentation and this License Agreement, in contract, tort (including negligence) or otherwise, exceed the original price
paid by you for your Product.
THE WARRANTY AND REMEDIES SET FORTH ABOVE ARE EXCLUSIVE AND IN LIEU OF ALL OTHERS, ORAL OR
WRITTEN, EXPRESS OR IMPLIED. No GCC dealer, agent, or employee is authorized to make any modification or addition
to this warranty.
SOME STATES DO NOT ALLOW THE EXCLUSION OF IMPLIED WARRANTIES OR LIABILITY FOR INCIDENTAL OR
CONSEQUENTIAL DAMAGES, SO THE ABOVE LIMITATION OR EXCLUSION MAY NOT APPLY TO YOU. THIS WARRANTY GIVES YOU SPECIFIC LEGAL RIGHTS, AND YOU MAY ALSO HAVE OTHER RIGHTS WHICH VARY FROM
STATE TO STATE.
GENERAL
This License Agreement is governed by the laws of the Commonwealth of Massachusetts. This License Agreement constitutes the entire
agreement between GCC and you concerning the Software and the Documentation, and supersedes all prior communications, agreements and
understandings, written or oral, between GCC and you with respect thereto.
Should you have any questions concerning this License Agreement, the Software or the Documentation, you may contact GCC by writing to
Customer Service, GCC Technologies Inc., 209 Burlington Road, Bedford, MA 01730-9143. For the name of the nearest GCC service center
or representative, call (800) 422-7777.
TRADEMARKS
GCC Technologies and the GCC Technologies logo are registered trademarks of GCC Technologies Inc. GCC printers, the GCC printers logo and Elite are trademarks of
GCC Technologies, Inc. Apple, AppleTalk, LaserWriter, EtherTalk, Macintosh, and the Apple logo are registered trademarks of Apple Computer, Inc. Finder and TrueType
are trademarks of Apple Computer, Inc. PostScript is a registered trademark of Adobe Systems Incorporated. Adobe and Acrobat are registered trademarks of Adobe
Systems Incorporated. IBM is a registered trademark of International Business Machines Corp. Helvetica, Palatino, and Times are registered trademarks of Linotype-Hell
AG Corp. Centronics is a registered trademark of Centronics Data Computer Corp. Ethernet is a registered trademark of Xerox Corp. Microsoft and Word are registered
trademarks of Microsoft Corp. Windows, Windows 95, Windows 98, Windows 2000 and Windows NT 4.0 are trademarks of Microsoft Corp. Bitstream is a registered
trademark of Bitstream Inc. Speedo, Bitstream Dutch, Bitstream Swiss, Bitstream Swiss Narrow, and Bitstream Zapf Calligraphic are trademarks of Bitstream Inc. ITC
Avant Garde, ITC Bookman, ITC Zapf Chancery, and ITC Zapf Dingbats are registered trademarks of International Typeface Corporation. New Century Schoolbook is a
registered trademark of Kingsley-ATF Type Corp. Helvetica, Palatino, and Times are registered trademarks of Linotype-Hell AG Corporation. PCL is a registered trademark of Hewlett-Packard Company. NetWare is a registered trademark of Novell Corp. Other trademarks are the property of their respective owners.
J-2
Limited Hardware Warranty
GCC Technologies, Inc. (“GCC”) warrants, for the limited period of one year from the date of original purchase, the Elite
21ppm sold by GCC and any accompanying media on which GCC software is recorded (the “Product”) to be free from
defects in materials and workmanship. During the warranty period, GCC or its authorized representative will, at its option,
repair, replace or refund the purchase price of any defective product at no additional cost, provided you return it during the
warranty period, transportation charges prepaid, to GCC or an authorized GCC dealer or representative. You must attach
your name, address and telephone number, a description of the problem, and a dated proof-of-purchase bearing the serial
number for each product returned for warranty service.
This Warranty is limited to the original purchaser of the product and is not transferable unless otherwise agreed by GCC in
writing. This Warranty does not apply to any product which has been damaged by accident, abuse, or misuse, which has
been modified without the prior written permission of GCC.
GCC MAKES NO WARRANTY OR REPRESENTATION, EITHER EXPRESS OR IMPLIED, WITH RESPECT TO THE
SOFTWARE SUPPLIED WITH THE PRODUCT, ITS QUALITY, PERFORMANCE, MERCHANTABILITY, OR FITNESS FOR
A PARTICULAR PURPOSE. AS A RESULT, THE SOFTWARE IS LICENSED “AS IS,” AND YOU THE LICENSEE ASSUME
THE ENTIRE RISK AS TO ITS QUALITY AND PERFORMANCE.
EXCEPT AS EXPRESSLY SET FORTH ABOVE, GCC MAKES NO OTHER WARRANTIES WITH RESPECT TO THE
PRODUCT, EXPRESS OR IMPLIED, INCLUDING BUT NOT LIMITED TO, ANY IMPLIED WARRANTIES OF MERCHANTABILITY OR FITNESS FOR A PARTICULAR PURPOSE.
UNDER NO CIRCUMSTANCES SHALL GCC’S LIABILITY ARISING OUT OF OR IN CONNECTION WITH THE PRODUCT
OR THE USE OF, OR THE INABILITY TO USE, THE PRODUCT, IN CONTRACT, IN TORT (INCLUDING NEGLIGENCE),
OR OTHERWISE EXCEED THE PURCHASE PRICE OF THE PRODUCT, AND IN NO EVENT SHALL GCC BE LIABLE
FOR SPECIAL, INCIDENTAL OR CONSEQUENTIAL DAMAGES INCLUDING, BUT NOT LIMITED TO, DAMAGES FOR
DOWNTIME OR LOST PROFITS, BUSINESS, USE OF SOFTWARE OR EQUIPMENT, OR GOODWILL, WHETHER OR
NOT GCC HAS BEEN ADVISED OF THE POSSIBILITY OF SUCH DAMAGES.
Some states do not allow the exclusion or limitation of implied warranties or liability for incidental or consequential damages,
or do not allow limitations on how long an implied warranty lasts, so the above limitations or exclusions may not apply to
you. ANY IMPLIED WARRANTIES, INCLUDING ANY IMPLIED WARRANTIES OF MERCHANTABILITY OR FITNESS FOR
A PARTICULAR PURPOSE, ARE LIMITED IN DURATION TO ONE YEAR FROM THE DATE OF ORIGINAL PURCHASE
OF THIS PRODUCT. This warranty gives you specific legal rights, and you may also have other rights which vary from state
to state.
No GCC dealer, representative, agent or employee is authorized to make any modification, extension or addition to this warranty on behalf on GCC. THE WARRANTIES AND REMEDIES SET FORTH ABOVE ARE EXCLUSIVE AND IN LIEU OF
ALL OTHERS, EXPRESS OR IMPLIED.
For the name of the nearest GCC service facility or representative, call GCC at (800) 422-7777, or write to:
Director of Customer Service, GCC Technologies Inc., 209 Burlington Road, Bedford, MA 01730-9143.
J-3
FEDERAL COMMUNICATIONS COMMISSION
WARNING: This equipment was tested and found to comply with the limits for a Class A digital device, pursuant
to Part 15 of the FCC Rules. These limits are designed to provide reasonable protection against harmful interference in a residential installation. This equipment generates, uses, and can radiate radio frequency energy and, if
not installed and used in accordance with the instructions in this manual, may cause harmful interference to radio
communications. However, there is no guarantee that interference will not occur in a particular installation. For
more information about radio frequency interference, refer to the section of this manual on Radio and TV interference.
CANADIAN REGULATIONS
This equipment is a Class A digital apparatus that complies with the Radio Interference Regulations, CRC c. 1374.
IMPORTANT: Changes or modifications to this product not authorized by GCC Technologies Inc. could void the
FCC Certification and negate your authority to operate the product. This product was tested for FCC Compliance
under conditions that included the use of shielded cables and connectors between system components. It is important that you use shielded cables and connectors to reduce the possibility of causing interference to radios, television sets, and other electronic devices. You can obtain the proper shielded cables from GCC Technologies or
from an Authorized GCC Technologies dealer.
CLASS 1 LASER PRODUCT
LASER SAFETY: This printer is certified as a Class 1 laser product under the U.S. Department of Health and
Human Services (DHHS) Radiation Performance Standard according to the Radiation Control for Health and
Safety Act of 1968. This means that the printer does not emit hazardous radiation. Since radiation emitted inside
the printer is completely confined within protective housings and external covers, the laser beam cannot escape
from the machine during any phase of user operation. The Center for Devices and Radiological Health (CDRH) of
the U.S. Food and Drug Administration implemented regulations for laser products on August 1, 1976. These regulations apply to laser products marketed in the United States. The label on the printer indicates compliance with
the CDRH regulations and must be attached to the laser products marketed in the United States.
Caution - Use of controls, adjustments, or performance of procedures other than those specified in this manual may result in hazardous radiation exposure.
CREDITS
© Copyright GCC Technologies Inc., 2000. All rights reserved.
The Elite 21 User Manual was written by David Nicholson.
It was edited by Donna Atwood, Kevin Curran, Donald Damon, Lee Doron, Laurie Freitas, Brian
Harriss and Gregg Linzey.
Cover design by Adam DeFanti. Illustrations courtesy Xerox International Partners, Technical
Services Group. Additional illustrations by Adam DeFanti, Bill Krech and Tracie King.
Printed in USA; part number 030-16479 rev A.
J-4


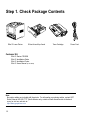
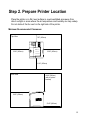
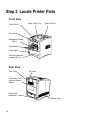
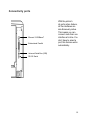
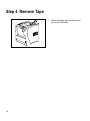
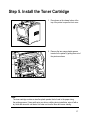
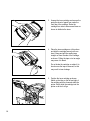
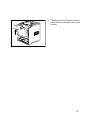
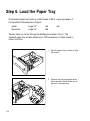
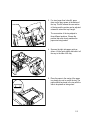
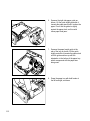
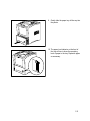

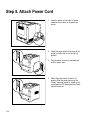

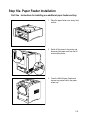
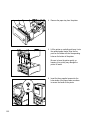
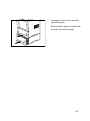
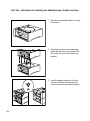

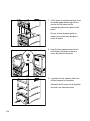
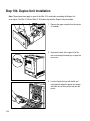
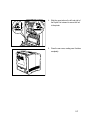

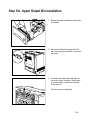
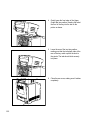
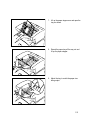

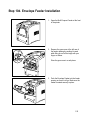


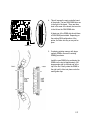
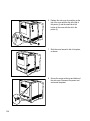
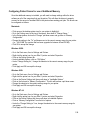


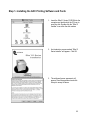
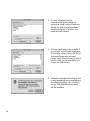
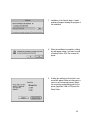
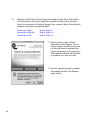

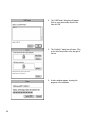
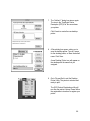
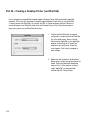
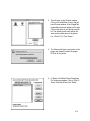
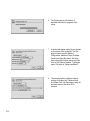

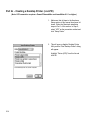
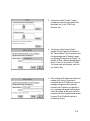
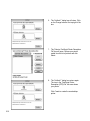
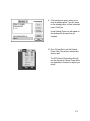
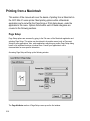
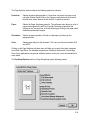

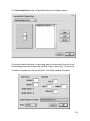

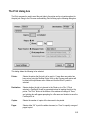
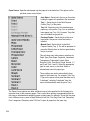
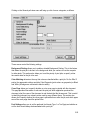
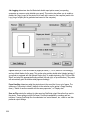
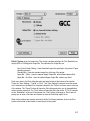
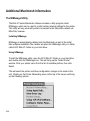

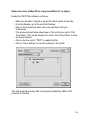


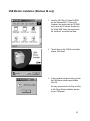
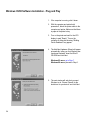
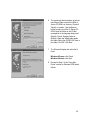
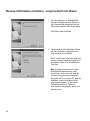
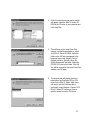
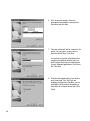

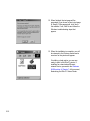
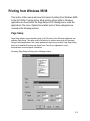
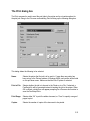
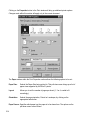
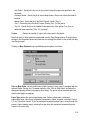
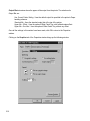
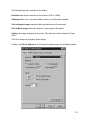

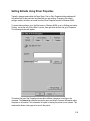
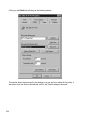
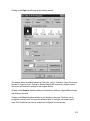
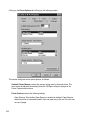


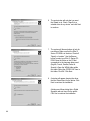
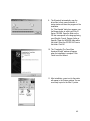
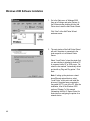
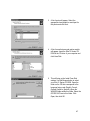
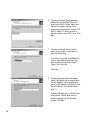
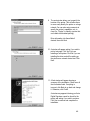
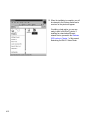
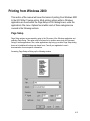


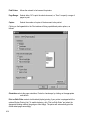
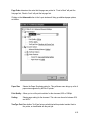
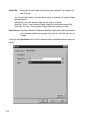

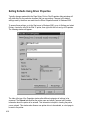
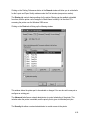
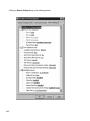


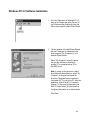
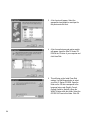

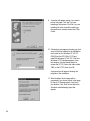
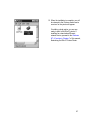
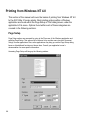
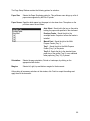
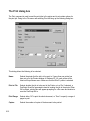
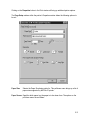
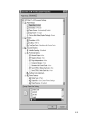

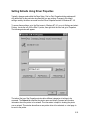
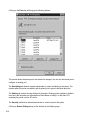


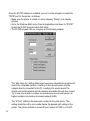

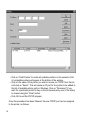
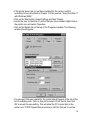


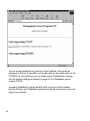
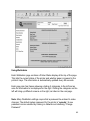

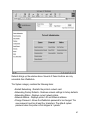
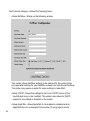


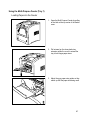
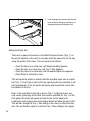


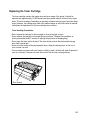

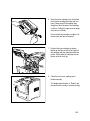
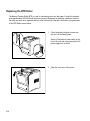
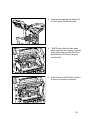
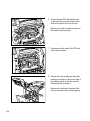
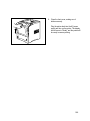
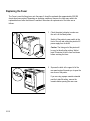
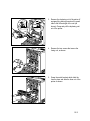
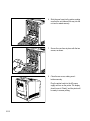
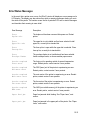
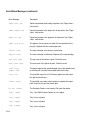
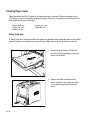
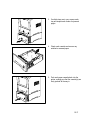
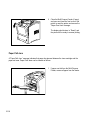
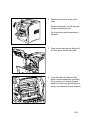
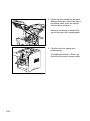
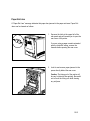

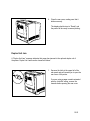
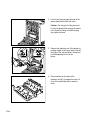

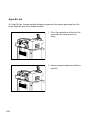
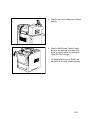
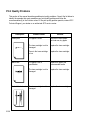
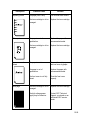
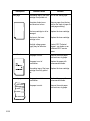
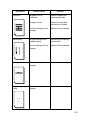
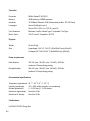
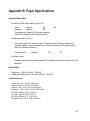

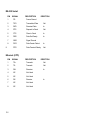


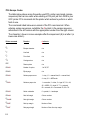


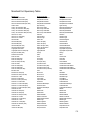


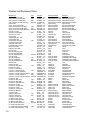
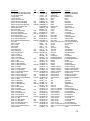


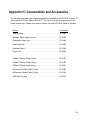


![4 Click [OK] - Toshiba America Business Solutions](http://vs1.manualzilla.com/store/data/005818130_1-6da0751aebf4d6c87686321c2c4e7e3a-150x150.png)