1
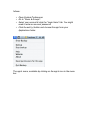
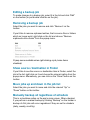
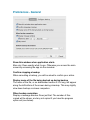
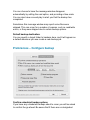
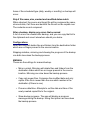
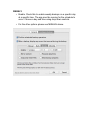
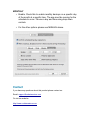
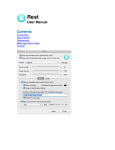
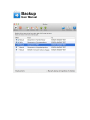
Backup
User Manual
Screenshots of the Mac version are used in this manual.
Legal Notice:
Disclaimer
Use at your own risk. The creator of this application is not responsible for any
damage to your computer or data resulting from use of this product.
THIS SOFTWARE IS PROVIDED BY THE COPYRIGHT HOLDERS AND
CONTRIBUTORS "AS IS" AND ANY EXPRESS OR IMPLIED WARRANTIES,
INCLUDING, BUT NOT LIMITED TO, THE IMPLIED WARRANTIES OF
MERCHANTABILITY AND FITNESS FOR A PARTICULAR PURPOSE ARE
DISCLAIMED. IN NO EVENT SHALL THE COPYRIGHT OWNER OR
CONTRIBUTORS BE LIABLE FOR ANY DIRECT, INDIRECT, INCIDENTAL,
SPECIAL, EXEMPLARY, OR CONSEQUENTIAL DAMAGES (INCLUDING, BUT
NOT LIMITED TO, PROCUREMENT OF SUBSTITUTE GOODS OR SERVICES;
LOSS OF USE, DATA, OR PROFITS; OR BUSINESS INTERRUPTION)
HOWEVER CAUSED AND ON ANY THEORY OF LIABILITY, WHETHER IN
CONTRACT, STRICT LIABILITY, OR TORT (INCLUDING NEGLIGENCE OR
OTHERWISE) ARISING IN ANY WAY OUT OF THE USE OF THIS SOFTWARE,
EVEN IF ADVISED OF THE POSSIBILITY OF SUCH DAMAGE.
Introduction
Backup copies individual files or entire folder structures to a target
destination, duplicating the content.
• Manually back up the content whenever you wish.
• Set scheduled backups - daily, weekly and monthly (the app
must be running).
• Set various options to control what is backed up, such as
mirroring content, show backup progress, copy only newer files,
preserve date/time.
• Batch add files and folders by drag/dropping them.
• Set individual target backup locations for each backup job.
Mac users: The app resides in your menu bar area, and can be
configure to start up automatically each time your computer starts as
follows:
• Open System Preferences.
• Go to “Users & Groups”.
• Select your account & click the “Login Items” tab. You might
need to enter an account password.
• Click the add (+) button and choose this app from your
Applications folder.
The app’s menu, available by clicking on the app’s icon in the menu
bar.
File permissions (Mac only)
Mac users: Due to Apple sandboxing requirements the app needs
permission to use files in your folders. When you add a file, you will
be asked to confirm access to it's parent folder. Just click
"CONFIRM". You will not be asked to do this again for that folder, but
any different folders you select from might trigger another
confirmation.
To prevent being asked for confirmation a lot of times, simply select
the highest level folder you can, close to the root (first) folder of the
drive/image you are using. For example, selecting your user account
folder will give the app access to all the common folders within your
user account (Pictures, Movies, Documents, Music etc).
If you encounter repeated requests to confirm folder access, despite
having already given it, reset permissions using the 'Reset
permissions' option under the File menu. You may need to do this if
you delete the app and later re-install it.
Creating a backup job
You can specify as many backup jobs as you want. Each job
specifies one or more file or folder to copy to a new location as a
backup.
Click the “Add” button on the toolbar. In the window that appears, you
can drag/drop files/folders from outside the app to the list area (or use
the “File” and “Folder” buttons if you prefer).
Next, specify a backup location. This can be set to a preferred default
location in Preferences (see relevant section in this manual).
Finally select a backup type:
•
•
•
•
Manual (performed when you select “Backup” from the toolbar).
Daily
Weekly
Monthly
See the Preferences section of this manual for a description of the
various options for each backup type.
Click the “OK” button when ready. The job will be added to the list on
the app’s main window.
To disable a job uncheck it in the list. This comes in handy when you
sometimes may want to skip a particular backup job for whatever
reason.
Adding items to a backup job
Editing a backup job
To make changes to a backup job, select it in the list and click “Edit”
on the toolbar (or just double-click the on the job).
Removing a backup job
Select the jobs you want to remove and click “Remove” on the
toolbar.
If you’d like to remove orphaned entries, that is source files or folders
which no longer exist, right click on the list and choose “Remove
orphaned source items” from the popup menu.
Popup menu available when right clicking a job (some items
disabled).
Show source / destination in Finder
If you’d like to see the source or destination item in Finder, select the
job in the list, right click on it and choose the relevant option from the
popup menu. Alternatively, you can click on the “Show” button on the
toolbar.
Move jobs up and down in the job list
Select the jobs you want to move and click the relevant “Up” or
“Down” button on the toolbar.
Manually backup all regardless of schedule
This is a checkbox option on the app’s main screen. When checked,
if you perform a manual backup by clicking “Backup” on the toolbar a
backup of ALL jobs will occur regardless if they are set to schedule
(daily, weekly, monthly).
Preferences - General
Show this window when application starts
Mac only: Does exactly what it says. Otherwise you access the main
screen by accessing the app via the menubar.
Confirm stopping a backup
When cancelling a backup, you will be asked to confirm your action.
Display name of the file being backed up during backup
The name of the file, or an abbreviated version if it is long, will appear
along the left-bottom of the screen during a backup. This may slightly
slow down backup on slower computers.
When backup completes:
Display a message window: Does just that. The number of files
copied will be shown, and any not copied if you have the progress
option set (see below).
You can choose to have the message window disappear
automatically by setting the next option, and providing a time scale.
You can also have a sound play to alert you that the backup has
completed.
Sometimes this message window may report some files were
skipped. This can occur for a number of reasons, such as read/write
errors, or they were skipped due to certain backup options.
Default backup destination:
You can specify a target folder to backups here, and it will appear as
a default whenever you use create a new backup job.
Preferences – Configure backup
Confirm scheduled backup options
If you have any scheduled backups about to occur you will be asked
to confirm the go ahead. Be aware that if there are no designated
items of the scheduled type (daily, weekly or monthly) no backup will
occur.
Skip if file name, size, created and modified dates match
When checked, the source and target file will be compared by name,
size and date, if all three are identical the file will not be copied over.
The contents are not compared.
After a backup, display any errors that occurred
A list of errors can viewed after backup, and you can copy that list to
the clipboard and save it elsewhere should you desire.
Configurations
Note: Mirroring will delete files and folders from the destination folder
which are no longer present in the source location.
Skipping matches, mirroring and showing the progress of the backup
can both slow down the backup process.
MANUAL
These are the settings for manual backup.
• Mirror content. Mirroring will delete files and folders from the
destination folder which are no longer present in the source
location. Mirroring can slow down the backup process.
• Copy only newer files. Compares the modified date and only
copies if the file is newer than the one which resides in the
destination (if there is one).
• Preserve date/time. Attempts to set the date and time of the
newly created copied file to the original.
• Show backup progress. The app will display a progress
message during the backup. Using this option can slow down
the backup process.
• Count files. The app will count how many files it needs to copy
for the backup. Using this option can slow down the backup
process.
DAILY
• Enable. Check this to enable daily backups at a specific time.
The app must be running for the schedule to occur. Choose a
time using drop down controls.
• For the other options please see MANUAL above.
WEEKLY
• Enable. Check this to enable weekly backups on a specific day
at a specific time. The app must be running for the schedule to
occur. Choose a day and time using drop down controls.
• For the other options please see MANUAL above.
MONTHLY
• Enable. Check this to enable monthly backups on a specific day
of the month at a specific time. The app must be running for the
schedule to occur. Choose a day and time using drop down
controls.
• For the other options please see MANUAL above.
Contact
If you have any questions about this product please contact us:
Email: [email protected]
Or visit our website:
http://www.codeinventors.com