1
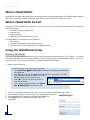
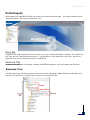
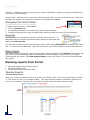
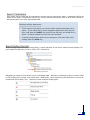
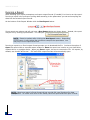
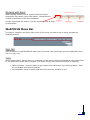
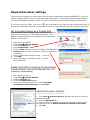
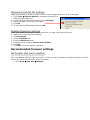
WebFOCUS User Manual Table of Contents What is WebFOCUS ______________________________ 1 Using the WebFOCUS Portal _______________________ 1 Portal Layout___________________________________ 2 Resource Tree __________________________________ 2 Navigating the Content Node __________________ 3 Favorites __________________________________ 3 Recent Items ______________________________ 3 Running Reports ________________________________ 3 Opening Reports ____________________________ 3 Report Parameters __________________________ 4 Report Output Formats _______________________ 4 Running a Report ___________________________ 5 Working with Excel __________________________ 6 WebFOCUS Menu Bar ____________________________ 6 Required Browser Settings ________________________ 7 Welcome The Columbia College WebFOCUS Portal - a flexible, robust and user-friendly reporting solution that keeps data at your finger tips. The reports accessible through the WebFOCUS Portal replace select statements and paragraphs that you are used to running from XHAL (colon prompt) in Colleague. With the upgrade to R18, XHAL (colon prompt) will not be available so we are embracing the new reporting methods. The new tools expand the reporting capabilities and offer more sophisticated designs to meet your needs. Many reports can be delivered in a variety of formats, including Excel, HTML, and PDF. The possibilities are endless - you can have tabular reports, visualize your data with colorful graphs and charts and drill down from summaries to details. This is an exciting opportunity for Columbia College to bring its reporting practices to the next level. However we ask you to be patient as it will take time to accommodate all reporting needs. It will be a process of continuous improvement and we look forward to working with you. WebFOCUS Help For help with basic understanding and browser set up, please refer to this manual or use the WebFOCUS Online Training Module. For additional browser setup questions, contact [email protected]. Please submit all WebFOCUS questions, issues, or requests for new reports to [email protected]. If the question or request is related to an existing report, please include the name of the report and the Domain location of the report. Example: The report Active report example for training video, is located under the Public domain, in the Demo Reports subfolder of Standard Reports. WebFOCUS Portal What is WebFOCUS? WebFOCUS is a Web-ready enterprise reporting system that takes advantage of wide distribution capabilities of the corporate intranet, to deliver easy access to the information that users need. What is WebFOCUS Portal? A portal is a web interface that gives you a “point of entry” to information. Some examples of portals you may be using are; Columbia College CougarTrack Amazon.com Online Banking State and Federal Government (.gov) The WebFOCUS Portal allows you the ability to; Run reports Conduct advanced searches within domains Personalize the content displayed in a Dashboard view Using the WebFOCUS Portal Opening the Portal The portal is a web based application you will access through Internet Explorer 7.0 or higher. It is highly recommended that you use Internet Explorer 9 when running reports with WebFOCUS portal. If you do not have access to run Internet Explorer 9, please contact the Helpdesk. 1. Open Internet Explorer. First time access - Add link to your favorites Click Favorites Add to Favorites. Windows will display the Add Favorite dialog box. The Name box will display WebFOCUS BI Portal. If you prefer, you may type a different name to identify the WebFOCUS Portal in your Favorites list. Click OK. The link will now be saved in your Favorites list. In the future you will need to click Favorites WebFOCUS to access the link. 2. 3. 4. 5. Go to the link https://webfocus.ccis.edu. You will be at the WebFOCUS Login page. At the WebFOCUS Sign In box enter your CougarTrack username. At the Password box enter your CougarTrack password. Click Sign in. The Columbia College Portal will be displayed. 1 WebFOCUS Portal Portal layout After logging into WebFOCUS Portal you arrive at the Portal Welcome page. The Portal contains the following two areas: Menu bar and Resource Tree. Menu Bar Located in the upper-right section of the screen, you may enable accessibility if needed. The options under Tools are not being utilized at this time. The last option on the Menu Bar is Sign Out. Be sure to Sign Out when you are finished working in WebFOCUS. Resource Tree Located on the left side of the page, contains WebFOCUS Resources, such as Content and Favorites. Resource Tree The following image shows an example of a Domain Tree displaying multiple domains, subfolders, and reports all of which can be found under Content on the Resource Tab. 2 WebFOCUS Portal Domain: A domain is a high-level grouping of reports. Specifically, reports are grouped by department then broken into subfolders. Domain Tree: A domain tree is a structure housing domains that you are authorized to view. When the contents of a domain tree change the contents are automatically updated. Navigating the Content Node: To 1. 2. 3. select a specific domain in WebFOCUS; Click the Content node. To expand the Domain tree, click the plus sign next to a Domain. Continue clicking the plus signs to expand each tree and locate the report you are looking for. Favorites Favorites allow you to bookmark reports you’d like easier access to. To designate an item as a Favorite, right-click the report, and on the context menu that opens, select Add to Favorites. You can clear all items in your Favorite Reports list by right-clicking Favorites and selecting Clear Favorites. To remove an individual item, right-click the item in your Favorite Reports list and select Remove. Recent Items The Recent Items node lists the items that you have recently accessed. Click Refresh if the window was open while you were accessing reports in WebFOCUS. This will update the list so you most recently viewed reports are visible. Click Clear Recent Items to clear your history. This will not actually delete any reports. Running reports from Portal Selecting parameterized reports options Selecting output format Saving Excel files to a network folder Opening Reports When you locate the subfolder with your reports in the Domain tree, click on the report name to launch it. The report will open in a separate window. The Report window contains information about the report, such as purpose. Special notes are listed to provide extra information about a report. 3 WebFOCUS Portal Report Parameters Each report has a unique set of parameters to select prior to running the report. Parameters define the scope of the report. Parameters may be in a variety of different formats, such as drop down menus or text boxes where you enter appropriate data. Selecting multiple parameters There may be times when you need to select multiple parameters for a report. If you would like to select contiguous parameters click the first item, hold down the SHIFT key and click the last item you would like to select. All items between the two items are selected. To select multiple items that are not contiguous, click each item while holding down the CTRL key. Report Output Format When viewing a report on the Content Node, a visiual indicator of the report output format displays. Report output formats may be Excel, HTML, PDF, PowerPoint. Outputting a report to Excel allows you to manipulate data. Whereas, outputting a report to either HTML or PDF allows you to simply view report data. Additionally, some reports may be delivered in comma delimited text file formats (.csv). Below are some example output types: 4 WebFOCUS Portal Running a Report After selecting your report parameters and report output format (if needed) it is time to run the report. Running a report is the process of pulling data according to the parameters you set and compiling the data into the selected report format. At the bottom of the Report Window click the Run Report button. Some reports are unique and will not have a Run Report button as shown above. Instead, the report may be run by clicking a push button. For example: NOTE: Please be patient after clicking the Run Report button. Depending on the report, it may take a few minutes to compile the report data. You may only run one report at a time. Running a report to an Excel output format prompts you to download the file. You have the option of Open the report within a second browser window or Save the report to a location on your hard drive, network drive, or portable device. When you Save a report, be sure to rename the File. All reports, by default, are named “WFServlet”. PDF and HTML output formats will automatically open. NOTE: Opening a report in Excel format will not provide full excel functions for data manipulation. To utilize Excel tools to the fullest, save the report and then open in Excel. 5 WebFOCUS Portal Working with Excel When opening reports in Excel, please note that multiple worksheets may contain report information. Worksheets are located at the bottom of the Excel Workbook. If many worksheets are present, click the arrows to scroll through all worksheets. WebFOCUS Menu Bar The banner, located in the upper right corner of the screen, provides a way to easily navigate the WebFOCUS Portal. Sign Out Use this button to logoff WebFOCUS when you are finished. You should sign out of the application whenever it is not in use. Tools Opens report Library. Report Library is a repository of the reports that were distributed using Repot Caster, the WebFOCUS report delivery engine. The Report Library is an advanced function of reporting. Deferred Status: View the status of any reports which have been run in deferred status. Must be coordinated with Systems Analyst. Stop Requests: Perform specific searches of the domains available to you. 6 Required browser settings There are three changes you must make to your browser settings before using WebFOCUS on a non Columbia College computer. This will ensure the best performance. All settings are applied automatically for Columbia College computers. When using IE 7.0 or above you may need to display the Menu bar. If your Menu bar isn't visible, click on the Tools drop-down arrow (near the upper-right-hand corner of the browser) and select Menu bar. A check mark next to an item indicates that the menus are turned on. Set Columbia College as a Trusted Site You must add Columbia College as a trusted site in Internet Explorer for reports to pull valid and accurate data. Not adding Columbia College as a trusted site may cause report data to be inaccurate. 1. 2. 3. 4. 5. 6. Open Internet Explorer. Click Tools Internet Options. Click the Security tab. Click Trusted Sites. Click the Sites button to open the Trusted Sites dialog box. Uncheck Require server verification (https://) for all sites in this zone. 7. In the Trusted Sites dialog box type: *.ccis.edu 8. Click Add. 9. Under Websites you should now see *.ccis.edu as a trusted site. Enable automatic prompting for Downloads Internet Explorer may block downloads from automatically downloading. 1. 2. 3. 4. 5. Open Internet Explorer Click Tools Internet Options. Click the Security tab. Click the Custom Level button. Scroll to the Downloads Section. Under Automatic prompting for file downloads, select Enable. Advanced browser settings 1. Click Tools Internet Options. Windows will open the Internet Options dialog box. 2. Click the Advanced Tab. 3. Scroll through the Settings list and in the Browser section select the check box next to Reuse windows for launching shortcuts. 4. Click OK. Temporary Internet File Settings Setup your browser to check for newer version of stored pages with every visit to the page. 1. Click Tools Internet Options. Windows will open the Internet Options dialog box. 2. In the Temporary Internet files section click Settings. 3. Select the option Every visit to the page. 4. Click OK. 5. At the Internet Options dialog box click OK. Desktop Resolution Settings Verify your Desktop Resolution is set to Normal so you may view reports correctly. 1. Right click on your Window's Desktop. 2. Click Properties 3. Click the Settings Tab 4. Click the Advanced button. 5. Change the DPI setting to Normal size (96 DPI). 6. Click OK. 7. Click OK to close the Display Properties. Recommended browser settings Set browser text size to medium This is the default setting in Internet Explorer. If you are having problems viewing the reports in the Portal you can check to be sure this option is selected. 1. Click View Text Size Medium.