1
O.::::-_::
: '_i -: _: '
5e:-_:. ::-: :
.L: -' cc_,:_ :_:::: : -: :::_:
oE',
:-':i.
::: ::::
'. _: _ : ._ 'l
jj - -:_ -t -:' . i':
B"'
ke: ::':::
:_:::: :::-ia'aa-a::--*-:.a-.
de-:_:::-: :-:. ::: :_:-::_- se-..ceicrvoul
::::-:::-:'::::-:
:'
.. ..-..i
a
f..=-
l
i' , ':'-:_:
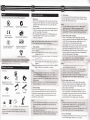
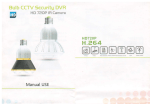
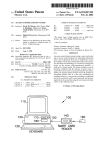
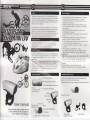
> Buiit-in hgh capacity li batrery lasttng vidrc r<ording for
3h.
> 2GB minl TF card (optional). support up to 32 cB
@8
orac.i : :: ::
'qe-:.:--:::.
Pc/,:' ,:.
I -::: : =-::.
2.
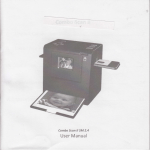
User ma n ua
Before using the product, please
.ec
I
this
manual carefully and keep rt propei.r' for
future reference, when neces-rv.
,)
::::
-S: :ca aia.g.g
:fdlcato'
lnsta ::_
:- --i-
: I :.
.:.
--.
; :i :,. ;-:,._
:':
i :,j:
-:-:,::-::ac(co,eT
}I
k
llse back clip
together with stand
r{ q
lnstall to sta nd
@o
product:ha
This
U.S. Power
I
adopt the power certified by authority.
Certification
Australia Power Certification
,"ss""
@
EUrOpean unton
power
Certificarion
Germany Power Certifcat on
@rc
PSE
Cedification
China Power Cefrification
Japan Power
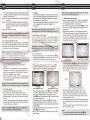
1. Starting up
> lnsert TF Card, press power key for 2 seconds, blue LED will
be always on, then open your hand. When the product stops
to vibrate, which indicates that it turns on and enters into
Standby mode.
> Cause the difference of the capacity and data storage for the
TF Card, the camera need a few seconds to ready, so please
wait for the prompt of the vibrates.
> For the product video resolution is HD 720q please use the
brand high-speed TF card to avoid the recording effect
reducjng or inoperation.
Note: The blue,indicator flashs quickly when turns on withou:
Card. Pleare turn off and insert TF ord aqain.
TF
China power Cedification
lapan Power Certification
pSE
2. Modetransfer
When it turns on, press the mode
circle in 4 modes:
se
ryb
.re" 3i-:-s€-
of
:rE::: _:-:.;::1:
poe,
srfre tmprafue
Ftr? ;-o!,\ s -€#
rising ol
- :c.=i€
Adapto(Euro/U5/UK
/ AUST Standared Charger)
Y
6sT
Card
*&
Gt'
Manual
USB
Optional Accesorry:
iF
BO.
User
bag
,1'
together
Motion-detect photo taking, red and yellow ( mothiondetect ) indicator are constantly on together
-:s
cable
Base
stand
AVcable
bandages multi functional bracke:
Notes: Picture may be slightly djfferent from the actual
product and packaging shall be subject to change without
lurtner notice.
1
.
The careta.wiil shake once after press the key w&ich
ind;cates thai the key is in effest, if the status irdG:or s
not changed immediately, please don't prss it ag; :, r..s
camera is eving data. lt is a normal situation, please
-.,: i
2.
little patience
When it is lransftered to other mods fron motlon{::{
mode, the reaation will be faster if yo; sf!: ou: :-e ,srs.
3. Video Recording
a the manual video recording mode, press the execute kev
::crtly, the camera will shake once, and blue indicator flashs
: cwly and the camera begins to record video. Press the key
._oa n, the camera will shake once and blue indicator will be
:cnstantly on, stop to record.
Note
1,
2.
3.
:
The unit can last.video recording for 20 minutes every time
and save the iideo automatically, and then records next
video.
Please opei thewaterproof plug for better recording effect
when 4ot uE it underuater.
When the TF.Card was fully loaded. battery used up or stop
operated for 3 milutes, it will shur down auromatically.
been taken after vibration stops.
Note:
'
.
2.
The red indicator will goes out when it is taking photo,
please keep itrstiil for better photograhing quality!
When the TF Card was f.Lilly loaded, batteiy used up or stop
operated for 3 minulet it wjll shuidown automatically.
5. Motion-detect video recording
> When it is transfered to motion-detect video recording
mode, the camera will enters into intelligent video recording
mode. When the camera captures mobile objects, it will
record video for 1 0 seconds and save the video
automatically, then it record next video and loop recording.
> Motion-detect recording loop coverage: when the TF Card is
fully loaded, will delete the former videos or photos
automatically to acquire the space to store new videos. lf the
function is closed, the camera will power off automatically
when the storage space is fully loaded.
>
Lasting time of vjdeo recording and motion-detect recording
loop coverage fuction can be amended by the system
rttings,
plw
refer to
tie systm qtuo ;rutFrctbr.
|loEi
,
2,
Note:
w
|t{,-
s-oa :
yellow indicator are( motion-detect start) constantly on
1,rode4:
Accessories
(s..
Model:Manual vide'-:-: --- ii-::. -::: : -a -: -':will be :c--:-:., :Mode2: Ma^-: :'o:c:a(-; i:-::, -::: ':t -t ::::- r,'
:i cca5:e-: _, c:r'iode3: Mot on-oetect video re.ooing sianooy mooe, o !e ano
,***Y**""
NotcDudng the
t'a^ia'
4. Photo Taking
- :he manual photo taking standby mode, press the execute
<:',, ihen please keep the camera still untill it vibrates, a photo
3.
:i -t: .'a-a'."..4',
i:a::
:a:' -_: .,;::
'.'
plug for better rtrording effert.
When the TF Card was fully loaded.( the loop coverage
function closed), battery used up or stop operated for 3
minules, it will shut down automatically.
Enter into this mode 3 minutes later, LED light will turn off,
the Gmera is still at work, press any key to-instruct.
6. Motion-detect photo taking
> ivhen it is transfered to motion-detect video recording
node, the camera will enter into intelligent photo-taking
rode. When the camera captures mobile objects, it wlll
:.kes a photo automatically.
> '.lotion-detect photo taking loop coverage: when the TF
lard is fully loaded, it will delete the old videos or photos
:Jtomaticlly to acquire the space to store the new photos. lf
:1e function is closed, the camera will power off
.itomatically when the storage space ls fuliy loaded.
Note:
: . When the TF Card was fully loaded ( the loop coverage
function closed) , battery used up or stop operated for 3
minutes, it will shut down automatically.
2. Enter into this mode 3 minutes later. LED light will tur of,
the camera is still at work, press any key to instrucl,
7. Turn on the led light
> The camera provides two kinds of led mode: LED
3rd LED infareo light. P,ease tLrn on ,: as oercv,'
fr-
:: :^:
Short press"Led light key''in the state of any mode( except T\.
out playback mode),the led light will circle in 3modes, plear
choose it on your own will
Model: Turn on the LED white light, it can record colour vidrc
in the dark.
Mode2: Turn on LED infrared light, the video will be in black
and white in the dark circumstance. Cause the infrarea
lamp was invisible and hidden, so it can be used for
1
'1.
Charging
> Put the matched AC adaptor into socket, then connect with
camera for li-battery recharging. The red indicator turns on
when charging, it turns off after the battery is full charged.
The charging time is about 3 hours.
> To avoid the charge time be longer, it is proposed to charge
with the adapter,and the computer charging is not
r*omended.
surueillance.
Note: After coriiectiryithiahaoe.r;,AnEiqiwlliqI!,qf.
Mode3: Turn off all the LED light
.
automaticlly after 3 minutes,, it's still chirijirig,a_fter turns off
and hold down the led light' @' to turn off all tlE
led functions. The amsa will shake when h is operated
Note:
.
Press
su ccessfu
I
ly.
2. Taking vidm when charging
]l:1he AC adapio. inro socket. then connect with camera, the
-.," c. aricmatically and enter into the standby
-rc:.. ne rm light wii co.trantly on ind cating it's charging. ln
:-: -ea" time. each function as nill available for operating.
1
..r.'. t,
8. Turn off and automatic turn off
ln the standby mode, press and hold down the' power kel for
two seconds, the blue light flashes 3 times and goes out, and
then release your hand. At the mean time the camera shakes
for twice, and then turn off the camera.
:44
a@-iaElr rrtr
.te ffi
-'-:':
(fii llE @
::
;
9. Dom load a vido and removeable disk.
> Please turn off the camera first, then connect it with
computer.
> The camera turns on automatically, and a removeable disk
will appear in " my computer', you can view the pictures or
videos in the removeable disk " DCIM/l ooDSCIM", and you
can also copy these {iles to your computer.
> When it is connected with USB1.1 port on computer, please
copy the video to your computer desktop, and then replay it
to avoid ragged playback.
Note: in the sl.al.e of this mode, you can short pre$ the'led
light@' to turn on the liqll cqrl,q9,6qd as a.UsBlable lamp.
1 0. PC camera function
> lnstall the CD driver software at the computer.
> Turn on the camera, after the vibration stoped, please
connect it with the computer, at that time, a 'camera" lcon
will be oppeared in "my computer", it enters into PC camera
function.
> Using the'' third-party''applications software can also viry
real-time vidm of PC camera and save real-time video into
the local computer. e.g. Amcap etc.
xonds
and then connect it again, the camera wilr 'estart
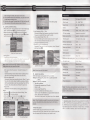
13. Tv-out function
> Please conn( the plug o'7.5 AV cable with the camltati
ry OUT port. the yellow plug connec with TV video input \
port(yellow), white plug connect with TV audio input
::at,',i la' D'a::: i:::Aa ::!.: inout aacordltg to the user
>--- )r --.-= :-y'=r, --::_:: :_:.3 a^c olie liqht
:-- 3. t: a€ -a€ :-: _i: :i !'.:a c- .,oo will be
:::e::eC on tire T'J- i:€ ;rigi::= s srom as picture
'1
.
ffiirqs.r.br
> Short press 'Mode button@',camera will change to motion
detect monitor photo taking mode(yellow and red light will
hold on together), Show as picture 3.When object moves b
efore the camere,it will start to take a photo automatically,
and so the cycle.
picture 3
:::a:::t:,...
ryVldeo&
Mdeo&
Audio Ploybock Pholo
TV
Audio Ploybock Video
> Manually play:by pressing 'up button@'or'down button@'
for browsing, when video camera lcon appears on the top
right corner, it indicates the file is video, press "confirm
buttton@"to play the video.Please set the ry volume in order
to get proper sound effect.
> Auto play:short press "confirm buttton@"into auto play
mode,when it plays the pictures, it will stay for 5 seconds
then change to another one, when it plays the video,it will be
replayed directly.
Note : in th€ state of this mode, you can lurn on the white
light or infrared light for a betttr image effect.
14. i/otion detect monitor mode
>Connect the yellow plug with the TV video input port(yellow)
white plug connect with TV audio input port(white).Please
set the signal input refer to TV user manual.
> Turn on the camera,short press "N/ode button @'into motion
detect video recording mode(yellow and blue light will ho d
on together)
> Piease connect the plug of 2.5'AV cable with the camera's
TV-OUT,after few seconds, the video will be appeared on the
TV. Re{er to picture2, in the meantime the camera will enter
into the state of intelligent video recording, When object
moves before the camere, the camera will start to record a 1 0
5econds video file, and so the cycle.
picture2
llote: whtr the camera turns oft autoruticlblif you want to
m it again, dironnect the camera from the ida;tb&tor about
5
Note: The camera will turn off automatically when the TF Card
jcaded(
is ru rr
the looc ccverage Junction closed). the b3tier.
Note: When play a large.video file, need to wait a few seconds
to a minutes; it's.d.normal phenomenon.
> Stop auto play:during auto play mode, short press 'confirm
buttton@"to stop auto play
> Stop TV-OUT: Please press the "power kef'for long to turn
off the camera.
--'
. ::r:a;.
[/otion-detect photo-taking standby
> Motion detect loop recording:when TF card is full ,the
camera will delete old video or photo to get new space
recording new videos or photos.lf turn off loop recording
fuction,the camera will turn off automatically when there is
no enough space to record.
> Video recording time and turn on/off loop recoding function
can be changed by system setting,please refer system settlng
lnstruct.
> Stop motion detect monitor mode: Please press the'power
key" to turn off the camera
Note:
1. During the recording.short press'Mode button@'can
chairge viileo and phcito rnode. Please obstruk ttle leris ,
.
2,
3.
when change the mode. the reaction wl. E'$i
lf the camera doesnt use undeMtg.
=- 3H back cover
to get better r(ording voice.
jl
Enter into this mode 3 minLi6 eir
!!t will turn off.
the qamm is nill ai rc( B5 nr, (?r :: :lf,Jct.
4 LatL:;it-
Tlme setll.g S:ep3
'{il2 E?? Iti
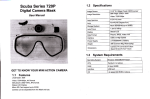
15. 5ynem pa.arf,er -:.1
Efkr',e :,r.-:
5.0 Mega CMOS SENSOR
Pho:c':-;:
Vdrc r-E:
_"4
2460*1920
\,' -).230-720
Framg
- - -..,4
,- U
::: ^ j :-:: :-=: $ :: ,. . --a' :-:- :_:!: '9'a:
..-.... +..
MD
':q
tr::a:
'-'.:*'.
"l-'
MD @a ::,:-=:.:
trown
Mdm c-:
: -=:,:
.-
-
::: .-- :-a-.
a
:::
-:
the rnsert storage wi
I
ncressed
wlth hrgh quality.
:i
::
About 3 hou6
Note: Please use the brand high-speed I I Ca'd. to avoid lne
vidm paue whm you Gord the vidrc!
<:: ^ -,^h <r.#
Note:Synem time won: Ea
i ,,-- <- .:i
:-3:
'::-i-i:
16, System time setting
- : ::
lf the time stamp is !1 -:
:
or,.
lvlethod 1: Setting o-v
o a:s€ ieier 10 system ca':-:::'
sett ng.
Method 2: Setting by computer
1 . Turn off the camera;
2. Connect with computer by US3
3. Open U-disk
-: .:j: ;::
-,
:i
-r-
?: :
4.Createar$v'i;re-ji
J. I pr.
'20': ': :: ': j: :a'---a: i : ;:,::: :".--r,-- :a:e and
:ire
::.::-:
-.':_ -::_, --a -:.:::::.
:-_-j a'
aa,\a' --a : aa.- --: r. :: -:oated.
=
\lhs re Err. ---:€::r ,:-;:-€:-c:^:
r :t --:_i :i:r':'-i
J3.:::,i-:-i
Note:
L)ed
caitery
j:.aory
2.CP-
de{au its.
17 RG1
tra':
::: s_,=r
ll'-:-:::.':Time sett ng Stepl
:
DCsV 500mA
a:.:a
aa
t,s:' :'
=-a:
::::i -:: : :
_
:: :'::::_: rin
hole
=
r- -r.d,