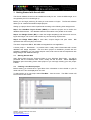
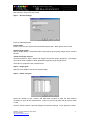
1
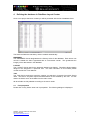
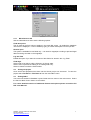
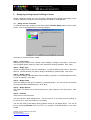
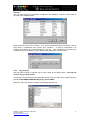
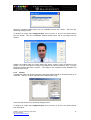
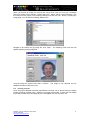
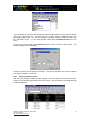
Securit 4400 Version 6.2 Service Pack 1 Quick Start Guide September 2006 QSG003 - Securit 4400 Quick Start Guide Technical Support http://www.securitworld.com/ 1 Securit 4400 Quick Start Guide 1 Introduction 3 1.1 About Securit 4400 3 2 Installation 3 2.1 2.2 2.3 2.3.1 2.3.2 Installing the Securit software Uninstalling the Securit software Installing Securit hardware Installing the camera Installing the card printer 3 3 3 3 3 3 Getting started 4 3.1 3.2 Starting Securit 4400 Creating a new Securit project 4 4 4 Defining a database using DataBase Layout Creator 6 4.1 4.1.1 4.2 4.3 Field properties Miscellaneous tab Saving the project Exiting DBLC 6 7 7 7 5 Designing a layout in Badge Creator 8 5.1 5.2 5.2.1 5.2.2 5.2.3 5.2.4 5.2.5 5.2.6 5.3 5.3.1 5.3.2 5.3.3 5.3.4 5.3.5 5.3.6 5.3.7 5.3.8 5.3.9 5.4 5.4.1 Badge Creator essentials Adding items Image Static text Dynamic text Logo (Clipart) Barcode Shapes Editing items Edit item properties Delete item Snap to reference line Open layout Remove layout Flip layout (reverse) Save Save as Mode Encode options Magnetic layout mode 8 9 9 9 10 11 12 12 12 12 12 12 12 12 12 12 13 13 13 13 6 Using Securit 14 6.1 6.2 6.3 6.3.1 6.3.2 6.3.3 6.4 6.4.1 6.4.2 6.5 Opening a project Adding, editing and deleting records Acquiring images Setting the image source Twain Custom Printing records Printing multiple records Print list Exiting Securit Badge Maker 14 14 15 15 15 16 17 18 19 19 QSG003 - Securit 4400 Quick Start Guide Technical Support http://www.securitworld.com/ 2 1 Introduction 1.1 About Securit 4400 Securit 4400 is the perfect tool for organisations with limited card requirements. It is based on MS Access technology offering a stable platform with which to manage your ID card requirements. The software enables single-sided card design, database customisation and card personalisation on demand. Securit 4400 is a stand-alone software package and is not intended to be used in a multi-user network environment. The Securit software is protected with a licence dongle; this is a USB hardware key included with the CD-ROM. Plug the dongle into a free USB port after installing the software but before you launch the application for the first time. If the dongle is not installed the software will only operate in restricted ‘DEMO MODE’. This document is intended as a guide to software installation and initial system set up and describes the process of defining the database structure, creating card design templates and producing cards. This document is intended as a quick start guide only, for an in-depth description of the software and its advanced features please consult the detailed PDF user manual provided on the CD-ROM. 2 Installation 2.1 Installing the Securit software To install the Securit software take the following steps: Insert the Securit CD-ROM (set up should launch automatically). Click on the ‘Enter’ button. From the Main Menu select the ‘ID Software’ option. From the ID Software menu select Securit ‘BM4400-32’. Click the ‘Install’ button and follow the install wizard steps (It is recommended that you accept all default options). If you are installing on Windows 2000 Pro or XP Pro then you must be logged on as an administrator otherwise some components may not be installed properly. Install the comprehensive PDF user manual by clicking the ‘Copy Manual to Computer’ button on the BM4400-32 page of the CD-ROM. 2.2 Uninstalling the Securit software The Securit software can be uninstalled by selecting the ‘Add/Remove Programs’ option from the computer’s ‘Control Panel’. 2.3 Installing Securit hardware In order to produce cards you must also install additional hardware. accessories include a camera and specialist card printer. Typically these 2.3.1 Installing the camera Securit World offers a range of cameras to meet the requirements and budget of our customers. Separate help documents are available describing in detail the installation and set up of these cameras. If you are unsure on how to proceed please contact the Securit World Support Department. 2.3.2 Installing the card printer Installing a dedicated ID card printer is like installing any other type of printer to your PC. Simply follow the instructions in the documentation supplied with the printer. QSG003 - Securit 4400 Quick Start Guide Technical Support http://www.securitworld.com/ 3 3 Getting Started with Securit 4400 The Securit software should now be installed and ready for use. Insert the USB dongle; once recognised by the PC it should light up. Before you can begin producing ID cards you must create a ‘Project’. The Securit software allows you to create and maintain multiple projects. Setting up a project from scratch is performed according to the following three-step process: Step 1: Use DataBase Layout Creator (DBLC) to create the project and to define the database field structure. The database holds the information to be printed on the cards. Step 2: Use Badge Creator (BC) to create the badge template(s) with items such as text, logos and images. BC is also used to define any card encoding requirements. Step 3: Use Badge Maker (BM) to enter data, acquire images and print cards. represents the main everyday user screen. BM The three components DBLC, BC & BM are integrated into one application. A demo project – ‘Demo4400’ - is provided with a ready made ‘Demo4400.mdb’ Access database and badge templates. Use this demo project to familiarise yourself with the software’s capabilities; you can create and print cards, enter new records and experiment with badge designs and database settings. 3.1 Starting Securit 4400 Start ‘Securit 4400’ from the ‘Programs’ folder on your ‘Windows Start’ button. You will be presented with the software’s main screen, initially this will be blank. Select File>Open Project to open the existing ‘Demo 4400’ project or you can begin creating your own project instead. 3.2 Creating a new Securit project Before starting you should have a good idea of the information to be included on your ID cards and how it is to be displayed on the card. To start working on a new project select File>New… from the menu. The DBLC screen will launch with its own wizard. QSG003 - Securit 4400 Quick Start Guide Technical Support http://www.securitworld.com/ 4 Now follow the ‘Project Set Up’ wizard. Step 1 – General settings Enter the following details: Project name Enter a name for your project and its associated project files. Note spaces are not valid. Default image quality Specify image quality. The default value of 50 produces good quality images with a compact file size. Thumb nail image support Check this option to store a thumb nail image of the photos and/or signatures. The images can now be made available to other applications supporting bmp image format. Click ‘Next’ to progress to the next tab screen. Step 2 – Image types Step 2 is not available in the Securit 4400 package. Step 3 – Fields in project Select the number of text, numeric and date fields required to store the data deemed necessary for your ID card requirements. There are (14) text, (6) date and (6) numeric fields in total. Click the ‘Finish’ button to close the dialogue and save the settings. A new project is created. QSG003 - Securit 4400 Quick Start Guide Technical Support http://www.securitworld.com/ 5 4 Defining the database in DataBase Layout Creator Once a new project has been created you will be presented with the list of database fields. The first three fields are mandatory and are created automatically. IDNUMBER The ‘IDNUMBER’ field is designated as the Primary index for the database. Each time a new record is created this field is populated with an incremental counter. This guarantees the integrity of the data stored in the database. LAYOUT The ‘LAYOUT’ field is used for the automatic badge layout feature. This allows distinct badge designs to be assigned to a particular user. For more information on this feature please consult the full PDF ‘User Manual’. TAG The ‘TAG’ field is required to permit the ‘tagging’ (or selection) of records from within Securit 4400. This field is a system requirement and should not be modified by the user. For this reason the field is set to be invisible from the main screen. All other fields are fully editable according to the user’s needs. 4.1 Field properties Double click on any field to enter into it’s properties. The following dialogue is displayed. QSG003 - Securit 4400 Quick Start Guide Technical Support http://www.securitworld.com/ 6 4.1.1 Miscellaneous tab Use the ‘Miscellaneous’ tab to set the following options: Field description This is used as the field column heading in the main BM screen. By default the database ‘field name’ is displayed. It can be edited by typing in another description into the input box. Restrict input This option is available for text fields only. It is used for magstripe encoding to prevent illegal data from being encoded on the magstripe. Log this field Enable this option if you want the contents of this field to be stored in the ‘Log Table’. Field Style Select ‘Edit’ to be able to edit the field entry in Securit 4400. Select ‘View’ to prevent the editing of an existing field entry. Select ‘Invisible’ to make the field invisible. 4.2 Saving the project Once all the field properties have been set the Securit project can be saved. To save the project select File>Save or File>Save as from the main DBLC menu. 4.3 Exiting DBLC You have now finished in Database Layout Creator and can return to the main screen. Select the ‘Back to Main Screen’ button on the toolbar. For a more detailed overview of additional features and options please consult the full PDF ‘User Manual’. QSG003 - Securit 4400 Quick Start Guide Technical Support http://www.securitworld.com/ 7 5 Designing a badge layout in Badge Creator Having created the project you can now design a badge layout in Badge Creator (BC). BC is a tool for designing card layouts and incorporates a number of useful features. 5.1 Badge Creator essentials To enter BC and begin creating a new layout select File>New Badge option from the main screen. You are presented with the following dialogue. Click ‘Next’ to continue with the wizard. Step 1 – Layout Type Select the type of layout to be created, choose ‘Badge’ to design a card layout. Un-tick the ‘Use Template’ option unless you wish to be restricted to existing templates. Click ‘Next’. Step 2 – Badge Type Choose a badge name for the new card design. Accept the default type value of ‘ISO-Card 86/54.5’. Choose whether you wish to design in landscape or portrait mode. Click ‘Next’. Step 3 – Badge Layout This stage is largely redundant apart from the ability to specify an overall background colour to your card design. Click ‘Next’. Step 4 – Badge Fields Select the fields you wish to be included on your badge design. You can choose not to select any and to add them individually later. Click ‘Next’. Step 5 – Badge Options This option is of limited use in Securit 4400 and in most instances it can be ignored. Click ‘Next’. Step 6 – Finished Click ‘Finish’ to exit the wizard. You will now see a blank badge layout. You can zoom in or out of the layout by clicking on the ‘Zoom In’ or ‘Zoom Out’ buttons on the toolbar. You are now ready to add design items (graphics & text) to your badge layout. You can do this by selecting Edit>Add from the menu or by using the individual buttons on the main toolbar. QSG003 - Securit 4400 Quick Start Guide Technical Support http://www.securitworld.com/ 8 5.2 Adding items The following items can be added to a badge layout: Images, Static Text, Dynamic Text, Logos, Barcodes and Shapes. 5.2.1 Image Click on the ‘Add Image’ button on the main toolbar. The following dialogue is displayed. Image Field Select the required image field. Aspect Ratio Select the required image ratio. The default value of ‘3*4’ represents the ratio of a standard passport photo. Scale Type Select the scaling method. The default value of ‘Fit Source in Destination’ is recommended as it does not distort the image. Dimensions Here you can position and size the image box. In most cases this can be skipped as it is easier to use your mouse to drag & drop and resize the image box after it has been added. Once you click ‘OK’ a green rectangle is added. This represents where the photo will be positioned on the badge layout. Do not expect to see an actual photo while in Badge Layout Mode. 5.2.2 Static text Static text forms part of the badge template and is independent of any data entered into the database. Click the ‘Add Static’ Text button to add text to your badge layout. The following dialogue is displayed. QSG003 - Securit 4400 Quick Start Guide Technical Support http://www.securitworld.com/ 9 Data tab In the top window type the text to be added to the badge layout. This text is also displayed in the selected font, style and colour in the Preview window below. Use the ‘word wrap’ option if the text is too long for one line. Position tab In most cases this can be skipped as it is easier to use your mouse to drag & drop and resize the text box after it has been added to the card layout. Font tab Select the text font, size, style and colour. Text alignment and effects can also be set. 5.2.3 Dynamic text Dynamic text is the term given to data added from a database field previously defined in DBLC. Click the ‘Add Dynamic Text’ button to add text to your badge layout. The following dialogue is displayed. The ‘Position’ and ‘Font’ tabs in the dialogue box are identical to those described in Section 5.2.2. QSG003 - Securit 4400 Quick Start Guide Technical Support http://www.securitworld.com/ 10 Data tab You can select a field or combination of fields from the database. Click the ‘Field’ button to get a list of the available fields. Select a field and click ‘OK’ to confirm. You can also create field strings consisting of one or more fields in combination with ‘spaces’ and ‘constants’. A common requirement is to combine first name and surname fields onto one line. This is achieved by selecting the ‘FirstName’ field, then adding a ‘space’ before finally adding the ‘Surname’ field: 5.2.4 Logo (Clipart) Use this option to add a company logo or other clipart to the badge layout. The logo file must be in jpg or bmp format. It is strongly recommended that any logos are stored in the logo folder of the project directory, typically C:\SC\BM4400\PROJECTS\project_name\LOGOS. Select the ‘Add Logo’ button to display the following dialogue box. QSG003 - Securit 4400 Quick Start Guide Technical Support http://www.securitworld.com/ 11 Select the logo to be added and click ‘Open’. To edit the logo properties simply double click the logo once added to the design. Locate logo tab Select the ‘Get Logo File’ button to select a different logo file. If your logo has a white background use the ‘Transparent’ option to make the logo transparent. Position tab In most cases this can be skipped as it is easier to use your mouse to drag & drop and resize the logo after it has been added to the card layout. Click ‘OK’ to add the logo. 5.2.5 Barcode Use this option to add a barcode representing one or more database fields to your badge layout. Select the ‘Add Barcode’ button to enter into dialogue. For a more detailed overview of barcodes please consult the ‘Barcodes’ section in the PDF ‘User Manual’. 5.2.6 Shapes You can add basic shapes by selecting the ‘Add Line’, ‘Add Rectangle’ or ‘Add Circle’ buttons on the main toolbar. All three options result in the same generic dialogue box. Position tab Use the ‘Position’ tab to position the shape and define its dimensions. Colour tab Use the ‘Colour’ tab to define the shape colour, fill options and border thickness. 5.3 Editing items Once items are added it is possible to edit their properties. 5.3.1 Edit item properties To edit an item’s properties simply double click on the item and make any necessary changes in the ‘Edit Item Properties’ box. 5.3.2 Delete item To delete an item select it and hit the delete button. 5.3.3 Snap to reference line A reference line is displayed by clicking on the horizontal or vertical rulers. Items can be aligned to this reference line by right-clicking on the item and selecting the ‘Snap To Reference Line’ option. 5.3.4 Open layout Existing badge layouts are displayed in the ‘Project Explorer’ pane on the right hand side. You can open an existing badge layout by double-clicking on the badge file name in the ‘Project Explorer’ pane. 5.3.5 Remove layout Existing badge layouts can be removed from the project by right-clicking the layout in the Project Explorer pane and selecting ‘Remove From Project’ option. 5.3.6 Save Use this command to save any changes made to the current badge layout. QSG003 - Securit 4400 Quick Start Guide Technical Support http://www.securitworld.com/ 12 5.3.7 Save as Use this command to save the current badge layout as another filename. 5.3.8 Mode Use this option to switch between ‘Badge Layout Mode’ and ‘Magnetic Layout Mode’. 5.4 Encode options 5.4.1 Magnetic layout mode Use this mode to add magnetic encoding data to your badge layout. NOTE: In order to successfully encode the cards you must ensure you have a card printer with encoding capabilities and suitable cards. It is beyond the scope of this guide to describe the process of card encoding. For a more detailed overview of the ‘Encoding Modes’ please consult the ‘Securit Advanced Options’ section in the PDF ‘User Manual’. You have now finished in ‘Badge Creator’ and can return to the main screen. Select the ‘Back to Main Screen’ button on the toolbar. QSG003 - Securit 4400 Quick Start Guide Technical Support http://www.securitworld.com/ 13 6 Using Securit You are now ready to begin using Securit. Badge Maker (BM) represents the main everyday user screen where data is entered, images are acquired and cards are printed. 6.1 Opening a project The main screen is initially displayed whenever the application is started. To open a project select File>Open from the menu or use the equivalent toolbar button. Select the project to be opened from the dialogue box and click ‘OK’. The project will open displaying all data entered to date. 6.2 Adding, editing and deleting records Records can be added to the project database by selecting the ‘+’ button on the toolbar or by selecting the Edit>Add record option from the menu. The following dialogue is displayed. QSG003 - Securit 4400 Quick Start Guide Technical Support http://www.securitworld.com/ 14 Enter the data into the individual fields and click ‘OK’. The data is now entered as a new record in the database. To ‘edit’ an existing record simply double-click in any of the fields associated with that record. You are now in edit mode and are presented with the same dialogue box as before from which you can edit any field data. To ‘delete’ an existing record, select it by clicking on the left-most numbered grey column so that the records are highlighted in black. Now select Edit>Delete Selection from the menu or simply hit your delete button on your keyboard. 6.3 Acquiring images Once data has been entered and a record created an image can be captured and bound to that record. Securit uses either a ‘Twain’ or a ‘Custom’ source to capture images. 6.3.1 Setting the image source To set the image source select Image>Select Source from the menu. The following dialogue will be displayed. 6.3.2 Twain TWAIN drivers are generally included with scanners, digital cameras and image capture PC boards. This is also where the CamGrabber software will be located if installed for live image capture. To select a Twain source select the ‘Twain’ button. QSG003 - Securit 4400 Quick Start Guide Technical Support http://www.securitworld.com/ 15 Select the required TWAIN driver from the available list and click ‘Select’. Exit from any remaining dialogue boxes. To acquire an image select Image>Acquire from the menu or click on the camera button from the toolbar. The SC CamGrabber window should launch with a live image from the camera. Position the subject within the image frame and select ‘Freeze’ to take a snapshot of the subject. You can revert back to a live moving image at any time by selecting ‘Live’. Crop the image as required and select ‘Transfer’. The image is now captured into the database and bound with the record. 6.3.3 Custom Typically this option can be set to acquire existing jpg images stored on file either locally or on a network. Use the ‘Custom’ dropdown list to select ‘Twain Crop’. Click ‘OK’ and exit from any remaining dialogue boxes. To acquire an image select Image>Acquire from the menu or click on the camera button from the toolbar. QSG003 - Securit 4400 Quick Start Guide Technical Support http://www.securitworld.com/ 16 When you acquire an image for the first time using Twain Crop you may get a message saying ‘No Twain source selected. Please select one’. Select ‘OK’ to exit this message. Tick the ‘Load from disk’ option in the resulting ‘Settings’ box and click ‘OK’. Now try acquiring the image again, you will see the following dialogue box. Navigate to and select the jpg image file, click ‘Open’. The following Twain Crop box will appear displaying the jpg image file. Crop the image as required and select ‘Transfer’. database and bound with the record. The image is now captured into the 6.4 Printing records Once the project database has been populated the records can be printed using the badge layouts previously created in BC. Select the record(s) to be printed. If more than one badge layout was created select the badge layout to be applied from the drop down list. QSG003 - Securit 4400 Quick Start Guide Technical Support http://www.securitworld.com/ 17 If you would like to check the data and layout before printing select the ‘Print Preview’ button next to the drop down list. The data from the current record is displayed within the appropriate badge layout. To view any magnetic encoding information select ‘Encode’ from the ‘Information’ menu. To exit Print Preview mode select Information>Close from the menu. To print one or more cards select File>Print from the menu or click the ‘Print’ button. The following dialogue box is displayed. Check the correct ID card printer is selected. The printer properties can also be adjusted from here if necessary. Click ‘OK’. 6.4.1 Printing multiple records You can select multiple records for batch printing. To do this select the required records by clicking on the left hand grey border next to the record. The records are now highlighted with a black background. QSG003 - Securit 4400 Quick Start Guide Technical Support http://www.securitworld.com/ 18 Alternatively, to select all records select the File>Select All option from the menu. The records can now be printed according to the process described in the previous section. 6.4.2 Print list It is possible to print a customisable list of all records entered into the database. To specify which fields are displayed go to the File>Print List Setup option from the menu. To print the list select the File>Print List option from the menu. 6.5 Exit Securit Badge Maker To exit the application select File>Exit from the menu. Alternatively click on the standard Windows exit button in the top right-hand corner. This concludes the Securit 4400 Quick Start Guide. For a more detailed overview of Securit 4400 and its advanced features please consult the full PDF ‘User Manual’. QSG003 - Securit 4400 Quick Start Guide Technical Support http://www.securitworld.com/ 19