1
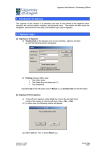
-1-
Bangor University Agresso User Manual
Contents
Introduction
Agresso overview
.
How this manual works
.
.
Agresso basics and familiarisation
Agresso terminology .
.
Requesting access
.
.
Logging in/security timeout feature
Checking your access .
.
Agresso start screen .
.
Creating shortcuts
.
.
Personalising your Start page .
Modules/the Menu pane
.
Changing your password
.
Searching/using field help .
Printing from Agresso .
.
.
.
.
.
.
.
.
.
.
.
.
.
.
.
5
5
.
.
.
.
.
.
.
.
.
.
.
.
.
.
.
.
.
.
.
.
.
.
.
.
.
.
.
.
.
.
.
.
.
.
.
.
.
.
.
.
.
.
.
.
.
.
.
.
.
.
.
.
.
.
.
.
.
.
.
.
.
.
.
.
.
.
.
.
.
.
9
9
10
11
12
12
13
15
16
16
18
.
.
.
.
.
.
.
.
.
.
.
.
.
.
.
.
.
.
.
.
.
.
.
.
.
.
.
.
.
.
.
.
.
.
.
.
.
.
.
.
.
.
21
22
26
31
34
36
38
40
43
46
49
51
53
55
.
.
.
.
.
.
General Ledger – journals and transactions
The journal workflow process.
.
.
.
.
Registering a journal transaction
.
.
.
.
Approving and rejecting journals
.
.
.
.
Amending and closing rejected journals
.
.
.
Checking the status of a journal in workflow .
.
.
Finding a ‘lost’ transaction/finding a transaction number
Parking a journal, retrieving a parked journal
.
.
High volume journals (BIF sheets) .
.
.
.
GL transaction enquiries
.
.
.
.
.
Internal recharges
.
.
.
.
.
.
Finding out if an invoice has been paid (open supplier reports)
Historical supplier transactions
.
.
.
.
Aged Creditor Report .
.
.
.
.
.
Running a ledger report
.
.
.
.
.
Bangor University/Finance/Systems Support/Agresso Training/Agresso Web user manual/v0.1/12/08/2009/CB/eng
-2-
Customers and sales
The sales order workflow process .
.
Raising a sales order .
.
.
.
Raising a credit note .
.
.
.
Approving and rejecting sales orders .
.
Amending and closing rejected sales orders .
Checking the workflow status of a sales order
Getting the balance of a customer account .
Raising a customer statement of accounts .
Aged Debtor Reports .
.
.
.
Raising a copy invoice/finding an invoice number
.
.
.
.
.
.
.
.
.
.
.
.
.
.
.
.
.
.
.
.
.
.
.
.
.
.
.
.
.
.
.
.
.
.
.
.
.
.
.
.
.
.
.
.
.
.
.
.
.
.
61
62
67
68
72
76
79
81
84
85
Monitoring and reporting: enquiries and reports
Budget Reports: introduction .
.
.
Budget Reports: features
.
.
.
Budget Reports: academic .
.
.
Budget reports: non-academic
.
.
Budget reports: research projects .
.
Ordering a report
.
.
.
.
Transferring to Excel .
.
.
.
.
.
.
.
.
.
.
.
.
.
.
.
.
.
.
.
.
.
.
.
.
.
.
.
.
.
.
.
.
.
.
.
.
90
90
92
96
99
103
106
.
Bangor University/Finance/Systems Support/Agresso Training/Agresso Web user manual/v0.1/12/08/2009/CB/eng
-3-
Introduction
Bangor University/Finance/Systems Support/Agresso Training/Agresso Web user manual/v0.1/12/08/2009/CB/eng
-4-
Bangor University/Finance/Systems Support/Agresso Training/Agresso Web user manual/v0.1/12/08/2009/CB/eng
-5-
Agresso overview
Agresso is a fully integrated financial management system. It was implemented at the
university in August 2008 to replace the Prophecy system. It also replaces Bi-query/UWBmis
for reporting.
Agresso is available in two versions; Smart Client and Web Service.
•
Smart Client is mainly used by the university’s financial department for functions
such as Accounts Payable and Accounts Receivable.
•
Web Service is the web tool used by the wider community for functions such as
budget reporting, entering journals and budgets, and authorising.
This manual is based on the Web Service version of Agresso; for information regarding
Smart Client, please contact [email protected]
How this manual works
This manual is designed for those who are new to Agresso and want a comprehensive guide.
It explains each process in detail, guiding you with screenshots and action boxes.
For quick reference and concise information, individual ‘how to’ guides and quick cards are
available from the Agresso training web page:
Cymraeg: http://finweb.bangor.ac.uk/c/agresso/
English: http://finweb.bangor.ac.uk/e/agresso/
This manual and all other Agresso training guides follow the same format:
The blue instruction boxes tell you to click, navigate or input information.
These boxes warn you to take care or be aware.
Sage advice or a clever Agresso feature.
Bangor University/Finance/Systems Support/Agresso Training/Agresso Web user manual/v0.1/12/08/2009/CB/eng
-6-
Bangor University/Finance/Systems Support/Agresso Training/Agresso Web user manual/v0.1/12/08/2009/CB/eng
-7-
Agresso basics
and
familiarisation
Bangor University/Finance/Systems Support/Agresso Training/Agresso Web user manual/v0.1/12/08/2009/CB/eng
-8-
Bangor University/Finance/Systems Support/Agresso Training/Agresso Web user manual/v0.1/12/08/2009/CB/eng
-9-
Agresso terminology
One of the first things to get to grips with when using Agresso is the terminology, as it is
different from Prophecy and UWBmis. Even if you are new to the university, your colleagues
may use old Prophecy terminology, so it makes sense to be aware of these differences.
Differences in terminology
The CODES are the same as before, but the TERMINOLOGY has changed, i.e.
A cost centre is now referred to as a project code.
A category code is now referred to as an account code.
In order to get accustomed to the new terminology as quickly as possible, make up a screen
strip and fix it to your screen so you have a quick reference when you need it.
Agresso
Account code
Costc
Project code
501
0049
B17100
Prophecy
Category code
School/Dept
Cost code
Agresso
ACTIVITY
CustID
Product code
PFNONPAY
D000058
284
Prophecy
Budget Head
Debtor code
Category code (income)
This manual will use Agresso terminology only, so you will need your screen strip right from
the start.
Requesting Access
Before using Agresso, you must have a valid username and password, and your profile must
be set up with the correct access. If your profile is not set up with relevant access, you will
be able to do very little in Agresso, even with an ID/password.
Due to the nature of the information held within Agresso, access must be requested via
email from an authorised member of staff. For academic departments and research
projects, this is likely to be the College Manager or College Finance Manager. For non
academic departments this is likely to be the Department Head or a senior member of staff
who has budgetary authority.
If you require access to certain account/project codes, contact the relevant person for your
school/department, who will email [email protected] on your behalf, stating
your name, user ID and the codes you require.
N.B. You will need to follow this procedure even if you independently manage a research
project.
Bangor University/Finance/Systems Support/Agresso Training/Agresso Web user manual/v0.1/12/08/2009/CB/eng
- 10 -
Logging in
Access Agresso via the following URL: https://agresso.bangor.ac.uk
Accessing Agresso via Internet Explorer is highly recommended.
If you use a different type of browser (e.g. Firefox) you will not have access to
features such as copy to clipboard.
You will be prompted to give 3 pieces of information:
Name:
This is your Bangor University Network ID
Client:
Bangor University is U1*
Password:
Alpha-numeric and 8 characters long
Case sensitive
*Other clients are Cast Ltd (XC), MDC Ltd (XM), Pension Fund (XP), & UWBE Ltd (XU)
If you are unable to log in, check that your name and password are correct, and
that you are using relevant upper and lower case characters.
Agresso will only allow three failed attempts at logging in, before ‘freezing’ or locking for
about 15 minutes. If this happens, close the screen, wait 10-15 minutes, and then try
again.
Security ‘timeout’ feature
As a security measure, Agresso will ‘timeout’ after
approximately 20 minutes of inactivity. If this
happens, you will be required to log in again.
Although any enquiry/report screens will remain open, any inputted work
will be lost, as these screens will ‘refresh’ when you log in again.
Bangor University/Finance/Systems Support/Agresso Training/Agresso Web user manual/v0.1/12/08/2009/CB/eng
- 11 -
Checking your user profile
Your Agresso profile is unique to you and should mirror the financial responsibilities you
hold, whether you are responsible for inputting large volumes of journals, running customer
statements or checking spend against budget. It holds information on:
•
•
•
•
Who you are, where you are and your contact details
What projects and accounts you can use or enquire on
What roles you have in workflows and authorisation
What screens and menus you can have access to
If you try to use a code that you do not have access to, an error or invalid
message will appear.
A handy way of finding out what codes you have access to, is using the enquiries in the
Codes and Lists folder.
.
Open the relevant enquiry
screen, such as List of
Projects, and leave the search
criteria blank. Click Search.
The enquiry will return
a list of all project codes
that you have access to.
Bangor University/Finance/Systems Support/Agresso Training/Agresso Web user manual/v0.1/12/08/2009/CB/eng
- 12 -
Agresso start up screen
Once you have logged in, the start up screen will appear.
The screen is split into 3 sections:
The menu
pane
The start
page
The
modules
section
The start page default is the Home page, which has a small My Shortcuts section.
Shortcuts
As you work through Agresso, you will notice that each page has a
Clicking on this button will create a link on your start page.
button.
Saving shortcuts to your home page will save you having to navigate your way
around the menus each time. You can easily remove the shortcut when/if you no
longer need it by clicking ‘Remove’.
Clicking on
at any point whilst in Agresso will bring you back to the home page.
Bangor University/Finance/Systems Support/Agresso Training/Agresso Web user manual/v0.1/12/08/2009/CB/eng
- 13 -
Personalising your Start page
If there is a certain screen that you use frequently (e.g. registration of journal transactions),
you can set it as your start page.
This means the screen will automatically open when you log in to Agresso, instead of the
Home page.
Either follow the link on the
home page . . .
. . . OR go to the Options
module and choose Set Self
service start page.
Choose a
module from
the drop down
menu . . .
Bangor University/Finance/Systems Support/Agresso Training/Agresso Web user manual/v0.1/12/08/2009/CB/eng
- 14 -
. . . and then
choose a screen
from the Start
Page drop down list.
Click Save.
You will receive
a confirmation
message.
Click the Refresh button to see your
chosen screen in the start page. This
screen will now open automatically each
time you log in to Agresso.
You can change the start up screen at any
time by going into Options and choosing set
Self service start page again.
Bangor University/Finance/Systems Support/Agresso Training/Agresso Web user manual/v0.1/12/08/2009/CB/eng
- 15 -
Agresso Modules
This section of the screen contains a list of modules
available to you.
Click on each module on your
screen to see what menus are
available to you.
The Modules section also contains a refresh button, and a log off
button, for exiting Agresso safely.
The Menu pane
The menu pane features a list of folders within the selected module.
Click on
Click on
and all folders in the
menu will open:
to close the
folders.
You can also use the + and –
buttons to open and close each
individual folder.
Bangor University/Finance/Systems Support/Agresso Training/Agresso Web user manual/v0.1/12/08/2009/CB/eng
- 16 -
Changing your password
In the Options module choose
Change password
Complete
the three
fields and
then click Save.
N.B. Your password
must be eight
characters long,
contain both letters
and numbers, and will
be case sensitive.
Searching/using field help
You can use Agresso to search for codes and account/ID/transaction numbers.
Wherever information is required, you will see a field help button at the end of each box
Clicking on field help will enable you to search with either a full or partial code or name.
For example, you want to run a report against a supplier, but you don’t know the Supplier
ID code.
Click on the field help button next to
the SuppID box.
The following window will open (next page):
Bangor University/Finance/Systems Support/Agresso Training/Agresso Web user manual/v0.1/12/08/2009/CB/eng
- 17 -
If you are running a numerical search, use the Attribute value box.
If you are running an alpha search, use the Description box.
Searching with partial information
You can use a wildcard to search with partial information; for example, in Historical
Supplier Transactions, you want to find the Supp ID for Bunzl Catering Supplies.
Type the first few letters of
the supplier name in the
Description box and use * to denote
missing information. Click Search.
When searching with incomplete information, use the following wildcard
characters:
*
use this as a substitute for one or more characters or numbers
?
use this as a substitute for a single character or number, e.g. B5?41
Field Help will return all suppliers with this letter combination, giving corresponding
supplier codes.
Click on the line you require, and
the code will automatically drop
into the original SuppID box.
Bangor University/Finance/Systems Support/Agresso Training/Agresso Web user manual/v0.1/12/08/2009/CB/eng
- 18 -
Printing from Agresso
Agresso is designed to be paper-free; its accessibility, range of enquiry screens and scanned
documentation/PDF invoices mean that filing large quantities of printed material is no
longer necessary - saving time, space and money. Using live screens instead of printed
reports also ensures you have access to the most up-to-date information.
If you do need to print information from Agresso, you can do so by transferring the
information to Microsoft Excel and printing from this application.
Before transferring to
MS Excel, set the Rows
per page to the
maximum of 1000, then check
at the foot of the page to see
how many pages of data there
are.
You can only transfer one page
at a time.
In your enquiry or report
screen, click on the Copy to
clipboard button.
Open Microsoft Excel
and choose edit>paste.
Repeat these steps for each
page of the enquiry/report,
ensuring your Excel cursor is at
the correct position when you
paste subsequent data.
Copy to Clipboard is only available through the Internet Explorer web
browser.
Bangor University/Finance/Systems Support/Agresso Training/Agresso Web user manual/v0.1/12/08/2009/CB/eng
- 19 -
General Ledger
Bangor University/Finance/Systems Support/Agresso Training/Agresso Web user manual/v0.1/12/08/2009/CB/eng
- 20 -
Bangor University/Finance/Systems Support/Agresso Training/Agresso Web user manual/v0.1/12/08/2009/CB/eng
- 21 -
The journal workflow process
One of the features of Agresso is the Workflow process.
A registered journal will not automatically become a transaction on the General Ledger –
first it must enter a workflow. The Finance team and certain accountants within the
university school/department will have self approval, which means the journal will post
directly into the General Ledger without a workflow task being generated.
If the initiator does not have self approval status, then the journal will be tasked to the
school/department’s financial officers to approve or reject. The task may be allocated to
several people but only one will need to approve it. A rejected journal will return to the
initiator as a task. This can then be amended and returned to the workflow or rejected
which will close the journal as it is no longer required.
If you have approval responsibilities, you must ensure that all journals are
completed within the correct posting month.
Bangor University/Finance/Systems Support/Agresso Training/Agresso Web user manual/v0.1/12/08/2009/CB/eng
- 22 -
Registering a journal transaction
In the Accounting
section of Agresso,
open the General
Ledger folder and
choose:
Registration of GL
Transactions
Bangor University/Finance/Systems Support/Agresso Training/Agresso Web user manual/v0.1/12/08/2009/CB/eng
- 23 The following window will open:
The window is split into 7 sections:
•
•
•
•
•
•
•
GL transaction information
GL analysis
Amounts
Recurring journal
Workflow log
Details
Tax Information
The GL transaction information section shouldn’t need amending for most
journals. You can change the transaction date but it must fall within the period
specified.
Bangor University/Finance/Systems Support/Agresso Training/Agresso Web user manual/v0.1/12/08/2009/CB/eng
- 24 -
In the GL Analysis section, enter the account code representing the type of
product/service involved in the transaction. The example above uses 621 (toilet
tissues). Tab down and enter required fields.
Different account codes require different additional information. The list below gives an
outline of what each field represents.
Account:
type of product or service, e.g. stationery (501)
Project:
area of the university to be debited e.g. B37545
Costc:
university department (automatically generated and fixed)
Activity:
determines the budget affected (automatically generated)
Tax Code &
Tax System:
generally unavailable in General Ledger
Enter a description for the transaction. This will help with auditing/future queries.
Currency:
the currency associated with the account
Curr
Amount:
amount to be debited
Enter amounts to be debited as a POSITIVE value.
Bangor University/Finance/Systems Support/Agresso Training/Agresso Web user manual/v0.1/12/08/2009/CB/eng
- 25 *The recurring journals section is not currently used by the university.
Recording the balancing credit line(s)
In the Details
section, click
Add to create
a new blank line.
The GL Analysis section will clear and you will be required to input information for the
balancing line. REMEMBER TO RECORD THE BALANCING LINE AS NEGATIVE FIGURE.
Look at the Σ sign to make sure the balance is zero. Agresso will not allow the
journal to be saved if the lines don’t balance
Click Save to confirm the
journal and generate a
transaction number. Make a
note of the transaction
number.
The journal will enter the workflow and wait for approval. Each line of the journal will be
sent for approval to the relevant Finance Officer.
Will you be
registering journals
often?
Click
to link the registration
screen to your Home page.
Bangor University/Finance/Systems Support/Agresso Training/Agresso Web user manual/v0.1/12/08/2009/CB/eng
- 26 -
Approving and rejecting journals
If you have approval status, journals to review will appear as tasks in your Agresso menu
pane.
Click on a task you
wish to action.
The following window will open:
The details of the journal are outlined in the main screen for review.
You can click on the workflow icon to see the workflow for the
journal:
You can click on
the workflow icon
to see the workflow for
the journal.
Bangor University/Finance/Systems Support/Agresso Training/Agresso Web user manual/v0.1/12/08/2009/CB/eng
- 27 -
Approving a journal
Review the details and click Approve. You will be given a confirmation
message, and the journal will move on to the next stage of the
workflow.
Click Update Task List
to remove the journal
from your Task folder.
Rejecting a journal
Review the details and click Reject. If you have not left a comment in
the Workflow Log, a comment box will open (see next page).
Bangor University/Finance/Systems Support/Agresso Training/Agresso Web user manual/v0.1/12/08/2009/CB/eng
- 28 -
You are required to enter a comment in the Workflow Log when you reject a
journal.
It is best practice to enter the reason you are rejecting the journal so the initiator
knows what action to take.
Leave a comment and click Reject again. You will receive a confirmation
message, and the journal will automatically be sent back to the initiator as a task.
Click Update task list
to remove the journal
from your Task folder.
Bangor University/Finance/Systems Support/Agresso Training/Agresso Web user manual/v0.1/12/08/2009/CB/eng
- 29 -
Approving/Rejecting in Advanced Mode
Advanced Mode enables you to approve/reject individual lines of a journal
In the main screen, click Advanced Mode.
The GL Transactions box will now include tick boxes and Approve/Reject buttons will
appear.
Bangor University/Finance/Systems Support/Agresso Training/Agresso Web user manual/v0.1/12/08/2009/CB/eng
- 30 -
Review the information contained within the window, including any comments
addressed to you in the Workflow Log section.
Actioning a journal line
Check the box at the beginning of the line you are actioning and click Approve or
Reject. The line will now be marked as appropriate in the status column (see
‘Approve’ marked above).
Click Save.
In Advanced Mode, you must MANUALLY save your changes once you have
actioned.
Bangor University/Finance/Systems Support/Agresso Training/Agresso Web user manual/v0.1/12/08/2009/CB/eng
- 31 -
Amending and closing rejected journals
If you have registered a journal and it has been rejected, it will be returned to you as a task.
Click to open the task. It will
open in the original GL
registration screen.
You can either amend or cancel the line(s).
The details section has a Workflow status
column. W = workflow (approved or
waiting to be actioned), R = rejected.
Click on a rejected line and read the workflow log
for further details/instructions.
Bangor University/Finance/Systems Support/Agresso Training/Agresso Web user manual/v0.1/12/08/2009/CB/eng
- 32 -
Tab through the screen and make amendments as instructed in the
workflow log. Leave a comment in the workflow log.
Click Save to enter back into
workflow.
The journal MUST balance before amendments are saved. If amending a line,
ensure the balancing line is amended also.
Bangor University/Finance/Systems Support/Agresso Training/Agresso Web user manual/v0.1/12/08/2009/CB/eng
- 33 -
Closing a rejected journal
Click to open the task
Open the Tools menu then click
Park to remove the journal
from your list (see page 36 for
details on how to park)
Parked journals with a transaction number are ‘scooped up’ by a background
process and deleted from the system. This does not affect other parked journals
in your list (i.e. journals you have not yet sent for approval).
Bangor University/Finance/Systems Support/Agresso Training/Agresso Web user manual/v0.1/12/08/2009/CB/eng
- 34 -
Checking the status of a journal in workflow
In the Accounting
section of Agresso,
click into the
General Ledger
folder and choose:
Workflow Enquiry – GL
Transactions
The following window will open:
Use the selection criteria to narrow your search, either with the transaction
number, transaction type, workflow status and/or task owner. Click Search.
Bangor University/Finance/Systems Support/Agresso Training/Agresso Web user manual/v0.1/12/08/2009/CB/eng
- 35 -
If the workflow status is Finished, then the journal has been approved. If the status shows
Workflow in progress, you can find out what stage of the authorisation process the journal
is at.
Click on the blue hyperlink in the Workflow Status column.
•
Yellow represents the current
status
•
Green represents the paths
available via workflow
•
Red represents rejections
Bangor University/Finance/Systems Support/Agresso Training/Agresso Web user manual/v0.1/12/08/2009/CB/eng
- 36 -
Finding a ‘lost’ journal/finding a transaction number
You may sometimes need to look up a transaction, but do not have the transaction number.
For example, you may have saved a journal without taking note of the transaction number.
In the Reports
section of Agresso,
go to:
Finance Reports→
Transaction Based
Reports→
and choose Find a
transaction.
In the Selection criteria section, enter information to narrow your search.
For example, searching by project code will return all transactions under
that project code (within your access). If you are looking for a recent
transaction, narrow your search further by only searching within the
current period.
Bangor University/Finance/Systems Support/Agresso Training/Agresso Web user manual/v0.1/12/08/2009/CB/eng
- 37 -
You can narrow your
search results by
typing other
information you have, such
as the invoice type, in the
relevant column and clicking
Search again.
The enquiry will show
transactions only of your
chosen transaction type.
You can click on the blue transaction number hyperlink to see
further transaction details if required.
‘Find my transactions’ option
Underneath the find a transaction enquiry, is a find my transactions enquiry.
This enquiry will return all transactions inputted by you. You can
narrow by period if required.
You can then use
column headings
to filter your
results.
Bangor University/Finance/Systems Support/Agresso Training/Agresso Web user manual/v0.1/12/08/2009/CB/eng
- 38 -
Parking a journal
You may want to save a journal and complete or submit it later – in Agresso you can ‘park’
your journal, in order to save it without committing to workflow.
On the left of the GL
transaction screen is a Tools
bar.
Click on the >> icon in the top left
hand corner to open the Tools menu
The tools menu will
open. Click Park.
Enter a description for your
journal and click OK. You will
be given a temporary number.
Your journal is now ‘parked’ until you need it again.
Bangor University/Finance/Systems Support/Agresso Training/Agresso Web user manual/v0.1/12/08/2009/CB/eng
- 39 -
Retrieving a parked journal
To the left of the GL
transaction screen is a
Tools bar.
Click on the >> icon in the top
left hand corner to open the
Tools menu.
The tools menu
will open. Click
Get Parked
Enter your journal description.
Click
If you leave the text box blank and click Get Parked, Agresso will return all your
parked journals. You can then choose from the list.
Click on the line you need to open your parked journal. Notice the temporary
number you were given is listed under TransNo.
Bangor University/Finance/Systems Support/Agresso Training/Agresso Web user manual/v0.1/12/08/2009/CB/eng
- 40 -
High volume journals (BIF journal sheets)
Journals of 20 lines or more can be entered onto a pre-ordered spreadsheet and uploaded
into Agresso (via a Payment Supervisor). This manual uses the Debit Journal Sheet as an
example.
In the Information
Pages section of
Agresso, click into
the Report
Ordering folder
and choose:
Debit Journal Sheet
Choose Debit Journal (0) from the dropdown menu. The following window will
open. Enter/amend criteria in the Open Parameters section as required. Leave all
other fields as default.
Bangor University/Finance/Systems Support/Agresso Training/Agresso Web user manual/v0.1/12/08/2009/CB/eng
- 41 -
N.B. enter Project code ONLY if all transactions on the spreadsheet
correspond to this project. For journals for more than one project, leave this
field blank.
Click Save to generate the
spreadsheet order. You
will be given an order
number. Click OK.
Now go to My Ordered Reports
at the top of the page.
Check against order number – once the
status is Finished, click to open and
save to your PC or secure drive.
Open the spreadsheet template and enter your journals or copy your journals
from the spreadsheet you have been working on. For explanations regarding
columns, please see next page.
Bangor University/Finance/Systems Support/Agresso Training/Agresso Web user manual/v0.1/12/08/2009/CB/eng
- 42 Date:
this should be the transaction date. This will default to today’s date.
Voucher no: if voucher number is left blank all the transaction lines will be uploaded as
one journal. If you want the lines to be separate journals then enter a voucher number (i.e.
1, 2, 3 etc.). If you have ten transaction lines which should be one journal then all these line
should have the same voucher number. N.B. When using separate voucher numbers, the
same number must be used for both the debit AND the credit line.
Account:
the account code for the transactions.
Project:
the project code for the transactions.
Resource ID:
the resource ID for the transactions. If the transaction is involved with staff,
such as salary, the staff‘s resource ID will need to be entered.
Sub Nominal: more detailed level of account. For example, Pos Number (position).
Amount:
the transaction amount. You must enter positive values for debits and
negative vales for credits. If the spreadsheet does not balance it will not be
uploaded.
Description: enter the reason for the journal entry. This will help for auditing purposes.
Period:
the financial period the transaction is for. You can only enter transactions for
open financial periods.
Account Check and Project Check columns will verify that the accounts and
projects used in the spreadsheet are codes that you have access to in
Agresso. If the code is not allowed you will see ‘Error – Project code’ or ‘Error
– Account code’ otherwise the columns will display ‘OK’.
Save the changes and when complete email the spreadsheet to the Payment
Supervisor at [email protected]. The Payment Supervisor will upload the
contents of your spreadsheet into Agresso.
Bangor University/Finance/Systems Support/Agresso Training/Agresso Web user manual/v0.1/12/08/2009/CB/eng
- 43 -
Running a General Ledger transaction enquiry
Other enquiries/reports can be found in the Reports section of Agresso. This section shows
you how to run a standard transaction enquiry in the General Ledger folder.
In the Accounting
section of Agresso,
click into the
General Ledger
folder and choose:
General Ledger
Transactions
The following window will open:
Use any/all
selection criteria
to narrow your
search.
Click Search.
If you leave the criteria boxes blank, the enquiry will still run and you will see all
transactions within your access. However, this can take a long time to run.
Bangor University/Finance/Systems Support/Agresso Training/Agresso Web user manual/v0.1/12/08/2009/CB/eng
- 44 -
The example above shows all transactions listed under the account code 621 (toilet tissues).
The transactions are subtotalled by period. In order to see results at transaction level,
ensure the detail level is set at All Levels.
Explanation of Columns
TT
Transaction Type
Trans No
Transaction number (assigned automatically)
#
Sequence Number (the line number with the transaction table)
Trans. Date
The date the transaction was posted
Period
The financial period in which the transaction was posted
Account
The Account code the transaction was posted against
Cat 1
The Costc code the transaction was posted against
Cat2
The Activity code the transaction was posted against
TC
Tax Code
Text
This is the description entered when the transaction is created
Amount
The amount for the transaction line. Red is for CREDIT, black is for DEBIT
Bangor University/Finance/Systems Support/Agresso Training/Agresso Web user manual/v0.1/12/08/2009/CB/eng
- 45 -
Click on a transaction number to see further details.
Click on the line you require to see further transaction details and the scanned
invoice (where available).
Bangor University/Finance/Systems Support/Agresso Training/Agresso Web user manual/v0.1/12/08/2009/CB/eng
- 46 -
Transferring costs (internal recharges)
Transferring costs from one department or project to another is a very similar process to
registering a journal.
Go to the Accounting
module and open
Registration of GL
Transactions
If you are transferring a cost from department A to department B, then you must
CREDIT department A (by inputting as a NEGATIVE value), and DEBIT department
B (by inputting as a POSITIVE value).
Bangor University/Finance/Systems Support/Agresso Training/Agresso Web user manual/v0.1/12/08/2009/CB/eng
- 47 -
Leave GL Transaction information as default unless required otherwise.
Enter Account code 033 for transfers within a department (i.e. project code to
project code) or 044 for transfers outside of your department (i.e. Finance to IT
Services).
Tab down to Project. Enter the code of the project you are taking funds from. This will
automatically generate the relevant codes (Costc, Activity, Actgroup, Tax). Type in a
description for the transaction.
Tab down to the Amounts section. Enter the amount as a POSITIVE value in the
Curr.amount (GBP) box, and tab again to autofill the Amount (GBP) box.
Bangor University/Finance/Systems Support/Agresso Training/Agresso Web user manual/v0.1/12/08/2009/CB/eng
- 48 -
The information will automatically populate the journal line in the Details section.
Click the Add button to complete the balancing line. This will bring up a new,
blank GL registration screen.
In the GL analysis section, enter Account code again and tab down to
Project. Enter the project code you are transferring funds to .
Use the same description for the transaction.
Enter the amount as a NEGATIVE figure.
Check the Details section to ensure the lines balance. Click
the journal to workflow.
to submit
Bangor University/Finance/Systems Support/Agresso Training/Agresso Web user manual/v0.1/12/08/2009/CB/eng
- 49 -
Finding out if an invoice has been paid (running an open supplier report)
An open supplier report will give details of all outstanding invoices by supplier, cost code or
department. It is a good report to run when you want to find out if a certain supplier or
invoice has been paid, or to look at outstanding commitments (monies still to be paid) for
your department/project.
In the Reports section of
Agresso, go to:
Financial Reports→
Finance Reports→
Accounts Payable→
Open Supplier Transactions
The following window will open:
Bangor University/Finance/Systems Support/Agresso Training/Agresso Web user manual/v0.1/12/08/2009/CB/eng
- 50 Use the selection criteria to run your report by project, supplier or other criteria.
For example, to find out all open invoices for a certain supplier, enter the supplier ID in the
relevant box and click Search.
To find out all open invoices against a project code, enter the project code in the relevant
box and click Search.
To find out if a particular invoice is still to be paid, enter the invoice number and click
Search.
Remember you can use field help to source a supplier ID or code.
Details of how to use field help can be found in the ‘Agresso Basics and
Familiarisation’ section of this manual.
Status codes
Agresso status codes vary depending on the enquiry or screen you are in. For open supplier
transactions, the status codes are as follows:
P – the transaction is currently being registered and is not yet posted to be paid
N – this has been posted and is now ready to be considered in a payment run
Bangor University/Finance/Systems Support/Agresso Training/Agresso Web user manual/v0.1/12/08/2009/CB/eng
- 51 -
You can drill down to the
transaction details by clicking
on the TransNo hyperlink
Historical Supplier Transactions
Use the Historical
Supplier transactions
report to check details of
paid invoices.
Bangor University/Finance/Systems Support/Agresso Training/Agresso Web user manual/v0.1/12/08/2009/CB/eng
- 52 -
Choose which criteria you wish to search on, and enter the relevant code in the box.
alternatively, to find out if a particular invoice has been paid, type in the invoice
number.
Click Search.
The example above shows a report returned when searching for all paid
invoices for a particular supplier. You can narrow your search by typing other
information you may have, such as the invoice date, in the relevant column
and clicking Search again.
Click on the TransNo
hyperlink to view further
details.
Bangor University/Finance/Systems Support/Agresso Training/Agresso Web user manual/v0.1/12/08/2009/CB/eng
- 53 -
Aged Creditor Report
An Aged Creditor Report will give you details on outstanding payments per creditor for each
costc (department).
In the Reports module,
go to:
Financial Reports→
Finance Reports→
Accounts Payable→
Aged Creditors Report by CostC
The following window will open:
Enter the Costc (use Field help if required) and click Search.
Bangor University/Finance/Systems Support/Agresso Training/Agresso Web user manual/v0.1/12/08/2009/CB/eng
- 54 -
The report will show any outstanding monies owed for each supplier, against ‘due’ columns.
Bangor University/Finance/Systems Support/Agresso Training/Agresso Web user manual/v0.1/12/08/2009/CB/eng
- 55 -
Running a Ledger Report
A ledger report will show all transactions (income and expenditure) for your project or
account. You can choose to list the report by account (i.e. type of product/service) or period
(i.e. transactions month on month). You can choose your report to include registered items.
In the Reports module,
go to:
Financial Reports→
Finance Reports→
Transaction Based Reports→
Ledger Report by
Project/Period.
Enter your project code and/or account code. You can also
narrow your report to a specific period.
Bangor University/Finance/Systems Support/Agresso Training/Agresso Web user manual/v0.1/12/08/2009/CB/eng
- 56 The report lists all transactions on the ledger, and subtotals them by period.
Click on the + sign to see a list of transactions for
the period, or choose All Levels from the Detail
Level dropdown list to see all periods at transaction
level.
You can tailor your report by using the column headers and clicking Search
again. In the example above, the report will return all transactions for account
532 only.
You can drill down to the transaction details by clicking
on the TransNo hyperlink.
Bangor University/Finance/Systems Support/Agresso Training/Agresso Web user manual/v0.1/12/08/2009/CB/eng
- 57 -
You can also transfer reports and enquiries to Microsoft Excel, by clicking on the
button. Click this button, then go to MS Excel and choose
edit>paste.
Transferring to Excel is highly recommended if you want to print the report.
Copy to clipboard will only copy the report page by
page
.
Ensure Rows per page
are set to maximum.
Scroll down to the
bottom of the enquiry
screen to check how
many enquiry pages there are
to print.
The copy to clipboard feature is only available if you access Agresso via Internet
Explorer. You will not see this button on screen if you access Agresso via Firefox
or other browser.
Bangor University/Finance/Systems Support/Agresso Training/Agresso Web user manual/v0.1/12/08/2009/CB/eng
- 58 -
Bangor University/Finance/Systems Support/Agresso Training/Agresso Web user manual/v0.1/12/08/2009/CB/eng
- 59 -
Customers and Sales
Bangor University/Finance/Systems Support/Agresso Training/Agresso Web user manual/v0.1/12/08/2009/CB/eng
- 60 -
Bangor University/Finance/Systems Support/Agresso Training/Agresso Web user manual/v0.1/12/08/2009/CB/eng
- 61 -
The sales order workflow process
Need for Sales order or
Credit note identified
Rejected order
returned with comments
Rejected
Sales order or
Credit note created and saved
Rejected
order
Rejected
item
terminated
terminated
College or department
manager approval
Authorised
Rejected
Finance Office
(VAT) approval
Authorised
Sales order or Credit note
converted to an invoice
Invoice emailed to Inputter
as PDF and they send to customer
A workflow is a series of steps which are automated within Agresso, which require some
human interaction to progress onto the next step. All sales orders should follow the
workflow process shown above. There are parts of this workflow that rely purely on human
decisions, such as whether to approve or reject the order. However most of the workflow is
automated because it is actually ‘built in’ to the system. The workflow is explained below:
1.
2.
3.
4.
5.
6.
7.
8.
The business need for a customer to be invoiced is identified.
The inputter raises a sales order in Agresso and saves it.
Agresso generates a unique order number.
The sales order is automatically workflowed to the correct budget holder for approval.
The budget holder has the ability to authorise or reject the order.
Once authorised, the sales order is then automatically workflowed to the Finance
Office for a final VAT check. They also have the ability to approve or reject the order.
Once approved by both the budget holder and the Finance Office, the sales order will
be automatically converted into a sales invoice and a sales invoice with a unique
number assigned.
The sales invoice is emailed to the inputter as a PDF (an electronic image of the sales
invoice).
The inputter sends the invoice to the customer.
Bangor University/Finance/Systems Support/Agresso Training/Agresso Web user manual/v0.1/12/08/2009/CB/eng
- 62 -
Raising a sales order
You will find the sales order screen in the Customers and Sales section of Agresso.
There are two folders (subject to your access):
Customer information allows you
to view customer details and any
information held against them. It
also allows you to request and print a copy
invoice and/or statement of accounts.
Sales Orders allows you to create
and submit sales orders and credit
notes, and to check their workflow
status.
In the Customers
and sales section
of Agresso, click
into the Sales
orders folder and
choose:
Simple sales orders
Bangor University/Finance/Systems Support/Agresso Training/Agresso Web user manual/v0.1/12/08/2009/CB/eng
- 63 The following window will open:
The window is split into eight sections:
•
•
•
•
•
•
•
•
Sales order
Delivery Address
Invoice text
Terms
Order lines
Details
Workflow log
GL Analysis
Bangor University/Finance/Systems Support/Agresso Training/Agresso Web user manual/v0.1/12/08/2009/CB/eng
- 64 -
Sales order section
Enter the Customer ID. This will begin with the letter D. Use field help if you are
unsure (see ‘Agresso Basics and Familiarisation’ for more information on field
help).
Order type:
Defaulted to sales order.
Status: the default is to invoice.
Responsible: This is the person who will appear on the sales invoice as the contact. This is
also the person who receives the sales invoice.
Input by:
This is the person inputting the sales order (i.e. you), so it is usually the same
as the responsible field.
External Ref: you need to enter any quotation or reference here that is relevant
to the customer. This will print on the invoice.
Currency:
This will match the customer’s preferred currency (usually GBP unless an
overseas customer).
Pay Method: This can be left as the default setting which is cheque.
Payment
Terms:
Leave as default – this is linked to the customer.
Project Code: Enter the relevant project code. This will automatically populate
the Project, Costc and Activity codes in the GL Analysis section.
In the Delivery section,
ensure you select the
correct address if the
customer has more than
one.
Bangor University/Finance/Systems Support/Agresso Training/Agresso Web user manual/v0.1/12/08/2009/CB/eng
- 65 Use the Invoice text section only if you want a heading for your invoice.
Skip Terms section.
Order lines Section
Enter the correct product code i.e 213 Conference/Vacation Letting.
Enter a meaningful description. This will help the workflow process, auditing, and
future analysis/searches if required.
The Unit section will populate automatically, so there is no need to change.
Enter the Number of units. This may be greater than one for physical products,
but for a service it is likely to be one.
This is the Unit price of the product excluding VAT. If the price is automatically
populated (based on the product type selected) then it should not be amended. If
there is no default product price then you need to enter the price manually.
Curr Amount:
This is the total amount in the applicable currency (usually GBP).
Amount:
This is the total amount in GBP.
Tax curr.amount:
This is the amount of tax payable in the applicable currency
Tax.amount:
This is the amount of tax on GBP.
Product text:
To add more detail to the description of the product, or any extra
information for the customer, you can add in this box. This will print
immediately below the detail for the invoice line.
For multiple line sales orders, click
line.
for each subsequent
Bangor University/Finance/Systems Support/Agresso Training/Agresso Web user manual/v0.1/12/08/2009/CB/eng
- 66 Skip Workflow log
GL Analysis Section
The GL Analysis section is auto-filled by the previous sections:
Account:
This field is populated by the data added to the Product field
Costc:
populated by the data added to Project Code
Project:
populated by the data added to Project code in Sales order section.
Activity:
populated by the data added to the Project code (Although Activity is
actually a combination of Project code and Account code).
ActGroup:
determined by the Account
Tax Code:
determined by the Product. However, this can also be changed.
Tax system:
this will always be zero.
Once you have entered all the details you need to save your sales order,
click Save in the top left hand corner of the screen.
Agresso will run a check to make sure all the details are valid. If you have completed all the
details correctly, a unique sales order number will be generated and you will see a message
at the top of the screen. All sales orders begin with a ‘6’ and contain six figures.
Bangor University/Finance/Systems Support/Agresso Training/Agresso Web user manual/v0.1/12/08/2009/CB/eng
- 67 -
If you have omitted any details from the sales order, or entered any incorrectly, Agresso will
return an error message and a link to the errors or omissions.
To resolve this:
Return to where the error has occurred, amend the information and press Save
to resubmit.
Once saved, the sales order will enter the workflow for approval.
To input another sales order without exiting the screen, click
Invoices
Once a sales order has been approved, it will be converted into an invoice by an automated
process that runs in the background of Agresso every 30 minutes. Agresso will then email
the invoice in PDF format to the Responsible person on the original sales order. They can
then print and send to the customer, or email to them directly.
Raising a Credit Note
If a customer is owed a refund, you need to raise a credit note in Agresso. A
credit note is exactly the same as a sales order except the amounts are
negative.
Bangor University/Finance/Systems Support/Agresso Training/Agresso Web user manual/v0.1/12/08/2009/CB/eng
- 68 -
Approving/rejecting sales orders
You need approval status in order to perform this task.
In the My Tasks
section of Agresso,
open the Workflow
Tasks folder and
choose the sales order
you wish to action.
The following window will open:
All outstanding
sales orders for
approval are
listed on the left
hand side of the
screen.
Details of the chosen (highlighted) sales order
appears in the main screen.
The Approve and Reject buttons appear at the top of the
screen.
Bangor University/Finance/Systems Support/Agresso Training/Agresso Web user manual/v0.1/12/08/2009/CB/eng
- 69 You can approve or reject sales orders in three ways:
1. You can choose
Select all visible items
by clicking the box,
and then Approve or
Reject all/multiple
sales orders with one
click.
2. You can review the
blue highlighted sales
order in the main
screen and click either
Approve or Reject
3. You can switch to
Advanced Mode, which
will enable you to
approve/reject individual
lines of a sales order.
Click the white box on
the relevant line and
approve or reject.
Bangor University/Finance/Systems Support/Agresso Training/Agresso Web user manual/v0.1/12/08/2009/CB/eng
- 70 When approving or rejecting in
Advanced mode, you must also
save your changes by clicking on
Save at the bottom of the page.
This also gives you the option of
choosing Undo before saving if
you’ve made a mistake. Approving
and rejecting in Simple mode will
save automatically.
In both Simple and
Advanced mode, you can
click on the Workflow
icon
to see the
workflow for each sales
order.
Bangor University/Finance/Systems Support/Agresso Training/Agresso Web user manual/v0.1/12/08/2009/CB/eng
- 71 -
All rejected sales orders
require a comment. This
enables the initiator to
either amend or cancel the order. If
you click reject before leaving a
comment, a pop-up window will
prompt you.
You will receive a confirmation once your approval/rejection has been saved.
Once you have approved or rejected a sales order, you can remove the task
from your Workflow Tasks folder by clicking
Bangor University/Finance/Systems Support/Agresso Training/Agresso Web user manual/v0.1/12/08/2009/CB/eng
- 72 -
Amending/closing a rejected sales order
If your sales order has been rejected, you will receive a task in your Workflow Tasks folder.
Open your Workflow
Tasks folder and click
on your rejected
order. The Approval
window will open.
Read the workflow log for
comments/instructions
Bangor University/Finance/Systems Support/Agresso Training/Agresso Web user manual/v0.1/12/08/2009/CB/eng
- 73 -
Depending on the reason for rejection, you can either cancel the sales order, or amend and
re-submit it.
Closing a rejected sales order
Click Reject to close the
sales order, then click
Update task list to
remove the sales order
from your tasks.
The sales order has now been closed.
Bangor University/Finance/Systems Support/Agresso Training/Agresso Web user manual/v0.1/12/08/2009/CB/eng
- 74 -
Amending a rejected sales order
If you have a rejected sales order that requires amending, you must go to the Simple Sales
Order screen and open the order.
Click on Open and enter the sales order number in the field.
Tab to populate the order screen.
If you have a multi line sales order, there will be a red warning icon next to each
line that requires amending. Click on the order line to amend and see Workflow
log.
Bangor University/Finance/Systems Support/Agresso Training/Agresso Web user manual/v0.1/12/08/2009/CB/eng
- 75 -
Tab through the sales order screen and make amendments where required/ click
the
button to apply your changes.
Click Save to enter back into
workflow. You will be given a
confirmation message.
Click on Update task list to
remove the sales order from
your tasks.
Bangor University/Finance/Systems Support/Agresso Training/Agresso Web user manual/v0.1/12/08/2009/CB/eng
- 76 -
Checking the status of a sales order in workflow
In the Customers
and Sales section
of Agresso, click
into the Sales
orders
folder and choose:
Workflow enquiry –
Sales orders
The following screen will appear:
You can search for your sales order by workflow state or task owner.
Click Search to display the sales orders. The oldest will be displayed at the
top.
Bangor University/Finance/Systems Support/Agresso Training/Agresso Web user manual/v0.1/12/08/2009/CB/eng
- 77 -
You can use the filter bar to refine your results. Remember to click Search
again.
The workflow status will tell you exactly where your sales order has got to in the approval
process:
•
•
•
Workflow in progress:
Finished:
Rejected:
the order is still awaiting approval
the sales order has been approved
the sales order has been rejected
To view a
Workflow map
associated with a
sales order, click on the
Workflow in Progress
hyperlink.
Bangor University/Finance/Systems Support/Agresso Training/Agresso Web user manual/v0.1/12/08/2009/CB/eng
- 78 The Workflow map will then be shown in a separate window.
Green = approval has been given.
Yellow = this is the current workflow
step
Red
= the sales order has been
rejected
The boxes with grey borders are the
steps in the process that still need to be
completed.
Bangor University/Finance/Systems Support/Agresso Training/Agresso Web user manual/v0.1/12/08/2009/CB/eng
- 79 -
Customer enquiries - finding the balance of a customer account
In the Customers and sales
module, open the Customer
information folder and click:
Maintenance of open items
The following window will open:
Enter the Customer ID number, or use field help to search (see ‘Agresso Basics
and Familiarisation’ for information on how to use field help). You can search for
the ID number from a variety of sources, shown in the dropdown menu.
Bangor University/Finance/Systems Support/Agresso Training/Agresso Web user manual/v0.1/12/08/2009/CB/eng
- 80 Once you
have
selected
your supplier,
click Load.
The results are split into two:
Customer Invoices shows current outstanding items. The Curr.amount represents the
original amount raised, where the Rest.curr.amnt is the outstanding balance against the
invoice.
Historical Overview (click on
to expand the box)
These will be all the paid invoices and the credit notes or payments which matched against
them. [Trans Type RC = Receipts, SO = Sales Order Invoice, SI = imported Sales Invoice, PA =
Payment Allocation (i.e. Credit Note matching)]
Click on
to see further invoice details if
required.
Bangor University/Finance/Systems Support/Agresso Training/Agresso Web user manual/v0.1/12/08/2009/CB/eng
- 81 -
Raising a customer statement of accounts
A customer may request a historical or up to date statement of their account(s). You can
order these statements from Agresso and retrieve them as PDF files, which you can then
print or email to the customer.
In the Customers and sales
module, open the Customer
information folder and click on
Statement of accounts
Choose Bangor University
Statement of Accounts (1) from
the dropdown list.
The following window will open:
Bangor University/Finance/Systems Support/Agresso Training/Agresso Web user manual/v0.1/12/08/2009/CB/eng
- 82 -
The General Parameters box contains information and options on your order; as you are
essentially ordering a piece of documentation, it gives you options such as how many copies
you would like, where you would like it printed etc.
Unless you have specific requirements, leave everything as default and go to Open
Parameters.
In the Open parameters box, type the Customer ID in
both the to and from boxes, and choose the statement
period from the drop down list. Click Save.
You will be given an order number.
Now go to My Ordered
Reports at the top of the
screen to retrieve your
statement.
When the status is showing
Finished, click the line to
open.
You will receive a file download message,
asking if you would like to open or save the
file. Click Open.
Bangor University/Finance/Systems Support/Agresso Training/Agresso Web user manual/v0.1/12/08/2009/CB/eng
- 83 -
Your statement will open as a PDF, so you can print or email as required.
Bangor University/Finance/Systems Support/Agresso Training/Agresso Web user manual/v0.1/12/08/2009/CB/eng
- 84 -
Aged Debtor Reports
You can use Agresso to run an aged debtor report, by customer, by invoice or by costc
(school/department).
The report will list outstanding monies owed against 30, 60 and 90 day overdue periods.
In the Reports section of
Agresso,
open the Accounts
Receivable folder, and open
Customer Information.
Click on Aged Debtors
(detailed) by Costc
The following window will open:
Enter your selection criteria depending on whether you want to search by
customer, costc or invoice number. You can use field help if required to find the
relevant code (see ‘Agresso Basics and Familiarisation’ for information on using
field help).
Click Search.
Bangor University/Finance/Systems Support/Agresso Training/Agresso Web user manual/v0.1/12/08/2009/CB/eng
- 85 -
Raising a copy invoice/finding a sales invoice number
If a customer requires a copy of an existing invoice, a copy invoice can be requested and
printed from Agresso. The original invoice number is required for this.
Finding a sales invoice number
If you do not have the
invoice number you can
search for it in the
Maintenance of open items
screen, which is in the
Customers and Sales section
of Agresso.
If you already have the invoice number, jump
to the next page.
Enter the Customer ID and click Load. All outstanding invoices will be loaded into
the Customer invoices section. Find the invoice number you require from this list.
Paid invoices are available in the historical overview section.
Bangor University/Finance/Systems Support/Agresso Training/Agresso Web user manual/v0.1/12/08/2009/CB/eng
- 86 -
Once you have the
invoice number,
go to the
Customer
information folder
in Customers and
Sales and click
Copy Invoice.
Select Bangor Copy Invoice from the variant drop-down box.
1. Select a printer or leave as default
2. Enter the relevant number in the Invoice number from and to fields
3. Click Save
Agresso will automatically generate an Order number. Make a note of this.
Bangor University/Finance/Systems Support/Agresso Training/Agresso Web user manual/v0.1/12/08/2009/CB/eng
- 87 Now click the My Ordered Reports button at the top of your screen. A list of
reports is displayed with the most recent report at the top. A copy invoice report
is called a SO07 Report.
When the status of the
report is Finished, click
on the row to view the
report, which will display the
invoice in Adobe. Ensure there
is a file name present – if there
is no file name, then there is no
file to download.
You will receive a File
Download message. Click
Open to view invoice. You can
then send, print or save as
required.
Bangor University/Finance/Systems Support/Agresso Training/Agresso Web user manual/v0.1/12/08/2009/CB/eng
- 88 -
Budgets and Reports
Bangor University/Finance/Systems Support/Agresso Training/Agresso Web user manual/v0.1/12/08/2009/CB/eng
- 89 -
Bangor University/Finance/Systems Support/Agresso Training/Agresso Web user manual/v0.1/12/08/2009/CB/eng
- 90 -
Budget Reports: Introduction
This section of the manual covers budget type reports, report ordering and Agresso
reporting features (which are applicable to all types of report/enquiry).
There are various types of budget reports available - the best way of finding out which is the
most suitable for you is by familiarising yourself with those that fall into your category. As
each area has different requirements, this manual covers academic, non-academic and
research budgets separately.
Agresso reports are multi layered; they allow you to ‘drill down’ to see a breakdown of
spend by activity, account or period, view transaction details, including scanned invoices
(where available), and much more.
You can customise your report screen to contain only the columns you require, and keep
these settings for future enquiries. If you wish to analyse results further, you can export the
results to Microsoft Excel.
Due to Agresso’s web accessibility, reports and figures can be obtained anywhere with a PC
and web access, by anyone with the appropriate access.
Report Features
Field Help:
Use the field help feature to search for
project/account codes by name or with partial
information (see page 16 of this manual for
more information).
Filter Columns:
Use any of the report column headings to
narrow your search by typing in the white box,
then clicking Search.
Choose Columns:
allows you to delete unwanted columns from a
report to make for simpler viewing.
Bangor University/Finance/Systems Support/Agresso Training/Agresso Web user manual/v0.1/12/08/2009/CB/eng
- 91 -
Report features (continued)
Copy to clipboard
allows you to transfer report
information to MS Excel. Click this
button, go to Excel and choose
edit→paste.
The copy to clipboard
feature is only
available through the
Internet Explorer web
browser.
If you are going to run a
particular report often, you
can add a shortcut to your
Agresso home page.
You will receive a
confirmation.
The report will appear on
your home page. (You may
have to click the refresh
button to load the
shortcut).
Bangor University/Finance/Systems Support/Agresso Training/Agresso Web user manual/v0.1/12/08/2009/CB/eng
- 92 -
Academic Budget Report
This manual uses Pro-forma Project Detail by Activity as an example. It is a widely used
report that enables you to search by project of group of projects, showing spend against
budget and subtotalling by Activity. You can also drill down to transaction details and view
scanned invoices (where available).
In the Reports
section of Agresso,
click into the
Academic Reports
folder and choose:
Pro-forma Project Detail
by activity
The following window will open.
Bangor University/Finance/Systems Support/Agresso Training/Agresso Web user manual/v0.1/12/08/2009/CB/eng
- 93 The Selection criteria section is used to choose the information you want to access in the
report.
Enter your project code in the Project like box, and enter account code if you
want to narrow your report to one account. You can use field help to search for
correct codes if required. (See ‘Agresso Basics and Familiarisation’ for information
on using field help). Leave the boxes blank to return a report on all Project codes
within your access.
Click Search in the Results section.
Your report will display below:
The report shows all income and expenditure, subtotalled by Activity.
•
•
•
Actual is the actual amount spent to date
Budget is the amount allocated to that Activity
Variance is the amount left against budget ( Budget – Actual = Variance)
Bangor University/Finance/Systems Support/Agresso Training/Agresso user manual/v0.1/12/08/2009/CB/eng
- 94 Choose All Levels from the drop down menu.
You can now see expenditure at the lowest
level (Account).
You can now see expenditure at the lowest level (Account).
Click on an Actual figure. This will return all transactions for that particular
account.
You are now able to see each transaction in the particular account for this Activity.
This detailed report enables you to see
•
•
•
•
•
The transaction type (TT) i.e. expenses (E1), supplier invoice (AP)
The transaction number
The date it was inputted, and the period this falls in
Text – what the money was spent on
How much was spent
Bangor University/Finance/Systems Support/Agresso Training/Agresso user manual/v0.1/12/08/2009/CB/eng
- 95 -
If you wish to query a transaction, you can ‘drill down’ to the transaction details
by clicking on the TransNo hyperlink.
Select a row to see the transaction details and scanned invoice (where applicable).
Bangor University/Finance/Systems Support/Agresso Training/Agresso user manual/v0.1/12/08/2009/CB/eng
- 96 -
Non-Academic Budget Report
This manual uses Gen Acc Project Detail by Activity as an example. It is a widely used report
that enables you to search by project, showing spend against budget and subtotalling by
Activity.
The report also allows you to ‘drill down’ to see a breakdown of spend against each account
and view transaction details, including scanned invoices (where applicable).
In the Reports
section of Agresso,
click into the NonAcademic Budgets
Reports folder and
choose:
Gen Acc Project Detail by
Activity
Enter
project
code and/or
account code/period
to narrow your
search.
Click Search.
Bangor University/Finance/Systems Support/Agresso Training/Agresso user manual/v0.1/12/08/2009/CB/eng
- 97 Your report will display below:
The report shows amounts, listed by Account and subtotalled by Activity.
•
•
•
•
Budget is the amount allocated to that Activity
Amount is the amount spent and paid to date
Commitments is the amount spent but not yet paid out (i.e. open orders)
Variance is the amount left against budget ( Budget – Actual = Variance)
Click on an Amount hyperlink againt the Account code you wish to query.
This will return all transactions for that particular account.
You are now able to see each transaction in the particular account for this Activity.
This detail level enables you to see
•
•
•
•
•
The transaction type (TT) i.e. expenses (E1), supplier invoice (AP)
The transaction number
The date it was inputted, and the period this falls in
Text – what the money was spent on
How much was spent
Bangor University/Finance/Systems Support/Agresso Training/Agresso user manual/v0.1/12/08/2009/CB/eng
- 98 -
If you wish to query a transaction, you can ‘drill down’ to the transaction details
by clicking on the TransNo hyperlink.
Select a row to see the transaction details and scanned invoice (where
applicable).
Bangor University/Finance/Systems Support/Agresso Training/Agresso user manual/v0.1/12/08/2009/CB/eng
- 99 -
Research Budget Report
A research budget is different from academic/non academic budgets in that it can span
multiple years, therefore the report will cover the lifetime of the budget, rather than year
on year.
In the reports section of
Agresso, click into the
Research Project Reports
folder and open:
Research Project Statement
The following window will open:
Bangor University/Finance/Systems Support/Agresso Training/Agresso user manual/v0.1/12/08/2009/CB/eng
- 100 -
In Selection Criteria, enter your Project Code and click Search.
The report is showing spend against budget and is subtotalled by the type of cost (i.e.
directly incurred cost, indirectly incurred cost etc.). It also shows the type of spend under
Activity.
You are able to ‘drill down’ into further detail, by selecting a report from the links boxes.
Click on the link next to an Activity and choose
Drill to Project Actuals from the drop down
menu. The following window will open:
Bangor University/Finance/Systems Support/Agresso Training/Agresso user manual/v0.1/12/08/2009/CB/eng
- 101 -
The Research Actuals screen allows you to see information by transaction.
•
•
•
•
The type of transaction (TT)
The transaction number, and the date it was posted
The text boxes allow you to view the details of the transaction
The amount spent
The information is subtotalled by account (i.e. the type of product/service purchased)
If you wish to query a transaction, you can ‘drill down’ to the individual invoice by
clicking on the TransNo.
Each transaction number is a hyperlink. Click on the
hyperlink to open details of the transaction.
Bangor University/Finance/Systems Support/Agresso Training/Agresso user manual/v0.1/12/08/2009/CB/eng
- 102 -
The screen will show the transaction listing. Click on the line you require to see
the transaction details and a scanned image of the actual invoice/documentation
(where applicable).
You can download or print the scanned invoice as required.
Bangor University/Finance/Systems Support/Agresso Training/Agresso user manual/v0.1/12/08/2009/CB/eng
- 103 -
Ordering a report
Some reports are complex and must be pre-ordered.
The report ordering menu is found in the Information Pages section.
In the Information
section of Agresso,
click into the
Finance Reports
folder and click on
the report you
require.
This guide shows a
Departmental
Report as an
example. The information
required to run your
report will be different
depending on the type of
report, but the ordering
process is exactly the
same.
Bangor University/Finance/Systems Support/Agresso Training/Agresso user manual/v0.1/12/08/2009/CB/eng
- 104 The following window will open:
Click on the
button to see the drop down menu. Select the report.
The following window will open:
Enter the required code in the Project field and tab. For a sequence of Project
codes, use %, i.e. B37% will capture information on all project codes beginning
with B37.
You must now save your request. Saving the request processes your order.
Once saved, the window will generate an order number.
Now click My
Ordered reports
Bangor University/Finance/Systems Support/Agresso Training/Agresso user manual/v0.1/12/08/2009/CB/eng
- 105 The following screen will appear:
Click anywhere on the line containing your order number (ensure status is
Finished) to download your report.
You may get a warning
message on your screen
asking you for permission
to allow the file to be
downloaded. Click Open
or Save to your PC.
Bangor University/Finance/Systems Support/Agresso Training/Agresso user manual/v0.1/12/08/2009/CB/eng
- 106 -
Transferring to Excel
You can transfer information from an Agresso enquiry or report to Microsoft Excel by using
the Copy to Clipboard button.
The benefit of using Agresso screens to run enquiries and reports is that the
data is ‘real time’. Once information has been copied over to Excel, the data
soon becomes out of date.
Before transferring to
MS Excel, set the Rows
per page to the
maximum of 1000, then check
at the foot of the page to see
how many pages of data there
are.
You can only transfer one page
at a time.
In your enquiry or report
screen, click on the Copy to
clipboard button.
Open Microsoft Excel and
choose edit>paste.
Repeat these steps for each page
of the enquiry/report, ensuring
your Excel cursor is at the correct
position when you paste
subsequent data.
Copy to Clipboard is only available through the Internet Explorer web
browser.
Bangor University/Finance/Systems Support/Agresso Training/Agresso user manual/v0.1/12/08/2009/CB/eng