1
UM1980
Getting started with osxMotionCP real-time carry position library
for X-CUBE-MEMS1 expansion for STM32Cube
Introduction
This document describes how get started with the osxMotionCP software package.
The osxMotionCP real-time carry position algorithm is provided in static library format as an add-on
software package for the X-CUBE-MEMS1 software expansion for STM32Cube. It is designed to run on
the NUCLEO-F401RE STM32 Nucleo board equipped with the X-NUCLEO-IKS01A1 Motion MEMS and
environmental sensor expansion board, or the X-NUCLEO-IKS01A1 plus the STEVAL-MKI160V1,
LSM6DS3 adapter board for standard DIL24 sockets.
The osxMotionCP library is integrated in a software package with sample applications for the above
platforms.
The software is based on STM32Cube technology. Information regarding STM32Cube is available on
www.st.com at http://www.st.com/stm32cube
November 2015
DocID028621 Rev 1
1/46
www.st.com
Contents
UM1980
Contents
1
osxMotionCP add-on library for X-CUBE-MEMS1 ......................... 4
1.1
osxMotionCP overview ...................................................................... 4
1.2
osxMotionCP architecture ................................................................. 4
1.3
osxMotionCP folder structure ............................................................ 5
1.4
osxMotionCP APIs ............................................................................ 6
1.4.1
1.5
osxMotionCP library ........................................................................... 6
Sample application ............................................................................ 7
1.5.1
Stand-alone working mode ................................................................. 8
1.5.2
PC GUI driven mode ........................................................................ 10
1.5.3
Sensors_DataLog utility.................................................................... 11
1.5.4
Data storage ..................................................................................... 16
2
Algorithm performance ................................................................. 18
3
System setup guide....................................................................... 20
3.1
3.1.1
STM32 Nucleo platform .................................................................... 20
3.1.2
X-NUCLEO-IKS01A1 expansion board ............................................ 20
3.2
Software description ........................................................................ 23
3.3
Hardware setup ............................................................................... 23
3.4
Software setup ................................................................................ 23
3.5
4
Hardware description ...................................................................... 20
3.4.1
Development tool-chains and compilers .......................................... 23
3.4.2
PC utility ........................................................................................... 23
System setup .................................................................................. 23
3.5.1
STM32 Nucleo and sensor expansion boards setup ....................... 24
3.5.2
Sensors_DataLog GUI setup ........................................................... 24
3.5.3
osxMotionCP installer setup ............................................................. 24
3.5.4
osxMotionCP license wizard ............................................................ 30
Appendix ........................................................................................ 41
4.1
Production license ........................................................................... 41
5
Acronyms and abbreviations ....................................................... 43
6
References ..................................................................................... 44
7
Revision history ............................................................................ 45
2/46
DocID028621 Rev 1
UM1980
List of figures
List of figures
Figure 1: osxMotionCP plus X-CUBE-MEMS1 software architecture ........................................................ 5
Figure 2: osxMotionCP package folder structure ....................................................................................... 6
Figure 3: Example x, y, z axis values ......................................................................................................... 7
Figure 4: STM32 Nucleo board connected to battery pack; jumper JP1 closed ........................................ 8
Figure 5: NUCLEO-F401RE board details.................................................................................................. 9
Figure 6: State machine ............................................................................................................................ 10
Figure 7: Windows Device Manager ......................................................................................................... 11
Figure 8: Sensors_DataLog utility screenshot 1 ....................................................................................... 12
Figure 9: Sensors_DataLog utility screenshot 2 ....................................................................................... 13
Figure 10: Sensors_DataLog utility screenshot: data upload ................................................................... 14
Figure 11: Sensors_DataLog utility screenshot: data upload ................................................................... 15
Figure 12: Sensors_DataLog utility screenshot: data upload ................................................................... 16
Figure 13: Board vs phone orientation ...................................................................................................... 18
Figure 14: STM32 Nucleo board ............................................................................................................... 20
Figure 15: STM32 Nucleo board ............................................................................................................... 21
Figure 16: LSM6DS3 adapter board ......................................................................................................... 22
Figure 17: Sensor expansion board and adapter connected to the STM32 Nucleo ................................ 22
Figure 18: osxMotionCP installer screenshot 1 ........................................................................................ 25
Figure 19: osxMotionCP installer screenshot 2 ........................................................................................ 26
Figure 20: osxMotionCP installer screenshot 3 ........................................................................................ 27
Figure 21: osxMotionCP installer screenshot 4 ........................................................................................ 28
Figure 22: osxMotionCP installer screenshot 5 ........................................................................................ 29
Figure 23: osxMotionCP installer screenshot 6 ........................................................................................ 30
Figure 24: OSX License Wizard screenshot 1 .......................................................................................... 31
Figure 25: OSX License Wizard screenshot 2 .......................................................................................... 32
Figure 26: OSX License Wizard screenshot 3 .......................................................................................... 33
Figure 27: OSX License Wizard screenshot 4 .......................................................................................... 34
Figure 28: OSX License Wizard screenshot 5 .......................................................................................... 35
Figure 29: OSX License Wizard screenshot 6 .......................................................................................... 36
Figure 30: OSX License Wizard screenshot 7 .......................................................................................... 37
Figure 31: OSX License Wizard screenshot 8 .......................................................................................... 38
Figure 32: OSX License Wizard screenshot 9 .......................................................................................... 39
Figure 33: OSX License Wizard screenshot 10 ........................................................................................ 40
Figure 34: OSX License Wizard screenshot 11 ........................................................................................ 41
Figure 35: OSX License Wizard screenshot 12 ........................................................................................ 42
DocID028621 Rev 1
3/46
osxMotionCP add-on library for X-CUBE-MEMS1
UM1980
1
osxMotionCP add-on library for X-CUBE-MEMS1
1.1
osxMotionCP overview
The osxMotionCP is a middleware component for the X-CUBE-MEMS1 software that
makes use of the 3D accelerometer sensor only.
The software runs on the STM32 microcontroller and includes drivers to recognize the
available inertial sensors (currently LSM6DS0 or LSM6DS3).
The acronym CP stands for Carry Position, as this software recognizes and provides realtime information about how the user is carrying the board; i.e., the phone carry position:
on desk;
in hand;
near head;
shirt pocket;
trouser pocket;
arm swing;
all of which represent typical phone carry positions.
It is built on the STM32Cube software platform to facilitate portability across different
STM32 microcontrollers.
The key package features include:
complete middleware to build applications specifically for LSM6DS0 or LSM6DS3
motion sensor accelerometer sections;
osxMotionCP carry position middleware (under open.MEMS license)
easy portability across different MCU families, thanks to STM32Cube
sample application to detect carry and optionally transmit sensor and detected data to
a PC
sample implementation available for the X-NUCLEO-IKS01A1 board (optionally with
the LSM6DS3 adapter board) when connected to NUCLEO-F401RE.
The software comes with driver implementation examples, running on NUCLEO-F401RE
mounted with the X-NUCLEO-IKS01A1 expansion.
1.2
osxMotionCP architecture
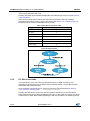
The following software layers are used by the application to access and use the sensor
expansion board:
4/46
STM32Cube HAL layer: the HAL driver layer provides a generic, multi-instance,
simple set of APIs (application programming interfaces) to interact with the upper
layers (application, libraries and stacks). It is composed of generic and extension
APIs. It is directly built around a generic architecture and allows the layers that are
built upon, such as middleware layers, to implement their functionalities avoiding
dependencies on the specific hardware configuration for a given microcontroller unit
(MCU). This structure improves library code reusability and guarantees easy
portability to other devices.
Board support package (BSP) layer: the software package needs to support all the
available peripherals on the STM32 Nucleo board apart from the MCU. This software
is included in the board support package (BSP). This is a limited set of APIs which
provides a programming interface for certain board specific peripherals; e.g., the LED,
user button, etc. This interface also helps in identifying the specific board version. If
DocID028621 Rev 1
UM1980
osxMotionCP add-on library for X-CUBE-MEMS1
the sensor expansion board is used, it provides the programming interface for various
inertial and environmental sensors. It provides support for initializing and reading
sensor data.
The diagram below outlines the software architecture of the package:
Figure 1: osxMotionCP plus X-CUBE-MEMS1 software architecture
1.3
osxMotionCP folder structure
The following folders are included in the package:
Documentation: this folder contains a compiled HTML file generated from the source
code and documenting in detail the software components and APIs (doxygen).
Middlewares: this folder contains the osxMotionCP static library binary code, the
library header file, documentation, license information plus header file for node-locked
license validation.
Projects: this folder contains a sample application used to access sensors and carry
position data, provided for the NUCLEO-F401RE platform according to three IDE
(Integrated Development Environments) proprietary formats (IAR Embedded
Workbench for ARM, µVision (MDK-ARM) toolchain, System Workbench for STM32).
DocID028621 Rev 1
5/46
osxMotionCP add-on library for X-CUBE-MEMS1
UM1980
Figure 2: osxMotionCP package folder structure
1.4
osxMotionCP APIs
Detailed technical information fully describing the functions and parameters of the
osxMotionCP APIs can be found in the osxMotionCP_Package.chm compiled HTML file
located in the Documentation folder of the software package.
The osxMotionCP is provided as a node-locked library which allows derivative firmware
images to run on a specific STM32 Nucleo device only. Licensing activation codes must be
requested from ST and included in the project (and become part of the build process) prior
to attempting its usage. The resulting firmware binary image will therefore be node-locked.
For complete information about the open.MEMS license agreement, please refer to the
license file located in the Middlewares/ST/STM32_OSX_MotionCP_Library folder.
1.4.1
osxMotionCP library
The osxMotionCP is a real time carry position software solution. The algorithm only
manages the data acquired from the accelerometer, at the low sampling frequency of 50
Hz to reduce host platform power consumption.
The exposed APIs of the osxMotionCP library are listed below:
6/46
uint8_t osx_MotionCP_GetLibVersion(char *version);
retrieves the revision of the included core engine;
uint8_t osx_MotionCP_Initialize (void);
performs osxMotionCP initialization and setup of the internal mechanism used for
node-locking (See Section 3.5.3: "osxMotionCP installer setup"). The output for
correct or incorrect initialization is 1 or 0 respectively (e.g., 0 is returned for
license errors);
void osx_MotionCP_SetOrientation_Acc const char
*acc_orientation);
this function is used to set the accelerometer data orientation; library
configuration is usually performed immediately after the
osx_MotionCP_Initialize function call.
The required input is a pointer to a string of three characters indicating the
direction of each of the positive orientations of the reference frame used for
accelerometer data output, in the sequence x, y, z. Valid values are: n (north) or s
(south), w (west) or e (east), u (up) or d (down).
As shown in the figure below, the X-NUCLEO-IKS01A1 accelerometer sensor
has an ENU orientation (x - East, y - North, z - Up), so the string is: “enu”, while
the accelerometer sensor in STEVAL-MKI160V1 is NWU (x-North, y-West, z-Up):
“nwu”.
DocID028621 Rev 1
UM1980
osxMotionCP add-on library for X-CUBE-MEMS1
Figure 3: Example x, y, z axis values
1.5
osx_MCP_output_t osx_MotionCP_Update (osx_MCP_input_t *data_in);
The required input is a pointer to a structure containing the three axis
accelerometer data expressed in [g]; the output is osx_MCP_output_t,
indicating the carry position code and is an enum.
Sample application
The osxMotionCP middleware can be easily manipulated to build user applications; an
application example is provided in the Projects folder.
It is designed to run on a NUCLEO-F401RE board connected to an X-NUCLEO-IKS01A1
board (based on LSM6DS0), or a NUCLEO-F401RE board connected to an X-NUCLEOIKS01A1 plus a STEVAL-MKI160V1 board (based on LSM6DS3).
The algorithm recognizes the position in which the board is carried; recognized positions
are the typical phone carrying positions like on desk, in hand, near head, shirt pocket,
trousers pocket and arm swinging.
The detected positions are stored in the board for offline analysis or may be displayed in
real time through a GUI. In the former case, the application runs in stand-alone mode, while
in the latter, it runs in PC GUI driven mode.
Stand-alone mode
In stand-alone mode, the STM32 Nucleo board may be supplied by a portable battery pack
to make the user experience more comfortable, portable and free of any PC connections.
See Section 1.5.1: "Stand-alone working mode" for more details.
DocID028621 Rev 1
7/46
osxMotionCP add-on library for X-CUBE-MEMS1
UM1980
PC GUI driven mode
In this mode, a USB cable connection is required to transfer stored data from the MCU to a
PC, or to monitor real time data in case of PC_GUI Driven Mode. Once connected, launch
the dedicated Sensors_DataLog GUI and connect it to the STM32 Nucleo board; for more
details, refer to Section 1.5.3: "PC GUI driven mode".
Table 1 Power supply scheme
1.5.1
Power source
NUCLEO-F401RE settings
Working mode
USB PC cable
JP1 open
PC GUI driven mode or Data upload to PC
Battery pack
JP1 closed
Stand-alone
Stand-alone working mode
In stand-alone mode, the user can power the board by means of an external battery pack,
ensuring that jumper JP1 is fitted.
Figure 4: STM32 Nucleo board connected to battery pack; jumper JP1 closed
Once the board position has been recognized, the relative data code and associated time
tag are logged in the MCU memory. The last recognized carry position information can be
read from the flashing sequence of the on-board LED. Moreover, the entire acquisition may
be transferred to a PC with a specific GUI for subsequent offline analysis.
8/46
DocID028621 Rev 1
UM1980
osxMotionCP add-on library for X-CUBE-MEMS1
Figure 5: NUCLEO-F401RE board details
The above figure shows the user button B1 and the three LEDs of the NUCLEO-F401RE
board. Once the board is powered, LED LD3 (PWR) turns ON and the tricolor LED LD1
(COM) begins blinking slowly due to the missing USB enumeration (refer to user manual
UM1724 STM32 Nucleo boards for further details).
When user button B1 is first pressed and LED LD2 (USER) is OFF, the system starts
acquiring data from the accelerometer sensor and detects the current carry position of the
board; during this acquisition mode, rapid LED LD2 blinking indicates that the algorithm is
running.
Pressing button B1 a second time stops the algorithm (and the relative data storage
session) and the LED LD2 displays the carry position code according to a sequence of
flashes described in Table 2: "LED LD2 carry position codes".
DocID028621 Rev 1
9/46
osxMotionCP add-on library for X-CUBE-MEMS1
UM1980
By pressing the button B1 a third time, the system goes in standby mode; i.e., the algorithm
is not running and LED LD2 is off.
Pressing the button again initiates the algorithm and data storage once more (see Figure 6:
"State machine").
If the LED LD2 is ON after powering the board, this represents a warning message
indicating that the flash memory is full or almost full (see Section 1.5.4: "Data storage") or
the library has an incorrect embedded license number.
Table 2 LED LD2 carry position codes
Carry position
LED LD2 blinking sequence (5 s interval)
Unknown position
0
On desk
1
In hand
2
Near head
3
Shirt pocket
4
Trouser pocket
5
In arm swing
6
Figure 6: State machine
1.5.2
PC GUI driven mode
In PC GUI driven mode, the board is powered through a PC USB connection. This
operating mode allows the user to display real-time board position, sensor data and time
information with a dedicated GUI.
Once the board is powered, launch Sensors_DataLog.exe as described in Section
1.5.3: "Sensors_DataLog utility".
Pressing the Start button on the GUI, the carry position algorithm runs and the carried
board position and sensor data is displayed on the GUI. In this mode, the data is not stored
in MCU memory flash. More details regarding the GUI are provided in the following section.
10/46
DocID028621 Rev 1
UM1980
1.5.3
osxMotionCP add-on library for X-CUBE-MEMS1
Sensors_DataLog utility
The osxMotionCP software package for STM32Cube uses the Windows Sensors_DataLog
utility of the STM32CubeExpansion_MEMS1 package in the
ROOT_DIR\Utilities\PC_software folder.
Before using it, ensure that the necessary drivers are installed and the expansion board
and the STM32 Nucleo board is connected to the PC.
Please follow these steps:
1. Connect the STM32 Nucleo board to the PC with a USB cable (jumper JP1 not
fitted); find the ST COM port in Windows Device Manager (COM4 in the figure below)
Figure 7: Windows Device Manager
DocID028621 Rev 1
11/46
osxMotionCP add-on library for X-CUBE-MEMS1
Figure 8: Sensors_DataLog utility screenshot 1
12/46
UM1980
2. Launch Sensors_DataLog.exe and check that the COM Device number is correct.
DocID028621 Rev 1
UM1980
osxMotionCP add-on library for X-CUBE-MEMS1
3. At this point, you need to choose from the two possible operating modes shown
below:
Figure 9: Sensors_DataLog utility screenshot 2
DocID028621 Rev 1
13/46
osxMotionCP add-on library for X-CUBE-MEMS1
Figure 10: Sensors_DataLog utility screenshot: data upload
14/46
UM1980
4a. If the board is stand-alone mode and user wants to retrieve stored data, press
Upload CP Data to upload the stored carried position data to the PC GUI. This
operation automatically deletes acquired data from microcontroller. The figure below
shows how the data is arranged in Time, Carry Position Code and Description
columns. Carry positions with a duration of less than 20 seconds are not memorized.
A closer look at our example reveals that the user took the board from the desk, held it
in his or her hand for approx. 40 s, and then put on the desk again.
5a. Press the Save CP Data button in the figure below to save the uploaded data in a
.tsv file located in a new folder called SensorsDataLog. The acquired data may be
exported and plotted in an Excel file.
DocID028621 Rev 1
UM1980
osxMotionCP add-on library for X-CUBE-MEMS1
OR
4b. If in PC-GUI driven mode, select between the various sensors (pressure,
temperature, humidity, accelerometer, gyroscope, magnetometer) available on the
expansion board (please note that accelerometer has to be selected to make Carried
Position check box available), and press the “Start” button to commence the
acquisition and position computation session. Sensor data and Carried Position
information will be shown as in the figure below.
Figure 11: Sensors_DataLog utility screenshot: data upload
DocID028621 Rev 1
15/46
osxMotionCP add-on library for X-CUBE-MEMS1
UM1980
5b. Once acquisition has stopped, the user can save the log in a file in the
"SensorsDataLog" folder with the "Save" button, or clear it with the "Clear" button, as
shown below.
Figure 12: Sensors_DataLog utility screenshot: data upload
1.5.4
Data storage
The application example, when running in standalone mode, allows the user to detect the
board position and store it in MCU flash memory. Data is automatically saved every 5
minutes to avoid excessive data loss in case of an unforeseen power fault. Data is also
immediately stored when the user stops acquisition by pressing button B1.
When stored data is retrieved via the GUI (see Section 1.5.3: "Sensors_DataLog utility"),
the MCU flash sector dedicated to this purpose is cleared.
LED LD2 should be OFF at power-on, unless:
the flash memory is full or almost full
the license number is incorrect
In the first case, the user can continue using the board for normal carry position recognition
and data storage (if enough space is available) as described in Section 1.5.1: "Stand-alone
working mode", by pushing the user button (LED switches off in 5 seconds). Data
continues to be stored until the reserved sector is full, at which time the algorithm keeps
running, but data is no longer stored.
The flash sector dedicated to data storage is 128 KB, allowing memorization of more than
16,000 data sets, this equates to:
16/46
DocID028621 Rev 1
UM1980
osxMotionCP add-on library for X-CUBE-MEMS1
a minimum of 91 hours (carry position changes and a new buffer is stored every 20
seconds)
a maximum of 1365 hours (carry position never changes and data is automatically
stored every 5 minutes).
If LED LD2 switches ON at reset, no more than 1400 Bytes are free; i.e., from one hour
recording time if data is stored every 20 seconds to 15 hours if data is automatically saved
every five minutes.
If a large amount of data needs to be stored and no PC is available for data download and
flash memory clean up, the MCU memory can be erased when LED LD2 is ON by holding
the user push button down for at least 5 seconds. LED LD2 switches OFF and then starts
blinking to indicate that acquisition mode has been activated and the carry position data
stored in the MCU has been erased.
If, notwithstanding the above operation, LED LD2 does not switch OFF, it means that the
license number is wrong. In this case no action is allowed and the user must program the
STM32 Nucleo board with the correct license number (see Section 3.5.4: "osxMotionCP
license wizard"for details on how to obtain a license).
DocID028621 Rev 1
17/46
Algorithm performance
2
UM1980
Algorithm performance
The carry position (CP) algorithm only uses data from the accelerometer and runs at a low
frequency (50 Hz) to reduce power consumption.
The detected position is a typical phone carry position as the algorithm is sensitive to
orientation in particular for in hand and near head positions. Some other carry positions,
like arm swing, trouser pocket are only detected when the person is walking.
When replicating phone activity with the NUCLEO-F401RE board, ensure the USB
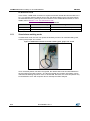
connector is oriented downwards, as it would be on an ordinary phone, see the figure
below.
Figure 13: Board vs phone orientation
18/46
DocID028621 Rev 1
UM1980
Algorithm performance
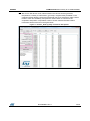
The table below shows the performance of the CP algorithm in terms of recognition
accuracy.
Table 3 Algorithm performance
Carry
position
Detection
accuracy
Best performance
Vulnerable
On desk
100%
Normal use cases when phone is on
desk
Vulnerable to sustained
vibrations like banging on desk
or continuously tapping on phone
92.7%
Correct orientation; i.e., natural phone
carrying positions in hand while
looking, reading or texting.
Robust for stationary and walking and
fast walking scenarios.
Horizontal orientation/panorama
orientation are not considered
Near
head
98.2%
Correct orientation (i.e. carrying
phone while talking on it)
Robust for stationary and walking and
fast walking scenarios.
Wrong orientation
Shirt
pocket
94.9%
Robust for walking and fast walking
scenarios.
For stationary scenarios, the
posture of the torso determines
the performance of the algorithm
Trouser
pocket
99.8%.
Robust for walking scenarios, for both
front and back trouser pocket and
multiple orientations in which the
phone can be carried while putting in
trouser pocket.
Stationary
Arm
swing
99.3%
Walking
Stationary
In hand
DocID028621 Rev 1
19/46
System setup guide
UM1980
3
System setup guide
3.1
Hardware description
This section describes the hardware components required to develop a sensor-based
application.
3.1.1
STM32 Nucleo platform
The STM32 Nucleo boards represent an affordable and flexible solution for users to
implement new ideas and build prototypes with any STM32 microcontroller lines. Arduino™
connectivity support and ST Morpho headers make it easy to expand the functionality of
the STM32 Nucleo open development platform with a wide range of specialized expansion
boards.
The STM32 Nucleo board does not require any separate probes as it integrates the STLINK/V2-1 debugger/programmer, and it is bundled with the STM32 comprehensive
software HAL library together with various packaged software examples.
Information about the STM32 Nucleo boards is available on www.st.com at:
http://www.st.com/stm32nucleo
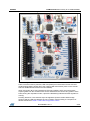
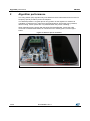
Figure 14: STM32 Nucleo board
3.1.2
X-NUCLEO-IKS01A1 expansion board
The X-NUCLEO-IKS01A1 figured below is a sensor expansion board for use with the
STM32 Nucleo system. It is also compatible with the Arduino UNO R3 connector layout,
and is designed around the STMicroelectronics humidity (HTS221), pressure (LPS25HB)
20/46
DocID028621 Rev 1
UM1980
System setup guide
and motion sensors (LIS3MDL and LSM6DS0). The X-NUCLEO-IKS01A1 interfaces with
the STM32 MCU via an I²C pin, and the user can change the default I²C address and the
device IRQ by changing one resistor on the evaluation board.
Figure 15: STM32 Nucleo board
Information about the X-NUCLEO-IKS01A1 expansion board is available on www.st.com
at: http://www.st.com/x-nucleo.
The LSM6DS3 adapter board in the figure below can be plugged on top of the X-NUCLEOIKS01A1 expansion board, as shown in Figure 17: "Sensor expansion board and adapter
connected to the STM32 Nucleo".
DocID028621 Rev 1
21/46
System setup guide
UM1980
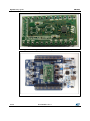
Figure 16: LSM6DS3 adapter board
Figure 17: Sensor expansion board and adapter connected to the STM32 Nucleo
22/46
DocID028621 Rev 1
UM1980
3.2
System setup guide
Software description
The following software components are required to set up a suitable development
environment for creating applications using the osxMotionCP library for the STM32 Nucleo,
equipped with the sensor expansion board:
3.3
X-CUBE-MEMS1: an expansion for STM32Cube dedicated to sensor application
development. The X-CUBE-MEMS1 firmware and related documentation is available
on st.com.
osxMotionCP: an add-on software package for X-CUBE-MEMS1 that provides carry
position APIs. The osxMotionCP firmware and relative documentation is available on
st.com.
Development tool-chain and compiler: The STM32Cube expansion software supports
the following three IDEs:
IAR Embedded Workbench for ARM® (EWARM) toolchain + ST-LINK
µVision(MDK-ARM) toolchain + ST-LINK
System Workbench for STM32
Hardware setup
The following hardware components are required:
3.4
One STM32 Nucleo development platform (order code: NUCLEO-F401RE)
One sensor expansion board (order code: X-NUCLEO-IKS01A1) optionally mounted
with the LSM6DS3 adapter board (order code: STEVAL-MKI160V1)
One USB type A to Mini-B USB cable to connect the STM32 Nucleo to the PC
One battery pack to run the application example
Software setup
This section lists the minimum requirements for the developer to set up the SDK, run the
sample testing scenario based on the GUI utility and customize applications.
3.4.1
Development tool-chains and compilers
Please select one of the integrated development environments supported by the
STM32Cube expansion software, and read the system requirements and setup information
provided by the selected IDE provider.
3.4.2
PC utility
The Sensors DataLog utility for PC has following minimum requirements:
3.5
PC with Intel or AMD processor running one of the following Microsoft operating
systems:
Windows XP SP3
Windows Vista
Windows 7
At least 128 MBs of RAM
2 X USB ports
40 MB of hard disk space
System setup
This section describes how to set up different hardware components before writing and
executing an application on the STM32 Nucleo board with the sensor expansion board.
DocID028621 Rev 1
23/46
System setup guide
3.5.1
UM1980
STM32 Nucleo and sensor expansion boards setup
The STM32 Nucleo board includes the ST-LINK/V2-1 debugger/programmer. The
developer can download the relevant version of the ST-LINK/V2-1 USB driver by accessing
the STSW-LINK008 or STSW-LINK009 on www.st.com (according to which MS Windows
OS is used).
The sensor expansion board X-NUCLEO-IKS01A1 can be easily connected to the STM32
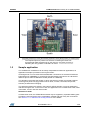
Nucleo motherboard through the Arduino UNO R3 extension connector (see Figure 17:
"Sensor expansion board and adapter connected to the STM32 Nucleo"). The LSM6DS3
adapter board (STEVAL-MKI160V1) is plugged on top of the expansion board. The sensor
expansion boards are capable of interfacing with the external STM32 microcontroller on the
STM32 Nucleo via an inter-integrated circuit (I²C) transport layer.
3.5.2
Sensors_DataLog GUI setup
The Sensors_DataLog GUI included in the X-CUBE-MEMS1 software package is a
graphical user interface that can be used to obtain carry position data previously stored on
MCU. Please see Section 1.5.3: "Sensors_DataLog utility" for a description of the how this
PC utility works.
This utility retrieves data from the connected STM32 MCU flash memory and stores it in a
table format which can be exported for offline analysis, and can also be used to monitor
real time data from sensors and carry position software.
In order to use the Sensors_DataLog GUI, the user has to correctly set up the hardware
and software.
The utility can be launched by simply double-clicking on the Sensors_DataLog.exe file,
located in the "Utilities\PC_software\Sensors_DataLog" folder.
3.5.3
osxMotionCP installer setup
The osxMotionCP software package is equipped with a Windows installer
(osxMotionCP_Setup_vXXX.exe), which guides the user through the software package
installation. The installer also includes the OSX License Wizard tool, which allows the user
to automatically obtain a valid node-locked license for his or her STM32 Nucleo board. The
installer for this wizard is described in Section 3.5.4: "osxMotionCP license wizard".
24/46
DocID028621 Rev 1
UM1980
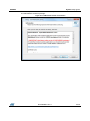
System setup guide
1
Before running the installer, download the latest release of the X-CUBEMEMS1
software package and unzip this package in the relative workspace. For example, if the
X-CUBE-MEMS1 package is located in
"C:\workspace\STM32CubeExpansion_MEMS1", the installer will display welcome
window shown in the figure below.
Figure 18: osxMotionCP installer screenshot 1
DocID028621 Rev 1
25/46
System setup guide
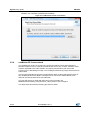
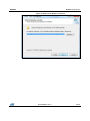
2 The license agreement must be accepted, as shown in the figure below.
Figure 19: osxMotionCP installer screenshot 2
26/46
DocID028621 Rev 1
UM1980
UM1980
System setup guide
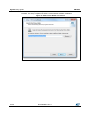
3
The installer provides information such as the requirements of the latest release of the
X-CUBE-MEMS1 software package.
Figure 20: osxMotionCP installer screenshot 3
DocID028621 Rev 1
27/46
System setup guide
UM1980
4 The installer then asks for the destination location of the osxMotionCP library.
Figure 21: osxMotionCP installer screenshot 4
28/46
DocID028621 Rev 1
UM1980
System setup guide
5
The user must then provide the path to the X-CUBE-MEMS1 package. It is imperative
to insert the correct path to the X-CUBEMEMS1 package, otherwise the sample
application will not compile. It is the path where the folders "Documentation", "Projects",
"Drivers", "Utilities", etc.., contained in the X-CUBE-MEMS1 software package are
located. In this example, it is "C:\workspace\STM32CubeExpansion_MEMS1".
Figure 22: osxMotionCP installer screenshot 5
DocID028621 Rev 1
29/46
System setup guide
UM1980
6 The user must then provide the path to the Start menu folder where the shortcuts are
installed. This completes osxMotionCP installation.
Figure 23: osxMotionCP installer screenshot 6
3.5.4
osxMotionCP license wizard
The osxMotionCP engine is provided as a node-locked library which allows derivative
firmware images to run on a specific STM32 Nucleo device only. License activation codes
must be requested to ST and included in the project (and becomes part of the build
process) prior to attempting its usage. The resulting firmware binary image will therefore be
node-locked.
The License wizard allows the user to automatically obtain a valid node-locked license for
their STM32 Nucleo board. Before running this tool, connect the STM32 Nucleo to be
linked to the node-locked license via USB cable.
The user will receive an email with the license to be included in the
Middlewares\ST\STM32_OSX_MotionCP_Library folder of the workspace.
The steps below describe the licensing procedure in detail.
30/46
DocID028621 Rev 1
UM1980
System setup guide
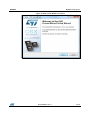
1
The figure below shows the welcome screen.
Figure 24: OSX License Wizard screenshot 1
DocID028621 Rev 1
31/46
System setup guide
UM1980
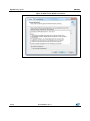
2 The user needs to accept the license agreement to proceed with the installation.
Figure 25: OSX License Wizard screenshot 2
32/46
DocID028621 Rev 1
UM1980
System setup guide
3
The wizard then asks for the destination location of the OSX License Wizard.
Figure 26: OSX License Wizard screenshot 3
DocID028621 Rev 1
33/46
System setup guide
UM1980
4 The user must then provide the path to the Start menu folder where the shortcuts are
installed. This step completes the OSX License Wizard software installation.
Figure 27: OSX License Wizard screenshot 4
34/46
DocID028621 Rev 1
UM1980
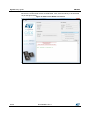
System setup guide
5
The OSX License Wizard needs to access some information on the STM32 Nucleo
board in order to create the request for the node-locked license. For this reason, the
OSX License Wizard requires the installation of some additional packages ("Microsoft
VS 2013 redistributable" and "STM32 ST-LINK Utility"), if the user has not already
done so.
Figure 28: OSX License Wizard screenshot 5
DocID028621 Rev 1
35/46
System setup guide
UM1980
6 Before launching the OSX License Wizard, connect the STM32 Nucleo board to be
linked to the node-locked license via USB cable. First, select the library to be activated
as per the figure below.
Figure 29: OSX License Wizard screenshot 6
36/46
DocID028621 Rev 1
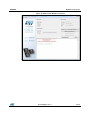
UM1980
System setup guide
7
Next click on the "Identify STM32 Nucleo board" button.
Figure 30: OSX License Wizard screenshot 7
DocID028621 Rev 1
37/46
System setup guide
UM1980
8 At this point, information about the connected STM32 Nucleo board is available to the
user together with a node code associated with the same board. Complete the "User
name", "Company" and "Email" fields and click on "Generate license request".
Figure 31: OSX License Wizard screenshot 8
38/46
DocID028621 Rev 1
UM1980
System setup guide
9
A new window concerning the license agreement will appear and user can accept the
conditions by clicking the Continue button to proceed.
Figure 32: OSX License Wizard screenshot 9
DocID028621 Rev 1
39/46
System setup guide
10 Click the "Send license request email" button shown in the figure below.
UM1980
Figure 33: OSX License Wizard screenshot 10
11
40/46
Once the license activation codes have been received, edit the content of the
osx_license.h file with the license number. You must also delete or comment the
"#error...." line, found in the Middlewares\ST\STM32_OSX_MotionCP_Library folder
of your workspace.
DocID028621 Rev 1
UM1980
Appendix
4
Appendix
4.1
Production license
Additionally a production (i.e., node-free) license can be obtained following express ST
authorization. This license is usable on any STM32-based platform, provided Cortex core
compatibility.
The request for this license type must be first authorized by ST through a user-specific
certificate. Ownership of a valid certificate will enable the end-user to initiate a production
license request, which is then automatically processed by the server.
ST will only authorize end-users to request a production license after the signing of a twoparty License User Agreement (LUA).
After signing the LUA and receiving a valid certificate, proceeds as follows:
1
In the tools menu, select “Enter Production Certificate…” and insert a valid code in the
relative window, as shown below.
Figure 34: OSX License Wizard screenshot 11
DocID028621 Rev 1
41/46
Appendix
UM1980
2
After a valid certificate has been inserted, the node-free license request flag becomes
visible and the production license can be requested. Once received, the new license
can replace the old node-locked license in the osx_license.h file.
Figure 35: OSX License Wizard screenshot 12
42/46
DocID028621 Rev 1
UM1980
5
Acronyms and abbreviations
Acronyms and abbreviations
Table 4 Acronyms and abbreviations
Acronym
Description
API
Application Programming Interface
BSP
Board Support Package
ENU
x-East, y-North, z-Up
GUI
Graphical User Interface
HAL
Hardware Abstraction Layer
IDE
Integrated Development Environments
LUA
License User Agreement
NED
x-North, y-East, z-Down
SEU
x-South, y-East, z-Up
SDK
Software Development Kit
DocID028621 Rev 1
43/46
References
6
UM1980
References
44/46
UM1859: Getting started with the X-CUBE-MEMS1 motion MEMS and environmental
sensor software expansion for STM32Cube
DB2687: Real-time Carry Position software expansion for STM32Cube
UM1724: STM32 Nucleo boards
DocID028621 Rev 1
UM1980
7
Revision history
Revision history
Table 5 Document revision history
Date
Revision
11-Nov-2015
1
DocID028621 Rev 1
Changes
First release.
45/46
UM1980
IMPORTANT NOTICE – PLEASE READ CAREFULLY
STMicroelectronics NV and its subsidiaries (“ST”) reserve the right to make changes, corrections, enhancements, modifications, and
improvements to ST products and/or to this document at any time without notice. Purchasers should obtain the latest relevant information on ST
products before placing orders. ST products are sold pursuant to ST’s terms and conditions of sale in place at the time of order
acknowledgement.
Purchasers are solely responsible for the choice, selection, and use of ST products and ST assumes no liability for application assistance or the
design of Purchasers’ products.
No license, express or implied, to any intellectual property right is granted by ST herein.
Resale of ST products with provisions different from the information set forth herein shall void any warranty granted by ST for such product.
ST and the ST logo are trademarks of ST. All other product or service names are the property of their respective owners.
Information in this document supersedes and replaces information previously supplied in any prior versions of this document.
© 2015 STMicroelectronics – All rights reserved
46/46
DocID028621 Rev 1