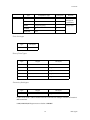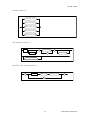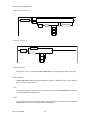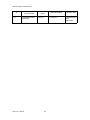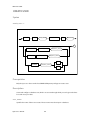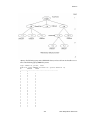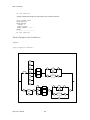
1
ALTIBASE Application Development
SQL Users’ Manual
release 5.3.3
1
ALTIBASE Application Development SQL User’s Manual
Release 5.3.3
Copyright ? 2001~2009 Altibase Corporation. All rights reserved.
This manual contains proprietary information of Altibase Corporation; it is provided under a license agreement containing restrictions
on use and disclosure and is also protected by copyright patent and other intellectual property law. Reverse engineering of the software is prohibited.
Altibase Corporation
10F, Daerung PostTower II, 182-13,
Guro-dong Guro-gu Seoul, 152-847, Korea
Telephone: +82-2-2082-1000
Fax: 82-2-2082-1099
E-mail: [email protected]
www: http://www.altibase.com
2
Contents
Preface ............................................................................................................................................................................ i
About This Manual ...................................................................................................................................................................................ii
Part I ................................................................................................................................................................................1
1. Introduction...............................................................................................................................................................2
ALTIBASE SQL Overview.........................................................................................................................................................................3
SQL Statements Classification..............................................................................................................................................................7
2. Data Types ...............................................................................................................................................................12
Overview................................................................................................................................................................................................... 13
Character Data Types ........................................................................................................................................................................... 18
Numeric Data Types ............................................................................................................................................................................. 22
Date Data Types ..................................................................................................................................................................................... 34
Binary Types............................................................................................................................................................................................. 48
LOB Data Type ........................................................................................................................................................................................ 52
Spatial Types ........................................................................................................................................................................................... 55
Part II .............................................................................................................................................................................56
3. Data Definition Statements....................................................................................................................................57
ALTER DATABASE .................................................................................................................................................................................. 58
ALTER INDEX............................................................................................................................................................................................ 65
ALTER QUEUE.......................................................................................................................................................................................... 70
ALTER REPLICATION ............................................................................................................................................................................ 71
ALTER SEQUENCE .................................................................................................................................................................................. 75
ALTER TABLE............................................................................................................................................................................................ 77
ALTER TABLESPACE............................................................................................................................................................................... 98
ALTER TRIGGER.....................................................................................................................................................................................105
ALTER USER............................................................................................................................................................................................107
ALTER VIEW............................................................................................................................................................................................109
COMMENT ..............................................................................................................................................................................................111
CREATE DATABASE .............................................................................................................................................................................113
CREATE DATABASE LINK ...................................................................................................................................................................115
CREATE DIRECTORY ............................................................................................................................................................................119
CREATE INDEX.......................................................................................................................................................................................121
CREATE QUEUE .....................................................................................................................................................................................130
CREATE REPLICATION ........................................................................................................................................................................132
CREATE SEQUENCE .............................................................................................................................................................................135
CREATE SYNONYM ..............................................................................................................................................................................142
CREATE TABLE.......................................................................................................................................................................................145
CREATE DISK TABLESPACE ...............................................................................................................................................................165
CREATE MEMORY TABLESPACE......................................................................................................................................................171
CREATE VOLATILE TABLESPACE ....................................................................................................................................................176
CREATE TEMPORARY TABLESPACE ...............................................................................................................................................180
CREATE TRIGGER ..................................................................................................................................................................................182
CREATE USER.........................................................................................................................................................................................188
CREATE VIEW .........................................................................................................................................................................................191
DROP DATABASE ................................................................................................................................................................................195
DROP DATABASE LINK .......................................................................................................................................................................197
DROP DIRECTORY ................................................................................................................................................................................198
DROP INDEX ..........................................................................................................................................................................................199
DROP QUEUE ........................................................................................................................................................................................200
DROP REPLICATION ............................................................................................................................................................................201
DROP SEQUENCE .................................................................................................................................................................................202
DROP SYNONYM ..................................................................................................................................................................................203
DROP TABLE...........................................................................................................................................................................................205
DROP TABLESPACE .............................................................................................................................................................................206
DROP TRIGGER......................................................................................................................................................................................208
DROP USER.............................................................................................................................................................................................209
1
DROP VIEW.............................................................................................................................................................................................211
GRANT......................................................................................................................................................................................................212
RENAME TABLE.....................................................................................................................................................................................226
REVOKE ...................................................................................................................................................................................................228
TRUNCATE TABLE ................................................................................................................................................................................231
4. Data Manipulation Statements............................................................................................................................233
DELETE.....................................................................................................................................................................................................234
INSERT......................................................................................................................................................................................................239
LOCK TABLE ...........................................................................................................................................................................................243
SELECT .....................................................................................................................................................................................................248
UPDATE ...................................................................................................................................................................................................280
MOVE........................................................................................................................................................................................................286
ENQUEUE ................................................................................................................................................................................................289
DEQUEUE ................................................................................................................................................................................................290
5. Data Control Statements ......................................................................................................................................293
ALTER SESSION .....................................................................................................................................................................................294
ALTER SYSTEM ......................................................................................................................................................................................297
COMMIT .................................................................................................................................................................................................299
SAVEPOINT.............................................................................................................................................................................................300
ROLLBACK ..............................................................................................................................................................................................301
SET TRANSACTION ..............................................................................................................................................................................304
Part III..........................................................................................................................................................................307
6. Set Operators.........................................................................................................................................................308
UNION......................................................................................................................................................................................................309
UNION ALL .............................................................................................................................................................................................310
INTERSECT ..............................................................................................................................................................................................311
MINUS ......................................................................................................................................................................................................312
Precedence of Operator....................................................................................................................................................................313
7. SQL Functions ........................................................................................................................................................316
Introduction to SQL Functions .......................................................................................................................................................317
Aggregate Functions..........................................................................................................................................................................319
Numeric Functions..............................................................................................................................................................................323
Character Functions............................................................................................................................................................................337
Datetime Functions ............................................................................................................................................................................353
Conversion Functions ........................................................................................................................................................................363
Other Functions ...................................................................................................................................................................................372
Encryption Functions .........................................................................................................................................................................382
8. Arithmetic Operators ............................................................................................................................................386
Arithmetic Operators .........................................................................................................................................................................387
Unary Operators...................................................................................................................................................................................388
Binary Operations................................................................................................................................................................................389
Concatenation Operator...................................................................................................................................................................391
CAST Operator .....................................................................................................................................................................................392
9. SQL Conditions ......................................................................................................................................................394
SQL Conditions.....................................................................................................................................................................................395
Logical Conditions...............................................................................................................................................................................397
Simple Comparison Conditions......................................................................................................................................................400
Other Conditions .................................................................................................................................................................................402
AppendixA. Schema..................................................................................................................................................412
Information about Example Tables...............................................................................................................................................412
E-R Diagram and Sample Data........................................................................................................................................................416
Maximum Values of Altibase Objects...........................................................................................................................................421
2
Preface
i
Preface
About This Manual
About This Manual
This manual provides how to use SQL statement to access the database.
Target Users
This manual could be useful for the following Altibase users.
•
Database administrators
•
Application designers
•
Programmers
Before reading this manual, understanding of following background knowledge is recommended.
•
Basic knowledge required for computers, operating systems, and operating system command
•
Experience in using the relational database or understanding of the database concepts
•
Computer programming experience
Software environment
This manual has been prepared assuming Altibase 5.3.3 is in use as the database server.
Organization
This manual has been organized as follows:
•
Chapter 1 Introduction to Altibase SQL
This chapter provides the overview, classification and structure of Altibase SQL.
•
Chapter 2 Data Types
This chapter describes data types that are provided by Altibase.
•
Chapter 3 Data Definition Language
This chapter describes Data Definition Language (DDL) that can be used with Altibase.
•
Chapter 4 Data Manipulation Language
This chapter describes Data Manipulation Language (DML) that can be used with Altibase.
•
Chapter 5 Data Control Language
This chapter describes Data Control Language (DCL) that can be used with Altibase.
•
Chapter 6 Set Operators
This chapter describes set operators that can be used with Altibase.
SQL Users’ Manual
ii
About This Manual
•
Chapter 7 Functions
This chapter describes functions that are provided by Altibase.
•
Chapter 8 Arithmetic Operators
This chapter describes arithmetic operators that can be used with Altibase.
•
Chapter 9 Conditional Operators
This chapter describes conditional operators that can be used with conditional SQL statements in
Altibase.
•
Appendix A. Schema
This chapter describes example table information, ER diagrams and sample data.
Convention
This chapter describes the rules of this manual. With understanding of this rule, it is easy to search
information in this manual and other manuals.
Rules are as follows:
•
Syntax diagram
•
Sample code rule
Syntax diagram
This manual describes the command syntax using the diagram composed of the following elements:
Elements
semantics
The command starts. The syntax element which is not a complete command starts with an arrow.
Reserved
word
The command continues in the next line. The syntax element
which is not a complete command terminates with this symbol.
The command continues from the previous line. The syntax
element which is not a complete command starts with this
symbol.
End of a statement.
;
iii
Preface
About This Manual
Elements
semantics
Mandatory
SELECT
Optional
NOT
Mandatory field with optional items Only one field must be
provided.
ADD
DROP
Optional field with optional item
ASC
DESC
Optional Multiple fields are allowed. The comma must be in
front of every repetition.
ASC
DESC
,
Sample code rule
The code example explains SQL, stored procedure, iSQL, or other command line syntax.
The following table describes the printing rules used in the code example.
Rules
semantics
Example
[]
Displays the optional fields.
VARCHAR [(size)] [[FIXED |]
VARIABLE]
{}
Displays the mandatory fields.
Specifies a field that requires selection of more than one item.
{ ENABLE | DISABLE | COMPILE }
SQL Users’ Manual
iv
About This Manual
Rules
semantics
Example
|
Argument indicating optional or
mandatory fields
{ ENABLE | DISABLE | COMPILE
}[ ENABLE | DISABLE | COMPILE
]
...
Repetition of the previous argumentSpecifies the omission of the
example codes.
SQL> SELECT ename FROM
employee;
ENAME
-----------------------SWNO
HJNO
HSCHOI
...20
rows selected.
Other symbols
Other Symbols
EXEC :p1 := 1;
acc NUMBER(11,2);
Italicized words
Syntax variable to be defined by
the user, location identifier that
must be provided with special values
SELECT * FROM table_name;
CONNECT userID/password;
Lower case words
Program elements provided by the
user such as table names, column
names, file names, etc.
SELECT ename FROM
employee;
Upper case words
Elements provided by the system
or keyword appearing in the syntax
DESC SYSTEM_.SYS_INDEX_;
Related data
For more detailed information, see the following document list.
•
Altibase Installation User’s Manual
•
Altibase Administrator’s Manual
•
Altibase Replication User’s Manual
•
Altibase Precompiler User’s Manual
•
Altibase ODBC User’s Manual
•
Altibase Application Program Interface User’s Manual
•
Altibase iSQL User’s Manual
•
Altibase Utilities User’s Manual
•
Altibase Error Message Reference
v
Preface
About This Manual
Online Manual
Korean and English versions of on-line manuals (PDF or HTML) are available from Altibase Technical
Center (http://atc.altibase.com/).
Altibase Welcomes Your Opinions!
Please send us your comments and suggestions regarding this manual. Your comments and suggestions are important, and they may be used to improve future versions of the manual. When you send
your feedback, please make sure to include the following information:
•
The name and version of the manual in use
•
Your comments or suggestions regarding the manual
•
Your name, address, and phone number
Please send your e-mail to the following address:
[email protected]
This address is intended to report any errors or omissions discovered in the manual. When you need
an immediate assistance regarding technical issues, please contact Altibase Customer Support Center.
We always appreciate your comments and suggestions.
SQL Users’ Manual
vi
Part I
•
Chapter1.Introduction
•
Chapter2.Data Types
1
1 Introduction
2
Introduction
ALTIBASE SQL Overview
ALTIBASE SQL Overview
SQL statements are a kind of programming language. SQL statements define data objects and
manipulate the data in a database. This section describes characteristics of Altibase SQL.
Enhancements
•
Query performance
Altibase has an optimized execution plan tree used during the preparation process, which is
used repeatedly for greatly improved execution speed. This method is useful for the application that has frequent Data Manipulation Language (DML) operation when the Data Definition
Language (DDL) is rarely executed after the initial database scheme is created.
•
Support for SQL/92 standard
Altibase SQL fully complies with SQL/92 standard so that users can easily use the Altibase.
•
Powerful subquery
The subquery is generally used in the expression of SELECT statement or used in CREATE
TABLE ~ AS SELECT, INSERT~ AS SELECT statements. Most of the sub-queries used here are to
retrieve multiple records of multiple columns. The subquery can be useful for complicated
applications.
•
Built-in functions
Altibase supports various built-in functions in addition to the SQL/92 standard specifications.
Query Optimizer and Execution Plans
The efficient SQL statement makes better system performance. Therefore, a good understanding of
the database SQL processing procedures is necessary for writing optimal SQL. This is especially true
for high transaction processing systems. Altibase server’s SQL processing steps are like followings;
Determination Step
When a SQL statement is executed on an Altibase database, the Altibase query optimizer determines the most efficient execution plan after considering many factors related to the objects referenced and the conditions specified in the query. This determination is an important step in the
processing of any SQL statement and can greatly affect execution time.
Evaluation Step
During the evaluation process, the query optimizer reads statistics gathered on the system to determine the best data access path and other considerations. You can override the execution plan of the
query optimizer with hints inserted in SQL statement.
SQL Users’ Manual
3
ALTIBASE SQL Overview
Execution Step
Execution step is the real data processing step to make result for a SQL statement. During the execution step, Altibase manipulates database objects referenced by the SQL statement according to the
explain plans.
This manual is a reference for Altibase SQL syntax and usages. If you want more information about
SQL performance and optimal SQL statements, see the SQL tuning chapter of Administrator’s manual.
Comments Syntax
You can use following two types of comment string in the SQL statement;
•
/* */
Start with ‘/*’ and end with ‘*/’ in the same format in the C Language. The comment may be in multiple lines.
•
--
Write dash twice for one-line comments.
ALTIBASE Object
Usually, the SQL statements are to manipulate data in database objects and to modify or create
database objects. Data objects provided by Altibase are divided into schema objects and nonschema objects as following:
Schema Object
•
Constraints
•
Index
•
Sequences
•
Synonyms
•
Tables
•
Stored procedures
•
Views
•
Triggers
•
Database Link
Non-schema Object
•
Users
4
Introduction
ALTIBASE SQL Overview
•
Replications
•
Tablespaces
•
Data Directory
Because table, view, sequence, synonym and stored procedure have the same namespace, there
cannot be an object with the same name. All other objects have their own namespace.
Altibase objects should have a unique name under a user name. Therefore, a restriction should also
have a unique name not just within a table but under a user.
The length of an object name can be up to 40 bytes, and it is not case-sensitive.
For more information on objects, please refer to Administrator’s Manual.
Restrictions
Object Name
There are not their objects which have the same names, because table, view, sequence, synonym,
and stored procedure have the same name space. But each one of other objects except them has his
own name space. The objects of Altibase must have the unique ones of the names for each users.
Thus, the name is unique value not for each table but for each user. The maximum length of the
object name is 40bytes, this is 40 characters, and you can use only from A to Z, from a to z, from 0 to
9, _ and $ except the reserved words of Altibase. Refer to the following for the reserved words of
Altiabse. The first letter must be the character. Refer to Administrator’s Manual for the object.
Password
The password for connecting to Altibase also has restrictions similar to them of object name. You
can use only from A to Z, from a to z, from 0 to 9, _ and $ except the reserved words of Altibase. The
first letter must be the character and the maximum length of password is from 8 characters to 40
characters depending on the operating system.
Reserved Words
The following words are reserved in Altibase, and cannot be used as database object names. You
need consider it when you create database objects and write SQL statements.
ADD
AND
ASC
BY
CHECK
COMMIT
CONSTRAINT
CREATE
CYCLE
DEFAULT
DISCONNECT
ELSE
SQL Users’ Manual
ALL
ANY
BEGIN
CASCADE
CLOSE
CONNECT
CONSTRAINTS
CUBE
DATABASE
DELETE
DISTINCT
ELSEIF
ALTER
AS
BETWEEN
CASE
COLUMN
CONSTANT
CONTINUE
CURSOR
DECLARE
DESC
DROP
ELSIF
5
ALTIBASE SQL Overview
END
EXEC
EXIT
FETCH
FOREIGN
FUNCTION
GRANT
HAVING
IN
INSERT
IS
KEY
LIKE
LOOP
MODE
NOCYCLE
OFF
OPEN
OTHERS
PRIMARY
PROCEDURE
REFERENCES
REPLICATION
REVERSE
ROLLBACK
ROWCOUNT
SELECT
SET
SQLCODE
STEP
TABLE
THEN
TRIGGER
UNION
UPDATE
VARIABLE
WHEN
WITH
ESCAPE
EXECUTE
EXTENTSIZE
FIXED
FROM
GET
GROUP
IDENTIFIED
INDEX
INTERSECT
ISOLATION
LEFT
LIMIT
MAXROWS
NATIVE
NOT
OFFLINE
OR
OUT
PRIOR
RAISE
RENAME
RESTRICT
REVOKE
ROLLUP
ROWTYPE
SEQUENCE
SETS
SQLERRM
SYNONYM
TABLESPACE
TO
TRUE
UNIQUE
USER
VIEW
WHERE
WORK
EXCEPTION
EXISTS
FALSE
FOR
FULL
GOTO
GROUPING
IF
INNER
INTO
JOIN
LEVEL
LOCALUNIQUE
MINUS
NO
NULL
ON
ORDER
OUTER
PRIVILEGES
READ
REPLACE
RETURN
RIGHT
ROW
SAVEPOINT
SESSION
SOME
START
SYSTEM
TEMPORARY
TRANSACTION
TRUNCATE
UNTIL
VALUES
WAIT
WHILE
SWRITE
6
LOCK
Introduction
SQL Statements Classification
SQL Statements Classification
SQL statements in Altibase can be classified as following:
Data Definition Language (DDL)
Data Manipulation Language (DML)
Data Control Language (DCL)
This chapter introduces the SQL statement briefly.
Data Definition Language(DDL)
DDL is a language used by a database system which allows users to define the database, specifying
datatypes, structures and constraints on the data.
SQL statement
Description
ALTER DATABASE
Changes a database.
ALTER INDEX
Changes Index name
ALTER REPLICATION
Changes or rebuilds an existing replication object.
ALTER SEQUENCE
Changes or rebuilds an existing sequence object.
ALTER TABLE
Changes or rebuilds an existing table.
ALTER TABLESPACE
Changes or rebuilds an existing tablespace.
ALTER TRIGGER
Changes or rebuilds an existing trigger.
ALTER USER
Changes or rebuilds an existing user.
ALTER VIEW
Changes or rebuilds an existing view.
CREATE DATABASE
Creates a database.
CREATE DIRECTORY
Creates a directory object for file handling from stored
procedures.
CREATE INDEX
Creates an index on a table.
CREATE REPLICATION
Creates a replication object.
CREATE SEQUENCE
Creates a sequence generating objects.
CREATE SYNONYM
Creates an alias name for a objects
CREATE TABLE
Creates a table.
CREATE TABLE
Creates a tablespace.
CREATE TRIGGER
Creates or replaces a trigger.
SQL Users’ Manual
7
SQL Statements Classification
SQL statement
Description
CREATE USER
Creates a database user.
CREATE VIEW
Creates a view.
DROP DIRECTORY
Removes a directory object the database.
DROP INDEX
Removes an index from the database.
DROP REPLICATION
Removes a replication from the database.
DROP SEQUENCE
Removes a sequence object from the database.
DROP SYNONYM
Removes a synonym from the database.
DROP TABLE
Removes a table and its data from the database
entirely.
DROP TABLESPACE
Removes a tablespace from the database.
DROP TRIGGER
Removes a trigger from the database.
DROP USER
Removes a user and optionally removes user’s objects
and data from the database.
DROP VIEW
Removes a view from the database.
GRANT
Grants privileges to database users
RENAME
Renames a table, view, sequence, and synonym.
REVOKE
Revokes privileges from a database user.
TRUNCATE TABLE
Removes all rows from a table.
When the DDL statement is executed, the system meta-data changed also. Therefore, DDL statements will implicitly commit any outstanding transaction. In other words, when the DDL statement
is executed, the outstanding transaction will be automatically reflected although the transaction
does not commit explicitly.
Data Manipulation Language(DML)
Data Manipulation Language commands can be used to manipulate data within existing database
tables. You must specify COMMIT or ROLLBACK to complete or undo a DML transaction. If your database is in autocommit mode, the database commits every DML statement immediately.
SQL statement
Description
DELETE
Removes data from a table.
INSERT
Insert data into a table.
LOCK TABLE
Locking a table.
SELECT
Retrieves data from objects.
8
Introduction
SQL Statements Classification
SQL statement
Description
UPDATE
Change data in a table.
MOVE
Moves data from one table to another table.
ENQUEUE
Insert message into a Queue
DEQUEUE
Remove message from a Queue
Data Control Language(DCL)
System Control Statements
SQL statement
ALTER SYSTEM
Description
Changes system properties and Check point, Back up
the database.
Job Control Statements
SQL statement
ALTER SESSION
Description
Changes session properties and Controls user transactions.
Transaction Control statements
SQL statement
Description
COMMIT
Reflects current transaction to the database.
ROLLBACKorROLLBACK TO SAVEPOINT savepoint_name
Undo the work done; Undo the work done back to the
savepoint_name.
SAVEPOINT savepoint_name
Identifies a point in a transaction to which you can later
roll back.
SQL Users’ Manual
9
SQL Statements Classification
SQL statement
SET TRANSACTION
Description
Establishes the current transaction as read-only or
read/write, establish its isolation level, or assign it to a
specified rollback segment.
It is a SQL statement that is used to terminate, undo or change the isolation level of a transaction.
This SQL statement affects the current task only and does not affect other tasks.
10
Introduction
SQL Statements Classification
SQL Users’ Manual
11
2 Data Types
12
Data Types
Overview
Overview
Data Types
Datatypes provided by Altibase are as follows;
Character Data Types
Type
Length
Size
CHAR
1 ~ 32000
length + 2
VARCHAR
1 ~ 32000
length + 2
NCHAR
1~16000(UTF16)
1~10666(UTF8)
length*2 + 2(UTF16)
length*3 + 2(UTF8)
NVARCHAR
1~16000(UTF16)
1~10666(UTF8)
length*2 + 2(UTF16)
length*3 + 2(UTF8)
NCHAR and NVARCHAR are Unicode character types and length means the amount that it measures
from one end to the other along longest side of character. The length of UTF16 is different from that
of UTF8.
Numerical datatypes
Type
Non-native
Precision
Scale
NUMERIC
38
0
NUMERIC(p)
1 ~ 38
0
NUMERIC(p, s)
1 ~ 38
-84 ~ 128
DECIMAL
38
0
DECIMAL(p)
1 ~ 38
0
DECIMAL(p, s)
1 ~ 38
-84 ~ 128
NUMBER(p)
1 ~ 38
0
NUMBER(p, s)
1 ~ 38
-84 ~ 128
NUMBER
38
X
FLOAT
38
X
FLOAT(p)
1 ~ 38
X
SQL Users’ Manual
13
Size (bytes)
Remarks
3+((precision)+2)/2
* fixed decimal data* is
equal to the
DECIMAL
datatype.
3+((precision)+2)/2
* Fixed decimal datatype
Overview
Type
Native
Compatible C Type
Size (bytes)
Remarks
DOUBLE
Double
8
REAL
Float
4
Fixed decimal
datatype of
real Number
BIGINT
Long or long long
8
Integer Type
INTEGER
Int
4
SMALLINT
short
2
Date datatype
Type
DATE
Size (byte)
8
Binary Data Types
Type
Length
Size (byte)
BLOB/CLOB
1~2147483647
BYTE
1~32000
length + 2
NIBBLE
1~254
length/2 + 1
BIT
1~60576
length/8 + 4
VARBIT
1~131068
length/8 + 4
Geometry datatypes
Type
GEOMETRY
Length
Size (byte)
16~104857600
length + 56
* A size of real record is added a header information size with each datatype. A header information is
different with OS
*CHAR, VARCHAR, BYTE types means to declare a VARIABLE
14
Data Types
Overview
Notes
About fixed decimal data
Size Calculation
( 3 + ( ( p ) + 2 ) / 2 )
About the precision and scale of odd number (+1)
- NUMERIC
Example) NUMERIC(38,0)
Size = 3 + 40/2 = 23 bytes
- NUMERIC(p)/ NUMERIC(p, 0)
Example) NUMERIC(10)
Size = 3 + 12/2 = 9 bytes
- NUMERIC(p, s)
Example) NUMERIC(10, 9)
Size = 3 + 12/2 = 9 bytes
- DECIMAL : the same as NUMERIC
- DECIMAL(p) : the same as NUMERIC(p)
- DECIMAL(p,s) : the same as NUMERIC(p,s)
- NUMBER(p) : the same as NUMERIC(p)
- NUMBER(p,s) : the same as NUMERIC(p,s)
About fixed decimal datatype
Size Calculation
( 3 + ( ( p
- FLOAT
Example)
Size = 3
- FLOAT(p)
Example)
Size = 3
- NUMBER :
) + 2 ) / 2 )
FLOAT(38)
+ 40/2 = 23 bytes
FLOAT(20)
+ 22/2 = 14 bytes
the same as FLOAT
NULL
Use a null for inserting rows into table when the actual value is not known or when a value would
not be meaningful. In other words, null indicates that values aren't existed. Therefore, it is different
from 0 or blank and is treated specially for comparative operation or saving.
If null is included in numerical formula of some operation, the result of last operation is null without
NVL(), IS NULL, IS NOT NULL condition. In other words, if null is included, there is no point in comparison or operation.
If a column in a row has no value, then the column is said to be null, or to contain null. Nulls can
appear in columns of any datatype that are not restricted by NOT NULL or PRIMARY KEY integrity
constraints.
Data Type Conversion
The following table indicates the matrix of datatype conversion. Same datatypes are avialable in
SQL Users’ Manual
15
Overview
o
o
o
o
clob
o
o
o
o
o
o
o
o
o
o
o
o
o
o
o
o
o
o
o
o
o
o
o
o
o
o
o
o
o
o
o
o
o
o
o
o
o
o
o
o
bigint
o
o
o
o
o
o
o
o
o
o
o
o
o
decimal
o
o
o
o
o
o
o
o
o
o
o
o
o
double
o
o
o
o
o
o
o
o
o
o
o
o
o
float
o
o
o
o
o
o
o
o
o
o
o
o
o
integer
o
o
o
o
o
o
o
o
o
o
o
o
o
number
o
o
o
o
o
o
o
o
o
o
o
o
o
numeric
o
o
o
o
o
o
o
o
o
o
o
o
o
real
o
o
o
o
o
o
o
o
o
o
o
o
o
smallint
o
o
o
o
o
o
o
o
o
o
o
o
o
date
o
o
o
o
o
blob
o
byte
o
nibble
o
o
bit
varbit
o
geometry
nvarchar
o
varbit
o
o
bit
o
o
nibble
o
o
byte
o
o
blob
nchar
o
date
o
smallint
o
real
o
numeric
o
number
varchar
integer
o
float
o
double
nvarchar
o
decimal
nchar
o
Before
bigint
varchar
char
After
clob
char
case of comparison operation. However, if data have different datatypes, compare the results after
conversion. They are converted into the other datatype, and then execute in case of character data.
o
geometry
o
* The number which is defined without specifying precision and scale.
Explicit Datatype Conversion
You can explicitly specify datatype conversions using SQL conversion functions or using casting format like following.
16
Data Types
Overview
Syntax
Datatype ' string of the constant value'
Description
The datatype of the constant data are converted into different datatypes. For example, the following
converts a numeric value ‘157.27’ into a character string of ‘157.27.’
CHAR '157.27'
On the chapter 7. Functions , you can see the SQL functions that explicitly convert a value from one
datatype to another.
SQL Users’ Manual
17
Character Data Types
Character Data Types
Character datatypes store character (alphanumeric) data, which are words and free-form text, in the
database character set or national character set.
These datatypes are used for character data;
•
CHAR
•
VARCHAR
CHAR
Syntax Diagram
CHAR
(
size
)
FIXED
variable_clause
variable_clause ::=
VARIABLE
IN
size
ROW
Syntax
CHAR [(size)] [[FIXED |] VARIABLE ( IN ROW size ) ]
Description
A letter data type that has the fixed length of the specified size. If an input value is smaller than the
specified total size, trailing spaces are appended to it.
The default size of CHAR column is 1 byte. The maximum length can vary depending on how it is
declared. If it is declared as FIXED, it can be specified within the page size (8 K). If it is declared as
VARIABLE, it can be specified up to 32KB, which is 32000bytes.
18
Data Types
Character Data Types
VARCHAR
Syntax Diagram
VARCHAR
(
size
)
FIXED
variable_clause
variable_clause ::=
VARIABLE
IN
size
ROW
Syntax
VARCHAR [(size)] [[FIXED |] VARIABLE ( IN ROW size ) ]
Description
Stores alphanumeric data with the variable length specified in the size.
Variable-length character string has maximum length size bytes or characters. When the size is
declared Variable, the length will be variable within the specified size. For example, to store the
string ‘magic’ into a VARCHAR (10) FIXED , 10 bytes will be used even the string length is 6. However,
if VARCHAR (10) VARIABLE is used, it will use 6 bytes.
However, FIXED type improves the processing speed, although it uses a larger storage space.
VARIABLE efficiently uses the storage space while it may slow down the processing speed.
If VARIABLE_COLUMN_IN_ROW_SIZE is not defined, FIXED will be set when the specified size is less
than 30 bytes. If the specified size is higher than 30 bytes, VARIABLE will be set. However, for the disk
table, VARIABLE, the default, will be always set.
The default size of a VARCHAR column is 1 byte. If it is declared as FIXED, it can be specified within
the page size (8 K). If it is declared as VARIABLE, it can be specified up to 32KB, which is 32000 bytes.
* It is a variable length data type that stores the actual length of data when the length of a VARCHAR
value is shorter than the column length. Whereas, for CHAR data type, if a value shorter than the column length is input, spaces are filled from the right side of the value to the end of the column. For
example, If a column is defined as CHAR(10) and "magic" is to be stored, it will be stored as
"magic_____", where "_" represents a blank space.
SQL Users’ Manual
19
Character Data Types
* If the size of VARCHAR data is 30, the physical memory space taken by the data will be 32. That is, if
the actual memory space used is 32 or smaller, it is treated as FIXED.
IN ROW size
When specifying a memory table as VARIABLE, the user can use the ‘IN ROW’ statement to specify
the length of data that will be placed in the fixed and variable areas. For example, when a column is
defined as ‘VARCHAR(400) in row 200’, data will be inserted into the fixed area if its length is <= 200
bytes, and into the variable area if its length > 200 bytes.
Except for special cases, by specifying the default in row size in the
VARIABLE_COLUMN_IN_ROW_SIZE property, ‘IN ROW size’ can be omitted from individual declaration, avoiding repeated specification. For more information on this property, please refer to the Altibase property section in Starting User’s Manual.
NCHAR
Syntax Diagram
NCHAR
size
(
)
FIXED
variable _clause
variable_clause ::=
VARIABLE
IN
size
ROW
Syntax
NCHAR [(size)] [[FIXED |] VARIABLE ( IN ROW size ) ]
Description
This is character data type with fixed length. The last part of entire length is filled with blanks if the
inserted value is smaller than the specified.
If national character set is UTF16, the size of one character in NCHAR column is 2byte in fixed length
(no variable length), whereas if national character set is UTF8, the size of one character in NCHAR column is 3byte in variable length (no fixed length).
20
Data Types
Character Data Types
Maximum length is different depending on its declaration. If declared as FIXED, it can be specified
up to 8K, and if declared as VARIABLE, it can be specified up to 32KB, which is 32768bytes.
NVARCHAR
Syntax Diagram
NVARCHAR
(
size
)
FIXED
variable _clause
variable_clause ::=
VARIABLE
IN
size
ROW
Syntax
NVARCHAR [(size)] [[FIXED |] VARIABLE ( IN ROW size ) ]
Description
This is the unicode character data type with variable length.If national character set is UTF16, the
size of one character in NCHAR column is 2byte in fixed length (no variable length), whereas if
national character set is UTF8, the size of one character in NCHAR column is 3byte in variable length
(no fixed length).Other attributes are same as those of VARCHAR, so refer to VARCAHR for details.
SQL Users’ Manual
21
Numeric Data Types
Numeric Data Types
Numeric datatype stores zero as well as positive and negative fixed numbers with absolute values.
Altibase supports following numeric types;
•
BIGINT
•
DECIMAL
•
DOUBLE
•
FLOAT
•
INTEGER
•
NUMBER
•
NUMERIC
•
REAL
•
SMALLINT
BIGINT
Syntax Diagram
BIGINT
Syntax
BIGINT
Description
Is equivalent to the short type in C Language.
Is 8-bytes of integer datatype.
Range: -2^63 + 1(-9223372036854775807) ~ 2^63 – 1 (9223372036854775807).
* The minimum value(OxFFFFFFFFFFFFFFFF) is used as Null value.
22
Data Types
Numeric Data Types
DECIMAL
Syntax Diagram
DECIMAL
(
precision
)
,
Syntax
DECIMAL [(precision[, scale])]
Description
Is equivalent to NUMERIC type.
DOUBLE
Syntax Diagram
DOUBLE
Syntax
DOUBLE
Description
Stores 8-byte fixed decimal datatype.
Is equivalent to the double type in C Language.
SQL Users’ Manual
23
scale
Numeric Data Types
FLOAT
Syntax Diagram
FLOAT
(
precision
)
Syntax
FLOAT [(precision)]
Description
Fixed decimal data from -1E+120 to 1E+120.
Precision is the total number of significant decimal digits.
The precision range is between 1 and 38.
If the precision is not specified, 38 is the default.
INTEGER
Syntax Diagram
INTEGER
Syntax
INTEGER
Description
4-bytes of integer datatype.
24
Data Types
Numeric Data Types
Datatype same as int type of C.
It can have integer value -2,147,483,647 to 2,147,483,647.
* -2,147,483,648 is used as Null value.
NUMBER
Syntax Diagram
NUMBER
(
precision
)
,
scale
Syntax
NUMBER [(precision, scale)]
Description
Aliased form of the numeric type. However, it will be considered same as Float unless the precision
and the scale are defined.
NUMERIC
Syntax Diagram
NUMERIC
(
precision
)
,
SQL Users’ Manual
25
scale
Numeric Data Types
Syntax
NUMERIC [(precision, scale)]
Description
Numeric data with precision and scale. A fixed decimal data with a precision of the valid numeric
numbers and the scale up to the decimal point. While FLOAT datatype is a variable decimal-type
data indicating the real number, NUMERIC datatype is a fixed decimal-type data. For NUMERIC
datatype, the precision is 38 and the scale is 0.
The precision is from 1 to 38.
The scale is from -84 to 126.
38 is set as the default after precision is omitted.
In case the scale is not set, the default, 0, will be set.
The following shows the converted value when the value is defined as numeric type and the defined
value is 1234567.89.
NUMERIC=> 1234568
NUMERIC(9)=> 1234568
NUMERIC(9, 2)=> 1234567.89
NUMERIC(9, 1)=> 1234567.9
NUMERIC(6)=> Exceeds precision.
NUMERIC(7, -2)=> 1234500
NUMERIC(7, 2)=> Exceeds precision.
REAL
Syntax Diagram
REAL
Syntax
REAL
26
Data Types
Numeric Data Types
Description
Stores 4-byte fixed decimal floating value.
Is equivalent to the float type in C Language.
SMALLINT
Syntax Diagram
SMALLINT
Syntax
SMALLINT
Description
Sores 2-byte integer value.
Is equivalent to the short type in C Language.
Integer data from -2^15 + 1(-32,767) to 2^15 - 1(32,767).
* The minimum value(OxFFFF) is used as Null value.
Numeric Format Model
When data cast functions such as TO_CHAR or TO_NUMBER are used, numeric data can be specified
in the following format models. A number format model consists of more than one argument representing a number. This chapter provides various examples of number format models for these arguments.
, (comma)
Description
Outputs a comma to the specified position. A comma can be used more than once.
Restriction
A comma cannot be placed after a number or period nor before a number.
SQL Users’ Manual
27
Numeric Data Types
Example
iSQL> SELECT TO_CHAR (1234, '99,99') FROM dual;
TO_CHAR (1234, '99,99')
--------------------------12,34
1 row selected.
iSQL> SELECT TO_NUMBER ( '12,34', '99,99') FROM dual;
TO_NUMBER ( '12,34', '99,99')
-------------------------------1234
1 row selected.
. (period)
Description
Returns a period to the specified position.
Restriction
A period can be used only once within a number.
Example
iSQL> SELECT TO_CHAR (1.234, '99.999') FROM dual;
TO_CHAR (1.234, '99.999')
----------------------------1.234
1 row selected.
iSQL> SELECT TO_NUMBER ( '1.234', '99.999') FROM dual;
TO_NUMBER ( '1.234', '99.999')
--------------------------------1.234
1 row selected.
$
Description
Prepends the $ sign to a number.
Example
iSQL> SELECT TO_CHAR (123, '$9999') FROM dual;
TO_CHAR (123, '$9999')
-------------------------$123
1 row selected.
iSQL> SELECT TO_NUMBER ( '$0123', '09$99') FROM dual;
TO_NUMBER ( '$0123', '09$99')
-------------------------------123
1 row selected.
28
Data Types
Numeric Data Types
0 (digit 0)
Description
If the number of significant digits in the integer part exceeds the number of digits for an actual number, prepend 0's (zero) to the number before it is returned. Other characteristics are the same as for
9.
Example
iSQL> SELECT TO_CHAR (123, '0999') FROM dual;
TO_CHAR (123, '0999')
------------------------0123
9 (digit 9)
Description
Show the number of digits for a number to output with 9's. If the number of 9's is greater than the
number of digits for an actual number, prepend 0's (zero) to the number before it is output. If the
number of 9's is less than the number of digits for an actual number, output #'s for the length of the
number. The number of #'s is the number of characters in the user-defined format + 1 (a sign character).
A period that comes between 9's separates the integer and fraction parts of a number.
When there are decimal places in the first argument, if the user-defined format does not have an
arrangement for decimal places or it allows smaller number of decimal places, make it fit in the
length of decimal places in the user-defined format by rounding it.
Example
iSQL> SELECT TO_CHAR (123, '99999') FROM dual;
TO_CHAR (123, '99999')
-------------------------123
iSQL> SELECT TO_CHAR (123.55, '999') FROM dual;
TO_CHAR (123.55, '999')
--------------------------124
1 row selected.
iSQL> SELECT TO_CHAR (123.4567, '999999') FROM dual;
TO_CHAR (123.4567, '999999')
-------------------------------123
1 row selected.
iSQL> SELECT TO_CHAR (1234.578, '9999.99') FROM dual;
TO_CHAR (1234.578, '9999.99')
--------------------------------1234.58
1 row selected.
iSQL> SELECT TO_CHAR (1234.578, '999.99999') FROM dual;
SQL Users’ Manual
29
Numeric Data Types
TO_CHAR (1234.578, '999.99999')
----------------------------------##########
1 row selected.
iSQL> SELECT TO_NUMBER ( '123', '99999') FROM dual;
TO_NUMBER ( '123', '99999')
-----------------------------123
1 row selected.
iSQL> SELECT TO_NUMBER ( '1234.58', '9999.99') FROM dual;
TO_NUMBER ( '1234.58', '9999.99')
-----------------------------------1234.58
1 row selected.
B
Description
If the result is 0 (zero), replace 0 with a blank space before it is returned.
Example
iSQL> SELECT TO_CHAR (0.4, 'B9') FROM T1;
TO_CHAR (0.4, 'B9')
----------------------1 row selected.
EEEE
Description
Represent an input number in exponential notation.
Restrictions
EEEE should always come at the right most place. However, it can come before S, PR or MI. It cannot
be used with a comma.It cannot be used with the TO_NUMBER function.
Example
iSQL> SELECT TO_CHAR (1234, '9.9EEEE') FROM dual;
TO_CHAR (1234, '9.9EEEE')
----------------------------1.2E+03
1 row selected.
MI
Description
When MI is used at the right most place in a number format, if an input value is negative, the minus
30
Data Types
Numeric Data Types
(-) sign is appended to the value before it is returned. If an input value is positive, a blank space is
added.
Restrictions
MI should always come at the right most place in a number format. It cannot be used with S or PR.
Example
iSQL> SELECT TO_CHAR (-123, '999MI') FROM dual;
TO_CHAR (-123, '999MI')
--------------------------1231 row selected.
iSQL> SELECT TO_NUMBER ( '123-', '999MI') FROM dual;
TO_NUMBER ( '123-', '999MI')
-------------------------------123
1 row selected.
PR
Description
When PR is used at the right most place in a number format, if an input value is negative, the value is
output in the form of <number> instead of the minus (-) sign.
Restrictions
PR should always come at the right most place in a number format.It cannot be used with S or MI.
Example
iSQL> SELECT TO_CHAR (-123, '999PR') FROM dual;
TO_CHAR (-123, '999PR')
--------------------------<123>
1 row selected.
iSQL> SELECT TO_NUMBER ( '<123>', '999PR') FROM dual;
TO_NUMBER ( '<123>', '999PR')
--------------------------------123
1 row selected.
RN
Description
Converts an input number to a Roman numeral. The valid input range is between 1 ~ 3,999. If lower
letters 'm' are used in the number format, Roman numerals are output.
SQL Users’ Manual
31
Numeric Data Types
Restrictions
It cannot be used with other number formats. It cannot be used with the TO_NUMBER function.
Example
iSQL> SELECT TO_CHAR (14, 'RN') FROM dual;
TO_CHAR (14, 'RN')
---------------------XIV
1 row selected.
S
Description
Depending on the sign of an input number, add minus (-) or plus (+) sign at the beginning or end of
a number format.
Restrictions
S can be placed at the beginning or end of a number format. It cannot be used with MI or PR.
Example
iSQL> SELECT TO_CHAR (123, 'S999.99') FROM dual;
TO_CHAR (123, 'S999.99')
---------------------------+123.00
1 row selected.
iSQL> SELECT TO_CHAR (-123, '999.99S') FROM dual;
TO_CHAR (-123, '999.99S')
----------------------------123.001 row selected.
iSQL> SELECT TO_NUMBER ( '+123', 'S999.99') FROM dual;
TO_NUMBER ( '+123', 'S999.99')
--------------------------------123
1 row selected.
iSQL> SELECT TO_NUMBER ( '123.00-', '999.99S') FROM dual;
TO_NUMBER ( '123.00-', '999.99S')
------------------------------------123
1 row selected.
V
Description
Multiply the number of 9's after V by 10 and then multiply the result by an argument. The number of
9's before V Represents the number of significant digits in the first argument.
32
Data Types
Numeric Data Types
Restrictions
It cannot be used with a period. It cannot be used with the TO_NUMBER function.
Example
iSQL> SELECT TO_CHAR (12, '99V99') FROM dual;
TO_CHAR (12, '99V99')
------------------------1200
1 row selected.
iSQL> SELECT TO_CHAR (1200, '99V99') FROM dual;
TO_CHAR (1200, '99V99')
--------------------------######
1 row selected.
iSQL> SELECT TO_CHAR (-123.456, '999V999EEEEMI') from dual;
TO_CHAR (-123.456, '999V999EEEEMI')
--------------------------------------1235E+021 row selected.
XXXX
Description
Converts an input number to a hexadecimal number. If an input number is not an integer, round it
before it is converted to a hexadecimal number. xxxx returns letters in a hexadecimal number in
lower letters.
Restrictions
It cannot be used with other number formats. A number to be converted should be greater than 0
(zero).
Example
iSQL> SELECT TO_CHAR (123, 'XXXX') FROM dual;
TO_CHAR (123, 'XXXX')
------------------------7B
1 row selected.
iSQL> SELECT TO_NUMBER ('ABC', 'XXXX') FROM dual;
TO_NUMBER ('ABC', 'XXXX')
---------------------------2748
1 row selected.
SQL Users’ Manual
33
Date Data Types
Date Data Types
The DATE type stores date and time information. Although date and time information can be represented in both character and number datatypes, the DATE datatype has its special properties. This
datatype contains the datetime fields YEAR, MONTH, DAY, HOUR, MINUTE, and SECOND
DATE
Syntax Diagram
DATE
Syntax
DATE
Description
Stores date values as 8 bytes long integer internally.
The available range of date type depends on the system. Usually valid date range is from 0001/01/01
~9999/12/31.
You can display the date value in various formats using date format string .
Datetime Format Model
Date data type data is managed as numerical data within a database. However, the user can display
it in a string by using TO_CHAR / TO_DATE conversion functions. When using conversion functions,
the user should specify a date data type string in the specified format.
Date data type consists of the following basic elements:
•
AM, PM
•
CC
•
D, DD, DDD, DAY,DY
•
HH, HH12, HH24
•
MM, MON, MONTH
•
MI
34
Data Types
Date Data Types
•
Q
•
SS, SSSSS, SSSSSS, SSSSSSSS, FF[1..6]
•
WW, W
•
Y,YYY
•
YYYY, YY, RR, RRRR
Along with these basic elements, the following punctuations and special characters also comprise
date data type.
•
Hyphen (-)
•
Slash (/)
•
Comma (,)
•
Period (.)
•
Colon (:)
•
Single Quotation (‘)
The following describes use of these basic elements with examples:
AM, PM
Description
Separates a day to before and after noon (‘AM’ or ‘PM’).
Example
iSQL> SELECT TO_CHAR ( TO_DATE( '13', 'HH' ), 'AM' ) FROM dual;
TO_CHAR ( TO_DATE( '13', 'HH' ), 'AM' )
------------------------------------------PM
1 row selected.
iSQL> SELECT TO_DATE('1980-12-28 PM', 'YYYY-MM-DD AM') FROM dual;
TO_DATE('1980-12-28 PM', 'YYYY-MM-DD AM'
------------------------------------------1980/12/28 12:00:00
1 row selected.
CC
Description
Represents a century.
•
If the last 2 digits of a 4-digit year are 01-99, 1 is added to the first 2 digits of the 4-digit year
before it is returned.
SQL Users’ Manual
35
Date Data Types
•
If the last 2 digits of a 4-digit year are 00, the first 2 digits of the 4-digit year are returned as
they are.
It cannot be used as an argument for the TO_DATE function.
Example
iSQL> SELECT TO_CHAR ( '28-DEC-1980', 'CC' ) FROM dual;
TO_CHAR ( '28-DEC-1980', 'CC' )
----------------------------------20
1 row selected.
D
Description
Represents the day of a week in a number between 1 – 7. It starts with Sunday as 1.
It cannot be used as an argument for the TO_DATE function.
Example
iSQL> SELECT TO_CHAR ( '28-DEC-1980', 'D' ) FROM dual;
TO_CHAR ( '28-DEC-1980', 'D' )
---------------------------------1
1 row selected.
DAY
Description
Represents the day of a week in English (SUNDAY, MONDAY,…).
It cannot be used with the TO_DATE function.
Example
iSQL> SELECT TO_CHAR ( '28-DEC-1980', 'DAY' ) FROM dual;
TO_CHAR ( '28-DEC-1980', 'DAY' )
-----------------------------------SUNDAY
1 row selected.
DD
Description
Represents the day of a month in a number between 1 - 31.
Example
iSQL> SELECT TO_CHAR ( '28-DEC-1980', 'DD' ) FROM dual;
36
Data Types
Date Data Types
TO_CHAR ( '28-DEC-1980', 'DD' )
----------------------------------28
1 row selected.
iSQL> SELECT TO_DATE( '1980-12-28', 'YYYY-MM-DD') FROM dual;
TO_DATE( '1980-12-28', 'YYYY-MM-DD')
--------------------------------------1980/12/28 00:00:00
1 row selected.
DDD
Description
Represents the day of an year in a number between 1 – 366.
It cannot be used with the TO_DATE function.
Example
iSQL> SELECT TO_CHAR ( '28-DEC-1980', 'DDD' ) FROM dual;
TO_CHAR ( '28-DEC-1980', 'DDD' )
-----------------------------------363
1 row selected.
DY
Description
Represents the day of a week in an abbreviation (SUN, MON, TUE, …).
It cannot be used with the TO_DATE function.
Example
iSQL> SELECT TO_CHAR ( '28-DEC-1980', 'DY' ) FROM dual;
TO_CHAR ( '28-DEC-1980', 'DY' )
----------------------------------SUN
1 row selected.
FF [1..6]
Description
Represents the number of digits in a micro second with a number between 1 – 6 (0 - 999999). The FF
format returns the same result as in FF6.
It cannot be used with the TO_DATE function.
Example
iSQL> SELECT TO_CHAR ( SYSDATE, 'FF5' ) FROM dual;
SQL Users’ Manual
37
Date Data Types
TO_CHAR ( SYSDATE, 'FF5' )
-----------------------------34528
1 row selected.
HH, HH24
Description
Represents time in 24-hour format (0 - 23).
Example
iSQL> SELECT TO_CHAR ( TO_DATE( '2008-12-28 17:30:29', 'YYYY-MM-DD HH:MI:SS'
), 'HH' ) FROM dual;
TO_CHAR ( TO_DATE( '2008-12-28 17:30:29'
-------------------------------------------17
1 row selected.
iSQL> SELECT TO_CHAR ( TO_DATE( '2008-12-28 17:30:29', 'YYYY-MM-DD
HH24:MI:SS' ), 'YYYY-MM-DD HH24:MI:SS' ) FROM dual;
TO_CHAR ( TO_DATE( '2008-12-28 17:30:29',
-----------------------------------------2008-12-28 17:30:29
1 row selected.
HH12
Description
Represents time in 12-hour format (1 - 12).
It cannot be used with the TO_DATE function.
Example
iSQL> SELECT TO_CHAR ( TO_DATE( '2008-12-28 17:30:29', 'YYYY-MM-DD HH:MI:SS'
), 'HH12' ) FROM dual;
TO_CHAR ( TO_DATE( '2008-12-28 17:30:29',
--------------------------------------------05
1 row selected.
iSQL> SELECT TO_CHAR( TO_DATE ( '08-12-28 05:30:29', 'RR-MM-DD HH12:MI:SS' ),
'RR-MM-DD HH12:MI:SS') FROM dual;
TO_CHAR( TO_DATE ( '08-12-28 05:30:29', 'R
-------------------------------------------08-12-28 05:30:29
1 row selected.
MI
Description
Minute(s) (0 - 59)
38
Data Types
Date Data Types
Example
iSQL> SELECT TO_CHAR ( TO_DATE( '1980-12-28 17:30:29', 'YYYY-MM-DD HH:MI:SS'
), 'HH' ) FROM dual;
TO_CHAR ( TO_DATE( '1980-12-28 17:30:29'
-------------------------------------------17
1 row selected.
iSQL> SELECT TO_DATE ( '05-12-28 14:30:29', 'RR-MM-DD HH:MI:SS' ) FROM dual;
TO_DATE ( '05-12-28 14:30:29', 'RR-MM-DD
------------------------------------------2005/12/28 14:30:29
1 row selected.
MM
Description
Month (01 - 12)
Example
iSQL> SELECT TO_CHAR ( TO_DATE( '1980-12-28 17:30:29', 'YYYY-MM-DD HH:MI:SS'
), 'HH' ) FROM dual;
TO_CHAR ( TO_DATE( '1980-12-28 17:30:29'
-------------------------------------------17
1 row selected.
iSQL> SELECT TO_DATE ( '05-12-28 14:30:29', 'RR-MM-DD HH:MI:SS' ) FROM dual;
TO_DATE ( '05-12-28 14:30:29', 'RR-MM-DD
------------------------------------------2005/12/28 14:30:29
1 row selected.
MON
Description
Represents the day of a month in an abbreviation ( JAN, FEB, MAR, …).
Example
SQL> SELECT TO_CHAR (TO_DATE ('1995-12-05', 'YYYY-MM-DD'), 'MON') FROM dual;
TO_
--DEC
MONTH
Description
Represents the day of a month (JANUARY, FEBRUARY, … )
SQL Users’ Manual
39
Date Data Types
Example
iSQL> SELECT TO_CHAR ( '28-DEC-1980', 'Month' ) FROM dual;
TO_CHAR ( '28-DEC-1980', 'Month' )
-------------------------------------December
1 row selected.
iSQL> SELECT TO_DATE ( '05-APRIL-28 14:30:29', 'RR-MONTH-DD HH:MI:SS' ) FROM
dual;
TO_DATE ( '05-APRIL-28 14:30:29', 'RR-MO
------------------------------------------2005/04/28 14:30:29
1 row selected.
Q
Description
Represents a quarter (1 - 4).
It cannot be used with the TO_DATE function.
Example
iSQL> SELECT TO_CHAR ( '28-DEC-1980', 'Q' ) FROM dual;
TO_CHAR ( '28-DEC-1980', 'Q' )
---------------------------------4
1 row selected.
RM
Description
Represents a month in a Roman numeral (I, II, III, IV... ).
Example
iSQL> SELECT TO_CHAR ( '28-DEC-1980', 'RM' ) FROM dual;
TO_CHAR ( '28-DEC-1980', 'RM' )
----------------------------------XII
1 row selected.
iSQL> SELECT TO_DATE ('28-V-1980', 'DD-RM-YYYY') FROM dual;
TO_DATE ('28-V-1980', 'DD-RM-YYYY')
-------------------------------------1980/05/28 00:00:00
1 row selected.
RR
Description
Represents an year in a 2-digit integer. When a date is represented in 2 digits, if it is < 50, 2000 is
40
Data Types
Date Data Types
added to it for the 21st Century, and if it is >= 50, 1900 is added to it before it is displayed. Therefore,
the range of years that can be displayed is between 1950 – 2049.
Example
iSQL> SELECT TO_CHAR ( '28-DEC-80', 'RR' ) FROM dual;
TO_CHAR ( '28-DEC-80', 'RR' )
--------------------------------80
1 row selected.
iSQL> SELECT TO_DATE ( '28-DEC-80', 'DD-MON-RR' ) FROM dual;
TO_DATE ( '28-DEC-80', 'DD-MON-RR' )
--------------------------------------1980/12/28 00:00:00
1 row selected.
RRRR
Description
Year (0 - 9999)
When an year is input in 2 or 4 digits, if it is < 50, 2000 is added to it, and if it is >= 50 and < 100, 1900
is added to it before it is output. If an year is in 4 digits, it is displayed as it is.
Example
iSQL> SELECT TO_CHAR ( '28-DEC-1980', 'RRRR' ) FROM dual;
TO_CHAR ( '28-DEC-1980', 'RRRR' )
------------------------------------1980
1 row selected.
iSQL> SELECT TO_CHAR ( '28-DEC-1980', 'DD-MON-RRRR' ) FROM dual;
TO_CHAR ( '28-DEC-1980', 'DD-MON-RRRR' )
-------------------------------------------28-DEC-1980
1 row selected.
SS
Description
Second(s) (0 - 59)
Example
iSQL> SELECT TO_CHAR ( TO_DATE( '1980-12-28 17:30:29', 'YYYY-MM-DD HH:MI:SS'
), 'HH' ) FROM dual;
TO_CHAR ( TO_DATE( '1980-12-28 17:30:29'
-------------------------------------------17
1 row selected.
iSQL> SELECT TO_DATE ( '05-12-28 14:30:29', 'RR-MM-DD HH:MI:SS' ) FROM dual;
TO_DATE ( '05-12-28 14:30:29', 'RR-MM-DD
-------------------------------------------
SQL Users’ Manual
41
Date Data Types
2005/12/28 14:30:29
1 row selected.
SSSSS
Description
Represents how many seconds have passed since the last midnight (0 - 86399).
Example
iSQL> SELECT TO_CHAR ( TO_DATE( '1980-12-28 17:30:29', 'YYYY-MM-DD
HH24:MI:SS' ), 'SSSSS' ) FROM dual;
TO_CHAR ( TO_DATE( '1980-12-28 17:30:29'
-------------------------------------------62940
1 row selected.
iSQL> SELECT TO_DATE('1980-12-28 12345', 'YYYY-MM-DD SSSSS') FROM dual;
TO_DATE('1980-12-28 12345', 'YYYY-MM-DD
------------------------------------------1980/12/28 03:25:45
1 row selected.
SSSSSS
Description
Represents a date data type value in microseconds (0 - 999999).
Example
iSQL> SELECT TO_CHAR (SYSDATE, 'SSSSSS') FROM dual;
TO_CHAR (SYSDATE, 'SSSSSS')
------------------------------490927
1 row selected.
iSQL> SELECT TO_CHAR ( TO_DATE('1980-12-28 123456', 'YYYY-MM-DD SSSSSS'),
'SSSSSS' ) FROM dual;
TO_CHAR ( TO_DATE('1980-12-28 123456', '
-------------------------------------------123456
1 row selected.
SSSSSSSS
Description
Represents a second + a microsecond. The first 2 digits represent a second and the remaining 6 digits represent a microsecond (0 - 59999999).
Example
iSQL> SELECT TO_CHAR (SYSDATE, 'SSSSSSSS') FROM dual;
42
Data Types
Date Data Types
TO_CHAR (SYSDATE, 'SSSSSSSS')
--------------------------------48987403
1 row selected.
iSQL> SELECT TO_DATE ( '12.345678', 'SS.SSSSSS') FROM dual;
TO_DATE ( '12.345678', 'SS.SSSSSS')
-------------------------------------2005/12/01 00:00:12
1 row selected.
iSQL> SELECT TO_CHAR( TO_DATE( '12.345678', 'SS.SSSSSS'), 'SSSSSS') FROM
dual;
TO_CHAR( TO_DATE( '12.345678', 'SS.SSSSS
-------------------------------------------345678
1 row selected.
WW
Description
Represents the week of an year. For example, the period from January 1 to Saturday in that week is
the first week of that year (1 - 54).
It cannot be used with the TO_DATE function.
Example
iSQL> SELECT TO_CHAR ( '28-DEC-1980', 'WW' ) FROM dual;
TO_CHAR ( '28-DEC-1980', 'WW' )
----------------------------------53
1 row selected.
W
Description
Represents the week of a month. For example, the period from the 1st to Saturday in that week is the
first week of that month (1 - 6).
It cannot be used with the TO_DATE function.
Example
iSQL> SELECT TO_CHAR ( '28-DEC-1980', 'W' ) FROM dual;
TO_CHAR ( '28-DEC-1980', 'W' )
---------------------------------5
1 row selected.
SQL Users’ Manual
43
Date Data Types
Y,YYY
Description
A comma can be inserted into any place within a number representing an year. It can be place at the
beginning or end.
It cannot be used with the TO_DATE function.
Example
iSQL> SELECT TO_CHAR ( '28-DEC-1980', 'Y,YYY' ) FROM dual;
TO_CHAR ( '28-DEC-1980', 'Y,YYY' )
-------------------------------------1,980
1 row selected.
YYYY
Description
A 4-dgit number is treated as an year (0 - 9999).
Example
iSQL> SELECT TO_CHAR ( '28-DEC-1980', 'YYYY' ) FROM dual;
TO_CHAR ( '28-DEC-1980', 'YYYY' )
------------------------------------1980
1 row selected.
iSQL> SELECT TO_DATE ( '28-DEC-1980', 'DD-MON-YYYY' ) FROM dual;
TO_DATE ( '28-DEC-1980', 'DD-MON-YYYY' )
------------------------------------------1980/12/28 00:00:00
1 row selected.
YY
Description
Last 2 digits of year. With the 21st Century is assumed, 2000 is added to it before it is output (2000 2099).
Example
iSQL> SELECT TO_CHAR ( '28-DEC-1980', 'YY' ) FROM dual;
TO_CHAR ( '28-DEC-1980', 'YY' )
----------------------------------80
1 row selected.
iSQL> SELECT TO_DATE ( '28-DEC-80', 'DD-MON-YY' ) FROM dual;
TO_DATE ( '28-DEC-80', 'DD-MON-YY' )
--------------------------------------2080/12/28 00:00:00
44
Data Types
Date Data Types
1 row selected.
* Please refer to YYYY, YY, RRRR and RR.
[YYYY]: A number is treated as an year.
‘23-FEB-5’ : February 23, 0005
‘23-FEB-05’ : February 23, 0005
‘23-FEB-2005’: February 23, 2005
‘23-FEB-95’ : February 23, 0095
[YY]: 2000 + YY
‘23-FEB-5’ : February 23, 2005
‘23-FEB-05’ : February 23, 2005
‘23-FEB-2005’: Error
‘23-FEB-95’ : February 23, 2095
‘23-FEB-05’ : February 23, 2005
‘23-FEB-2005’: Error
‘23-FEB-95’ : February 23, 2095
[RRRR]: A 4-digit number is treated as an year. If it is < 50, 2000 is added to it, and if it is >= 50 and <
100, 1900 is added to it before it is output.
‘23-FEB-5’ : February 23, 2005
‘23-FEB-05’ : February 23, 2005
‘23-FEB-2005’: February 23, 2005
‘23-FEB-95’ : February 23, 1995
‘23-FEB-100’: February 23, 0100
‘23-FEB-0005’: February 23, 0005
[RR]: If a number is < 50, 2000 is added to it, and if a number is >= 50 and < 100, 1900 is added to it
before it is output.
‘23-FEB-5’: February 23, 2005
‘23-FEB-05’: February 23, 2005
‘23-FEB-2005’: Error
‘23-FEB-95’ : February 23, 1995
SQL Users’ Manual
45
Date Data Types
Example
iSQL> CREATE TABLE timetbl(i1 INTEGER, t1 DATE, etc VARCHAR(10));
Create success.
iSQL> INSERT INTO timetbl VALUES (1, SYSDATE, 'Start');
1 row inserted.
iSQL> INSERT INTO timetbl VALUES (2, TO_DATE('2003-02-20 12:15:50', 'YYYY-MMDD HH:MI:SS'), 'The end');
1 row inserted.
iSQL> SELECT TO_CHAR(T1, 'YYYY YY MM MON Mon mon DD HH MI SS SSSSSS D DDD')
Date_format FROM timetbl WHERE I1 = 2;
DATE_FORMAT
-----------------------------------------------2003 03 02 FEB Feb feb 20 12 15 50 000000 5 051
1 row selected.
46
Data Types
Binary Types
Binary Types
You can store large and unstructured data such as text, image, video, and spatial data into a binary
data type. Altibase supports following binary types;
•
BYTE
•
NIBBLE
•
BIT
•
VARVIT
BYTE
Syntax Diagram
BYTE
(
size
)
Syntax
BYTE [(size)] [[FIXED |] VARIABLE ( IN ROW size ) ]
Description
A binary datatype with the specified fixed length.
The default size of BYTE column is 1 byte. If being declared as FIXED, it can be specified within the
page size (8K). If being declared as VARIABLE, it can be specified up to 32000 bytes.
Can be expressed in a character type such as ‘0FAE13.’ The characters are 0 ~ 9 and A ~ F.
You must use the value of exact size for a BYTE type column. For one byte, two characters can be
stored.
For example, for BYTE (3), ‘000000’ ~ ‘FFFFFF’ can be inputted.
* The inserted value is converted into capital letters when lower cases ‘a’ through ‘f’ are inputted.
* The minimum value(OxFF) is used as NULL value.
SQL Users’ Manual
47
Binary Types
NIBBLE
Syntax Diagram
NIBBLE
(
size
)
Syntax
NIBBLE [(size)]
Description
Binary data with the variable length of the specified size.
The default size of NIBBLE column is a character, and the maximum size is 254 bytes.
Can be expressed in a string data. Characters are 0 ~9 and A ~ F.
For example, for NIBBLE (6), ‘000000’ to ‘FFFFFF’ can be inserted.
* The lower case character such as ‘a’, ‘f’ in input string is converted into upper case character(‘A’~’F’).
BIT
Syntax Diagram
BIT
(
size
)
Syntax
BIT [(size)]
48
Data Types
Binary Types
Description
It is a binary data type with a fixed length, which consists of 0’s and 1’s only. The default size of BIT
column is 1 bit. Its maximum length is 60576 bits. If a string longer than the specified length is input,
the ‘Invalid length of data type’ error occurs.
If a string shorter than the specified length is input, the right side is filled with 0’s. If a value other
than 0 or 1, the ‘Invalid literal’ error occurs.
Example
iSQL> CREATE TABLE T1 ( I1 BIT(1), I2 BIT(5) );
Create success.
iSQL> INSERT INTO T1 VALUES ( BIT'1', BIT'011' );
1 row inserted.
iSQL> SELECT TO_CHAR(I1), TO_CHAR(I2) FROM T1;
TO_CHAR(I1) TO_CHAR(I2)
----------------------------1 01100
1 row selected.
iSQL> INSERT
[ERR-2100D :
iSQL> INSERT
[ERR-21011 :
INTO T1
Invalid
INTO T1
Invalid
VALUES ( BIT'1111', BIT'011' );
length of the data type]
VALUES ( BIT'1', BIT'1234' );
literal]
VARBIT
Syntax Diagram
Syntax
VARBIT [(size)]
Description
It is a binary data type with a variable length, which consists of 0’s and 1’s only.
The default size of VARBIT column is 1 bit. Its maximum length is 131070 bits (28 KBits).
If a string longer than the specified length is input, the ‘Invalid length of data type error’ occurs.
SQL Users’ Manual
49
Binary Types
If a string shorter than the specified length is input, the right side is filled with 0’s.
If a value other than 0 or 1, the ‘Invalid literal Error’ occurs.
Example
iSQL> CREATE TABLE T1 ( I1 VARBIT(1), I2 VARBIT(5) );
Create success.
iSQL> INSERT INTO T1 VALUES ( VARBIT'1', VARBIT'011' );
1 row inserted.
iSQL> SELECT TO_CHAR(I1), TO_CHAR(I2) FROM T1;
TO_CHAR(I1) TO_CHAR(I2)
----------------------------1 011
1 row selected.
iSQL> INSERT
[ERR-2100D :
iSQL> INSERT
[ERR-21011 :
INTO T1
Invalid
INTO T1
Invalid
VALUES ( VARBIT'1111', VARBIT'011' );
length of the data type]
VALUES ( VARBIT'1', VARBIT'1234' );
literal]
50
Data Types
LOB Data Type
LOB Data Type
Overview
Large Object (LOB) is a data type that can hold large data. Up to 2 GB bytes can be stored as LOB.
Unlike other data types, its length is not specified when a table is created. More than one LOB type
column can be defined in a table.
The LOB data type can be divided into Binary Large Object (BLOB) that can hold binary data such as
image and video files and Character Large Object (CLOB) that can hold string data.
The Features of LOB
The Altibase LOB provides the following features:
•
Data Storage
•
Partial Read
•
Disk LOB Partition
Data Storage
CLOB or BLOB data can be stored by using the ODBC SQLPutLob function or JDBC File Stream.
Partial Read
Data pieces in a specific part of LOB data can be read. A specific offset size can be read by using the
SQLGetLob function.
Disk LOB Partition
Disk LOB data can be stored in a disk tablespace other than the one which a table belongs to, and it
can be configured just like partitions.
Storing LOB Column
Most of LOB data in a memory table are stored in the variable area beyond the record area, and LOB
data in a disk table are saved in LOB segment beyond table segment. If the size of LOB column is not
big, it can also be stored within the record area (fixed area) by using the ‘in row’ option. However,
LOB data is always stored in the variable area in a disk table regardless of its size.
Since the size of LOB column data that is stored in the variable area is very big, it can reduce space
efficiency to store it in the same tablespace with the record area.
In a disk table, LOB column data can be stored in a tablespace different from the table which LOB column belongs to. However, in a memory table, LOB column data cannot be stored separately, and it
should be stored in the same tablespace with the table.
SQL Users’ Manual
51
LOB Data Type
BLOB
Syntax Diagram
BLOB
VARIABLE
IN
ROW
size
Syntax
BLOB [ VARIABLE ( IN ROW size ) ]
Description
BLOB is a binary data type with a variable length (up to 2 GB), which is intended to store large binary
data. For BLOB, FIXED|VARIABLE can be specified but it does not have any meaning since all data is
treated as VARIABLE.
If the size of BLOB data stored in memory table is 64 bytes and below, they are saved in the fixed area
of the table. Otherwise, they are stored in the variable area. You can set the default size of BLOB data
saved in the variable area with MEMORY_LOB_COLUMN_IN_ROW_SIZE.
If the size of BLOB data stored in disk table is 4000 bytes and below, they are saved in table segment.
Otherwise, they are stored in LOB segment. You can set the default size of BLOB data saved in the
variable area with DISK_LOB_COLUMN_IN_ROW_SIZE in the same way to specify their default in
memory table.
IN ROW size
For a memory table, when the user specifies VARIABLE, he can use the ‘IN ROW’ statement to specify
the length of data that will be placed in the fixed or variable area, respectively. For example, when a
column is defined as ‘BLOB in row 200’, data will be inserted into the fixed area if its length is <= 200
bytes, and into the variable area if its length is > 200 bytes. For a disk table, when specifying VARIABLE, you can also use the 'IN ROW' statement to set the length of data which will be placed in table
segment or LOB segment respectively.
Except for special cases, by specifying MEMORY_LOB_COLUMN_IN_ROW_SIZE property for memory
table and DISK_LOB_COLUMN_IN_ROW_SIZE for disk table, ‘in row size’ can be omitted when a table
is created. For more information on this property, please refer to the Altibase property section in
Starting User’s Manual.
52
Data Types
LOB Data Type
CLOB
Syntax Diagram
CLOB
VARIABLE
IN
ROW
size
Syntax
CLOB [ VARIABLE ( IN ROW size ) ]
Description
CLOB is a letter data type with a variable length (up to 2 GB), which is intended to store large letter
data. Like BLOB or VARCHAR type, for CLOB, FIXED|VARIABLE can be specified but it does not have
any meaning since all data is treated as VARIABLE.
Like BLOB, in a memory table, if the size of CLOB data is 64 Bytes and below, the data is stored in the
fixed area of the table. Otherwise, they are stored in the variable area. You can set the default size of
CLOB data saved in the fixed area with MEMORY_LOB_COLUMN_IN_ROW_SIZE.
If the size of CLOB data stored in disk table is 4000 bytes and below, they are saved in table segment.
Otherwise, they are stored in LOB segment. You can set the default size of CLOB data saved in table
segment with DISK_LOB_COLUMN_IN_ROW_SIZE.
IN ROW size
For a CLOB column in a memory table, when specifying VARIABLE, you can use the IN ROW statement to set the length of data within the record area. The details regarding this are the same as with
BLOB.
Restrictions
LOB type isn't available in stored procedure, trigger, cursor, volatile table and disc temporary
tablespace. You can't use LOB column of discarded tablespace and LOB type for partition column.
Partition column must be enabled to compare all sizes. You can't generate indexes in LOB column.
NOT NULL constraint isn’t available in LOB column. If you try to add NOT NULL constraint in LOB column, error occurs.
SQL Users’ Manual
53
Spatial Types
Spatial Types
When the geometry datatype is defined as the SQL type, only GEOMETRY datatype is supported. The
Geometry datatype has seven sub datatypes;
•
Point
•
LineString
•
Polygon
•
GeomCollection
•
MultiPolygon
•
MultiLineString
•
MultiPoint
For more information about the geometry datatype, see the Altibase Spatial User's Manual.)
54
Data Types
Spatial Types
SQL Users’ Manual
55
Part II
•
Chapter3.Data Definition Statements
•
Chapter4.Data Manipulation Statements
•
Chapter5.Data Control Statements
56
3 Data Definition Statements
57
Data Definition Statements
ALTER DATABASE
ALTER DATABASE
Syntax
alter_database ::=
ALTER
DATABASE
database_name
startup_clause
rename_datafile_clause
create_datafile_clause
database_name
archivelog_option
backup_clause
recover_clause
altiLinker_clause
SQL Users’ Manual
58
session_clause
;
ALTER DATABASE
startup_clause ::=
CONTROL
SERVICE
META
UPGRADE
RESETLOGS
RESETUNDO
SHUTDOWN
NORMAL
IMMEDIATE
rename_clause ::=
RENAME
DATAFILE
‘
file_name
’
TO
‘
file_name
’
create_clause ::=
CREATE
DATAFILE
‘
datafile_name
’
session_clause ::=
SESSION
number
CLOSE
59
Data Definition Statements
ALTER DATABASE
archivelog_option ::=
ARCHIVELOG
NOARCHIVELOG
backup_clause ::=
LOGANCHOR
BACKUP
TABLESPACE
tablespace _name
TO
‘
backup _dir
DATABASE
recover_clause ::=
RECORVER
DATABASE
until_option
until_option ::=
CANCEL
UNTIL
TIME
YYYY -MM-DD:HH:MM:SS
‘
altiLinker_clause ::=
START
LINKER
STOP
SQL Users’ Manual
60
’
’
ALTER DATABASE
Prerequisites
Only SYS user can submits ALTER DATABASE statement in the CONTROL startup phase after connected with –sysdba option. However, you can use SESSION CLOSE statement without -sysdba
option.
Description
Used to modify, maintain, or recover an existing database.
database_name
Specify the database name to be altered.
startup_clauses
Specify the startup phase name of Altibase
CONTROL
The step of starting up a database is changed to the step for CONTROL statement. This is the stage in
which DB media recovery and replication can be performed during multi-level startup of a database.
A tablespace can also be discarded during this stage. Refer to Administrator’s Manual for details
about the multi-level startup of a database.
Use the ALTER DATABASE dababase_name META; statement to enter this stage.
SERVICE
The step of starting up a database is changed to the step for SERVICE statement. During multi-level
startup of a database, data is loaded into memory and disk DB’s, and the extended services such as
replication or SNMP can be started. When this option is used, the system is at the stage in which all
recovery is complete and normal services are being provided.
META
The step of starting up a database is changed to the step for META statement. In this phase, the meta
data are loaded. To proceed to the next level, execute ALTER DATABASE dababase_name SERVICE;
statement.
META UPGRADE
The step of starting up a database is changed to the step for META UPGRADE statement. In this
phase, the meta data are upgraded and all recovery tasks are completed at this stage.
To proceed to the next level, execute ALTER DATABASE dababase_name SERVICE; statement.
61
Data Definition Statements
ALTER DATABASE
META RESETLOGS
Incomplete recovery can be performed at the control stage during multi-level startup of a database
and it is required to ensure normal startup of the server. Performing incomplete recovery initializes
unnecessary log records.
To proceed to the next level, execute ALTER DATABASE dababase_name SERVICE; statement.
META RESETUNDO
While the SYS_TBS_DISK_UNDO tablespace is initialized, the file size is not adjusted. It should be
ensured that disk garbage collection is performed for integrity of a database before this statement is
executed.
SHUTDOWN NORMAL
Wait until all client connections to the server are normally disconnected before shutting down the
server normally.
SHUTDOWN IMMEDIATE
Shut down the server normally after forcing disconnection of all client connections to the server.
RENAME DATAFILE
You can move or relocate the datafile to another location, and modify data files in database using
this command only at control level while database runs. Data files should reside in TO datafile_path
to be moved. Great attention should be paid to this fact.
You should enter a relative or absolute path, where data files are created, in datafile_path. For a relative path, you should enter a path under $ALTIBASE_HOME/dbs/. SPACE statement should be used
when you move checkpoint image files in memory tablespace for your guidance.
CREATE DATAFILE
When a data file is lost, create a data file by referring to the log anchor data. After executing this
statement, perform complete media recovery to recover a data file. This statement is available only
for control level while database runs.
Enter a relative or absolute path for the directory in datafile_path where a data file will be created.
For a relative path, enter a path under $ALTIBASE_HOME/dbs/. ALTER TABLESPACE statement should
be used when you create checkpoint image files in memory tablespace for your guidance.
CREATE CHECKPOINT IMAGE
Memory checkpoint image file is created by referring to the log anchor data when it is lost. You can
restore it with media recovery after executing this statement.
You don't have to set a path but a file name because checkpoint image file is created in checkpoint
path specified by memory tablespace. This statement is availeable only for control level while database runs.
SQL Users’ Manual
62
ALTER DATABASE
<Query> You should create a checkpoint image file named as MEM-TBS-1’ again.
iSQL> ALTER DATABASE CREATE CHECKPOINT IMAGE 'MEM-TBS-1';
SESSION CLOSE
Terminates the session forcefully. Specify the session_id after SESSION CLOSE clause. When the
statement submitted the transaction will be rolled back immediately.
You can control the database startup phases manually using ALTER DATABASE statement. But you
can shut down your database only with ABORT option in that startup phase.
About Altibase starting up phases and about starting up a database, see Administrator’s Manual.
archivelog_option
Switch database mode to the archivelog or non-archivelog mode at the server control stage.
BACKUP LOGANCHOR
When a database is operating in the archivelog mode, perform online backup of log anchors without service interruption.
BACKUP TABLESPACE
When a database is operating in the archivelog mode, backup the specified tablespace to the
backup directory without service interruption.
BACKUP DATABASE
When a database is operating in the archivelog mode, backup all memory and disk tablespaces and
log anchors without service interruption.
RECOVER DATABASE
Perform complete media recovery. Read log files in the archive log directory and recover data files
with media errors to the data files at the current point.
RECOVER DATABASE UNTIL TIME
Recover the entire database from the point when data was backed up to a certain point in the past
after that.
RECOVER DATABASE UNTIL CANCEL
Recover the entire database from the point when data was backed up to the point when valid log
files or log records were included.
63
Data Definition Statements
ALTER DATABASE
AltiLinker_clause
Terminate or restart AltiLinker process that enables data exchange with a remote server at a database link.
LINKER START
Start AltiLinker process. However, AltiLinker should not exist.
LINKER STOP
Terminate AltiLinker process. However, there should be no transaction that uses the database link at
the time of termination. This operation fails if there is a transaction that uses the database link.
Examples
<Query> Assuming you are in CONTROL phase, Start up your database service to be accessible by all
users.
iSQL> ALTER DATABASE mydb SERVICE;
<Query> Operate a database in the archivelog mode.
iSQL> ALTER DATABASE ARCHIVELOG;
<Query> Start up a database normally that was recovered incompletely.
iSQL> ALTER DATABASE mydb META RESETLOGS;
<Query> Initialize the SYS_TBS_DISK_UNDO tablespace.
iSQL> ALTER DATABASE mydb META RESETUNDO;
<Query> Back up the SYS_TBS_DISK_DATA tablespace to /altibase_backup.
iSQL> ALTER DATABASE TABLESPACE SYS_TBS_DISK_DATA TO ‘/altibase_backup/’;
<Query> Recover a database from the point when it was backed up to Feb. 16, 2008, 12:00 PM.
iSQL> ALTER DATABASE RECOVER DATABASE UNTIL TIME ‘2008-02-16:12:00:00’’
<Query> Recover a database from the point when it was backed up to the log file #20000 right
before the lost log file #20001.
iSQL> ALTER DATABASE RECOVER DATABASE UNTIL CANCEL;
<Query> Start up a AltiLinker for Database to link
iSQL> ALTER DATABASE LINKER START;
<Query> Stop the AltiLinker.
iSQL> ALTER DATABASE LINKER STOP;
SQL Users’ Manual
64
ALTER INDEX
ALTER INDEX
Syntax
alter_index ::=
ALTER
index_name
INDEX
.
user_name
set_persistent_clause
;
rebuild_index_partition
RENAME
TO
new_name
alter_index_properties
AGING
set_persistent_clause ::=
ON
SET
PERSISTENT
=
OFF
rebuild_index_partition ::=
REBUILD
PARTITION
index_partition _name
index_attribute
index_attribute ::=
TABLESPACE
tablespace_name
65
Data Definition Statements
ALTER INDEX
alter_index_properties::=
alter_index_segment _attribute_clause
allocate_extent_clause
alter_index_segment_attribute_clause::=
INITRANS
integer
MAXTRANS
integer
storage_clause
storage_clause::=
STORAGE
(
INITEXTENTS
integer
NEXTEXTENTS
integer
MINEXTENTS
integer
)
integer
MAXEXTENTS
UNLIMITED
allocate_extent_clause::=
ALLOCATE
EXTENT
(
SIZE
)
integer
K
M
G
Prerequisites
The index must be in your own schema or you must have ALTER ANY INDEX system privilege.
SQL Users’ Manual
66
ALTER INDEX
Description
The ALTER INDEX statement to change or rebuild an existing index
user_name
Specify the owner name of the index to be altered.
If omitted, Altibase will consider it as belonging to the schema of the user connected to the current
session.
index_name
Specify the name of the index to be altered.
SET PERSISTENT clause
Creates the PERSISTENT index, and alters it. About the PERSISTENT INDEX, see the CREATE INDEX
statement.
Warning: You can not use ALTER INDEX statement for the index on the replication table.
rebuild_index_partition
Rebuild an index partition in the specified tablespace.
RENAME
This sets the name of index to be changed.
index_attribute
Specify the tablespace name.
alter_index_segment_attributte_clause
•
INITRANS Clause
This alters the initial number of TTS(Touched Transaction Slot)s.
•
MAXTRANS Clause
This alters maximum number of TTS(Touched Transaction Slot)s.
storage_clause
This enables you to set storage parameter for managing the extents in the segments.Extent size in
each parameter is set to its mutiple value by default. Otherwise, ALTIBASE resizes it.
67
Data Definition Statements
ALTER INDEX
•
INITEXTENTS Clause
INITEXTENTS is ignored in ALTER INDEX statement.
•
NEXTEXTENTS Clause
This alters the number of extents when you want to expand them in case of creating a segment.
•
MINEXTENTS Clause
This alters minimum number of extents in segment.
•
MAXEXTENTS Clause
This alters maximum number of extents in segment.
allocate_extent_clause
This allocates explicitly extent to index segment. At this time, you should set proper extent size for
additionally allocating extent to index segment. If disk tablespace consists of several data files,
extents are allocated to them equally.
Restrictions
If the indexes you want to change are on replication table, you can't use them. However, you can use
‘ALTER INDEX SET PERSISTENT = ON/OFF’, ‘ALTER INDEX REBUILD PARTITION.’
Example
Change persistent index.
<Query> Change the index emp_idx1 to be a persistent index.
iSQL> ALTER INDEX emp_idx1 Set PERSISTENT = ON;
Alter success.
<Query> Add a persistent index to index named const1.
iSQL> ALTER INDEX const1 SET PERSISTENT = ON;
Alter success.
Rebuild an index partition.
<Query> Rebuild the index partition IDX_P5 to the tablespace TBS1.
iSQL> ALTER INDEX IDX1 REBUILD PARTITION IDX_P5 TABLESPACE TBS1;
Index Name Change
<Query> You should change emp_idx1 into emp_idx2.
SQL Users’ Manual
68
ALTER INDEX
iSQL> ALTER INDEX emp_idx1 RENAME TO emp_idx2;
Allocating extents to index
<Query> You should allocate 10M extent to LOCAL_IDX in disk tablespace.
iSQL> ALTER INDEX felt_idx ALLOCATE EXTENT ( SIZE 10M );
Alter success.
69
Data Definition Statements
ALTER QUEUE
ALTER QUEUE
Syntax
alter_queue ::=
ALTER
QUEUE
queue_name
user_name
COMPACT
;
.
Description
This alters the definition of queue.
COMPACT
This returns blank pages to the tablespace. When using compaction method supported only for
memory and volatile tables and queue, ALTIBASE doesn't transfer data.
SQL Users’ Manual
70
ALTER REPLICATION
ALTER REPLICATION
Syntax
alter_replication ::=
ALTER
replication _name
REPLICATION
SYNC
ONLY
PARALLEL
parallel _factor
TABLE
.
user _name
tbl_name
,
START
QUICKSTART
STOP
;
ADD
TABLE
DROP
HOST
FROM
user_name
.
tbl_name
TO
user _name
.
tbl_name
where _clause
remote_host_ip
.
remote_port _no
FLUSH
ALL
WAIT
HOST
remote_host_ip
MODE
ACKED
SET
wait_time
.
remote_port _no
LAZY
EAGER
Description
The statement to control replication after creating replication is as follows. Refer to Replication User’s
Manual for details about it.
replication_name
Specify the replication object name.
SYNC
Sends all data of the replication tables in the local server to the remote database tables, and starts
the replication.
SYNC ONLY
Sends all data of the replication tables in the local server to the remote database tables. The sender
71
Data Definition Statements
ALTER REPLICATION
is not created with this option.
PARALLEL parallel_factor
Parallel_factor values are available to be omitted. If you omit them, they are recognized as 1. The
maximum values of Parallel_factor are the number of CPU * 2, and the maximum values can't be
over them even though you specify the maximum values as those in excess. Error message appears
when you specify 0 or minus values.
TABLE user_name.table_name
You can specify the table for synchronization among replication tables of the remote server. If you
want to do replication, you can start to do at the last replication process. And if you don't want to use
TABLE clause, you can start to do replication at the place of current logs.
START
Replication starts from the latest replication point.
QUICKSTART
The replication starts from the current point.
STOP
Stops the replication.
ADD TABLE
Adds the table to be replicated. The user can add a table to replication only when the replication is
stopped.
where_clause
See where_clauase of SELECT statement. Replication conditional clauses specify only logs suited for
conditions as the destination replication with WHERE user_name.table_name.column_name {< | > |
<> | >= | <= | = | !=} value [{AND | OR} ... ]. However, it can be used only on ADD TABLE.
user_name
This indicates user's name of replication table.
tbl_name
This indicates replication table name.
SQL Users’ Manual
72
ALTER REPLICATION
FLUSH
You may wait until changed data are transferred to the other server by replication sender thread for
wait_time seconds. If All is used here, you may wait until changed data, which not current logs but
the latest logs have, are transferred to the other server.
SET HOST
This specifies certain host as current one. You can change it while replication terninates.
SET MODE
This changes current mode into another when you create replication.
All changes can occur while replication terminates, and you can choose one of LAZY, ACKED and
EAGER modes.
Considerstions
There are several considerations for replication users must understand before using the features.
Please see your Replication User’s Manual before you summit ALTER REPLICATION command.
Examples
•
Starting the repl1 replication object to work.
<Query> Send the local server data to the remote server, and start replication.
iSQL> ALTER REPLICATION rep1 SYNC;
Alter success.
<Query> Start rep1 replication from the most recent replication point.
iSQL> ALTER REPLICATION rep1 START;
Alter success.
<Query> Start the replication.
iSQL> ALTER REPLICATION rep1 QUICKSTART;
Alter success.
•
Removing a table from replication assuming the replication name is rep1 .
<Query> Remove the replicated table employee from the replication rrepl1.
iSQL>
Alter
iSQL>
Alter
ALTER REPLICATION rep1 STOP;
success.
ALTER REPLICATION rep1 DROP TABLE FROM sys.employee TO sys.employee;
success.
73
Data Definition Statements
ALTER REPLICATION
•
Adding a table to the replication object assuming that the replication name is rep1 .
<Query> Add a table employee to the replication repl1.
iSQL>
Alter
iSQL>
Alter
•
ALTER REPLICATION rep1 STOP;
success.
ALTER REPLICATION rep1 ADD TABLE FROM sys.employee TO sys.employee;
success.
Stop the replication rep1.
<Query> Stop replication.
iSQL> ALTER REPLICATION rep1 STOP;
Alter success.
SQL Users’ Manual
74
ALTER SEQUENCE
ALTER SEQUENCE
Syntax
alter_sequence ::=
INCREMENT
BY
integer
integer
MAXVALUE
NOMAXVALUE
ALTER
SEQUENCE
seq_name
user_name
integer
MINVALUE
;
.
NOMINVALUE
CYCLE
CACHE
integer
Prerequisites
The sequence must be in your own schema, or you must have the ALTER object privilege on the
sequence, or you must have the ALTER ANY SEQUENCE system privilege.
Description
A statement to change the increment, minimum and maximum values, cached numbers, and behavior of an existing sequence.
user_name
Specifies the owner name of the sequence to be altered.. If omitted, Altibase will consider it as
belonging to the schema of the user connected to the current session.
seq_name
Specifies the name of the sequence to be altered.
INCREMENT BY
Specify the interval between sequence numbers.
75
Data Definition Statements
ALTER SEQUENCE
MAXVALUE
Specify the maximum value the sequence can generate.
MINVALUE
Specify the minimum value of the sequence.
CYCLE
Specify CYCLE to indicate that the sequence continues to generate values after reaching either its
maximum or minimum value. After an ascending sequence reaches its maximum value, it generates
its minimum value. After a descending sequence reaches its minimum, it generates its maximum
value.
CACHE
Specify how many values of the sequence the database pre-allocates and keeps in memory for faster
access.
Precautions
START WITH clause cannot be used when you already use ALTER SEQUENCE statement even once
after create it. Because the sequence was created already.
Examples
<Query> Alter the minimum and the maximum of sequence seq1 into 0 and 100 respectively, and
set it to increase by 1.
iSQL> ALTER SEQUENCE seq1
INCREMENT BY 1
MINVALUE 0
MAXVALUE 100;
Alter success.
<Query> Alter the minimum and the maximum of sequence seq2 into unlimited value.
iSQL> ALTER SEQUENCE seq2
NOMAXVALUE
NOMINVALUE;
Alter success.
SQL Users’ Manual
76
ALTER TABLE
ALTER TABLE
Syntax
alter_table::=
TABLE
ALTER
table_name
user_name
.
alter_table_properties
alter_table_segment_properties
alter_table_partitioning
column_clauses
constraint_clauses
RENAME
TO
MAXROWS
integer
new_tbl_name
;
ENABLE
ALL
INDEX
DISABLE
AGING
allocate_extent_clause
alter_table_properties::=
logging _clause
parallel _clause
row_movement_clause
77
Data Definition Statements
ALTER TABLE
alter_table_segment_properties::=
alter_table_segment_attribute_clause
alter_table_segment_attribute_clause::=
PCTFREE
integer
INITRANS
integer
PCTUSED
integer
MAXTRANS
integer
storage_clause
storage_clause::=
STORAGE
INITEXTENTS
integer
NEXTEXTENTS
integer
MINEXTENTS
integer
(
integer
MAXEXTENTS
UNLIMITED
alter_table_partitioning::=
add_table_partition
coalesce_table_partition
drop_table_partition
merge_table_partition
rename_table_partition
split_table_partition
truncate_table_partition
SQL Users’ Manual
78
)
ALTER TABLE
add_table_partition ::=
ADD
alter_table_partition _spec
alter_table_partition_spec ::=
PARTITION
partition_name
table_partition_description
alter_table_index_partition_description
table_partition_description ::=
TABLESPACE
tablespace_name
LOB_storage_clause
alter_table_index_partition_description ::=
INDEX
(
partitioned index_name
PARTITION
index_partition_name
)
TABLESPACE
tablespace_name
,
coalesce_table_partition ::=
COALESCE
PARTITION
79
Data Definition Statements
ALTER TABLE
drop_table_partition ::=
DROP
PARTITION
partition_name
merge_table_partition ::=
MERGE
PARTITIONS
partition_1
,
partition_2
INTO
alter_table_partition_spec
rename_table_partition ::=
RENAME
PARTITION
old_partition_name
TO
new_partition_name
split_table_partition ::=
AT
SPLIT
PARTITION
partition_name
(
VALUES
INTO
(
alter_table_partition_spec
,
truncate_table_partition ::=
TRUNCATE
SQL Users’ Manual
PARTITION
partition_name
80
alter_table_partition_spec
value
)
,
)
ALTER TABLE
column_clauses::=
add_column_clause
alter_column_clause
modify_column_clause
drop_column_clause
rename_column_clause
add_column_clauses::=
ADD
(
column_definition
COLUMN
)
lob_storage_clause
,
partition_lob_storage_clause
partition_lob_storage_clause ::=
(
PARTITION
partition_name
LOB_storage_clause
)
,
81
Data Definition Statements
ALTER TABLE
alter_column_clause ::=
SET
ALTER
(
column_name
DEFAULT
DROP
COLUMN
expr
DEFAULT
)
NULL
NOT
partition_lob_storage_clause
lob_storage_clause
modify_column_clause::=
modify_column_spec
MODIFY
COLUMN
modify_column_spec
(
)
,
modify_column_spec::=
column_name
data_type
FIXED
TOLERATE
VARIABLE
DEFAULT
expr
NULL
NOT
SQL Users’ Manual
82
DATA
LOSS
ALTER TABLE
drop_column_clause::=
column_name
DROP
COLUMN
column_name
(
)
,
rename_column_clause::=
RENAME
COLUMN
column_name
TO
new_column_name
constraint_name
TO
new_constraint_name
constraints_clauses::=
add_table_constraint_clauses
rename_constraint_clauses
drop_constraint_clauses
add_table_constraint_clauses ::=
ADD
table_constraint
rename_constraint_clauses ::=
RENAME
CONSTRAINT
83
Data Definition Statements
ALTER TABLE
drop_constraint_clauses ::=
CONSTRAINT
constraint_name
DROP
PRIMARY
UNIQUE
KEY
(
column_constraint
)
,
allocate_extent_clause::=
ALLOCATE
EXTENT
(
)
integer
SIZE
K
M
G
Prerequisites
To alter a relational table in your own schema, you must have the ALTER TABLE system privilege. To
create a table in another user's schema, you must have the ALTER ANY TABLE system privilege.
Description
ALTER TABLE is an SQL statement to change table definition. Meta information is modified after executing this statement.
Use the ALTER TABLE statement to change the attributes of a partitioned table. The related statements include ADD, COALESCE, DROP, MERGE, RENAME, SPLIT and TRUNCATE.
The following table shows whether each statement can be used for range, list or hash partition.
Range Partition
List Partition
Hash Partition
ADD
X
X
O
COALESCE
X
X
O
DROP
O
O
X
MERGE
O
O
X
SQL Users’ Manual
84
ALTER TABLE
Range Partition
List Partition
Hash Partition
RENAME
O
O
O
SPLIT
O
O
X
TRUNCATE
O
O
O
Operations Supported by Different Partitioning
user_name
Specify the owner name of the table to be altered.. If omitted, Altibase will consider it as belonging
to the schema of the user connected to the current session.
tbl_name
Specify the name of the table to alter.
COMPACT
This indicates to return free pages in tablespace. Altibase doesn't move data when executing compaction, and supports this syntax for memory table, volatile table and queue.
alter_table_segment_attribute_clause
•
PCTFREE Clause
You can alter the ratio of free space to reserve for future updates of the existing records in page
after executing alter_table_segment_attribute_clause while ALTIBASE runs.
However, changes are not immidiately reflected in all pages but are reflected in table page
after next operatoin.
•
PCTUSED Clause
You can alter the minimum percentage of used space for reinsertion.
•
INITRANS Clause
This alters the initial number of TTS(Touched Transaction Slot)s.
•
MAXTRANS Clause
This alters maximum number of TTS(Touched Transaction Slot)s.
storage_clause
This enables you to set storage parameter for managing the extents in the segments.Extent size in
each parameter is set to its mutiple value by default. Otherwise, ALTIBASE resizes it.
•
INITEXTENTS Clause
85
Data Definition Statements
ALTER TABLE
INITEXTENS is ignored in ALTER INDEX statement,
•
NEXTEXTENTS Clause
This alters the number of extents when you want to expand them in case of creating a segment.
•
MINEXTENTS Clause
This alters minimum number of extents in segment.
•
MAXEXTENTS Clause
This alters maximum number of extents in segment.
add_table_partition
A statement that adds a partition to a partitioned table. It can be used with a hash-partitioned
table.If a local index is built in the existing table, a local index is also built in the added partition. At
this time, the index name is automatically created by the system and the tablespace follows a
tablespace in a partition.
alter_table_partition_spec
Specify the partition name and a tablespace. A tablespace can be omitted. If it is, data is stored in a
tablespace where the table is located. Furthermore, if there is an index in the table, a tablespace to
store an index partition can be specified.
table_partition_description
Specify a tablespace for each partition and the attributes of LOB column if it is available.
If the tablespace statement is omitted, data is stored in the default tablespace where a table is
located. Likewise, if the tablespace statement is omitted, data is stored in the tablespace in the partition.For more information on applying a tablespace, please refer to table_partition_description in
the CREATE TABLE statement.
alter_table_index_partition_description
When SPLIT PARTITION, MERGE PARTITION or ADD PARTITION is executed, a new partition is created.
During this time, this statement can be used to specify a tablespace that stores an index partition
which is created along with the tablespace.
coalesce_table_partition
It can be used with hash partitions only. It coalesces hash partitions and reconfigures data. If partitions are coalesced, partitions and their name are removed, beginning with the last partition and its
name.
SQL Users’ Manual
86
ALTER TABLE
drop_table_partition
It removes a partition. Data and local indices in the partition are removed. To keep data, merge with
other partition before performing DROP.
merge_table_partition
Merge two partitions into one. Specify the name of a new partition in the INTO clause. One of two
partition names or a name that does not exist in the table can be used.
For range partitions, partitions are merged into the one with a greater upper limit among two partitions.
For list partitions, partitions are merged into the one with the union of the key values of two partitions.
When partitions are merged into the default partition, the domain of the merged partitions is
included in the domain of the default partition and only the default remains.
If there are local indices in the table, the local indices of the merged partitions are deleted.
If there is a LOB column, its attributes can be specified separately.If a tablespace is not specified, the
rule of the default tablespace for the table is followed regardless of the name of the newly created
partition.
rename_table_partition
Rename a partition.
split_table_partition
Split a partition into two partitions.
The AT clause can only be used with range partitions, and it specifies criteria based on which partitions are split into two. At this time, the criteria should be larger than the criteria of the left partition
and smaller than the criteria of partitions before split.
The VALUES clause can only be used with list partitions, and it specifies the list of values to split in
the existing partition value list. At the time, a value for the VALUES clause should come from the list
of the existing partition values, but it cannot include the list itself.
The INTO clause can be used to specify the name of the two split partitions and a tablespace.
If there are local indices, the local index partition is also split along with the partition.
If there is a LOB column, its attributes can be specified separately.
truncate_table_partition
Delete all data in a partition.
add_column_clause
Add new column to table
partition lob clause
When adding a LOB column to a partitioned table, the user can determine which tablespace to store
the column by partition.
87
Data Definition Statements
ALTER TABLE
alter_column_clauses
Alter the default value of existing column
modify_column_clause
This changes data type of the existing column. The following table shows whether data type can be
changed into another one or not.
o
o
o
△ △ △ △ △ △ △ △ △
nvarchar
o
o
o
o
△ △ △ △ △ △ △ △ △
bigint
o
o
o
o
o
double
o
o
o
o
△ o
float
o
o
o
o
△ △ △ △ △ △ △ △
integer
o
o
o
o
o
number
o
o
o
o
△ △ △ △ △ △ △ △
numeric
o
o
o
o
△ △ △ △ △ △ △ △
real
o
o
o
o
△ △ △ △ △ △ o
smallint
o
o
o
o
o
date
△ △ △ △
float
o
o
o
o
clob
△ △ o
△ △ △ o
△ △ △ △ △ △
△ △ o
△ △ o
△ △ △ o
△
△ △ △ o
o
blob
byte
o
nibble
o
bit
varbit
SQL Users’ Manual
o
88
geometry
o
varbit
nchar
bit
△ △ △ △ △ △ △ △ △
nibble
o
byte
o
blob
o
date
o
smallint
varchar
real
△ △ △ △ △ △ △ △ △
numeric
o
number
o
integer
nvarchar
o
double
nchar
o
bigint
varchar
char
clob
After
ModificationB
efore
Modification
char
△ means the possibility of data loss in case of changing their type if data in the table don't have null.
TOLERATE DATA LOSS can be used if you wamt to change data type even with their loss. Data type is
modified depending on default_date_format .
geometry
geometry
varbit
bit
nibble
byte
blob
date
smallint
real
numeric
number
integer
float
double
bigint
clob
nvarchar
nchar
varchar
After
ModificationB
efore
Modification
char
ALTER TABLE
o
drop_column_clause
DROP [COLUMN]This deletes one column or several columns.
rename_column_clause
•
RENAME COLUMN
Rename the column
•
DROP CONSTRAINT
Remove the constraints
•
DROP PRIMARY KEY
Remove the primary key
•
DROP UNIQUE
Drop unique restrictions
•
RENAME TO
Rename table
•
MAXROWS
Alter the maximum record number when creating table (See CREATE TABLE)
•
ENABLE/DISABLE
You can activate or deactivate all indexes in tbl_name with this clause. Server can have better
performance by minimizing time1 at buiding them when server is restarted or at run-time.
For example, if many indexes exist in table, it takes much time2 to load a large amount of data
in database or relocate them to new table by using iLoader due to operation for indexes. You
can minimize time at building indexes by diabling indexes and then enabling again after
inserting a large amount of records. Therefore, you can realize the performance improvements.
1.
You can use statement for building index parallely when restarting server to maximize performance, and use persistent index statement to reflect indexes on disk when shutting down server normally.
2.
The necessary time is proportional to the number of indexes when you create them in table containing a large amount of data in database. You cannot build several indexes in one table simultaneously,
but can minimize time by building each of them parallely.
89
Data Definition Statements
ALTER TABLE
column_definition
•
Default
: Specify new default values for the attributes of the table.
•
TIMESTAMP
: Adds timestamp column
column_constraint
Adds constraints for the column
NULL/NOT NULL: Specify whether Null values is allowed in the column. In case of a row for which
null is not allowed, a column can be added by ALTER TABLE only when a default has been specified.
In other words, NULL must be allowed or a default value must be defined for a new row to be added
to the table.
•
SET PERSISTENT
For details, see CREATE INDEX.
•
USING INDEX TABLESPACE tablespace_name
Specify the tablespace to store the index created for the constraints.
* Many clauses in ALTER TABLE statement have the same function as CREATE TABLE statement. For
more information about such clauses, see CREATE TABLE statement also.
constraints_clause
This clause adds table constraint, and changes and deletes its name.
add_table_constraints_clause
This adds table constraint.
rename_constraints_clause
This changes the name of table constraint.
drop_constraints_clause
This deletes table constraint.
AGING
This eliminates old version deleted logically in table.
allocate_extent_clause
This allocates explicitly extent to table segment. At this time, you should set proper extent size for
additionally allocating extent to table segment. If disk tablespace consists of several data files,
extents are allocated to them equally.
SQL Users’ Manual
90
ALTER TABLE
Precautions
In case of a replication target table, the definition of the table cannot be altered. It isn't available to
change data type of column in table for replication because changing data type means to alter table
definition.
If there is only one partition, COALESCE/DROP TABLE PARTITION cannot be used.
DROP PARTITION and MERGE PARTITION cannot be used with hash-partitioned tables. Instead, the
COALESCE PARTITION statement should be used. In addition, SPLIT PARTITION cannot be used with
hash-partitioned tables.
For range-partitioned tables, partitions to merge should be adjacent to each other.
If there is a primary key or unique key referred to by another table, the definition of the table cannot
be altered.
The maximum number of columns can not exceed 1024 or become 0 by adding or removing of column. If data type of column is VARCHAR in table, maximum number of columns is 500.
No more than two basic keys may exist in one table.
For a reference constraint, the foreign key and the reference key must have the same number of columns and the same datatype.
If foreign key identifies a column or a column exists in the referenced table, you cannot modify its
data type not to change its value.
Up to 64 indexes can be created in one table. The total number of primary keys or the unique keys
must not exceed 32.
When SELETC/UPDATE/DELETE statement is executed for a table with an in-activated index, the following error message will be displayed;
Index was disabled.
The solution is to executes SELECT/UPDATE/DELETE statements after running ALTER TABLE …
ENABLE;.
Constraints
You can not add or remove a timestamp column using ADD/DROP CONSTRAINT clause. The reason
is that the default value of timestamp column is the system time of the row is last modified.
Example
Add/Drop a New Column
<Query> Add a column on the table book.
isbn : CHAR(10) PRIMARY KEY
edition : INTEGER DEFAULT 1
91
Data Definition Statements
ALTER TABLE
iSQL> ALTER TABLE book
ADD COLUMN (isbn CHAR(10) PRIMARY KEY,
edition INTEGER DEFAULT 1);
Alter success.
or
iSQL> ALTER TABLE book
ADD COLUMN (isbn CHAR(10) CONSTRAINT const1
PRIMARY KEY, edition INTEGER DEFAULT 1);
Alter success.
<Query> Drop isbn column from the table book.
iSQL> ALTER TABLE book
DROP COLUMN isbn;
Alter success.
<Query> You should delete isbn and edtion in book table.
iSQL> ALTER TABLE book DROP COLUMN (isbn, edition);
Alter success.
<Query> Add TIMESTAMP column from the table book.
iSQL> ALTER TABLE book
ADD COLUMN (due_date TIMESTAMP);
Alter success.
<Query> Drop TIMESTAMP column from the table book.
iSQL> ALTER TABLE book
DROP COLUMN due_date;
Alter success.
Add/Drop constraints for an existing column
<Query> Add the unique constraint to the existing book number of the table book.
iSQL> ALTER TABLE book
ADD UNIQUE(bno);
Alter success.
or
iSQL> ALTER TABLE book
ADD CONSTRAINT const1 UNIQUE(bno);
Alter success
<Query> You should change the name of const1 on book table.
iSQL> ALTER TABLE book
RENAME CONSTRAINT const1 TO const_unique;
Alter success
<Query> You should drop unique constraint of bno column of the table book.
iSQL> ALTER TABLE book
DROP UNIQUE(bno);
Alter success.
or
iSQL> ALTER TABLE book
SQL Users’ Manual
92
ALTER TABLE
DROP CONSTRAINT const_unique;
Alter success
<Query> Add fk_isbn to refer to isbn of the book table when adding the next column to the table
inventory.
isbn : CHAR(10)
iSQL> ALTER TABLE inventory
ADD COLUMN(isbn CHAR(10) CONSTRAINT fk_isbn REFERENCES book(isbn));
Alter success.
<Query> Drop the constraining fk_isbn from table inventory.
iSQL> ALTER TABLE inventory
DROP CONSTRAINT fk_isbn;
Alter success.
<Query> Drop the primary key from the table book.
iSQL> ALTER TABLE book
DROP PRIMARY KEY;
Alter success.
<Query> Add a PRIMARY KEY restriction to the existing book number (bno) in the table book, and
ensure that the index can be used even when a system or media fault occurs (LOGGING).
iSQL> ALTER TABLE book
ADD PRIMARY KEY (bno) USING INDEX PARALLEL 4;
Alter success.
Or
iSQL> ALTER TABLE book
ADD PRIMARY KEY (bno) USING INDEX LOGGING
PARALLEL 4;
Alter success.
<Query> Add a PRIMARY KEY restriction to the existing book number (bno) in the table book. Create
an index with NOLOGGING option, ensuring that the index can be used even when the server is
dead (FORCE).
iSQL> ALTER TABLE book
ADD PRIMARY KEY (bno) USING INDEX NOLOGGING PARALLEL 4;
Alter success.
Or
iSQL> ALTER TABLE book
ADD PRIMARY KEY (bno) USING INDEX NOLOGGING FORCE PARALLEL 4;
Alter success.
<Query> Add a PRIMARY KEY restriction to the existing book number (bno) in the table book. Create
an index with NOLOGGING option, ensuring that it is not committed to disk (NOFORCE).
iSQL> ALTER TABLE book
ADD PRIMARY KEY (bno) USING INDEX NOLOGGING NOFORCE PARALLEL 4;
Alter success.
93
Data Definition Statements
ALTER TABLE
Specify a tablespace for each index partition.
<Query> Add I2 column with LOCALUNIQUE restriction to the partitioned table T1.
iSQL> ALTER TABLE T1 ADD COLUMN
(I2 INTEGER LOCALUNIQUE USING INDEX LOCAL
(
PARTITION P1_LOCALUNIQUE ON P1 TABLESPACE TBS3,
PARTITION P2_LOCALUNIQUE ON P2 TABLESPACE TBS2,
PARTITION P3_LOCALUNIQUE ON P3 TABLESPACE TBS1
)
);
Rename the column
To alter the column name in a table. The new column name must not be the same as another column name in the table. When the column is renamed, the new column will receive all index and constraints related to the previous column.
When a stored procedure related to the previous column exists, the corresponding stored procedure
is changed as invalid. Therefore, when using the stored procedure again, the users need to alter the
stored procedure into a new column name.
<Query> Alter column name dno into dcode in the table department.
iSQL> ALTER TABLE department
RENAME COLUMN dno TO dcode;
Alter success.
Setting DEFAULT Value
<Query> Set the default of gender in the table employee as ‘M.’
iSQL> ALTER TABLE employee
ALTER (gender SET DEFAULT 'M');
Alter success.
<Query> Drop the default setting of gender from the table employee.
iSQL> ALTER TABLE employee
ALTER (gender DROP DEFAULT);
Alter success.
Changing Data Type of a Column
<Query> You should specify data type of isbn in book table as CHAR(20) and that of edtion as
BIGINT.
iSQL> ALTER TABLE book MODIFY COLUMN (isbn CHAR(20), edition BIGINT);
Alter success.
SQL Users’ Manual
94
ALTER TABLE
Rename table
<Query> Alter the name of the table book into ebook.
iSQL> RENAME book TO ebook;
Rename success.
or
iSQL> ALTER TABLE book
RENAME TO ebook;
Alter success.
Alter index to be a persistent Index
<Query> Add the primary key constraint on the column isbn with PERSISTENT index to the table
book.
iSQL> ALTER TABLE book
ADD COLUMN (isbn CHAR(10) CONSTRAINT const1
PRIMARY KEY SET PERSISTENT = ON, edition
INTEGER DEFAULT 1);
Alter success.
<Query> Add PERSISTENT index on the column isbn with the primary key constraint to the table
book.
iSQL> ALTER TABLE book
ADD COLUMN (isbn CHAR(10) CONSTRAINT const1
PRIMARY KEY, edition INTEGER DEFAULT 1);
Alter success.
iSQL> ALTER TABLE book
DROP COLUMN isbn;
Alter success.
iSQL> ALTER TABLE book
ADD COLUMN (isbn CHAR(10) CONSTRAINT const1
PRIMARY KEY SET PERSISTENT = ON, edition
INTEGER DEFAULT 1);
Alter success.
Alter MAXROWS
<Query> Set the maximum number of records to be 6000000.
iSQL> ALTER TABLE department MAXROWS 6000000;
Alter success.
Activating a index
<Query> Disable all index in the table orders.
iSQL> ALTER TABLE orders ALL INDEX DISABLE;
Alter success.
Create a partitioned table.
<Query> Create range-, list- and hash-partitioned tables.
95
Data Definition Statements
ALTER TABLE
CREATE TABLE T1
(
I1 INTEGER,
I2 INTEGER
)
PARTITION BY RANGE(I1)
(
PARTITION P1 VALUES LESS THAN (100),
PARTITION P2 VALUES LESS THAN (200),
PARTITION P3 VALUES DEFAULT
) TABLESPACE SYS_TBS_DISK_DATA;
CREATE TABLE T2
(
I1 INTEGER,
I2 INTEGER
)
PARTITION BY LIST (I1)
(
PARTITION P1 VALUES (1,2,3,4),
PARTITION P2 VALUES (5,6,7,8),
PARTITION P3 VALUES DEFAULT
) TABLESPACE SYS_TBS_DISK_DATA;
CREATE TABLE T3
(
I1 INTEGER
)
PARTITION BY HASH (I1)
(
PARTITION P1,
PARTITION P2
) TABLESPACE SYS_TBS_DISK_DATA;
ADD PARTITION
<Query> Add a new partition to a hash-partitioned table.
ALTER TABLE T3 ADD PARTITION P3;
COALESCE PARTITION
<Query> Coalesce partitions in a hash-partitioned table (only two has partitions remain in T3.).
ALTER TABLE T3 COALESCE PARTITION;
DROP PARTITION
<Query> Delete partition P2 from table T1.
ALTER TABLE T1 DROP PARTITION P2;
MERGE PARTITION
<Query> Coalesce the remaining partitions P1 and P3 in table T1 into a new partition named P_1_3.
ALTER TABLE T1 MERGE PARTITIONS P1, P3 INTO PARTITION P_1_3;
SQL Users’ Manual
96
ALTER TABLE
RENAME PARTITION
<Query> Change the name of partition P1 to P1_LIST.
ALTER TABLE T2 RENAME PARTITION P1 TO P1_LIST;
SPLIT PARTITION
<Query> Split the default partition P3 in range partition T1 with the criteria of 350. This will create a
partition named P_200_350 with a range of 200 – 350, and the name of the default partition will be
changed to P_OVER_350.
ALTER TABLE T1 SPLIT PARTITION P3
AT ( 350 ) INTO ( PARTITION P_200_350, PARTITION P_OVER_350 );
<Query> For a list partition, use VALUES instead of AT to split.
ALTER TABLE T2
SPLIT PARTITION P1_LIST VALUES ( 2, 4 )
INTO
(
PARTITION P_2_4 TABLESPACE TBS1,
PARTITION P_1_3 TABLESPACE TBS2
);
TRUNCATE PARTITION
<Query> Delete all data in partition P5.
ALTER TABLE T1 TRUNCATE PARTITION P5;
Use the row_movement_clause statement.
<Query> Table T1 should be a partitioned table. If it is a non-partitioned table, an error will occur.
ALTER TABLE T1 ENABLE ROW MOVEMENT;
Allocating extetnts to table
<Query> You should allocate 10M extent to LOCAL_TBL in disk tablespace.
iSQL> ALTER TABLE LOCAL_TBL ALLOCATE EXTENT ( SIZE 10M );
Alter success.
97
Data Definition Statements
ALTER TABLESPACE
ALTER TABLESPACE
Syntax
alter_tablespace ::=
datafile _tempfile _clause
ALTER
TABLESPACE
tablespace _name
;
m o d ify_checkp o int_p ath_clause
status_clause
backup _clause
datafile_tempfile_clause ::=
DATAFILE
datafile_spec
ADD
TEMPFILE
,
DATAFILE
‘
RENAME
file_name
’
TO
'
file _name
TEMPFILE
,
,
modify_datafile_clause
ALTER
modify_autoextend_clause
DATAFILE
DROP
file_name
'
TEMPFILE
,
SQL Users’ Manual
98
'
’
ALTER TABLESPACE
datafile_spec ::=
‘
file _name
’
SIZE
integer
REUSE
autoextend _clause
K
M
G
autoextend_clause ::=
OFF
AUTOEXTEND
ON
NEXT
integer
maxsize_clause
K
M
G
maxsize_clause ::=
UNLIMITED
MAXSIZE
integer
K
M
G
99
Data Definition Statements
ALTER TABLESPACE
modify_datafile_clause ::=
DATAFILE
file_name
‘
’
TEMPFILE
autoextend _clause
integer
SIZE
K
M
G
modify_autoextend_clause ::=
autoextend _clause
modify_checkpoint_path_clause ::=
ADD
RENAME
DROP
SQL Users’ Manual
CHECKPOINT
CHECKPOINT
CHECKPOINT
PATH
PATH
PATH
‘
‘
chkpoint_path
chkpoint_path
‘
100
’
chkpoint_path
’
TO
‘
’
chkpoint_path
’
ALTER TABLESPACE
status_clause ::=
ONLINE
OFFLINE
DISCARD
backup_clause ::=
BEGIN
BACKUP
END
Prerequisites
The SYS user or the user with the ALTER TABLESPACE system authority can use all functions of the
ALTER TABLESPACE statement.
Description
Use the ALTER TABLESPACE statement to change the definition of disk, temp, memory or volatile
tablespace. Other attributes including data file, temporary file, checkpoint path, auto extension setting and tablespace status can also be changed.
tablespace_name
Specify the name of a tablespace to change.
datafile_tempfile_clause
Add, delete or change a data file or temporary file.
For information on datafile_spec, maxsize_clause and autoextend_clause, please refer to CREATE
TABLESPACE.
ADD DATAFILE | TEMPFILE Clause
Add data or temporary files to the corresponding tablespace.
101
Data Definition Statements
ALTER TABLESPACE
RENAME DATAFILE | TEMPFILE Clause
Rename data or temporary files in a tablespace. More than one file can be renamed at a time. A new
name of TO file_name should have been already created.
modify_datafile_clause
You can change the size and the autoextend attribute of a data or temporary file in disk tablespace.
DROP DATAFILE | TEMPFILE Clause
Remove data or temporary files from a tablespace. More than one file can be removed at a time. If
this clause is executed, files in operating system are not deleted automatically. Therefore, they need
to be managed separately by the user.
modify_checkpoint_path_clause
Add, change or delete a checkpoint image path. Operations related to checkpoint image paths can
only be performed at the control stage.
ADD CHECKPOINT PATH Clause
Add a new checkpoint path to a memory tablespace. It is a DBA’s responsibility to move the existing
checkpoint image files in other checkpoint paths to the new checkpoint path. Because the system
looks for checkpoint image files in all checkpoint paths when a memory tablespace is loaded, checkpoint image files should be stored in one of the checkpoint paths for the tablespace.
If a checkpoint occurs after a new checkpoint path is added, checkpoint image files are distributed
throughout all checkpoint paths including the new checkpoint path.
The DBA should manually create a checkpoint path to add in a file system. However, if the checkpoint path does not exist or the DBA does not have an appropriate permission on the checkpoint
path, an error will occur.
RENAME CHECKPOINT PATH Clause
Change the existing checkpoint path in a memory tablespace with the clause below TO. The DBA
should manually rename an actual checkpoint path in a file system. However, if the checkpoint path
does not exist or the DBA does not have an appropriate permission on the checkpoint path, an error
will occur.
DROP CHECKPOINT PATH Clause
Delete the existing checkpoint path from a memory tablespace. It is a DBA’s responsibility to move
the existing checkpoint image files in the deleted checkpoint path to other remaining checkpoint
paths in a tablespace. Because the system looks for checkpoint image files in all checkpoint paths
when a memory tablespace is loaded, checkpoint image files should be stored in one of the valid
checkpoint paths for the tablespace.
The DBA should manually delete an actual checkpoint path in a file system. There should be at least
one checkpoint path in a memory tablespace. If the DBA attempts to delete the last checkpoint path
SQL Users’ Manual
102
ALTER TABLESPACE
left in a memory space, an error will occur.
modify_autoextend_clause
You can change the autoextend setting, extension unit and max size of a memory or volatile
tablespace by modifying its autoextend attribute.
status_clause
Switch the status of a disk or memory tablespace to ONLINE, OFFLINE or DISCARD.
OFFLINE
If the disk tablespace status is OFFLINE, all data page contents in the tablespace are written in data
files and invalidated in buffer pool.
For a memory tablespace, the data page content is written in checkpoint image files and the page
memory is released.
All index memory for the tablespace is released and the indices created in the table become unavailable. Furthermore, the table to which the tablespace belongs becomes unavailable until the
tablespace is switched to ONLINE.
ONLINE
In this state, all data files in a disk tablespace can be accessed and the tables in the tablespace
become available again.
For a memory tablespace, all data page memory is reassigned and the content of checkpoint image
files is loaded into memory pages.
If the referred tablespace is in a state other than OFFLINE, online operations over the tablespace can
fail.
For a referred tablespace, the tablespace in which the table is, the indices related to the table, BLOB/
CLOB columns and partition tables can be in other tablespace.
DISCARD
Switch the status of a disk or memory tablespace to DISCARD at the STARTUP CONTROL stage.
Tables, indices and BLOB/CLOB columns in the discarded tablespace become unavailable. Furthermore, DISCARD TABLESPACE ignores all during the RESTART RECOVERY and REFINE DB stages.
Once a tablespace is discarded, only DROP TABLESPACE can be performed and it cannot be switched
to ONLINE.
backup clause
This statement can be used to specify the start and end of online backup (hot backup) that copies
data files in a disk or memory tablespace.
103
Data Definition Statements
ALTER TABLESPACE
BEGIN BACKUP
Specify all data files that comprise a tablespace before setting online backup mode. A tablespace
being backed up does not interfere with transaction access.
The user should use BEGIN BACKUP before performing backup. Furthermore, the user can set online
backup mode for more than one tablespace and proceed with online backup. However, a disk temp
tablespace is a not a backup target.
END BACKUP
Indicate that online backup of a disk or memory tablespace is complete. The user should execute the
END BACKUP statement right after online backup is completed.
Caution
With the ALTER TABELSPACE statement, adding of a data file and changing of attributes can only be
performed in online mode, and renaming of a data file can only be performed at the control stage
during multi-level startup.
status_clause cannot be used with a temp or volatile tablespace.
Examples
<Query> Add 64 MB data file tbs2.user to user_disk_tbs tablespace. If a larger space is needed, automatically increase space by 500 KB.
iSQL> ALTER TABLESPACE user_disk_tbs
ADD DATAFILE '/tmp/tbs2.user' SIZE 64M
AUTOEXTEND ON NEXT 500K;
Alter success.
<Query 2> For distributed disk I/O, add ‘/home/path’ to the user_memory_tbs tablespace, and
change the extension unit to 25 6M and the max size to 1 G. (A path can be added at the control
stage only. An attribute can be changed at the service stage.)
iSQL(sysdba)>>startup control;
iSQL(sysdba)>>ALTER TABLESPACE user_memory_tbs ADD CHECKPOINT PATH '/home/
path';
Alter success.
iSQL> ALTER TABLESPACE user_memory_tbs ALTER AUTOEXTEND OFF;
iSQL> ALTER TABLESPACE user_memory_tbs ALTER AUTOEXTEND ON NEXT 256M MAXSIZE
1G;
Alter success.
<Query 3> For the user_volatile_tbs tablespace, change the extension unit to 256 M and the max
size to 1 G.
iSQL> ALTER TABLESPACE user_volatile_tbs ALTER AUTOEXTEND ON NEXT 256M MAXSIZE 1G;
Alter success.
SQL Users’ Manual
104
ALTER TRIGGER
ALTER TRIGGER
Syntax
alter_trigger ::=
ENABLE
ALTER
trigger _name
TRIGGER
user_name
DISABLE
;
.
COMPILE
Prerequisites
Only the SYS user, or a user whose schema includes the trigger or who has ALTER ANY TRIGGER privilege can alter the trigger.
Description
You can enable, disable, or compile a database trigger.
user_name
Specify the owner name of the trigger to be altered. If omitted, Altibase will alter the trigger in the
table belonging to the current user.
trigger_name
Specify the name of the trigger to alter.
ENABLE
Enable the trigger.
DISABLE
Disable the trigger.
COMPILE
Explicitly compile regardless of the validity of the trigger. Explicit recompiling drops the system work
load caused by automatic compiling if the trigger is not valid.
105
Data Definition Statements
ALTER TRIGGER
Examples
<Query> Disable your trigger to be not fired.
iSQL> ALTER TRIGGER del_trigger DISABLE;
Alter success.
SQL Users’ Manual
106
ALTER USER
ALTER USER
Syntax
alter_user ::=
ALTER
USER
IDENTIFIED
TEMPORARY
DEFAULT
user_name
password
BY
tblspace_name
TABLESPACE
TABLESPACE
;
tblspace_name
ON
ACCESS
tblspace_name
OFF
Prerequisites
You must have the ALTER USER system privilege. However, you can change your own password without this privilege.
Description
Changes the authentication or database resource characteristics of a database user.
IDENTIFIED clause
Specify BY password to specify a new password for the user.
Because other usage is the same as with the CREATE USER statement, please refer to the CREATE
USER statement.
107
Data Definition Statements
ALTER USER
Precautions
To change the password for the SYS user that can log on in SYSDBA mode, after changing the password with the ALTER USER statement, the user should change it one more time by running altipasswd in the console of the operating system (Unix shell or DOS window). For more information on
altipasswd, please refer to Utilities User’s Manual.
Examples
<Query> Alter the password of user Tome into Tom.
iSQL> ALTER USER Tome
IDENTIFIED BY Tom;
Alter success.
<Query> Alter the default tablespace of the user.
iSQL> ALTER USER Tom
DEFAULT TABLESPACE uare_data;
Alter success.
SQL Users’ Manual
108
ALTER VIEW
ALTER VIEW
Syntax
alter_view ::=
ALTER
view_name
VIEW
user_name
COMPILE
;
.
Prerequisites
The view must be in your own schema or you must have ALTER ANY TABLE system privilege.
Description
Explicitly recompile a view that is invalid or to modify view constraints.
user_name
Specify the owner name of the view to recompile. If omitted, Altibase will consider it as belonging to
the schema of the user connected to the current session.
view_name
Specify the name of the view to recompile.
When recompiling the view, Altibase reads the view creation statement and compiles it again.
If CREATE VIEW statement includes FORCE option, view may be still invalid even after successful execution of ALTER VIEW statement.
ALTER VIEW statement does not alter the definition of the existing view. Therefore, to define the
view again, use CREATE OR REPLACE VIEW statement.
Examples
<Query> Alter the definition of the table employee. Then, recompile view avg_sal
109
Data Definition Statements
ALTER VIEW
iSQL> ALTER TABLE employee
ADD COLUMN (email VARCHAR(20));
Alter success.
iSQL> SELECT * FROM avg_sal;
[ERR-311BE : This view is invalid.
0001 : SELECT * FROM AVG_SAL
^
^
]
iSQL> ALTER VIEW avg_sal COMPILE;
Alter success.
iSQL> SELECT * FROM avg_sal;
DNO EMP_AVG_SAL
--------------------D001 2075750
C002 1660000
A001 2066666.67
C001 1576666.67
F001 1845000
6 rows selected.
SQL Users’ Manual
110
COMMENT
COMMENT
Syntax
comment_on ::=
user_name
.
table_name
TABLE
view_name
COMMENT
ON
user_name
.
table _name
.
column_name
COLUMN
view_name
IS
‘
comment
’
.
;
Prerequisite
You can write annotation with COMMENT statement only in the following situation:
- You have sys privilege.
- Table or view is one of schema objects for current user.
- You have the ALTER TABLE privilege for table or view.
- You can run ALTER TABLE command on any table in a database.
Description
You can write or modify annotation for a table, view or column with COMMENT statement.
user_name
This sets the name of user who executes COMMENT statement. If you skip this setting, ALTIBASE considers user name is included in user schema of current session.
table_name, view_name
This specifies the table or view where you write annotation.
111
Data Definition Statements
COMMENT
column_name
This sets the name of column where you write annotation.
comment
This specifies annotation which can be written as less size than 4000 bytes. If you want to delete it,
execute COMMENT statement with remaining blank between (‘’).
Example
<Query> Add an annotation to book table and its column of library user.
iSQL> COMMENT ON TABLE library.book IS 'Table of Book Info';
Comment Created.
iSQL> COMMENT ON COLUMN library.book.title IS 'Title of Book';
Comment Created.
<Query> Look up an annotation in book table and its column of library user.
iSQL> SET VERTICAL ON;
iSQL> SELECT * FROM system_.sys_comments_ WHERE user_name = ‘LIBRARY’ AND
table_name = ‘BOOK’;
SYS_COMMENTS_.USER_NAME : LIBRARY
SYS_COMMENTS_.TABLE_NAME : BOOK
SYS_COMMENTS_.COLUMN_NAME : TITLE
SYS_COMMENTS_.COMMENTS : title of book
SYS_COMMENTS_.USER_NAME : LIBRARY
SYS_COMMENTS_.TABLE_NAME : BOOK
SYS_COMMENTS_.COLUMN_NAME :
SYS_COMMENTS_.COMMENTS : table of book info
2 rows selected.
<Query> Delete an annotation in book table and its column of library user.
iSQL> COMMENT ON TABLE library.book IS '';
Comment created.
iSQL> COMMENT ON COLUMN library.book.title IS '';
Comment created.
SQL Users’ Manual
112
CREATE DATABASE
CREATE DATABASE
Syntax
create_database ::=
CREATE
DATABASE
database _name
INITSIZE
integer
=
M
G
ARCHIVELOG
CHARACTER
SET
charaset
;
NOARCHIVELOG
NATIONAL
CHARACTER
SET
charaset
Prerequisites
Only SYS user can submit the statement in the PROCESS phase of starting server.
Description
Create a database, making it available for general use. When a database is created, various system
tablespaces including dictionary tablespace, undo tablespace and temp tablespace are created. The
created system tablespaces have the name defined by the system and the default value for Altibase
properties.
However, a user-defined tablespace cannot be created during database creation, but it can be
added by the user later.
You should specify character set and national character set when creating datbase.
database_name
Specify the name of the database to create. If the database name is specified, it must be the same as
the DB_NAME in the property file. Otherwise, an error will occur when you start up your database.
INITSIZE clause
Specify the size of the memory database to initialize. The size unit of the database space is M (mega).
SYSTEM TABLESPACE will be created when CREATE DATABASE statement is executed.
113
Data Definition Statements
CREATE DATABASE
Create the default value for TABLESPACE by reading following properties from the Altibase property
file;
•
SYS_DATA_TBS_EXTENT_SIZE
•
SYS_DATA_TBS_INIT_SIZE
•
SYS_DATA_TBS_MAX_SIZE
•
SYS_DATA_TBS_NEXT_SIZE
ARCHIVELOG | NOARCHIVELOG
Specify the database archive log mode. ARCHIVELOG mode allows media recovery, NOARCHIVELOG
mode does not allow media recovery.
For more about Altibase backup and recovery, See the Administrator’s Manual.
charset
You should specify database character set and national character set.
•
Available Database Character Set
US7ASCII
KO16KSC5601
MS949
BIG5
GB231280
UTF8
SHIFT-JIS
EUC-JP
•
Available National Character Set
UTF8
UTF16
Examples
<Query> You may create a 10MB database file named as mydb. Database character set should
be KSC5601, and national character set should be UTF16.
shell> is –sysdba
..
iSQL> STARTUP PROCESS;
Trying Connect to Altibase.. Connected with Altibase.
TRANSITION TO PHASE: PROCESS
Command execute success.
iSQL> CREATE DATABASE mydb INITSIZE=10M NOARCHIVELOG CHARACTER SET KSC5601
NATIONAL CHARACTER SET UTF16;
.
.
Create success.
SQL Users’ Manual
114
CREATE DATABASE LINK
CREATE DATABASE LINK
Syntax
create_database_link ::=
CREATE
DATABASE
LINK
dblink _name
PUBLIC
PRIVATE
WITH
host_descriptor
CONNECT
TO
user_id_clause
;
host_descriptor ::=
ODBC
dsn
user_id_clause ::=
user_id
IDENTIFIED
password
BY
object_descriptor ::=
object _name
@
dblink _name
Prerequisites
The SYS user or the user with the CREATE DATABASE LINK system authority can create a database
link.
115
Data Definition Statements
CREATE DATABASE LINK
Since a database link uses ODBC to connect to a remote server, ODBC drivers should be installed in
the server and the DSN for a remote server should be set in the ODBC environment file. For more
information on ODBC settings, please refer to Starting User's Manual.
Description
Create a new database link object with the given database link name.
PUBLIC|PRIVATE
Specify the PUBLIC|PRIVATE attribute of a database link to create. If PUBLIC is specified, the created
database link can be used by all users. If PRIVATE is specified, the created database link can only be
used by the user who creates it. If not specified, a database link is created as PRIVATE.
dblink_name
Specify the name of a database link to create.
dsn
Specify the Data Source Name (DSN) of ODBC when access is made via ODBC.
user_id/password
You should specify id and password of a database user in a remote server to connect. However, user
specified in odbc.ini has higher priority than he specified in this statement if setting user and password in odbc.ini. Therefore, setting ODBC like this isn’t recommanded when you execute CREATE
DATABASE LINK statement.
The user specified here should have an access privilege to a database link that he/she attempts to
access. Otherwise, error related to access privilege will occur.
Location Descriptor
A location descriptor is utilized to use a database link in a DML query statement. A location descriptor consists of the '@' sign and a link name. A location descriptor of a database link can only be used
in the FROM statement.
An object descriptor combined with a location descriptor can be used in object_descriptor::= statement. It specifies object and database link names to enable access to an object in a remote server via
a database link.
Presumption
A database link that the user wants to use should be a PUBLIC database link or the PRIVATE database
link created by the user.
SQL Users’ Manual
116
CREATE DATABASE LINK
object_name
Specify the name of an object in a remote server. This object can be a table or view in a remote
server.
dblink_name
Specify the name of a database link to use.
Cautions
To use a database link, a location descriptor for the link should be specified in the FROM clause. If the
user wants to specify conditions in the WHERE clause for an object in a remote server, he should
assign an alias to the object in the FROM clause and then use the alias in the WHERE clause instead
of using a location descriptor directly in the WHERE clause.
Ex. 1> SELECT * FROM emp@link1;
Ex. 2> SELECT * FROM dept d, emp@link1 AS e
WHERE d.dept_no = e.dept_no;
REMOTE_HINT
When using a database link, it may be efficient to join the found tables from a remote server and
only retrieve its results. When there is a query that needs to be processed by a remote server, the
query can be passed to the remote server with EXEC_REMOTE hint for processing.
Description
Send a query to a remote server for processing.
Usage
EXEC_REMOTE hint can be used when the query targets are objects within the same remote server.
EXEC_REMOTE hint cannot be applied in the following cases:
•
An object in a local server is included.
•
The database link names of objects are different.
•
A stored procedure or sequence is included.
•
A main language variable is used.
•
An external column is referenced in a sub query.
If any of the above conditions is met, EXEC_REMOTE hint is ignored.
If any of the objects in a statement using the hint uses other link or includes an object in a local
server, the hint is ignored.
117
Data Definition Statements
CREATE DATABASE LINK
Furthermore, if a query includes a sub query and both queries use EXEC_REMOTE hint, the hint in
the upper query is applied and the hint in the sub query is ignored. That is, the EXEC_REMOTE hint in
the sub query is applied only when there is no hint in the upper query.
Ex. 1> SELECT /*+EXEC_REMOTE*/ DISTINCT name
FROM employee@link1;
Ex. 2> SELECT /*+EXEC_REMOTE*/ e.dno,
COUNT(e.dno) CNT, AVG(salary)
FROM employee@link1 e, department@link1 d
WHERE e.dno = d.dno
GROUP BY e.dno
HAVING COUNT(e.dno) >= 3;
Ex. 3> SELECT /*+EXEC_REMOTE*/ e.ename, e.birth,
(SELECT /*+EXEC_REMOTE*/
SUM(salary)
FROM employee@link1) sum
FROM employee@link1 e,
(SELECT /*+EXEC_REMOTE*/ dname, dno FROM department@link1) d
WHERE e.dno = d.dno
AND e.emp_job = 'SALESMAN'
AND 10 >
(SELECT /*+EXEC_REMOTE*/ count(*)
FROM department@link1)
ORDER BY e.eno DESC
LIMIT 3;
Examples
<Query 1> In a remote database server of which DSN is altibase_odbc, there is an account for a database link, user1/user1. Create a database link named link1 that can be used only by the user who creates it.
iSQL> CREATE PRIVATE DATABASE LINK link1
WITH ODBC altibase_odbc
CONNECT TO user1 IDENTIFIED BY user1;
<Query 2> In a remote database server of which DSN is altibase_odbc, there is an account for a database link, user1/user1. Create a database link named link2 that can be used by all users in the system.
iSQL> CREATE PUBLIC DATABASE LINK link2
WITH ODBC altibase_odbc
CONNECT TO user1 IDENTIFIED BY user1;
SQL Users’ Manual
118
CREATE DIRECTORY
CREATE DIRECTORY
Syntax
CREATE
DIRECTORY
OR
AS
‘
directory_name
REPLACE
path_name
’
;
Prerequisites
SYS user or a user with CREATE ANY DIRECTORY system privilege can summit this command.
Description
The file control feature of the stored procedure enables the user to read and write the text file of the
operating system. With this feature, the user can leave separate messages related to execution of the
stored message. The user can report the results to the file and insert the data read from the file into
the table.
This statement creates the directories to store files which used to control the stored procedure files
as database objects.
CREATE DIRECTORY statement records directory data in SYS_DIRECTORIES_ meta table and does not
create a new directory in the actual file system. Therefore, the user must explicitly create a directory
in the actual file system.
OR REPLACE
An option to create a new directory with the same name to replace the existing directory. The directory in the actual file system will not be deleted.
directory_name
Specify the directory name as a database object.
path_name
Specify the full path of the directory
119
Data Definition Statements
CREATE DIRECTORY
Examples
<Query> Create a directory named alti_dir1 at the path of /home/altibase/altibase_home/psm_msg.
iSQL> create directory alti_dir1 as
'/home/altibase/altibase_home/psm_msg';
Create success.
<Query>Create a directory named alti_dir1 at the path of /home/altibase/altibase_home/
psm_result. However, if alti_dir1 directory already exists in the database, create a new one.
iSQL> create or replace directory alti_dir1 as
'/home/altibase/altibase_home/psm_result';
Create success.
SQL Users’ Manual
120
CREATE INDEX
CREATE INDEX
Syntax
create_index ::=
CREATE
index_name
INDEX
LOCALUNIQUE
user_name
.
UNIQUE
ON
table _index_clause
index_partitioning _clause
domain _index_clause
;
set_persistent_clause
index_segment_attribute _clause
table_index_clause ::=
tbl_name
user_name
(
)
column_name
.
ASC
DESC
,
index_partitioning_clause ::=
LOCAL
(
PARTITION
index_partition _name
ON
table _partition _name
,
)
TABLESPACE
tablespace_name
121
Data Definition Statements
CREATE INDEX
domain_index_clause ::=
BTREE
INDEXTYPE
IS
RTREE
set_persistent_clause ::=
ON
SET
PERSISTENT
=
OFF
index_segment_attribute_clause::=
TABLESPACE
tablespace_name
parallel_clause
INITRANS
integer
MAXTRANS
integer
storage_clause
parallel_clause ::=
NOPARALLEL
parallel _factor
PARALLEL
logging_clause ::=
LOGGING
NOLOGGING
NOLOGGING FORCE
NOLOGGING NOFORCE
SQL Users’ Manual
122
logging_clause
CREATE INDEX
storage_clause ::=
STORAGE
(
INITEXTENTS
integer
NEXTEXTENTS
integer
MINEXTENTS
integer
)
integer
MAXEXTENTS
UNLIMITED
Prerequisites
The user should be SYS or have the CREATE INDEX authority or the authority that allows access to
index objects in a table for indexing.
Description
An index is a schema object that contains an entry for each value that appears in the indexed column(s) of the table for the fast accessing.
When creating an index, the user can create a local index and assign local unique attributes to it.
A partitioned index can be divided into prefixed index or non-prefixed index depending on the relationship between partition key and index column. If index partition key and the left column of index
column are the same, it is a prefixed index. If not, it is a non-prefixed index.
user_name
Specifies the owner name of the index to create. If omitted, Altibase creates an index in the schema
of the user connected to the current session.
index_name
Specify the index name to create.
UNIQUE
Duplicated values are not allowed.
LOCALUNIQUE
A local index can be unique.
123
Data Definition Statements
CREATE INDEX
ASC/DESC
Use ASC or DESC to indicate whether the index should be created in ascending or descending order.
index_partitioning_clause
Create a local index in each partition within a partitioned table. For a local partition index, the user
can use the LOCAL statement only or specify an index partition to create for each table partition.
If the user uses the LOCAL statement only, an index partition is created for each of table partition
and its name is automatically created by the system. Index partitions are named sequentially as in
SYS_IDX1, SYS_IDX2, ....
The user can specify an index partition for the part or all of a table partition. If the user specifies an
index partition for only the part of a table partition, index partition for the remaining table partition
is automatically created as in the above.
BTREE
Specify the index type. BTREE or RTREE, BTREE is the default.
RTREE
R-Tree index. Useful for processing multi-dimensional data.
SET PERSISTENT
This option specifies whether to save memory index on disc or not when you shut down the server
normally. The server doesn't save memory indexes when you shut it down normally, and regenerates all indexes in memory tablespace when you start it up.
However, if you specify SET PERSISTENT as On, memory indexes are saved as the special file on disc.
And you can save time to regenerate indexes by reading their files, which are saved in case of starting the server up.
The default is OFF. Specify PERSISTENT as On to save indexes on disc when you shut down server.
index_segment_attribute_clause
Specify a tablespace. If this statement is omitted, an index partition is created in the default
tablespace.
If a tablespace is not specified, a tablespace for a local index is determined as shown in the following
diagram:
SQL Users’ Manual
124
CREATE INDEX
When only LOCAL
is included
When each index
partition is specified
A tablespace in
each table partition
A tablespace in the
partition is specified
NO
YES
The specified
tablespace
•
A tablespace in the
table partition
INITRANS Clause
This sets the initial number of TTS(Touched Transaction Slot)s. Default is 8.
•
MAXTRANS Clause
This sets maximum number of TTS(Touched Transaction Slot)s. Default is 30.
TABLESPACE clause
Specify the name of the tablespace to be used by the index. If this clause is omitted, Altibase creates
an index in the basic tablespace of the schema owner.
parallel_clause
This is a hint which influences on the number of threads creating an index. You would realize the
performance improvements when creating an index with this hint.
You can set the number of threads creating an index with prallel_factor which considers available
memory size to create an index suitable for size of target table.
You can specify the value of parallel_factor as from 0 to 512. Default is the number of CPUs on platform where ALTIBASE runs. If you skip setting parallel_factor or specify it as 0, the value of
INDEX_BUILD_THREAD_COUNT is set instead of it. The number of threads is specified to create an
index by referring to the number of CPUs if INDEX_BUILD_THREAD_COUNT is not defined or you set
parallel_factor to the value which is greater than the number of CPUs or 512.
logging_clause
The LOGGING or NOLOGGING statement can be used to enable or disable logging when an index is
built for a restriction. Logging is enabled by default. That is, logging is performed when an index is
built.
FORCE or NOFROCE options can be used to determine whether to force storing of the built index in
a disk. Refer to the section of Index in Objects and Privileges of Administrator's Manual for more
125
Data Definition Statements
CREATE INDEX
details about logging_clause.
storage_clause
This enables you to set storage parameter for managing the extents in the segments. Extent size in
each parameter is set to its mutiple value by default. Otherwise, ALTIBASE resizes it.
•
INITEXTENTS Clause
This sets the size of extent allocated basically when you create segment. Default is 1.
•
NEXTEXTENTS Clause
This sets the number of added extents in case of creating segment when you want to expand
them. Default is 1.
•
MINEXTENTS Clause
This sets minimum number of extents in segment. Default is 1.
•
MAXEXTENTS Clause
This set maximum number of extents in segment. If this isn't specified, this is set to unlimited
by default.
Precautions
When local index is being built, a tablespace for the index cannot be specified and only BTREE can
be specified for INDEXTYPE.
Due to a system or media fault, consistency may not be maintained with an index that is built with
NOLOGGING (FORCE/NOFORCE) option. In this case, the error message ‘The index is inconsistent’
will be displayed. To fix this error, locate and drop an inconsistent index and build it again. The index
consistency can be checked in V$DISK_BTREE_HEADER.
An index cannot be created in a LOB column.
Example
<Query> Join the following column in the employee table, and create index emp_idx2.
On the column eno as ascending
On the column dno as descending
iSQL> CREATE INDEX emp_idx2
ON employee (eno ASC, dno ASC);
Create success.
<Query> Create unique index named emp_idx2 using the column in the employee table. (Can be
SQL Users’ Manual
126
CREATE INDEX
created when there is no record in the employee table or there is only unique value in column dno.)
On the column dno as descending
iSQL> CREATE UNIQUE INDEX emp_idx2
ON employee (dno DESC);
Create success.
<Query> Create emp_idx1 with emp_idx3 index using the column in the table employee. (In eno of
the employee table, a primary key exists. The user can create index emp_idx3 after deleting the primary key constraint.) Otherwise, [ERR-3104C : Duplicated index names. The specified index name
already exists on the database.])
On the column eno as descending
iSQL> ALTER TABLE employee
DROP PRIMARY KEY;
Alter success.
iSQL> CREATE INDEX emp_idx3
ON employee (eno ASC)
INDEXTYPE IS BTREE;
Create success.
<Query> Create emp_idx1 with BTREE and PERSISTENT index using the next column in the table
employee.
On the column eno as descending
On the column dno as ascending
iSQL> CREATE INDEX emp_idx1
ON employee (eno ASC, dno ASC)
INDEXTYPE IS BTREE SET PERSISTENT = ON;
Create success.
<Query> Create index idx1 in 1i column in user_data tablespace.
iSQL> CREATE INDEX idx1
ON table_user (i1)
TABLESPACE user_data;
Create success.
<Query 7> The following query creates a local index for each table partition based on product_id. A
partition name is created automatically.
CREATE INDEX prod_idx ON products(product_id) LOCAL;
127
Data Definition Statements
CREATE INDEX
<Query 8> The following query creates a local index by specifying each index partition.
CREATE INDEX prod_idx ON products(product_id)
LOCAL
(
PARTITION p_idx1 ON p1 TABLESPACE tbs_disk1,
PARTITION p_idx2 ON p2 TABLESPACE tbs_disk2,
PARTITION p_idx3 ON p3 TABLESPACE tbs_disk3
);
<Query 9> In this example, only a part of an index partition is specified. A local index that is not
specified is created automatically.
CREATE INDEX prod_idx ON products(product_id)
LOCAL
(
PARTITION p_idx1 ON p1 TABLESPACE tbs_disk1,
PARTITION p_idx3 ON p3 TABLESPACE tbs_disk3
);
<Query 10> Create index idx1 in table employee with employee number (eno) and enable logging
to ensure availability upon a system or media fault.
iSQL> CREATE INDEX idx1
ON employee (eno);
Create success.
or
iSQL> CREATE INDEX idx1
ON employee (eno) LOGGING ;
Create success.
<Query 11> Create index idx1 in table employee with NOLOGGING option by using the following
column. However, the index should be available upon a system fault (FORCE).
Employee NO(eno): ASC
Depart NO(dno): ASC
iSQL> CREATE INDEX idx1
ON employee (eno ASC, dno ASC)
NOLOGGING;
Create success.
or
Employee NO(eno): ASC
Depart NO(dno): ASC
iSQL> CREATE INDEX idx1
ON employee (eno ASC, dno ASC)
NOLOGGING FORCE;
Create success.
SQL Users’ Manual
128
CREATE INDEX
<Query 12> Create index idx1 in table employee with NOLOGGING option by using the following
column. Do not have it committed to a disk (NOFORCE).
Employee NO(eno): ASC
Depart NO(dno): ASC
iSQL> CREATE INDEX idx1
ON employee (eno ASC, dno ASC)
NOLOGGING NOFORCE;
Create success.
<Query 13> You should create LOCAL_IDX in LOCAL_TBL as a table of USERTBS as a disk tablespace.
However, you should create 1 extent, can add 2 extents whenever wanting to expand extent and
should not limit total number of extents in segment.
iSQL> CREATE INDEX LOCAL_IDX ON LOCAL_TBL ( I1 )
TABLESPACE USERTBS
STORAGE ( INITEXTENTS 1 NEXTEXTENTS 2 개 MAXEXTENTS UNLIMITED );
Create success.
129
Data Definition Statements
CREATE QUEUE
CREATE QUEUE
Syntax
create_queue ::=
CREATE
(
QUEUE
queue_name
size
)
FIXED
;
MAXROWS
count
variable _clause
Description
This statement is used to specify the max length of a message that can be inserted to a queue in
order to create a queue. The max number of records for a queue can also be specified.
queue_name
This specifies the name of the queue. The maximum possible length of the queue name is 32bytes.
size
This sets the maximum size(unit: bytes) of messages to be stored in the queue. This value can be set
within the range from 1 to 3200 bytes.
FIXED|variable_clause
This specifies how messages are saved. (see VARCHAR data type).
MAXROWS count
This sets the maximum number of records that can be stored in a queue table. This value can be set
within the range from 1 to 4294967295(232-1). When not specified, it defaults to the maximum
value of 4294967295.
Precautions
When a queue is created, an object named “Queue Name” + “_NEXT_MSG_ID” is created within a
SQL Users’ Manual
130
CREATE QUEUE
database. As a result, if there is a table, view, sequence, synonym or stored procedure under the
same name with a queue to be created or an object named “Queue Name” + “_NEXT_MSG_ID”, the
CREATE QUEUE statement will return an error.
Example
<Query> Create queue Q1 where the max length of message is 40 and the number of records is
1,000,000.
CREATE QUEUE Q1(40) MAXROWS 1000000;
131
Data Definition Statements
CREATE REPLICATION
CREATE REPLICATION
Syntax
create_replication ::=
CREATE
replication _name
REPLICATION
LAZY
AS MASTER
ACKED
AS SLAVE
EAGER
'
WITH
FROM
'
replication _host_ip
.
user_name
tbl _name
TO
,
user_name
replication _host_port _no
.
tbl_name
,
;
where_clause
Description
Connect the local server to the remote server to use the replication object. Supported replication
level is table-to-table. A table is matched to only one corresponding table.
Can connect to maximum of 32 different remote servers.
Can specify master or slave in the statement when creating a replication. In this way, the user can use
master-slave scheme, which specifies as master or as slave in syntax to resolve the conflict, in the
replication. It is same as modifying REPLICATION_UPDATE_REPLACE property. Refer to Replication
User’s Manual for details.
replication_name Specify the replication object name. The local server and the remote server must
have same replication name.
remote_host_ip
Specify t he IP address of remote server.
remote_host_port_no The port number for receiver thread. Is identical to REPLICATION _PORT_NO
of the Altibase property file.
user_name
tbl_name
Replication user ID
Name of replication table
SQL Users’ Manual
132
CREATE REPLICATION
where_clause See where_clauase of SELECT statement. Replication conditional clauses specify
only logs suited for conditions as the destination replication with WHERE
user_name.table_name.column_name {< | > | <> | >= | <= | = | !=} value [{AND | OR} ... ].
Precautions
Prerequisites
If conflictions occur in case of inputting, modifying or deleting data, this is discarded and leaves
error log files.
* Except error log files
- deadlock: If replication transaction is rollbacked cause of deadlock in remote server, error logs
aren't left.
- network error: You can't stop data loss cause of network(TCP/IP) error in process of replication. And
error logs aren't left.
Errors, which occur in process of replication, are rollbacked partially. Namely if there is one duplicate
data while you input several data, you can delete only the duplicate data and complete the rest.
The speed of replication is much slower than that of service.
Even if you set Altibase property as AUTO_REMOVE_ARCHIVE_LOG = 1, incomplete replication logs
aren't deleted in log file. If you set it as 0, number 5 as below doesn't influence on replication.
If checkpoint occurs at the point that the gap between the log file that current replication sender
thread operates and current log file is bigger than the number of maximum log files of Altibase
property, log files with incomplete replication are deleted, and replication ignores the previous log
files and starts in the current log file again.
Data Requirements
Default key must exist on the copied table.
Default key must not be modified on the copied table.
Column information, default key and NOT NULL on the table of both sides must be same.
Table for replication must not be altered or dropped after starting it.
Connection Requirements
Altibase database has maximum 32 replication connections.
Examples
<Query> Create replication rep1 satisfying following condition
Assume followings;
133
Data Definition Statements
CREATE REPLICATION
IP address of the local server is 192.168.1.60
Port number is 25524
IP address of the remote server is 192.168.1.12
Port number is 35524
Create and execute the replication for employee table and department table between servers.
At local server:
iSQL> CREATE REPLICATION rep1
WITH '192.168.1.12',35524
FROM sys.employee TO sys.employee,
FROM sys.department TO sys.department;
Create success.
At remote server:
iSQL> CREATE REPLICATION rep1
WITH '192.168.1.60',25524
FROM sys.employee TO sys.employee,
FROM sys.department TO sys.department;
Create success.
SQL Users’ Manual
134
CREATE SEQUENCE
CREATE SEQUENCE
Syntax
create_sequence ::=
START
WITH
integer
INCREMENT
BY
integer
MAXVALUE
NOMAXVALUE
CREATE
seq_name
SEQUENCE
user_name
integer
MINVALUE
;
.
NOMINVALUE
CYCLE
CACHE
integer
Prerequisites
The user should be SYS or have the CREATE SEQUENCE system authority.
To create a sequence in other user’s schema, the user should have the CREATE ANY SEQUENCE
authority.
Description
Create a sequence number by defining a new sequence with the specified sequence name.
user_name
Specify the name of the owner of a sequence to be created. If it is omitted, Altibase creates a
sequence in the user’s schema that is connected to the current session.
135
Data Definition Statements
CREATE SEQUENCE
seq_name
Specify the name of a sequence to be created.
START WITH
This is initial value of a sequence. Its default is 0. You can set this to the value between MINVALUE
and MAXVALUE.
INCREMENT BY
This is increment of a sequence. Its default is 1. You can specify this as the value between MINVALUE
and MAXVALUE.
MAXVALUE
This is maximum value of a sequence. Its default is 9223372036854775806. You can set this to the
value from -9223372036854775807 to 9223372036854775806.
MINVALUE
This is minimum value of a sequence. Its default is -9223372036854775806. You can specify this as
the value from -9223372036854775807 to 9223372036854775806.
CYCLE
To assign an additional value in a sequence when the sequence reaches MAXVALUE or MINVALUE, a
minimum value is created for a sequence in ascending order and a maximum value is created for a
sequence in descending order.
CACHE
Cache the specified number of sequence values into memory to ensure faster access to them. The
memory cache is filled the first time a sequence is referred to, and the cached sequence is looked for
every time a sequence value is requested. A sequence request after the last sequence is used copies
other sequence values to memory. To use the default value 20.
* sequence_name.CURRVAL during sequence creation, sequence_name.NEXTVAL should have been
used after the sequence is created.
Examples
<Query> Use the following statements to define a new sequence and view the sequence values and
information.
iSQL> CREATE TABLE seqtbl(i1 INTEGER);
Create success.
iSQL> CREATE OR REPLACE PROCEDURE proc1
AS
BEGIN
SQL Users’ Manual
136
CREATE SEQUENCE
FOR i IN 1 .. 10 LOOP
INSERT INTO seqtbl VALUES(i);
END LOOP;
END;
/
Create success.
iSQL> EXEC proc1;
Execute success.
iSQL> CREATE SEQUENCE seq1
START WITH 13
INCREMENT BY 3
MINVALUE 0 NOMAXVALUE;
Create success.
-> Create seq1 that begins at 13, incrementing by 3, with the min value of 0
and the infinite max value.
iSQL> INSERT INTO seqtbl VALUES(seq1.NEXTVAL);
1 row inserted.
iSQL> INSERT INTO seqtbl VALUES(seq1.NEXTVAL);
1 row inserted.
iSQL> SELECT * FROM seqtbl;
SEQTBL.I1
-------------1
2
3
4
5
6
7
8
9
10
13
16
12 rows selected.
iSQL> ALTER SEQUENCE sys.seq1
INCREMENT BY 50
MAXVALUE 100
CYCLE;
Alter success.
-> Increment seq1 by 50, but if it reaches the max value, change the sequence
based on the given condition by starting over at the min value.
iSQL> INSERT INTO sys.seqtbl VALUES(seq1.NEXTVAL);
1 row inserted.
iSQL> INSERT INTO sys.seqtbl VALUES(seq1.NEXTVAL);
1 row inserted.
iSQL> INSERT INTO sys.seqtbl VALUES(seq1.NEXTVAL);
1 row inserted.
iSQL> INSERT INTO sys.seqtbl VALUES(seq1.NEXTVAL);
1 row inserted.
iSQL> SELECT * FROM sys.seqtbl;
SEQTBL.I1
-------------1
2
3
4
5
137
Data Definition Statements
CREATE SEQUENCE
6
7
8
9
10
13
16
66
0
50
100
16 rows selected.
iSQL> SELECT seq1.CURRVAL FROM seqtbl;
SEQ1.CURRVAL
----------------------100
.
.
.
100
16 rows selected.
-> View the current value of seq1 to create a new value.
iSQL> UPDATE SEQTBL SET i1 = seq1.NEXTVAL;
16 rows updated.
-> Column i1 is changed to 0.
iSQL> SELECT seq1.CURRVAL FROM seqtbl;
SEQ1.CURRVAL
----------------------0
.
.
.
0
16 rows selected.
-> View the current value of seq1 to create a new value.
iSQL> ALTER SEQUENCE seq1
INCREMENT BY 2
MAXVALUE 200
CACHE 25;
Alter success.
-> Cache the specified number of sequence values (25) for faster access.
iSQL> CREATE OR REPLACE PROCEDURE proc2
AS
BEGIN
FOR i IN 1 .. 30 LOOP
INSERT INTO sqqtbl VALUES(seq1.NEXTVAL);
END LOOP;
END;
/
Create success.
iSQL> EXEC proc2;
Execute success.
iSQL> SELECT * FROM seqtbl;
SEQTBL.I1
-------------0
50
100
0
SQL Users’ Manual
138
CREATE SEQUENCE
50
100
0
50
100
0
50
100
0
50
100
0
2
4
6
8
10
12
14
.
.
.
58
60
46 rows selected.
iSQL> SELECT * FROM SEQ;
-> When connected to a database with the SYS account, output information on
all sequences.
USER_NAME
-------------------------------------------SEQUENCE_NAME
CURRENT_VALUE
INCREMENT_BY
-----------------------------------------------MIN_VALUE
MAX_VALUE
CYCLE
-----------------------------------------------SYS
SEQ1
0
2
0
200
YES
1 row selected.
CACHE_SIZE
25
<Query> Use the following statements with multiple accounts to define a new sequence and view
the sequence values and information.
iSQL> CONNECT sys/manager;
Connect success.
iSQL> CREATE USER user1 IDENTIFIED BY user1;
Create success.
iSQL> CREATE USER user2 IDENTIFIED BY user2;
Create success.
iSQL> CONNECT user1/user1;
Connect success.
iSQL> CREATE SEQUENCE seq1 MAXVALUE 100 CYCLE;
Create success.
iSQL> CREATE SEQUENCE seq2;
Create success.
iSQL> SELECT * FROM SEQ;
-> Output information on all sequences that are created by user1.
139
Data Definition Statements
CREATE SEQUENCE
SEQUENCE_NAME CURRENT_VALUE INCREMENT_BY
-----------------------------------------------MIN_VALUE MAX_VALUE CYCLE CACHE_SIZE
-----------------------------------------------SEQ1 1 1
1 100 YES 20
SEQ2 1 1
1 9223372036854775806 NO 20
2 rows selected.
iSQL> CONNECT user2/user2;
Connect success.
iSQL> CREATE SEQUENCE seq1 INCREMENT BY -30;
Create success.
iSQL> CREATE SEQUENCE seq2 INCREMENT BY -10 MINVALUE -100;
Create success.
iSQL> CONNECT sys/manager;
Connect success.
iSQL> CREATE SEQUENCE seq2 START WITH 20 INCREMENT BY 30;
Create success.
iSQL> CREATE SEQUENCE seq3 CACHE 40;
Create success.
iSQL> SELECT * FROM SEQ;
-> When connected to a database with the SYS account, output information on
all sequences.
USER_NAME
-------------------------------------------SEQUENCE_NAME
CURRENT_VALUE
INCREMENT_BY
-----------------------------------------------MIN_VALUE
MAX_VALUE
CYCLE
-----------------------------------------------SYS
SEQ1
60
2
0
200
YES
SYS
SEQ2
20
30
1
9223372036854775806
NO
SYS
SEQ3
1
1
1
9223372036854775806
NO
USER1
SEQ1
1
1
1
100
YES
USER1
SEQ2
1
1
1
9223372036854775806
NO
USER2
SEQ1
-1
-30
-9223372036854775806 -1
NO
USER2
SEQ2
-1
-10
-100
-1
NO
7 rows selected.
CACHE_SIZE
25
20
40
20
20
20
20
<Query> Use the following statements to view information on sequence objects.
iSQL> select * from v$seq;
-> Read information from sequence objects that have been created. Unlike Select * from seq, inforSQL Users’ Manual
140
CREATE SEQUENCE
mation on other user’s sequence can be viewed. For information on performance view V$SEQ,
please refer to the performance view section in Data Dictionary in Administrator's Manual.
V$SEQ.SEQ_OID
V$SEQ.CURRENT_SEQ
V$SEQ.START_SEQ
-----------------------------------------------V$SEQ.INCREMENT_SEQ
V$SEQ.SYNC_INTERVAL
V$SEQ.MAX_SEQ
V$SEQ.MIN_SEQ
V$SEQ.LAST_SYNC_SEQ
V$SEQ.FLAG
-----------------------------------------------34664
104
4
1
100
9223372036854775806
1
104
0
35604
21
1
1
20
9223372036854775806
1
21
0
36544
61
1
1
20
9223372036854775806
1
61
0
37484
1
1
1
20
9223372036854775806
1
1
0
38424
1
1
20
9223372036854775806
4 rows selected.
141
Data Definition Statements
CREATE SYNONYM
CREATE SYNONYM
Syntax
create_synonym ::=
CREATE
synonym_name
SYNONYM
user_name
PUBLIC
.
object_name
FOR
user_name
;
.
Prerequisites
To create a private synonym in your own schema, you must have the CREATE SYNONYM system privilege.
To create a private synonym in another user's schema, you must have the CREATE ANY SYNONYM
system privilege.
Description
Creates a synonym, which is an alternative name for a database object such as table, view. Synonyms
provide both data independence and location transparency. Synonyms permit applications to function without modification regardless of which user owns the table or view and regardless of which
database holds the table or view. However, synonyms are not a substitute for privileges on database
objects. Appropriate privileges must be granted to a user before the user can use the synonym.
Synonym is used to define alias names of the following objects:
•
Tables
•
Views
•
Sequences
•
stored procedures and functions
•
Other synonyms
SQL Users’ Manual
142
CREATE SYNONYM
You can refer to synonyms in the following DML statements;
DML statement
SELECT
INSERT
UPDATE
DELETE
MOVE
LOCK TABLE
DDL statement
GRANT
REVOKE
PUBLIC synonym and PRIVATE synonym
Specify PUBLIC to create a public synonym. Public synonyms are accessible to all users. However
each user must have appropriate privileges on the object in order to use the synonym.
To create a public synonym, specify PUBLIC in the statement. Otherwise, a private synonym will be
created.
user_name
The user name in front of the synonym is the synonym owner's name.
When creating a public synonym, do not indicate the owner's name.
When creating a private synonym, indicate the owner. Otherwise, the private synonym for the current session owner will be created.
synonym_name
If there is a table, view, sequence, synonym, stored procedure, or stored function that has the same
name as the synonym, an error will be returned. Because the synonym uses the same name as
objects, the name must be unique in the current schema.
FOR clause
Specify the object for which the synonym is created.
user_name
Specify the schema to contain the synonym.
If not specified, the database creates the synonym in your own.
object_name
Specify the name of the object to create a synonym.
In case the object does not exist in the database, an error will not be returned and a synonym will be
143
Data Definition Statements
CREATE SYNONYM
created upon creation of the synonym. In other words, The schema object need not currently exist
and you need not have privileges to access the object.
Privileges with the Synonym
To execute the DML statement using the synonym, the user must have the execution privilege for
the corresponding object.
Although the execution privilege of the DML statement is given through the synonym, it is directly
granted or denied to the object subject to the synonym.
Therefore, when an error occurs upon execution of the DML statement, check if the corresponding
privilege is granted to the user. If no proper privilege exists, give the privilege directly to the object
or through the synonym.
If the corresponding privilege is already granted, create only a synonym.
The privilege granted to the object through the synonym is kept although the corresponding synonym is dropped. This is because the privilege is granted to the synonym target object, not to the
synonym, although the privilege is granted through the synonym.
Examples
<Query> Create my_dept synonym for the table dept to the current user and execute a DML statement using the synonym.
iSQL> CONNECT altibase/altibase;
Connect success.
iSQL> CREATE TABLE dept
2 (
3 id integer,
4 name char(10),
5 location varchar(40),
6 member integer
7 );
Create success.
iSQL> GRANT INSERT ON dept TO mylee;
Grant success.
iSQL> GRANT SELECT ON dept TO mylee;
Grant success.
iSQL> CONNECT mylee/mylee;
Connect success.
iSQL> CREATE SYNONYM mylee.my_dept FOR altibase.dept;
Create success.
iSQL> INSERT INTO my_dept VALUES (1,'rndn1',NULL,4);
1 row inserted.
iSQL> SELECT * FROM my_dept;
MY_DEPT.ID MY_DEPT.NAME MY_DEPT.LOCATION
-----------------------------------------------------------------------MY_DEPT.MEMBER
----------------1
rndn1
4
1 row selected.
SQL Users’ Manual
144
CREATE TABLE
CREATE TABLE
Syntax
create_table ::=
column_definition
CREATE
TABLE
tbl_name
user_name
(
)
table _constraint
.
,
MAXROWS
integer
segment_attributes _clause
table_properties _clause
table_partitioning_clauses
:
lob_storage_clause
select
AS
column_definition ::=
data_type
FIXED
column_name
DEFAULT
expr
VARIABLE
column_constraint
TIMESTAMP
,
145
Data Definition Statements
CREATE TABLE
column_constraint ::=
constraint _name
CONSTRAINT
PRIMARY
ON
DELETE
CASCADE
KEY
LOCALUNIQUE
set_persistent_clause
NULL
NOT
tbl _namle
REFERENCES
user_name
(
.
column_name
)
set_persistent_clause ::=
ON
SET
PERSISTENT
=
OFF
table_constraint ::=
CONSTRATINT
PRIMARY
constraint_name
KEY
(
column_name
)
LOCALUNIQUE
,
using_index_clause
referential _constraint
using_index_clause ::=
USING
INDEX
index_attribute _clause
index_partitioning_clause
SQL Users’ Manual
146
CREATE TABLE
index_attribute_clause ::=
tablespace_name
TABLESPACE
parallel _clause
logging _clause
force_clause
parallel_clause ::=
NOPARALLEL
PARALLEL
integer
logging_clause ::=
LOGGING
NOLOGGING
force_clause ::=
NOLOGGING FORCE
NOLOGGING NOFORCE
147
Data Definition Statements
CREATE TABLE
referential_constraint ::=
FOREIGN
column_name
(
KEY
)
,
tbl_name
REFERENCES
column_name
(
user_name
)
.
,
INSERT
ON
DELETE
NO
ACTION
UPDATE
DELETE
CASCADE
table_partitioning_clause ::=
range_partitioning
hash_partitioning
list_partitioning
row_movement_clause
range_partitioning ::=
PARTITION
BY
RANGE
(
column
)
,
(
PARTITION
partition _name
range _values_clause
)
table _partition _description
,
SQL Users’ Manual
148
CREATE TABLE
table_partition_description ::=
TABLESPACE
tablespace _name
LOB_storage_clause
range_values_clause ::=
DEFAULT
VALUES
value
LESS
THAN
(
)
max value
,
hash_partitioning ::=
TABLESPACE
tablespace _name
LOB_storage_clause
list_partitioning ::=
PARTITION
BY
LIST
(
column
)
,
(
PARTITION
partition _name
list_values_clause
)
table _partition _description
,
149
Data Definition Statements
CREATE TABLE
list_values_clause ::=
DEFAULT
VALUES
value
(
)
NULL
row_movement_clause ::=
ENABLE
ROW
MOVEMENT
DISABLE
segment_attribute_clause ::=
TABLESPACE
tablespace_name
storage_clause
PCTFREE
integer
INITRANS
integer
PCTUSED
integer
MAXTRANS
integer
logging_clause
storage_clause ::=
STORAGE
(
INITEXTENTS
integer
NEXTEXTENTS
integer
MINEXTENTS
integer
integer
MAXEXTENTS
UNLIMITED
SQL Users’ Manual
150
)
CREATE TABLE
table_properties_clause ::=
column_properties
AS
table_partition _clause
parallel _clause
row_movement_clause
subquery
lob_storage_clause ::=
lob_storage
lob_storage ::=
LOB
(
lob _attribute
)
STORE
AS
,
(
TABLESPACE
tablespace_name
151
)
Data Definition Statements
CREATE TABLE
select_clause ::=
hints
select_list
SELECT
ALL
DISTINCT
FROM
tbl_reference
where_clause
,
group_by_clause
HAVING
condition
hierarchical _query_clause
UNION
ALL
INTERSECT
select
MINUS
Prerequisites
To create a relational table in your own schema, you must have the CREATE TABLE system privilege.
Description
Creates a new table with the specified name.
user_name
Specify a name of the table owner. If omitted, Altibase will create a table the current session user.
tbl_name
Specify the table name to be created.
column_definition
DEFAULT
If the DEFAULT clause is not specified for column, the initial value for each column is
NULL. If the DEFAULT clause is specified, the existing rows for a column is changed to the default
value that is specified when the column is added.
TIMESTAMP Syntactically works like a data type. For example, if TIMESTAMP is specified as the column data type in the CREATE TABLE statement, TIMESTAMP with the size of 8 bytes is internally created. However, the default value for the TIMESTAMP column is determined by the system and it
cannot be specified by the user. Furthermore, only one TIMESTAMP column can be created in a table.
SQL Users’ Manual
152
CREATE TABLE
column constraint
Specify a column condition when a new table is created. A restriction name can be used for more
than one column instruction and local unique attributes are assigned to a partitioned table.
•
PRIMARY KEY
•
(LOCAL) UNIQUE
•
(NOT) NULL
•
Referential integrity constraints
•
PERSISTENT Indexing
•
TIMESTAMP Constraints
•
PRIMARY KEY
The primary key must be unique in the table. The column belonging to the primary key can not be
NULL. Only one primary key can be defined in each table. The primary key can be created for up to
32 columns.
•
LOCALUNIQUE
A restriction that satisfies UNIQUE for each local index.
•
UNIQUE
A UNIQUE constraint prohibits multiple rows from having the same value in the same column or
combination of columns but allows some values to be null.
The unique key and the primary key cannot be defined at the same time on the same column or on
the combination of columns. The user can create a unique key for up to 32 columns.
•
NULL
Means that the corresponding column can be NULL.
•
NOT NULL
A NOT NULL constraint prohibits a database value from being null.
•
PERSISTENT
The default is OFF means PERSISTENT option is disabled. See CREATE INDEX about PERSISTENT
INDEX.
TABLE constraints
Constraint for the table. It can be a Primary Key, Unique, Referential integrity constraints.
•
PRIMARY KEY
•
(LOCAL) UNIQUE
153
Data Definition Statements
CREATE TABLE
•
Referential integrity constraints
using_index_clause
Specify a tablespace to store an index that is built for a restriction.
If PRIMARY KEY, UNIQUE or LOCALUNIQUE restrictions are specified, the tablespace of a local index
to be built can be specified for each index partition. For more information, please refer to
index_partitioning_clause in the CREATE INDEX statement.
parallel_clause
Use the PARALLEL statement for faster index building for a restriction.
logging_clause
The LOGGING or NOLOGGING statement can be used to enable or disable logging when an index is
built for a restriction. Logging is enabled by default. That is, logging is performed when an index is
built.
FORCE or NOFROCE options can be used to determine whether to force storing of the built index in
a disk.
references_constraint
Specify a foreign key. A referenced key that is referred to by a foreign key is unique or the default key.
If columns of a referenced key is not specified, the default key for the table automatically becomes a
referenced key.
•
NO ACTION
If a table have a referential constraint, when you insert/update/delete on the table, the referring
table will be checked after operation for data integrity automatically. NO ACTION option can disable
this kind of cascading operations.
CREATE TABLE EMPLOYEE (
ENO INTEGER PRIMARY KEY,
DNO INTEGER,
NAME CHAR(10),
FOREIGN KEY(DNO) REFERENCES
DEPARTMENT(DNO) ON DELETE NO ACTION );
In this example, although the department is deleted in the department table, the department code
will not be deleted from the employee table.
ON DELETE CASCADE
Deleting a row in the parent table deletes all rows in the child tables that have a foreign key related
to this row.
CREATE TABLE EMPLOYEE (ENO INTEGER PRIMARY KEY, DNO INTEGER, NAME CHAR(10),
FOREIGN KEY(DNO) REFERENCESDEPARTMENT(DNO) ON DELETE CASCADE );
SQL Users’ Manual
154
CREATE TABLE
MAXROWS
Specify the maximum number of records of the table. If you insert more than the MAXROWS, database will return error code.
table_partitioning_clauses
Create a table as a partitioned table through range partitioning, hash partitioning or list partitioning. row_movement_clause can also be specified when a partitioned table is created.
range_partitioning
Perform partitioning based on the range of key values. It is primarily used for DATE data types.
Because partitioning is done based on the value specified by the user, uniform distribution of data
may not be ensured. Determine the range of partitions by setting the max value for each partition.
All other values and NULL belong to the default partition and the default partition statement cannot
be omitted. A column list can be made with a partition key.
table_partition_description
If a tablespace is specified or there is a LOB column, the attributes for the LOB column can be specified separately.
If the tablespace statement is omitted, a partition is stored in the default tablespace where a table is
located.
Likewise, if the tablespace statement is omitted for a LOB column, data is stored in the tablespace in
the partition.
Please see the following example (where tablespace is tbs_05.)
CREATE TABLE print_media_demo
(
product_id INTEGER,
ad_photo BLOB,
ad_print BLOB,
ad_composite BLOB
)
PARTITION BY RANGE (product_id)
(
PARTITION p1 VALUES LESS THAN (3000) TABLESPACE tbs_01
LOB (ad_photo) STORE AS (TABLESPACE tbs_02 ),
PARTITION p2 VALUES DEFAULT
LOB (ad_composite) STORE AS (TABLESPACE tbs_03)
) TABLESPACE tbs_04;
Because a tablespace is specified, partition p1 is stored in tbs_01. And the ad_photo column in the
partition is stored in tbs_02. Because a tablespace for the default partition p2 is not specified, it is
stored in tablespace tbs_04 where table T1 resides. If a tablespace for the table is not specified
either, it is stored in the default tablespace. This is illustrated in the following diagram:
155
Data Definition Statements
CREATE TABLE
A tablespace for a LOB
column specified?
NO
YES
The specified
tablespace
A tablespace for a
partition specified ?
NO
YES
The specified
tablespace
A tablespace for a
table specified ?
NO
YES
The specified
tablespace
A default user
tablespace
range_values_clause
Specify the upper limit for a partition. This value should not overlap with the range of other partitions.
hash_partitioning
Perform partitioning based on the hash value of a partition key. It is intended for uniform distribution of data and it enables list of columns based on a partition key.
list_partitioning
Perform partitioning based on a set of values. The default partition cannot be omitted and it has all
domain values for the corresponding column.
If a new partition is specified with a set of certain values, those values are removed from the default
partition. This is because partition cannot share values. Only a single column can be used with a partition key.
list_values_clause
Each list partition should have at least one value. It cannot have the values of other partition keys.
row_movement_clause
When a partitioned table is updated and the partition key changes requiring data movement, the
user can use this statement to determine whether data will be moved automatically or an error will
occur. If this clause is not specified, the DISABLE ROW MOVEMENT option is set by default.
SQL Users’ Manual
156
CREATE TABLE
CREATE TABLE ... AS SELECT
When you create a table, you can copy the column specification and data from other tables into the
new table using CREATE ~ SELECT statement..
In case the column name is not specified for the new table, the name of the searched column will
become the column name of the new table. If the search target is an expression, an alias name must
exist and this name becomes the column name.
segment_attribute_clause
You can specify PCTFREE, PCTUSED and tablespace with this statement. If you use this statement on
the partitioned table, PCTFREE and PCTUSED are applied to all partitioned tables.
•
TABLESPACE Clause
This sets tablespace to save on the table. If this is set in CREATE TABLE statement, this statement isn’t changed into ALTER TABLE statement. If you omit this clause, DEFAULT TABLESPACE
specified when you create user is set to tablespace for table. (But if you omit DEFAULT
TABLESPACE when creating user, table is created in memory.)
If you set unique key and primary key constraint in CREATE TABLE statement, index tablespace
for them is equal to table tablespace.
•
PCTFREE Clause
The PCTFREE clause specifies what percentage of each page is left free when loading or reorganizing the data. You can insert record into the page except this percentage of page. Unit of
this value is the percentage of space left free.
For example, if PCTFREE is set to 20, 20% of page is reserved for update and the rest is for insertion. This option is applicable only for disk based table.
If setting this option in CREATE TABLE statement, you can’t modify it in ALTER TABLE statement.
This option must have an integer value from 0 to 99. The default for PCTFREE is 10 applicable
for table.
•
PCTUSED Clause
The PCTUSED clause represents the minimum percentage of used space for reinsertion. When
the space usage reaches the PCTFREE limit, ALTIBASE stops inserting new record, but allows to
update or delete record. If the used space falls below the value of PCTUSED due to delete operation, ALTIBASE can insert new record on pages again.
For example, if PCTUSED is set to 40 and the space usage reaches the PCTFREE limit, ALTIBASE
stops inserting record until the free space falls below 40. This option is applicable only for disk
based table.
If setting this option in CREATE TABLE statement, you can’t modify it ALTER TABLE statement.
This option must have an integer value from 0 to 99. And its unit is the percentage of used
space. The default for PCTUSED is 40 applicable for table.
•
INITRANS Clause
This sets the initial number of TTS(Touched Transaction Slot)s. Default is 2.
157
Data Definition Statements
CREATE TABLE
•
MAXTRANS Clause
This sets maximum number of TTS(Touched Transaction Slot)s. Default is 120.
Note: 2 clauses above are used together for performance optimization as follows. (If PCTFREE is set to 20
and PCTUSED to 40)
20% of page allocated for table is reserved for updating the existing record and ALTIBASE insert new
record before the rest reaches 80% limit. And if the rest does finally, ALTIBASE stops inserting new record.
Update operation is available only for the existing record and wates 20% of page to reserve. If the used
page falls below 40% due to delete operation, ALTIBASE can insert new record on the page again.
PCTFREE and PCTUSED are functions of how you use data. This cicular procedure continues as above.
storage_clause
This enables you to set storage parameter for managing the extents in the segments. Extent size in
each parameter is set to its mutiple value by default. Otherwise, ALTIBASE resizes it.
•
INITEXTENTS Clause
This sets the size of extent allocated basically when you create segment. Default is 1.
•
NEXTEXTENTS Clause
This sets the number of added extents in case of creating segment when you want to expand
them. Default is 1.
•
MINEXTENTS Clause
This sets minimum number of extents in segment. Default is 1.
•
MAXEXTENTS Clause
This set maximum number of extents in segment. If this isn't specified, this is set to unlimited
by default.
LOB_storage_clause
In a disk table, LOB column data can be stored in a tablespace different from the table which LOB column belongs to. However, in a memory table, LOB column data cannot be stored separately, and it
should be stored in the same tablespace with the table.
Precautions
These are general precaution for creating tables;
The maximum number of columns is 127.
The primary key for a table can not be more than one.
In case of the reference constraint, the foreign key and the referenced key must have the same number of columns.
SQL Users’ Manual
158
CREATE TABLE
In case of the reference constraint, the foreign key and the referenced key must have the same column datatypes.
Maximum of 17 indexes can be created in a table. The total number of primary keys and the unique
keys may exceed 17.
If the column name is identified in CREATE TABLE ~ AS SELECT, the number of the columns must be
the same as the number of search target columns.
In case of CREATE TABLE ~ AS SELECT, when the column name is not specified in CREATE TABLE statement and an expression is included in the select list of the select statement, there must be an alias
name to create a new table column.
The MAXROWS statement does not support a partitioned table.
Up to 32 partitioning columns can be specified for range and hash partitioning. (This is the same
with the allowed number of index columns during index building.)
Due to a system or media fault, consistency may not be maintained with an index that is built with
NOLOGGING (FORCE/NOFORCE) option. In this case, the error message ‘The index is inconsistent’
will be displayed. To fix this error, locate and drop an inconsistent index and build it again. The index
consistency can be checked in V$DISK_BTREE_HEADER.
Like with the CREATE INDEX statement, a tablespace for a partitioned index cannot be specified.
Example
Create the following Tables.
•
Creating a table named employee.
iSQL> CREATE TABLE employee(
eno INTEGER PRIMARY KEY,
ename CHAR(20) NOT NULL,
emp_job CHAR(15),
emp_tel NIBBLE(15),
dno BYTE(2),
salary NUMBER(10,2) DEFAULT 0,
gender CHAR(1) DEFAULT 'M' NOT NULL,
birth BYTE(2),
join_date DATE,
status CHAR(1) DEFAULT 'H');
Create success.
•
Creating a table named order
iSQL> CREATE TABLE orders(
ono NIBBLE(10),
order_date DATE,
eno INTEGER NOT NULL,
cno CHAR(14) NOT NULL,
gno BYTE(5) NOT NULL,
qty INTEGER DEFAULT 1,
arrival_date DATE,
processing CHAR(1) DEFAULT '0', PRIMARY KEY(ono, order_date));
Create success.
159
Data Definition Statements
CREATE TABLE
•
Using CREATE TABLE ~ AS SELECT
This statement copy the column specification and data from another table.
iSQL> CREATE TABLE dept_c002
AS SELECT * FROM employee
WHERE dno = BYTE'C002';
Create success.
•
Creating a table with a timestamp type column
iSQL> CREATE TABLE tbl_timestamp(
i1 TIMESTAMP CONSTRAINT const2 PRIMARY KEY,
i2 INTEGER,
i3 DATE,
i4 BYTE(8));
Create success.
You can see the information of the table tbl_timestamp is as follows.
iSQL> DESC tbl_timestamp;
[ TABLESPACE : SYS_TBS_MEMORY ]
[ ATTRIBUTE ]
-----------------------------------------------NAME
TYPE
IS NULL
-----------------------------------------------I1
TIMESTAMP
FIXED NOT NULL
I2
INTEGER
FIXED
I3
DATE
FIXED
I4
BYTE(8)
FIXED
[ INDEX ]
-----------------------------------------------NAME
TYPE
IS UNIQUE
COLUMN
-----------------------------------------------CONST2
BTREE
UNIQUE
I1 ASC
[ PRIMARY KEY ]
-----------------------------------------------I1
You can see how the values of timestamp columns are designated like following example;
iSQL> INSERT INTO tbl_timestamp VALUES(DEFAULT, 2, '02-FEB-01',
BYTE'A1111002');
1 row inserted.
iSQL> UPDATE tbl_timestamp SET i1 = DEFAULT, i2 = 102, i3 = '02-FEB-02', i4 =
BYTE'B1111002' WHERE i2 = 2;
1 row updated.
iSQL> SELECT * FROM tbl_timestamp;
TBL_TIMESTAMP.I1 TBL_TIMESTAMP.I2 TBL_TIMESTAMP.I3 TBL_TIMESTAMP.I4
-----------------------------------------------41EDEF14000ED8B8 102 2002/02/02 00:00:00 B111100200000000
1 row selected.
iSQL> INSERT INTO tbl_timestamp(i2, i3, i4) VALUES(4, '02-APR-01',
BYTE'C1111002');
1 row inserted.
iSQL> UPDATE tbl_timestamp SET i2=104, i3='02-APR-02', i4=BYTE'D1111002'
WHERE i2=4;
1 row updated.
SQL Users’ Manual
160
CREATE TABLE
iSQL> SELECT * FROM tbl_timestamp;
TBL_TIMESTAMP.I1
TBL_TIMESTAMP.I2
TBL_TIMESTAMP.I3
TBL_TIMESTAMP.I4
-----------------------------------------------41EDEF14000ED8B8
102
2002/02/02 00:00:00 B111100200000000
41EDEF66000AB65C
104
2002/04/02 00:00:00 D111100200000000
2 rows selected.
•
Creating a table in a specific tablespace
<Query> Creates table tbl1 of which table owner is uare1. (In case the default tablespace is not
defined for the created user)
iSQL> CONNECT uare1/rose1;
Connect success.
iSQL> CREATE TABLE tbl1(
i1 INTEGER,
i2 VARCHAR(3));
Create success.
Note: * Notes: The table will be created in the memory when the default tablespace has not been defined
for the created user.
<Query> Creates tables in a specific tablespace.
iSQL> CREATE TABLE book(
isbn CHAR(10) CONSTRAINT const1 PRIMARY KEY SET PERSISTENT = ON,
title VARCHAR(50),
author VARCHAR(30),
edition INTEGER DEFAULT 1,
publishingyear INTEGER,
price NUMBER(10,2),
pubcode CHAR(4)) MAXROWS 2
TABLESPACE user_data;
Create success.
iSQL> CREATE TABLE inventory(
subscriptionid CHAR(10) PRIMARY KEY,
isbn CHAR(10) CONSTRAINT fk_isbn REFERENCES book(isbn),
storecode CHAR(4),
purchasedate DATE,
quantity INTEGER,
paid CHAR(1))
TABLESPACE user_data;
Create success.
or
iSQL> CREATE TABLE inventory(
subscriptionid CHAR(10),
isbn CHAR(10),
storecode CHAR(4),
purchasedate DATE,
quantity INTEGER,
paid CHAR(1),
PRIMARY KEY(subscriptionid),
CONSTRAINT fk_isbn FOREIGN KEY(isbn) REFERENCES book(isbn))
TABLESPACE user_data;
Create success.
•
Specify a tablespace for each index partition.
161
Data Definition Statements
CREATE TABLE
<Query> Create partitioned table T1 that has UNIQUE restriction for column T1.
CREATE TABLE T1
(
I1 INTEGER UNIQUE USING INDEX LOCAL
(
PARTITION P1_UNIQUE ON P1 TABLESPACE TBS3,
PARTITION P2_UNIQUE ON P2 TABLESPACE TBS2,
PARTITION P3_UNIQUE ON P3 TABLESPACE TBS1
)
)
PARTITION BY RANGE (I1)
(
PARTITION P1 VALUES LESS THAN (100),
PARTITION P2 VALUES LESS THAN (200) TABLESPACE MEM_TBS1,
PARTITION P3 VALUES DEFAULT TABLESPACE MEM_TBS2
) TABLESPACE SYS_TBS_DISK_DATA;
•
Range Partitioning
<Query 1> As shown in the following figure, create table range_sales by partitioning into quarters in
2006.
CREATE TABLE range_sales
(
prod_id NUMBER(6),
cust_id NUMBER,
time_id DATE,
)
PARTITION BY RANGE (time_id)
(
PARTITION Q1_2006 VALUES LESS THAN
PARTITION Q2_2006 VALUES LESS THAN
PARTITION Q3_2006 VALUES LESS THAN
PARTITION Q4_2006 VALUES LESS THAN
PARTITION DEF VALUES DEFAULT
) TABLESPACE SYS_TBS_DISK_DATA;
(TO_DATE('01-APR-2006')),
(TO_DATE('01-JUL-2006')),
(TO_DATE('01-OCT-2006')),
(TO_DATE('01-JAN-2007')),
<Query 2> An example that specifies the TABLESPACE statement.
CREATE TABLE
(
I1 INTEGER,
I2 INTEGER
)
PARTITION BY
(
PARTITION P1
PARTITION P2
PARTITION P3
) TABLESPACE
T1
RANGE (I1)
VALUES LESS THAN (100),
VALUES LESS THAN (200) TABLESPACE TBS1,
VALUES DEFAULT TABLESPACE TBS2
SYS_TBS_DISK_DATA;
<Query 3> An example that has multi column as a partition key.
CREATE TABLE T1
(
I1 DATE,
SQL Users’ Manual
162
CREATE TABLE
I2 INTEGER
)
PARTITION BY
(
PARTITION P1
PARTITION P2
PARTITION P3
) TABLESPACE
RANGE (I1, I2)
VALUES LESS THAN (TO_DATE('01-JUL-2006'), 100),
VALUES LESS THAN (TO_DATE('01-JAN-2007'), 200),
VALUES DEFAULT
SYS_TBS_DISK_DATA;
<Query 4> An example that specifies row_movement_clause.
CREATE TABLE
(
I1 INTEGER,
I2 INTEGER
)
PARTITION BY
(
PARTITION P1
PARTITION P2
PARTITION P3
) ENABLE ROW
•
T1
LIST (I1)
VALUES (100, 200),
VALUES (150, 250),
VALUES DEFAULT
MOVEMENT TABLESPACE SYS_TBS_DISK_DATA;
List Partitioning
<Query> Create table list_customers to partition into asia partition for the value of the nls_territory
column being ‘CHINA’ or ‘THAILAND,’ europe partition for the value being ‘GERMANY’, ‘ITALY’ or
‘SWITZERLAND,’ west partition for the value being ‘AMERICA,’ east partition for the value being
‘INDIA’ and the default partition for the rest of the values.
CREATE TABLE list_customers
(
customer_idNUMBER(6),
cust_first_nameVARCHAR(20),
cust_last_nameVARCHAR(20),
nls_territoryVARCHAR(30),
cust_emailVARCHAR(30)
)
PARTITION BY LIST (nls_territory)
(
PARTITION asia VALUES ('CHINA', 'THAILAND'),
PARTITION europe VALUES ('GERMANY', 'ITALY', 'SWITZERLAND'),
PARTITION west VALUES ('AMERICA'),
PARTITION east VALUES ('INDIA'),
PARTITION rest VALUES DEFAULT
) TABLESPACE SYS_TBS_DISK_DATA;
•
Hash Partitioning
<Query > Create a table by partitioning into 4 hash partitions based on product_id.
CREATE TABLE hash_products
(
product_idNUMBER(6),
product_nameVARCHAR(50),
product_description VARCHAR(2000)
)
PARTITION BY HASH (product_id)
(
PARTITION p1,
163
Data Definition Statements
CREATE TABLE
PARTITION p2,
PARTITION p3,
PARTITION p4
) TABLESPACE SYS_TBS_DISK_DATA;
<Query> Create a table of which LOB files are stored in separate tablespaces; image1 is stored in
tablespace LOB_DATA1 and image2 is stored in tablespace LOB_DATA2.
CREATE TABLE lob_products
(
product_id integer,
image1 BLOB,
image2 BLOB
) TABLESPACE SYS_TBS_DISK_DATA
LOB(image1) STORE AS ( TABLESPACE LOB_DATA1 )
LOB(image2) STORE AS ( TABLESPACE LOB_DATA2 );
Creating a table specified to manage the extents in the segment.
<Query> You should create LOCAL_TBL as a table in USERTBS as a disk tablespace. However, you
should allocate 10 extents when creating a table and add 1 extent whenever wanting to expanding
extent.
iSQL> CREATE TABLE LOCAL_TBL ( I1 INTEGER, I2 VARCHAR(32) )
TABLESPACE USERTBS
STORAGE ( INITEXTENTS 10 NEXTEXTENTS 1 );
Create success.
<Query> You should create LOCAL_TBL as a table in USERTBS as a disk tablespace. However, minimum number of extents is 3 initially when a table is created, and maximum number of them is limited to 100.
iSQL> CREATE TABLE LOCAL_TBL ( I1 INTEGER, I2 VARCHAR(32) )
TABLESPACE USERTBS
STORAGE ( INITEXTENTS 3 MINEXTENTS 3 MAXEXTENTS 100 );
Create success.
SQL Users’ Manual
164
CREATE DISK TABLESPACE
CREATE DISK TABLESPACE
Syntax
create_disk_tablespace ::=
CREATE
TABLESPACE
DISK
tablespace_name
DATAFILE
DATA
datafile_spec
;
EXTENTSIZE
,
integer
K
M
G
SEGMENT MANAGEMENT
MANUAL
AUTO
datafile_spec ::=
‘
file_name
’
SIZE
REUSE
integer
autoextend _clause
K
M
G
165
Data Definition Statements
CREATE DISK TABLESPACE
autoextend_clause ::=
OFF
AUTOEXTEND
ON
integer
NEXT
maxsize_clause
K
M
G
maxsize_clause ::=
UNLIMITED
MAXSIZE
integer
K
M
G
Prerequisites
Only the SYS user, or a user who has CREATE TABLESPACE system privilege can create a tablespace.
Description
CREATE TABLESPACE statement creates a tablespace, which is an allocation of space in the database
that can contain schema objects.
DISK
Create a disk tablespace. A disk tablespace is created even when the CREATE TABLESPACE statement
is executed without the DISK keyword.
DATA
Create a tablespace where user’s data is stored. A data tablespace is created even when the CREATE
TABLESPACE statement is executed without the DATA keyword.
SQL Users’ Manual
166
CREATE DISK TABLESPACE
tblspace_name
Specify the name of the tablespace to be created.
DATAFILE datafile_spec
Specify the specification of data file which compose the tablespace.
EXTENTSIZE clause
This specifies the size of EXTENT which is the set of pages. You can't change it after setting. The
default unit for EXTENT size is KB(K), and you are also allowed to use the unit such as MB(M) or GB(G).
If you don't set EXTENT size, the 32 times a single page size will be used by default. If doing, you
should set EXTENT size to the multiple of a single page size. If you shouldn't, EXTENT size is changed
into same value as the multiple of page size internally.
The size of EXTENT is greater than double the size of a single page at least. For example, if the size of
a single page is 32K, the mininum size of EXTENT should be 64K.
Minimum size of exetent in disk tablespace should be set to size of 5 pages. In other words, its minimum size is specified as 40K because page size is 8K.
SEGMENT MANAGEMENT Clause
This indicates how to manage segment when you create disk tablespace. You can choose options to
manage segment when creating tablespace.
•
MANUAL : This indicates to generate segment to manage free page in free list.
•
AUTO : This indicates to generate segment to manage free page based on bitmap index.
However, if you don't choose option, you can generate segment in the way specified in
DEFAULT_SEGMENT_MANAGEMENT_TYPE.
file_name
Specify the name of the data file to be created using the full path.
SIZE clause
Specifies the size of the data file in bytes. If this statement is not specified, the default will be 100
Mega bytes. You can change the default file size configuring the SYS_DATA_TBS_INIT_SIZE property.
Specify the number as an integer and the unit like these;
Kilobytes as K , Megabytes as M, or gigabytes as G.
In case the unit is not indicated, the default unit will be K.
167
Data Definition Statements
CREATE DISK TABLESPACE
REUSE
Specify whether to reuse the existing data file or not. If there is a file with the specified name, you
must specify the REUSE option. However, if this option is specified for a file that does not exist, it will
be ignored and a new file will be created. In case an existing file is reused, the existing data will be
lost. its original contents.
autoextend_clause
Specify whether automatically extends the file when it exceeds its predefined size.
ON
Enable the AUTOEXTEND option.
OFF
Disable the file AUTOEXTEND option.
NEXT
Specify the size of the space to be extended upon file extension.
When AUTOEXTEND ON;In case this value is not specified while AUTOEXTEND is enabled, the default
NEXT value will be the size of extent * n. (that of ADD_EXTENT_NUM_FROM_SYSTEM_TO_TBS property parameter)
When AUTOEXTEND OFF;NEXT will be 0.
Kilobytes as K , Megabytes as M, or gigabytes as G. In case the unit is not indicated, the default unit
will be K.
maxsize_clause
Specify the maximum size of the file.
In case this value is not specified while AUTOEXTEND is enabled, the default will be UNLIMITED.
When AUTOEXTEND OFF;NEXT will be 0.
Kilobytes as K , Megabytes as M, or gigabytes as G.In case the unit is not indicated, the default unit
will be K.
UNLIMITED
Must be indicated not to limit the file extension size.
Example
<Query> Create a tablespace with three data files:
SQL Users’ Manual
168
CREATE DISK TABLESPACE
iSQL> CREATE TABLESPACE user_data
DATAFILE '/tmp/tbs1.user' SIZE 10M,
'/tmp/tbs2.user' SIZE 10M,
'/tmp/tbs3.user' SIZE 10M
SEGMENT MANAGEMENT MANUAL;
Create success.
<Query> Create a tablespace of initial size is 10 M with AUTOEXTEND option enabled.
iSQL> CREATE TABLESPACE user_data DATAFILE '/tmp/tbs.user' SIZE 10M AUTOEXTEND ON;
Create success.
<Query> Create a tablespace which is auto-extendable up to 100M by increasing 500K at a time.
iSQL> CREATE TABLESPACE user_data
DATAFILE '/tmp/tbs.user' SIZE 500K REUSE
AUTOEXTEND ON NEXT 500K MAXSIZE 100M;
Create success.
<Query> CREATE TABLE user_data. Tbs.user data file is not automatically extended.
iSQL> CREATE TABLESPACE user_data
DATAFILE '/tmp/tbs.user' AUTOEXTEND OFF;
Create success.
ID
TABLESPACE
CLASSIFICATION
STORING
SPACE
TABLESPACE NAME
CREATING TIME
0
SYSTEM DICTIONARY
TABLESPACE
MEMORY
SYS_TBS_MEM_DIC
CREATE DATABASE
1
SYSTEM MEMORY
DEFAULT TABLESPACE
MEMORY
SYS_TBS_MEM_DATA
CREATE DATABASE
2
SYSTEM DISK DEFAULT
TABLESPACE
DISK
SYS_TBS_DISK_DATA
CREATE DATABASE
3
SYSTEM UNDO
TABLESPACE
DISK
SYS_TBS_DISK_UNDO
CREATE DATABASE
4
SYSTEM DISK TEMPORARY TABLESPACE
DISK
SYS_TBS_DISK_TEMP
CREATE DATABASE
>=5
USER MEMORY DATA
TABLESPACE
Memory
User-Defined
CREATE MEMORY DATA
TABLESPACE
>=5
USER DISK DATA
TABLESPACE
Disk
User-Defined
CREATE DISK
DATA
TABLESPACE
>=5
USER DISK TEMPORARY
TABLESPACE
Disk
User-Defined
CREATE DISK
TEMPORARY
TABLESPACE
169
Data Definition Statements
CREATE DISK TABLESPACE
ID
>=5
TABLESPACE
CLASSIFICATION
USER VOLATILE DATA
TABLESPACE
SQL Users’ Manual
STORING
SPACE
Memory
TABLESPACE NAME
User-Defined
170
CREATING TIME
CREATE VOLATILE
DATA
TABLESPACE
CREATE MEMORY TABLESPACE
CREATE MEMORY TABLESPACE
Syntax
create_memory_tablespace ::=
CREATE
MEMORY
TABLESPACE
tablespace_name
initsize_clause
DATA
;
ONLINE
autoextend_clause
splitsize _clause
checkpoint _path _clause
OFFLINE
initsize_clause ::=
SIZE
integer
K
M
G
autoextend_clause ::=
OFF
AUTOEXTEND
ON
NEXT
integer
maxsize_clause
K
M
G
171
Data Definition Statements
CREATE MEMORY TABLESPACE
maxsize_clause ::=
UNLIMITED
MAXSIZE
integer
K
M
G
checkpoint_path_clause ::=
CHECKPOINT
PATH
‘
checkpoint _path
’
,
splitsize_clause ::=
SPLIT
EACH
integer
K
M
G
Prerequisites
A tablespace can be created by the user who is SYS or has the CREATE TABLESPACE system authority.
Description
This statement is used to create a memory tablespace where database objects can be stored in a
database.
SQL Users’ Manual
172
CREATE MEMORY TABLESPACE
A memory table can be created in a tablespace that is created with this statement.
MEMORY
Create a memory tablespace.
DATA
Create a tablespace where user’s data is stored. By default, a data tablespace is created even when
the CREATE TABLESPACE statement is executed without the DATA keyword.
tablespace_nam00e
Specify the name of a tablespace to create.
initsize_clause
Specify the initial size of a tablespace to create.
SIZE
Specify the initial size of a tablespace in bytes.
The initial size should be a multiple of the basic extension unit for a memory tablespace (The number of page(s) specified in the EXPAND_CHUNK_PAGE_COUNT property * The page size of a memory
tablespace (32KB)).
For example, if EXPAND_CHUNK_PAGE_COUNT is set to 128, the basic extension unit of a memory
tablespace becomes 128 * 32 = 4 MB. Therefore, the size can be specified as a multiple of 4 MB.
The size can be specified in Kilobyte (K), Megabyte (M) or Gigabyte (G). If the unit is not specified, the
default unit K is used.
autoextend_clause
Specify whether to use auto extension for a tablespace.
ON
Enable auto extension.
OFF
Disable auto extension. This is the default.
NEXT
The initial size should be a multiple of the basic extension unit for a memory tablespace (The number of page(s) specified in the EXPAND_CHUNK_PAGE_COUNT property * The page size of a memory
173
Data Definition Statements
CREATE MEMORY TABLESPACE
tablespace (32KB)).
Specify the size of the next extension during auto extension.
If AUTOEXTEND is ON and this value is not specified, the value is set to the default extension unit of a
tablespace specified in EXPAND_CHUNK_PAGE_COUNT.
If AUTOEXTEND is OFF, this value is 0.
The size can be specified in Kilobyte (K), Megabyte (M) or Gigabyte (G). If the unit is not specified, the
default unit K is used.
maxsize_clause
Specify the max size to which a table can be extended during auto extension. If AUTOEXTEND is ON
and this value is not specified, the default value is UNLIMITED.
If AUTOEXTEND is OFF, this value is 0. The size can be specified in Kilobyte (K), Megabyte (M) or Gigabyte (G). If the unit is not specified, the default unit K is used.
UNLIMITED
Specify that there is no limit in the size of auto extension.
If it is set to UNLIMITED, a tablespace is automatically extended to the point where the total size of all
memory tablespaces in the system matches the size specified in the MEM_MAX_DB_SIZE property.
checkpoint_path_clause
To ensure durability of data in a memory tablespace, data should be stored in files. These data files in
a memory tablespace are called checkpoint images.
The checkpoint_path clause specifies a checkpoint path where image files are stored.
If a checkpoint path is not specified, the path specified in the MEM_DB_DIR property becomes the
default path.
checkpoint_path
A checkpoint image is stored in this path at checkpoint of a memory tablespace. More than one path
can be specified to distribute the disk I/O costs upon checkpoint and tablespace loading.
split_each_clause
If a memory tablespace exceeds the max file size supported by OS or I/O cost needs to be distributed, it is split into smaller files. The split size can be specified by the user. If it is not specified, the
default split size specified in the DEFAULT_MEM_DB_FILE_SIZE property is used.
The size can be specified in Kilobyte (K), Megabyte (M) or Gigabyte (G). If the unit is not specified, the
default unit K is used.
SQL Users’ Manual
174
CREATE MEMORY TABLESPACE
Examples
<Query 1> Create a user-defined memory data tablespace with the initial size of 512 M and no auto
extension. (A checkpoint image is stored in the path specified in the MEM_DB_DIR property. The
split size of a checkpoint image file is based on the value in the DEFAULT_MEM_DB_FILE_SIZE property.)
iSQL> CREATE MEMORY DATA TABLESPACE user_data SIZE 512M;
Create success.
<Query 2> Create a user-defined memory data tablespace with the initial size of 512 M and auto
extensionfn by 128 M. (A checkpoint image is stored in the path specified in the MEM_DB_DIR property. The split size of a checkpoint image file is based on the value in the
DEFAULT_MEM_DB_FILE_SIZE property.)
iSQL> CREATE MEMORY DATA TABLESPACE user_data SIZE 512M AUTOEXTEND ON NEXT
128M;
Create success.
<Query 3> Create a user-defined memory data tablespace with the initial size of 512 M and auto
extension by 128 M up to 1 G. (A checkpoint image is stored in 3 directories and the split size of the
checkpoint image is 256 M.)
iSQL> CREATE MEMORY DATA TABLESPACE user_data SIZE 512M AUTOEXTEND ON NEXT
128M MAXSIZE 1G CHECKPOINT PATH ‘/dbs/path1’, ‘/dbs/path2’, ‘/dbs/path3’
SPLIT EACH 256M;
Create success.
175
Data Definition Statements
CREATE VOLATILE TABLESPACE
CREATE VOLATILE TABLESPACE
Syntax
create_tablespace ::=
CREATE
VOLATILE
tablespace _name
TABLESPACE
initsize_clause
DATA
;
autoextend_clause
initsize_clause ::=
SIZE
integer
K
M
G
autoextend_clause ::=
OFF
AUTOEXTEND
ON
NEXT
integer
maxsize_clause
K
M
G
SQL Users’ Manual
176
CREATE VOLATILE TABLESPACE
maxsize_clause ::=
UNLIMITED
MAXSIZE
integer
K
M
G
Prerequisites
A tablespace can be created by the user who is SYS or has the CREATE TABLESPACE system authority.
Description
This statement is used to create a volatile tablespace where database objects can be stored in a
database.
A volatile table can be created in a tablespace that is created with this statement.
VOLATILE
Create a volatile tablespace.
DATA
Create a tablespace where user’s data is stored. By default, a data tablespace is created even when
the CREATE TABLESPACE statement is executed without the DATA keyword.
tablespace_name
Specify the name of a tablespace to create.
initsize_clause
Specify the initial size of a tablespace to create.
177
Data Definition Statements
CREATE VOLATILE TABLESPACE
SIZE
Specify the initial size of a tablespace in bytes. The size can be specified in Kilobyte (K), Megabyte (M)
or Gigabyte (G). If the unit is not specified, the default unit K is used.
The initial size should be a multiple of the basic extension unit for a memory tablespace (The number of page(s) specified in the EXPAND_CHUNK_PAGE_COUNT property * The page size of a memory
tablespace (32KB)).
For example, if EXPAND_CHUNK_PAGE_COUNT is set to 128, the basic extension unit of a memory
tablespace becomes 128 * 32 = 4 MB. Therefore, the size can be specified as a multiple of 4 MB.
The size can be specified in Kilobyte (K), Megabyte (M) or Gigabyte (G). If the unit is not specified, the
default unit K is used.
autoextend_clause
Specify whether to use auto extension for a tablespace.
ON
Enable auto extension.
OFF
Disable auto extension. The is the default.
NEXT
The initial size should be a multiple of the basic extension unit for a memory tablespace (The number of page(s) specified in the EXPAND_CHUNK_PAGE_COUNT property * The page size of a memory
tablespace (32KB)).
Specify the size of the next extension during auto extension. If AUTOEXTEND is ON and this value is
not specified, the value is set to the default extension unit of a tablespace specified in
EXPAND_CHUNK_PAGE_COUNT.
If AUTOEXTEND is OFF, this value is 0. The size can be specified in Kilobyte (K), Megabyte (M) or Gigabyte (G). If the unit is not specified, the default unit K is used.
maxsize_clause
Specify the max size to which a table can be extended during auto extension. If AUTOEXTEND is ON
and this value is not specified, the default value is UNLIMITED.
If AUTOEXTEND is OFF, this value is 0. The size can be specified in Kilobyte (K), Megabyte (M) or Gigabyte (G). If the unit is not specified, the default unit K is used.
UNLIMITED
Specify that there is no limit in the size of auto extension.
SQL Users’ Manual
178
CREATE VOLATILE TABLESPACE
If it is set to UNLIMITED, a tablespace is automatically extended to the point where the total size of all
memory tablespaces in the system matches the size specified in the MEM_MAX_DB_SIZE property.
Examples
<Query 1> Create a user-defined volatile data tablespace with the initial size of 512 M and no auto
extension.
iSQL> CREATE VOLATILE DATA TABLESPACE user_data SIZE 512M;
Create success.
<Query 2> Create a user-defined volatile data tablespace with the initial size of 512 M and auto
extensionfn by 128 M.
iSQL> CREATE VOLATILE DATA TABLESPACE user_data SIZE 512M AUTOEXTEND ON NEXT
128M;
Create success.
Restrictions
LOB type isn't available in volitile tablespace.
179
Data Definition Statements
CREATE TEMPORARY TABLESPACE
CREATE TEMPORARY TABLESPACE
Syntax
create_temporary_tablespace ::=
CREATE
TEMPORARY
TABLESPACE
tblspace_name
TEMPFILE
datafile_spec
,
;
EXTENTSIZE
integer
K
M
G
datafile_spec ::=
'
file_name
'
SIZE
integer
REUSE
K
M
G
SQL Users’ Manual
180
autoextend_clause
CREATE TEMPORARY TABLESPACE
autoexetend_clause ::=
OFF
AUTOEXTEND
ON
NEXT
integer
maxsize_clause
K
M
G
Prerequisites
The SYS user, or a user who has CREATE TABSPACE system privilege can create temporary
tablespaces.
Description
A temporary tablespace contains schema objects only for the duration of a session. Objects in temporary tablespaces are stored in data files.
Use CREATE TABLESPACE statement to store a permanent database object in the database.
tblspace_name
Specify the name of the temporary tablespace to be created.
TEMPFILE datafile_space
Specify a temporary file list which associated with the temporary tablespace.
Examples
<Query> Create a temporary tablespace of 5 MB size
iSQL> CREATE TEMPORARY TABLESPACE temp_data
TEMPFILE '/tmp/tbs.temp' SIZE 5M
AUTOEXTEND ON;
Create success.
181
Data Definition Statements
CREATE TRIGGER
CREATE TRIGGER
Syntax
create_trigger ::=
CREATE
trigger _name
TRIGGER
.
user_name
AFTER
trigger _event
tbl_name
ON
BEFORE
.
user_name
OLD
alias _name
REFERENCING
NEW
ROW
AS
,
;
trigger _action
trigger_event ::=
INSERT
DELETE
UPDATE
OF
column_name
,
SQL Users’ Manual
182
CREATE TRIGGER
trigger_action::=
FOR
EACH
ROW
WHEN
(
search_condition
)
STATEMENT
psm_body
psm_body::=
AS
BEGIN
IS
declare_section
statement
END
EXCEPTION
exception _handler
Prerequisites
Only the SYS user or a user who has CREATE TRIGGER system privilege can create a trigger.
To create a trigger in another user's table, you must have CREATE ANY TRIGGER privilege.
Description
Creates a trigger with the defined name.
user_name
Specify the owner name of the trigger to be created. If this value is omitted, Altibase will create a
trigger in the current user's table.
trigger_name
Specify the name of the trigger to be created. Must be unique in the corresponding schema.
183
Data Definition Statements
CREATE TRIGGER
AFTER
Specify AFTER to cause the database to fire the trigger after executing the triggering event. For row
triggers, the trigger is fired after each affected row is changed.
BEFORE
Specify the time when trigger executes. This means that it executes before trigger_event does.
trigger_event
Specify the transformation of table data that can cause the trigger to fire. However, table change
cause of replication for database integrity is not available for trigger_event.
The following three types of DML can be defined:
DELETE
Specify DELETE if you want to the database to fire the trigger whenever a DELETE statement
removes a row from the table or removes an element from a nested table.
INSERT
Specify INSERT if you want to the database to fire the trigger whenever an INSERT statement inserts
a row into the table.
UPDATE
Specify UPDATE if you want the database to fire the trigger whenever an UPDATE statement changes
a value in one of the specified columns. If you want to use OF statement in UPDATE trigger_event,
the database can fire the trigger only when an UPDATE statement changes a value in one of the
specified columns in OF statement.
However, BEFORE UPDATE ROW clause will not be processed as a trigger event.
ON table_name
Determine the database object on which the trigger is to be created.
You can created trigger only on tables, in other words you can not create trigger on view, sequence,
and stored procedure.
No trigger can be created in the table which included in the replication. And any replication object
can not be created for a table which has triggers either.
REFERENCING syntax
REFERENCING clause has the concept of old and new rows cause of the nature of trigger. In other
words, if data are changed, the row has old and new values cause of changing the special row. To
refer to old value and the new value, use REFERENCING clause.REFERENCING clause has following
restrictions;
Can be used for only in FOR EACH ROW clause.
SQL Users’ Manual
184
CREATE TRIGGER
Referencing statement may include the following reference to refer to in trigger_action clause.
{OLD|OLD ROW|OLD ROW AS|OLD AS} alias_name
Indicates rows before modified. you can reference the old value in WHEN clause and trigger body.
OLD referencing cannot be used in Insert trigger event.
{NEW|NEW ROW|NEW ROW AS|NEW AS} alias_name
Indicates rows which are modified. Cannot be used for DELETE trigger event. You can change the
values of each column in BEFORE TRIGGER.
trigger_action
To specify the trigger action you should decide followings;
•
Trigger operation unit ( for each row or statement)
•
When fire the trigger.
•
What to do in trigger body
FOR EACH {ROW|STATEMENT}
Specify the operation unit of the trigger. The default is FOR EACH STATEMENT.
FOR EACH ROW : Specify FOR EACH ROW to designate the trigger as a row trigger. Database fires a
row trigger once for each row that is affected by the triggering statement and meets the optional
trigger constraint defined in the WHEN condition.
FOR EACH STATEMENT : The trigger will be fired only once when the corresponding DML SQL statement is completed.
WHEN search_condition
Specify conditions to fire the trigger. The trigger body is run only when search_condition is TRUE. If
when search_condition is FALSE, the trigger body will not run. If when search_condition is not indicated, TRUE will be always recognized and trigger operation will be executed upon occurrence of
the trigger event.
There are several restrictions to use when search_condition;
•
when search_condition can be used only the action unit FOR EACH ROW.
•
Only the alias_name defined in the REFERENCING clause can be used.
•
A subquery cannot be used in a when search_condition.
•
A stored procedure cannot be used in a when search_condition.
185
Data Definition Statements
CREATE TRIGGER
psm_body
Specify the action to be executed by the trigger. psm_body can be used in the same way as block
statement in the store procedure. There are several restrictions like following:
•
Cannot use the host and stored procedure variables in a trigger body.
•
Cannot use transaction statements such as COMMIT or ROLLBACK in a trigger body.
•
DCL statements such as CONNECT cannot be used.
•
DDL statements such as CREATE TABLE cannot be used.
•
Cannot call the stored procedure.
•
No trigger with a cycle can be created.
For more about semantics of trigger body, you can refer to the Stored Procedure User's Manual.
Summary
•
Trigger execution procedure
In case multiple triggers are defined for the same event and on a table , the trigger execution order is
not consistent. If the priority is important, multiple triggers must be integrated into one manually.
•
Failure of trigger execution
If an error occurs during execution of the trigger, the database returns error code to the DML that
caused the corresponding trigger.
•
DDL on the table which referred to by a trigger
If a table referenced by a trigger is deleted by DROP TABLE, all triggers in the corresponding table
will be also removed.
When a table that the trigger action body refers is altered or dropped, the trigger will not be
dropped but it is going to be invalid. However, the trigger will be automatically recompiled and executed whenever it is fired.
•
Trigger and replication
The DML from the replication does not fire the trigger.
•
Trigger and LOB
LOB type do not use on trigger. If you use LOB type, all data display ‘NULL’.
Examples
< Query > The following example shows tracking the deleted rows. You can create trigger in way of
FOR EACH ROW and then refer to the existing values of ono, cno, qty and arrival_date column. Then
you can track the deleted rows with inserting rows in log_tbl when data about the completed (processing=’D’) delivery order are deleted in orders table rows.
SQL Users’ Manual
186
CREATE TRIGGER
iSQL> CREATE TABLE orders(
ono NIBBLE(10),
cno CHAR(14),
qty INTEGER,
arrival_date DATE,
sysdate DATE);
Create success.
iSQL> CREATE TABLE log_tbl(
ono NIBBLE(10),
cno CHAR(14),
qty INTEGER,
arrival_date DATE,
sysdate DATE);
Create success.
iSQL> CREATE TRIGGER del_trigger
AFTER DELETE ON orders
REFERENCING OLD ROW old_row
FOR EACH ROW
AS BEGIN
INSERT INTO log_tbl VALUES(old_row.ono, old_row.cno, old_row.qty,
old_row.arrival_date, sysdate);
END;
/
Create success.
iSQL> DELETE FROM orders WHERE processing = 'D';
2 rows deleted.
iSQL> SELECT * FROM log_tbl;
LOG_TBL.ONO LOG_TBL.CNO LOG_TBL.QTY LOG_TBL.ARRIVAL_DATE
-----------------------------------------------LOG_TBL.SYSDATE
----------------------0011290011 761001-1000001 1000 2000/12/05 00:00:00
2005/03/21 10:07:12
0011290100 700101-1001001 500 2000/12/07 00:00:00
2005/03/21 10:07:12
2 rows selected.
<Query>The following example shows that if the records have no SCORE, they are specified as O for
SCORE before they are inserted in SCORES table with creating trigger in way of FOR EACH ROW.
iSQL> CREATE TABLE SCORES( ID INTEGER, SCORE INTEGER );Create success.
iSQL> CREATE TRIGGER SCORES_TRIGGERBEFORE INSERT ON SCORESREFERENCING NEW ROW
NEW_ROWFOR EACH ROWAS BEGIN IF NEW_ROW.SCORE IS NULL THEN NEW_ROW.SCORE := 0;
END IF;END;/Create success.
iSQL> INSERT INTO SCORES VALUES( 1, 20 );1 row inserted.
iSQL> INSERT INTO SCORES VALUES( 5, NULL );1 row inserted.
iSQL> INSERT INTO SCORES VALUES( 17, 75 );1 row inserted.
iSQL> SELECT * FROM SCORES;ID
SCORE
--------------------------1
20
5
0
17
75
3
rows selected.
187
Data Definition Statements
CREATE USER
CREATE USER
Syntax
create_user ::=
CREATE
USER
user_name
IDENTIFIED
BY
password
;
TEMPORARY
DEFAULT
TABLESPACE
TABLESPACE
tblspace_name
tblspace_name
ON
ACCESS
tblspace_name
OFF
Prerequisites
Only the Sys user or the user who has CREATE USER system privilege can create a user.
Description
Create and configure a database user, which is an account through which you can log in to the database and access your data.
user_name
Specifies the name of the user to create. The user name must be unique in a database.
SQL Users’ Manual
188
CREATE USER
IDENTIFIED BY password
Altibase uses password to authenticate the user. The user must enter the password when logging on
a database.
In Solaris 2.8 and higher versions and Windows NT, the password can contain up to 11 characters. In
other operating systems, the password can contain up to 8 characters. If the number of characters in
the password exceeds this limitation, Altibase recognizes only up to 11 or 8 characters, depending
on the operating system.
TEMPORARY TABLESPACE Clause
Specify the tablespace for the user's temporary tablespace to be used for the user's table operation
in the disk.
If this value is not specified, system temporary tablespace1 will be defined as the default temporary
tablespace. Allocates temporary tablespaces to the users.
When using a temporary tablespace, one or more disk-based tables are accessed by the SQL statement and the disk temporary tablespace is used for those tables.
If all tables are stored in the memory, all operations will use the memory space. Only one temporary
tablespace can be specified to a user.
DEFAULT TABLESPACE clause
Specify the default tablespace for objects that the user creates. If you omit this clause, then the
user's objects are stored in the database default tablespace. If no default tablespace has been specified for the database, then the user's objects are stored in the SYSTEM tablespace. Only one temporary tablespace can be specified to a user.
ACCESS clause
Specify whether the specified tablespace can be used or not by the user.
ACCESS tablespace_name ON : The user can access the specified tablespace.
ACCESS tablespace_name OFF : The user can not access the specified tablespace.
If the user is not explicitly granted the system privilege for the tablespace, no access will be allowed
to the specified tablespace.
Restrictions
One user can use multiple data tablespaces. However, only one temporary tablespace is available
per user.
There is no available statement to access the UNDO tablespace.
189
Data Definition Statements
CREATE USER
Examples
<Query> Create a user of which name is uare1 and password is password.
iSQL> CREATE USER uare1 IDENTIFIED BY rose1;
Create success.
<Query> Create a user and grant the accessing privileges of the SYS_TBS_MEMORY to the user.
iSQL> CREATE USER uare4
IDENTIFIED BY rose4
DEFAULT TABLESPACE user_data
TEMPORARY TABLESPACE temp_data
ACCESS SYS_TBS_MEMORY ON;
Create success.
SQL Users’ Manual
190
CREATE VIEW
CREATE VIEW
Syntax
create_view ::=
CREATE
OR
REPLACE
FORCE
NO
view_name
VIEW
user_name
,
subquery
AS
(
alias_name
;
subquery_restriction _clause
)
,
subquery_restriction_clause ::=
WITH
READ
ONLY
Prerequisites
Only the SYS user or the user who has CREATE VIEW system privilege can create view objects.
The user must have CREATE ANY VIEW privilege to create a view in another user's schema.
The schema owner of the view must have a proper privilege to select from the associated table or
view.
191
Data Definition Statements
CREATE VIEW
Description
Defines a view, which is a logical table based on one or more tables or views. A view contains no data
itself. The tables upon which a view is based are called base tables.
OR REPLACE
Specify OR REPLACE to re-create the view if it already exists. You can use this clause to change the
definition of an existing view without dropping, re-creating, and re-granting object privileges previously granted on it.
FORCE
Specify FORCE if you want to create the view regardless of whether the base tables of the view or the
referenced object types exist or the owner of the schema containing the view has privileges on
them.
Therefore, an invalid view with an error can be created. In this case, an error will occur upon execution of SELECT statement for the view. Use FORCE option to create a view and select it. Or search the
meta table to check the status of the view.
NO FORCE
Specify NOFORCE if you want to create the view only if the base tables exist and the owner of the
schema containing the view has privileges on them. This is the default.
user_name
Specify the name of the owner to be created. If this value is omitted, Altibase will create a view in the
schema of the user connected to the current session.
view_name
Specify the name of the view to create.
alias_name
In case the search target of the view is an expression, the alias name must be indicated and the
name will become the column name of the view. The alias name must be unique in the select statement.
subquery
Specify a subquery that identifies rows and columns of the basic table.
WITH READ ONLY
Specify that the table or view is read-only. A read-only view is always created even if this option is
not selected.
SQL Users’ Manual
192
CREATE VIEW
Constraints
Maximum of 1024 expressions can be specified in the select statement to build a view.
Cannot use CURRVAL and NEXTVAL pseudo columns in the select statement to build a view.
Examples
•
Creating a view
<Query> Create a view
iSQL> CREATE VIEW avg_sal AS
SELECT DNO, AVG(salary) emp_avg_sal
-- salary average of each department
FROM employee
GROUP BY dno;
Create success.
iSQL> SELECT * FROM avg_sal;
AVG_SAL.DNO
AVG_SAL.EMP_AVG_SAL
-----------------------------------A001
2066666.67
C001
1576666.67
C002
1660000
D001
2075750
F001
1845000
6 rows selected.
•
Create a Join View
<Query> The following view shows the employee no. responsible for the ordered product, the
employee name, and the customer's name.
iSQL> CREATE VIEW emp_cus AS
SELECT DISTINCT o.eno, e.ename, c.cname
FROM employee e, customer c, orders o
WHERE e.eno = o.eno AND o.cno = c.cno;
Create success.
iSQL> SELECT * FROM emp_cus;
ENO
ENAME
CNAME
-----------------------------------------------12
MYLEE
DJKIM
12
MYLEE
JHKIM
12
MYLEE
YSKIM
12
MYLEE
JHCHOI
12
MYLEE
DHCHO
12
MYLEE
KSKIM
12
MYLEE
BSYOUN
19
KMKIM
LSPARK
19
KMKIM
BSYOUN
19
KMKIM
CHLEE
19
KMKIM
JHPARK
19
KMKIM
SMCHO
19
KMKIM
DKKIM
20
DIKIM
DHKIM
20
DIKIM
DKKIM
20
DIKIM
YDPARK
193
Data Definition Statements
CREATE VIEW
20
20
20
20
20
21 rows
DIKIM
LSPARK
DIKIM
DJKIM
DIKIM
IJLEE
DIKIM
JHKIM
DIKIM
YSKIM
selected.
SQL Users’ Manual
194
DROP DATABASE
DROP DATABASE
Syntax
drop_database ::=
DROP
database _name
DATABASE
;
Prerequisites
This SQL statement can be executed in the –sysdba administrator mode by the SYS user at the process stage during multi-level startup of a database.
Description
Delete a database from the system.
database_name
Specify the name of a database to delete.
If this command is executed, all data, log and log anchor files that are used by a database are
deleted.
Example
<Query> Delete a database named mydb.
iSQL> DROP DATABASE mydb;
Checking MRDB files
[Ok] /home/ altibase_home/dbs/mydb-0-0 Exist.
[Ok] /home/ altibase_home/dbs/mydb-1-0 Exist.
Checking Log Anchor files
[Ok] /home /altibase_home/logs/loganchor0 Exist.
[Ok] /home /altibase_home/logs/loganchor1 Exist.
[Ok] /home /altibase_home/logs/loganchor2 Exist.
Removing DRDB files
195
Data Definition Statements
DROP DATABASE
Removing Log files
Removing Log Anchor files
Drop success.
SQL Users’ Manual
196
DROP DATABASE LINK
DROP DATABASE LINK
Syntax
drop_database_link ::=
DROP
DATABASE
LINK
dblink _name
;
PUBLIC
PRIVATE
Prerequisites
The SYS user or a user who has DROP DATABASE LINK system privilege can drop to link database.
Description
Remove the specified database link.
user_name
If a database link to remove is PRIVATE, it can be accessed only by the user who has created it. Therefore, to remove the database link, the related user name should be specified.
dblink_name
Specify the name of a database link to remove.
Precautions
If a database link to remove is currently in use, it cannot be removed. In order to remove a database
link, there should not be any query for the database link. Otherwise, an error will occur.
Examples
<Query> The user user1 removes PRIVATE database link that has been created under the name
dblink1.
iSQL> DROP DATABASE LINK user1.dblink1;
197
Data Definition Statements
DROP DIRECTORY
DROP DIRECTORY
Syntax
drop_directory ::=
DROP
directory _name
DIRECTORY
;
Prerequisites
The SYS user or a user who has DROP ANY DIRECTORY system privilege can drop a directory.
Description
A statement to remove a directory. However, the directory is removed only in the database, not in
the actual file system.
directory_name
Specify the directory name to drop.
Examples
<Query> Drop the directory named alti_dir1.
iSQL> DROP DIRECTORY alti_dir1;
Drop success.
SQL Users’ Manual
198
DROP INDEX
DROP INDEX
Syntax
drop_index ::=
DROP
index_name
INDEX
user_name
;
.
Prerequisites
The index must be in your own schema or you must have the DROP ANY INDEX system privilege.
Description
Removes an index from the database.
user_name
Specify the owner name of the index to drop. If omitted, Altibase will consider it as belonging to the
schema of the user connected to the current session.
index_name
Specify the name of the index to drop.
Examples
<Query> Drop index emp_idx1.
iSQL> DROP INDEX emp_idx1;
Drop success.
199
Data Definition Statements
DROP QUEUE
DROP QUEUE
Syntax
drop_queue ::=
DROP
QUEUE
queue_name
;
Description
Delete the specified queue. The queue table, the queue table index and the sequence created for
MSGID in the queue table are deleted together.
Example
<Query> Delete message queue Q1 and its objects.
DROP QUEUE Q1;
SQL Users’ Manual
200
DROP REPLICATION
DROP REPLICATION
Syntax
drop_replication ::=
DROP
REPLICATION
replication _name
;
Description
An SQL statement to drop the replication object.
Cannot be used after the replication has started.
Can be used after the replication ends.
replication_name
Specify the name of the replication object to drop.
Precautions
Only the SYS user can use the replication-related statements.
The replication under processing cannot be dropped.
Examples
<Query> Drop replication rep1.
iSQL> DROP REPLICATION rep1;
Drop success.
201
Data Definition Statements
DROP SEQUENCE
DROP SEQUENCE
Syntax
drop_sequence ::=
DROP
seq_name
SEQUENCE
user_name
;
.
Prerequisites
The sequence must be in your own schema or you must have the DROP ANY SEQUENCE system privilege.
Description
Removes a sequence from the database.
user_name
Specify the owner name of the sequence to drop. If omitted, Altibase will consider it as belonging to
the schema of the user connected to the current session.
seq_name
Specify the sequence name to drop.
Examples
<Query> Delete sequence seq1.
iSQL> DROP SEQUENCE seq1;
Drop success.
SQL Users’ Manual
202
DROP SYNONYM
DROP SYNONYM
Syntax
drop_synonym ::=
DROP
synonym_name
SYNONYM
PUBLIC
user_name
;
.
Prerequisites
To drop a private synonym, either the synonym must be in your own schema or you must have the
DROP ANY SYNONYM system privilege.
To delete a public synonym, the user must have DROP PUBLIC SYNONYM system privilege.
Description
Removes a synonym from the database or to change the definition of a synonym by dropping and
re-creating it.
PUBLIC
To drop the public synonym, select PUBLIC option. Otherwise, the PRIVATE synonym of the specified
name will be dropped.
If PUBLIC is specified, user_name cannot be specified.
user_name
Specify the owner name of the synonym to drop. If omitted, Altibase will consider it as belonging to
the schema of the user connected to the current session.
synonym_name
Specify the synonym to drop.
203
Data Definition Statements
DROP SYNONYM
Examples
<Query> Drop my_dept synonym.
iSQL> DROP SYNONYM my_dept;
Drop success.
<Query> Drop the PUBLIC synonym dept.
iSQL> DROP PUBLIC SYNONYM dept;
Drop success.
SQL Users’ Manual
204
DROP TABLE
DROP TABLE
Syntax
drop_table ::=
DROP
table_name
TABLE
user_name
.
;
CASCADE
CONSTRAINTS
Prerequisites
The table must be in your own schema or you must have the DROP ANY TABLE system privilege.
Description
Removes the table and all its data from the database entirely.
user_name
Specify the owner name of the table to drop. If omitted, Altibase will consider it as belonging to the
schema of the user connected to the current session.
table_name
Specify the name of the table to be dropped.
Examples
<Query> Drop the employee table.
iSQL> DROP TABLE employee;
Drop success.
205
Data Definition Statements
DROP TABLESPACE
DROP TABLESPACE
Syntax
drop_tablespace ::=
DROP
TABLESPACE
tblspace_name
;
INCLUDING
CONTENTS
AND
DATAFILES
CASCADE
CONSTRAINTS
Prerequisites
You must have the DROP TABLESPACE system privilege.
Description
Removes a tablespace from the database.
tblspace_name
Specify the tablespace to drop.
INCLUDING CONTENTS
Specify if you want to drop all the contents of the tablespace. If one or more objects exist in the
tablespace, this clause must be specified to remove a tablespace. Otherwise, Altibase will return an
error and DROP TABLESPACE statement will fail.
AND DATAFILES
When INCLUDING CONTENTS clause is specified with AND DATAFILES, Specifying the AND DATAFILES clause along with the INCLUDING CONTENTS clause deletes all files related to a tablespace
from the file system.
For a disk tablespace, all data files in a disk tablespace are deleted from the file system.
SQL Users’ Manual
206
DROP TABLESPACE
For a memory tablespace, all checkpoint image files in a memory tablespace are deleted from the
file system. However, checkpoint paths are kept.
The AND DATAFILES statement cannot be used for a volatile tablespace.
CASCADE CONSTRAINTS
Specify CASCADE CONSTRAINTS to drop all referential integrity constraints from tables outside
tablespace that refer to primary and unique keys of tables inside tablespace. If you omit this clause
and such referential integrity constraints exist, then Altibase database returns an error and does not
drop the tablespace.
Constraints
You can not remove these tablespace with the DROP TABLESPACE statement;
•
SYSTEM TABLESPACE
•
SYS_TBS_MEMORY
•
SYS_TBS_DATA
•
SYS_TBS_TEMP
•
UNDO TABLESPACE
Examples
<Query> Drop the tablespace user_data.
iSQL> DROP TABLESPACE user_data;
Drop success.
<Query 2> Delete a tablespace along with all objects and data files in disk tablespace user_data.
iSQL> DROP TABLESPACE user_data INCLUDING CONTENTS AND DATAFILES;
Drop success.
<Query 3> Delete a tablespace along with all objects and data files in memory tablespace
user_data.
iSQL> DROP TABLESPACE user_memory_tbs INCLUDING CONTENTS AND DATAFILES;
Drop success.
<Query 4> Delete tablespace user_data along with all referential integrity constraints that refer to
primary and unique keys in all objects and tables in tablespace user_data.
iSQL> DROP TABLESPACE user_data INCLUDING CONTENTS CASCADE CONSTRAINTS;
Drop success.
207
Data Definition Statements
DROP TRIGGER
DROP TRIGGER
Syntax
drop_trigger ::=
DROP
TRIGGER
trigger_name
user _name
;
.
Prerequisites
The trigger must be in your own schema or you must have the DROP ANY TRIGGER system privilege.
Description
Drops the specified trigger from the database.
user_name
Specify the owner name of the trigger to drop. If omitted, Altibase will drop the trigger from the current user's schema.
trigger_name
Specify the name of the trigger to be dropped.
Examples
<Query> Drop a trigger from a table.
iSQL> DROP TRIGGER del_trigger;
Drop success.
SQL Users’ Manual
208
DROP USER
DROP USER
Syntax
drop_user ::=
DROP
USER
user_name
;
CASCADE
Prerequisites
Only the SYS user or a user who has DROP USER system privilege can drop a user.
Description
Drops the specified user from the database.
user_name
Specify the user name to drop.
CASCADE
If the database user and the user's schema include objects, all objects will be also removed.
Table or sequence created by the user must be dropped previously if you omit CASCADE.
Examples
<Query> Drop the user uare1.
iSQL> DROP USER uare1;
Drop success.
<Query> Drop the user uare4 and all the objects in it.
209
Data Definition Statements
DROP USER
iSQL> DROP USER uare4 CASCADE;
Drop success.
SQL Users’ Manual
210
DROP VIEW
DROP VIEW
Syntax
drop_view ::=
DROP
view_name
VIEW
user_name
;
.
Prerequisites
The view must be in your own schema or you must have the DROP ANY VIEW system privilege.
Description
Drops the specified view from the database.
user_name
Specify the owner name of the view to drop. If omitted, Altibase will drop the view from the user's
schema.
view_name
Specify the name of the view to be dropped.
Examples
<Query> Drop the view avg_sal in the followings.
iSQL> DROP VIEW avg_sal;
Drop success.
211
Data Definition Statements
GRANT
GRANT
Syntax
grant ::=
grant _system_ privilege
GRANT
;
grant _object _ privilege
grant_system_privilege ::=
,
,
system_privilege
user
TO
ALL
PUBLIC
PRIVILEGES
grant_object_privilege ::=
,
object _ privilege
ON
object
ALL
DIRECTORY
PRIVILEGES
directory _name
,
user
TO
PUBLIC
SQL Users’ Manual
WITH
212
GRANT
OPTION
GRANT
Prerequisites
To grant a system privilege, you must have GRANT ANY PRIVILEGES system privilege.
Description
Grants privileges to the specified users to access the database and the object.
Manages the privileges by dividing it into system privileges and object privileges.
grant_system_privilege
The system privilege is usually managed by the DBA. Users with the system privilege can perform
the operations in the database and access the objects in all schemas.
The privileges required to run the DDL statement and DCL statement.
grant_object_privilege
The object owner manages the object-accessing authorities. With the object-accessing authority,
the user can access and manipulate the object.
The privilege required to run the DML statement.
System Privileges
The system privilege is usually managed by the DBA. Users with the system privilege can perform
the operations in the database and access the objects in all schemas.
system_privilege
Specify the system access privilege name to grant
ALL PRIVILEGES
Grant all the system privileges.
TO user
Grant the system privilege to the specified user.
TO PUBLIC
Grant the system privilege to all users.
Notes:
1.
Only the SYS user or a user who has GRANT ANY PRIVILEGES can grant all system access privi213
Data Definition Statements
GRANT
leges to other users.
2.
The SYS user has all system access privileges.
3.
CREATE privilege is to create or drop objects.
4.
CREATE TABLE privilege includes a privilege to create an index. A privilege to create index is a
privilege to access the object, not the system.
5.
When the new user is created, usually you must grant these privileges.
•
•
•
•
•
•
•
•
CREATE SESSION
CREATE TABLE
CREATE SEQUENCE
CREATE SYNONYM
CREATE PROCEDURE
CREATE VIEW
CREATE TRIGGER
CREATE DATABASE LINK
The following query shows you a list of Altibase system privileges.
iSQL> SELECT * FROM SYSTEM_.SYS_PRIVILEGES_ where PRIV_TYPE = 2;
Altibase supports total of 51 system privileges.
PrivID
System privilege
1
Name
Purpose
ALL
Do not use
ALTER SYSTEM
Dynamically change database
server environment configurations.
233
ALTER DATABASE
Do not use
234
DROP DATABASE
Do not use
CREATE ANY DIRECTORY
Creates a directory to control
the file in the stored procedure.
DROP ANY DIRECTORY
Drops a directory to control the
file in the stored procedure.
CREATE ANY INDEX
Creates an index not only in
the grantee's schema but also
in other users' schema.
203
ALTER ANY INDEX
Alters the definition of any
index in the database
204
DROP ANY INDEX
Drops any index from a database
201
250
DATABASE
DIRECTORY
251
202
SQL Users’ Manual
INDEXES
214
GRANT
PrivID
205
System privilege
Purpose
CREATE PROCEDURE
Creates a stored procedure or
function in the grantee's
schema.
206
CREATE ANY PROCEDURE
Creates the stored procedure
or function not only in the
grantee's schema but also in
other users' schemas.
207
ALTER ANY PROCEDURE
Recompiles any stored procedures and functions in the
database.
208
DROP ANY PROCEDURE
Executes any stored procedures and functions in the
database
209
EXECUTE ANY PROCEDURE
Drops all stored procedures
and functions in the database.
CREATE SEQUENCE
Creates a sequence in the
grantee's schema.
211
CREATE ANY SEQUENCE
Creates a sequence not only in
the grantee's schema but also
in other users' schema.
212
ALTER ANY SEQUENCE
Alters the definition of all
sequences in the database.
213
DROP ANY SEQUENCE
Deletes all sequences in the
database.
214
SELECT ANY SEQUENCE
Searches all sequences in the
database.
CREATE SESSION
Grant a user connection privileges.
ALTER SESSION
Not mean
CREATE SYNONYM
Creates the private synonym.
246
CREATE PUBLIC SYNONYM
Creates the public synonym.
247
CREATE ANY SYNONYM
Creates the private synonyms
not only in the current user's
schema but also other users'
schemas.
248
DROP ANY SYNONYM
Drops any private synonym.
249
DROP PUBLIC SYNONYM
Drops the public synonym.
210
215
PROCEDURES
Name
SEQUENCES
SESSIONS
216
245
SYNONYM
215
Data Definition Statements
GRANT
PrivID
217
System privilege
Purpose
CREATE TABLE
Creates the table in the
grantee's schema.
218
CREATE ANY TABLE
Creates views not only in the
current user's schema but also
in other users' schemas.
219
ALTER ANY TABLE
Alters the definition of all
tables in the database.
220
DELETE ANY TABLE
Drops the records of all tables
in the database.
221
DROP ANY TABLE
Truncates any table in the database
222
INSERT ANY TABLE
Inserts new records in all tables
in the database.
223
LOCK ANY TABLE
Locks all tables in the database.
224
SELECT ANY TABLE
Searches the data in any table
in the database.
225
UPDATE ANY TABLE
Changes the columns in any
table in the database.
CREATE USER
Creates a new user.
227
ALTER USER
Alters the password of any
users.
228
DROP USER
Drops users.
CREATE VIEW
Creates views in the grantee's
schema.
230
CREATE ANY VIEW
Creates the table not only in
the current user's schema but
also in other users' schema.
231
DROP ANY VIEW
Deletes all views in the database.
226
229
TABLES
Name
USERS
VIEWS
232
MISCELLANEOUS
GRANT ANY PRIVILEGES
Grants all system privileges to
other users.
235
TABLESPACES
CREATE TABLE
Creates the tablespace.
236
ALTER TABLESPACE
Alters the definition of the
tablespace.
237
DROP TABLESPACE
Deletes the tablespace.
238
MANAGE TABLESPACE
Do not use
240
SYSDBA
Do not use
SQL Users’ Manual
216
GRANT
PrivID
241
System privilege
TRIGGER
Name
Purpose
CREATE TRIGGER
Creates a new trigger.
242
CREATE ANY TRIGGER
Creates views not only in the
current user's schema but also
in other users' schemas.
243
ALTER ANY TRIGGER
Alters the definition of any trigger in the database.
244
DROP ANY TRIGGER
Drops any trigger in the database.
Object Privileges
The object owner manages the object-accessing authorities. With the object-accessing authority,
the user can access and manipulate the object.
object_privilege
Specify if you intend to grant only an object-privilege.
ALL [PRIVILEGES]
Specify if you intend to grant all privileges .
ON object
Specify the corresponding object.
ON DIRECTORY directory_name
Specify the name of the directory to grant privileges for the directory controlled by the stored procedure.
TO user
Specify the user who receives the corresponding object access privilege.
TO PUBLIC
Specify TO PUBLIC if you intend to grant the privilege to all users.
WITH GRANT OPTION
Specify WITH GRANT OPTION to enable the grantee to grant the object privileges to other users.
217
Data Definition Statements
GRANT
Summary
1. An object owner refers to a user who has created an object.
2. Only the object owner or a user who received WITH GRANT OPTION from the object can grant the
object access privilege.
3. The object owner can have all access privileges for the corresponding object.
iSQL> SELECT * FROM SYSTEM_.SYS_PRIVILEGES_ where PRIV_TYPE = 1;
Displays the information about all the object-accessing privileges that Altibase supports.
Altibase supports the object privileges as follows;
PrivID
Object privileges
Table
Sequence
PSM
View
directory
101
ALTER
O
102
DELETE
O
103
EXECUTE
104
INDEX
O
105
INSERT
O
106
REFERENCES
O
107
SELECT
O
108
UPDATE
O
109
READ
O
110
WRITE
O
O
O
O
O
All users have SELECT privilege for the meta table. The user who can access the object with ANY Keyword can execute the DML for the meta table.
Examples
System Privilege
<Query> Grant system privileges to a user.
iSQL> CREATE TABLE seqtbl(i1 INTEGER);
Create success.
iSQL> CREATE OR REPLACE PROCEDURE proc1
AS
BEGIN
FOR i IN 1 .. 10 LOOP
INSERT INTO seqtbl VALUES(i);
SQL Users’ Manual
218
GRANT
END LOOP;
END;
/
Create success.
iSQL> CREATE USER uare5 IDENTIFIED BY rose5;
Create success.
iSQL> GRANT EXECUTE ANY PROCEDURE, SELECT ANY TABLE TO uare5;
Grant success.
iSQL> CONNECT uare5/rose5;
Connect success.
iSQL> EXEC sys.proc1;
Execute success.
iSQL> SELECT * FROM sys.seqtbl;
SEQTBL.I1
-------------1
2
3
4
5
6
7
8
9
10
10 rows selected.
iSQL> CONNECT sys/manager;
Connect success.
iSQL> CREATE SEQUENCE seq1
START WITH 13
INCREMENT BY 3
MINVALUE 0 NOMAXVALUE;
Create success.
iSQL> INSERT INTO seqtbl VALUES(seq1.NEXTVAL);
1 row inserted.
iSQL> INSERT INTO seqtbl VALUES(seq1.NEXTVAL);
1 row inserted.
iSQL> SELECT * FROM seqtbl;
SEQTBL.I1
-------------1
2
3
4
5
6
7
8
9
10
13
16
12 rows selected.
iSQL> GRANT ALTER ANY SEQUENCE, INSERT ANY TABLE, SELECT ANY SEQUENCE TO
uare5;
Grant success.
iSQL> CONNECT uare5/rose5;
Connect success.
iSQL> ALTER SEQUENCE sys.seq1
INCREMENT BY 50
MAXVALUE 100
CYCLE;
Alter success.
iSQL> INSERT INTO sys.seqtbl VALUES(sys.seq1.NEXTVAL);
1 row inserted.
219
Data Definition Statements
GRANT
iSQL> INSERT INTO sys.seqtbl VALUES(sys.seq1.NEXTVAL);
1 row inserted.
iSQL> INSERT INTO sys.seqtbl VALUES(sys.seq1.NEXTVAL);
1 row inserted.
iSQL> INSERT INTO sys.seqtbl VALUES(sys.seq1.NEXTVAL);
1 row inserted.
iSQL> SELECT * FROM sys.seqtbl;
SEQTBL.I1
-------------1
2
3
4
5
6
7
8
9
10
13
16
66
0
50
100
16 rows selected.
Object access control
<Query> Grant an object privileges to a user.
iSQL> CREATE USER uare6 IDENTIFIED BY rose6;
Create success.
iSQL> GRANT CREATE USER TO uare6;
Grant success.
iSQL> @schema.sql
iSQL> GRANT SELECT, DELETE ON employee TO uare6 WITH GRANT OPTION;
Grant success.
iSQL> CONNECT uare6/rose6;
Connect success.
iSQL> CREATE USER uare7 IDENTIFIED BY rose7;
Create success.
iSQL> GRANT SELECT, DELETE ON sys.employee TO uare7;
Grant success.
iSQL> CONNECT uare7/rose7;
Connect success.
iSQL> DELETE FROM SYS.employee WHERE eno = 12;
1 row deleted.
iSQL> SELECT eno, ename FROM sys.employee WHERE eno = 12;
ENO ENAME
------------------------------------No rows selected.
iSQL> CONNECT sys/manager;
Connect success.
iSQL> CREATE USER uare8 IDENTIFIED BY rose8;
Create success.
iSQL> CONNECT uare6/rose6;
Connect success.
iSQL> GRANT SELECT, DELETE ON sys.employee TO uare8;
Grant success.
SQL Users’ Manual
220
GRANT
The grantee (uare6) created by With Grant Option can grant the object access privilege not only to
the user created by the grantor (uare7) but also the user (uare8) created by the grantor (Sys).
iSQL> CONNECT uare8/rose8;
Connect success.
iSQL> DELETE FROM sys.employee WHERE eno = 13;
1 row deleted.
iSQL> SELECT eno, ename FROM sys.employee WHERE eno = 13;
ENO ENAME
------------------------------------No rows selected.
<Query> Granting privileges and Revoking privileges.
iSQL> CONNECT sys/manager;
Connect success.
iSQL> CREATE TABLE book(
isbn CHAR(10) PRIMARY KEY,
title VARCHAR(50),
author VARCHAR(30),
edition INTEGER DEFAULT 1,
publishingyear INTEGER,
price NUMBER(10,2),
pubcode CHAR(4));
Create success.
iSQL> CREATE TABLE inventory(
subscriptionid CHAR(10) PRIMARY KEY,
storecode CHAR(4),
purchasedate DATE,
quantity INTEGER,
paid CHAR(1));
Create success.
iSQL> CREATE USER uare9 IDENTIFIED BY rose9;
Create success.
iSQL> GRANT ALL PRIVILEGES TO uare9;
Grant success.
<= sys grants uare9 all the system access privileges.
iSQL> GRANT REFERENCES ON book TO uare9 WITH GRANT OPTION;
Grant success.
<= uare9 receives the REFERENCE privilege from sys, and, through WITH GRANT OPTION, uare9 is
able to grant another user (uare10) the REFERENCE object privilege on book, the object.
iSQL> CONNECT uare9/rose9;
Connect success.
iSQL> INSERT INTO sys.book VALUES ('0070521824', 'Software Engineering',
'Roger S. Pressman', 4, 1982, 100000, 'CHAU');
1 row inserted.
<= uare9 input the data to 이 sys book table, the object of this sys.
221
Data Definition Statements
GRANT
iSQL> INSERT INTO sys.book VALUES ('0137378424', 'Database Processing',
'David M. Kroenke', 6, 1972, 80000, 'PREN');
1 row inserted.
iSQL> INSERT INTO sys.inventory VALUES('BORD000002', 'BORD', '12-Jun-2003',
6, 'N');
<= uare9 input the data in the inventory table, the object of sys.
iSQL> INSERT INTO sys.inventory VALUES('MICR000001', 'MICR', '07-Jun-2003',
7, 'N');
1 row inserted.
iSQL> SELECT * FROM sys.book;
<= uare9 searches the book table, the object of sys.
BOOK.ISBN BOOK.TITLE
-----------------------------------------------BOOK.AUTHOR BOOK.EDITION BOOK.PUBLISHINGYEAR BOOK.PRICE
-----------------------------------------------BOOK.PUBCODE
---------------0070521824 Software Engineering
Roger S. Pressman 4 1982 100000
CHAU
0137378424 Database Processing
David M. Kroenke 6 1972 80000
PREN
2 rows selected.
iSQL> SELECT * FROM sys.inventory;
<= uare9 searches the inventory table, the object of sys.
INVENTORY.SUBSCRIPTIONID INVENTORY.STORECODE INVENTORY.PURCHASEDATE
-----------------------------------------------INVENTORY.QUANTITY INVENTORY.PAID
-------------------------------------BORD000002 BORD 2003/06/12 00:00:00
6 N
MICR000001 MICR 2003/06/07 00:00:00
7 N
2 rows selected.
iSQL> CREATE TABLE book(
isbn CHAR(10) PRIMARY KEY,
title VARCHAR(50),
author VARCHAR(30),
edition INTEGER DEFAULT 1,
publishingyear INTEGER,
price NUMBER(10,2),
pubcode CHAR(4));
Create success.
iSQL> CREATE TABLE inventory(
subscriptionid CHAR(10) PRIMARY KEY,
isbn CHAR(10) CONSTRAINT fk_isbn REFERENCES book(isbn),
storecode CHAR(4),
purchasedate DATE,
quantity INTEGER,
paid CHAR(1));
Create success.
iSQL> CREATE USER uare10 IDENTIFIED BY rose10;
Create success.
<= uare9 can create other users since ALL PRIVILEGES are granted to uare9 from sys.
iSQL> GRANT REFERENCES ON sys.book TO uare10;
SQL Users’ Manual
222
GRANT
Grant success.
<= uare9 grants the REFERENCES privilege on the object sys.book and uare10 through REFERENCES
… WITH GRANT OPTION received by sys.
iSQL> GRANT ALTER ANY TABLE, INSERT ANY TABLE, SELECT ANY TABLE, DELETE ANY
TABLE TO uare10;
Grant success.
<= uare9 which received GRANT ANY PRIVILEGES grants the system privilege on other user(uare10).
iSQL> CONNECT uare10/rose10;
Connect success.
iSQL> ALTER TABLE sys.inventory
ADD COLUMN (isbn CHAR(10) CONSTRAINT fk_isbn REFERENCES sys.book(isbn));
Alter success.
<= uare10 grants CONSTARINT CONDITION on book, system object.(by ALTER ANY TABLE and REFERENCE privilege)
iSQL> INSERT INTO uare9.book VALUES('0471316156', 'JAVA and CORBA', 'Robert
Orfali', 2, 1998, 50000, 'PREN');
1 row inserted.
<= uare10 input the data to book, the object of uare9. (by INSERT ANY TABLE privilege)
1 row inserted.
iSQL> INSERT INTO
'01-Jun-2003', 5,
1 row inserted.
iSQL> INSERT INTO
Orfali', 1, 1999,
1 row inserted.
uare9.inventory VALUES('TOWE000001', '0471316156', 'TOWE',
'N');
sys.book VALUES('053494566X', 'Working Classes', 'Robert
80000, 'WILE');
<= uare10 input the data to the book, object of this sys. (by INSERT ANY TABLE privilege)
iSQL> INSERT INTO sys.inventory VALUES('MICR000005', 'WILE', '28-JUN-1999',
8, 'N', '053494566X');
1 row inserted.
<= uare10 input the data to inventory, object of this sys. (by INSERT ANY TABLE privilege)
iSQL> SELECT * FROM uare9.book;
<= uare10 searches the book data, object of uare9. (by SELECT ANY TABLE privilege)
BOOK.ISBN
BOOK.TITLE
-----------------------------------------------BOOK.AUTHOR
BOOK.EDITION
BOOK.PUBLISHINGYEAR
-----------------------------------------------BOOK.PUBCODE
---------------0471316156
JAVA and CORBA
Robert Orfali
2
1998
PREN
1 row selected.
iSQL> SELECT * FROM uare9.inventory;
BOOK.PRICE
50000
<= Search with the SELECT ANY TALBE privilege of uare10.
INVENTORY.SUBSCRIPTIONID
INVENTORY.ISBN
INVENTORY.STORECODE
-----------------------------------------------INVENTORY.PURCHASEDATE
INVENTORY.QUANTITY
INVENTORY.PAID
223
Data Definition Statements
GRANT
-----------------------------------------------TOWE000001
0471316156
2003/06/01 00:00:00
5
1 row selected.
iSQL> SELECT * FROM sys.book;
TOWE
N
<= Search with SELECT ANY TALBE privilege of uare10
BOOK.ISBN
BOOK.TITLE
-----------------------------------------------BOOK.AUTHOR
BOOK.EDITION
BOOK.PUBLISHINGYEAR
BOOK.PRICE
-----------------------------------------------BOOK.PUBCODE
---------------0070521824
Software Engineering
Roger S.Pressman 4
1982
100000
CHAU
0137378424
Database Processing
David M. Kroenke 6
1972
80000
PREN
053494566X
Working Classes
Robert Orfali
1
1999
80000
WILE
3 rows selected.
iSQL> SELECT * FROM sys.inventory;
INVENTORY.SUBSCRIPTIONID
INVENTORY.STORECODE
INVENTORY.PURCHASEDATE
-----------------------------------------------INVENTORY.QUANTITY
INVENTORY.PAID
INVENTORY.ISBN
-----------------------------------------------BORD000002
BORD
2003/06/12 00:00:00
6
N
MICR000001
MICR
2003/06/07 00:00:00
7
N
MICR000005
WILE
1999/06/28 00:00:00
8
N
053494566X
3 rows selected.
iSQL> DELETE FROM uare9.inventory WHERE subscriptionid = 'TOWE000001';
1 row deleted.
iSQL> SELECT * FROM uare9.inventory;
INVENTORY.SUBSCRIPTIONID
INVENTORY.ISBN
INVENTORY.STORECODE
-----------------------------------------------INVENTORY.PURCHASEDATE
INVENTORY.QUANTITY
INVENTORY.PAID
-----------------------------------------------No rows selected.
iSQL> DELETE FROM sys.inventory WHERE subscriptionid = 'MICR000005';
1 row deleted.
iSQL> SELECT * FROM sys.inventory;
INVENTORY.SUBSCRIPTIONID
INVENTORY.STORECODE
INVENTORY.PURCHASEDATE
-----------------------------------------------INVENTORY.QUANTITY
INVENTORY.PAID
INVENTORY.ISBN
-----------------------------------------------BORD000002
BORD
2003/06/12 00:00:00
6
N
MICR000001
MICR
2003/06/07 00:00:00
7 N
2 rows selected.
iSQL> CONNECT uare9/rose9;
Connect success.
iSQL> REVOKE ALTER ANY TABLE, INSERT ANY TABLE, SELECT ANY TABLE, DELETE ANY
TABLE FROM uare10;
Revoke success.
<= Even running REVOKE ALL FROM uare10 instead,all the system privileges granted by uare9 are all
released.
SQL Users’ Manual
224
GRANT
iSQL> REVOKE REFERENCES ON sys.book FROM uare10 CASCADE CONSTRAINTS;
Revoke success.
<= Release together REFERENTIAL INTEGRITY CONSTRAINTS associated with REFERENCES privilege
of uare10.
iSQL> CONNECT sys/manager;
Connect success.
iSQL> REVOKE ALL PRIVILEGES FROM uare9;
Revoke success.
<= Release all the system privileges of uare9.
iSQL> REVOKE GRANT ANY PRIVILEGES FROM uare9;
Revoke success.
<= Release GRANT ANY PRIVILEGES of uare9.
iSQL> REVOKE REFERENCES ON book FROM uare9;
Revoke success.
<= Release REFERENCES privilege of uare9.
225
Data Definition Statements
RENAME TABLE
RENAME TABLE
Syntax
rename ::=
tbl_name
RENAME
user_name
TO
new_tbl_name
;
.
Prerequisites
The object must be in your own schema or you must be a SYS user.
Description
Renames the name of the specified object. Only the object name is altered, and the stored data
remains.
user_name
Specify a name of the table owner to be altered. If omitted, Altibase will consider it as belonging to
the schema of the user connected to the current session.
old_name
Specify the name of the existing object.
new_name
Specify a new name for the object.
Precautions
In case of the replication target table, the table name cannot be altered.
Examples
<Query> Rename a table.
SQL Users’ Manual
226
RENAME TABLE
iSQL> RENAME employee TO emp1;
Rename success.
or
iSQL> ALTER TABLE employee
RENAME TO emp1;
Alter success.
227
Data Definition Statements
REVOKE
REVOKE
Syntax
revoke ::=
,
revo ke _system_ p rivilege
REVOKE
;
revo ke _o b ject _ privileg e
revoke_system_privilege ::=
,
,
system_privilege
user
FROM
ALL
PRIVILEGES
PUBLIC
revoke_object_privilege ::=
,
object _ privilege
ON
object
ALL
DIRECTORY
PRIVILEGES
directory _name
,
user
FROM
PUBLIC
SQL Users’ Manual
CASCADE
228
CONSTRAINTS
REVOKE
Prerequisites
To revoke an object privilege, you must previously have granted the object privilege to the user.
To revoke a system privilege, you must be a SYS user.
Description
Revokes object privileges for a particular object from users.
Revokes the system privilege from users.
System Privilege
system_privilegeSpecify the system privilege to be revoked. Please refer to GRANT statement for a
list of system privileges.
ALL [PRIVILEGES]Specify ALL to revoke all system privileges that you have granted to the revokee.
FROM userIdentify the user from which the privilege will be revoked.
FROM PUBLICSpecify PUBLIC to revoke the privileges from all users.
Note:
When the system privilege is granted with All PRIVILEGE keyword, the system privilege can be revoked by
All PRIVILEGE. In other words, the user can revoke the system privilege like these examples;
REVOKE ALL PRIVILEGE FROM user_name;
REVOKE SELECT ANY TABLE FROM user_name;
Object Privilege
object_privilegeSpecify the object privilege to be revoked.
ALL [PRIVILEGES]Specify ALL to revoke all object privileges that you have granted to the revokee.
ON objectSpecify the corresponding object.
ON DIRECTORY directory_nameSpecify directory object name.
FROM userIdentify the user from which the privilege will be revoked.
FROM PUBLICSpecify PUBLIC to revoke the privileges from all users.
CASCADE CONSTRAINTSThis clause is relevant only if you revoke the REFERENCES privilege or
ALL[PRIVILEGES]. It drops any referential integrity constraints that the revokee has
defined using the REFERENCES privilege, which might have been granted either explicitly or implicitly through a grant of ALL [PRIVILEGES].
Note:
When you revoke with ALL[PRIVILEGES] clause, all object access privileges of the user will be revoked even
though the object access privilege was not granted by ALL[PRIVILEGES] clause.
229
Data Definition Statements
REVOKE
This example shows you than granting only select privileges but revoking all privileges.
GRANT SELECT ON table_name TO user_name;
REVOKE ALL ON table_name FROM user_name;
Of cause you can revoke like this if you want revoke only select privileges.
REVOKE SELECT ON table_name FROM user_name;
Examples
<Query> Revoke select privileges.
iSQL> CONNECT uare6/rose6;
Connect success.
iSQL> REVOKE SELECT, DELETE ON sys.employee
FROM uare7, uare8;
Revoke success.
iSQL> CONNECT uare7/rose7;
Connect success.
iSQL> SELECT eno, ename FROM sys.employee WHERE eno = 15;
[ERR-311B1 : You must have SELECT_ANY_TABLE privilege(s) for executing this statement.]
<= After releasing SELECT and DELETE privilege for employee table, the error message is displayed
when running the SELECT statement.
SQL Users’ Manual
230
TRUNCATE TABLE
TRUNCATE TABLE
Syntax
truncate ::=
TRUNCATE
tbl_name
TABLE
user_name
;
.
Prerequisites
The table must be in your own schema, or you must have DROP object privilege on the table, or you
must have DROP ANY TABLE system privilege.
Description
TRUNCATE TABLE removes all records of the specified table.
user_name
Specify the table owner’s name to be truncated. If omitted, Altibase will consider it as belonging to
the schema of the user connected to the current session.
tbl_name
Specify the table name to be truncated
TRUNCATE vs. DELETE
In case TRUNCATE statement is executed, all pages in the table are returned as free pages. Therefore,
other tables can use the truncated page. TRUNCATE statement is relatively fast but you can not roll
back.
However, even when free pages are created after DELETE statement is executed, the page is not
returned to the database space and it still remains as the table space permanently.
231
Data Definition Statements
TRUNCATE TABLE
Examples
<Query> Truncate all the data of table employee.
iSQL> TRUNCATE TABLE employee;
Truncate success.
SQL Users’ Manual
232
4 Data Manipulation Statements
233
Data Manipulation Statements
DELETE
DELETE
Syntax
delete ::=
hints
DELETE
PARTITION
From_Clause
(
partition _name
;
where_clause
Limit_Clause
from_clause ::=
tbl_name
From
user_name
;
WHERE
condition
where_clause ::=
limit_clause ::=
row_count
LIMIT
row_offset
SQL Users’ Manual
234
;
)
DELETE
hints ::=
fullscan_hint
index_hint
noindex _hint
/*
+
*/
indexasc_hint
indexdesc_hint
plancache_hint
fullscan_hint ::=
FULL
SCAN
tbl_name
(
)
index_hint ::=
INDEX
(
tbl _name
,
)
index_name
235
Data Manipulation Statements
DELETE
noindex_hint ::=
NO
tbl _name
(
INDEX
,
)
index_name
indexasc_hint ::=
tbl _name
(
INDEX
,
)
index_name
ASC
indexdesc_hint ::=
(
INDEX
tbl _name
,
)
index_name
desc
plancache_hint ::=
NO_PLAN_CACHE
KEEP_PLAN
Prerequisites
To delete rows from a table, the table must be in your own schema or you must have the DELETE
object privilege on the table.
Description
You can remove rows from your tables. Also remove the data from specified partition.
SQL Users’ Manual
236
DELETE
user_name
Specify the table owner name which you are deleting rows.
tbl_name
Specify the table name from which you are deleting rows.
HINTS Options
Specify a comment that passes instructions to the optimizer on choosing an execution plan for the
statement. The optimizer uses this hint to choose the plan node.
The plus sign inside comment enables Altibase to convert the commentary note to hints, and must
be located right after the explanatory note symbol with no space like this; /*+ FULL SCAN */
Even with syntax errors in hints, you can execute queries while ignoring syntax errors without executing functuinalities of hints.
FULL SCAN
Searches the entire table without using the index although it is provided in the table.
INDEX
Use the index scan for the index listed when accessing table data.
INDEX ASC
Use the index scan for the index listed in the table-accessing method, and searches the index in the
ascending order.
INDEX DESC
Use the index scanning method in the descending order.
NO INDEX
Do not use index scanning method using specified index.
plancache_hint
You can use hints like NO_PLAN_CACHE and KEEP_PLAN in plan cache. NO_PLAN_CACHE indicates
not to cache generated plan.
KEEP_PLAN prevents plan from being regenerated even though statics information on the table,
which the generated plan once refers to, is changed. This makes plan used in itself.
You can use KEEP_PLAN not only in direct-execute query but also in prepare-execute query.
See also:
“The SQL Tuning” on Altibase Administrator’s Manual for the syntax and description of hints
237
Data Manipulation Statements
DELETE
Examples
<Query> Delete all data from a table.
iSQL> DELETE FROM orders;
30 rows deleted.
<Query> Delete partition P2 from table T1.
iSQL> DELETE FROM T1 PRTITION (P2);
<Query> Delete selected data from a table.
iSQL> DELETE
FROM orders
WHERE eno = (SELECT eno FROM employee
WHERE ename = 'KMKIM');
9 rows deleted.
SQL Users’ Manual
238
INSERT
INSERT
Syntax
insert ::=
INSERT
tbl_name
INTO
.
user_name
insert_hint
values_clause
select
(
PARTITION
(
partition _name
column_name
)
)
;
,
VALUES
DEFAULT
values_clause ::=
expr
VALUES
(
)
DEFAULT
,
insert_hints ::=
APPEND
/*
PARALLEL
tbl_name
+
integer
*/
plancache_hint
239
Data Manipulation Statements
INSERT
Prerequisites
For you to insert rows into a table, the table must be in your own schema or you must have the
INSERT object privilege on the table..
Description
INSERT statement inserts a new record in the specified table or partition. In case an index exists in
the table, the index data will be also modified.
user_name
Specify the owner name of the table to which a record will be inserted. If omitted, Altibase will consider is as belonging to the schema of the user connected to the current session.
tbl_name
Specify the name of the table to which a record will be inserted.
NULL
If there is no default in non-specified column in case of specifying only some column, null is
inserted.(TIMESTAMP column specifies system time as default in case of INSERT execution. Therefore, if TIMESTAMP column value is not specified, not null but system time is inserted.) If you write
null explicitly in VALUES clause, null is inserted.
DEFAULT
In case the default is specified in VALUE clause, the defined default value will be inserted into the
corresponding column. If you want to insert default for all columns, you can use DEFAULT VALUES
clause. If the default is specified in the timestamp column, the system time will be inserted.
INSERT ~ SELECT
Use an INSERT ... SELECT statement to copy column into another table. The number of columns to
insert and the number of selected columns must be the same and must be compatible data type.
HINTS Options
Clauses can be passed to Optimizer by adding comments to an Altibase SQL statement. Optimizer
uses these hints to select a plan node. The plus (+) sign lets Altibase convert comments to hints and
it should be placed right after a comment symbol without a blank space.
Determine how comments are placed in the INSERT SQL statement. However, the HINTS function
can only be used with the ‘INSERT… INTO tbl_name SELECT…’ statement. The HINTS function is
ignored in all other statements.
APPEND
SQL Users’ Manual
240
INSERT
The direct-path INSERT Method. Instead of inserting data in an empty area of a page, create a new
page and insert data to it. When a page is placed in a disk, there are two options available:
APPEND_LOGGING that enables logging of the entire page, and APPEND_NOLOGGING that disables
logging.
PARALLEL
You can implement Direct-Path INSERT operation by specifying whether to execute parallelism on
the table. Specify the degree of parallelism (which may be greater than 2) in insert_hint after specifying PARALLEL DML execution in PARALLEL_DML_MODE. You must specify the parallel attribute for
the target table if the degree of parallelism appears to be 1.
Precautions
When you insert data using INSERT statement, please be careful following:
The number of the specified columns and the number of values to be inserted must be the same
and must be compatible datatypes.
If you specify partition, you can insert values suitable for it. And if you specify inserting default, you
can insert null unless default no longer exists. This column, however, must not have NOT NULL conditions.
•
direct-path INSERT
The destination table is disc table, and it can't include LOB column and have index.
•
The destination table can't be replicated.
•
The destination table can't have trigger or reference integrity.
Examples
•
Input command for simple data
<Query> Insert a record into customer table without specifying column name. Insert a record of
HJKIM customer information.
iSQL> INSERT INTO customer VALUES ( '800101-1212123', 'HJKIM', 'STUDENT',
NIBBLE'025282222', 'F', BYTE'0101', BYTE'150763', 'Korea Life Insurance 63
Bldg. Yeouido-dong, Yeongdeungpo-gu Seoul');
1 row inserted.
<Query> Insert a record of only employee number, name and sex on MSJUNG customer information.
iSQL> INSERT INTO employee(eno, ename, gender) VALUES(21, 'MSJUNG', 'F');
1 row inserted.
•
Input command for complex data
<Query> Copy customer number and order day of delayed order table information on
delayed_processing table.
241
Data Manipulation Statements
INSERT
iSQL> CREATE TABLE delayed_processing(
cno CHAR(14), order_date DATE);
Create success.
iSQL> INSERT INTO delayed_processing
SELECT cno, order_date
FROM orders
WHERE PROCESSING = 'D';
1 row inserted.
•
Instruct to insert data into a partition.
CREATE TABLE T1 ( I1 INTEGER, I2 INTEGER )
PARTITION BY RANGE ( I1 )
(
PARTITION P1 VALUES LESS THAN ( 300 ),
PARTITION P2 VALUES LESS THAN ( 400 ),
PARTITION P3 VALUES DEFAULT
) TABLESPACE SYS_TBS_DISK_DATA;
INSERT INTO T1 PARTITION ( P1 ) VALUES ( 123, 456 );
1 row inserted.
•
Direct-Path INSERT Command
<Query> Input all data of T1 into T2 with Direct-Path INSERT operation. At this time, the degree of
parallelism is specified as 5.
INSERT /*+ APPEND PARALLEL(T2, 5) */ INTO T2 SELECT * FROM T1;
SQL Users’ Manual
242
LOCK TABLE
LOCK TABLE
Syntax
lock_table ::=
LOCK
tbl_name
TABLE
user_name
.
WAIT
IN
lock_mode
integer
MODE
;
NOWAIT
Prerequisites
The table or view must be in your own schema or you must have the LOCK ANY TABLE system privilege, or you must have any object privilege on the table or view..
Description
A locked table remains locked until you either commit your transaction or roll it back.
user_name
Specify the owner name of the table to lock. If omitted, Altibase will consider it as belonging to the
schema of the user connected to the current session.
tbl_name
Specify the name of the table to lock.
LOCK TABLE [user_name.]{tbl_name} IN lock_mode MODE {wait_clause};
243
Data Manipulation Statements
LOCK TABLE
lock_mode =
ROW SHARE
SHARE UPDATE
ROW EXCLUSIVE
SHARE ROW EXCLUSIVE
SHARE
EXCLUSIVE
wait_clause = NOWAIT | WAIT n(INTEGER)
ROW SHARE
ROW SHARE permits concurrent access to the locked table but prohibits users from locking the
entire table for exclusive access.
SHARE UPDATE
Same as the row share.
ROW EXCLUSIVE
ROW EXCLUSIVE is the same as ROW SHARE, but it also prohibits locking in SHARE mode. ROW
EXCLUSIVE locks are automatically obtained when updating, inserting, or deleting.
SHARE ROW EXCLUSIVE
SHARE ROW EXCLUSIVE is used to look at a whole table and to allow others to look at rows in the
table but to prohibit others from locking the table in SHARE mode or from updating rows.
SHARE
SHARE permits concurrent queries but prohibits updates to the locked table.
EXCLUSIVE
The current transaction can read or update the locked table. However, other operations are not
allowed.
wait_clause
You can specify whether wait until get lock resource or not.
WAIT n
Waiting for n seconds until the row is locked. If the row is not locked, an error will occur.
SQL Users’ Manual
244
LOCK TABLE
NOWAIT
Specify NOWAIT if you want the database to return control to you immediately if the specified table
is locked.
Table 4-1 Summary of Table Locks
SQL Statement
Mode of
Table
Lock
Permitted Lock Mode
IS
IX
S
SIX
X
SELECT … FROM tbl_name
…
IS
Y(IS)
Y(IX)
Y(S)
Y(SIX)
N(X)
INSERT INTO tbl_name …
IX
Y(IX)
Y(IX)
N(SIX)
N(SIX)
N(X)
UPDATE tbl_name …
IX
Y*(IX)
Y*(IX)
N(SIX)
N(SIX)
N(X)
DELETE FROM tbl_name …
IX
Y*(IX)
Y*(IX)
N(SIX)
N(SIX)
N(X)
SELECT … FROM tbl_name
FOR UPDATE …
IS
Y*(IX)
Y*(IX)
Y*(S)
Y*(SIX)
N(X)
LOCK TABLE tbl_name IN
ROW SHARE MODE
IS
Y(IS)
Y(IX)
Y(S)
Y(SIX)
N(X)
LOCK TABLE tbl_name IN
ROW EXCLUSIVE MODE
IX
Y(IX)
Y(IX)
N(SIX)
N(SIX)
N(X)
LOCK TABLE tbl_name IN
SHARE MODE
S
Y(S)
N(SIX)
Y(S)
N(SIX)
N(X)
LOCK TABLE tbl_name IN
SHARE ROW EXCLUSIVE
MODE
SIX
Y(SIX)
N(SIX)
N(SIX)
N(SIX)
N(X)
LOCK TABLE tbl_name IN
EXCLUSIVE MODE
X
N(X)
N(X)
N(X)
N(X)
N(X)
IS: row share (Intension share lock)
IX: row exclusive (Intension exclusive lock)
S: share
SIX: share row exclusive (Share intention exclusive lock)
X: exclusive
* Y: When locking conflict does not occur with other transactions. In other cases, will be waiting.
In ( ) 1: Conversion when the currently locked type is newly locked when it is possible to convert
locking mode by another transaction (Y).
2: When it is not possible to convert locking mode by another transaction (N). In other words,
when only one transaction can request lock and the transaction creates a new lock.
Examples
The following example shows how Altibase manages data concurrency, integrity, and consistency of
the data using LOCK TABLE and SELECT statements.
245
Data Manipulation Statements
LOCK TABLE
Transaction A
Time
Point
iSQL> AUTOCOMMIT OFF;
Set autocommit off success.
Transaction B
iSQL> AUTOCOMMIT OFF;
Set autocommit off success.
1
(request X lock on employee)
iSQL> LOCK TABLE employee IN
EXCLUSIVE MODE;
Command execute success.
(acquire X lock on employee)
2
iSQL> DROP TABLE employee;
[ERR-11170 : Trans exceeds lock
wait time specified by user]
3
iSQL> UPDATE employee
SET salary = 2500000
WHERE eno = 15;
1 row updated.
4
(request S lock on employee)
iSQL> LOCK TABLE employee IN
SHARE MODE;
(request conflicts with the X lock already
held by transaction B)
wait
wait
wait
5
iSQL> COMMIT;
Commit success.
(release X lock on employee)
6
(resume)
Lock success.
(acquire S lock on employee)
iSQL> SELECT salary
FROM employee
WHERE eno = 15;
SALARY
-------------2500000
1 row selected.
(committed data is seen)
7
iSQL> ROLLBACK;
Rollback success.
(release S lock on employee)
8
iSQL> LOCK TABLE employee IN
EXCLUSIVE MODE;
Lock success.
(acquire X lock on employee)
SQL Users’ Manual
246
LOCK TABLE
Transaction A
Time
Point
Transaction B
iSQL> SELECT SALARY
FROM employee
WHERE eno = 15;
wait
wait
wait
iSQL> UPDATE employee
SET eno = 30
WHERE eno = 15;
1 row updated.
10
iSQL> COMMIT;
Commit success.
11
(release X loc on employee)
12
(resume)
SALARY
-------------2500000
1 row selected.
247
Data Manipulation Statements
SELECT
SELECT
Syntax
select ::=
;
select _clause
order _by_clause
limit_clause
for_update_clause
select_clause ::=
hints
select_list
SELECT
ALL
DISTINCT
FROM
tbl_reference
where_clause
hierarchical _query_clause
,
HAVING
condition
UNION
ALL
select
INTERSECT
MINUS
SQL Users’ Manual
248
group _by_clause
SELECT
select_list ::=
*
tbl_name
user_name
.
*
.
expr
alias _name
AS
.
tbl_space ::=
(
subquery
)
tbl_name
user_name
,
alias _name
PARTITION
(
partition _name
)
AS
joined _table
joined_table ::=
tbl_reference
JOIN
tbl_reference
ON
condition
join_type
249
Data Manipulation Statements
SELECT
join_type ::=
INNER
LEFT
RIGHT
OUTER
FULL
where_clause ::=
condition
WHERE
AND
OR
hierarchical_query_clause ::=
CONNECT
START
SQL Users’ Manual
WITH
condition
BY
condition
IGNORE
250
LOOP
SELECT
expression_list ::=
expr
,
(
expr
)
,
order_by_clause ::=
ORDER
BY
expr
ASC
DESC
,
limit_clause ::=
row_count
LIMIT
row_offset
251
,
Data Manipulation Statements
SELECT
for_update_clause ::=
WAIT
FOR
UPDATE
NOWAIT
SQL Users’ Manual
252
integer
SELECT
hints ::=
fullscan_hint
index_hint
noindex _hint
indexasc_hint
indexdesc_hint
ordered _hint
rule_hint
cost_hint
/*
cnf_hint
+
*/
dnf _hint
use_nl_hint
use_hash_hint
use_sort_hint
use_merge_hint
hash _bucket_count_hint
group _bucket_count_hint
see _bucket_count_hint
temp_table_type_hint
group_method_hint
distinct _method_hint
view_opt_hint
push_pred _hint
253
Data Manipulation Statements
SELECT
fullscan_hint ::=
FULL
SCAN
tbl _name
(
)
index_hint ::=
INDEX
tbl_name
(
,
)
index_name
noindex_hint ::=
INDEX
tbl_name
(
,
)
index_name
NO
indexasc_hint ::=
(
INDEX
tbl_name
)
index_name
ASC
SQL Users’ Manual
,
254
SELECT
ordered_hint ::=
ORDERED
rule_hint ::=
RULE
cost_hint ::=
COST
cnf_hint ::=
CNF
255
Data Manipulation Statements
SELECT
dnf_hint ::=
DNF
use_nl_hint ::=
USE_NL
tbl_name
(
,
tbl_name
)
use_hash_hint ::=
USE_HASH
(
tbl_name
,
tbl _name
)
(
tbl_name
,
tbl _name
)
use_sort_hint ::=
USE_SORT
SQL Users’ Manual
256
SELECT
use_merge_hint ::=
(
USE_MERGE
tbl_name
tbl_name
,
)
hash_bucket_count_hint ::=
HASH
BUCKET
COUNT
integer
group_bucket_count_hint ::=
GROUP
BUCKET
COUNT
integer
hash_bucket_count_hint ::=
SET
BUCKET
COUNT
257
integer
Data Manipulation Statements
SELECT
temp_table_type_hint ::=
TEMP_TBS_MEMORY
TEMP_TBS_DISK
group_method_hint ::=
GROUP_HASH
GROUP_SORT
distinct_method_hint ::=
DISTINCT_HASH
DISTINCT_SORT
SQL Users’ Manual
258
SELECT
view_opt_hint ::=
NO_PUSH_SELECT_VIEW
PUSH_SELECT_VIEW
push_pred_hint ::=
PUSH_PRED
view_name
(
)
group_by_clause ::=
GROUP
BY
expr
HAVING
condition
,
Prerequisites
To select data from a table or a view, the table must be in your own schema or you must have the
SELECT privilege on the objects.
The SELECT ANY TABLE system privilege also allows you to select data from any table or view.
259
Data Manipulation Statements
SELECT
Description
Use a SELECT statement or subquery to retrieve data from one or more tables, or views.
•
SELECT-list clause
1.
2.
3.
4.
Specify DISTINCT if you want the database to return only one copy of each set of duplicate rows selected.
In case there is GROUP BY clause, only the constant, group function, and expressions in
GROUP BY clause, and combination of expressions can be specified in the select list.
When there is at least one group function, the other expressions also must be group
functions which in GROUP BY clause or combination of these group functions.
Specify HINTS after SELECT key word. Hint string is like this.
/*+ your_hint */
For more about hint, see the SQL Tuning of Altibase Administrator's Manual.
•
FROM clause
1.
2.
3.
4.
5.
•
The alias name cannot be used more than once. Otherwise, the same table can be
repeatedly used.
The table cannot be used more than once without the alias name specified.
Maximum of 32 tables or views can be used in FROM clause.
OUTER JOIN; An outer join extends the result of a simple join. An outer join returns all
rows that satisfy the join condition and also returns some or all of those rows from one
table for which no rows from the other satisfy the join condition. NULL will be displayed
to all rows in the result set without corresponding rows.
In-line Views; A subquery in the FROM clause of a SELECT statement is also called an
inline view. The inline view is similar to the one that uses the sub records specified in
FROM clause of the default record
WHERE condition clause
For more information about the condition, see Chapter IX Condition Operator. (see SQL Conditions)
•
Hierarchical Query clause
You can select rows in a hierarchical order. If you specify this clause, then do not specify either
ORDER BY or GROUP BY, because they will destroy the hierarchical order of the CONNECT BY
results.
1.
2.
start WITH clause
Specify a condition that identifies the row(s) to be used as the root(s) of a hierarchical
query. The database uses as root(s) all rows that satisfy this condition. If you omit this
clause, then the database uses all rows in the table as root rows. The START WITH condition can contain a subquery, but it cannot contain a scalar subquery expression..
This clause cannot be used if CONNECT BY clause does not exist. Otherwise, it can be
omitted when there is CONNECT BY clause. You cannot include the subquery in CONNECT BY clause.
CONNECT BY Clause
Specify the conditions to identify the relationship between parent row s and child rows
of the hierarchy.
To identify the previously searched rows from current rows, the PRIOR operator is used.
SQL Users’ Manual
260
SELECT
3.
4.
•
In other words, to write a parent row, the PRIOR operator must be used.
The PRIOR operator can be used only in the SELECT statement with CONNECT BY clause.
The PRIOR operator can be used in select_list of the select statement with CONNECT BY
clause, Where clause, and CONNECT BY clause.
After the PRIOR operator, rows containing functions and related conditions can be used.
You can not use a subquery and join in the CONNECT BY clause.
The CONNECT BY clause must be used after WHERE clause and before ORDER BY, GROUP
BY, and HAVING clauses.
LEVEL
SELECT statements that contain hierarchical queries can contain the LEVEL pseudo column in the select list. LEVEL returns the value 1 for a root node, 2 for a child node of a
root node, 3 for a grandchild, and so on.
The LEVEL clause can be used in WHERE, ORDER BY, GROUP BY, and HAVING clauses.
You can use the LEVEL clause in a select_list clause even if CONNECT BY clause does not
exist.
IGNORE LOOP
When a loop is created in the hierarchy, Altibase will return an error. Here, loop means
that one row becomes another row's parent and child. However, if IGNORE LOOP is specified, even when a loop is created during query execution, an error is not returned and
the row creating a loop is not added to the query result set.
GROUP BY clause
Specify the GROUP BY clause if you want the database to group the selected rows based on
the value of expressions for each row and return a single row of summary information for each
group.
Use the HAVING clause to restrict the groups of returned rows to those groups for which the
specified condition is TRUE. If you omit this clause, then the database returns summary rows
for all groups.
Specify GROUP BY and HAVING after the WHERE clause and hierarchical_clause. If you specify
both GROUP BY and HAVING, then they can appear in either order.
•
HAVING condition clause
Use the HAVING clause to restrict the groups of returned rows to those groups for which the
specified condition is TRUE. If you omit this clause, then the database returns summary rows
for all groups.
•
UNION(ALL), INTERSECT, MINUS
The set operators combine the rows returned by two SELECT statements into a single result.
The number and datatypes of the columns selected by each component query must be the
same, but the column lengths can be different. The names of the columns in the result set are
the names of the expressions in the select list preceding the set operator.
If you combine more than two queries with set operators, then the database evaluates adjacent queries from left to right. You can use parentheses to specify a different order of evaluation.
For more about set operators, see The SQL operator's chapter of this manual.
•
ORDER BY clause
261
Data Manipulation Statements
SELECT
Use the ORDER BY clause to order rows returned by the statement. Without an
order_by_clause, no guarantee exists that the same query executed more than once will
retrieve rows in the same order.
You can sort the result data in ascending or in descending order.
It can be used only once in the SELECT statement and cannot be used in the subquery.
You can specify multiple expressions in the order_by_clause. Altibase first sorts rows based on
their values for the first expression. Rows with the same value for the first expression are then
sorted based on their values for the second expression, and so on. The database sorts nulls following all others in ascending order and preceding all others in descending order..
If you have specified the DISTINCT operator in this statement, then this clause cannot refer to
columns unless they appear in the select list.
If there is GROUP BY, only the group expression can be used.
If there is DISTINCT in the SELECT statement, the expressions or the combination of the expressions can be used in ORDER BY clause.
•
LIMIT clause
You can use ROWNUM to limit the number of rows returned by a query.
row offset: The starting record to retrieve.
row count: The number of records to retrieve.
LIMIT clause can be used in the subquery.
•
FOR UPDATE clause
Locks the selected row so that other users cannot lock or edit the row until the current transaction ends.
In FOR UPDATE [wait_clause], wait_clause can be omitted.
You can not use FOR UPDATE clause in subquery clauses
You can use them only in a main body of SELECT statement.
It is not allowed using with DISTINCT, GROUP BY, aggregate functions, set operators (UNION,
INTERSECT, etc).
HINTS Clause
Specify a comment that passes instructions to the optimizer on choosing an execution plan for the
statement. The plus sign (+) in a commentary(/* */) instructs Altibase to convert the commentary
note to hints.
Table Access Path Hints
FULL SCAN
SQL Users’ Manual
262
SELECT
The FULL hint instructs the optimizer to perform a full table scan for the specified table.
INDEX
The INDEX hint instructs the optimizer to use an index scan for the specified table.
INDEX ASC
The INDEX_ASC hint instructs the optimizer to use an index scan for the specified table
INDEX DESC
The INDEX_DESC hint instructs the optimizer to use a descending index scan for the specified table.
If the statement uses an index range scan and the index is ascending, then Altibase scans the index
entries in descending order of their indexed values.
NO INDEX
The NO_INDEX hint instructs the optimizer not to use one or more indexes for the specified table.
Join Ordered Hints
ORDERED
The ORDERED hint instructs database to join tables in the order in which they appear in the FROM
clause. When you omit the ORDERED hint from a SQL statement requiring a join, the optimizer
chooses the order in which to join the tables. You might want to use the ORDERED hint to specify a
join order if you know something that the optimizer does not know about the number of rows
selected from each table.
Optimizer Mode Hints
RULE
The RULE hint disables the use of the optimizer. Not recommended.
COST
Creates an execution plan tree considering the costs to optimize SELECT statement. Altibase user
cost based optimizer in default.
Normal Form Hints
CNF
In the conjunctive normal form, ND is the highest-level logical operator and OR is a lower level operator. If you specify CNF hint, Altibase convert a SELECT statement into a conjunctive normal form,
and creates an execution plan tree. Because when the conditional clause is converted into CNF format, it can make very complicated conditional clause. Sometimes CNF normalization causes system
resource being exhausted. Please see the SQL Tuning chapter of Administrator’s Manual about these
considerations.
DNF
In the disjunctive normal form, the highest-level logical operator is OR. AND logical operator is at the
263
Data Manipulation Statements
SELECT
lower level. If you specify this hint, you can make each conditional clause user index. Optimizer converts SELECT statement into the disjunctive normal form, and creates an execution plan tree. However, if there is no OR clause, it will be ignored. When the property of the conditional clause is
converted into DNF and a lot of conditional clauses are created as a result. Sometimes DNF normalization causes also system resource being exhausted.
Join Method Hints
USE_NL
The USE_NL hint instructs the optimizer to join each specified table to another row source with a
nested loops join, using the specified table as the inner table.
USE_HASH
The USE_HASH hint instructs the optimizer to join each specified table with another row source
using a hash join.
USE_SORT
The USE_SORT hint instructs the optimizer to use SORT JOIN. The specified table became outer table
and the optimizer sort specified table first before join the rows. However, if there is no sorting predicate, optimizer use the nested loops join.
USE_MERGE
The USE_MERGE hint instructs the optimizer to use sort merge join. However, if there is no sorting
predicate, optimizer uses the nested loops join.
Hash Bucket Size Hints
Optimizer uses hashing method when it process statement in which containing GROUP BY, UNION,
INTERSECT, MINUS and DISTINCT, aggregation function and HASH JOIN.
You can instruct optimizer to allocate proper number of hash buckets according to your query statement and data.
During the cost based optimization process, the proper number of hack buckets is specified internally depending on the number of table records. However, you can perform SQL tuning by adjusting
the number of hash buckets via hints.
HASH BUCKET COUNT
Changes the number of hash buckets in HASH and DITINCT nodes.
GROUP BUCKET COUNT
Changes the number of hash buckets in GROUP-AGGREGATION and AGGREAGATION nodes.
SET BUCKET COUNT
Changes the number of hash buckets in SET-INTERSECT and SET-DIFFERENCE nodes.
SQL Users’ Manual
264
SELECT
Temporary Table Type Hints
A temporary table stores the intermediate query result internally. You can specify where your temporary table is located. A temporary memory table is recommended in case the table has small
amount of data and if it is performance critical.
TEMP_TBS_MEMORY
Creates temporary table on the memory.
TEMP_TBS_DISK
Creates temporary table on the disk.
Grouping Method Hints
Specify the grouping method.
GROUP_HASH
Performs Hash-based grouping.
GROUP_SORT
Performs Sort-based grouping.
Distingtion Method Hints
DISTINCT statement eliminates duplicated record from the result set regardless of the number of
occurrences. Sometimes elimination process can cause memory exhausting. You can specify the
eliminating method for the DISTINCT statement.
DISTINCT_HASH
Performs Hash-based eliminating.
DISTINCT_SORT
Performs Sort-based eliminating.
View Optimization Hints
Determines whether to perform view materialization or push selection for view optimization
NO_PUSH_SELECT_VIEW
View materialization-based view optimization
PUSH_SELECT_VIEW
Push selection-based view optimization.
265
Data Manipulation Statements
SELECT
Restrictions
Altibase has following restrictions for executing SQL statements and stored procedures.
•
Maximum of 65536 internal-tuples can be used for row processing. About internal-tuples see
the next paragraph.
•
Maximum of 32 tables or views can be used in FROM clause.
•
Maximum of 32 tables or views can be used for WHERE clause, GROUP BY, or ORDER By operation.
When you violate prior restrictions, the following error will return.
qpERR_ABORT_QTC_TUPLE_SHORTAGE
Too many DML statements in the stored procedure or too long query.
qpERR_ABORT_QTC_TOO_MANY_TABLES
Too many tables are referenced in a phrase.
Definition of Internal Tuple
Altibase uses tuple set concept for record processing. It can be allocated for tables , constants, variables, intermediate result records. The number of tuples used for processing is as follows:
•
For a table or a viewOne tuple for a table or a view
•
For a temporary tableOne tuple for a table or a view.
•
For a constantOne internal tuple is allocated when the total size of constants reached 4096
bytes.
•
For a host variableOne internal tuple is allocated when the total number of host variables
reached 1024 bytes.
•
For intermediate result recordOne internal tuple is used when the total number of temporary
result record reached 1024 bytes..
The internal tuples are also allocated for tables which are included in a view also. For example,
SELECT * FROM V1, V2 WHERE V1.i1 = V2.i1;
if V1 and V2 views consist of 100 rows, at least 202 internal tuples are needed to process the corresponding record.
The number of internal tuples affects the memory usage of database server. The default number of
internal tuples is 16, and it can increase up to 65536 depending on the complexity of the record.
Examples
•
Simple search command
<Query> Search names, pay dates, and wage amounts of all employees.
SQL Users’ Manual
266
SELECT
iSQL> SELECT ename, join_date, salary
FROM employee;
ENAME
JOIN_DATE
SALARY
-----------------------------------------------SWNO
HJNO
1999/11/18 00:00:00
1500000
HSCHOI
2000/01/11 00:00:00
2000000
.
.
.
20 rows selected.
•
Search using partition
CREATE TABLE T1 (I1 INTEGER)
PARTITION BY RANGE (I1)
(
PARTITION P1 VALUES LESS THAN (100),
PARTITION P2 VALUES LESS THAN (200),
PARTITION P3 VALUES DEFAULT
) TABLESPACE SYS_TBS_DISK_DATA;
INSERT INTO T1 VALUES (55);
INSERT INTO T1 VALUES (123);
SELECT * FROM T1 PARTITION (P1);
I1
---------55
SELECT * FROM T1 PARTITION (P2);
I1
---------123
SELECT * FROM T1 PARTITION (P3);
No rows selected.
•
Using search conditions
<Query> Sort names, operations, employment date, and wage amount of all employees
whose wage is less than one million won in descending order of the wage amount.
iSQL> SELECT ename, emp_job, join_date, salary
FROM employee
WHERE salary < 1000000
ORDER BY 4 DESC;
ENAME
EMP_JOB
JOIN_DATE
SALARY
-----------------------------------------------KWKIM
CEO
980000
HJMIN
MANAGER
2000/01/24 00:00:00 500000
2 rows selected.
•
Searching using the hierarchical query
<Query> The following query with a CONNECT BY clause defines a hierarchical relationship in
which the id value of the parent row is equal to the parent_id value of the child row start with
id=0:
iSQL> CREATE TABLE hier_order(id INTEGER, parent INTEGER);
Create success.
iSQL> INSERT INTO hier_order VALUES(0, NULL);
1 row inserted.
iSQL> INSERT INTO hier_order VALUES(1, 0);
1 row inserted.
iSQL> INSERT INTO hier_order VALUES(2, 1);
1 row inserted.
267
Data Manipulation Statements
SELECT
iSQL> INSERT INTO hier_order VALUES(3, 1);
1 row inserted.
iSQL> INSERT INTO hier_order VALUES(4, 1);
1 row inserted.
iSQL> INSERT INTO hier_order VALUES(5, 0);
1 row inserted.
iSQL> INSERT INTO hier_order VALUES(6, 0);
1 row inserted.
iSQL> INSERT INTO hier_order VALUES(7, 6);
1 row inserted.
iSQL> INSERT INTO hier_order VALUES(8, 7);
1 row inserted.
iSQL> INSERT INTO hier_order VALUES(9, 7);
1 row inserted.
iSQL> INSERT INTO hier_order VALUES(10, 6);
1 row inserted.
iSQL> SELECT ID, parent, LEVEL
FROM hier_order START WITH id = 0 CONNECT BY PRIOR id = parent ORDER BY
level;
ID
PARENT
LEVEL
-----------------------------------------------0
1
6
0
2
5
0
2
1
0
2
10
6
3
4
1
3
7
6
3
3
1
3
2
1
3
8
7
4
9
7
4
11 rows selected.
SQL Users’ Manual
268
SELECT
<Query> The following query omits START WITH clause, and uses all rows in the table as root
rows. In the following query, PRIOR id is parent:
iSQL> SELECT id, parent, level
FROM hier_order CONNECT BY PRIOR id = parent ORDER BY id;
ID
PARENT
LEVEL
-----------------------------------------------0
1
1
0
1
1
0
2
2
1
1
2
1
3
2
1
2
3
1
2
3
1
1
3
1
3
4
1
1
4
1
2
4
1
3
5
0
1
5
0
2
6
0
2
6
0
1
7
6
1
7
6
2
7
6
3
8
7
3
8
7
1
8
7
2
8
7
4
9
7
2
269
Data Manipulation Statements
SELECT
9
7
9
7
9
7
10
6
10
6
10
6
30 rows selected.
3
4
1
1
2
3
<Query> The following is a hierarchical query using IGNORE LOOP clause to acquire results of
record search except rows with loops created during search:
iSQL> CREATE TABLE triple(
num INTEGER,
tri INTEGER,
PRIMARY KEY(num, tri));
Create success.
iSQL> CREATE OR REPLACE PROCEDURE proc_tri
AS
v1 INTEGER;
BEGIN
FOR v1 IN 1 .. 1000 LOOP
INSERT INTO triple VALUES(v1, v1 * 3);
END LOOP;
INSERT INTO triple VALUES(1, 1);
END;
/
Create success.
iSQL> EXEC proc_tri;
Execute success.
iSQL> SELECT num, tri, level
FROM triple
WHERE num < 3001
START WITH num = 1
CONNECT BY PRIOR tri = num
IGNORE LOOP;
NUM
TRI
LEVEL
-----------------------------------------------1
1
1
1
3
2
3
9
3
9
27
4
27
81
5
81
243
6
243
729
7
729
2187
8
1
3
1
3
9
2
9
27
3
27
81
4
81
243
5
243
729
6
729
2187
7
15 rows selected.
•
Search Using GROUP BY
<Query> Search the average wage amount of each department:
iSQL> SELECT dno, AVG(salary) AS avg_sal
-- salary average of each department
FROM employee
GROUP BY dno;
SQL Users’ Manual
270
SELECT
DNO AVG_SAL
--------------------A001 2066666.67
C001 1576666.67
C002 1660000
D001 2075750
F001 1845000
6 rows selected.
<Query> Display the total wage amount paid to each position within the department: (Using
GROUP BY clause in multiple columns.)
iSQL> SELECT dno, emp_job, COUNT(emp_job) num_emp, SUM(salary) sum_sal
FROM employee
GROUP BY dno, emp_job;
DNO
EMP_JOB
NUM_EMP
SUM_SAL
-----------------------------------------------CEO
1
C002
DESIGNER
2
3800000
D001
ENGINEER
3
6300000
.
.
.
12 rows selected.
<Query> Display the average wage amount higher than 1.5 million won. This is a common
error case.
iSQL> SELECT dno, AVG(salary)
FROM employee
WHERE AVG(salary) > 1500000
GROUP BY dno;
[ERR-31061 : An aggregate function is not allowed here.
0003 : WHERE AVG(SALARY) > 1500000
^ ^
]
To correct the above error, use the HAVING clause.
iSQL> SELECT dno, AVG(salary)
FROM employee
GROUP BY dno
HAVING AVG(salary) > 1500000;
DNO AVG(SALARY)
--------------------A001 2066666.67
C001 1576666.67
C002 1660000
D001 2075750
F001 1845000
5 rows selected.
<Query> Display order number and the total number of ordered products only for orders that
the total order count is more than two:
iSQL> SELECT gno, COUNT(*)
FROM orders
GROUP BY gno
HAVING COUNT(*) > 2;
GNO
COUNT
271
Data Manipulation Statements
SELECT
-----------------------------------A111100002
3
C111100001
4
D111100008
3
E111100012
3
4 rows selected.
<Query> Display the number of the product of which order quantity is more than 1 during
December in ascending order by average of the quantity:
iSQL> SELECT gno, AVG(qty) month_avg
FROM orders
WHERE order_date BETWEEN '01-Dec-2000' AND '31-Dec-2000'
GROUP BY gno
HAVING COUNT(*) > 1
ORDER BY AVG(qty);
GNO
MONTH_AVG
--------------------------A111100002
35
D111100003
300
D111100004
750
C111100001
1637.5
D111100010
1750
D111100002
1750
E111100012
4233.33333
D111100008
5500
8 rows selected.
•
Search using ORDER BY
<Query> Display the names, department numbers, and the wage of all employees. Sort them
in the order of the department number, and display them in the descending order of the wage
amounts.
iSQL> SELECT ename, dno, salary
FROM employee
ORDER BY dno, salary DESC;
ENAME
DNO
SALARY
-------------------------------------------YHBAE
A001
4000000
HYCHOI
A001
1700000
HJMIN
A001
500000
MSKIM
C001
2750000
20 rows selected.
<Query> The following query displays the names and wages of all employees, sorts them by
department number, and retrieves them in the descending or of the wage.
iSQL> SELECT ename, salary
FROM employee
ORDER BY dno, salary DESC;
ENAME
SALARY
------------------------------------YHBAE
4000000
HYCHOI
1700000
HJMIN
500000
MSKIM
2750000
.
.
.
20 rows selected.
•
Searching using the operator
SQL Users’ Manual
272
SELECT
<Query> Display the name of the inventory and the inventory status.
iSQL> SELECT gname, (stock*price) stock_price
FROM goods;
GNAME
STOCK_PRICE
------------------------------------IM-300
78000000
IM-310
9800000
NT-H5000
27924000
.
.
.
30 rows selected.
•
Search using the alias name
<Query> Specify an alias name for a column.
iSQL> SELECT dname, 'District Name', dep_location
FROM department;
DNAME
'District Name'
-----------------------------------------------Applied Technology Team
District Name
Engine Development Team
District Name
Marketing Team
District Name
Planning & Management Team
District Name
Sales Team
District Name
5 rows selected.
•
DEP_LOCATION
Mapo
Yeoido
Gangnam
Gangnam
Shinchon
Searching using the LIMIT
<Query> Display only five employee names from employee table after 3’rd record.
iSQL> SELECT ename Name FROM employee LIMIT 3, 5;
NAME
-----------------------HSCHOI
KSKIM
SJKIM
HYCHOI
HJMIN
5 rows selected.
<Query> Display the name and the wage of the first record employee from the manager table.
iSQL> CREATE TABLE manager(
mgr_no INTEGER PRIMARY KEY,
mname VARCHAR(20),
address VARCHAR(60));
Create success.
iSQL> INSERT INTO manager VALUES(7, 'HJMIN', '44-25 YouIDo-dong Youngdungpo-gu Seoul, Korea');
1 row inserted.
iSQL> INSERT INTO manager VALUES(8, 'JDLEE', '3101 N. Wabash Ave. Brooklyn, NY');
1 row inserted.
iSQL> INSERT INTO manager VALUES(12, 'MYLEE', '130 Gongpyeongno Jung-gu
Daegu, Korea');
1 row inserted.
iSQL> SELECT ename, salary
FROM employee
WHERE eno = (SELECT mgr_no FROM manager LIMIT 1);
ENAME SALARY
273
Data Manipulation Statements
SELECT
------------------------------------HJMIN 500000
1 row selected.
•
Search command using FOR UPDATE
This table shows how to use FOR UPDATE statement.
Transaction A
Time
Point
iSQL> AUTOCOMMIT OFF;
Set autocommit off success.
Transaction B
iSQL> AUTOCOMMIT OFF;
Set autocommit off success.
(request X lock on employee)
1
iSQL> LOCK TABLE employee IN
EXCLUSIVE MODE;
Lock success.
(acquire X lock on employee)
iSQL> SELECT ename
FROM employee
WHERE eno = 15;
ENAME
-----------------------JHSEOUNG
1 row selected.
2
iSQL> SELECT ename
FROM employee
WHERE eno = 15
FOR UPDATE;
(request conflicts with the X lock already
held by transaction A)
wait
wait
wait
iSQL> UPDATE employee
SET ENO = 30
WHERE eno = 15;
1 row updated.
iSQL> SELECT ename
FROM employee
WHERE eno = 30;
ENAME
-----------------------JHSEOUNG
1 row selected.
3
iSQL> COMMIT;
Commit success.
4
5
(resume)
ENAME
-----------------------No rows selected.
•
Search using Hints
SQL Users’ Manual
274
SELECT
1.
Using Table Access Method Hints
- full scan, index scan, index ascending order scan, index descending order scan, no
index scan
The following record searches the numbers, names, occupations of female employees.
<Query> SELECT eno, ename, emp_job
FROM employee WHERE gender = 'F';
For example, let's assume that there is an index in gender column of the employee table
and the index value may be ‘M’ or ‘F’.
When the number of the male employees is similar to that of the female employees, it
will be much faster to search the record using the full scan rather than using index scan.
However, if there are fewer female employees than male employees, index scan is faster
than full table scan. In other words, to search records with certain conditions in a row
where only two types of data exists, the optimizer assumes that two types of data are
distributed evenly and uses full table scan rather than index scan in a cost-based
approach. The access counts are 20 and 4 in the following query.
<Query> Display the employee number, name, and the occupation of the female user.
(Using FULL SCAN)
iSQL> SELECT /*+ FULL SCAN(employee) */ eno, ename, emp_job
FROM employee WHERE gender = 'F';
ENO ENAME EMP_JOB
-----------------------------------------------2 HJNO DESIGNER
10 YHBAE PROGRAMMER
12 MYLEE SALESMAN
16 JHCHOI DESIGNER
4 rows selected.
-----------------------------------------------PROJECT ( COLUMN_COUNT: 3, TUPLE_SIZE: 43 )
SCAN ( TABLE: EMPLOYEE, FULL SCAN, ACCESS: 20, SELF_ID: 2 )
------------------------------------------------
<Query> Display the employee number, name, and the occupation of the female user.
(Using specific index.)
iSQL> CREATE INDEX gender_index ON employee(gender);
Create success.
iSQL> SELECT /*+ INDEX(employee, gender_INDEX) use gender_index
because there are few female employees */ eno, ename, emp_job
FROM employee
WHERE gender = 'F';
ENO ENAME
EMP_JOB
-----------------------------------------------2
HJNO
DESIGNER
10 YHBAE
PROGRAMMER
12 MYLEE
SALESMAN
16 JHCHOI DESIGNER
4 rows selected.
-----------------------------------------------PROJECT ( COLUMN_COUNT: 3, TUPLE_SIZE: 43 )
SCAN ( TABLE: EMPLOYEE, INDEX: GENDER_INDEX, ACCESS: 4, SELF_ID: 2
)
-----------------------------------------------iSQL> SELECT /*+ INDEX ASC ( t1, idx1, idx2, idx3 ) INDEX DESC ( t1,
idx4 ) */
* FROM t1 WHERE t1.i1 = 1;
iSQL> SELECT /*+ INDEX DESC ( t1, idx1, idx2, idx3 ) */ * FROM t1
WHERE t1.i1
275
Data Manipulation Statements
SELECT
= 1;
iSQL> SELECT /*+ NO INDEX ( t1, idx1, idx2, idx3 ) */ * FROM t1 WHERE
t1.i1 =
1;
2.
Join Order Hints (ordered, optimized)
<Query> Retrieve the employee number, name, and the related customer list of the
employee who is in charge of the ordered products. (Join an employee table with a customer table and then join the result set with the others table)
iSQL> SELECT /*+ ORDERED */ DISTINCT o.eno, e.ename, c.cname
FROM employee e, customer c, orders o
WHERE e.eno = o.eno AND o.cno = c.cno;
ENO ENAME CNAME
-----------------------------------------------12 MYLEE YSKIM
12 MYLEE DJKIM
12 MYLEE BSYOUN
12 MYLEE JHCHOI
12 MYLEE KSKIM
12 MYLEE DHCHO
12 MYLEE JHKIM
19 KMKIM CHLEE
19 KMKIM JHPARK
19 KMKIM BSYOUN
19 KMKIM LSPARK
19 KMKIM DKKIM
19 KMKIM SMCHO
20 DIKIM YSKIM
20 DIKIM IJLEE
20 DIKIM LSPARK
20 DIKIM YDPARK
20 DIKIM DHKIM
20 DIKIM DKKIM
20 DIKIM JHKIM
20 DIKIM DJKIM
21 rows selected.
-----------------------------------------------PROJECT ( COLUMN_COUNT: 3, TUPLE_SIZE: 48 )
DISTINCT ( ITEM_SIZE: 40, ITEM_COUNT: 21, BUCKET_COUNT: 1024,
ACCESS: 21, SELF_ID: 4, REF_ID: 3 )
JOIN
JOIN
SCAN ( TABLE: EMPLOYEE E, FULL SCAN, ACCESS: 20, SELF_ID: 1 )
SCAN ( TABLE: CUSTOMER C, FULL SCAN, ACCESS: 400, SELF_ID: 2 )
SCAN ( TABLE: ORDERS O, FULL SCAN, ACCESS: 12000, SELF_ID: 3 )
------------------------------------------------
<Query> Retrieve the employee number, name, and the related customer list of the
employee who is in charge of the ordered products. (Regardless of table order in FROM
clauses, perform the table joining procedure using optimizer)
iSQL> SELECT DISTINCT o.eno, e.ename, c.cname
FROM employee e, customer c, orders o
WHERE e.eno = o.eno AND o.cno = c.cno;
ENO ENAME CNAME
-----------------------------------------------19 KMKIM CHLEE
12 MYLEE YSKIM
20 DIKIM YSKIM
12 MYLEE DJKIM
19 KMKIM JHPARK
19 KMKIM BSYOUN
12 MYLEE BSYOUN
20 DIKIM IJLEE
SQL Users’ Manual
276
SELECT
12 MYLEE JHCHOI
12 MYLEE KSKIM
19 KMKIM LSPARK
20 DIKIM LSPARK
12 MYLEE DHCHO
20 DIKIM YDPARK
20 DIKIM DHKIM
20 DIKIM DKKIM
19 KMKIM DKKIM
19 KMKIM SMCHO
12 MYLEE JHKIM
20 DIKIM JHKIM
20 DIKIM DJKIM
21 rows selected.
-----------------------------------------------PROJECT ( COLUMN_COUNT: 3, TUPLE_SIZE: 48 )
DISTINCT ( ITEM_SIZE: 40, ITEM_COUNT: 21, BUCKET_COUNT: 1024,
ACCESS: 21, SELF_ID: 4, REF_ID: 1 )
JOIN
JOIN
SCAN ( TABLE: CUSTOMER C, FULL SCAN, ACCESS: 20, SELF_ID: 2 )
SCAN ( TABLE: ORDERS O, INDEX: ODR_IDX2, ACCESS: 30, SELF_ID: 3 )
SCAN ( TABLE: EMPLOYEE E, INDEX: __SYS_IDX_ID_366, ACCESS: 30,
SELF_ID: 1 )
------------------------------------------------
3.
Optimizer Mode Hints (RULE, COST)
iSQL> SELECT /*+ RULE */ * FROM t1, t2 WHERE t1.i1 = t2.i1;
iSQL> SELECT /*+ COST */ * FROM t1, t2 WHERE t1.i1 = t2.i1;
Normal Form Hints (CNF, DNF)
iSQL> SELECT /*+ CNF */ * FROM t1 WHERE i1 = 1 OR i1 = 2;
iSQL> SELECT /*+ DNF */ * FROM t1 WHERE i1 = 1 OR i1 = 2;
Join Method Hints (nested loop, hash, sort, sort merge)
iSQL> SELECT /*+ USE_NL (t1,t2) */ * FROM t1, t2 WHERE t1.i1 = t2.i1;
iSQL> SELECT /*+ USE_HASH (t1,t2) */ * FROM t1, t2 WHERE t1.i1 =
t2.i1;
iSQL> SELECT /*+ USE_SORT (t1,t2) */ * FROM t1, t2 WHERE t1.i1 =
t2.i1;
iSQL> SELECT /*+ USE_MERGE (t1,t2) */ * FROM t1, t2 WHERE t1.i1 =
t2.i1;
Hash Bucket Size Hints (hash bucket count,group bucket count)
iSQL> SELECT /*+ HASH BUCKET COUNT (20) */ DISTINCT * FROM t1;
iSQL> SELECT * FROM t1 GROUP BY i1, i2;
iSQL> SELECT /*+ GROUP BUCKET COUNT (20) */ * FROM t1 GROUP BY i1,
i2;
iSQL> SELECT * FROM t1 INTERSECT SELECT * FROM t2;
iSQL> SELECT /*+ SET BUCKET COUNT (20) */ * FROM t1 INTERSECT SELECT
* FROM t2;
•
Search through OUTER JOIN
<Query> Retrieve all the department numbers and the employee names. (B001, the department number without staff, is displayed.)
iSQL> INSERT INTO department VALUES(BYTE'B001', 'Quality Assurance',
'Jonglo', 22);
1 row inserted.
iSQL> SELECT d.dno, e.ename
FROM department d LEFT OUTER JOIN employee e ON d.dno = e.dno
ORDER BY d.dno;
DNO ENAME
------------------------------A001 HYCHOI
A001 HJMIN
277
Data Manipulation Statements
SELECT
A001 YHBAE
B001
C001 MSKIM
C001 KWKIM
C001 JHSEOUNG
C002 HJNO
C002 KMLEE
C002 JHCHOI
C002 DIKIM
C002 CHLEE
D001 HSCHOI
D001 KSKIM
D001 SJKIM
D001 JDLEE
D001 KCJUNG
F001 MYLEE
F001 KMKIM
F001 DIKIM
20 rows selected.
<Query> Retrieve all the department numbers and the employee names. (CEO, which does
not belong to the department, is also displayed.)
iSQL> SELECT d.dno, e.ename
FROM department d RIGHT OUTER JOIN employee e ON d.dno = e.dno
ORDER BY d.dno;
DNO ENAME
------------------------------A001 HJMIN
A001 HYCHOI
A001 YHBAE
C001 JHSEOUNG
C001 KWKIM
C001 MSKIM
C002 HJNO
C002 JHCHOI
C002 DIKIM
C002 CHLEE
C002 KMLEE
D001 SJKIM
D001 KCJUNG
D001 KSKIM
D001 HSCHOI
D001 JDLEE
F001 KMKIM
F001 DIKIM
F001 MYLEE
SWNO
20 rows selected.
<Query>Retrieve the number and name of the department and product number of all the
locations where the department location and the product location are the same.
iSQL> INSERT INTO department VALUES(BYTE'F002', 'headquarters',
'CE0002', 100);
1 row inserted.
iSQL> SELECT d.dno, d.dname, g.gno
FROM department d FULL OUTER JOIN goods g
ON d.dep_location = g.goods_location;
DNO DNAME GNO
-------------------------------------------A111100001
A111100002
B111100001
SQL Users’ Manual
278
SELECT
C111100001
C111100002
D111100001
D111100002
D111100003
D111100004
D111100005
D111100006
D111100007
D111100008
D111100009
D111100010
D111100011
E111100001
E111100002
E111100003
E111100004
F002 headquarters E111100005
E111100006
E111100007
E111100008
E111100009
E111100010
E111100011
E111100012
E111100013
F111100001
A001 Applied Technology Team
D001 Engine Development Team
C002 Planning Management Team
C001 Marketing Team
F001 Sales Team
B001 Quality Assurance
36 rows selected.
•
Search using In-line View
<Query> Display the department average wage as well as the name, the wage, and the
department of the employee whose wage is higher than the department's average wage.
iSQL> SELECT e.ename, e.salary, e.dno, v1.salavg
FROM employee e, (SELECT dno, AVG(salary) salavg FROM employee GROUP BY
dno) v1
WHERE e.dno = v1.dno
AND e.salary > v1.salavg;
ENAME
SALARY
DNO
SALAVG
-----------------------------------------------YHBAE
4000000 A001 2066666.67
MSKIM
2750000 C001 1576666.67
JHCHOI 2300000 C002 1660000
CHLEE
1900000 C002 1660000
SJKIM
2500000 D001 2075750
MYLEE
1890000 F001 1845000
6 rows selected.
279
Data Manipulation Statements
UPDATE
UPDATE
Syntax
update ::=
hints
tbl_name
UPDATE
user _name
.
PARTITION
(
partition _name
update _set_clause
;
t_alias
where_clause
limit_clause
AS
update_set_clause ::=
expr
column_name
=
subquery
(
)
SET
expr
(
column_name
)
(
,
where_clause ::=
SQL Users’ Manual
,
=
,
WHERE
280
)
condition
subquery
)
UPDATE
limit_clause ::=
condition
LIMIT
row_offset
,
hints ::=
fullscan_hint
index_hint
noindex _hint
/*
+
*/
indexasc_hint
indexdesc_hint
plancache_hint
fullscan_hint ::=
FULL
SCAN
tbl_name
(
)
index_hint ::=
INDEX
(
tbl _name
,
)
index_name
281
Data Manipulation Statements
UPDATE
noindex_hint ::=
INDEX
(
tbl_name
,
)
index_name
NO
indexasc_hint ::=
(
INDEX
tbl_name
,
)
index_name
ASC
Prerequisites
For you to update values in a table, the table must be in your own schema or you must have the
UPDATE object privilege on the table.
Description
Use the UPDATE statement to change existing values in a table.
When specifying a partition, change the column value of a record that satisfies a condition for the
partition.
user_name
Specify the owner name of the table to which a record will be changed. If omitted, Altibase will consider it as belonging to the schema of the user connected to the current session.
tbl_name
Specify the name of the table to which a record will be changed.
Hint Options
Clauses can be passed to Optimizer by adding comments to an Altibase SQL statement. Optimizer
uses these hints to select a plan node. The plus (+) sign lets Altibase convert comments to hints and
it should be placed right after a comment symbol without a blank space.
1.
FULL SCAN
SQL Users’ Manual
282
UPDATE
Searches the entire table without using the index although it is provided in the table.
2.
INDEX
Use the index scan for the index listed when accessing table data.
3.
INDEX ASC
Use the index scan for the index listed in the table-accessing method, and searches the index
in the ascending order.
4.
INDEX DESC
Use the index scanning method in the descending order.
5.
NO INDEX
Do not use index scanning method using specified index.
6.
Even with syntax errors in hints, you can execute queries while ignoring syntax errors without
executing functionalities of hints.
•
Modifying data with subquery in SET clause
1.
2.
3.
•
if one column is specified in SET clause, the result of subquery will return only one value.
if multiple columns are specified in SET clause, the result of subquery will return values
as the number of column specified.
if no row is returned as the result of subquery, null will be allocated to the column.
Modifying the data in the timestamp column
The default of the timestamp for updating is the system time. Therefore, If you update a timestamp column on other value, it will be updated on NULL or system time.
When the default is specified in the timestamp column, the system time will be inserted.
Precautions
The same column cannot be used more than once in an UPDATE statement.
When a partitioning key is changed and the related data need to be moved to other partitions, if the
partitioned table has the ENABLE ROW MOVEMENT attribute, data can be moved, but if not, an error
will occur.
In the column with NOT NULL constraints, NULL cannot be inserted or no data can be inserted as
null.
Examples
•
Updating a column
<Query> Update the wage of the employee whose name is JDLEE into 2500000.
283
Data Manipulation Statements
UPDATE
iSQL> UPDATE employee
SET salary = 2500000
WHERE ename = 'KMLEE';
1 row updated.
<Query> Increase all employee’s wages by 7%.
iSQL> UPDATE employee
SET salary = salary * 1.07;
20 rows updated.
•
Updating with subquery in WHERE clause
<Query> Subtract 50 from the order quantity of employee MYLEE.
iSQL> UPDATE orders
SET qty = qty - 50
WHERE eno IN(
SELECT eno
FROM employee
WHERE ename ='MYLEE');
9 rows updated.
•
Update data of partition table.
iSQL> UPDATE T1 PARTITION(P1) SET I1 = 200;
•
Update with subquery in SET clause
<Query> The following example shows syntax structure of UPDATE statement.
(You can modify columns with two types of subqueries in UPDATE statement, but can't modify
rows in related subqueries each other and WHERE clause.)
iSQL> CREATE TABLE bonuses
(eno INTEGER, bonus NUMBER(10, 2) DEFAULT 100, commission NUMBER(10, 2)
DEFAULT 50);
Create success.
iSQL> INSERT INTO bonuses(eno)
(SELECT e.eno FROM employee e, orders o
WHERE e.eno = o.eno
GROUP BY e.eno);
3 rows inserted.
iSQL> SELECT * FROM bonuses;
BONUSES.ENO BONUSES.BONUS BONUSES.COMMISSION
-----------------------------------------------12
100
50
19
100
50
20
100
50
3 rows selected.
iSQL> UPDATE bonuses
SET eno = eno + 100, (bonus, commission) =
(SELECT 1.1 * AVG(bonus), 1.5 * AVG(commission) FROM bonuses)
WHERE eno IN
(SELECT eno
FROM orders
WHERE qty >= 10000);
1 row updated.
iSQL> SELECT * FROM bonuses;
BONUSES.ENO BONUSES.BONUS BONUSES.COMMISSION
-----------------------------------------------12
100
50
20
100
50
SQL Users’ Manual
284
UPDATE
119
110
3 rows selected.
75
Note: if the result of the subquery is null in WHERE clause, no row is affected. However, if the result of
the subquery in SET clause is null, the corresponding column will be updated on null.
iSQL> UPDATE orders
SET qty = qty - 50
WHERE eno IN(
SELECT eno
FROM employee
WHERE ename ='HHHHH');
No rows updated.
iSQL> UPDATE employee
SET dno =
(SELECT dno
FROM department
WHERE dep_location = 'LOCAL');
20 rows updated.
iSQL> WHERE eno = 12;
Syntax error.
iSQL> SELECT ename, dno
FROM employee
WHERE eno = 12;
ENAME DNO
------------------------------MYLEE
1 row selected.
285
Data Manipulation Statements
MOVE
MOVE
Syntax
move ::=
hints
MOVE
target_tbl_name
INTO
user_name
PARTITION
partition _name
(
FROM
)
,
column_commalist
source_tbl_name
,
user _name
where_clause
expression_commalist
limit_clause
column_commalist ::=
(
column_name
,
SQL Users’ Manual
286
)
MOVE
expression_commalist ::=
(
expr
)
,
limit_clause ::=
row_count
LIMIT
row_offset
,
Prerequisites
To move table records, the user should have the authority to insert or delete a record to/from a table.
This is because moving data involves with inserting and deleting of data.
To insert a record into a table, the user should be SYS or have the INSERT ANY TABLE system authority, and a table following INTO becomes the target.
To delete a record into a table, the user should be SYS or have the DELETE ANY TABLE system authority, and a table following FROM becomes the source.
Description
You can move data from a table to another table using MOVE statement. Data in a certain partition
can also be moved.
hints
Specify hints for FROM clause. Same as hints of SELECT statement
table_name
Specify the table, not a view or meta table.
287
Data Manipulation Statements
MOVE
column_commalist
Specify columns belonging to the table.
expression_commalist
Specify a list of expressions.
where_clause
Specify the WHERE clause. Same as that of SELECT statement
limit_clause
Specify the LIMIT clause.
Precautions
Cannot use Move for the same table.
When a partition is specified, an unappropriate value for a partition cannot be entered.
Examples
<Query> Insert a record that satisfies T2.I2 = 4 at T2 (I1, I2) and delete it from T2.
iSQL> MOVE INTO T1(I1, I2) FROM T2(I1, I2) WHERE T2.I2 = 4;
<Query> Insert a row composed of (I1, I2, I3) of T2 in T1 and delete T2. (T1 must have a column corresponding to (I1, I2, I3) of T2 and must have the same number of columns.)
iSQL> MOVE INTO T1 FROM T2 (I1, I2, I3);
SQL Users’ Manual
288
ENQUEUE
ENQUEUE
Syntax
enqueue ::=
ENQUEUE
INTO
queue_
name
(
column_name
)
values _clause
;
,
values_clause ::=
expr
VALUES
(
)
DEFAULT
,
Description
Insert a message into a queue. The ENQUEUE statement has a similar structure with the INSERT
statement. More than one column names should be specified after the INTO clause.
In general, the user specifies a message to store before entering a message. However, the user can
specify Correlation id to group or differentiate massages.
Examples
<Query> Enter 'This is a message' message to message queue Q1.
ENQUEUE INTO Q1(message) VALUES ('This is a message');
<Query> Enter 'This is a message' message to message queue Q1 with Correlation id 237.
ENQUEUE INTO Q1(message,corrid) VALUES ('This is a message', 237);
289
Data Manipulation Statements
DEQUEUE
DEQUEUE
Syntax
dequeue ::=
DEQUEUE
queue_co
lumn_list
FROM
queue _name
where _clause
;
fifo_option
WAIT
integer
fifo_option ::=
FIFO
LIFO
Description
The DEQUEUE statement retrieves a message that satisfies a condition in the where_clause clause
and then delete it.
FIFO_option
If the FIFO option is enabled or no option is specified, the oldest message that satisfies a condition is
retrieved. If the LIFO option is enabled, the latest message is retrieved.
WAIT integer
When there is no message in a queue, the DEQUEUE statement waits until a message is enqueued.
The wait time is specified in the WAIT clause. If the wait time is not specified, the DEQUEUE statement continues to wait.
SQL Users’ Manual
290
DEQUEUE
Precautions
The following should be considered when the DEQUEUE statement is used.
Only the columns in a queue table can be specified in queue_column_list in DEQUEUE.
The DEQUEUE statement has some of the characters of the SELECT statement. However, only one
queue name can be specified and if more than one queue or table name is specified, an error will
occur.
A subquery cannot be used under the WHERE clause in the DEQUEUE statement.
Examples
<Query> Read all messages of which Correlation id is 'From Seoul' from message queue Q1.
DEQUEUE MESSAGE, CORRID FROM Q1 WHERE CORRID='From Seoul';
291
Data Manipulation Statements
DEQUEUE
SQL Users’ Manual
292
5 Data Control Statements
293
Data Control Statements
ALTER SESSION
ALTER SESSION
Syntax
alter_session::=
ALTER
alter_session_set_clause
SESSION
replication _mode_set_clause
dblink _session_close_clause
alter_session_set_clause::=
SET
parameter _name
=
parameter_value
replication_mode_set_clause::=
DEFAULT
LAZY
SET
REPLICTION
=
ACKED
EAGER
NONE
SQL Users’ Manual
294
;
ALTER SESSION
dblink_session_close_clause::=
CLOSE
DATABASE
LINK
Description
Change the attributes of the current s ession.
alter_session_set_clause
For more information on parameter_name and parameter_ value in the alter_session_set_clause
clause, please refer to the Altibase property section in Starting User’s Manual.
replication_mode_set_clause
The replication_mode_set_clause clause sets the replication mode attribute of a transaction in the
current session. DEFAULT means that replication mode is not set for a session. Otherwise, it sets a
transaction in the current session to LAZY, ACKED or EAGER mode. However, if you specify this as
NONE, all DDL, DML, DCL executing in the session are excluded for replication.
For more information on replication mode, please refer to Replication User’s Manual.
dblink_session _close_clause
If a user connects to a server, a session is created in the server. If a database link is used in this session, the session allocated to the user creates a session for database link to AltiLinker. If the user’s
session is closed, the database link session is also closed. However, if a database link operation is performed and this user session is not closed, the unnecessary database link session remains open.
In that case, the user can use the close clause to end database link sessions.
Precautions
When the ALTER SESSION SET REPLICATION statement is used to set replication mode to EAGER, the
following considerations should be taken into account:
If a message appears saying that commit has failed due to a replication conflict, the user should roll
back. Otherwise, a transaction that cannot be committed continues, preventing changes from being
committed.
In Autocommit mode, if a transaction fails due to a replication conflict, it is rolled back automatically.
If a transaction fails due to a replication conflict and then the session is closed, it is rolled back automatically.
295
Data Control Statements
ALTER SESSION
The ALTER SESSION CLOSE DATABASE LINK clause simply ends database link sessions in a user’s session instead of disconnecting the user’s session.
Example
<Query> Change the replication mode for the current session and perform DML. Commit fails due
to a replication conflict and rollback is carried out.
iSQL> ALTER SESSION SET REPLICATION = EAGER;
Alter success.
iSQL> INSERT INTO TABLEA VALUES ( 2, 2 );
1 row inserted.
iSQL> COMMIT;
[ERR-110D2 : Transaction's commit was canceled by replication conflict.]
iSQL> ROLLBACK;
Rollback success.
<Query> Close the database link session only, keeping the current session.
iSQL> ALTER SESSION CLOSE DATABASE LINK;
SQL Users’ Manual
296
ALTER SYSTEM
ALTER SYSTEM
Syntax
alter_system ::=
CHECKPOINT
ALTER
SYSTEM
;
MEMORY
COMPACT
START
FLUSHER
integer
STOP
START
ARCHIVE
LOG
STOP
alter _system_set_clause
SET
FLUSH
BUFFER _POOL
COMPACT
SQL_PLAN_CACHE
RESET
alter_system_set_clause ::=
parameter _name
=
parameter_value
Description
ALTER SYSTEM statement indicates to change ALTIBASE systtem properties. SYS user or user with
privilege of ALTER SYSTEM can execute all options of ALTER SYSTEM statement.
CHECKPOINT
This indicates to execute checkpoint.
COMPACT
This indicates to execute compaction for memory only in IBM AIX.
297
Data Control Statements
ALTER SYSTEM
START/STOP FLUSHER
This indicates to start up or shut down flusher.
ARCHIVE LOG START/STOP
If you choose START, archive thread starts and if you choose STOP, it stops. You can execute it only in
archive mode.
You can know whether to execute the archive mode or not in V$LOG, V$ARCHIVE. Refer to Database
Mode in Admin User's Manual for more details about the archive.
SET alter_system_set_clause
You can change initial parameters. For more information about them, see Starting User’s Manual
Chapter IV. Altibase Properties.
FLUSH BUFFER_POOL
This unloads all pages of buffer to disk, and empties the buffer.
Only sysdba should execute this statement with special care. Query executed next occurs buffer
miss in all pages accessed initially because they are deleted.
Example
<SQL>
iSQL>
<SQL>
iSQL>
Stop flusher 1.
ALTER SYSTEM STOP FLUSHER 1;
Start the archive log in archive mode.
ALTER SYSTEM ARCHIVE LOG START;
SQL Users’ Manual
298
COMMIT
COMMIT
Syntax
commit ::=
COMMIT
Description
COMMIT statement reflects your current transaction to the database.
You can use this when specifying AUTOCOMMIT mode as FALSE.
FORCE global_tx_id
You can commit transaction compulsorily in XA when transaction is in doubt state.
global_tx_id computes format ID of XID, global transaction ID and branch qualifier as charater string.
Restriction
You can't execute this statement in AUTOCMMIT mode.
Examples
iSQL> COMMIT; => This reflects all data inserted by command until now.
Commit success.
299
Data Control Statements
SAVEPOINT
SAVEPOINT
Syntax
savepoint::=
SAVEPOINT
savepoint _name
;
Description
Transactions executed until now are saved temporarily in their process by specifying savepoint.
Namely this command indicates to specify the point for rollback in transactions. This is
available when AUTOCOMMIT mode is FALSE.
Examples
iSQL> AUTOCOMMIT OFF;
Set autocommit off success.
iSQL> CREATE TABLE savept(num INTEGER);
Create success.
iSQL> INSERT INTO savept VALUES(1);
1 row inserted.
iSQL> SAVEPOINT sp1;
Savepoint success.
iSQL> INSERT INTO savept VALUES(2);
1 row inserted.
iSQL> SELECT * FROM savept;
SAVEPT.NUM
-------------1
2
2 rows selected.
iSQL> ROLLBACK TO SAVEPOINT sp1;
Rollback success.=> Rollback transactions to the point where
savepoint_name(sp1) is designated.
iSQL> SELECT * FROM savept;
SAVEPT.NUM
-------------1
1 row selected.
iSQL> COMMIT;
Commit success.
SQL Users’ Manual
300
ROLLBACK
ROLLBACK
Syntax
rollback ::=
;
ROLLBACK
TO
SAVEPOINT
savepoint_name
global _tx_id
FORCE
Description
ROLLBACK (TO SAVEPOINT)
This does rollback total transactions or partial rollback to a savepoint.
FORCE global_tx_id
This does compulsorily rollback trasaction committed in XA.
global_tx_id computes format ID of XID, global transaction ID and branch qualifier as charater string.
Precautions
You can not use this statement on Autocommit mode.
Examples
iSQL> AUTOCOMMIT OFF;
Set autocommit off success.
iSQL> UPDATE employee
SET salary = 2300000
WHERE ename = 'HSCHOI';
1 row updated.
iSQL> SAVEPOINT hachoi_sal;
Savepoint success.
iSQL> DELETE FROM employee
WHERE ename = 'KMKIM';
1 row deleted.
iSQL> SAVEPOINT kmkim_ret;
Savepoint success.
iSQL> INSERT INTO employee(eno, ename, salary, gender)
VALUES(21, 'MSJUNG', 3000000, 'F');
1 row inserted.
301
Data Control Statements
ROLLBACK
iSQL> SAVEPOINT msjung_join;
Savepoint success.
iSQL> UPDATE employee
SET salary = 2200000
WHERE ename = 'CHLEE';
1 row updated.
iSQL> SELECT ename, salary
FROM employee
WHERE ename = 'HSCHOI' OR ename = 'KMKIM'
OR ename = 'MSJUNG' OR ename = 'CHLEE';
ENAME
SALARY
------------------------------------HSCHOI
2300000
MSJUNG
3000000
CHLEE
2200000
3 rows selected.
iSQL> ROLLBACK TO SAVEPOINT msjung_join;
Rollback success. => Rollback transactions to the point where savepoint_name
(msjung_join) is designated.
iSQL> SELECT ename, salary
FROM employee
WHERE ename = 'HSCHOI' OR ename = 'KMKIM'
OR ename = 'MSJUNG' OR ename = 'CHLEE';
ENAME
SALARY
------------------------------------HSCHOI
2300000
MSJUNG
3000000
CHLEE
1900000
3 rows selected.
iSQL> ROLLBACK TO SAVEPOINT kmkim_ret;
Rollback success.
iSQL> SELECT ename, salary
FROM employee
WHERE ename = 'HSCHOI' OR ename = 'KMKIM'
OR ename = 'MSJUNG' OR ename = 'CHLEE';
ENAME
SALARY
------------------------------------HSCHOI
2300000
CHLEE
1900000
2 rows selected.
iSQL> ROLLBACK TO SAVEPOINT msjung_join;
[ERR-11016 : ERR-11016: Unable to find the savepoint
iSQL> INSERT INTO employee(eno, ename, gender, join_date)
VALUES(22, 'MHJUNG', 'F', TO_DATE('2001-11-19 00:00:00', 'YYYY-MM-DD
HH:MI:SS'));
1 row inserted.
iSQL> COMMIT;
Commit success.
-> Commit all the actions performed by the first DML statement (DELETE statement) and the last
DML statement (the second INSERT statement). All other SQL statements are rolled back before
COMMIT and SAVEPOINT hachoi_sal are no longer available.
iSQL> SELECT eno, ename, salary FROM employee;
ENO
ENAME
SALARY
------------------------------------------3
HSCHOI
2300000
22
MHJUNG
0
.
.
.
20 rows selected.
iSQL> COMMIT;
Commit success.
SQL Users’ Manual
302
ROLLBACK
303
Data Control Statements
SET TRANSACTION
SET TRANSACTION
Syntax
set_transaction ::=
SET
TRANSACTION
READ
ONLY
READ
WRITE
;
READ
ISOLATION
LEVEL
COMMITTED
REPEATABLE
READ
SERIALIZABLE
Description
Use the SET TRANSACTION statement to establish the current transaction as read-only or read/write,
establish its isolation level, or assign it to a specified rollback segment.
The operations performed by a SET TRANSACTION statement affect only your current transaction,
not other users or other transactions. Your transaction ends whenever you issue a COMMIT or ROLLBACK statement.
All operations performed by SET TRANSACTION command affects only the current transaction, not
other users nor other transactions.
READ COMMITTED
If the transaction contains DML that requires row locks held by another transaction, then the DML
statement waits until the row locks are released. READ COMMITED is the default Altibase transaction
SQL Users’ Manual
304
SET TRANSACTION
isolation level.
REPEATABLE READ
This statement guarantees that the same value is always read. That means, this isolation level locks
the data read by the transaction, and prohibits other transactions modifying the data before the
transaction is committed.
SERIALIZABLE
The SERIALIZABLE setting specifies serializable transaction isolation mode as defined in the SQL92
standard. If a serializable transaction contains data manipulation language (DML) that attempts to
update any resource that may have been updated in a transaction uncommitted at the start of the
serializable transaction, then the DML statement fails
Precautions
Cannot be used when the current mode is AUTOCOMMIT mode.
Cannot be used when there is an activated transaction.
Examples
iSQL> AUTOCOMMIT OFF;
Set autocommit off success.
iSQL> SET TRANSACTION ISOLATION LEVEL READ COMMITTED;
Command execute success.
iSQL> SET TRANSACTION ISOLATION LEVEL REPEATABLE READ;
Command execute success.
Transaction A
Time
Point
iSQL> AUTOCOMMIT OFF;
Set autocommit off success.
Transaction B
iSQL> AUTOCOMMIT OFF;
Set autocommit off success.
iSQL> SET TRANSACTION READ ONLY;
Command execute success.
1
iSQL> SELECT ename
FROM employee
WHERE eno = 20;
ENAME
-----------------------DIKIM
1 row selected.
2
305
Data Control Statements
SET TRANSACTION
Transaction A
Time
Point
3
iSQL> UPDATE EMPLOYEE
SET ename = 'KBJUNG'
WHERE eno = 20;
1 row updated.
4
iSQL> SELECT ename
FROM employee
WHERE eno = 20;
ENAME
-----------------------DIKIM
1 row selected.
5
6
iSQL> SELECT ename
FROM employee
WHERE eno = 20;
ENAME
-----------------------KBJUNG
1 row selected.
SQL Users’ Manual
Transaction B
306
iSQL> commit;
Commit success.
Part III
•
Chapter6.Set Operators
•
Chapter7.SQL Functions
•
Chapter8.Arithmetic Operators
•
Chapter9.SQL Conditions
307
6 Set Operators
308
Set Operators
UNION
UNION
Syntax
SELECT statement1 UNION SELECT statement2
Description
To select all distinct rows selected by either query.
Therefore, if the results are duplicated, only one row will be displayed.
Examples
<Query> Retrieve employees and customers whose birthdays are before June 30th. (In case the
result is duplicated, only one will be displayed.)
iSQL> SELECT COUNT(*) Num_birth
FROM employee
WHERE birth < BYTE'0630'
UNION
SELECT COUNT(*)
FROM customer
WHERE birth < BYTE'0630';
NUM_BIRTH
----------------------7
8
2 rows selected.
SQL Users’ Manual
309
UNION ALL
UNION ALL
Syntax
SELECT statement1 UNION ALL SELECT statement2
Description
To all rows selected by either query, including all duplicates.
Therefore, if the results are duplicated, only one row will be displayed.
Examples
<Query> Display employees whose birthdays are before June 30th as well as employees whose
order quantity is less than 50 with their employee numbers all together.
iSQL> SELECT eno
FROM employee
WHERE birth < BYTE'0630'
UNION ALL
SELECT eno
FROM orders
WHERE qty < 50 ;
ENO
-------------3
7
9
10
12
15
16
20
8 rows selected.
310
Set Operators
INTERSECT
INTERSECT
Syntax
SELECT statement1 INTERSECT SELECT statement2
Description
INTERSECT operator returns all distinct rows selected by both queries.
Examples
<Query> Displays names of employees and customers whose birthdays are before June 30th and
who have same names.
iSQL> SELECT ename
FROM employee
WHERE birth < BYTE'0630'
INTERSECT
SELECT cname
FROM customer
WHERE birth < BYTE'0630';
ENAME
-----------------------MYLEE
1 row selected.
SQL Users’ Manual
311
MINUS
MINUS
Syntax
SELECT statement1 MINUS SELECT statement2
Description
MINUS operator returns all distinct rows selected by the first query but not the second.
Examples
<Query> Display the product numbers except ordered products
iSQL> SELECT gno FROM goods
MINUS
SELECT gno FROM orders;
GNO
-------------A111100001
B111100001
C111100002
.
.
.
14 rows selected.
312
Set Operators
Precedence of Operator
Precedence of Operator
Precedence is the order in which database evaluates different operators in the same expression.
When evaluating an expression containing multiple operators, database evaluates operators with
higher precedence before evaluating those with lower precedence. Database evaluates operators
with equal precedence from left to right within an expression.
Description
This tale lists the levels of precedence among SQL operators from high to low. Operators listed on
the same line have the same precedence. You can use parentheses in an expression to override operator precedence.
Computation Procedure
Operator
1
All comparison operator
2
NOT
3
AND
4
OR
Examples
<Query> Display the names, positions, and wage amounts of employees or salespersons whose
wage is more than 1850000 won.
iSQL> SELECT ename, emp_job, salary
FROM employee
WHERE emp_job = 'SALESMAN'
OR emp_job = 'ENGINEER'
AND salary >= 1850000;
ENAME
EMP_JOB
SALARY
-----------------------------------------------HSCHOI
ENGINEER
2000000
SJKIM
ENGINEER
2500000
MYLEE
SALESMAN
1890000
KMKIM
SALESMAN
1800000
DIKIM
SALESMAN
5 rows selected.
<Query> Display the names, positions, and wage amounts of employees or salespersons whose
wage is more than 1850000 won.
iSQL> SELECT ename, emp_job, salary
FROM employee
WHERE (emp_job = 'SALESMAN'
OR emp_job = 'ENGINEER')
AND salary >= 1850000;
ENAME
EMP_JOB
SALARY
SQL Users’ Manual
313
Precedence of Operator
-----------------------------------------------HSCHOI
ENGINEER
2000000
SJKIM
ENGINEER
2500000
MYLEE
SALESMAN
1890000
3 rows selected.
314
Set Operators
Precedence of Operator
SQL Users’ Manual
315
7 SQL Functions
316
SQL Functions
Introduction to SQL Functions
Introduction to SQL Functions
SQL functions are built into Altibase and are available for use in various SQL statements. SQL functions do not include the user-defined function.
If you call a SQL function with an argument of a datatype other than the datatype expected by the
SQL function, then Altibase attempts to convert the argument to the expected datatype before performing the SQL function. If you call a SQL function with a null argument, then the SQL function
automatically returns null.
This section shows you what SQL functions supported in Altibase.
Group of SQL Functions
SQL functions are grouped by their return values. This table lists the function group.
Group
Description
Group Function
This function returns a single value for the query result group, and
can be included in SELECT_list, ORDER BY, HAVING statements.
This function supports AVG, COUNT, MAX, MIN, STDDEV, SUM and
VARIANGE.
Analytic Function
This function creates result set value for several rows in group, and
returns it to them.Analytic function and group function are much
alike, but group function returns one result for one group.
Analytic function supports reporting aggregation such as SUM, AVG,
MIN, MAX, COUNT, VARIANCE and STDDEV.
Single-Row Function
This function returns one result for one table or row of view, and can
be included in SELECT_list, WHERE, START WITH, CONNECT BY and
HAVING statements.
This function supports numeric function, character function, conversion function, date function, encryption function and other function.
User-Defined Function
This function is defined by user.
Following table lists what functions are existed in each function group.
Group
Type
Group Function
AVG, COUNT, GROUP_ID, GROUPING_ID, MAX, MIN, STDDEV, SUM,
VARIANCE
Numeric Function
ABS, ACOS, ASIN, ATAN, ATAN2, CEIL, COS, COSH, EXP, FLOOR, LN,
LOG, MOD, POWER, RANDOM ROUND, SIGN, SIN, SINH, SQRT, TAN,
TANH, TRUNC, BITAND, BITOR, BITXOR, BITNOT
SQL Users’ Manual
317
Introduction to SQL Functions
Group
Type
Character function
This returns character and numeric value for the input value of character string.
Character return function
LOWER, LPAD, LTRIM, NCHR, REPLICATE, REPLACE2, REVERSE_STR,
RPAD, RTRIM, STUFF, SUBSTRB(SUBSTRING), TRANSLATE, TRIM, UPPER
Numeric return function
CHAR_LENGTH(CHARACTER_LENGTH,LENGTH), DIGEST,INSTR(POSITION, INSTRB), OCTET_LENGTH(LENGTHB), SIZEOF
Date Function
ADD_MONTHS, DATEADD, DATEDIFF, DATENAME, EXTRACT(DATEPART), LAST_DAY, MONTHS_BETWEEN, NEXT_DAY, SYSDATE, SYSTIMESTAMP
Conversion Function
This returns character, DATE or numeric value for the input value
(date, character or number).
ASCIISTR, BIN_TO_NUM, CONVERT, HEX_TO_NUM, OCT_TO_NUM,
TO_BIN, TO_CHAR(datetime), TO_CHAR(number), TO_DATE, TO_HEX,
TO_NCHAR(character), TO_NCHAR(datetime),TO_NCHAR(number),
TO_NUMBER, TO_OCT, UNISTR
Encryption Function
DESENCRYPT, DESDECRYPT
Other Function
CASE2, DECODE, DUMP, GREATEST, LEAST, NVL, NVL2, Nested Function
318
SQL Functions
Aggregate Functions
Aggregate Functions
Aggregate functions return a single result row based on groups of rows, rather than on single rows.
Aggregate functions can appear in select lists and in ORDER BY and HAVING clauses.
In a query containing a GROUP BY clause, the elements of the select list can be aggregate functions,
GROUP BY expressions, constants, or expressions involving one of these.
AVG
Syntax
AVG ( [ALL | DISTINCT] expression)
Description
This function takes as an argument any numeric datatype or any nonnumeric datatype that can be
implicitly converted to a numeric datatype. The function returns the same datatype as the numeric
datatype of the argument.
Examples
<Query> Calculate and display the average price record of the product table.
iSQL> SELECT AVG(price) FROM goods;
AVG(PRICE)
-------------30406.173
1 row selected.
* The null columns are not counted.
COUNT
Syntax
COUNT ( [ * | [ALL | DISTINCT] expression ] )
Description
COUNT returns the number of rows returned by the query.
The null columns are not counted.
SQL Users’ Manual
319
Aggregate Functions
Examples
<Query> Display the number of all records of the employee table.
iSQL> SELECT COUNT(*) Rec_count FROM employee;
REC_COUNT
----------------------20
1 row selected.
<Query> Display the number of birthday data in the employee table.
iSQL> SELECT COUNT(birth) Rec_count
FROM employee;
REC_COUNT
----------------------13
1 row selected.
MAX
Syntax
MAX ([ALL | DISTINCT] expression)
Description
MAX returns maximum value of expression.
Examples
<Query> Calculate and display the highest price from the product table.
iSQL> SELECT MAX(price) FROM goods;
MAX(PRICE)
-------------100000
1 row selected.
MIN
Syntax
MIN ([ALL | DISTINCT] expression)
Description
MAX returns maximum value of expression.
Examples
<Query> Calculate and display the lowest price from the product table.
320
SQL Functions
Aggregate Functions
iSQL> SELECT MIN(price) FROM goods;
MIN(PRICE)
-------------966.99
1 row selected.
STDDEV
Syntax
STDDEV ([ALL | DISTINCT] expression)
Description
STDDEV returns standard deviation of expression.
The returned value may have a bias depending on the accumulated calculation bias by the system
mathematical function.
Examples
<Query> Calculate standard deviation of the wage amounts in the employee table.
iSQL> SELECT STDDEV(salary) standard_deviation
FROM employee;
STANDARD_DEVIATION
--------------------797706.787
1 row selected.
SUM
Syntax
SUM ([ALL | DISTINCT] expression)
Description
SUM returns the sum of values of expression. You can use it as an aggregate or analytic function.
Examples
<Query> Calculate the sum of storage quantities of the Goods Table.
iSQL> SELECT SUM(stock) FROM goods;
SUM(STOCK)
----------------------379420
1 row selected.
SQL Users’ Manual
321
Aggregate Functions
VARIANCE
Syntax
VARIANCE ([ALL | DISTINCT] expression)
Description
VARIANCE returns standard deviation of expression.
The returned value may have a bias depending on the accumulated calculation bias by the system
mathematical function.
Examples
<Query> Calculate the deviation of the wage amounts in the employee table.
iSQL> SELECT VARIANCE(salary) variance
FROM employee;
VARIANCE
-------------6.3634E+11
322
SQL Functions
Numeric Functions
Numeric Functions
Numeric functions accept numeric input and return numeric values. Most numeric functions that
return NUMBER values that are accurate to 38 decimal digits.
ABS
Syntax
ABS (number)
Description
ABS returns the absolute value of n.
This function takes as an argument any numeric datatype or any nonnumeric datatype that can be
implicitly converted to a numeric datatype.
Examples
<Query> Display the result of ABS function for three numeric values.
iSQL> SELECT ABS(-1), ABS(0.0), ABS(1) FROM dual;
ABS(-1) ABS(0.0) ABS(1)
---------------------------------------1
0
1
1 row selected.
<Query> Calculate the difference between the most expensive item and the most inexpensive item
in the product table.
iSQL> SELECT ABS(MIN(price) - MAX(price)) absolute_value FROM goods;
ABSOLUTE_VALUE
----------------99033.01
1 row selected.
ACOS
Syntax
ACOS (n)
Description
ACOS returns the arc cosine of n. The argument n must be in the range of -1 to 1, and the function
returns a value in the range of 0 to pi, expressed in radians. This is called the arc cosine. In case the
value does not belong to this range, 0.000000 is returned. <= ACOS(1) 도 0
SQL Users’ Manual
323
Numeric Functions
1 radian = 180º/pi
Examples
<Query>
iSQL> SELECT ACOS(.3) Arc_Cosine FROM dual;
ARC_COSINE
-------------1.266104
1 row selected.
ASIN
Syntax
ASIN (n)
Description
ASIN returns the arc sine of n. The argument n must be in the range of -1 to 1, and the function
returns a value in the range of -pi/2 to pi/2, expressed in radians. In case the value does not belong
to this range, 0.000000 is returned.
Examples
<Query>
iSQL> SELECT ASIN(.3) Arc_Sine FROM dual;
ARC_SINE
-------------0.304693
1 row selected.
ATAN
Syntax
ATAN (n)
Description
ATAN returns the arc tangent of n. The argument n can be in an unbounded range and returns a
value in the range of -pi/2 to pi/2, expressed in radians. This is called the arc tangent.
Examples
<Query>
324
SQL Functions
Numeric Functions
iSQL> SELECT ATAN(.3) Arc_Tangent FROM dual;
ARC_TANGENT
-------------0.291457
1 row selected.
ATAN2
Syntax
ATAN2 (n, m)
Description
ATAN2 returns the arc tangent of n1 and n2. The argument n1 can be in an unbounded range and
returns a value in the range of -pi to pi, depending on the signs of n1 and n2, expressed in radians.
ATAN2(n1,n2) is the same as ATAN2(n1/n2).
Examples
<Query>
iSQL> SELECT ATAN2(.3, .2) Arc_Tangent2 FROM dual;
ARC_TANGENT2
--------------0.982794
1 row selected.
CEIL
Syntax
CEIL (number)
Description
CEIL returns smallest integer greater than or equal to n.
This function takes as an argument any numeric datatype or any nonnumeric datatype that can be
implicitly converted to a numeric datatype.
Examples
<Query> Return the minimum out of the defined range (99.9 ~ -99.9.)
iSQL> SELECT CEIL(99.9), CEIL(-99.9) FROM dual;
CEIL(99.9) CEIL(-99.9)
--------------------------100
-99
1 row selected.
SQL Users’ Manual
325
Numeric Functions
<Query> Calculate the difference between the most expensive item and the most inexpensive item
in the product table, and find the minimum integer out of the defined range.
iSQL> SELECT CEIL(ABS (MIN(price) - MAX(price))) Smallest_int FROM goods;
SMALLEST_INT
--------------99034
1 row selected.
COS
Syntax
COS (n)
Description
A numeric operation function that converts the cosine of the float-type expression radio angle into a
radian.
Examples
<Query>
iSQL> SELECT COS(180 * 3.14159265359/180) Cos_of_180_degrees FROM dual;
COS_OF_180_DEGREES
---------------------1
1 row selected.
COSH
Syntax
COSH (n)
Description
COS returns the cosine of n (an angle expressed in radians).
COSH(n) = ( e n + e -n )/2
Examples
<Query>
iSQL> SELECT COSH(0) FROM dual;
COSH(0)
326
SQL Functions
Numeric Functions
-------------1
1 row selected.
EXP
Syntax
EXP (n)
Description
EXP function returns e multiplied by n. e = 2.71828183…
Examples
<Query>
iSQL> SELECT EXP(2.4) FROM dual;
EXP(2.4)
-------------11.023176
1 row selected.
FLOOR
Syntax
FLOOR (number)
Description
FLOOR returns largest integer equal to or less than n.
Examples
<Query> Return returns the largest integer equal to or less than 99.9 and -99.9.
iSQL> SELECT FLOOR(99.9), FLOOR(-99.9) FROM dual;
FLOOR(99.9) FLOOR(-99.9)
---------------------------99
-100
1 row selected.
<Query> Calculate the difference between the most expensive item and the most inexpensive item
in the product table, and find the maximum integer out of the defined range.
iSQL> SELECT FLOOR(ABS(MIN(price) - MAX(price))) Largest_int FROM goods;
LARGEST_INT
SQL Users’ Manual
327
Numeric Functions
-------------99033
1 row selected.
LN
Syntax
LN (n)
Description
LN returns the natural logarithm of n, where n is greater than 0.
Examples
<Query>
iSQL> SELECT LN(2.4) FROM dual;
LN(2.4)
-------------0.875469
1 row selected.
LOG
Syntax
LOG (m, n)
Description
LOG returns the logarithm, base m, of n. The base n can be any positive value other than 0 or 1 and
m can be any positive value.
Examples
<Query>
iSQL> SELECT LOG(10, 100) FROM dual;
LOG(10, 100)
--------------2
1 row selected.
328
SQL Functions
Numeric Functions
MOD
Syntax
MOD (m, n)
Description
MOD returns the remainder of m divided by n. Returns n2 if n1 is 0.
Examples
<Query> Find the remainder after dividing 10 by 3.
iSQL> SELECT MOD(10, 3) FROM dual;
MOD(10, 3)
-------------1
1 row selected.
<Query> Find the remainder after dividing the total sum of wages by the minimum wage amount.
iSQL> SELECT MOD(SUM(salary), MIN(salary)) Remainder FROM employee;
REMAINDER
-------------223000
1 row selected.
POWER
Syntax
POWER (m, n)
Description
POWER returns m raised to the n power. The base m and the exponent n can be any numbers, but if
m is negative, then n1 must be an integer.
Examples
<Query>
iSQL> SELECT POWER(3, 2) FROM dual;
POWER(3, 2)
-------------9
1 row selected.
SQL Users’ Manual
329
Numeric Functions
RANDOM
Syntax
RANDOM (n)
Description
Returns a pseudo random integer value. The range of return value is between 0 and the maximum
integer value.
n is a seed value. If the random function with the same seed is repeatedly called, the same value will
be turned.
Examples
<Query> Retrieve a random number without seed value
iSQL> SELECT RANDOM(0) FROM dual;
RANDOM(0)
-------------16838
1 row selected.
<Query> Retrieve a random number with seed value
iSQL> SELECT RANDOM(100) FROM dual;
RANDOM(100)
-------------12662
1 row selected.
ROUND
Syntax
ROUND ( n[ , integer] )
Description
ROUND returns n rounded to integer places to the right of the decimal point. If you omit integer,
then n is rounded to 0 places. The argument integer can be negative to round off digits left of the
decimal point..
Examples
<Query> Retrieve decimal column using round function.
iSQL> SELECT ROUND(123.9994, 3), ROUND(123.9995, 3) FROM dual;
330
SQL Functions
Numeric Functions
ROUND(123.9994, 3) ROUND(123.9995, 3)
----------------------------------------123.999
124
1 row selected.
<Query> Round up the most inexpensive product price, and display it.
iSQL> SELECT ROUND( MIN(price) ) FROM goods;
ROUND( MIN(PRICE) )
---------------------967
1 row selected.
Note:
If integer is a negative value, Round returns a rounded value regardless of the data format.
Example
Result
ROUND(748.58, -1)
750
ROUND(748.58, -2)
700
ROUND(748.58, -3)
1000
Round always returns the value. If integer is negative and decimal digits are higher, Round will
return 0.
Example
Result
ROUND(748.58, -4)
0
SIGN
Syntax
SIGN (number)
Description
SIGN returns the sign of n. This function takes as an argument any numeric datatype:
In case of positive: 1, in case of negative: -1, otherwise return 0.
Examples
<Query> To use SIGN function
SQL Users’ Manual
331
Numeric Functions
iSQL> SELECT SIGN(15), SIGN(0), SIGN(-15) FROM dual;
SIGN(15) SIGN(0) SIGN(-15)
---------------------------------------1
0
-1
1 row selected.
<Query> Display 1, if the wage is higher than 100, or -1 if lower than 100. Otherwise, display 0.
iSQL> SELECT ename AS Employee_name, SIGN(salary-1000000) FROM employee;
EMPLOYEE_NAME SIGN(SALARY-1000000)
---------------------------------------------SWNO
HJNO
1
HSCHOI
1
KSKIM
1
SJKIM
1
HYCHOI
1
HJMIN
-1
.
.
.
20 rows selected.
SIN
Syntax
SIN (n)
Description
SIN returns the sine of n (an angle expressed in radians) in the float format.
Examples
<Query> Retrieve the sign of 30 degree.
iSQL> SELECT SIN (30 * 3.14159265359/180) Sine_of_30_degrees FROM dual;
SINE_OF_30_DEGREES
--------------------0.5
1 row selected.
SINH
Syntax
SINH (n)
332
SQL Functions
Numeric Functions
Description
SINH returns the hyperbolic sine of n.
SINH(n) = ( e n - e -n )/2
Examples
<Query> Retrieve the hyperbolic sine of 1:
iSQL> SELECT SINH(1) Hyperbolic_sine_of_1 FROM dual;
HYPERBOLIC_SINE_OF_1
----------------------1.175201
1 row selected.
SQRT
Syntax
SQRT (n)
Description
SQRT function returns the square root of n. n must not be a negative value.
Examples
<Query>
iSQL> SELECT SQRT(10) FROM dual;
SQRT(10)
-------------3.162278
1 row selected.
TAN
Syntax
TAN (n)
Description
TAN returns the tangent of n (an angle expressed in radians).
Examples
<Query> Retrieve the tangent of 135 degrees:
SQL Users’ Manual
333
Numeric Functions
iSQL> SELECT TAN (135 * 3.14159265359/180) Tangent_of_135_degrees FROM dual;
TANGENT_OF_135_DEGREES
-------------------------1
1 row selected.
TANH
Syntax
TANH (n)
Description
TANH returns the hyperbolic tangent of n.
Examples
<Query>Retrieve the hyperbolic tangent of .5:
iSQL> SELECT TANH(.5) Hyperbolic_tangent_of_ FROM dual;
HYPERBOLIC_TANGENT_OF_
------------------------0.462117
1 row selected.
TRUNC(number)
Syntax
TRUNC ( n1 [ , n2] )
Description
The TRUNC (number) function returns n1 truncated to n2 decimal places.
If n2 is omitted, then n1 is truncated to 0 places. n2 can be negative to truncate (make zero) n2 digits
left of the decimal point.
Examples
<Query> Truncating numbers:
iSQL> SELECT TRUNC(15.79, 1), TRUNC(15.79, -1) FROM dual;
TRUNC(15.79, 1) TRUNC(15.79, -1)
-----------------------------------15.7
10
1 row selected.
<Query> Retrieve the integer value of the most inexpensive product:
iSQL> SELECT TRUNC(MIN(price)) FROM goods;
TRUNC(MIN(PRICE))
334
SQL Functions
Numeric Functions
-------------------966
1 row selected.
BITAND
Syntax
BITAND (bit_a, bit_b)
Description
Return the AND result of between bit_a and bit_a.
Examples
iSQL> SELECT TO_CHAR( BITAND( BIT'01010101', BIT'10101010' ) ) FROM DUAL;
TO_CHAR( BITAND( BIT'01010101', BIT'1010
-------------------------------------------00000000
1 row selected.
BITOR
Syntax
BITOR (bit_a, bit_b)
Description
Return the OR result of between bit_a and bit_a.
Examples
iSQL> SELECT TO_CHAR( BITOR( BIT'01010101', BIT'10101010' ) ) FROM DUAL;
TO_CHAR( BITOR( BIT'01010101', BIT'10101
-------------------------------------------11111111
BITXOR
Syntax
BITXOR (bit_a, bit_b)
SQL Users’ Manual
335
Numeric Functions
Description
Return the XOR result of between bit_a and bit_a.
Examples
iSQL> SELECT TO_CHAR( BITXOR( BIT'01010101', BIT'10101010' ) ) FROM DUAL;
TO_CHAR( BITXOR( BIT'01010101', BIT'1010
-------------------------------------------11111111
1 row selected.
BITNOT
Syntax
BITNOT (bit_a)
Description
Return the NOT result of bit_a.
Examples
iSQL> SELECT TO_CHAR( BITNOT( BIT'01010101' ) ) FROM DUAL;
TO_CHAR( BITNOT( BIT'01010101' ) )
-------------------------------------10101010
1 row selected.
336
SQL Functions
Character Functions
Character Functions
Character functions that return character or numeric values and character functions are divided into
two types by their returning data types.
Character returning functions
CHR, CONCAT, DIGITS, INITCAP, LOWER, LPAD, LTRIM, NCHR, REPLICATE, REPLACE2, REVERSE_STR,
RPAD, RTRIM, STUFF, SUBSTRB(SUBSTRING), TRANSLATE, TRIM, UPPER
Numeric returning functions
ASCII, BINARY_LENGTH, INSTR(POSITION), CHAR_LENGTH(CHARACTER_LENGTH, LENGTH), INSTRB,
OCTET_LENGTH(LENGTHB), SIZEOF
ASCII
Syntax
ASCII (char)
Description
ASCII returns the decimal representation in the database character set of the first character of char.
Examples
<Query> Retrieve ASCII code of ‘A’
iSQL> SELECT ASCII('A') FROM dual;
ASCII('A')
-------------65
BINARY_LENGTH
Syntax
BINARY_LENGTH (char)
Description
Return the length of a binary data type such as BLOB, Byte or NIBBLE. A data type such as BLOB, Byte
or NIBBLE can be entered as an argument.
Example
<Query> Output the length of three binary data types.
SQL Users’ Manual
337
Character Functions
iSQL> CREATE TABLE T1 (I1 BLOB, I2 Byte(10), I3 NIBBLE(10) );
Create success.
iSQL> INSERT INTO T1 VALUES ( BLOB'3FD', Byte'123FD', NIBBLE'90BCD');
1 row inserted.
iSQL> SELECT BINARY_LENGTH (I1), BINARY_LENGTH (I2), BINARY_LENGTH (I3) FROM
T1;
BINARY_LENGTH (I1) BINARY_LENGTH (I2) BINARY_LENGTH (I3)
------------------------------------------------------------2
10
5
1 row selected.
CHAR_LENGTH, CHARACTER_LENGTH, LENGTH
Syntax
CHAR_LENGTH (char)CHARACTER_LENGTH (char)LENGTH (char)
Description
Returns the length of char string.
Examples
<Query> Print the length of Manager address.
* Database character set is KO16KSC5601.
iSQL> CREATE TABLE manager(
mgr_no INTEGER PRIMARY KEY,
mname VARCHAR(20),
address VARCHAR(60));
Create success.
iSQL> INSERT INTO manager VALUES(1, 'JDLEE', '3101 N. Wabash Ave. Brooklyn,
NY');
1 row inserted.
iSQL> INSERT INTO manager VALUES(15, 'HJMIN', ' 서울 마포구 아현 1');
1 row inserted.
<result>
CHAR_LENGTH (ADDRESS)
-----------------------32
11
2 rows selected.
CHR
Syntax
CHR (n)
Description
CHAR(n) converts the integer ASCII code into a character string.
338
SQL Functions
Character Functions
Examples
<Query>
iSQL> SELECT CHR(65) || CHR(76) || CHR(84) || CHR(73) || CHR(66) || CHR(65)
|| CHR(83) || CHR(69) mmdbms
FROM dual;
MMDBMS
-----------------------------------ALTIBASE
1 row selected.
<Query> In the following example, print line feed using ASCII code:
iSQL> SELECT cname || CHR(10) || gender || ' ' || cus_job || CHR(10) ||
address cus_info
FROM customer
WHERE cno = '730828-1201145';
CUS_INFO
-----------------------------------------------CHLEE
M ENGINEER
Busan Dong-gu Sujeong 3
1 row selected.
Note:
Control Character
Value
Tab
CHR(9)
New line
CHR(10)
Carriage Return
CHR(13)
CONCAT
Syntax
CONCAT (char1, char2)
Description
CONCAT returns char1 concatenated with char2. Both char1 and char2 can be any of the datatypes
CHAR, VARCHAR.
Same as concatenation operator (II).
Examples
<Query> Retrieve a row as a concatenated string.
SQL Users’ Manual
339
Character Functions
iSQL> SELECT CONCAT(CONCAT(RTRIM(ename), '''s job is ' ), emp_job ) Job
FROM employee
WHERE eno = 10;
JOB
-----------------------------------------------YHBAE's job is PROGRAMMER
1 row selected.
DIGITS
Syntax
DIGITS (number)
Description
Return a number in a different length based on its data type.
Return a string in 5 digits for SMALL INTEGER, 10 digits for INTEGER and 19 digits for BIG INTEGER. If
the number of digits is not met, fill it with 0’s (zeroes).
Examples
<Query> Adjust the string length based on three numerical data types for output.
iSQL> CREATE TABLE T1 (I1 SMALLINT, I2 INTEGER, I3 BIGINT);
Create success.
iSQL> INSERT INTO T1 VALUES (357, 12, 5000);
1 row inserted.
iSQL> SELECT DIGITS(I1), DIGITS(I2), DIGITS(I3) FROM T1;
DIGITS(I1)
DIGITS(I2)
DIGITS(I3)
-----------------------------------------------00357
0000000012
0000000000000005000
1 row selected.
INITCAP
Syntax
INITCAP (char)
Description
INITCAP returns char, with the first letter of each word in uppercase, all other letters in lowercase.
Words are delimited by white space or characters that are not alphanumeric.
Examples
<Query> Display ‘the soap’ with the first letter being upper-cased.
iSQL> SELECT INITCAP ('the soap') Capital FROM dual;
340
SQL Functions
Character Functions
CAPITAL
-----------The soap
1 row selected.
INSTR, POSITION
Syntax
INSTR (char, substring [, start [, occurrence]])
INSTRB (char, substring [, start [, occurrence]])
POSITION (char, substring [, start [, occurrence]])
Description
The INSTR function looks for a sub string in a string input for char and returns the location of the
found sub string. It returns 0 (zero) if no sub string is found. The INSTRB function returns the position
of the specified string in bytes rather than in characters.
Start specifies the position at which search begins. If a negative value is specified, search begins at
the end of char. If 0 (zero) is specified, it returns 0 (zero). If a value greater than the length of char is
specified, an error will occur.
Occurrence indicates the number of the found sub strings. The default value is 1. If occurrence is 1, it
returns the position of the first substring that is found. If it is set to 0 (zero) or a value greater than the
number of the found sub strings, it will return 0 (zero). If it is set to a negative value, an error will
occur.
Examples
<Query> Return the position of the 2nd occurrence of ‘OR’ in string ‘CORPORATE FLOOR’, beginning
search at the 3rd character.
iSQL> SELECT INSTR ('CORPORATE FLOOR','OR', 3, 2) Instring FROM dual;
INSTRING
-------------14
1 row selected.
<Query> Return the position of the 2nd occurrence of ‘BA’ in string ‘ALTIBASE 4 DATABASE’, beginning search at the 3rd character from the end (when KO16KSC5601 is specified.)
iSQL> SELECT INSTR (' 알티베이스 4 데이터베이스 ',' 베이 ', 3, 2) Instring FROM dual;
INSTRING
-------------11
1 row selected.
SQL Users’ Manual
341
Character Functions
LOWER
Syntax
LOWER (char)
Description
LOWER returns char, with all letters lowercase.
Examples
<Query> Convert the following into lower-case letters, and display them.
iSQL> SELECT LOWER('ONE PAGE PROPOSAL') Lowercase FROM dual;
LOWERCASE
--------------------one page proposal
1 row selected.
LPAD
Syntax
LPAD (expr1, n [, expr2])
Description
LPAD returns expr1, left-padded to length n characters with the sequence of characters in expr2.
This function is useful for formatting the output of a query. If you do not specify expr2, then the
default is a single blank. If expr1 is longer than n, then this function returns the portion of expr1 that
fits in n.
Examples
<Query> The following example inserts ‘xyz’ from the left of ‘abc’ character string and returns total
10 characters.
iSQL> SELECT LPAD('abc', 10, 'xyz') Lpad_ex FROM dual;
LPAD_EX
-----------------------------------------------xyzxyzxabc
1 row selected.
342
SQL Functions
Character Functions
LTRIM
Syntax
LTRIM (expr1 [, expr2])
Description
LTRIM removes from the left end of char all of the characters contained in set. If you do not specify
set, it defaults to a single blank.
Examples
<Query> Display the character string except the leftmost a and b in ‘abaAabLEFT TRIM’.
iSQL> SELECT LTRIM ('abaAabLEFT TRIM', 'ab') Ltrim_ex FROM dual;
LTRIM_EX
------------------AabLEFT TRIM
1 row selected.
<Query> Display the last seven digits of the customer's resident registration number.
iSQL> SELECT LTRIM (LTRIM(cno,'1234567890'), '-' ) FROM customer;
LTRIM (LTRIM(CNO,'1234567890'), '-' )
----------------------------------------1201145
1345471
1431202
.
.
.
20 rows selected.
NCHR
Syntax
NCHR (number)
Description
NCHAR_CHARACTERSET returns value of number. Its type is NVARCHAR.
Example
You may compute the 187th (U+0088) of national character set to the character.
SELECT NCHR(187) FROM DUAL;
NC
SQL Users’ Manual
343
Character Functions
--
OCTET_LENGTH, LENGTHB
Syntax
OCTET_LENGTH (char)
Description
OCTET_LENGTH calculates length using bytes as defined by the input character set. Byte size is
different depending that character string has database character set or national character set.
Examples
<Query> Print the length available for ' 우리나라 '. (Database character set should be K016KSC5601.)
iSQL> SELECT OCTET_LENGTH(' 우리나라 ') FROM dual;
OCTET_LENGTH(' 우리나라 ')
--------------------------8
1 row selected.
<Query> Retrieve the Manager address length.
iSQL> SELECT OCTET_LENGTH(address)
FROM manager;
OCTET_LENGTH(ADDRESS)
-----------------------32
18
2 rows selected.
REPLACE2
Syntax
REPLACE2 (char , string1 , [string2])
Description
REPLACE returns char with every occurrence of string1 replaced with string2. If string2 is omitted or
null, then all occurrences of string1 are removed. If string1 is null, then char is returned.
While TRUNSRATE function corresponds to each character, Replace2 function drops the character
string and replaces it with another character string.
Examples
<Query> Replace ‘team’ with ‘division’
344
SQL Functions
Character Functions
iSQL> SELECT REPLACE2(dname, 'team', 'division')
FROM department;
REPLACE2(DNAME, 'team', 'division')
-----------------------------------------------Applied Technology Division
Engine Development Division
Marketing Division
Planning and Management Division
Sales Division
5 rows selected.
<Query> Replace ‘cde’ of abcdefghi into ‘xx’.
iSQL> SELECT REPLACE2('abcdefghicde', 'cde', 'xx') FROM dual;
REPLACE2('abcdefghicde', 'cde', 'xx')
----------------------------------------abxxfghixx
1 row selected.
RPAD
Syntax
RPAD (char1, n [, char2])
Description
RPAD returns char1, right-padded to length n characters with char2, replicated as many times as
necessary. If a length of char1 is longer than n, only (length n) a part of char1 will be returned. However, the unit of n is the number of characters, not the byte size. Therefore, depending on the language, the byte of the actual character string differs.
Examples
<Query> The following example is used to pad ‘0’ to the right side of ‘123’ and return a 10-digit
number.
iSQL> SELECT TO_NUMBER(RPAD('123', 10, '0')) rpad_ex FROM dual;
RPAD_EX
-------------1230000000
1 row selected.
RTRIM
Syntax
RTRIM (char1 [, char2])
Description
RTRIM removes from the right end of char1 all of the characters that appear in char2.
SQL Users’ Manual
345
Character Functions
This function is useful for formatting the output of a query.
Examples
<Query> Display the character string except ‘ab’ on the right side of ‘RightTrimbaAbab’.
iSQL> SELECT RTRIM ('RIGHTTRIMbaAbab', 'ab') rtrim_ex FROM dual;
RTRIM_EX
------------------RIGHTTRIMbaA
1 row selected.
<Query> Display the first six digits of the customer's resident registration number.
iSQL> SELECT RTRIM (RTRIM(cno,'1234567890'), '-' ) FROM customer;
RTRIM (RTRIM(CNO,'1234567890'), '-' )
----------------------------------------730828
771215
711111
.
.
.
20 rows selected.
SIZEOF
Syntax
SIZEOF (string)
Description
SIZEOF Informs the size allocated to the character string. The character string can include char, varchar, and numeric data types. For the numeric data type, converted size will be returned.
While OCTET_LENGTH function returns the size of the input character string, SIZEOF function
returns the length of the column specified when create the table.
Therefore, SIZEOF returns 20 for numeric data type such as integer, bigint, and smallint or 45 for decimal. float, number,numeric, Double, and Real.
Examples
<Query> Retrieve the length of column x in the table dual.
iSQL> SELECT SIZEOF(x) FROM dual;
SIZEOF(X)
-------------1
1 row selected.
346
SQL Functions
Character Functions
SUBSTR, SUBSTRING
Syntax
SUBSTR (string, m [, n])
Description
The SUBSTR functions return a portion of string, beginning at character m, n characters long.
•
If m is 0, then it is treated as 1.
•
If m is positive, then Altibase counts from the beginning of string
•
to find the first character.
•
If position is negative, then Altibase counts backward from the end of string.
•
If n is omitted, then Altibase returns all characters to the end of
•
string.
Input variable and return value data type is CHAR or VARCHAR.
SUBSTR calculates lengths using characters as defined by the input character set. SUBSTRB uses
bytes instead of characters.
Examples
<Query> The following returns a sub string of which length is 5 starting from the first character in
the character string SALESMAN.
iSQL> SELECT SUBSTR('SALESMAN', 1 ,5) Substring FROM dual;
SUBSTRING
------------SALES
1 row selected.
<Query> The following returns a sub string of ABCDEFG.
iSQL> SELECT SUBSTR('ABCDEFG', -5 ,4) Substring FROM dual;
SUBSTRING
------------CDEF
1 row selected.
<Query> The following returns characters of which length is 2 bytes from 5th byte character in the
character string ‘ABCDEFG’.
iSQL> SELECT SUBSTRB('ABCDEFG', 5, 2) Substring_with_bytes FROM dual;
SUBSTRING_WITH_BYTES
-----------------------EF
1 row selected.
SQL Users’ Manual
347
Character Functions
TRANSLATE
Syntax
TRANSLATE (char , string1, string2 )
Description
TRANSLATE returns char with all occurrences of each character in string1 replaced by its corresponding character in string2. Characters not included in string1 will not be replaced. String1 can have
more characters than string2. In this case, there are no characters after string1 that correspond to
string2. If remaining characters in the char, they will not be returned. When string2 is empty, all corresponding characters can be deleted.
Examples
<Query> Among the product names of which stock is 50000 or more, change ‘M’ in the name to ‘L.’
iSQL> SELECT TRANSLATE(gname, 'M', 'L')
FROM goods
WHERE stock > 50000;
TRANSLATE(GNAME, 'M', 'L')
-------------------------------------------TL-U200
L-190G
2 rows selected.
<Query> Convert the capital letter to the small letter among character strings.
iSQL> SELECT
TRANSLATE('0123456789ABCDEFGHIJKLMNOPQRSTUVWXYZ0123456789',
'ABCDEFGHIJKLMNOPQRSTUVWXYZ',
'abcdefghijlkmnopqrstuvwxyz')
FROM dual;
TRANSLATE('0123456789ABCDEFGHIJKLMNOPQRS
-----------------------------------------------0123456789abcdefghijlkmnopqrstuvwxyz0123456789
1 row selected.
<Query> The following SQL statement returns the license number where the character string is
dropped and only the numbers are left.
iSQL> SELECT TRANSLATE('3PQR334',
'0123456789ABCDEFGHIJKLMNOPQRSTUVWXYZ',
'0123456789') License
FROM dual;
LICENSE
-----------------3334
1 row selected.
348
SQL Functions
Character Functions
TRIM
Syntax
TRIM (char1 [, char2])
Description
TRIM enables you to trim leading or trailing characters (or both) from a character string. If char2 or
char1 is a character literal, then you must enclose it in single quotes.
If you specify only char1, then Altibase removes leading and trailing blank spaces.
Examples
<Query> Display a character string of ‘abbAaBbAbba’ except the leftmost and the rightmost ‘a’ and
‘b’.
iSQL> SELECT TRIM ('abbAaBbAbba', 'ab') trim_ex FROM dual;
TRIM_EX
--------------AaBbA
1 row selected.
UPPER
Syntax
UPPER (char)
Description
UPPER returns char, with all letters uppercase.
Examples
<Query> Display the character string in upper-class letters.
iSQL> SELECT UPPER('Capital') Uppercase FROM dual;
UPPERCASE
------------CAPITAL
1 row selected.
SQL Users’ Manual
349
Character Functions
REPLICATE
Syntax
REPLICATE (char, number)
Description
Return char for the specified number of times. Char should be a string and number should be positive. If 0 (zero) or a negative number is entered, the REPLICATE function will return null.
Examples
<Query> Output string ‘KSKIM’ three times.
iSQL> SELECT REPLICATE ('KSKIM', 3) FROM dual;
REPLICATE ('KSKIM', 3)
----------------------------------KSKIMKSKIMKSKIM
1 row selected.
REVERSE_STR
Syntax
REVERSE_STR (char)
Description
Reverse and return the char received as an argument.
Examples
<Query> Output string ‘KSKIM’ reversed.
iSQL> SELECT REVERSE_STR ('KSKIM') FROM dual;
REVERSE_STR ('KSKIM')
------------------------MIKSK
1 row selected.
<Query> Output string ‘Altibase4’ reversed (when KO16KSC5601 is specified.)
iSQL> SELECT REVERSE_STR (' 알티베이스 4') FROM dual;
REVERSE_STR (' 알티베이스 4')
------------------------4 스이베티알
1 row selected.
350
SQL Functions
Character Functions
STUFF
Syntax
STUFF (char1, start, length, char2)
Description
Erase char1 for the specified length, beginning at the start position, and insert char2 in the place.
If length is specified as 0 (zero), nothing is deleted and char2 is inserted. The char2 is inserted the left
side of the start position. If length is greater than the actual length of char1, the string is erased to
the end and char2 is inserted.
To insert char2 at the end of char1, the start should be specified as the length of char1 + 1 and the
length should be 0 (zero) or a positive number.
If the start or length is negative or the start is greater than the length of char1 + 2, an error will occur.
Examples
<Query> Use the STUFF function to convert ‘KDHONG’ to ‘KILDONG HONG’.
iSQL> SELECT STUFF (‘KDHONG’, 2, 1, ‘ILDONG ’) FROM dual;
STUFF (‘KDHONG’, 2, 1, ‘ILDONG ’)
-------------------------------------------------KILDONG HONG
1 row selected.
<Query> Insert the char2 string before the char1 string.
iSQL> SELECT STUFF (‘KDHONG’, 1, 0, ‘ILDONG ’) FROM dual;
STUFF (‘KDHONG’, 1, 0, ‘ILDONG ’)
-------------------------------------------------ILDONG KDHONG
1 row selected.
<Query> Insert the char2 string after the char1 string.
iSQL> SELECT STUFF (‘KDHONG’, 7, 0, ‘ILDONG ’) FROM dual;
STUFF (‘KDHONG’, 7, 0, ‘ILDONG ’)
-------------------------------------------------KDHONGILDONG
1 row selected.
<Query> If the length is 0, char2 is inserted to the left side of the start position.
iSQL> SELECT STUFF (‘KDHONG’, 2, 0, ‘ILDONG ’) FROM dual;
STUFF (‘KDHONG’, 2, 0, ‘ILDONG ’)
-------------------------------------------------KILDONG DHONG
1 row selected.
<Query> (When KO16KSC5601 is specified.)
iSQL> SELECT STUFF (' 알티베이스 0', 5, 1, ' 데이터베이스 ') FROM dual;
STUFF (' 알티베이스 0', 5, 1, ' 데이터베이스 ’)
SQL Users’ Manual
351
Character Functions
-----------------------------------------------알티베이데이터베이스 0
1 row selected.
352
SQL Functions
Datetime Functions
Datetime Functions
Datetime functions operate on date and returns varchar string and numeric datatypes.
ADD_MONTHS
Syntax
ADD_MONTHS (date, integer)
Description
ADD_MONTHS returns the date date plus integer months. The integer argument can be an integer
or any value that can be implicitly converted to an integer.
Examples
<Query> Display the hiring date of employee MYLEE and the date six month after employment.
iSQL> SELECT join_date, ADD_MONTHS(join_date, 6)
FROM employee
WHERE ename = 'MYLEE';
JOIN_DATE
ADD_MONTHS(JOIN_DATE, 6)
-----------------------------------------------1999/12/14 00:00:00
2000/06/14 00:00:00
1 row selected.
DATEADD
Syntax
DATEADD (date, number, date_field_name)
Description
Increment the date_field_name part of date or time data type date by number. If number is a fraction number, apply it after discarding the places after the decimal point.
If date_field_name is ‘SECOND’, number should be 68 years or less. If it is ‘MICROSECOND’, number
should be 30 days or less.
The following table shows date_field_name that can be used with the DATEADD function:
Date Field Name
CENTURY
SQL Users’ Manual
Description
Add 100 * Number to the year part of the current date.
353
Datetime Functions
Date Field Name
Description
YEAR
Add Number to the year part of the current date.
QUARTER
Add 3 * Number to the month part of the current date.
MONTH
Add Number to the month part of the current date.
WEEK
Add 7 * Number to the day part of the current date.
(For example, the period from the 1st of Jan. to Saturday in
that week is the first week of the year.)
DAY
Add Number to the day part of the current date.
HOUR
Add Number to the hour part of the current date.
MINUTE
Add Number to the minute part of the current date.
SECOND
Add Number to the second part of the current date.
MICROSECOND
Add Number to the microsecond part of the current date.
Example
<Query> Get the number of employees whose employment period is less than 40 days.
iSQL> SELECT COUNT(*) FROM employee WHERE join_date > DATEADD (SYSDATE, -40,
‘DAY’);
COUNT
---------5
1 row selected.
DATEDIFF
Syntax
DATEDIFF (startdate, enddate, date_field_name)
Description
Show the difference between enddate and startdate (enddate – startdate) in date_field_name. If
startdate is greater than enddate, a negative number is returned.
Get the date_field values of enddate and startdate, respectively, and take subtraction of them. The
result of the DATEDIFF function is always an integer.
The date_field_name that can be used with the DATEDIFF function is as follows:
354
SQL Functions
Datetime Functions
date field name
Description
CENTURY
Century
YEAR
Year
QUARTER
Quarter
MONTH
Month
WEEK
Week
DAY
Day
HOUR
Hour
MINUTE
Minute
SECOND
Second
MICROSECOND
Microsecond
The DATEDIFF function only provides the specified range of results. If date_field_name is ‘MICROSECOND’, the difference between enddate and startdate should be 30 days or less. If it is ‘SECOND’,
the difference should be 68 years or less. If this range is exceeded, an error will occur.
It returns BIG INTEGER data type.
Examples
<Query> Get the difference between August 31, 2005 and November 30, 2005 in terms of months.
iSQL> SELECT DATEDIFF ('31-AUG-2005', '30-NOV-2005', 'MONTH') FROM dual;
DATEDIFF ('31-AUG-2005', '30-NOV-2005',
------------------------------------------3
1 row selected.
DATENAME
Syntax
DATENAME (date, date_field_name)
Description
Return a name in date_field_name for the specified date.
The following table shows date_field_name that can be used with the DATENAME function:
SQL Users’ Manual
355
Datetime Functions
Date Field Name
Description
MONTH
Month (full name)
MON
Month (abbreviated)
DAY
The day of a week (full name)
DY
The day of a week (abbreviated)
Output results for each date_field_name are as in the below. Depending on the case of
date_field_name, the result value is also output in upper or lower case letters.
•
MONTH
JANUARY, FEBRUARY, MARCH, APRIL, MAY, JUNE, JULY, AUGUST, SEPTEMBER, OCTOBER,
NOVEMBER, DECEMBER
•
MON
JAN, FEB, MAR, APR, MAY, JUN, JUL, AUG, SEP, OCT, NOV, DEC
•
DAY
SUNDAY, MONDAY, TUESDAY, WEDNESDAY, THURSDAY, FRIDAY, SATURDAY
•
DY
SUN, MON, TUE, WED, THU, FRI, SAT
Examples
<Query> Select the month of Dec. 28, 1980.
iSQL> SELECT DATENAME ('28-DEC-1980', 'Month') FROM dual;
DATENAME ('28-DEC-1980', 'Month')
------------------------------------December
1 row selected.
EXTRACT, DATEPART
Syntax
EXTRACT (date, date_field_name)
DATEPART (date, date_field_name)
Description
Return only the date_field_name part of the date input.
356
SQL Functions
Datetime Functions
Date Field Name
Description
CENTURY
Century
YEAR
Year
QUARTER
Quarter
MONTH
Month
WEEK
Indicates the week of an year. (For example, the period from
the 1st of Jan. to Saturday in that week is the first week of the
year.)
WEEKOFMONTH
Indicates the week of a month. (For example, the period from
the 1st to Saturday in that week is the first week of the month.)
DAY
Day
DAYOFYEAR
Indicates the day of an year.
DAYOFWEEK
Indicates the day of a week.(Sunday: 1)
HOUR
Hour
MINUTE
Minute
SECOND
Second
MICROSECOND
Microsecond
Examples
<Query> Find a quarter in which an employee named ‘KSKIM’ was hired.
iSQL> SELECT DATEPART (join_date, ‘QUARTER’) FROM employee WHERE ename =
‘KSKIM’;
DATEPART (join_date, ‘QUARTER’)
----------------------------------3
1 row selected.
MONTHS_BETWEEN
Syntax
MONTHS_BETWEEN (date1, date2)
Description
Return the result of subtraction between date1 and date2 in months. If date1 is less than date2, it
will return a negative number. If date1 and date2 are the same day in the same month, the same day
in different months or the last day in different months, it will return an integer. In this case, it will
SQL Users’ Manual
357
Datetime Functions
return an integer regardless of the type such as time, minute, second and microsecond.
If the returned value is not an integer, it is assumed that there are 31 days in a month and the fraction part is calculated by considering time, minute, second and microsecond.
It returns DOUBLE data type.
Examples
<Query> Get the difference between February 2, 1995 and January 1, 1995 in terms of months.
iSQL> SELECT MONTHS_BETWEEN (TO_DATE('02-02-1995','MM-DD-YYYY'), TO_DATE('0101-1995','MM-DD-YYYY') ) Months FROM DUAL;
MONTHS
------------------------1.03225806451613
1 row selected.
ROUND
Syntax
ROUND (date [, date_field_name])
Description
Return a date that is rounded based on the specified date_field_name. The default value of
date_field_name is ‘DAY’.
The following table shows date_field_name that can be used with the ROUND function:
Date Field Name
Description
CENTURY
Round to the next century, beginning at year 51.(A century
begins at year xxx1.)
YEAR
Round to the next year, beginning at July 1.
QUARTER
Round to the next quarter, beginning at day 16 of the second
month.
MONTH
Round to the next month, beginning at day 16.
WEEK
Round to the next Sunday, beginning at Thursday.
DAY
Round to the next day, beginning at PM 12:00.
HOUR
Round to the next hour, beginning at 30 minutes.
MINUTE
Round to the next minute, beginning at 30 seconds.
358
SQL Functions
Datetime Functions
Example
<Query> Round December 27, 1980 to YEAR and then output.
iSQL> SELECT ROUND ( TO_DATE('27-DEC-1980', 'DD-MON-YYYY'), 'YEAR') FROM
dual;
ROUND ( TO_DATE('27-DEC-1980', 'DD-MON-Y
------------------------------------------1981/01/01 00:00:00
1 row selected.
LAST_DAY
Syntax
LAST_DAY (date)
Description
LAST_DAY returns the date of the last day of the month that contains date. The return type is always
DATE, regardless of the datatype of date.
Examples
<Query> Display the last day of December.
iSQL> SELECT LAST_DAY(TO_DATE('15-DEC-2001')) FROM dual;
LAST_DAY(TO_DATE('15-DEC-2001'))
----------------------------------2001/12/31 00:00:00
1 row selected.
<Query> Display the latest date when an employee worked for a company.
iSQL> SELECT LAST_DAY(join_date ) FROM employee;
LAST_DAY(JOIN_DATE )
----------------------1999/11/30 00:00:00
2000/01/31 00:00:00
.
.
.
20 rows selected.
NEXT_DAY
Syntax
NEXT_DAY (date, char)
SQL Users’ Manual
359
Datetime Functions
Description
NEXT_DAY returns the date of the first weekday named by char that is later than the date date. The
return type is always DATE, regardless of the datatype of date.
The argument char must be a day of the week in the date language.
Examples
<Query> Display the hiring date of the employee, and the first Monday after employment.
iSQL> SELECT join_date, NEXT_DAY(join_date, 'SUNDAY') First_sunday FROM
employee;
JOIN_DATE
FIRST_SUNDAY
--------------------------------------------1999/11/18 00:00:00
2000/01/11 00:00:00
.
.
.
20 rows selected.
1999/11/21 00:00:00
2000/01/16 00:00:00
SYSDATE
Syntax
SYSDATE
Description
SYSDATE returns the current date and time set for the operating system on which the database
resides.
Examples
<Query> Display the system date.
iSQL> SELECT SYSDATE System_Date FROM dual;
SYSTEM_DATE
----------------------2005/01/20 09:49:33
1 row selected.
SYSTIMESTAMP
Syntax
SYSTIMESTAMP
360
SQL Functions
Datetime Functions
Description
Output the date in the current system. It is an alias of the SYSDATE function and does not support
time zones.
Example
<Query> Output the system date (current date).
iSQL> SELECT SYSTIMESTAMP
SYSTIMESTAMP
----------------------2005/01/20 09:49:33
1 row selected.
FROM dual;
TRUNC (date)
Syntax
TRUNC (date [, ‘fmt’])
Description
The TRUNC (date) function returns date with the time portion of the day truncated to the unit specified by the format model fmt.
All units except the corresponding fmt will be displayed as 0.
If you omit fmt, then date is truncated to the nearest day. Other data under the date will be returned
as 0.
Character string indicating in fmt
YEAR
MONTH
DAY
HOUR
MINUTE
SECOND
MICROSECOND
Examples
<Query> Returns the result when the system time is rounded off.
iSQL> SELECT TRUNC(SYSDATE) FROM DUAL;
SQL Users’ Manual
361
Datetime Functions
<Result>
TRUNC(SYSDATE)
----------------------2005/07/19 00:00:00
1 row selected.
<Query> Returns the result when the date is rounded off.
iSQL> SELECT TRUNC(TO_DATE('2005-JUL-19','YYYY-MON-DD'), 'YEAR') New_Year
FROM DUAL;
<Result>
NEW_YEAR
----------------------2005/00/00 00:00:00
1 row selected.
362
SQL Functions
Conversion Functions
Conversion Functions
Conversion functions convert a value from one data type to another.
TO_BIN
Syntax
TO_BIN (integer)
Description
Convert the given integer into binary. The integral number used in Altibase is basically is the decimal
number.
* The data format of the returned value is the character type, and can be used only in SELECT statement.
Examples
<Query> Convert the given value into binary.
iSQL> SELECT TO_BIN(1000) FROM dual;
TO_BIN(1000)
-----------------------------------1111101000
1 row selected.
BIN_TO_NUM
Syntax
BIN_TO_NUM (char)
Description
Convert a string argument consisting of 1’s and 0’s into a decimal number. It returns INTEGER data
type.
char can have up to 32 characters.
Example
<Query> Convert the given binary number to a decimal number.
iSQL> SELECT BIN_TO_NUM ('1010') FROM dual;
BIN_TO_NUM ('1010')
---------------------10
SQL Users’ Manual
363
Conversion Functions
1 row selected.
HEX_TO_NUM
Syntax
HEX_TO_NUM (char)
Description
Convert a string argument consisting of 0-9 and A-F into a decimal number. It returns INTEGER data
type.
char can have up to 8 characters.
Example
<Query> Convert the given hexadecimal number to a decimal number.
iSQL> SELECT HEX_TO_NUM ('1A') FROM dual;
HEX_TO_NUM ('1A')
-------------------26
1 row selected.
OCT_TO_NUM
Syntax
OCT_TO_NUM (char)
Description
Convert a string argument consisting of 0 -7 into a decimal number. It returns INTEGER data type.
char can have up to 11 characters.
Example
<Query> Convert the given octal number to a decimal number.
iSQL> SELECT OCT_TO_NUM ('71') FROM dual;
OCT_TO_NUM ('71')
-------------------57
1 row selected.
364
SQL Functions
Conversion Functions
TO_CHAR (datetime)
Syntax
TO_CHAR (datetime [, ‘fmt’])
Description
TO_CHAR (datetime) converts a datetime or interval value of DATE to a value of VARCHAR2 data type
in the format specified by the date format fmt.
Examples
<Query> Display the date started in YYYY-MM-DD HH:MI:SS format.
iSQL> SELECT ename, TO_CHAR(join_date, 'YYYY-MM-DD HH:MI:SS') Join_date FROM
employee;
ENAME JOIN_DATE
-----------------------------------------------SWNO
HJNO 1999-11-18 00:00:00
HSCHOI 2000-01-11 00:00:00
.
.
.
20 rows selected.
Datetime Formats
Please refer to Datetime Format Model for more information.
YYYY
4-digit year; 0 ~ 9999
RRRR
Round year; Accepts either 4-digit or 2-digit input. If 2-digit, provides the same return as RR. If you
do not want this functionality, then enter the 4-digit year.
YY
Last 2 digit year of 2000 ~ 2099
RR
Stores 20th century dates in the 21st century using only two digits. (1950 ~ 2049).
SQL Users’ Manual
365
Conversion Functions
MON
Abbreviated name of month; All upper-case such like JAN, FEB, etc
Mon
Abbreviated name of month; Only the first letter is upper-case such like Jan, Feb, etc.
mon
Abbreviated name of month; all letters are lower-case such like jan, feb, etc
MM
Month; 01 ~ 12 , JAN=01
D
Day of the week (1~7)
Start 1 from Sunday. Cannot be used to set a date
DD
Fay of a month (1 ~ 31)
DDD
Day of the year (1~366)
Cannot be used to set the date.
HH
Our of day (0 ~ 12)
HH24
Our of day (0 ~ 23)
MI
Minute (0 ~ 59)
SS
Second (0 ~ 59).
366
SQL Functions
Conversion Functions
SSSSSSSS
8-digits, Microsecond (0 ~ 59999999)
SSSSSS
6-digits,Microsecond (0 ~ 999999)
Note: [YYYY]: The number is regarded as the year.
'23-FEB-5' : 2-23-0005
'23-FEB-05' : 2-23-0005
'23-FEB-2005': 2-23-2005
'23-FEB-95' : 2-23-2095
[YY]: 2000 + YY
'23-FEB-5' : 2-23-2005
'23-FEB-05' : 2-23-2005
'23-FEB-2005': Error
'23-FEB-95' : 2-23-2095
'23-FEB-05' : 2-23-2005
'23-FEB-2005': Error
'23-FEB-95' : 2-23-2095
[RRRR]: 4-digit numbers are regarded as the year. When the number is less than 50, add 2000. when the
number is less than 100, add 1900.
'23-FEB-5' : 2-23-2005
'23-FEB-05' : 2-23-2005
'23-FEB-2005': 2-23-2005
'23-FEB-95' : 2-23-1995
'23-FEB-100' : 2-23-2000
'23-FEB-0005' 2-23-0005
[RR]: When the number is less than 50, add 2000. when the number is within 50 ~ 100, add 1900.
SQL Users’ Manual
367
Conversion Functions
'23-FEB-5' 2-23-2005
'23-FEB-05' 2-23-2005
'23-FEB-2005': Error
'23-FEB-95' : 2-23-1995
Examples
<Query> Using Date Formats
iSQL> CREATE TABLE timetbl(i1 INTEGER, t1 DATE, etc VARCHAR(10));
Create success.
iSQL> INSERT INTO timetbl VALUES (1, SYSDATE, 'Start');
1 row inserted.
iSQL> INSERT INTO timetbl VALUES (2, TO_DATE('2003-02-20 12:15:50', 'YYYY-MMDD HH:MI:SS'), 'The end');
1 row inserted.
iSQL> SELECT TO_CHAR(T1, 'YYYY YY MM MON Mon mon DD HH MI SS SSSSSS D DDD')
Date_format FROM timetbl WHERE I1 = 2;
DATE_FORMAT
-----------------------------------------------2003 03 02 FEB Feb feb 20 12 15 50 000000 5 051
1 row selected.
TO_CHAR (number)
Syntax
TO_CHAR (number)
Description
TO_CHAR (number) converts n to a value of VARCHAR2 datatype.
Examples
The following SQL statement converts the character string into a number to calculate it.
iSQL> SELECT TO_CHAR('01110' + 1) FROM dual;
TO_CHAR('01110' + 1)
-----------------------------------------------1111
1 row selected.
TO_DATE
Syntax
TO_DATE (char[, ‘fmt’ ])
368
SQL Functions
Conversion Functions
Description
TO_DATE converts CHAR, VARCHAR type characters into a value of datatype. fmt designates the date
format of char.
In case the datatype of year or month is not specified, the result of TO_DATE will be returned as the
year or month. For example, If the result of TO_DATE (TO_DATE (sysdate,'YYYY'),'YYYY') is ‘2005/08/24
17:32:34’, the result of TO_DATE will be ‘2005/08/01 00:00:00’.
If the datatype is not specified for TO_DATE, the current month will be the result value, and the day
and time will be ‘2nd day 00:00:00.’
Examples
<Query> Inserting sample data:
iSQL> INSERT INTO employee(eno, ename, gender, join_date) VALUES(22,
'MHJUNG', 'F', TO_DATE('2001-11-19 00:00:00', 'YYYY-MM-DD HH:MI:SS'));
1 row inserted.
<Query> Convert the column using TO_DATE:
iSQL>
select to_char(to_date(to_char(sysdate,'YYYY'),'YYYY'),'YYYYMMDD HH24:MI:SS'
) from dual; TO_CHAR(TO_DATE(TO_CHAR(SYSDATE,'YYYY'),
------------------------------------------- 20050801 00:00:00
1 row selected.
(SYSDATE = 2005/08/24 17:32:34)
TO_HEX
Syntax
TO_HEX (integer)
Description
Convert the given integer into hexadecimal. The integral number used in Altibase is basically is the
decimal number.
* The data format of the returned result is the character type, and can be used only in SELECT statement.
Examples
<Query> Convert the given value into hexadecimal.
iSQL> SELECT TO_HEX(1000) FROM dual;
TO_HEX(1000)
---------------3E8
1 row selected.
SQL Users’ Manual
369
Conversion Functions
TO_NUMBER
Syntax
TO_NUMBER (char [, number_fmt] )
Description
The TO_NUMBER function converts string char into a numeric data type. The user can specify the
desired numeric output format.
Examples
<Query> Convert string 10000.00 to a numeric data type and then output.
iSQL> UPDATE employee
SET salary = salary + TO_NUMBER( '10000.00')
WHERE ename = 'MSKIM';
1 row updated.
<Query> The following example shows that the given string is output in various numeric output formats.
iSQL> SELECT TO_NUMBER ( '0123.4500', '0990.9909' ) FROM dual;
TO_NUMBER ( '0123.4500', '0990.9909' )
----------------------------------------123.45
1 row selected.
iSQL> SELECT TO_NUMBER ( '$12,3.45-', '09,$0.00S' ) FROM dual;
TO_NUMBER ( '$12,3.45-', '09,$0.00S' )
-----------------------------------------123.45
1 row selected.
iSQL> SELECT TO_NUMBER ( '<$183.5>', '$9,000.0PR' ) FROM dual;
TO_NUMBER ( '<$183.5>', '$9,000.0PR' )
-----------------------------------------183.5
1 row selected
TO_OCT
Syntax
TO_OCT (integer)
Description
Convert the given integer into octal. The integral number used in Altibase is basically is the decimal
number.
* The data format of the returned result is the character type, and can be used only in SELECT state370
SQL Functions
Conversion Functions
ment.
Examples
<Query> Convert the given value into octal:
iSQL> SELECT TO_OCT(1000) FROM dual;
TO_OCT(1000)
---------------1750
1 row selected.
SQL Users’ Manual
371
Other Functions
Other Functions
CASE2
Syntax
CASE2 (expression1, result1,
[,expression2, result2,..,]
[, default])
Description
CASE2 returns the result when the expression is true. It returns the default when the expression is
false. If no default has been defined, null will be returned.
Example
<Query> Using CASE2 function:
iSQL> SELECT ename, emp_job, salary, CASE2(salary > 2000000, 'HIGH', salary <
1500000, 'LOW') Sal FROM employee;
ENAME
EMP_JOB
SALARY
SAL
-----------------------------------------------SWNO
CEO
HJNO
DESIGNER
1500000
HSCHOI
ENGINEER
2000000
KSKIM
ENGINEER
1800000
SJKIM
ENGINEER
2500000
HIGH
HYCHOI
PROGRAMMER
1700000
HJMIN
MANAGER
500000
LOW
.
.
.
20 rows selected.
CASE WHEN
Syntax
simple_case_expr
CASE
END
searched_case_expr
372
else_clause
SQL Functions
Other Functions
simple_case_expr
expr
WHEN
comparison_expr
THEN
return_expr
searched_case_expr
WHEN
condition
THEN
return_expr
else_clause
ELSE
else_expr
Description
You can use CASE WHEN syntax, which is the same function as CASE2 function. If expr is true,
return_expr values are returned, and if it is false, else_expr values are returned. Or if it is default,
NULL is returned. You can use simple_case_expr only if relation condition is equality operator(=),
and searched_case_expr enables you to use various relation operators like CASE2 function.
Example
<Query> If one value of the third character in C1 column is a, aaaaa is outputted. If it is b, bbbbb is
outputted and if it is c, ccccc is outputted.
iSQL> create table test (c1 char(10));
iSQL> insert into test values('abcdefghi');
iSQL> select CASE substring(c1,3,1)
WHEN 'a' THEN 'aaaaa'
WHEN 'b' THEN 'bbbbb'
WHEN 'c' THEN 'ccccc'
END
from test;
CASE SUBSTRING(C1,3,1)
------------------------ccccc
1 row selected.
SQL Users’ Manual
373
Other Functions
DECODE
Syntax
DECODE (expression, search1, result1,
[, search2, result2,..,]
[, default])
Description
DECODE compares expression to each search value one by one. If expression is equal to a search,
then Altibase returns the corresponding result. If no match is found, then Altibase returns default. If
default is omitted, then Altibase returns null.
Examples
<Query> If i is null, 1 or 2, convert NULL, ONE or TWO, respectively.
iSQL> CREATE TABLE t2(i NUMBER);
Create success.
iSQL> INSERT INTO t2 VALUES(NULL);
1 row inserted.
iSQL> INSERT INTO t2 VALUES(1);
1 row inserted.
iSQL> INSERT INTO t2 VALUES(2);
1 row inserted.
iSQL> INSERT INTO t2 VALUES(3);
1 row inserted.
iSQL> SELECT DECODE(i, NULL, 'NULL', 1, 'ONE', 2, 'TWO') Revised_i FROM t2;
REVISED_I
------------NULL
ONE
TWO
4 rows selected.
<Query> Increase the wage 10% if emp_job is engineer. Or increase by 12% for salesman and 20%
for the manager. For other cases, display the current wage of the employee.
iSQL> SELECT emp_job, salary,
DECODE(RTRIM(emp_job, ' '),
'ENGINEER', salary*1.1,
'SALESMAN', salary*1.12,
'MANAGER', salary*1.20,
salary) Revised_salary
FROM employee;
EMP_JOB
SALARY
REVISED_SALARY
-----------------------------------------------CEO
DESIGNER
1500000
1500000
ENGINEER
2000000
2200000
ENGINEER
1800000
1980000
ENGINEER
2500000
2750000
PROGRAMMER
1700000
1700000
MANAGER
500000
600000
374
SQL Functions
Other Functions
.
.
.
20 rows selected.
DIGEST
Syntax
DIGEST( expression1, algorithm_name )
Description
Use a public message digest algorithm to return a Varchar type string as the hash value of the given
string. The algorithm that is currently supported by Altibase4 is SHA-1.
Examples
<Query > Convert a certain column value in table Example into a string with the SHA-1 algorithm,
and output the string.
iSQL> SELECT DIGEST( ‘I am a boy.’ , ‘SHA-1’) FROM DUAL;
DIGEST(‘I am a boy.’, ‘SHA-1’)
-------------------------------------------A817613E0B781BBF01816F36A8B0DC7C98B2C0CC
1 ROW SELECTED. rows selected.
DUMP
Syntax
DUMP (expression)
Description
Analyze input data expression and display the information of the data it in ‘data, length, memory
content’ format.
Examples
<Query> Display three input data from the employee number and name.
iSQL> SELECT DUMP(eno) EMP_NUMBER, DUMP(ename) Name
FROM employee LIMIT 3;
EMP_NUMBER
-----------------------------------------------NAME
-----------------------------------------------Type=INTEGER Length=4: 0,0,0,1
Type=CHAR(ENGLISH) Length=22:
0,20,83,87,78,79,32,32,32,32,32,32,32,32,32,32,32,32,32,32,32,32
SQL Users’ Manual
375
Other Functions
Type=INTEGER Length=4: 0,0,0,2
Type=CHAR(ENGLISH) Length=22:
0,20,72,74,78,79,32,32,32,32,32,32,32,32,32,32,32,32,32,32,32,32
Type=INTEGER Length=4: 0,0,0,3
Type=CHAR(ENGLISH) Length=22:
0,20,72,83,67,72,79,73,32,32,32,32,32,32,32,32,32,32,32,32,32,32
3 rows selected.
GREATEST
Syntax
GREATEST (expressions)
Description
GREATEST returns the greatest of the list of one or more expressions. The return data type is VARCHAR.
Examples
<Query>
iSQL> SELECT GREATEST('HARRY', 'HARRIOT', 'HAROLD') Greatest FROM dual;
GREATEST
-----------HARRY
1 row selected.
LEAST
Syntax
LEAST (expressions)
Description
LEAST returns the least of the list of expressions. The return data type is VARCHAR.
Examples
<Query> Using LEAST function:
iSQL> SELECT LEAST('HARRY','HARRIOT','HAROLD') Least FROM dual;
LEAST
----------HAROLD
1 row selected.
376
SQL Functions
Other Functions
ROWNUM
Syntax
ROWNUM
Description
Return a pseudo record number (pseudo rownum BIGINT value) in the form of integer. The range of
return values is between 1 and the max value of BIGINT type.
Record numbers are assigned in the order of records in a table or joined view. However, they can be
reordered by using the ORDER BY, GROUP BY or HAVING clause.
It can be used in the SELECT statement. But it cannot be used with DML’s such as UPDATE and
DELETE.1
Example
<Query> Search records in the order of employee names, and output the employee number, name,
phone number and status of the first three employees.
iSQL> SELECT eno, ename, emp_tel, status FROM employee WHERE ROWNUM < 4 ORDER
BY ename;
ENO
ENAME
EMP_TEL
STATUS
----------------------------------------------------------1
EJJUNG
1195662365
R
2
HJNO
113654540
H
3
HSCHOI
162581369
H
3 rows selected.
NVL
Syntax
NVL (expression1, expression2)
Description
NVL lets you replace null with a string in the results of a query.
The arguments expression1 and expression2 should have same data type.
Example
<Query> Display the name and the wage of the employee. Display ‘Not’ if there is no wage data.
1.
UPDATE or DELETE clause can be used similarly to the ROWNUM with LIMIT clause. iSQL>
DELETE FROM employee LIMIT 1, 10 ;
SQL Users’ Manual
377
Other Functions
iSQL> SELECT ename, NVL(TO_CHAR(salary), 'NOT')
FROM employee;
ENAME
NVL(TO_CHAR(SALARY), 'NOT')
-----------------------------------------------SWNO
NOT
HJNO
1500000
HSCHOI 2000000
.
.
20 rows selected.
NVL2
Syntax
NVL2 (expression1, expression2, expression3)
Description
If expression1 is not NULL, NVL2 returns expression2, but if NULL, it returns expression3.
Examples
<Query> Display the name and the wage of the employee. If there are wage data, display 10%
increased wage. Otherwise, display ‘Not’.
iSQL> SELECT ename, salary, NVL2(TO_CHAR(salary), TO_CHAR(salary * 1.1),
'NOT') Nvl2_salary FROM employee;
ENAME
SALARY
------------------------------------NVL2_SALARY
-----------------------------------------------SWNO
NOT
HJNO
1500000
1650000
.
.
.
20 rows selected.
SENDMSG
Syntax
SENDMSG ( VARCHAR ipaddr,
INTEGER port,
VARCHAR msg,
INTEGER ttl )
378
SQL Functions
Other Functions
Description
Send a user message to the specified ip-address and port as a socket datagram. If a regular ipaddress is entered, a UDP datagram is sent. If a multicast ip-address is entered, a multicast datagram
is sent.
Except a scheduled multicast group, a multicast ip-address is limited to 225.0.0.0 - 238.0.0.255.
The port range is 1025-65535.
msg cannot exceed 2048 bytes.
ttl stands for TimeToLive and it limits the transfer range during multicast transfer as in the below. The
valid range is 0 – 255 and it is applied when a message is sent to a multicast ip-address.
TTL
Range
0
Limit to the inside of host, no output to interface.
1
Limit to the same subnet, no forwarding to router.
< 32
Limit to the same site, organization or department.
< 64
Limit to the same region.
< 128
Limit to the same continent.
< 255
Unlimited, worldwide.
It returns the length of the sent message (INTEGER).
Examples
<Query> Send a user message to a regular ip-address (ttl ignored).
iSQL> SELECT SENDMSG( '192.168.1.60', 12345, 'THIS IS MESSAGE', 1 ) FROM T1;
SENDMSG( '192.168.1.60', 12345, 'THIS IS
------------------------------------------15
1 row selected.
<Query> Send a user message to a multicast ip-address (ttl applied).
iSQL> SELECT SENDMSG( '226.0.0.37', 12345, 'THIS IS MESSAGE', 0 ) FROM T1;
SENDMSG( '192.168.1.60', 12345, 'THIS IS
------------------------------------------15
1 row selected.
SQL Users’ Manual
379
Other Functions
USER_ID
Syntax
USER_ID()
Description
Output the ID of the user connected. The data type is integer.
Example
<Query> View the table information of the current user.
iSQL> SELECT table_name FROM system_.sys_tables_ WHERE user_id = USER_ID();
TABLE_NAME
----------------------------------------T_CO
T_DEPT
T_EMP
3 rows selected.
USER_NAME
Syntax
USER_NAME()
Description
Output the name of the user connected. The data type is integer.
Example
<Query> View the name of the current user.
iSQL> SELECT user_name(), user_id() FROM dual;
USER_NAME
USER_ID
-------------------------------------SYS
2
1 row selected.
SESSION_ID
Syntax
SESSION_ID()
380
SQL Functions
Other Functions
Description
Output the session identifier of the connected user. The data type is integer.
Example
<Query> Print the client_NLS code of currently connected session.
iSQL> SELECT client_nls FROM v$session WHERE id = SESSION_ID();
CLIENT_NLS
-------------------------------------------US7ASCII
1 row selected.
Nested Functions
Description
The single row function can nested several times. The nested function calculates the data from
inside to outside.
Examples
<Query> display the date of the first Monday after the corresponding employee was hired by the
company.
iSQL> SELECT TO_CHAR(NEXT_DAY(ADD_MONTHS(join_date, 6), 'MONDAY'), 'DD-MonYYYY') Ater_six_months
FROM employee
ORDER BY join_date;
ATER_SIX_MONTHS
-----------------------------------------------22-May-2000
05-Jun-2000
19-Jun-2000
.
.
.
20 rows selected.
SQL Users’ Manual
381
Encryption Functions
Encryption Functions
Altibase provides functions that encrypt or decrypt the given string. The encryption/decryption
algorithm that is used by Altibase is Data Encryption Standard (DES).
The 8-byte block encryption algorithm that is used by Altibase is Cipher Block Chaining CBC.
DESENCRYPT
Syntax
DESENCRYPT ( varchar my_string , varchar key_string)
Description
my_string: Enter a string to encrypt. The length of the string should be a multiple of 8.
key_string: Enter a string for an encryption key. The minimum length of the key value is 8 and a
string after the 9th place is ignored.
Example
Please see the DESDENCRYPT example in the below:
DESDENCRYPT
Syntax
DESDECRYPT ( varchar encrypted_string , varchar key_string)
Description
encrypted_string: Enter a string to decrypt. The length of the string should be a multiple of 8.
key_string: Enter a string for an encryption key. The minimum length of the key value is 8 and a
string after the 9th place is ignored.
Caution: if an encrypted string is output to the screen, a terminal emulator error may occur.
Example1
After saving an encrypted text in a table, decrypt and output the text.
iSQL> create table t1( encrypted_string varchar(40) ); Create success.
1.
Encrypt and save.
iSQL> insert into t1 values( desencrypt( 'A4 ALTIBASE Corporation.',
382
SQL Functions
Encryption Functions
'altibase' ) );
1 row inserted.
2.
if an encrypted text is selected, it may become unrecognizable.
iSQL> select * from t1;
T1.ENCRYPTED_STRING
-------------------------------------------Z\uf900\u5b87\ub94c]\uffff\uffffu\uffffxE\uffffIXek\uffff
1 row selected.
3.
Decrypt the text with the same encryption key and output.
iSQL> select desdecrypt(encrypted_string, altibase') from t1;
DESDECRYPT(ENCRYPTED_STRING, altibase')
-------------------------------------------A4 ALTIBASE Corporation.
1 row selected.
Example2
Perform encryption and decryption by using PSM that does require a multiple of 8 and the length of
8 restrictions.
iSQL> create table t1( encrypted_string varchar(40) );
Create success.
1.
The length of the source text is not a multiple of 8, Therefore, an error will occur.
iSQL> insert into t1 values( desencrypt( Altibase Client Query utility.',
altibase' ) );
[ERR-2100D : Invalid length of the data type]
2.
The length of the source text is a multiple of 8 but the key length is shorter than 8. Therefore,
an error will occur.
iSQL> insert into t1 values( desencrypt( Altibase Client Query utility...', alti4' ) );
[ERR-2100D : Invalid length of the data type]
3.
Perform rpad by adjusting the length of the source text to a multiple of 8 and the key length to
8, and then encrypt the text.
iSQL> create or replace function my_encrypt( input_string in varchar(100), key_string in varchar(40) )
2 return varchar(100)
3 as
4 encrypted_string varchar(100);
5 pieces_of_eight INTEGER;
6 begin
7 pieces_of_eight := ((FLOOR(LENGTH(input_string)/8 + 9)) * 8);
8
9 encrypted_string := desencrypt( RPAD( input_string, pieces_of_eight),
10 RPAD( key_string, 8, #' ) );
11 return encrypted_string;
12 end;
13 /
Create success.
4.
Perform rpad by adjusting the key length to 8, and decrypt the text. Then, trim the decrypted
text.
SQL Users’ Manual
383
Encryption Functions
iSQL> create or replace function my_decrypt( input_string in varchar(100), key_string in varchar(40) )
2 return varchar(100)
3 as
4 decrypted_string varchar(100);
5 begin
6 decrypted_string = desdecrypt( input_string,
7 RPAD( key_string, 8, '#') );
8
9 return trim(decrypted_string);
10 end;
11 /
Create success.
5.
The length of the source text is not a multiple of 8. After encrypting the source text with the
my_encrypt function, save the encrypted text.
iSQL> insert into t1 values( my_encrypt( 'Altibase Client Query utility.', 'altibase' ) );
1 row inserted.
6.
Decrypt the source text with the my_decrypt function.
iSQL> select my_decrypt( encrypted_string, 'altibase' ) from t1;
MY_DECRYPT( ENCRYPTED_STRING, 'altibase'
-----------------------------------------------------------------------------------------Altibase Client Query utility.
1 row selected.
iSQL> delete from t1;
1 row deleted.
7.
The key length is 8. After encrypting the source text with the my_encrypt function, save the
encrypted text.
iSQL> insert into t1 values( my_encrypt( 'Altibase Client Query utility...', 'alti4' ) );
1 row inserted.
8.
Decrypt the source text with the my_decrypt function .
iSQL> select my_decrypt( encrypted_string, 'alti4' ) from t1;
MY_DECRYPT( ENCRYPTED_STRING, 'alti4' )
-----------------------------------------------Altibase Client Query utility...
1 row selected.
384
SQL Functions
Encryption Functions
SQL Users’ Manual
385
8 Arithmetic Operators
386
Arithmetic Operators
Arithmetic Operators
Arithmetic Operators
Arithmetic operators are used for arguments to negate, add, subtract, multiply, and divide numeric
values. Some of these operators are also used in date arithmetic. The arguments to the operator
must resolve to numeric data types or to any data type that can be implicitly converted to a numeric
data type.
The Type of Arithmetic Operators
Followings list brief descriptions of arithmetic operators which are supported by Altibase.
Operator
Description
Unary operator(+)
Explicitly specifies a positive number.
Unary operator(-)
Reverses the symbol of the input number.
Four fundamental rules operator
The number and the calculation result of the number
Concatenation Operator
Combine the two character strings
SQL Users’ Manual
387
Unary Operators
Unary Operators
Positive Number Expression
Syntax
+ number
Description
When these denote a positive expression
Negative Number Expression
Syntax
- number
Description
When these denote a negative expression
388
Arithmetic Operators
Binary Operations
Binary Operations
Addtion
Syntax
number1 + number2
Description
To add number1 and number2
Subtraction
Syntax
number1 - number2
Description
To subtract number2 from number1
Multiplication
Syntax
number1 x number2
Description
To multiply number1 by number2
Division
Syntax
number1 / number2
Description
To divide number1 by number2.
SQL Users’ Manual
389
Binary Operations
Datetime Arithmetic
Syntax
date
date
date
date
date
date
[
–
[
[
[
[
+ | date
+ | + | + | + | -
] number
]
]
]
]
day (After/Before i day: i)
hour (After/Before i hour: i/24) )
minute (After/Before i minute: i/(24*60) )
second (After/Before i second: i/(24*60*60))
Description
Date + Number = Date: Add the number of days to the date.
Date - Number = Date: Subtract the number of days from the date.
Date – Date = The number of days: Subtract one date from the other date.
Date + The number of days = Date: Add the number of days to the date.
Date - The number of days = Date: Subtract the number of days from the date.
Date + Hour = Date: Add the hour to the date.
Date - Hour = Date: Subtract the hour from the date.
Date + Minute = Date: Add the minute to the date.
Date - Minute = Date: Subtract the minute from the date.
Date + Second = Date: Add the second to the date.
Date - Second = Date: Subtract the second from the date.
Examples
<Query> Display names and the number of working weeks of all employees in department A001:
iSQL> SELECT ename, (SYSDATE-join_date)/7 Weeks
FROM employee
WHERE dno = BYTE'A001';
ENAME
WEEKS
------------------------------------HYCHOI
227.772775
HJMIN
260.487061
YHBAE
263.201346
3 rows selected.
<Query> Display 10 minutes later from the current time:
iSQL> SELECT SYSDATE + (10/(24*60)) After_10minutes FROM dual;
AFTER_10MINUTES
----------------------2005/01/20 09:59:34
1 row selected.
390
Arithmetic Operators
Concatenation Operator
Concatenation Operator
Syntax
char1 || char2
Description
The concatenation operator manipulates character strings.
Examples
<Query> Insert ‘is a’ between the employee name and the position and display it as a column.
iSQL> SELECT ename || ' is a ' || emp_job Concatenation
FROM employee;
CONCATENATION
--------------------------------------------SWNO is a CEO
HJNO is a DESIGNER
HSCHOI is a ENGINEER
.
.
.
20 rows selected.
SQL Users’ Manual
391
CAST Operator
CAST Operator
Syntax
CAST (expression AS data_type)
Description
Convert the type of expression to the given data_type. (All types except blob and clob types are supported.)
Example
<Query> Convert a string value to a double type.
iSQL> SELECT CAST(‘3.14159265359’ AS DOUBLE) PI FROM dual;
PI
------------------------3.14159265359
1 row selected.
392
Arithmetic Operators
CAST Operator
SQL Users’ Manual
393
9 SQL Conditions
394
SQL Conditions
SQL Conditions
SQL Conditions
A condition specifies a combination of one or more expressions and logical (Boolean) operators and
returns a value of TRUE, FALSE, or UNKNOWN.
You must use appropriate condition syntax whenever condition appears in SQL statements.
You can use a condition in the WHERE clause of these statements:
•
DELETE
•
SELECT
•
UPDATE
You can use a condition in any of these clauses of the SELECT statement:
•
WHERE
•
START WITH
•
CONNECT BY
•
HAVING
The sections that follow describe the various forms of conditions.
Logical Conditions
A logical condition combines the results of two component conditions to produce a single result
based on them or to invert the result of a single condition. This table lists logical conditions.
Local operators
Description
NOT
Returns TRUE if the following condition is FALSE. Returns FALSE if it is
TRUE. If it is UNKNOWN, then it remains UNKNOWN.
AND
Returns TRUE if both component conditions are TRUE. Returns FALSE
if either is FALSE.Otherwise returns UNKNOWN.
OR
Returns TRUE if either component condition is TRUE. Returns FALSE if
both are FALSE. Otherwise returns UNKNOWN.
Unary Comparision Conditions
The following shows brief description and types of unary comparison which frequently used in SQL
statements.
SQL Users’ Manual
395
SQL Conditions
Unary comparison area
Description
BETWEEN condition
The BETEEN conditions is a range condition tests for inclusion in a
range.
IN condition
An IN condition is a membership condition. It tests a value for membership in alist of values or subquery
LIKE condition
The LIKE conditions specify a test involving pattern matching.
NULL condition
A NULL condition tests for nulls. This is the only condition that you
should use to test for nulls.
EXISTS condition
An EXISTS condition tests for existence of rows in a subquery.
UNIQUE Predicate
Checks if the result of the subquery is only one record.
396
SQL Conditions
Logical Conditions
Logical Conditions
NOT
Syntax
NOT condition
Description
Returns TRUE if the following condition is FALSE.
Returns FALSE if it is TRUE.
This is a NOT Truth Table:
Condition
Result
TRUE
FALSE
FALSE
TRUE
UNKNOWN
UNKNOWN
Examples
<Query> Display names, departments, and birth dates of employee whose birth dates are not in the
second half (June 30.)
iSQL> SELECT ename, dno, birth
FROM employee
WHERE NOT birth < BYTE'0630';
ENAME
DNO
BIRTH
--------------------------------------HJNO
C002
1219
KSKIM
D001
0730
HYCHOI
A001
0822
JDLEE
D001
0726
KWKIM
C001
1102
DIKIM
C002
1026
6 rows selected.
AND
Syntax
condition1 AND condition2
Description
Returns TRUE if both component conditions are TRUE. Returns
SQL Users’ Manual
397
Logical Conditions
FALSE if either is FALSE. Otherwise returns UNKNOWN.
This is a AND Truth Table:
Condition1
Condition2
TRUE
FALSE
UNKNOWN
TRUE
TRUE
FALSE
UNKNOWN
FALSE
FALSE
FALSE
FALSE
UNKNOWN
UNKNOWN
FALSE
UNKNOWN
Examples
<Query> Display names, wages, and the hired dates of engineers whose wage is 2 million won or
more.
iSQL> SELECT ename, salary, join_date
FROM employee
WHERE emp_job = 'ENGINEER' AND salary >= 2000000;
ENAME
SALARY
JOIN_DATE
-----------------------------------------------HSCHOI
2000000
2000/01/11 00:00:00
SJKIM
2500000
1999/12/20 00:00:00
2 rows selected.
OR
Syntax
condition1 OR condition2
Description
Returns TRUE if either component condition is TRUE. Returns FALSE if both are FALSE. Otherwise
returns UNKNOWN.
This is an OR Truth Table:
Condition1
Condition2
TRUE
FALSE
UNKNOWN
TRUE
TRUE
TRUE
TRUE
FALSE
TRUE
FALSE
UNKNOWN
UNKNOWN
TRUE
UNKNOWN
UNKNOWN
398
SQL Conditions
Logical Conditions
Examples
<Query> Display the data of which inventory is more 20000 or more and of which unit price is
100000 or more.
iSQL> SELECT *
FROM goods
WHERE stock > 20000 OR price >= 100000;
GOODS.GNO
GOODS.GNAME
GOODS.GOODS_LOCATION
-----------------------------------------------GOODS.PRICE
-------------C111100001
IT-U950
FA0001
7820.55
D111100008
TM-U200
AC0006
10000
E111100004
M-190G
CE0001
5638.76
E111100012
M-U420
CE0003
3566.78
F111100001
AU-100
AC0010
100000
5 rows selected.
SQL Users’ Manual
399
GOODS.STOCK
35000
61000
88000
43200
10000
Simple Comparison Conditions
Simple Comparison Conditions
Syntax
simple_comparison_condition ::=
=
!=
<>
expr
expr
>
subquery
(
)
<
>=
<=
=
(
expr
,
)
!=
(
subquery
)
<>
Description
Comparison is made according to the comparison operator. Two conditions on both sides will be
compared, and the comparison result will be displayed.
Conditional clause to compare the size and the state of two expressions on both sides.
If there are two or more expressions on the left, the number of expressions on the left and the number of expressions of the subquery target list must be the same.
The result of the subquery on the right must be one record.
400
SQL Conditions
Simple Comparison Conditions
Examples
<Query> Display the name, quantity, unit cost, and inventory price of a product of which inventory
amount is 100 million won or more. The inventory amount is the kept quantity multiplied by the
cost.
iSQL> SELECT gname, stock, price, stock*price stock_price
FROM goods
WHERE stock*price > 100000000;
GNAME
STOCK
PRICE
STOCK_PRICE
-----------------------------------------------IT-U950
35000
7820.55
273719250
TM-T88
10000
72000
720000000
TM-U950
8000
96200
769600000
.
.
.
11 rows selected.
SQL Users’ Manual
401
Other Conditions
Other Conditions
BETWEEN
Syntax
between_condition ::=
expr
BETWEEN
expr
AND
expr
NOT
Description
Checks whether the data are within a certain range.
‘column1 between x1 and x2’ is logically same with ‘column1 >= x1 and column1 <= x2’.
Examples
<Query> Display the name, storage quantity, unit cost, and inventory prices of the product of which
inventory amount is between 1 million won and 10 million won. The inventory amount is the kept
quantity multiplied by the cost.
iSQL> SELECT gname, stock, price, stock*price stock_price
FROM goods
WHERE stock*price BETWEEN 1000000 AND 10000000;
GNAME
STOCK
PRICE
STOCK_PRICE
-----------------------------------------------IM-310
100
98000
9800000
IT-U200
1000
9455.21
9455210
M-T245
900
2290.54
2061486
M-180
1000
2300.55
2300550
M-T153
900
2338.62
2104758
M-T102
7890
966.99
7629551.1
M-T500
5000
1000.54
5002700
7 rows selected.
402
SQL Conditions
Other Conditions
IN
Syntax
in_condition ::=
expr
expr
IN
NOT
subquery
(
)
expr
(
(
expr
)
IN
)
,
(
)
NOT
,
(
subquery
)
,
Description
In condition is same as ‘=Any’ predicate. Checks whether the expression on the left matches any
expression on the right expression.
Not In condition is same as ‘!= ALL’ predicate. Checks whether the expression on the left matches any
expression on the right expression.
Examples
<Query> Display names, operations, telephone numbers, and hiring dates of the staff in the application team and the marketing team.
iSQL> SELECT ename, emp_job, emp_tel, join_date
FROM employee
WHERE dno IN (BYTE'A001', BYTE'C001');
ENAME
EMP_JOB
EMP_TEL
-----------------------------------------------JOIN_DATE
----------------------HYCHOI
PROGRAMMER
0197853222
2000/09/09 00:00:00
HJMIN
MANAGER
0175221002
2000/01/24 00:00:00
YHBAE
PROGRAMMER
0167452000
2000/01/05 00:00:00
MSKIM
WEBMASTER
0114553206
2000/04/28 00:00:00
KWKIM
CEO
0187636550
SQL Users’ Manual
403
Other Conditions
JHSEOUNG
WEBMASTER
01195568840
6 rows selected.
Where clause in the above SQL statement means WHERE DNO = BYTE'A001' or DNO = BYTE'C001'.
<Query> Retrieve the name of the customer who ordered the product, C111100001.
iSQL> SELECT DISTINCT customer.cname
FROM customer
WHERE customer.cno IN
(SELECT orders.cno
FROM orders
WHERE orders.gno = BYTE'C111100001');
CNAME
-----------------------YSKIM
DKKIM
IJLEE
CHLEE
4 rows selected.
LIKE
Syntax
like_condition ::=
expr
LIKE
expr
NOT
ESCAPE
'
indexdesc_hint
'
Description
The LIKE conditions specify a test involving pattern matching Whereas the equality operator (=)
exactly matches one character value to another, the LIKE conditions match a portion of one character value to another by searching the first value for the pattern specified by the second. LIKE calculates strings using characters as defined by the input character set. LIKEC uses Unicode complete
characters.
The character _ matches any single character. Any character canfollow ESCAPE except percent (%)
and underbars (_).
404
SQL Conditions
Other Conditions
Examples
<Query> Display employee numbers, names, department numbers, and telephone numbers of the
employees whose family names are LEE.
iSQL> SELECT eno, ename, dno, emp_tel
FROM employee
WHERE ename LIKE '%LEE%';
ENO
ENAME
DNO
EMP_TEL
-----------------------------------------------8
JDLEE
D001
0178829663
9
KMLEE
C002
0165293668
12
MYLEE
F001
0174562330
18
CHLEE
C002
01755231044
4 rows selected.
<Query> Retrieve all the rows of all departments with the under line (_).
iSQL> INSERT INTO department VALUES(BYTE'F002', 'HEAD_QUARTERS', 'YOUIDO',
100);
1 row inserted.
iSQL> SELECT * FROM department
WHERE dname LIKE '%\_%' ESCAPE '\';
DEPARTMENT.DNO DEPARTMENT.DNAME DEPARTMENT.DEP_LOCATION DEPARTMENT.MGR_NO
-----------------------------------------------F002
HEAD_QUARTERS
YOUIDO
100
1 row selected.
Escape option identifies using escape characters ( \ ). In this pattern, the escape character is before
the under line (_) so that Altibase interprets the under line as literal.
<Query> Display names of all employees of which name has ‘S’ in the names.
iSQL> SELECT ename
FROM employee
WHERE ename LIKE '_S%';
ENAME
-----------------------HSCHOI
KSKIM
MSKIM
3 rows selected.
SQL Users’ Manual
405
Other Conditions
IS (NOT) NULL
Syntax
null_condition ::=
expr
IS
NULL
NOT
Description
Checks if the expression is or is not NULL.
Examples
<Query> Display the employee numbers, names, and operations of the employees whose birth
dates have not been inputted.
iSQL> SELECT eno, ename, emp_job
FROM employee
WHERE salary IS NULL;
ENO
ENAME
EMP_JOB
-----------------------------------------------1
SWNO
CEO
8
JDLEE
MANAGER
20
DIKIM
SALESMAN
3 rows selected.
406
SQL Conditions
Other Conditions
EXISTS
Syntax
exists_condition ::=
EXISTS
subquery
(
)
Description
Check if there is at least one result of the subquery.
In case at least one exists, TRUE will be returned.
Examples
<Query> Display the customer numbers who ordered at least on product.
iSQL> SELECT DISTINCT cno
FROM orders a
WHERE EXISTS
(SELECT *
FROM orders b
WHERE a.cno = b.cno
AND NOT(a.gno = b.gno));
CNO
-----------------771215-1345471
761012-1220475
750625-1122143
740508-1332014
731231-1515123
730828-1201145
711111-1431202
700101-1001001
690209-1234567
9 rows selected.
<Query> Retrieve the name of the customer who ordered all products. The last query searches the
products ordered by the customers in the order table. The middle part searches products not
ordered by the customer. If there is no product that is not ordered, the customer's name will be displayed.
SQL Users’ Manual
407
Other Conditions
iSQL> SELECT customer.cname
FROM customer
WHERE NOT EXISTS
(SELECT *
FROM goods
WHERE NOT EXISTS
(SELECT *
FROM orders
WHERE orders.cno = customer.cno
AND orders.gno = goods.gno));
CNAME
-----------------------No rows selected.
UNIQUE
Syntax
unique_condition ::=
UNIQUE
subquery
(
)
Description
UNIQUE checks if the result of the subquery is unique
Examples
<Query> If there is only one employee named ‘CHLEE’, display the employee's name.
iSQL> SELECT ename
FROM employee
WHERE UNIQUE
(SELECT *
FROM employee
WHERE ename = 'CHLEE');
ENAME
-----------------------SWNO
HJNO
HSCHOI
.
408
SQL Conditions
Other Conditions
.
.
20 rows selected.
<Query> Retrieve the employee name with only one female customer.
iSQL> SELECT ename
FROM employee
WHERE UNIQUE
(SELECT *
FROM customer
WHERE GENDER = 'F');
ENAME
-----------------------No rows selected.
Result Comparison Conditions
Syntax
group_comparison_condition ::=
=
!=
expr
<>
ANY
>
SOME
(
)
,
ALL
<
expr
subquery
(
)
>=
<=
=
(
expr
,
)
!=
<>
SOME
ALL
expr
(
ANY
,
(
(
subquery
,
SQL Users’ Manual
409
)
)
)
Other Conditions
Description
•
ANY / SOME
Returns true if one or more values is satisfactory upon comparison with the expression or subquery result.
•
ALL
Returns true if all values are satisfactory upon comparison with the expression or subquery.
Examples
<Query> Display the numbers, dates, and status of the orders that an employee whose family name
is Lee received for 60 days after being hired.
iSQL> SELECT ono, order_date, processing
FROM orders
WHERE order_date < ANY
(SELECT (join_date+60)
FROM employee
WHERE ename LIKE '%LEE%');
ONO
ORDER_DATE
PROCESSING
-----------------------------------------------0011290007
2000/11/29 00:00:00
C
0011290011
2000/11/29 00:00:00
D
0011290100
2000/11/29 00:00:00
D
0012100277
2000/12/10 00:00:00
C
0012300001
2000/12/01 00:00:00
P
rows selected.
410
SQL Conditions
Other Conditions
SQL Users’ Manual
411
Information about Example Tables
Appendix A. Schema
This appendix includes schema and data for examples used in the manual.
Information about Example Tables
Script Files
Schema creation file:
Provided as $ALTIABSE_HOME/sample/schema.sql.
This file creates the tables used in the manual and inserts the new example data.
Therefore, to execute the examples in this manual, follow the provided files and practice exercises.
Schema
Purpose: Managing Customers and Orders
Table: employee, department, customer, order, product
Employee Table
Basic Key: Employee Number (eno)
Record Size: 20
Column Name
Data Type
Description
Others
eno
INTEGER
Employee Number
Primary Key
ename
CHAR(20)
Employee Name
NOT NULL
emp_job
CHAR(15)
Title
NULL
emp_tel
NIBBLE(15)
Tel. No.
NULL
dno
BYTE(2)
Department No.
NULL, INDEX, ASC
salary
NUMBER(10,2)
Monthly Salary
NULL,DEFAULT 0
gender
CHAR(1)
Gender
NOT NULL,'M' or
'F',DEFAULT 'M'
birth
BYTE(2)
Birthday
NULL
412
Schema
Information about Example Tables
Column Name
Data Type
Description
Others
join_date
DATE
Employment Date
NULL
status
CHAR(1)
Position
DEFAULT 'H'
Department Table
Basic Key: Department Name (dno)
Record Size: 5
Column Name
Data Type
Description
Others
dno
BYTE(2)
Department No.
Primary Key
dname
CHAR(20)
Department Name
NOT NULL
dep_location
CHAR(9)
Department Location
NULL
mgr_no
INTEGER
Administrator No.
NULL,BTREE INDEX, ASC
Customer Table
Basic Key: Resident Registration No. (cno)
Record Size: 20
Column Name
Data Type
Description
Others
Cno
CHAR(14)
Resident Registration
No.
Primary Key
cname
CHAR(20)
Customer Name
NOT NULL
cus_job
CHAR(20)
Occupation
NULL
cus_tel
NIBBLE(15)
Tel. No.
NOT NULL
gender
CHAR(1)
Gender
NOT NULL,‘M’ or
‘F’,DEFAULT ‘M’
Birth
BYTE(2)
Birthday
NULL
Post
BYTE(3)
Postal Code
NULL
address
CHAR(60)
Address
NULL
SQL User’s Manual
413
Information about Example Tables
Orders Table
Basic Key: Ordering Date + Order No. (ono, order_date)
Record Size: 30
Column Name
Data Type
Description
Others
Ono
NIBBLE(10)
Order No.
Primary Key
order_date
DATE
Order Date
Primary Key
eno
INTEGER
Sales Clerk
NOT NULL,BTREE INDEX,
ASC
Cno
CHAR(14)
Customer's Resident
Registration No.
NOT NULL,BTREE INDEX,
DESC
Gno
BYTE(5)
Product No.
NOT NULL,INDEX, ASC
Qty
INTEGER
Order Quantity
NULL,DEFAULT 1
arrival_date
DATE
Expected Arrival Date
NULL
Processing
CHAR(1)
Order Status
NULL,
O: ORDER,
R: PREPARE,
D: DELIVERY,
C: COMPLETE,
DEFALT 'O'?
Goods Table
Basic Key: Product No. (gno)
Record Size: 30
Column Name
Data Type
Description
Others
Gno
BYTE(5)
Product No.
Primary Key
Gname
CHAR(20)
Product Name
NOT NULL,Unique
goods_location
CHAR(9)
Storage
NULL
Stock
INTEGER
Stored Quantity
NULL, DEFAULT 0
Price
NUMERIC(10,2)
Cost
NULL
Dual Table
Record Size: 1
414
Schema
Information about Example Tables
Column Name
x
SQL User’s Manual
Data Type
Description
CHAR(1)
415
Others
E-R Diagram and Sample Data
E-R Diagram and Sample Data
E-R Diagram
dep_location
dno
DEPARTMENT
1
dname
mgr_no
WORKS_FOR
emp_tel
ename
N
salary
eno
EMPLOYEE
emp_job
birth
join_date
N
sex
status
dno
TAKE_ORDERS
cno
eno
ono
order _date
ORDERS
processing
N
qty
arrival _date
N
gno
ORDER_FOR
birth
sex
M
ORDER_GOODS
price
cus_tel
cno
CUSTOMER
M
goods _location
gno
GOODS
post
cus_job
stock
gname
cname
address
416
Schema
E-R Diagram and Sample Data
Sample Data
Employee Table
iSQL> SELECT * FROM employee;
EMPLOYEE.ENO
EMPLOYEE.ENAME
EMPLOYEE.EMP_JOB
EMPLOYEE.EMP_TEL
---------------------------------------------------------------------------EMPLOYEE.DNO
EMPLOYEE.SALARY
EMPLOYEE.GENDER
EMPLOYEE.BIRTH
----------------------------------------------------------------EMPLOYEE.JOIN_DATE EMPLOYEE.STATUS
----------------------------------------1
SWNO
CEO
01195662365
M
R
2
HJNO
DESIGNER
0113654540
C002
1500000
F
1219
1999/11/18 00:00:00 H
3
HSCHOI
ENGINEER
0162581369
D001
2000000
M
0226
2000/01/11 00:00:00 H
4
KSKIM
ENGINEER
0182563984
D001
1800000
M
0730
H
5
SJKIM
ENGINEER
01145582310
D001
2500000
M
1999/12/20 00:00:00 H
6
HYCHOI
PROGRAMMER
0197853222
A001
1700000
M
0822
2000/09/09 00:00:00 H
7
HJMIN
MANAGER
0175221002
A001
500000
M
0417
2000/01/24 00:00:00 H
8
JDLEE
MANAGER
0178829663
D001
M
0726
1999/11/29 00:00:00 H
9
KMLEE
PLANER
0165293668
C002
1200000
M
0102
2000/06/14 00:00:00 H
10
YHBAE
PROGRAMMER
0167452000
A001
4000000
F
0213
2000/01/05 00:00:00 H
11
MSKIM
WEBMASTER
0114553206
C001
2750000
M
2000/04/28 00:00:00 H
12
MYLEE
SALESMAN
0174562330
F001
1890000
F
0211
1999/12/14 00:00:00 H
13
KWKIM
CEO
0187636550
C001
980000
M
1102
H
14
KCJUNG
CEO
0197664120
D001
2003000
M
H
15
JHSEOUNG
WEBMASTER
01195568840
C001
1000000
M
0514
H
16
JHCHOI
DESIGNER
0195562100
C002
2300000
F
0509
H
17
DIKIM
CEO
0165293886
C002
1400000
M
1026
2000/05/07 00:00:00 H
SQL User’s Manual
417
E-R Diagram and Sample Data
18
CHLEE
C002
1900000
2000/10/30 00:00:00 H
19
KMKIM
F001
1800000
2000/11/18 00:00:00 H
20
DIKIM
F001
2000/11/18 00:00:00 H
selected row count [20]
PLANER
M
01755231044
SALESMAN
M
0185698550
SALESMAN
M
01154112366
Department Table
iSQL> SELECT * FROM department;
DEPARTMENT.DNO DEPARTMENT.DNAME DEPARTMENT.DEP_LOCATION DEPARTMENT.MGR_NO
---------------------------------------------------------------------------A001
Applied Technology Team
Mapo
1
D001
Engine Development Team
Yeoido
10
C001
Marketing Team
Gangnam
9
C002
Planning and Management Team
Gangnam
15
F001
Sales Team
Shinchon
9
5 rows selected
Customer Table
iSQL> SELECT * FROM customer;
CUSTOMER.CNO
CUSTOMER.CNAME
CUSTOMER.CUS_JOB
---------------------------------------------------------------CUSTOMER.CUS_TEL
CUSTOMER.GENDER
CUSTOMER.BIRTH
CUSTOMER.POST
---------------------------------------------------------------------------CUSTOMER.ADDRESS
---------------------------------------------------------------730828-1201145
CHLEE
ENGINEER
0514685282
M
0828
601033
Busan Dong-gu Sujeong 3
771215-1345471
YSKIM
DOCTOR
023242121
M
1215
121011
Ahyeon 1 Mapo-gu Seoul
711111-1431202
DJKIM
DESIGNER
023442542
M
1111
135010
Nonhyeon-dong Gangnam-gu Seoul
720305-2101114
JHPARK
ENGINEER
022326393
F
0305
121758
Jeil Building Gongdeok 2-dong Mapo-gu Seoul
761012-1220475
BSYOUN
WEBMASTER
0233452141
M
1012
121021
Gongdeok 1 Mapo-gu Seoul
690209-1234567
IJLEE
WEBPD
025743215
M
0209
136751
Hanshin Apartment Donam 2-dong Seongbuk-gu Seoul
731225-2402221
JHCHOI
PLANER
023143366
F
1225
156772
Geukdong Apartment Sadang 2-dong Dongjak-gu Seoul
730801-1101115
HYCHOI
PD
024721114
M
0801
135747
Seongdo Building Shinsa-dong Gangnam-gu Seoul
600211-2417214
MYLEE
DESIGNER
0512543734
F
0211
600033
Gwangbok 3-dong Jung-gu Busan
620815-1724174
KSKIM
0516232256
M
0815
608703
Busan Vehicle Registration Office Daeyeon 3-dong Namgu Busan
418
Schema
E-R Diagram and Sample Data
700101-1001001
LSPARK
MANAGER
027664545
M
0101
142704
Pauline Order Mia 1-dong Gangbuk-gu Seoul
670905-2101013
DHCHO
BANKER
023343214
F
0905
152761
Guro Jugong Apartment Guro 1-dong Guro-gu Seoul
791230-2114547
YDPARK
ENGINEER
022320119
F
1230
153600
Seoul Guro Post Office Geumcheon-gu Seoul
740508-1332014
DHKIM
BANKER
024720112
M
0508
135740
Gangnam Hospital Samsung 1-dong Gangnam-gu Seoul
750625-1122143
DKKIM
MANAGER
0518064398
M
0625
606796
Korea Maritime University Dongsam 2-dong Yeongdo-gu Busan
781225-1333044
SMCHO
PLANER
027544147
M
1225
157703
Gangseo Medical Insurance Union Hwagok 6-dong Ganeseo-gu Seoul
761001-1000001
JHKIM
023543541
M
1001
157717
Armed Forces Capital Hospital Deungchon 2-dong Gangseo-gu Seoul
740419-2146506
JHKIM
ENGINEER
024560207
F
0419
138701
Garak Farm Market Garak 1-dong Songpa-gu Seoul
731231-1515123
DJKIM
022371234
M
1231
138742
Seoul Transportation Building Shincheon Songpa-gu Seoul
700405-2321123
DKHAN
WEBMASTER
024560002
F
0405
135757
KOEX Building Samsung 1-dong Gangnam-gu Seoul
20 rows selected.
Order Table
iSQL> SELECT * FROM orders;
ORDERS.ONO
ORDERS.ORDER_DATE
ORDERS.ENO
ORDERS.CNO
---------------------------------------------------------------------------ORDERS.GNO
ORDERS.QTY
ORDERS.ARRIVAL_DATE
ORDERS.PROCESSING
--------------------------------------------------------------------0011290007
2000/11/29 00:00:00 12
711111-1431202
A111100002
70
2000/12/02 00:00:00
C
0011290011
2000/11/29 00:00:00 12
761001-1000001
E111100001
1000
2000/12/05 00:00:00
D
0011290100
2000/11/29 00:00:00 19
700101-1001001
E111100001
500
2000/12/07 00:00:00
D
0012100277
2000/12/10 00:00:00 19
761012-1220475
D111100008
2500
2000/12/12 00:00:00
C
0012300001
2000/12/01 00:00:00 19
730828-1201145
D111100004
1000
2001/01/02 00:00:00
P
0012300002
2000/12/29 00:00:00 12
771215-1345471
C111100001
300
2001/01/02 00:00:00
P
0012300003
2000/12/29 00:00:00 20
740508-1332014
E111100002
900
2001/01/02 00:00:00
P
0012300004
2000/12/30 00:00:00 20
750625-1122143
D111100002
1000
2001/01/02 00:00:00
P
0012300005
2000/12/30 00:00:00 19
720305-2101114
D111100008
4000
2001/01/02 00:00:00
P
0012300006
2000/12/30 00:00:00 20
791230-2114547
A111100002
20
2001/01/02 00:00:00
P
0012300007
2000/12/30 00:00:00 12
731225-2402221
D111100002
2500
2001/01/02 00:00:00
P
0012300008
2000/12/30 00:00:00 20
700101-1001001
SQL User’s Manual
419
E-R Diagram and Sample Data
D111100011
300
0012300009
2000/12/30
D111100003
500
0012300010
2000/12/30
D111100010
2000
0012300011
2000/12/30
C111100001
1000
0012300012
2000/12/30
E111100012
1300
0012300013
2000/12/30
C111100001
5000
0012300014
2000/12/30
F111100001
800
0012310001
2000/12/31
A111100002
50
0012310002
2000/12/31
D111100008
10000
0012310003
2000/12/31
E111100009
1500
0012310004
2000/12/31
E111100010
5000
0012310005
2000/12/31
E111100007
940
0012310006
2000/12/31
D111100004
500
0012310007
2000/12/31
E111100012
1400
0012310008
2000/12/31
D111100003
100
0012310009
2000/12/31
E111100013
500
0012310010
2000/12/31
D111100010
1500
0012310011
2000/12/31
E111100012
10000
0012310012
2000/12/31
C111100001
250
30 rows selected.
00:00:00
00:00:00
00:00:00
00:00:00
00:00:00
00:00:00
00:00:00
00:00:00
00:00:00
00:00:00
00:00:00
00:00:00
00:00:00
00:00:00
00:00:00
00:00:00
00:00:00
00:00:00
2001/01/02
20
2001/01/02
19
2001/01/02
20
2001/01/02
12
2001/01/02
20
2001/01/02
12
2001/01/02
20
2000/12/09
12
2001/01/03
20
2001/01/03
19
2001/12/08
20
2001/01/03
20
2001/01/03
12
2001/01/03
19
2001/01/03
12
2001/01/03
20
2001/01/03
19
2001/01/03
19
2001/01/03
00:00:00
00:00:00
00:00:00
00:00:00
00:00:00
00:00:00
00:00:00
00:00:00
00:00:00
00:00:00
00:00:00
00:00:00
00:00:00
00:00:00
00:00:00
00:00:00
00:00:00
00:00:00
00:00:00
P
731231-1515123
P
781225-1333044
P
750625-1122143
P
711111-1431202
P
690209-1234567
P
670905-2101013
P
750625-1122143
O
620815-1724174
O
740419-2146506
O
761012-1220475
O
740508-1332014
O
771215-1345471
O
731231-1515123
O
730828-1201145
O
761012-1220475
O
690209-1234567
O
750625-1122143
O
730828-1201145
O
Goods Table
iSQL> SELECT * FROM goods;
GOODS.GNO
GOODS.GNAME
GOODS.GOODS_LOCATION
GOODS.STOCK
------------------------------------------------------------------------GOODS.PRICE
-------------A111100001
IM-300
AC0001
1000
78000
A111100002
IM-310
DD0001
100
98000
B111100001
NT-H5000
AC0002
780
35800
C111100001
IT-U950
FA0001
35000
7820.55
C111100002
IT-U200
AC0003
1000
9455.21
D111100001
TM-H5000
AC0004
7800
12000
D111100002
TM-T88
BF0001
10000
72000
420
Schema
Maximum Values of Altibase Objects
D111100003
TM-L60
45100
D111100004
TM-U950
96200
D111100005
TM-U925
23000
D111100006
TM-U375
57400
D111100007
TM-U325
84500
D111100008
TM-U200
10000
D111100009
TM-U300
50000
D111100010
TM-U590
36800
D111100011
TM-U295
45600
E111100001
M-T245
2290.54
E111100002
M-150
7527.35
E111100003
M-180
2300.55
E111100004
M-190G
5638.76
E111100005
M-U310
1450.5
E111100006
M-T153
2338.62
E111100007
M-T102
966.99
E111100008
M-T500
1000.54
E111100009
M-T300
3099.88
E111100010
M-T260
9200.5
E111100011
M-780
9832.98
E111100012
M-U420
3566.78
E111100013
M-U290
1295.44
F111100001
AU-100
100000
30 rows selected.
BF0002
650
DD0002
8000
AC0005
9800
EB0001
1200
EB0002
20000
AC0006
61000
DD0003
9000
DD0004
7900
FA0002
1000
AC0007
900
FD0001
4300
BF0003
1000
CE0001
88000
CE0002
11200
FD0002
900
BF0004
7890
EB0003
5000
FA0003
7000
AC0008
4000
AC0009
9800
CE0003
43200
FD0003
12000
AC0010
10000
Dual Table
iSQL> SELECT * FROM dual;
DUAL.X
-----------X
selected row count [1]
Maximum Values of Altibase Objects
The following table includes the maximum values of Altibase objects.
SQL User’s Manual
421
Maximum Values of Altibase Objects
Identification
Maximum Values of Objects
Remarks
DB_NAME Length
128
OBJECT Length
40
The Number of
Tablespaces
64K (Including System TBS)
Maximum Number of
TBS in DB
The Number of Data
Files
1,024
Maximum Number of
Data Files in TBS
4,294,967,295 (232-1)However, actual value
is 67,108,864 (64K * 1024) because maximum
values of the number of TBS is 64k and the
number of data files by TBS unit is limited to
1,024.
Maximum Number of
Data Files in DB
The Number of Users
2,147,483,638(Including System Users)
Maximum Number of
Users in DB
The Number of
Tables
2,097,151(Including Metatables)
Maximum Number of
Tables in DB
The Number of
Indexes
64
Maximum Number of
Indexes on the table
The Number of Columns
1,024
Maximum Number of
Columns on the Table
32
Maximum Number of
Columns in Index
The Number of Rows
Unlimited
Maximum Number of
Row on the Table
The Number of Partitions
2,147,483,638(In Whole System)
Maximum Number of
Partitions on the Table
The Number of Constraints
2,147,483,638(In Whole System)
Maximum Number of
Constraints in the Column
422
Schema
Maximum Values of Altibase Objects
SQL User’s Manual
423
Index
A
CASE WHEN function 372
CASE2 function 372
cast 392
CBC(Cipher Block Chaining) 382
CEIL function 325
CHAR datatype 18
character datatype 13
character functions 337
CHAR_LENGTH function 338
CHR function 338
CNF hint 263
Comment 4
COMMENT statement 111
COMMIT statement 299
comparison conditions 400
CONCAT function 339
concatenation operator 391
CONNECT BY Clause 260
conversion functions 363
COS function 326
COSH function 326
COST hint 263
COUNT function 319
CREATE DATABASE LINK statement 115
Create database statement 113
Create directory statement 119
Create disk tablespace statement 165
Create index statement 121
CREATE QUEUE 130
Create replication statement 132
Create sequence statement 135
Create synonym statement 142
Create table statement 145
CREATE TEMPORARY TABLESPACE statement 171
Create temporary tablespace statement 180
Create trigger statement 182
Create user statement 188
Create view statement 191
Customer table 413
CYCLE 76, 136
ABS function 323
ACOS function 323
ADD TABLE clause 72
ADD_MONTHS function 353
aggregate functions 319
ALL PRIVILEGES Statement 217
Alter database statement 58
Alter index statement 65
ALTER QUEUE 70
Alter replication statement 71
Alter sequence statement 75
Alter sesssion statement 294
Alter system statement 297
Alter table statement 77
Alter tablespace statement 98
Alter trigger statement 105
Alter user statement 107
Alter view statement 109
AND condition 397
ARCHIVELOG 114
arithmetic operator 387
AS SELECT 157
ASC clause 124
ASCII function 337
ASIN function 324
ATAN function 324
ATAN2 function 325
AVG function 319
B
BETWEEN 402
BIGINT datatype 22
binary data type 14
BINARY function 337
binary operator 389
BIN_TO_NUM function 363
BIT datatype 49
BITAND 335
BITNOT 336
BITOR 335
BITXOR 335
BLOB data type 52
BLOB datatype 53
BTREE 124
BYTE datatype 48
D
data control language 9
data definition language 7
data manipulation language 8
datatype 13
Datatype conversion 15
DATE datatype 34
date datatype 14
DATEADD function 353
C
CACHE clause 76, 136
CASCADE 154, 209
424
DATEDIFF function 354
DATENAME function 355
DATEPART function 356
datetime arithmetic 390
datetime format model 34
Datetime formats 365
datetime functions 353
DCL 9
DDL 7
DECIMAL datatype 23
DECODE function 374
DEFAULT clause 94
Delete statement 234
Department table 413
DEQUEUE statement 290
DES(Data Encryption Standard) 382
DESC clause 124
DESDENCRYPT 382
DESENCRYPT 382
DIGEST function 375
DIGITS function 340
DISABLE 89
DML 8
DNF hint 263
DOUBLE datatype 23
DROP clause 89
DROP CONSTRAINT clause 89
DROP DATABASE LINK statement 197
DROP DATABASE statement 195
Drop directory statement 198
DROP INDEX statement 199
DROP PRIMARY KEY 89
DROP QUEUE statement 200
Drop replication statement 201
Drop sequence statement 202
Drop synonym statement 203
Drop table statement 205
Drop tablespace statement 206
Drop trigger statement 208
DROP UNIQUE 89
Drop user statement 209
Drop view statement 211
Dual table 414
DUMP function 375
EXP function 327
Explicit datatype conversion 16
EXTRACT function 356
F
FLOAT datatype 24
FLOOR function 327
FOR UPDATE clause 262
FORCE 192
FULL SCAN 282
FULL SCAN hint 237, 262
G
geomcollection 55
GEOMETRY datatype 55
geometry datatype 14
Goods table 414
Grant statement 212
GREATEST function 376
GROUP BUCKET COUNT hint 264
GROUP BY clause 261
group of SQL functions 317
H
HASH BUCKET COUNT hint 264
HAVING clause 261
HEX_TO_NUM function 364
Hierarchical query clause 260
HINTS 237, 240, 262
I
IGNORE LOOP 261
IN 403
INCREMENT BY clause 75, 136
INDEX 283
INDEX ASC 283
INDEX ASC hint 237, 263
INDEX DESC 283
INDEX DESC hint 237, 263
INDEX hint 237, 263
index_partitioning_clause 124
index_segment_attribute_clause 124
INITCAP function 340
INITSIZE clause 113
In-line view 260
Insert statement 239
INSTR function 341
INTEGER datatype 24
Internal Tuple 266
INTERSECT Group Operator 261
Intersect set operator 311
E
Employee table 412
ENABLE 89
encryption function 382
ENQUEUE statement 289
example table 412
EXCLUSIVE lock mode 244
execution plan 3
EXISTS 407
425
J
NOT condition 397
NOT NULL 90
NOT NULL constraint 153
NULL 15, 90, 153, 406
NUMBER datatype 25
NUMERIC datatype 25
numeric datatype 13
Numeric Format Model 27
numeric functions 323
NVARCHAR datatype 21
NVL function 377
NVL2 function 378
Job Control Statement 9
L
LAST_DAY function 359
LEAST function 376
LENGTH function 338
LENGTHB function 344
LEVEL 261
LIKE 404
LIMIT clause 262
linestring 55
LN function 328
LOB data type 52
LOCALUNIQUE 123, 153
Lock table statement 243
LOG function 328
logging_clause 154
logical condition 395
logical conditions 397
LOWER function 342
LPAD function 342
LTRIM function 343
O
object privilege 213, 217
OCTET_LENGTH function 344
OCT_TO_NUM function 364
Operator priority 313
OR condition 398
OR REPLACE 192
ORDER BY clause 261
ORDERED hint 263
Orders table 414
OUTER JOIN Clause 260
M
P
MAX function 320
MAXROWS 89, 155
MAXVALUE clause 76, 136
META 61
META UPGRADE 61
MIN function 320
MINUS Group Operator 261
MINUS set operator 312
MINVALUE clause 76, 136
MOD function 329
modify_checkpoint_path_clause 102
MONTHS_BETWEEN function 357
multilinestring 55
multipoint 55
multipolygon 55
PARALLEL 72
parallel_clause 125, 154
PERSISTENT Clause 90
PERSISTENT clause 124
PERSISTENT INDEX 153
PERSISTENT Index Change 67
plancache_hint 237
point 55
polygon 55
POSITION function 341
POWER function 329
PRIMARY KEY 153
private synonym 143
public synonym 143
N
Q
NCHAR datatype 20
NCHR function 343
nested functions 381
NEXT_DAY function 359
NIBBLE datatype 49
NO ACTION 154
NO FORCE 192
NO INDEX 283
NO INDEX hint 237, 263
NOARCHIVELOG 114
non-schema object 4
QUICKSTART 72
R
RANDOM function 330
READ COMMITTED 304
REAL datatype 26
RENAME COLUMN clause 89
Rename table statement 226
RENAME TO clause 89
REPEATABLE READ 305
REPLACE2 function 344
426
REPLICATE function 350
REPLICATION_PORT_NO 132
REPLICATION_UPDATE_REPLACE 132
result comparison condition 409
REVERSE_STR function 350
REVOKE statement 228
Rollback statement 301
ROUND function 330, 358
ROW EXCLUSIVE lock mode 244
ROW SHARE lock mode 244
row_movement_clause 156
ROWNUM 377
RPAD function 345
RTREE 124
RTRIM function 345
RULE hint 263
summary of table locks 245
SYNC 71
SYSDATE function 360
System Control Statement 9
T
table constraints 153
table_partitioning_clauses 155
TAN function 333
TANH function 334
TIMESTAMP constraint 91
TO_ NUMBER function 370
TO_BIN function 363
TO_CHAR(datetime) function 365
TO_CHAR(number) function 368
TO_DATE function 368
TO_HEX function 369
TO_OCT function 370
TRANSLATE function 348
TRIM function 349
TRUNC(date) function 361
TRUNC(number) function 334
TRUNCATE TABLE statement 231
S
Sample data 417
Savepoint statement 300
schema object 4
SEGMENT MANAGEMENT Clause 167
segment_attribute_clause 157
Select statement 248
SENDMSG function 378
SERIALIZABLE 305
SESSION CLOSE 63
SET BUCKET COUNT hint 264
SET clause 283
set operators 308
Set transaction statement 304
SHARE lock mode 244
SHARE ROW EXCLUSIVE lock mode 244
SHARE UPDATE lock mode 244
SIGN function 331
SIN function 332
SINH function 332
SIZEOF function 346
SMALLINT datatype 27
Spatial type 55
SQL 3
SQRT function 333
START 72
START FLUSHER 298
START WITH clause 136, 260
startup clause 61
STDDEV function 321
STOP 72
STOP FLUSHER 298
STUFF function 351
subquery 3
SUBSTR function 347
SUBSTRING function 347
SUM function 321
U
unary comparison condition 395
unary operator 388
UNION ALL set operator 310
UNION set operator 309
UNION(ALL) Group Operator 261
UNIQUE 408
Unique 153
UNIQUE Clause 123
Update statement 280, 286
UPPER function 349
USE_HASH hint 264
USE_MERGE hint 264
USE_NL hint 264
USER_ID 380
USER_NAME 380
USE_SORT hint 264
using_index_clause 154
V
VARBIT datatype 50
VARCHAR datatype 19, 54
VARIANCE function 322
W
WAIT 244, 245
where_clause 72
WITH GRANT OPTION 217
WITH READ ONLY 192
427