1
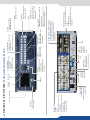
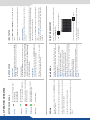
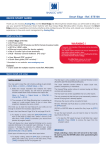
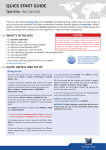
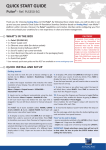
QUICK START GUIDE
NeXtage 16 - Ref. NXT1604
Thank you for choosing Analog Way and the NeXtage 16. By following these simple steps, you will be able to
set up and use your Powerful true-seamless AV processor based on Analog Way’s new LiveCore™ platform
within minutes. Discover the NeXtage 16 capabilities and intuitive interface while commanding top-notch
presentations and unleash your creativity for a new experience in show and event management.
What’s in the box
• 1 x NeXtage 16 (NXT1604)
• 1 x Power supply cord
• 1 x Ethernet cross cable (for device control)
• 1 x Web-based Remote Control Software included and hosted on the device
• 1 x Rack mount kit
• 1 x User manual (PDF version)*
• 1 x Quick start guide*
* User manual and quick start guide are also available on www.analogway.com
CAUTION!
Mounting using only the front
rack ears is sufficient for fixed
installations. Additional support,
such as the rear rack support or
slide rails, is required for mobile
applications, and recommended
for all.
quick install and setup
Connecting with the Web RCS
The NeXtage 16 uses standard ethernet LAN
networking. To connect the Web RCS to your new
NeXtage 16, you first need to connect a computer
to the NeXtage 16 using the Ethernet cable. Then
on your computer open an internet browser which
supports Flash® player.
Into this internet browser, please enter the IP
address of the NeXtage 16 displaying on the front
panel screen.
If the connection is not starting, please see:
• Be sure the computer IP address is on the same
network and subnet as the NeXtage 16.
• Be sure that no two devices have the same IP
address (prevent IP conflicts)
• Check your network cable. You will need a
crossover ethernet cable if you are connecting
directly from the NeXtage 16 to the computer. If
a hub or switch is involved, use straight ethernet
cables.
The connection should start.
• For more information, please see the user manual
or contact your local technical support.
Often, computers are set to DHCP client (automatic
IP detection) mode. You may need to change the Once you have successfully connected, the flash
IP address configuration on your computer before app will automatically download and launch in your
you can connect. These settings are found in the browser. When the two icons in the bottom right
properties for your LAN network adaptor, and vary corner of the screen turn green, the Web RCS is
by operating system.
ready to use. If you are having trouble syncronizing,
The default IP address on the NeXtage 16 is try clearing the cache and refreshing the page
192.168.2.140 with a netmask of 255.255.255.0 (ctrl+F5 in most browsers):
Therefore, you can assign your computer a static - NXT1604: will turn green when connected
IP address of 192.168.2.100 and a netmask of - Synch OK: will turn green when the Web RCS has
255.255.255.0 and should be able to connect.
finished syncronizing.
- 8 x 3G/HD/SD-SDI
- 8 x Universal Analog
(4 x HD15 & 4 x DVI-A)
Power supply:
100-240 VAC; 4.8A;
50/60Hz; 225W; internal,
autoswitchable
(Dual link available on Inputs 4 and 8)
- 2 x DisplayPort
(Dual link available on Inputs 2 and 6)
Inputs #1 to #8:
- 4 x HDMI
- 6 x DVI-I
Stand-by:
Hold for 3 seconds
for stand-by mode
4.3’’ TFT color display
Menu scroll
knob
See User’s Manual for details
Devices sync.:
Used for effect sync in
multi-machine mode.
Ethernet
Plug
Frame Lock:
Analog Frame
Lock plug and
specific loop
output
Tally
Monitoring Preview output:
- 1 x Universal Analog (HD15 & DVI-A)
- 1 x DVI-I
- 2 x SD/HD/3G SDI
- 1 x RGBs/RGsB/RGB/YPrBr/YC/comp
Analog output
Program output #1 - Preview output #2:
- 2 x Universal Analog (HD15 & DVI-A)
- 2 x DVI-I (DVI Dual-Link on output #1)
- 2 x Video Optical SFP module cage
- 3G/HD/SD-SDI
Source control:
Frame logo: press before selecting the
Logo/Frame number
Freeze: freeze the input linked to the
current layer on the Program
TAKE:
Transition the preselected sources onto the
Program output with the
selected effects
Step Back:
Recall the last preset into
your Preview monitor
Screen:
#1 to #2: select a screen
Edit:
Program: edit Program
Preview: edit Preview
Layer control:
Clear: clear a layer
Aspect Image Layer: adjust
Layer properties
Source selection:
#1 to #8: access Frame #1 to #4
or Logo #5 to #8
Color: fill in a layer with a color
Preset:
Load: load a preset
Save: save a preset
Layer selection:
Native Background: not
scaled layer.
A/B/C/D: scaled layers
Control:
Exit/Menu: Home menu
or back one level
Enter: validate the menu
or command
RS232 port:
Reserved for
manufacturer
4 x USB Plugs
USB Plug
Contextual
buttons
NeXtage 16 - Ref. NXT1604 / front & REAR panelS description
Solid orange:
TIP: Always try to use native resolution of your screens/
projectors to avoid additional scaling.
Output settings:
Under this menu you have access to the HDCP ON/OFF feature,
Optical SFP restart and test pattern possibilities.
Other settings are available for layers, please refer to the user
manual.
• Drag sources into layers to change the source
• Load and place all your layer with your mouse and use the take
button to send it to your program
• Resize or reposition your layer by clicking and dragging the layer.
Preconfig.: Setup assistant for adjusting all basic setups.
Outputs: Manage your outputs and have access to every settings and parameters.
Inputs: Configure your inputs connected to your NeXtage 16.
Logos: Configure Logos and Frames selections.
Library: Load your Logos and Frames into the system.
Presets: Configure your preset by loading layouts.
Confidence: Configure the Confidence monitor.
Monitoring: Configure the operator’s monitor including the resolution and choice of layout, to show input or output preview
combinations.
Blending: Configure the blending.
Control: Access all control settings.
Versions: Check the version number, board checksum...
Maintenance: Access to all Analog Way maintenance services
(update, ...).
Contextual button
Blinking green:
Once your setup is complete, click on the EDITION tab to start
building your presets.
Layer/source selected or is not currently
active on the Program output
Home menu
Layer/source selected or is currently active
on the Program output
Blinking red:
Output format/rate:
Under SETUP > OUTPUT, click on the selected output on the
left to have access to the setup. Then choose the format and
rate. (Rate choice is only available for preview output, the main
output will use the rate defined under SETUP > Preconfig >
Internal rate, Framelock, etc.)
Click on SETUP > INPUT > GENERAL to have an overview of your
inputs.
Operation mode:
Choose your operation mode using the setup menu (SETUP >
Preconfig > screens) to drag and drop your unused output to
the selected mode.
• You can load your preset at anytime on Program or Preview
using the load button.
button
then choose your preset number:
• Preset can be reset by the user using
• Click on
Once you build a preset, you can save it as one of the 64 preset
slots the NeXtage 16 offers.
Preset management
Click on your ACTIVE PLUG in order to choose the displayed
input.
Click on the SETUP PLUG to start settings a specific plug without
choosing it as the active displayed plug. (Not necessarily
displayed).
As each input has multiple input plugs, you must choose one
plug to display as this input. The remaining non-displayed plugs
remain active and can still be configured.
Individual input setting:
Click on the left on the individual input setup in order to define
your input
Click on AUTOSET ALL to launch the automatic detection of all
inputs.
INPUT SETUP
Output setup
Edition
#1 = Source is on Preview
#2 = Function available for modification
#1 = Source is on the Program output
#2 = Freeze enable
#3 = Stand-by button
#4 = Preset Selection
Solid green:
Solid red:
Button color usage
OPERATION OVERVIEW
WEB RCS STRUCTURE
SETUP
Click on SETUP, then go to the preconfig
button. The Setup assistant is here to help
you to set up step by step your unit by
following an interactive tutorial.
edition
The Edition mode is the place where you
will manage all your configurations. You will
manage your inputs, your layers in terms
of size position effect etc… your Frames
and Logos. You can save all your screen
configurations into presets
live
The Live mode is the section where you
will start operating your show. You can play
preset one after the other on a real timeline
adding some parameters like duration or
wait for user interaction.
WARRANTY AND SERVICE
This Analog Way product has a 3 year warranty on parts and labor, back to factory. This warranty does not
include faults resulting from user negligence, special modifications, electrical surges, abuse (drop/crush),
and/or other unusual damage. In the unlikely event of a malfunction, please contact your local Analog Way
office for service.
going further with the nextage 16
For complete details and operations procedures, please refer to the NeXtage 16 User’s Manual and our website for further information: www.analogway.com
Version: 1.0 - 16/04/2013
NXT1604-QSG