1
Lab Exercise – programming the system
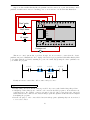
Like wiring a control system, programming one is best done with thoughtful planning rather than
a “design-as-you-build” approach. Each team will work with the instructor to develop a “prototype” PLC
program, usually on a whiteboard or on paper. Having multiple teams prototype their programs on whiteboards
within the same classroom works well to foster peer review of programming, where teams analyze and critique
other teams’ programming solutions! Your prototype program should completely address the following points:
•
•
•
•
•
Identify
Identify
Identify
Identify
Identify
all
all
all
all
all
inputs to the PLC, giving each one a sensible tagname
signal outputs from the PLC, giving each one a sensible tagname
major program functions (i.e. What must this program do?)
internal variables necessary for these functions, giving each one a sensible tagname
system variables necessary for these functions (e.g. real-time clock/calendar variables)
The importance of identifying and naming all relevant variables is paramount to “clean” programming.
This is especially true when an HMI (Human-Machine Interface) is to be connected to the PLC, and all
relevant variables must be named there as well.
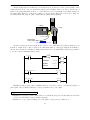
A reasonable approach to developing a robust program prototype is to create your prototype in your
own personal (“brick”) PLC, de-bugging it there with all the switches in place to simulate input signals.
Even if your personal PLC is a different model (or manufacture) than the project PLC, this is a very helpful
exercise. Furthermore, it allows you to continue program development outside of school when you do not
have access to the project PLC.
Only after a prototype program is developed should you begin programming the project PLC. I
recommend the following steps:
•
•
•
•
•
•
•
•
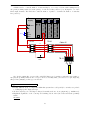
Establish communications between PLC and personal computer (PC)
Connect all I/O cards (modules) to the PLC and get them recognized by the processor
Assign tagnames to all relevant variables, beginning with I/O points
Enter a simplified version of the program, running to check for “bugs”
Diagnose any program problems
Add complexity to the program (e.g. additional features) and run to check for “bugs”
Repeat last two steps as often as necessary
Add comments to each and every line of the program, explaining how it functions
The final program should be well-documented, clean, and as simple as possible. All members of the
team should have a hand in designing the program, and everyone must thoroughly understand how it works.
Common mistakes:
• Waiting too long after writing the program code to insert comments. This is best done immediately,
while everything makes sense and is fresh in your memory!
• Insufficient commenting – only makes sense to the person who did the programming
• Students working on portions of the program in isolation, not sharing with their teammates what they
did and how. It is important that the whole team learns all aspects of their system!
101