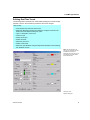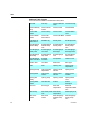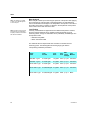
1
9700
USM003GVAE1005
User Manual
www.varec.com
Varec, Inc. • 5834 Peachtree Corners East • Norcross (Atlanta), GA 30092 USA
Tel: +1 (770) 447-9202 • Fax: +1 (770) 662-8939
Varec
Copyright
All rights reserved. Printed in the United States of America.
Except as permitted under the United States Copyright Act of 1976, no part of this
publication may be reproduced, stored in a retrieval system or transmitted in any
form or by any means- electronic, mechanical, photocopying, recording or
otherwise- without the prior written permission of the Publisher:
Varec, Inc.
5834 Peachtree Corners East
Norcross (Atlanta), Georgia 30092
Phone: (770) 447-9202
Fax: (770) 662-8939
Trademarks Acknowledged
Trademarks of other products mentioned in this manual are held by the
companies producing them.
FuelsManager® is a registered trademark
of:
Varec, Inc.
Microsoft® is a registered trademarks of:
Microsoft Corporation.
Acrobat Reader® is a registered trademark
of:
Adobe Systems Incorporated.
Crystal Reports® is a registered trademark
of:
Crystal Decisions, Inc.
All other trademarks are acknowledged.
USM003GVAE1005
i
FuelsManager Defense
Using This Manual
Before reading this manual, users should become familiar with the operation of
Microsoft Windows. The primary purpose of this manual is to describe and explain
the environment and processes of the FuelsManager operator application.
The most commonly used features of the system are explained by a selection of
step-by-step instructions. These instructions will soon become second nature,
allowing operators to respond to alarms, run reports and monitor the facility
quickly and efficiently.
This manual includes operator instructions for both the Standard and Professional
editions of FuelsManager. Please refer to FuelsManager Administrator Manual for
information on topics not contained in this document.
It is assumed that the FuelsManager System has already been installed and
commissioned. If there is any doubt of the state of the system, operators are
advised to contact an Administrator or Supervisor before continuing.
Windows Terminology
FuelsManager operator interface is based upon the Microsoft Windows Graphical
User Interface (GUI) standard and is SAA-compliant (System Application
Architecture standard for open systems). All top-level menus, dialog boxes and
mouse-driven interfaces adhere to the published standards for Microsoft
Windows. This manual uses the terms described in the table below when
describing operator actions and windows elements for step-by-step instructions.
Actions in Windows
ii
Actions
Description
Point
To move the mouse pointer until it rests on the item of choice
Click
To quickly, press and release the mouse button once
Double-click
To quickly, press and release the mouse button twice in
succession
Drag
To hold down the mouse button while moving an object
across the computer screen
Release
To quit holding down the mouse button after dragging an item
Select
To pick an item on a menu, button or to highlight text or
graphics usually via a single click). Selecting does not initiate
an action
Choose
To pick an item to carry out an action. Often needed to select
an item before choosing it (usually via a double-click).
User Manual
Window Elements
Elements
Description
Program Icon
Provides a pop-up menu, which allows window modification.
Title Bar
Shows the title of the application, document or FuelsManager
graphic screen
Menu Bar
Lists of available menus. Most applications have a File menu,
Edit menu, and a Help menu, as well as menus unique to the
application.
Menu
A menu contains a list of commands or actions performed by
the operator. Also referred to as a pop-up/drop-down menu.
Dialog Box
A movable window that is displayed on screen in response to
the user selecting a menu option. It provides the current
status and available options for a particular feature in the
application.
Window
A scrollable viewing area on screen. May refer to the entire
application in a window.
Window Title
The Window title can be the name of an application,
document, group, directory or file depending on the type of
window in which it appears.
Close Button
Use this button to close the window or application.
Maximize Button
Use this button to enlarge the application window so that it
fills the entire desktop.
Minimize Button
Use this button to reduce the application window to an icon at
the bottom of the screen.
Restore Button
This button can restore an application window to its previous
size and location.
Window Border
The Window border is the outside edge of a window. The
user can change the window size by dragging the border in
or out on each side of a window.
USM003GVAE1005
iii
FuelsManager Defense
iv
User Manual
FuelsManager Defense
Table of Contents
Introduction to FuelsManager Defense .................................................................1
About FuelsManager .............................................................................................. 2
Getting Started with OPERATE ............................................................................. 3
OPERATE Window Elements................................................................................. 4
Keyboard Shortcuts................................................................................................ 6
Command Summary ............................................................................................... 7
Working with Individual Tanks.................................................................................9
Understanding Tank Details ................................................................................ 10
Tank Detail Fields ........................................................................................... 10
Viewing Tank Details for a Single Tank .......................................................... 10
Selecting a Tank Detail to View ...................................................................... 11
Modifying Tank Parameters ................................................................................. 12
Overriding a Value .......................................................................................... 13
Tank Calculations ................................................................................................. 14
Opening the Calculator .................................................................................. 14
Performing a Calculation ..........................................................................14
Tank Transfers ...................................................................................................... 15
Performing a Tank Transfer ............................................................................ 15
Once the Tank Transfer Process is Complete ..........................................16
Tank Detail Field Descriptions............................................................................. 18
Command Summary ............................................................................................. 20
Working with Multiple Tanks ..................................................................................21
Understanding Tank Groups ............................................................................... 22
Static Tank Groups ......................................................................................... 22
Dynamic Tank Groups .................................................................................... 22
Graphical and Tabular Based Window Displays ............................................ 22
Opening a Tank Detail Window from a Tank Group Window ...................23
Viewing a Tank Group .......................................................................................... 24
Opening a Tank Group ................................................................................... 24
Selecting an Existing Static Tank Group to View .....................................25
Selecting an Existing Dynamic Tank Group to View ................................25
Opening Multiple Tank Groups ................................................................25
Graphical Tank Group Display ............................................................................ 26
Using Menu Commands from the Graphical Tank Group .............................. 27
Displaying a Process Variable .................................................................27
Selecting a Background Color Scheme ...................................................28
Showing Tank Information ........................................................................28
Hiding the Display Flow Icon ....................................................................29
Obtaining Additional Operator Information .................................................... 30
USM003GVAE1005
v
Varec
Tank Status Icons .................................................................................... 30
Changing the Number of Tanks Displayed .................................................... 31
Deleting a Tank from a Tank Group Display ........................................... 31
Modifying Tanks on a Graphical Tank Group .......................................... 31
Modifying Tank Variables from a Graphical Tank Group ............................... 32
Changing the Product Code for a Tank ................................................... 32
Changing a Tank Variable ....................................................................... 33
Tabular Tank Group Display ................................................................................ 34
Modifying Information Displayed in the Tabular Tank Group ......................... 35
Tank Group Name ................................................................................... 35
Setting the Number of Database Levels to Be Displayed ....................... 35
Configuring Columns on Tabular Display ....................................................... 36
Modifying the Column Header Alias ........................................................ 36
Modifying the Column Format ................................................................. 36
Selecting and Displaying Engineering Units ........................................... 37
Deleting a Column from a Tank Group .................................................... 37
Modifying, Adding and Inserting Columns .............................................. 37
Cells in a Tank Group Display ........................................................................ 38
Changing a Tank Variable in a Tank Group Cell ..................................... 38
Changing the Font Size in the Tabular Tank Group ................................ 38
Total and SubTotal Rows ................................................................................ 39
Calculating a Column Total and SubTotal ............................................... 39
Selecting the Location of the Total Row .................................................. 39
Freezing the Total Row ............................................................................ 39
Selecting the Location of the SubTotal Row ............................................ 39
Changing the Number of Tanks Displayed .................................................... 40
Deleting a Tank/Row from a Tabular Tank Group ................................... 40
Modifying Tabular Tank Group ................................................................ 40
Dynamic Tank Groups .......................................................................................... 41
Creating a new Dynamic Tank Group ............................................................ 41
Designate a Filter Setup for a Dynamic Tank Group ............................... 42
Refining a Dynamic Tank Group Selection .............................................. 44
Command Summary ............................................................................................. 45
Custom Graphics ......................................................................................................49
Understanding Custom Graphics........................................................................ 50
Opening a Graphic Window ........................................................................... 51
Command Summary ............................................................................................. 52
Working with Reports .............................................................................................. 53
Predefined Reports ............................................................................................... 54
Viewing Multiple Page Reports ....................................................................... 54
Enabling and Disabling a Report......................................................................... 55
Printing a Report ................................................................................................... 56
Print an Undisplayed Report ........................................................................... 56
Print a Currently Displayed Report ................................................................. 56
Print to File ...................................................................................................... 56
vi
User Manual
FuelsManager Defense
Notes on Printing Reports ................................................................................... 57
Other Types of Reports ........................................................................................ 58
Historical Reports ........................................................................................... 58
Opening a Historical Report .....................................................................59
Command Summary ............................................................................................. 60
Working with Trends.................................................................................................61
Understanding Tank Trends ................................................................................ 62
Generic Trends ............................................................................................... 62
Real-Time and Historical Trends .................................................................... 62
Trend Window ....................................................................................................... 63
Opening a Predefined Trend from a Tank Detail................................................ 64
Configuring a Tank Trend for an Existing Tank................................................. 64
Defining Real-Time Trends ............................................................................. 65
Selecting Pen Attributes ................................................................................. 67
Defining Pen Attributes from a Trend Window ............................................... 70
Editing a Trend ............................................................................................... 70
Creating a New Generic Tank Trend ................................................................... 71
Defining the Database, Point and Variable .................................................... 71
Command Summary ............................................................................................. 73
Working with Alarms ................................................................................................75
Alarm Tools ........................................................................................................... 76
Alarm Menu .................................................................................................... 76
Silence ......................................................................................................76
Alarm Line ................................................................................................76
Summary ..................................................................................................76
Log File Browser ......................................................................................76
Alarm Tool Bar ................................................................................................ 76
Operator Information ................................................................................76
Alarm Indicator Box ..................................................................................77
Alarm Mode Button ..................................................................................77
Current Alarm Status ................................................................................77
Alarm Buttons ...........................................................................................78
Alarm Line ................................................................................................79
When an Alarm Sounds........................................................................................ 80
Responding to an Alarm ................................................................................. 80
Viewing Alarm Details Using the Alarm Summary .......................................... 81
The Tank Detail Window and Alarm Conditions .......................................81
Acknowledging an Alarm ............................................................................... 82
Silencing Alarms Before Acknowledgement ............................................82
Removing the Alarm Condition ....................................................................... 82
Alarm Details in the Log File Browser ................................................................ 83
Opening the Log File Browser ........................................................................ 83
Viewing Details in the Log File Browser ......................................................... 83
Alarm Information .....................................................................................84
USM003GVAE1005
vii
Varec
Event Types ............................................................................................. 84
Event Information ..................................................................................... 84
Printing a Log File Browser Entry .................................................................... 84
Adding Comments to Log Files ...................................................................... 85
Printing Specific Selections of the Log File Browser ............................... 85
Error Messages in the Log File Browser ......................................................... 85
Command Summary ............................................................................................. 86
Working with Product Movement ......................................................................... 87
Understanding Product Movement ..................................................................... 88
Product Movement Terms ............................................................................... 88
Product Movement States ....................................................................... 91
Product Movement Types ........................................................................ 92
Product Transfer (Xfr) Modes .................................................................. 95
Using Product Movement..................................................................................... 97
Movement Summary Table ............................................................................. 97
Default Table Columns ............................................................................ 97
Additional Table Columns ....................................................................... 98
Menu Commands .................................................................................. 100
Movement History Table ............................................................................... 101
Default Table Columns .......................................................................... 101
Additional Table Columns ..................................................................... 102
Menu Commands .................................................................................. 104
Viewing a Movement History ................................................................. 105
Refreshing the Movement History Table ............................................... 105
Creating and Modifying Movements ............................................................. 106
Handgauged Movements ...................................................................... 110
Modifying Movement Setup ................................................................... 110
Initiating a Movement ............................................................................ 110
Stopping a Movement ........................................................................... 110
Resetting a Movement ........................................................................... 111
Holding for Meter Values ....................................................................... 111
Entering Meter Values (Net or Gross Volume, Mass) ............................ 111
Resuming a Movement .......................................................................... 111
Formatting Movement Tables and Data ....................................................... 112
Filtering Movements .............................................................................. 112
Removing Column Specific Filter .......................................................... 112
Showing All Movements ........................................................................ 112
Sorting by Column ................................................................................. 112
Clearing the Sort .................................................................................... 113
Deleting a Movement ............................................................................ 113
Adding a Column .................................................................................. 113
Inserting a Column ................................................................................ 113
Replacing a Column .............................................................................. 114
Deleting a Column ................................................................................. 114
Entering a Column Alias ........................................................................ 114
Increasing Font Size .............................................................................. 114
Decreasing Font Size ............................................................................ 115
viii
User Manual
FuelsManager Defense
Toggling Grid Lines On and Off .............................................................115
Entering User String Data .......................................................................115
Entering Handgauge Values ..................................................................116
Toggling Automatic Values ....................................................................117
Toggling Handgauged Values ...............................................................117
Viewing Discrepancies in Percentages ..................................................117
Movement Tickets ........................................................................................ 118
Preview a Movement Ticket Before Printing ...........................................121
Printing a Movement Ticket ....................................................................121
Practical Movement Examples .......................................................................... 122
Example 1 – Simple Tank Transfer ............................................................... 122
Example 2 – Product Receipt ....................................................................... 122
Example 3 – Shipment via a Meter Node. .................................................... 123
Command Summary ........................................................................................... 124
Working with Leak Detection ...............................................................................125
Understanding Leak Detection .......................................................................... 126
Tank Analysis Methods ................................................................................ 127
Volumetric Analysis ................................................................................127
Mass Analysis ........................................................................................128
Level Probes ..........................................................................................128
Tank Analysis Types ..................................................................................... 129
Static Analysis ........................................................................................129
Continuous Analysis ...............................................................................129
Real-Time Analysis .................................................................................129
Using Leak Detection ......................................................................................... 130
Leak Analysis Tests ...................................................................................... 130
Performing Static/Continuous Leak Analysis Test ........................................ 132
Leak Test Reports............................................................................................... 134
Command Summary ........................................................................................... 138
Working with the Throughput Calculator ..........................................................139
Understanding the Throughput Calculator ...................................................... 140
Using the Throughput Calculator...................................................................... 141
Performing Throughput Analysis .................................................................. 143
Index ............................................................................................................................145
USM003GVAE1005
ix
Varec
x
User Manual
Introduction to FuelsManager
Defense
1
Varec
About FuelsManager
FuelsManager is an advanced Inventory Management suite of software products
for tank farms, terminals, pipelines and other management facilities. This system
runs under the Microsoft Windows 2000 or the Microsoft Windows XP operating
systems. These multi-tasking, 32-bit operating systems allow for complete client/
server applications. FuelsManager can operate on a single personal computer or
as part of a network. In addition, FuelsManager can be networked with other
personal computers or host computer systems.
Users are able to integrate all major types of tank level and mass measurement
instruments, including float, radar, servo, hydrostatic, magnetostrictive and hybrid
tank gauges, into one system. Storage tank parameters, such as level,
temperature, gross and net standard volumes are displayed in real-time at the
local operator workstation. The system contains fuels management-specific
functionality and can communicate with most major manufacturers’ tank gauges
and other automation equipment. The system can monitor levels, temperatures,
alarms, volumes, flow and other variables for up to 2000 tanks.
In addition, FuelsManager is capable of controlling an entire tank farm.
Programmable Logic Controllers (PLCs) are used to monitor and control tank farm
instrumentation and control devices, such as pumps and valves. Combining tank
farm automation with tank farm inventory reduces the number of systems that
operators have to manage. Complete control of pipeline receipts, hydrant system
control, independent high level alarm systems, Emergency Fuel Shut-Off (EFSO)
and interfaces to leak detection systems are all possible with FuelsManager's
Tank Farm Automation.
2
User Manual
FuelsManager Defense
Getting Started with OPERATE
FuelsManager is operated and maintained through the OPERATE program
interface. The interface allows the operator to interact with the facility during runtime and provides dynamic interaction with the FuelsManager database. Using
FuelsManager OPERATE, the operator can monitor and control equipment
through the use of real-time graphics and reports. Also, the operator can manage
alarms and view trends.
To get started with FuelsManager OPERATE perform the following operations:
Step-by-Step
• From the Windows Start menu, select Programs.
• Select FuelsManager.
• From the FuelsManager program group select Operate. The FuelsManager
OPERATE window appears showing the Index Display graphic.
The following sections briefly describes FuelsManager OPERATE elements and
keyboard shortcuts.
Window title
Title bar
Menu bar
Minimize button
Maximize button
Menu bar
Window border
Tank Group
Tank Detail
Close button
Restore button
Program icon
Alarm tool bar
windows
USM003GVAE01005
3
Varec
OPERATE Window Elements
4
Element
Description
Menu Bar
The Menu bar displays all available menus, depending on
the type of active window. Each menu provides access to
the functions necessary to operate the application. (The
menu options may change depending on the type of active
window.)
Display Menu
This menu enables operators to display different
FuelsManager windows, view FuelsManager System
communications, Weights & Measures Seals and exit the
FuelsManager OPERATE application.
Alarm Menu
The Alarm menu allows operators to silence, acknowledge
and view alarm information, such as the number of
alarms, the alarm description and alarm priority. Using the
log file browser from this menu, operators are also able to
view and print all alarms, events and comments for any
selected day.
Point Menu
This menu enables operators to continuously monitor any
point’s variable in the FuelsManager database and have it
readily available to issue a command.
Tools Menu
The Tools menu provides a macro option; operators can
run the macro and the system automatically performs the
graphics-related commands and can prompt operators
with the resulting dialog boxes.
Edit Menu
Only available when a Tank Group window is active, this
menu allows the user to modify the format and content of
the static and dynamic Tank Group displays.
Movements Menu
This menu enables the operator to open the Movement
Summary or Movement History windows for creating and
operating Product Movements.
Trend Menu
Only available when a Tank Detail window is active,
allows the user to configure / view Real-Time and
Historical trends for the selected tank.
Window Menu
The Window menu always allows the operator to tile,
cascade, arrange icons and close all windows and
depending on the selected window the operator is
provided with additional functions.
User Manual
FuelsManager Defense
Element
Description
Help Menu
When operators select Help on the Menu bar, a list of Help
options appears, which provide access to FuelsManager’s
online documentation. This is a convenient way to look up
information about a task that operators are performing, a
feature operators would like to know more about or a
command operators want to use. FuelsManager displays
online help using Adobe Acrobat Reader v5.1.
Window Displays
There are various types of windows found in
FuelsManager OPERATE - Graphic, Report, Historical,
Report, Tank Detail, Tank Group, Real-Time Trend and
Historical Trend. Each type of window is accessible by
selecting the Open command from the Display menu.
Alarm Tool Bar
The Alarm tool bar shown at the bottom of the screen
provides the operator with a quick view of any alarm
conditions. Operators are also able to easily silence,
acknowledge and view alarm information, such as the
number of alarms, the alarm description and alarm priority.
USM003GVAE01005
5
Varec
Keyboard Shortcuts
6
Key
Action
F1
Returns user to the Index Display graphic
F2
Opens the Graphic Display Selection dialog box
F3
Opens the Report List Selection
F4
Opens the Database Point Monitor for a previously defined point
F5
Displays the Alarm Summary
F6
Silences alarms
F7
Opens a Tank Detail screen
F8
Opens a Tank Group
F9
Toggles between Graphic and Tabular Tank Group displays
CTRL + F4
Closes the selected window
CTRL + F6
(CTRL + Tab)
Toggles between all open FuelsManager window displays
ALT + Tab3
Toggles between all open Windows applications
User Manual
FuelsManager Defense
Command Summary
Display ¦ Index Display (F1)
Opens the Index Display
Display ¦ Open
Displays a list of submenu commands that allow the user to open various types
of windows
Display ¦ Print Display
Allows the user to print the current display
Display ¦ Exit
Exits the FuelsManager OPERATE application
Tools ¦ Macro
Allows the user to record/playback sequences of actions and commands via the
Macro dialog box
Tools ¦ Perform Leak Rate Analysis
Allows the user to perform analysis of sensor data for conditions that might
indicate a leak, via the Perform Leak Analysis dialog box
Window ¦ Select
Depending on the active window type - Allows the user to open another window
of that type
Window ¦ Tile
Tiles all currently open windows
Window ¦ Cascade
Cascades all currently open windows
Window ¦ Arrange Icons
Arranges all icons at the bottom-left of the FuelsManager OPERATE window
Window ¦ Close All
Closes all currently open windows
Help ¦ Table Of Contents
Opens this manual in Adobe Acrobat® for online reference at the ‘Table of
Contents’ section
Help ¦ Movements
Opens this manual in Adobe Acrobat® for online reference at the ‘Using Product
Movement’ section
Help ¦ For Beginners
Opens this manual in Adobe Acrobat® for online reference at the ‘Using This
Manual’ section
Help ¦ Menu Commands
Opens this manual in Adobe Acrobat® for online reference at the ‘OPERATE
Window Elements’ section
USM003GVAE01005
7
Varec
Help ¦ Alarm System
Opens this manual in Adobe Acrobat® for online reference at the ‘Alarm Tools’
section
Help ¦ Using Operate
Opens this manual in Adobe Acrobat® for online reference at the ‘Getting
Started with OPERATE’ section
Help ¦ Keyboard Shortcuts
Opens this manual in Adobe Acrobat® for online reference at the ‘Keyboard
Shortcuts’ section
About Operate
Opens the About FuelsManager dialog box
8
User Manual
Working with Individual Tanks
9
Varec
Understanding Tank Details
Each tank within the facility has a corresponding Tank Detail window. The operator
is able to see various information for a single tank in these windows.
Tank Detail Fields
Note! Please refer to the ‘Tank
Detail Description’ section for a
complete description of fields on
the Tank Detail window.
The following pages explain the meaning of the standard fields shown on a Tank
Detail window. Since the Tank Detail template is configurable, the Tank Detail may
look differently based on the facilities requirements. In addition, FuelsManager
can use a different Tank Detail template for different types of tanks, hence, the
Tank Detail fields may differ depending on the tank selected.
Viewing Tank Details for a Single Tank
Note! Multiple ‘Tank Detail’
windows can be opened using
these methods.
To view details for a single tank, users must first open the Select Tank Point dialog
box. This allows access to all tanks in the current database and enables operators
to select an individual tank to view its details. Using a keyboard shortcut is the
simplest method available to open this window.
Step-by-Step: Keyboard Shortcut
• Press ‘F7’ key on the keyboard. The Select Tank Point dialog box appears.
Tank information
Data field
Measured values
SET button
Calculated values
Alarm tool bar
Tank image
10
User Manual
FuelsManager Defense
Select Tank Point dialog box
Selecting a Tank Detail to View
Once the Select Tank Point dialog box has been opened, then:
Step-by-Step
• Press ‘F7’ key on the keyboard. The Select Tank Point dialog box appears
• Choose a specific Tank Point to be displayed on screen. The selected Tank
Point is highlighted.
• Click Select. The selected Tank Detail window appears.
USM003GVAE1005
11
Varec
Modifying Tank Parameters
Note! The Operator Command
dialog box shows the user current,
minimum and maximum values.
On the Tank Detail window, any modifiable tank parameters contains a SET button
next to the field. When modifying a tank parameter, the operator has the option of
forcing the input data to the entered value. This will, of course, affect the value of
any calculated data derived from inputs, which are forced.
Step-by-Step
• Click the appropriate SET button to enter a new value. The Operator
Command dialog box appears. This example dialog box lists the attributes
of the variable, such as database system, the database point and tank
description.
• Change current values by typing the required value in the text box or by
sliding the scroll bar.
• Click the Manual Override check box. This overrides the current value in the
system.
• Click the Execute button to change the value. The new value is transmitted
to the FuelsManager System.
Operator Command
dialog box
12
User Manual
FuelsManager Defense
Overriding a Value
The Manual Override feature is enabled for a value that is receiving data from the
field, the operator is able to manually override a database value. These values are
denoted by FRC anywhere the database value appears. Other values may be
affected by these forced values. These values also contain superscripts indicating
the consequence of the forced value. Several example values containing
superscripts are shown in the following table.
Superscript values
Description
FRC
Input data has been forced to the current value.
OVR
Input data exceeds maximum value (over range).
UND
Input data falls below minimum value (under range).
CAL
Calculated data has been derived.
Note! The SET buttons involved in
performing a tank transfer are
different from the SET buttons
mentioned in this discussion.
Please see the operations section
entitled ‘Tank Transfers‘.
A forced value shown
in the Tank Detail
window
USM003GVAE1005
13
Varec
Tank Calculations
The Calculator command from the window menu allows the operator to perform
calculations manually for tank data. This option is useful for performing ‘what if’
type calculations, allowing the operator to see what the level would be if 5000
gallons of product was added to the tank or what volume would be at the high level
alarm limit. The results of the calculations are only shown within the Calculator
dialog box and not transferred to the Tank Detail.
Note! In order to perform
calculations, a Tank Detail window
must be displayed and currently
active.
Opening the Calculator
Step-by-Step
• Select Window from the Menu bar. A pop-up menu appears.
• Choose Calculations. The Calculator dialog box appears.
Performing a Calculation
Note! Changing values in the
Calculator does not affect the
existing data found in the Tank
Detail window.
Some values within the calculator cannot be changed. These values appear gray.
Step-by-Step
• Select Window from the Menu bar. A pop-up menu appears.
• Choose Calculations. The Calculator dialog box appears.
• Click on the parameter to be changed. An Operator Command dialog box
will be displayed.
• Select or type in the new value.
• Click Execute. The changes appear in the Calculator dialog box.
Note! Operators are able to print
out the results of any calculations
from the Calculator dialog box.
Changing one parameter value causes all data derived from the parameter to be
recalculated, i.e. changing the level parameter will cause all volumes to be
recalculated.
Calculator dialog
14
User Manual
FuelsManager Defense
Tank Transfers
FuelsManager OPERATE provides each tank with advisory and transfer shutdown
setpoints. During Tank Transfers:
• The database calculates the volume of product transferred and time
remaining to transfer completion.
• Operators are notified when the advisory setpoint is reached.
• An operator alarm occurs when the shutdown setpoint is reached, indicating the end of
the transfer.
Performing a Tank Transfer
A Tank Transfer can only be configured from the Tank Detail window. To perform a
transfer, follow the operations below:
Note! Clicking execute affects the
displayed units found in the
Advisory and Transfer SD
(Shutdown) Setpoint.
Operator Command
dialog box for tank
transfers
Step-by-Step
• Click on the Transfer Mode Set button. An Operator Command dialog box
appears. In this dialog box, users can use various methods to transfer
product, see the transfer mode command descriptions opposite.
• Select the mode for the Tank Transfer.
• Click Execute.
• Click on the Transfer Shutdown Set button. An Operator Command dialog
box appears.
• Select or type in the new tank value.
• Click Execute.
• Click on the Advisory Setpoint Set button. The Operator Command dialog
box appears.
Continued...
USM003GVAE1005
15
Varec
...Continued
• Select or type in the time. This time is used to set when the Advisory Alarm
occurs. Click Execute.
• Click Tank Command Mode Set button. An Operator Command dialog box
appears.
• Select the appropriate command and then click Execute. This action begins
the transfer process.
Once the Tank Transfer Process is Complete
Step-by-Step
• Click the Transfer Mode button. An Operator Command dialog box appears.
• Select Inactive and click Execute.
16
Transfer Mode Command
Description
Inactive
Terminates a transfer
Xfr Level
A transfer that is terminated by defined
Level.
Xfr Volume
A transfer that is terminated by Stop Total
Volume.
Xfr Diff Vol
A transfer that is terminated by the Stop
Differential Volume (change in volume).
Xfr Mass
A transfer that is terminated by the Stop
Mass.
Xfr Diff Mass
A transfer that is terminated by the Stop
Differential Mass (change in mass).
User Manual
FuelsManager Defense
Tank Mode Command
Description
Stop
Stops tank - No movement allowed
Fill
Fills tank - Upward movement only
Empty
Empties tank - Downward movement only
Run
Tank could be Filling/Emptying/Stopped.
Mode alarms are disabled
Test
Mode and Operational alarm disabled.
Level alarms not affected
Reset
Resets an illegal Movement Alarm Current.
Level/Volume are recaptured and
movement monitoring begins again based
on the new data
Out of Service
Tank is disabled. All alarms are disabled.
USM003GVAE1005
17
Varec
Tank Detail Field Descriptions
18
Field
Description
Tank
Displays the name of the tank.
Description
Displays the description of the tank.
Product
Displays the product and product description
contained in the tank.
Level
Displays the current level of the tank.
Level Time
Displays the last time that the tank level was
updated.
Temperature
Displays the current temperature of the tank.
Gross Volume
Total measured volume of the product, corrected for
Water Level, % BSW, and Roof Volume. This is
calculated from the tank gauge reading and the
tank-strapping table.
Net Standard Volume
The corrected volume of the product in the tank.
This is calculated by multiplying the Gross Volume
by the Volume Correction Factor.
Net Available Product.
Net Volume of product that can safely be issued
from the tank. This is calculated by subtracting the
Net Standard Volume at the minimum working level
from the current Net Standard Volume.
Net Remaining Capacity
Net Volume of product that can be added to the
tank. This is calculated by subtracting the current
Net Standard Volume from the Net Standard Volume
at the maximum working level.
Density
Displays the current observed density of the product
at the current temperature.
Density Time
The last time that the Density value was updated.
Standard Density
Displays the density of the product corrected to the
standard temperature as defined by the selected
correction method.
Mass
Displays the product mass based on density.
Water Level
Displays the level of water (if any) in the tank.
Water Volume
The volume calculated from the strapping table at
the water level.
Flow Rate
The rate of movement based on consecutive level
readings. Calculated from the change in volume and
the time interval between scans of the tank level.
User Manual
FuelsManager Defense
Field
Description
Tank Command Mode
The desired mode of the tank operation: stop, fill,
empty, run, test, reset, or out of service.
Tank Status
The actual direction of product flow into or out of a
tank. The current state of the tank mode: stopped,
filling, emptying, running, testing, or disabled.
Transfer Mode
How the transfer is measured: inactive, level, mass,
volume or by differential volume or mass.
Transfer Status
The current status of a transfer; displays In
Progress, Advisory, or Complete. If there is no
active transfer for the tank, the status is Inactive.
Transfer Shutdown
Setpoint
Displays the desired ending point of a tank transfer.
Advisory Setpoint
The time that a transfer alarm should be triggered.
Can be from 0-120 minutes before the transfer
reaches the Transfer SD Setpoint.
Transferred Volume
The amount of volume transferred into or out of a
tank during the tank transfer, or the amount
transferred thus far if a transfer is active.
Time Remaining
The time left to complete an active transfer, based
on the amount left to transfer, and the current flow
rate.
HiHi Alarm
The limit for a high-high level alarm. If the tank level
exceeds the HiHi Alarm, then an alarm ensues.
Hi Alarm
The limit for a high level alarm. If the tank level
exceeds the Hi Alarm, then an alarm ensues.
Lo Alarm
The limit for a low level alarm. If the tank level drops
below the Lo Alarm, then an alarm ensues.
LoLo Alarm
The limit for a low-low level alarm. If the tank level
drops below the LoLo Alarm, then an alarm ensues.
USM003GVAE1005
19
Varec
Command Summary
Display ¦ Open ¦ Tank Detail (F7)
Allows the user to select a Tank Detail to open
Display ¦ W&M Tag Seals
Allows the user to view the seal status for Weights & Measures approved tanks
Display ¦ Communications
Allows the user to view the communication status of all OPERATE screens
Point ¦ Define
Allows the user to select a Database Point to monitor
Point ¦ Open Restore (F4)
Opens/Restores the Database Point Monitor
Point ¦ Close Window
Closes the Database Point Monitor
Point ¦ Minimize
Minimizes the Database Point Monitor
Window ¦ Calculations
(Only available when a Tank Detail screen is open)
Allows the user to perform and print 'What if' calculations
20
User Manual
Working with Multiple Tanks
21
Varec
Understanding Tank Groups
FuelsManager OPERATE provides the user with two different ways of viewing
Tank Group information: a Static Group or a Dynamic Group.
Static Tank Groups
These are combinations of tanks selected from the current database. The tanks
included in each static group will be pre-configured when the system is installed,
although the operator may also add/delete tanks to/from groups or create
completely new groups. The tanks included in static groups remain constant
unless a tank is added, inserted or deleted manually.
For example, generally all Static Tank Groups will be based on the location of the
tanks - Static Tank Group 1 = all tanks displayed from West tank farm.
Dynamic Tank Groups
As their name suggests, Dynamic Tank Groups can constantly change. They are
made up of tanks with characteristic limits defined by the operator. Any tank with a
characteristic that fits within these limits will be added to the Tank Group. Any tank
within the database, but outside the limits, will not be displayed.
For example, Dynamic Tank Groups are made up of tanks that fit defined
characteristics - e.g. Dynamic Tank Group 1 = all tanks on a facility that have a
temperature above 40° degrees.
Graphical and Tabular Based Window Displays
FuelsManager OPERATE also provides two (2) ways to display Static and
Dynamic Tank Groups. The operator is able to see graphical information
overlayed onto tank images or a text information in a table form. Both types of
windows provide access to the same process data and allow the operator to:
•
•
•
•
•
•
22
View the Process Data of any tank
Display multiple tanks per page in any order
Add and delete existing displays
Add and delete existing entries
Change the value of tank variables
Access the Tank Detail window for any selected tank
User Manual
FuelsManager Defense
Opening a Tank Detail Window from a Tank Group Window
Operators can easily view a Tank Detail if a Tank Group window is currently
active.
Step-by-Step: Option 1
• From the Tabular Tank Group window, double-click on a real-time data field
for the Tank Detail to be opened. The selected Tank Detail window appears.
Step-by-Step: Option 2
Note! Use the ‘F9’ key on the
keyboard to toggle between a
tabular based view and a graphical
view of a Tank Group.
• From the Graphical Tank Group window double-click on a tank image for the
required Tank Detail. The selected Tank Detail window appears.
Both Graphical and Tabular based windows allow the operator to customize the
information displayed using modify, add, insert, clear or delete commands.
Graphical Tank Group
Tabular Tank Group
USM003GVAE1005
23
Varec
Viewing a Tank Group
To view details for multiple tanks, operators must first open the Tank Group Select
dialog box.
Opening a Tank Group
This shows all Tank Groups in the current database and enables operators to
select a group of tanks to view. Open this window using a keyboard shortcut:
Step-by-Step: Keyboard Shortcut
• Press ‘F8’ key on the keyboard. The Tank Group Select dialog box appears
Tank Group Select
dialog box
The operator has a number of options from this dialog box, such as:
•
•
•
•
24
Create a template that the Tank Group display uses
Create a new Tank Group
Delete any Tank Group
Rename any Tank Group
User Manual
FuelsManager Defense
Selecting an Existing Static Tank Group to View
From the Tank Group Select dialog box operators are able to create new Tank
Groups or view existing Tank Groups. In this example, we will view an existing
Tank Group. The dialog box provides two choices, Static or Dynamic. The system
will have a number of pre-defined groups. To view these, operators must first
expand the tree structure of the Static Groups
Note! When a Tank Group is
selected, the group appears on
screen in the same format as the
last viewed Tank Group, either
Tabular or Graphically based.
Step-by-Step
• Click on the box with the ‘+’ sign to the left of Static. The tree structure
expands to show the predefined Tank Groups.
• Choose the desired Tank Group. The choice is highlighted.
• Click the Select button or double-click on the tank. The selected Tank Group
window appears.
Selecting an Existing Dynamic Tank Group to View
From the Tank Group Select dialog box, operators must first expand the tree
structure of the Dynamic Group to see the available choices of Dynamic Groups.
Step-by-Step
• With the mouse click on the box with the ‘+’ sign to the left of Dynamic. The
tree structure expands to show the predefined Tank Groups.
• Choose the desired Tank Group. The choice is highlighted.
• Click the Select button or double-click on the tank. The selected Tank Group
window appears.
Opening Multiple Tank Groups
FuelsManager OPERATE allows operators to open multiple Tank Group windows.
To do this, simply repeat the previous instructions.
USM003GVAE1005
25
Varec
Graphical Tank Group Display
The operator can place up to 105 tanks on a single Static Tank Group at one time.
However, an unlimited amount of tanks may be added for a Dynamic Tank Group.
Each tank is represented by a realistic, three-dimensional graphic showing the
tank size and shape. Overlayed onto these tank images, the operator can select
various amounts of information to be displayed, such as:
•
•
•
•
•
•
•
Note! Any changes made to the
Graphical Tank Group window will
also be made to the Tabular Tank
Group window.
Product Level
Alarm Level
Tank Description and Number
A single Process Variable
Flow
Tank Status
Water Level
Step-by-Step: Keyboard Shortcut
• At any point, the operator may use the ‘F9’ key on the keyboard to toggle
between a text based view and a graphical view of a Tank Group.
Tank information
Water level
Status icon
Tank type
Process variable
High Alarm levels
Flow icon
Color scheme
Level bar graph
Alarm tool bar
26
User Manual
FuelsManager Defense
Using Menu Commands from the Graphical Tank Group
The operator can modify the contents of a Graphical Tank Group window using
the Edit and the Tank Group menus. The Edit menu is available from the Menu bar
at the top of the screen and provides a number of options for the operator. Some
menu items are unavailable when the Graphical Tank Group display is active.
These items appear grey. The Tank Group menu is available by right-clicking on a
tank from the Graphical Tank Group window.
Right-click on a tank to
use the Tank Group
menu
Displaying a Process Variable
A single Process Variable can be displayed below the tank. This variable is the
same for each tank in the display.
Step-by-Step
• Select Edit menu from the Menu bar.
• Select ‘Select Alt View Process Variable’. The Select Process Variable
dialog box appears.
• From the drop-down menu, select the desired variable to display.
• Click Select. The Process Variable is shown at the bottom of each tank in
the display.
Select Process
Variable dialog box
USM003GVAE1005
27
Varec
Selecting a Background Color Scheme
FuelsManager OPERATE allows operators to choose from the following
background color schemes:
• Green grass with sky
• Sand with sky
• Earth with sky
Step-by-Step
• Select Edit menu from the Menu bar.
• Select ‘Select background Scheme’. The Select Tank Background dialog
box appears.
• Check the box below the desired background.
• Click OK. The background scheme for all tanks changes to the selection.
Showing Tank Information
Using the Edit menu, FuelsManager OPERATE allows operators to display the
following tank information as values or icons on the tank image:
•
•
•
•
28
Flow
Tank Status
Water Level
Point Description
User Manual
FuelsManager Defense
Hiding the Display Flow Icon
Step-by-Step
•
•
•
•
Select Edit menu from the Menu bar.
Move the mouse to highlight Display Flow and click.
The icon on each tank image is removed.
If the Edit menu is selected again, the check mark to the left of Display
Flow has also been removed, indicating this value or icon is not displayed.
Note! In the Edit menu a check is
displayed next to each of these
commands to indicate to the
operator that the value/icon is
displayed on the Tank Group.
Edit menu from Menu
bar
USM003GVAE1005
29
Varec
Obtaining Additional Operator Information
Various percentage values can be obtained directly from the Tank Group window,
such as:
•
•
•
•
Current Product Level
Current Water Level
Current Alarm Indication Levels
Product Flow
Step-by-Step
• Move the mouse over the bar graph.
• A box appears showing the current level as a percentage value.
• Move the mouse over the letters indicating an alarm level, e.g. High Level
alarm (H).
• A box appears showing the percentage value of contents in the tank at
which a High Level alarm will occur.
A tank as shown in the
Tank Group window
displaying Left - Current High
Level Alarm Setpoint
as a percentage value
Right - Current level as
a percentage value
Tank Status Icons
Depending on the status of the tank, additional information may be displayed to
the operator using icons in the top left corner of each tank image.
30
Test
Test mode
Mode
Test mo
Run
Run
est mo
Movement
Movement
Run
No
flow
estNo
mo
Mov
em
RFlow
Scan Failure
Failure
Scan
Reverse
Flow
Scan Failu
Reverse
Flow
Filling
an Failu
Filling
erse
Flow
Flow
Failure
Flow
Failure
an eFai
Fil
ers
Fl
Out of
of Service
Service
Out
Alarm
Alarm
Out of Servi
Emptying
Alarm
Emptying
of
Servi
User Manual
FuelsManager Defense
Changing the Number of Tanks Displayed
The operator can easily modify the tanks displayed in a Graphical Tank Group
using the Tank Group menu. The commands included in the Tank Group menu
include:
•
•
•
•
Modify/Add Tank
Insert Tank
Delete Tank
Clear Tank
Deleting a Tank from a Tank Group Display
In this example the operator can decrease the number of tanks displayed.
Step-by-Step
• Right-click anywhere on the specific tank that is to be removed from the
display. The Tank Group menu appears.
• Select Delete Tank. The tank is removed from the group.
• Press ‘F9’ to toggle to the text Tank Group window. On the text Tank Group,
the tank has also been removed.
• Press ‘F9’ to toggle back to the Graphical Tank Group window.
Modifying Tanks on a Graphical Tank Group
The operator can use the step-by-step operations shown above for deleting a tank
for the other Tank Group menu commands to change the Tank Group window.
USM003GVAE1005
31
Varec
Modifying Tank Variables from a Graphical Tank Group
Individual tank variables can be modified from the Tank Group window in a similar
way to modifying variables from the Tank Detail window. When modifying a tank
variable, the operator has the option of forcing the data to the entered value. This
will, of course, affect the value of any calculated data derived from inputs which
are forced.
Note! The Tank Group menu also
allows the operator to access Tank
Details and modify Process Data
for individual tanks.
To modify variables, the operator will first need to open the Process Data dialog
box.
Step-by-Step
• Right-click anywhere on the specific tank that is to be modified. The Tank
Group menu appears.
• Select the Process Data command. The Process Data dialog box appears
showing variables and associated values for the tank selected.
The Process Data
dialog box
Changing the Product Code for a Tank
Note! Modifying tank variables in
the Tank Group changes the
values in the Tank Detail.
Continuing from the instructions above, with the Process Data dialog box open:
Step-by-Step
• Double-click anywhere on the product code row. The Select A Product
dialog box appears.
• Select a product from the list. The product selected is highlighted and the
product name appears in the text box.
• Click Select. The product in the tank is changed to the newly selected
product.
32
User Manual
FuelsManager Defense
Changing a Tank Variable
Continuing from the instructions above, with the Process Data dialog box open:
Step-by-Step
• Double-click anywhere on the variable row that is to be changed. The
Operator Command dialog box appears. This example dialog box lists the
attributes of the variable, such as the database point, tank description and
value.
• Change current values by typing the required value in the text box or by
sliding the scroll bar.
• Click the Manual Override check box. This over rides the current value in
the system.
• Click the Execute button to change the value. The new value is transmitted
to the FuelsManager System.
Select A Product
dialog box
USM003GVAE1005
33
Varec
Tabular Tank Group Display
From this window, operators can view relevant tank information as well as modify,
add, insert, clear, or delete tank points and columns. Operators can also access a
Tank Detail for a selected point. There are five elements to this window:
•
•
•
•
•
Tank Group name
Tank Group Name
Column Headings
Real-Time Data
Column Totals
Database Points
Edit menu
Column heading
Database point
Real-time data
Column total
34
User Manual
FuelsManager Defense
Modifying Information Displayed in the Tabular Tank
Group
The user is able to modify the content and format of a Tabular Tank Group window
directly from the window in five ways.
Step-by-Step
• Right-click on the Tank Group name cell. The Tank Group Name menu
appears.
• With the mouse right-click on any Column Headings cell. The Column
Heading menu appears.
• Right-click on any Real-Time Data value. The Real-Time Data menu
appears.
• Right-click on any Database Point. The Database Point menu appears.
• From the Menu bar select the Edit menu.
Using the commands from these five menus gives the operator a large amount of
flexibility to the format and content of a tank view. The following sections briefly
describe the commands and provide some step-by-step examples of operation.
Tank Group Name
This field displays the unique Tank Group name assigned by the user. The Tank
Group name can be any combination of numbers, upper or lowercase characters,
spaces, or other punctuation marks, up to a maximum length of 30 characters.
(The Tank Group name cannot include any of the following characters: forward
slash (/), backslash (\), comma (,)).
Setting the Number of Database Levels to Be Displayed
The operator can select the number of FuelsManager database levels to be
displayed in the left hand column of the Tank Group. i.e. A typical FuelsManager
database tagname looks like:
Note! The Column Header Alias
dialog box also has a reset button
that sets the column heading text
back to the default FuelsManager
Variable text.
Area1.Tank123.TankPoint
Where:
TankPoint is database Level 0
Tank123 is database Level 1
Area1 is database Level 2
Database Level 3 does not exist in this
example.
USM003GVAE1005
35
Varec
Step-by-Step
• Right-click on the Tank Group name cell. The Tank Group Name menu
appears.
• Select Set database Levels. The Database Level Display Configuration
dialog box appears.
• Selecting the check boxes allows users to set which level, or combination of
levels to be displayed in the left hand column of the Tank Group window.
• Click OK. The format of the database levels changes according to the
selection.
Configuring Columns on Tabular Display
All column headings are user configurable. Using the Column Heading menu,
operators can modify, add, insert or delete columns, as well as display column
format, change units and select column title aliases. Depending on the contents of
the column some commands may not be available.
Modifying the Column Header Alias
From this dialog box, operators can change the text displayed for the selected
Tank Group column heading. Changing the Column Header Alias only affects the
displayed group and does not change the template.
Step-by-Step
• Right-click on the column heading to be modified. The Column Heading
menu appears.
• Select Header Alias. The Column Header Alias dialog box appears.
• In the text box, type the new Tank Group column heading.
• Click OK.
Modifying the Column Format
Note! Changing the format of a
column only affects the displayed
group and does not change the
template.
Note! If the data to be displayed is
bigger than the size entered in the
Field and Precision fields, the data
will be displayed as ###### in the
Tank Group window
36
From Set Column Format dialog box, operators can:
• Use the Precision text box to set the number of digits to the right of the
decimal point in the column.
• Use the Field text box to set the number of digits to the left of the decimal
point in the column.
Step-by-Step
• Right-click on the column heading to be modified. The Column Heading
menu appears.
• Select Display Format. The Column Header Alias dialog box appears.
• In the text box fields enter the required values.
• Click OK. The changes are applied to the column.
User Manual
FuelsManager Defense
Selecting and Displaying Engineering Units
The Select Engineering Units dialog box, which is available from the Column
Heading menu allows the operator to set the engineering units to be used for the
selected Tank Group column. The operator is provided with a number of options
from this dialog box, such as:
• A list box displaying the available engineering units applicable to the column
selected.(i.e. Temperature, Level, Volume, etc.). FuelsManager automatically
selects the appropriate unit type based on the tank variable column selected.
• The Clear button resets the engineering units for the selected column to the
default engineering units configured for the tank.
Deleting a Column from a Tank Group
Select Engineering
Units dialog box
In this example the operator can delete a column from a Text Tank Group window.
Step-by-Step
• Right-click on the column heading to be modified. The Column Heading
menu appears.
• Select Delete Column command. The column selected is deleted from the
view.
Modifying, Adding and Inserting Columns
The operator can modify, add or insert a column into the Tank Group, each
command is available from the Edit menu on the Menu bar or by using the Column
Heading menu. These commands access the Select Point Variable dialog box that
presents the operator with a list of variables. Selecting a variable from the list will
modify, add or insert a column of that type.
USM003GVAE1005
Note! When a column is inserted
into a table, the new column is
placed to the left of the initial
selection. Adding a column places
the new column at the end of the
group (to the right). Modifying a
column will replace the currently
selected column with the new
variable data.
37
Varec
Cells in a Tank Group Display
Each Tank Group cell displays the current data of the particular tank variable (as
indicated by the column heading). Changing the column variable will change the
data within that column, the operator can also modify individual cells manually.
Changing a Tank Variable in a Tank Group Cell
To manually change a tank variable in a Tank Group cell perform the following
operation:
Step-by-Step
• Right-click on the real-time field to be modified. The Real-Time Data menu
appears.
• Select Set. The Operator Command dialog box appears. This example
dialog box lists the attributes of the variable, such as the database point,
tank description and value.
• Change current values by typing the required value in the text box or by
sliding the scroll bar.
• Click the Manual Override check box. This over rides the current value in
the system.
• Click the Execute button to change the value. The new value is transmitted
to the FuelsManager System.
Changing the Font Size in the Tabular Tank Group
Note! The font size in a Tank
Group window has a maximum
and minimum value. Changing the
font size beyond these values will
have no effect.
The font size for all elements of the Tank Group display can be increased or
decreased.
Step-by-Step
• Right-click on any cell in the Tank Group. The Real-Time Data menu
appears.
• Select Increase Font Size (or Decrease Font Size). The font is changed
according to the selection.
38
User Manual
FuelsManager Defense
Total and SubTotal Rows
The FuelsManager configurable Tank Group supports the selective totals of
columns via a Total row placed at the bottom of the display or at a fixed position.
Fixing the position of the Total row allows it to remain visible when the operator
scrolls past the allowable 20 tanks per page. In addition, Static Tank groups
support SubTotal rows that can be used to provide sub-totalization of user defined
tanks.
Calculating a Column Total and SubTotal
To calculate a total or subtotal sum for a particular column, perform the following
operation:
Step-by-Step
• Right-click on the column heading to be modified. The Column Heading
menu appears.
• Select Column Total. The sum of values is shown in the Total and/or
SubTotal rows.
Selecting the Location of the Total Row
The location of the Total row can be moved so that the operator can always see
on screen the total values or it can be placed at the bottom of all rows.
Step-by-Step
• Right-click on the Database Point after the Database Point where the Total
row is to be positioned. The Database Point menu appears.
• Select Set Total Position. The Total row is now inserted into position above
the Database Point selected.
Freezing the Total Row
To freeze the position of the Total row perform the following operation:
Step-by-Step
• After positioning the Total row to a desired location on the Tabular Tank
Group grid, right-click on the Total row. The Database Point menu appears.
• Select Freeze Total Row. The Total row will remain at the set position when
the operator scrolls past the allowable 20 tanks per page
Note! If Freeze Total Row is set,
then the SubTotal Position will be
disabled from the Database Point
menu. If SubTotal Position is set,
then Freeze Total Row will be
disabled from the Database Point
menu.
Selecting the Location of the SubTotal Row
The location of the SubTotal row can be inserted to allow the operator to quickly
see the sub-totalization of user defined tanks.
Note! Subtotals can only be
inserted from a clear tank row.
For example, tanks 1-5 contain gasoline and tanks 5-10 contain crude, the
operator could build a static tank group that included tanks 1-5 followed by a
SubTotal row, then tanks 5-10 followed by a SubTotal row then a space and a final
Total row. This tank group would allow operator to quickly see the total gasoline,
the total crude supply and the overall site product totals on a single display.
USM003GVAE1005
39
Varec
Step-by-Step
• Right-click on the clear row following the tank group row(s) where the
SubTotal row is to be positioned. The Database Point menu appears.
• Select SubTotal Position. The SubTotal row is now inserted into position
below the tank group row(s).
Changing the Number of Tanks Displayed
The operator can easily modify the tanks displayed in a Tabular Tank Group using
the Database Point menu. The commands included in the Database Point menu
include:
•
•
•
•
Modify/Add tank
Insert tank
Delete tank
Clear tank
Deleting a Tank/Row from a Tabular Tank Group
In this example the operator can decrease the number of tanks displayed.
Step-by-Step
• Right-click on the Database Point to be delete. The Database Point menu
appears.
• Select Delete Tank/Row. The tank row is removed from the group display.
• Press ‘F9’ to toggle to the Graphical Tank Group window. On the Graphical
Tank Group, the tank has also been removed.
• Press ‘F9’ to toggle back to the Configurable Tank Group window.
Modifying Tabular Tank Group
The operator can use the step-by-step operations shown above in the same way
for the other commands on the Database Point menu, thereby editing the Tank
Group display.
40
User Manual
FuelsManager Defense
Dynamic Tank Groups
Dynamic Groups, as their name suggests, can constantly change. They are made
up of tanks with criteria defined by the operator. Any tank with a characteristic that
fit these criteria will be added to the Tank Group. Any tank in the database with
variables outside the criteria will not be displayed.
For example, dynamic Tank Groups are made up of tanks that fit defined
characteristics - Dynamic Tank Group 1 = all tanks on a facility that have a
temperature above 40° degrees.
To view details for multiple tanks, operators must first open the Tank Group Select
dialog box. The operator has a number of options from this dialog box, such as:
• Create a template that the
Tank Group display uses
• Create a new Tank Group
• Delete any Tank Group
• Rename any Tank Group
Creating a new Dynamic Tank Group
Tank Group Select
dialog box
From the Tank Group Select dialog box, operators must first select the type of
Tank Group to be work with before the option buttons are accessible.
Step-by-Step
• Press the ‘F8’ key on the keyboard. The Tank Group Select dialog box
appears.
• Click on the box with the ‘+’ sign to the left of Dynamic. The tree structure
expands to show the pre-defined Tank Groups. The New option button
becomes available.
• Click the New button. A New Tank Group Name dialog box appears.
• Type in the desired name for the Tank Group.
• Click OK. A new Tank Group window is opened.
USM003GVAE1005
41
Varec
Note! New Tank Groups, Static or
Dynamic, are created with column
heading set from a predefined
template.
All new Tank Groups are initially blank. The operator must add database points to
a Static Tank Group or designate a filter setup for a Dynamic Tank Group.
Note! Dynamic Tank Group
columns can be modified in the
same way as Static Tank Groups to
show the required real-time data.
Designate a Filter Setup for a Dynamic Tank Group
42
The operator must first select a number of parameters for FuelsManager
OPERATE to filter tanks into the Tank Group. Filter specifications include:
Field
Description
Filter Setup Menu
If user rights clicks within the Dynamic Tank
Group Setup dialog box, the Filter Setup menu
will display with Add, Insert and Delete
capabilities.
Conditional Expression
This is where the user will open a bracketed
expression.
Variable
Tank Variables that can be setup for filtering.
Condition
The conditions that can be setup for filtering:
>- Greater Than
<- Less Than
=- Equal To
>=- Greater Than or Equal To
<=- Less Than or Equal To
<> Not Equal To
Result
The result available for filtering will be based on
the variable selected in the Variable field. For
absolute values, there will not be a dropdown
list. However, there will be an edit field.
Close Conditional Expression
This is where the user will close a bracketed
expression. Available options are: ‘)’ or ““
User Manual
FuelsManager Defense
Unit
Allows user to select the units for the number
entered or a percent. This field is only available
for numbered variables. This field will be
populated with the available units for the
variables selected and will be disabled for
variables that do not have units.
Deadband
The deadband of the result in the selected unit
result.
In the example below, the operator needs to view all tanks from the current
database with a level greater than 30 ft. The operator would utilize the Filter Setup
to query the database for this information.
Step-by-Step
Tank Group Name
menu after rightclicking the Tank
Group Name cell.
• Right-click on the Tank Group Name cell. The Tank Group Name menu
appears. (Option 2: Select the Edit menu from the Menu bar).
• Select Filter Setup. The Dynamic Tank Group Setup dialog box appears.
• Click in the Variable cell. A drop-down menu appears with a list of variables
to choose from.
• Select Level. Level is now the selected variable.
• Click in the Units cell. A drop-down menu appears with a list of units to
choose from.
• Select ft./inch/16th. ft./inch/16th is now the selected unit. The format of the
Result and Deadband cells changes to the format of the selected units.
• Click in the Condition cell. A drop-down menu appears with a list of symbols
to choose from.
• Select the Greater Than (>) symbol. Greater Than is now the selected
condition.
• Change the value in the Result cell (00-00-00) to read 30 feet (30-00-00).
• Click OK. The Tank Group window now contains all tanks from the database
with a level greater than 30 feet.
Note! During normal operations, if a tanks level rises above or falls below 30 feet, that tank
will be added or removed from this Dynamic Tank Group display.
USM003GVAE1005
43
Varec
Refining a Dynamic Tank Group Selection
A Deadband value can be used when configuring the Filter Setup for any Dynamic
Tank Group. Continuing from the example above, the operator may only wish to
see tanks within 5 feet 6 inches of the 30 feet value.
Step-by-Step
• Right-click on the Tank Group Name cell. The Tank Group Name menu
appears.
• Select Filter Setup. The Dynamic Tank Group Setup dialog box appears with
the current values for the Dynamic Tank Group still in place.
• Scroll to see the Deadband column cell and modify this value (00-00-00) to
read 5 feet 6 inches (5-06-00). The Tank Group window dynamically
changes to contains all tanks from the database with a level within 5 ft. 6
Inches of 30 feet.
44
User Manual
FuelsManager Defense
Command Summary
Display ¦ Open ¦ Tank Group (F8)
Allows the user to select a Tank Group to open
Edit Menu
Only available when the Tank Group window is active
Edit ¦ Modify Column
Allows the user to change the currently displayed variable in the selected
column
Edit ¦ Add Column
Allows the user to add a column to the right of all existing columns in a Tabular
Tank Group
Edit ¦ Insert Column
Allows the user to insert a column to the left of the currently selected column in a
Tabular Tank Group
Edit ¦ Delete Column
Deletes the selected column in a Tabular Tank Group
Edit ¦ Modify/Add Tank
Allows the user to change the currently selected tank in a Tabular Tank Group
Edit ¦ Insert Tank
Allows the user to insert a Tank above the currently selected row in a Tabular
Tank Group
Edit ¦ Delete Tank/Row
Deletes a tank, moving all tanks up one row to fill the space
Edit ¦ Clear Tank
Clears a tank leaving all tanks in the original positions, creating a blank row /
position
Edit ¦ Display Format
Allows the user to change the numeric format for data in the selected columns
Edit ¦ Select Units
Allows the user to select the required engineering units for the selected column.
All values will be converted to the selected engineering units.
Edit ¦ Increase Font Size
Increases the font size throughout the Tank Group
Edit ¦ Decrease Font Size
Decreases the font size throughout the Tank Group
Edit ¦ Header Alias
Allows the user to customize or reset the currently selected column heading in a
Tabular Tank Group
Edit ¦ Filter Setup
Allows the user to define the criteria for a Dynamic Tank Group
USM003GVAE1005
45
Varec
Edit ¦ Select Alt View Process Variable
Allows the user to view additional process data from the Graphical Tank Group
Edit ¦ Select Background Scheme
Allows the user to select the background color scheme for a Graphical Tank
Group
Edit ¦ Display Flow
Toggles the display of the flow icon on a tank group image for a Graphical Tank
Group
Edit ¦ Display Tank Status
Toggles the display of the tank status icon if appropriate for a Graphical Tank
Group
Edit ¦ Display Water Level
Toggles the display of the water level in the tank bar graph for a Graphical Tank
Group
Edit ¦ Display Point Description
Allows the user to display the Tank Point description for a Graphical Tank Group
Edit ¦ Toggle View (F9)
Toggles between the Graphical and Tabular Tank Group views
From Tank Group Menu
Tank Detail
Opens the selected Tank Detail window
Process Data
Displays the Process Data for the selected tank
Set
Allows the user to view or change the currently selected variable
Column Total
Calculates a total value for the selected column and displays this in the Total row
Sort Ascending
Arranges columns in a Tabular Tank Group into ascending order
Sort Descending
Arranges columns in a Tabular Tank Group into descending order
Set Total Position
Positions the Total row above the selected column
Set Total At Bottom
Positions the Total row at the bottom of the Tank Group
Freeze Total Row
Freezes the Total row in its current position
SubTotal Position
Changes the currently selected row (selected row must be cleared first) to a
subtotal row
46
User Manual
FuelsManager Defense
Set Database Levels
Allows the user to select how much of the database tag-name to be displayed in
the left most column in a Tabular Tank Group
USM003GVAE1005
47
Varec
48
User Manual
Custom Graphics
(Professional Edition Only)
49
Varec
Understanding Custom Graphics
Graphic windows may be custom designed and, therefore, each capability is
specific to each facility. For example, a custom graphic window may have built in
buttons, animations or hotlinks that allow the operator to:
•
•
•
•
•
•
Note! The availability of menu
items will change according to the
type of window displayed. The
Display, Alarm, Point and Tools, as
described in the proceeding
sections, remain constant for each
window type.
50
View facility specific graphics, such as a tank farm overview
Maneuver between windows
Open multiple graphics
Set values
Open reports
Open custom help files
Typical custom graphics include Site Overviews and Process Diagrams. Site
Overviews are custom graphics that may display a facilities tanks. Clicking on a
tank from the site overview custom graphic will cause the Tank Detail window to
open. Process Diagrams are custom graphics that show piping and
instrumentation status, with hotlinks allowing the user to change the status directly
from the custom graphic. For example, when the mouse is moved over an item,
such as a valve, a hand will appear, indicating the user may ‘click’ and link to a
dialog box or custom graphic. In this example, the user may then be allowed to
open or close the valve using a command from the dialog box.
User Manual
FuelsManager Defense
Opening a Graphic Window
The operator first needs to open the Graphic Display Selection dialog box. From
there, they may select a particular graphic to open.
Step-by-Step: Keyboard Shortcut
• Press ‘F2’ key on the keyboard. The Graphic Display Selection dialog box
appears.
• From the list, select the particular graphic display. The selection is
highlighted.
• Click OK. The graphic window opens.
USM003GVAE1005
Left - Site Overview
Custom Graphic
Right - Process
Diagram Custom
Graphic
Note! When FuelsManager
OPERATE starts one graphic is
displayed. This is a custom graphic
and is referred to as the Index
Graphic specific to each facility.
51
Varec
Command Summary
Display ¦ Open ¦ Graphic (F2)
Allows the user to select a graphic to open
52
User Manual
Working with Reports
53
Varec
Predefined Reports
Operators may work with a number of predefined reports that are supplied with
FuelsManager OPERATE or create custom reports specific to each facility. The
reports discussed in this section are reports that were created in FuelsManager
REPORT. To display a report, operators must first open the Report Manager
dialog box, which enables operators to:
•
•
•
•
Note! When a report is displayed
on screen the menu bar contains
two additional menus, Print and
Page.
Print a report on demand
Select a printer
Display a report
Enable and disable reports
To open the Report Manager dialog box, perform the following steps:
Step-by-Step: Keyboard Shortcut
• Press ‘F3’ key on the keyboard.
• Select the desired report in the Report Manager dialog box. The report will
now be highlighted.
• Choose Display. The selected report is displayed.
Left - Report Manager
dialog box
Right - Report window
When displaying reports on screen, FuelsManager OPERATE allows operators to
work with multiple reports, with each report displayed in a separate window.
Viewing Multiple Page Reports
Multiple page reports can be viewed using the commands from the Page menu,
keyboard shortcuts or the window scroll bars. The Page menu is shown here with
the commands and associated keyboard shortcuts.
54
User Manual
FuelsManager Defense
Enabling and Disabling a Report
The operator is able to disable or enable a selected report from the Report
Manager dialog box.
Step-by-Step
• Select the desired report in the Report Manager dialog box. The report will
now be highlighted.
Either...
• Click Enable. The selected report becomes active.
Or....
• Click Disable. The selected report becomes inactive.
An operator may want to disable a report for several reasons:
• Printing problems
• Printer maintenance
• Operator shifts
USM003GVAE1005
55
Varec
Printing a Report
The operator can print an undisplayed report from the Report Manager dialog box
or print a displayed report from the Report window:
Print an Undisplayed Report
Open the Report Manager dialog box using the previous instructions and then:
Step-by-Step
• Select the desired report in the Report Manager dialog box.
• Confirm that the correct printer is selected.
• Click Print.
Print a Currently Displayed Report
Make sure the report window is the currently selected window and then:
Step-by-Step
• Click the Print menu. The Print dialog box appears
• Select the print options.
• From this dialog box, users are able to select the desired printer, define the
print range and the number of copies. Operators also have the option of
printing to a disk file.
• Click OK.
Print to File
Selecting the ‘Print to File’ option allows the operator to store the report as a disk
file in the project directory as opposed to printing a hard-copy report.
Step-by-Step
• From the Print dialog box, select ‘Print to File’.
• Select OK. The Print to File dialog box appears.
• Enter a file name using a *.prn file extension (e.g. TankFarmWest.prn).
56
User Manual
FuelsManager Defense
Notes on Printing Reports
• Active reports are printed at preset intervals and print times defined when the
report was created.
• Enabling a report causes the report to print at its next specified print time or
interval.
• Inactive reports do not print at specified times.
• Contact an Administrator or Supervisor for a list of scheduled report print
times and intervals.
• Printing the report does not affect its pre-defined print time or interval. For
example, suppose the Current Tank Inventory Report is set to print every
hour (03:00, 04:00, etc.). Printing the report at 03:50 does not affect its
scheduled time of 04:00.
• Print Files, which may be viewed using any text file application, should be
stored in the project directory. The designated subdirectories where the files
are stored depend on the facility. Consult an Administrator or Supervisor
before continuing.
For example, suppose there are three shifts: morning, swing and night. The
Current Tank Volumes report (which is set to print every 2 hours) is not printed
during the night shift. So, the swing shift operator disables the report before he or
she leaves. At the end of the night shift, the night shift operator enables the report,
so that it is printed at the next interval.
USM003GVAE1005
57
Varec
Other Types of Reports
Other reports that can be output from FuelsManager OPERATE include:
• Historical Reports
• Automatic Alarm/Event Reports
• Log File Browser Reports
Note! Please refer to the section
‘Working with Alarms’ for details on
Automatic Alarm/Event and Log
File Browser reports.
Historical Reports
For complete instructions on configuring historical reports, refer to the
FuelsManager Administrator Manual. There may be a number of historical reports
predefined in the system that operators may be able to open, these could include:
•
•
•
•
•
•
•
•
Current Tank Inventory
Active Tank
Inactive Tank
Last Full Day Tank Change
7-Day Tank Change
Last Full Week Tank Change
Last Full Month Tank Change
Month to Date Tank Change
Tool bar
Report type
Report details
Scroll bars
58
User Manual
FuelsManager Defense
Opening a Historical Report
To open a predefined historical report perform the following steps:
Step-by-Step
• Click Display menu from the menu bar.
• Select Open.
• Select Historical Reports. The historical reports submenu appears with a list
of pre-defined reports.
• Select the report required from the submenu. The historical report window
opens showing the required data.
Note! The operator can navigate
through historical reports on
screen using the scroll bars or tool
bar at the top of the window. They
may also print the report using the
icon on the tool bar.
Historical Reports
menu
USM003GVAE1005
59
Varec
Command Summary
Display ¦ Open ¦ Report (F3)
Allows the user to select a Real-Time report to open
Display ¦ Open ¦ Historical Reports
Displays a list of submenu commands that allow the user to open various types
of reports, which will be listed as submenus
Print Menu
Only available when a report window is active - Allows the user to print the
current report
Page ¦ Next Page (Ctrl + PgUp)
Displays the next page of the currently displayed report
Page ¦ Previous Page (Ctrl + PgDn)
Displays the previous page of the currently displayed report
Page ¦ Screen Down (PgDn)
Scrolls down the current page of the currently displayed report
Page ¦ Screen Up (PgUp)
Scrolls up the current page of the currently displayed report.
60
User Manual
Working with Trends
61
Varec
Understanding Tank Trends
The Trend feature allows operators to view Real-Time and Historical Trends. The
defined trend displays data in a time-versus-magnitude format that simulates the
operation of a conventional strip chart recorder. A horizontal time-line is provided
for movement across the trend. The values, corresponding to the position of the
time-line, are displayed in decimal form. An optional grid may be displayed within
each window with horizontal and vertical line spacing that can be modified at any
time.
Tank Trends are only accessible from the Tank Detail window using the Trend
menu. Tank Trends allow the user to view one or more database point variables
for that particular tank. For example, a Tank Trend can track the tank level,
temperature and gross volume of a single tank.
Generic Trends
Generic Trends provide access to one or more database point variables for one or
more database points. This can be any point or variable from the configured
database. For example, a Generic Trend can show tank level from three different
tanks simultaneously.
Real-Time and Historical Trends
Note! The user can view both Tank
and Generic Trends in real-time or
from a historical database.
62
Real-Time Trends provide the user with current information from the moment the
trend window is opened. Historical Trends use recorded data. The operator
provides a start and end time for the trend to be produced. Both types of Trends
have a preset configuration for a given database point. For Historical Trends to be
produced, FuelsManager OPERATE must have access to historical data for the
time specified.
User Manual
FuelsManager Defense
Trend Window
Area
Description
Pen Box
The pen box allows users to view the cursor information at the slide bar position
within the display grid. Operators can change the pen attributes temporarily by
clicking in the pen box.
Time & Date
The time and date area displays the time and date at the slide bar. In a Real-Time
trend, the Pause button freezes the display grid allowing users to view a particular
time and date.
Value Scale
Value scale defines the vertical axis in value increments. The values are drawn from
the historical database and are displayed in decimal form. Operators can set the
Major and Minor Divisions for the vertical axis.
Time Bar
Time bar defines the placement of the time axis. Operators can display the time axis
along the top and/or bottom of the grid by selecting the desired option(s).
Display Grid
The display grid gives users a graphical representation of what the tank has done.
The values are displayed in decimal form.
Slider Bar
The slide bar allows users to display information at a particular time within the display
grid, the values are shown in the pen boxes.
Pen box
Display grid
Value scale
Time
Time bar
USM003GVAE1005
63
Varec
Opening a Predefined Trend from a Tank Detail
The most common trend operation for the operator is to open a Real-Time Tank
trend from a Tank Detail window. With the required Tank Detail window open,
follow these steps:
Step-by-Step
• From the Menu bar select the Trend menu.
• Open the Real-Time submenu.
• Select Open. The Tank Trend window opens.
Note! One section of the RealTime Trend Definition dialog box
differs for Real-Time and Historical
trends. For Historical trends, the
operator provides a start and end
time for the trend to be produced in
the Time Span section.
Configuring a Tank Trend for an Existing Tank
Operators can customize or create their own Trends. This example shows how to
modify the existing, pre-defined configuration for a Tank trend. With the required
Tank Detail window open, follow these steps:
Step-by-Step
• From the Menu bar select the Trend menu.
• Extend the Real-Time submenu and select the Configure command. The
Real-Time Trend Definition dialog box opens.
64
User Manual
FuelsManager Defense
Defining Real-Time Trends
The following fields in the Real-Time Trend Definition dialog box need to be filled,
selected or chosen. Some fields are pre-defined, but can be changed
Step-by-Step
• From the Menu bar select the Trend menu.
• Extend the Real-Time submenu and select the Configure command. The
Real-Time Trend Definition dialog box opens.
• Type in a description of the trend.
• Choose a style.
• Define a time span.
• Define a time bar.
• Select the grid colors.
• Define a value scale.
• Select the open attributes using the steps below described in the ‘Selecting
Pen Attributes’ section.
Note! The trend filename, can
have up to 35 characters and can
be different from the trend
Description, which can have up to
30 characters. The files contain
the.rat file extension.
Real-Time Trend
Definition dialog box
USM003GVAE1005
65
Varec
Field/Section
Description
Description
Used to record a more detailed explanation of the trend. The
description appears in the Trends menu bar
Style (Discrete/
Overlapped)
The Discrete Style option allows each pen to have a separate
window. The Overlapped Style option allows all pens to be
plotted in a single window.
Time Span
Defines the time interval in which the system retrieves new
data. Operators can set the time interval of how often new
data is added to the trend in the Sample Rate field and the
interval units in seconds, minutes or hours
Time Bar
The Time Bar defines the horizontal axis in time increments.
Operators can set the Major and Minor Divisions for the
horizontal axis.
• A Major Division is the number of Divisions that can fit in
the width of the Real-Time Trend window.
• Minor Divisions are the # of cells in one Major Division.
The lines defining Major Divisions are thicker than the
lines defining Minor Divisions.
• Operators can display the time along the top and/or
bottom of the grid by selecting the desired option(s).
• Time/Maj Div. defines the length in time it takes to
complete one Major Division of the time bar. The number
entered in this field can be defined in seconds, minutes,
or hours. For example, entering 10 seconds for the
Time/Maj Div entry causes 10 seconds to complete one
Major Division.
• The Format defines the type of time format that the
system displays along the horizontal axis.
Grid Colors
Grid colors define the three system colors for the grid
Divisions and background.
Value Scale
Value Scale defines the vertical axis in value increments. The
values correspond to the real-time database and are
displayed in decimal form. Operators can set the Major and
Minor Divisions for the vertical axis.
• A Major Division is the number of Divisions that can fit in
the height of the Real-Time trend window.
• Minor Divisions are the # of cells in one Major Division.
The lines defining Major Divisions are thicker than the
lines defining Minor Divisions.
• Operators can display the value on the right and/or left of
the grid by selecting the desired option(s).
66
User Manual
FuelsManager Defense
Selecting Pen Attributes
The right side of the Real-Time Trend Definition dialog box displays the settings
for pens (Up to four pens may be created). Each variable may have a unique pen
color assigned for plotting. Scales are drawn at the right vertical axis depending
on the number of pens selected. Both the scale and the range are color-coded to
match the pen selected
Step-by-Step
•
•
•
•
•
•
•
After defining a trend as described in the ‘Defining Real-Time Trends’.
Click on the Pen 1 button. The Pen Attribute dialog box appears.
Choose Scaling parameters. Scaling
Choose Pen Color.
Choose Pen Width.
Select Other Options.
Click OK. The changes are temporarily made to the Tank Trend displayed.
Pen Attributes dialog
box
Field/Section
Description
Scaling
Defines the minimum and maximum range of the variable
selected. The initial values in this area are derived from the
limits defined during database configuration.
Pen Color
Defines the color of the pen used when plotting the results on
the screen.
Pen Width
Pen Width defines the thickness of the line being plotted on
the screen.
USM003GVAE1005
67
Varec
68
Field/Section
Description
Options
Other Options include selecting the trace style of the trend.
The Filled Trace produces a solid trace. The Display Scale is
shown on the vertical axis.
User Manual
FuelsManager Defense
Changing the Point Variable for a Tank Trend Pen
Each pen within a Tank trend corresponds to a database point variable for that
particular tank. Pens may be modified to display different variables in the current
trend, to do this follow the steps below.
Select Point Variable
dialog box
Step-by-Step
• From the Pen Attributes dialog box click Edit.
• The Select Point Variable dialog box appears. This dialog box displays the
choices appropriate for this value: the type and variable.
• Scroll through the list and choose a variable, then click OK. The Pen
Attribute dialog box appears.
• Confirm that the correct point and variable are displayed in the dialog box
and click OK.
• Repeat the procedure for additional pens from the Real-Time Trend
Definition dialog box.
USM003GVAE1005
69
Varec
Defining Pen Attributes from a Trend Window
The operator is able to define Pen Attributes from the Trend window and during
the editing or creating a trend process.
Step-by-Step
• From the Trend window click on the colored Pen Title bar. The Pen Attribute
dialog box appears.
• Make the selections for Pen Attributes based on options 2-5 described in
the ‘Selecting Pen Attributes’ section.
• Click OK. The changes are temporarily made to the trend displayed.
Editing a Trend
To edit a Trend, perform the following steps:
Step-by-Step
•
•
•
•
•
•
•
•
From the Menu bar, select Display.
Select the Open submenu.
Select Real-Time trend.
The Select Trend Definition dialog box opens.
Highlight the desired filename.
Click Edit. The Real-Time Trend Definition dialog box appears.
Choose the required selections.
Many of the selections are similar to creating a new trend. Please reference
the section above.
• When all changes are made, re-save the Trend file. Operators are also able
to save this as a new file.
70
User Manual
FuelsManager Defense
Creating a New Generic Tank Trend
FuelsManager OPERATE provides operators with the ability to customize and
create their own trends. In this example users can create a new Generic, RealTime Trend.
Step-by-Step
•
•
•
•
•
•
•
From the Menu bar select the Display menu.
Select the Open submenu.
Select Real-Time trend.
The Select Trend Definition dialog box opens.
Select New.
The Real-Time Trend Definition dialog box appears
Modify, change and select all the entries as previously described for a Tank
trend until it is fully configured.
• All changes are permanently made to this trend when it is saved.
Defining the Database, Point and Variable
The operator is able to define the database, point and variable for a specific pen
during when creating or editing a trend. Continuing from the Step-by-Step
instruction above, with the Select Trend Definition dialog box open:
Database Edit
dialog box
USM003GVAE1005
71
Varec
Step-by-Step
• Click on the Pen 1 button.
• The Database Edit dialog box appears. From this dialog box, the user is
able to define the database, point and variable for this specific pen.
• Click on the Database button to select the DataManager.
• A Select DataManager Subsystem dialog box appears.
• Click on the desired DataManager.
• The system highlights and places the selection in the System field.
• Click Select.
• The Database Edit dialog box appears with the selection.
• Choose the desired point name and click Select.
Continued...
Select Database Point
Variable dialog box
...Continued
• The Select Database Point Variable dialog box appears showing the
selection. To change the selection, click on either the Database, Point or
Variable buttons again.
• If these selections are correct click Select.
• The Pen Attributes dialog box appears.
• Modify the Pen attributes as detailed in the sections above, then Click OK.
• The Real-Time Trend Definition dialog box appears.
• Modify, change and select all the entries as previously described for a Tank
trend until it is fully configured.
• All changes are permanently made to this trend when it is saved.
Note! In the Database Edit dialog box users are able to browse through these levels by
using the <<Prev Level and Next Level>> buttons. The Select button is not enabled until
the last level is selected.
72
User Manual
FuelsManager Defense
Command Summary
Display ¦ Open ¦ Real-Time Trend
Allows the user to select a Real-Time (Generic) trend to open
Display ¦ Open ¦ Historical Trend
Allows the user to select a Historical (Generic) trend to open
Trend Menu
Only Available when a Tank Detail is open
Trend ¦ Real-Time
Displays a list of submenu commands
Trend ¦ Real-Time ¦ Open
Opens the currently configured Real-Time trend for the selected tank
Trend ¦ Real-Time ¦ Configure
Allows the user to configure the values for the Real-Time trend
Trend ¦ Historical
Displays a list of submenu commands
Trend ¦ Historical ¦ Open
Opens the currently configured Historical trend for the selected tank
Trend ¦ Historical ¦ Configure
Allows the user to configure the values for the Historical trend
USM003GVAE1005
73
Varec
74
User Manual
Working with Alarms
75
Varec
Alarm Tools
FuelsManager OPERATE provides the operator with two methods of working with
alarm configuration, display and management: the Alarm menu and the Alarm tool
bar.
Alarm Menu
This menu enables users to silence, acknowledge, and browse through alarms.
Operators are also able to access the Alarm Summary. The menu options include:
Alarm menu
Silence
The Silence command allows users to silence the alarm(s).
Alarm Line
The Alarm Line submenu includes the same capabilities found on the Alarm tool
bar. Selecting any of these options produces the same result as pressing the
corresponding icon button on the Alarm tool bar.
Summary
The Summary submenu is used to open, restore, and close the Alarm Summary
window. The Alarm Summary lists the current alarms with the most recent alarm
displayed at the top of the list. Once opened, users are able to change the length
of the Alarm Summary by clicking and dragging the bottom edge to a desired
position.
Log File Browser
Opens the Log File Browser, where the operator can view and print reports for
alarms and events.
Alarm Tool Bar
The Alarm tool bar is located at the bottom of FuelsManager OPERATE window. It
allows users to acknowledge and view alarm information such as the number of
alarms, the alarm description and alarm priority.
Indicator box
Buttons
Database Point Name
Alarm Mode button
Operator infor
Status
Alarm tool bar
Operator Information
Identifies the operator currently logged onto the system, along with the time and
date.
76
User Manual
FuelsManager Defense
Alarm Indicator Box
The Alarm Indicator box displays the color of the highest priority active alarm in
the system.
Color
Description
Black
NO alarms are present.
Flashing color
System contains unacknowledged, active alarm(s).
Color reflects alarm(s) of highest priority.
Flashing green
One or more alarms have returned to normal, but have
NOT been acknowledged.
Non-flashing color
One or more alarms have NOT returned to normal, but
have been acknowledged.
Color reflects alarm(s) of highest priority.
Alarm Mode Button
Using the Alarm Mode button, operators can cycle through various alarm modes
to respond to alarms. See the Current Alarm Status Table for details of each
mode. Cycling through the different mode will change the operator information
and the buttons displayed on the Alarm tool bar.
Mode
Description
Select
Used to view all alarm mode types.
Newest UnAck
Used to view newest unacknowledged alarm
Oldest UnAck
Used to view oldest unacknowledged alarm
Newest Alarm
Used to view newest alarm
Oldest Alarm
Used to view oldest alarm
Current Alarm Status
The current alarm status depends on the database value. For example, if a tank
level alarm becomes active, this line would display a status, such as Low or HighHigh.
Alarms appear in the order in which they occur. This number shown in the status
area represents where the currently selected alarm stands in the total number of
alarms (for example, 1 of 4).
Color
Description
Flashing color
Unacknowledged active alarm
Flashing green
Alarm has returned to normal, but has not been
acknowledged
Non-flashing color
Alarm has NOT returned to normal, but has been
acknowledged
USM003GVAE1005
77
Varec
Alarm Buttons
Operators can browse through any current alarms using the buttons on the Tool
bar. An additional three buttons are available, depending on the type of an alarm.
Some alarms have an associated graphic file, help file or both.
Alarm Button
78
Name
Description
Acknowledge
Used to acknowledge an alarm
Silence
Used to silence an audible alarm
First
Used to view the first alarm in the current
FuelsManager OPERATE session
Previous
Used to view the alarm before the alarm
currently displayed
Next
Used to view the next alarm after the alarm
currently displayed
Last
Used to view the last alarm in the current
FuelsManager OPERATE session
Summary
Used to view the Alarm Summary
Help graphic
Visible if there is a graphic
assigned to the currently displayed alarm, It is used to activate the run-time graphic
associated with that alarm.
Help file
Visible if there is a help file
associated with the currently displayed
alarm
Tank Detail
Visible only if the alarm pertains to a tank. It
is used to activate the Tank Detail
associated with the
alarm.
User Manual
FuelsManager Defense
Alarm Line
The Alarm Line describes an alarm in the system. If no alarms are present, the
Alarm Line displays:
**NO ACTIVE ALARMS**
When an alarm is present, the line displays the information shown in the table
opposite.
Element
Description
Format
Time
The time of day the alarm occurred expressed in the format:
HH:MM:SS
(Hour, Minute,
Second).
Date
The date the alarm occurred - expressed in MM/DD/YY
the format:
(Month, Day,
Year).
Database Point
The name as it appears in the database
(Tank_34 Gauge) and the corresponding
variable (Level)
Alarm Status
The database points alarm condition,
examples include: Disconnected, HighHigh and Movement Alarm.
USM003GVAE1005
79
Varec
When an Alarm Sounds
When one or more alarms become active, the following events may occur:
• Audible tone occurs corresponding to the alarm priority. The higher the pitch,
the higher the priority.
• Alarm Indicator box (found at the bottom of the window) flashes the assigned
alarm color (for example red, yellow).
• Buttons and/or other objects flash the assigned alarm color. Some of the
facility-specific graphics may contain text or objects that flash when the
corresponding alarms become active.
For example, the level field for a particular tank will flash in the Tank Detail
and Tank Group window if there is a level alarm and the status field in the
Alarm Summary will flash.
• The alarms and events are logged to a disk file.
Responding to an Alarm
Generally, an operator’s response will be to:
• View the alarm details.
• Acknowledge and silence the alarm.
• Perform operations to remove the alarm condition in the field.
The Alarm tool bar (described in the previous section) provides some basic details
of current Alarm status. FuelsManager OPERATE also allows these details to be
viewed by the operator using the Alarm Summary.
80
User Manual
FuelsManager Defense
Viewing Alarm Details Using the Alarm Summary
The operator can use the Alarm Summary to view all the current acknowledged
and unacknowledged alarms. To access the alarm summary, perform the following
step:
Step-by-Step
• On the Alarm tool bar select the Alarm Summary icon.
• The Alarm Summary appears over the current window.
The Alarm Summary lists a maximum of 28 alarms per page with the most recent
alarm at the top of the list. The following information is provided for each individual
alarm:
• Time & Date (e.g. 11:14:51 02/21/96)
• Tag, Description & Variable (e.g. Site_34.Tank121.GAUGE, Site 34 Tank 121,
Temperature)
• Alarm status (e.g. Low-Low)
The Tank Detail Window and Alarm Conditions
Alarm Summary
window
If the alarm is associated with an individual tank, the operator may want to view
more details associated with the tank. The Tank Detail is accessible directly from
the Alarm Summary and the Alarm tool bar using the Tank Detail button:
Step-by-Step
• In the Alarm tool bar, click the Alarm Mode button until the newest alarm is
displayed.
• The Tank Detail icon appears next to the Alarm Mode icon.
• Click the Alarm Mode icon.
• The Tank Detail screen appears and the data field will be highlighted in the
designated color for that alarm condition.
USM003GVAE1005
81
Varec
Acknowledging an Alarm
FuelsManager OPERATE will continue to flash facility-specific graphics until the
alarm has been acknowledged. Once acknowledged, the facility-specific graphics
(text or objects) will remain the designated color for that alarm status until the
alarm condition has been fixed. The operator can acknowledge alarms in three
ways.
Step-by-Step
• In the Alarm Summary window, click the Alarm Acknowledge button.
Silencing Alarms Before Acknowledgement
Once the alarm status and condition are known, the operator may decide to
silence the alarm before acknowledging the alarm. Each of these options will
silence the alarm:
Step-by-Step
• On the Menu bar, open the Alarm menu.
• Select the Silence command.
Removing the Alarm Condition
Removing the alarm condition will depend on the cause of the alarm in the field.
The operator may be able to use features in FuelsManager OPERATE. For
example, product moved between tanks may have caused a level alarm. Please
see the FuelsManager Administrator Manual in relation to that alarm condition.
82
User Manual
FuelsManager Defense
Alarm Details in the Log File Browser
The operator can use the Log File Browser to view and print all the alarms, events
or a combination of both for any selected day.
Opening the Log File Browser
To open the Log File Browser dialog box, perform the following steps:
Step-by-Step
• On the Menu bar open the Alarm menu.
• Select Show Log File Browser command.
• The Log File Browser dialog box appears.
Viewing Details in the Log File Browser
Log File Browser
dialog box
The Log File Browser is empty upon first opening the dialog box. To view the
information required for a specific time and date perform the following operation:
Step-by-Step
• Select the appropriate database system, date and the log type (Alarm,
Event or Combined).
• Click Open.
• The Log File Browser window contains all the alarms and events generated
by the system.
USM003GVAE1005
83
Varec
Alarm Information
Alarms may contain the following information:
•
•
•
•
New alarm state
Tag and description of database point
Time and date of occurrence
Priority of alarm
Event Types
Events may be of the following types:
•
•
•
•
New tank setpoints
Tank status changes
Tank mode changes
Operator-entered data
Event Information
Events may contain the following information:
• Present status
• Tag and description of database point
• Time and date of occurrence
• Event type and identification
To display for additional dates, repeat the operations above.
Printing a Log File Browser Entry
To print a Log File Browser entry, perform the following steps:
Step-by-Step
• Click Print.
• The Print dialog box appears. From this dialog box, users are able to define
the page range, the number of copies and the desired printer.
• Click OK.
The hard copy contains all the information as displayed in the Log File Browser
dialog box. The page number and sequence (for example ‘2 of 5’ pages) is found
at the bottom-center of each page. Closing the Log File Browser dialog box
returns users to the FuelsManager OPERATE screen.
84
User Manual
FuelsManager Defense
Adding Comments to Log Files
Operators can add comments to a particular alarm, event or both by using the
Comment feature, which displays text (60 characters maximum) immediately
below the alarm or event. If more than 60 characters are required, the system
allows multiple comments to be associated with a single alarm, once entered
comments cannot be deleted.
Printing Specific Selections of the Log File Browser
Adding comments in
the Log File Browser
Operators can print specific selections by highlighting the desired selections or
print the daily log, which can include alarms, events or both.
Error Messages in the Log File Browser
Operators can view a day file by selecting the appropriate system, date and
viewing selection (alarms, events or both). Click Open to access the data. If this
entry does not exist, one of the following messages appear:
Error Message
Description
If Current View is set to Alarm Log:
Then the system displays the following
message: The file
alarmEvent_(Date).LOG could not be
opened.
If Current View is set to Event Log:
Then the system displays the following
message: The file
alarmEvent_(Date).LOG could not be
opened.
If Current View is set to Combined:
Then the system displays the following
message: The file
alarmEvent_(Date).LOG could not be
opened.
USM003GVAE1005
85
Varec
Command Summary
Alarm ¦ Silence (F6)
Silences the current alarms
Alarm ¦ Alarm Line
Displays a list of submenu commands
Alarm ¦ Alarm Line ¦ Acknowledge
Acknowledges the current alarm
Alarm ¦ Alarm Line ¦ First
Selects the first alarm in the current alarm list
Alarm ¦ Alarm Line ¦ Previous
Selects the previously viewed/selected alarm in the current alarm list
Alarm ¦ Alarm Line ¦ Next
Selects the next alarm in the current alarm list
Alarm ¦ Alarm Line ¦ Last
Selects the last alarm that was triggered
Alarm ¦ Alarm Line ¦ Alarm Graphic
Opens a specific graphic screen associated with the currently selected alarm.
Alarm ¦ Summary
Displays a list of submenu commands
Alarm ¦ Summary ¦ Open/Restore (F5)
Opens/Restores the Alarm Summary window
Alarm ¦ Summary ¦ Close Window
Closes the Alarm Summary window
Alarm ¦ Show Log File Browser
Opens the Log File Browser window
86
User Manual
Working with Product Movement
(Professional Edition Only)
87
Varec
Understanding Product Movement
FuelsManager’s Product Movement System allows refineries and bulk storage
facilities to track movements of product. The Movement System manages product
movements and archives information detailing the actual amounts of product
transferred. A movement involves transferring product from one or more sources
to one or more destinations. The system manages tank-to-tank transfers, charges,
yields (rundowns), shipments, receipts, water drains and blends. It provides realtime operational alarms when setpoints are approached and reached.
It is assumed that the necessary equipment has already been installed and
commissioned. If there are questions concerning the status of any equipment,
please contact an Administrator or Supervisor before continuing. Contained in this
section are brief explanations followed by step-by-step instructions to the most
commonly used processes of the Product Movement System.
Product Movement Terms
This section uses the following terms when explaining how to operate the Product
Movement System.
88
Node Type
Description
Unit
The Product Movement System allows the creation of
Source/Destination designations called units, examples
could be Pipeline XYZ, Truck Rack 123, Pumphouse A2B.
Units allow the operator to use meaningful names for
plant items being utilized for product movements. A unit
has no measuring device so it has no way of monitoring
product movement, users cannot enter movement
setpoints for a unit and movements involving units will not
calculate discrepancies.
Meter
A location in a product movement instance where a
reading from a physical meter is possible. Operators can
associate FuelsManager input and output database points
with meter nodes and have the meter data automatically
collected or manually entered.
Tank
Any tank point configured in the FuelsManager System. A
tank point includes predefined variables specifically
designed for tank gauging applications. Each tank
provides process values, or tank variables, which may be
entered manually, received from a field device or
internally calculated.
User Manual
FuelsManager Defense
Node Diagrams
USM003GVAE1005
89
Varec
Term
90
Description
Closeout
• Stopping of the movement (either manually OR
due to non-zero flow)
• If the movement is active at the system specified
closeout time (default midnight)
Opening Value
• If a close out has occurred, the opening value is
the value of the particular variable at the last
closeout time.
• If the movement has been started but a closeout
has not occurred yet, the opening value is the
value of the particular variable when the
movement started.
Closeout Value
Only exists after a closeout event has occurred. If the
movement remains active, and further closeout events
occur the closeout value will be updated.
Start Value
The value of the particular variable when the
movement was initiated.
Combined Movement
A combination of movements that involve one or more
common tanks. The following combinations are NOT
allowed:
• A combination that involves the same node pair
twice.
• A combination that results in a circular transfer of
product.
Discrepancy
The difference between the total amount transferred
from all the From tanks and the total amount received
at all the To tanks.
Totals
Only available for Shipment and Receipt movements
and is the sum of amount transferred.
User Manual
FuelsManager Defense
Product Movement States
The following table shows the different states of movements.
Movement States
Description
Inactive
The movement has been setup but has not been initiated
by the operator.
Active
The movement has been initiated by the operator and is
not configured to use Start on Non-Zero Flow.
Disabled
The movement cannot be initiated because one or more
of the tanks involved in the movement are currently in use
by another movement and this movement cannot be
combined.
Halted
The movement has been paused by the operator.
Failed
During the start-up of the movement a failure occurred,
the movement is neither active nor inactive. The operator
must use the Reset menu option to clear this state.
Starting
The movement has been initiated by the operator but the
movement has been configured to Start on Non-Zero
Flow and no flow has been detected yet.
Stopping
The movement has been configured to Stop on Non-Zero
Flow and zero flow has not existed for a time greater than
the Zero Flow Hold Off Value.
USM003GVAE1005
91
Varec
Product Movement Types
The following table shows the different types of movements.
Movement Types
From (Sources)
To (Destinations)
Blend
One or More Tanks
One Tank
Charge
One Tank
One Unit/Meter
Receipt
One Unit/Meter
One or More Tanks
Run-Down
One Unit/Meter
One Tank
Shipment
One or More Tanks
One Unit/Meter
Transfer
One Tank
One Tank
Water Drain
One Tank
One Unit/Meter
To assist in setting up complex movements, combined movements can be
produced by chaining together other movements.
The following are illustrations of the Movement Types:
Blend Movement
Charge Movement
92
User Manual
FuelsManager Defense
Receipt Movement
Run-Down Movement
Shipment Movement
USM003GVAE1005
93
Varec
Transfer Movement
Water-Drain Movement
94
User Manual
FuelsManager Defense
Product Transfer (Xfr) Modes
The transfer (or Xfr) mode refers to the measuring denomination operators are
using to measure the product movement: Level, Mass, or Differential Volume or
Mass.
Transfer Mode
Description
Xfr Level
A transfer that is terminated by defined Level
Xfr Volume
A transfer that is terminated by Stop Total Volume
Xfr Diff Vol
A transfer that is terminated by the Stop Differential Volume
(change in volume)
Xfr Mass
A transfer that is terminated by the Stop Mass
Xfr Diff Mass
A transfer that is terminated by the Stop Differential Mass
(change in mass)
Product Transfer by
Level
Product Transfer by
Volume or Mass
USM003GVAE1005
95
Varec
Product Transfer by
Differential Volume or
Mass
96
User Manual
FuelsManager Defense
Using Product Movement
The Product Movement System is divided into two parts, the definition of possible
movement paths (creating a movement) and the operation of the actual product
movement (operating a movement instance).
This section provides operational information for the day-to-day use of
FuelsManager Product Movement.
The FuelsManager OPERATE program allows the user to select, set up, start,
monitor and terminate movement instances. The operator uses the Movements
menu item to open either the Movement Summary or Movement History tables.
Movement Summary Table
The Movement Summary table displays the real-time movement data. The table
continues to display a movement’s data until it is either stopped or deleted.
Default Table Columns
These columns automatically appear in the Movement Summary table.
Name
Row Type
Node
Move Type
Xfr Gross Volume
Xfr Net Volume
Xfr Mass
Time Remaining
State
Xfr Setpoint
Xfr Mode
Start Time
Product
User
USM003GVAE1005
97
Varec
Additional Table Columns
These columns are available in the Movement Summary table.
Amb. Temperature
Comment
Density
Density Temp
Density Units
Flow
Flow Units
Gross Volume
Group
Initiation Count
Initiation Time
Level
Level Units
Mass
Mass Units
Move Type
Name
Net Volume
Node
Opening Amb.
Temperature
Opening Density
Opening Density
Temperature
Opening Mass
Opening Gross Volume
Opening Level
Opening Mass Xfr Mass
Units
Opening Roof Volume
Opening Shell Correction Opening Std Density
Opening Temp
Opening VCF
Opening Volume
Opening Water Level
Opening Water Volume
Order Number
Product
Product Description
Row Type
Roof Volume
Shell Correction
Start Amb. Temperature
Start Amb. Temperature
Date/Time
Start Density
Start Density Date/Time
Start Density
Temperature
Start Employee ID
Start Gross Volume
Start Handgauge
Ambient Temp Time
Start Handgauge Density Start Handgauge Density Start Handgauge Level
Temp Time
Time
Time
98
Start Handgauge Ref
Height
Start Handgauge Ref
Height Time
Start Handgauge Temp
Time
Start Handgauge Water
Level Time
Start Level
Start Mass
Start Net Volume
Start Roof Volume
Start Shell Correction
Start Std Density
Start Std. Density Date/
Time
Start Tank Ref. Height
Start Temp
Start Temperature
Start Temperature Date/
Time
Start VCF
Start Volume
Start Water Level
User Manual
FuelsManager Defense
Start Water Level Date/
Time
Start Water Volume
State
Status
Std Density
Temp Units
Temperature
Time Remaining
User Def String (1 - 10)
User Name
Volume Units
VCF
Volume
Water Level
Water Volume
Xfr Deviation
Xfr Gross Volume
Xfr Setpoint Units
Xfr Mass
Xfr Mode
Xfr Net Volume
Xfr Setpoint
Xfr Setpoint Units
Xfr Volume Units
Xfr Water Volume
USM003GVAE1005
99
Varec
Menu Commands
The following sections detail the use of the Movement Summary pop-up menu, the
contents of this menu differ slightly depending on where on the screen the mouse
cursor is positioned when operators right-click.
This pop-up menu appears if users right-click while the mouse cursor is positioned
on an empty row in the Movement Summary grid.
This pop-up menu appears if users right-click while the mouse cursor is positioned
on a row that contains movement data.
100
User Manual
FuelsManager Defense
Movement History Table
The Movement History allows the operator to view all product movements, totals,
and discrepancies on a daily basis. Operators can open multiple Movement
History tables and visually compare movement data from different days. The
Movement History is a database and may be accessed offline in order to create
custom reports using 3rd party reporting tools. The Product Movement System
writes records to the Movement History at the following times:
• If a movement is stopped, either manually by the operator or automatically on
non-zero flow (if the Stop on Non-Zero Flow option is selected).
• If a movement is active at the system close out time. The default close out
time is midnight but can be configured to be any single time during the day.
Default Table Columns
These columns automatically appear in the Movement History table.
Name
Record Type
Node
Move Type
Xfr Gross Volume
Closeout Xfr Gross
Volume
Xfr Net Volume
Closeout Xfr Net Volume
Xfr Mass
Closeout Xfr Mass
Xfr Setpoint
Xfr Mode
Start Time
Stop Time
Product
User
USM003GVAE1005
101
Varec
Additional Table Columns
These columns are available in the Movement History table.
102
Auto Start
Auto Stop
Closeout Ambient
Temp
Closeout Density
Closeout Density
Temp
Closeout Gross
Volume
Closeout Level
Closeout Mass
Closeout Net
Volume
Closeout Temp
Closeout Time
Closeout Water
Level
Closeout Water
Volume
Closeout Xfr
Gross Volume
Closeout Xfr Mass Comment
Cumulative Xfr
Water Volume
Database Tag
Density Units
End Employee ID
End Handgauge
Ambient Temp
End Handgauge
Ambient Temp
Time
End Handgauge
Density Temp
End Handgauge
Density Temp
Time
End Handgauge
Density Time
End Handgauge
Level Time
End Handgauge
Ref Height
End Handgauge
Ref Height Time
End Handgauge
Std Density
End Handgauge
Temp Time
End Handgauge
VCF
End Handgauge
Volume TOV
End Handgauge
Water Level Time
End Shell
Correction
Group Name
Initiation Count
Initiation Time
Level Units
Mass Units
Move Type
Name
Node
Opening VCF
Opening Amb
Temperature
Opening Density
Opening Density
Temperature
Opening Gross
Volume
Opening Level
Opening Mass
Opening Net
Volume
Opening Roof
Volume
Opening Shell
Creation
Opening Std.
Density
Opening Temp
Opening Volume
Opening Water
Level
Opening Water
Volume
Order Number
Product
Product
Description
Record Id
Record Type
Start Amb.
Temperature
Start Amb.
Temperature Date/
Time
Start Density
Start Density Date/ Start Density
Time
Temperature
Start Employee ID
Start Gross
Volume
Start Gross
Volume
Start Handgauge
Density Temp
Time
Start Handgauge
Ambient Temp
Time
User Manual
FuelsManager Defense
Start Handgauge
Density Time
Start Handgauge
Level Time
Start Handgauge
Ref Height
Start Handgauge
Ref Height Time
Start Handgauge
Temp Time
Start Handgauge
Water Level Time
Start Level
Start Level Date/
Time
Start Mass
Start Net Volume
Start Roof Volume Start Shell
Correction
Start Std Density
Start Std. Density
Date/Time
Start Tank Ref.
Height
Start Temp
Start Temperature
Start Temperature
Date/Time
Start VCF
Start Volume
Start Water Level
Start Water Level
Date/Time
Start Water
Volume
Stop Time
Temp Units
User Def String (1
- 10)
User Name
Volume Units
Xfr Deviation
Xfr Gross Volume
Xfr Mass Units
Xfr Mode
Xfr Net Volume
Xfr Setpoint
Xfr Setpoint Units
Xfr Volume Units
Xfr Water Volume
USM003GVAE1005
103
Varec
Menu Commands
The following sections detail the use of the Movement History pop-up menu, the
contents of this menu differ slightly depending on where on the screen the mouse
cursor is positioned when users right-click.
This pop-up menu appears if users right-click while the mouse cursor is positioned
on an empty row in the Movement History grid.
This pop-up menu appears if users right-click while the mouse cursor is positioned
on a row that contains movement data.
This pop-up menu appears if users right-click while the mouse cursor is positioned
on the dividing row between two movement instances, or if no Movement Ticket
reports have been configured for the system.
104
User Manual
FuelsManager Defense
Viewing a Movement History
Step-by-Step
• From the Movements menu, click History. The Open Movement History
dialog box appears.
• Select or enter the date. Click OK. The Movement History table appears.
The << and >> buttons advances or goes back one year at a time.
The < and > buttons advances or goes back one month at a time.
Refreshing the Movement History Table
Open Movement
History dialog box
A refresh causes the Movement History to re-load the information for the selected
day from the history database. Only the current Movement History can be
refreshed. This option shows movements that have been closed out since the
Movement History was opened.
Step-by-Step
• From the Movements History table, right-click on the grid area. The
Movements History pop-up menu appears.
• Click Refresh.
USM003GVAE1005
105
Varec
Creating and Modifying Movements
Movement Setup
dialog box
Step-by-Step
• Select the Movements menu from FuelsManager OPERATE, click
Summary. The Movement Summary table appears.
• Select the Movements menu from the Movement Summary table. Select
New, and then click on the desired movement type. Or right-click on any
area of the Movement Summary table. The Movement Summary pop-up
menu will appear. Select New and then click on the desired movement type.
The Movement Setup dialog box appears.
• Type in the Name.
• Type or select the Group (Optional).
• Type in the Order # (Optional) and Comment (Optional).
• Select the appropriate options, in the Movements Interlocks Group.
• Select the Movement Ticket Name and Ticket Printer in the Movement
Ticket Group (Optional).
• Under Movements, select the desired source or sources in the From field.
• Select the desired destination or destinations in the To field.
• Enter the Xfr Mode and Setpoints.
• Click OK. The system displays the information on the Movement Summary
table.
106
User Manual
FuelsManager Defense
Field
Description
Name
Name lets users type in a specific name for the
movement. When a new movement is created from the
New menu the system provides the default Name in the
form of Movement ###, where ### is a unique ID
number. When movement is initiated, this field is
cleared.
Group
Group lets users type or select a group name for the
movement, which may be used to correlate multiple
movements. Clicking the Group arrow allows operators
to view all previously defined Groups and displays the
selection.
Order #
Order # lets users type in a specific movement order
number used for invoicing. Once a movement is initiated,
this field is disabled.
Comment
Comment lets users type in a specific comment for the
movement.
Stop/Halt Based On
Zero Flow
Selecting this option allows the movement to
automatically stop when zero flow persists for the Stop
Hold Off Time.
Zero Flow Hold Off
Time (Min.)
Zero Flow Hold Off Time defines the time the Zero Flow
must persist before the system automatically stops the
movement. This field is enabled only when Stop Based
on Zero Flow is selected.
If the movement consists of multiple Source and
Destination tanks, Zero Flow must persist for all tanks.
Delete After
Completion
Selecting this option allows the system to automatically
remove the movement from the summary after the
movement is stopped (either manually or automatically –
refer to Stop based on Zero Flow).
Source Setpoints
Specified In Percent
Selecting this option displays the Transfer Setpoint for
Source Nodes in percent. This field is enabled only for
Blend movements.
Start Time Based On
Non Zero Flow
Selecting this option ensures that the Start Time
recorded for the movement will be the time at which a
flow was first detected, not the time at which the
movement was initiated.
Interlock Source And
Destination Setpoints
Selecting this option causes changes in either source or
destination setpoint to be automatically reflected in the
corresponding destination or source.
USM003GVAE1005
107
Varec
Field
Description
Use Lineup Action
Sequence
This option is used to work with a specific third-party
software application. It activates different tanks in a
movement sequentially, instead of simultaneously.
Include Handgauge
Values
Selecting this option creates a handgauged node for
every tank node involved in the movement. Use this
option when users are required to enter handgauged
results for the movement.
Halt After Completion This option is used in conjunction with the Stop Based
on Zero Flow option. Selecting this option instructs the
system to put the movement into the “Halted” state when
zero flow is detected instead of stopping the movement.
This lets users enter Handgauge or meter data before
stopping the movement. The ‘Use Lineup Action
Sequence’ field is enabled when in this field is selected.
108
Individual Node
Control
Selecting this option gives the operator the ability to start
and stop tanks in an active movement independent of
stopping the movement. This option is only available for
Receipt, Shipment, and Blend movement types.
Movement Ticket
Name
The Movement Ticket Name list selects the report users
want to automatically print when this movement
completes. Movement tickets specified here will be
automatically printed to the selected printer when the
movement is complete. For manual movement ticket
printing please see the ‘Movement Tickets’ section.
Ticket Printer
The Ticket Printer list lets users select the destination
printer for the selected Movement Ticket report.
From
The From list lets users select the source(s) as
determined by the movement type.
To
The To list lets users select the destination(s) as
determined by the movement type.
Xfr Mode
The Xfr Mode list lets users select one of the following
modes.
• Xfr Level
• Xfr Volume
• Xfr Diff Vol (Differential Volume)
• Xfr Mass
• Xfr Diff Mass (Differential Mass)
• Inactive
User Manual
FuelsManager Defense
Field
Description
Setpoint
The Setpoint lets users set the amount to be transferred
from the Source tank into the Destination tank or the
amount to be transferred from the Destination tank to the
Source tank.
Setpoint units depend on the Xfr Mode and the units of
the tank selected. The system only allows setpoints for
Source or Destination tank points.
The system automatically converts the setpoint when
changing between different Xfr Modes.
%
The% is only available to Blend movements, and then
only if the Source Setpoints Specified in Percent check
box is selected. When enabled, users can enter the
destination and source setpoint and enter the source
setpoints in percentage, for example 80% and 20%.
Units
The Units lists the units associated with the Xfr Mode
selection.
Min. and Max. and
Reference Volume
This area shows the valid range for the Setpoint or%
based upon the cell selected in the movements frame.
The Min. and Max. values are only visible when a
setpoint cell is selected. Reference volume is only visible
for Xfr by Diff. Vol and indicates the current tank volume
to which the diff. volume setpoint will be relative to.
USM003GVAE1005
109
Varec
Handgauged Movements
When creating a movement and selecting the Include Handgauged Values
checkbox, the Movement Summary will include rows for the Handgauge (from)
and Handgauged (to) row types.
Modifying Movement Setup
Operators can modify the movement setup for the following modes: Active,
Inactive, Disabled, Starting, Stopping, or Halted.
Step-by-Step
• From the Movement Summary table, right-click on the movement row
desired in the grid area. The Movements Summary pop-up menu appears.
• Click Setup. The Movement Setup dialog box for the associated movement
type appears.
• Make the appropriate changes and click OK.
Initiating a Movement
Note! If the movement was setup
to Start Based on Non-Zero Flow,
Starting displays under State
column. When a flow is detected it
changes to Active.
Operators can initiate the movements that are in the Inactive or Starting mode.
Step-by-Step
• From the Movement Summary table, right-click on the movement row. The
Movements Summary pop-up menu appears.
• Click Initiate. The system activates and displays Active or Starting in the
State column for the associated movement.
Stopping a Movement
Operators can stop movements that are in the Active, Starting, Stopping mode.
Step-by-Step
• From the Movement Summary table, right-click on the movement row. The
Movements Summary pop-up menu appears.
• Click Stop. The system displays message: ‘Verify stop of selected
movement’.
• Click Yes. The system stops and displays Inactive in the State column for
the associated movement.
110
User Manual
FuelsManager Defense
Resetting a Movement
Operators can reset a movement that is in a Failed state.
Step-by-Step
• From the Movement Summary table, right-click on the movement row. The
Movements Summary pop-up menu appears.
• Click Reset. The system resets all default parameters and sets the
movement to Inactive in the State column for the associated movement.
Holding for Meter Values
Holding for Meter Values lets users pause a movement that is in an Active or
Starting mode.
Step-by-Step
• From the Movement Summary table, right-click on the movement row. The
Movements Summary pop-up menu appears.
• Click Hold For Meter Values. The system pauses and displays Halted in the
State column for the associated movement.
Entering Meter Values (Net or Gross Volume, Mass)
After a movement has been set to Hold for Meter Values, operators can enter the
meter reading.
Step-by-Step
• From the Movement Summary table, right-click on the movement that is
holding for the meter values. A pop-up menu appears.
• Select the measurement that the meter node is set to display. This includes
Set Gross Volume, Set Net Volume, or Set Mass. A dialog box appears,
prompting to enter the selected amount.
• Enter the meter reading and click OK. The system returns to the Movement
Summary table, updates the fields, and calculates the discrepancy.
Resuming a Movement
Operators can resume a movement that is in the Halted mode.
Step-by-Step
• From the Movement Summary table, right-click on the movement row. The
Movements Summary pop-up menu appears.
• Click Resume. The system resumes and displays Active in the State column
for the associated movement.
USM003GVAE1005
111
Varec
Formatting Movement Tables and Data
Filtering Movements
Step-by-Step
• From the Movement Summary or Movement History table, right-click on the
desired column heading. The pop-up menu appears.
• Click Filter. The Column Filter dialog box appears.
• Select the desired item or items that are to be displayed from the Do Not
Display list.
• Click the > button (right arrow). The system moves the selected item(s) to
the Display list. Click >> button to move all items from the Do Not Display list
to the Display list.
• Click OK. The selected item or items display on the Movement Summary or
Movement History table.
Note! Columns that display numeric and time/date related data cannot be filtered, for
example Temperature and Xfr Gross Volume.
Note! Filtered columns are denoted with an asterisk in the column heading.
Removing Column Specific Filter
Step-by-Step
• From the Movement Summary or Movement History table, right-click on the
desired column heading. The pop-up menu appears.
• Click Remove Filter. The filtered item or items display on the Movement
Summary or Movement History table.
Note! Filtered columns are denoted with an asterisk in the column heading.
Showing All Movements
Step-by-Step
• From the Movement Summary or Movement History table, right-click on the
grid area. The pop-up menu appears.
• Click Show All. The system displays all information.
Sorting by Column
Step-by-Step
• From the Movement Summary or Movement History table, click on the
desired column heading to sort based on that column.
Note! That the column sorts in ascending or descending order only.
112
User Manual
FuelsManager Defense
Clearing the Sort
Step-by-Step
• From the Movement Summary or Movement History table, right-click on the
grid area. The pop-up menu appears.
• Click Clear Sort. The system returns back to the original display.
Deleting a Movement
Operators can delete the movements that are in the Disabled or Inactive mode.
Step-by-Step
• From the Movement Summary or Movement History table, right-click on the
movement row desired in the grid area. The pop-up menu appears.
• Click Delete. The system deletes and removes the associated movement
from the Movement Summary or Movement History table.
Adding a Column
Step-by-Step
• From the Movement Summary or Movement History table, right-click on any
column heading. The pop-up menu appears.
• Click Add Column. The Select a Column dialog box appears.
• Click the down arrow. A drop-down menu appears.
• Select the new column heading from the list.
• Click OK. The system adds the new column heading and its data at the far
right of the Movement Summary or Movement History table.
Inserting a Column
Step-by-Step
• From the Movement Summary or Movement History table, position the
cursor to insert the new column.
• Right-click on the column heading. The pop-up menu appears.
• Click Insert Column. The Select a Column dialog box appears.
• Click the down arrow. A drop-down menu appears.
• Select the new column heading from the list.
• Click OK. The system inserts the new column heading and its data to the
left of the currently selected column.
USM003GVAE1005
113
Varec
Replacing a Column
Step-by-Step
• From the Movement Summary or Movement History table, right-click on the
desired column heading. The pop-up menu appears.
• Click Modify Column. The Select a Column dialog box appears.
• Click the down arrow. A drop-down menu appears.
• Select a new column heading from the list.
• Click OK. The system replaces the column heading and its data with the
new selection.
Deleting a Column
Operators can delete any column except for Name, Row Type, and Node.
Step-by-Step
• From the Movement Summary or Movement History table, right-click on the
desired column heading. The pop-up menu appears.
• Click Delete Column. The system displays message: ‘Delete column: Level’.
• Click OK. The system deletes the column from the Movement Summary or
Movement History table.
Entering a Column Alias
Operators can change the column headings by entering an alias for that column.
Step-by-Step
• On the Movement Summary or Movement History table, right-click the
column heading to enter an alias. The pop-up menu appears.
• Select Alias Column. The Column Header Alias dialog box appears.
• Enter the alias and click OK. The system closes the dialog box and replaces
the old column heading with the alias. Click reset to return the column
heading to its original name.
Increasing Font Size
Operators can increase the font size on the Movement Summary or Movement
History table.
Step-by-Step
• Right-click on any area of the Movement Summary or Movement History
table. The pop-up menu will appear. Select Increase Font. The system
increases the font size throughout the Movement Summary or Movement
History table.
• Repeat this step until the desired font size.
Note! The Product Movement System has a maximum font size. Attempting to increase the
font beyond this limit will have no effect.
114
User Manual
FuelsManager Defense
Decreasing Font Size
Step-by-Step
• Right-click on any area of the Movement Summary or Movement History
table. The pop-up menu will appear. Select Decrease Font. The system
decreases the font size throughout the Movement Summary or Movement
History table.
• Repeat this step until the desired font size.
Note! The Product Movement System has a minimum font size. Attempting to decrease
the font beyond this limit will have no effect.
Toggling Grid Lines On and Off
Step-by-Step
• Right-click on any area of the Movement Summary or Movement History
table. The pop-up menu will appear. Select Grid Lines.
• The system removes or adds the grid lines in the Movement Summary or
Movement History table.
Entering User String Data
Operators can enter and store user data to a movement from the Movement
Summary table. This feature allows the user to store any string of data or
information that is needed to have while that movement is active.
Step-by-Step
• In the Movement Summary table, select one of the rows in the movement.
• Right-click the selected row. The Movement Summary pop-up menu will
appear. Select User Data. The User Data dialog box appears for the
selected movement.
• Enter any of the necessary data. and click OK. The system attaches the
user data to the movement.
Note! Open the User Data dialog box again to view the information stored.
USM003GVAE1005
115
Varec
Entering Handgauge Values
Operators can enter the results of a handgauge measurement into the Handgauge
(from) and Handgauge (to) nodes.
Handgauge Data
dialog box
Step-by-Step
• In the Movement Summary or Movement History table, right-click over the
Handgauge (from) row for the movement where values are to be entered.
The pop-up menu appears.
• Select Edit Handgauge Values. The Handgauge Data dialog box appears
for the selected node.
• In the Process Data grid, enter the values from the handgauge. The results
of the values entered in the Process Data section are automatically
calculated and displayed in the Calculated Value Section.
• After entering all handgauged values, click OK.
Note! Users can also enter handgauge values for movements that have been stopped from
the Movement Summary or Movement History table.
116
User Manual
FuelsManager Defense
Toggling Automatic Values
Operators can toggle a movement to show and hide the automatic values. If the
automatic values are hidden, only the handgauged values will appear.
Step-by-Step
• In the Movement Summary table, right-click any of the rows in the
movement. The Movements Summary pop-up menu appears.
• Select Automatic Values. The rows with the automatic values disappear or
appear.
Toggling Handgauged Values
Operators can toggle a movement to show and hide the handgauged values. If the
handgauged values are hidden, only the automatic values will appear in the
Movement Summary table.
Step-by-Step
• In the Movement Summary table, right-click any of the rows in the
movement. The Movements Summary pop-up menu appears.
• Select Handgauge Values. The rows with the automatic values disappear
or appear. Handgauged values only appear if the checkbox Include
Handgauge Values was checked in the Movement Setup dialog box.
Note! Users cannot have both the handgauged and automatic values toggled off at the
same time. If the handgauged values are hidden, make sure that the automatic values are
visible.
Viewing Discrepancies in Percentages
The Movement System defaults to showing any discrepancy in the Movement
Summary table in amounts. Operators can change this to show discrepancies by
percentages.
Step-by-Step
• In the Movement Summary table, right-click any of the rows in the
movement. The Movements Summary pop-up menu appears.
• Select Discrepancy as Percentage. The Volumes and Mass columns switch
to percentages.
Note! To view the amounts again, just follow the same two steps.
USM003GVAE1005
117
Varec
Movement Tickets
Note! The format and types of
movement tickets available at the
load faculty are configured by the
Administrator or Supervisor. This
section details the pre-packaged
movement tickets.
From the Movement History table, operators can print movement tickets that
contain summaries of product movements. The movement tickets are general
movement reports and can be applied to any movement type. There are four
different movement tickets.
•
•
•
•
Movement Gauge Only
Movement Gauge-Handgauge Only
Movement Handgauge Only
Product Movement
Most movement tickets display the following data
•
•
•
•
Movement Name
Movement Initiation Time
Product
Movement Type
Ticket reports also contain a table that lists the different points and displays the
following fields from each point from the Opened and Closed date and time.
•
•
•
•
•
•
•
•
•
•
118
Node
Status
Product Level
Temperature
Water Level
Standard Density
Gross Volume
Net Volume
Net Volume Transferred
Total Discrepancy
User Manual
FuelsManager Defense
Movement Gauge Only
Ticket
Movement Handgauge
Only Ticket
.
USM003GVAE1005
Movement GaugeHandgauge Ticket
119
Varec
Product Movement
Report
120
User Manual
FuelsManager Defense
Preview a Movement Ticket Before Printing
Step-by-Step
• From the Movement History table, select the movement instance that is to
be previewed.
• On the Movement History pop-up menu, click Print Preview Ticket and
select the ticket to be previewed.
• The ticket will display as a report to be previewed by the user.
Printing a Movement Ticket
Step-by-Step
• From the Movement History table, select the movement instance that is to
be printed.
• On the Movement History pop-up menu, click Print Ticket and select the
ticket to be printed.
• Select the correct printer and options from the Print Setup dialog box.
• Click OK. The system prints the movement ticket.
USM003GVAE1005
121
Varec
Practical Movement Examples
Example 1 – Simple Tank Transfer
• Create a new movement of type Transfer.
• Select the required Source Tank and the required Destination Tank.
• Select the required transfer mode and enter the level, volume or mass value
for the movement to stop for either the source or destination tank.
• Initiate the transfer, the Product Movement System will capture the starting
tank data values and show the movement as Active on the Movement
Summary.
• Operators can monitor the progress of the transfer from the Movement
Summary. In particular the summary screen shows the amounts already
transferred, the estimated time to complete the transfer and any discrepancy
between the amount transfer out of the source tank and the amount received
in the destination tank.
• As the transfer nears its completion the Product Movement System will
provide a warning alarm a short time before the ending setpoint.
• When the transfer is complete the Product Movement System will provide a
shutdown alarm indicating that the requested amount of product has been
transferred from the source tank. Stop the transfer, the Product Movement
System will capture the stop values and final discrepancy data.
• The transfer data for this movement has been archived in the Movement
History database and can now be viewed from the Movement History.
Example 2 – Product Receipt
• Create a new movement of type Receipt
• Select the required Source Unit and the required Destination Tanks. A unit is
simply a name given to the source of the product transfer (i.e. Dock, Truck
Rack, Ship etc.). Operators can select multiple tanks as the destinations; the
Product Movement System will track the product receipt in all selected tanks
simultaneously.
• Select the required transfer mode and enter the level, volume or mass value
for the movement to stop for each of the destination tanks.
• Initiate the receipt, the Product Movement System will capture the starting
tank data values and show the movement as Active on the Movement
Summary.
• Operators can monitor the progress of the receipt from the Movement
Summary. In this example there is no discrepancy row displayed. This is
because the source of the receipt is a unit node and therefore has no
measurement device. Discrepancies can only be calculated when there is a
measurement device on both the source and destination nodes.
• The receipt movement shows a total row. This row sums the total amount of
product received in each of the tanks.
• Typically operations will run the receipt into one of the destination tanks then
switch over to the other. The Movement Summary will provide independent
122
User Manual
FuelsManager Defense
warning and shutdown alarms for each of the destination tanks, allowing the
operator to administer the switchover process.
• When all of the destination tanks have reached their shutdown setpoints stop
the receipt. The Product Movement System will capture the stop values and
final totals data.
Example 3 – Shipment via a Meter Node.
Create a new movement of type Shipment
• Select the required Source Tanks and Destination Meter Node. A meter node
is a movement node containing a measurement device that can be manually
or automatically updated. Operators can select multiple tanks as the source
for a shipment; the Product Movement System will track the shipment from all
selected tanks simultaneously.
• Select the required transfer mode and enter the level, volume or mass value
for the movement to stop for each of the source tanks.
• Meter nodes can be configured to reset the volume or mass values when the
movement starts (able to be reset) or to accumulate the values until a rollover
point is reached. In the example we will assume the meters are able to be
reset.
• Initiate the shipment, the Product Movement System will capture the starting
tank data values, reset any meter node volume or mass data to zero and
show the movement as Active on the Movement Summary.
• Operators can monitor the progress of the shipment from the Movement
Summary. Since the shipment has a measurement device at both the tank
and meter nodes a discrepancy row is shown on the Movement Summary.
This row shows the difference between what has been transferred out of the
source tanks and what has passed through the meter.
• If the meter data is being manually updated, users should expect the
discrepancy to be large until the meter data is updated. Electing to update the
meter values periodically over the span of the shipment, say hourly, provides
consolidation information the may be useful in the early detection of leaks or
incorrect line-ups
• As with example 2 above the Movement Summary will provide independent
warning and shutdown alarms for each of the source tanks.
• When all of the source tanks have reached their shutdown setpoints select
“Hold for Meter Values’. This action halts the movement and allows users to
enter the final meter volume or mass data.
• Once the final meter data has been entered, stop the shipment. The Product
Movement System will capture the stop values and final meter data.
USM003GVAE1005
123
Varec
Command Summary
Movements ¦ Summary
Displays the real-time movement data.
Movements ¦ History
Displays all product movements, totals, and discrepancies on a daily basis.
124
User Manual
Working with Leak Detection
(Professional Edition Only)
125
Varec
Understanding Leak Detection
FuelsManager Leak Detection is designed to monitor tank farms for leak
conditions and send alerts of potential environmental hazards. Leak Detection
basic functions include:
• Monitoring level, temperature, water level and density from field instruments
or operator entry
• Performing analysis of sensor data, looking for conditions that might indicate
a leak
• Comparing instrument readings and calculations against alarm limits
• Annunciating, processing and logging alarms
• Providing reports
Leak Detection reads data directly from historical data, applying filtering
algorithms, calculating various statistics and applying qualifying logic. Alarm
processes running within the systems database can monitor the resultant
calculations. This includes data manually entered, data calculated in real-time and
data received via communication interfaces.
Leak Detection’s primary objective is to detect a leak at rates as low as 0.2 gallons
per hour. The ability to detect leaks at these rates depends upon the physical
characteristics of the tank (size, shape, above/below ground, materials used in
construction, etc.), the types of instruments available to measure the properties of
the product in the tank, the resolution and stability of the instruments and how the
tank is used.
126
User Manual
FuelsManager Defense
Tank Analysis Methods
Leak Detection integrates with third party leak detection systems and
instrumentation to detect and calculate leaks based on:
• Volumetric Analysis
• Mass Analysis
Volumetric Analysis
Volumetric analysis requires measuring the level and temperature, calculating the
Net Standard Volume, analyzing the tank data during periods of inactivity and
searching for losses.
If a volumetric analysis is required without the rounding of the VCF, an operator
has the option to chose an un-rounded net volume. This will provide data with
more precise measurements when reporting leak date.
Detection of leaks in bulk storage tanks using volumetric changes depends upon
a number of factors, including the dimensions of the tank and the Net Standard
Volume derived from the level and temperature.
The resolution, stability and accuracy of the level and temperature instruments
determine the effectiveness of utilizing the volumetric analysis method. An
accurate gauge with high resolution yields the best results for static measurement.
The accuracy of the tank strapping table will also affect the accuracy of the
volume calculation. Errors in the strapping table could appear as leaks.
Some factors have more influence than others, depending upon the application. In
large tanks (over 50,000 gallons), the resolution of the level measurement is the
limiting factor. For example, for a 1,000,000-gallon cylindrical tank, 40 feet in
height, a sixteenth of an inch (1/16”) equates to almost 150 gallons. This means
that a long time period is needed to effectively detect a leak. Another limiting
factor is the resolution and stability of the temperature sensor. Changes in both
the product and the tank shell temperature will affect the volume of the product in
the tank.
USM003GVAE1005
Note! Leak Detection detects leak
rates as low as 0.2 gallons per
hour for tanks up to 75,000
gallons.
127
Varec
Mass Analysis
Note! Leak Detection is certified
on tanks up to 3,000,000 gallons
for mass analysis.
Mass analysis is based upon measuring the pressure of the product and applying
the conservation of mass principle. In bulk storage tanks, the Total Observed
Volume will fluctuate with changes in the temperature of the product. The mass of
the product in the tank is constant, so changes in the temperature of the product
have no effect on the total mass in the tank.
Level Probes
Note! All probes used for analysis
are approved by an independent
third party certified to meet all EPA
leak detection standards.
Currently, Leak Detection is approved with two different level probes. However,
the same analysis methods can be applied to tanks gauged with any level
measuring device, though no certification can be provided by FuelsManager. The
level probes include:
• MTS DDA compatible
• Barton Instruments 3500
The certificate rate and required test time are based on the tank size and
measuring probe. The following table shows the gauge types and the
corresponding certification parameters.
128
Max
Test
Test
Temp
Time
Method
Change
Gauge
Name
Tank
Volume
Cert.
Rate
MTS DDA - Type 1
0-75,000 gals
0.2 gal/hr 24hrs (+/-)3.6
Volumetric
MTS DDA - Type 2
0-75,000 gals
0.2 gal/hr 24hrs (+/-)0.1
Volumetric
Barton 3500 - Type
1
0-75,000 gals
0.2 gal/hr 24hrs (+/-)6.9
Volumetric
Barton 3500 - Type
2
0-3,000,000 gals 3.0 gal/hr 48hrs (+/-)1.5
Volumetric
Barton 3500 - Type
3
0-3,000,000 gals 3.0 gal/hr 48hrs (+/-)1.0
Mass
User Manual
FuelsManager Defense
Tank Analysis Types
The analysis type selected by the operator determines the method used to search
for a leak. When configuring a tank, the following analysis types can be set:
Note! Real-Time analysis can only
be configured and performed by an
administrator.
• Static
• Continuous
• Real-Time
Static Analysis
A Static analysis requires the tank to be shut down (out-of-service) and stable for
the time period or amount of time required for the analysis. Typically, a total of 24
hours of valid data or quite time is needed to perform a relevant static tank
analysis. After analyzing valid historical data over a minimum 24 hour time period,
the system can report valid leak rates.
Note! A tank typically requires four
hours to become stable for
adequate Static analysis.
Continuous Analysis
Continuous analysis allows the operator to keep the tank in use while performing
an analysis. Typically, a total of 24 hours of valid data or quite time is needed to
perform a relevant continuous analysis. Continuous analysis should normally be
done during a 30 day time period. During this time, the system identifies valid
down times from historical data during regular operation and builds the results.
Note! Continuous analysis types
do not analyze tanks in real-time.
Like Static types, Continuous types
are manual operations, not
automatic.
Real-Time Analysis
Real-Time analysis allows for an automatic on-going analysis of tanks. Only an
Administrator or Supervisor can configure and perform Real-Time analysis. Unlike
Static and Continuous types, Real-Time works constantly to analyze the leak rate.
A total of 24 hours of valid data or quite time is needed to perform a relevant realtime analysis over a 60 day time period. Tests are performed automatically every
day at 12:00 am and at the time defined for Auto Printing. If the Leak Data alarm is
enabled, an alert is given every day at 12:00 am to notify the operator that there is
not enough valid data or quiet time data from the tank to produce a valid Leak Test
Report. A Leak Rate alarm, if enabled, also notifies the operator if the calculated
leak rate exceeds the preset alarm limit.
USM003GVAE1005
129
Varec
Using Leak Detection
Leak Analysis Tests
Operators can perform two types of leak analysis test:
Note! If configured by an
Administrator or Supervisor, RealTime leak analysis are performed
automatically at 12:00 AM and at
the time defined for Auto Printing.
Operators need to consult an
Administrator or Supervisor to
configure and perform Real-Time
leak analysis test.
Perform Leak Analysis
dialog box
130
• Static
• Continuous
Static and Continuous test methods are tests that have to be initiated by the
operator. These tests are run from the Perform Leak Analysis dialog box utilizing
the Run Analysis button.
.
Field
Description
Point Name
Used to display the name of the currently selected tank
point. To select a new tank point, press the “…” button and
the Select Tank Point dialog box will appear.
System Name
Displays the name of the currently selected DataManager
System
Start Time
Used to select the starting date and time of the leak test.
The Start Time date time picker control will default to
12:00am today minus the required leak test span for the
tank gauge selected.
User Manual
FuelsManager Defense
Field
Description
End Time
Used to select the ending date and time of the leak test.
The End Time date time picker control will default to
12:00am today.
Run Analysis
The Run Analysis button will initiate the leak test analysis
with the current state of the dialog box. The Run Analysis
button will be disabled until the Start Time, End Time or
the Tank Analysis Type has changed.
Tank Gauge
Displays the tank gauge that will be used in the leak test
Tank Analysis
Method
Displays the leak analysis method that will be used in the
leak test
Tank Analysis Type
Supported types in this field include: Static and
Continuous. Regardless of how the tank was initially
configured, the selection from this field override all other
settings.
Leak Rate
Displays the resulting calculate leak rate after the Run
Analysis button is clicked
Elapsed Time
Displays the resulting elapsed time of the test after the
Run Analysis button is clicked
Minimum Volume
Displays the resulting minimum volume after the Run
Analysis button is clicked
Minimum
Temperature
Displays the resulting minimum temperature after the Run
Analysis button is clicked
Maximum Volume
Displays the resulting maximum volume after the Run
Analysis button is clicked
Maximum
Temperature
Displays the resulting maximum temperature after the Run
Analysis button is clicked
Temperature
Change
Displays the resulting temperature change after the Run
Analysis button is clicked
Test Analysis Status Displays the status of the leak test that was analyzed after
the Run Analysis button is clicked
Print Preview
The Print Preview button will display a report based off the
current leak test result in a preview mode. If the report
needs to be printed, it can be printed from the Print
Preview. The Print Preview button will be disabled until a
leak test has been run.
Cancel
The Cancel button ignores the changes and dismisses the
dialog box.
USM003GVAE1005
131
Varec
Performing Static/Continuous Leak Analysis Test
Step-by-Step
• From FuelsManager OPERATE, select the Tools menu.
• Select Perform leak rate analysis. The Perform Leak Analysis dialog box
appears.
Continued...
Perform Leak Analysis dialog box
132
User Manual
FuelsManager Defense
...Continued
• Click the “…” button, next to the Point Name field. The Select Tank Point
dialog box will appear.
• Select the tank point for which the static leak analysis is to be performed.
Verify the selected tank displays in the Point Name field.
• Select a Start Time and an End Time.
• Select a Tank Analysis Type. Either Static or Continuous analysis types can
be selected regardless of how the tank point was originally configured from
the Edit Tank Point - Leak Detection page.
• Click the Run Analysis button to perform the leak test with the criteria
selected. The following results display in the Test Analysis Status field upon
execution: leak rate, elapsed time, minimum volume, maximum volume,
minimum temperature, maximum temperature, temperature change and the
test analysis result.
• If a print preview is desired, click the Print Preview button. This will display
the current results graphically, as detailed in the ‘Leak Test Report ‘ section.
The report can be printed from the dialog box if needed.
USM003GVAE1005
133
Varec
Leak Test Reports
Leak Test Reports include the following:
Note! When in Real-time mode,
reports may be scheduled to print
automatically.
134
• Static Report
• Continuous Report
• Real-Time Report
Field
Description
Point Name
Used to display the name of the currently selected tank point.
To select a new tank point, press the “…” button and the
Select Tank Point dialog box will appear.
System Name
Displays the name of the currently selected FuelsManager
System
Start Time
Used to select the starting date and time of the leak test. The
Start Time date time picker control will default to 12:00am
today minus the required leak test span for the tank gauge
selected.
End Time
Used to select the ending date and time of the leak test. The
End Time date time picker control will default to 12:00am
today.
User Manual
FuelsManager Defense
Static Report
USM003GVAE1005
135
Varec
t
Continuous Report
136
User Manual
FuelsManager Defense
Real-Time Report
USM003GVAE1005
137
Varec
Command Summary
Tools ¦ Perform Leak Rate Analysis
Allows the user to perform Static and Continuous leak analysis tests
138
User Manual
Working with the
Throughput Calculator
(Professional Edition Only)
139
Varec
Understanding the Throughput Calculator
Note! The Throughput Calculator
supports throughput calculations
for Federal EPA requirements.
State or local regulations may vary.
Please consult the local emissions
office for relevant requirements.
140
Title V of the 1990 Clean Air Act requires that all Major sources of air pollution
obtain a new operating permit. Tank farms and terminals may be a major source of
emissions, as such, they require a Title V permit. Operators have to estimate their
total emissions each year. If this estimate is exceeded they are penalized very
heavily. Typically, a software application developed by the EPA, called TANKS, is
used to submit total emissions for Title V applications. The Throughput Calculator
supplies throughputs to TANKS to reduce the amount of time and effort required
by operators to calculate these values for the purpose of estimating total
emissions. The Throughput Calculator uses volume increases for an individual
tank, which is supplied by FuelsManager, to calculate the total throughput for a
given time range.
User Manual
FuelsManager Defense
Using the Throughput Calculator
Operators can perform an analysis by opening the Throughput Calculator
interface. After opening the Throughput Calculator dialog box, all relevant criteria
must be entered before an analysis can be generated.
Throughput Calculator
dialog box
Fields
Description
Start Date
Defaults to the current date minus 30 days. Selecting
the drop-down arrow will open a calendar for ease of
selection.
End Date
Defaults to the current date. Selecting the drop-down
arrow will open a calendar for ease of selection.
Start Time
Defaults to 12:00 PM
End Time
Defaults to 12:00 PM
Volume Units
Engineering units used for throughput calculation
Available Tanks
The available tanks in the current archive subsystem will
be displayed in the Available Tanks list.
USM003GVAE1005
141
Varec
Note! In order for the Throughput
Calculator to export directly into
TANKS software, the tank names
used in FuelsManager must
correspond exactly with the names
used in the TANKS software. Varec
recommends the naming convention
in the TANKS software be changed
to correspond with the naming
convention used in FuelsManager.
Please consult an Administrator or
Supervisor if there is concern of the
current configuration of TANKS.
142
Fields
Description
Selected Tanks
The tanks selected by the user from the current archive
subsystem will be displayed in the Selected Tanks list.
Calculated Values
All the results from the throughput calculation are shown
in the Calculated Values list view. If multiple tanks have
been selected, the control will display the results one
row at a time as the analysis for a tank is completed.
Calculate
Button that Initiates a throughput analysis. The Calculate
button is disabled until at least one tank has been
selected.
Update TANKS
When the Update TANKS button is clicked, the
Throughput Calculator will automatically populate the
yearly throughput value in the TANKS software and the
values for the date range selected - reducing the amount
of manual calculations operators have to perform.
Export -> File/Abort
The Export/Abort button has two distinct functions,
depending on the state of the application. If the
Throughput Calculator is analyzing tank data, the button
will be labeled Abort. Clicking this will immediately abort
the current analysis operation. If the analysis is
complete, the button will be labeled Export -> File.
Clicking this will prompt the user for a filename and
location for a "csv" formatted file.
User Manual
FuelsManager Defense
Performing Throughput Analysis
Step-by-Step
• From the Windows Start menu, select Programs.
• Select FuelsManager.
• From the FuelsManager program group select Throughput Calculator. The
Throughput Calculator dialog box appears.
• Select the start and end dates for the throughput analysis.
• Select the start and end times for the throughput analysis.
• Select the type of volume units to be used in the calculation, display and
exported files.
• The available tanks in the current archive subsystem will be displayed in the
Available Tanks list. Add individual tanks to the selected list by highlighting
the tank in the Available Tanks list and then either double-clicking or
selecting the Add>> button.
• Click the Calculate button to start a throughput analysis. The same settings
will be applied to all the selected tanks and the results will be displayed in
the order the tanks are selected. The progress of the analysis is displayed in
a bar below the Calculated Values list.
Note! Remove an individual tank by highlighting the tank in the Selected Tanks list and
then either double-clicking or selecting the <<Remove button. To add or remove all of the
tanks, use the Add All or Remove All buttons.
USM003GVAE1005
143
Varec
144
User Manual
Varec
Index
Reports, 60
Trends, 73
A
About, 10, 88
Advisory Setpoint, 15, 19
Custom Graphic
About, 50
Command Summary, 52
Index Display, 51
Opening, 51
Process Diagram, 50, 51
Site Overview Diagram, 50, 51
Alarm
Acknowledging, 82
Advisory Setpoint, 16
Buttons, 78
Command Summary, 86
Current Status, 77
Details, 83
Indicator Box, 77
Line, 76, 79
Log File Browser, 76, 83
Menu Commands, 4, 76
Mode button, 77
Operator Information, 76
Removing, 82
Responding to, 80
Silence, 76
Silencing Before Acknowledgement, 82
Sounding, 80
Summary, 76
Tool Bar, 5, 76
Transfer Shutdown Setpoints, 15
Alarm Summary
About, 76
Viewing, 81
Window, 81
C
Calculator, 14
Opening, 14
Performing Calculations, 14
Printing, 14
Using, 14
Command Summary
Alarm, 86
Custom Graphics, 52
Individual Tanks, 20
Leak Detection, 138
Multiple Tanks, 45
OPERATE, 7
Product Movement, 124
145
D
Dialog Box
Calculator, 14
Column Filter, 112
Column Header Alias, 35, 36, 114
Database Edit, 71, 72
Database Level Display, 36
Dynamic Tank Group Setup, 42, 43, 44
Graphic Display Selection, 6, 51
Handgauge Data, 116
Log File Browser, 83, 84
Macro, 4, 7
Movement Setup, 106, 110, 117
New Tank Group Name, 41
Open Movement History, 105
Operator Command, 12, 14, 15, 16, 33, 38
Pen Attribute, 67, 69, 70, 72
Perform Leak Analysis, 7, 130, 132
Print, 56, 84
Print to File, 56
Process Data, 32, 33
Real-Time Trend Definition, 64, 65, 69, 70, 71, 72
Report Manager, 54, 55, 56
Select a Column, 113, 114
Select a Product, 32
Select Database Point Variable, 72
Select DataManager Subsystem, 72
Select Engineering Units, 37
Select Point Variable, 37, 69
Select Process Variable, 27
Select Product, 33
Select Tank Background, 28
Select Tank Point, 10, 11, 130, 133, 134
Select Trend Definition, 70, 71
User Manual
FuelsManager Defense
Set Column Format, 36
Tank Group Select, 24, 25, 41
Throughput Calculator, 141, 143
User Data, 115
Alarm, 4
Bar, 4
Column Heading, 35, 36, 37, 39
Database Point, 35, 39, 40
Display, 4, 59, 71
Edit, 4, 27, 28, 29, 45
Filter Setup, 42
Help, 5
Movements, 4
Page, 54
Point, 4
Print, 56, 60
Real-Time Data, 35, 38
Tank Group, 32, 46
Tank Group Name, 35, 36, 43, 44
Tools, 4
Trend, 4, 62, 64, 65, 73
Window, 4
F
FuelsManager
About, 2
Getting Started, 3
Keyboard Shortcuts, 6
Window Elements, 4
G
Graphical Tank Group
Menu Commands, 27
Window Elements, 26
Movement History
H
About, 101
Filtering, 105
Menu Commands, 101, 104
Movement Tickets, 118
Printing Movement Tickets, 119
Viewing, 101, 105
Historical Reports, 58
Opening, 59
I
Index Display, 3, 6, 7, 51
Movement Summary
L
About, 97
Deleting a Movement, 113
Editing Start Data, 113
Entering Handgauge Values, 116
Entering Meter Values, 111
Entering User String Data, 115
Filtering, 112
Initiating a Movement, 110
Menu Commands, 97
Movement Setup, 106
Resetting a Movement, 111
Resuming a Movement, 111
Stopping a Movement, 110
Viewing Discrepancies in Percentages, 117
Leak Detection
About, 126
Command Summary, 138
Continuous Analysis, 129
Leak Test Reports, 134
Mass Analysis, 128
Performing Leak Analysis Test, 132
Real-Time Analysis, 129
Tank Analysis Types, 129
Using, 130
Volumetric Analysis, 127
Log File Browser, 83
Adding Comments, 85
Error messages, 85
Opening, 83
Printing, 84, 85
Viewing, 83
Movement Tickets
About, 118
Previewing, 121
Printing, 121
M
O
Menu Commands
OPERATE
USM003GVAE1005
146
Varec
Display Menu, 4
Getting Started, 3
Help, 5
Keyboard Shortcuts, 6
Window Displays, 5
Window Elements, 4
Log File Browser, 58
Movement Tickets, 118
Predefined, 54
Print Displayed, 56
Print Files, 57
Print to File, 56
Print Undisplayed, 56
Printing, 54, 56, 57, 121
Report Manager, 54
Undisplayed, 56
Viewing Multiple Pages, 54
Window, 54
P
Process Data
Changing Product Code, 32
Product Movement
Command Summary, 124
Deleting a Movement, 113
Editing Start Data, 113
Entering Handgauge Values, 116
Entering Meter Values, 111
Entering User String Data, 115
Filtering, 112
Handgauged Values, 110
Holding for Meter Values, 111
Initiating a Movement, 110
Movement History, 101
Movement Setup, 106
Movement Summary Window, 97
Movement Tickets, 118
Practical Movement Examples, 122
Preview Movement Tickets, 121
Printing Movement Tickets, 119, 121
Resetting a Movement, 111
Resuming a Movement, 111
Stopping a Movement, 110
Terms, 88
Using, 97
Viewing Discrepancies in Percentages, 117
R
Reports
Active, 57
Automatic Alarm/Event, 58
Command Summary, 60
Disable, 54, 55
Display of, 54
Enable, 54, 55
Historic, 59
Historical, 58
Inactive, 57
Leak Detection, 134
147
T
Tank
Alarm Indication Level, 30
Clear, 31, 40
Delete, 31, 40
Image, 26
Information, 28
Insert, 31, 40
Modify/Add, 31, 40
Parameters, 12
Product Flow, 30
Product Level, 30
Status, 19, 26, 28, 30, 46
Trends, 62
Variables, 32, 33
Water Level, 30
Tank Detail
Field Descriptions, 18
Manual Override, 12, 13
Opening, 23
Parameters, 12
Set Button, 12
Set Buttons, 13
Viewing, 10, 11
Window, 10, 11, 13, 15
Tank Group
About, 22
Background Color Scheme, 28
Dynamic, 22, 41
Filter Setup, 42
Graphical, 22, 23, 32
Menu Commands, 27
Multiple, 25
New, 41
Opening, 24
User Manual
FuelsManager Defense
Opening Multiple, 25
Percentage Values, 30
Refining, 44
Static, 22
Tabular, 22, 23
View Existing Dynamic, 25
View Existing Static, 25
Viewing, 24
W
Windows
Actions & Elements, ii, iii
Terminology, ii
Tank Mode
Command, 17
Tank Parameters
Manual Override, 12
Set Button, 12, 13
Tank Transfer, 15
Advisory Setpoint, 15
Performing, 15
Tank Mode Commands, 17
Transfer Mode Commands, 16
Transfer Modes, 15
Transfer Shutdown Setpoint, 15
Throughput Calculator
About, 140
EPA, 140
Performing Analysis, 143
TANKS, 140
Using, 141
Transfer Mode, 95
Commands, 16
Set Button, 15
Transfer Shutdown Setpoint, 15, 19
Trends, 62
About, 62
Command Summary, 73
Defining Pen Attribute, 70
Editing, 70
Generic, 62, 71
Historical, 62
Menu Commands, 4
Opening, 64
Pen Attribute, 67
Point Variables, 69
Real-Time, 62
Select Definitions, 71
Window, 63
USM003GVAE1005
148
This page is left intentionally blank
Your offical representative
www.varec.com
Varec, Inc. • 5834 Peachtree Corners East • Norcross (Atlanta), GA 30092 USA
Tel: +1 (770) 447-9202 • Fax: +1 (770) 662-8939