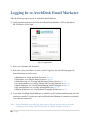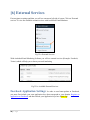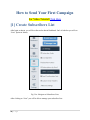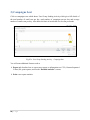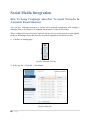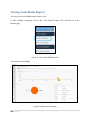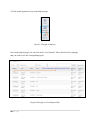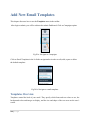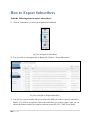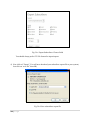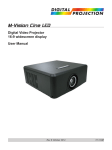
1
AWEBDESK EMAIL MARKETER Version 7.1.0 AwebDesk Softwares User’s Guide Edition 1.0 June 2014 1|Page About This User’s Guide How to Use This User’s Guide This user’s guide describes AwebDesk Email Marketer’s Graphical User Interface (GUI). It shows you how to use each screen in the GUI. Use the Introduction to get a basic overview of AwebDesk Email Marketer. See page 9. Use the Getting Started chapter to start sending emails right away. See page 14. Use the Table of Contents (page 3), to find information about a particular screen in the GUI. Use the rest of the user’s guide to see in‐depth descriptions of AwebDesk Email Marketer’s features. The chapters are roughly arranged in order of the frequency with which you are like ly to use them when configuring AwebDesk Email Marketer. Customer Support If you have a problem with AwebDesk Email Marketer that is not covered in this User's Guide or the online knowledge base (click the Help link in the toolbar), please visit the AwebDesk online support center: http://awebdesk.com/support/ Copyright 2014 AwebDesk Softwares (http://awebdesk.com). All rights reserved. DISCLAIMER: The information in this user’s guide is accurate at the time of writing. This user’s guide is provided “as is” without express or implied warranty of any kind. Neither AwebDesk Softwares nor its agents assume any liability for inaccuracies in this user’s guide, or Loss incurred by use or misuse of the information in this user’s guide. 2|Page TABLE OF CONTENTS Title Page No. ABOUT THIS USER’S GUIDE 2 How to Use This User’s Guide 2 Customer Support 2 TABLE OF CONTENTS 3 INTRODUCTION 8 Introduction 9 Welcome to AwebDesk Email Marketer 9 AwebDesk Email Marketer Overview 9 Contact 10 Contact lists 10 Manual Input, CSV Files and Website Forms 10 Templates 11 Email Campaigns and Split Tests 11 Auto responders and Triggers 11 Custom Fields 12 Email Tracking 12 Bounce Tracking 12 Cron 13 Event Log 13 GETTING STARTED 14 LOGGING IN TO AWEBDESK EMAIL MARKETER 16 THE NAVIGATION BAR 18 Overview of Dashboard 19 3|Page Choose Theme for Admin panel Overview of Left Side Navigation Bar Subscribers Management 20 23 24 Import Subscribers 25 Add Subscribers 25 View Subscribers 25 Search Subscribers 25 Export Subscribers 25 Excluded Subscribers 25 Batch Actions 26 List Cleanup 26 Database Sync Utility 27 Campaigns Creation 28 Create Campaign 28 View Campaigns 29 Email Templates 29 Message Variables 29 List Management 30 Add New List 30 Manage Lists 31 List Sharing 31 Subscriber Fields 32 List Segment 33 Subscriber Actions 33 Subscriptions by Email 33 Email Confirmation Sets 33 Custom Email Header 33 Bounce Settings 34 Reports Analysis 4|Page 35 Campaign Reports 35 List Reports 36 User Reports 36 Read Trends 36 Email Client Trends 36 FIRST THING FIRST 37 Setting up Crons 37 Autoresponder Settings 39 Branding Your Email Marketer 41 Settings 42 General Settings 43 Localization 43 SMTP/Mail Settings 43 Deliverability Tools 43 Automatic Abuse Management 43 Feedback Loop Processing 43 SPF Records 44 User Groups 45 Managing Users 48 External Services 50 Multiple SMTP Connections 53 HOW TO SEND YOUR FIRST CAMPAIGN 54 Create Subscribers List 54 Adding Subscribers 58 5|Page Adding a Subscriber Manually 58 Importing Contacts from a File 59 Exclusion List 61 Campaign creation 62 Email Campaigns Overview 62 Creating and Editing Email Campaigns 62 USING FORM Forms Overview Creating and Editing Forms 66 66 66 Creating or Editing a Subscription Form 67 Creating or Editing an Unsubscription Form 70 Adding a Form to Your Website 72 REPORTS AND ANALYSIS 75 Reports Menu 76 Viewing Campaign Reports Statistics 77 View Campaign Detailed Report 78 Viewing List Reports 80 Subscribe Trend 81 Unsubscribe Trend 82 Opens by Hour Trend 83 User Reports Emails Sent 84 Campaigns Sent 85 Trend Reporting 86 Read Trends 87 Email Client Trends 88 SOCIAL MEDIA INTEGRATION 84 89 How to setup campaign auto post to social networks in Awebdesk Email Marketer 89 How to activate Facebook social media reporting 95 How to auto post campaigns to Twitter 101 Social Media Reports & Analytics 105 HOW TO 112 Add New Email Templates 113 Templates Overview 113 6|Page How Templates Work 114 Advantages of Templates 114 Built-in and Custom Templates 114 Creating and Editing Custom Email Templates 115 Editing a Custom Template 117 Viewing Built-In Email Templates 118 How to Export Email Templates 121 How to Export Subscribers 123 7|Page I INTRODUCTION This section contains the following chapters: Introduction (page 9) Getting Started (page 14) Logging In to AwebDesk Email Marketer (page 16) 8|Page INTRODUCTION Welcome to AwebDesk Email Marketer Congratulations on your purchase of AwebDesk Email Marketer! AwebDesk Email Marketer gives you an unprecedented ability to create, manage and automate large‐scale email marketing campaigns, mailing lists, and automatic responses. Note: If you want to start using AwebDesk Email Marketer to send out emails right away (see Getting Started on page 15). AwebDesk Email Marketer Overview Here’s an overview of how AwebDesk Email Marketer works. The figure below shows how AwebDesk Email Marketer’s most important components interact. The rest of this chapter describes the components in this figure. Fig 1: Awebdesk Email Marketer Overview 9|Page Contacts Contacts are the people about whom you store information in AwebDesk Email Marketer. These are the people to whom you send emails. Contact lists AwebDesk Email Marketer stores all of your contacts in contact lists. You can have multiple contacts lists, and you can configure each contact list to work in a different way. For example, you can configure one contact list to send out automatic emails to its members every month, and configure another list to take no automatic action. You can also configure information differently for each contact list (such as the “from” address of the emails you send out, and your company name). Manual Input, CSV Files and Website Forms There are three ways to add contacts to a contact list: by inputting them manually one‐by‐ one, by uploading a CSV (Comma‐Separated Value) file with information on multiple contacts, or by having contacts fill out a form on your website. Note: You can output a CSV file from many database and spreadsheet applications (Microsoft Excel, for example). When you upload a CSV file to AwebDesk Email Marketer, you can specify how AwebDesk Email Marketer should populate the contact list with the information in the file. AwebDesk Email Marketer helps you create forms you can put on your website to let your customers sign up for your newsletter or emails. Note: You can design forms in AwebDesk Email Marketer, and then paste the HTML directly into your web pages. You can also put some kinds of forms into the emails you send out. There are three ways to add contacts to a contact list: by inputting them manually one‐by‐ one, by uploading a CSV (Comma‐Separated Value) file with multiple contacts’ information, or by having contacts fill out a form on your website. Note:You can output a CSV file from many database and spreadsheet applications (Microsoft Ex cel,for example).When you upload a CSV file to AwebDesk EmailMarketer, you can speci fy how it should populate the contact list with the informationin the file. 10 | P a g e Templates Use HTML and plain‐text templates to form the basis of your email campaigns. Templates make your emails attractive and promote your brand identity. Either use the templates included with AwebDesk Email Marketer, which are designed specifically to display correctly in all popular email clients, or design your own using AwebDesk Email Marketer’s fully‐featured HTML development editor and plain‐text editor. Email Campaigns and Split Tests Email campaigns are the emails that you send out from AwebDesk Email Marketer to the people on a contact list. Email campaigns are based on an HTML or plain‐text template, and are sent to members of a contact list. You control when you send email campaigns; you can send them at the click of a button, or schedule them to be sent out at a specific point in the future. Split tests allow you to discover which version of an email is most effective. You can create different variations on an email (three versions with different subject lines, for example) and send them out to your contact list at random, in equal numbers. The statistics that are returned let you see which version has the highest open or click‐through rate. AwebDesk Email Marketer also supports automatic split testing, in which the “candidate” email versions are sent to only a small proportion of your contact list, and the “winner” version is then sent to the remaining contacts in the list. Autoresponders and Triggers Like email campaigns, autoresponders are emails based on HTML or plain‐text templates. However, autoresponders are sent out automatically at pre‐defined intervals after a contact is added to a contact list. For example, you may want to send out one autoresponder as soon as contacts are added to the list (“Thanks for joining our mailing list!”) and another a month or a year after they join (“You’ve been reading our daily newsletter for 30 days now; tell us what you think!”). Triggers are similar to autoresponders, but allow you even greater flexibility to automate email and administrative tasks to happen automatically when certain other events occur. 11 | P a g e You can set up date‐related triggers (so that everyone in your contact list receives a “Happy Birthday” email on their birthday, for example) and event‐related triggers (so that a contact is automatically added to a “warm leads” contact list when he or she opens your email). Custom Fields Custom fields are variables that are added to a contact list. You can add any kind of variable you want (“City”, “Date of birth”, “Zip code”, “Hat size” ‐ whatever you need). When you add a custom field to a contact list, you can then add it in to an email campaign. AwebDesk Email Marketer already has a lot of built‐in custom fields that you can use to persona lize your emails. For example, if you required that a contact fills in a “First name” field in the we bsite form, you can then send out an email that automatically addresses the contact as “Dear Joe” .This function is similar to the “mail merge” feature found in some word processing and database applications Note: If you are going to use custom fields in emails, it is strongly recommended that you make them mandatory (a contact must fill them in to sign up). This way, you can be sure that you will have no embarrassing gaps in your emails. Email Tracking AwebDesk Email Marketer allows you to track and view a variety of information about the email s you send; how many are opened (and when), how many links are clicked in each one (and whic h link was clicked), and so on. Bounce Tracking Bounced emails are those that never reach their destination. This can happen for numerous reasons. However, if you keep sending emails to an address that d oes not accept them, there is a danger that your email server could be blacklisted (making it muc h more difficult to send subsequent emails to anybody).To avoid this AwebDesk Email Marketer can track bounced emails, discover why they were bounced, and automatically act by deactivatin g contact’s email addresses. The contact’s details remain in the list, but emails are no longer sent. AwebDesk Email Marketer can tell the difference between emails that bounced for temporary re asons (a contact’s inbox was full, for example) and those that bounced for permanent reasons (th e account does not exist, for example). AwebDesk Email Marketer can then take different action 12 | P a g e depending on the type of bounce that occurred. Cron Cron (an abbreviation of “chronograph”) is a program that activates other programs, commands a nd processes at pre‐determined times and intervals. It is a way of scheduling tasks to happen auto matically. The AwebDesk Email Marketer server uses cron jobs to take care of sending out sched uled emails, handling autoresponders and bounced emails, and a variety of other tasks. Event Log AwebDesk Email Marketer’s event log is a CRM (Customer Relationship Management) feature t hat allows you to see all of your interactions with a contact at a glance. Information about Aweb Desk Email Marketer‐related events (for example, each time an email is sent to a contact) is logg ed automatically, and you can also manually log all sorts of other information (for example, each time you call or meet a contact in person). 13 | P a g e Getting Started Use this chapter if you want to start sending out emails right away. The steps in this chapter show you how to set up a list of your contacts, and send emails to them. Note: AwebDesk Email Marketer should already be set up and configured on your server. If you are in doubt, check with your system administrator or whoever is in charge of the server. Steps marked with a red asterisk (*) are necessary. The other steps are not necessary, but allow you to perform additional, useful tasks. Follow the links to other parts of this user’s guide for information on how to complete each step. 1) Log in to AwebDesk Email Marketer. * Use your username and password to access AwebDesk Email Marketer. 2) Set up a contact list. * Create a list to hold information about your contacts (the people to whom you send your emails). You can also configure the following: Your name, email address, and other personal details. Your company’s name, address and phone number. Where bounced emails should be sent. Which custom fields you want to use (see step 3) Which fields you want to see when you view the list. 3) Create custom fields. If you want to collect a specific type of information about your contacts, you can create a custom field to hold the information. You can specify the kind of field you want to make (text box, drop‐down list, check box, and so on), and a variety of other settings. You can also specify whether or not the field should be mandatory (if a field is mandatory, it must be filled in before you can successfully add a contact to the list). Note: Skip this step if you do not want to collect information that is not covered by the built‐ in fields. 4) Add contacts to your contact list. * Manually add information about one or more people to whom you want to send emails. You can also upload a file containing contacts’ information, if you have one. 5) Create a signup form. Use AwebDesk Email Marketer to create an HTML form you can add to your website that allows people to add their information to your contact list. 14 | P a g e Note: Skip this step if you do not want to allow people to sign up to join your contact list. 6) Place the signup form on your website. Add the HTML form you created in step 5 to a page on your website Note: Skip this step if you did not create a form in step 5. 7) Create an email campaign. * Email campaigns control the emails you sent to the contacts on your contact list. Specify whether you want to send an HTML email, a plain‐text email, or both (known as “multipart”). Design the HTML and/or text components of the campaign. Use the built‐in templates, modify a template, or build your own from scratch. Write your email’s text content. Use custom fields, if required. Activate the email: allow it to be sent to your contacts. Validate your email, if required: check how it looks in popular email clients. Preview your email, if required: send a test copy to your own email address. Save the campaign. 8) Send your campaign to your contacts. * Select the contact list to which you want to send the email campaign, and send it out to the contacts belonging to the list. 9) Check statistics about your campaign. Find out how many of your emails reached their targets successfully, how many were opened, and a variety of other statistics. Note: Skip this step if you do not want to view statistics about your campaign. 15 | P a g e Logging In to AwebDesk Email Marketer Take the following steps to log in to AwebDesk Email Marketer. 1) Open your Internet browser and enter AwebDesk Email Marketer’s URL in the address bar. Hit Enter or click Login. Fig 2: Login screen 2) Enter your Username and Password. 3) Select the screen you want to see once you have logged in. See the following pages for more information on each screen: Dashboard: see Using the Home Screen on page 19. Subscribers: see Using the Home Screen on page 24. Subscribers lists: see Viewing and Managing Contact Lists on page 54. List Segmentation: see Creating, Editing and Viewing Segments on page 63. Email campaigns: see Viewing and Managing Email Campaigns on page 62. My autoresponders: see Viewing Autoresponders on page 39. Reports & Statistics: see Viewing Email Campaign Statistics on page 75. 4) If you want AwebDesk Email Marketer to remember your Username and Password, click Re member my details. If you do not want AwebDesk Email Marketer to remember your details, leave this box unchecked. Note: Select Remember my details only when you are the only person with access to the computer you are using. NEVER select this on a public computer. Failure to 16 | P a g e adequately protect the details of your contacts may contravene your local data protection laws. 5) Click Login. If your Username and Password are correct, the screen you selected in step 3 displays. Note: If you forgot your password, click the Forgot your password? link. A screen displays in which you can enter your Username. Click Send email. An email is sent to the email address you registered with AwebDesk Email Marketer. You can click a link in the email to regain access to AwebDesk Email Marketer. 17 | P a g e II \ THE NAVIGATION BAR This section contains the following chapters: Overview of Dashboard (page 19) Choose the theme for admin panel(page 20) Overview of Left Side Navigation Bar (page 23) Subscribers Management (page 24) Campaigns Creation (page 28) List Management (page 30) Reports Analysis (page 35) 18 | P a g e Overview of Dashboard This chapter discusses a brief overview and steps on how to send campaigns. Fig 3: Dashboard Overview 19 | P a g e Choose Theme for Admin panel After login as admin, you will be redirected to admin Dashboard. On Left side bar you will see “Settings” option in Menu). Fig 4: Setting Option If you want to change theme please follow below steps: 1) Click Settings in the left navigation bar and select Account settings. Fig 5: Account Settings 20 | P a g e 2) You will see option Default Dashboard theme. You can easily choose theme which you want to set for email marketer. Kindly see below image to get idea. Fig 6: Choose your theme 3) Select theme and click on Update button. 21 | P a g e 4) Once you refresh your dashboard will comes with new changed theme. Fig 7: Dashboard with Updated Theme You may also choose theme for your mobile version from same screen. Fig 8: Mobile Version Theme Updating 22 | P a g e Overview of Left Side Navigation Bar Fig 9: Left Side Navigation Bar 23 | P a g e Subscribers Management Fig 10: Subscriber Management Our Email Marketing Software can be used just like an innovative CRM solution to build your subscribers list, segment them and later on send emails with one to one user activity log. You can copy and paste your email addresses, your contacts, file upload, direct MySQL connection and of course import them with simply a few mouse clicks. Fig 11: Steps to manage subscribers 24 | P a g e [1] Import Subscribers Import subscribers from a file (recommended for large scale imports), copy or paste (recommended for small scale imports), synchronization with external service by using an Import form or else attach a file (maximum size 2MB) to it and then import into the chosen file. Contains advanced Importing options where you can import as an active subscriber, as an unsubscribed subscriber, as an unconfirmed subscriber or as excluded email address. [2] Add Subscribers Build your list and manage your subscribers more effectively. Add new subscribers to particular list in order to send email campaigns. Advanced options enable to filter active, unsubscribed, bounced or unconfirmed status of the subscribers. [3] View Subscribers View subscriber’s mailing list, subscriber details (status of subscriber, first name, last name), recent campaign history, campaigns that are scheduled to send to in the near future and list of email addresses that has been bounced. [4] Search Subscribers Search subscriber’s mailing list, subscriber details (status of subscriber, first name, last name), recent campaign history, campaigns that are scheduled to send to in the near future and list of email addresses that has been bounced [5] Export Subscribers Export contacts to a CSV (Comma‐Separated Value), XLS (Microsoft Excel) or XML (Extensible Markup Language) file. You can export all contacts or selected ones(current list) from a list (or multiple lists), or export only contacts who match certain criteria or fields such as Last name, first name, ID, Status, date added, IP address, user agent and so on. [6] Excluded Subscribers Exclude all or selected subscribers from the list to personalize your marketing for greater results. You can exclude subscribers or contacts by entering their details that matches exactly else that begins with or ends with the information you have provided manually. 25 | P a g e [7] Batch Actions Removing bulk subscribers from list is performed through batch actions. You can remove a selected list of addresses (enter emails in box - one per line) manually or from the given list, remove all non-confirmed subscribers from the selected lists or remove all subscribers from the lists. [7.1] List Cleanup Awebdesk email marketer is the only self hosted email marketing platform to provide you integrated list cleanup feature. With this mind blowing feature, you could cleanup your thousands of bad emails on a click of a button. The process is fully automated and runs in background. So you just select lists and click List cleanup button. Our system will automatically remove bad emails from the system. To do list cleaning goto: Subscribers -> Batch Actions, here you will find list clearing feature with different options. Fig 12: List cleanup 26 | P a g e [8] Database Sync Utility Prepare a backup of your data and let you save it as a file on your machine. The format of the backup is a series of MySQL statements, suitable to be restored (imported) by a utility such as phpMyAdmin. 27 | P a g e Campaign Creation Create campaigns for all your marketing & email needs. From a basic newsletter to an automated auto responder, AwebDesk Email Marketer can take care of it all. Campaign types includes Onetime campaigns, Auto responder campaigns, Birthday campaigns, RSS triggered campaigns, Text-only campaigns, API based campaigns, Scheduled campaigns, Split testing campaigns, Date based campaigns, Recurring campaigns, Fetched by URL campaigns. Fig 13: Campaign Creation [1] Create Campaign Email campaigns are the emails that you send out from AwebDesk Email Marketer to the people on a contact list. Email campaigns control the emails you sent to the contacts on your contact list. . Fig 14: Campaign creation and features Enter a name and choose the type of campaign you want to send like regular, autoresponder, 28 | P a g e RSS, Subscriber database, split testing campaign and so on. Specify whether you want to send an HTML email, a plain‐text email, or both (known as “multipart”). Design the HTML and/ortext components of the campaign Use the built‐in templates, modify a template, or build your own from scratch. Then write your email’s text content by using custom fields (if required). Hence activate the email and allow it to be sent to your contacts. Preview your email, if required and send a test copy to your own email address and finally save the campaign. [2] View Campaigns View or delete the selected campaigns from the list of your campaigns. Shows the summary of the selected campaign like you can preview the message subject, schedule your campaign, make the campaign private or public archive, spam filter tests, enable or disable reads or open tracking etc. [3] Email Templates Templates control the look of your email. They specify which fonts and text colors to use,the background colors and images to display, and the size and shape of the text areas on the user’s screen. AwebDesk Email Marketer includes a huge variety of built‐in templates, ready for you to use out of the box. They have been designed and tested with interoperability in mind, so they will display correctly in all common HTML email clients. You can also create your own custom email templates. Either use the included WYSIWYG(What You See Is What You Get) editor, or upload an HTML file from your local computer or a remote URL as the basis for the template. [4] Message Variables Message Variables includes certain variables while creating a campaign like personalizing tag that will be used in mailings, personalization name to be inserted from the list or by adding new name, allows to Insert Conditional Content in order to personalize messages. 29 | P a g e List Management With this Email Marketing tool make subscriber lists with custom fields and store different information of your subscribers like name, age, email, phone no etc. Fig 15: List Management [1] Add New List Lists are used to group sets of subscribers. Here you can add new lists so that you can send a campaign. You can easily include your senders contact information (specific to the list you are sending to) by placing the personalization tag within your outgoing emails Fig 16: Follow to manage subscriber list 30 | P a g e Specify sender’s contact information before addling them to list. Now you can start adding subscribers, Import subscribers, manage subscribers to your list so that you can send a campaign. [2] Manage Lists Edit the predefined lists so that you can send a campaign and you can configure each list to work in a different way. Include your senders contact information by placing the personalization tag. You can configure one contact list to send out through external services like Configure Facebook or twitter application settings, Configure Unbounce integration settings. [2.1] List Sharing You have created a list, now want to share it with other users?. Don't worry at all our new version will let you allow to share a list with existing users anytime you want. Fig 17: List Sharing To do list sharing go to: Lists ->click on edit button for any list, you will see the “additional and advanced settings” just scroll down and at last there you have option to add the userID of user to whom you want to share the list. Simply add the userID’s with comma separator and click on Save. That’s it. 31 | P a g e Fig 18: Additional and Advanced settings [3] Subscriber Fields Add customized subscription forms to your web site to allow your visitors to subscribe to your list(s). You can customize the look and feel of the form to match your existing web design for seamless integration. Edit text field names, bubble content (the contents of this field will show up as a tool tip when visitor hovers over the field), and label justification and personalization tag. [4] List Segment This section controls the contact list segments that users of this account may use. Select all segments to allow users of this account to use every contact list segment stored in AwebDesk 32 | P a g e Email Marketer. Select User’s own segments plus the following lists to allow the user to access contact list segments configured in the user’s account, plus the other lists that display below (if other contact lists are already configured). [5] Subscriber Actions Here select the subscriber name and then select an action type like when subscriber reads/opens a campaign, when subscriber clicks on a link, when subscriber socially shares a campaign, when subscriber forwards a campaign, when subscriber subscribes to a list, when subscriber unsubscribe from a list and so on. Select the list and campaign type and the actions that you want to take place like whether you want to update subscriber info, send campaign and so on. [6] Subscriptions by Email Subscribe by email which contains email address and Contact format. Subscription lets contacts sign up for your emails. Select from the given list the subscribers whom you want to subscribe or unsubscribe by email depending upon POP3 account or Pipe. Enter your host and port number and number of emails you want to process at one time and then add your subscriber. [7] Email Confirmation Sets Design the HTML version or plain text version of the confirmation email in this section. AwebDesk Email Marketer’s built‐in HTML editor is an HTML design tool that allows you to easily create and modify your emails. You can use the WYSIWYG editing tool, work directly with HTML code, and preview your email. Enter the message for the thank‐you email. Confirm the Opt-In/Opt-Out Email and select names from the list to those you want to access this confirmation set and browse any documents for attachments. [8] Custom Email Header This feature is for advanced users only. Custom headers are headers that will go in the message source, invisible to the subscriber. Some custom headers might prevent your mailings from being sent. [9] Bounce Settings Bounced emails are emails that could not be delivered to the intended recipient. Enter the email address to which bounced emails should be sent by default. Enter the username and password associated with the Default bounce username. Select the method you want to deal with the 33 | P a g e bounced emails such as select No Bounced E-mail Management which is default one and here bounced E-mail Messages will be sent to the From sender of the mailing. No configuration is needed, recommended for novice users. Others are pipe from email address or use POP3 account. 34 | P a g e Report Analysis Comprehensive reporting and analytics are provided to help you analyze your contacts and your campaigns. Learn more about your contacts and use that information to help improve your overall marketing. Fig 19: Report & Analysis [1] Campaign Reports Shows a report of the email campaign you are about to send. Comprehensive reporting and analytics are provided to help you analyze your contacts and your campaigns. From the statistics tab you can see exactly who opened your email, how many times they opened it, and the date/time that they viewed your campaign, which email addresses bounced, how many unsubscribed and many more. Fig 20: Reports & Analysis Navigation You can view the data as a bar chart or as a data table with more elaborated detail. See which links were clicked, who clicks on each link, how many times they clicked, and on what 35 | P a g e date/time. You can type in your Google Analytics details and a tracking code will be added to all links in your email, giving you full integration for number of visits, goals and e-commerce conversions for that campaign. [2] List Reports Shows the List Sending Activities like subscribe trend, unsubscribe trend which shows subscribe or unsubscribe statistics for each email campaign you send, either for a specific date or over time. You can see what time of the day receives the most opens which is shown by the tab opens by hour trend. Shows total number of confirmed or unconfirmed subscribers, bounces, total email sent and average number of emails sent per day. [3] User Reports Shows User Group Sending Activity which gives full details of the total number of email sent per day, total number of campaign sent per day and average number of emails sent per day. Also shows the limit of emails that is to be sent per month. [4] Read Trends By the help of Trend report you can see what time of the day receives the most opens. You can look across all your lists, for a specific list, or a specific campaign. You can also see what day of the week achieves the highest opens. By using this data you can find out the optimal day of the week and time of the day to send future campaigns. [5] Email Client Trends It automatically tracks the email clients your subscribers are using. You will be able to view the top email clients for a list and/or a specific campaign. From there you can export the list of best email clients. 36 | P a g e First Thing First Do [1] Setting up Crons What is Cron? Cron (an abbreviation of “chronograph”) is a program that activates other programs, commands and processes at pre‐determined times and intervals. It is a way of scheduling tasks to happen automatically. The AwebDesk Email Marketer server uses cron jobs to take care of sending out scheduled emails, handling autoresponders and bounced emails, and a variety of other tasks. Setting up Crons Fig 21: Navigate to Crons setup After login as admin, you will be redirected to admin Dashboard. On Top Right of dashboard you will see option to set crons (scheduled tasks). After Clicking on “Crons” you will be able to change cron settings 37 | P a g e Fig 22: Edit each scheduled task as per requirement Before doing anything first always set your cron settings so that all your scheduled tasks will work appropriately. Fig 23: Cron job settings Always provide exact field details so that scheduled tasks will work as you want. 38 | P a g e Autoresponder Settings Autoresponders are emails which get sent to a contact after they've been on your list for a certain time, such as 24 hours or 2 weeks. This email marketing software allows you to create multiple, sequential autoresponder emails for each of your contact lists. You can set auto responders for different actions such as subscription, certain link click or when an email is forwarded or another email address. With this bulk email software you can fetch all kind of statistics about your auto responders just like email campaigns. Click on “Edit” option Fig 24: Navigate to Autoresponder Settings When you click on edit option you will see autoresponder settings page. You can set autoresponders to send automatic emails to your subscribers through crons settings. This sends campaigns to subscribers scheduled against the subscription date. 39 | P a g e Fig 25: Autoresponder Settings 40 | P a g e [2] Branding Your Email Marketer Fig 26: Navigate to Branding Email Marketer Under “Branding” option you can easily personalize AwebDesk Email Marketing Software accordingly and you can send group-wise emails to your different customers. After Clicking on Branding you can easily set details which you want to send with particular email group campaigns. Fig 27: Personalize your email marketer for group mailing You can easily edit your details for any particular group emails. It will make you to set brand for every email you send under any user group, you don’t need to be panic if you want to send emails to group of customers from different businesses. 41 | P a g e Fig 28: Branding AwebDesk Email Marketer Personalize email marketing software according to your needs. Set predefined header and footer for your outgoing emails. You can change look and feel of your email marketing software admin panel and also give excellent new frontend look with template editing feature. 42 | P a g e [3] Settings Fig 29: Navigate to Settings Wizard On Top Right of dashboard you will see Settings option. After Clicking on “Settings” you will be redirected to Awebdesk Email Marketer settings wizard. General Settings: Here you can easily set your default send from email address, add down to maintenance message, If you want to show SEO friendly URL then always check “SEO Friendly URLS” ( Please verify your .htaccess content to assure use of seo friendly urls utility), you can set maximum upload size for files uploads. Localization: You can set your own regional language for your software with this it will be more comfortable for you to handle this excellent email marketing software. Set default time zone and also set default date & time format here. SMTP/Mail Settings: Here you can set maximum emails to send in a specific time period per sending method, Throttle your email sending per mail sending method, & Setup multiple sending methods & setup rotating options. Deliverability Tools: Automatic Abuse Management: The report abuse link can be added to each user group mandatory footer (thus adding it to all their outgoing emails). When clicked it will verify that they wish to report abuse and unsubscribe them from the list if they choose to continue with reporting abuse. Feedback Loop Processing: A feedback loop is a service provided by ISPs where they will forward complaints made by email recipients to the original sender. Joining feedback loops 43 | P a g e provides a way for you to clean your list and identify a problem that exists in your marketing strategy SPF Records: SPF records need to be setup on a server level, and not within this application. The administrator of your DNS server needs to make adjustments to your DNS zone. The DNS syntax for an SPF record may look like this: YOURMAILSERVER.COM. IN TXT "v=spf1 a mx –all" 44 | P a g e [4] User Groups On Top Right of dashboard you will see Users option. After Clicking on “Users” you will be redirected to user management area. Fig 30-a: Navigate to User Groups Now you will see a navigation bar on left side. Just click on “User Groups” to manage user groups and settings. Fig 30-b: Navigate to User Groups After clicking on “User Groups” you will be able to view user groups you have in your email marketing software. You can edit user group settings and also view and edit the login sources. 45 | P a g e Fig 30-c: Edit User Groups You can edit any user group settings just by clicking on “Edit” option with respective user group. You can assign different permissions for sending emails or limit the users based on number of email sent, number of subscribers, list, campaigns per month etc. by creating a user group. 46 | P a g e Fig 30-d: Editing User Group Note: Our email marketing software also has ESP(Email Service Provider) edition through which you can run your Aweber/Mailchimp clone and manage the users, there subscription billing, emails through an centralized platform. Click here to View Demo. 47 | P a g e [5] Managing Users After navigating to user management area you will see users list. You can edit or delete any user from the list anytime. With AwebDesk Email Marketer, you can export the available users anytime into csv file. Fig 31 -a: Manage Users Just click on “Edit “option to edit any user then you will be navigated to user details where you can change username, email-Id, user password and more. As mentioned earlier in user groups, you can create user. Users will have same permissions as mentioned in user groups. 48 | P a g e Fig 31-b: Edit Users You can change the user details & also allot it to a new user group. Note: Additional user slots can be purchased at [email protected] 49 | P a g e [6] External Services First navigate to settings and then you will see a menu on left side of screen. Click on “External services” to view the available external services with AwebDesk Email Marketer. Fig 32-a: External Services With Awebdesk Email Marketing Software you will use external services (Example. Facebook, Twitter) which will help you to boost you email marketing Fig 32-b: Available External Services Facebook Application Settings: In order to send auto-updates to Facebook, you must first include your own application keys that correspond to your domain. Register an application on Facebook, and then include your application keys here (Refer Fig). 50 | P a g e Fig 32-c: Facebook App Setting NOTE: You will have to update your list settings if these values are changed. Twitter Application Settings: By default, Twitter updates will have a source from @awebdesk. To include your own source, register an application on Twitter and include the consumer keys here. Make sure your Twitter application meets the requirements that we outline (provide a value for the Callback URL). You will not be able to save these settings unless it does. Fig 32-d: Twitter App Settings NOTE: You may have to update your list settings if these values are changed. 51 | P a g e Unbounce Integration Settings: You can add list to which you want to apply unbounce service. Fig 32-e: Unbounce Integration Settings Choose the list from available subscribers list to which you want to apply unbounce service (Refer Fig 30-e). 52 | P a g e [7] Multiple SMTP Connections On Top Right Navigation bar you will see “SMTP Connections”. After Clicking on it you will be redirected to multiple SMTP Settings wizard. Fig 33-a: Navigate to SMTP Settings ALL major email sending MTA's are supported by our email marketing software. Setup multiple SMTP server connections and let AEM sending engine rotate (based on your settings) through the connections while sending out your email campaigns Fig 33-b: Multiple SMTP Settings Here you can set maximum emails to send in a specific time period per sending method, Throttle your email sending per mail sending method, & Setup multiple sending methods & setup rotating options. 53 | P a g e How to Send Your First Campaign For Video Tutorial Click Here [1] Create Subscribers List After login as admin, you will be redirected to admin Dashboard. On Left side bar you will see “Lists” option in Menu). Fig 34-a: Navigate to Subscribers Lists After clicking on “Lists” you will be able to manage your subscriber lists. 54 | P a g e Fig 34-b: Add/Edit New List Create a list to hold information about your contacts (the people to whom you send your emails). You can also configure the following: Your name, email address, and other personal details. Your company’s name, address and phone number. Where bounced emails should be sent. Which custom fields you want to use (see step 3). Which fields you want to see when you view the list. 55 | P a g e Fig 34-c: Adding New List Create custom fields: If you want to collect a specific type of information about your contacts, you can create a custom field to hold the information. You can specify the kind of field you want to make (text box, drop‐down list, check box, and so on), and a variety of other settings. You can also specify whether or not the field should be mandatory (if a field is mandatory, it must be filled in before you can successfully add a contact to the list). Advanced Settings: In Advanced Settings you can add more features to your subscribers list. You can send copies of campaigns to any special recipient, and send subscription/unsubscription notification emails to your admin or department head. You can use Captcha Image in subscription forms to prevent automated bots to subscribe to your list. You can put a option to ask your subscribers for unsubscribing your emails. 56 | P a g e Fig 34-d: New List Details 57 | P a g e [2] Adding Subscribers Adding a Subscriber Manually Take the following steps to add a contact to one of your contact lists: 1) Click Add Subscribers in the left side bar, to add new subscriber manually. Fig 35-a: Navigate to Adding Subscribers 2) Select the Subscribers list to which you want to add the contact. Fig 35-b: Add New Subscriber to List 58 | P a g e 3) Enter the contact’s details( you can also set autoresponder feature and send last campaign to this subscriber by using advanced options) and then click Add 4) After adding subscriber you will be redirected to subscribers list. Importing Contacts from a File Take the following steps to import contact information from a CSV file to AwebDesk Email Marketer. 1) Click Import Subscribers in the navigation bar, then you will be redirected to subscribers import page. Fig 35-c: Navigate to Import Subscribers 2) Choose the file (prefer csv files) from which you want to import contacts and then select subscribers list in which you want to import contacts then click Next. 59 | P a g e Fig 35-d: Choose file format- Import Subscribers 3) Now select the fields to map import details. Fig 35-e: Field Mapping– Import Subscribers 4) After mapping all available fields click on Import Now. 5) Your subscribers are imported to list you chosen. You can import more subscribers to same list or another list. Fig 35-f: Import Finish 60 | P a g e Exclusion List On Dashboard select subscribers then on left panel you will see “Excluded Subscribers” under advanced options just click on that then you will be redirected to exclusion list page. Fig 35-g-: Navigate to Excluded Subscribers Exclude all or selected subscribers from the list to personalize your marketing for greater results. You can exclude subscribers or contacts by entering their details that matches exactly else that begins with or ends with the information you have provided manually. Fig 35-h: Exclusion List Settings 61 | P a g e [3] Campaign Creation Email Campaigns Overview Email campaigns are the emails you send out to your contacts. Each email campaign you plan, create, and send out transmits an email, based on an HTML or plain‐text template (or both), to each of the addresses stored in the contact list you select. Creating and Editing Email Campaigns AwebDesk Email Marketer’s email campaigns are usually based on templates (see Using Templates on page 64). You can take a template and customize it for use in your campaign; replacing its text with your own, adding or removing sections and images, and modifying its formatting if required. Alternatively, you can create a new email campaign without using a template. If you choose to d o this, you can build the campaign yourself using the text or HTML editor, or import an HTML file from your computer or a web page. Take the following steps to create a custom email campaign: 1) Click Create campaigns in the Left navigation bar on your dashboard. Fig 36-a: Navigate to Campaign Creation 2) Enter a new Email Campaign Name. 3) Select the type of campaign you want to create. 62 | P a g e Fig 36-b: Type of Campaign - Campaign Creation 4) Select the subscribers list (or lists) to which you want to send this campaign. Fig 36-c: Select List – Campaign Creation 63 | P a g e 5) You can segment your subscribers list and send the campaign accordingly. It allows you to filter your campaign to subscribers who match certain conditions. This section controls the contact list segments that users of this account may use. Select all segments to allow users of this account to use every contact list segment stored in AwebDesk Email Marketer. Select User’s own segments plus the following lists to allow the user to access contact list segments configured in the user’s account, plus the other lists that display below (if other contact lists are already configured). Fig 36-d: Choose Template – Campaign Creation 6) If you want to base this email campaign on an existing template, select the template in the Email template list. A preview of the template displays. If you do not want to base this campaign on an existing template, select Blank message in the Email template list. Click Next 7) Specify how you want to build the HTML email. If you want to use the built‐in WYSIWYG (What You See Is What You Get) editor in this page, select Create content using the WYSIWYG editor below. If you want to use a file from a page on the Internet, select “Fetch From URL” and enter the full URL (for example, “http://www.examplesite.com/) in the field that displays. Click Insert. The HTML editor screen updates to show the new file. 64 | P a g e 8) You can now manually edit your HTML or Text message in editor. After editing click Next Fig 36-e: Summary & Options – Campaign Creation 9) On next screen you will see all details about your campaign including sending list, Message subject, you can check campaign open & link trackability, and you can check your campaign for spam. If it shows spam free then it will not be marked as spam in recipient’s email. 10) You can send the campaign instantly or schedule it to deliver at your customer’s convenient time. You can also send this campaign test copy to your own email address and check it thoroughly. 11) Finish the campaign: Click Save & keep editing to save the new campaign and remain in this screen to make further changes. Click Save and exit to save the new campaign Click Back to return to make any change in your campaign. Click “Send Now “to send the campaign to your selected subscribers list. 65 | P a g e Using Forms This chapter discusses how to use the Forms. Forms Overview Forms allow members of the public to interact with AwebDesk Email Marketer by signing up to contact lists, unsubscribing from contact lists, and changing the details stored about them. Contacts can also easily forward emails on to their friends using a form. The forms you use to allow people to sign up to, or unsubscribe from, contact lists are hosted on your own website. The forms you add to your site on the Internet use scripts to interact with AwebDesk Email Marketer. The forms you use to allow contacts to change the details stored about them on AwebDesk Email Marketer or to forward an email to a friend are not hosted on your website. Instead, you can add them to the emails you send. The forms you add to your emails also use scripts to interact with AwebDesk Email Marketer. Therefore, such forms will work correctly only when the form is able to access AwebDesk Email Marketer over the Internet, and not when contacts view the emails offline. Creating and Editing Forms You can create various types of forms in AwebDesk Email Marketer. Subscription: Let’s contacts sign up for your emails. See Creating or Editing a Subscription Form on page 67. Unsubscribe: Lets contacts unsubscribe from your list, and stop receiving emails. This has the same effect as the unsubscribe link you can add to your emails. See Creating or Editing an Unsubscribe Form on page 70 66 | P a g e [1] Creating or Editing a Subscription Form Fig 37-a: Navigate to Integration Wizard On Left side bar of dashboard you will see “Forms” Just click on it. Take the following steps to set up or edit a Subscription website form. 1) Click Add after going to Subscription Forms in integration wizard, then and create a website form. ( You can also modify available forms just click on Edit option ) Fig 37-b: Subscription Form List 67 | P a g e 2) Select Subscription in the form options field. Configure the other basic form settings (form name, form design and format, CAPTCHA security, and the contact list ‐ or lists ‐ for the form). Fig 37-c: Subscription Form Details 68 | P a g e 3) Now you have option to use the form you created, you can easily choose in which format you want to integrate this form. HTML: Copy the HTML source code in the text box and paste it anywhere into your web site. Link: You can direct users to this URL to subscribe. Popup: Copy the HTML/JavaScript source code in the text box and paste it anywhere into your web site. (It will generate a popup through which you can offer to subscribe) Fig 37-d: Use Subscription Form 4) You can preview your form just by clicking on “Preview” on right side as shown in fig: 37-e Fig 37-e: Preview Form 69 | P a g e [2] Creating or Editing an Unsubscription Form Take the following steps to set up or edit a Subscription website form. 1) Click Add after going to Subscription Forms in integration wizard, and then create a website form (Refer Fig: 37-c ) 2) Select Unsubscription in the form options field. Configure the other basic form settings (form name, form design and format, CAPTCHA security, and the contact list ‐ or lists ‐ for the form). Fig 38-a: Create Unsubscription For 70 | P a g e 3) Now you have option to use the form you created, you can easily choose in which format you want to integrate this form. HTML: Copy the HTML source code in the text box and paste it anywhere into your web site. Link: You can direct users to this URL to subscribe. Popup: Copy the HTML/JavaScript source code in the text box and paste it anywhere into your web site. (It will generate a popup through which you can offer to subscribe) Fig 38-b: Use Unsubscription Form 4) You can preview your form just by clicking on “Preview” on right side as shown in fig: 38-c Fig 38-c: Preview Unsubscription Form 71 | P a g e [3] Adding a Form to Your Website Take the following steps to add a form you already created to your website. 1) In your web development application (for example, Adobe Dreamweaver), open the web page into which you want to add the form. Fig 39-a: Copy HTML Code 2) In Awebdesk Email Marketer, go to the Get code Area after creating form and then copy complete html code (Refer Fig 37-a) 3) In your web development application’s HTML code editing window, paste (CTRL‐V) the code into the required location. 4) Check, align and modify the form in your web development application’s WYSIWYG or text editor. 72 | P a g e Fig 39-b: Form in Web Development Application Note: When you edit the form, remember that its styles are defined in the form code and are not inherited from your page or CSS. If you want to change the appearance of text, modify the form code (bearing in mind the earlier warning against modifying other aspects of the form). 5) Test the page into which you placed the form in a web browser. Fig 39-c: View in Browser 6) With access to the Internet, test the form: Make sure that you are able to sign up to the list (and that the correct confirmation or thank‐you screen displays) by entering the required information, using an email address to which you have access. If you chose double‐opt‐in confirmation, test that the link in the 73 | P a g e email you receive works correctly. When you attempt to sign up to the list, but do not include a required field, a warning should display. Make sure that required fields are actually required by attempting to sign up without entering one of the required fields. Repeat the test for all required fields. Force an error (by entering an incorrect CAPTCHA security code, for example) to ensure that the error page displays correctly. 7) When you are happy with the form’s appearance and operation, upload the page to your website. 74 | P a g e Reports and Analysis This chapter discusses how to use the Report and Analysis menu in the navigation bar. Comprehensive reporting and analytics are provided to help you analyze your contacts and your campaigns. Learn more about your contacts and use that information to help improve your overall marketing. Fig 40-a: Navigate to Reports & Analysis After login as admin, you will be redirected to admin Dashboard. On Left side bar you will be able to view Reports option. Click on the option to analyze your contacts and your campaigns. 75 | P a g e Reports Menu Fig 40-b: View Reports Use the Reports and Analysis screens to view general and detailed information about AwebDesk Email Marketer’s various subjects, such as email campaigns, campaign reports, list reports, user reports, read trends, email client trends. Each screen provides you with a variety of statistical information. 76 | P a g e Viewing Campaign Reports Statistics Fig 40-c: Navigate to Campaign Reports To view statistics about campaign reports, click Reports in the navigation bar, and then click campaign reports. This screen displays information about the campaigns you have already sent out and also to create new ones. Fig 40-d: Campaigns Report This screen shows an overview of your email campaigns, and some basic statistics about each. 77 | P a g e View Campaign Detailed Report View a campaign’s detailed report. These include statistics about the number of opened emails, links clicks, bounced emails, unsubscribed contacts, and forwarded emails, successfully sent emails and so on. Fig 40-e: Campaign Report Overview You have some additional features with campaign reports such as: Export a campaign’s report to a CSV (Comma‐Separated Value) file. Print a campaign report. Social Share and Share Report a campaign from AwebDesk Email Marketer. Links: Use this tab to see information about the number and percentage of links in this email campaign that were clicked by their recipients, as well as the average number of clicks per email, and the most popular link in this campaign. You can also see which individual recipients clicked a link, and at what date and time. Bounces: Use this tab to see information about the number and percentage of undeliverable emails in this campaign, as well as the number of hard bounces and soft bounces. You can also see the type of bounce (hard or soft) for each bounced email, the exact reason that the email was not delivered, and the date and time at which the bounce occurred. Unsubscriptions: Use this tab to see information about the number of contacts who have unsubscribed using a link in this email campaign. You can also see the email address of each contact, the date and time at which the contact unsubscribed, and the month with the greatest number of contacts unsubscribing. 78 | P a g e View the detailed message you have sent in campaign report Fig 40-f: Message overview Forwards: Use this tab to see information about the number of contacts who have forwarded this email campaign to their friends. Opens: Use this tab to see information about the number and percentage of emails in this campaign that were opened by their recipients. You can also see the date on which an email was opened by an individual recipient, and whether it was opened as HTML or plain text. 79 | P a g e Viewing List Reports To view reports about lists, click reports in the navigation bar, and then click List reports. Fig 40-g: Navigate to List Reports It shows the list sending activity like subscribe trend, unsubscribe trend which shows subscribe or unsubscribe statistics for each email campaign you send, either for a specific date or over time. Fig 40-h: List Sending Activity - Open by Hour Trend You can see what time of the day receives the most opens which is shown by the tab opens by hour trend. Shows total number of confirmed or unconfirmed subscribers, bounces, total email sent and average number of emails sent per day. 80 | P a g e View a list report detailed statistics. These include statistics about the domains to which your contacts in this list belong, the number of emails sent to this list that are opened, the number of links in emails to this list that are clicked, the number of emails to this list that have bounced, the number of contacts who have unsubscribed from the list. Print a list report statistics. Unsubscribed tab displays the number of contacts who have unsubscribed from this contact list. Bounced tab displays information about the number and percentage of undeliverable emails sent to this contact list, as well as the number of hard bounces and soft bounces. Confirmed Subscribers tab displays information about the number of confirmed subscribers in the list. Unconfirmed Subscribers tab displays information about the number of unconfirmed subscribers in the list. 1) Subscribe Trend Click on subscribe trend to see information about the number of contacts who are confirmed or subscribed for each email campaign you send, either for a specific date or over time. Fig 41-a: Subscribe Trend 81 | P a g e 2) Unsubscribe Trend Click on unsubscribe trend tab to see information about the number of contacts who have unsubscribed from this list. You can also see the date and time at which the contact unsubscribed. Fig 41-b: Unsubscribe Trend 82 | P a g e 3) Opens by Hour Trend Click on opens by hour trend tab to see information about the number and percentage of emails that were opened by members of this contact list. You can also see the date on which an email was opened by an individual recipient. Fig 42: Open By Hour Trend 83 | P a g e User Reports To view statistics about AwebDesk Email Marketer’s user reports, click reports in the navigation bar, then click User reports in left side Reports navigation bar. Fig 43-a: Navigate to User Reports In user reports you can see an overview of emails sent, campaigns sent and some basic statistics about each. 1) Emails Sent Click on emails sent which shows User Group Sending Activity which gives full details of the total number of email sent per day, total number of campaign sent per day and average number of emails sent per day. Also shows the limit of emails that is to be sent per month. Fig 43-b: Emails Sent 84 | P a g e 2) Campaigns Sent Click on campaigns sent which shows User Group Sending Activity which gives full details of the total number of email sent per day, total number of campaign sent per day and average number of emails sent per day. Also shows the limit of emails that is to be sent per month. Fig 43-c: User Group Sending Activity – Campaign Sent You will some additional features such as Export tab describes how to export user reports or information to a CSV (Comma‐Separated Values) file, print reports, and use the “Detailed statistics” screens. Print a user report statistics. 85 | P a g e Trend Reporting By the help of Trend report you can see what time of the day receives the most opens. You can look across all your lists, for a specific list, or a specific campaign. You can also see what day of the week achieves the highest opens. By using this data you can find out the optimal day of the week and time of the day to send future campaigns. Fig 44-a: Navigate to Trend Reports 86 | P a g e 1) Read Trends Click on read trends tab to see information about the number and percentage of emails that were opened by members of this contact list depending on open by hour trend or open by week day trend. You can also see the date on which an email was opened by an individual recipient. Fig 44-b: Read Trends 87 | P a g e 2) Email Client Trends Click on email client trends which automatically track the email clients your subscribers are using. You will be able to view the top email clients for a list and/or a specific campaign. From there you can export the list of best email clients. . Fig 44-c: Email Client Trends 88 | P a g e Social Media Integration How To Setup Campaign Auto-Post To Social Networks In Awebdesk Email Marketer You can have campaigns auto-post to various social networks immediately after sending a campaign. Here is an example of a campaign auto-posted to Twitter and Facebook: This is configured on a per-List basis. Each list can have its own social network account applied, so that each campaign sent to that list will post to the designated social network account. 1) Visit the List Settings page. Fig 45-a: Navigate To Lists 2) Select any list ->Click edit -> Scroll down Fig 45-b: Edit List 89 | P a g e 3) Check the social networks you want to set up. Fig 45-c: Check Social Network Twitter For Twitter, you will first need to log into Twitter through the Email Marketing software. 1) Check this box in order to login to Twitter successfully. Fig 45-d: Twitter Login 90 | P a g e 2) Click "Login to Twitter." The "Login to Twitter" link should take you to the Twitter site and prompt you to log in. Enter Username and password and click on login button. Fig 45-e: Sign in with Twitter Note: If you wait too long on the List Settings page before clicking "Login to Twitter" (the token expires) an error occurs. Please refresh the List Settings page and try clicking "Login to Twitter" again. If you are already logged in to Twitter, you should be taken directly to the application confirmation page. 3) Make sure to hit "Update" on the List Settings page, so your changes take effect. 91 | P a g e Facebook For Facebook, start by clicking "Login to Facebook": Fig 45-f: Enable Facebook Login This will take you to the Facebook site, and prompt you to log in if you are not already. Enter your Facebook email ID and Password to create your App. Fig 45-g: Facebook Login 92 | P a g e You should set up your Facebook application with the same domain that your Email Marketing software resides on. Once you sign-in to Facebook, you will be asked to confirm that your Facebook account can be accessed (and updated) by the Email Marketing software. Click "Allow" and you will be redirected back to the Email Marketing software. Fig 45-h: Request for Permission You should see a message saying you are now logged-in to Facebook. 93 | P a g e Fig 45-i: Facebook Login Confirmation Make sure to hit "Update" on the List Settings page, so your changes take effect. Once you set up Twitter and Facebook accounts on the List Settings page, you will see an option during the "Create Campaign" process to automatically send the campaign to each service Fig 45-j: Campaigns automatically posted to Twitter & Facebook 94 | P a g e After you send a campaign, your message subject and shortened link will appear on either social network. How to activate Facebook Social Media reporting As mentioned in our Social Media Reporting Overview, subscribers that click the Facebook icon within an email message will be tracked for segmenting and subscriber actions. It is also possible to share the social link on Facebook without being a subscriber to the list. For example, anyone could obtain the link and post it to Facebook on their own. In this case, the software obtains the data from Facebook and appends it to the campaign report. In order to have the software do this, you will need to have a Facebook application configured in your software settings. You would need to go to the External Services page to configure your Facebook application in your software. To go to the External Services page, click on the Settings tab (the cog icon) then click on the External Services link on the right. (you can also access this page at this location URL: /manage/desk.php?action=service). Fig 46-a: External Services page 1) Click “Edit” in the Facebook row. 2) Supply your Facebook application ID and secret in the appropriate boxes. Click on Update to apply the changes. Once you have updated the Email Marketing software with the Facebook application keys, your campaign reports will show more accurate Facebook totals for social sharing. 95 | P a g e Fig 46-b: Facebook application ID and secret in the appropriate boxes Setting Up an Application on Facebook 1) Click the link given below. Go here to set up an application on Facebook 2) Enter your Facebook email ID and Password to create your App. Fig 46-c: Facebook Login 96 | P a g e 3) Specify your App name and App Namespace. Fig 46-d: Create New App 97 | P a g e 4) After creating your App you can manage your App. Go to Edit Setting. Fig 46-e: App 98 | P a g e 5) You can manage your App like Basic App Display Name,App Namespace,Contact Email,App Domain,Category,hosting URL etc. Fig 46-f: Edit Setting of your App 6) Specify your Own Website URL. Go through the entire process until your application has been created: Once your App has been created, copy the necessary application keys from the Facebook site: 99 | P a g e NOTE: The URL for your Facebook application must match the same domain where your Email Marketing software is installed. If they do not match, Facebook users will not be able to approve your application for autoposting and data retrieval. If users are seeing any error, it typically means the URL for your Facebook application is incorrect: After setting up your App on Facebook, please follow the steps at the beginning of this guide. 100 | P a g e How To Autopost Campaigns To Twitter (Twitter Integration) You can have your campaigns auto-post to social networks like Facebook and Twitter. Here is our Instruction on how to do that. For Twitter, by default we include our own "AwebDesk Email Marketing" application, which appears as the source of tweets. You can change this to use any application you have already set up on Twitter. 1) Click the link given below. To register a new application. twitter.com/apps 2) Enter your Twitter Username and Password to use Twitter application with Email Marketing. Fig 47-a: Twitter login 3) To create new application click create a new application. Fig 47-b:Creat a new application 4) You can specify all the details like Name, Description, Website, Callback URL. 101 | P a g e Fig 47-c: Create a new application 102 | P a g e When setting up your Twitter application, please make sure you include a Callback URL, properly: (It doesn't truly matter what URL is supplied for the Callback URL, but a value must be present. The email marketing software will supply a unique callback URL when obtaining a request token on your behalf.) 5) Your new Application will be created. Fig 47-d: Demo application 103 | P a g e 6) You can see your created App. Fig 47-e: New application If these settings are different, you could experience problems when authenticating to your Twitter account from the Email Marketing software. Once you have set up your Twitter application, you can apply the new API keys in the Email Marketing software under Settings > External Services: Fig 47-f: Edit twitter setting 104 | P a g e Edit the Twitter settings: 1) Go to Edit Option. 2) Include your Twitter consumer key and secret in the appropriate textbox. Fig 47-g: Configure twitter application setting After doing this, you will have to go into each List settings that already has a Twitter account connected. You have to re-connect each one, because the new application keys will require new account keys, in order to post to Twitter. Social Media Reports & Analytics AwebDesk Email Marketing software provides a lot of social features, including social media reporting. With the Social Media features of the software, you will be able to add Facebook, Twitter, Digg, etc., links to your campaigns. These links would allow your subscribers to share or like your campaign. This will enable you to have a more dynamic campaign that touches on the Social Media component of your Email Marketing efforts. The reports on the Social Media links would allow you to gain valuable information that could help you with future campaigns. 105 | P a g e Viewing Social Media Reports You can access Social Media reports in three ways. 1) After sending a campaign, click on the “View Report” button. This will take you to the Reports page. Fig 48-a: View Social Media Reports View Reports after Sending. Fig 48-b: Reports After Sending 106 | P a g e 2) Click on the Reports tab to go to the Reports page. Fig 48-c: Navigate to Reports Once on the Reports page, you can click on the “View Reports” link to the left of the campaign that you wish to view the corresponding report. Fig 48-d: Navigate to View Reports Link 107 | P a g e On the Campaign Reports page click on the Social Sharing tab. This page will show the total amount of social shares, for both Facebook and Twitter. Fig 48-e: Social Share Tab Choose from the links given to share campaign on social networks. Fig 48-f: Links to Share Campaigns 108 | P a g e Social Sharing Page How are Facebook and Twitter Sharing Totals Obtained? Sharing totals for Facebook and Twitter are currently obtained in the following manner: If sharing directly from the email (by clicking social share icons within the email), the subscriber who clicked the icon will be tracked – the software will know that particular subscriber clicked the icon. This can be used later for social actions and segments, Social Media on Email If sharing outside of our interface, such as directly pasting the share link into Facebook or Twitter, or by clicking the share icons that reside in various permanent spots (such as the Campaign Reports page, or public message and social views), data will be obtained from both Facebook and Twitter and added to the Campaign Reports page. Social Sharing Outside of Email NOTE: Facebook shares are indicated by the number of subscribers who have clicked the Facebook icon within email messages. For each subscriber, you will see a matching row indicating when they clicked the Facebook icon. Fig 49-a: Social Sharing Statistics Sharing Count If a Facebook user obtains the share link through some other means, and proceeds to share directly on Facebook (without clicking on the Facebook icon in the email), the software will obtain that share count, and append it to the reports. Twitter data is obtained through a public search method, and in most cases captures all mentions of a particular link. Due to some limitations from Twitter, sometimes, if multiple Twitter users post the same exact link, those tweets will be removed from the search results. Extending Social Data Once social data is obtained within the Email Marketing software, you can export it, and create list segments from it. 109 | P a g e To Export data from the Social Sharing report, click the Export link on the Social Sharing page of your Campaign’s report. Fig 49-b: Export Data from Social Sharing Report To create a List Segment based on Social Sharing data, you could choose the “Has shared socially” from the dropdown as a condition and then choose the campaign and Social Media site. Fig 49-c: Create List segments based on social sharing data 110 | P a g e For instructions on creating List Segments, please go here, List Segment - Social Sharing You can also create subscriber actions that are based on subscribers’ clicks on any social share icon (within the email body). Go to List>Subscriber Action>add/edit Fig 49-d: Create Subscriber Actions That Are Based On Subscribers’ Clicks 111 | P a g e How To: (1) Add New Email Templates (page 113) (2) Creating and Editing Custom Email Templates (page 115) (3) Viewing Built-In Email Templates (page 118) (4) How to Export Email Templates (page 121) (5) How to Export Subscribers (page 123) 112 | P a g e Add New Email Templates This chapter discusses how to use the Templates menu in the toolbar. After login as admin, you will be redirected to admin Dashboard. Click on Campaigns option. Fig 50-a: Navigate to Campaigns Click on Email Templates in the Left side navigation bar in order to edit, add, export or delete the default templates. Fig 50-b: Navigate to email templates Templates Overview Templates control the look of your email. They specify which fonts and text colors to use, the background colors and images to display, and the size and shape of the text areas on the user’s screen. 113 | P a g e How Templates Work Templates use HTML (HyperText Markup Language) to define your email’s aesthetics. The user’s email client reads this information and displays the email accordingly. This gives your email the same design flexibility found in HTML web design. Note: If in doubt, it is strongly advised that you configure email templates to send both HTML and plain text elements (multipart). Some email clients cannot display HTML, and some users turn HTML display off, so it is important to transmit a plain text element as well. You can assign templates to new email campaigns, or to autoresponders. Advantages of Templates Using templates to coordinate your email campaigns confers two main advantages. First, your email is instantly recognizable. You can use templates to define or extend corporate branding by presenting the user with your company’s color scheme, logo and associated imagery. Second, your email is consistent. When you use a template for your email campaigns over a period of time, you know that each email you send is based on the same design, and will convey the same message. This is particularly useful when multiple people may be sending out email campaigns from your company. Built-in and Custom Templates AwebDesk Email Marketer includes a huge variety of built‐ in templates, ready for you to use out of the box. They have been designed and tested with interoperability in mind, so they will display correctly in all common HTML email clients. You can also create your own custom email templates. Either use the included WYSIWYG (What You See Is What You Get) editor, or upload an HTML file from your local computer or a remote URL as the basis for the template. 114 | P a g e Creating and Editing Custom Email Templates AwebDesk Email Marketer allows you to create custom email templates using the built‐ in editor. You can build a template from scratch, edit an existing built‐ in template, or base your template on an HTML file you upload from your computer or a remote URL. Take the following steps to create a custom email template: 1) Click Email Templates in the toolbar and select Add template in order to create a custom email template. Fig 50-c: Email Templates list 2) Enter a new Template Name. 3) Enter the Message Subject line. 4) Choose the type of visibility like whether it should be available for all lists and users or available for specific lists. 5) Select the type of template you want to create. Select HTML and Text if you want emails you send using this template to be sent with both HTML and plain text elements (multipart). Email clients that can display HTML messages use the HTML element, and clients that cannot display HTML use the plain text element. Select Text if you want emails you send using this template to be sent in plain text only. 115 | P a g e Select HTML if you want emails you send using this template to be sent in HTML only. If you select this option, your emails will not display in email clients that cannot display HTML messages. 6) Insert conditional content in your message by creating a section of content that will only show if a certain condition is matched. 7) Dynamically include an RSS feed in your message. Specify the RSS feed url, how many rows/entries to return, and whether or not to only fetch new rows/entries. You can include all fetched items else only the items that were not previously sent for the message. 8) Personalize Message by adding options in subscriber info, message options and links, social media and lot more. 9) If you want to base this email template on an existing template, select the template in the Email template list. A preview of the template displays. In short you can (optionally) add a template preview. Your preview must be a GIF, JPG, or PNG image file. The size of your preview should be at least 200px wide. 200px width by 250px height is suggested. 10) Click Add or you can also import the selected templates from the list. The preview of the template will appear like this: Fig 50-d: Preview of Template 116 | P a g e Note: If you selected Text only in the previous page, the HTML Content section in this page does not display. Likewise, if you selected HTML only, the Text Content section in this page does not display. 11) Click Delete Selected to delete the selected templates. 12) Click Back to return to the view Email Templates screen without saving the template. Any changes you made are lost. Editing a Custom Template Take the following steps to edit an existing template: 1) Click Campaigns in the navigation bar and select Email templates from left side bar. Click Edit next to the template you want to edit. The Update Template screen displays. Fig 51: Editing Template 2) Configure the template details. If you want to change the Template Name, enter the new name. If you want to change the Template Format, select the new format, Insert conditional content and personalize messages. 3) Upload a new or different file and Update it. 117 | P a g e Viewing Built-In Email Templates AwebDesk Email Marketer has a wide variety of built‐ in email templates designed for different uses. To view the built‐ in templates, click Campaigns in the navigation bar and select Created Campaign.re4 Enter a name in your campaign and choose your campaign type (Regular Campaign, Auto Responder Campaign, Split Testing Campaign, RSS Campaign, Text-Only Campaign, and Subscriber Date Based Campaign) then click Next. Fig 52-a: Create Campaign 118 | P a g e Select names from the list which you want to send to and then click Next. Fig 52-b: Select subscribers list 119 | P a g e It allows you to filter your campaign to subscribers who match certain conditions. Fig 52-c: Available email templates Select a template to base your email here and click next to use a template in an email campaign. To modify a template for later use in an email campaign, create a new custom template based on the built‐ in template. 120 | P a g e How to Export Email Templates Take the following steps to export email templates: 1) Click Campaigns in the navigation bar and select Email templates from left side bar. Fig 53-a: Email Templates 2) Now Click on Export > Export as XML Fig 53-b: Export as XML File 121 | P a g e 3) Now choose to save and click on “OK” Fig 53-c: Save Email Template file 122 | P a g e How to Export Subscribers Take the following steps to export subscribers: 1) Click on “subscribers” on Left Top navigation on Dashboard. Fig 54-a: Navigate to Subscribers 2) Now you will see a navigation bar on Right side. Click on “ Export Subscribers” Fig 54-b: Navigate to Export Subscribers 3) You will see a pop up window ask you to choose the fields you want to export as subscriber’s details. You will see an option to choose the subscribers you want to export. Also you can choose the format in which you want to create the export file (CSV, XML, Excel Sheet). 123 | P a g e Fig 54-c: Export Subscribers- Choose fields You should always prefer CSV file format for import/export. 4) Now click on” Export”. You will now download your subscribers export file to your system( Just click on “save file” then OK) Fig 54-d: Save subscribers export file 124 | P a g e