1
FLUX
USER MANUAL
VERSION 4
INDEX
INTRODUCTION!
6
GETTING STARTED!
7
CREATING A WEBSITE PROJECT!
8
CREATING A WEBPAGE!
9
ACTIONS!
12
ATTRIBUTES!
13
SITE MANAGER!
17
PAGE DESIGNER!
21
FULLSCREEN!
22
INSPECTOR!
24
GRADIENTS!
27
SNIPPETS!
30
SWATCHES!
31
TABS!
32
USING WIDGETS!
33
GOOGLE MAPS!
34
IMAGE EFFECTS!
36
INTRODUCTION TO CODE EDITING!
40
AUTOCOMPLETE!
41
FREECODE!
42
CHANGING AN ELEMENTS TYPE!
44
WHAT IS CSS?!
45
HOW CSS WORKS...!
46
USING CSS IN FLUX!
48
USING CSS RESET PACKAGES!
52
USING CUSTOM CSS!
53
@MEDIA RULES!
54
GOOGLE FONT API!
55
CUSTOM FONTS USING CÚFON!
57
CUSTOM FONTS USING @FONT-FACE!
59
ELEMENT POSITIONING!
63
TEXT FORMATTING!
67
FORMS!
69
IMAGES!
72
LAYOUTS!
75
LINKS!
78
LOCKING OBJECTS!
80
PAGE ELEMENTS & ATTRIBUTES!
81
IMAGE MAPS!
84
USING MAMP WITH FLUX!
90
MASTER ELEMENTS!
94
HISTORY!
97
CONFIGURING EMBEDDED MEDIA!
99
PACKAGES!
100
PLUGINS!
104
PREFERENCES!
107
BOOKMARKS!
113
PUBLISHING!
114
LIVE PREVIEW!
115
CUSTOM PREVIEW URLS!
117
SERVER SIDE PROGRAMMING!
118
SIMPLE JAVASCRIPT!
119
ADVANCED JAVASCRIPT!
124
GOOGLE ADSENSE!
130
USER CODE!
131
DOCTYPES!
132
DOJO!
133
EXPRESSION ENGINE!
134
LITMUS!
136
IMPORT FROM iWEB!
138
USING ZOPE WITH FLUX!
140
ZOPE AND EXPANDRIVE!
144
ZOPE AND WEBDAV!
146
TIPS!
149
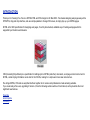
INTRODUCTION
Thank you for choosing Flux. Flux is a XHTML/HTML and CSS design tool for Mac OS X. Flux makes designing web pages easy with a
WYSIWYG, drag and drop interface, and uses simple palettes to change CSS values, to simply style up your XHTML pages.
XHTML is the W3C specification for designing web pages, it's a fully documented, validated way of creating web pages which is
supported by all modern web browsers.
CSS (Cascading Style Sheets) is a specification for adding style to XHTML (and other) documents, so all page content can be held in
XHTML, and all styling information can be held in the CSS file, making for a simple and more clean site structure.
Flux brings XHTML, CSS and an easy Mac interface together to let novices and professionals create amazing websites.
If you are already a Flux user, upgrading to Version 4, then the following sections will be of most interest, as they describe the most
significant new features.
Freecode
AutoComplete
Publishing
GETTING STARTED
Getting started in Flux is simple, you can create a brand new website from scratch, a website based on one of the many templates
provided by Flux, or use an existing XHTML compliant website you created in another package. You need to start by launching Flux by
double-clicking it's icon in your Applications directory:
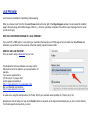
CREATING A WEBSITE PROJECT
In Flux, you can either start a project from scratch, create one based on one of the supplied templates, or import one of your existing sites.
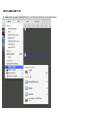
CREATING A PROJECT FROM SCRATCH
To create a new project, simply choose 'New' from the File menu. You will then be prompted to choose a location and name for your
project. You will also be asked if you want to create a HTML file and CSS file to get you started, if you've never created website before,
this is a good starter.
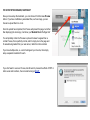
CREATING A PROJECT BASED ON A TEMPLATE
Flux is supplied with a number of templates that can make a great starting point for a new website. To create a site based on a template,
simply choose 'New with Template...' from the 'File' menu
IMPORTING AN EXISTING SITE
You can import an existing site by simply selecting the containing folder of the site after choosing 'Open..' from the File menu , Flux cannot
open individual pages such as index.html
TIP
It's best just to use normal characters in your site name, avoid quotes and other special characters.
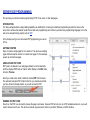
CREATING A WEBPAGE
Once you have created a website, you'll need a page to put in it.
STEP 1
First, open your site in Flux by choosing in the Open Dialog, that is accessed from the File->Open menu item.
If you have accessed the project before, it may also be in the 'Open Recent' menu, which is also in the 'File' menu.
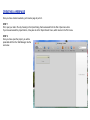
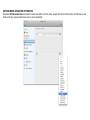
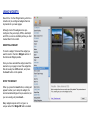
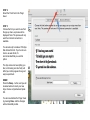
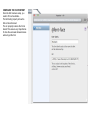
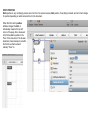
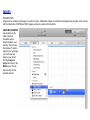
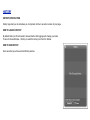
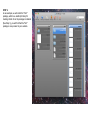
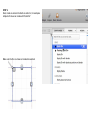
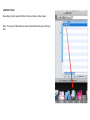
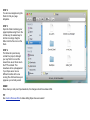
STEP 2
Once you have open the project, you will be
presented with the Flux Site Manager, like the
one below
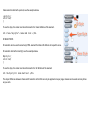
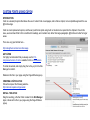
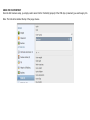
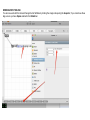
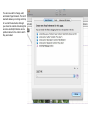
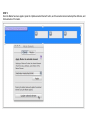
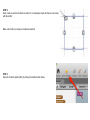
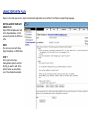
STEP 3
Select the folder that you want to create the page in, and press the 'New Page' toolbar button, and a sheet will appear to let choose what
kind of page you want to create.
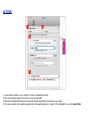
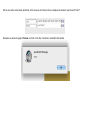
Enter a name for your new page, the usual name for the first page in a website is index.html, so enter 'index' into the name field, the
extension will be added automaticaly.
You can also choose what type of page you want to create, for a normal page, choose 'HTML'
You can also choose what type of DOCTYPE to use, choose the one most appropriate to your page. Many people like to use XHTML, as
it's often considered more modern and cleaner than HTML.
Press 'OK' and the new page will be created.
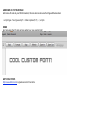
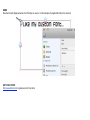
DONE!
The new page has been created.
TIP
Not all servers are created equal.
Best practice to ensure your page names cause no problems follow these simple rules:
1. Start the name with a letter.
2. Use letters a to z in lower case.
3. Use numbers 1 to 0.
4. You can use hyphens (-), underscores (_) and periods (.).
5. Do not use spaces.
6. Do not use special characters.
ACTIONS
1. Choose which Toolkit to use, or 'Simple' for built-in JavaScript functions.
2. Then choose which method or function to use from the toolkit.
3. Now fill in the fields with parameters, these will change depending on the toolkit you are using.
4. You can now attach the created Javascript call to the selected element, or copy it to the clipboard for use in the Code Editor.
ATTRIBUTES
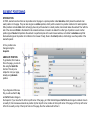
INTRODUCTION
Most aspects of the appearance and behaviour of elements on a webpage are controlled by the attributes of those elements. Everything
from simple background fills to complex AJAX functionality all involve changing attributes of elements.
In Flux, attributes are changed using the Inspector and you can change most attributes with standard Mac controls, and no HTML coding
at all.
CREATE A DIV TO BE CHANGED
To get started, first create a Div on the page, you can do this using the Quick Div function. This will put a simple Div onto your page,
ready to be changed.
SETTING SIMPLE ATTRIBUTES
Now select the Div, and open the Inspector from the toolbar.
You can now start to change basic attributes of the selected div, we will start by changed the background colour. You will see in Flux that
categories of attributes are listed in the left column of the Inspector, this is because there are so many HTML attributes that we need to
sort them into a manageable list. You will see that there is a category called "Fill". If you click this category, you will see all the different
types of fill available. By clicking any of the fill attributes, you get the opportunity to edit them. Now click background-color and now you
can choose a new colour for the div.
SETTING MORE ADVANCED ATTRIBUTES
Now select Attributes & Actions and select to add a new action. For this action, we will choose the onClick action, so that when a user
clicks on the div, we know about it can can run some JavaScript.
We can now enter some simple JavaScript, in this case we will choose to show a simple alert window to say the word "Hello!".
Now when we show the page in Preview, and click on the Div, it will show a Javascript alert window.
SITE MANAGER
INTRODUCTION
The Site Manager is where all the files of your site are manager, HTML, CSS, images, and all other files are shown in this window.
VIEW OPTIONS
In the Site Manager you can view your files in 3 different ways.
The first in the control, is the Site View, where you can see the whole layout of your site.
The second is a simple list view, very similar to the list view in the Finder.
The third, is an outline view, again, very similar to what can be found in the Finder.
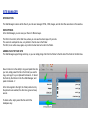
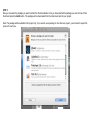
ADDING FILES TO YOUR SITE
The Site Manager support drag and drop, so you can simply drag a file from the Finder to the title bar of the folder in the Site View.
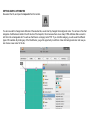
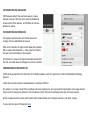
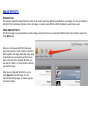
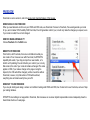
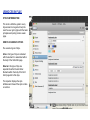
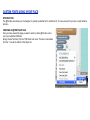
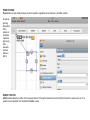
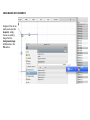
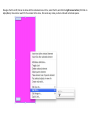
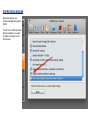
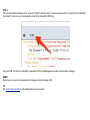
New in Version 4 is the ability to copy and paste files into
your site, simply select the file in the Finder you want to
copy, and copy it to your clipboard Command - C. Select
the folder by the title bar in the Flux Site Manager, and
paste Command - V.
In the Screengrab to the right, the folder pointed out by
the pink arrow is selected, the other two (green arrows)
are not.
To delete a file, simply select the file and hit the
backspace key.
TIP
You can change the color of the Site Manager folders in the Preferences.
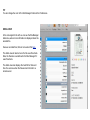
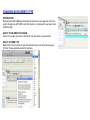
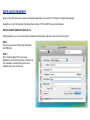
DETAIL VIEW
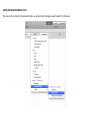
In the screengrab to the left, we can see the Site Manager
detail view, where more information is displayed about the
selected file.
Here we can label files, find out more about this here.
The detail view will also tell us is the file uses FreeCode.
Note, the filename is underlined in the Site Manager if it
uses FreeCode.
The detail view also displays the 'Last Mirror' date and
time. So we know when the file was last mirrored to a
remote server.
LABELS
Flux fully supports Finder-style 'labels', where you can assign a colour to a file to help your organise them in a less formal way than the
directory structure.
LABELLING FILES
You can label files in the Finder, in the usual way, or select
the file in Flux's Site Manager and label a file there, the
end result is the same.
USING LABELLED FILES
To enable quick access to labelled files, Flux will put them at the top of any asset menu.
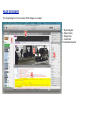
PAGE DESIGNER
The Page Designer in Flux is where HTML designs are created.
1. Style Navigator
2. Object Library
3. Design View
4. Code Editor
5.Embedded Inspector
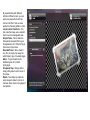
FULLSCREEN
Flux fully supports Full Screen in Lion. To turn on Full Screen, click the icon in the top right of the window.
Please note that Full Screen mode in Flux required Mac OS X 10.7 (Lion) and will not work in any older
version.
When using the Full Screen mode, you can also enable the Embedded Site Manager, so it easy to access
all the assets of your site without leaving the Full Screen view. You can toggle this option with the Toggle
Site Manager menu item in the View menu.
The Embedded Site Manager supports drag and drop, so you can easily drag images and other assets to your page.
To leave Full Screen mode, move the mouse pointer to the top right of the screen, and click the blue button shown in
the image above.
INSPECTOR
The Inspector is used to change the properties of all elements and rules, and the attributes of elements (rules do not have attributes.)
INTRODUCTION
As of version 4, Flux has two Inspector mode, one is floating like in previous versions, the other is embedded into the Page Editor window.
FLOATING INSPECTOR
The floating Inspector can be toggled using the 'Inspector' button on the main toolbar, or the 'Inspector' menu item in the View menu.
EMBEDDED INSPECTOR
You can toggle the Embedded Inspector from the View menu, using the Toggle Embedded Inspector item.
You can use both Inspectors at the same time if you want to.
TIP
You can toggle the collapse state of all sections by holding the Option key when toggling.
If you want to only have a single section of the Embedded Inspector visible at any one time, use the Concertina Mode in the 'gear' menu.
USING THE INSPECTOR
Both types of Inspector work in fundamentally the same way.
There are 'sections' of properties, for example the Text section
contains all the properties relevant to text and paragraph
styling.
In the screengrab to the right, an element to modify has been
selected (green arrow), a 'section' selected (pink arrow), and
now we can change the background-color property by clicking
it.
The property can usually be editing using an 'assistant control',
in this case, it's a color well, and some useful colors, such as
the colors already in use in the document, and the current
Swatch.
TIP
If you can't see these assistants, make sure sure the Use
Assistant Controls menu is checked in the 'gear' pop up menu.
By clicking a property, such as background-color, we are
enabling it on the selected element, which can be an element
on the page, or a CSS rule. After enabling it, we need to give it
a value, the 'assistants' make this quite simple.
To disable the property, so that it is no longer declared in the
CSS, simply click the small 'X' icon at the top right of the
property.
The floating Inspector works in the exact same way, there is no functional difference between them, so whenever this manual or a
screencast instructs you to use the Inspector, you can use either
THE INSPECTOR AND CSS RULES
CSS Rules are edited in the exact same way as on page
elements, however, CSS rules do not have the Attributes &
Actions section of the Inspector, as CSS Rules do not have
attributes or actions.
THE INSPECTOR AND FREECODE
The Inspector works the same in FreeCode as it would
normally. There is subtle difference however.
When not in FreeCode, the Inspector will display the properties
that are parsed and interpreted, i.e. If the property is invalid in
the code, then it won't display in the Inspector.
In FreeCode, the values in the Inspector are taken directly from
the code, so invalid values will still appear, so can be corrected.
CONTRIBUTORS IN THE INSPECTOR
Contributor styles are listed in the left column of the floating Inspector, and in the 'gear' menu in both the Embedded and Floating
Inspector.
Contributors are shown when the selected element is selecting a CSS rule.
For example, if you have a 'body' CSS rule defined, with some properties in it, and you select the body element on the page, then this
'body' rule will be shown as a contributor. This is because the 'body' CSS rule is contributing to the style of the body element.
Another example would be to have a DIV element with the class attribute set to 'mystyle' and have a rule called '.mystyle'.
You can read more about CSS selectors here.
GRADIENTS
Flux 4 introduces much more comprehensive support for CSS gradients. In addition to editing gradients, and saving them for later use,
you can also export rasterized versions for use in browsers that do not support CSS gradients.
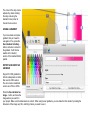
APPLYING A GRADIENT TO AN ELEMENT OR CSS STYLE
Select the element or style you want to
apply a gradient to and press the 'Gradient
Editor' button which is in the 'backgroundimage' property in the 'Fill' section of the
Inspector.
You must have at least
two colour 'stops' in you
gradient, which are
created by simply double
clicking the position you
want the stop to be. Stops
can be dragged to other
locations by simply
moving them by dragging
them with your mouse or
trackpad.
The colour of the stop can be
adjusted by double clicking
the stop, and using the
standard colour picker to
choose the new colour.
SAVING A GRADIENT
If you have made a complex
gradient, that you'll want to
use again in Flux, press the
Save Gradient to Gallery...
button, and enter a name for
the gradient. It will then be
availble in the 'Gallery'
section of the Gradient Editor
palette.
EXPORT A GRADIENT AS
AN IMAGE
Support for CSS gradients is
still not widespread, so rather
than use the CSS version,
Flux can create a rasterized
version as a PNG or JPEG.
Press the Save Gradient as
image... button, and save the
image where you want it in
your project. Make sure the dimensions are correct. When using Linear gradients, you can make the files smaller by making the
dimension of the image very thin, and tiling it when you need to use it.
SNIPPETS
The Snippets windows allows you to collect, organise and use snippets
of code.
Snippets can be arranged into collections, and when you want to use
them, simply drag them to the code editor to paste them in.
ADDING SNIPPETS
Select an element on the page you want to add, and choose Add
Element to Snippets from the contextual menu.
EXPORTING SNIPPETS
To export a snippet collection, use the contextual menu on Snippets
window by right clicking, or Command-Clicking on the list of snippets.
Only the current collection will be exported.
IMPORTING SNIPPETS
To import a .fluxsnippets file, simply drag it to the Flux icon on your dock.
SWATCHES
Flux allows you to manage colour 'swatches', these are simply collections of colours
that have usually be setup to complement each other. You can download swatches
from colourlovers.com
IMPORTING SWATCHES
To import a swatch into Flux, simply press the Import button on the palette, and
choose the file to import. Flux can currently only import '.gpl' files.
USING SWATCHES
Once you have imported or created a swatch, you can activate it by checking the box
next to it.
The swatch will then become available in areas such as 'background-color' in the
Inspector, making in simple to apply complementary colors to areas of your design.
The swatch will also be available in the AutoComplete feature of Flux.
TABS
Flux 3 introduces tabbed editing, much like the way your web browser allows tabbed browsing.
OPENING PAGES IN TABS
To put a page into a new tab, simply drag it from the Site Manager to the tab bar of the window you want to open it in.
USING WIDGETS
New to Flux 3 is the Widget Gallery, which is a
collection of pre-configured widgets that can
be placed into your web pages.
Although most of the widgets come preconfigured, they are simply HTML, JavaScript
and CSS, so can be modified just like you had
created them from scratch.
INSERTING A WIDGET
To insert a widget, first select the widget you
want to insert in the list in Widgets section of
the Actions & Widgets palette.
Once you have selected the widget, select the
element on your page to insert the widget into,
this will usually be a DIV element, and press
the Insert button on the palette.
SETUP THE WIDGET
When you press the Insert button, a dialog will
appear to allow you to setup the widget, the
recommended settings will be pre-selected, so
you can usually just press Insert....
Many widgets require an ID, so type in a
unique name if the Widget ID field is enabled.
GOOGLE MAPS
GOOGLE MAPS INTRODUCTION
Flux has a built in Google Map Widget to make adding one to your page simple. Once added you will need to edit it so it displays the map
for the area required.
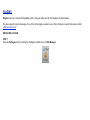
HOW TO ADD A GOOGLE MAP TO YOUR WEB PAGE
To start open the page you wish to add a Google Map to. Then show the Actions & Widgets Window using the Toolbar or from the
application menu Window -> Actions & Widgets and select Widgets. Then scroll down to Google Map, Simple Map. Select the element
you want to insert the map into, add an ID then click Insert.
More detail can be found here Inserting Widgets.
HOW TO CHANGE THE PARAMETERS OF A GOOGLE MAP
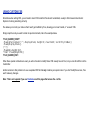
Within the head of the page you have added a Google Map to you will find.
<script type="text/javascript">
function initialize() {
var latlng = new google.maps.LatLng(-34.397, 150.644);
var myOptions = {
zoom: 8,
center: latlng,
mapTypeId: google.maps.MapTypeId.ROADMAP };
var map = new google.maps.Map(document.getElementById("map_canvas"),
myOptions);
}
</script>
To see the head of a page use the Toolbar Page icon and select Head Element or from the application menu select Page -> Page
Attributes -> Head Element.
You can now edit the script to suit your needs.
LatLng sets the position you want to centre the map on.
Zoom sets the maps Zoom property where 0 is fully zoomed out.
MapTypeId can be set to ROADMAP, SATELLITE, HYBRID or TERRAIN.
For more detailed information see here: http://code.google.com/apis/maps/documentation/javascript/tutorial.html
TIP
Use Google Earth to find the Latitude and Longitude values to centre your map on.
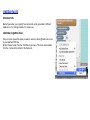
IMAGE EFFECTS
INTRODUCTION
Flux includes a powerful image effects tool which can be used to add many different visual effects to your images. You can use the built-in
effects in Flux to add simple coloration or blurs to images, or combine many different effects to create the exact look you want.
USING SIMPLE EFFECTS
First find an image in your project that you wish to chage, and select it. Now you can press the Effects button in the toolbar to open it into
Flux's Effects tool.
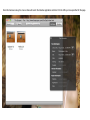
Now you can choose an effect from the popup
menu and press the + button to add it to the list of
filters applied to this image. Each filter has a range
of parameters you can tweak to get the look you
want. In the case of the Gaussian Blur filter, you
can alter the "radius", or in other words, how blurry
you want the image.
When you are happy with the effects, you can
press Apple-S to save the image. You can
overwrite the existing image, or make a new one
to keep the original.
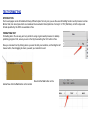
USING MANY EFFECTS
By using many effects, you
can make a simple picture look
a lot different, and also save
the range of filters you use to
use time and time again on
different images. We will take
the same picture of the cat,
and make it look like it is in a
frame, with sticky tape.
By experimenting with different
effects in different orders, you can
achieve unusual effects with the
minimum of effort. Here we have
applied the following effects in order.
Lanczos Scale Transform - This
can scale the image, we've scaled it
down to a more manageable size.
Simple Frame - We've made the
frame white and quite thick to give
the appearance of a "Polaroid" style
frame around the picture.
Rounded Frame - We've made it
very thin, to simply crop away the
white frame to give it rounded edges.
Gloss - To give the picture the
traditional gloss of a printed
photograph.
Scrapbook Tape - Simply adds a
simply sticky-tape to each corner of
the image.
Rotate - Now finally we rotate the
whole image to make it look like it
has been stuck down in the pages of
a scrapbook.
SAVING THE EFFECTS USED
When you're happy with the effects you've used, you can "bookmark" them for later use. Simply choose "Save filter set" from the "cog"
menu and then that filter set will become available from the cog menu and you will be able to use it on any other image.
INTRODUCTION TO CODE EDITING
In addition to making changes on the page, and using the Inspector, you can also make changes directly to the HTML and CSS code in
Flux, and see the changes appear right away.
EDITING CODE
The Code Editor in Flux is toggled using the Code button on the toolbar, or the Code Editor entry in the View menu.
The Code Editor in Flux works very much like the Inspector, choose the element you wish to edit on the page, such as a DIV or a CSS
rule, and the relevant code will appear in the editor.
New to Version 4 is FreeCode, this is a very important feature for those wishing to edit code by hand, and is explained in more depth in
the FreeCode section of this manual.
WHEN I MAKE CHANGES, THE CHANGE DOESN'T COME OUT THE WAY I TYPED IT?
When Flux is not in FreeCode mode, it will interpret your code, formalize it, and correct any mistakes. However, Flux cannot always
predict your intend, and undesirable code changes can be made. If this is the case, then convert your page to FreeCode mode, and this
problem will no longer occur.
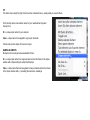
OTHER FEATURES OF THE CODE EDITOR
At the top left of the Code Editor area, there is a little drop down menu with a 'gear' symbol. From this menu you can access a number of
helpful features:
Editor in separate Window - Users with multiple screens may wish to have the Code Editor in a separate window, so it can be moved to
a different screen.
Arrange Vertically - By default, the Code Editor will appear under the page you are editing,with this option enabled, the page and the
Code Editor will appear side by side.
Show Invisible Characters - This will display characters that are usually inivisble, such as spaces.
Tidy Code - This will format your code so it is easier to read, note that the results may be different in FreeCode mode.
SNIPPETS
You can also access Snippets from the menu, which is explained in more details in the Snippets section of this manual.
AUTOCOMPLETE
AutoComplete is significantly enhanced in Version 4. Rather than having to remember syntax, and type in long tags and filenames, the
AutoComplete system in Flux will help you.
HOW TO ACTIVATE AUTOCOMPLETE
AutoComplete can be activated manually using the Esc key, or by checking the box 'AutoComplete after delay' in the Editor section of
Preferences.
HOW TO USE AUTOCOMPLETE
To try out AutoComplete, open the Code Editor and type in a '<' character, now hit escape (or just wait if
you have the 'AutoComplete after delay' preference enabled.)
You will be presented with a list of possible options, which is in context to where your caret is in the
code, for example, if you the caret is positioned after <img src=" then the AutoComplete menu will show
a list of possible images.
If you are editing a .css file, and the caret is after background-color:, then you will be presented with a
list of colors from the currently selected Swatch.
The screengrab above shows the caret in the src attribute of an IMG element. When AutoComplete is
activated, Flux will present a list of available images.
FREECODE
FreeCode is new to version 4, and is the single most important feature of this release.
WHEN SHOULD I USE FREECODE
When you need absolute control over your HTML and CSS code, use FreeCode. Previous to FreeCode, Flux would generate your code
for you, and not allow 100% flexibility. With FreeCode, Flux still generates code for you, but will only make the changes you request, even
if your code is invalid, Flux will not change it.
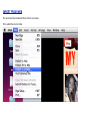
HOW DO I ENABLE/DISABLE IT?
Choose FreeCode from the Edit menu:
BENEFITS OF FREECODE
Total Control, with FreeCode, there are no limitations to what you
can create in Flux. However even with FreeCode, the WYSIWYG
capability still exists, if you drag an object to a new location, or to
stretch out it's padding, Flux will still alter your code for you, but only
that element, the rest of your code will remain unchanged. The same
applies in CSS, if you make a change on the page or using the
Inpsector, the CSS will still be changed, just like it would be without
FreeCode, however, only that section of CSS will be altered,
everything else will remain exactly how you left it.
WHEN NOT TO USE FREECODE
If you are just starting web design, and are not confident creating valid HTML and CSS, then it's best not to use FreeCode, as it won't stop
you making mistakes.
WYSIWYYG text editing is not supported in FreeCode, this is because an on-screen stylistic representation cannot adequately show the
hierarchical structure of a web page.
CAN I CHANGE A PAGE TO USE FREECODE?
Yes, however there are some caveats...
If you switch a normal page to use FreeCode, no changes are made to the page, other than it's marked in
the files' metadata that it is now a FreeCode page. Any future changes will be done using FreeCode.
WHAT ABOUT SWITCHING BACK?
If you switch a FreeCode page to be non-FreeCode, it's possible destructive changes could be made, and
your code formatting will almost certainly change. Any code that Flux doesn't understand could be lost.
SOMETIMES FLUX SAYS THAT IT CANNOT MAKE A CHANGE IN FREECODE?
FreeCode is very powerful and capable, however, sometimes code is so invalid, broken or corrupt, that Flux cannot find the section of
code that it needs to change.
TIP
To help Flux find the code, give the element a unique id attribute, this will help Flux find objects in messy code.
If you think Flux is failing on valid code, then please report this to [email protected], including the affected HTML page.
HOW DOES FREECODE AFFECT EXTERNAL CSS FILES?
FreeCode can also make changes to external CSS, just like it can with HTML, however, it's important if you do this, that all HTML pages
that use the .css file all use FreeCode. If they do not, if you make edits on a non-FreeCoded page, then destructive changes could be
made to the .css file.
TIP
As a general rule, switching a page to FreeCode is harmless, but switching back can occasionally produce undesirable changes.
IDENTIFIYING FREECODE FILES
FreeCoded files are underlined in the Site Manager.
You can also setup Flux in the Preferences to open ALL files in FreeCode.
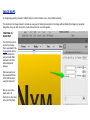
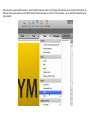
CHANGING AN ELEMENTS TYPE
INTRODUCTION
Elements such as P or DIV are essential to the structure of your page, but what if you
need to change, say, a P to H1 to alter this structure, or maybe just to see how it looks
in different style.
SELECT THE ELEMENT TO CHANGE
Click on the element you want to change, this can be a block or span element.
SELECT THE NEW TYPE
Right-Click (or Control-Click) to open the contextual menu, and select the new type
from the 'Change selected element to' submenu.
WHAT IS CSS?
CSS is a language that defines the style of HTML/XHTML documents. CSS controls fonts, images, colors, and almost every other aspect
of styling.
CSS - Cascading Style Sheets
CSS is designed primarily to enable the separation of document content from document presentation.
HOW CSS WORKS...
TYPE SELECTORS
The CSS code below will make all text that uses the H1 tag red.
The 'H1' part of the code is called a 'selector' (they are used to "select" elements on an HTML page so that they can be styled), the 'color'
part of the code is called a 'property', and the 'red' part of the code is the value.
h1 {
color:red;
}
So when HTML code like below is used..
<h1> Some Red text </h1>
The text color is changed.
SOME RED TEXT
CLASS SELECTORS
The H1 example above is probably the simplest type of selector, it's called a 'type' selector.
Type selectors 'select' every instance of an element, class selectors can be used to select any HTML element that has a class attribute of
a specific value.
Class selectors start with a period, see the example below.
.mystyle {
color:red;
}
To use the style, the name must be referenced in the 'class' attribute of the element.
<h1 class="mystyle"> Some Red text </h1>
ID SELECTORS
ID selectors can be used to select any HTML element that has a ID attribute of a specific value.
ID selectors start with a hash (#), see the example below.
#mystyle {
color:red;
}
To use the style, the name must be referenced in the 'id' attribute of the element.
<h1 id="mystyle"> Some Red text </h1>
The major difference between Class and ID selectors is that IDs can only be applied once per page, classes can be used as many times
as you wish.
USING CSS IN FLUX
STYLES INTRODUCTION
This is not a definitive guide to every
style scenario but a guide to help the
new Flux user get to grips with the basic
principles and quickly produce a web
page.
HOW FLUX HANDLES STYLES
Flux uses two types of style.
Inline - this type of style is contained
with the element it is associated with in
the body of the html/xhtml page.
External - this type of style is a
separate file within the site folder.
Elements within the body of the html/
xhtml page link to this style.
The inspector displays the style
attributes and shows if the style is inline
or external.
The styles window lists external styles associated with the site.
CONVERT INLINE STYLE TO EXTERNAL STYLE
When you place an element on the page in the Flux edit window Flux automatically creates an Inline style for this element. As you edit the
style in the Inspector Flux updates this style for each change.
To convert an Inline style to an External one right click the element, in the Edit window, to show the contextual menu for the element and
select 'Create style with' option.
TIP
If in doubt when using Flux right click to see the contextual menu, usually what you need is there.
From the drop down menu add a name for your new External style and
choose from
ID - a unique style name for your element.
Class - a style name to be applied to a group of elements.
Check remove Inline styles from source object.
NAMING ELEMENTS
Elements can have style name associated to them.
ID - a unique style name for a single element and will be shown in the styles
window with a # preceding the name like #mystyle
Class - a style name that can be applied to many elements and will be shown
in the styles window with a . preceding the name like .classstyle
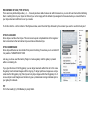
PRE DEFINED STYLES (TYPE STYLES)
There are many defined styles like p, li, .... these styles have default values set within browsers so you can still use them without defining
them or adding them to your styles list. Should you not be happy with the default style assigned to these elements you can add them to
your style sheet and edit them to suit your needs.
To do this click the + at the bottom of the Styles window, select Override Style followed by the element you want to override the style of.
STYLES CASCADE
Some styles override other styles. This can become quite complicated but all the beginner
has to remember is that an Internal style overrides an External style.
STYLE INHERITANCE
Some style attributes can be inherited from parent to sibling. Flux allows you to set inherit if
it is possible. TARGETING STYLES
Lets say you have used the Gallery Plugin to create a gallery and this gallery is placed
within a containing div.
If you give this div an ID of #mygallery you can target elements within this div. In this case
the gallery has thumbnail images with the img tag. To target just these images use a style
name like this '#mygallery img' this style will only style images within the #mygallery div. It
is now simple to add margins and borders to give a professional looking individual style to
your gallery thumbnails.
TIP
For further reading try CSS Mastery by Andy Budd.
USING CSS RESET PACKAGES
There are many popular CSS Reset packages such as Baseline or Blueprint.
Flux supports these types of packages, but sometimes, when, for example, you are dragging a margin or padding to a new value, Flux will
change the 'CSS reset' value, and not the value in a different stylesheet.
This is probably undesirable, to disable these implied changes to certain stylesheets, just add a simple attribute to the link in your HEAD
element.
<link flux:noimpliedchanges="1"
href="baseline.0.5.3/css/uncompressed/baseline.reset.css"rel="stylesheet"
media="screen" type="text/css">
This feature can also be used by using the 'Toggle Lock' (Command-L) function after selecting the stylesheet you want to lock in the
Style Navigator.
USING CUSTOM CSS
Sometimes when writing CSS, you will need to insert CSS code that Flux doesn't understand, usually to trick browsers like Internet
Explorer into doing something correctly.
Flux allows you to mark your code so that it won't get modified by Flux, allowing you to insert invalid, or "unusual" CSS.
Simply wrap the code you want to retain in special comments, like in the example below.
/*FLUX_IGNORE_START*/
.fixed:after{content:"."; display:block; height:0; clear:both; visibility:hidden;}
.fixed{display:block;}
/* \*/
.fixed{min-height:1%;}
* html .fixed{height:1%;}
/*FLUX_IGNORE_END*/
When these special comments are used, you will not be able to modify these CSS visually rules in Flux, but you can still edit them in the
Code Editor.
Another solution to this problem is to use a separate CSS file that only contains your special rules. If you don't modify these rules, Flux
won't make any changes.
Note : This is not required if you use FreeCode on all the pages that access the .css file.
@MEDIA RULES
INTRODUCTION
Media Types allow you to specify how documents will be presented in different
situations i.e. for printing instead of on screen use.
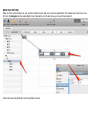
CREATING AN @MEDIA RULE
Once you have opened the page you want to work on, add a @media rule to one
of your attached CSS files.
Simply choose 'media' from the 'CSS Rules' sub menu. This menu is accessible
from the + button at the bottom of the Styles list.
GOOGLE FONT API
Flux supports the Google Font Directory , which is a very easy way to use non-system fonts in your webpages.
It's a simplified way of using the @font-face tag, and no coding is required
STEP 1
First, open a page in Flux, the page must have a .css file associated to it.
STEP 2
Select the 'Fonts' tab in the 'Page'
sheet.
STEP 3
Choose the font you want to use from
the pop-up menu, a preview will be
displayed. Note: The preview will only
work if an internet connection is
available.
You can also opt to create a CSS style
that utilizes this font. If you're not sure
how to use web fonts, it's
reccommended that you use this
option.
The style name can be anything you
like, but choosing one like 'body' will
affect your entire page and is a good
way to experiment.
DONE!
Press the Setup... button, and you will
be asked where to insert your new
style, choose a stylesheet and press
OK.
You can now dismiss the 'Page' sheet
by pressing Done, and the changes
will be immediatly visible.
CUSTOM FONTS USING CÚFON
INTRODUCTION
Cufón is a Javascript system that allows the use of custom fonts on webpages, and is often a simpler, more compatible approach the use
@font-face tags.
Cufón is a text replacement system, and thus any text that is styled using it will not be able to be copied into the clipboard. Due to this
issue, we recommend that Cufón is restricted to headings, and cosmetic text, rather than large paragraphs. @font-face is better for larger
areas.
There is a very good tutorial here....
http://wiki.github.com/sorccu/cufon/usage
GET CÚFON
It is highly recommended that you always use the YUIcompressed version of cufón, available from the cufón website.
To install, download, and simply drag the 'cufon-yui.js' to the Site
Manager to install it.
Reference this file in your page using the Page Attributes popup.
CREATING A CÚFON JS FILE
Follow the steps at the following website...
http://cufon.shoqolate.com/generate/
INSTALL THE JS FILE
Drag the resulting .js file that Cúfon created to the Site Manager
Again, reference this file in your page using the Page Attributes
popup.
ADD SOME JS TO YOUR PAGE
Add some JS code to your HEAD element, this can also be done via the Page attributes sheet.
<script type="text/javascript"> Cufon.replace('h1'); </script>
DONE
Any text using the H1 style will now adopt your new custom font!
GET COOL FONTS
http://www.dafont.com/ is great source for free fonts.
CUSTOM FONTS USING @FONT-FACE
INTRODUCTION
The @font-face rule allows you, the designer, to specify a particular font to render text in. You can use any font you like, not just Verdana,
Arial etc...
CREATING AN @FONT-FACE RULE
Once you have opened the page you want to work on, add a @font-face rule to
one of your attached CSS files.
Simply choose 'font-face' from the 'CSS Rules' sub menu. This menu is accesible
from the '+' icon at the bottom of the Styles list.
CONFIGURE THE CUSTOM FONT
Once the font has been setup, you
need to fill in a few details....
The font-family property is how the
font will be referenced.
The src property is where the font is
stored. This value is very important as
it's how the users web browser knows
where to get the font.
USING THE CUSTOM FONT
Once the font has been setup, you simply need to select it in the 'font-family' property of the CSS style (or element) you want to apply it to.
Note : The font will be listed at the top of the pop up menus.
DONE
Now the font will display wherever the CSS style is used, or, in this example, it's applied directly to the element.
GET COOL FONTS
http://www.dafont.com/ is great source for free fonts.
ELEMENT POSITIONING
INTRODUCTION
In HTML, elements such as Divs can be positioned on the page in a precise position called absolute, which places the element at an
exact position on the page. They can also be given a relative position, which puts the element in a position relative to it's natural position.
Other positions include static which confusingly does not put the element in a static position, but instead makes the element 'flow' with the
rest of the document. Static is the default for all elements and does not need to be stated if no other type of position is used. Another
position type is fixed which positions the element in a particular place in the web browser window, so it similar to absolute except that
fixed elements ignore the position of scrollbars in the browser. Finally, there is the inherit position, which simply uses the position of the
element's parent.
In Flux, positions are
changed using the
Inspector.
ABSOLUTE POSITION
To get started, first create a
Div on the page, you can do
this using the Quick Div
function. This will put a
simple Div onto your page,
already using absolute
position.
If you drag around this new
Div, you will see that it's top
and left attributes change in
the Inspector. If you move the Div to the top left corner of the page, you'll find that both top and left attributes change to numbers close to
or exactly 0, this is because elements are position by their top left corner, relative to the top left corner of the page, so if the top left corner
of the Div is exactly on top of the top left corner of the page, then the numbers will both be 0.
STATIC POSITION
Static position is very confusingly named, as in fact, the if an element uses a static position, it's anything but static, and will in fact change
it's position depending on what comes before it in the document.
When this Div has it's position
attribute changed to static, it
immediately snaps to the top left
corner of the page, this is because it
is the first available position in the
"flow" of the document, if the div was
duplicated, it would snaps to just after
the first div, as that is where it
naturally "flows" to.
RELATIVE POSITION
Relative position is something of a cross between static and absolute in that the element will move in the flow of the document, but you
can also alter it's position relative to it's position. So setting the top and left attributes to '5 px' and '5 px' will move the element by 5 pixels
each way more than it already was, and not in relation to the top left of the body element.
What you will notice in the screen
capture above is that the top and
left attributes are each set to "5
px", but the Div is more than 5
pixels down from the top, this is
becase the text before it has
already pushed down the element,
and the 5 pixels is in addition to
the amount it has already moved.
Similarly, you could drag the
element back up the page by
setting the top attribute to "-5 px".
FIXED POSITION
Fixed position is quite simply fixing an element in position, regardless of window size or scrollbar position.
As well as
ignoring
the position
of the
window or
scrollbars,
it will also
ignore any
other
elements
and text
before or
after it.
INHERIT POSITION
Inherit position takes the position from it's parent element, if the parent element is also inherit then it's parent is used, and so on. If no
position is ever specified, then the default of static is used.
TEXT FORMATTING
INTRODUCTION
Text in web pages can be formatted with many different styles. Not only can you use the usual formatting found in word processor such as
Bold or Italic, but also styles which are considered more semantic than stylistic like "acronym" or "dfn" (Definition). All of the styles and
formats specified by the W3C are available in Flux.
FORMATTING TEXT
Formatting text in Flux is easy, and very similar to using a typical word processor or desktop
publishing program. First, ensure you are in Text by the selecting the "Aa" button in Flux.
Now you can select text by clicking where you want to start your selection, and holding the left
mouse button, then dragging to where you want your selection to end.
Now click the Text button on the
toolbar.Now click the Text button on the toolbar
Now you can choose which style to use, in this case, we will make the text bold.
Now you can see that the selected text is in bold, and the HTML tags are displayed
graphically to show how the tags are working. These tagscan be turned off and on in
the details bar at the bottom of the window.
FORMS
INTRODUCTION
Forms allows users of your web pages to enter information, and then when the form is "submitted", the information can be passed back to
your web server to be processed and stored.
CREATING A SIMPLE FORM
You can create a form inside either the body, a div or other elements such as a table. To create a simple form inside a div, you can create
a div in the usual manner, such as using Quick Div from the Containers menu, and then select it.
Then you can choose Quick Form from the Forms menu.
MODIFYING THE FORM
When you have a form inside a div, you can then modify it to work with your own server applications. The easiest way to select your new
form is in the Navigator and by expanding the tree of elements, you'll be able to see your new form and select it.
Forms can have many attributes, but the important ones are:
Forms can have many attributes, but the important ones are:
method - This controls what method to use to pass the data back to your server, GET is the simplest method, but is limited to the amount
of data you can pass, whereas POST can sometimes be a little more complicated, but you can pass back large amounts of data, even
hundreds of megabytes.
name - This is a critical attribute if you want to control your form with JavaScript, as it allows it to be accessed easily using the JavaScript
DOM tree.
action - This is the script on your web server that the data will be passed to, if it's not stated, then the current page will be used,
alternatively you can state something like /cgi-bin/submit-address.php for the target.
ADDING ELEMENTS TO THE FORM
When you have the form selected, you can add elements to
the form, these can be any XHTML/HTML element but
mostly they will be input elements like text entry fields,
checkboxes and buttons.
You can add as many elements as you like to a form, and
then you should give all elements name attributes as this is
what will be passed back to your server.
IMAGES
INTRODUCTION
Images can be included in web pages in a number of ways. Traditionally, images are included in web pages using img tags, more recently,
with the introduction of XHTML and CSS, images can also be used as a Div backdrop.
USING IMG ELEMENTS
img elements are the
oldest, and most
compatible way to
include images in your
web site. They are also
the simplest. To add an
image to your web page,
you can choose any
image in your project
from the Images in
project sub menu in the
Media menu. This will
insert an img into the
selected element.
USING IMAGES IN DIV ELEMENTS
Images in Divs can be
easily used using the
Inspector, simply
choose an existing
image from the
background-image
attribute area in the
Fill section.
You can of course type in an alternative image from either your project or a full HTTP URL such as:
url(http://www.dogbreedinfo.com/images17/NorthernInuitDogFreya14wks.JPG)
LAYOUTS
INTRODUCTION
Flux includes some pre-defined CSS/XHTML layouts to get you started quickly with modern web layouts. Once you're confident in laying
out websites yourself, you can add your own layouts to Flux to use over and over again.
ACCESSING FLUX LAYOUTS
First create a new page from the Site Manager and open it in to the Page Editor,
now click the Layouts button on the toolbar.
CHOOSING A LAYOUT
Flux supplies several layouts, and you can choose them
from the sheet which appears. You can also choose to
create a new CSS file containing the styles required for
the layout, add the styles to your existing CSS files, or not
use CSS at all, if you plan to create the styles yourself.
WORKING WITH LAYOUTS
Once the layout is on
the page, it becomes
just like any other page
Flux and you and add
divs and edit the styles
just like any other page.
LINKS
INTRODUCTION
Links are used to create a link between web pages, the pages can either be part of your project, or on a completely different website
owned by another person.
GETTING STARTED
You can very quickly create a link in Flux by using the Quick Link function in the
contextual menu (Right-click, or Control-click).
To do this, first type some text at select the part you want to become the link.
Now choose the Quick Link item in the menu. and either choose a page in your
site to link to, or type in a URL. Now press OK.
You will now see that the link has turned blue and in Preview mode,
can be clicked to go to the link's destination.
WORKING WITH THE LINK
You can now work with the link and change the href attribute by clicking the a tags and opening the Inspector, if you cannot see the a
tags, ensure you have Spans enabled in the Details bar.
LOCKING OBJECTS
To prevent accidental changes to your page, Flux allows you to 'lock' objects.
To lock an object, simply select the object you want to lock by clicking on it an use the the key combination Command-L (or choose
Toggle Lock from the Edit menu).
When locked, the objects 'tag' will go red.
PAGE ELEMENTS & ATTRIBUTES
INTRODUCTION
Page Elements & Attributes are generally stored in the <head> element of a web page, the contents of the elements generally affect the
whole page, and not just one element. Elements in the <head> element are generally JavaScript and CSS imports, which are required for
styles and third-party JavaScript libraries. Other elements include <meta> elements which are used to describe advanced behaviour to
the web browser and also contain simple information such as the author of the web page.
WORKING WITH PAGE ELEMENTS & ATTRIBUTES
To work with Page Elements & Attributes, click the Page button on the toolbar of the Page Editor window.
You can now start to change, add,
and delete Page Elements. The list of
elements allows you to drag and drop
to re-order the elements, although
you should be careful while doing this
as some JavaScript libraries can be
particular about in the order in which
they are loaded.
META TAGS
Meta tags can contain many different types of data, some are purely information, such as the author of the web page, or a description of
it's content. You can add a new Meta tag from the popup menu, and refer to the following pages for more information:
http://en.wikipedia.org/wiki/Meta_tag
http://w3schools.com/tags/tag_meta.asp
http://www.w3.org/TR/REC-html40/struct/global.html#h-7.4.4.2
LINK TAGS
Link tags in the Head element define a link to an external resource, generally this means an external CSS stylesheet file. You can have as
many link tags as you like, and also define different links for different types of web browser, for example
<link rel="stylesheet" media="screen" type="text/css" href="theme.css" />
defines a stylesheet which will be used by desktop web browsers, however on a handheld device, these styles may be too complex or
high-bandwidth to be useful, so another link can be added like so:
<link rel="stylesheet" media="handheld" type="text/css" href="handheldtheme.css" />
which will be read by the web browser on a handheld computer instead, and you, the author can ensure that the styles are more
appropriate for this kind of device. You can read more about <link> elements here:
http://www.w3schools.com/TAGS/tag_link.asp
TITLE TAG
The title tag simply contains a title for the web page, this will normally appear in the title bar of your web browser.
SCRIPT TAGS
Scripts tags contain either JavaScript code, or the URLs of files contain JavaScript code. Including these in the <head> element ensures
that they are loaded right away by the web browser, before any JavaScript makes calls to methods or functions with the linked JavaScript
file. It is generally advisable to have JavaScript in separate files so that it can be re-used in many HTML files.
You can choose any JavaScript file in your project from the popup menu to add to the <head> element, or type them in manually if you
prefer. You should not that certain JavaScripts need to be linked in a particular order to work.
IMAGE MAPS
An image map usually consists of a MAP element, which contains one or more AREA elements.
The intention of an image map is to provide an easy way of linking various parts of an image without dividing the image into separate
image files, they can also be used to create links which are non-rectangualar.
CREATING AN
IMAGE MAP
The first thing to do is
to insert an image,
this is explained in the
Image section of this
manual. Maps can
only work with IMG
elements, not DIVs
with background
images.
We now need to set
the usemap attribute
of the IMG element
using the Inspector.
Ensure your name
starts with a '#'
character. In this case,
let's call it '#mymap'.
We now need to create a MAP element. It doesn't matter where we create it on the page, IMG elements do not permit child elements, so
although it may seem logical to put the MAP element inside the image, we cannot. For this example, you can insert the element into the
body element.
Once you have created the MAP element, we need to set the name of the MAP to 'mymap' (no '#' prefix this time.
We have no created the MAP element, but by itself, it won't do anything, we need to create a AREA within it. To do this, select the MAP
element, and choose a shape from the 'Area' submenu of the 'Misc' menu.
Once the circle has been created, you can move it by dragging the AREA tag, and resize it by dragging the handle at the bottom of the
circle.
Rects works in a similar way to circles.
EDITING POLYGON AREAS
Circles and Rectangles are, by nature, easy to edit, polygons can be a bit more complicated.
There are two types of handles on polygon areas, the resize ones, which are solid, and the 'add' ones which are white, and have a '+' in
them.
The solid ones can be dragged to reshape the polygon, and they can also be doubled clicked, which gives you the option to remove that
point of the polygon.
The '+' handles are simply clicked, to add a new point to the polygon.
By adding and manipulating the points, it's easy to create very advanced polygons with no knowledge of coding.
USING MAMP WITH FLUX
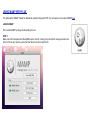
The abbreviation "MAMP" stands for: Macintosh, Apache, Mysql and PHP. You can read a lot more about MAMP here.
LAUNCH MAMP
First, launch MAMP by simply double clicking it's icon.
STEP 1
Make sure both the Apache and the MySQL server are both running, they should both have green dots next
to them. If there are red dots, press the 'Start Servers' button to start them.
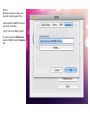
STEP 2
Now the servers are running, we
can start creating pages in Flux.
Check where the MAMP 'document
root' is set, it's usually
/Applications/MAMP/htdocs
You can check in the Preferences
section of MAMP, under the Apache
tab.
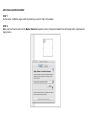
STEP 3
Now, drag the
'document root' folder
to the Flux icon to
open it as a website.
You can now edit this
web site like any other
site in Flux.
To make sure MAMP is
working correctly,
create an index.html
file, and add an object
to it, just so you will
recongnize it when
seeing it again.
STEP 4
Usually when using Flux, you could switch to Preview
mode to see the page, and although this will still work,
you won't be seeing it with a server environment, which
would defeat the point of using MAMP.
To see it within the server environment, we need to setup
a 'Custom Preview URL', this is done from Live Preview
pop up menu.
Once you have setup the custom preview URL, it will be
available from the Live Preview pop up menu.
DONE!
Now, when you preview your page using this technique, any database access, or PHP will run withing the MAMP environment, giving you
the correct result!
CHECK YOUR PREFERENCES
You might want to enable the 'Support content before <HTML> tags', as often PHP pages need to have code outside the usual HTML
area.
MASTER ELEMENTS
Master Elements are used when a structure of elements need to be repeated across multiple pages.
DESIGNATE AN ELEMENT TO BE A MASTER
STEP 1
First, select the element you want to make into a Master.
STEP 2
Open the Master Elements palette. The is available from the Window menu.
STEP 3
Make sure the 'Masters' section of the
palette is active, and type a name for
the master. This name must be unique
with the page.
STEP 4
Press the 'Setup as Master' button. A
confirmation dialog will appear, press
'OK'.
STEP 5
Save the Page.
APPLYING A MASTER ELEMENT
STEP 1
On the same, or different page, select the element you want to 'map' to the master.
STEP 2
Make sure the 'Clients' section of the Master Elements Inspector is active. Choose the Master from the PopUp button, and press the
'Apply' button.
STEP 3
Once the Master has been applied, press the 'Update selected Element' button, and the selected element will adopt the attributes, and
child elements of it's master.
HISTORY
HISTORY INTRODUCTION
History logs what you do and allows you to step back in time to an earlier version of your page.
HOW TO LAUNCH HISTORY
By default History is off and needs to be launched to start logging each change you make.
To launch choose Window -> History or select the history icon from the Toolbar.
HOW TO USE HISTORY
Once launched you will see a blank History window.
With a Snapshot button for taking a Snapshot of your page when you want and an Auto checkbox so History logs every change
automatically.
As you construct your page Newer changes show at the top of the window and older ones fall away at the bottom.
To step back in time in the current editing session that you have recorded with History, just
double click the relevant place in the time line.
TIP
Use Snapshot to highlight your History timeline, the camera icon is easy to find and can
help locate important steps if used at key moments in your page construction.
CONFIGURING EMBEDDED MEDIA
Flux can setup three different types of embedding. The first is HTML5 style, which is the modern, standards-compliant, recommended way
of embedding.
The second is the 'Quicktime' style, which is a method recommended by
Apple, and should be used with the 'Save for Web' feature in Quicktime
Player. When using this method, choose the '.mov' variation of the movie.
The third is the 'OBJECT EMBED' style, which is older, less reliable, and
should only be used when compatibilty with old browsers is required.
HTML5 EMBEDDING
When embedding in the HTML5 style, you have the option of adding more
media sources, for example, you could add an Ogg Theora alternative to a
Quicktime movie.
At the time of writing, there is no media format that is supported across all
popular browsers, this makes adding alternative sources very important.
As an alternative to multiple sources, you can as the 'html5media' Javascript
library. This library will use a Flash based player to display the video when a
browser is used that does not support any of the sources.
QUICKTIME EMBEDDING
If this is the first time you have used this method on a page, you will need to
add the required libraries to your page. Flux will do this for you if you click
the checkbox.
PACKAGES
Packages allow you to extend the capabilities of your web pages, some packages are provided by The Escapers, but most are from 3rd
parties.
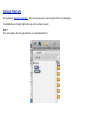
INSTALLING A PACKAGE
STEP 1
Select the folder in the
Site Manager that you
want to install the
Package into. Usually,
the root of your site is the
best place, as some 3rd
Party packages expect it
to be here.
STEP 2
Open the Packages
panel by clicking the
'Packages' toolbar icon in
the Site Manager
STEP 3
Now you can select the package you want to install from the list available. Once you have selected the package you want, choose it from
the list and press the Install button. The package will be downloaded from the internet and put into your project.
Note: The package will be available in this project only, if you want to use a package in more than one project, you will need to repeat this
process for each one.
STEP 4
As an example, we will install the "Flotr"
package, which is a JavaScript library for
creating charts. Once the package is installed
(See Step 3), you will find that the "flotr"
package is now present in your website.
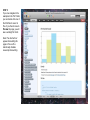
STEP 5
If you now navigate to the
examples in the 'flotr' folder,
you can double click one of
the html files to view it in
Flux. If you then choose to
Preview the page, you will
see a working Flotr chart.
Note: The chart will not
appear while editing the
page in Flux as Flux
intentionally disables
Javascript while editing.
PLUGINS
PlugIns allow you to extend the capabilities of Flux, they are written by both The Escapers and third parties.
Flux also supports many Coda plugins, if you find a Coda plugin you want to use in Flux, that does not work, then please contact
[email protected]
INSTALLING A PLUGIN
STEP 1
Open the Packages panel by clicking the 'Packages' toolbar icon in the Site Manager
STEP 2
Now you can select the PlugIn you want to
install from the list available. Once you
have selected the PlugIn you want, choose
it from the list and press the Install button.
The PlugIn will be downloaded from the
internet and installed into Flux's
Application Support folder.
Note: The Plugin will be available for your
user/login, if you have other users/logins
on your system, each user will have to
install the PlugIn.
STEP 3
In this case we will install the "EMail
Obfuscator", this simple plugin converts a
simple email address into JavaScript so
that it becomes difficult for an automated
SPAMBot to read the address.
Once the PlugIn is installed, it immediatly
become available from the Packages
menu, no restart is required.
PREFERENCES
Flux is an advanced application that can be customized in many ways.
ONLY SHOW FONTS IN 'WEB' COLLECTION
Your Mac has a built-in Font manager called Font Book, using this application you can sort fonts into collections. By checking this option,
Flux will only show fonts that are in the 'Web' collection.
USE INTERNET EXPLORER COMPATIBLE CSS FOR 'OPACITY'
Internet Explorer (IE) has historicaly never supported CSS 'opacity'. Check this option if you want Flux to use an IE compatible
workaround.
PRESSING RETURN CREATES 'P' ELEMENT
Pressing return in Flux can either insert a BR tag, or create a new P element, this option toggles between the two options.
SHOW FULL PATH IN PAGE EDITOR TITLE BAR
Rather than use a relative path, this option will make Flux show the whole path to file in the title bar of a window.
SHOW WELCOME WINDOW
When Flux starts, it displays a window that allows you to create a new project, open a recent project and a few other functions. This option
will turn this off.
SHOW MINI TOOLBARS
Tables and Lists will show small toolbars with commonly used actions when selected. This option will turn this off.
SUPPORT BESPOKE <$
Some CMS system can use tags that start with <$, this is invalid, but Flux can optionally support them.
USE DIALOG TO CHOOSE PATHS WHEN PASTING IMAGES
Older releases of Flux will put pasted images directly into a 'PastedObjects' folder. Newer releases use a dialog to allow you to choose a
location. This option allows you to toggle between these two options.
USE LARGER FONTS IN UI
If you find some of the text in the Flux user interface too small, this option will enlarge them.
ALWAYS ESCAPE CHARACTERS, REGARDLESS OF ENCODING
When using more modern encoding such as UTF-8, asian or accented characters do not need to be escaped. Choose this option to
escape them anyway. This can be useful if you are using an outdated web browser or web server.
SUPPORT EXPRESSION ENGINE STYLE TAGS
If you are creating pages for ExpressionEngine, check this option.
USE UPPERCASE TAG NAMES
If checked, Flux will use tag names like <DIV> rather than <div>.
DO NOT USE INLINE STYLES
Prevent Flux from using inline styles, i.e. styles in the style="" attribute.
TIDY CODE WHEN SAVING
Saved code will be formatted prettily if this option is checked.
SHOW THUMBNAILS
Thumbnails will be shown in the Site Manager and other areas when this option is checked. Very large sites will be handled quicker if this
option is turned off.
OPEN LAST SITES USED WHEN STARTING UP
If this option is checked, and you quit Flux with a site loaded, the next time you start Flux, this site will be loaded automaticaly.
AUTOMATICALLY CHECK FOR UPDATES
Flux can check for updates automatically, but you may want to turn this off.
DRAW TAG ABOVE ELEMENT ON PAGE
Tags are usually drawn inside the object on the page, this option will draw them above the element.
USE PATHS RELATIVE TO ROOT OF PROJECT
This option should only be used by experienced web developers, as it could prevent images from loading properly.
SUPPORT CONTENT BEFORE <HTML> TAGS
PHP pages will often have content before the HTML tags. This is invalid, but sometimes unavoidable.
ONLY DRAW TAGS FOR SELECTED CSS ITEMS.
Selecting this option will tell Flux to draw CSS tags as simple text, only drawing decor around selected styles. This makes the selected
item much more obvious.
DOUBLE-CLICK ON PAGE SWITCHES TO TEXT EDIT MODE
Default behaviour is to switch to Text Editing Mode when the page is double-clicked. Turning this off will cause the Inspector to appear
instead.
SHOW CODE EDITOR INSTEAD OF INSPECTOR WHEN DOUBLE-CLICKING.
If the above option is enabled, the Code Editor will appear rather than the Inspector when double-clicking an item.
CODE EDITOR FLOATS WHEN SEPARATE (RESTART REQUIRED)
When the Code Editor is in a separate window, this option makes it float above the page window.
BACKUP FILES BEFORE SAVING.
Before saving a CSS or HTML file, Flux can optionally copy a backup to ~/Documents/Backups/Flux
DISABLE RELATION LINES ANIMATION.
Animation can affect performance, particularly on older machines, if you are affected by poor performance, disabling animation can help.
SHOW LABELLED ASSETS IN ASSET MENUS.
Will displayed assets which have a Finder label at the root of the asset menu for easy access.
UP/DOWN CURSOR KEYS SHOULD ADJUST NUMERIC VALUES IN INSPECTOR
Numeric values, such as 'width' can be incremented and decremented with the cursor keys if this option is on.
PREVENT ACCIDENTAL DRAGGING IN PAGE EDITOR
If this option is enabled, then all drags in the Page Editor become 'sticky', meaning that to drag an item, you must drag it a few pixels
before the move commences.
CSS OVERFLOW COMPATIBILITY MODE
Enables overflow-x and overflow-y properties for compatibility purposes.
ONLY CREATE WEBKIT SPECIFIC CSS
By default, Flux will add Firefox and Opera specific CSS where required. However, if you are creating a iPad/iPhone Web app, you may
not want this as it can create bloated code.
SHOW HIDDEN FILES IN SITE MANAGER
By default, Flux will hide files starting with '.', this option will show them.
AUTOMATICALLY RELOAD PAGE IF CHANGED EXTERNALLY.
If you often use a Text Editor to edit files while they are loaded in Flux, then you should turn this option on, then Flux will keep itself up-todate with any changes you make.
OPEN IN FREECODE BY DEFAULT.
Rather than enable FreeCode for all your files, you can make it the default by check this option.
USE FONT-FAMILY FONT IN STYLE NAVIGATOR IF AVAILABLE.
If you are using custom fonts, this option will display the associated CSS tags using that font. Note : The font must be installed on your
Mac.
BROWSERS
Lists the Browsers that can be used to preview your page.
Browsers can be found automatically by using the Find Browsers button.
Added or deleted using the +/- buttons.
Or dragged in from a Finder window.
Theese Browsers can then be used from within Flux by using Page -> Preview -> choose the browser you want.
COLORS
A drop down menu allows you to choose from preset color schemes.
Clicking any of the colors displays the color chooser where you can pick any color you want.
EDITOR
AutoComplete
The Code Editor will AutoComplete after a short delay.
Editor Font
Clicking Set Font button allows you to choose font and font size used by the Code Editor.
Editor Colours
Allows you to customise the colours used in the Code Editor
Clicking the colour displays the colour picker to change the colour.
Default external text editor.
Choose from the drop down menu which text editor you want to use as default.
Double clicking some files in the Site Manager, .css .js, will open in thie chosen editor.
RAILS
Advanced settings for Rails projects
PHP
Advanced PHP settings
GUIDES
Resolution Guides
These guides give the width and height of displays.
To add your own or delete use the + and - buttons.
To see how much of your page will display with a given screen size you can overlay these guides on your page by clicking the gear wheel
at the top left of the Edit window.
Grid
Value in pixels of the vertical and horizontal Grid Line spacing.
BOOKMARKS
Settings for servers you connect to.
This is covered in depth here Bookmarks.
BOOKMARKS
Before you can publish to any host, you need to setup a Bookmark for it.
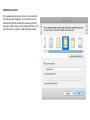
CREATING A BOOKMARK
Select the Bookmarks section of the Preferences window.
Press the '+' at the bottom left of the window to create a new bookmark.
Select the new bookmark, and fill in the details of your host.
BOOKMARK FIELDS
Name - A name for your bookmark, this is purely a reference, for
example 'My Fancy new Host'.
Host - This will be something like 'ftp.myhost.com' or a number, like
192.168.1.18, do not include a prefix such as http: or ftp:, or a suffix
such as :80 or /myfiles
Port - This will be supplied by your hosting supplier, but if you are not sure, 21 or 22 (SFTP) is common.
User - This will be supplied by your hosting supplier.
Password - This will usually be supplied by your hosting supplier.
Folder - For most hosts, this will be left empty, but you will sometimes be directed to put your files in a folder, such as htdocs.
Website Root - When using the Live Preview system, Flux needs this information to direct itself to the location on the web of your site,
such as http://www.mynewsite.com/
PUBLISHING
INTRODUCTION
In Version 4, the old publishing system has been replaced with a brand new system, based on a 'mirroring' model.
With the new system, you can mirror to an FTP or SFTP site. MobileMe publishing is no longer supported.
If you host your site on MobileMe, then please read the following article http://support.apple.com/kb/HT4686
GETTING STARTED
Before you can mirror any site, you need to setup a bookmark for your host.
LIVE PREVIEW
Live Preview is combination of publishing and previewing.
When you choose a host from from the Live Preview button at the top right of the Page Designer window. Flux will upload the modified
page to the host (along with modified images, CSS etc...). Once the upload has completed, Flux will then open that page from the server
(not the local copy).
WHY USE LIVE PREVIEW INSTEAD OF LOCAL PREVIEW?
If you use PHP, a CMS system, or any other type of operation that requires your HTML page to be live hosted, then Live Preview can
streamline your workflow to a few seconds, rather than modify->upload->browse to URL.
HOW DO I USE LIVE PREVIEW?
First, you need to setup a Bookmark for your host.
The Bookmark must have a Website root setup, and the
URL must be correct in relation to your upload location, for
example....
If you were to upload a file to
/htdocs/mysite/page.html
and the page is accessible at
http://www.mybestsite.com/page.html
then your Website root should be
http://www.mybestsite.com/
As a side note, using the example above, the 'Folder' field of your bookmark would probably be /htdocs/mysite/
Sometimes a host will setup your login so the 'Folder' field is not required, as the login will automatically put you in the correct directory.
Your Hosts' support site should tell you more.
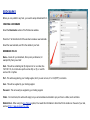
I'VE SETUP MY BOOKMARK, NOW WHAT?
Now you have setup the bookmark, you can choose it from the Live Preview
button. If you have modified any associated files, such as image, you can
choose to upload them too or not.
Once the upload has completed, the Preview will present the page, but rather
than displaying the local copy, it will show your Website Root+ThePage.html
You will probably notice the Preview is quite a bit slower to appear than a
normal Preview, this is perfectly normal, and it's simply due to the page and
it's assets being loaded from your web server, rather than the local disk.
If you have multiple sites, i.e. one for testing and your live site, then simply
setup a separate bookmark for each.
If you don't want to use Live Preview, but still want to preview the effects of PHP or
other server-side functions, then consider looking at MAMP.
CUSTOM PREVIEW URLS
Custom Preview URLs are a way of telling Flux to preview a different URL than the one you are editing.
The main reason you would to do this is if you are working on a Zope page template, or other types of site where the HTML can only be
previewed correctly by running it via a server.
SETTING UP A CUSTOM PREVIEW URL
Every page in Flux can have it's own Preview URL, to set it up, choose 'Setup
Custom URL...' from the 'Live Preview' popup menu.
Enter the complete (i.e. WITH the http prefix) URL you want to preview in the
sheet that appears.
USING A CUSTOM PREVIEW URL
Once the URL has been setup, that URL will be available in the same popup
menu.
SERVER SIDE PROGRAMMING
Flux can help you with server-side programming in PHP, Yuma, Java, or other languages.
INTRODUCTION
For many web applications, simply adding capability via JavaScript is not enough, sometimes programming needs to be done on the
server too to achieve the desired results. Server side web programming can be done in just about any programming language, but on the
web, a few are particularly popular such as PHP.
In this chapter, we'll go over some basic PHP programming you can do
in Flux.
GETTING STARTED
Open or create a simple page for us to work on. This can be an existing
page which already has content, or a brand new page. For this example,
we will use a brand new page.
ADD A DIV AND PHP CODE
PHP code is contained in your web page similarly to normal elements,
and Flux displays PHP code as "tokens" which display in the Edit mode,
but not in Preview.
Now if you create a div, select it and then choose PHP from the menu,
Flux will insert a simple PHP script into the Div, you should ensure that
you have chosen to display tokens, or you will not see the PHP.
RUNNING THE PHP CODE
Now to run the PHP, you will need to preview the page in a browser, however PHP will only run on a PHP-enabled web server, so you will
need to have access to one. This can be on almost any web server either on your Mac, Windows, or UNIX machine.
SIMPLE JAVASCRIPT
You can do many advanced effects and operations using JavaScript and Flux, but in this chapter we are going to focus on attaching a
basic Javascript action to an element on the page.
STEP 1
First, open or create a simple page for us to work on.
STEP 2
Next, create an element to attach an action to, for example a simple div that we can create
with 'Quick Div'
Make sure the Div you have just created is selected.
STEP 3
Open the 'Actions' palette (⌘-5) by clicking the toolbar button below.
STEP 4
As a simple example, we will attach an action to
the Div that simply redirects to a new page.
From the Pop Up menu at the top left of the
palette, choose 'Simple', which will select a
collection of basic JavaScript functions.
From the Pop Up menu in the top right of the
palette, choose 'Redirect to page', which is
JavaScript function that simply takes the user to a
different page (or site).
The target URL can now be typed in to the 'url'
field. As you type, Flux will construct the
appropriate JavaScript code.
To go to the target page when the user clicks on
the Div, make sure the Event is set to onClick
STEP 5
Once you are happy with your parameters, press the Attach to Selected Object button,
which attaches the JavaScript to the Div we just created.
To indicate the Div has an action attached, a marker will appear on the Div.
DONE!
You've now attached a JavaScript action, so you can now try it out in the Preview mode.
DELETING AN ACTION
DELETING THE ACTION
You can delete the action you just made using the Inspector in the Attributes & Actions section.
ADVANCED JAVASCRIPT
In this chapter we are going to attach a Moo.FX action to an element on the page.
STEP 1
Install the Moo.FX package into your project.
See Installing Packages.
STEP 2
Open or create a simple page for us to work on.
STEP 3
Add the Moo.FX JavaScript library to your page
using the 'Page Attributes' panel. Dismiss Page
Attributes by pressing Done.
STEP 4
Next, create an element to attach an action to, for example a
simple div that we can create with 'Quick Div'
Make sure the Div you have just created is selected.
STEP 5
Now use the Inspector to give the new Div a colour, this can be anything you like, it's just so you can see the Div when you preview it.
Now give the Div an ID, this can be done with the contextual menu in Flux, select the Div, and click the right mouse button (Ctrl-Click on
laptop Macs). Now enter a new ID for the element in the menu, this can be any name you like but should not include spaces.
STEP 6
We can use one of the effects from Moo.FX on this element,
by using the Actions palette. To use the Actions palette you
need to take the following steps:
1. Choose 'MooFX' as your toolkit in the top left of the
Actions palette.
2. Choose 'Fx.Style' as the class to use.
3. Now for the ID of the element, choose or type in
the ID you gave your new Div.
4. Now choose 'height' for the property you want to
change.
5. Now choose to encapsulate this with a method
call of 'start'
6. Now in the code editing area, you can change the
values in the start() method to reflect the height of
your Div, and the height you want to change to.
(new Fx.Style('mybox', 'height',
{ })).start(500,100);
7. Now you can attach this action to the selected element and preview your page.
DONE!
You've now attached a JavaScript action, so you can now try it out in the Preview mode. When you click your Div, it should now change
height with a smooth animation. MooFX provides lots of effects like this, and many are exposed through the Actions palette.
GOOGLE ADSENSE
AdSense is an ad serving application run by Google Inc. Website owners can enroll in this program to enable text, image, and video
advertisements on their websites.
You can use Adsense in Flux very easily.
STEP 1
Obtain your advertising code from your Adsense account, it'll look something like this
<script type="text/javascript" ><!-google_ad_client = "pub-9752748337765590";
/* 300x250, created 09/02/10 */
google_ad_slot = "4445662943";
google_ad_width = 300;
google_ad_height = 250;
//--<
</script<
<script type="text/javascript" src="http://pagead2.googlesyndication.com/pagead/show_ads.js">
</script>
STEP 2
Simply paste this code in your body element using Flux's Code Editor. It's a good idea to use a DIV to contain the code, to keep it
seperate, and to allow you to move the ad around the page.
You won't see the ad display in Flux's Edit view.
DONE!
Now, when you preview (or publish) your site, the Google Adsense adverts will display on your page.
TIP
If you've only just created the Adsense code, it can take up to 10 minutes for ads to start functioning.
USER CODE
WHAT IS USER CODE?
User Code objects allow you, the page designer, to embed any code
into a web page, HTML, JavaScript, or anything else.
The main reason you would want to do this, is if you have some code
that you don't want Flux to interpret, for example, non-compliant
HTML for legacy reasons.
Note : This feature is not available in FreeCode mode as it is not
required.
DOCTYPES
An example DOCTYPE below.
<!DOCTYPE html PUBLIC "-W3CDTD XHTML 1.1EN" "http://www.w3.org/TR/xhtml11/DTD/xhtml11.dtd">
A Document Type Declaration, or DOCTYPE, is an instruction that associates a particular HTML file with a Document Type Definition
(DTD) (for example, the formal definition of a particular version of HTML).
In the serialized form of the document, it manifests as a short string of markup that conforms to a particular syntax.
A DOCTYPE is always the first line in the file.
<!DOCTYPE html PUBLIC "-W3CDTD XHTML 1.1EN" "http://www.w3.org/TR/xhtml11/DTD/xhtml11.dtd">
<HTML>
<HEAD>
<TITLE>My Webpage</TITLE>
</HEAD>
....
The are many DOCTYPEs in the Snippets library ready for use. This is especially useful in FreeCode where the DOCTYPE may need to
be altered manually.
DOJO
Dojo is a powerful toolkit used to create buttons and other widgets on your pages.
BUTTONS
Buttons are probably the simplest widget in the Dojo toolkit. After using the widgets gallery to insert a button, you simply need to assign an
action, the 'onclick' actions is usually appropriate.
EXPRESSION ENGINE
Expression Engine is a
content management system
(CMS).
To use Flux to edit Expression
Engine templates, you need
to enable it's support in the
Preferences.
USING EXPRESSION ENGINE TAGS
Flux has an Object Library for Expression Engine, so simply choose the tag you want to insert from the menu.
LITMUS
Litmus is a 3rd Party service for testing web pages on an array of different web browsers.
http://litmusapp.com/alkaline/
USING LITMUS WITH FLUX
To use the Litmus service with Flux, first download the Alkaline application from the above link and install it into your applications folder.
Also download the Coda plugin for Alkaline, and copy it into your Flux plugins folder. (You can easily open this folder by choosing the
Open Plug-ins folder from Flux's Plug-ins menu.)
Flux supports many, but not all Coda plugins
For the plug-in to be recognized, you need to restart Flux.
You can now use the menu entries shown above, please note
however, Litmus can only test 'online' pages, so you need to setup a
custom URL in Flux, so Flux can tell Litmus where your page is on
the web.
If you haven't setup a Custom URL. Flux will prompt you to do so.
Once this has been setup, the menu entries will launch the Alkaline application and direct it to the URL you have specified for the page.
IMPORT FROM iWEB
Flux can import sites created in iWeb, and it is very simple.
First, publish the site to a folder.
LOAD INTO FLUX
Now simply drag the exported folder to Flux, just like any other project.
Note : The layout of iWeb sites can seem a little odd! But they will work fine in
Flux.
USING ZOPE WITH FLUX
Zope is a free and open-source, object-oriented web application server written in the Python programming language.
EDITING A ZOPE TEMPLATE
USING FLUX
Zope HTML templates are held
in the Zope database, so first,
we need to extract the HTML to
a file.
NOTE
Flux can only work with Zope
Page Templates, not DTML files.
STEP 1
First, login to the Zope
management system, and find
the file you want to edit. In the
picture below, we are editing
one of the standard examples.
STEP 2
Copy and paste the HTML code into a text
editor, and save the file into a brand new folder.
STEP 3
Now, drag the new folder (not the file)
to Flux to open it as a website.
You can now edit this web page like
any other page in Flux.
Flux has built-in support for Zope
attributes to make editing the page
even easier.
STEP 4
Once you have finished editing your file, we need to import it back into Zope. The easiest way to do this is to open the Flux Code Editor
(Command-3), make sure you are viewing the whole file by pressing the HTML tag.
Copy the HTML from the Flux Code Editor, paste back into the Zope Management System and press 'Save Changes'
DONE!
Now, when you visit your Zope based site, the changes should have taken effect.
TIP
See Custom Preview URLs to make editing Zope sites even easier!
ZOPE AND EXPANDRIVE
Zope is a free and open-source, object-oriented web application server written in the Python programming language.
ExpanDrive is a 3rd Party product that allows the mounting of FTP and SFTP servers as filesytems.
EDITING A ZOPE TEMPLATE USING FLUX
Using ExpanDrive, we can mount the Zope database as a filesystem, and treat it like any other Flux project.
NOTE
Flux can only work with Zope Page Templates,
not DTML files.
STEP 1
First, mount the Zope FTP server using
ExpanDrive, the host and port may be different on
your installation, check with the person who
installed Zope if you are not sure.
STEP 2
You can now navigate using the
Finder to find your page
templates.
STEP 3
Open the folder containing your
page templates using Flux in the
normal way, the easiest way to
do this is to simply drag the
folder onto the Flux icon on the
Dock.
STEP 4
The folder will open like any
normal Flux project, although
you may find it to run a little
slower than usual, this is due to
the FTP overhead. This
slowdown will be quite apparent
if your Zope server is on a
different machine to the one
running Flux. Edit and save your
pages as you normally would.
DONE!
Now, when you visit your Zope based site, the changes should have taken effect.
TIP
See Custom Preview URLs to make editing Zope sites even easier!
ZOPE AND WEBDAV
Zope is a free and open-source, object-oriented web application server written in the Python programming language.
Web-based Distributed Authoring and Versioning, or WebDAV, is a set of extensions to the Hypertext Transfer Protocol (HTTP) that allows
users to edit and manage files collaboratively on remote World Wide Web servers.
Mac OS X has built-in support for WebDav, so no other software is required.
EDITING A ZOPE TEMPLATE USING FLUX
We can use the Command-K shortcut in the Finder to mount a WebDav volume, and treat the folders within it like any other Flux project.
NOTE
Flux can only work with Zope Page Templates,
not DTML files.
STEP 1
First, mount the Zope WebDav server using the
Finder (Command-K), the host and port may be
different on your installation, check with the
person who installed Zope if you are not sure.
STEP 2
You can now navigate using the Finder to find your page templates.
STEP 3
Open the folder containing your page templates using Flux in the normal way, the easiest way to do this is to simply drag the folder onto
the Flux icon on the Dock.
STEP 4
The folder will open like any normal Flux project, although you may find it to run a little slower than usual, this is due to the network
overhead. This slowdown will be quite apparent if your Zope server is on a different machine to the one running Flux. Edit and save your
pages as you normally would.
DONE!
Now, when you visit your Zope based site, the changes should have taken effect.
TIP
See Custom Preview URLs to make editing Zope sites even easier!
TIPS
HOLD OPTION WHEN DRAGGING
Holding the Option Key (Alt) will prevent deselection of the selected element, so you can drag objects which are hidden below other
objects.
HOLD SHIFT WHEN ADJUST PADDING OR MARGIN TO CHANGE ALL AT ONCE
Holding the Shift Key while changing the Padding or Margins will change all properties (i.e. left,top,bottom,right) at once. So if you want
10px on all sides, you can do it in a single mouse movement.
HOVER NOT WORKING IN FIREFOX?
Make sure your pages has a DOCTYPE set.