1
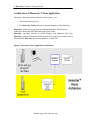
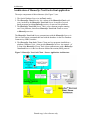
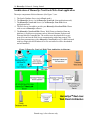
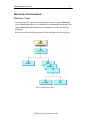
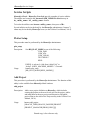
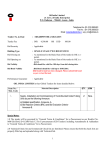
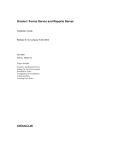
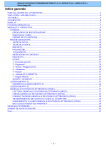
HarnesSys INSTALLATION User Manual May 2008 Issue AF 2 HarnesSys Volume 0: Getting Started Notices The information contained in this manual is believed to be accurate and reliable. However, Israel Aerospace Industries Ltd. (IAI) assumes no responsibility for any errors, omissions, or inaccuracies whatsoever. Information in this document is subject to change without notice and does not represent a commitment on the part of Israel Aerospace Industries Ltd. (IAI). The software and/or database described in this document are furnished under a license and/or agreement. The software and/or database may be used or copied only in accordance with the terms of such license and/or agreement. It is against the law to copy the software on any medium except as specifically allowed in the license and/or nondisclosure agreement. The purchaser may make one copy of the software for backup purposes. No part of this document and/or database may be reproduced or transmitted in any form or by any means, electronic or mechanical, including photocopying, recording, or information storage and retrieval systems, for any purpose other than the purchaser’s personal use, without the express written permission of IAI. 2007 Israel Aerospace Industries Ltd. All rights reserved. Publication Number 4422/HAR_SUM/00104 Issue AF Printed copy is for reference only Table of Contents 3 Table of Contents Introduction................................................................................................................. 5 Architecture ................................................................................................................ 7 Architecture of HarnesSys Classic application....................................................... 8 Architecture of HarnesSys Next-Look client application....................................... 9 Architecture of HarnesSys Next-Look Web client application............................. 10 HarnesSys Environment ........................................................................................... 11 Directory Trees ..................................................................................................... 11 User Environment Setup (on Unix platforms) ...................................................... 14 Motif Environment Setup (on Unix platforms) .................................................... 14 Resource Files ................................................................................................... 14 HarnesSys Fonts................................................................................................ 14 HarnesSys Installation Requirements ....................................................................... 15 HarnesSys Classic................................................................................................. 15 Hardware........................................................................................................... 15 Prerequisite Software........................................................................................ 15 Unix User.......................................................................................................... 15 HarnesSys Installation Procedure ..................................................................... 16 HarnesSys Upgrade Procedure ......................................................................... 18 HarnesSys Patch Installation Procedure ........................................................... 18 HarnesSys Next-Look........................................................................................... 19 Hardware........................................................................................................... 19 Prerequisite Software........................................................................................ 19 Unix User.......................................................................................................... 19 HarnesSys Installation Procedure ..................................................................... 19 HarnesSys Upgrade Procedure ......................................................................... 20 Service Scripts .......................................................................................................... 21 Plotter Setup.......................................................................................................... 21 Add Project ........................................................................................................... 21 Delete Project........................................................................................................ 22 Restore SDP Tables............................................................................................... 22 Enable New Sessions in HarnesSys...................................................................... 22 Disable New Sessions of HarnesSys .................................................................... 22 Color Setup ........................................................................................................... 23 Convert symbol library ......................................................................................... 23 Build plotter db ..................................................................................................... 23 HarnesSys User Documentation:............................................................................... 24 Printed copy is for reference only 4 HarnesSys Volume 0: Getting Started Printed copy is for reference only Introduction 5 Introduction This HarnesSys Installation Manual details the installation of the HarnesSys application. The HarnesSys environment, Oracle environment and installation requirements are described. Operating instructions for first time installation, upgrade installation, patch installation and Oracle installation are also provided. This manual is intended for the HarnesSys administrator. Below is a brief description of the sections which comprise this User Guide. Architecture This section describes the architecture of HarnesSys working as a standalone application (HarnesSys Classic), or as a HarnesSys multi-tier (client / server) application (HarnesSys Next-Look). HarnesSys Environment This section describes the directory trees and definitions as well as the User and Motiff setups. Installation Requirements and Procedures This section describes the hardware, operating system and software requirements for the installation of HarnesSys Classic and Next-Look environments. Service Scripts This section describes the service scripts provided with HarnesSys. Note: HarnesSys Installation Manual is one of a set of user guides that make up volume 0 of the HarnesSys user documentation. Printed copy is for reference only 6 HarnesSys Volume 0: Getting Started Printed copy is for reference only Architecture 7 Architecture HarnesSys can be operated in several different major modes: 1. HarnesSys Classic (stand-alone) application- This is the traditional way of running HarnesSys, as an interactive application. 2. HarnesSys Next-Look (2000) client application - In this mode, the user runs selected installed modules (the client programs) that provide HarnesSys services against a remote HarnesSys server program. 3. HarnesSys Next-Look Web client application - In this mode, the user operates selected modules that provide HarnesSys services via a web browser (such as Internet Explorer or Netscape Communicator) against a remote HarnesSys server program. Printed copy is for reference only 8 HarnesSys Volume 0: Getting Started Architecture of HarnesSys Classic application The major components of this architecture (See Figure 1 ) are: 1. The Oracle Database Server 1. The HarnesSys Classic software is currently running on Unix platforms. HarnesSys is made of several interactive and batch modules. The interactive modules are built upon OSF/Motif and upon Oracle Forms. HarnesSys repository includes an Oracle database and additional Unix files. HarnesSys software and repository files must be local on the user worksta- tion, or NFS-mounted. HarnesSys accesses the database via SQL*Net. Figure 1. HarnesSys Classic Application Architecture Printed copy is for reference only Architecture 9 Architecture of HarnesSys Next-Look client application The major components of this architecture (See Figure 2 ) are: 1. The Oracle Database Server (as in Classic mode) 2. The HarnesSys Classic Server. It is a subset of the HarnesSys Classic software, invoked by the HarnesSys Next-Look Server. It consists of several batch programs providing HarnesSys services. It runs on Unix platforms. 3. The HarnesSys Next-Look Server. This is a Java daemon program running on a Unix platforms, that allows HarnesSys Next-Look clients to access to HarnesSys services. The HarnesSys Next-Look Server communicates with the HarnesSys Server via Unix to Unix remote command shell and with the database via the Java Database Connectivity (JDBC) interface. 4. The HarnesSys Next-Look Clients. Clients are Java programs installed on a platform (Windows, Unix...) that provide HarnesSys services. An example of a client is the HarnesSys Viewer. Each client communicates with a HarnesSys Next-Look Server via the Java Remote Method Invocation (RMI) protocol. Figure 2. HarnesSys Next-Look Client. / Server Application Architecture Printed copy is for reference only 10 HarnesSys Volume 0: Getting Started Architecture of HarnesSys Next-Look Web client application The major components of this architecture (See Figure 3 ) are: 1. The Oracle Database Server (as in Classic mode) 2. The HarnesSys Server. (As in HarnesSys Next-Look client application mode). 3. The HarnesSys Next-Look Server. (As in HarnesSys Next-Look client application mode). 4. The Web Server is needed to provide your HarnesSys Next-Look Web Clients with access to HarnesSys software. 5. The HarnesSys Next-Look Web Clients. Web Clients are launched from any platform via web browser programs such as Microsoft Internet Explorer and Netscape/Mozilla Communicator. The web browser downloads the Java program to be run from the Web Server communicating with a http protocol. The web client communicates with a HarnesSys Next-Look Server via RMI activated with Java Plugin (On MS Windows if Java is not istalled it will be downloaded and self installed). Figure 3. HarnesSys Next-Look Web Client Application Architecture Printed copy is for reference only HarnesSys Environment 11 HarnesSys Environment Directory Trees The following figures depict the installation directory trees for the HarnesSys user, the HarnesSys Classic, the Next-Look server, HarnesSys Next-Look client and the HarnesSys Next-Look web server installation (on Unix and Windows platforms). Refer to the table in the following pages for the description of these directories. The User Directory Tree Printed copy is for reference only 12 HarnesSys Volume 0: Getting Started The HarnesSys Installation Directory Tree (*) (1) HarnesSys Classic only; (2) HarnesSys Next-Look only;(3) Unix only. Printed copy is for reference only HarnesSys Environment 13 Directory Definitions Directory Name harness directory Description Root of directory tree, $HOME of harness user name. install bin local HarnesSys installation scripts. HarnesSys command scripts. Customer local environment and script services (plot, print, etc.). dat Common data files, including global symbol libraries. File names including <_platform> are machine specific. decal(3) Decals and frames library. stipple(3) Stipples library for pipes. $HR_HOME(1)(3) HarnesSys repository for project files. SDP(1)(3) Demo project files (Software Demonstration Package). PROJx(1)(3) PROJx project files. h2srv_tmp(1)(3) Directory for data transfer between server and clients. rnnz.mm Version dependant release directory. bin Release command scripts. dbs(1) HarnesSys database management scripts. man(1)(3) User manuals. hp, ibm,linux,sun,win O/S-dependent directory. pvi(1)(3) Interpreter services for plot (Precision Visual Incorporated) lib(2) Java jar files of HarnesSys Next-Look. ext(2) Java extensions files for HarnesSys Next-Look. HarnesSys creates the following three directories for User Directory each HarnesSys user if they do not already exist: log User HarnesSys private directory: $HOME/harness/log private User HarnesSys private directory: $HOME/harness/<PRJ>/private. tmp User temporary directory: $HOME/harness/<PRJ>/tmp Printed copy is for reference only 14 HarnesSys Volume 0: Getting Started User Environment Setup (on Unix platforms) To invoke HarnesSys on UNIX from a user’s path 1. Enter for csh users: set path = (~harness/bin $path), then press <CR>. 2. Enter for sh users: export PATH = ~harness/bin:$PATH, then press <CR>. If not using user’s path, aliases can be used. Remember to create a separate alias for ‘~harness/bin/harness’ (HarnesSys Classic) and for ‘~harness/bin/harness2’(HarnesSys Next-Look). To invoke HarnesSys on Windows create a sortcut to <HarnesSys install>\bin\harness2.bat Motif Environment Setup (on Unix platforms) Resource Files HarnesSys requires two application resource files: • HARNESS - HarnesSys (Motif) application resource file in /usr/lib/X11/app-defaults. • Tk2Motif - Oracle application resource file in “<Oracle_Forms_HOME>/guicommon/tk2/admin” . Each HarnesSys user can create his/her own resource files. HarnesSys Services allow each user to create user specific resource files. These files are created in the user’s home directory. HarnesSys Fonts HarnesSys uses various fonts. All fonts are addressed with an asterisk (*) in the dpi field. therefore, 100 dpi will be selected automatically by the system. Set your font path according to your screen resolution. Usually, the following paths should be defined: • 100 dpi appears in first position on HP 700 series and IBM RS6000 series. • 75 dpi appears in alternative position on HP 700 series and IBM RS6000 series (If 100 dpi is not available 75 dpi will be selected). To check the font path Enter the command /usr/bin/X11/xset -q, then press <CR>. Printed copy is for reference only HarnesSys Installation Requirements and Procedures HarnesSys Installation Requirements HarnesSys Classic Hardware Hewlett-Packard UNIX workstations and servers, running HP-UX 11.11 (or higher) operating system IBM UNIX workstations running AIX 5.3 operating system. Intel x86 computers, running Linux operating system: Linux Kernel 2.6.9-22/ RedHat Enterprise Linux WS release 4 Minimum configuration is Pentium III, 400MHz, 256MBytes RAM, 16GBytes disk storage. KDE login is necessary Prerequisite Software Oracle RDBMS version 8.1.7 or higher. Oracle developer 6i. Create two Tables spaces: HARNESS,TMP for Oracle HarnesSys users . Oracle users in HARNESS table space and temp table space TMP: HarnesSys Oracle user - harnessdb; password - harnessdb HarnesSys Oracle user - harness; password - harness HarnesSys Oracle user - hrsdp; password - hrsdp HarnesSys Oracle user - hranp; password – hranp Create oracle User Names for additional projects as needed. All the ORACLE users have to be granted permissions connect, resource. Unix User The account for the installation is: ‘harness’ (account shell csh) Printed copy is for reference only 15 16 HarnesSys Volume 0: Getting Started HarnesSys Installation Procedure 1. 2. 3. 4. 5. 6. 7. 8. 9. 10. 11. 12. 13. 14. 15. 16. Create user name harness with login shell /bin/csh Login to harness. Put the installation file in harness home directory. Save the installation procedure in a log file. Use command: script <log_file name>, then press <CR> to enter script mode. Uncompress and untar the file use the following command: zcat<HR_FILE> | tar xvf, then press <CR>. cd ~/install Launch the installation procedure ./hr.install Select Full installation (option 1). Answer the questions. Refer to table 1 on next page. Enter exit, to exit from the script. Configure the file ~harness/local/hr_print_file ~harness/local/hr_plot_file according to the skeleton files supplied in ~harness/install/. Add a path to harness command to each HarnesSys user path : ~harness/bin Launch harness application. Create projects and give user permissions. Define on UNIX clients, the "PATH" (including harness/bin for each HarnesSys user. "harness" and the Oracle software should be mounted on specified workstations. Add to User Account "HARNESS" and "Tk2Motif" resource files according to versions/patches of HarnesSys, by Harness color_setup. Printed copy is for reference only HarnesSys Installation Requirements and Procedures 17 Table 1: Header hr_local_environment settings Variable ORACLE_HOME ORACLE_HOME_imp ORACLE_NODE ORA_NLS33 LD_LIBRARY_PATH HR_PLOT_MODE Significance Should point to the disk location of the Oracle Forms software. Should point to the disk location of the Oracle RDBMS software. Should be the connection string for Oracle HarnesSys DB. Should point to Oracle NLS directory under ORACLE_HOME. Shared library environment On Linux only: ‘ORACLE_HOME/lib:/usr/X11R6/lib’. Should be the local plotting mode default (One of HPGL2, CGM_DOD, CGM_ATA, CGM_CLEAR_TEXT) Should be TRUE if a Prepared By label Required. PREPARE_BY HARNESS_DOCUMENT Should point to HarnesSys legal drawings sizes definition file (Defaults are supplied). SIZES Should point to HarnesSys local decals directory DECAL_DIR (defaults are supplied). Should include local Web Browser activation HR_NETSCAPE command. Printed copy is for reference only 18 HarnesSys Volume 0: Getting Started HarnesSys Upgrade Procedure 1. Backup harness account and ORACLE database 2. Put the installation file in harness home directory. 3. cd ~/install 4. Save the installation procedure in a log file. 5. Use command: script <log_file name>, then press <CR> to enter script mode. 6. Launch the installation procedure. /hr.install 7. Select Upgrade installation (option 2). 8. Answer the questions. Refer to table 1. 9. Enter exit, to exit from the script. HarnesSys Patch Installation Procedure 1. Backup harness account and ORACLE database 2. Put the installation file in harness home directory. 3. cd ~/install 4. Save the installation procedure in a log file. 5. Use command: script <log_file name>, then press <CR> to enter script mode. 6. Launch the installation procedure ./hr.install 7. Select Patch installation (option 3). 8. Answer the questions. Refer to table 1. 9. Enter exit, to exit from the script. Printed copy is for reference only HarnesSys Installation Requirements and Procedures 19 HarnesSys Next-Look Hardware Hewlett-Packard UNIX workstations and servers, running HP-UX 11.11 (or higher) operating system IBM UNIX workstations running AIX 5.1 operating system. Intel x86 computers, running Linux operating system: Linux Kernel 2.4.21-20/ RedHat Enterprise Linux WS release 3. Minimum configuration is Pentium III, 400MHz, 256MBytes RAM, 16GBytes disk storage. KDE login is necessary Prerequisite Software HarnesSys Next-look is based on HarnesSys Classic. This installation is performed after the installation of HarnesSys Classic software. Java 2 Run Time Environment (JRE), including plugin for the web browsers, on each HarnesSys Next-Look client stations. (version 1.4.10). A Web Server is needed to provide your HarnesSys Next-Look Clients with web access to HarnesSys software. Check that server node has remote access (rexec, rsh (remsh on HP machine)). Add the server name to /etc/hosts.equiv or add it to every HarnesSys user ~/.rhosts file Unix User The account for the installation is: ‘harness’ (account shell csh) HarnesSys Installation Procedure 1. 2. 3. 4. 5. 6. 7. Install HarnesSys Classic The last stage in HarnesSys Classic installation is the HarnesSys New-Look installation or launch the procedure ~harness/install/h2_local_environmet.install Answer the questions. Refer to table 2 below. Create /add Plotters definition XML file. (harness2 build_plot_db) Make sure that HarnesSys Next-Look daemon will be invoked in every boot time. (You can use option 6 in the installation procedure that will create an rc file for boot time to invoke the HarnesSys Next-Look daemon. To launch HarnesSys Next-Look server, - login to the server as a harness user - each time you reboot, make sure to launch the command harness2 server Launch harness2 application. Printed copy is for reference only 20 HarnesSys Volume 0: Getting Started Table 2 Header h2_local_environment settings Variable Significance H2000_HOME Full directory path for the HarnesSys Next-Look H2000_SERVER Node name of the HarnesSys Next-Look server H2000_SERVEL Node name of the HarnesSys Next-Look server (local name if different from Network well known name) H2000 SERVERS List of node names where HarnesSys Next-Look server might run. H2000_PORTS List of port numbers used for the HarnesSys NextLook client/servers RMI communication. Defaults to 0 per each Har- nesSys Next-Look server, if no firewall issues are involved. H2_REG_PORT Port number used for the server RMI registry. Defaults to 1099, if no firewall issues are involved. HR_SERVER Node name of the HarnesSys Classic server. HR_SRV_VERSION HR_VERSION of the HarnesSys Classic installation (if installed separate from HarnesSys Next-Look). ORA_TARGET Node name of the Oracle_server:1521:Oracle_SID. JDK_HOME Full directory path for the Java 2 Standard Development Kit (per Operating System HP_UX; Linux; AIX,SunOS ) HarnesSys Upgrade Procedure HarnesSys Next-Look client installation (Windows) HarnesSys Patch Installation Procedure: This installation is optional. 1.To start the installation, double click the ‘H2_<HR_VERSION>_setup.exe’ file. An installer wizard will guide you through the various steps of the installation. (refer to table 2) 2. Create a shortcut to <HarnesSys install>\bin\harness2.bat 3. Launch HarnesSys Next-Look. Printed copy is for reference only HarnesSys Service Scripts 21 Service Scripts HarnesSys Classic / HarnesSys Next-Look provide a number of service utilities. The utilities are located in the ~harness/$<HR_VERSION>/bin directory in hr_<utility_name> / h2_<utility_name> format. To invoke the utilities enter harness <utility_name>, then press <CR>. Several utilities can be invoked only by the HarnesSys administrator (“harness”), others may be invoked by HarnesSys users (see the Utilities User Manual, Vol. 0). Plotter Setup This procedure must be performed by the HarnesSys administrator. plot_setup Description: Usage: Sets HR_PLOT_MODE to one of the following: CGM_DOD CGM_ATA CGM_CLEAR_ TEXT HPGL2 HPGL If HPGL is selected, a link from “drvhp7.cfg” to “drvhp7 <HPGL_MACHINE_MODEL>” is created. harness plot_setup [HR_PLOT_MODE [HPGL_MODEL]] Add Project This procedure is performed by the HarnesSys administrator. The function of this utility is also available from HarnesSys Motif windows. add_project Description: Adds a new project definition to HarnesSys, which includes creating the pointer to the new Oracle user for the project, tables and initial data for the new project and directories with public project files(see the Add a New Project utility in the Utilities User Manual, Vol. 0). Usage: harness add_project [ORACLE_USER [ORACLE_PASSWD [PROJECT [PROJECT_MANAGER [PROD_DESC]]]]] Printed copy is for reference only 22 HarnesSys Volume 0: Getting Started Delete Project This procedure must be performed by the HarnesSys administrator. del_project Description: Deletes a project’s definition form HarnesSys, which includes deleting the pointer to the Oracle user for the project, tables and all the data for the project and directories with public project files. Usage: harness del_project <PROJECT> Restore SDP Tables This procedure must be performed by the HarnesSys administrator. restart_sdp Description: Usage: restores SDP tables and project files to their original status. harness restart_sdp Enable New Sessions in HarnesSys This procedure must be performed by the HarnesSys administrator. start Description: Usage: Enables users to invoke HarnesSys after the HarnesSys administrator disabled some or all of HarnesSys versions. harness start Disable New Sessions of HarnesSys This procedure must be performed by the HarnesSys administrator. stop Description: Usage: Disables users from invoking HarnesSys for all specific versions of HarnesSys. harness stop Printed copy is for reference only HarnesSys Service Scripts 23 Color Setup color_setup Description: Usage: Changes user’s color setup for the HarnesSys application (creating resource files ‘HARNESS’ and ‘Tk2Motif’ in users’s home directory). harness color_setup [RainForest] || [Metro] || [CoralReef] || [White]. Convert symbol library convert_symbol_library Description: Usage: For HarnesSys Next-Look administrator - converts old HarnesSys symbol library to a Java jar file of XMLs. harness2 convert_symbol_library. Build plotter db build_plot_db Description: For HarnesSys Next-Look administrator - create /adds Plotters definition XML file. Usage: harness2 build_plot_db. Printed copy is for reference only 24 HarnesSys Volume 0: Getting Started HarnesSys User Documentation: Volume 0 - Getting Started. Volume 1 - Schematics. Volume 2 - Layout Drawing. Volume 3 - Wires. Volume 4 - Parts. Volume 5 - Integration. Volume 6 - Management and Configuration Control. Volume 7 - Manufacturing. Volume 8 - Technical Publications. Volume 9 - Retrofit. Printed copy is for reference only