1
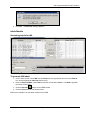
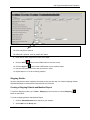
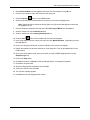
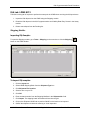
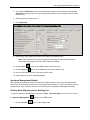
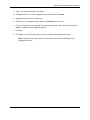
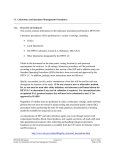
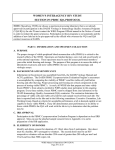
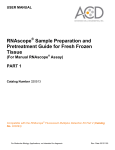
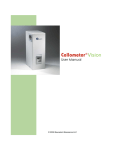
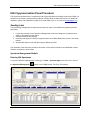
IQA Cryopreservation Panel Procedure
IQA Cryopreservation Panel Procedure
This document describes how to complete the IQA Cryopreservation and Viability Panel in the LDMS. It is
divided into two sections, sending labs and IQA lab. Please follow the instructions below. For additional
assistance, please call LDMS User Support at 716-834-0900 x7311 or via e-mail at [email protected].
Sending Labs
The immunology sending labs are required to perform four steps in the LDMS when preparing the IQA
specimens:
1. Log the specimen(s) into the Specimen Management module and assign the Cryopreservation
Assay in Test Setup to each aliquot.
2. Generate labels for IQA aliquots.
3. Result the IQA aliquots in the IQA Cryopreservation and Viability Data Entry Screen in the Assay
module.
4. Ship the IQA aliquots to the IQA lab using the Shipping module.
The remainder of the document provides a description of the various modules in the LDMS that must be
utilized to complete the above steps.
Specimen Management Module
Entering IQA Specimens
To open the Specimen Management module, go to Tasks – Specimen Mgt on the menu bar or click on
the Specimen Management (
) button on the LDMS toolbar. The Entry Tab displays.
© 2012 Frontier Science Foundation
Page 1 of 12
Date Modified: 31 Jan 2012
IQA Cryopreservation Panel Procedure
To enter IQA specimens:
1. Select IQA from the Group box.
2. Enter the donor number or PID in the ID1 field.
3. Enter your labs network affiliation/processing method in the ID3 field.
a. For example, a laboratory processing PBMC’s for the IPREX network would enter
“IPREX” in the ID3 field.
4. Select the specimen and received dates from the Spec. Date and Rec. Date boxes.
5. Note: Use the Current Date for this exercise.
6. Enter the following information above the primary grid:
# of tubes = 1
Primary Type = BLD
7. Click Add. The primary loads in the grid.
8. Enter the following into the primary grid:
Additive = ACD, EDT or HEP
Volume = 20
Units = ML
9. Click on the Primary Details button. Enter the Processing Date, Processing Time,
Processed by Tech Inits, and Total Cell Count.
10. Enter the following information above the aliquot grid:
# of Aliquots = 4
Vol = 5
Units = CEL
Derivative = CEL
Note: By entering the units of CEL, the LDMS will automatically multiply the volume by one million.
11. Click Add. The aliquots load into the grid.
12. Click on the Aliquot Details button. Enter the processing information for each aliquot.
Note: If you are resulting and shipping these aliquots to the IQA real-time you can utilize the Do Not Store
feature. This will prevent the aliquots from appearing in your bulk add list in storage. These aliquots will
also appear highlighted in red in the Shipping module so that you can easily identify those that have been
set aside to ship. Refer to the Specimen Management chapter of the LDMS User Manual for additional
information.
13. Click the Add (
appear.
) button on the LDMS toolbar. The Save Successful message box will
Note: If entering specimens for a patient or donor that has not been entered in your labs database, an
Enroll dialog box will appear. Click Enroll to add the record to the database.
14. Click OK. A Label Dialog box will appear asking if you would like to generate labels.
© 2012 Frontier Science Foundation
Page 2 of 12
Date Modified: 31 Jan 2012
IQA Cryopreservation Panel Procedure
15. If you wish to print labels for the aliquots that were just added, select the IQA format from the
box, select the label size from the list, and click Yes.
Note: To print labels for more aliquots than those on the Entry screen, refer to the Generating Labels for
IQA section on page 3.
Ordering the Cryopreservation Assay via Assign Tests
1. Enter the Assign Tests module via the Tools listing on the LDMS Toolbar.
2. Click to select the Specimen field category.
3. Add the following data items to the Selection Criteria:
Group = IQA
Specimen Date = Current Date
4. Execute to populate the Select Samples grid.
5. Highlight the four specimens.
6. Click on the + sign next to Immunology and highlight Cryopreservation.
7. Click Assign Selected Test. A message box appears.
© 2012 Frontier Science Foundation
Page 3 of 12
Date Modified: 31 Jan 2012
IQA Cryopreservation Panel Procedure
8. Click Yes. The Success message appears.
Labels Module
Generating Labels for IQA
To generate IQA labels:
1. In the Labels module, select IQA from the Group box, the appropriate format from the Format
box, and the appropriate label size from the grid.
2. Enter the Received Date in the Field box and the current date in Value. Click Add to populate
the search criteria grid.
3. Click the Execute (
) button on the LDMS toolbar.
4. Click the Print button on the Report toolbar.
Below is an example of an IQA label created in the LDMS:
© 2012 Frontier Science Foundation
Page 4 of 12
Date Modified: 31 Jan 2012
IQA Cryopreservation Panel Procedure
© 2012 Frontier Science Foundation
Page 5 of 12
Date Modified: 31 Jan 2012
IQA Cryopreservation Panel Procedure
Assay Module
Prior to shipping the samples to the IQA lab, each aliquot must be resulted in the Assay module.
Completing the Cryopreservation Data Entry Screen
To open the Assays module, go to Tasks – Assays on the menu bar or click the Assay (
the LDMS toolbar.
) button on
To complete the Cryopreservation Data Entry screen:
1. Click the plus (+) sign next to the Immunology category.
2. Click Cryopreservation.
3. Click New Run/Not Setup.
4. Click Select Assay.
5. Enter the specimen Received Date in the From box, or create a query statement in the
Filters/Criteria tab.
Note: You may generate a pending specimen report from the Filters/Criteria tab by clicking the Report
button on the LDMS toolbar.
6. Click Find Specimens. The Specimens Found grid populates with specimens.
7. Select the IQA aliquots to be resulted and click Add to Run. The Results tab opens.
© 2012 Frontier Science Foundation
Page 6 of 12
Date Modified: 31 Jan 2012
IQA Cryopreservation Panel Procedure
Notes:
The Viral Load field is optional.
The CD4 field is optional, even for positive HIV status.
8. Enter data or select responses for each of the fields.
9. Click the Add (
10. Click the Report (
) button on the LDMS toolbar to save the record.
)button on the LDMS toolbar to print a patient report.
11. Use the VCR buttons to scroll to the next record to result.
12. Repeat steps 8–11 for the remaining samples.
Shipping Module
Once the aliquots have been resulted in the Assay module, the last step is to create a Shipping diskette
and Manifest Report to send with the frozen aliquots to the IQA lab.
Creating a Shipping Diskette and Manifest Report
To open the Shipping module, go to Tasks – Shipping on the menu bar or click the Shipping (
button on the toolbar.
)
To create a shipping diskette and Manifest Report:
1. Click the Setup Shipment tab to search for your samples.
2. Select IQA from the Group box.
© 2012 Frontier Science Foundation
Page 7 of 12
Date Modified: 31 Jan 2012
IQA Cryopreservation Panel Procedure
3. Select Received Date from the Type box and enter the received date into the ID box.
4. Click the arrow button to move the criteria into the query grid.
5. Click the Execute (
) button on the LDMS toolbar.
6. Select two aliquots from each blood donor by clicking on the rows to highlight them.
Note: Aliquots that were marked as Do Not Store in the Specimen Management module will
be highlighted in red.
7. Click the Shipment Destination tab and select 213 University of Miami from the Lab box.
8. Select a contact from the Contact Person box.
9. Select a contact from the Contact @ Sending Lab box.
10. Click the Add (
) button on the LDMS toolbar to batch the shipment.
11. In the View Shipment screen, select your batch and click Manifest Report. If applicable, print the
Box Map Report.
12. Click on the Shipment QA/QC tab to perform QA/QC on the batch to be shipped.
13. QA/QC the shipment via barcode scanning or visual inspection. Click on the Save button on the
LDMS toolbar.
14. Click on the View Shipment tab, select your batch, and select LDMS Shipping Batch from the
Shipment Type box.
15. Click on the Ship button.
16. Click OK to continue or Cancel to view the Storage Report. A message box appears.
17. Click Yes to ship the batch.
18. Select the Shipping Box temperature and click OK.
19. Select your disk drive and click OK.
20. The success message appears.
21. Click OK and note the shipping batch number.
© 2012 Frontier Science Foundation
Page 8 of 12
Date Modified: 31 Jan 2012
IQA Cryopreservation Panel Procedure
IQA Lab: LDMS #213
The IQA receiving lab is required to perform three steps in the LDMS when receiving the IQA specimens:
1. Import the IQA aliquots into the LDMS using the Shipping module.
2. Result the IQA aliquots in the IQA Cryopreservation and Viability Data Entry Screen in the Assay
module.
3. Delete extra aliquots from the Pending list.
Shipping Module
Importing IQA Samples
To open the Shipping module, go to Tasks – Shipping on the menu bar or click the Shipping (
button on the LDMS toolbar.
)
To import IQA samples:
1. Click the Import tab.
2. Select LDMS Shipping Batch from the Shipment Type box.
3. Click Shipment File Location.
4. Select a drive on your PC.
5. Click OK.
6. Enter the batch number from the Shipping Manifest in the Shipment No. field.
7. Click Import. The shipping batch information will load into the grid.
8. Click on the Shipment QA/QC tab to perform QA/QC on the batch to be imported.
9. QA/QC the shipment via barcode scanning or visual inspection.
© 2012 Frontier Science Foundation
Page 9 of 12
Date Modified: 31 Jan 2012
IQA Cryopreservation Panel Procedure
10. Click the Import tab.
11. Click Continue. A message box appears.
12. Click OK to continue with the import or click Cancel to abort the import.
13. If you would like the aliquots never to appear in the bulk add list of the Storage module, click Yes
on the message box. If you want the specimens to appear in the bulk add list, click No on the
message box.
14. If the condition of the samples is something other than what appears in the import screen, click
Yes on the message box. The Adjust Conditions dialog box appears.
15. Select the aliquots that should be changed by clicking on each, select the new sample condition
from the box, and click OK. If the condition of the aliquots are satisfactory, click No. The Success
dialog box appears.
16. Click YES to import the associated test (Assay) information.
17. Select the appropriate temperature for the shipment and click OK.
18. Click OK. The Shipping Batch message box appears.
19. Click OK in the dialog box that displays the importing process was completed successfully.
20. Click OK to acknowledge the Shipment/Batch number.
21. A message will appear indicating that the Storage module must be run separately for the
imported specimens.
22. Click OK to complete the import process.
Note: Your imported IQA samples will automatically show up in Specimen Management with
the imported box checked, the imported date, the Cryopreservation test ordered and the
sending labs results available in the Assay Module.
Assay Module
After the samples have been imported and tested, you must enter the results for each aliquot in the Assay
module.
Completing the Cryopreservation Data Entry Screen
To open the Assay module, go to Tasks – Assay on the menu bar or click on the Assay (
the LDMS toolbar.
) button on
To complete the Cryopreservation data entry screen:
1. Click on the plus (+) sign next to the Immunology category.
2. Click Cryopreservation.
3. Click New Run/Not Setup.
4. Click Select Assay
5. Enter search criteria in the specimen search grid.
© 2012 Frontier Science Foundation
Page 10 of 12
Date Modified: 31 Jan 2012
IQA Cryopreservation Panel Procedure
6. Verify that the IQA Review check box is selected (by default it will be selected) and click Find
Specimens. The specimens found grid will populate with specimens meeting the above entered
search criteria.
7. Select specimens to add to the run.
8. Click Add to Run.
9. Enter data or select responses for each of the fields on the Result screen.
Note: The left side of the result screen displays the sending lab’s specimen information.
These fields are grayed out and the results cannot be changed.
10. Click the Save (
11. Click the Report (
) button on the LDMS toolbar to save the record.
) button on the LDMS toolbar to print a patient report.
12. Use the VCR buttons to scroll to the next record to result.
13. Repeat steps 9–11 for all remaining samples.
Specimen Management Module
After the IQA lab’s results have been entered for each aliquot tested, there may be extra aliquots that
have been sent and have been ordered for the Cryopreservation Assay. To remove the aliquots from the
pending list you must delete the test from the Test Setup tab in the Specimen Management module.
Deleting Extra Aliquots from the Pending List
To open the Specimen Management module, go to Tasks – Specimen Mgt on the menu bar or click on
the Specimen Management (
1. Click the Browse (
) button on the LDMS toolbar.
) button on the LDMS toolbar.
© 2012 Frontier Science Foundation
Page 11 of 12
Date Modified: 31 Jan 2012
IQA Cryopreservation Panel Procedure
2. Type in the specimen number of the aliquot.
3. Click Run and click on a row to highlight a specimen and then click Select.
4. Highlight the specimen in the aliquot grid.
5. Right-click on the highlighted aliquot and select Test Setup from the menu.
6. From the Test Setup screen, highlight the Cryopreservation test in the Test Setup grid and click
Delete. The Delete Test message box appears.
7. Click Yes.
8. Click Done on the Test Setup screen to return to the Specimen Management screen.
Note: Deleting the test will not remove the specimen record from the LDMS Specimen
Management module
© 2012 Frontier Science Foundation
Page 12 of 12
Date Modified: 31 Jan 2012